

Page 1

2
Safety Instructions
English
S
afety Instructions
This product has been manufactured to satisfy the international safety standards.
Please read all of safety and operating instructions before operating the product and keep this
manual for future reference.
MAINS SUPPLY
AC 90-250V~, 50/60Hz
Operate your product only from the type of power supply indicated on the marking label. If you
are not sure of the type of power supplied to your home, consult your local power company.
Disconnect the STB from the mains before you start any maintenance or installation procedures.
OVERLOADING
Do not overload a wall outlet, extension cord or adapter as this may result in electric re or
shock.
LIQUIDS
The product should not be exposed to any liquids such as dripping or splashing. No objects
lled with liquids, such as vases, should be placed on the apparatus,
CLEANING
Before cleaning, disconnect the product from the wall outlet, Use a cloth lightly dampened with
water (no solvents) to clean the exterior.
VENTILATION
The slots on top of the product must be left uncovered to allow proper airow to the unit. Do not
stand the product on soft furnishings or carpets. Do not expose the product to direct sunlight,
place it near a heater. Do not stack electronic equipment on top of the product.
ATTACHMENTS
Do not use any attachment that is recommended by the manufacturer it may cause a hazard or
damage the product.
CONNECTION TO THE SATELLITE DISH LNB
Disconnect the product from the mains before connecting or disconnecting the cable from the
satellite dish. Failure to do so can damage the LNB.
CONNECTION TO THE TV
Disconnect the product from the mains before connecting or disconnecting the cable from the
satellite dish. Failure to do so can damage the TV.
LOCATION
Place the product indoors in order not to expose to lightning, rain or sunlight.
Do not install near any heat sources such as radiators, heat registers, stoves, or other
apparatus (including amplier) that product heat.
LIGHTNING, or NOT IN USE
Unplug the product from the wall outlet and disconnect the cable during a lightning storm or
when unused for a long time.
SERVICING
Do not attempt service that this product yourself, as opening or removing covers may expose
you to dangerous voltage or other hazard. Refer all servicing to qualied service personnel.
“The mains plug is used as the disconnect device. Then disconnect device shall remain
readily operable”
Page 2

Contents
3
English
C
ontents
Safety instructions ................................ 2
Chapter 1
Before You Begin ................................... 4
General Features ................................. 4
Accessories .......................................... 4
Chapter 2
Controls and Functions ........................ 5
Front Panel .......................................... 5
Rear Panel ........................................... 5
Remote Control Unit ............................ 6
Chapter 3
Connections ........................................... 7
Location of your receiver ........................ 7
Connecting your receiver with
dish system ............................................ 7
Connecting your analog receiver ........... 8
Connecting your receiver to TV .............. 8
Connecting your receiver to VCR
(depending on model) ............................ 8
Connecting external audio/Hi-Fi system ... 8
Connecting digital audio system ............ 8
Chapter 4
Initial Settings and Operations ............. 9
Menu Information ................................. 9
Getting Started ..................................... 9
Selecting the On Screen Display (OSD)
Language ............................................... 9
Selecting the Antenna Setting ................ 9
Auto Scanning ........................................ 10
Auto Scanning (terrestrial) ..................... 10
Basic Operation ................................... 10
Switching Channel ................................. 10
Volume Control....................................... 11
Info Bar................................................... 11
Selecting the soundtrack ........................ 11
Selecting the OSD teletext, VBI teletext,
Subtitle and DVB subtitle ....................... 12
MoSAic .................................................. 12
Sleep Timer Function ............................. 12
Zoom Function ....................................... 12
Channel List ........................................... 12
To view channel list in specic order
(Alphabet/Satellite/Provider/HD) ............ 13
Electronic Program Guide (EPG) ........... 13
Chapter 5
Menu Map ............................................... 14
Main Menu .............................................. 15
Installation ............................................ 15
Antenna Setting...................................... 15
Motor Setting .......................................... 16
Auto Scanning ........................................ 19
Manual Scanning ................................... 19
Auto Scanning (terrestrial) ..................... 21
Manual Scanning (terrestrial) ................. 21
Defaults Setting ...................................... 21
System Setup ....................................... 22
Language Setting ................................... 22
OSD Setting ........................................... 22
Media Settings ....................................... 22
Time Setting ........................................... 23
Reservation Setting ................................ 23
System Information ................................ 23
Channel Setup ..................................... 23
Delete Channels..................................... 24
Delete All Channels ................................ 24
Favorite Channels .................................. 24
Edit Channels ......................................... 25
SW Manager .......................................... 25
Parental Lock ....................................... 26
Channel Lock ......................................... 26
Lock Control ........................................... 26
Change Pin Code ................................... 26
Game ................................................... 27
Multimedia ............................................ 27
Conditional Access ............................... 29
Troubleshooting .................................... 30
Specications ........................................ 31
Page 3

Chapter 1 >> Before You Begin
4
English
B
efore You Begin
General Features
• Accurate, Brilliant Friendly OSD with Full Function
• MPEG-2 (MP@ML), MPEG-2 (MP@HL), MPEG4 AVC/H.264, HP@L4
• LNB Controlling Logic (0/22KHz Tone)
• SCPC/MCPC Receivable from C /Ku-Band Satellites
• Digital Tuner with Loop-through
• Wide Symbol Rate 2~45Mbps & Frequency Input 950~2150MHz
• DiSEqC 1.0, 1.1 & 1.2 Supported (Go to X function)
• 2 SCARTS for TV, VCR (optional)
• 16 Bit Colors Graphic User Interface
• Multi-language Menu
• 13-digit VFD (Time clock in Stand-by mode)
• OSD Teletext Supported
• EPG (Electronic Program Guide) for On-screen Channel Information
• Installation by Easy Setup Guide
• 10,000 Channels
• User-friendly Data Editing Function
• Favorite Channel and Parental Lock Function
• RS232C Port for Additional Information Service and Upgrading System Software
• S/PDIF OUT Optical and Coaxial
• HDMI
• SVIDEO OUT
•
PVR Ready
•
Time-Shift
•
Unicable
•
OTA Update for Software and Channel Data
•
Ethernet Port
(optional)
•
USB Port
•
2 Common Interface and 2 Smart card Reader
•
SW Blind scanning function
Accessories
• User’s Manual
• Remote Control Unit
• Batteries
• HDMI Cable
Page 4
Chapter 2 >> Controls and Functions
5
English
C
ontrols and Functions
Front Panel
1
Power ( ) button
Turns your receiver On/Off.
2
Arrow (◄/►) buttons
Adjusts the volume and moves the cursor
left/right on the menu
3
Arrow (▲/▼) buttons
Changes channels or moves the cursor
up/down on the menu.
4
MENU button
Displays the menu
Exits from the current menu or goes to the
previous menu
5
OK button
Conrms selection
6
DISPLAY
Displays channel information
Displays local time in Standby mode
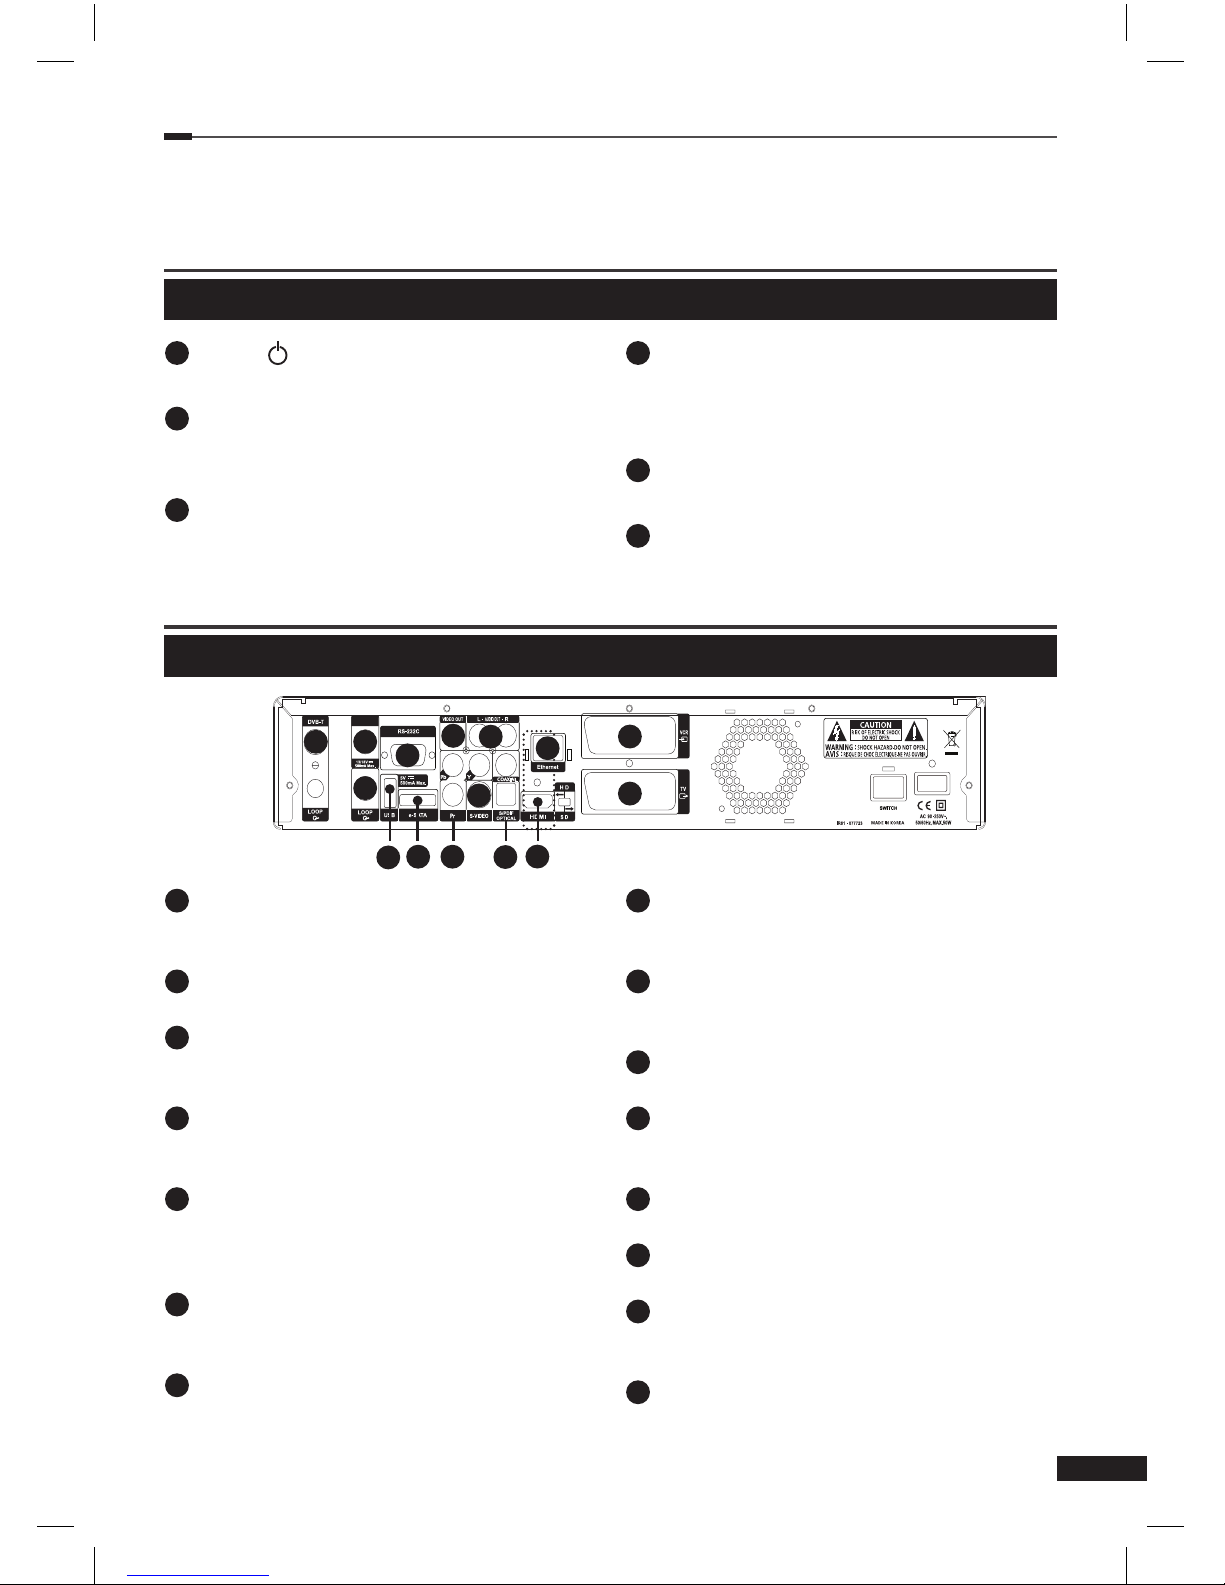
Rear Panel
1
RF IN (Optional)
It Connects to the terrestrial antenna for
DTV signal.
2
Dish INPUT
Connects to the satellite dish.
3
LOOP
Loop out is an output port of the DISH
INPUT signal.
4
USB
Connects to the External HDD or USB
storage with USB cable.
5
RS-232C
Connect to a PC.
RS232 transfers data to the external
computer.
6
e-SATA (optinal)
Connects to the External HDD with SATA
cable.
7
VIDEO OUT
Connects to video input jack on TV or any
external Video system.
8
AUDIO OUT, LEFT / RIGHT
Connects to audio input jacks on TV or any
external audio system.
9
Y Pb Pr OUT
Connects to video input jack on TV or any
external Video system.
10
S-Video OUT
Connects to the TV with S-Video cable
1 1
S/PDIF OUT Optical & Coaxial
Connects to a digital audio component with
optical cable.
12
Ethernet(Optional)
Connects to the Ethernet with Ethernet cable
13
HDMI
Connects to the TV with HDMI cable
14
SCART for VCR
Connects to the VCR(AUX) with SCART
cables.
15
SCART for TV
Connects to the TV with SCART cables.
1
2
3
4
5
6
9
10
1 1
12
13
14
15
7
8
Page 5
Chapter 2 >> Controls and Functions
6
English
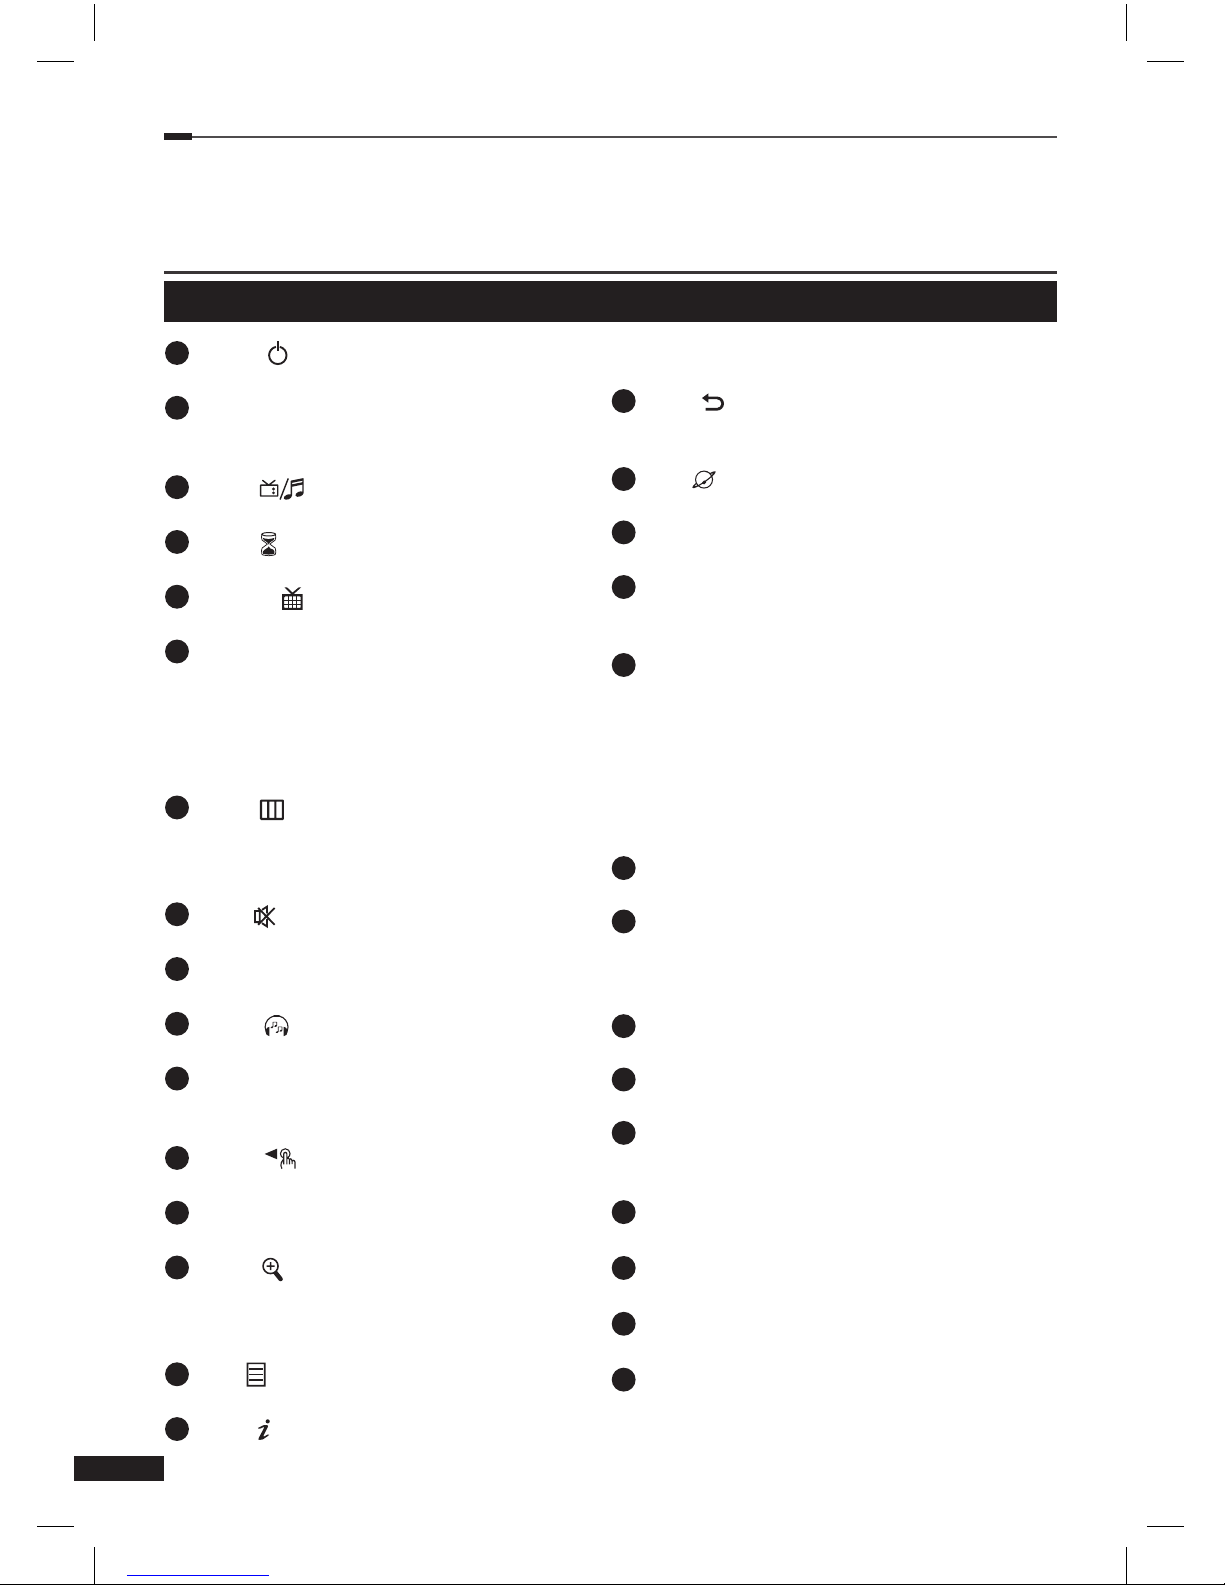
Remote Control Unit
1
Power ( ) button for TV & STB
Turns your receiver & TV On/Off.
2
Numeric (0~9) buttons
Controls the number entry and changes
program channel directly.
3
Mode ( ) button
Switches between TV and Radio channel list.
4
Sleep ( ) button
Shows the time setting for the sleep-timer.
5
MoSAic ( ) button
Displays multi picture section.
6
Arrow (◄/►) or OK buttons
Adjusts the volume level or moves the
cursor left or right on the menu.
Arrow (▲/▼) or OK buttons
Changes channels or moves the cursor up
or down on the menu.
7
Menu ( ) button
Displays the menu
Exits from the current menu or goes to the
previous menu.
8
Mute ( ) button
Mutes audio output.
9
Last button
Shows Viewed Channel List.
10
Audio ( ) button
Shows the Input Audio information.
1 1
OK button
Shows Channel list while watching TV or
listening to the Radio.
12
Guide ( ) button
Shows the TV program guide.
13
VOL +/- buttons
Adjusts the volume level.
14
Zoom ( ) button
Zooms in the selected screen.
The Zooming location changes by pressing
direction buttons. (x2 → normal)
15
Text ( ) button
Changes to the teletext mode.
16
INFO ( ) button
Displays program information in the
screen.
17
Back ( ) button
Goes to previous menu. The changed
values are to be saved.
18
SAT ( ) button
Shows satellite channel list.
19
PR +/- buttons
Changes channel up or down.
20
Page (+/-) buttons
Moves up or down pages on the menu and
TV/Radio List.
21
FAV (♥) button
Go to the last channel you’ve watched in
the Favorite Channel List 1.
And if pressed angina, you can see the last
channel you’ve watched in the next Favorite
Channel List2. Repeat pressing the button
until no more Favorite Channel is found.
Then it returns to the current channel.
22
REW button
Rewinds the recorded programs to x8.
23
Play button
Play the recorder programs
Shows the recorded program in the media
player.
24
FWD button
Fast forward the recorded program to x16.
25
Record button
Starts to record programs.
26
Stop button
Stops to record the program and to play
the program.
27
Pause button
Pauses and play the program.
28
F1 button
Set the Video format.
29
F2 button
Shows Media Player.
30
F3 button
Starts Time shift function.
Page 6
Chapter 3 >> Connections
7
English
C
onnections
Location of your receiver
• Install your receiver in horizontal position
• Do not put any heavy stuff such as a TV on your receiver
• Do not install your receiver in the places as follows: Vibrating place, direct sunrays, Humid
place, too high or low temperature, and no ventilated place.
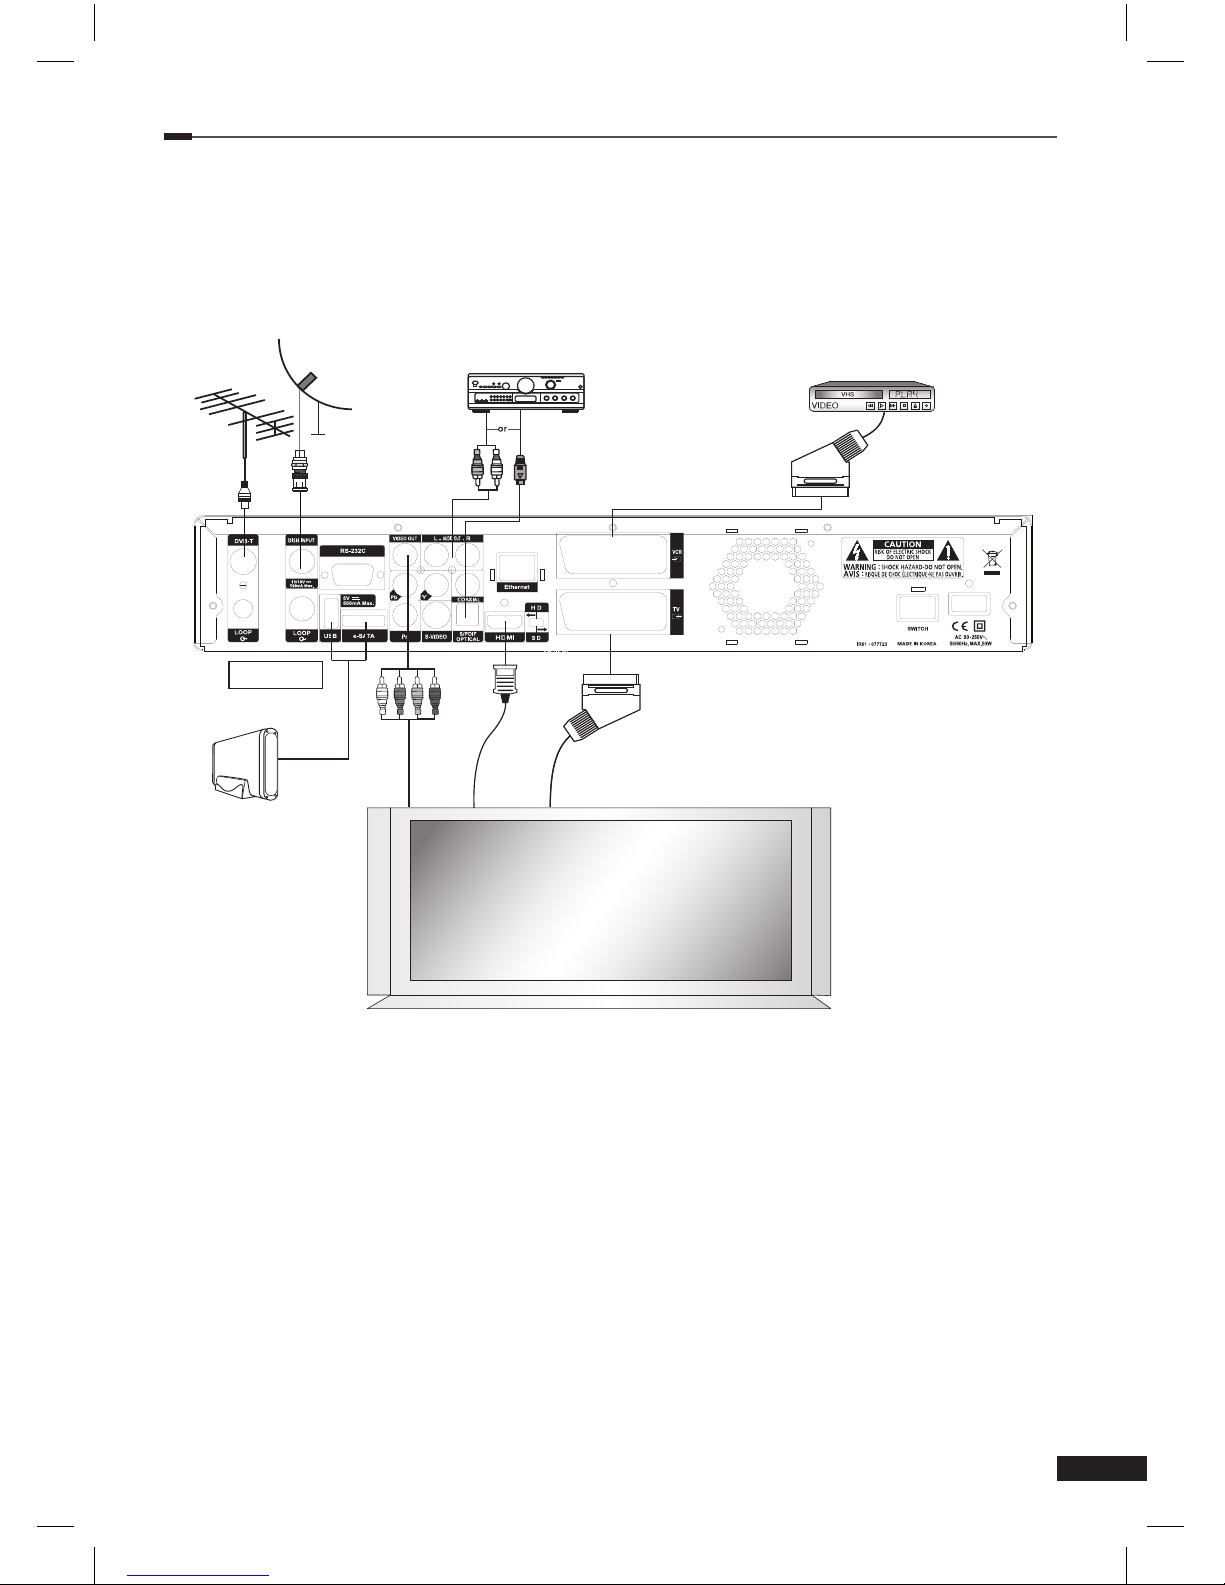
Connecting your receiver with dish system
After installing your antenna system, connect the coaxial cable from the LNB of your antenna to
“DISH INPUT” terminal marked at the rear panel of your receiver. All cable connectors should
be nger-tightened; do not use any kind of wrench while tightening connectors. The cable
should be 75 ohm impedance coaxial twisted at the end with an “F” type connector.
Loop through
Page 7

Chapter 3 >> Connections
8
English
Connecting your analog receiver
To facilitate the user using analog receiver to view analog channels, this product has been
provided with a loop through terminal marked as “Loop”. Connect the coaxial cable from this
terminal to the IF input terminal of your analog receiver. Now by keeping your receiver in
standby, you will be able to tune and view analog channels from your analog receiver.
Connecting your receiver to TV
To connect your receiver with your television, you can use 4 different methods; via RCA cable,
SCART cable, HDMI cable or YUV.
Connect the RF cable to the terminal marked “RF OUT” on the rear panel of your receiver and
its other end to the TV RF input socket.
Connect the Video/Audio RCA cables from the Video OUT/AUDIO OUT (LEFT, RIGHT) on the
rear of your receiver to the Video INPUT/AUDIO INPUT (LEFT, RIGHT) jacks on the TV. In the
case of connecting your TV through SCART cable, connect the SCART connector marked TV to
the respective SCART port on the TV. (depend on model)
Connect the HDMI cable to the terminal marked “HDMI” on the rear panel of your receiver
and its other end to the TV HDMI input.
Connecting your receiver to VCR (depending on model)
To connect a VCR, your receiver has been provided with SCART at the rear marked “VCR”.
Using a SCART connector, the VCR can be connected to your receiver.
Connecting external audio/Hi-Fi system
To connect any external Audio Hi-Fi system, your receiver has been provided with two RCA
connectors at the rear panel of your receiver, marked with AUDIO L and R respectively to
connect the left and right Audio on the external audio/Hi-Fi system.
Connecting digital audio system
Connect a cable between S/PDIF OUT at the rear panel of your receiver and S/PDIF INPUT
COAXIAL or OPTICAL on the Digital Audio System.
Page 8
Chapter 4 >> Initial Settings and Operations
9
English
I
nitial Settings and Operations
Menu Information
A menu is a eld of text shown on the TV screen. Selectable lines are generally activated
(highlighted). No-activated lines cannot be selected. Most of menus show short information at
the bottom of the screen.
This menu consists of 7 main menus:
• Installation • Game
• System Setup • Multimedia
• Channel Setup • Conditional Access
• Parental Lock
1 Using the Arrow (▲/▼) buttons you can move upwards and downwards on the menus.
On the menus, you can search channels using this button.
2 When you have reached the required subject menu, press the OK button to conrm your
choice.
3 On the menus, you can select menu items using the Arrow (◄/►) buttons.
4 When you want to return to the previous menu with saving the change, press the Back (
)
button.
5 When you want to exit from the current menu, press the Menu (
) button.
Getting Started
To start your receiver for the rst time, you must select the language for displaying menus
and you should set parameters for system conguration and scan satellite channels. Perform
the following setup procedure for scanning the satellite. Follow the instructions below to scan
satellite channels. You can enjoy watching TV or listening to
the Radio after the procedure completes.
1 Turn on your TV and receiver.
Language Setting menu will appear automatically.
OSD Language is highlighted.
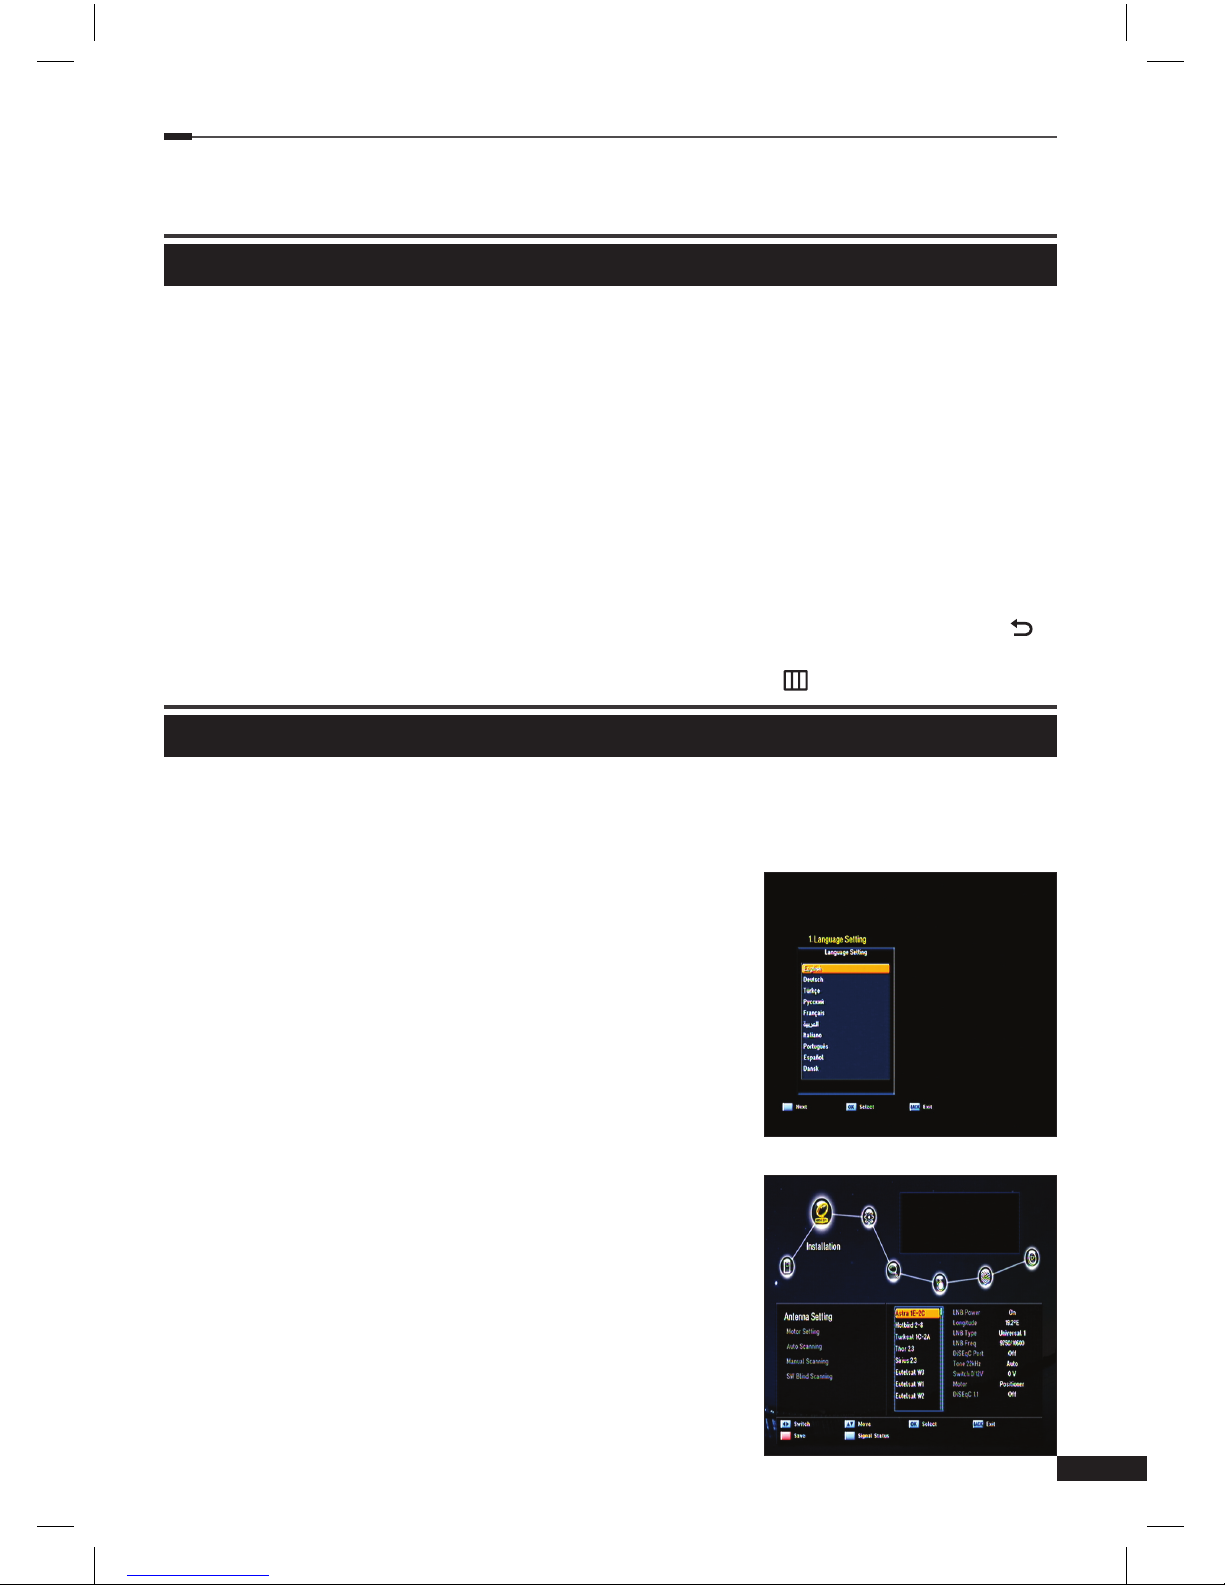
Selecting the On Screen Display (OSD)
Language
2 Select the OSD language of your choice using the Arrow
(◄/►) buttons.
You will see the selected language on the OSD menu.
3 Select Installation using the Arrow (◄/►) buttons.
<<SATELLITE>>
Selecting the Antenna Setting
4 Select Antenna Setting using the Arrow (▲/▼) buttons
and press the OK button.
Antenna list and option list will appear.
5 Select the desired satellite using the Arrow (▲/▼) buttons
or Page (+/-) buttons and press the Arrow (►) or OK
button to move through the option list.
6 Select options and press the RED(MoSAiC), OK or Menu
button to save the changes.
Page 9
Chapter 4 >> Initial Settings and Operations
10
English
• RED (MoSAiC): Save
• OK: Save and changes to exit for AV mode.
• Menu: Save the changes to exit for AV mode.
• Select one or more satellites according to the direction of your satellite dish. You can select
many satellites depending on the direction to the satellites.
7 Press the Back (
) button to return to the Installation menu.
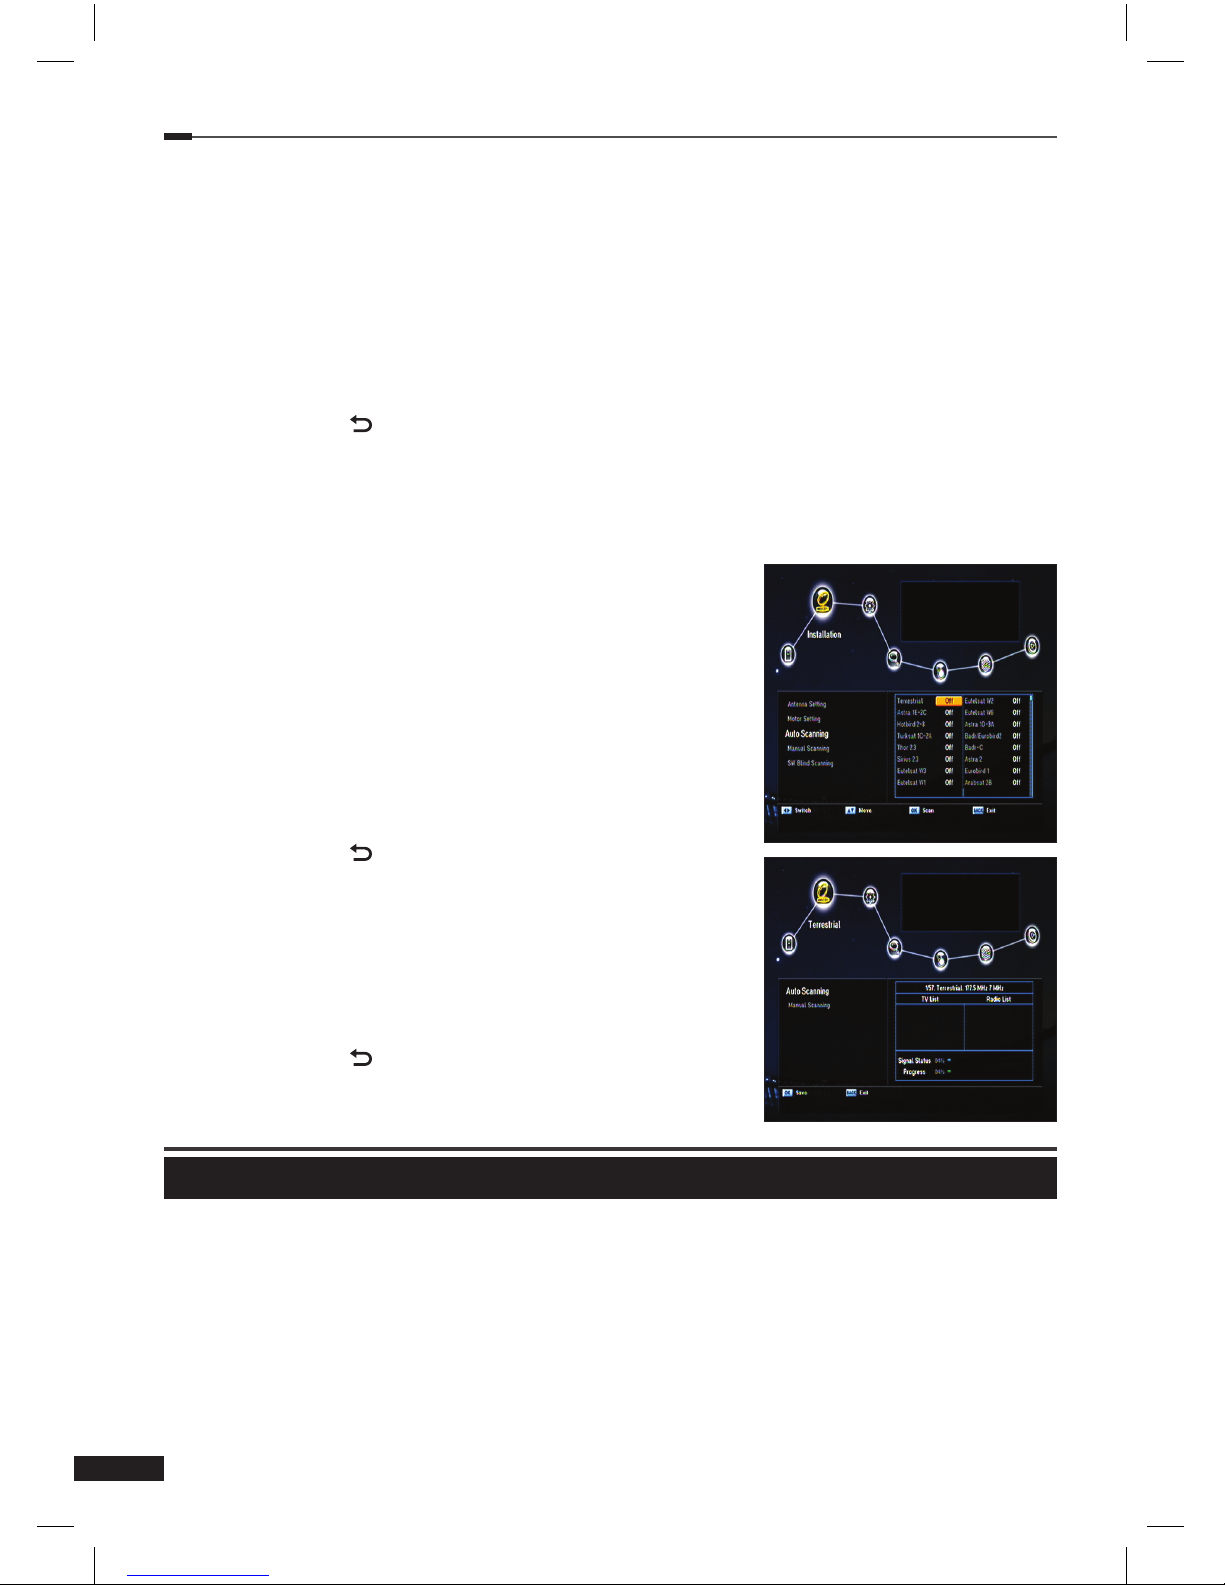
Auto Scanning
9 Select Auto Scanning using the Arrow (▲/▼) buttons and press the OK button.
The preprogrammed satellite lists will appear.
11 Select an appropriate satellite using the Arrow (▲/▼)
buttons and set the channel options using the Arrow
(◄/►) buttons.
• Off: Scanning is disabled.
• All: Scan all the free and scrambled channels.
• Free: Scan free channels only.
• NIT: Scan all mode with TP network scanning.
• You can set Off, All, Free or NIT to each satellite.
12 Press the OK button, Auto Scanning will start.
All the channels in the list from the selected satellite will be
automatically downloaded.
13 Press the OK button to save the changes.
14 Press the Back (
) button to exit from the menu and
press the Arrow (▲/▼) buttons to select the desired
channel. Now you can watch TV or listen to the Radio.
<<TERRESTRIAL>>
Auto Scanning
1 Press the OK button, auto Scanning will start.
2 Press the OK button to save the changes.
3 Press the Back (
) button to exit from the menu and
press the Arrow (▲/▼) buttons to select the desired
channel. Now you can watch TV or listen to the Radio.
Basic Operation
This section explains various functions while watching TV or listening to the Radio.
Switching Channel
You can switch the current channel by three different methods.
• Method 1: Press the Arrow (▲/▼) buttons or PR+/- buttons.
• Method 2: To select a channel directly, select a channel using the Numeric (0~9) button.
• Method 3:
1 To display the channel list, press the OK button.
2 Select a channel you want to watch using the Arrow (▲/▼) buttons and then press the OK
button.
Page 10
Chapter 4 >> Initial Settings and Operations
11
English
• If there are multiple channels, use the Page (+/-) or the Arrow (◄/►) buttons to move to
channels by page.
• Press the Mode (
) button to switch between the TV and Radio channel.
• Method 4: In case of more than two scanned satellites
1 Press the SAT(
) button to show satellite list.
2 Move the cursor to the satellite of a channel to watch with the Arrow (◄/►) buttons and
then press OK button.
3 You can follow the method 3 instruction for channel selection.
• Method 5: How to move to the watched channel.
1 Press the last button with RCU.
2 Press OK button after a channel selection by using the Arrow (▲/▼) with RCU.
3 Press OK button to exit.
Volume Control
To control the volume:
• Press the VOL+/- or the Arrow (◄/►) buttons.
• Press the Mute (
) button to turn the sound off.
• Press the Mute (
) button again or the VOL+/- or Arrow (◄/►) buttons to cancel muting.
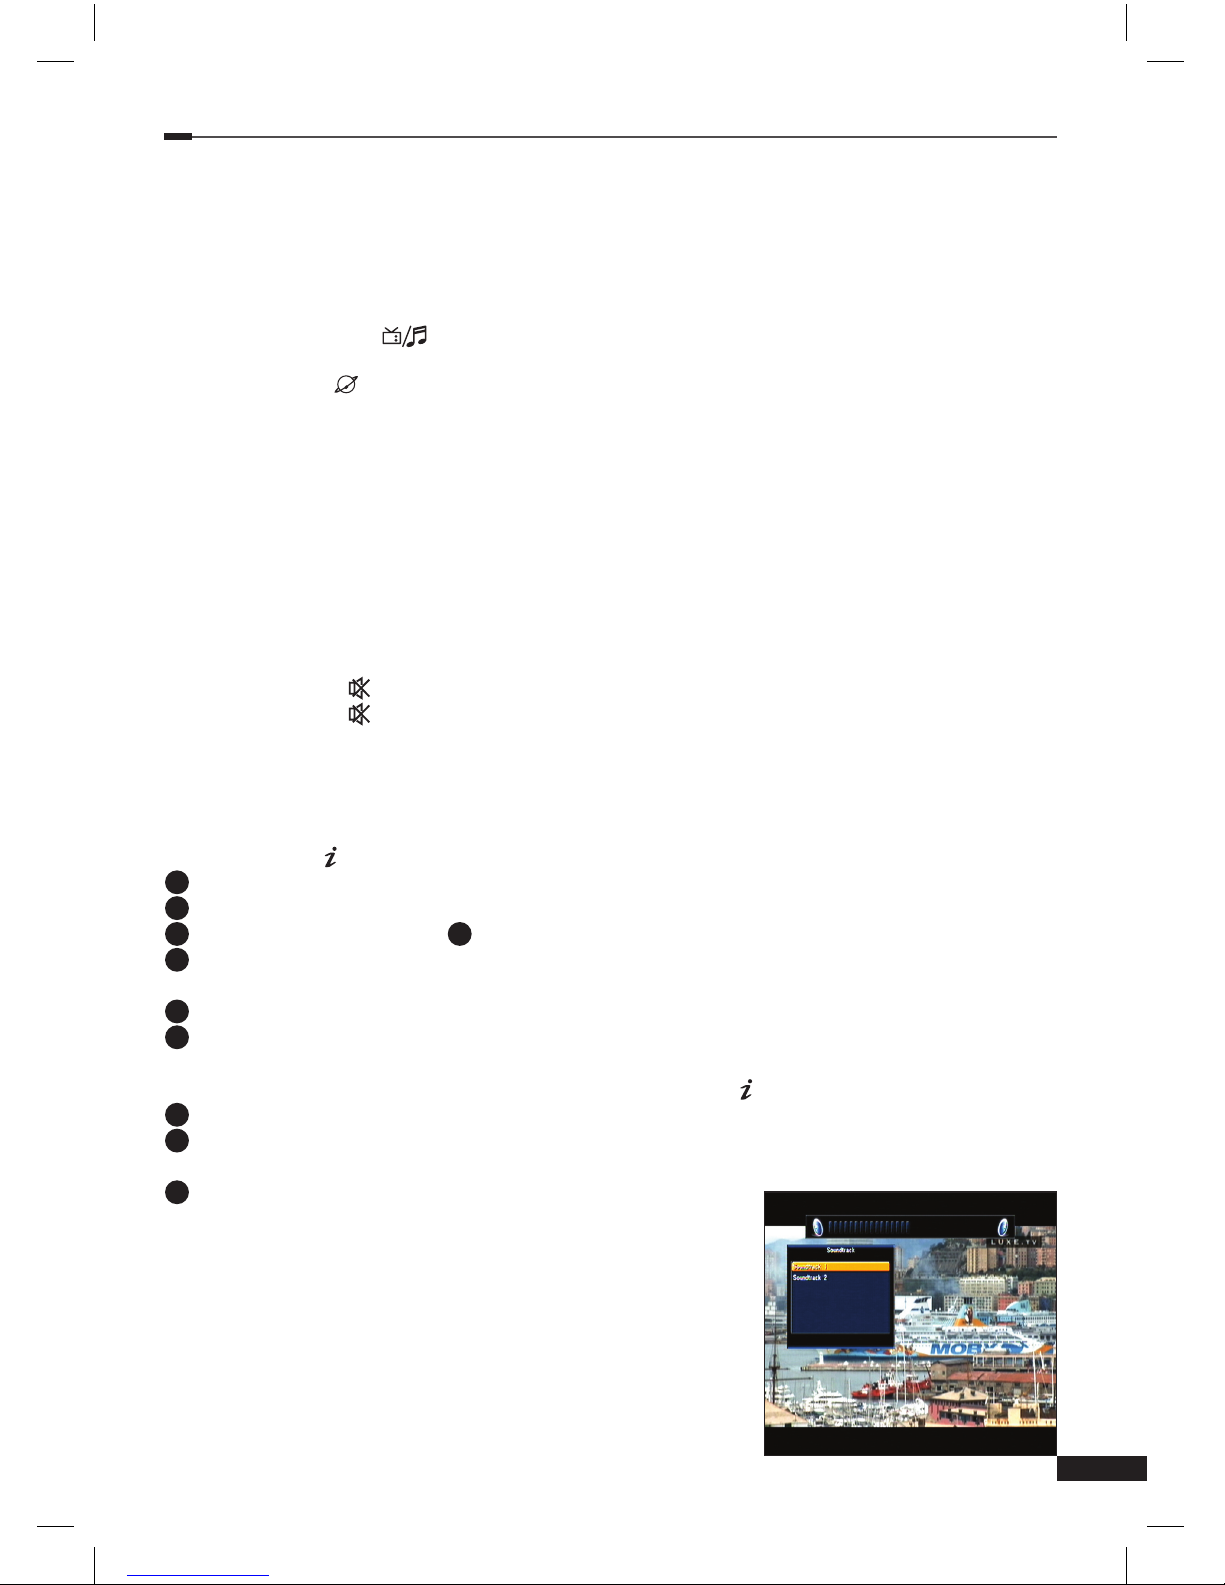
Info Bar
Channel information always appears for a specic period of time whenever you switch
channels.
General Information
Press the INFO (
) button; you can see general information of the current channel.
1
Channel number and name
2
Current time
3
Signal Level 4Signal Quality
5
Icons: HD channel, Locked channel, Radio Channel, Scrambled channel, Subtitle, Teletext
information
6
EPG information.
7
Conditional Access
Detailed Channel Information
You can see detailed channel information pressing the INFO (
) button again.
8
You can see detailed channel information pressing the INFO button again.
9
Satellite, Frequency, Symbol Rate, FEC, Polarity, Video PED, Audio PID, PCR PID,
Transponder
10
Display the stream information.
Selecting the soundtrack
You can select the audio language, soundtrack, or sound
mode.
1 Press the Audio (Yellow) button.
2 Press the Arrow (▲/▼) buttons to select the audio
language or soundtrack and press the OK button.
3 Press the Arrow (◄/►) buttons to select the sound mode
from Stereo, Mono left, or Mono Right.
4 Stream information.
Page 11
Chapter 4 >> Initial Settings and Operations
12
English
Selecting the OSD teletext, VBI teletext, Subtitle and DVB subtitle
You can choose the OSD teletext, VBI teletext, subtitle and DVB subtitle for the current live
TV program if provided from the broadcasting station.
• OSD teletext: Press the Text (
) button
• VBI teletext: Press the Text (
) button twice.
• Subtitle: Press the Text (
) button three times.
• DVB subtitle: Press the Text (
) button four times.
MoSAic
You can see multi picture by pressing the RED (MoSAic) button.
Sleep Timer Function
Press the GREEN (Sleep) button, you will see the time set for the sleep timer if already set from
the Time Setting menu.
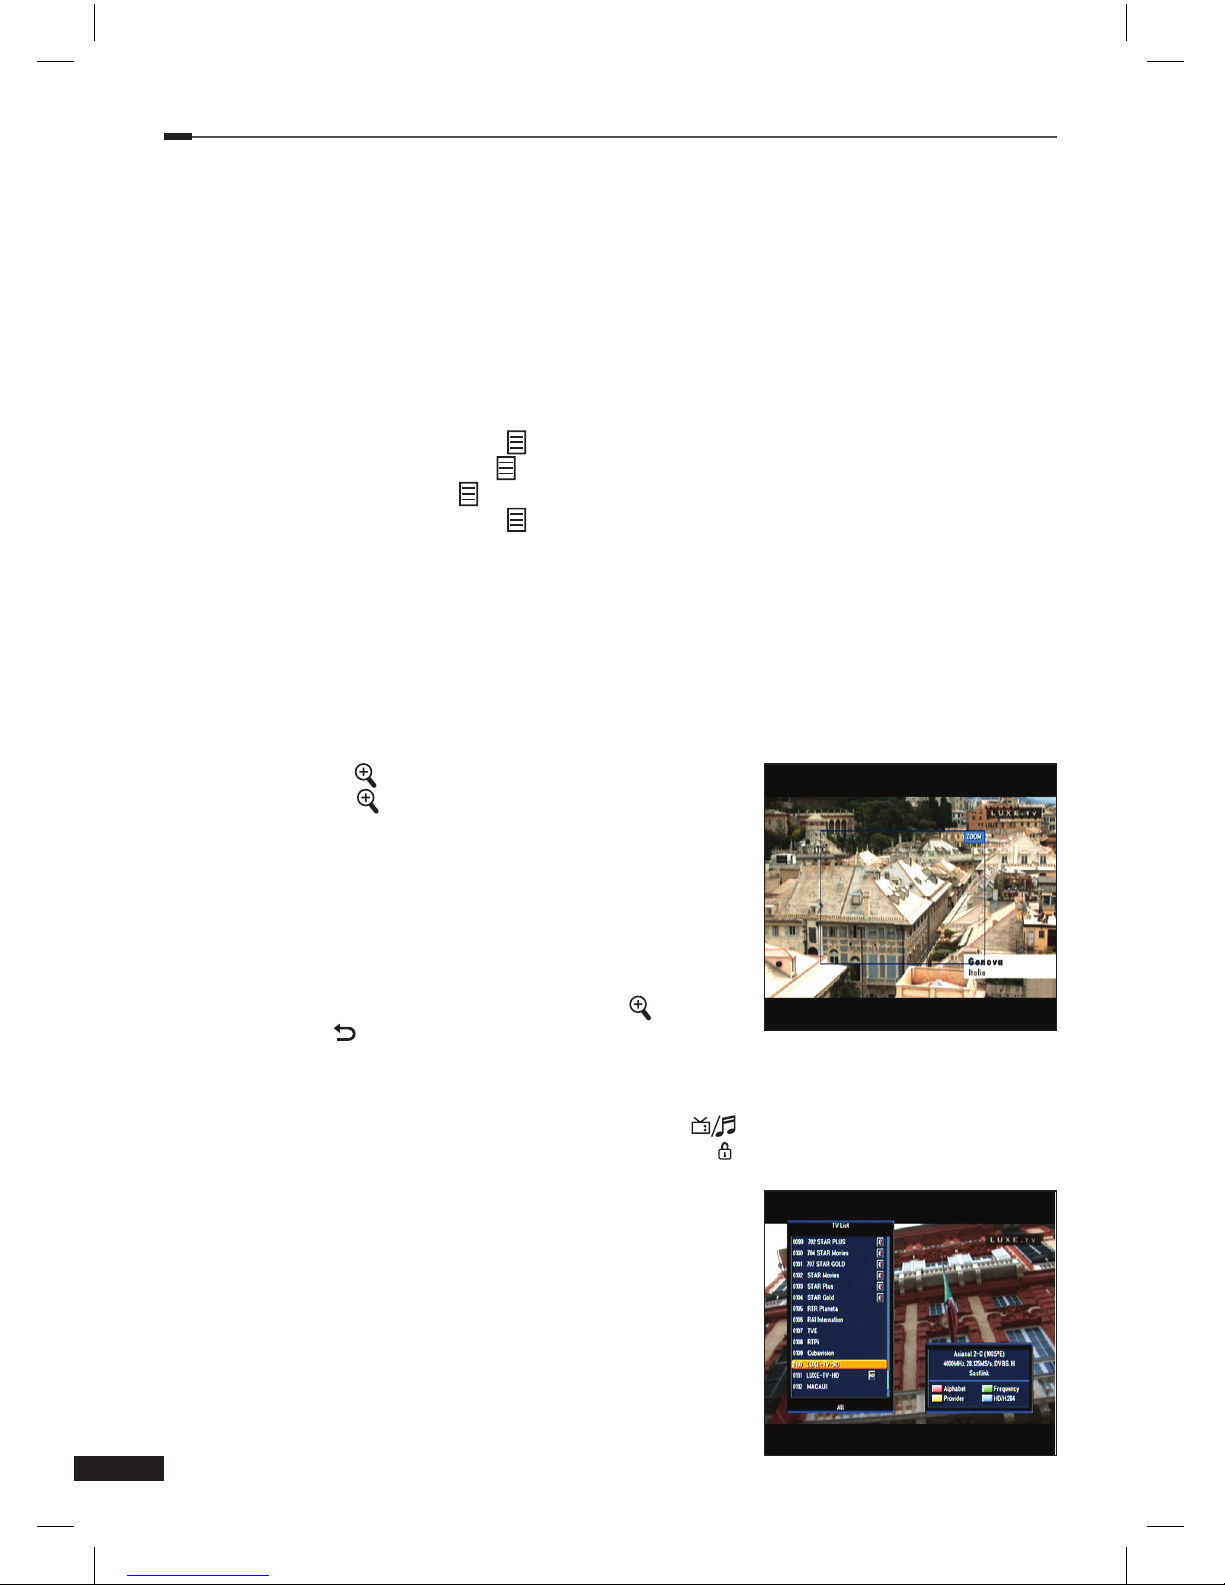
Zoom Function
You can make the picture appear larger on the screen
pressing the Zoom (
) button.
1 Press the Zoom (
) button.
2 Select the area you want to zoom using the Arrow buttons
and then press the OK button.
Picture is enlarged two times.
3 Each time you press the Page (+/-) buttons, the picture is
enlarged two or four times.
Press the Arrow (▲/▼/◄/►) buttons to change the
location at the lower right of display.
4 To cancel the Zoom function, press the Zoom (
) button
twice or Back (
) button.
Channel List
You can see the TV or Radio channel list pressing the OK button while watching TV or listening
to the Radio. Switch the channel list pressing the Mode (
) button. The icon (€) behind
the channel name symbolizes scrambled channel, and the (
) icon behind the channel name
symbolizes indicates a locked channel.
Select channel using the Arrow (▲/▼/◄/►), PR+/-, or Page
(+/-) buttons and press the OK button to watch.
The colored buttons show the channel lists as follows:
• RED (MoSAic) button: by alphabetical order
(alphabetical A-Z)
• GREEN (Sleep) button: by satellites
(all/searched satellites)
• YELLOW (Audio) button: by names of broadcasting
providers
• Blue (SAT) button: by HD channels
Page 12
Chapter 4 >> Initial Settings and Operations
13
English
To view channel list in specic order
(Alphabet/Satellite/Provider/HD)
1 Press the Colored (Red/ Green/Yellow/Blue) button.
Channel list is highlighted.
2 Select Alphabet, Satellite, Provider, or HD using the
Arrow (▲/▼) buttons.
The channel list is sorted automatically by your selection.
3 Select the channel pressing the Arrow (▲/▼) or Page
(
/ ) buttons and press the OK button to watch it.
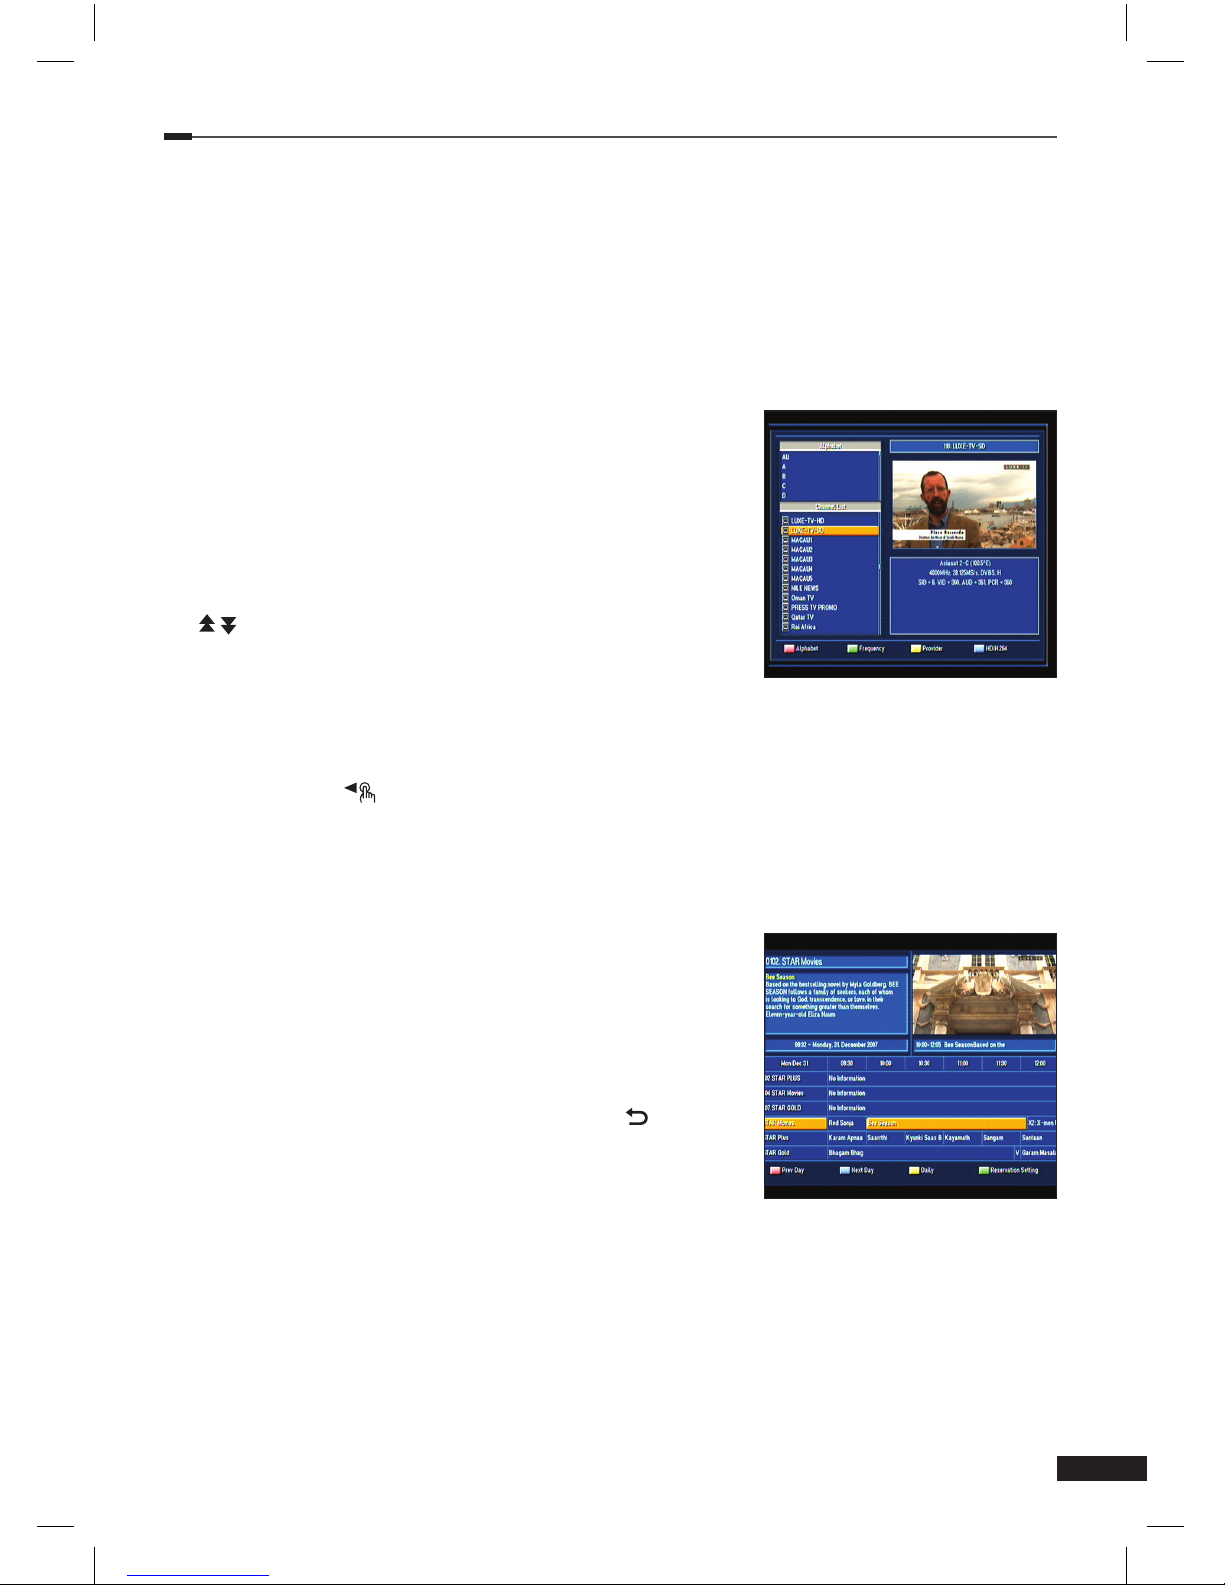
Electronic Program Guide (EPG)
EPG displays program information such as program titles, broadcasting schedule,
Program synopsis and such EPG service differ depending on the service provider.
1 Press the EPG (
) button while watching TV or listening to the Radio EPG information
appears.
2 Select a program for further more information.
• Arrow (▲/▼) buttons: Selects a program by channel
• Arrow (◄/►) buttons: Selects a program by time & date
within the same channel.
It displays the program list at 30 minutes intervals.
• You can see the detailed information by pressing Page
(+/-) buttons with RCU.
3 Press the OK button, detailed information on the selected
event appears.
4 To exit from the EPG mode, press the Back (
) button.
Page 13
Chapter 5 >> Main Menu
14
English
M
enu Map
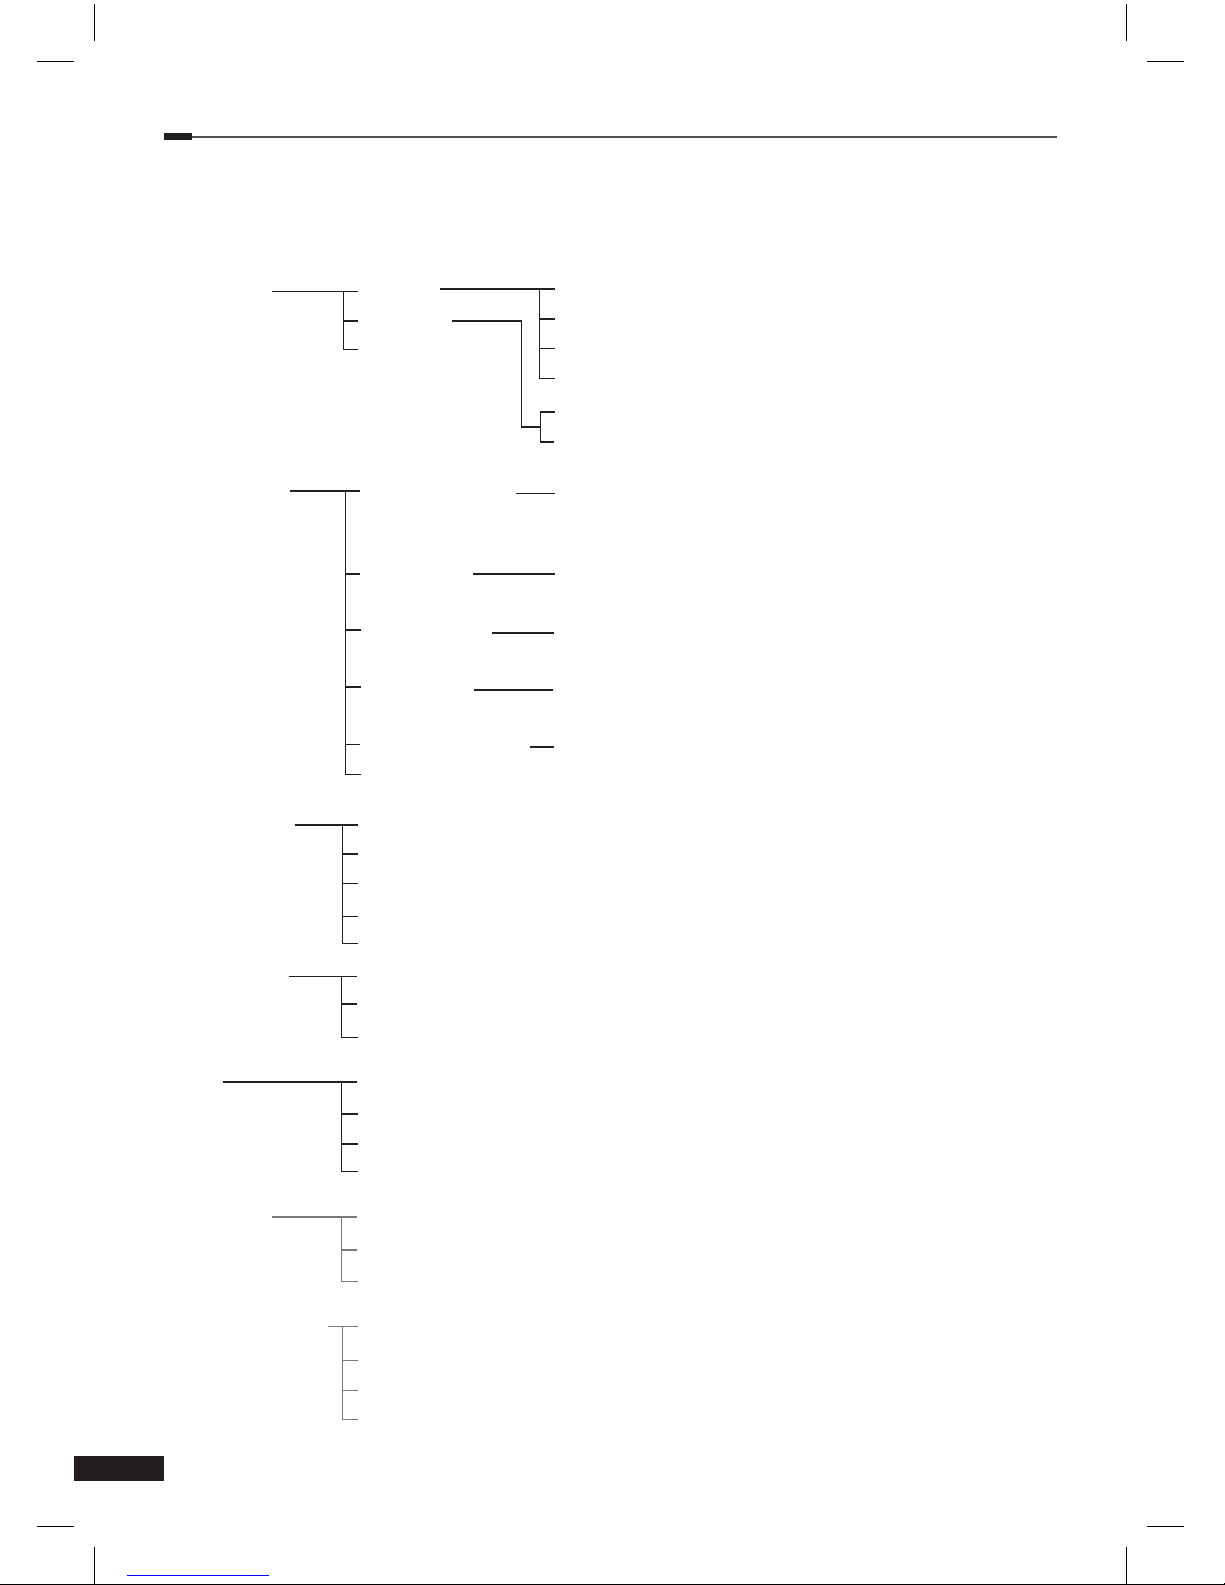
Installation Satellite Antenna Setting
Terrestrial Motor Setting
Defaults Setting Auto Scanning
Manual Scanning
Auto Scanning
Manual Scanning
System Setup Language Setting OSD Language / Audio 1st Language / Audio 2nd
Language /EPG 1st Language / EPG 2nd Language /
Teletext Language / Subtitle Language
OSD Setting Transparency / Window Trans / Banner Time / Screen
Saver Time/Serial Module
Media Setting TV system / TV Aspect Ratio / Video Aspect Ratio / Video
Signal Type / Video Freeze / Dolby Digital/ Time shift
Time Setting GMT Time / Local Time / Set Time Mode / Time Zone/
Summer Time
Reservation Setting On Time / Off Time / Repetition / Program
System Information
Channel Setup Delete Channels
Delete All Channels
Favorite Channels
Edit Channels
SW Manager
Parental Lock Channel Lock
Lock Control
Change PIN Code
Game A
B
C
D
Multimedia USB
SATA
Ethernet
Conditional Access CI Slot A
CI Slot B
CA Slot A
CA Slot B
Page 14
Chapter 5 >> Main Menu
15
English
M
ain Menu
The menu has been carefully designed from user-friendly point of view to assure easy operation
to your receiver. The main menu is classied into 7 sub menus that will carry out the various
operations individually.
Installation
In the Installation menu, you can customize antenna setting and do channel scanning.
Press the Menu (
) button.
Select Installation using the Arrow (◄/►) buttons on the main menu.
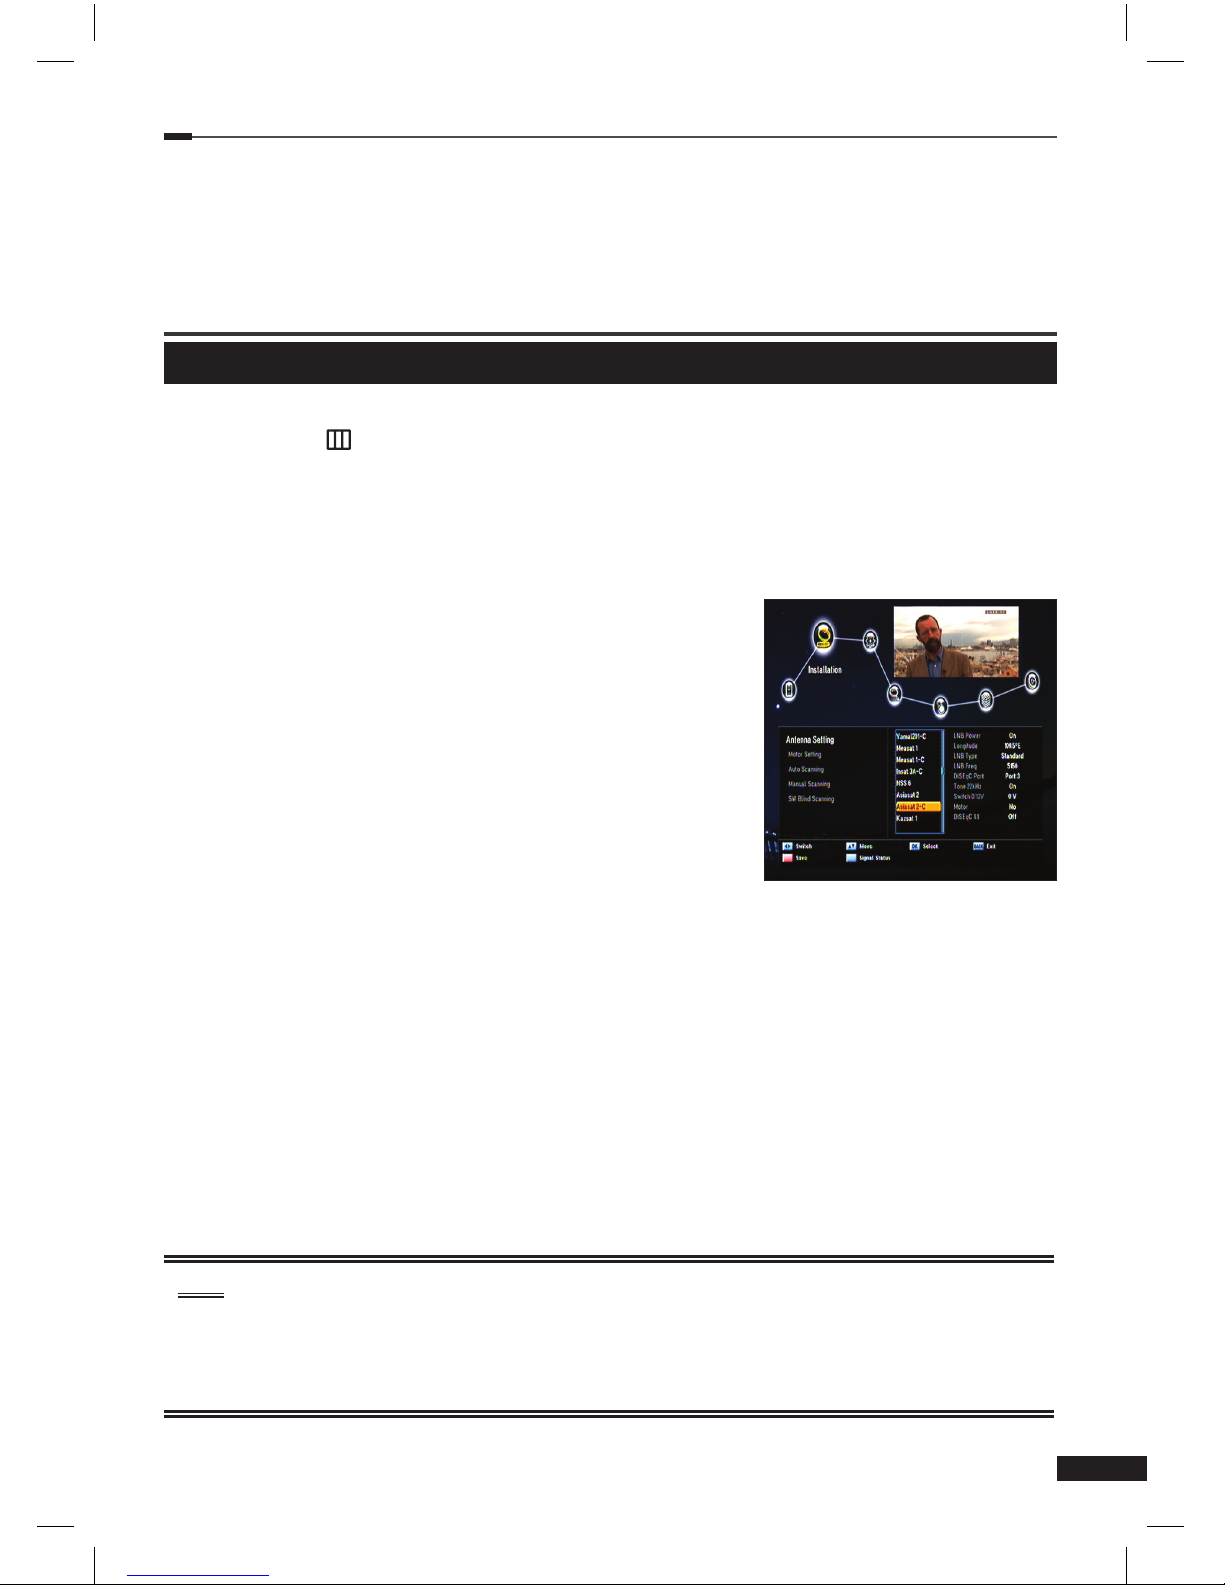
Installation >> Antenna Setting
Antenna Setting
You can set antenna and LNB information for scanning channels. If antenna is not correctly set,
you cannot scan channels, therefore you cannot watch any
programs.
1 Select Antenna Setting using the Arrow (▲/▼) buttons
and press the OK button.
Antenna setting menu appears.
2 Select satellite for channel scan using the Arrow (▲/▼) or
Page (+/-) buttons and press the Arrow (◄/►) button to
select at option.
3 Select an option using the Arrow buttons.
LNB Power
Set LNB Power On.
Longitude
If you know the exact longitude of your location, use the Numeric (0~9) buttons.
Toggle between E (East) and W (West) using the Arrow (◄/►) buttons.
LNB Type(Unicable)
Select the LNB type by pressing Arrow (◄/►) button
- Universal 1 (9750 / 10600)
- Universal 2 (9550 / 10750)
- Unicable (1210 IF / 1420 IF / 1680 IF / 2040 IF)
• Select the Unicable and press OK Button to choose one IF by Auto detection
(When you use Unicable, Blind Scan function will be not supported)
- User Dene (LNB Low / LNB high)
• LNB IF Frequency can be input with numeric key with RCU
- Standard (5150 / 9750 / 10000 / 10600 / 10750 / 11250 / 11300 / 11475)
Note
• What is Low Noise Block (LNB)?
The LNB is located at the satellite dish antenna. It amplies the very weak received
satellite signal then converts the received microwave satellite signal so that the signal
may not decrease the gain between the dish and your receiver.
Page 15
Chapter 5 >> Main Menu
16
English
DiSEqC (Digital Satellite Equipment Control) System Mode
You can select DiSEqC using the Arrow (◄/►) buttons.
You can select one mode among DiSEqC Port1~4 for 1.0 and Tone Burst 1~2 and Off.
Tone 22kHz
In case you are using a dual LNB or two antennas connected to a 22KHz Tone Switch
Box, with 22KHz Tone Switch (On, Off, or Auto) you can switch between LNB or antenna.
Motor
Select motor setting from DiSEqC, USALS, Positioner, and No.
DiSEqC 1.1
In case of DiSEqC 1.1 usage, select port 1~16 for the satellites by using the Arrow
(◄/►) button
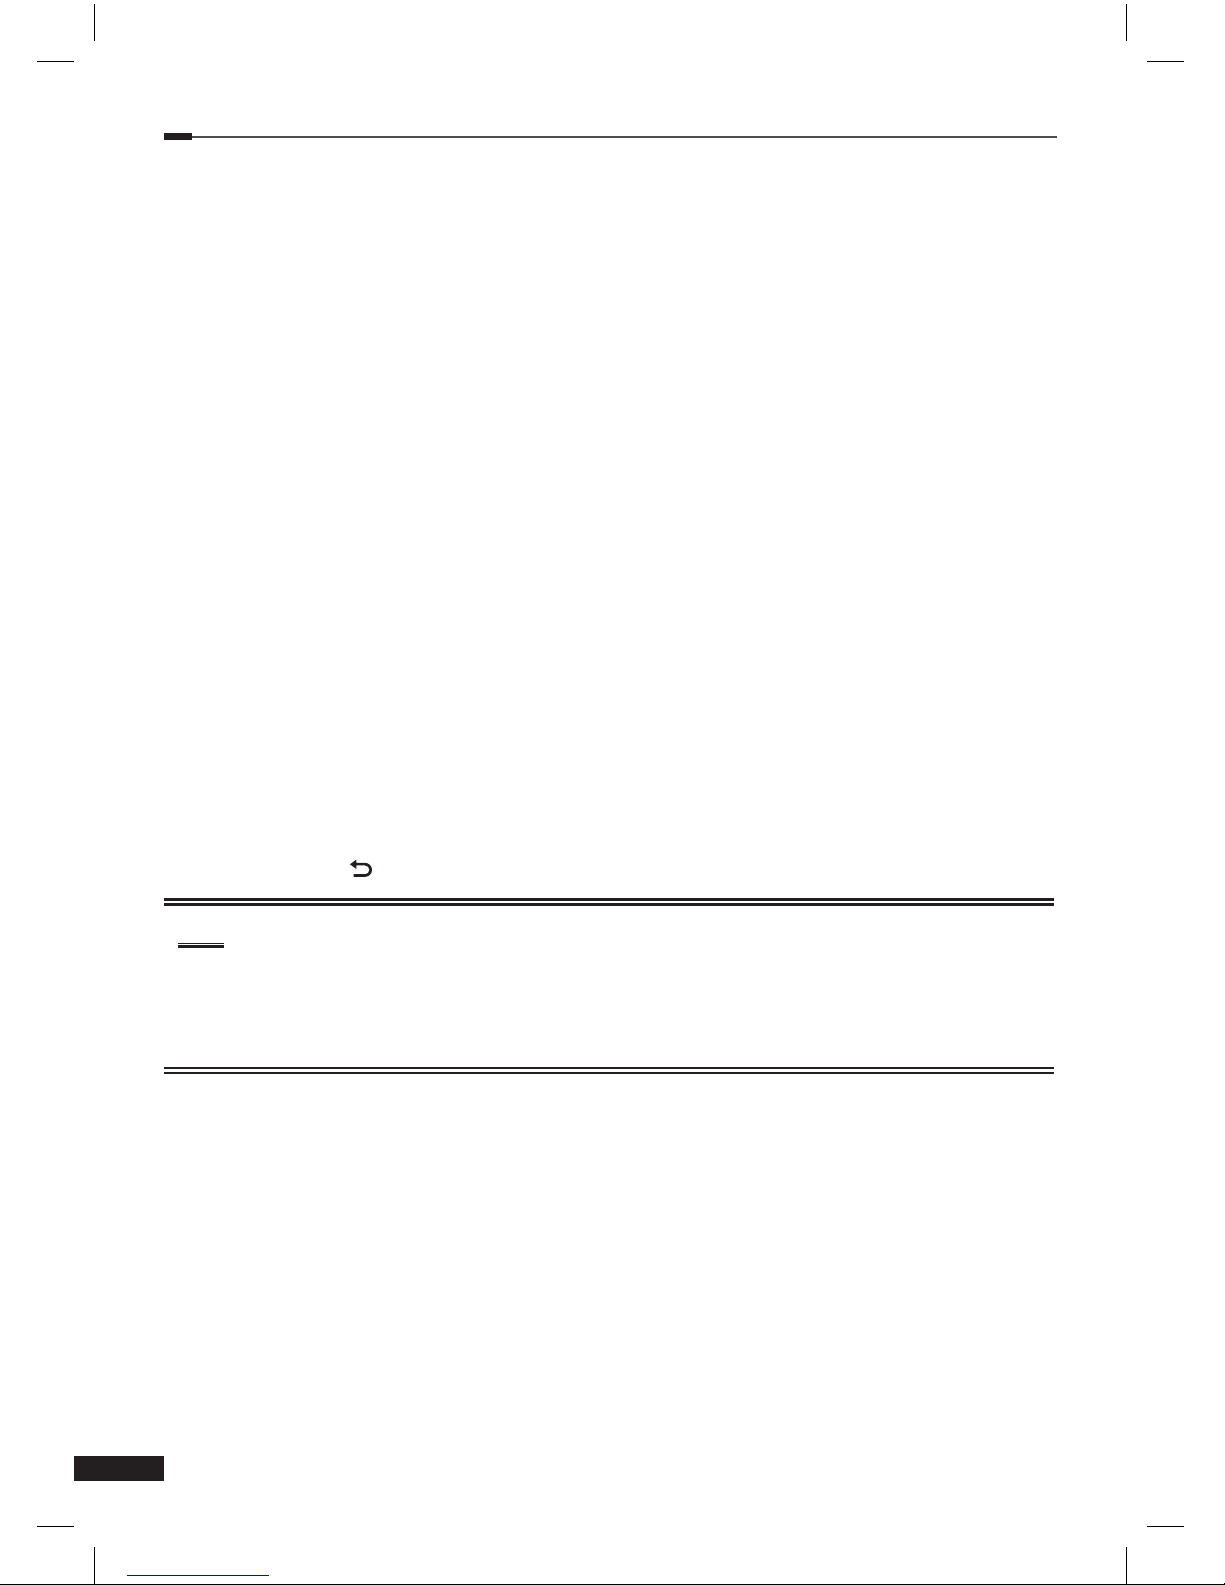
Signal Status
Press the blue button, you can check the signal status for each TP and Satellite with the
Arrow (◄/►▲/▼) buttons.
You can scan the selected satellite and TP and save the changes.
- Green (sleep) button: Satellite Auto Scan
- Yellow (Audio) button: TP Scan.
4 After setting the option, press the OK or RED (MoSAiC) button to save.
• Select satellite(s) according to the direction of your satellite dish. You can select many
satellites depending on the direction to the satellites.
5 Press the Back (
) button to return to the Installation menu.
Note
• DiSeqC is the registered trademark of Eutelsat Communications.
A standard through which is possible to let a DiSEqC compatible receiver send a signal
over the RF cable to a switching device to switch between different LNBs or dishes. The
DiSEqC uses the 22KHz signal to control the switching device.
Installation >> Motor Setting
Motor Setting
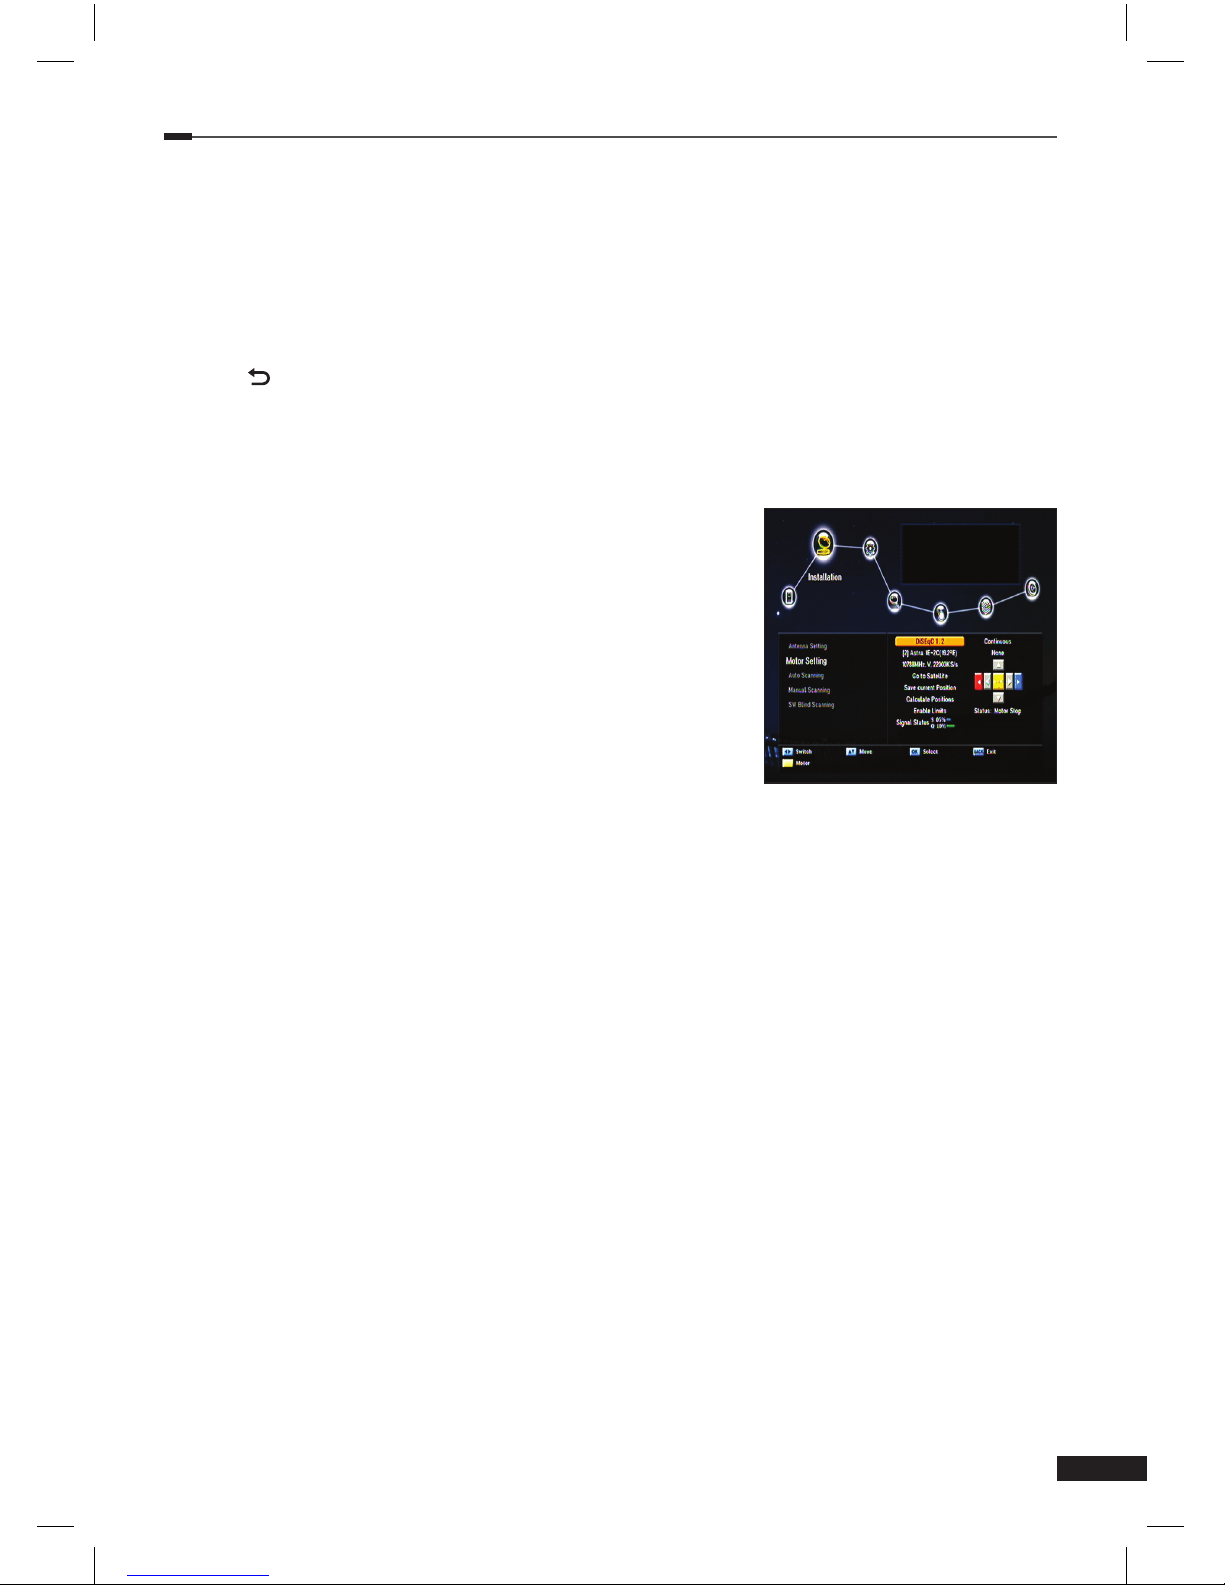
DiSEqC 1.2
When Motor is set to DiSEqC 1.2 in the Antenna Setting menu.
1 Select Motor Setting using the Arrow (▲/▼) buttons and press the OK button.
2 Select a satellite using the Arrow (▲/▼) buttons and press the OK button. Satellite list
appears.
Select satellite using the Arrow (▲/▼) buttons and press the OK buttons. Bulleted list
indicates selected satellites.
Page 16
Chapter 5 >> Main Menu
17
English
3 Press the RED (MoSAic) button to save selected satellites and then press the Back (
) button.
4 If you press the YELLOW (Audio) button, on-screen navigation menu is highlighted.
Use the Arrow buttons to move the motor to the west, east, north, and south in order.
The position of the motor can be restricted to the software setting limits (West/East)
using the RED (MoSAic) / BLUE (SAT) buttons.
5 Press the YELLOW (Audio) button to highlight
Satellite.
6 Press the OK button on the Go to satellite Menu.
Dish changes its position to the direction of satellite
(depending on the types of motor, dish changes its
position to the default-direction of satellite for the
maximum 28 satellites).
7 Press the OK button on the Save Current Position
menu. Current position of the motor is saved
according to the selected satellite.
8 You can change the Function Menu (Go to Ref.
Position / Reset Position / Calculate Positions)
by using the Arrow (◄/►) button, activate the
function with OK button
- Go to Ref. Position: Press the OK button in the Go to Ref. Position menu. Motor
changes its position to zero longitude / latitude where the count begins.
- Reset Position: Reset Positioner initialize the position of motor to the default value.
- Calculate Positions: Calculate Positions selects one satellite to revise the position
of motor and saves the changes. Changed position of the motor also applies to the
directions for other satellites.
9 Conrm the Enable Limits/Disable Limits function pressing the OK button. You will
be prompted to decide whether to use the West/East setting Limits setting value.
10 The method to position motor is selected in the Continuous/Step (Impulses)/Time
(Seconds) menu. If you press the Arrow (◄/►) buttons once in the Continuous mode,
selected TP signal of the satellite is locked or the motor stops to move. In the Step
(Impulses) mode, you can select Steps (Pulse) from 1 to 10. The motor changes its
position according to the selected step if moved to the left or right (depending on the
motor).
In the Time (seconds) mode, you can select time (seconds) from 1 to 20. The
motor changes its position according to the selected step if moved to the left or right
(depending on the motor).
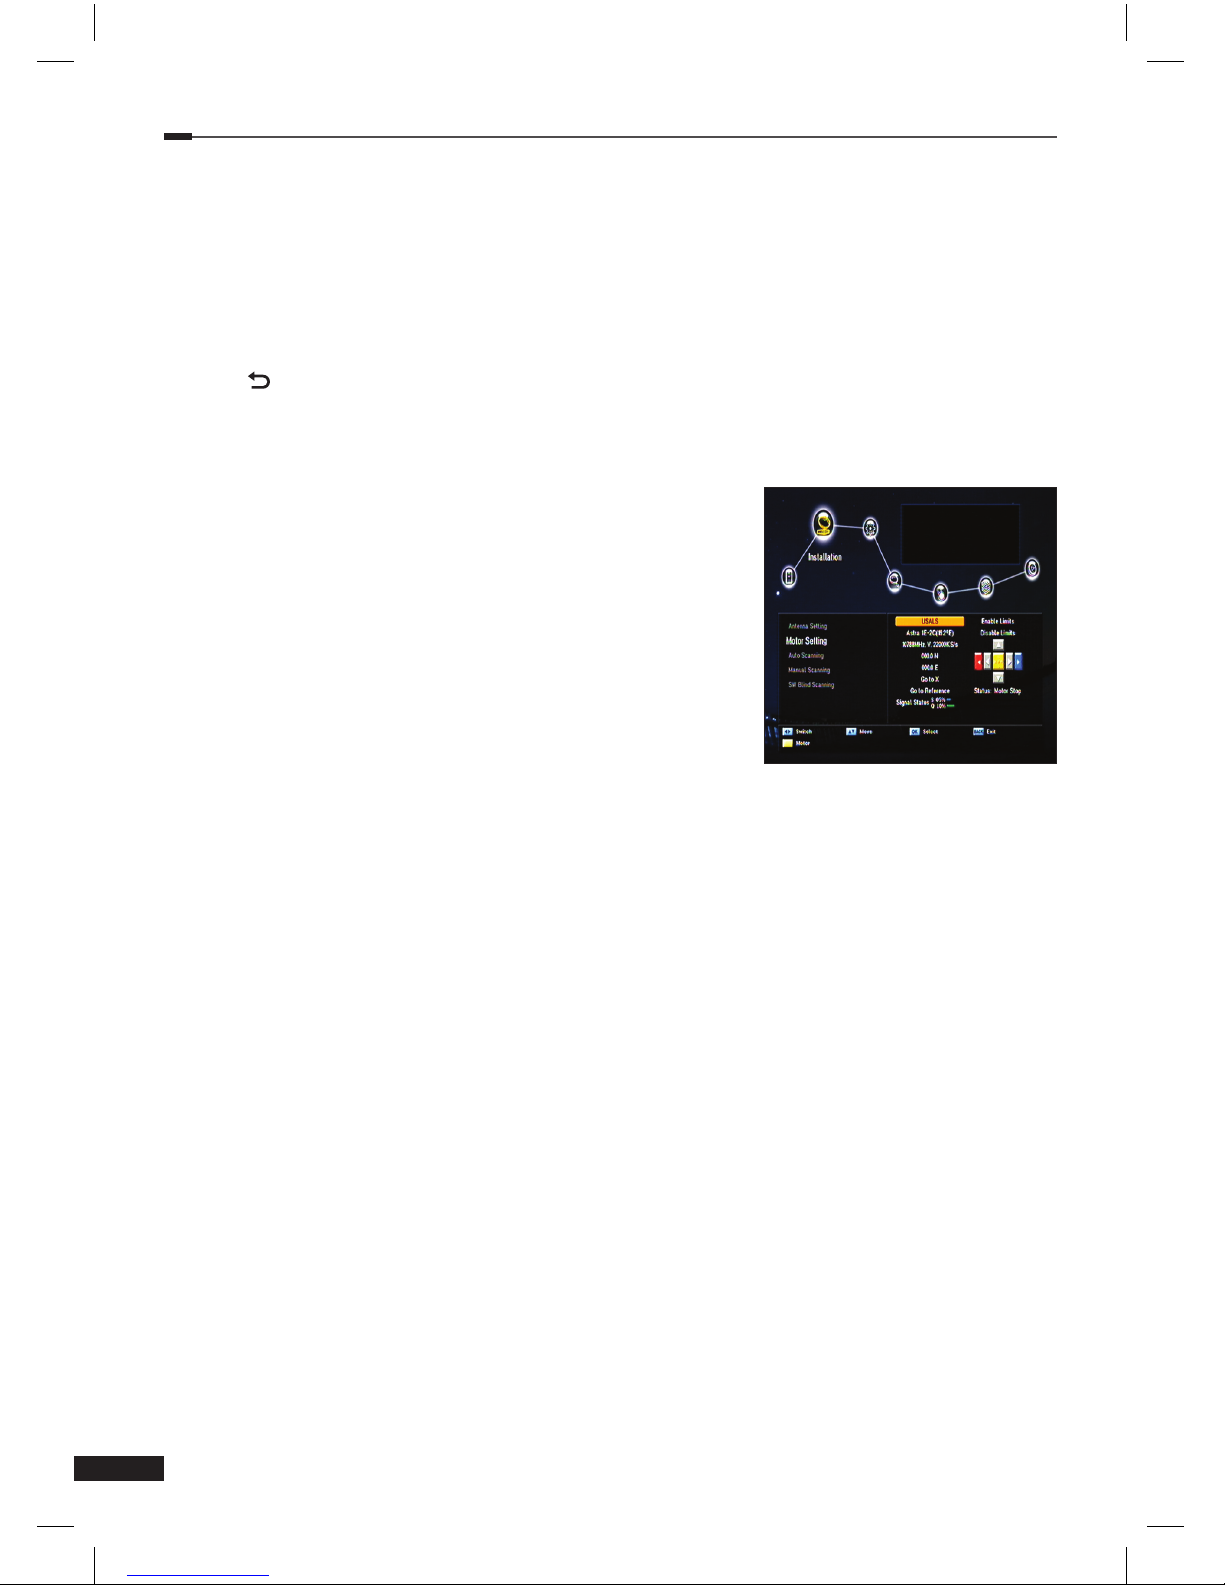
USALS
1 Select Motor Setting using the Arrow (▲/▼) buttons and press the OK button.
2
Select Satellite menu using the Arrow (▲/▼) buttons and press the OK button.
Satellite list appears. Select satellite using the Arrow (▲/▼) buttons and press the OK
button. Bulleted list indicates selected satellites.
Page 17
Chapter 5 >> Main Menu
18
English
3 Press the RED (MoSAic) button to save selected satellites and then press the Back (
) button.
4
If you press the YELLOW (Audio) button, on-screen navigation menu is highlighted.
Use the Arrow buttons to move the motor to the west, east, north, and south in order.
Position of the motor can be restricted to the software
setting limits (West/East) using the RED (MoSAic) /
BLUE (SAT) buttons.
5
Press the YELLOW (Audio) button to highlight
Satellite.
• This function may not work depending on the type
of USALS program.
6
Enter the value of 000.0 E/W (latitude) and 000.0
N/S (Longitude) and then press the OK button on
the Go to X menu.
Motor changes its position according to the selected
satellite.
7
Conrm the Enable Limits/Disable Limits function
pressing the OK button. You will be prompted to
decide whether to use the West/East setting Limits setting value.
• This function may not work depending on the type of USALS program.
• Press OK in Go to Reference menu, the motor moves at zero longitude/latitude.
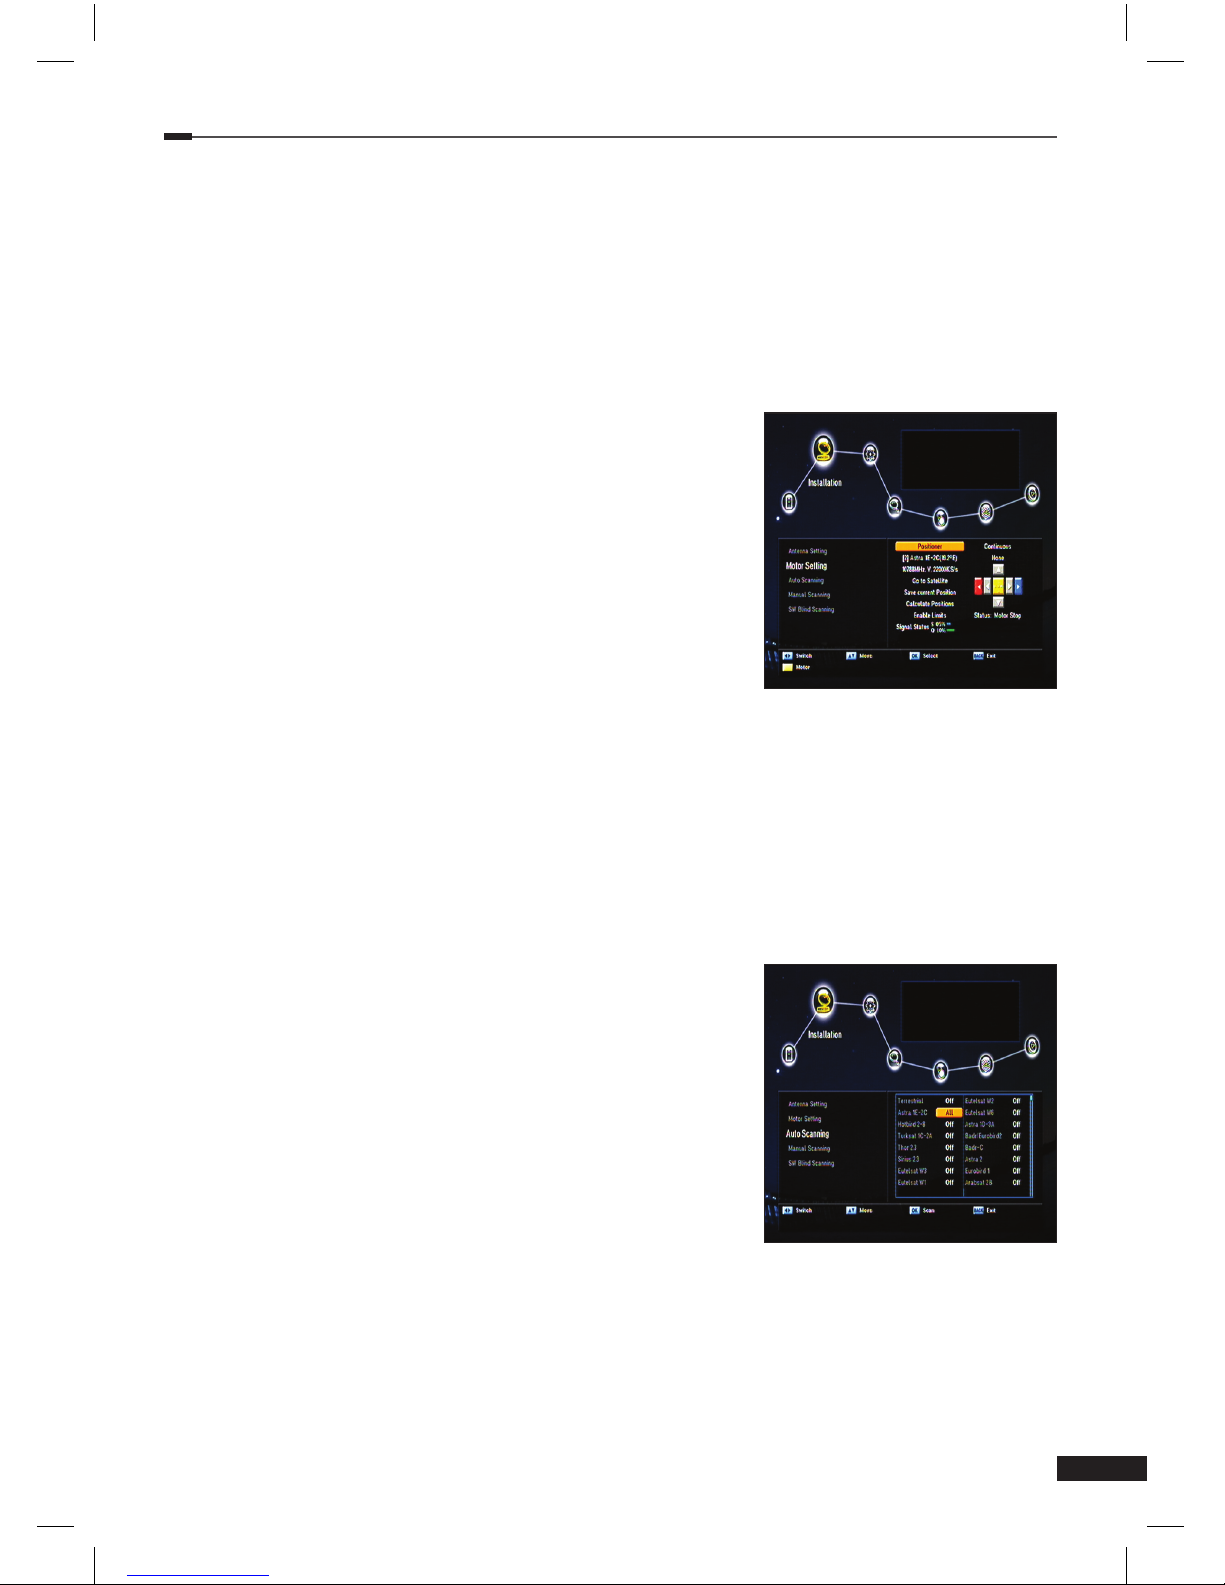
Positioner
1 This function is used when receiving DiSEqC 1.2 Command with the adaptor that
controls positioner antenna. Select a satellite using the Arrow (▲/▼) buttons and
press the OK button. Satellite list appears. On the satellite list, you can select satellites
pressing the OK button. Press the RED (MoSAic) button to save the selected satellites.
2
If you press the YELLOW (Audio) button, on-screen navigation menu is highlighted. Use
the Arrow (▲/▼/◄/►) buttons to move the motor to the west, east, north, and south in
order. Position of the motor can be restricted to the software setting limits (West/East)
using the RED (MoSAic) / BLUE (SAT) buttons.
3
Press the OK button on the Go to satellite menu. Dish changes its position to the
direction of satellite.
4
Press the OK button on the Save Current Position menu. Current position of the
motor is saved according to the selected satellite.
5
Press the OK button on the Go to Ref. Position menu. Motor changes its position to
the zero longitude/latitude where the count begins. (this function is not supported by
the adaptor that controls positioner antenna)
6
Go to Reference changes the position of control adaptor.
7
Reset Positioner initializes the position of motor to the default value.
8
You can change the function Menu (Go to Ref. Position / Reset Position / Calculate
Positions) by using the Arrow (◄/►) button, activate the function with OK button
Page 18
Chapter 5 >> Main Menu
19
English
- Go to Ref. Position: changed position of the motor also applies to the directions for
other satellites.
- Calculate Positions: Conrm the Enable Limits/
Disable Limits function pressing the OK button.
This function may not be supported depending on
the model.
9
The method to position motor is selected on the
Continuous / Step (Impulses) / Time (Seconds)
menu, If you press the Arrow (◄/►) button once
on the Continuous mode, selected TP signal of the
satellite is locked or the motor stops to move.
On the Step (Impulses) mode, you can select steps
(pulse) from 1 to 10. The motor changes its position
according to the selected step if moved to the left or
right (depending on the motor).
On the Time (Seconds) mode, you can select time (seconds) from 1 to20. the
motor changes its position according to the selected step if moved to the left or right
(Depending on the motor).
If you have a MOTEK motor please use positioned menu instead of DiSEqC 1.2. to make
sure that your motor is working correct.
Installation >> Auto Scanning
Auto Scanning
If you select the satellite to scan channel according to the
antenna setting, your receiver can automatically scan the
satellite without entering any other information.
1 Select Auto Scanning using the Arrow (▲/▼) buttons on
the Installation menu and press the OK button.
2 Select satellite to scan channels by using the Arrow
(▲/▼) buttons and select scan mode (All, Free or NIT)
using the Arrow (◄/►) button.
• All: Scans all channels.
• Free: Scans free channels only.
• NIT: Scan All mode with TP network scanning.
3
Press the OK button, and then it starts scanning.
After Auto Scanning completes, you can see TV and Radio
channels in the list.
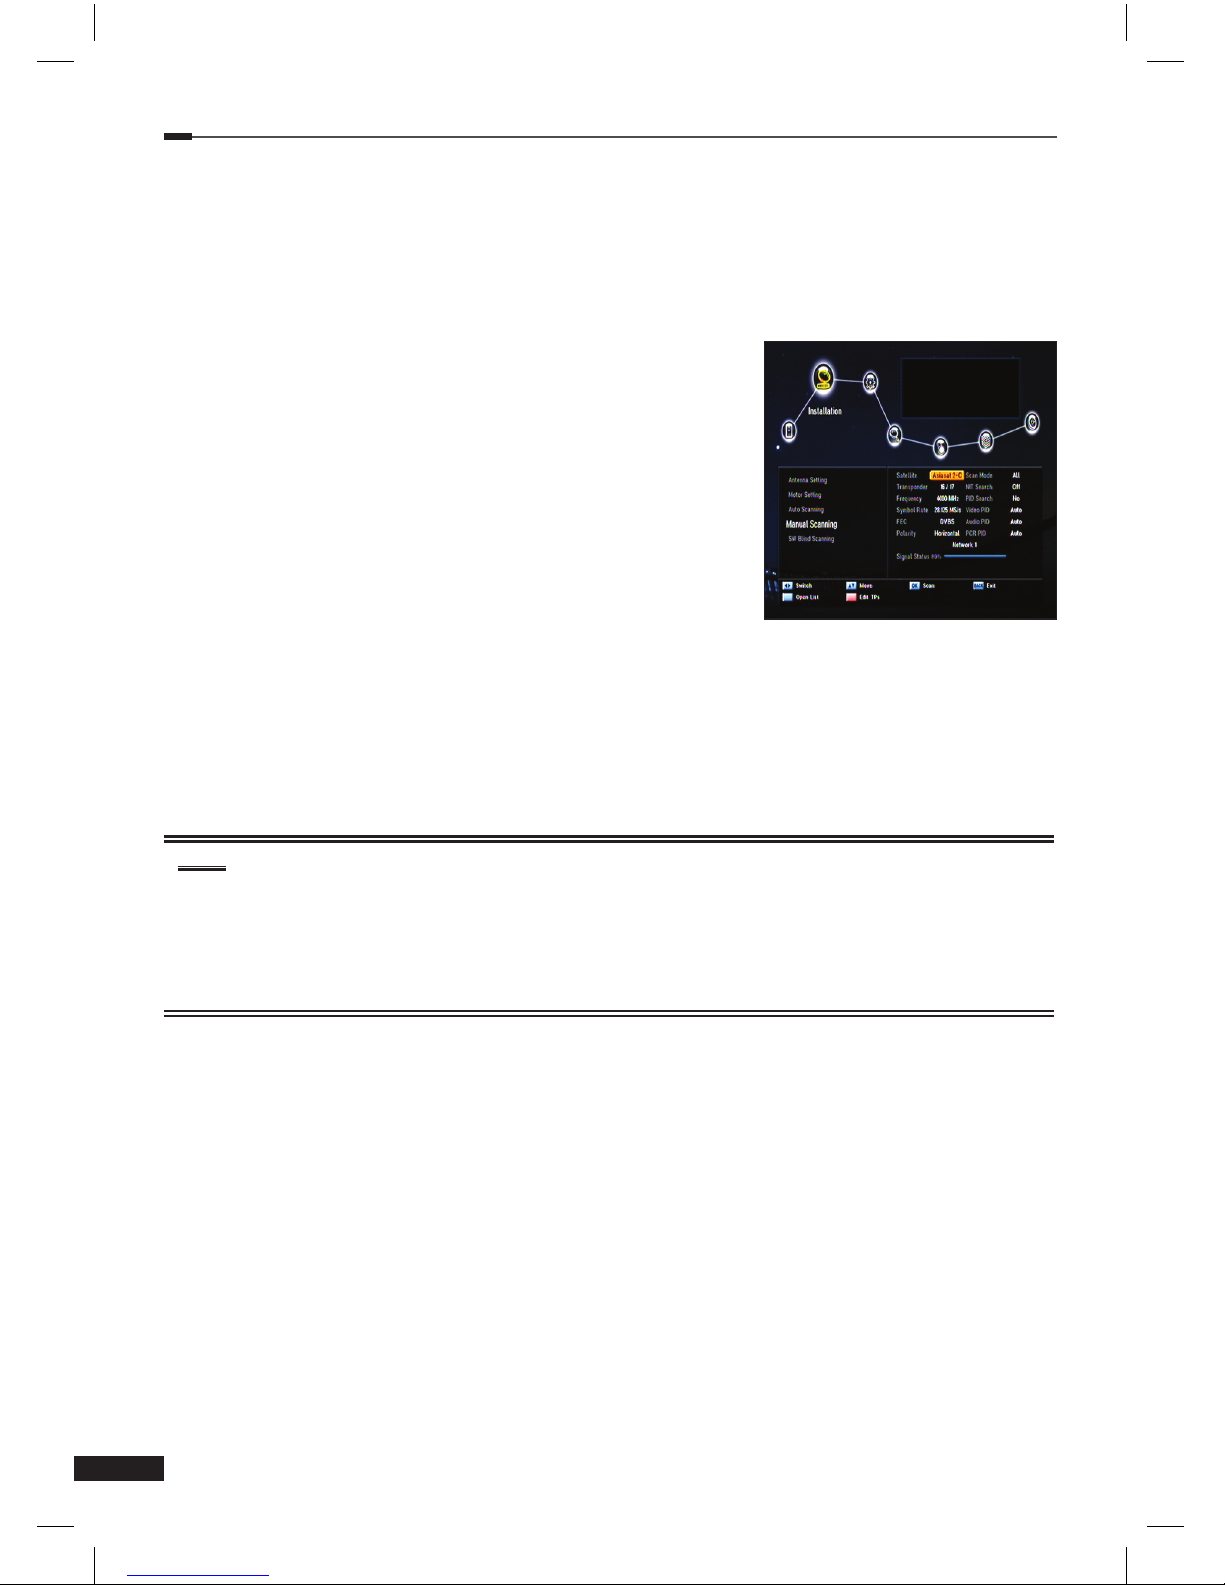
Installation >> Manual Scanning
Manual Scanning
You can scan channels of the selected satellites by transponders if you know the transponder
information.
1
Select Manual Scanning using the Arrow (▲/▼) buttons on the Installation menu and
press the OK button.
Page 19
Chapter 5 >> Main Menu
20
English
2 Set the following options to complete Manual Scanning.
Satellite:
Select a satellite by using the Arrow (▲/▼ ◄/►)
buttons or Page (+/-) buttons.
Transponder:
Set the transponder for the selected satellite.
Select a transponder using the Arrow (◄/►) buttons.
If you cannot nd your desired transponder, select New
to change transponder information as follows:
• Frequency
Display the selected TP Frequency.
• Symbol Rate
Display the selected TP Symbol Rates.
• FEC (Forward Error Correction)
Select a FEC option Auto, 1/2, 2/3, 3/4, 5/6, and 7/8 using the Arrow buttons.
• Polarity
Select a polarity value among Horizontal, Vertical, Circular Left, and Circular Right
using the Arrow buttons.
• Horizontal output is 18V and Vertical output is 13V via LAN.
Note
• What is transponder?
A wireless communications device usually attached to a satellite. A transponder
receives and transmits incoming signals with in a prescribed frequency range. After
receiving the signals the transponder will broadcast those signals with different
frequencies.
Scan Mode
Decide whether to nd free channels only or all the channels including scrambled ones.
Select a scan mode using the Arrow (◄/►) buttons.
• All: Scans all types of channels.
• Free: Scans free channels only.
NIT Search
You will be asked whether to search channels for another transponder.
Select either Yes or Off using the Arrow (◄/►) buttons.
Select Yes to run Network Search.
PID Search
You can manually scan channels by entering individual Packet Identier (PID) values.
Enter the PID the Numeric (0~9) buttons.
First, select a PID type (Video PID, Audio PID, or PCR PID) using the Arrow (◄/►)
buttons, then enter the PID value by pressing the Numeric (0~9) buttons.
3
Press the OK button, then starts scanning.
After Auto Scanning is complete, you can see TV and Radio channels found from Auto
Scanning.
Page 20
Chapter 5 >> Main Menu
21
English
4 Press the RED (MoSAiC) button on the Manual Scan menu
• Satellite: Select the satellite by using Arrow (▲/▼ ◄/►) buttons or Page (+/-) buttons
• Transponder: Change the TP with the Arrow (◄/►) buttons
• Frequency: Displays the current Frequency
• Symbol Rate: Displays the current Symbol Rate
• FEC (Forward Error Correction): Displays the current FEC
• Polarity: Displays the current Polarity
• Add TP: Press the Green (Sleep) button for a new TP add
• Del TP: Delete the current TP with Yellow (Audio) button
• RED (MoSAiC) button: Save the TP information
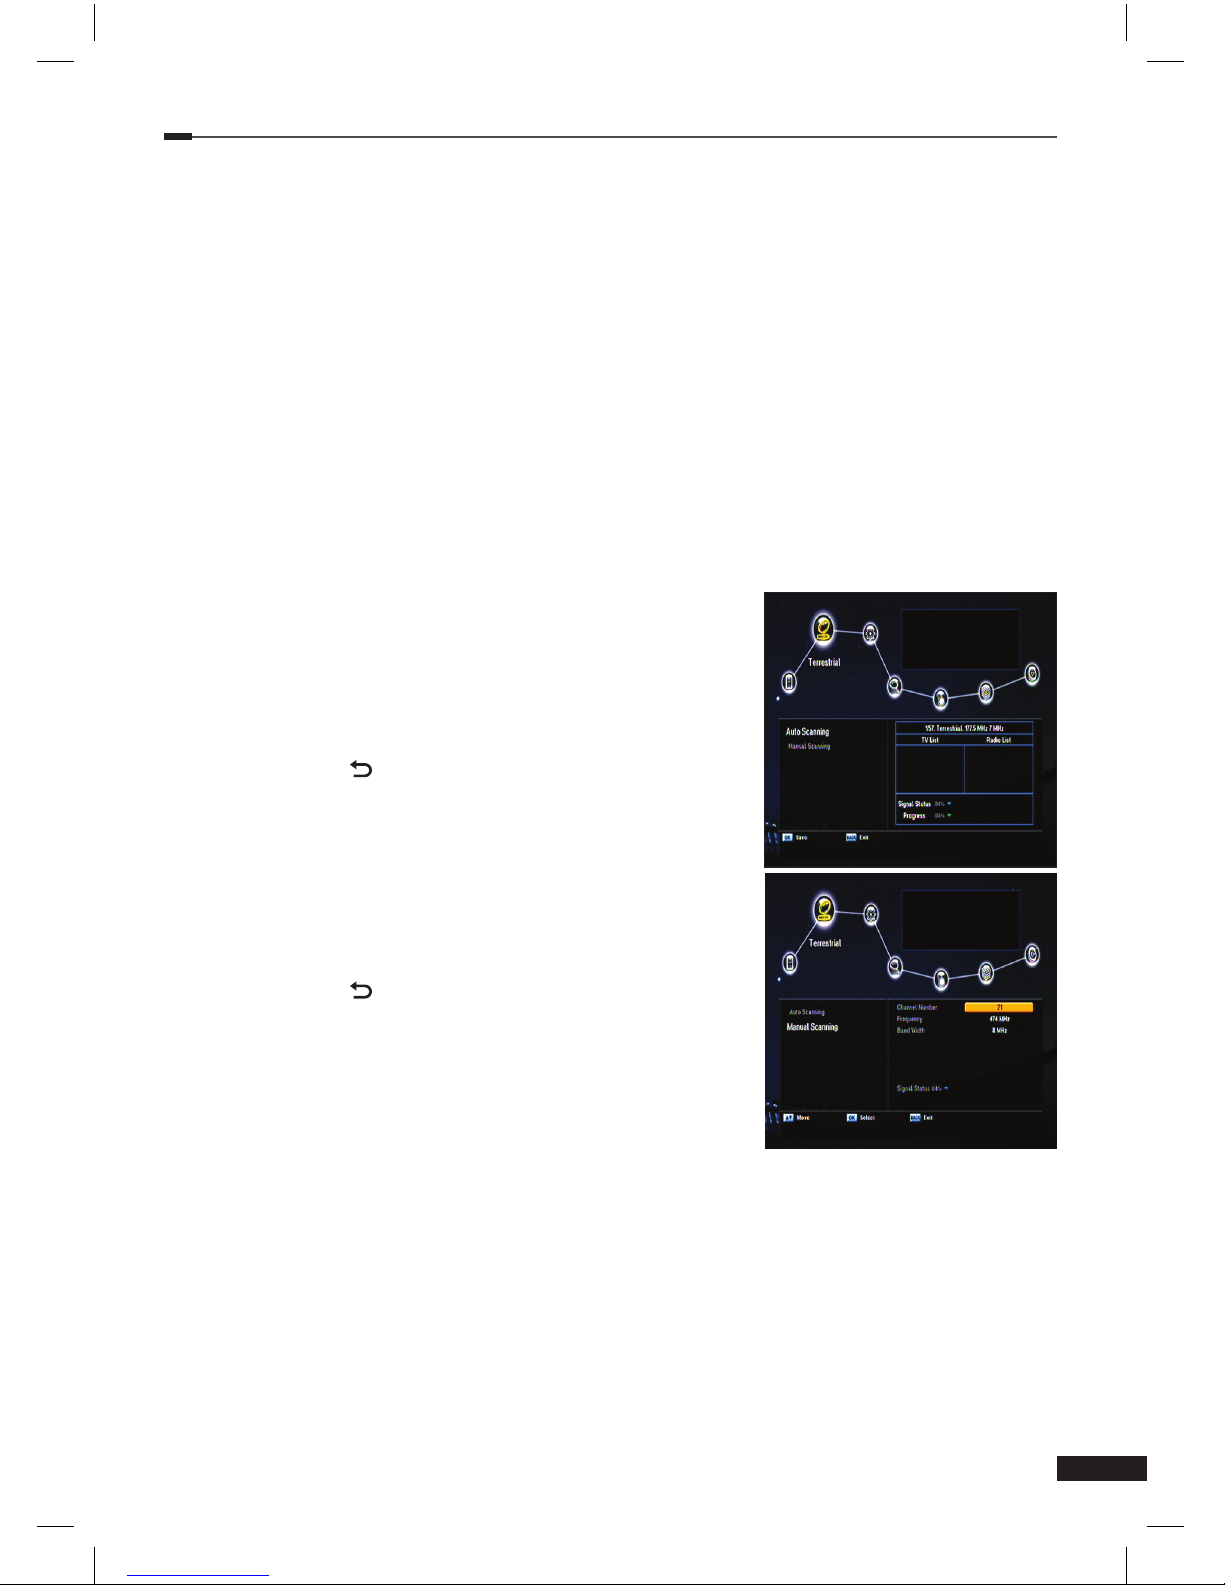
<<TERRESTRIAL>>
Auto Scanning
1 Press the OK button, Auto Scanning will start.
2 Press the OK button to save the changes.
3 Press the Back (
) button to exit from the menu and
press the Arrow (▲/▼) buttons to select the desired
channel. Now you can watch TV or listen to the Radio.
Installation >> Manual Scanning
Manual Scanning
1 Select the channel number using the Arrow (◄/►)
2 Press the OK button. Manual scanning will start.
3 Press the OK button to save the changes.
4 Press the Back (
) button to exit from the menu and press
the Arrow (▲/▼) buttons to select the desired channel. Now
you can watch TV or listen to the Radio.
Installation >> Defaults Setting
Defaults Setting
You can restore the default setting in case you have
encountered some problems after saving changes to channel
data and others that may be in error.
1
Select Defaults Setting using the Arrow (▲/▼) buttons on the Installation menu and press
the OK button.
2
Select a defaults option (Factory Defaults, or STB Reboot) using the Arrow (▲/▼) buttons
and press the OK button.
• Factory Defaults: Resets back to the factory-default settings.
If you press the OK button in this menu, you will see a dialog box asking you to conrm
the channel defaults or factory defaults setting.
Select Yes or No, and press the OK button.
• STB Reboot
If you press the OK button in this menu, the Set-top box (STB) reboots.
Page 21
Chapter 5 >> Main Menu
22
English
System Setup
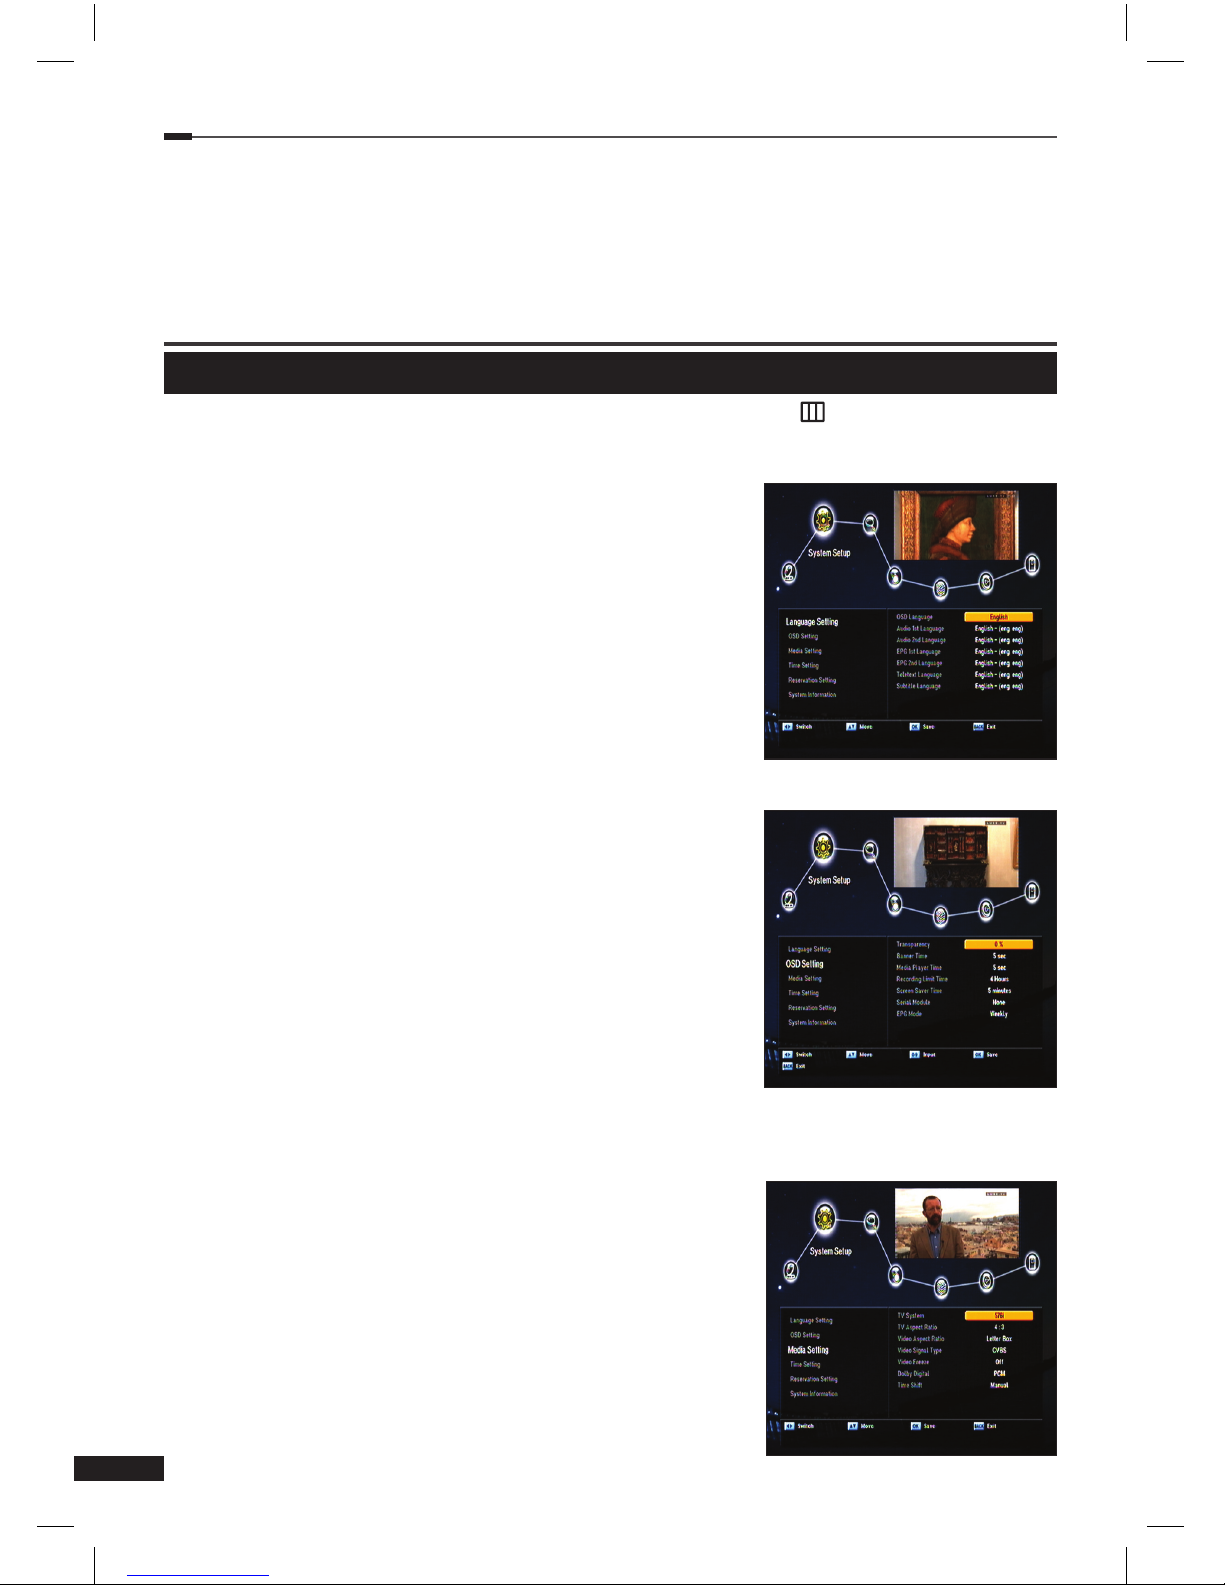
You can set the system conguration in this menu. Press the Menu ( ) button.
Select System Setup using the Arrow (◄/►) buttons on the menu.
System Setup >> Language Setting
Language Setting
You can set languages for OSD, Audio 1-2, Teletext, Subtitle,
and EPG 1-2
1
Select Language Setting using the Arrow (▲/▼) buttons
on the System Setup menu and press the OK button.
2
Select any of OSD, Audio1- 2, Teletext, Subtitle, and
EPG1-2 languages using the Arrow (▲/▼) buttons and
use the Arrow (◄/►) buttons to select its language.
System Setup >> OSD Setting
OSD Setting
You can adjust OSD Transparency, Window Trans OSD
Banner Time, and Screen Saver Time.
1
Select OSD Setting using the Arrow (▲/▼) buttons on
the System Setup menu and press the OK button.
2
Select any of Transparency, Window Trans, Screen
saver Time, VFD Module and Display in Standby Mode,
and Screen saver Time using the Arrow (▲/▼) buttons
and use the Arrow (◄/►) buttons to make changes.
• Transparency: 0 (opaque) to 100%
• Window Trans: 0 (opaque) to 100%
• Banner Time: 1 to 60 seconds or Always
• Screen saver Time: 1 to 60 minutes or None
• Serial Module: X-crypt or None
System Setup >> Media Setting
Media Setting
You can enter the various media setting for TV System,
TV Aspect Ratio, Video Aspect Ratio, RGB, Y/Pb/Pr or
Composite, RF Channel, Broadcasting System, Video Freeze
and DVB Subtitle.
1
Select Media Setting using the Arrow (▲/▼) buttons on
the System Setup menu and press the OK button.
2
Select Media Setting using the Arrow (▲/▼) buttons and
press the Arrow (◄/►) buttons to make changes.
• TV System: 576p, 720p, 1080i
• TV Aspect Ratio: You can set the aspect ratio of your
TV. (4:3,16:9 or Auto)
Page 22
Chapter 5 >> Main Menu
23
English
• Video Aspect Ratio: You can select the display format according to TV screen ratio.
(Letter Box, Pan & Scan, Mixed, or Full)
• Video Signal Type: RGB, Y/Pb/Pr, Composite
• Video Freeze: On/Off
• Dolby digital: PCM/Bitstream
• Time Shift: Manual / Auto
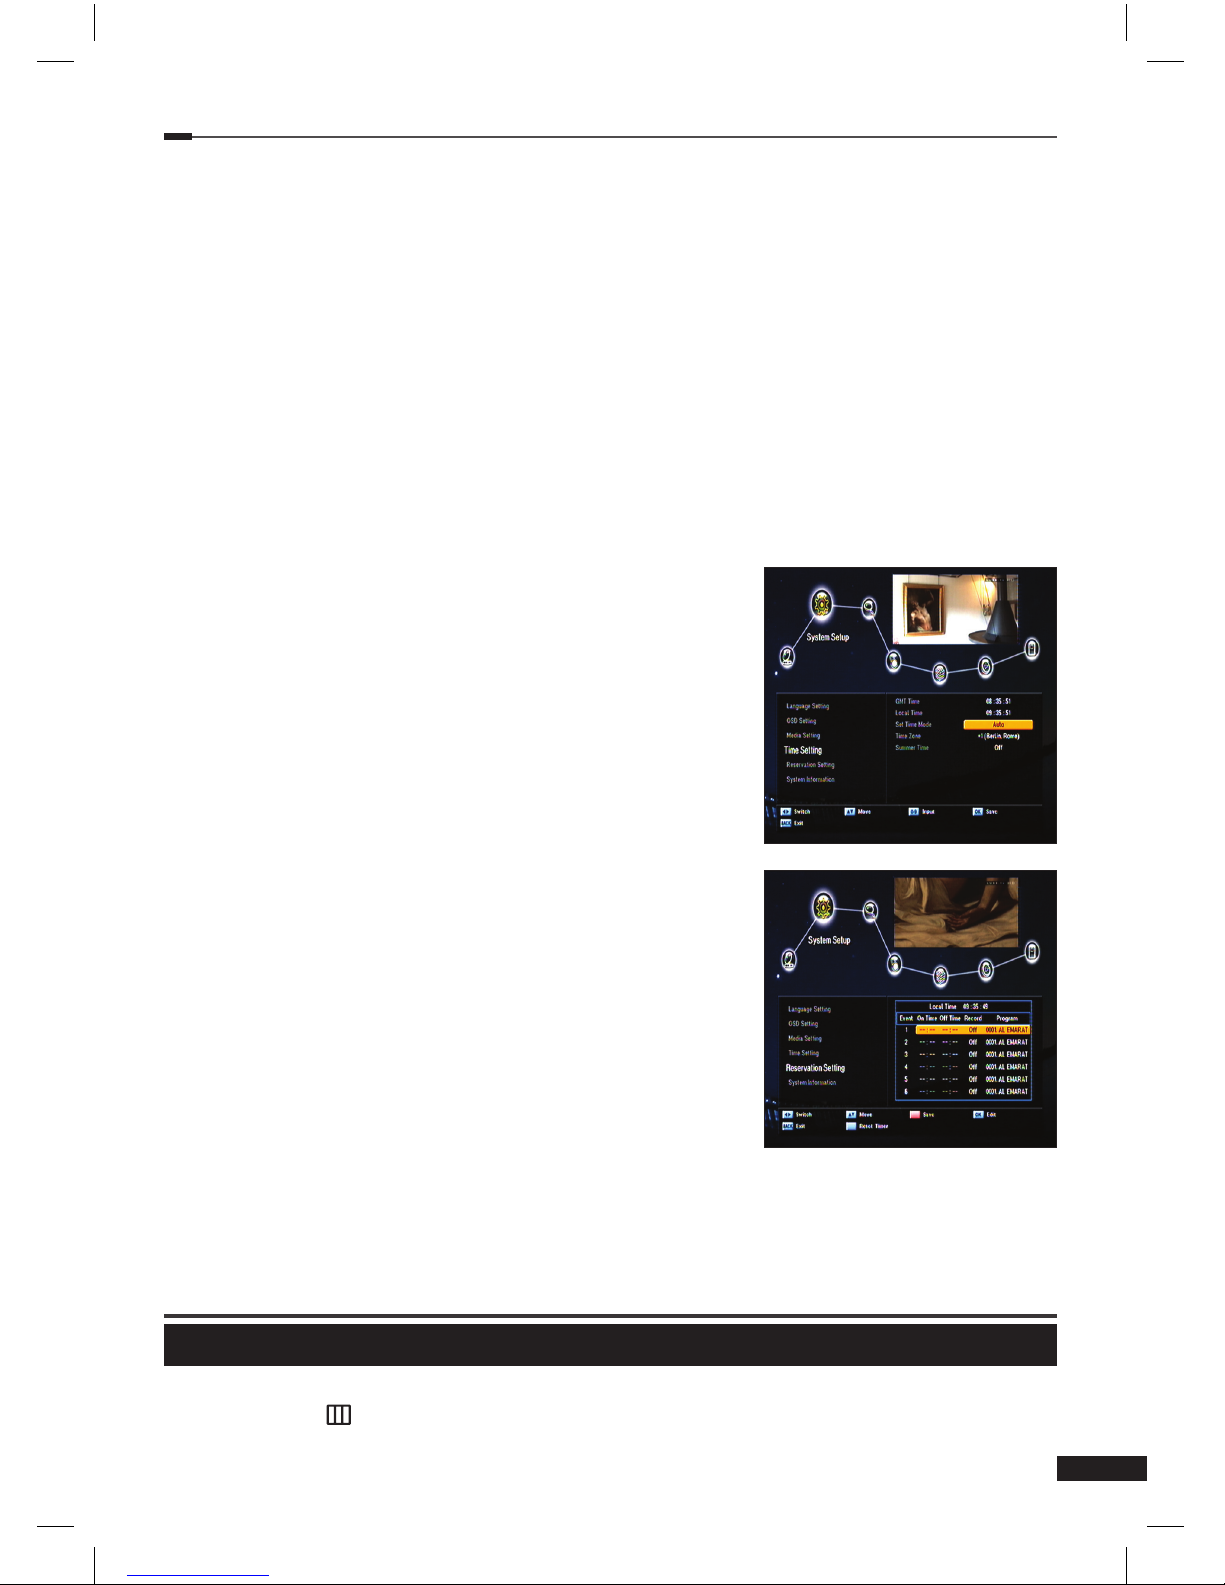
System Setup >> Time Setting
Time Setting
You can set the time zone.
1
Select Time Setting using the Arrow (▲/▼) buttons on the
System Setup menu and press the OK button.
Set Time Zone:
Press the Arrow (◄/►) buttons to set time mode for Auto
or Manual
Time Zone
Press the Arrow (◄/►) buttons to set the time zone.
The local time will be automatically changed by this setting.
Set the time by using the Arrow (◄/►) buttons in case of
Auto set time mode
Input the gures with the numeric keys in case of Manual
set time mode
Summer Time: Select the summer time function on or off
System Setup >> Reservation Setting
Reservation Setting
You can set timer of reservation for TV program such as switch
on, off and TV program. Select the Event NO. for the reservation.
• ON time: Input the Switch-ON time with numeric keys.
• OFF time: Input the Switch-OFF time with numeric keys.
• Repetition: Select the Event activation time option
(Once, Daily, one day a week) with the Arrow (◄/►)
buttons.
• Program: Select the channel with Arrow (◄/►) button and press OK to save.
System Setup >> System information
System Information
You can check system information like Model Name, hardware version, Loader version, Main
Software version, and Main Software Build Date.
Channel Setup
You can edit TV and Radio channels and the favorite channel group in this menu.
Press the Menu (
) button. Select Channel Setup using the Arrow (◄/►) buttons on the
main menu.
Page 23
Chapter 5 >> Main Menu
24
English
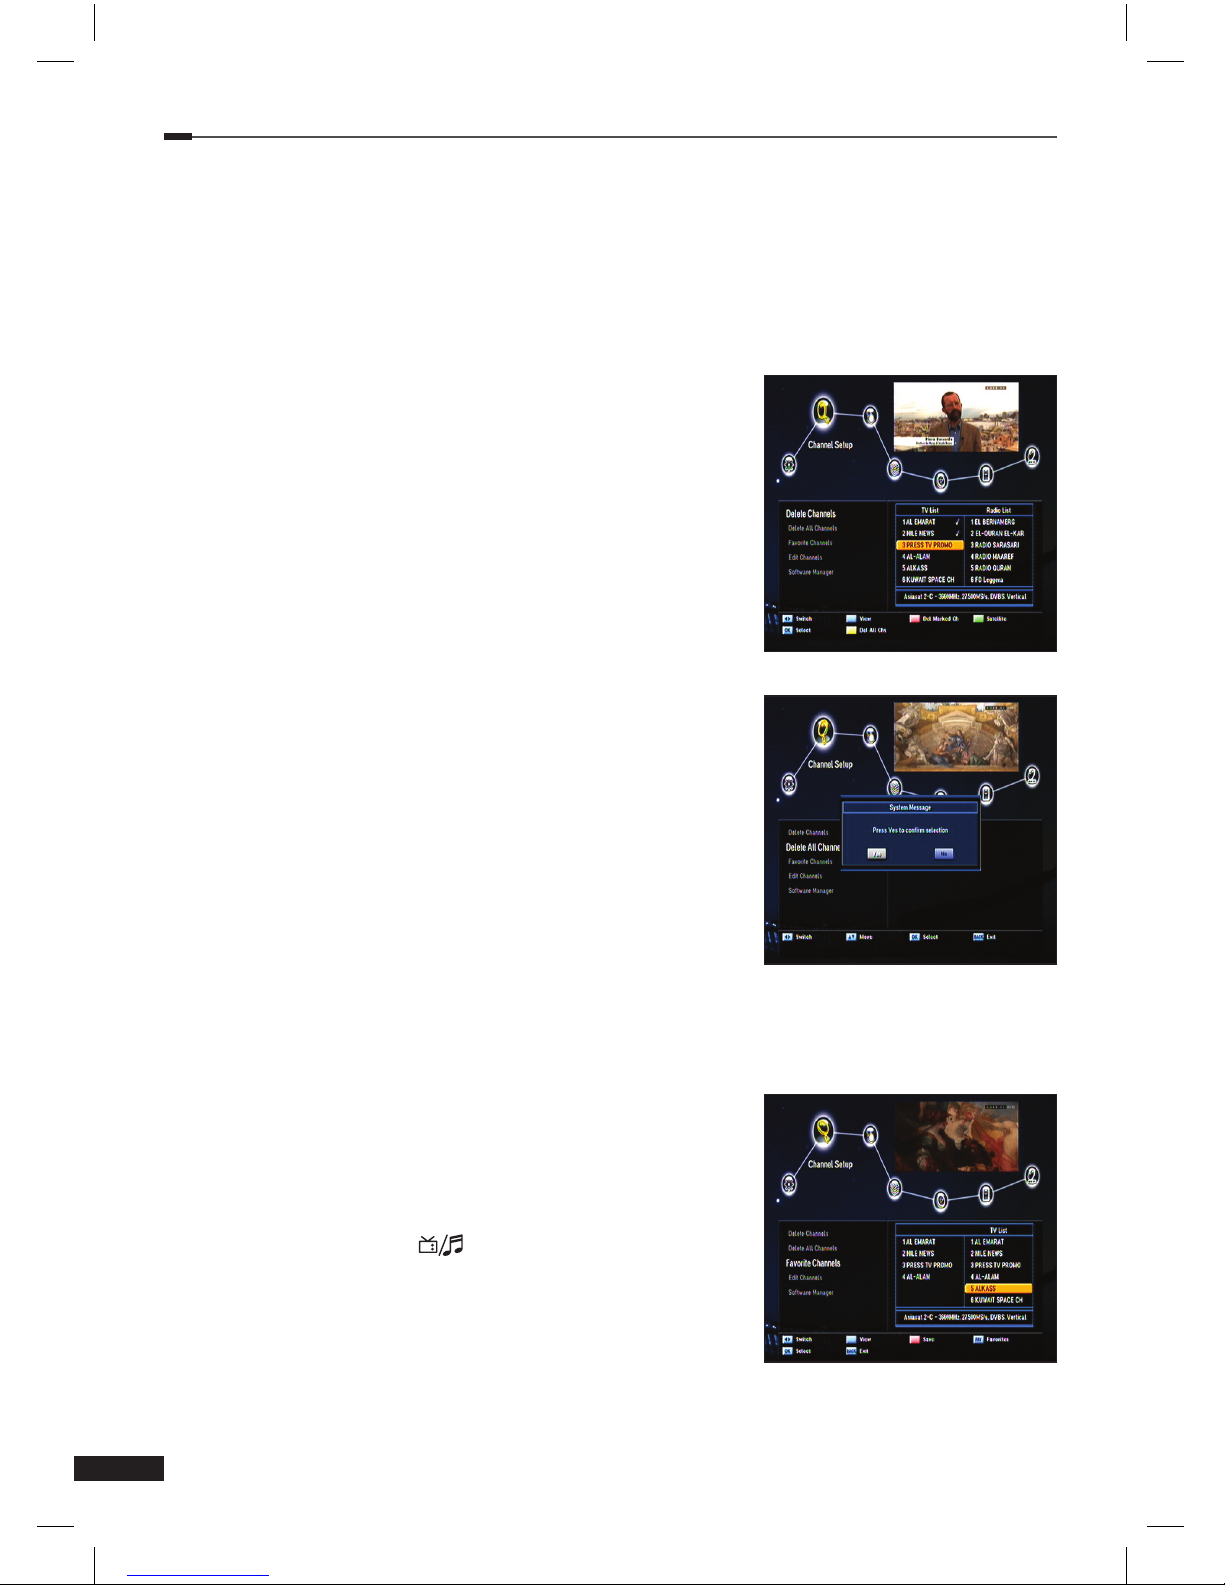
Channel Setup >> Delete Channels
Delete Channels
You can delete TV and Radio channels you want.
1
Select Delete Channel using the Arrow (▲/▼) buttons on
the Channel Setup menu and press the OK button.
2
Select the channel you want to delete using the Arrow
(▲/▼) buttons and press the OK button.
Press the Arrow (◄/►) buttons to switch between TV and
Radio List.
You can select multiple channels.
Bulleted list indicates selected channels.
Press the Green (sleep) button for Delete mode by
Channel, TP or Satellite.
3
Press the RED (MoSAiC) button to delete selected
channels.
Channel Setup >> Delete All Channels
Delete All Channels
You can delete all channels.
1
Select Delete All Channels using the Arrow (▲/▼)
buttons on the Channel Setup menu and press the OK
button. System message dialog box appears asking you to
conrm it.
2
Select Yes using the Arrow (◄/►) buttons and press the
OK button to delete all channels.
Channel Setup >> Favorite Channels
Favorite Channels
You can edit favorite channels. There are 9 favorite channel groups (News, Sports, Movie,
Music, Shopping, Kids, Adults, Drama, and Education).
1
Select Favorite Channels using the Arrow (▲/▼) buttons
on the Channel setup menu and press the OK button.
2
Select channels that you want to edit using the Arrow
(▲/▼) or Page (+/-) buttons in the TV/Radio List and
press the RED (MoSAic) button.
Selected channels are listed in the favorite group.
Pressing the TV/Radio (
) button switches between TV
and Radio List.
3
Press the FAV (♥) button to select another favorite group.
4
Select channels that you want to edit using the Arrow
(▲/▼) buttons in the TV/Radio List and press the RED
(MoSAic) button. Repeat steps from 3 to 4.
5
Press the OK button to conrm.
Page 24
Chapter 5 >> Main Menu
25
English
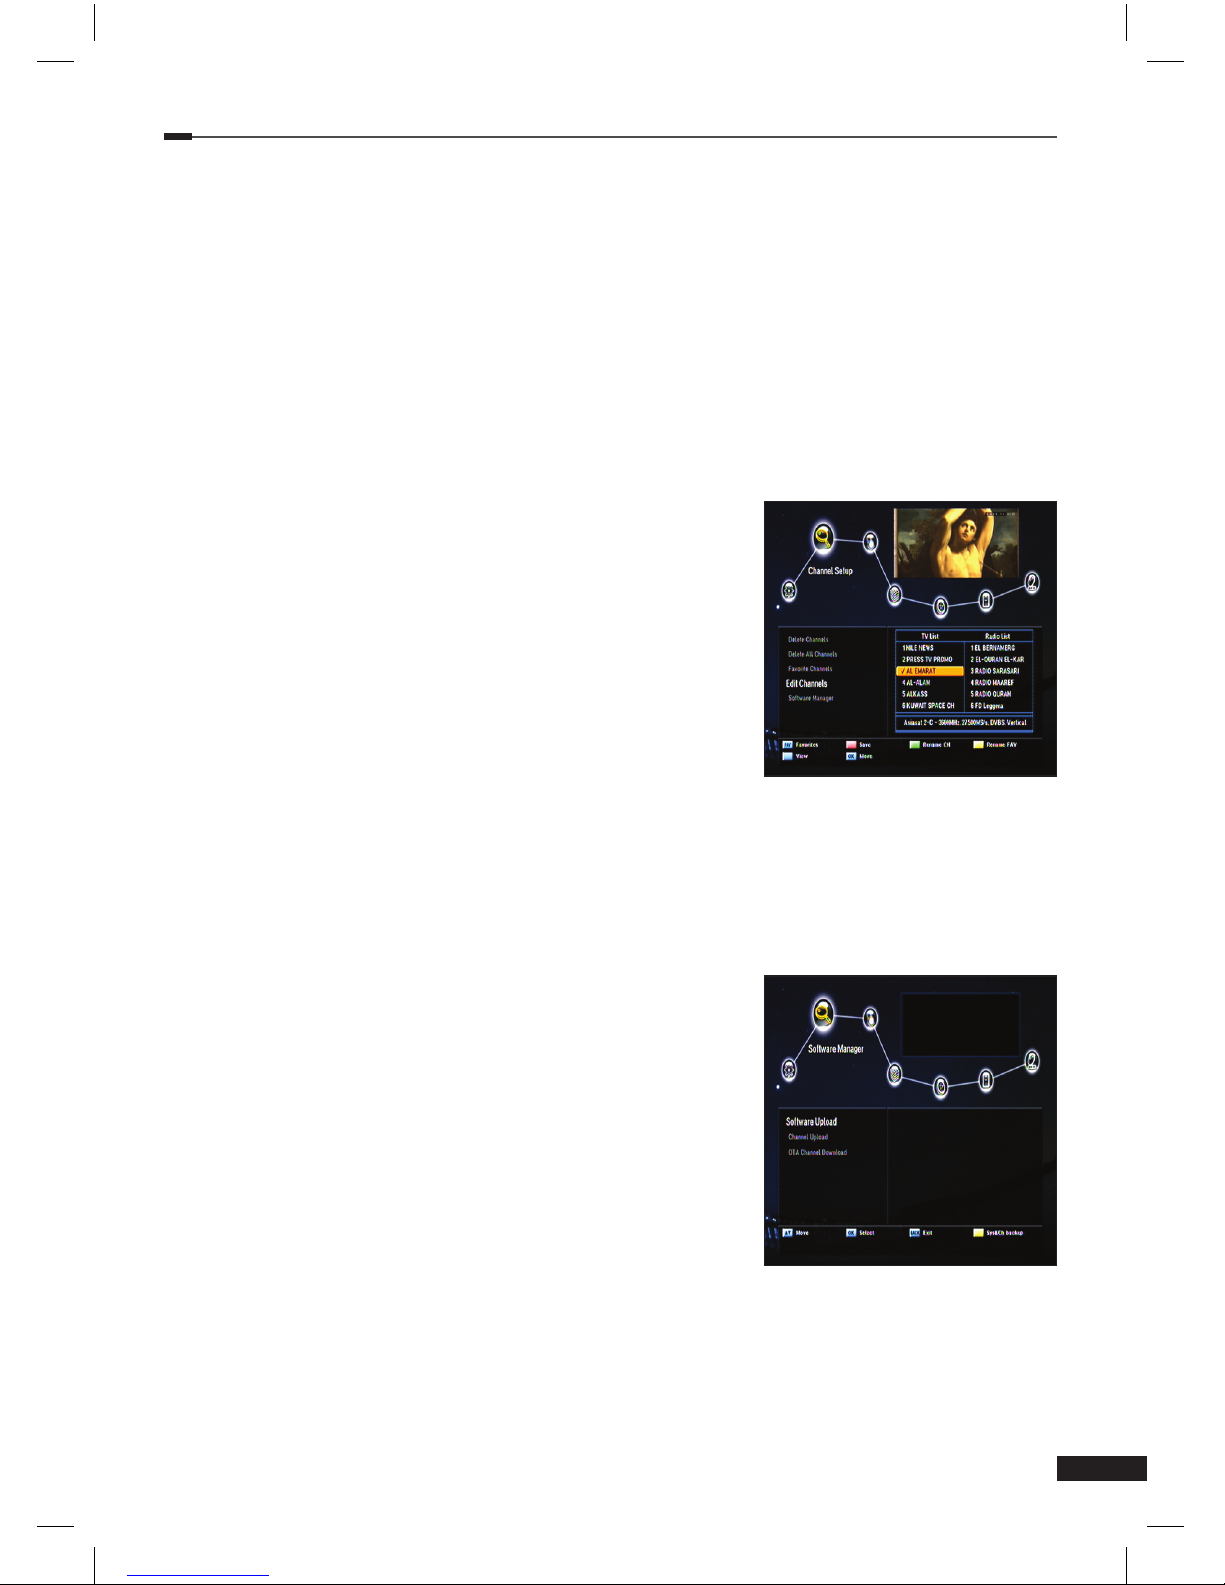
Channel Setup >>Edit Channels
Edit Channels
You can rename the channel list.
Select Edit Channels using the Arrow (▲/▼) buttons on the Channel Setup menu and press
the OK button.
• FAV (♥) button: Shows Favorite channel lists
• Arrow (◄/►) buttons: Switches between TV and Radio channel lists
To rename the channel list
1
Select the channel you want to rename using the Arrow
(▲/▼), PR+/-, or Page (+/-) buttons and press the GREEN
(Sleep) button. Font Table will appear.
2
Press the BLUE (SAT) button to delete the selected
channel name.
3
Select characters using the Arrow buttons and press the
RED (MoSAic) button to enter characters.
• YELLOW (Audio) button: Enters space
• BLUE (SAT) button: Hits the back space
• RED (MoSAic) button: Selects the input
4
Press the OK button to conrm.
Channel Setup >> SW Manager
SW Manager
You can download the software of your receiver through satellite when the new software is
available for your system. During download, don’t turn off your receiver. In case of the power is
turned off, turned on your receiver again to complete the download.
1
Select Software manager using the Arrow (▲/▼) buttons on the Installation menu and
press the OK button.
• Program Upload: Copies all the data from Master STB
to Slave STB.
• Channel Data Upload: Copies only the channel data
from master STB to Slave STB.
Connects both Master and Slave STB using RS232C
Cable and then press the OK button on the Software
Upload menu for the Master STB.
• USB Explore (Optional): Select a Software le by
using the Arrow (▲/▼) or Page (+/-) buttons and press
RED (MoSAic) button for software downloading.
• OTA Update (Optional): Main S/W or Channel Date
can be updated over the air.
Page 25
Chapter 5 >> Main Menu
26
English
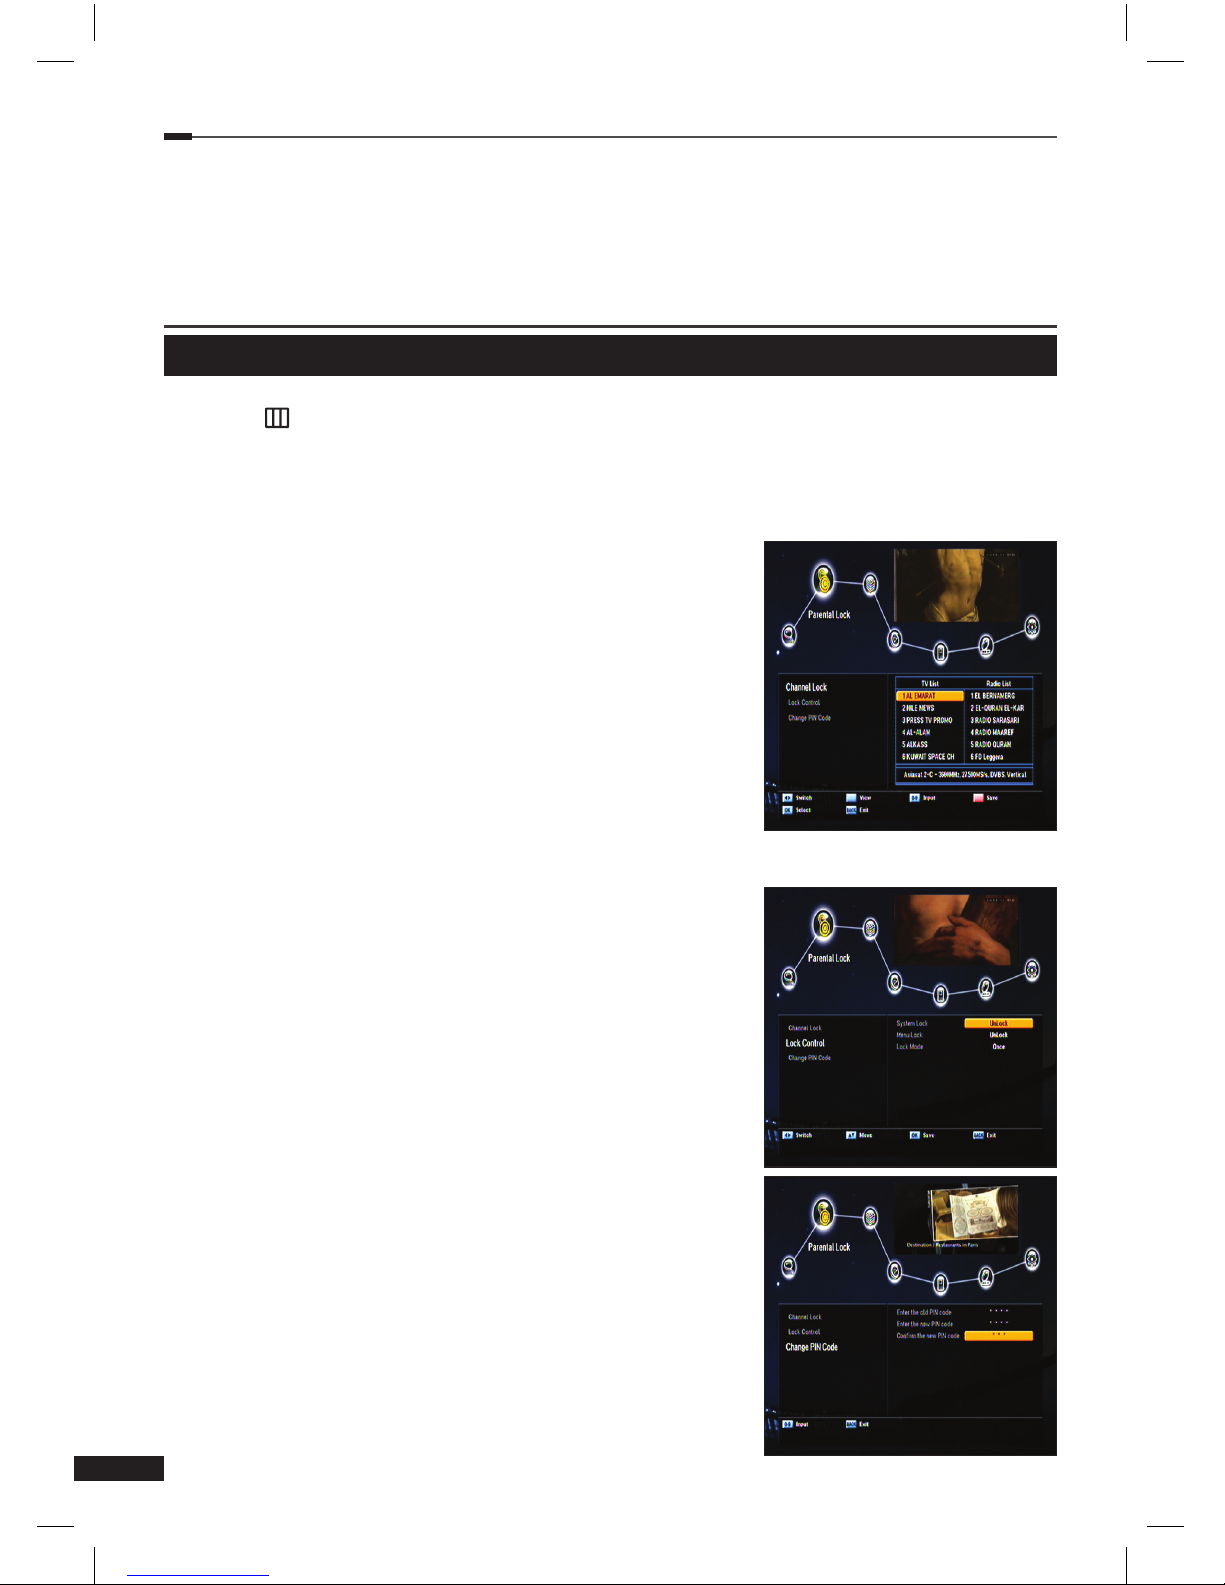
Parental Lock
You can lock the channels to prohibit unauthorized users from watching specic channels. Press
the Menu (
) button. Select Parental Lock using the Arrow (◄/►) buttons on the main munu
Parental Lock >> Channel Lock
Channel Lock
Whenever you want to see the locked channel you will be prompted to enter the PIN Code in
the dialog box.
1
Select Channel Lock using the Arrow (▲/▼) buttons on
the Parental Lock menu and press the OK button.
2
Select the channel that you want to use the Arrow (▲/▼),
PR+/-, Page (+/-), or Numeric (0~9) buttons and press the
OK button.
Selected channel will be displayed with locking-marked.
Press it again to clear.
Arrow (◄/►) buttons: Switches between TV and Radio
List.
3
Press the RED (MoSAiC) button to conrm.
4
Press the Blue (SAT) button to move PIG screen.
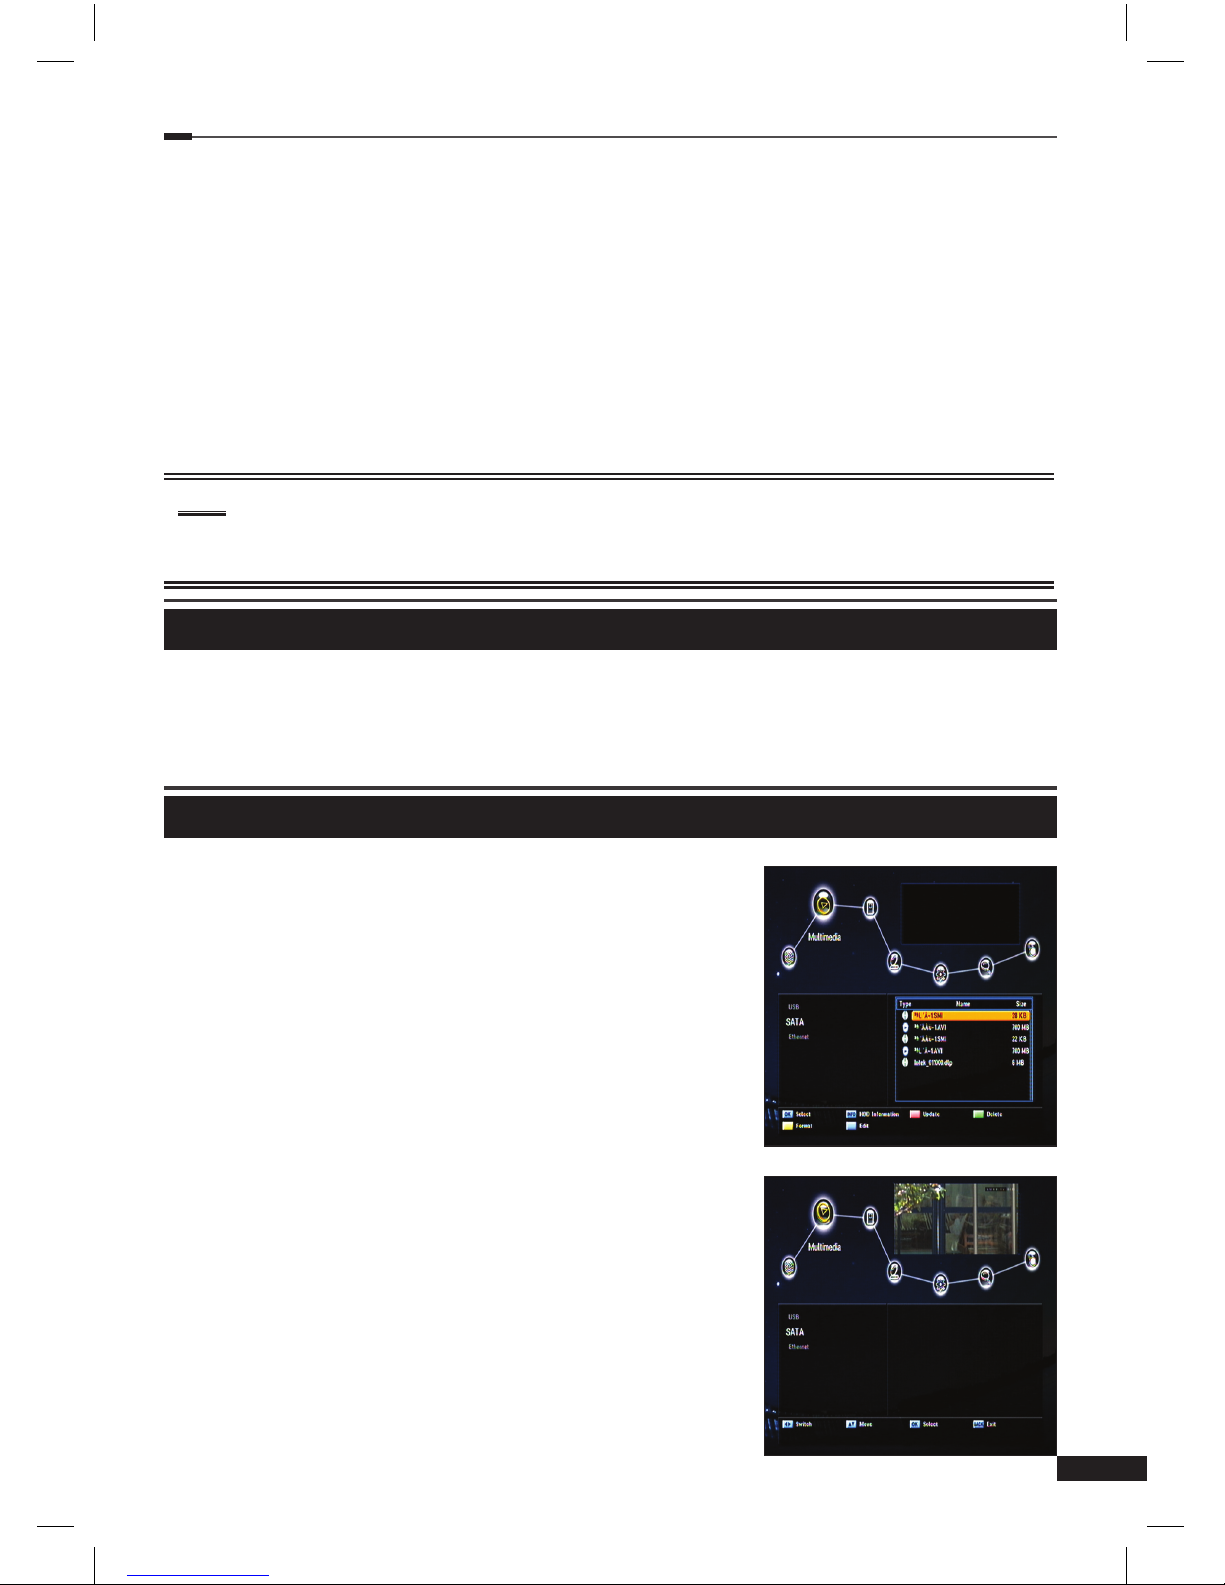
Parental Lock >> Lock Control
Lock Control
Whenever you want to use the locked system you will be
prompted to enter the PIN Code in the request dialog box.
Using Arrow (▲/▼) buttons and press OK button to select a
lock status.
• System Lock: Select Lock or Unlock by using the
Arrow (◄/►) button. If Lock is selected, the front key
function will be blocked.
• Menu Lock: Select Lock or Unlock by using the Arrow
(◄/►) button submenu Lock control will be available
with PIN code.
• Lock mode: Select Once or Every time mode by using
Arrow (◄/►) button.
• Once: Input the pin code once on the channel change
with Parental Lock.
• Every time: Input the pin code every time on the
channel change with Parental Lock Save the changes
with OK button Press the Blue (SAT) button to move
PIG screen
Parental Lock >> Change PIN Code
Change PIN Code
You can create a new PIN code in this menu. “0000” is the
default password.
Page 26
Chapter 5 >> Main Menu
27
English
1 Select Change PIN Code using the Arrow (▲/▼) buttons on the Parental Lock, System
Lock, Menu Lock and press the OK button.
2
Enter the old PIN code.
3
Enter the new PIN code.
4
Enter the new PIN code again to conrm.
Note
• Please keep in mind that the PIN code must be a four-digit number. In case you forgot
your PIN code, contact your local dealer.
Game
This product provides lots of games for your entertaining environment.
Select Game using the Arrow (◄/►) buttons on the main menu.
1 Select a game using the Arrow (▲/▼) buttons on the Game menu and press the OK button.
2
According to the instruction displayed on screen, you can enjoy games using the Arrow,
Numeric (0~9), and OK buttons.
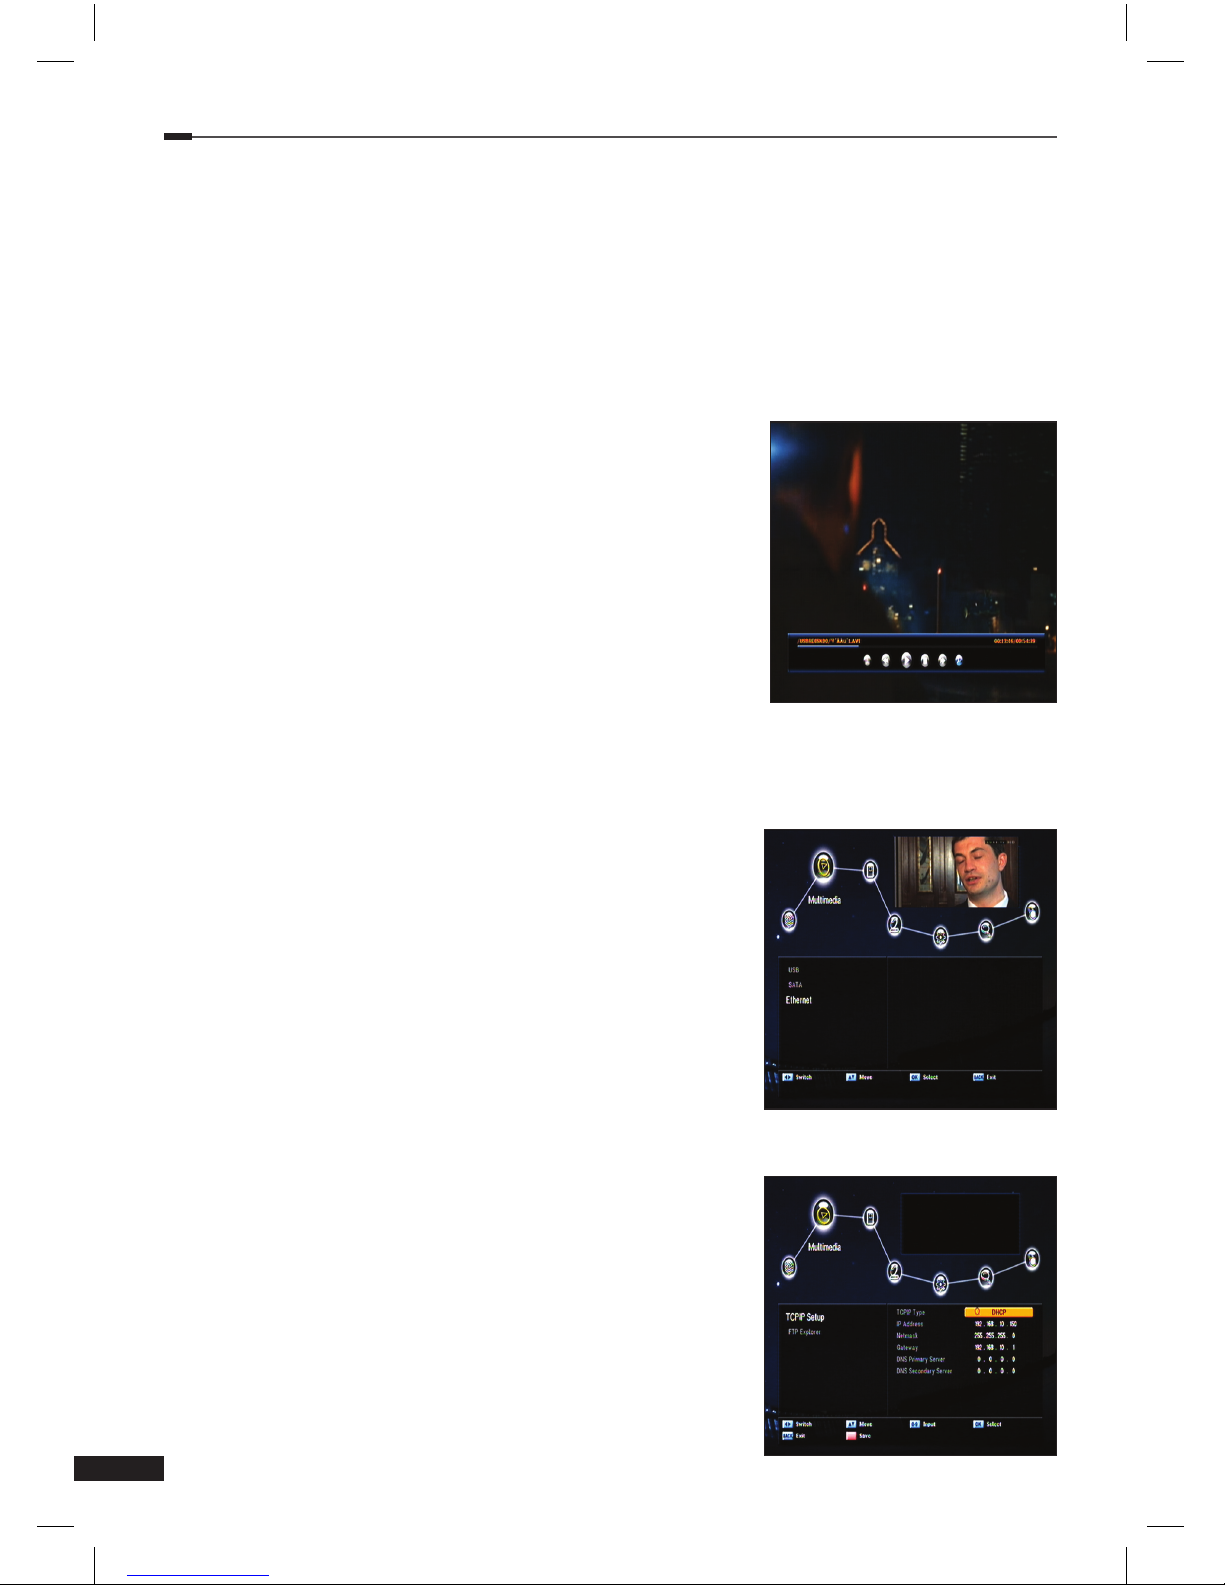
Multimedia
You can access to the multimedia function with USB, SATA
and Ethernet device.
• Whenever you connect or disconnect USB & SATA jack in
the STB,You must keep the STB in Stand by mode.
You can just use power button with RCU and front panel
power key.
Please don’t switch off the main plug and on/off switch on
the rear panel.
Multimedia >> USB
Connect USB stick or External HDD through USB connector.
Multimedia >> SATA (optional)
Connect the external HDD through SATA connector in the
rear panel.
• HDD must be compatible with FAT 32 le system.
If HDD is not compatible with FAT 32 File system, you
need to change the le system.
By using personal computer with the format function.
1
Playing the media les
Select the media le with channel up/down buttons and
press OK button.
2
Software Update
Select S/W les with channel up/down buttons and press
Red key (Mosaic).
Page 27
Chapter 5 >> Main Menu
28
English
3 Deleting les
Select the les with channel up/down buttons and press Green key (Sleep).
4
Format
Press yellow key (Audio) to delete all the les in the storage device.
• PVR function
In order to use PVR function, the storage device must
be connected through SATA or USB connector.
1) Record: Press Rec button during watching channel
2) Stop: Press Stop button to nish recording channel
3) Play: Press Play button to play the recorded programs
4) Fast Forward: Press FFR button to play in Fast
Forward mode to x16
5) Rewind: Press REW button to play in Rewind mode
to x8
6) Pause: Press Pause button to stop the program for a
while
7) Media player: press F2 to start the media player.
8) Time shift: Press F3 to start time shift function
9) File list: press text button to see the le list in the media player menu
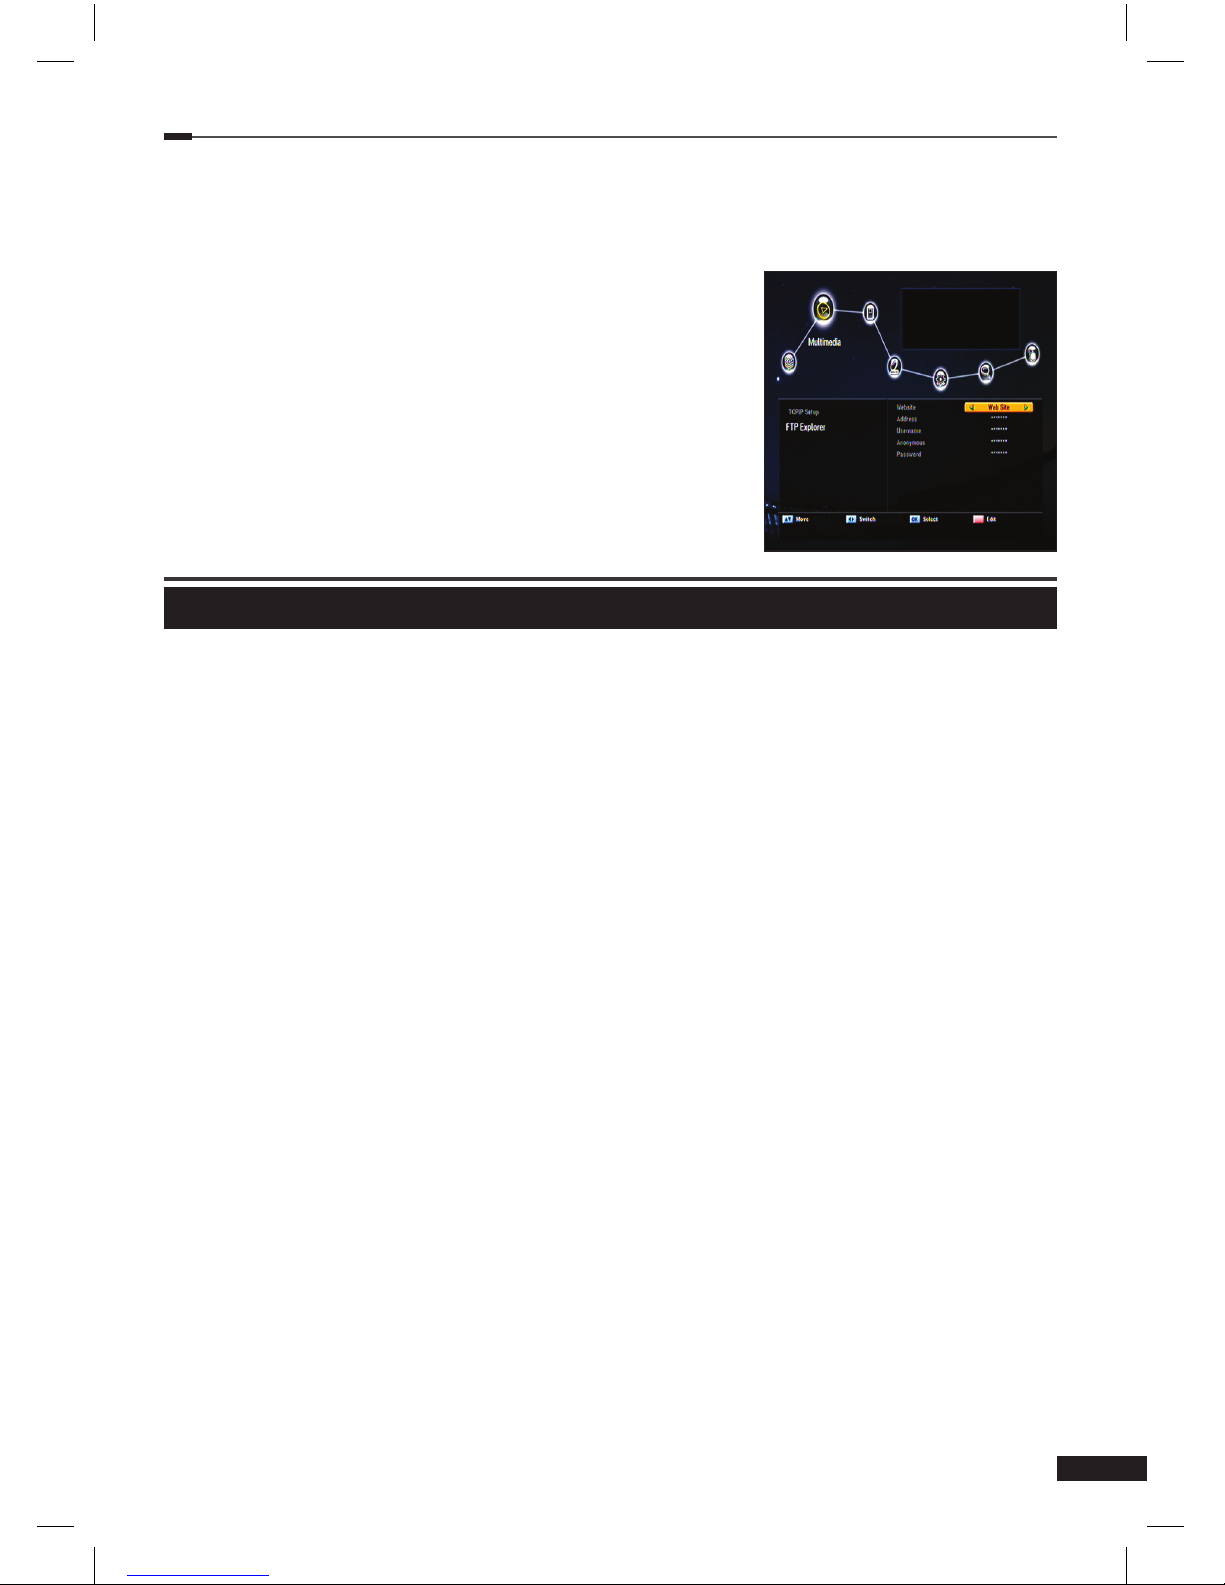
Multimedia >> Ethernet (Optional)
• Before starting setup, please check if the Ethernet cable
is connected to your receiver well.
1) TCP IP set up
Input the right information for the settings to the
followings.
TCPIP Type/ IP Address/ Net mask / Gateway/ DNS
Type/ DNS Server
Page 28
Chapter 5 >> Main Menu
29
English
2) FTP Explorer
Press O.K. to connect the FTP Server
Select le and press Red Key (Mosaic) for S/W
update.
Conditional Access
You can enjoy not only scrambled services using the Conditional Access Modules (CAM), but
also free-to air services, Types of common interface module and smart card differ depending
on the service provider. If you want to use conditional access modules, contact your service
provider or distributor.
• Without using the Conditional Access (CA) Modules, free-to-air services are available.
Page 29
Troubleshooting
30
English
Problem Solution
No display LED on the front panel.
No power supply
Plug the power cord correctly.
No picture. Ensure that the STB is switched on.
Check the connection status.
Check channels and Video output status.
Poor picture quality. Check the signal level
If this is too low, try adjusting the alignment
of your dish.
No sound. Check the volume level of the TV and STB
Check the mute status of the TV and STB
Check the connection of audio cable.
Remote Control does not operate. Point remote control directly towards your
receiver.
Check and replace batteries.
Check if anything blocks the front panel.
Service is not running or scrambled. Make sure the smart card is appropriate for
the selected service.
You have forgotten your PIN code. See chapter 5, “Parental Lock” in this
User’s manual.
Troubleshooting
Page 30
Specications
31
English
Specications
TUNER & CHANNE
Satellite(DVB-S2)
Input Frequency 950-2150MHz
Input connector F-type, IEC 169-24, Female
Symbol Rate
DVB-S2:10-30Ms/s(QPSK),10-31Ms/s(8PSK)
2-45Ms/s
Demodulation QPSK, 8PSK
Convolution code rate
DVB-S2: Auto1/2,2/3,3/4,3/5,4/5,5/6,8/9,9/10(8PSK )
Auto 2/3,3/4,3/5,5/6,8/9,9/10(8PSK )
DVB-S: Auto1/2,2/3,3/4,5/6,7/8
LNB Power &
Polarization
Vertical: DC13.5V
Horizontal: DC18V
Current: MAX. 500mA
Overload Protection
22KHz Tone
DiSEqC Control
Frequency : 22KHz +/- 1KHz
Amplitude : 0.6V +/- 0.2V
Version 1.1,1.2,USALS & Uncable
Switching Mode Power Supply
Satellite
Input Voltage AC100-250V~,50/60Hz
Power Consumption MAX.50W (Standby: Less than 3W)
MPEG TS A/V Decoding
Transport Stream MPEG-2 ISO/IEC 1318-1
Prole Level
MPEG-2 MP@ML
MPEG-2 MP@HL, MPEG-4 AVC/H.264 HP@L4
Aspect Ratio 4:3, 16:9, Letter Box
Video Resolution 1080i, 720p, 576p
Audio Decoding MPEG-1, Musicam Layers 1 & 2
Audio Mode Single channel/Dual channel/Joint Stereo/Stereo
Sampling Rate 32,44,1& 48KHz
System Resources
Main Processor ST40 CPU core: 266MHz(STi7101)
Flash Memory 8 Mbyte (Optional Expand)
Video DDR SDRAM 64 Mbyte (Optional Expand)
System DDR SDRAM 64 Mbyte (Optional Expand)
EEPROM 8Kbyte
A/V & Interfaces
Digital output(HD)
HDMI(TMDS main video output)
YPbPr
TV-Scart & RCA(SD)
Video : CVBS / RGB output
Audio : L/R output
VCR-Scart(SD)
Video : CVBS output / CVBS input bypass
Audio : L/R output / L,R input bypass
Digital Audio output
Digital AC-3 Decoding output
Digital Audio Bitstream output(S/PDIF)
Page 31
C
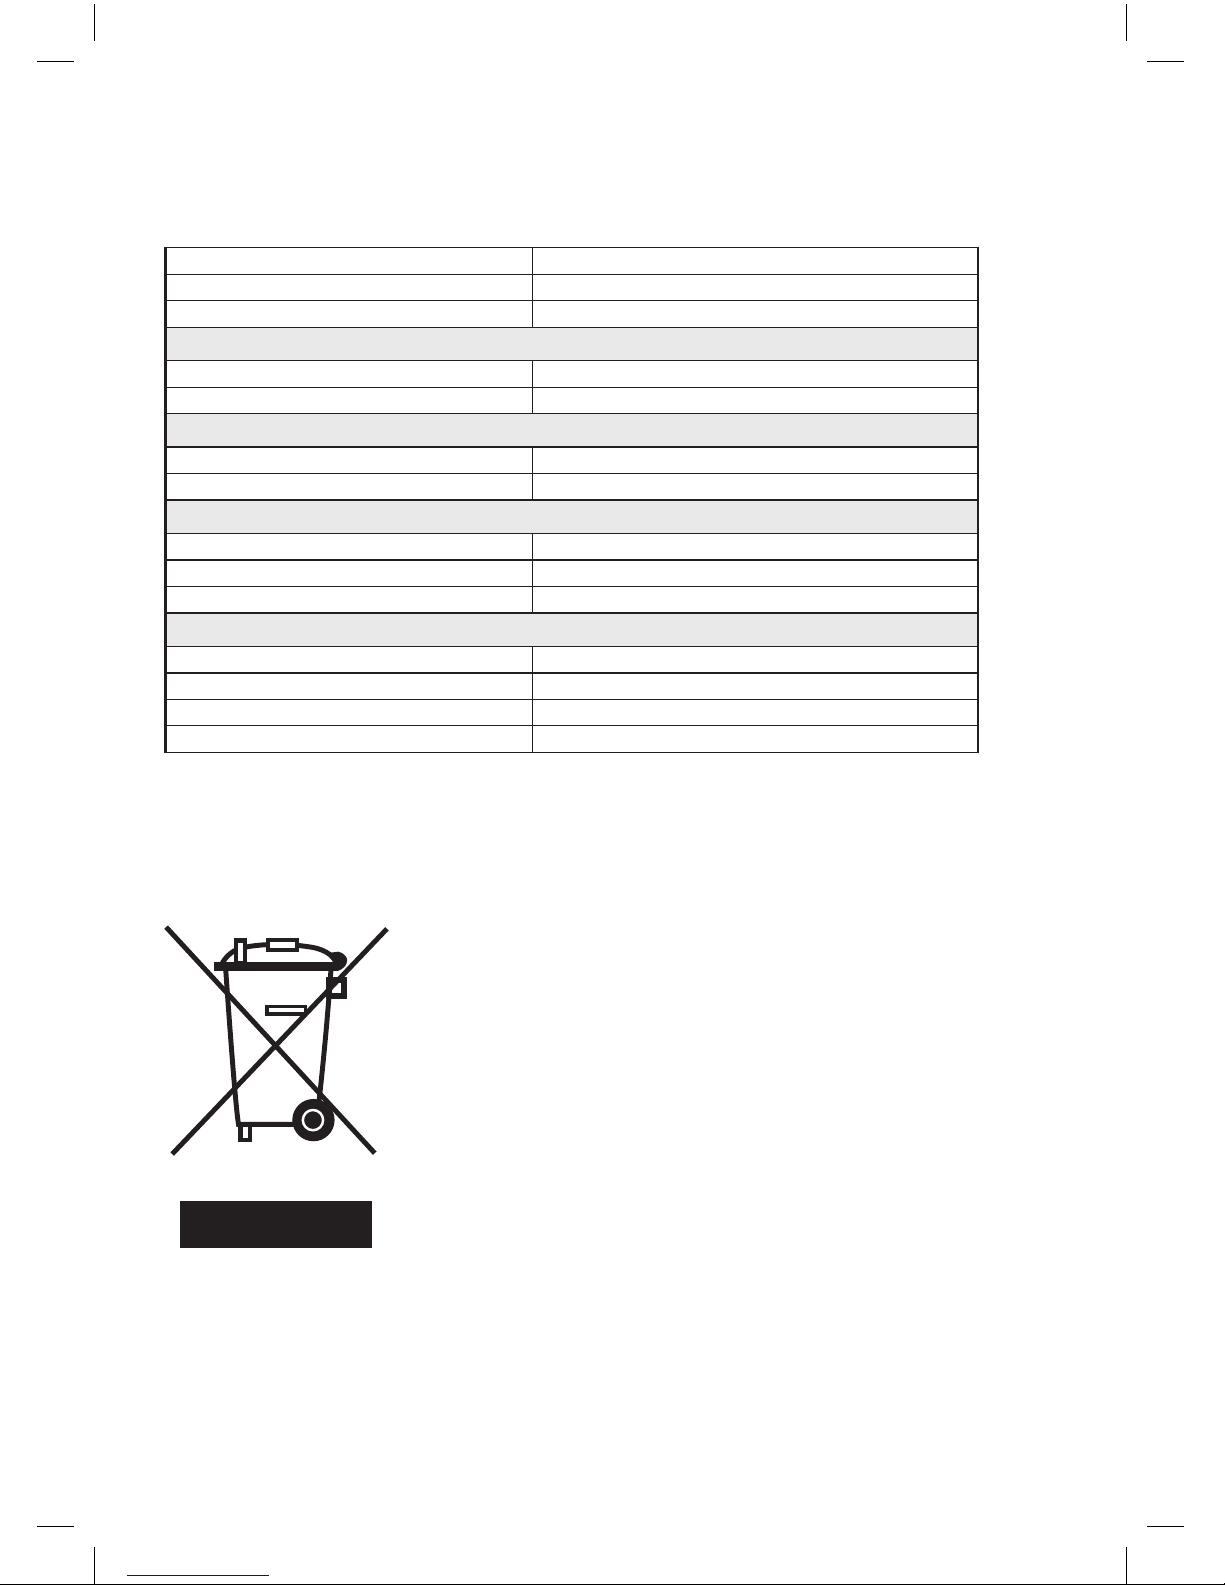
orrect Disposal of This Product
(Waste Electrical & Electronic Equipment)
(Applicable in the European Union and other European countries with
separate collection systems)
This marking shown on the product or its literature, indicates that it
should not be disposed with other household wastes at the end of its
working life.
To prevent possible harm to the environment or human health from
uncontrolled waste disposal, Please separate this from other types of
wastes and recycled it responsibly to promote the sustainable reuse
of material resources.
Household users should contact either the retailer where they
purchased this product, or their local government ofce, for details of
where and how they can take this item for environmentally safe recycling.
Business users should contact their supplier and check the terms and conditions of the
purchase contract. This product should not be mixed with other commercial wastes for disposal.
IM14 - 108012 [ENGLISH] Rev.01
S-Video Video : S-Video output
RS-232C Transfer rate 115.2Kbps, 9 pin D-sub type
PVR Ready(Optional) USB2.0 High speed host controller
Conditional Access System
PCMCIA (Optional) 2 Slot of DVB-CI
Smart Card(Optional) 2 Smart card Reader for Embedded CAS like
Front panel
Display Dot-Matrix VFD (Vacuum Fluorescent Display)
Keys Touch pad 7Keys
Accessories
RCU IR( Freq. : 38Khz), Battery : 2x1.5V AAA
HDMI Cable 1.5M
Manual
Physical Specication
Size (W x H x D) 375 x 60 X 230mm
Net Weight 3.5Kg
Operation Temperature 0~50 C
Storage Temperature -10~+60 C
 Loading...