


Table of contents
Product components
3
Product overview
4
Installation
5-6
Description
7-12
Operation
13-51
Focusing
13-19
Adjust the focus
13-14
Auto focus
15
ROI Auto focus
16
Confluence
17-18
Capture
19
Monitoring
20-23
Data
24-32
Open data
24-26
Screenshot
27
Save to USB
28-29
Rename
30
Delete
31-32
Counting
33-36
Settings
37-39
Set up parameter
37
Update date & time
38
Control LED power
38
Update software & firmware
38
Check the disk space
39
PC software
40-51
Introduction
40
Installation
40-41
Function guide
42
Home
43
Open data
44-45
Confluence
46
Edit movie file
47
Dual view
48-49
Create dual movie
50
Export data
51
Cleaning & maintenance
52
Troubleshooting
53-55
Warranty
56
Safety precaution
57-58
Product specifications
59
Technical support
60
2

Product components
JuLI™ Br is shipped with the following components.
Please check all components listed below when an instrument was delivered.
If any items are missing or damaged, contact your local distributor or e-mail
sales@nanoentek.com
· Model JULI-BRSC <Scope unit> is only used in conjunction with the <Station unit>.
Scope unit
JULI-BRSC
1 EA
USB drive
4 GB
1 EA
Station unit
JULI-BRST
1 EA
User manual
1 EA
Power cord
4 pcs/set, for U.S./Canada/
Taiwan/Japan, Europe or UK
1 SET
Quick manual
1 EA
Connection cable
3 M
1 EA
JuLITM Br, Cell History Recorder ©2012 NanoEnTek Inc.
3

Product overview
An increasing number of researchers are using live-cell imaging to study
cellular functions. The JuLI™ Br, a smart Bright-cell movie analyzer,
was designed for a variety of biological experiments.
JuLI™ Br uses state-of-the-art optics to get live-cell images from
various cell culture dishes. It is able to detect the quantified cell confluence
results with low variation and make growth curve using image based analysis.
JuLI™ Br is able to capture sequential time-lapse bright images which can be converted
to movie files (.avi) automatically. The compact design allows you to install the system
in your cell-culture incubator easily. It can be used to compare control and experimental
samples using dual systems (*optional), concurrently.
Features of JuLI™ Br,
live cell movie analyzer
Compatible with cell-culture incubator
: Operate inside cell-culture incubator with compact & compatible design
Time-lapse image capture & recording movie
: Sequential time-lapse images are stored and can be converted to movie file automatically
Automated quantitative cell confluence analysis
: Quantified cell confluence results with low variation and growth curve
10.1” color LCD touch screen
: Easy-to-use system control
Semi-automated focusing through LCD
: Focus adjustment using focus interface on LCD with knob
Dual system (*Optional)
: Compare the control & experimental data at the same time
4

Installation
Installing
JuLI™ Br
Live-cell images from various cell culture dishes are directly
captured in a cell culture incubator. This compact design allows
an instrument to be installed in an incubator and prevents
contamination by maintaining a sterile environment. Also, the
easily-viewed display allows quick and convenient use in a cell
culture incubator while capturing time lapse images.
IMPORTANT
JuLI™ Br is optimized into standard size of cell culture incubator.
It is recommend that the temperature should be stabilized in case of small size incubator
before using the instrument.
Avoid exposing JuLI™ Br to UV light.
UV light may degrade components, including plastic. Damage from UV exposure is not
covered under the manufacturer’s warranty.
Always wipe surfaces with ethanol-soaked paper towels, not directly spray ethanol
anywhere on JuLI™ Br.
Dimensions of Scope unit
Width
Depth
Height
Weight
Size
300 mm
190 mm
188 mm
4 kg
Cell culture incubator
JuLITM Br, Cell History Recorder ©2012 NanoEnTek Inc.
5

1. Place the instrument on a flat, dry and level surface after
unpacking the instrument. Allow at least 10 cm (4 inches) of
free space at the back of JuLI™ Br for proper ventilation and
prevention of overheating of electronic components.
2. Plug the supplied power cord into JuLI™ Br.
3. Connect scope unit to station unit using supplied
connection cable.
(* For dual monitoring, 2nd scope unit also should be connected to station unit. )
4. Plug the power cord into the electrical outlet. Be sure to only
use the power cord supplied with the instrument. Powering the
instrument with an unapproved power cord may damage the
instrument.
5. When JuLI™ Br is ready to use, start JuLI™ Br by pressing
the Power button on the station unit.
Installation
Installing
JuLI™ Br
2. 3. 3.
IMPORTANT
Connect to the 2
nd
scope unit after connecting to the 1
st
scope unit completely
6

Description
Front view
<Station unit>
LCD touch screen
: located at the front of the instrument, it contains buttons for
necessary functions and displays bright field images.
<Scope unit>
Focus knob
: is used to adjust the image quality to obtain better bright cell images.
Stage
: place sample here.
White LED
: provides bright image viewer.
White LED
Stage
< Scope unit >
< Station unit >
Neck
Focus knob
LCD
touch screen
JuLITM Br, Cell History Recorder ©2012 NanoEnTek Inc.
7

Description
Side view
<Station unit>
Power button
: turn an instrument on and off by pressing the Power button.
USB Port
: insert a USB drive to save and transport images to PC.
Display port
: connect to external monitor.(resolution: 1366 X 768 pixels)
: make sure to turn off an instrument before connecting.
<Scope unit>
Connection port
: port to connect scope unit with station unit .
< Scope unit >
< Station unit >
Connection port
USB port
Display port
Power button
8

Description
Rear view
<Station unit>
Power inlet
: connects JuLI™ Br to an electrical outlet using the supplied
power cord and the appropriate plug (based on the electrical outlet
configuration in your country).
On/off switch
: the main power switch. It is not necessary to use the on/off switch for
day-to-day operation of the instrument.
Connection port
: port to connect scope unit with station unit.
<Scope unit>
Fan
: machinery cooling system.
< Scope unit >
< Station unit >
Fan
Powe r inlet
On/off switch
Connection port
JuLITM Br, Cell History Recorder ©2012 NanoEnTek Inc.
9

The user interface of JuLI™ Br, Live cell movie analyzer provides
new tools to expand cellular research through proprietary
software. Insightful data can be acquired, such as proliferation
assays.
Description
User
interface
Focusing menu
User
interface
Monitoring menu
Zoom in
Navigation
Zoom out
Auto focus
Focus
interface
Exposure
Brightness
D-Phase
Capture
Confluence
Focusing menu
Graph
Scope unit
channel
Monitoring
setting
Monitoring data
infomation
Monitoring
movie
REC. button Stop button
Monitoring menu
Scope unit channel
Sacle bar
10
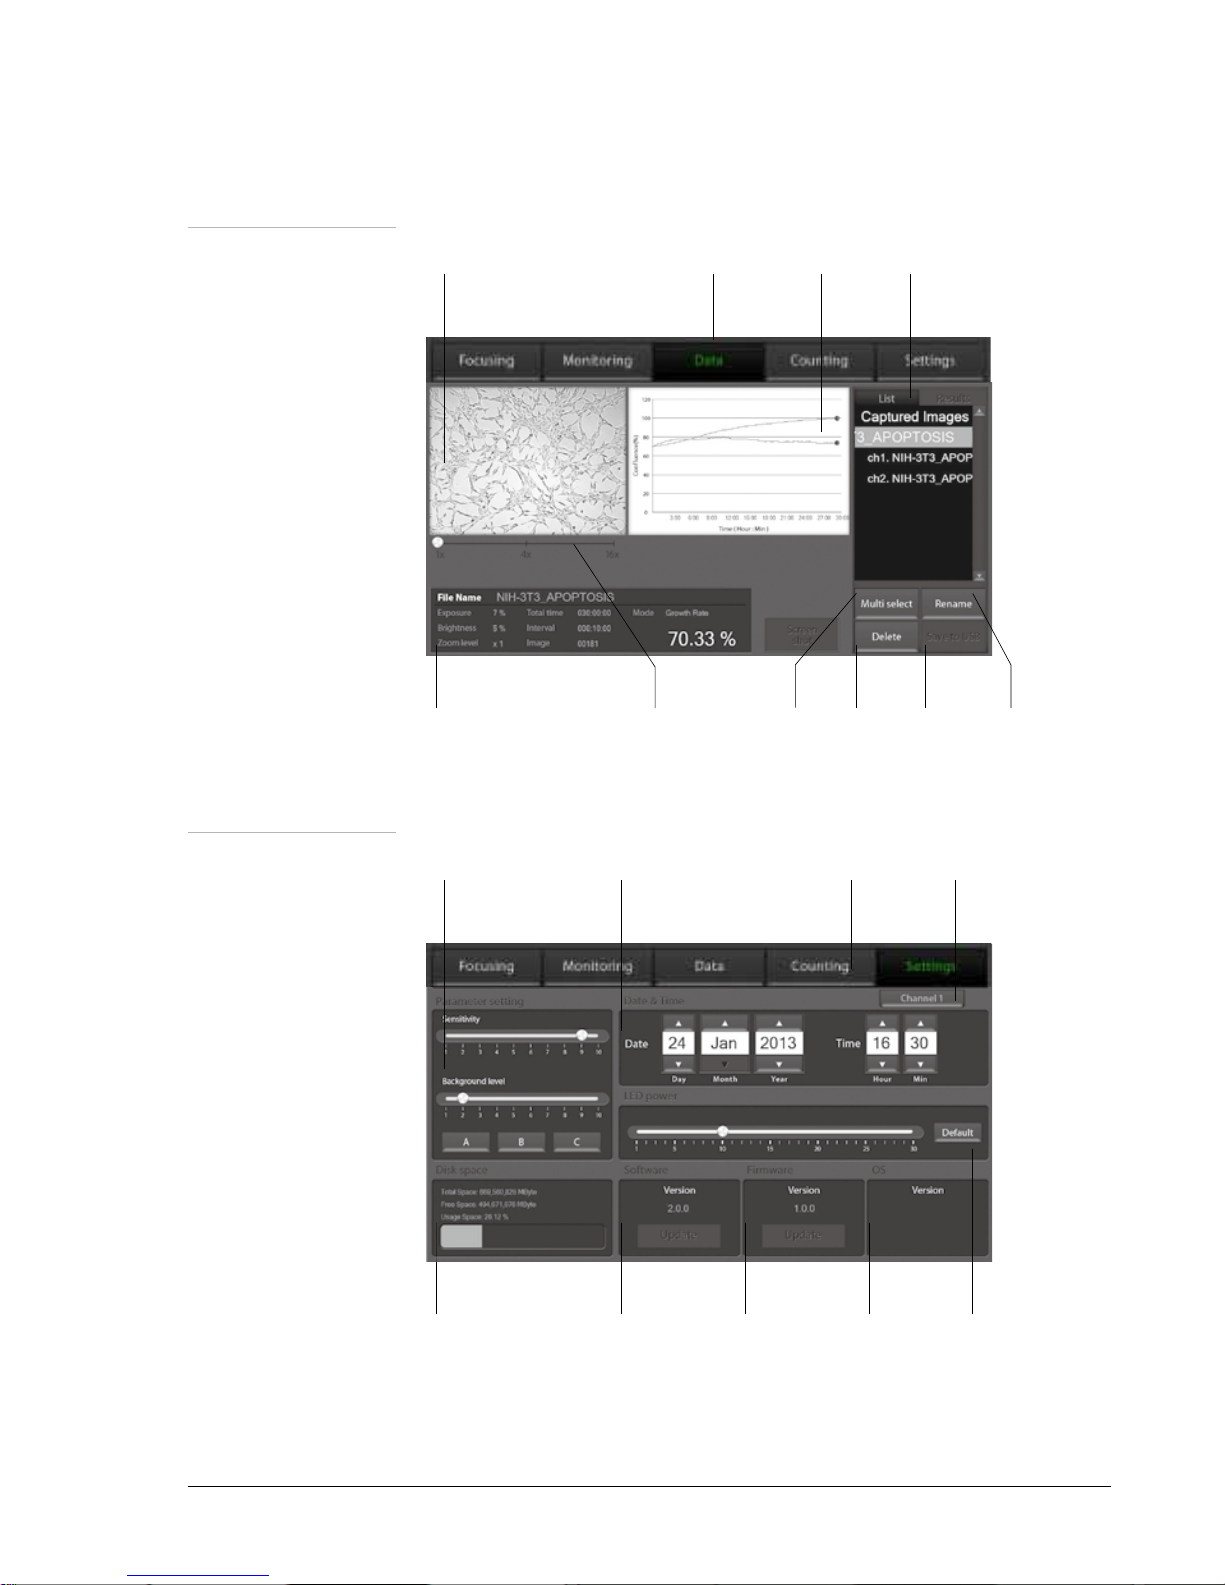
Description
User
interface
Data menu
User
interface
Settings menu
Monitoring movie
Monitoring data information Zoom bar
Multi
select
button
Delete
button
Save to
USB
button
Rename
button
Data menu Graph Data list
Sensitivity
& Background level
Disk space Software
version
Firmware
version
OS
version
LED
power
Data & Time
information
Settings
menu
Scope
unit
channel
JuLITM Br, Cell History Recorder ©2012 NanoEnTek Inc.
11

Description
User
interface
Counting menu
Counting menu is a JuLI™ Br Counting software which can be
used with various cell types giving the accurate and fast counting
results in the bright mode.
1. Bright counting : to check for the cell viability by trypan blue
staining method.
Counting menu
Features of JuLI™ Br Counting S/W:
Applicable for broad range of cell sizes and types:
Provides data on cell size and is compatible with a wide variety of eukaryotic cells
without the need for any special changes between large or small sizes.
Measures cell measurement ranging from 1 × 10
4
to 1 × 10⁷ cells/mL, optimal
measurement range from 1 × 10
5
to 4 × 10⁶ cells/mL, and cells with sizes ranging
from 5 µm to 60 µm.
Innovative Auto-focus technology:
Allows to get the optimized focus without variation of manual focus.
Accurate and fast counting result:
Provides counting result without focus variation and regardless of clumped cells in
less than 10 seconds
(Guaranteed the results and counting time using Auto-focus function.).
Brightness
bar
Exposure
bar
Scope unit
channel
Graph
Counting
result
Zoom in/out
Save to USB
button
Focus
interface
Auto
focusing
button
Setting bar of
min. & max. cell
size
Counting/Preview
button
12

Operation
Focusing
Adjust the focus
1. Press the Power button to start JuLI™ Br.
The main screen will be displayed.
2. Place the sample on the stage.
3. Adjust the focus for each scope unit if 2
nd
unit is connected to
station unit. Press Channel tab to select each scope unit.
4. To adjust Illumination intensity, use the Exposure and
Brightness bar on the touch screen.
Touch the arrow button (
◀|▶
) for more
minute adjustment.
5. If desired, use Zoom in button to
magnify the desired region.
(» The scale of enlargement can be checked by
pressing Scale bar tab.)
6. If focus of viewing region should be moved, tap a point on
navigation window or drag preview window.
JuLITM Br, Cell History Recorder ©2012 NanoEnTek Inc.
13

7.
While viewing cells, use the Focus knob or Focus interface
to further adjust the focus.
Operation
Focusing
Adjust the focus
· Type of focus interface would be switched by tapping circle point.
· Coarse focus is larger knob which moves up or down rapidly to
get the sample into coarse focus.
Fine focus is smaller knob which moves short distances slowly
and is used to get the sample into sharp focus.
The images below show the reference images to adjust focus.
< coarse focus interface >
Good setting
Exposure 4
Brightness 1
Normal setting
Exposure 6
Brightness 3
Bad setting
Exposure 6
Brightness 5
< fine focus interface >
Du-145 / Parameter A
14

Operation
Focusing
Auto focus
1. Adjust the focus of JuLI™ Br. (Refer to page 12-13)
2. After adjusting focus, press the Auto focus button to get more
accurate focus without individual variations.
· The Auto focus is the auto-focusing function which automatically senses the
focus optimized for the analysis software of the JuLI
™ Br
IMPORTANT!
It is strongly recommended to use Auto focus function after adjusting a focus. If not, it
might be the cause of incorrect counting results or viability
JuLITM Br, Cell History Recorder ©2012 NanoEnTek Inc.
15

Operation
Focusing
ROI Auto focus
1. Adjust the focus of JuLI™ Br. (Refer to page 12-13)
2. Touch the region of interest cell by hand on the screen
· The ROI Auto focus is the auto-focusing function which automatically
senses the focus optimized for the analysis software of the JuLI
™ Br
IMPORTANT!
It is strongly recommended to use ROI Auto focus function after adjusting a focus. If not, it
might be the cause of incorrect counting results or viability
16

Operation
Focusing
Confluence
1. Adjust the focus of JuLI™ Br using Focusing menu.
(on page 11-12)
2. Press Confluence button.
3. Value of confluence would be shown.
· If the value of confluence should be more accurate, try again after
adjusting parameter in Setting menu. (on page 29)
Parameter is the recommended value for corresponding to cell line.
· If confluence should be recalculated, press Confluence button after
pressing Preview button first.
4. Press the Capture button to acquire image with confluence.
5. Type the name of image that should be saved.
Then, press Save button.
JuLITM Br, Cell History Recorder ©2012 NanoEnTek Inc.
17
Operation
Focusing
Confluence
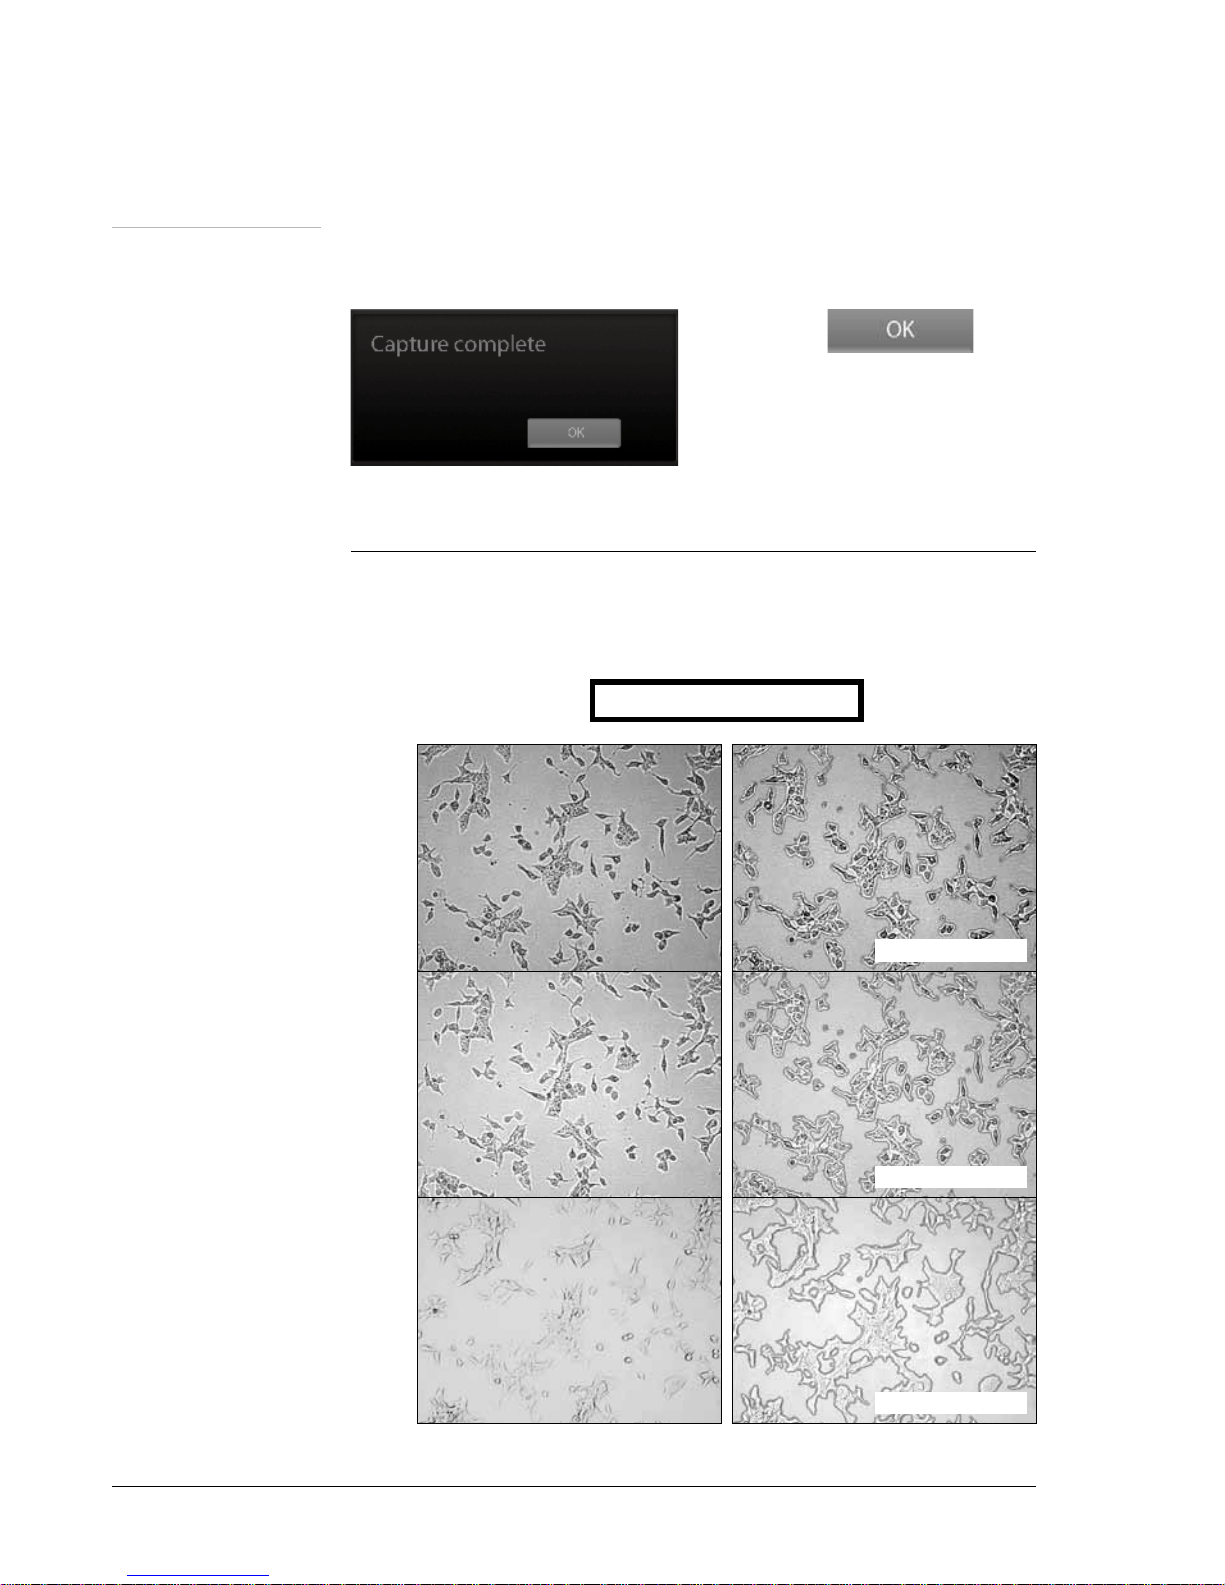
6. Check confirmation message ‘Capture complete’.
Saved data can be opened in Data menu. (on page 20)
The images below show the guideline for focus to obtain
accurate cell confluence.
Du-145 / Parameter A
Good setting
Exposure 4
Brightness 1
Normal setting
Exposure 6
Brightness 3
Bad setting
Exposure 6
Brightness 5
Confluence 35.11%
Confluence 36.22%
Confluence 43.03%
18

1. Adjust the focus of JuLI™ Br using Focusing menu.
(on page 11-12)
2. Press the Capture button to acquire the image.
3. Type the name of image that should be saved.
Then press Save button.
4. Check confirmation message ‘Capture complete’.
Press OK button.
5. Saved data can be opened in Data menu. (on page 20)
Operation
Focusing
Capture
JuLITM Br, Cell History Recorder ©2012 NanoEnTek Inc.
19

1. Each scope channel can be viewed by pressing Channel tab
if 2
nd
scope unit is connected to station unit.
2. Adjust the focus of JuLI™ Br and select the region that
should be monitored using Focusing menu. (on page 11-12)
Press Setting button.
3. Press the Name form to type file name for saving images or
movies. Then press Save button.
Operation
Monitoring
20

4. Choose the monitoring mode among Growth rate, Wound
healing and Movie only.
· Movie only means just monitoring cells without a confluence.
5. Press the Total time to set up the total running time.
Press the Interval to set the time interval.
Select ‘on’ for AVI file to create AVI file with time lapse images.
Select scope channel should be monitored.
· Choose both channel 1 and channel 2 in case of dual monitoring
IMPORTANT!
Warm up scope unit for 1 hour in incubator before making a movie. If not, it might be the
cause of uncertain data or unclear movies.
IMPORTANT!
Cell culture flask should be wetted by the culture media before making movie.
Operation
Monitoring
JuLITM Br, Cell History Recorder ©2012 NanoEnTek Inc.
21

· Time interval should be set up more than 1 minute for the best quality
result in case of growth rate and wound healing.
but in case of dual monitoring, more than 5 minutes is recommended.
· The number of total images will be displayed automatically when data
value of “Total Time” and “Interval” are set up.
6.
Press the Apply button to save all options.
· If the disk volume of the instrument is not enough to save recording
data, then the error message as below will be shown.
Please try again after deleting data in Data menu. (on page 20)
7. Press the Rec. button to begin recording.
JuLI™ Br displays live cell images continuously during recording.
Operation
Monitoring
22

· Dual scope channel can be checked at once by pressing
Dual view
button
when 2nd scope unit is connected to station unit.
To close dual view mode, double click it.
· If the movie should be finished while recording,
press
Stop button
.
Then the confirmation message as below will be shown.
Press
OK button
.
· Unexpected problems such that the power is off suddenly or
the scope unit is not connected to station unit while movie recording
could be happened.
Then the error message as below would be shown after restarting
the instrument.
Recorded data before getting in problem is saved in the disk of
instrument temporarily. So press
OK button
if the movie recording
should be continued.
8. Recorded data can be opened in Data menu. (page 20)
Operation
Monitoring
JuLITM Br, Cell History Recorder ©2012 NanoEnTek Inc.
23

Operation
Data
Open data
1 All of saved data could be checked in Data menu.
· Monitoring data including movie file and time lapse images were saved
in each of folder set up by user. And other data except monitoring are
saved in a default folder, ‘Captured Images’.
2. There are sub folders in case of dual monitoring data.
Each control sample and experimental sample data is in the sub
folder.
Default folder for captured images
Main folder
Monitoring data folders set up by user
Sub folder
<List category>
24

·
If you double tap main folder of dual monitoring data, summary
data view will show up.
3. Data can be opened or shown by double tapping folder name
in List category or tapping folder name once and pressing
Result category.
4. Recorded movie or image file can be shown by tapping its file
name. Movie file can be checked by pressing Play button.
Operation
Data
Open data
JuLITM Br, Cell History Recorder ©2012 NanoEnTek Inc.
25

5. Magnify movie screen or image screen widely for
convenience.
Operation
Data
Open data
26

1. Insert USB drive into USB port.
· If a USB drive is not inserted into USB port, screenshot function
can not be used.
2. Press Screenshot button.
3. Select the desired capture region using moving icon.
4. Select the screen size of snapshot using size icon.
· Snapshot capture process can be canceled
by pressing cancel icon
5. After then double tap the selected region.
6. Type the name for saving it, then press Save button.
7. Check confirmation message ‘Screenshot is saved successfully!’ .
Operation
Data
Screenshot
JuLITM Br, Cell History Recorder ©2012 NanoEnTek Inc.
27

1. Insert USB drive to USB port.
· If a USB drive is not inserted into USB port, you can not use this
function.
2. Select the folder or file by tapping it once.
3. Several folders or files can be selected at once using
Multi select button.
If the wrong file is selected, press Multi select button again.
4. Press the Save to USB button.
· Only main folder can be saved, not sub folders
individually in case of dual
monitoring data.
Operation
Data
Save to USB
28

5. Confirmation message ‘Save complete’ is shown, saving
process is completed.
· Experimental sample data (channel 2) is included in control sample
data (channel 1) folder in case of dual monitoring
Operation
Data
Save to USB
JuLITM Br, Cell History Recorder ©2012 NanoEnTek Inc.
29

Operation
Data
Rename
1. If you want to change folder or file name, tap the file or folder.
· Rename function can be used for folders of monitored data and files
in default folder ‘Captured Images’. Not for each files in monitored data
folder.
2. Then, press Rename button.
· Only main folder can be renamed, not sub folders individually in case of
dual monitoring data.
3. Enter new name of folder or file using the keypad display.
Then press Save button.
4. Check the confirmation message ‘Rename complete’ and
renamed folder or file in List and Result category.
30

1. Select folder or file which should be deleted from the instrument.
· Delete function can be used for folders of monitored data and files in
default folder ‘Captured Images’ , but not for each files in monitored
data folder.
· To delete several folders or files at once, select all of them after pressing
Multi select button.
2. Delete the folder or file with Delete button.
· If ‘Captured Images’ folder is selected,
all of image files in the folder will be deleted, but not the folder.
· Only main folder can be deleted, not sub folders individually in case of
dual monitoring data.
3. Press OK button when confirmation message shows up.
Operation
Data
Delete
JuLITM Br, Cell History Recorder ©2012 NanoEnTek Inc.
31

4. Check confirmation message ‘Delete complete’.
Operation
Data
Delete
32

· Mix well 10 µL of sample and the 10 µL of 0.4% trypan blue stain (Bright mode)
1. Load 10 µL of sample mixture on the counting slide (side A)
using a pipette. The two chambers of the slide and labeled as "A"
and "B" for
easy tracking of your samples. Each chambers is counted seperately.
2. Put the counting slide with the slide holder on the scope unit.
Operation
Counting
Sample-
preparation
JuLITM Br, Cell History Recorder ©2012 NanoEnTek Inc.
33

1. Adjust the focus JuLI™ Br (Refer to page 12-13)
2. After adjusting focus, press the Auto focus button to get more
accurate focus without individual variations.
· The Auto focus is the auto-focusing function wich automatically senses the focus
optimized for the analysis software of the JuLI™ Br and provides the precise and
rapid counting results.
· The example images of HeLa cells show the reference calue for adjusting focus.
Operation
Counting
Auto focus
Focus
by
user in
various
cases
Dark focus Normal focus
Bright focus
recommend for
JuLI
TM
Br counting
Apply
IMPORTANT!
It is strongly recommended to use Auto focus function after adjusting a focus. If not, it
might be the cause of,
- taking more time for counting (more than 10 seconds)
- incorrect counting results or viability
34

1. Adjust the focus of JuLI™ Br (Refer to page 12-13).
If necessary, press the Auto focus button to get more accurate
focus without individual variations.
2. Press the Counting button for the cell counting.
· The Br counting button is activated in the Bright mode.
· If necessary, set the dilution factor corresponding to the experiment condition
(Refer to page 42).
3. The counting results including the total cell, live cell, dead cell, and
average cell size show up.
Operation
Counting
Bright counting
(Stained by trypan blue)
Gating
background
Graph
Dead cell
(red bar)
Live cell
(blue bar)
Counting
results
JuLITM Br, Cell History Recorder ©2012 NanoEnTek Inc.
35

1. Connect USB drive to the station unit.
· If a USB drive is not connected to the station unit, you can not use this function.
2. Press the Save to USB button.
3. Type the folder name in the blank. Then press the Save button.
· When a user presses the Save button, the user will acquire the images and the
counting result file for one folder automatically. In a folder, there are one original cell
image, one cell counting image marked with different color for the viable and dead
cells, one screen shot image with cell counting result data and also, one csv file of
counting result data.
Bright
4. If the confirmation message is shown, the saving process is
completed.
Operation
Counting
Save to USB
< Bright counting result save > < Fluorescence counting result save >
36

Operation
Settings
Settings
Set up parameter
1. Setting menu works for each scope unit if 2
nd
unit is connected
to station unit. Press Channel tab to select each scope unit.
Set the recommended parameter value corresponding to cell line.
Default value is A.
Sensitivity :
refers to the contrast of the objects from the back ground.
Increased sensitivity provides better recognition of fainter objects
in bright field.
Background level:
decreased background level provides better recognition of fainter objects
in bright field.
Cell line
HepG2 GH3 Hep3B
A549 MCF7
SH-SY5Y SCN2.2
NIH-3T3 F9
HeLa DU-145
LNCaP
U-2 OS
ADSC
Recommendation
Sensitivity level 9
Background level 2
Sensitivity level 10
Background level 2
Sensitivity level 10
Background level 8
Parameter
A(Default)
B
C
JuLITM Br, Cell History Recorder ©2012 NanoEnTek Inc.
37

Operation
Set up local date & time with up and down button.
Adjust the LED power intensity, tapping the bar to point.
Default LED power is 10.
1. Periodically, NanoEnTek adds functionality and other
improvements to JuLI™ Br user interface. We recommend
keeping your JuLI™ Br update with the latest software and
firmware using update button.
If you have any questions about software updates,
contact sales@nanoentek.com.
2. Visit JuLI™ Br website at www.nanoentek.com to download
updated software which is supplied as a .zip file in your desktop.
3. Unzip the .zip file and save the software in a USB driver.
4. Insert the USB drive into the USB port on JuLI™ Br.
Setting
Update software &
firmware
Setting
Update data & time
Setting
Control LED power
38

Operation
Setting
Update software &
firmware
5. Check if the version of software and firmware are the latest one.
Press Update button. The update process takes a few seconds.
6. After updating, Press OK button to restart JuLI™ Br automatically.
Check the disk space of JuLI™ Br.
If no disk space left, saved data should be deleted in Data menu.
(on page 20)
Setting
Check the disk
space
JuLITM Br, Cell History Recorder ©2012 NanoEnTek Inc.
39

Operation
PC software
Introduction
PC software
Installation
PC software is designed to manage data from JuLI™ Br.
· User can review saved image from JuLI™ Br in the PC.
· User can recalculate confluence of all images and edited movies.
To install PC software, follow the directions as below :
Check to ensure that the PC is connected to Internet and then
the PC software could be installed.
1. Connect the supplied USB driver
to the computer. Then open the file
“JuLI™ Br PC software”
2. The start-up dialogue of the
software, as shown like left image, will
appear.
3. Click ‘Next’ to start installation.
40

Operation
PC software
Installation
5. After choosing installation folder,
click “Install” to proceed with the
installation.
4. If you want to change installation
folder, click ‘Browse’ and choose the
location that you want.
6. The computer activates the
“Installation of the software”
7. If the installation is successful,
the PC software program icon will
appear on your desktop.
JuLITM Br, Cell History Recorder ©2012 NanoEnTek Inc.
41

Operation
PC software
Function guide
When PC software program starts, the interface as below image
will be shown.
Home
Zoom bar Image information Preview window Graph Data list
Confluence Movie
Open
Save as
ExportCreate
dual movie
Preview window
Dual view
42

Operation
PC software
Home
1. Press Insert scale bar button to insert scale bar on viewing
image, if it is necessary.
Click Save with scale bar button to save image with scale bar
information.
JuLITM Br, Cell History Recorder ©2012 NanoEnTek Inc.
43

Operation
PC software
Open data
1. Click the Open button.
· Folders and files can be opened by dragging and dropping on
List region directly.
2. Browse the folder or files and select it.
3. If data opened successfully, data list could be checked out as
below image.
44

Operation
PC software
Open data
4. Click the name of image in data list. Preview window will
show the image and movie.
· In case of dual monitoring data, control sample folder
and experimental sample folder can be checked easily
using Channel tab.
5. The image can be magnified by tapping zoom bar.
6. Select the viewing region by dragging preview window.
JuLITM Br, Cell History Recorder ©2012 NanoEnTek Inc.
45

Operation
PC software
Confluence
1. Click the confluence menu button.
2. Select one image that needs recalculated confluence value
from data list.
3. Adjust the image by changing parameters; recommended
sensitivity level and background level corresponding to cell line.
4. Click the Confluence button. the value of confluence would
be recalculated by new sensitivity level, and background level.
5. If the confluence value from step 4 is good enough to use,
then check Apply box for recalculating confluence value of all
images in same folder by new sensitivity and background level.
6. Confluence graph would be redrawn.
7. Click Save as button
if recalculated data should be saved.
Parameter
A(Default)
B
C
Cell line
HepG2, GH3, Hep3B,
A549, MCF7, SH-SY5Y,
SCN2.2, NIH-3T3, F9,
HeLa, Du-145
LNCaP
U-2 OS, ADSC
Recommendation
Sensitivity level 9
Background level 2
Sensitivity level 10
Background level 2
Sensitivity level 10
<before> <after>
Time ( Hour : Min ) Time ( Hour : Min )
46

Operation
PC software
Edit movie file
1. Recorded movie can be shortened easily through PC
software. Set the start point and end point by moving the bar.
2. Check Apply box to edit the movie.
3. Click Save as button if edited movie should be saved.
4. Select the folder to save edited movie and press OK button.
Time ( Hour : Min )
JuLITM Br, Cell History Recorder ©2012 NanoEnTek Inc.
47

1. Dual monitoring data can be checked at once using
Dual view menu button. Click Dual view menu button.
2. Summary of dual monitoring data will be shown.
3. Individual movie files from control sample and experimental
sample can be made into one movie using Export dual movie
button.
Operation
PC software
Dual view
48

4. Type file name for merged movie and click Save button.
5. Merged movie file will be created after merging process is
done.
Operation
PC software
Dual view
JuLITM Br, Cell History Recorder ©2012 NanoEnTek Inc.
49

1. Individual movie files from 2 different single monitoring data
can be made into one movie using Create dual movie button.
2. Select 2 different single monitoring data folder for making
movie.
· Selected movie files should have been monitored under the same
interval and total time.
3. Click ‘Make New Folder’ button and type folder name for dual
movie.
3. Dual movie file will be created after working process is done.
Operation
PC software
Create dual movie
50

1. Click Export button. Information of each image in folder can
be exported.
2. Select the folder where exported file should be saved.
Type the file name to save exported file.
3. Exported file can be found in folder.
Operation
PC software
Export data
JuLITM Br, Cell History Recorder ©2012 NanoEnTek Inc.
51

Cleaning & maintenance
Clean the surface of JuLI™ Br instrument with a damp cloth.
To clean the LCD screen, turn off JuLI™ Br instrument, disconnect the
power cable, and clean the LCD screen with a soft cloth lightly moistened
with LCD cleansing detergent. Cleaning the screen with excessive force
can damage the LCD the screen. Wipe the screen dry immediately.
If liquid spills on JuLI™ Br, turn off the power immediately and wipe dry.
JuLI™ Br does not need regular maintenance. To troubleshoot problems
with JuLI™ Br, contact Technical Support (page 59).
IMPORTANT
Never disassemble or service JuLI™ Br by yourself.
Unauthorized repairs may damage JuLI™ Br or alter its functionality, which will void your
warranty. Contact sales@nanoentek.com or your local JuLI™ Br distributor to arrange for
service.
Always wipe surfaces with ethanol-soaked paper towels.
Do not directly spray ethanol anywhere on JuLI
TM
Br.
Avoid exposing JuLI™ Br to UV light
UV light may degrade components, including plastic. Damage from UV exposure is not
covered under the manufacturer’s warranty.
52

Troubleshooting
· Check on/off switch on back side of unit.
· Check power source or contact your distributor.
· Touch the LCD screen with your finger .
· Check if power supply is connected and
power switch is on.
· Reset the power button.
· Check the connection between scope and station.
· Connect connection cable to the 2
nd
scope unit after
connecting to the 1
st
scope unit completely.
· Check whether the focus interface is inactive or not.
· Move the focus knob to the opposite side.
· Re-optimize the brightness and exposure value.
· Reset the power button.
· Swipe the stage with cotton swab carefully.
· Eliminate any dust on culture dish.
· Check for and remove any condensation on the
lid of the culture dish.
· Warm up the instrument during 1 hour before
monitoring. (power should be on when warming up
the instrument)
· Cell culture flask should be wetted by the
culture media before making movie.
· Eliminate dust on a culture dish.
· Check for and remove any condensation on the lid
of the culture dish.
Installation
JuLI
TM
Br does not power up
LCD screen is black
Focusing and monitoring
menu are not activated
Get an error message
during the connecting the
2
nd
scope unit
Focus
Focus knob or focus
interface doesn’t work
Monitoring
Poor image
(Too dark and too bright)
Dirty image
Time-lapse images become
dark and bright
JuLITM Br, Cell History Recorder ©2012 NanoEnTek Inc.
53

Troubleshooting
· To prevent any problem such as shaking of culture
dish or inflowing light, pay special attention when you
open or close incubator door during monitoring.
· Please check the minimum interval (on page 18).
· Check the unused volume of the hard disk.
· Recording files are going to be saved as the last
state before recording stopped.
· Create movie file with time lapse images using
JuLI
TM
Br PC software program.
· Download 'JuLI Br Update' folder on NanoEnTek
website. (www.nanoentek.com)
· Check the files as below image. Then download
'JuLI Br Update' folder on NanoEnTek website.
(www.nanoentek.com)
Monitoring
Time-lapse images become
dark and bright
Can’t set the interval
Problem for saving movie file
Can not continue recording.
Do you want to save the
recording files?
Data
Can not play the movie
properly
Setting
'JuLI Br Update' folder does
not exist in the USB drive.
The update files do not exist
in the USB drive.
54

Troubleshooting
· Load the full folder to PC software program, not just
avi file.
· Check the interval and total time and match them
with same conditions.
· Confluence is not measured on Movie only mode.
However, movie can be edited using PC software
program.
· Connect scope unit with station unit using
connection cable again.
· Install the codec provided by JuLI Br USB drive or
NanoEnTek website.
· Check the resolution of the outer monitor.
(resolution 1366 X 768 pixels)
· Make sure to turn off instrument before connecting.
PC software
Movie doesn’t play
Can’t create the dual movie
using 2 different single
monitoring data
Graph is not be shown on
the movie tap
ETC
Fail to capture
Movie doesn’t play on
windows media player
Can’t transmit the screen
to external monitor through
display port
JuLITM Br, Cell History Recorder ©2012 NanoEnTek Inc.
55

Warranty
NanoEnTek provides 1-year warranty service for defects of material and workmanship.
If any defect occurs in JuLI
TM
, NanoEnTek provides free repair service for the defective
parts at its discretion.
The following defects, however, are specifically excluded:
1. Defects caused by improper operation.
2. Repair or modification done by anyone other than NanoEnTek or an authorized agent.
3. Damage caused by substituting with alternative parts.
4. Use of fittings or spare parts supplied by anyone other than NanoEnTek.
5. Damage caused by accident or misuse.
6. Damage caused by disaster.
7. Corrosion caused by improper solvent or sample.
For your protection, JuLITM Br units being returned must be insured against possible
damage or loss. NanoEnTek cannot be responsible for damage incurred during
shipment of a defective instrument. It is recommend that you save the original
packing material in which the instrument was shipped. This warranty is limited to the
replacement of defective products.
For any inquiry or request for repair service,
contact sales@nanoentek.com or your local distributor.
56

Safety precautions
Review and follow the safety instructions below :
· If water or other material enters the instrument, adaptor, or power inlet,
disconnect the power cord and contact a service person. For operating environment,
refer to Product Specifications (page 58).
· Do not touch the main plug or power cord with wet hands.
· Always ensure that the power supply input voltage matches the voltage
available at your location.
· This instrument is air-cooled and its surfaces may become hot during
operation. When installing leave a space of more than 10 cm (4 inches)
around the instrument and do not place any objects between the instrument
and the walls.
· Do not install an instrument on a slant or a place prone to vibrations, which
induces the risk of malfunction or damage of the instrument.
· Never insert any objects into the air vents of the instrument as this could
result in electrical shock, personal injury, and equipment damage.
· Plug the power cord firmly into the wall outlet and AC adapter.
· To avoid potential shock hazard, make sure that the power cord is properly
grounded.
· Be sure to position the equipment such that it is easy to disconnect.
· Turn off the instrument before unplugging the power cord and/or moving the
instrument.
· If the instrument is dropped or broken, disconnect the power cord and
contact a service person. The warranty will be void in case of disassembly.
· Use only authorized accessories (adaptor, power cord, and USB drive).
Warning
Class A equipment is intended for use in an industrial environment.
In the documentation for the user, a statement shall be included drawing
attention to the fact that there may be potential difficulties in ensuring
electromagnetic compatibility in other environments, due to conducted as well as
radiated disturbances.
JuLITM Br, Cell History Recorder ©2012 NanoEnTek Inc.
57

Review and follow the safety instructions below :
Safety precautions
Meaning
Caution & Warning
Protective earth (Ground)
This instrument and consumables conforms to the Declaration of
Conformity.
This equipment has been tested and found to comply with the limits for a
Class A digital device, pursuant to Part 15 of the FCC Rules.
These limits are designed to provide reasonable protection against
harmful interference when the equipment is operated in a commercial
environment.
This equipment generates, uses, and can radiate radio frequency energy
and, if not installed and used in accordance with the instruction manual,
may cause harmful interference to radio communications.
Operation of this equipment in a residential area is likely to cause
harmful interference in which the user will be required to correct the
interference at his own expense.
Symbol
FCC Compliance
58

Environmental conditions
Instrument specifications
Product specifications
AC 100 - 240Va.c., 1.9A, 100W
50 / 60 Hz
Indoor use only
5 - 40 °C
20 - 95 %
Device
JULI-BR04 (Single set, 1 Scope & 1 Station)
JULI-BRD04 (Dual set, 2 Scopes & 1 Station)
JULI-BRSC (2nd Scope)
Accessory
JULI-BRCM (Counting starter kit)
JULI-BRTB (XY Stage)
Objective 4X and digital zoom (~400X)
2560 x 1920 pixels (5M)
JPEG (image), AVI(movie), CSV(raw data)
10.1" LCD touch screen
White LED
Scope unit : 300 x 190 x 188 mm, 4kg
Station unit : 282 x 285 x 160 mm, 3.2kg
320 GB Hard drive
4 GB USB drive
Electrical input
Frequency
Installation site
Operating
temperature
Maximum relative
humidity
Cat. no.
Magnification
Image resolution
Exported formats
Display
Light source
Dimension & weight
Storage
JuLITM Br, Cell History Recorder ©2012 NanoEnTek Inc.
59

Technical support
Visit the our Website at www.nanoentek.com for :
·
Technical resources, including manuals, FAQs, etc.
·
Technical support contact information
·
Additional product information and special offers.
For more information or technical assistance, please call or email.
NanoEnTek Inc. (HQ)
12F, 5, Digital-ro 26-gil, Guro-gu, Seoul, 08389, Korea
Tel : +82-2-6220-7940
Fax : +82-2-6220-7721
NanoEnTek USA Inc.
5627 Stoneridge Drive Suite 304, Pleasanton, CA 94588, USA
Tel : +1-925-225-0108, +1-888-988-0108(Toll free)
Fax : +1-925-225-0109
Email
sales@nanoentek.com
Website
www.nanoentek.com
60

All the materials in this user manual are protected by Korean
and international copyright laws.
They cannot be reproduced, translated, published or
distributed without the permission of the copyright owner.
JuLI™ Br User Manual
Website : www.nanoentek.com
E-mail : sales@nanoentek.com
Manufactured by : NanoEnTek Inc.
12F, 5, Digital-ro 26-gil, Guro-gu, Seoul, 08389, Korea
Tel : +82-2-6220-7940
Fax : +82-2-6220-7721
The information in this manual is described
as accurately as possible.
The changes involved in firmware and software may be
applied without notification.
Copyright ©2012 by NanoEnTek Inc.
All rights reserved. Published in Korea.
Documentation : NESMU-JUB-001E
Revision History : V.0.0 Date : Oct 2012
V.1.0 Date : Jan 2013
V.1.5 Date : May 2013
V.1.6 Date : Jan 2014
V.2.0 Date : Nov 2015
JuLITM Br, Cell History Recorder ©2012 NanoEnTek Inc.
61

NanoEnTek Inc. (HQ)
12F, 5, Digital-ro 26-gil, Guro-gu, Seoul, 08389, Korea
Tel. +82-2-6220-7940
Fax. +82-2-6220-7721
NanoEnTek USA Inc.
5627 Stoneridge Drive Suite 304, Pleasanton,
CA 94588, USA
Tel : +1-925-225-0108, +1-888-988-0108(Toll free)
Fax : +1-925-225-0109
Email
sales@nanoentek.com
Website
www.nanoentek.com
NESMU-JUB-001E (V.2.0)
 Loading...