

Bench-top Fluorescence Cell Counter
User manual
ADAMII™ ©2016 NanoEnTek Inc.
1

All the materials in this user manual are protected by Korean and international copyright laws.
They cannot be reproduced, translated, published or distributed without the permission of the
copyright owner.
Every effort has been made to ensure that all the information contained in the ADAMII™ User
Manual is correct at the time of printing. However, NanoEntek Inc. reserves the right to make any
changes necessary without notice as part of ongoing product development.
ADAMII™ User Manual
Website: www.nanoentek.com
E-mail: ivdst@nanoentek.com
Copyright©2016 by NanoEnTek Inc.
All rights reserved. Published in Korea.
Documentation: NESMU-ACD-001E(V.0.0)
Revision history: V.0.0 Date: March 2017
2

Table of contents
Introduction
Product components
Product description
Installation
Home menu
Calibration
Sample loading
Operation
- Insert assay slide
- Measure menu
· Initial mode
· Focusing mode
- Data menu
- Setting menu
Cleaning & Maintenance
Troubleshooting
Error code
Warranty
Safety precautions
Safety symbols
Product specications
Ordering information
Technical support
4
5
6-7
8-9
10-11
12-19
20
21-49
21-23
24-33
24-26
27-33
34-43
44-49
50
51-52
53-54
55
56-57
58
59
60
61
ADAMII™ ©2016 NanoEnTek Inc.
3
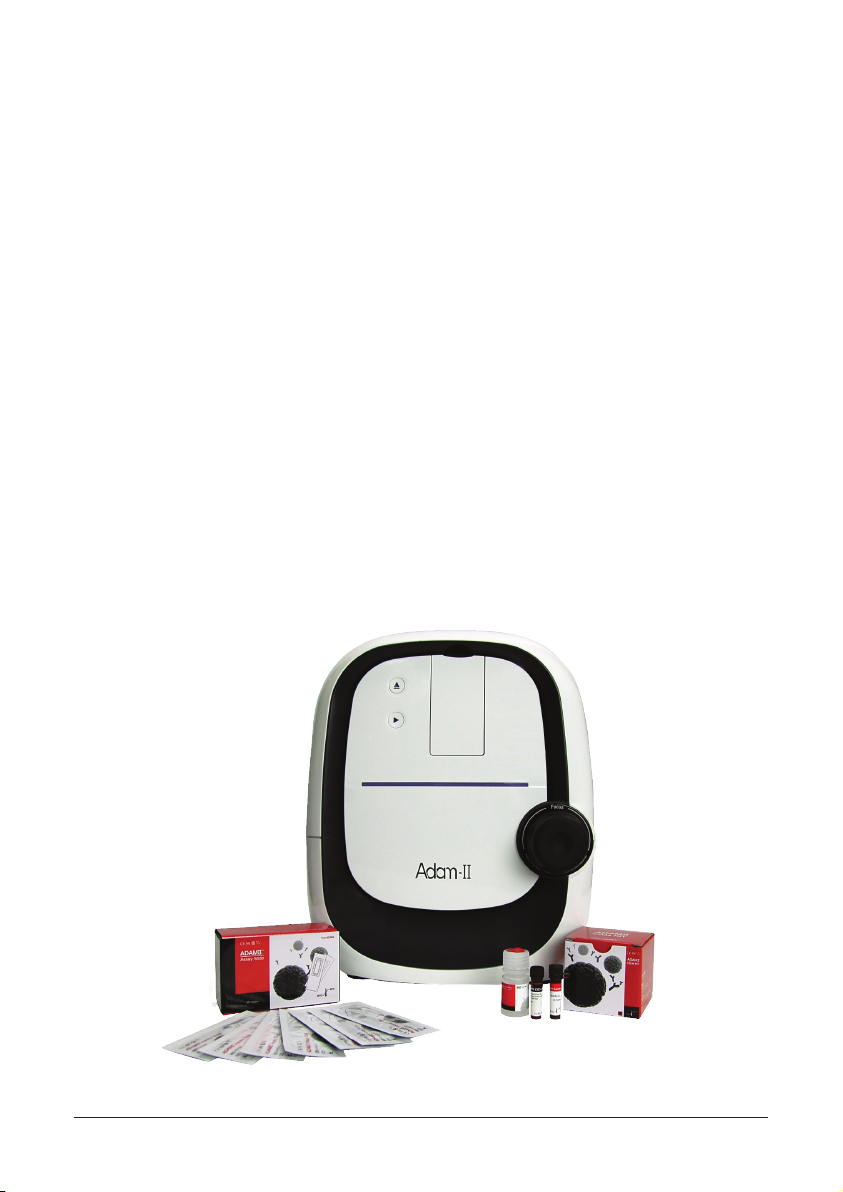
Introduction
ADAMIITM is a bench top uorescent cell counting analyzer that can be used in either a hospital and
research laboratory.
It has 4-channel (Bright, Yellow (PE), Red (PerCP) and Green (FITC)) light sources, so three color
uorescence samples can be analyzed simultaneously. The automatic X-Y-Z stage captures a maxi-
mum of 136 images and which increases the accuracy of analysis.
The obtained images are processed by image analysis software integrated in the system. All proce-
dures are automatic once the stained sample has been placed in the disposable assay slide.
[Features]
• A benchtop uorescence cell counting analyzer
• Can be used in hospital and research laboratory
• Visualize: Quantitative results with visual conrmation
• Quantify uorescence-labelled cells without sheath tank maintenance
4
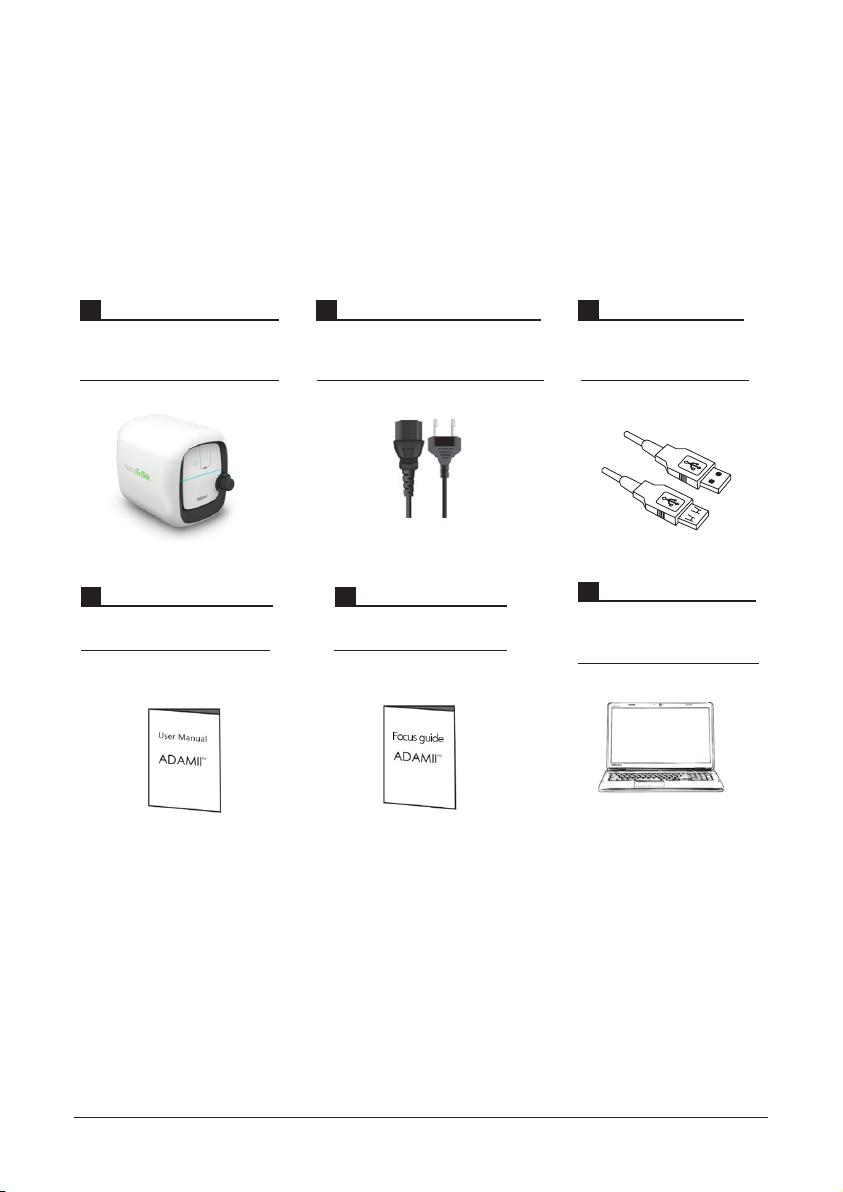
Product components
ADAMII™ is shipped with the following components. Once you receive your instrument, please
check that all components listed below were shipped.
If any component is missing or damaged, contact your local distributor or e-mail ivdst@nanoentek.com
ADAMII™
1 EA
User manual
1 EA
Power cord with 4 adaptor cords
(for U.S./Canada/ Taiwan/Japan,
Europe or UK)
4 pcs/1 SET
Focus guide
1 EA
USB cable
2 EA
Operating laptop
(Please note: Laptop will be
packaged separately)
1 set
ADAMII™ ©2016 NanoEnTek Inc.
5

Product description
Front view
Side view
Insert/Eject
button
Run button
State LED
Slide Holder
Door
Insert/Eject Button
Run Button
State LED
Insert and eject the slide from the ADAMII™.
Functions as load and unload.
Perform all procedures of automatic counting.
Light up when software runs in the laptop and
connection of camera and serial perform cor-
rectly.
Focus Knob
Slide Holder
Door
Focus Knob
6
Location to insert or remove the slide.
Open to check the slide holder.
Adjust focus to obtain better cell images.
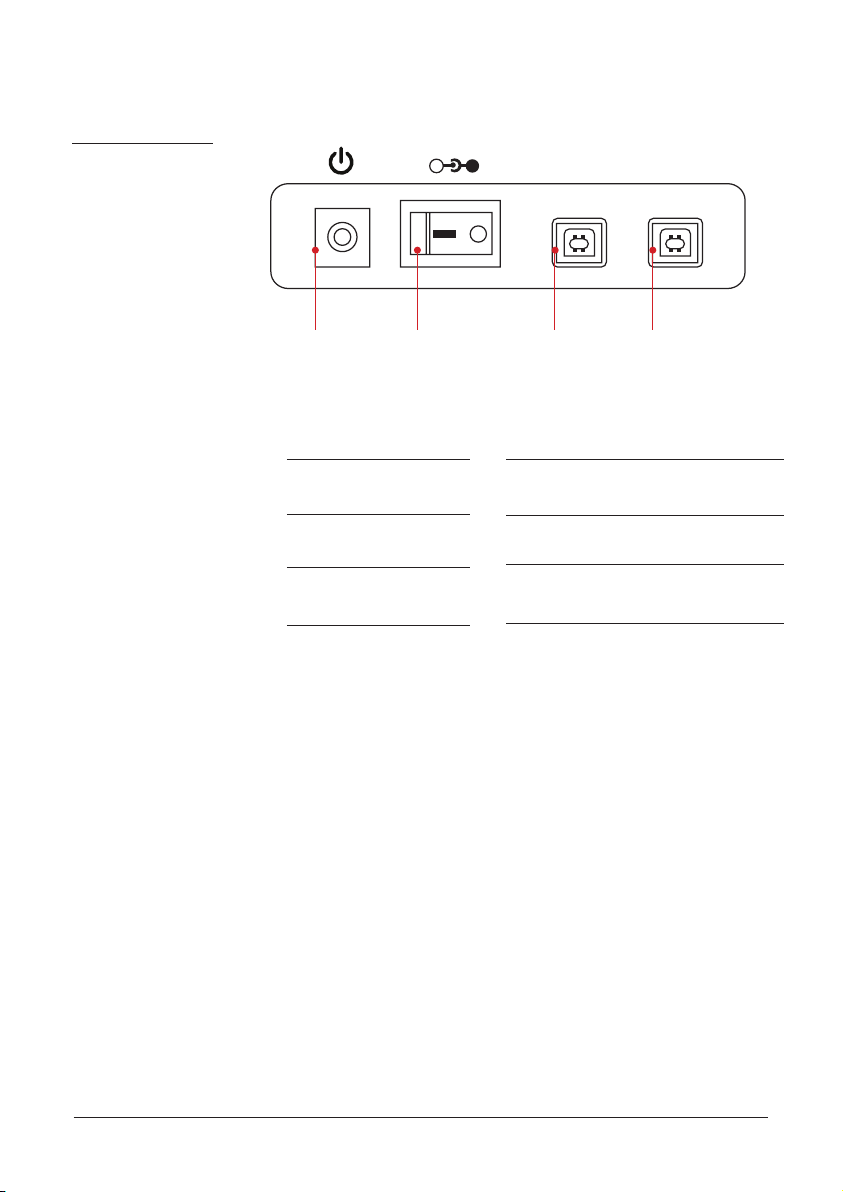
Product description
Rear view
+
Power
supply port
Power supply port
Power switch
Serial connection port
Camera connection port
Power switch Serial
-
Serial Camera
connection
port
Power supply
Power on/off
Control the ADAMII™ operating
Control the camera of the ADAMII™
Camera
connection
port
ADAMII™ ©2016 NanoEnTek Inc.
7
Installation
Unpacking the
instrument
Install
the instrument
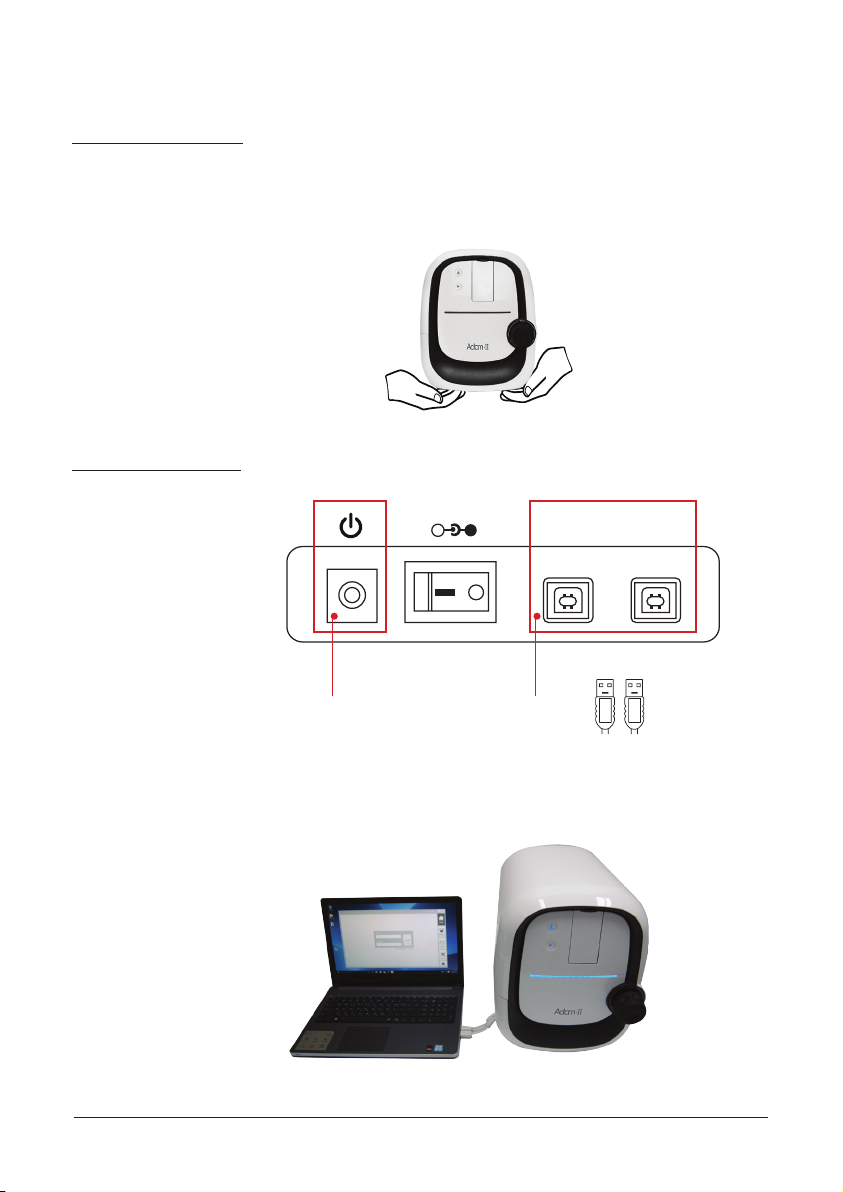
1. Open the box and remove the material foam in the box.
2. Carefully lift the instrument out of the box.
3. Place the instrument on a at, level surface.
1. Plug the power cord into the electrical outlet and connect two USB cables..
+
-
Power supply port USB port
Serial Camera
2. Connect the laptop and the ADAMII™ using two USB cables.
8

Installation
Install
SW program
1. Turn on the laptop and ADAMII™ by pressing the Power button. At
this time, the slide holder will be ejected automatically.
2. Double-click ADAMII™ icon on Desktop to start the software.
☞
Note: The ADAMII™ will be ready to use after initialization is
completed when powered on.
☞
Note: When the software runs and is connected with ADAMII™
normally, the state LED of instrument will be lighted up.
ADAMII™ ©2016 NanoEnTek Inc.
CAUTION:
• You must turn on the ADAMII™ before running the software program.
9
Home menu
Log in
User
management
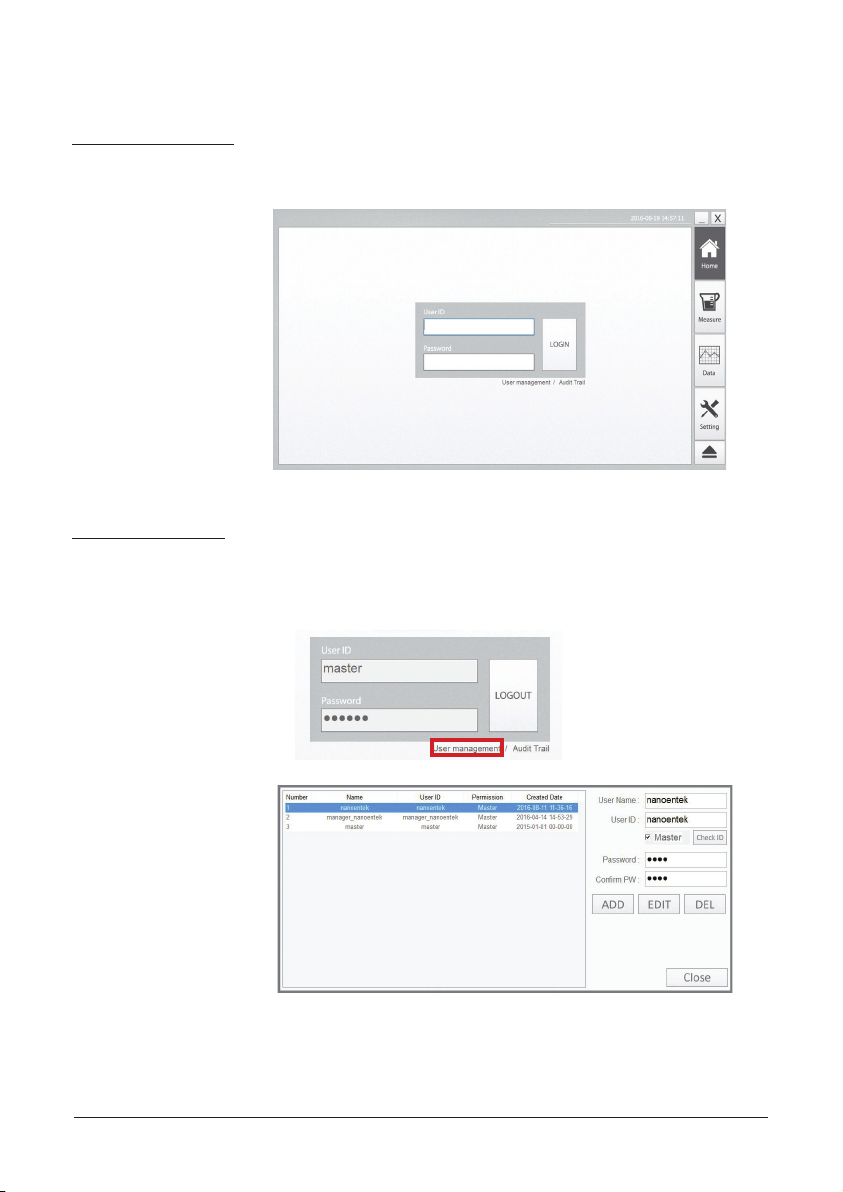
At the ‘Home’ screen, enter the user ID and password to log in.
Default ID and password are both ‘master’.
Click ‘User management’ when you need to manage accounts (e.g. ID
addition, password change). To create a new ID, ll out the blank (user
name, user ID, password, conrm PW) and click ‘Add’.
☞
Note: Only the master user can access the ‘User management’ .
10
Home menu
Audit trail
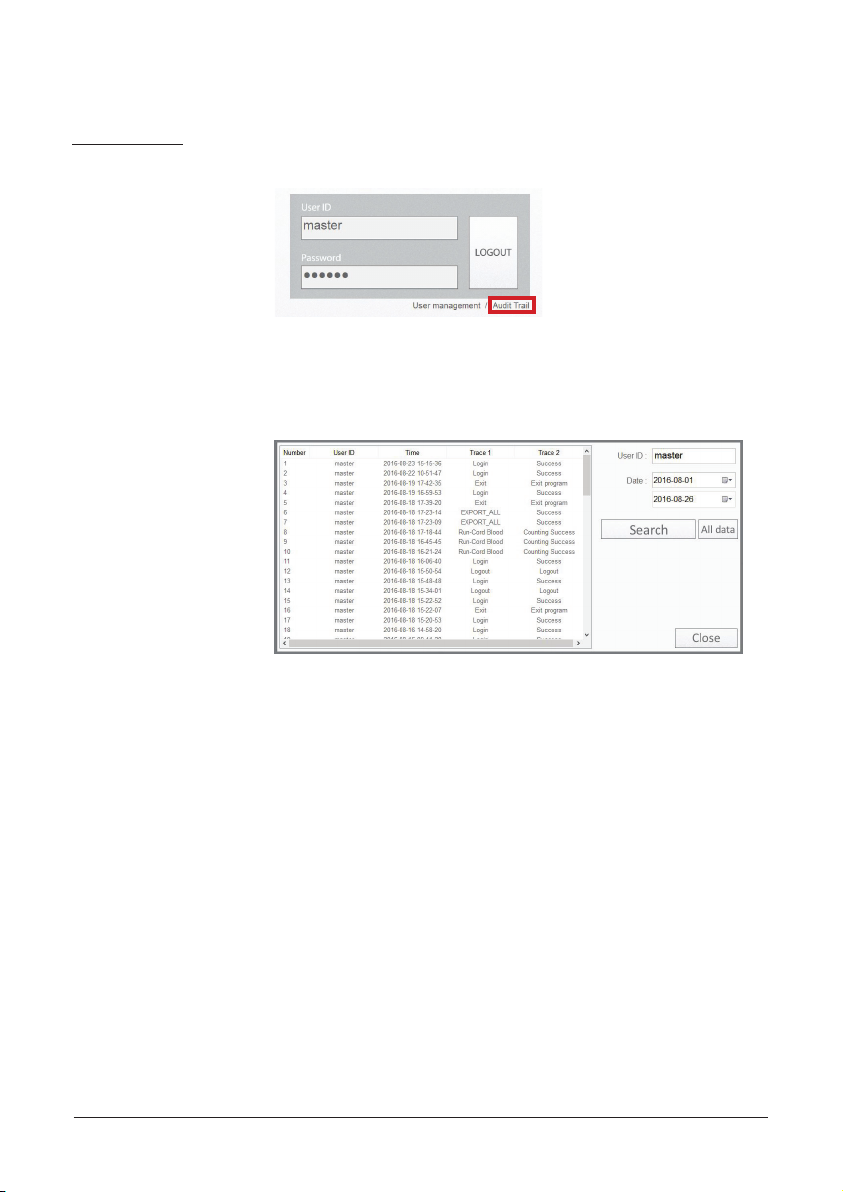
Click ‘‘Audit trail” to search and trace detailed information of each user.
1. Enter the User ID and set the date that you want to search.
2. Click ‘Search’ button.
3. Information of the selected user will appear.
☞
Note: Only the master user can access the ‘‘Audit trail”.
ADAMII™ ©2016 NanoEnTek Inc.
11
Calibration
Calibration
procedure
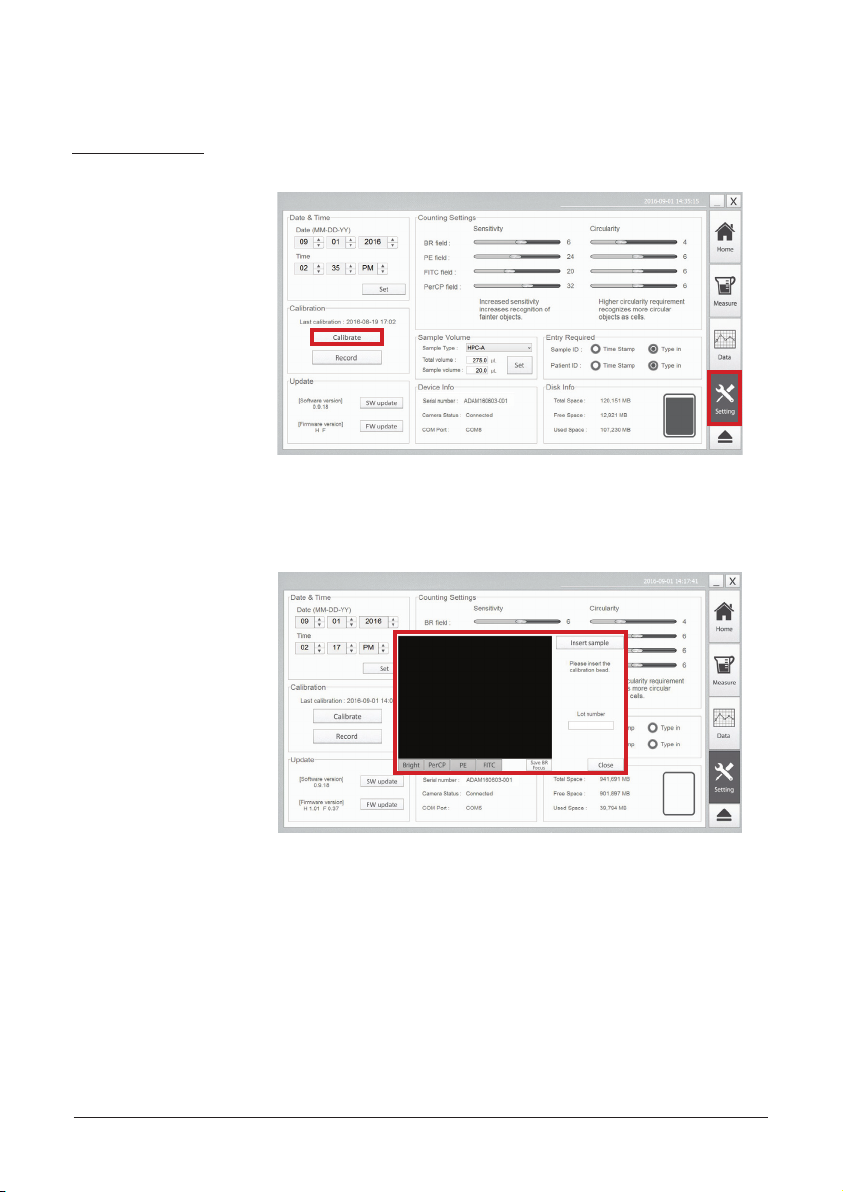
1. For calibration, go to ‘Setting’ menu and click ‘Calibrate’.
2. Then, calibration window will appear.
12
Calibration
Calibration
procedure
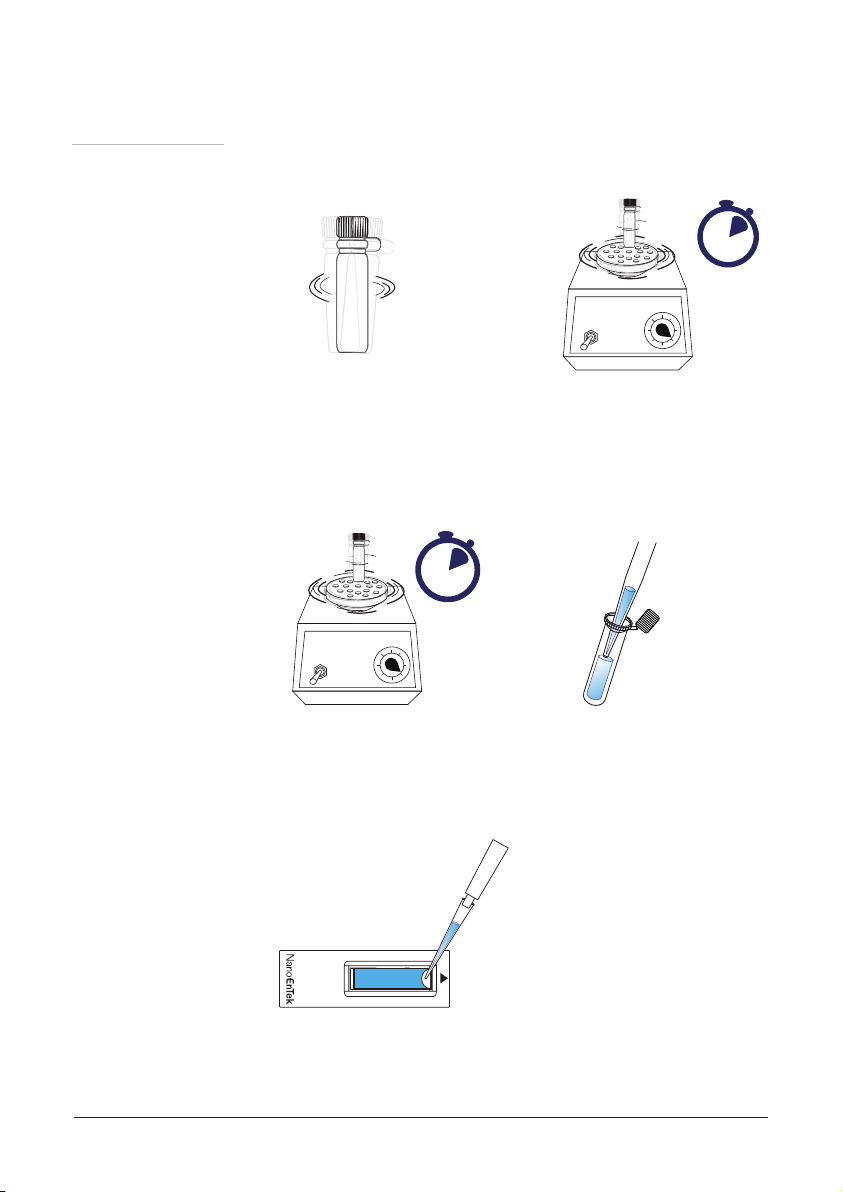
3. Shake bottle vigorously or vortex briey for 5 seconds before use.
5 sec.
[Shake bottle vigorously]
4. Once again, vortex for 4 seconds and pipette for 25 μL immediately.
4 sec.
[Vortexing]
[Pipetting calibration bead 25 μL]
[Vortexing]
ADAMII™ ©2016 NanoEnTek Inc.
5. Load 25 μL of calibration beads on the ADAMII™ assay slide.
[Load 25 μL calibration bead]
13
Calibration
Calibration
procedure
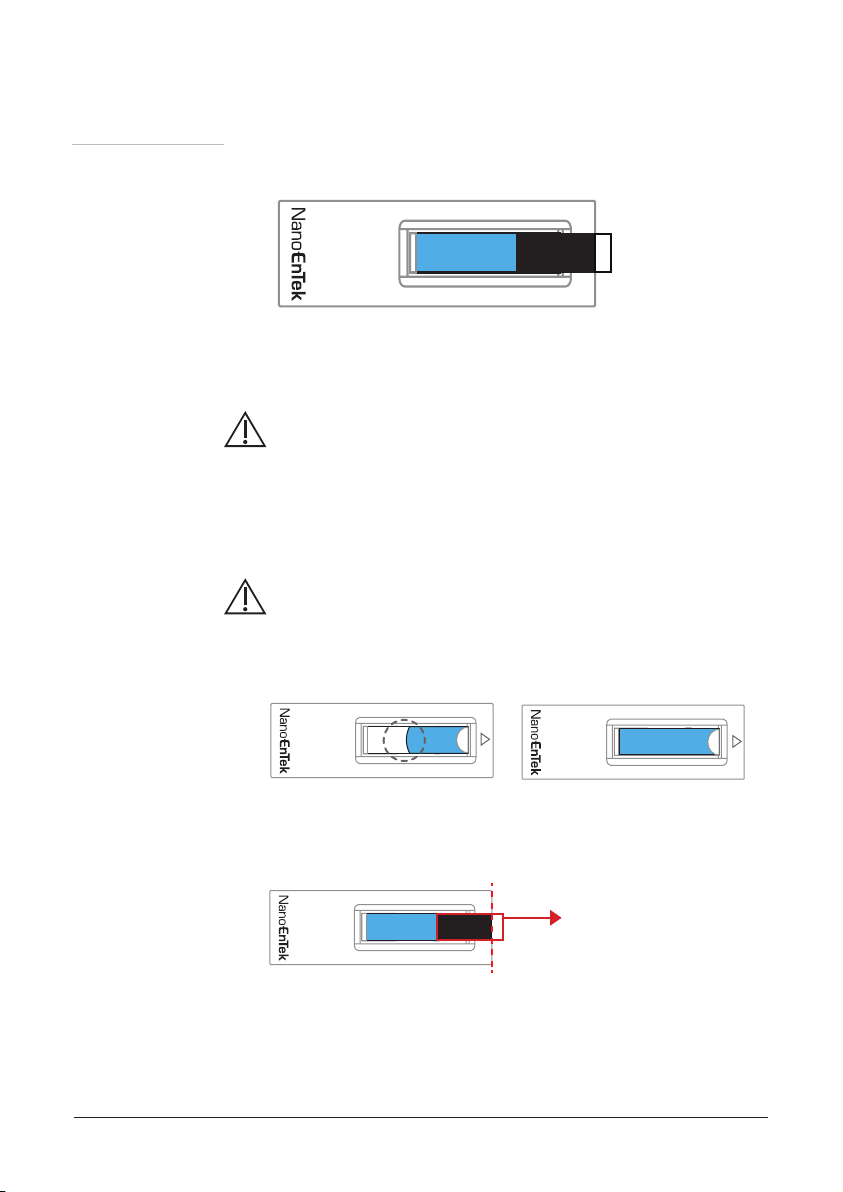
6. Attach dry-proof closure tape to prevent drying.
[Attach dry-proof closure tape]
Warning:
• Calibration bead loading error
- Ensure that 25μL of calibration bead is fully loaded on the ADAMII™
assay slide.
- The instrument will not detect in low or high loading volumes.
CAUTION:
• Avoid bubbles as theymay negativelyaffect results.
Low volume Correct volume
• Boundary between black and white on the tape should be lined up
with the edge of the slide.
Dry-proof closure tape
14
Calibration
Calibration
procedure
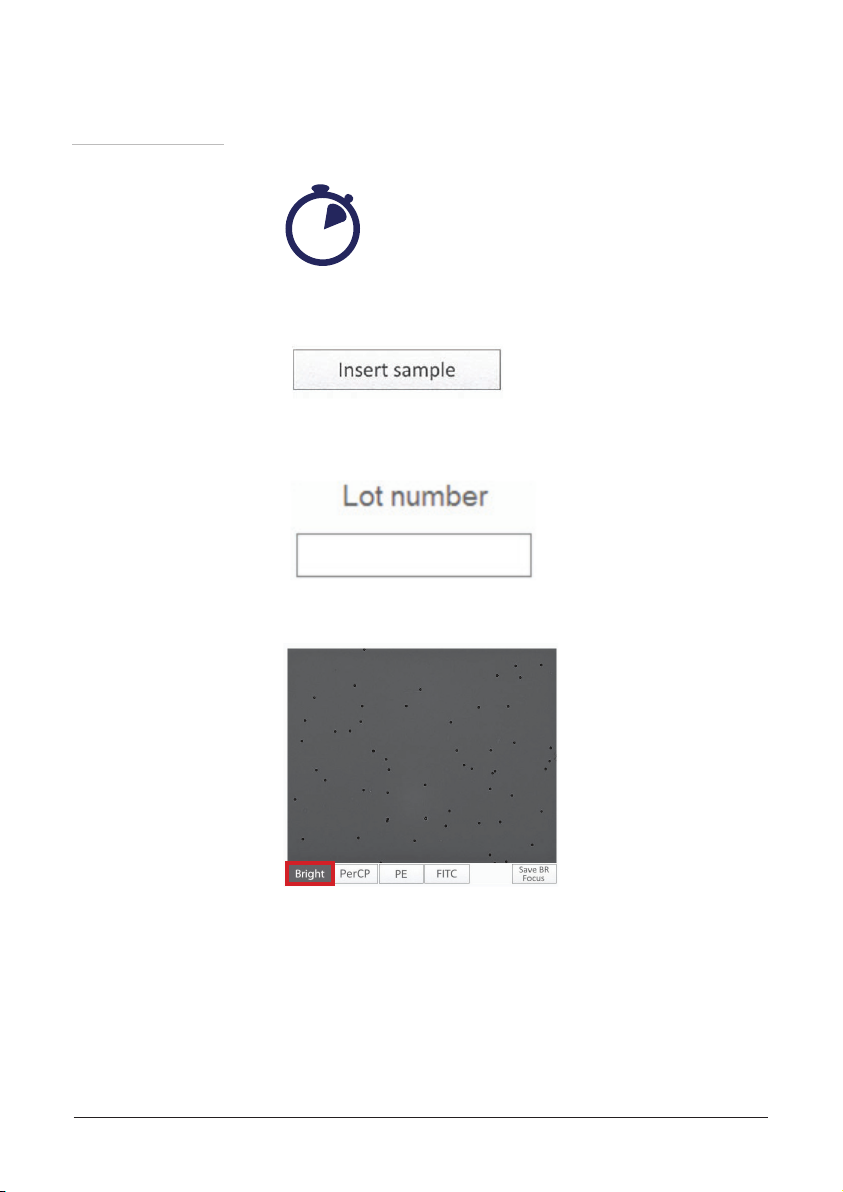
7. Leave for 20 seconds (need time for beads to settle).
20 sec.
8. Insert the slide with calibration beads into the slide port of the
instrument and press ‘Insert sample’ button.
9. Enter lot number of calibration beads.
10. Select Bright channel and adjust the focus using the focus knob.
ADAMII™ ©2016 NanoEnTek Inc.
15
Calibration
Calibration
procedure
☞
Note: Please check ‘ADAMII™ Focus guide’ before setting the focus.
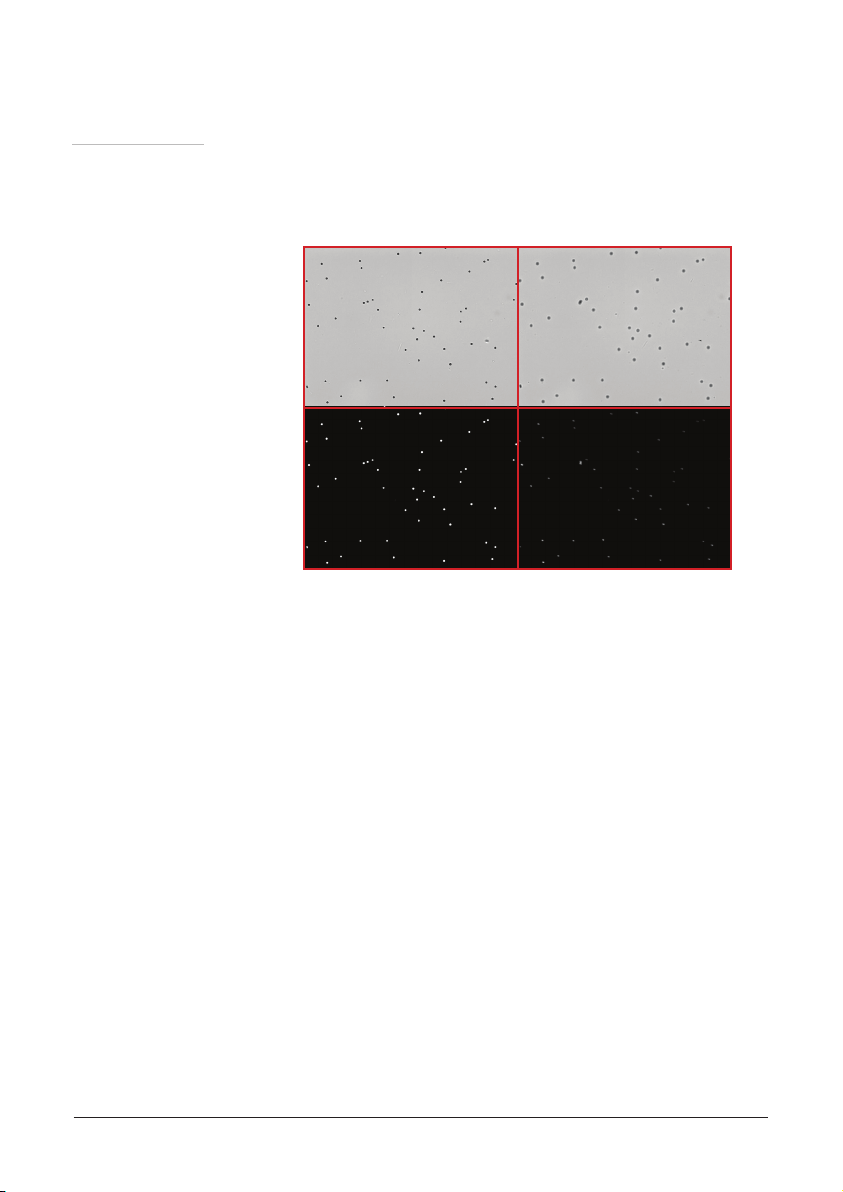
[Focusing example - representative images]
Bright- Good Focus
Good Focus VS. Bad Focus
FL- Good Focus
• Bright - Good Focus: Clear circumference of the beads, Dark and
clear contrast to the background
• Bright - Bad Focus: Blurry and unclear bead circumference
• FL - Good Focus: Bright uorescence beads with clear contrast to the
background
• FL - Bad Focus: Weak uorescence beads with unclear contrast to the
background
Bright- Bad Focus
FL- Bad Focus
16
Calibration
Calibration
procedure
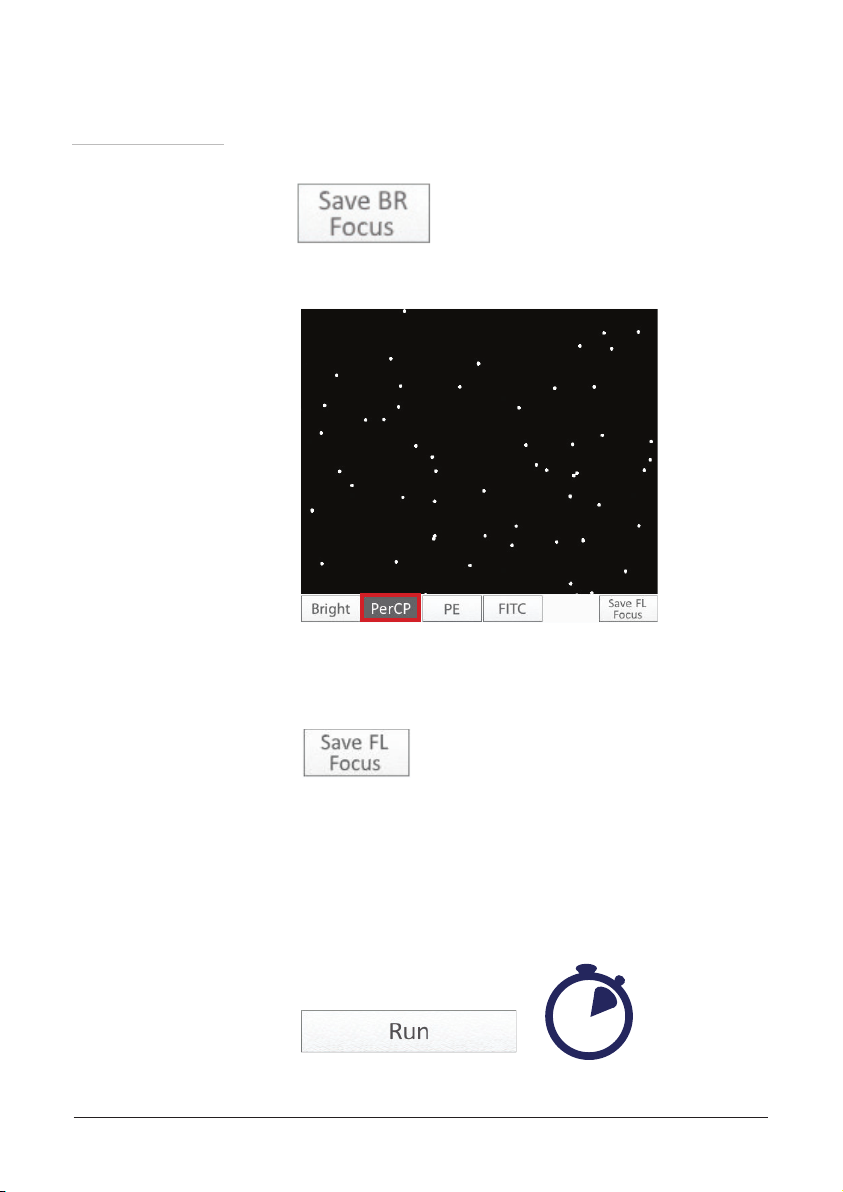
11. Press the ‘Save BR Focus’ after adjusting focus.
12. Select PerCP channel and adjust the focus using the focus knob.
13. Press the ‘Save FL Focus’ after adjusting focus. The focus of other
uorescence channels will be set automatically.
ADAMII™ ©2016 NanoEnTek Inc.
☞
Note: Save the focus in ‘Bright’ and ‘PerCP’ channel.
The other channels will be automatically focused.
14. Press the ‘Run’ button to start the auto calibration. Calibration will
take about 3 minutes to count the 24 frames.
3 min.
17
Calibration
Calibration
procedure
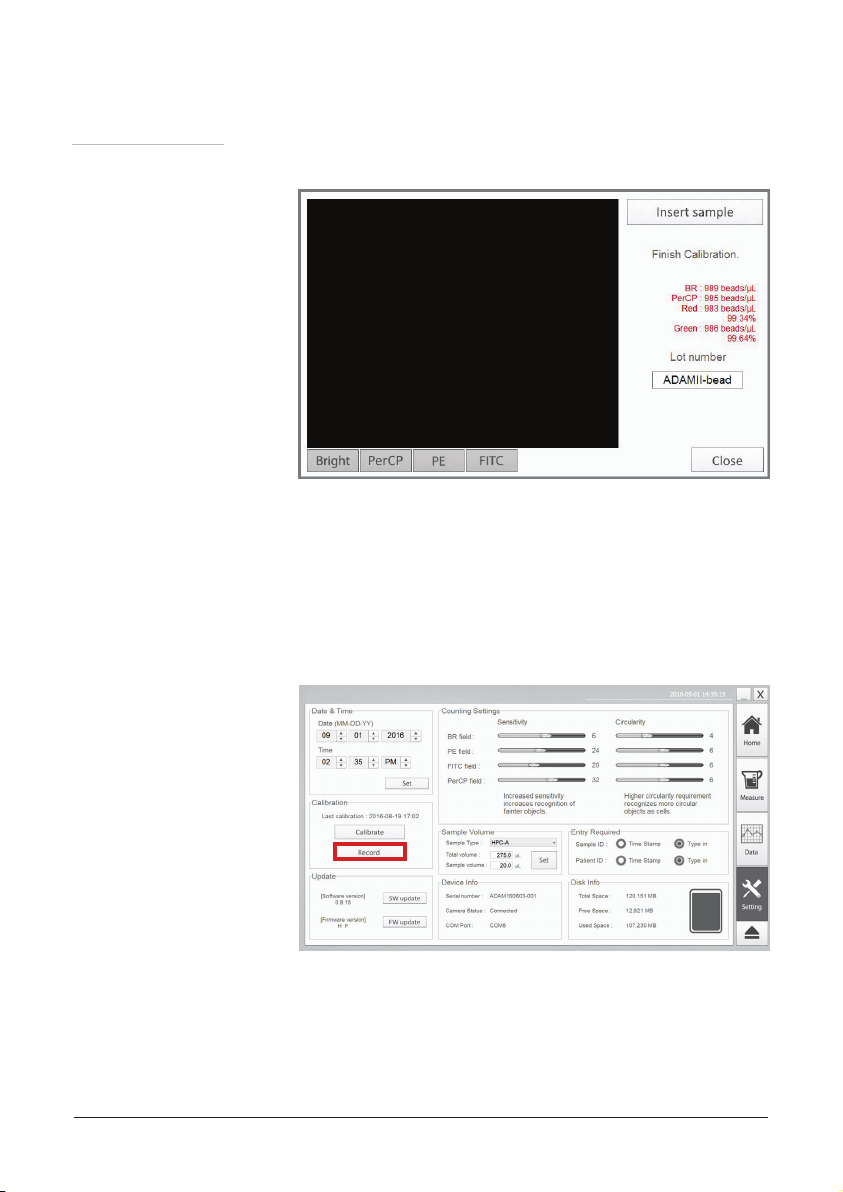
15. When the calibration is completed, the results will be displayed.
☞
Note: If the results are not within the range on the tube,
please ask your manufacturer or distributor.
16. When you need previous results of calibration, click ‘Record’ button.
18
Calibration
Calibration
procedure
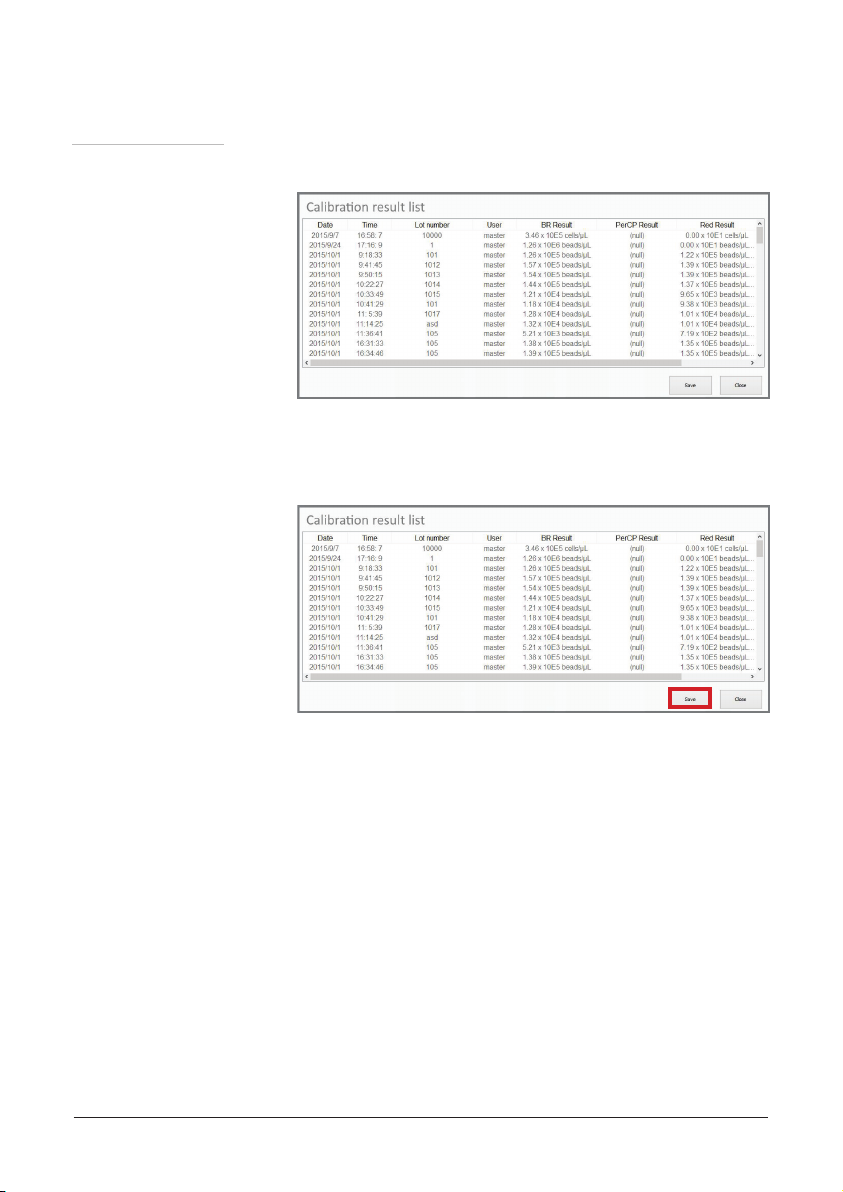
17. Calibration result list records will appear.
18. Click ‘Save’ button to save the calibration records. The result will be
saved in CSV format.
ADAMII™ ©2016 NanoEnTek Inc.
19. Press “Close” button to nish calibration.
19
Sample loading
Sample
preparation
Load sample
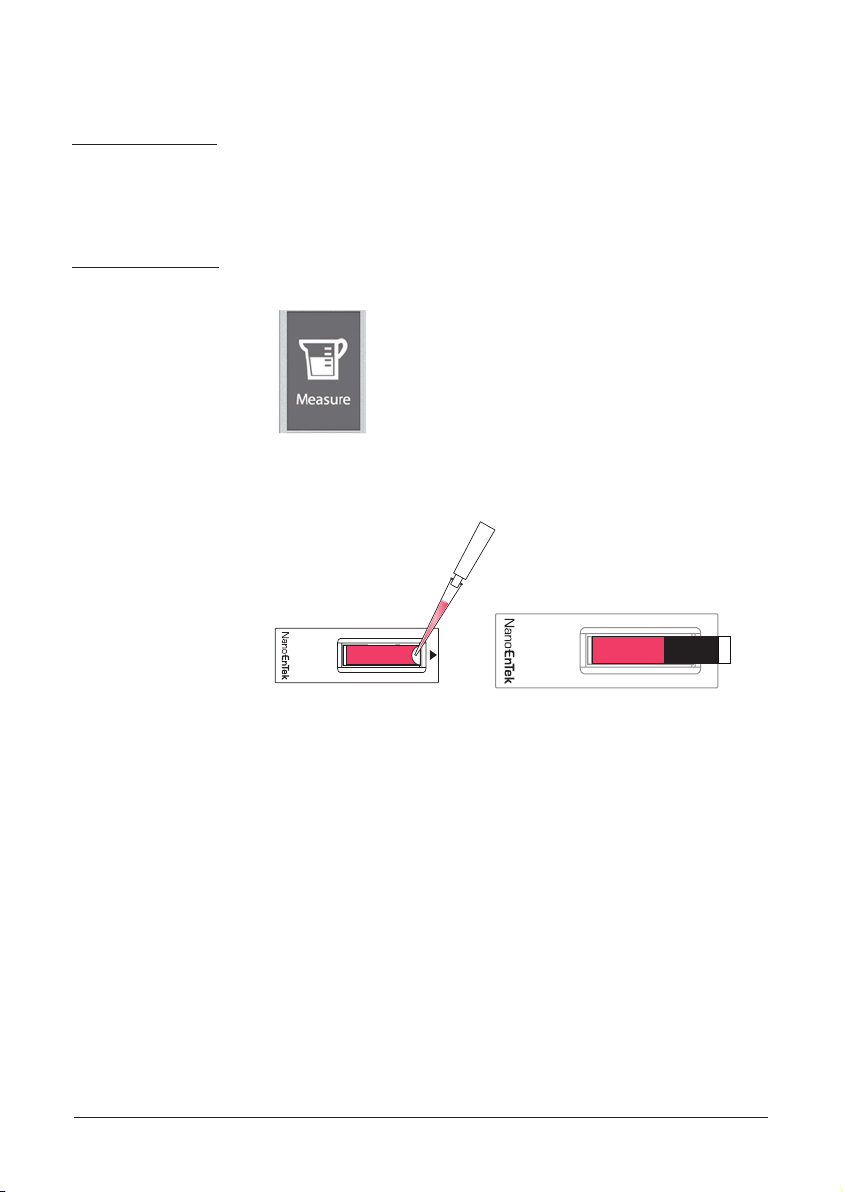
Prepare sample and check the sample type.
To run a sample, click ‘Measure’ menu.
Load 25 μL sample into the ADAMII™ assay slide and attach a dry-
proof closure tape.
[Load 25 μL sample] [Attach dry-proof closure tape]
Note: Please refer to page 14 to check cautions for loading correct
☞
volume and attaching the dry-proof closure tape.
☞
Note: Note: Before loading the antibody stained specimen or bead to
the slide, vortex enough to mix them up.
20

Operation
Insert
assay slide
1. Open the ADAMII™ door.
2. Press to open up the slide holder.
3. Insert the assay slide into the slide holder.
ADAMII™ ©2016 NanoEnTek Inc.
☞
Note: Assay slide should be inserted to the end of the slide holder,
in the direction of arrow on the slide, facing up. Incomplete
insertion of slide may cause erroneous results.
4. Close the slide holder cap tightly.
Warning:
• If you don’t close the slide holder cap, the slide will not be inserted.
21

Operation
Insert
assay slide
Warning:
• ADAMII™ assay slide insert error
- Completely insert ADAMII™ assay slide face up, in the direction
of the arrow on the slide. The instrument will not detect if slides
are inserted incorrectly. Illustrations of various possible cases of
erroneous assay slide insertion are presented below.
Correctly inserted
( O )
Not fully inserted
( X )
( X ) ( X )
Upside down inserted
Adverse direction inserted
(Arrow mark)
Warning:
• Using ADAMII™ assay slide
- Do not reuse the ADAMII™ assay slide, as leftover dye from the
previous reading may affect the next reading.
- Do not use any other slides as it results in inaccurate count and
may damage the instrument.
22

Operation
Insert
assay slide
5. Close the door of the ADAMII™.
6. Select the type of sample to run.
7. Press the ‘Insert/Eject’ button on top of the instrument, or “Insert
sample” button on the screen. The slide will automatically be moved
into the instrument.
ADAMII™ ©2016 NanoEnTek Inc.
☞
Note: LED light of the ‘Insert/Eject’ button shows the status of the
slide holder.
· Slide inserted – Off
· Slide ejected – On
· Slide inserting and ejecting - blinking
Warning:
• Close the door after inserting the sample.
• Do not look into the ADAMII™ instrument when door is open.
Direct exposure to high-energy LED light may be harmful to the eyes.
23

Operation
Measure menu
- Initial mode
To do a sample test, click the ‘Measure’ menu.
1 4
2
3
☞
Note: Above screen and upcoming screen images only relate to CD34
application.
1. Counting mode
2. Display area
3. Detection channel
4. Insert sample
5. Result area
6. Test information
5
6
24

Operation
Measure menu
- initial mode
① Counting
mode
② Display area
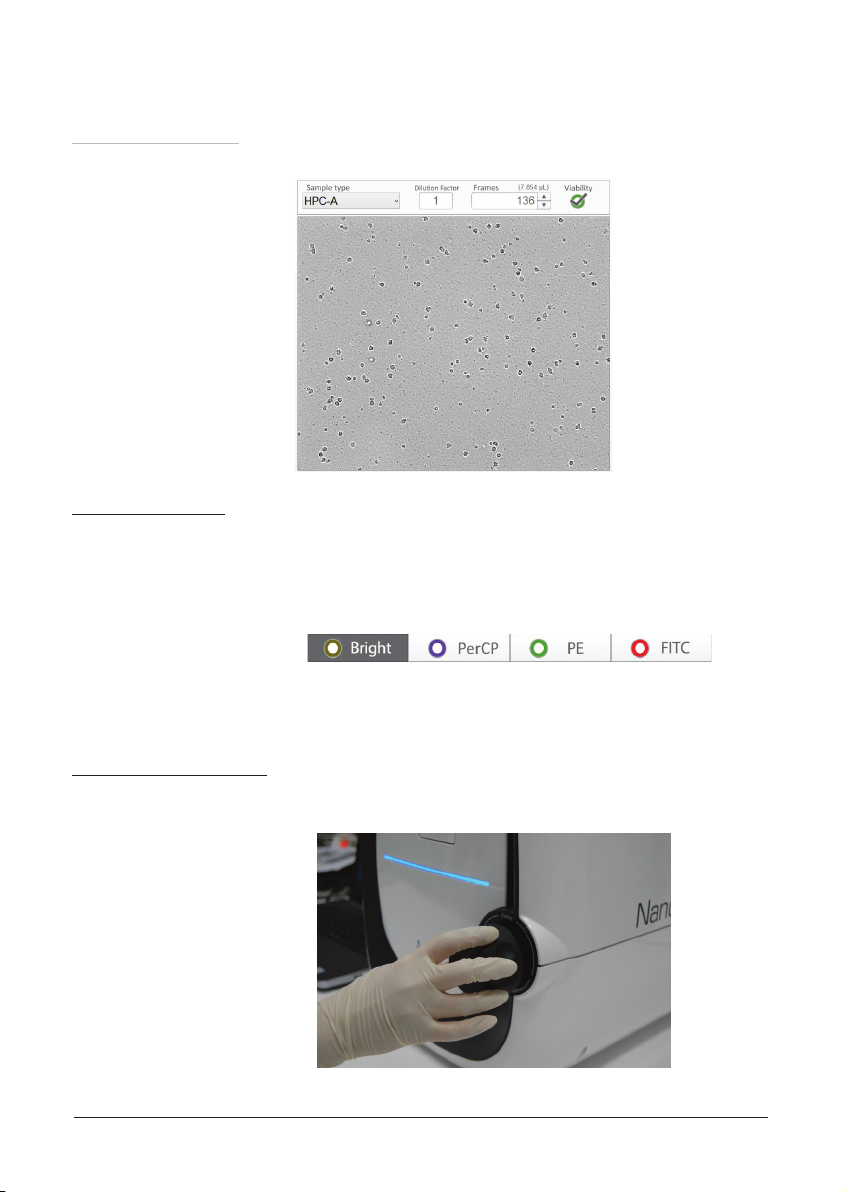
Select the type of sample to measure.
• Sample type: HPC-A, Mobilized PB, Control
• Dilution factor: Enter the dilution factor when the diluted sample
was stained and to be measured.
• Frames: Number of images to be captured. Recommended
number of frames is 136. Depending on cell density,
adjust the number of frames.
• Viability: Check the circle to include to get viability data.
Captured image of sample will be displayed. It will be activated after
inserting sample. (Refer to page 28)
③ Detection
channel
④ Insert sample
ADAMII™ ©2016 NanoEnTek Inc.
The selected channel will be displayed. It will be activated after
inserting sample. (Refer to page 28)
Insert the sample loaded assay slide and click ‘Insert sample’ button
to start the test.
☞
Note: Please check the door and slide holder cap is closed.
25

Operation
Measure menu
- initial mode
⑤ Result area
⑥ Test
information
Counting results of the sample will be displayed. It will be activated
after inserting sample. (Refer to page 33)
Date, sample/patient ID, and operator information will be displayed.
26

Operation
Measure menu
- Focusing mode
Once the assay slide is inserted, focusing mode will appear.
5
3
1
4
2
☞
Note: Above screen and upcoming screen images only relate to
CD34 application.
1. Display area
2. Detection channel
3. Focus option
4. Save focus
5. Run sample
6. Eject
6
ADAMII™ ©2016 NanoEnTek Inc.
27
Operation
Measure menu
- Focusing mode
① Display area
② Detection
channel
Display preview image of the sample from the camera.
Indicate which channel is displayed. For ADAMII™-CD34 assay,
three uorescent channels correspond to the markers below:
• PerCP: CD45
• PE: CD34
• FITC: live/dead marker
☞
Note: FITC channel will be measured only when the viability circle is
selected.
③ Focus option
28
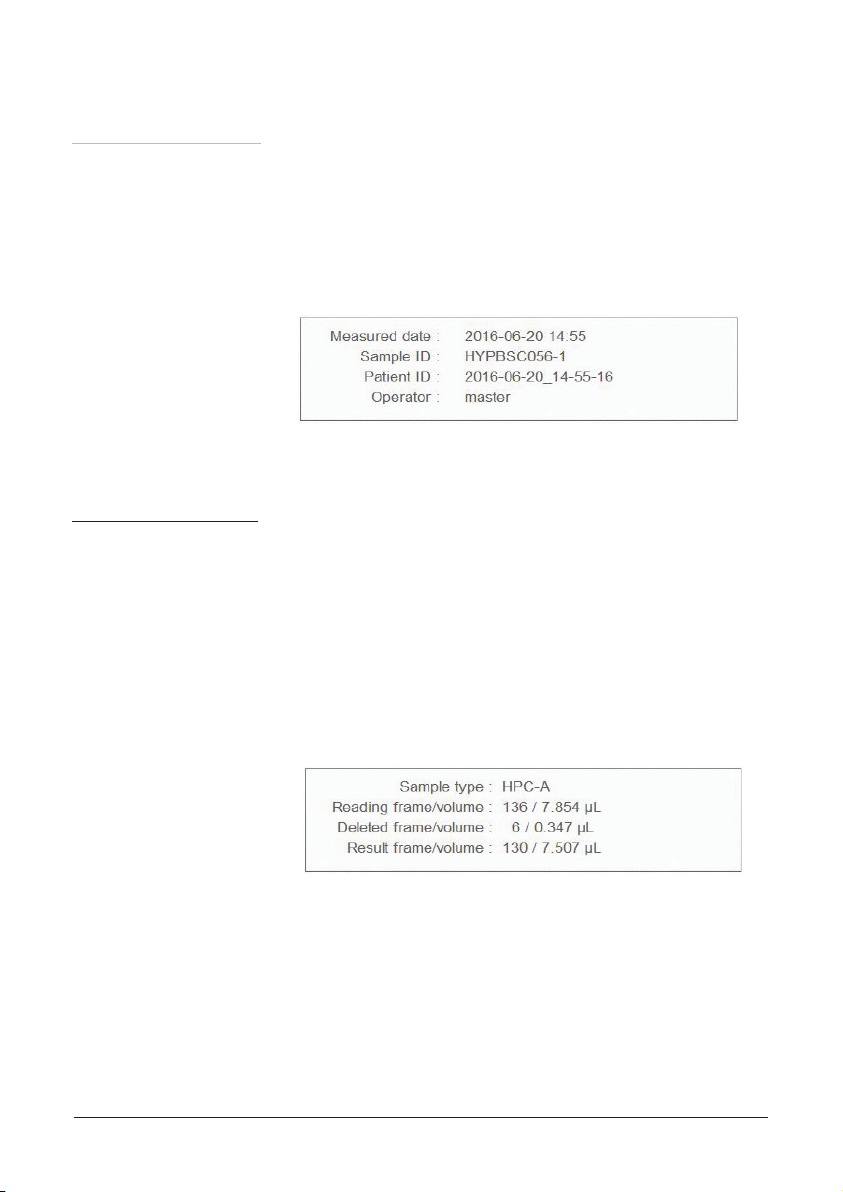
1. Focus can be adjusted manually or automatically. Focusing knob
is right side of the instrument.

Operation
Measure menu
- Focusing mode
③ Focus option
2. • Auto focus: set the focuses for all channels automatically,
when this option circle is selected.
• 2ch manual focus: Set the focuses for two channels ‘Bright’ and
‘PerCP’ manually, then the other two uorescent
channels will be automatically focused, when this
option circle is selected.
☞
Note: 2ch manual focus is recommended.
[Save BR focus]
ADAMII™ ©2016 NanoEnTek Inc.
[Save PerCP focus]
29

Operation
Measure menu
- Focusing mode
③ Focus option
☞
Note: Please check ‘ADAMII™ Focus guide’ before setting the focus.
[Focusing example – bright eld]
Bright- Good Focus
Good Focus VS. Bad Focus
Bright- Bad Focus #2
• Good Focus: Clear cell image – sharp cell membrane, dark cell body
with contrast to the bright background
• Bad focus #1: Unclear cell image – no contrast to the background
• Bad focus #2: Bright and white cell body undistinguishable to the background
• Bad focus #3: Blurry and unclear cell image
☞
Note: The example images only relate to CD34 application.
Bright- Bad Focus #1
Bright- Bad Focus #3
30

Operation
Measure menu
- Focusing mode
③ Focus option
☞
Note: Please check ‘ADAMII™ Focus guide’ before setting the focus.
[Focusing example – uorescence channel]
CD45 PerCP- Good Focus
Good Focus VS. Bad Focus
CD34 PE- Good Focus
Bright- Bad Focus #2 Bright- Bad Focus #3
FITC - Good Focus
• Good Focus: Clear cell image, bright cell body in contrast to the
dark background
• Bad focus: Unclear cell image, blurry cell image and donut shaped cell
image
☞
Note: The example images only relate to CD34 application.
CD45 PerCP- Bad Focus
CD34 PE- Bad Focus
FITC - Bad Focus
ADAMII™ ©2016 NanoEnTek Inc.
31

Operation
Measure menu
- Focusing mode
⑤ Run sample
1. Once the focusing is done, dilution factor and number of frames to
capture. If you want to see the viability, please check the circle
under the viability circle.
2. Press the “Run sample” button.
3. Enter the sample ID, patient ID, antibody lot number and slide
lot number.
4. Counting the 136 frames is recommended.
When the counting is done, assay slide will be ejected automatically.
15 min.
32

Operation
Measure menu
- Focusing mode
⑤ Run sample
⑥ Eject
5. The calculated data including total cell count and viability of CD34
and CD45 will be displayed in the data presenting area.
6. To run the next sample, take out the nished assay slide, insert
the new sample loaded assay slide, repeat focusing and running
procedure.
Click ‘Eject’ button when you want to manually eject the sample.
There is no need to use this button after the assay is ordinarily com-
pleted, when the sample will be ejected automatically.
ADAMII™ ©2016 NanoEnTek Inc.
☞
Note: The door should be closed when the slide holder is being ejected.
If not, the door can be damaged.
☞
Note: If the door is opened, the sample will not be ejected.
33

Operation
Data menu
Data menu provides the raw data including counting results, images
from each frame in each channel. Users are able to review, save and
export the data.
1
3
Data list
2
4
8
5
9
6
☞
Note: Above screen and upcoming screen images only relate to
CD34 application.
1. Test information
2. Sample information
3. Captured image
4. Sample volume information
5. Result area
6. Histogram
7. Raw data table
8. Data list
9. Export data
10. Edit data list
7
10
34
Operation
Data menu
① Test
information
② Sample
information
Test information shows the date, sample/patient ID, and operator
information.
• Measured date: displays measured date and time
• Sample ID: displays sample ID
• Patient ID: displays patient ID
• Operator: displays operator’s ID
User can check the frame numbers and sample volumes of
captured images.
• Sample type: display the sample type
(HPC-A, Mobilized PB, Control)
• Reading frame/volume: total frames and volume
• Deleted frame/volume: deleted frames and volume
• Result frame/volume: nal result frames and volume
(Subtract the deleted frame/volume from
the reading frame/volume)
ADAMII™ ©2016 NanoEnTek Inc.
35

Operation
Data menu
③ Captured
image
Image section displays the captured images. It is also available to
check the cells in each channel.
Press circle button of each channel to identify the cells counted
through a particular channel. ADAMII™ circles the cells that were
analyzed as follows.
• Yellow: cells counted in bright channel
• Purple: cells counted in PerCP channel (CD45 in ADAMII™-CD34 assay)
• Green: cells counted in PE channel (CD34 in ADAMII™-CD34 assay)
• Red: cells counted in FITC channel (dead cells in ADAMII™-CD34 assay)
☞
Note: This function is available only in the data menu.
36

Operation
Data menu
③ Captured
image
Double click the captured image, then you can check preview images of
selected channel on the right side of the screen. To check the preview im-
ages of other channels, select that channel and double click the captured
image again.
ADAMII™ ©2016 NanoEnTek Inc.
37

Operation
Data menu
④ Sample
volume
information
It shows the total sample volume with RBC lysis buffer and original
sample volume used for staining.
The default numerical values of total and sample volumes for each
sample type in ADAMII™-CD34 assay are shown below:
• HPC-A: total volume = 275 μL, sample volume 20 μL
• Mobilized PB: total volume = 60 μL, sample volume 20 μL
• Control: total volume = 275 μL, sample volume 20 μL
Click ‘Edit’ button to edit the total volume, sample volume and dilu-
tion factor. If there are many cells in the sample, edit the dilution factor.
⑤ Result area
38
Result area displays reportable counting results of the selected data.
• Events: displays the event count
• %: displays the percentage of CD34 contrast to CD45
• Cells/μL: displays the number of cells per μL

Operation
Data menu
⑥ Histogram
User can check the cell size graph of each channel. Cell size gating
is available by managing the gating bar in the four different channels.
1. Click the histogram of each channel, then the cell size graph will
be shown. X-axis indicates cell size and Y-axis indicates number
of cells.
2. Press ‘Apply’ button.
3. Blue lines are indicating the gating condition. It can be adjusted
by moving the bar.
⑦ Raw data table
ADAMII™ ©2016 NanoEnTek Inc.
The number of events for each frame will be displayed by channels.
Frame by frame revision of raw data image and removal of invalid
frames can be done on the table. For deleting an invalid frame, click
on the right mouse button and select ‘Delete’ menu. Then, the “Result
area” will show the re-calculated data, reecting the deleted frame(s).
39

Operation
Data menu
⑦ Raw data table
How to nd the invalid frames is described below:
1) Sample aggregation: when there is aggregation in specic area
of sample, that frame should be deleted.
Br image
2) Dust: when there is dust inside the slide, that frame should be
deleted.
Br image
FL image
FL image
3) Bubble: After loading the sample, if there is bubble in the slide,
that frame should be deleted.
Br image
40
FL image

Operation
Data menu
⑦ Raw data table
4) Cell debris: when there is cell debris, that frame should be deleted.
Br image
5) Overlapped circle: when there are several circles in one cell, that
frame should be deleted.
Br image
FL image
FL image
ADAMII™ ©2016 NanoEnTek Inc.
41

Operation
Data menu
⑧ Data list
⑨ Export data
To review the data that is saved in ADAMII™, select the desired sample from
the data list. Scroll up and down to check the data of sample.
Data list
ADAMII™ allows you to export the data table(.csv), images(.jpg),
and the nal report(.pdf). Click ‘All’ button to export the data in 3
types of formats at once.
• csv le: data table containing comprehensive information in a
spreadsheet
• jpg le: raw images of each channel collected for each eld of view
• pdf le: a nal report containing an aggregate result and
calculations such as the frames, volume, event count and
viability of the sample
[csv le]
[jpg le]
[pdf le]
42

Operation
Data menu
⑩ Edit data list
User can edit the data list. Please refer to below explanation of each
function.
• Rename: To rename a le, select the data le and click ‘Rename’
button to change name of the selected data.
• Select all: Click ‘Select all’ button to select all of the listed data.
You can also select all of the sample data at once by
pressing ‘Shift’ button.
• Delete: To delete a le, select the data le and click ‘Delete’ button.
ADAMII™ ©2016 NanoEnTek Inc.
43

Operation
Setting menu
Setting menu contains information of ADAMII™ as well as several
user preferences and other Settings. It allows users to edit settings
about the basic operation, software and rmware information.
1
2
3
4
5
6
87
1. Date & Time
2. Counting settings
3. Calibration
4. Sample volume
5. Entry required
6. Update
7. Device info
8. Disk info
44

Operation
Setting menu
① Date & Time
② Counting
settings
The date and time are already preset when you receive the instru-
ment. You can reset the date and time by yourself.
You can use the adjustment options below if you think that the
counting results are not adequate.
• Sensitivity: refers to the contrast of the objects from the background
- Adjusting the sensitivity higher makes instrument
more sensitive to objects
- While adjusting the sensitivity lower makes the
instrument less sensitive and is useful if there is a lot
of background
• Circularity: used to determine which objects to include in the
measurement based on their roundness
- Increasing the value from 80% requires objects to
be more round for inclusion in the measurement
- Decreasing the value from 80% allows objects to
be less round
- Adjusting this may be useful if the cell type is not
particularly circular or perhaps oddly shaped
ADAMII™ ©2016 NanoEnTek Inc.
45

Operation
Setting menu
③ Calibration
④ Sample
volume
Please refer to page 12~19 for calibration.
To open the calibration result list, click ‘Record’ button. You can
check the data of calibration briey including date, time, lot number,
user ID and result of each channel.
Select the sample type. Enter the total volume (sample volume +
RBC lysis buffer) and sample volume. Then click ‘Set’ button to apply.
⑤ Entry
required
46
Set entry option of the sample ID and Patient ID.

Operation
Setting menu
⑥ Update
Check the software and rmware versions to update.
[Software update]
1. Prepare the updated software in a USB drive and plug into the laptop.
2. Press ‘SW update’ button.
3. Find the updated software in the USB drive and double click the
le to execute.
ADAMII™ ©2016 NanoEnTek Inc.
4. When you see the window below, the update completed successfully.
Press OK button to proceed.
5. Program will be restarted automatically. Check that the version of
software was modied properly.
47

Operation
Setting menu
⑥ Update
[Firmware update]
1. Save the rmware on USB disk and connect to the laptop.
2. Press ‘FW update’ button.
3. Move to the folder where ‘Firmware update le’ is located and
click the le.
4. Press OK button when the automatic update is completed.
5. Program will be restarted automatically. Check the updated
rmware version.
48

Operation
Setting menu
⑦ Device info
⑧ Disk info
Device info indicates serial number of Instrument and connecting
status between cable and the instrument. Please check the connec-
tion status if ‘Disconnected’ is displayed.
Disk info indicates available hard disk space. Please back up or
delete your data from the hard drive when the free space is less
than 100MB.
ADAMII™ ©2016 NanoEnTek Inc.
49

Cleaning and Maintenance
Clean the surface of ADAMII™ instrument with a damp cloth. If liquid spills on ADAMII™, turn off the
power immediately and wipe dry.
ADAMII™ does not need regular maintenance. To troubleshoot problems with ADAMII™, contact
technical support.
IMPORTANT! Never disassemble or service ADAMII™ by yourself.
Unauthorized repairs may damage ADAMII™ or alter its functionality, which will void your
warranty. Contact ivdst@nanoentek.com or your local distributor to arrange for service.
IMPORTANT! Always wipe surfaces with ethanol-soaked paper towels.
Do not directly spray ethanol anywhere on ADAMII™.
IMPORTANT! Avoid exposing ADAMII™ to UV light.
UV light may degrade components, including plastic.
Damage from UV exposure is not covered under the manufacturer’s warranty.
50

Troubleshooting
Installation
ADAMII™
does not power on
Operator program
does not start
Camera preview
Camera preview fail
Operation
Warning message
when there are more than
1,000 cells in 1 frame
Total CD45 count is higher than
bright count (WBC count)
Total CD45 count is lower than
bright count (WBC count)
Frame becomes out of focus
towards the end
• Check on/off switch on back side of main instrument.
• Check power source or contact your distributor
• Check on/off switch on back side of main instrument.
• Check connection between instrument and PC
• Check connection between instrument and PC
• Reboot the instrument or PC
• Request technical support
• Dilute the cell concentration less than 1,000 cells/μL
• Recommend 500 ~ 900 cells in 1 frame
• Delete image that has bubble, uorescence debris or dust,
and then check the result
• Check the focus of image
• If the focus of image was not set properly, load and
read the sample again
• Change the slide and read again
• If you are still having problem, request technical support
Frame is in focus and then out of
focus. The following frame is in fo-
cus again. It happens repeatedly.
Focusing is not adjusted well
with autofocus function
Background of image is
suddenly brighten
ADAMII™ ©2016 NanoEnTek Inc.
• Request technical support
• Set the focus with 2ch manual focus function
• First, check the sample type
• Second, if you used the bottom of ADAMII™ CD34 Reagent
that almost used, please use the new reagent
• If none of the above 2 steps solve the problem, please
request technical support
51

Troubleshooting
Operation
• First, vortex enough for 5 seconds and load sample immediately to read
the slide again
• Second, check the focus. When the image is out of focus, the uorescence
Calibration fail
Sensor of slide
holder cap is faulty
Inaccurate result
of bead is unclear. If the focus is not set continuously in reading step,
please request technical support
• If the focus is still not set correctly even you did both the above rst and
second steps, change the bead
• If none of the above 3 steps solve the problem, please request technical support
• ADAMII™ does not inser t and count the slide when the slide holder cap opened.
• But if sensor of slide holder cap is faulty and you start counting without
closing the cap, then the result will not be accurate. When you eject
the slide with the door open, the cap can be broken inside the instrument.
Poor image quality
52
• While viewing cells in preview state, re-optimize the focus.

Error code
Error code Reason Message Position
E0001
E0002
E0010
E0020
E0030
Camera
connection fail
Serial
connection fail
Serial
disconnected
Camera
disconnected.
Open the slide
holder
Driver
Stage
working
Camera
Slide
inserting
E0031
ADAMII™ ©2016 NanoEnTek Inc.
Open the slide
door
Slide
ejecting
53

Error code
Error code Reason Message Position
E0040
E0050
E0060
Data storage
is full
Sample density
is too high
Update fail
Data save
Measuring
SW update
54

Warranty
NanoEnTek provides 1-year warranty service for defects of material and workmanship.
If any defects occur in ADAMII™, NanoEnTek provides repair services for the defective parts at its
discretion.
The following defects, however, are specically excluded:
1. Defects caused by improper operation.
2. Repair or modication done by anyone other than NanoEnTek or an authorized agent.
3. Damage caused by substituting alternative parts.
4. Use of ttings or spare parts supplied by anyone other than NanoEnTek.
5. Damage caused by accident or misuse.
6. Damage caused by disaster.
7. Corrosion caused by improper solvent or sample.
For your protection, ADAMII™ units being returned must be insured against possible damage or
loss. NanoEnTek cannot be responsible for damage incurred during shipment of a defective instru-
ment. It is recommend that you save the original packing material in which the instrument was
shipped. This warranty is limited to the replacement of defective products.
For any inquiry or request for repair service,
please contact ivdst@nanoentek.com or your local distributor.
ADAMII™ ©2016 NanoEnTek Inc.
55

Safety precautions
Review and follow the safety instructions below:
• If water or other material enters the instrument, adaptor, or power inlet, disconnect the power
cord and contact a service person. For operating environment, refer to Product Specications.
• Do not touch the main plug or power cord with wet hands.
• Always ensure that the power supply input voltage matches the voltage available at your location.
• This instrument is air-cooled and its surfaces may become hot during operation.
During installing, leave a space of more than 10 cm (4 inches) around the instrument and do not
place any objects between the instrument and the walls.
• Do not install the instrument on a slant or a place prone to vibrations, which induces the risk of
instrument malfunction or damage of the instrument.
• Never insert any objects into the air vents of the instrument as this could result in electrical shock,
personal injury, and equipment damage.
• Plug the power cord rmly into the wall outlet and AC adapter.
• To avoid potential shock hazard, make sure that the power cord is properly grounded.
• Be sure to position the equipment such that it is easy to disconnect.
• Turn off the instrument before unplugging the power cord and/or moving the instrument.
• If the instrument is dropped or broken, disconnect the power cord and contact a service person.
Disassembly of case will void warranty.
• Use only authorized accessories (adaptor, power cord, and USB drive).
Warning:
Class A equipment is intended for use in an industrial environment.
In the documentation for the user, a statement shall be included drawing attention to the fact that
there may be potential difficulties in ensuring electromagnetic compatibility in other environments, due
to conducted as well as radiated disturbances.
56

Consignes de securite
Examinez et suivez les consignes de securite ci-dessous :
· N’installez pas l’instrument dans un endroit humide comme une serre ou un incubateur pour
eviter un risque de choc electrique. Si de l’eau ou tout autre materiau penetre dans l’instrument,
l’adaptateur, ou l’entrees d’alimentation, debranchez le cordon d’alimentation et contactez un tech
nicien de service. Pour l’environnement d’exploitation, reportez-vous aux specications du produit.
· Ne touchez pas la che ou le cordon d’alimentation principale avec les mains mouillees.
· Assurez-vous toujours que la tension d’entree d’alimentation correspond a la tension disponible
dans votre endroit.
· Cet instrument est refroidi a l’air de sorte que ses surfaces peuvent devenir chaudes pendant le
fonctionnement.
· Lors de l’installation de l’instrument, laisser un espace de plus de 10 cm (4 pouces) autour de cet
instrument et ne placez aucun objet entre l’appareil et le mur.
· N’installez pas l’instrument sur une pente ou un endroit soumis a des vibrations, ce qui induit le
risque de dysfonctionnement ou d’endommagement de l’instrument.
· N’inserez jamais aucun objet dans les orices d’aeration de l’instrument, car cela pourrait entrainer
un choc electrique, des blessures chez les utilisateurs et des dommages d’equipement.
· Branchez le cordon d’alimentation fermement dans la prise murale et l’adaptateur secteur aussi.
· Pour eviter un risque potentiel de commotion electrique, assurez-vous que le cordon d’alimentation
est correctement mis a la terre.
· Assurez-vous de positionner l’instrument de telle sorte qu’il soit facile de debrancher l’instrument.
· Eteignez l’instrument avant de debrancher le cordon d’alimentation et / ou de deplacer l’instrument.
· Si l’instrument est casse ou qu’il soit tombe, debranchez le cordon d’alimentation et contactez un
technicien de service. Ne demontez pas l’instrument et la garantie sera annulee en cas de demontage.
· Utilisez uniquement les accessoires autorises (l’adaptateur, le cordon d’alimentation, et le lecteur USB).
Prudence
Le produit de classe A est concu pour l’utilisation dans un environnement industriel.
Dans la documentation de l’utilisateur, la declaration doit etre incluse pour attirer l’attention sur le
fait qu’il peut y avoir des difficultes potentielles pour assurer la compatibilite electromagnetique dans
d’autres environnements, en raison des perturbations rayonnees et.
ADAMII™ ©2016 NanoEnTek Inc.
57

Safety precautions
Review and follow the safety instructions below:
Symbol Meaning
Caution or Warning
Protective earth (Ground)
This instrument and consumables conforms to the EC Declaration of
Conformity.
This equipment has been tested and found to comply with the limits for a
Class A digital device, pursuant to Part 15 of the FCC Rules.
These limits are designed to provide reasonable protection against
harmful interference when the equipment is operated in a commercial
environment. This equipment generates, uses, and can radiate radio
FCC Compliance
frequency energy and, if not installed and used in accordance with the
instruction manual, may cause harmful interference to radio communications.
Operation of this equipment in a residential area is likely to cause harmful
interference in which case the user will be required to correct the
interference at his own expense.
Disposal of your old appliance 1. When this crossed-out wheeled bin
symbol is attached to a product it means the product is covered by the
European Directive 2012/19/EU. 2. All electrical and electronic products
should be disposed of separately from the municipal waste stream via
designated collection facilities appointed by the government or the local
authorities. 3. The correct disposal of your old appliance will help prevent
potential negative consequences for the environment and human health.
4. For more detailed information about disposal of your old appliance,
please contact your city office, waste disposal service or visit our
web-site, www.nanoentek.com.
This product conforms to UL 61010-1, CAN/CSA C22.2 No.61010-1
“Safety Requirements for Electrical Equipment for Measurement, Con-
trol, and Laboratory Use, Part 1: General Requirements. “Instruments
bearing the TUV symbol are certied by TUV Product Services to be in
conformance with the applicable safety standard for the US and Canada.
58

Product specications
ADAMIITM Instrument
• Light source:
Bright, Yellow (PE), Red (PerCP) and Green (FITC)
• Fluorescence:
PerCP: BLP01-635R (650 long pass)
PE: Excitation 525/50, Emission 572/28-25
FITC: Excitation 466/40, Emission 550/50
• Camera: High-sensitivity monochrome CCD
• Stage: Automated X-Y-Z stage
• Objective lens: Olympus lens (10X) / 35∮ tube lens
• Exported formats: Image: JPEG, BMP / Raw data: CSV
• Operating power: 100 – 240 V, 1.5 A, 50/60 Hz
• Electronic input: 12VDC, 5.0A
• Operating environment: 5 - 40 °C, 20 – 95 %
• Weight: 19.3 kg
• Dimensions: 300 x 420 x 370 mm (L x W x H)
Operating laptop
• CPU: 6th Generation Intel® Core™ i3-6100U Processor
• OS: Windows 8.1 (64 bit)
• RAM: 4 GB DDR3L 1600MHz
• HDD: 500GB 7200rpm Hard Drive
• 14” Full HD (1920 X 1080) Anti Glare(16:9) WLED
ADAMII™ ©2016 NanoEnTek Inc.
59

Ordering information
Cat. No. Description Contents
ADAM2
ADAM2-PC
TM
ADAMII
Fluorescence Cell Counter
ADAMII
, Bench-top
TM
Laptop PC
· Main instrument
· Power cord
· USB connection cable
· CPU : 6th Generation Intel® Core™ i3-6100U Processor
· OS : Windows 8.1 (64 bit)
· RAM : 4 GB DDR3L 1600MHz
· HDD : 500GB 7200rpm Hard Drive
· 14” Full HD (1920 X 1080) Anti Glare(16:9) WLED
60

Technical support
Visit the our Website at www.nanoentek.com for :
· Technical resources, including manuals, FAQs, etc.
· Technical support contact information
· Additional product information and special offers
For more information or technical assistance, please call or email.
Email
ivdst@nanoentek.com
Website
www.nanoentek.com
Manufactured by:
NanoEnTek Inc.
851-14, Seohae-ro, Paltan-myeon, Hwaseong-si, Gyeonggi-do, 18531, Korea
Tel : +82-2-6220-7942,
Fax : +82-2-6220-7999
MT Promedt Consulting GmbH
Altenhofstrasse 80, 66386 St. Ingbert, Germany
US Branch
NanoEnTek USA Inc.
5627 Stoneridge Drive Suite 304, Pleasanton, CA 94588, USA
Tel.: +1-925-225-0108, +1-888-988-0108(Toll free),
Fax.: +1-925-225-0109
ADAMII™ ©2016 NanoEnTek Inc.
61

Memo
62

Memo
ADAMII™ ©2016 NanoEnTek Inc.
63

ADAMII™
NESMU-ACD-001E (V.0.0)
Email
ivdst@nanoentek.com
Website
www.nanoentek.com
Manufactured by:
NanoEnTek Inc.
851-14, Seohae-ro, Paltan-myeon, Hwaseong-si, Gyeonggi-do, 18531, Korea
Tel : +82-2-6220-7942,
Fax : +82-2-6220-7999
MT Promedt Consulting GmbH
Altenhofstrasse 80, 66386 St. Ingbert, Germany
US Branch
NanoEnTek USA Inc.
5627 Stoneridge Drive Suite 304, Pleasanton, CA 94588, USA
Tel.: +1-925-225-0108, +1-888-988-0108(Toll free),
Fax.: +1-925-225-0109
64
 Loading...