


ADM-300A
Instruction
Versio
n(V1.0)
February 27th, 2010
www.obd2express.co.uk

Content
Ⅰ Product Introduction
··
··················································
·1
1 Features
··
·
··
························································
·1
2
ADM-300A Device
···
························································1
Ⅱ Softw
are Installation
··
··················································2
Ⅲ Activation
···
·······························································3
Pa
ymentⅣ
··
···································································4
UpgradeⅤ
···
···································································5
ExamplesⅥ
··
····································································7
1 Programmer
··
···························································7
2 Audio Decoding
··
······························································10
3 Meter System
··
······················································14
4 IMMO
··
·······················································20
5 Airbag Resetting
··
·························································23
6 Auto Computer Control Unit
··
················································ 27
7 Data Operation
··
······················································29
7.1 Fill data
··
···································································29
7.2
Transfer to the target address ·····································
29
Ⅶ Appendix
··
································································· 30
Appendix Ⅰ:The ways of identifying the pin order
··
·····················30
Appendix Ⅱ: Chip Disas
sembling & Soldering
··
··························30
Appendix Ⅲ:Instruction of using SMDS to adjust Lexus odometer 300,400
····
31
Appendix Ⅳ:W
iring diagram illustration
··
·····························32
Appendix Ⅴ:Table of replacement for acoustic m
emory chip and odometer··
33
Important Statement:
This instruction is on
ly available for reference for users. Nanning Auto Service Co., Ltd.
reserves the right to change the product or product instruction without notice, reserves the
right not to update this document to inform these changes.
www.obd2express.co.uk
ProductⅠ Intr
oduction
1. Features
SMDSIII is applicable to Audio Decoding, Reading IMMO code, Airbag resettin
g, Odometer
Adjusting, ECU Programming, Data programming and so on.
(1)Web-base guide :Give direction to operation. Easy operation and support full
range vehicle type.
(2)Memory rewriting: Modify the data of software; the data of chip will be modified
accordingly without any programming.
(3)Universal Socket: Solder different types chip to the same socket can read and
program immediately. One socket is used for all the devices.
(4)USB interface: Plug and play is ten times of the speed parallel port.
(5)Remote real-time control: All the operation can be remote operated by factory to
carry out easy distance training (need to contact with the factory before operation)
(6)Hardware and software can be upgraded on internet.
(7)Authorization way:
Permanent authorization: is a one-time buyout of existing model authorization
Renewal fee authorization: is a tokens deduction authorization. When original tokens in
the device will be used up, user can pay for the tokens to recharge flexibly.
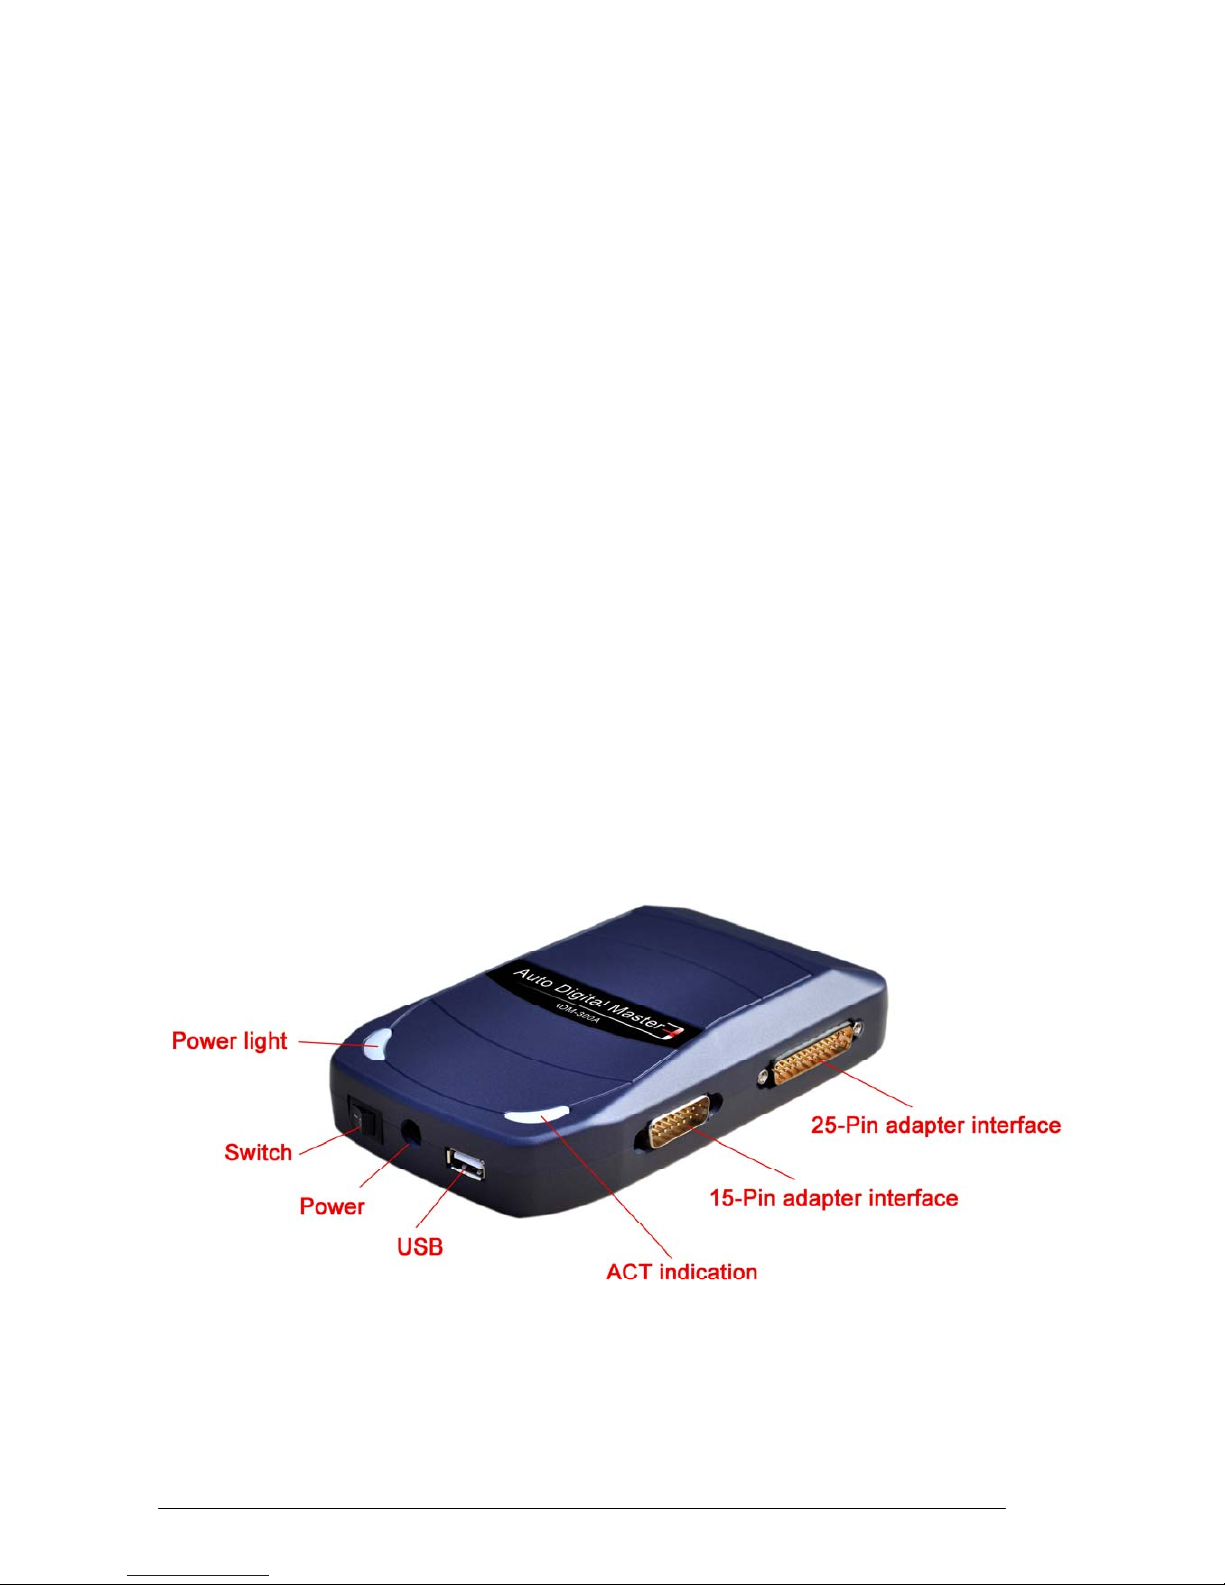
2. ADM-300A
Device
- 1 -
www.obd2express.co.uk

So
ftware InstallationⅡ
Operation steps:
Double click to install “ADM-300A-1.0-EN.exe”
.
You have completed the sof
tware installation , and the computer desktop displays
the icon.
.
- 2 -
www.obd2express.co.uk

ActivationⅢ
Note: Make sure the com
puter has been online before doing product activation
operation.
After finished the sof
tware installation, SMDS Ⅲ is on power and connect with computer by USB
line. Double click icon on the computer desktop; soft
ware will search for device running program
automatically. Operate as the following figure.
- 3 -
www.obd2express.co.uk
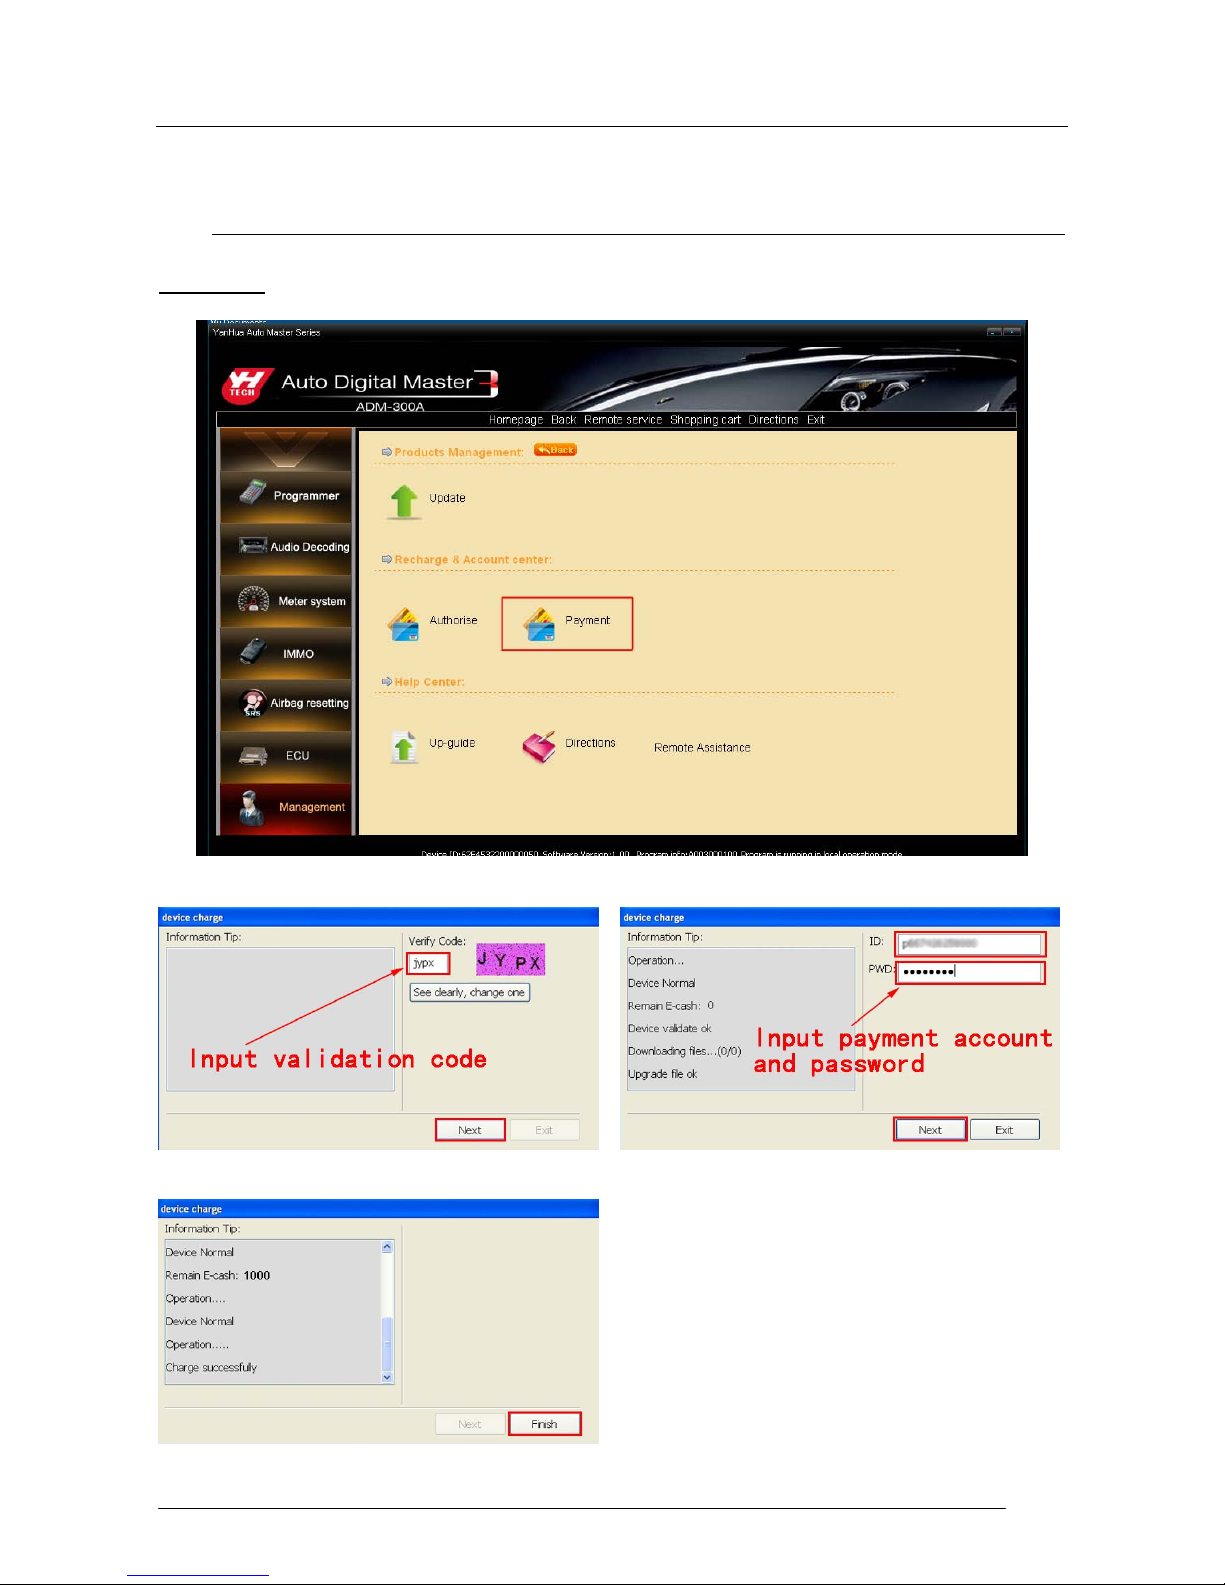
Payment Ⅳ
Note: Make sure the com
puter has been online before doing product paym
ent
operation.
- 4 -
www.obd2express.co.uk

UpgradeⅤ
Note: Make sure the computer has been online be
fore doing product upgrade
operation.
- 5 -
www.obd2express.co.uk

After the fi
rmware upgrade completed there will pop up a dialog box and prompt
whether you need to upgrade adapter, if yes, click "Yes" to upgrade adapter; If not, click
"No" to cancel adapter upgrade.
- 6 -
www.obd2express.co.uk

ExamplesⅥ
1 . Programmer
Programmer is specializing in reading, displaying, saving and programming memory
device. It can be used in common data adjusting, problems and troubleshooting of auto
meter, engine ECU, airbag ECU, and compute program matching, audio decoding, SRS
and so on. Different from other OEM tools that can only use in specific car models, the
programmer can use in all kinds of cars when the area of memory data is found.
Accompanied by more relevant function modules, such as audio decoding module,
odometer adjusting module, IMMO code reader module, it will solve the technical problem
quickly and accurately during car repairing process.
(1) In the homepage, click "
Programmer", you will see "IC Program" and "CPU Program". Take "IC
Program" for example, please see the following picture.
Button features Instruction:
"Home": go back to the first page of the system and reselect the fu
nction modules.
"Back": back to previous page.
(2)Select
93LC56 , click it will start reading data. When complete reading, you will see
window as follows.
- 7 -
www.obd2express.co.uk
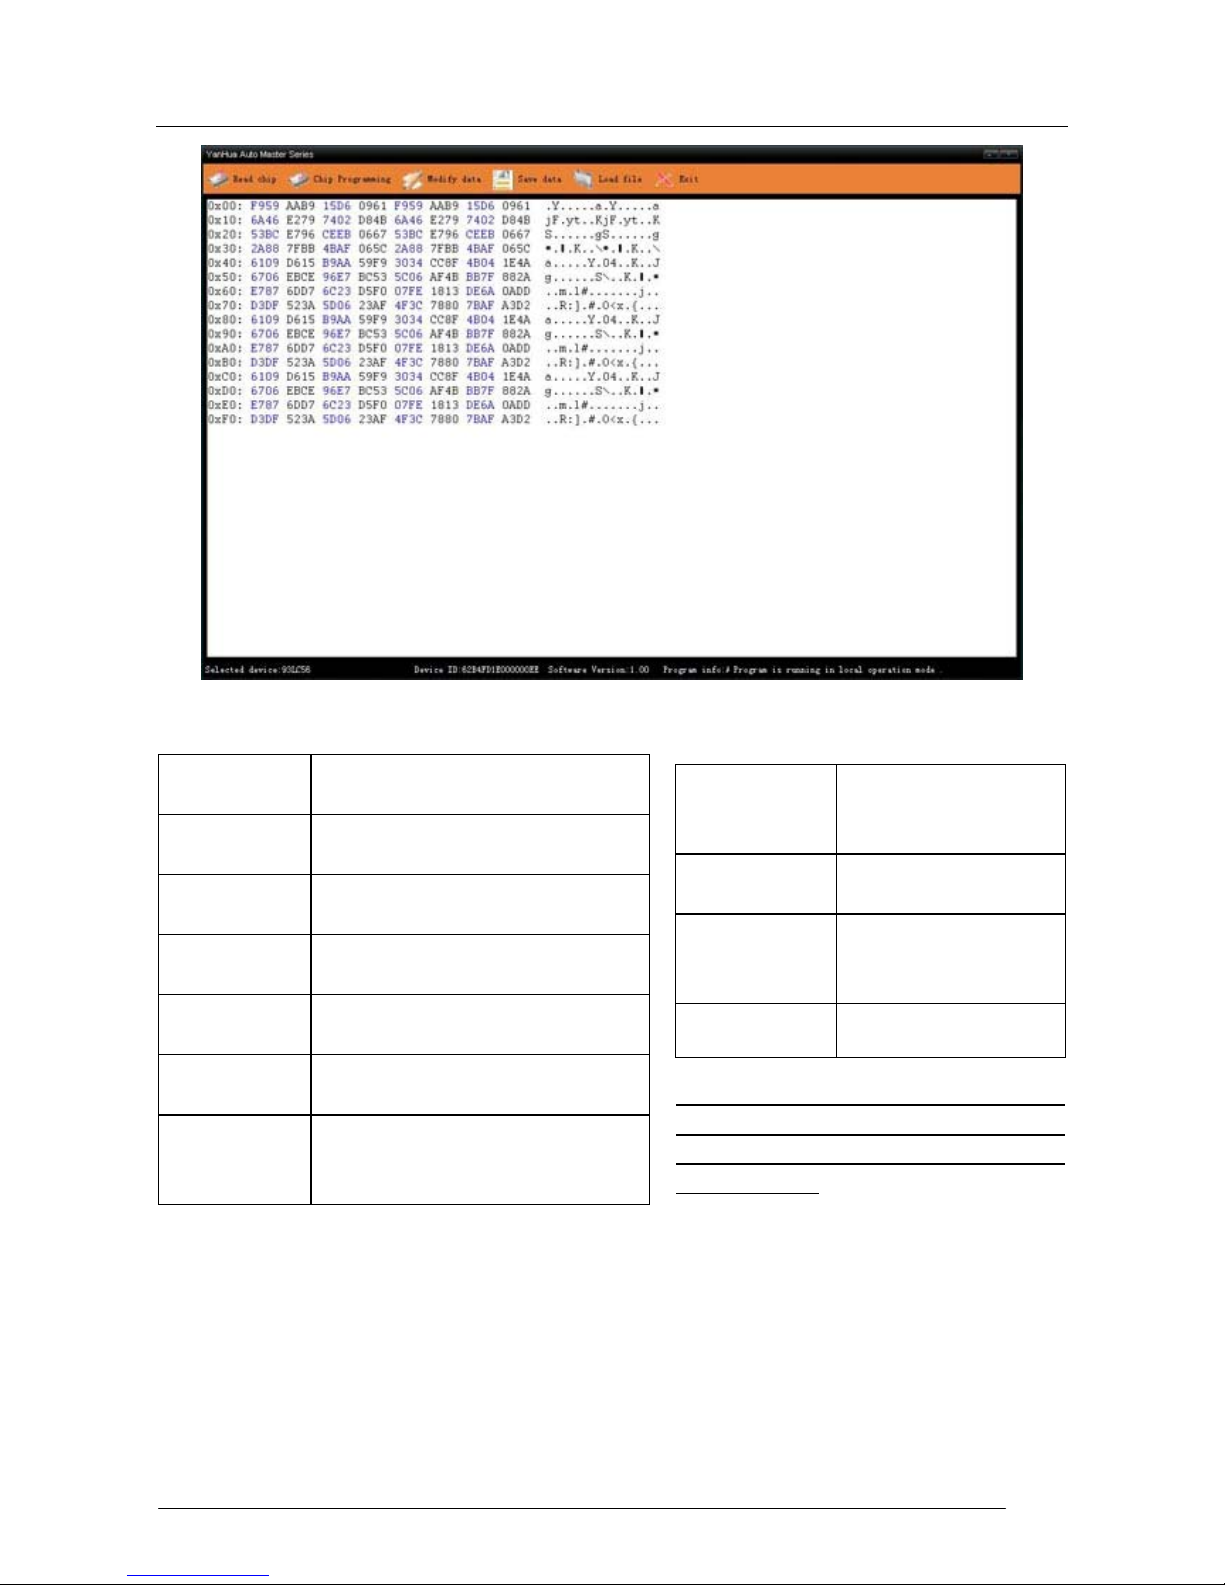
Button
Instruction
Read chip
Read the device data and display
them in the memory data area.
Modify data
Memory dat
a area turns into
modifiable status.
Save data
Save the current data of the
memory dat
a area.
Load file
Open an initial data file and write
the initial d
ata into device.
Chip
programming
You could write programmed dat
a
into the device.
Exit
Close memory data area and
back to previous p
age
to reselect
device and others.
"Memory Data
Manipulation"
Menu command
Instruction
Select all
Select all the dat
a in
memory data area.
Go
(Address)
Place the cursor jump
to the specified
address.
Note: Click on the top of this form of
"memory data
manipulation" menu will
pop-up sub-menus, menu commands
listed above。
- 8 -
www.obd2express.co.uk

(3)Modify data
Click "Modify Data
", memory data area turn into modifiable status, shown as picture.
Once a data is modified, it will write into the device immediately. It realize program when
modifying.
Button Instruction
Eraser
chip
Eraser the data of the chip. Use this operation must be careful, or some
special chip will be damaged.
Ver
ify
chip
Read data of the chip and compare with the data of memory data area.
Undo
Cancel one or more (at most 20) done operation. If cannot do the undo
function or no operation can be undone, this button cannot be used.
Exit
modify
Memory data
area turns into unmodified status. Such operation reset undo
function which makes done operation cannot be undone. So, please consider
the changes whether to restore to the original state when you exit.
Copy
data
Drag the mouse to select the dat
a you want to copy , and then click this button.
Now your copied data will save in the computer temporarily. The operation of
Paste Data can call out and put the data into the specific location.
Paste
Data
First, you should oper
ate "Copy Data", then move the cursor to where the data
should be in, at last click this button to put the copied data in the place of the
cursor.
Fill data
Fill some regular data into the specific location of the device.
- 9 -
www.obd2express.co.uk

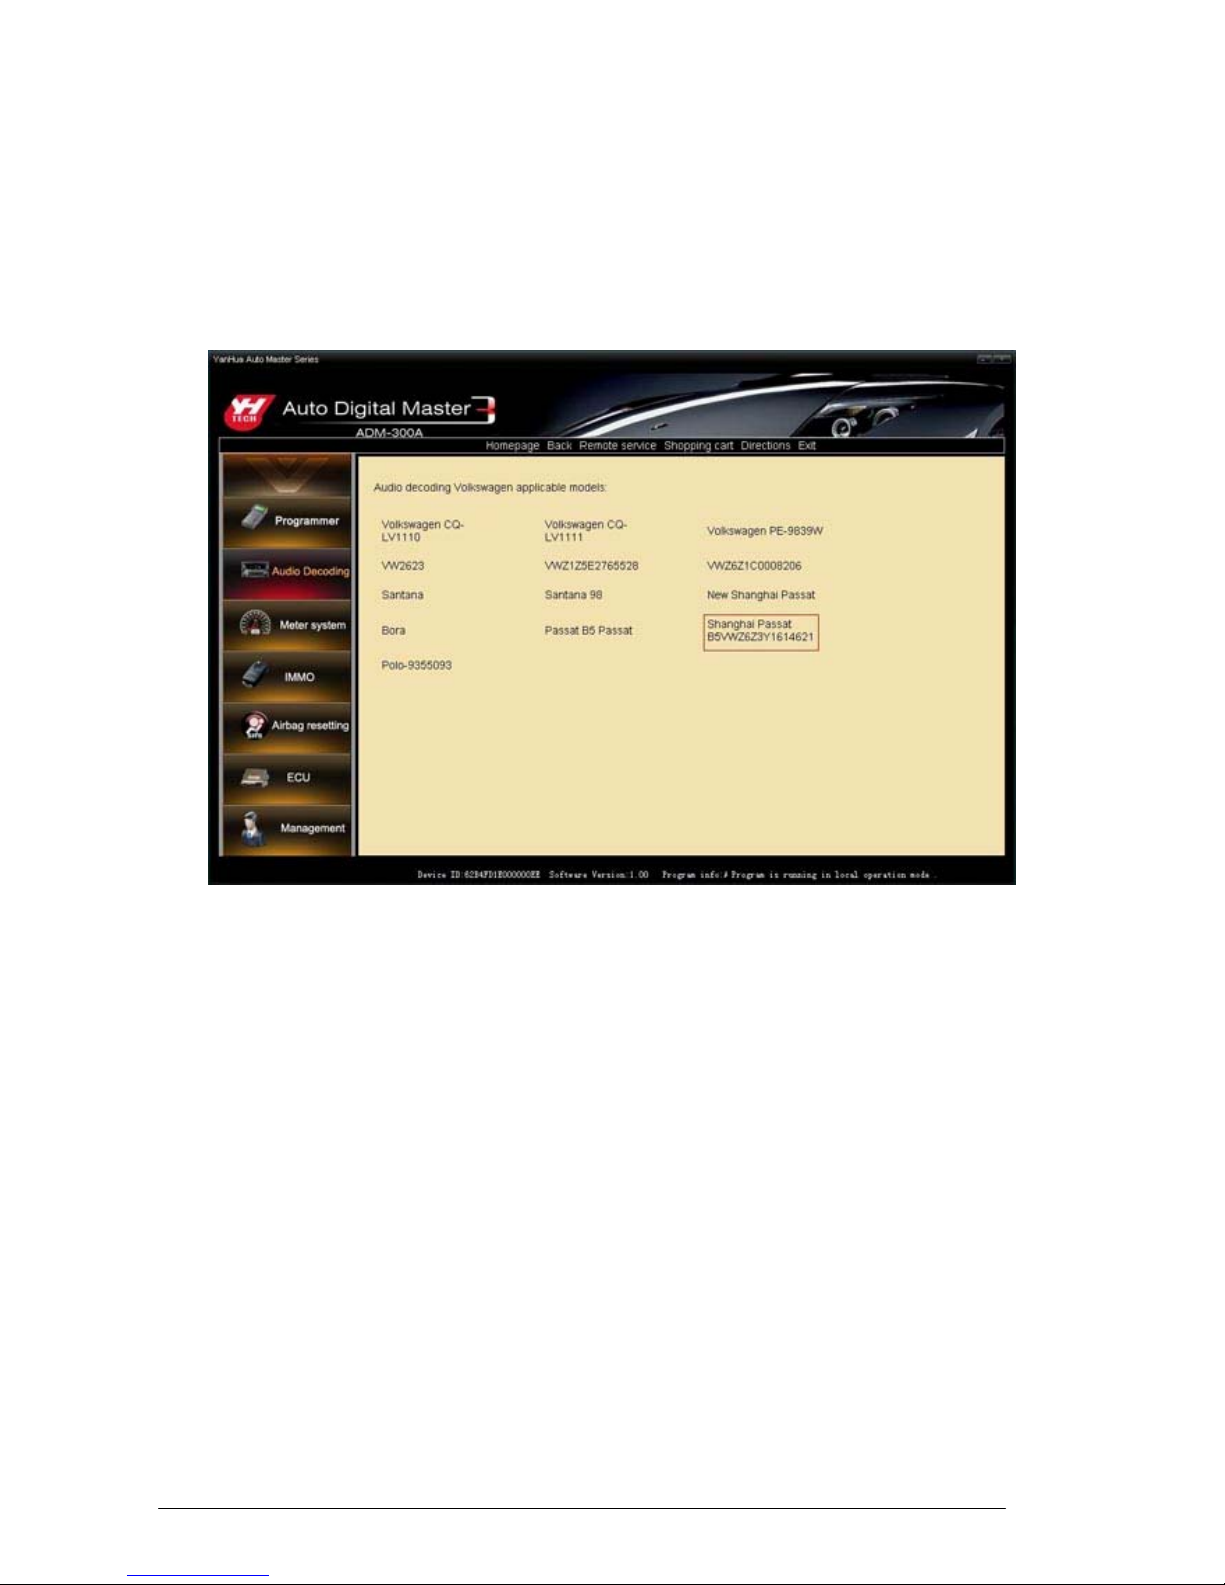
2.Audio Decoding
Main functions: get the audio code.
The audio will activate IMMO system automatically
when power off cause by battery damage or other reasons. You should input the code when
power on again.
Steps are as follows:
(1) Click "Audio Decoding" on the homep age, select the car model. Fo r inst
ance, picture
as follow, click "VW".
- 10
-
www.obd2express.co.uk
Button features Instruction:
"Home": go back to the first page of the system and reselect the fu
nction modules.
"Back": back to previous page.
(2)When you get into the module of audio decoding and selected VW, select the audio
model. For instance, click "Shanghai Passat B5VWZ6Z3Y1614621"
(3)Chip Disassembling & So
ldering
① It will display the detail information of the audio when you select the model number,
such as chip type, the code can be modified or not and so on.
② Find out the relevant chip (for example 24C16) on the circuit board, remember its
location before disassembling, and then solder it to the adapter.
③ Connect the adapter with the device by 25pin socket. Click “Local Operation” to
read the device data.
- 11
-
www.obd2express.co.uk

(4)Acquire pa
sswords
① If the audio code cannot be read and modified, first save the data, then prompt to
select the file needed transfer. That is to write the known code into the chip, and the code is
fixed. When program successfully, put the chip back to the audio. At last, unlock the audio
with the code. For instance, write the code transfer file "Shanghai Passat
B5VWZ6Z3Y1614621" into the chip, then get a code 1821; and if "-" within filename, it
means you don't need code to unlock the audio when program.
- 12
-
www.obd2express.co.uk

② If the audio can be read and modified, the sof
t will prompt you to save the initial
data when you click "Local Operation". ("Save" will automatically save to the default path:
C:\Program Files\SMDS3\user data directory.), the software will read the code of such type
audio automatically, and use this code to unlock the audio when put the chip back.
(5)Modify data
The audio unlock when you get the code.
And if you don't want to modify the chip data
you can skip this step when finishing audio decoding.
The memory data area will appear when finishing reading device data as follows
pictures.
- 13
-
www.obd2express.co.uk

Button Instruction
Modify data
The area of memory data can be modify when click this button.
Save data
Click this button and input the p
ath and filename to save the current data in
the memory data area.
Send data to
factory
Save the dat
a as a file and send to factory by email.
Read audio
code
Read and display the audio code (only for audio that its code can be
modified).
Modify audio
code
Modify audio code (only for audio that its code can be modified)
Tr
ansfer audio
code
Open the initial data file of the known audio code and write it into the device.
Exit memory
data area
Click it means close t
he memory data area and back to the selected info
browser window, then you can select other device or function.
3 . Meter System
Main functions: Used for odometer adjustment
Adjustment steps as follows:
- 14
-
www.obd2express.co.uk

(1)Click the "Meter system" button on the home p
age, choose the odometer- owned
cars, as: American cars.
Button features Instruction:
"Home": go back to the first page of the system and reselect the fu
nction modules.
"Back": back to previous page.
( 2) This page is the odometer-owned cars, as: Click Chrysler to enter the
corresponding model: Grand Cherokee. 300C. 300M. Now take an example to 300MK.
- 15
-
www.obd2express.co.uk

(3)Remove chip or welding cable
① It will shows the det
ail information after choose the corresponding model, as the
chip model, power-map.
② A. Based on the chip model and power-map (Because some odometer chip
- 16
-
www.obd2express.co.uk

contains a multi-block, or there are other considerations) to
find the chip on the odometer
PCB, remember that direction then removed it, installed on universal adapter, If the original
chips have been damaged or adjusted by the new chips please use the same model;
B. This is the Split-free chip, Please connect the cable refer to the wiring diagram
from software, and then plug the ICP to the 25 pin socket of the SMDSIII.
③ Click "Local operation" on the upper right corner of the dialog box as the upper
picture, the meter will read the device dat
a immediately.
(4)Input mileage
① Click “yes" the device will save the data of chip automatically, and will point its
name and location (The detail please looks at Page 12, 1.(3) Modify data).
② The follow window means the original data of the chip have saved.
A. Input the mileage you want on the white box then click "yes".
B. For there are not only mileage data on the odometer chip, so please write the
original data on the new chip before adjust, then write the mileage.
a. Click the "cancel" as the follow picture, then click "restore the original data", choose
the original data to write the chip, the device supply the most of cars original data, if
there is not, please collecting, take out the chip in the odometer, read the data then
save it.
b. Click the "Adjust mileage", input the mileage you wanted to adjust on the white box,
then click “yes”.
- 17
-
www.obd2express.co.uk

③ Quit after successful adjustment prompt, removed the welding line and then clean
the circuit board. Load odometer back to car
.
- 18
-
www.obd2express.co.uk

(5)Modify data
If no need to modify the inner dat
a of the chip after successful adjustment, please take
the chip back odometer to finish the operation, or you can skip this step.
① Click "modify data", the data of memory data area will change into editable state,
modify the data by cursor directly.
Button Instruction
Modify data
Click the b
utton, the memory data area will change into editable
state.
Save data
Click the button to sel
ect the storage path and enter a file name to
save the data of current memory data area.
Send the data
back to factory
Save the c
ontent of memory data area to a file, and send it to
factory by email.
Adjust the
mileage
Input the mileage for adjustment.
Restore the
original dat
a
Open a known original data file of mileage and write it into the
device.
Quit from
the
memory data
area
Click the button means close the memory data area, and quit to
the select information of browser window, reselect device or other
function.
Note: Click "memory dat
a operation" of the top of this form, it will show a
sub-menu. Please refer to page 13 menu command instruction.
- 19
-
www.obd2express.co.uk

4. IMMO
Main functions: Quit read the IMMO code (Also known as the matching key code
usually must be obtained from car manufacturers).
S
teps are as follows:
(1) Clic
k the "IMMO system" on the home page, select the IMMO-owned cars. Take an
example as: Volkswagen Audi.
- 20
-
www.obd2express.co.uk

(2) Select the car model series
of IMMO, as click New Passat.
(3) Remove chip
①
It will show the chip model of IMMO device after selecting the car model.
② find the chip (as 93C86) on the odometer PCB by the instruction, remember that
direction then removed it, solder on adapter.
③ plug the adapter to the 25 pin socket of the SMDSIII. Click "Local operation" on the
upper right corner's dialog box, it will read the device immediately data.
.
- 21
-
www.obd2express.co.uk
(4) Acquire the code
Click "Loc
al operation", read the IMMO code automatically, it will show windows as follows:
Button Instruction
Modify
data
The area of memory dat
a can be modify when click this button.
Save data
Click this button and input the p
ath and filename to save the current data in the
memory data area.
Send data
to factory
Save the dat
a as a file and send to factory by email.
Read
IMMO
code
Read the I
MMO code of IMMO device which connect to the SMDSIII, and
shows.
Exit
memory
data area
Click it means close the memory dat
a area and back to the selected info
browser window, then you can select other device or function.
Note: Click "memory data
operation" of the top of this form, it will show a sub-menu. Please
refer to page 13 menu command instruction.
- 22
-
www.obd2express.co.uk

(5) Modify dat
a
If no need to modify the inner data of the chip after successful reading code, please
take the chip back IMMO to finish the operation or you can skip this step.
① Transfer it out of memory data area after reading password
② Click "modify data", the data of memory data area will change into editable state, as
the picture (The detail please looks at Page 12, 1.(3) Modify data).
5 . Ai
rbag Resetting
Main function: After the airbag exploded, the ECU will store the fault record to th
e
memory chip of circuit board, it's no need to change the circuit board by writing the
unexploded data if the airbag ECU is not damaged.
Operation steps as follows:
- 23
-
www.obd2express.co.uk

(1) Clic
k the "Airbag ECU Data" on the home page, and select the model from
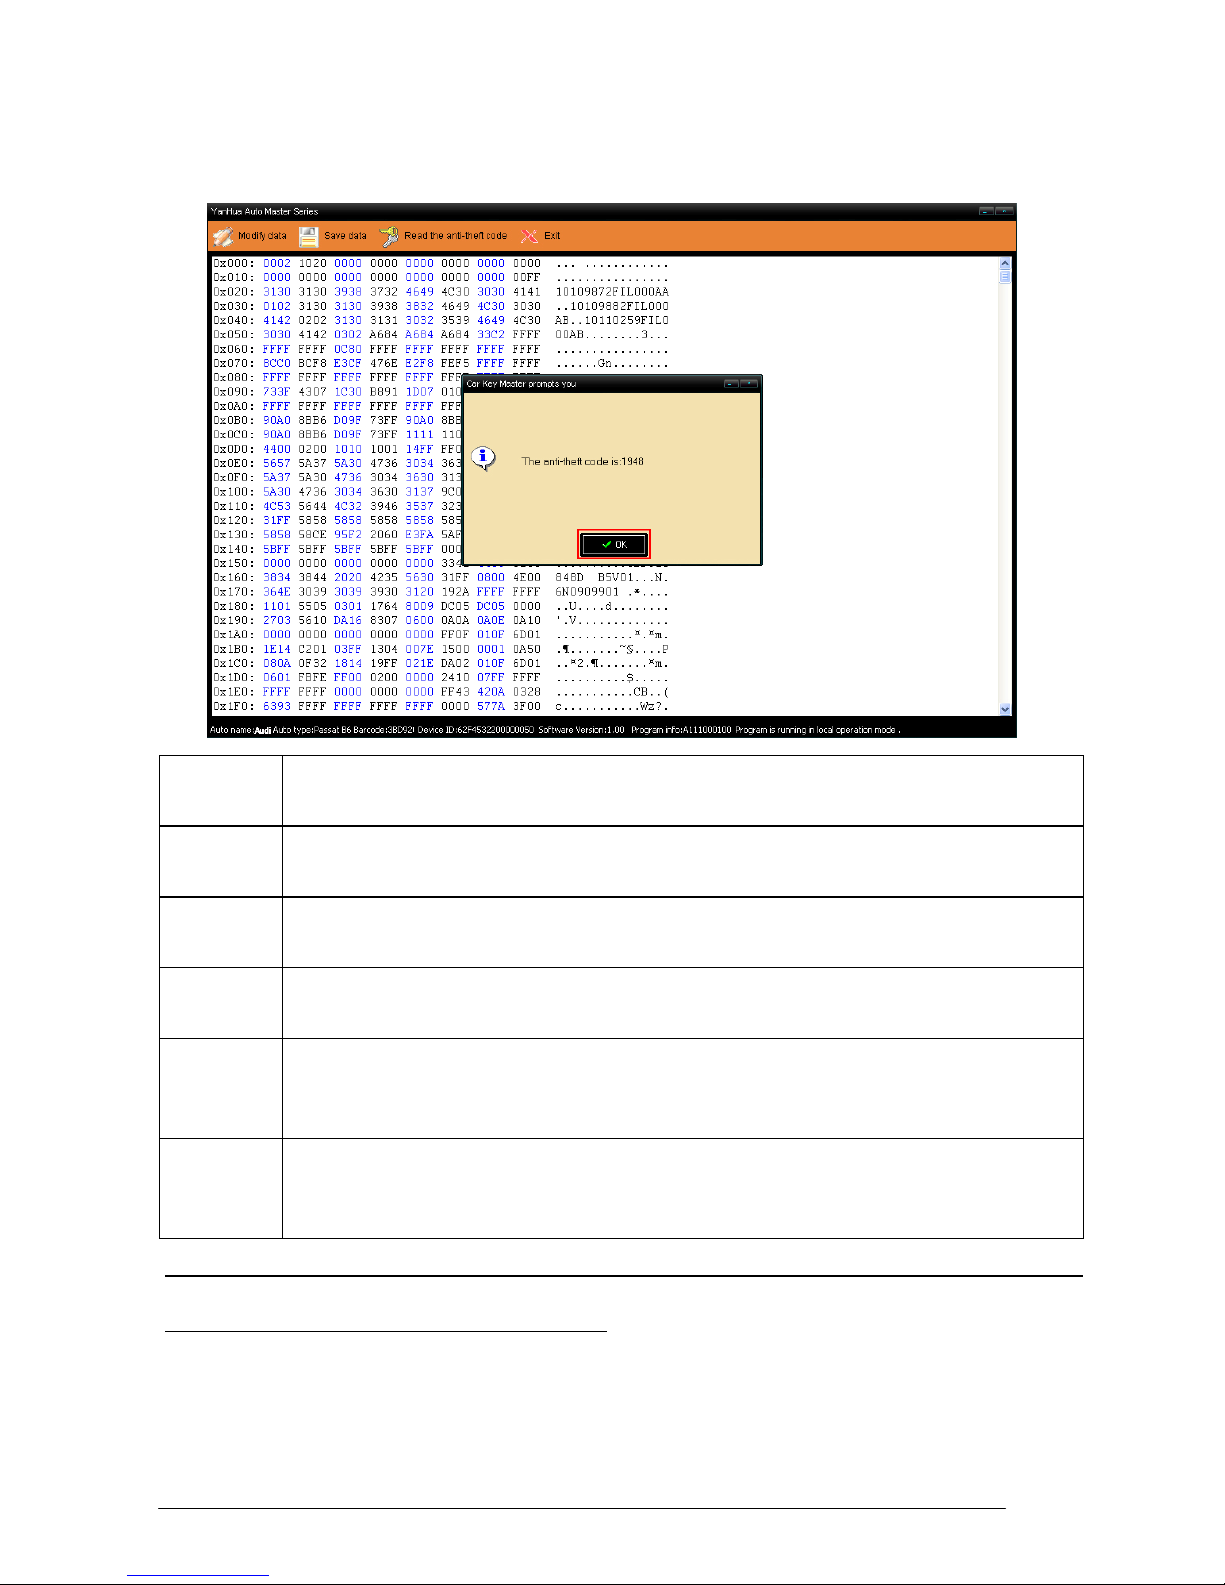
airbag, as click Toyota.
(2) Select the car model series of airbag, as select
Toyota 89170-06340 RA66.
- 24
-
www.obd2express.co.uk

(3) Click "Local Operation" on the upper right corn
er of dialog box, the device will
read the device data immediately.
(4) The device will save the dat
a of chip automatically, and point to load the airbag data,
select the corresponding data to write in the chip.
- 25
-
www.obd2express.co.uk
Button Instruction
Modify data
The area of memory data can be modify when click this button.
Save data
Click this button and input the p
ath and filename to save the current data in
the memory data area.
Send data
to factory
Save the dat
a as a file and send to factory by email.
Update
airbag data
Open an original airbag dat
a file then write it to the device.
Exit
memory
data area
Click it means close the memory dat
a area and back to the selected info
browser window, then you can select other device or function.
Note: Click "memory data
operation" of the top of this form, it will show a sub-menu. Please
refer to page 13 menu command instruction.
(5) Modify dat
a
If no need to modify the inner data of the chip after successful reading code, please
take the chip back airbag computer to finish the operation or you can skip this step.
① Transfer it out of memory data area after writing data into chip.
② Click "modify data", the data of memory data area will change into editable state, as the
picture(The detail please looks at Page 12, 1.(3) Modify data).
- 26
-
www.obd2express.co.uk

6 . Auto Computer
Control Unit
Function: Repa
ir vehicle ECU data. Following types of faults may be cause by ECU
data, and this function will solve the problem. The faults as: Engine jitter , idle inst ability, lack
of starting power, black smoke and so on.
The operation steps as follows:
(1) Enter "vehicle ECU" module
- 27
-
www.obd2express.co.uk

( 2) Ta
ke "Hongqi 488" as an example, enter "Hongqi 488", connect the wire as the
wiring diagram, and operate by the step from software instruction.
① Click "Next", enter the wiring diagram interface, then click "Local operation"
connect the target board to read the data, save the data as the prompt.
② As the picture, select "Next" will write the d
ata from the software to this device;
Select "cancel" back to the upper interface; select "Reselect" will show a selection dialog
box for other selection.
- 28
-
www.obd2express.co.uk

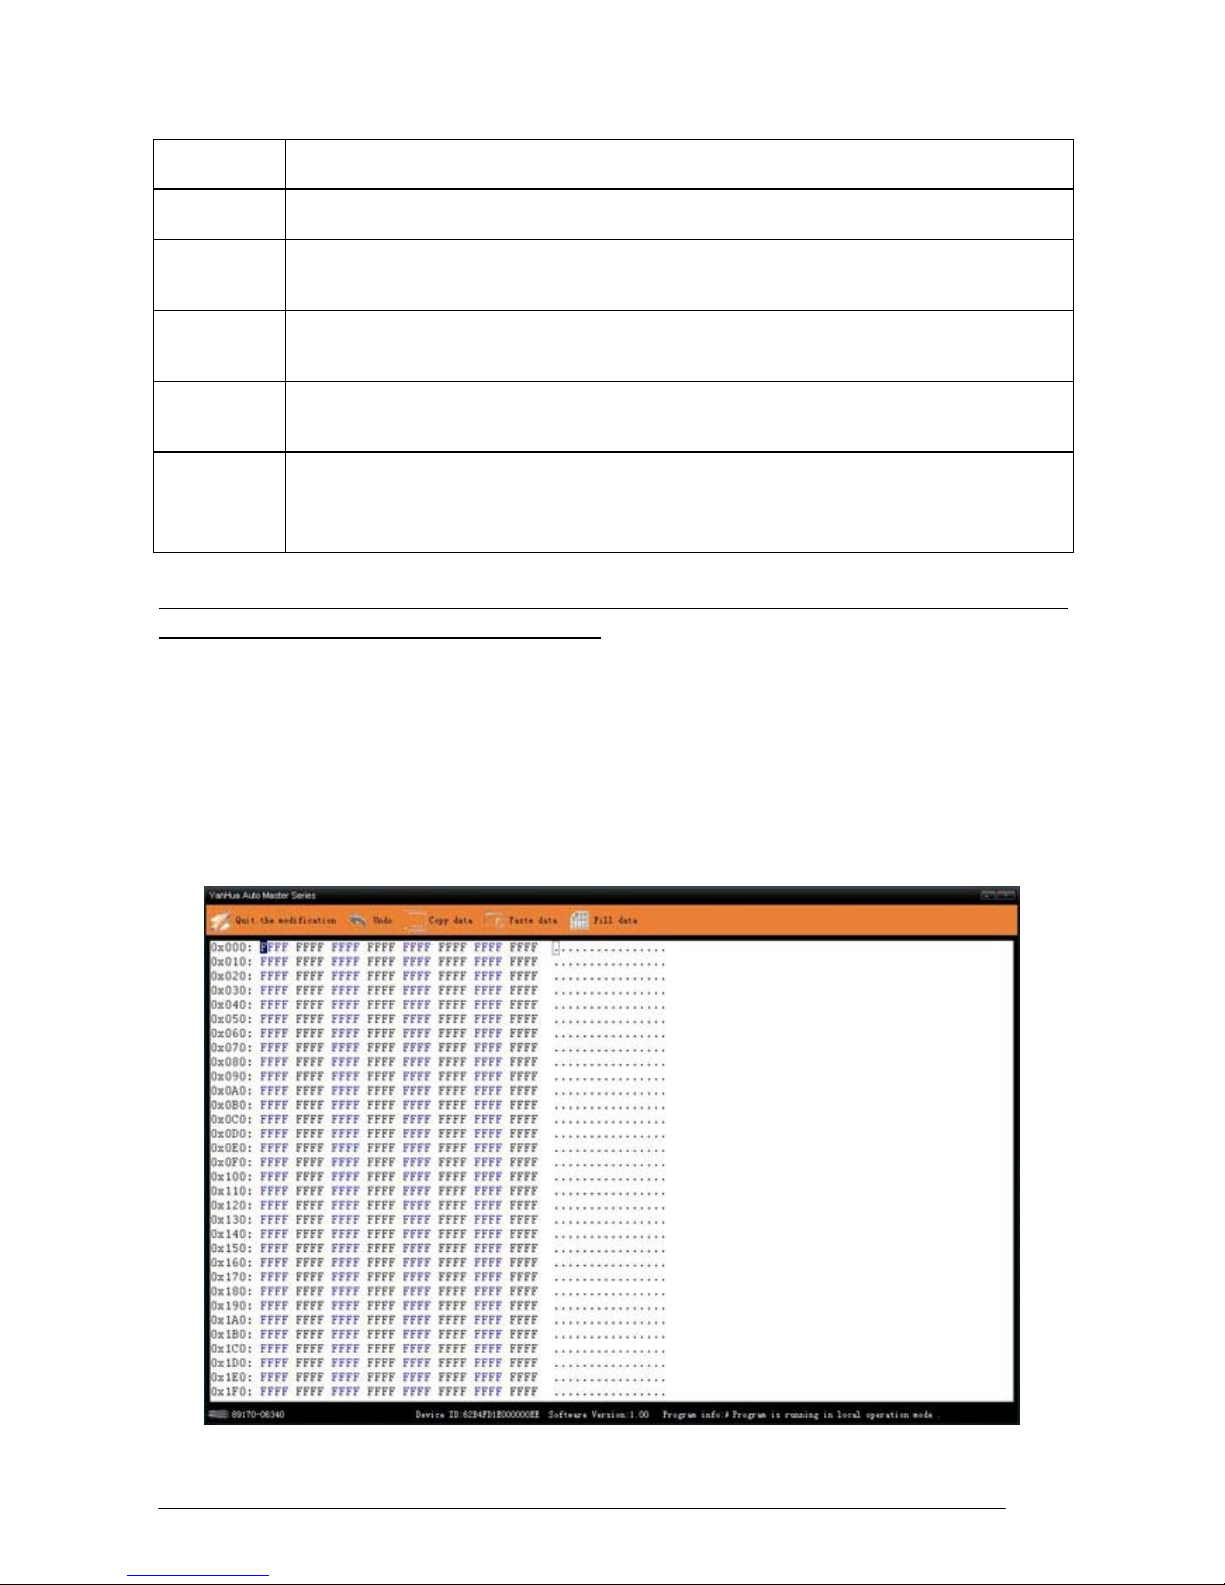
7 . Data operation
7.1 Fill data
It is used to filling data to memory dat
a. Like write data 52 on all the chips.
- 29
-
Button Instruction
S
t
arting
address
Starting address Written to
memory data area is the
location from which to start
writing (hex data).
End address
End addr
ess Written to memory
data area is the location from
which to start writing (hex data)
Fill dat
a
The dat
a to be written (hex
data)
Byte data
Click to
select the round button
on the left of the text, which
means the filled data is byte
form, its range is (00H --- FFH)
Char
acter
dat
a
Click to select the round button
on the left of the text, which
means the filled data is byte
form, its range is (00H --- FFH)
Increase
progressively
Click to select the
square button
on the left side of the text, which
means the filled data is
increased one by filling one unit.
Decrease
progressively
Click to select the
square button
on the left side of the text, which
means the filled data is
decreased one by filling one
unit.
For example: Fill
the starting address "00", fill
the end address "0F", the filled data is "00", and
select the byte data and increase progressively
form, then the written position info of memory
data area is as follows
The first line data can be shown From the written
start address and end address, the filled data is
as follows: 0x00: 0001 0203 0405 0607 0809
0A0B 0C0D 0E0F ................
7.2 T
ransfer to the target address
Tr
ansfer the cursor position of memory
data area:
(1) In the edit box (the default current cursor
position is assumed to be: 0064), input the
address (hex data).
(2) "Transfer" button can move the cursor to
input location. Click "Cancel" exit the window.
www.obd2express.co.uk

Ⅶ Appendix
AppendixⅠ: The
ways of identifying the pin order
1). If the chip has nick, pin 1 is on the bottom left
corner, and the number of Pins in
Count-clockwise direction are 1, 2, 3, 4, 5, 6, 7, and 8.
2). If the chip has no nick, but "●", pin 1 is close to "●", and the identification of the others'
number is the same as above.
3). If the chip has text only, from the text positive, pin 1 is on the bottom left corner, the
identification of the others' number is the same as above.
Chip 93C56 outline diagram
AppendixⅡ:
Chip
Disassembling
& Soldering
1. Prepar
e for soldering
1) The choice of iron:
It should be connected with ground safely
. When there is no constant temperature soldering
iron, the 20W internal heat-type or 25W external heat-type soldering iron can be OK, but
ensure that the former should not exceed 25W, and the latter does not exceed 30W.
2) The choice of flux:
Rosin is the best choice. Solder paste will never be allowed to use in soldering. You should
change the rosin immediately when it turns to black.
3) The choice of solder wire:
The imported solder wire with low melting point and rosin is t
he only choice.
2. Chip disassembling
1) When unsoldering biserial & straight inserted chip, you can clean out the soldering tin on
the pin by disordering gun or disordering wire, please don't draw hard.
2) When unsoldering p
atch or chip, melting more rosin on the two rows of pins, and heat
them up until the chip loose completely, then remove it. Please don't pry hard.
3) Please do not heat the chip too long, or it will be damaged.
- 30
-
www.obd2express.co.uk

- 31
-
4) If there is protection p
aint on the chip, please heat it up with iron, and scratch gently with
a blade or tweezers, then dismantle the chip.
5) How to wipe off the protection paint on the circuit board or IC?
Before soldering, please heat the layer of protection paint with iron or hot air to 70-80
degrees Celsius, and then peel gently with a word screwdriver.
3. Chip Soldering
1) Please do not heat the chip too long, or it will be damaged.
2) The iron should be wiped with a damp cloth or soaking sponge to keep it cl
ean ,because
it won't be easy to disordering tin in a state of high-temperature oxidation for a long time.
3) The heat conduction should depend on the tin, and it does no good to soldering by the
iron head-to-chip hard.
4) Don't move or shake the chip before the soldering solidified.
5) When soldering, you had better first solder the diagonally pins to fasten the chip, and
then do other pins.
AppendixⅢ:
Instruction of using SMDS to adjust L
exus odometer 300,400
Note: It is a long time to adjust Lexus odometer. So you pay more attention to
heat elimination. In very hot weather you must use fan to cool, or unplug several
sockets. As long as the odometer display does not be affected, any method is OK. Or
else the odometer will be damaged.
St
eps of adjusting:
Step 1: Pin 11 of Chip 457C GND.
Step 2: Connect GND of adapter to GND of odometer. Then connect the adapter speed
signal to odometer speed sensor input pin (Lexus 300 is white socket Pin 13, Lexus
400 is orange socket Pin 8.
Step 3: Connect to odometer power supply according to the instructions to see whether the
odometer displays 0. If not, it is Pin 11 doesn't GND, just re-connect GND and then
re-connect power supply)
www.obd2express.co.uk
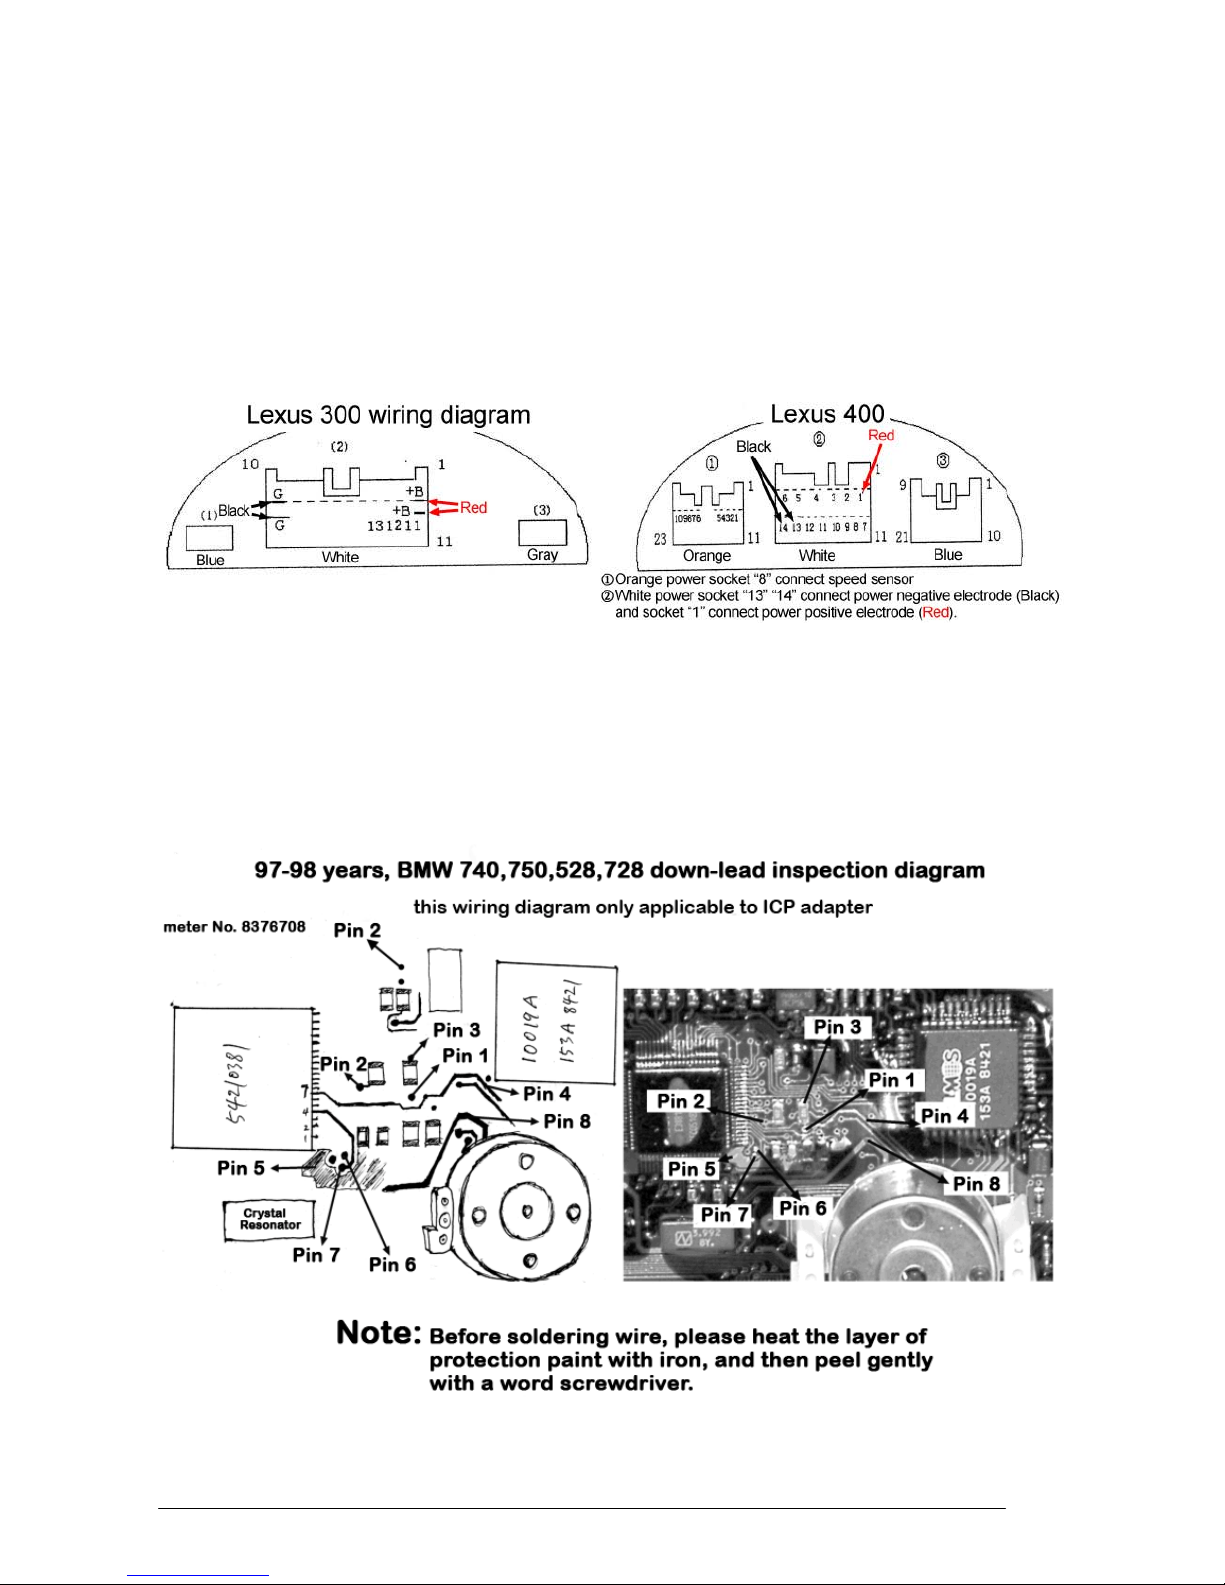
St
ep 4: Running the SMDS software, and enter the speed signal generator to produce a
speed signal, the frequency is 4500 Hz. Always the odometer starts from 0km.
When it displays about 159-161 miles, disconnect Pin 11 of chip 457C and out of
GND. At this time the odometer is automatically working, when it gets to the
required km, just stop generating the speed signal.
Note: In normal state, Lexus odometer w
alks 4000 to 5000 km per hour.
Appendix Ⅳ: Wiring
diagram illustration
- 32
-
www.obd2express.co.uk

AppendixⅤ:
Ta
ble of replacement for acoustic memory chip and odometer
Original ch
ip Alternative chip Remark
93C06 93C46 93C06 cannot replace 93C46
9314 93C46 9314 cannot replace 93C46
C46M6 93C46
DD72 93CS66 DD72 cannot replace 93CS66
DD82 93CS66 DD82 cannot replace 93CS66
S130 93C46
S220/SL221 93C56 S220 cannot replace 93CS66
S330 93C66
S530 93C86
93C56 93C66 93C56 cannot replace 93C66
C56M6 93CS66 C56M6 cannot replace 93CS66
- 33
-
www.obd2express.co.uk

- 34
-
L56R 93C56
RA57 93C56
RA66 93C66
RA86 93C86
CS56 93CS66 CS56 cannot replace 93CS66
85C72 24C16 85C72 cannot replace 24C16
85C82 24C16 85C82 cannot replace 24C16
24C01 24C16 24C01 cannot replace 24C16
24C02 24C16 24C02 cannot replace 24C16
24C04 24C16 24C04 cannot replace 24C16
24C08 24C16 24C08 cannot replace 24C16
D6253 24C16(OR
24C01) D6253 cannot replace 24C16
D6254 24C16(OR
24C01) D6254 cannot replace 24C16
PDH001
X2444P(OR
PDH004
X2444(
OR X24C44)
X24C01 none
X24C01 and 24C01 cannot be general
ST14771 25020
68343
25020
68558 25020
95P08 95080
0D080 35080
www.obd2express.co.uk
 Loading...