

Nakajima AE-740 Operation Manual
^rll
I
.{N\ll
IAKAJ'MA
-r \-\.f-
r- \\-
:
S-
_
(O
Ffrst
in
quality
and reliability
o4^
..---!
O-7/-
-S^!
- .7,7|t r\\ -
'o1(/llf
ll\\\\-S
eO!tlllll\-'.1-
'J,rrlll'
OPERATION
MANUAL
AE-740
ELECTRONIC
OFFICE
TYPEWRITER
FOR
USA
ONLY
NOTE: This equipment
has
been tested and found
to
comply
with
the limits
for
a
Cl.ss
B drgrral de
r
ice.
pursuant
to
Part l5
of the FCC
Rules. These limits
are
designed to
provide
reasonable
prorectron
agarnsr
harmful
interference in
a residential
installation. This
equipment
generates,
uses
and
can radiate
radro
frequency energy
and, if not installed
and
used
in
accordance with
the instructions,
may
caus€ harmful
interference
to radio
communications.
However,
there is no
guarantee
that interference will
not
occur in
a
particular
installation.
If
this equipment
does cause harmful
interference
to
radio
or television
reception, which
can
be determined
by turning
the equipment
off and on, the
user is encouraged
to try
to
correct the interference
by one or more
of the following measures:
-
Reorient
or
relocate
the receiving
antenna.
-
Increase
the
separation
between the
equipment and receiver.
-
Connect
the equipment into
an outlet on a circuit
different from
that to
which
the receiver
is connected.
-
Consult the dealer or
an experienced
radio/TV
technician for
help.
FCC
WARNING:
-
Changes
or modifications
not
expressly
approved
by the
party
responsible
for
compliance
could void
the user's
authority
to
operate
the equipment.
-
Use a shielded interface
cable.
your
new.Electronic
Typewriter
increases
your
typing
elficiency
through
use
of the
most advanced
technology.
Some
of the
many
outstanding
features
of
your
typewriler
are:
.
16,0O0-charactermemory
.
15.0
inch
paper capacity
.
40-character
liquid crystal
display
o
Four
modes: normal
print/line
prinVjustify
print/store
o
Easy-to-change
1O0-character
printwheel
.
l0-line correction
memory
(700
characters
max.)
.
Pitch selector:
10,
12, l5 and
PS
(proportional
spacing)
.
Line space
selector:
l, I
ll2 and
2lines
o
Programmable
paper insert
.
Full
electronic tabulation
for
up
to 30
positions
.
Decimal/center/flush
righttabulation
.
Column
layout
.
Search
and
replace
o
Block copy/move/delete/print
o
Automatic
full
page
relocation
.
Automatic centering
.
Right margin flush
o
Automatic return
o
Automaticunderlining
o
Bold
typing
'
Caps
lock
o
Micro up/micro
down/micro
back
space
o
Framing
(line
drawing)
.
Optional
interface
.
Optional spell
check
(dictionaries
for English,
French, and Spanish
are available)
This
manual describes
your
typewriter's
functions,
operating
controls
and
procedures, and
replacement
of
its accessories.
Thorough
study of
instructions
will facilitate
and
maximize
the efficient
use
of
your
new
electronic
typewriter.
TABLE
OF
CONTENTS
INTRODUCTION
Rules For Safe Operation
Part Names
And Functions
Key Functions
GETTING
STARTED
Unpacking
Setting Up
.6
rurningonryp.*;i,;;
:::.::....
.......7
InsertinglEjectingPaper
......8
Setting the Top of Form
(Amount
of Papbr Insert)
. . . . .9
TypingControls
......10
TypingModes(NP/LPlJUST/STORE)
...11
Margins
. . .13
Tabs .
.....14
ConectionsonPaper
.......16
Corrections on the
Display
. . . 19
TYPING FUNCTIONS
Paragraphlndentation...
....22
AutomaticCentering
.......23
RightMarginFlush
....26
AutomaticReturn
.....27
Required
Hyphen
and Required
Space
.
. .28
SyllableHlphen
......28
DecimalTabulation
...29
CenterTabulation
.....30
FlushRightTabulation
......31
GroupTabulation
.....32
Columnlayout
.......34
AutomaticUnderlining
......37
Keyboard
II
(Special
Characters)
. . .38
BoldTyping
....38
Capslock
......39
Overlay
. . .40
Superscript/Subscript
...
....41
Micro Up/tlicro Down/Jv1icro Back
Space
. . . . .42
Framing(LineDrawing)
.....43
MEMORY
FUNCTIONS
CreatingaTextFile.
...45
ModifyingaTextFile.
......51
CreatingaPhraseFile.
......54
ModifyingaPhraseFile
.....57
InsertingaPhraseFilewithinaTextFile .
......58
Setting the
Page Length of a Text File
. . . .59
StopCode ......60
SearchandReplace..
.......62
Block Operations
(Copy/Tvlove/Delete)
. . .67
Printing
aTextFile
.,..70

PrintingaPhraseFile.
.......72
Printing a Chain of Files
(Chain
Recall)
PrintingaBlockof Text
.....74
VariableFile
....75
FormatFile
.....78
FileCopy
......80
FileDeletion
....81
List of Files in Memory
. . . . .82
MemoryOverflow
....83
AvailableMemoryCapacity
......84
MemoryAllClear
.....84
HOW TO
CHANGE ACCESSORIES
Ribbon
Cassette
Conection Tape
Printwheel . . .
SUPPLIES
MAINTENANCE
Removing Platen
Cleaning
Service
.......85
.......87
.......88
INTRODUCTION
Rules
For Safe Operation
Make sure
you
are
using the
proper power as stated on the
name
plate
at the back of the typewriter.
Your
typewriter
is a highly sophisticated
mechanism. Never attempt to
repair it
yourself.
If repair
becomes necessary, take
it to the authorized
service center.
Never
insert metal
objects
such as a
screwdriver,
paper
clip,
nail file,
etc.,
inside the typewriter. This
could cause damage
to the typewriter
and/or electrical
shock.
Do not leave
your
typewriter
unattended
when it
is turned
on. Always turn off the typewriter
when
vou
have finished typing.
Be sure to turn off the typewriter
when
removing
platen.

Part
Names
And
Functions
27
26
25
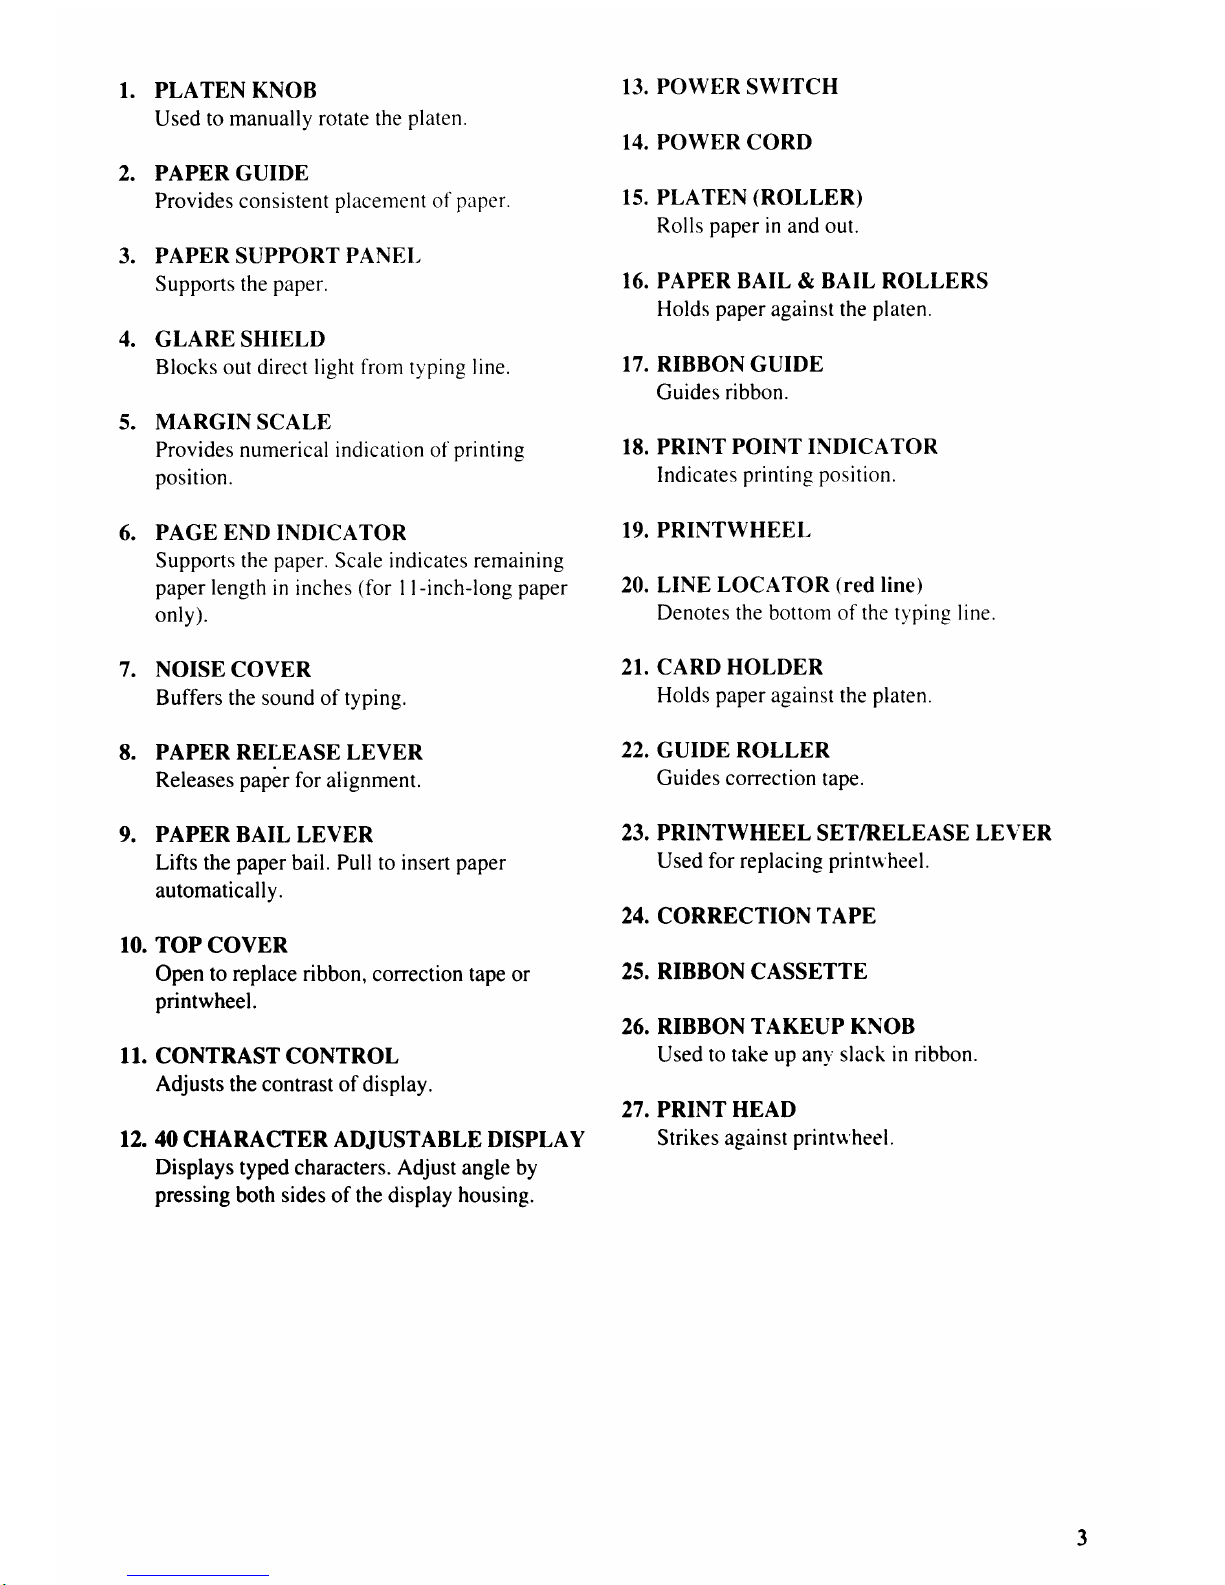
1. PLATEN KNOB
13.
POWER
SWITCH
used to manually
rotate the
platen'
14.
powER
coRD
2. PAPER GUIDE
Provides consistent
placement
of
paper.
15. PLATEN
(ROLLER)
Rolls
paper
in and out.
3. PAPER SUPPORT
PANEI,
Supports the
paper.
16. PAPER BAIL & BAIL
ROLLERS
Holds
paper
against the
platen.
4.
GLARE SHIELD
Blocks
out
direct light from typing line.
17. RIBBON
GUIDE
Guides
ribbon.
5. MARGIN SCALE
Provides numerical indication of
printing
lE.
PRINT
POINT INDICATOR
position.
Indicates
printing position.
6.
PAGE END INDICATOR
19.
PRINTWHEEL
Supports the
paper.
Scale indicates remaining
paper
length
in inches
(for
I l-inch-long
paper
20. LINE
LOCATOR
(red
line)
only).
Denotes the bottom of the typing line.
7. NOISE
COVER
2I. CARD HOLDER
Buffers the sound of typing.
Holds
paper
against the
platen.
8.
PAPER RELEASE LEVER
22, GUIDE ROLLER
Releases
paper
for alignment.
Guides correction
tape.
9. PAPER
BAIL LEVER
23. PRINTWHEEL
SET/RELEASE
LEVER
Lifts the
paper
bail.
Pull to insert
paper
Used for replacing
printuheel.
automatically'
24.
coRRECTIoN
TA*E
IO. TOP
COVER
Open to replace ribbon,
correction tape or
25. RIBBON CASSETTE
printwheel.
26. RIBBON
TAKEUP KNOB
ll.
CONTRAST CONTROL
Used
to take up anv slack in ribbon.
Adjusts the contrast
of display.
27. PRINT HEAD
12. 40
CHARACTER
ADJUSTABLE
DISPLAY
Strikes
against
printu'hee|.
Displays
typed characters. Adjust angle by
pressing
both sides of the display housing.
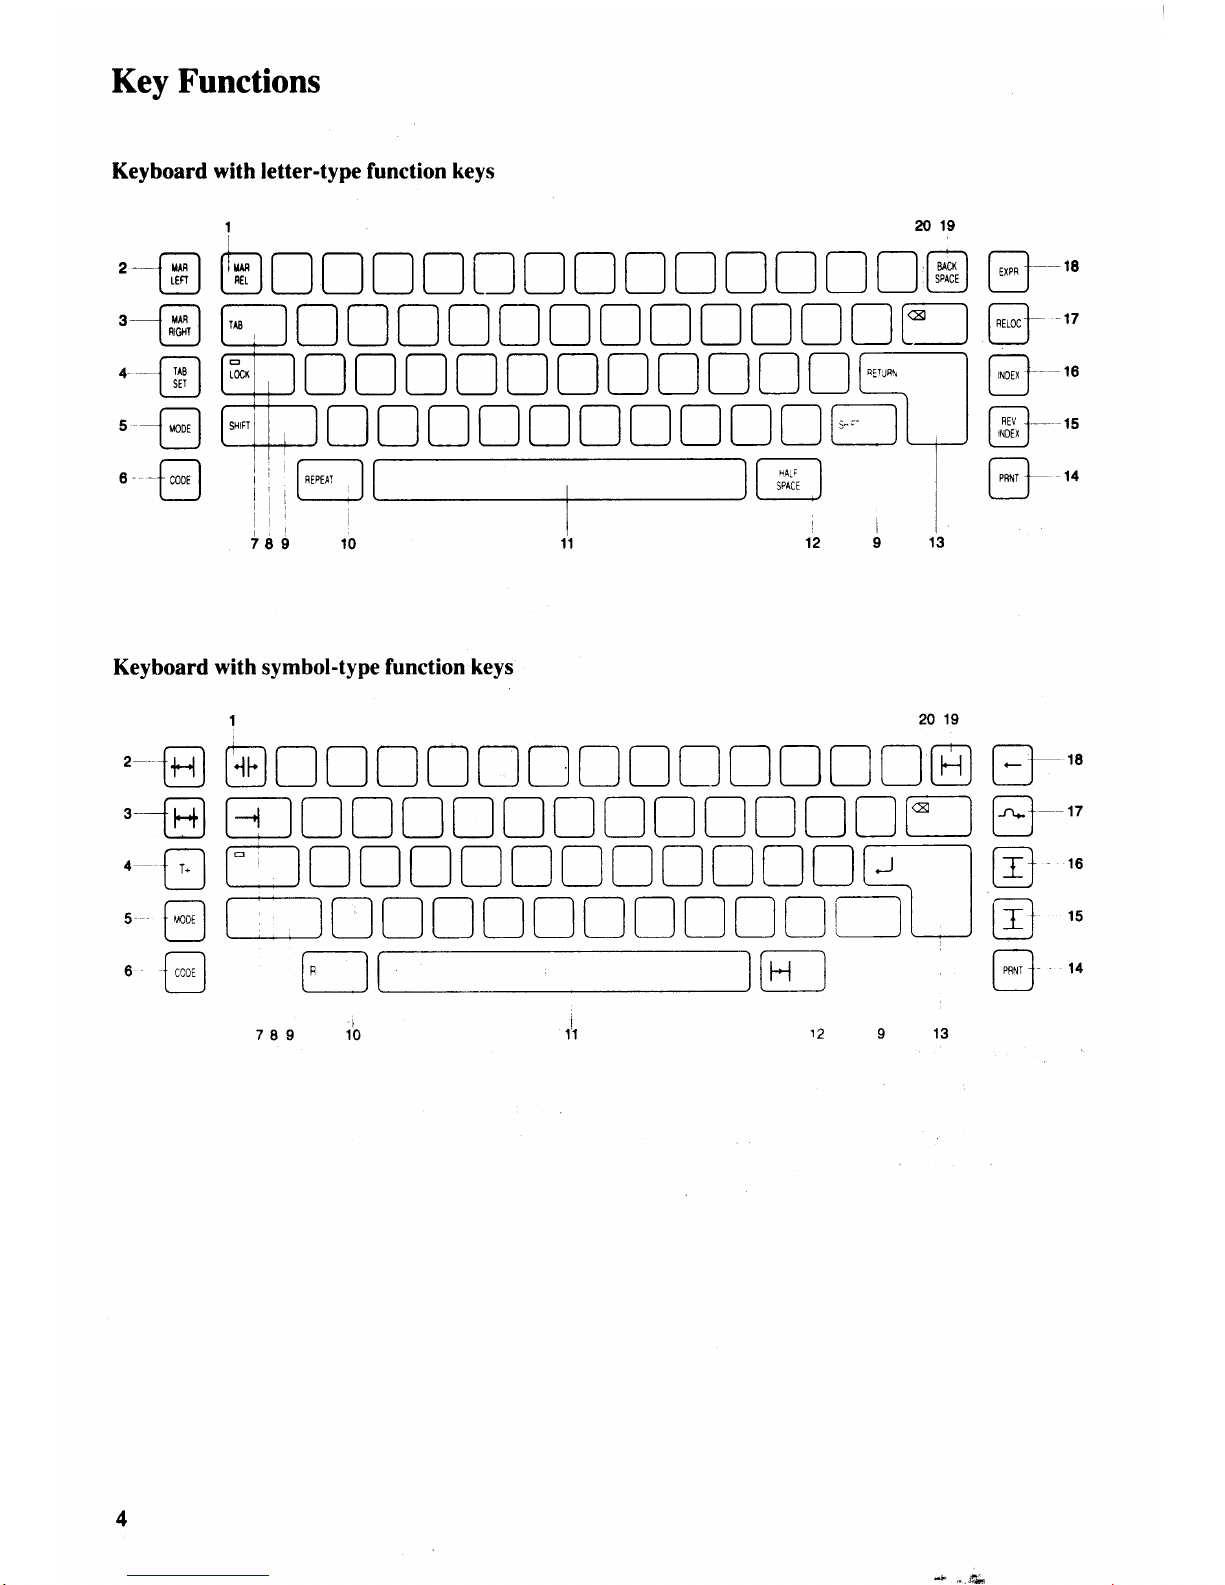
Key Functions
Keyboard
with
letter-type function
keys
,€
'=@
.---@
'@
'-@
1
2o1s
@DDDDtlDnDDtrDnD@
E--"
EJDDDIDDDDDDDDr]
B
''
w
D ! ! D D rn
DD
D
D
q-l
Et.-*
ffiDDlDTNDDDDiltJ
@-''
iii@
@ l
eu
- 1
ll
ltti
1112913
Keyboard
with
symbol-type
function keys
1
2019
,-@
ENIDDDNDTTDDTDB
B
''
'--E
MDDNDDDNDDDDDil
tr
fl
.EII]DDDDDnDDDTDq-IB
"
'
@
I;nnDDnDIIDI[]L*J
B
15
6@
n
E
@"
I
789 10
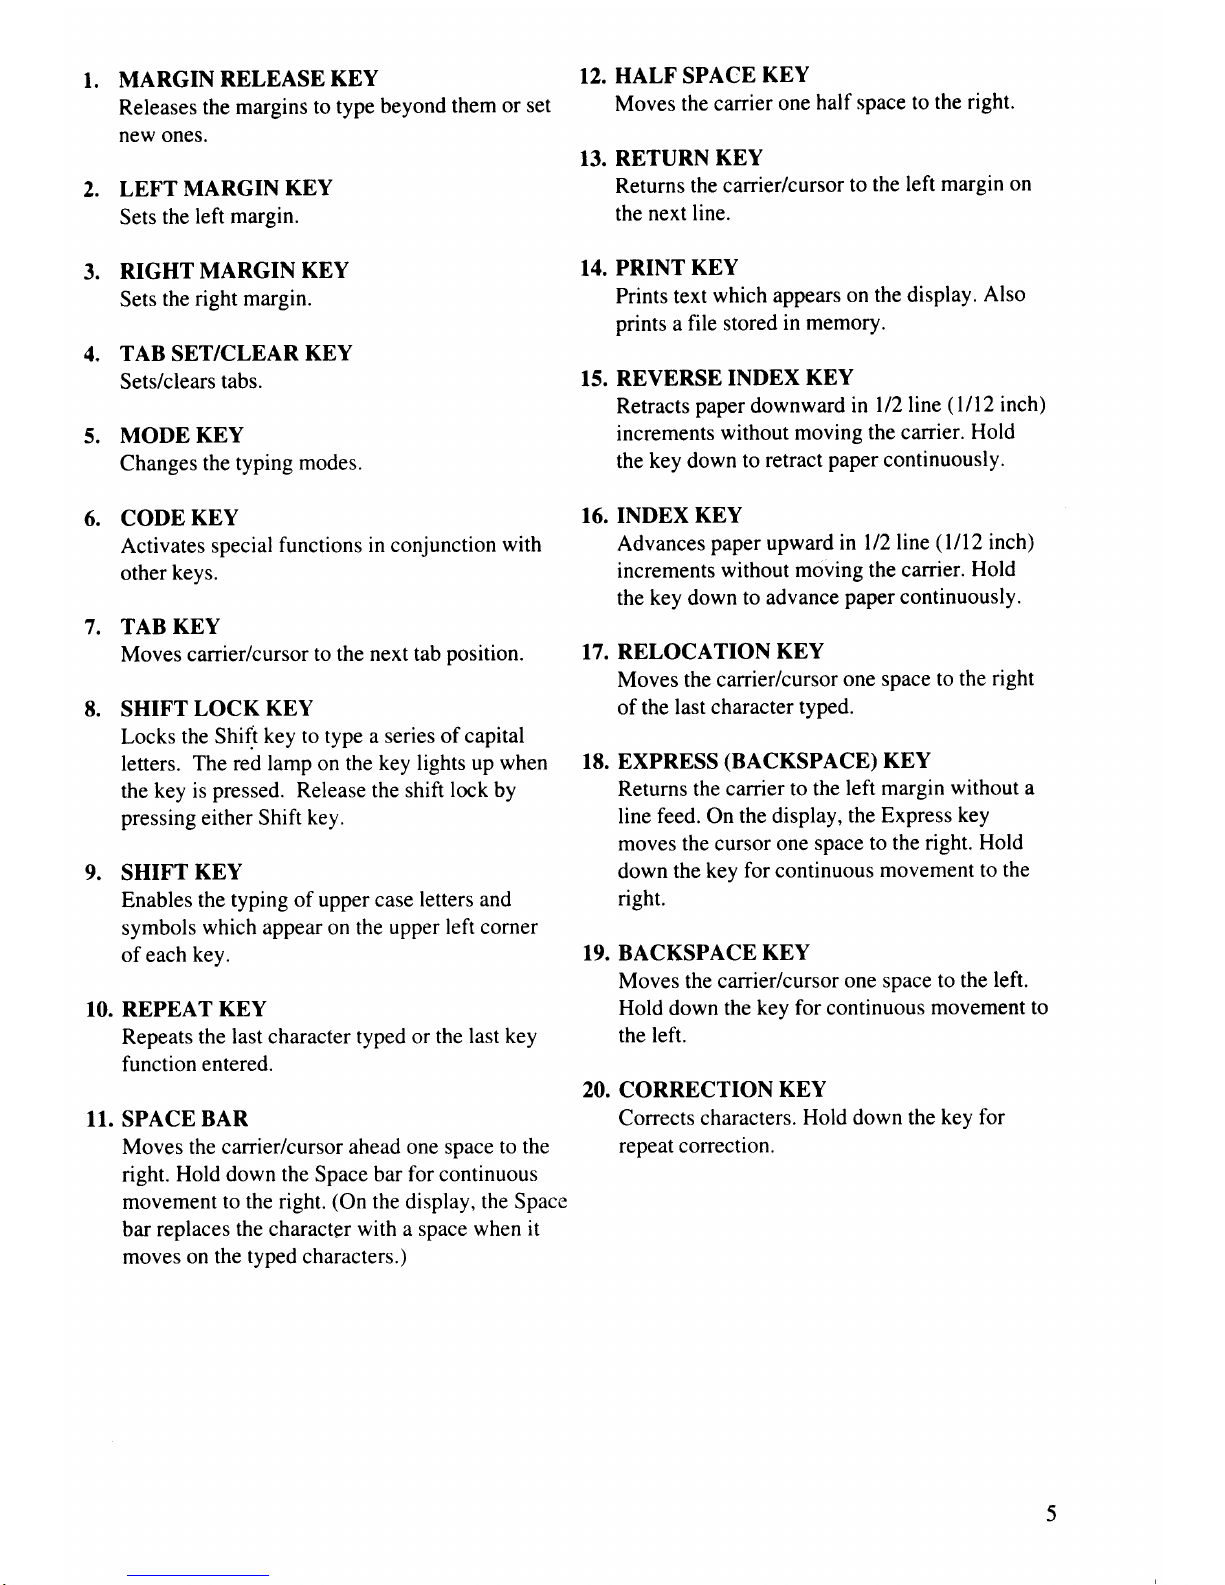
I.
MARGIN
RELEASE
KEY
12.
HALF
SPACE
KEY
Releases
the margins
to
type beyond
them
or set
Moves the
carrier
one
half space to
the right.
new ones'
13.
RETURN
KEY
2.
LEFT
MARGIN
KEY
Returns
the carrier/cursor
to
the left
margin on
Sets
the
left margin.
the next
line.
3.
RIGHT
MARGIN
KEY
14.
PRINT
KEY
Sets
the
right margin.
Prints text
which appears
on the display.
Also
prints
a
file stored
in
memory.
4.
TAB
SET/CLEAR
KEY
Sets/clears
rabs.
15.
REVERSE
INDEX
KEY
Retracts
paper
downward
in
ll2line
(
l/12 inch)
5.
MODE KEY
increments
without moving
the carrier.
Hold
Changes
the typing
modes.
the
key down
to retract
paper
continuously.
6. CODE
KEY
16. INDEX KEY
Activates
special
functions in conjunction
with
Advances
paper
upward
in ll?line
(
lll2 inch)
other
keys.
increments
without
moving the carrier.
Hold
the key down
to advance
paper
continuously.
7. TAB
KEY
Moves
carrier/cursor
to the next tab
position.
17. RELOCATION
KEY
Moves the carrier/cursor
one space to
the right
8. SHIFT
LOCK
KEY
of the last
character typed.
Locks
the Shift
key to type a series of capital
letters. The
red lamp on the
key lights up when
18. EXPRESS
(BACKSPACE)
KEY
the
key is
pressed. Release the shift
lock by
Returns the
carrier to the
left margin
without a
pressing
either Shift
key.
line feed. On
the display,
the Express key
moves the cursor one
space to
the right.
Hold
9.
SHIFT
KEY
down
the key
for continuous
movement to
the
Enables
the typing
of upper case letters and
right.
symbols
which appear on the
upper left corner
of each
key.
19. BACKSPACE
KEY
Moves the
carrier/cursor
one space to the
left.
10. REPEAT
KEY
Hold down the
key for continuous
movement to
Repeats the
last character typed or the
last key
the left.
function entered.
20.
CORRECTION
KBY
11. SPACE
BAR
Corrects
characters.
Hold down the
key for
Moves the carrier/cursor ahead one space
to the
repeat correction.
right.
Hold down the
Space
bar for continuous
movement
to the right.
(On
the display, the Space
bar
replaces
the character with a space when
it
moves
on the
typed
characters.)
GETTING
STARTED
Unpacking
Setting
Up
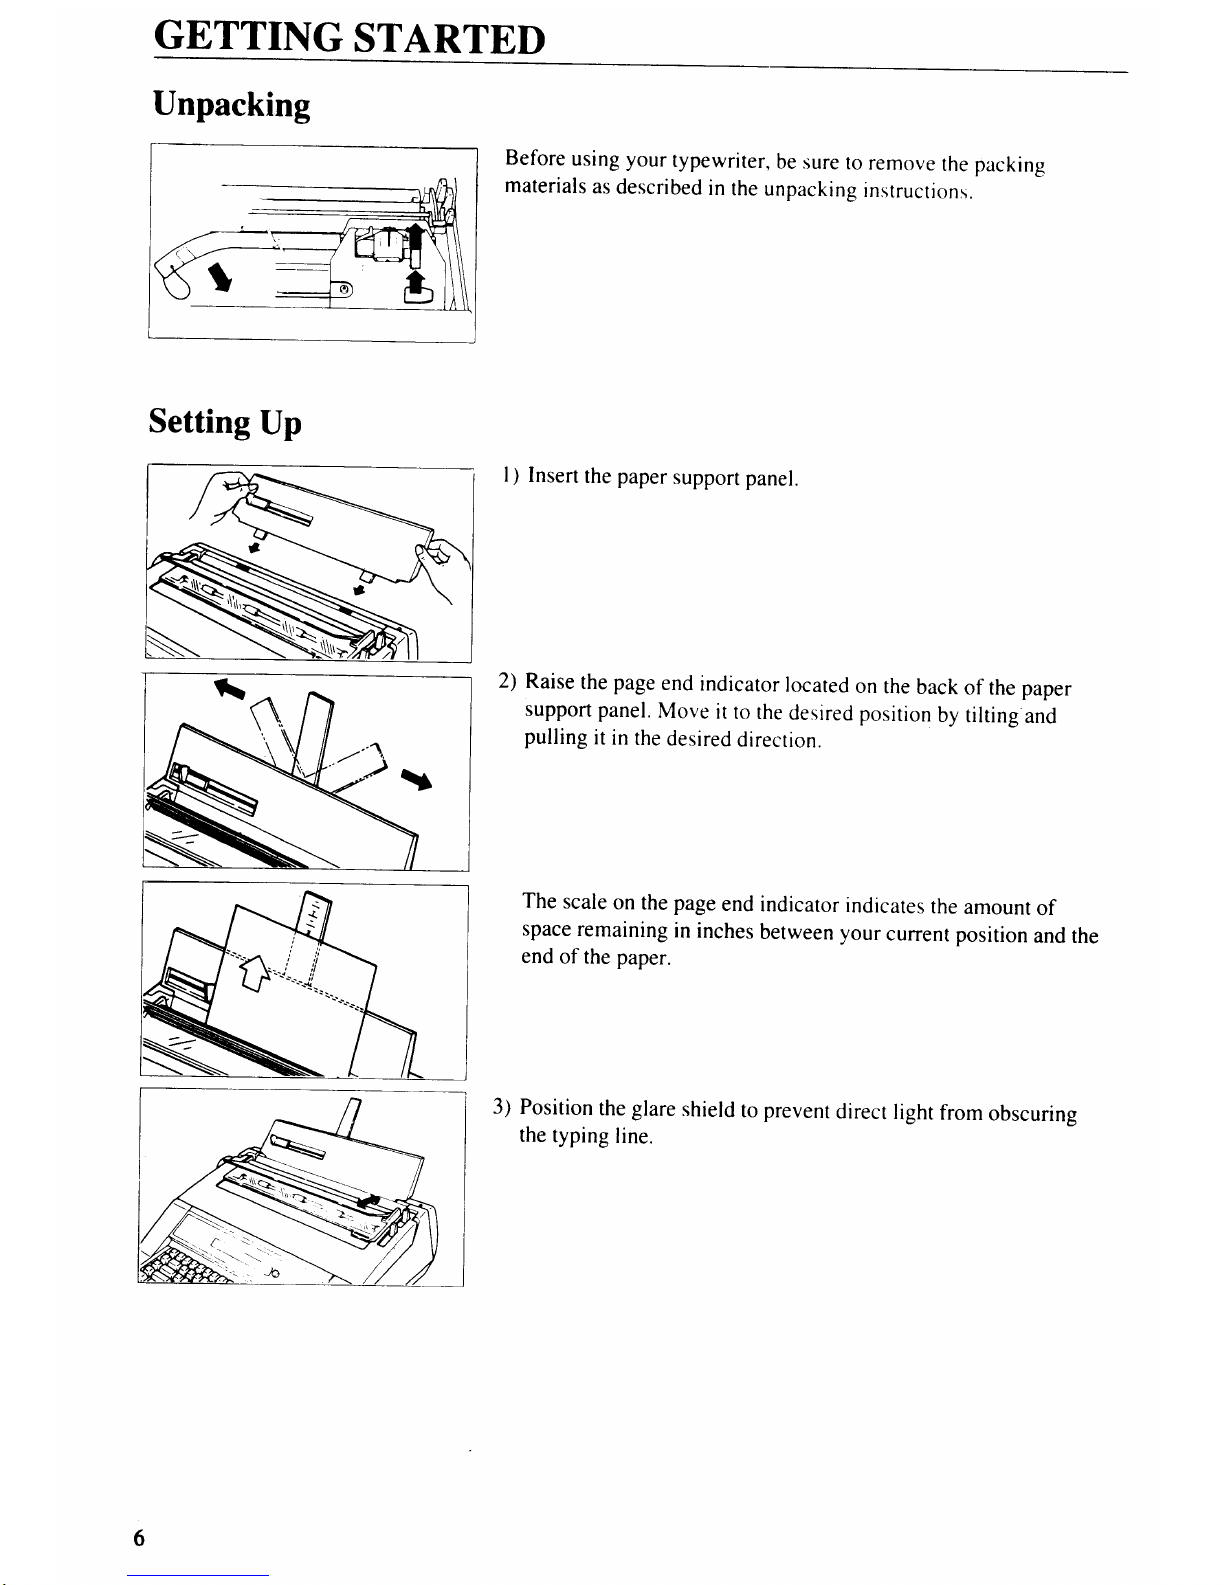
Before
using your
typewriter,
be sure
to
remove
the packing
materials
as
described
in
the
unpacking
instructions.
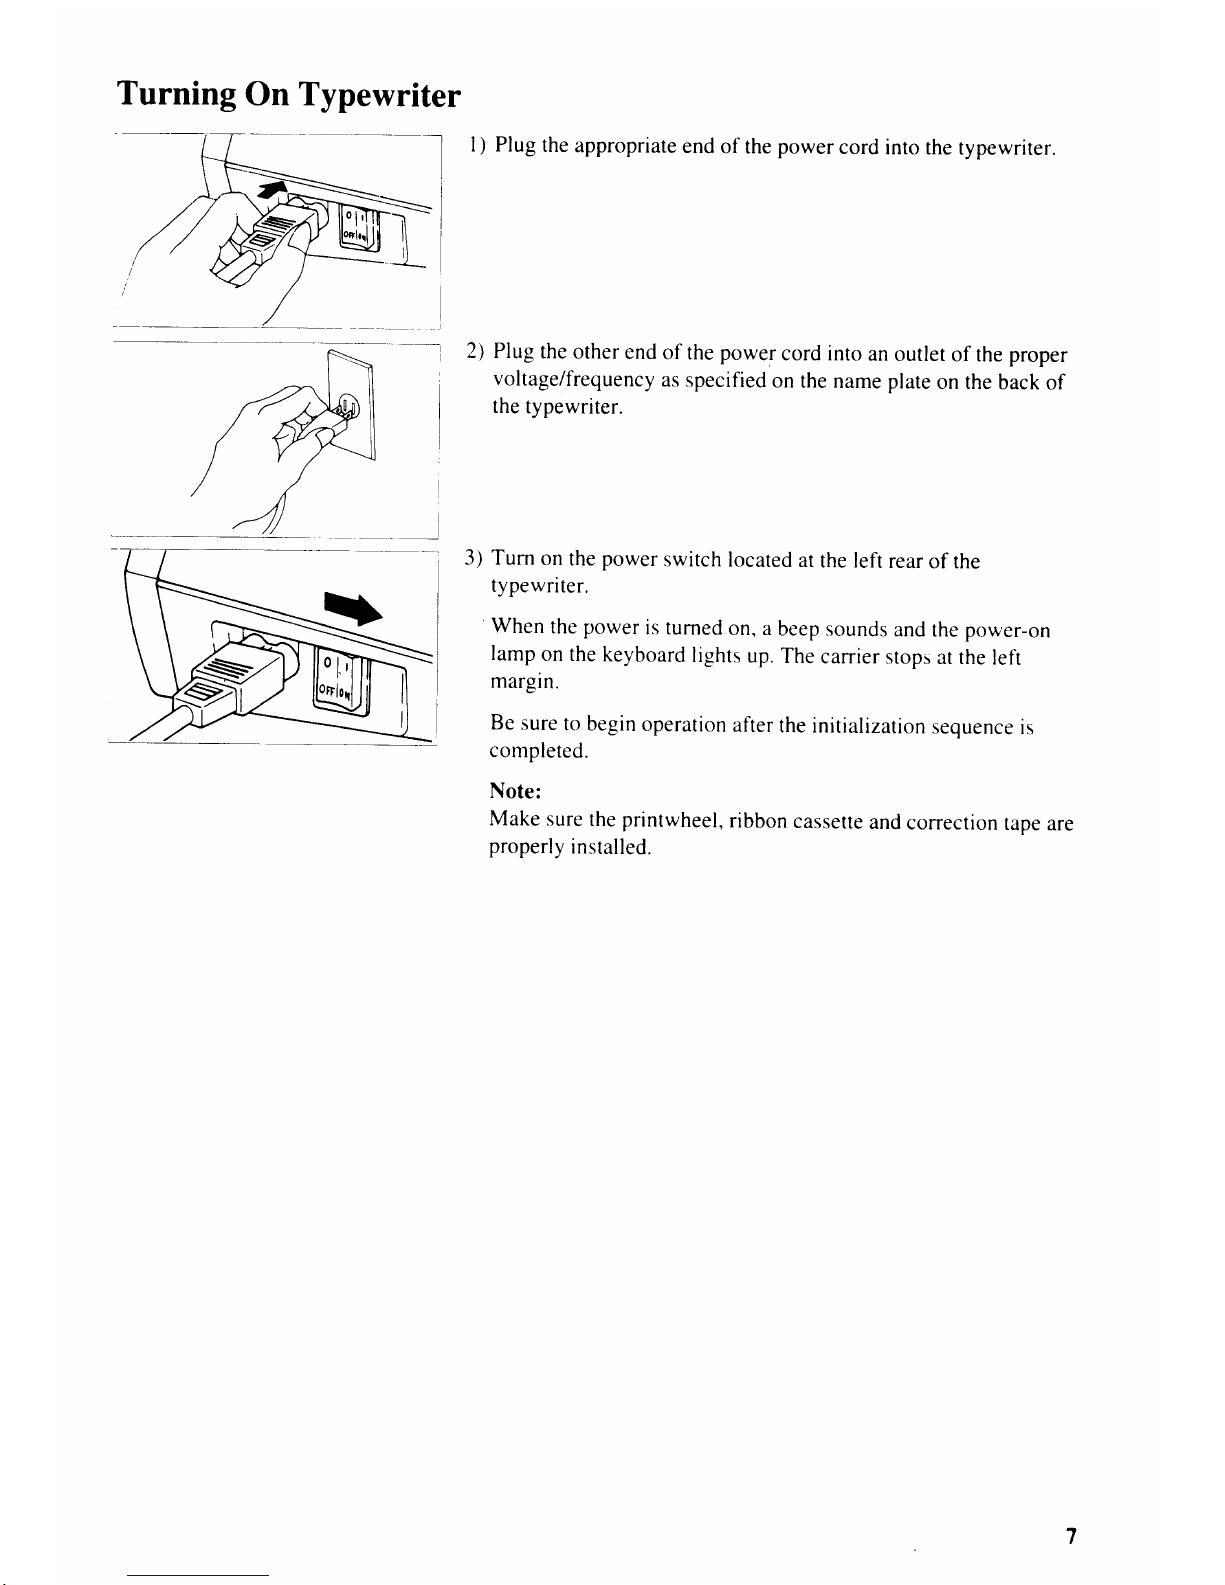
I
)
Insert
the paper
support
panel.
2)
Raise
the page
end
indicaror
located
on
rhe
back
of the paper
support panel.
Move
it
to the
desired
position
by
tilting
and
pulling
it
in
the
desired
direction.
The
scale
on
the
page
end
indicator
indicates
the
amount
of
space
remaining
in
inches
between
your
current
position
and
the
end
ofthe paper.
3)
Position
the
glare
shield
to
prevent
direct
light
from
obscuring
the
typing
line.
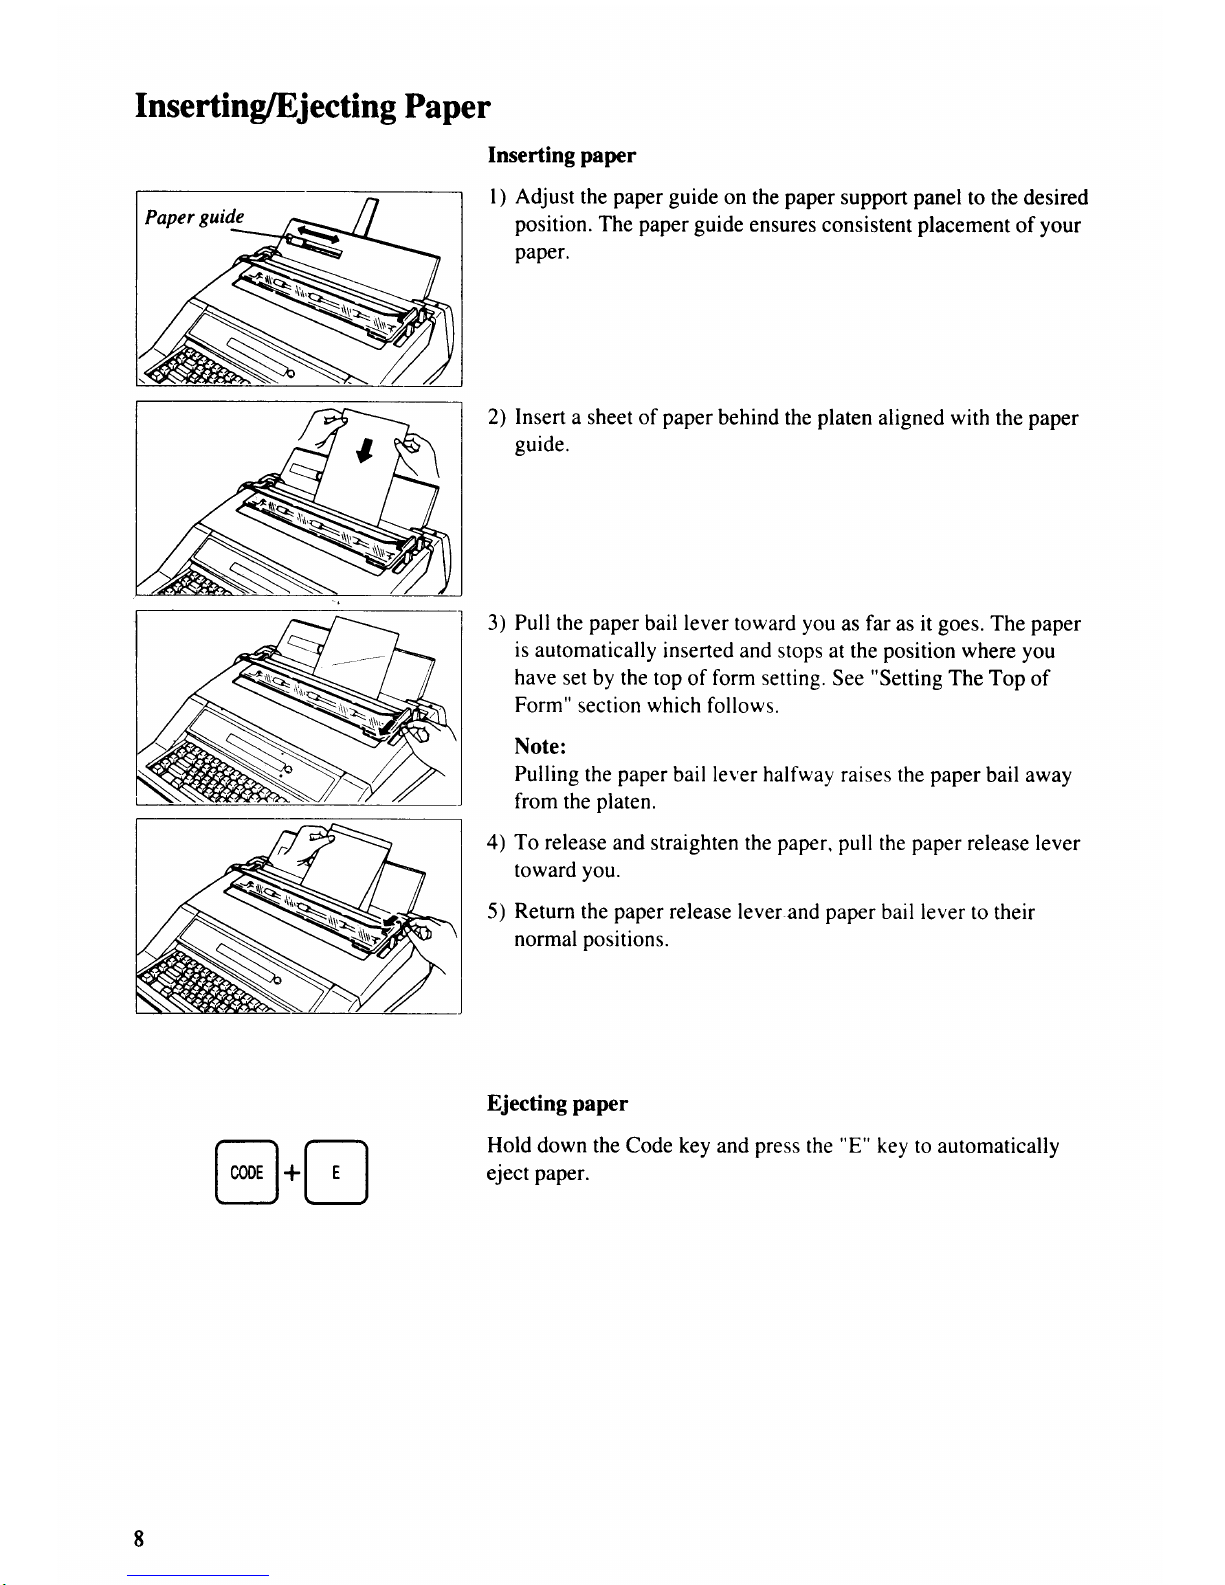
Turning
On
Typewriter
l) Plug
the
appropriate
end
of the
power
cord
into
the typewriter.
2) Plug
the
other
end
of the
power
cord into
an
outlet
of the
proper
voltage/frequency
as specified
on
the name plate
on the
back
of
the
typewriter.
3) Turn
on
the
power
switch
located
at
the left
rear
of the
typewriter.
When
the
power
is turned
on, a
beep
sounds
and
the
power-on
lamp
on the
keyboard
lights
up.
The
carrier
srops
at the
left
margin.
Be
sure
to begin
operation
after
the initialization
sequence
is
completed.
Note:
Make
sure the printwheel,
ribbon
cassette
and
correction
rape
are
properly
installed.
Inserting/Ej
ectin g Paper
@.8
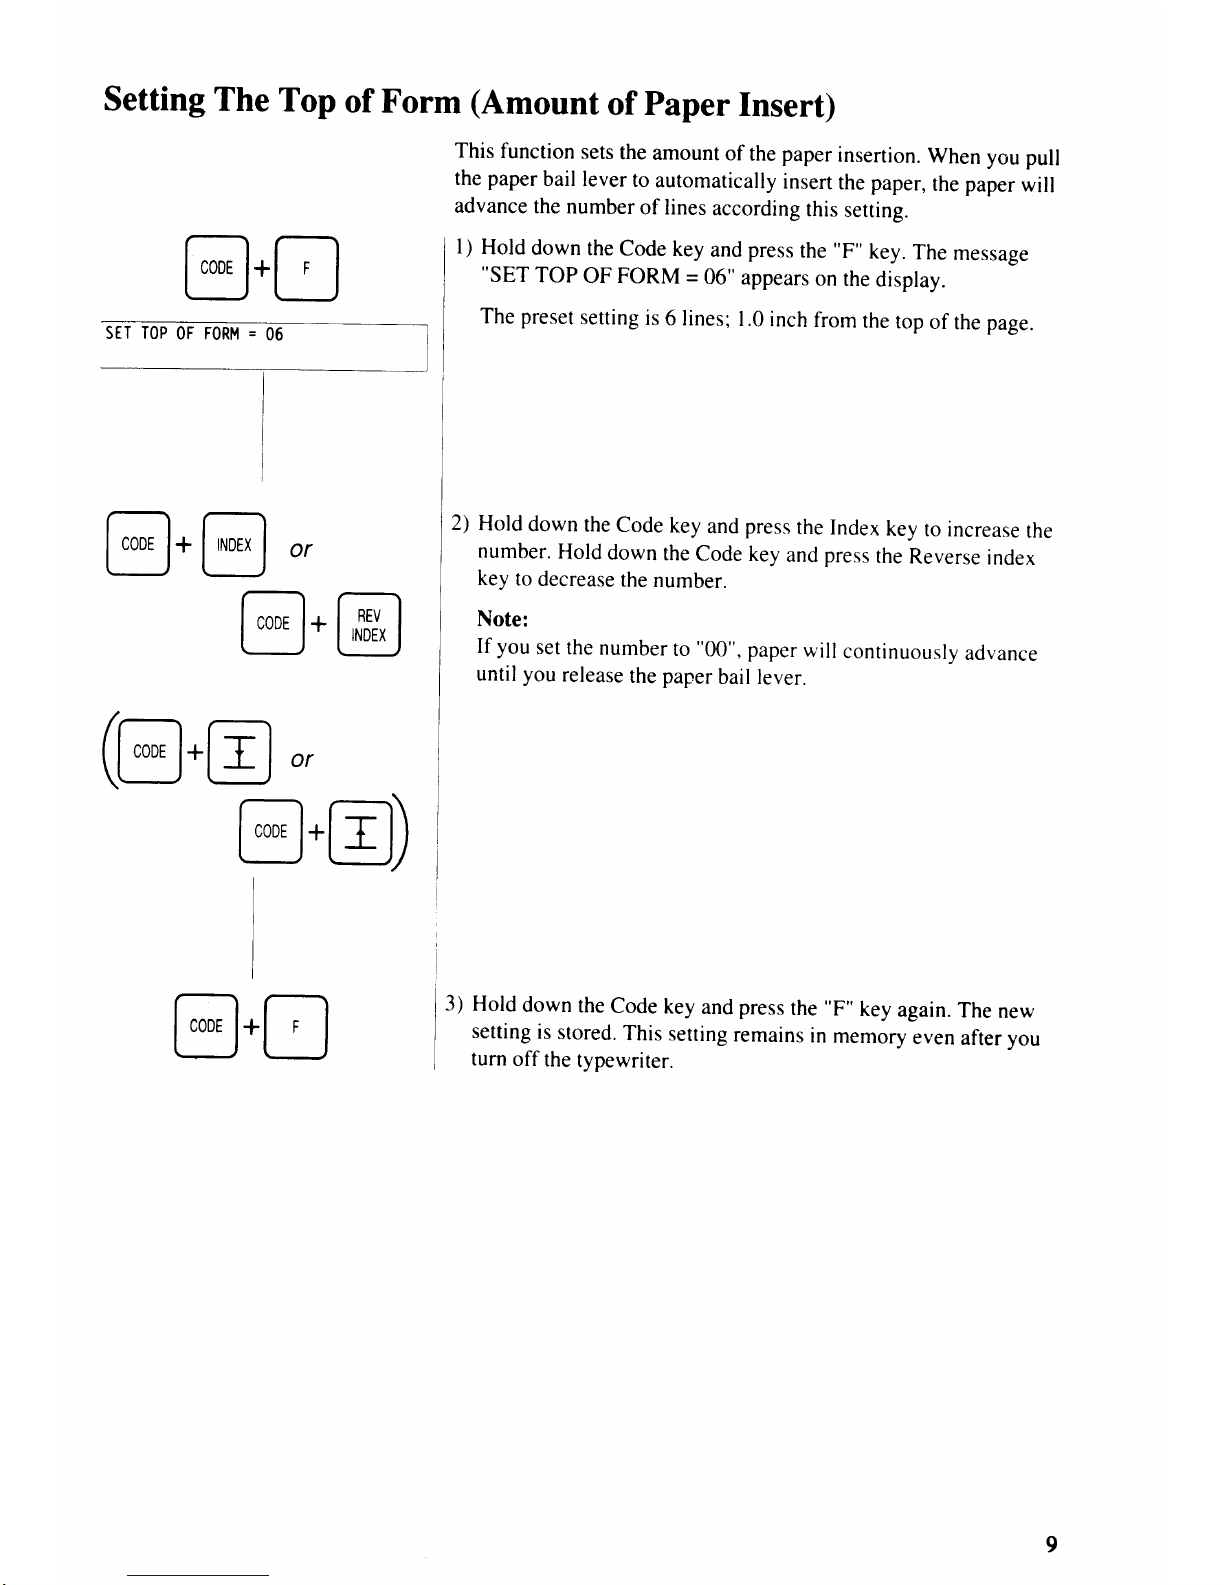
Inserting
paper
I ) Adjust
the
paper guide
on the
paper
support
panel
to the desired
position.
The
paper guide
ensures
consistent
placement
of
your
paper.
2)
Insert
a sheet of
paper
behind the
platen
aligned
with
the
paper
guide.
3) Pull the
paper
bail
lever
toward
you
as
far
as it
goes.
The
paper
is
automatically
inserted and stops
at the
position
where you
have
set by the top
of
form setting.
See
"Setting
The Top
of
Form"
section
which
follows.
Note:
Pulling
the
paper
bail
lever halfway
raises the
paper
bail away
from
the
platen.
4)
To
release
and straighten
the
paper. pull
the
paper
release lever
toward
you.
5)
Return
the
paper
release
lever and
paper
bail lever
to their
normal
positions.
Ejecting
paper
Hold
down the Code key and
press
the
"E"
key
to automatically
eject
paper.
Setting
The
Top
of Form
(Amount
of Paper
Insert)
@.@
or
This
function
sets
the
amount
of the
paper
insertion.
when
you
pull
the
paper
bail
lever
to
automatically
insert
the
paper,
the paper
will
advance
the
number
of lines
according
this
setting.
l)
Hold
down
the
code
key
and
press
the
"F"
key.
The
message
"SET
TOP OF
FORM
=
06"
appears
on
the
display.
The
preset
setting
is
6 lines;
L0
inch
from
the
top
of
the page.
2)
Hold
down
the
code
key
and
press
the
Index
key
to increase
the
number.
Hold
down
the
code
key
and press
the
Reverse
index
key
to
decrease
the
number.
Note:
If you
set
the
number
to
"00",
paper
wilr
continuously
advance
until you
release
the
paper
bail lever.
3)
Hold
down
the
code
key
and press
the
"F"
key
again.
The
new
setting
is
stored.
This
setting
remains
in
memory
even
after you
turn
off
the
typewriter.
@.@
(g.E
or
@.8)
@.8
Typing
Controls
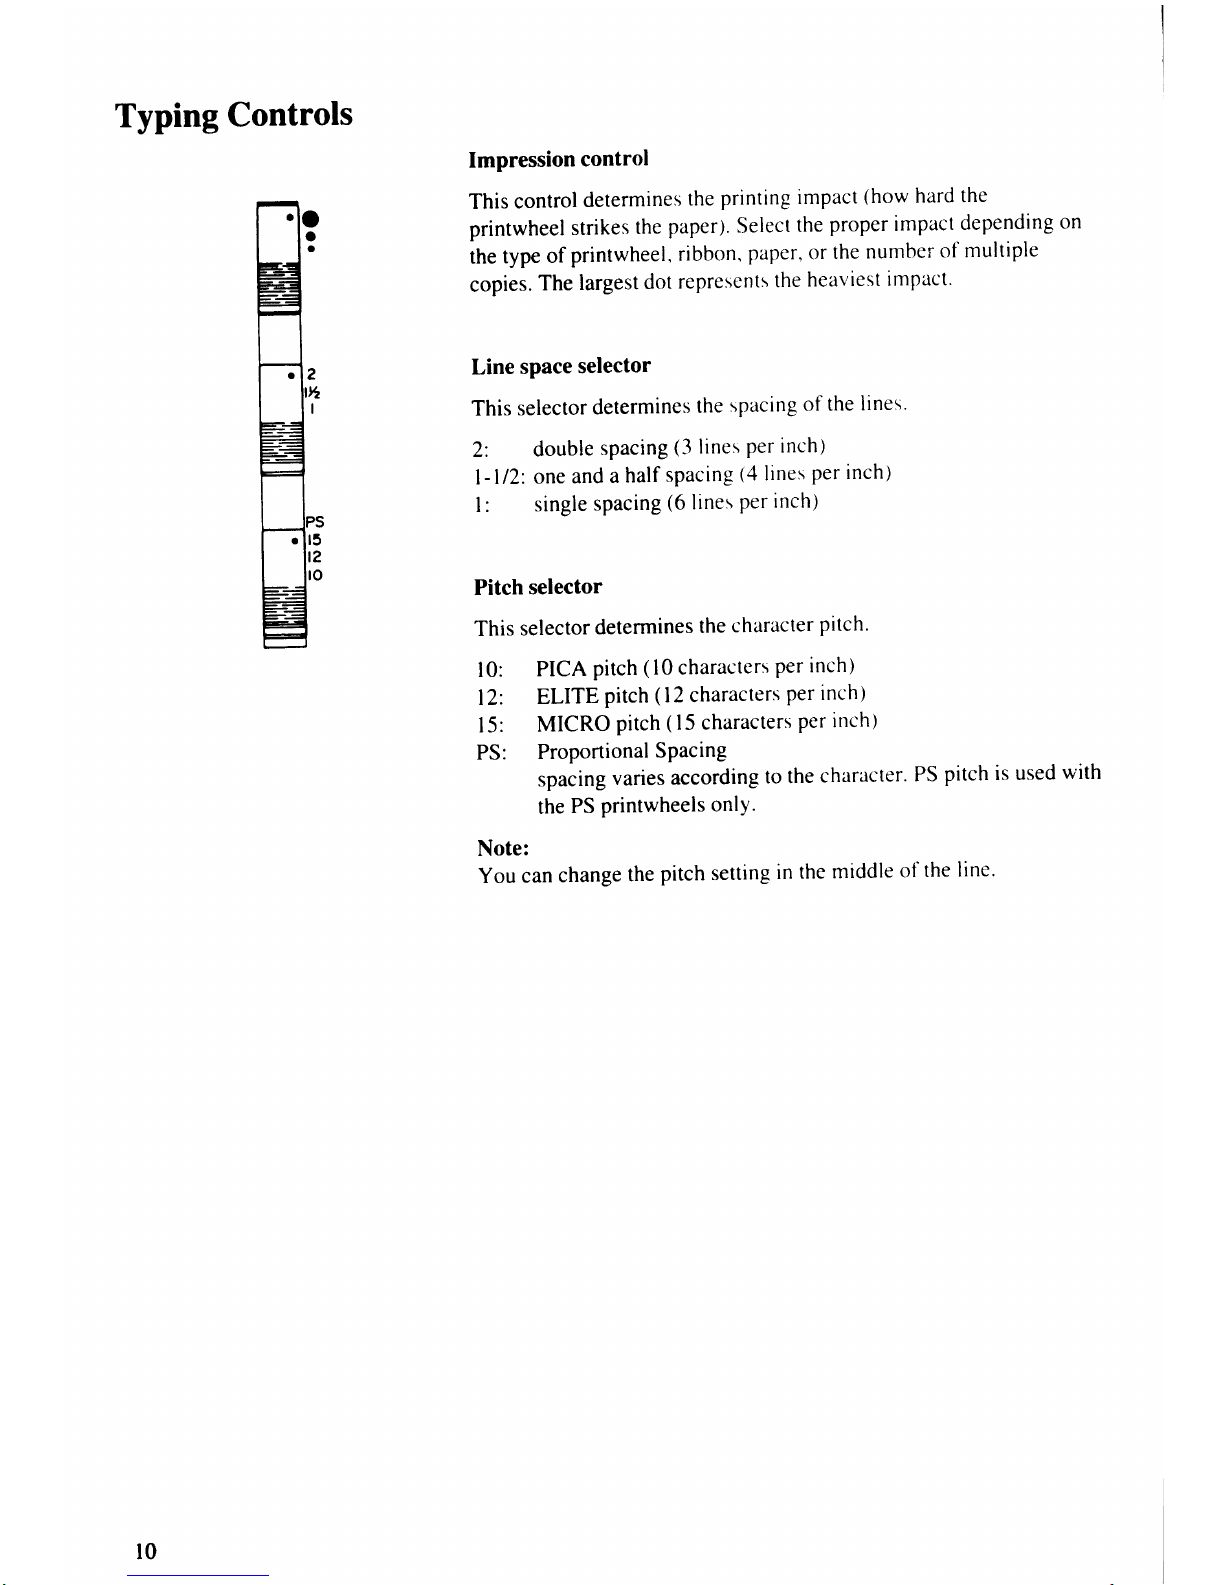
Impression
control
This
control
determines
the
printing
impact
(how
hard
the
printwheel
strikes
the
paper;.
Select
the
proper impact
depending
on
the
type
of
printwheel,
ribbon,
paper, or
the
number
of
multiple
copies.
The
largest
dot
represents
the
heaviest
impact'
Line
space
selector
This
selector
determines
the
spacing
of
the
lines'
2:
double
sPacing
(3
lines
Per
inch)
l-l12:
one
and
a
half
spacing
(4
lines
per inch)
l:
single
spacing
(6
lines
Per
inch)
Pitch
selector
This
selector
determines
the
character
pitch.
l0:
PICA
pitch ( l0 characters
per
inch)
12:
ELITE
pitch ( l2 characters
per inch)
l5:
MICRO
pitch
(
l5
characters
per inch)
PS:
ProportionalSPacing
spacing
varies
according
to the
character.
PS
pitch
is used
with
the
PS
printwheels
onlY.
Note:
You
can
change
the
pitch setting
in
the
middle
of
the
line.
l0

Typing
Modes
(NP/LPIJUST/STORE)
Your typewriter
has
four different
modes:
Normal
print
(NP),
Line
print
(LP),
Justify
print
(JUST)
and Store
(STORE)
mode. A
"y"
on
the display
indicates the
current
mode. Each time
you press
the
Mode
key, the
"v"
moves to the
next mode indication.
Normal
print
mode
(NP)
When
you
turn on
the typewriter,
it is set in the
normal
print
(NP)
mode.
In this
mode, characters
are immediately
printed
on
paper
as
you
type a character.
(Characters
does
not appear on the display.)
Line
print
mode
(LP)
------<65-l
The
Line
print mode is used to
print
characters one line at a time.
lvl
I
p
'
In this
mode, characters appear
on the display as
you
type. You can
correct an error
on the display before
it is
printed.
The line of text
is
printed
on
paper
when you
press
the Return, Tab,
or Print
key.
While
printing
the
line,
you
can
continue to
type
the
next
line of text on the display.
Note:
The column counter on the
right side of the display indicates the
remaining number of spaces to the right margin.
Justify
mode
(JUST)
The Justify
mode is used to
print
text
with
perfectly
aligned left and
right margins. This mode
randomly
adds
spaces
between
the
words
to
ensure
perfect
alignment
u,ith
the
margins.
(Spaces
will
be added
only during time of
print).
When
entering text, characters appear on the display as
you
type.
You can correct an eror on the display betore it is
printed.
The
justified
printing
of the current
line
automatically
starts
after
you
type a
word which will
be beyond the
right
margin. The
word
is
wrapped
to
the next line and remains on the
display
as the first
word
of the next
line.
Note:
If
you press
the Rcturn. Tab. or Print key,
the
line is
printed
immediately and not be
justified.
<6s
JUST
ll
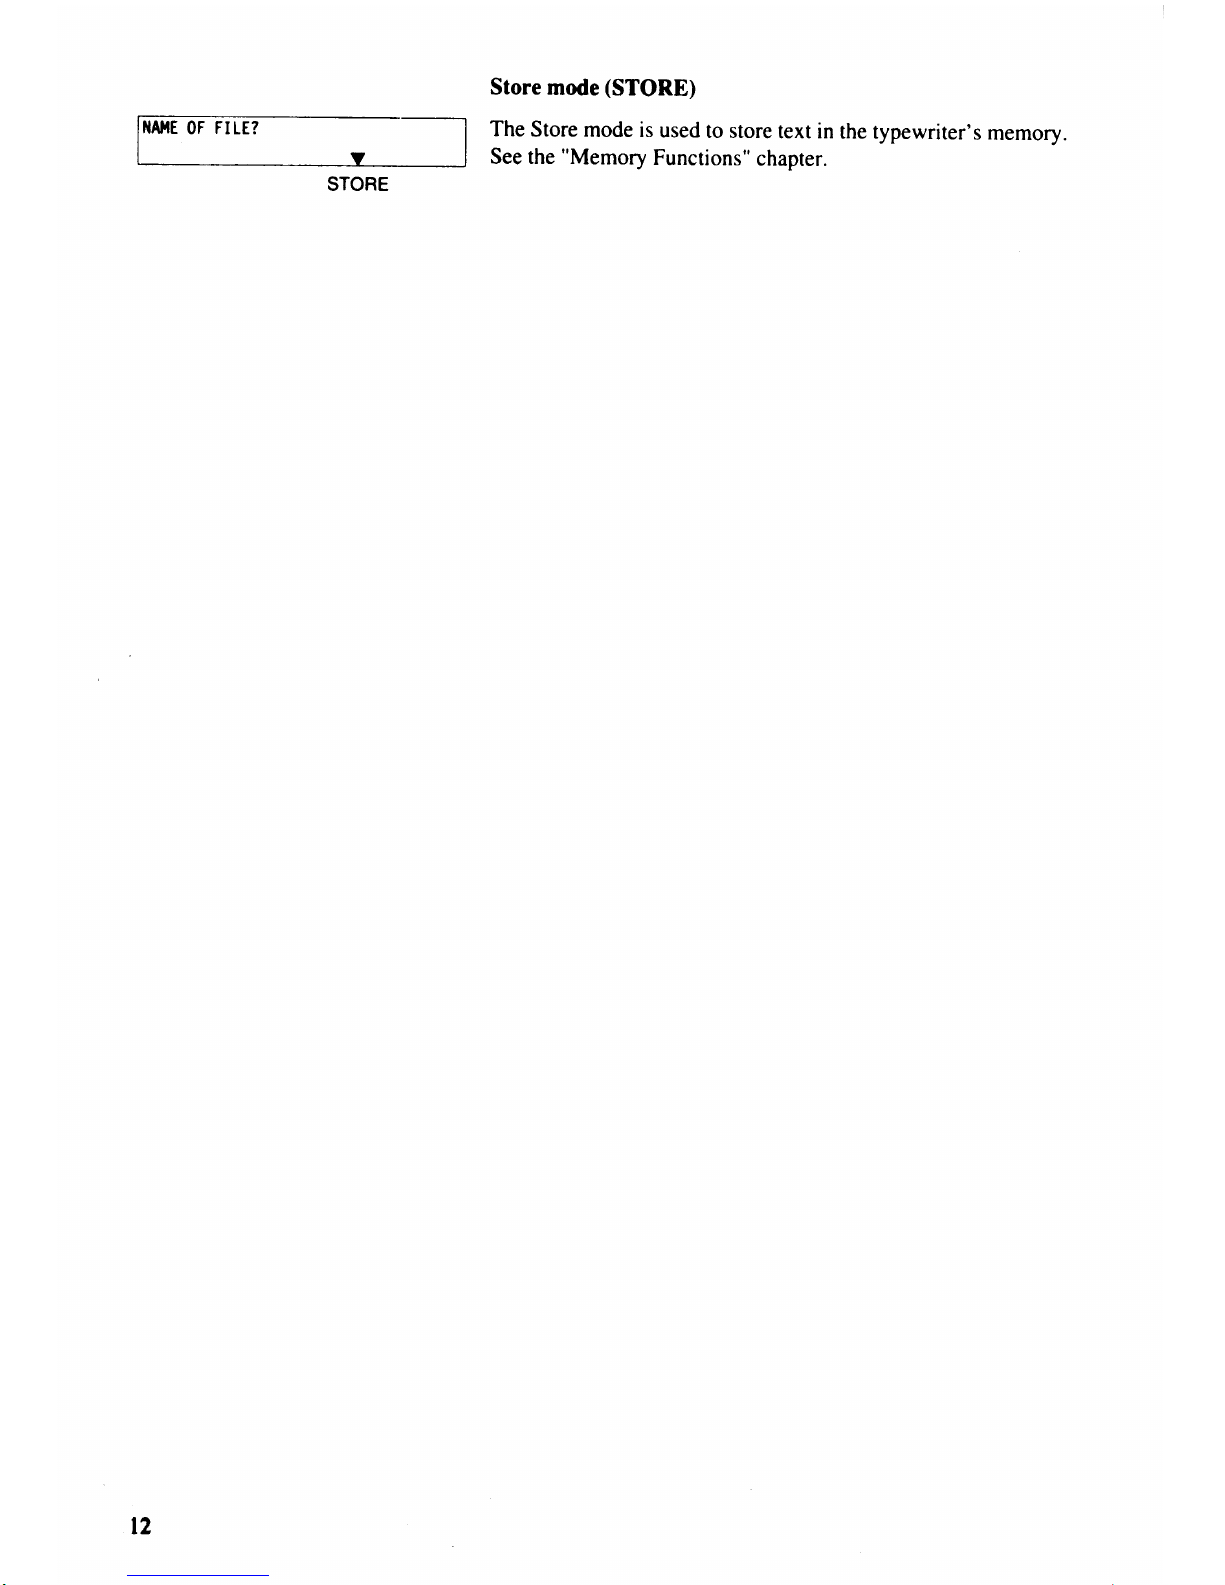
Store
mode
(STORE)
The
Store
mode is
used
to store
text in
the typewriter's
memory.
I
v
I
See the
"Memory
Functions"
chapter.
STORE
t2
Margins
Preset
margins
When
you
first turn on
the typewriter,
the
preset
margins are
used.
These settings
provide
you with
standard one
inch
left and one
inch
right
margins for each
pitch
selection.
Left margin
Right margin
l0
pitch
(PICA)
l0
12
pitch
(ELITE)
12
15
pitch
(MICRO)
15
PS
pitch
12
The area of 5 spaces
immediately
before the
right margin
is called
the
hot zone. As the carrier/cursor
moves toward the
end of a
line
and enters
the hot zone, a beep
sounds.
This beep
warns
you
that
the
right margin is approaching.
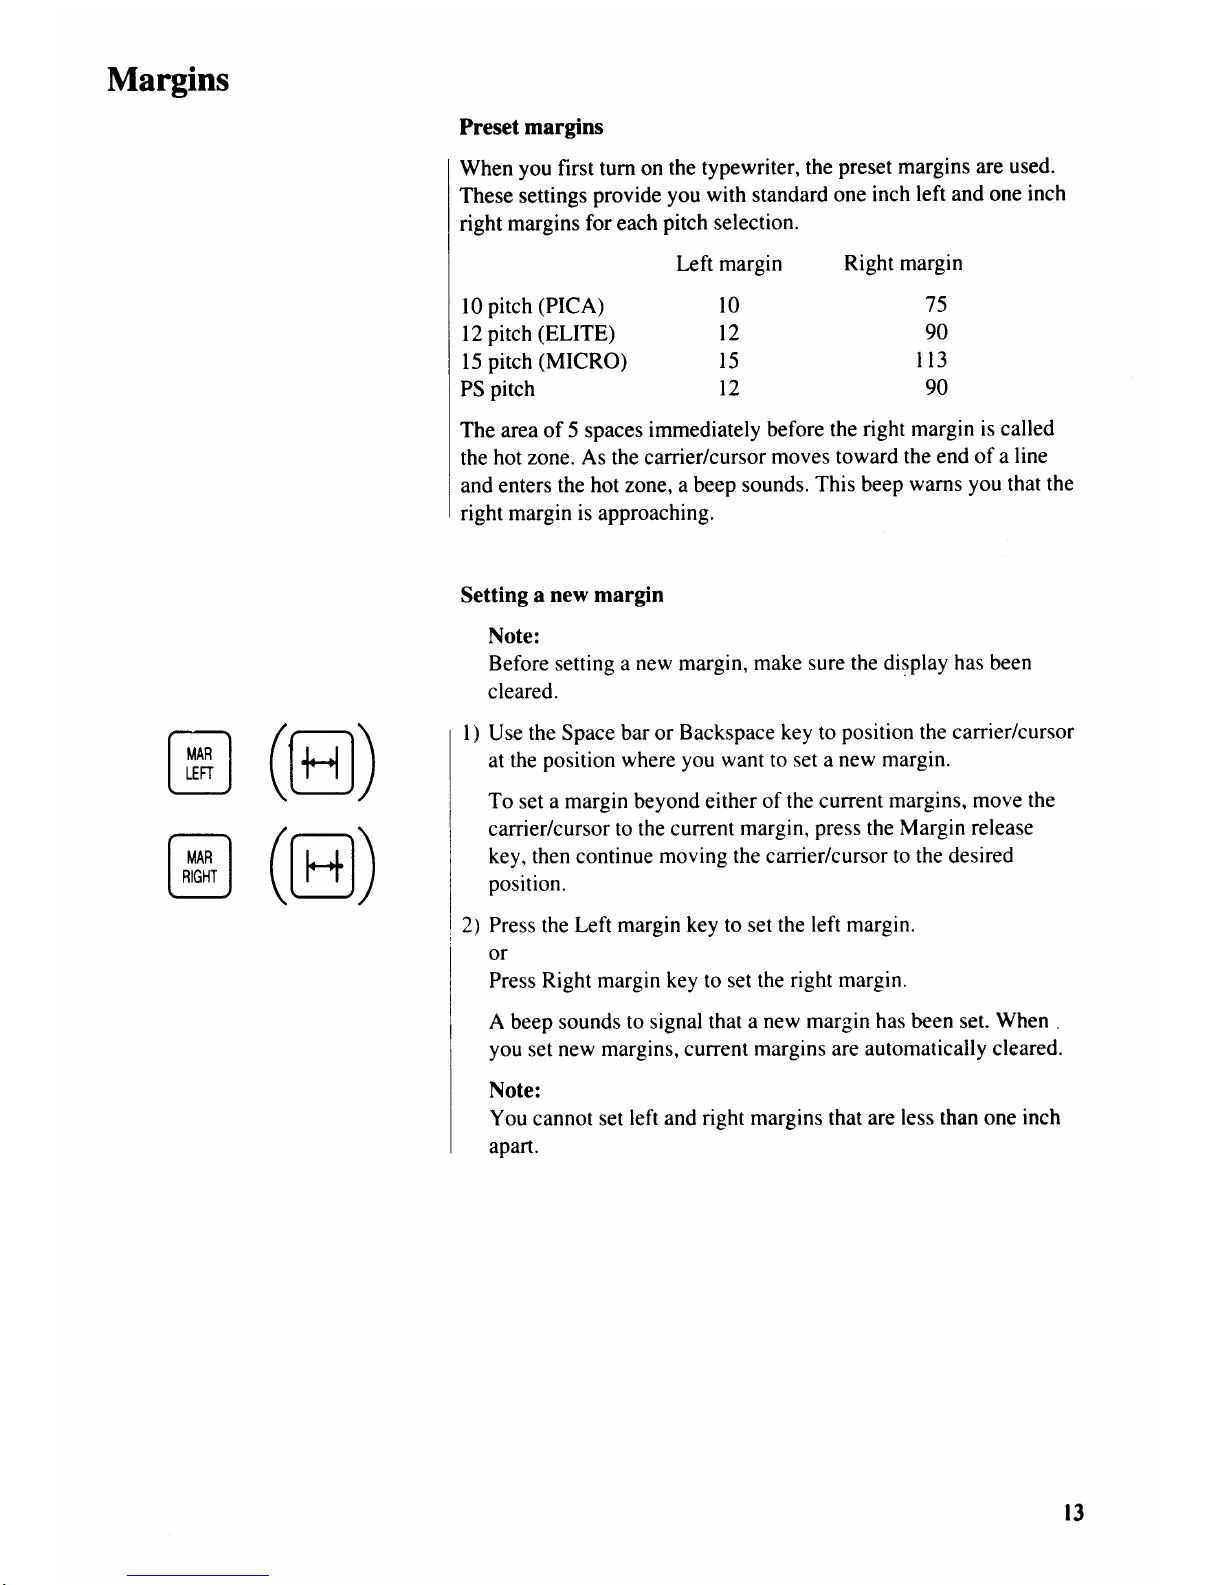
Setting a
new margin
Note:
Before setting a new margin,
make sure the display
has been
cleared.
I
)
Use
the
Space
bar or
Backspace key to
position
the carrier/cursor
at the
position where
you want
to set a new
margin.
To
set
a margin beyond either
of the curent
margins, move
the
carrier/cursor to the
current margin,
press
the Margin
release
key, then continue
moving the
carrier/cursor
to the desired
position.
2)
Press
the Left
margin key to set the
left margin.
or
Press
Right margin key to set the
right margin.
A beep sounds to signal
that a
new margin has been set.
When
.
you
set new
margins, current
margins
are
automatically cleared.
Note:
You cannot set
left and right margins that are
less than one inch
apart.
75
90
I 13
90
@
@
(@)
(tr)
r3
Tab
@
(@)
H(E)
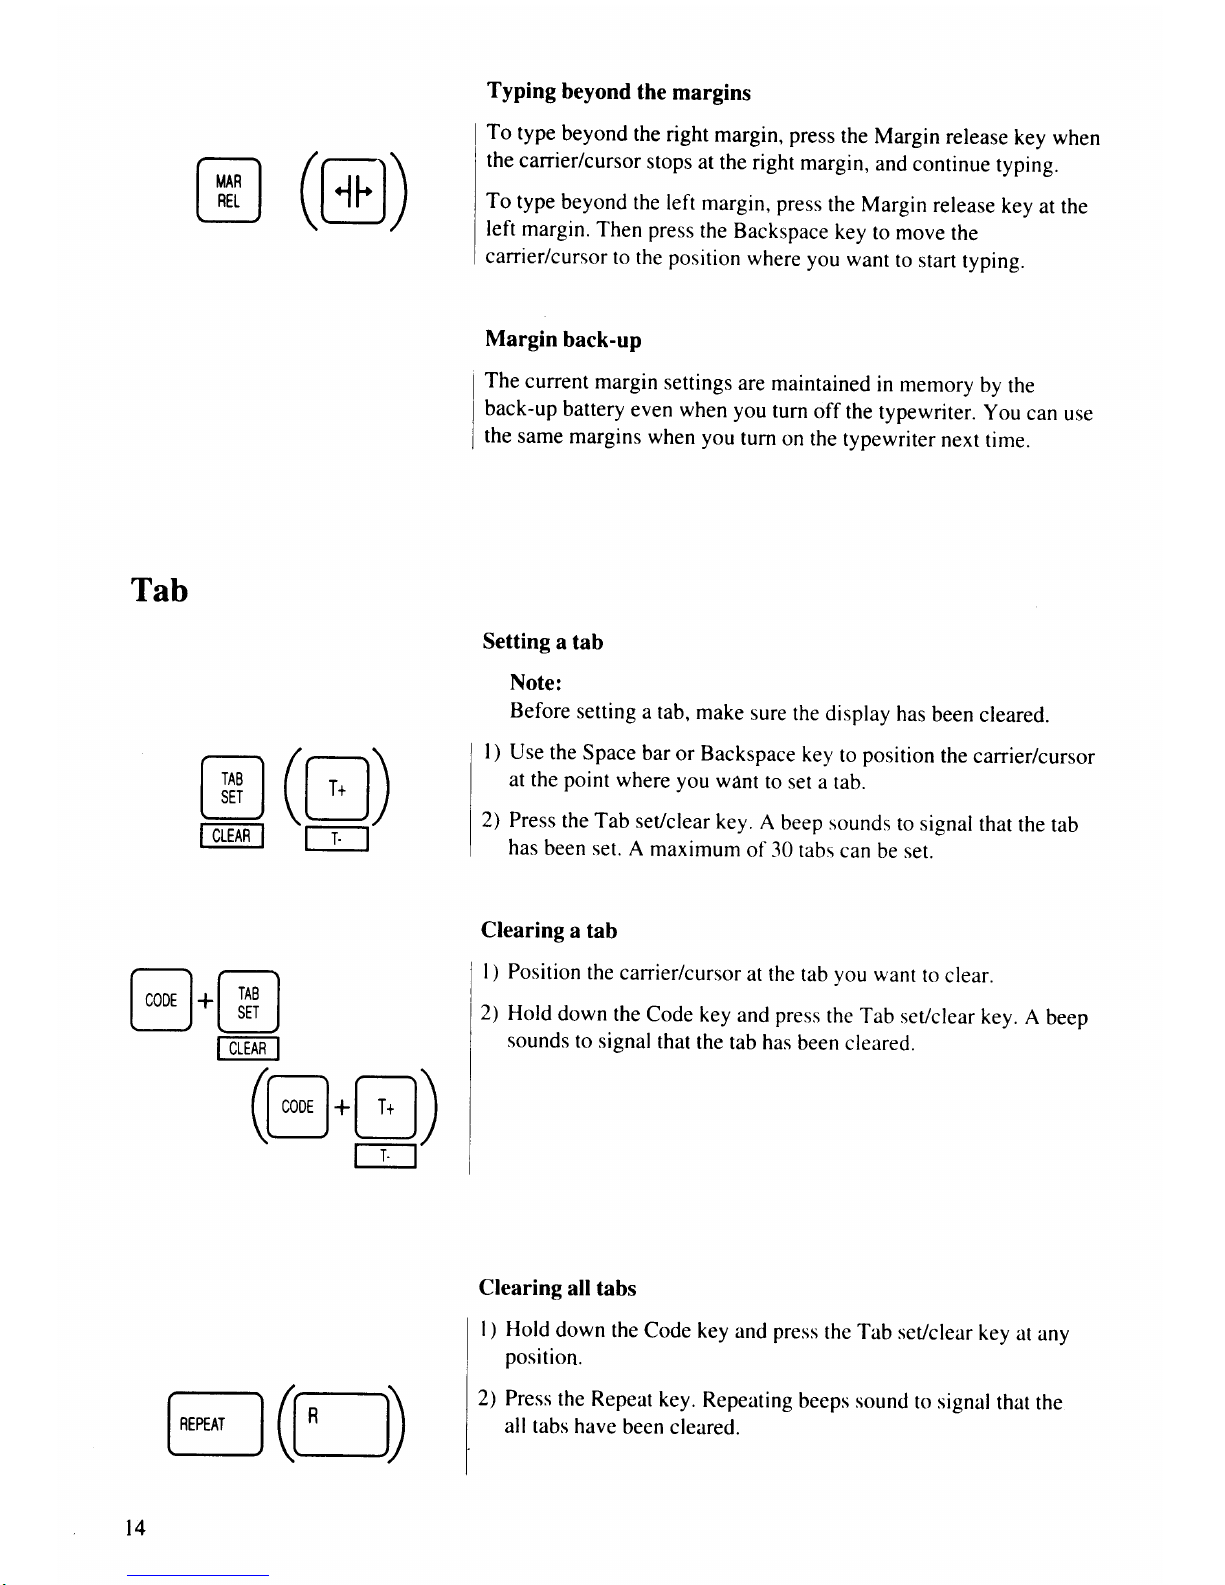
Typing
beyond
the
margins
To
type
beyond
the
right
margin, press
the
Margin
release
key when
the
carrier/cursor
stops
at
the right
margin,
and
continue
typing.
To
type
beyond
the
left
margin, press
the
Margin
release
key
at the
left
margin.
Then press
the
Backspace
key
to
move
the
carrier/cursor
to the
position
where
you want
to
start
typing.
Margin
back-up
The
current
margin
settings
are
maintained
in memory
by
the
back-up
battery
even when
you
turn
off the
typewriter.
you
can
use
the
same
margins
when you
turn
on the
typewriter
next
time.
Setting
a tab
Note:
Before
setting
a tab,
make
sure
the display
has
been
cleared.
I
)
use
the
Space
bar
or Backspace
key
to
position
the
carrier/cursor
at the point
where
you
want
to
set
a tab.
2) Press
the Tab
set/clear
key.
A beep sounds
to
signal
that
the
tab
has
been set.
A
maximum
of 30 tabs
can
be set.
Clearing
a tab
l) Position
the
carrier/cursor
at the
tab
you
want
to
clear.
2)
Hold
down
the
Code
key
and
press
the Tab
set/clear
key.
A
beep
sounds
to
signal
that
the
tab has
been
cleared.
Clearing
all tabs
l) Hold
down
the
Code key
and
press
the Tab
set/clear
key
ar any
position.
2) Press
the
Repeat
key.
Repeating
beeps sound
to signal
that
the
all tabs
have
been
cleared.
@.@
ITIHFI
(e.g)
t4

E(E)
Using
regular
tabs
l) Press the Tab
key
to
move
the carrier/cursor
to the first
tab
setting
to the right of
your
current
position.
2) Type
the text.
Tab
back-up
The
current tab
settings are maintained in memory
by the back-up
battery even when you
turn off
the typewriter. You can use
those
tabs
when you
turn on the typewriter
next time.
l5
Corrections
on Paper
position
carrier
The
b1st t,ypewriter
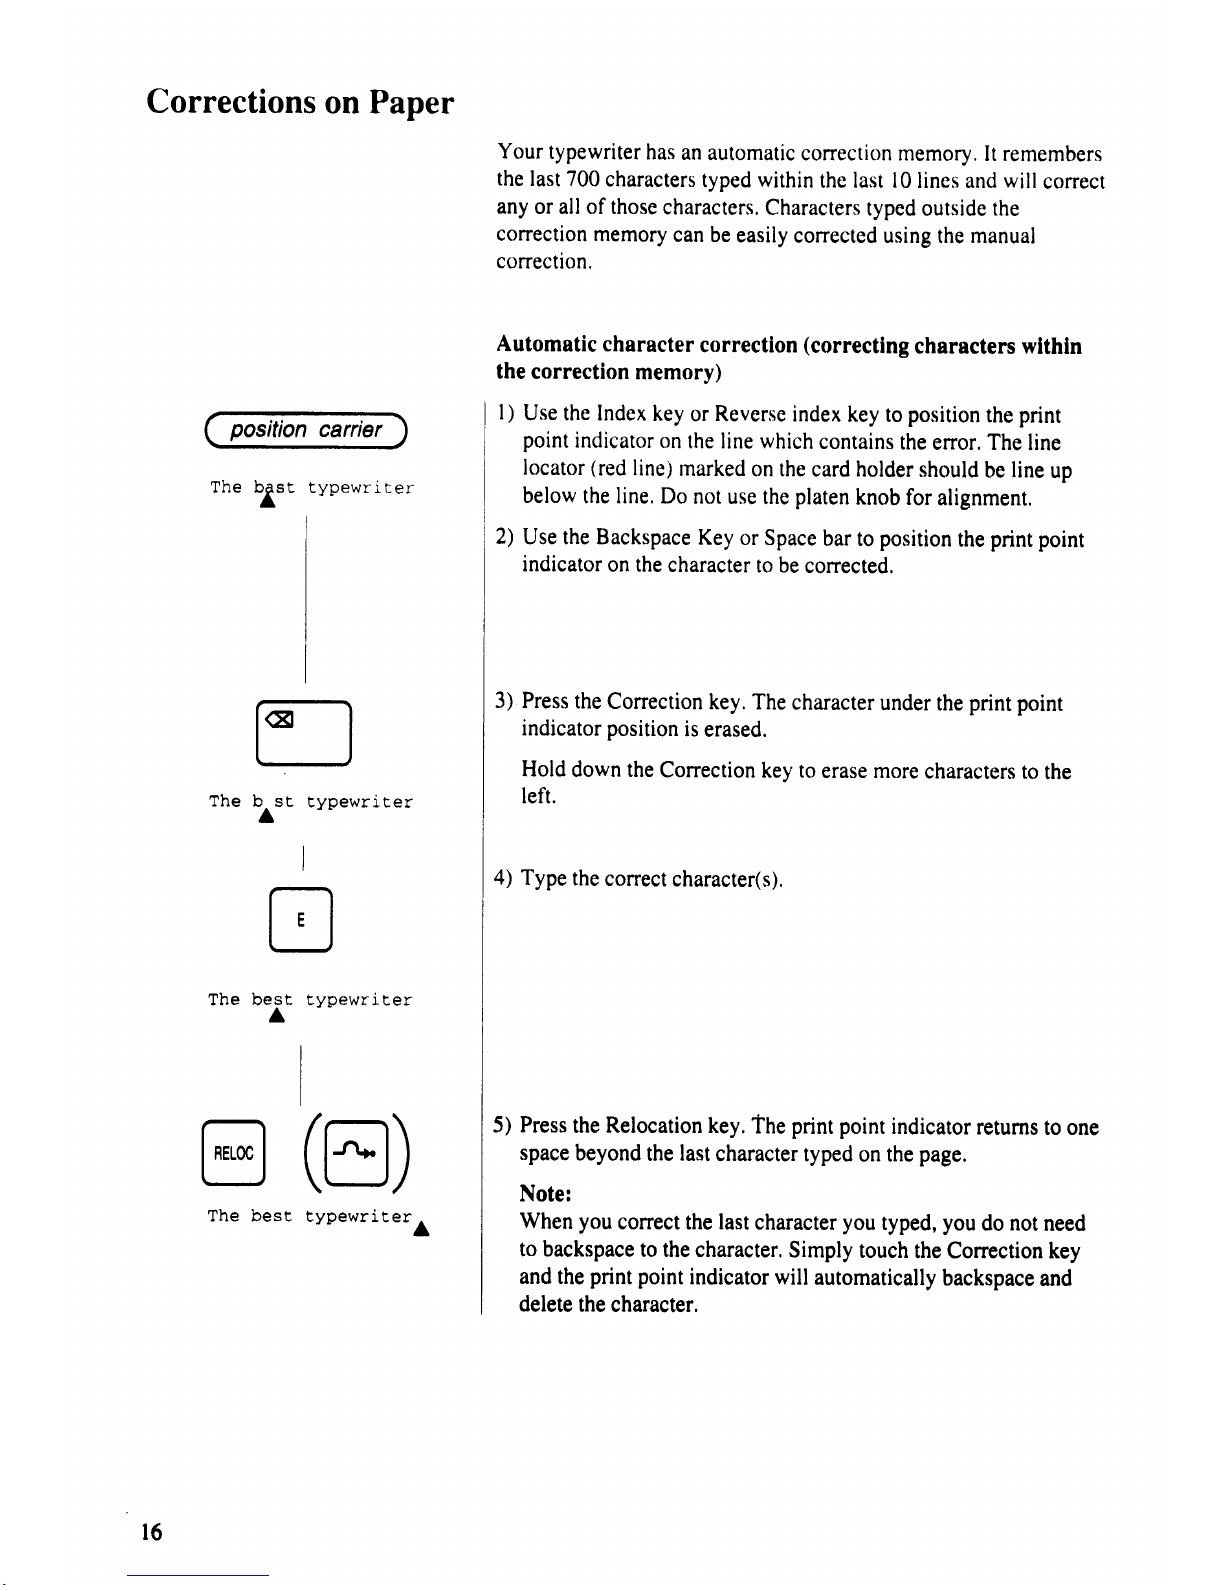
Your
typewriter
has
an
automatic conection
memory.
It remembers
the
last
700 characters
typed
within
the last l0lines
and
will
correct
any
or all of those
characters.
Characters
typed
outside
the
correction
memory
can be
easily
corrected using the manual
correction.
Automatic character
correction
(correcting
characters wlthln
the
correction
memory)
I
)
Use the Index
key
or Reverse
index key
to
position
the
print
point
indicator
on
the line which
contains
the
enor. The
line
locator
(red
line)
marked
on the
card holder
should
be
line
up
below
the line.
Do not
use
the
platen
knob for
alignment.
2)
Use the Backspace
Key or Space
bar to
position
the
print point
indicator
on the
character
to be
corrected.
3) Press
the
Conection
key.
The character
under the
print
point
indicator
position
is
erased.
Hold
down the
Correction
key to
erase more
characters
to
the
left.
4)
Type
the
correct
character(s),
5)
Press
the
Relocation
key,
The
print point
indicator
returns
to one
space
beyond
the last
character typed
on the
page.
Note:
When
you
correct
the
last
character
you
typed,
you
do not
need
to backspace
to the character.
Simply
touch
the Conection key
and the
print
point
indicator
will
automatically
backspace
and
delete
the character.
The
The
trl
b^st
CVnewrit,er
I
tr
OTt Eypewriter
(tr)
se
Cypewriter^
@
The be
l6
position
carrier
Tho rrnnd trznor^r;i1g
r rre
Yvvu
uf
vuvv
A
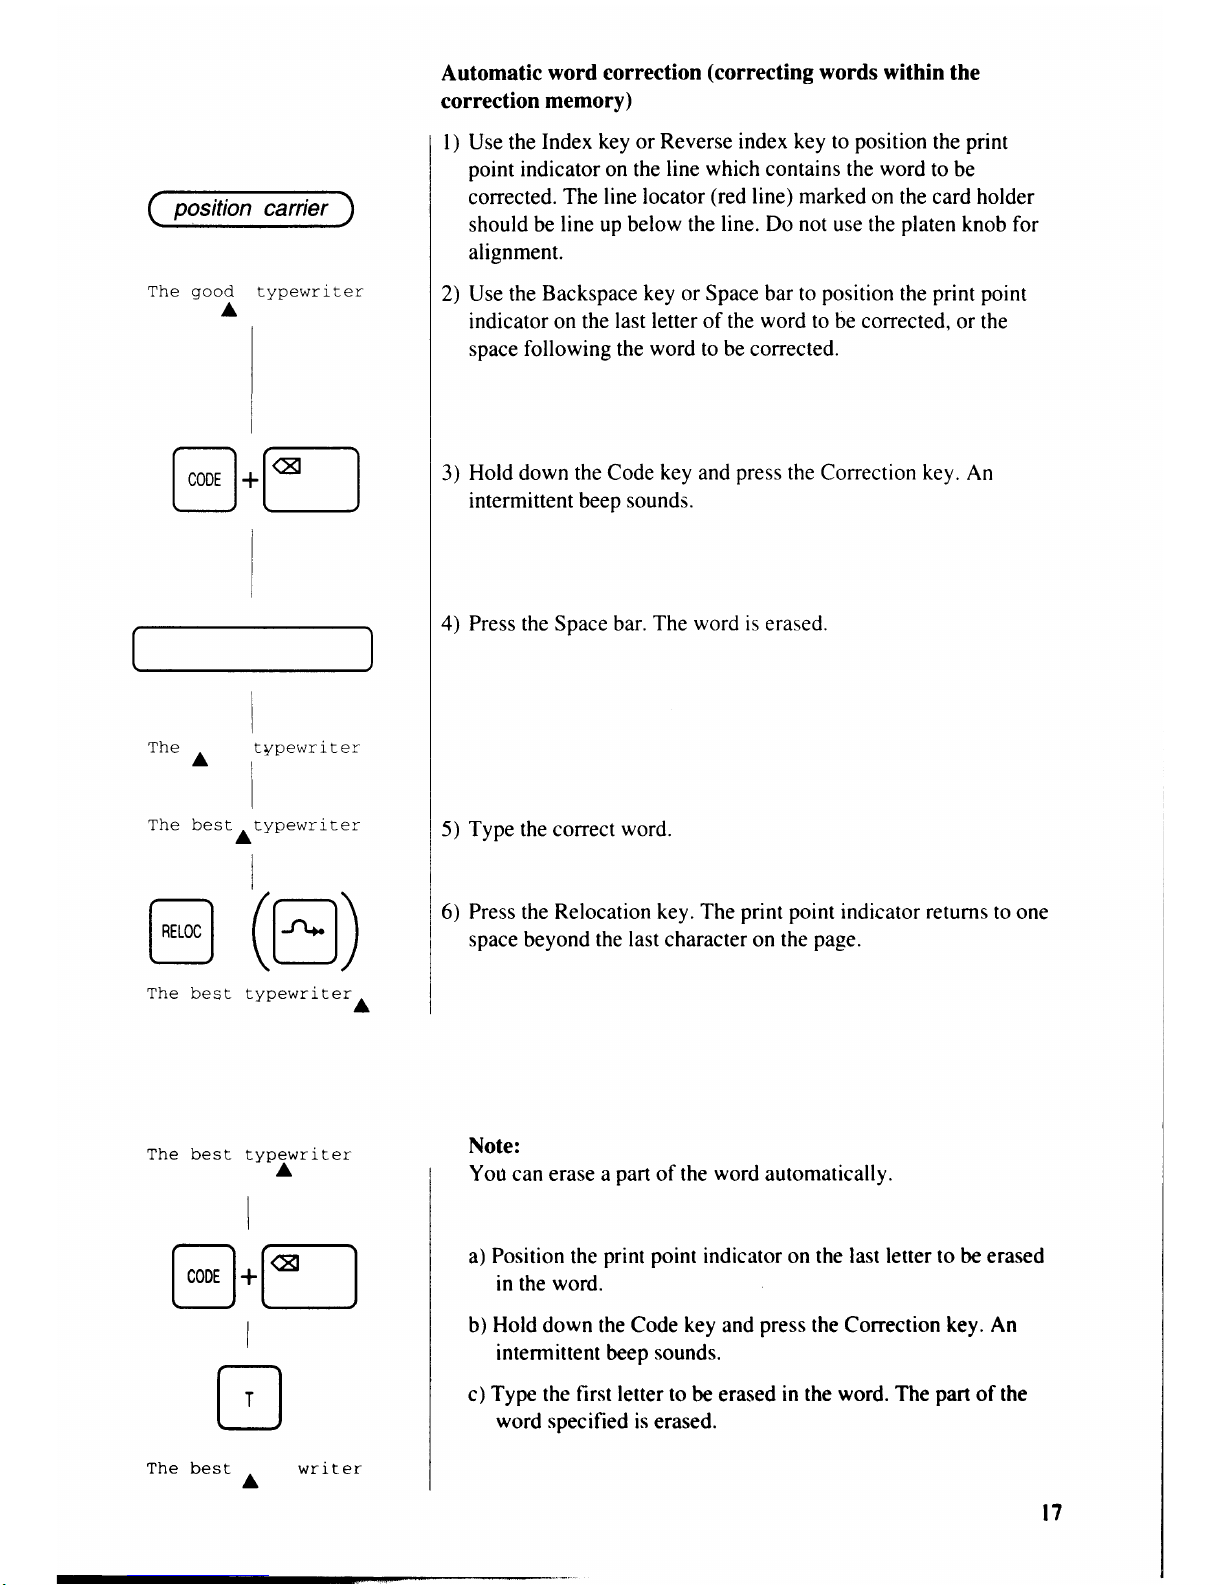
Automatic
word correction
(correcting
words within
the
correction
memory)
I ) Use the
Index key or
Reverse index key to
position
the
print
point
indicator on the
line
which
contains the
word
to be
conected.
The line locator
(red
line) marked
on the card holder
should be
line
up
below the line. Do
not
use the
platen
knob for
alignment.
2) Use the
Backspace key or Space bar to
position
the
print
point
indicator on the
last letter of the
word
to be corrected.
or the
space
following the
word
to be corrected.
3)
Hold down the Code
key
and
press
the
Correction key. An
intermittent beep sounds.
4) Press the Space bar.
The
word
is
erased.
5) Type the correct
word.
6) Press the Relocation key. The
print point
indicator
returns
to one
space
beyond
the last
character on
the
page.
Note:
You can erase a
part
of the
word
automatically.
a)
Position
the
print point
indicator on the last letter to be erased
in the
word.
b) Hold down the Code
key
and
press
the Correction
key. An
intermittent beep
sounds.
c)
Type
the
first letter to
be erased
in the
word.
The
part
of the
word specified
is erased.
ml- ^
'
Ine
r_l
mL^ L^^F
t ltg uE> L
(tr)
rypewrlrera
The best
tytrewriter
I
tr
t7
@.[*l
hact
"-""a
rypewr r r er
F\/no\^Irr l- ar
eJ
vv
rt
The
best
A
writer
position
carrier
l llc
rypewrlrer
Thc h ci r\/nF\^r.
i tef
A
DASJL
A
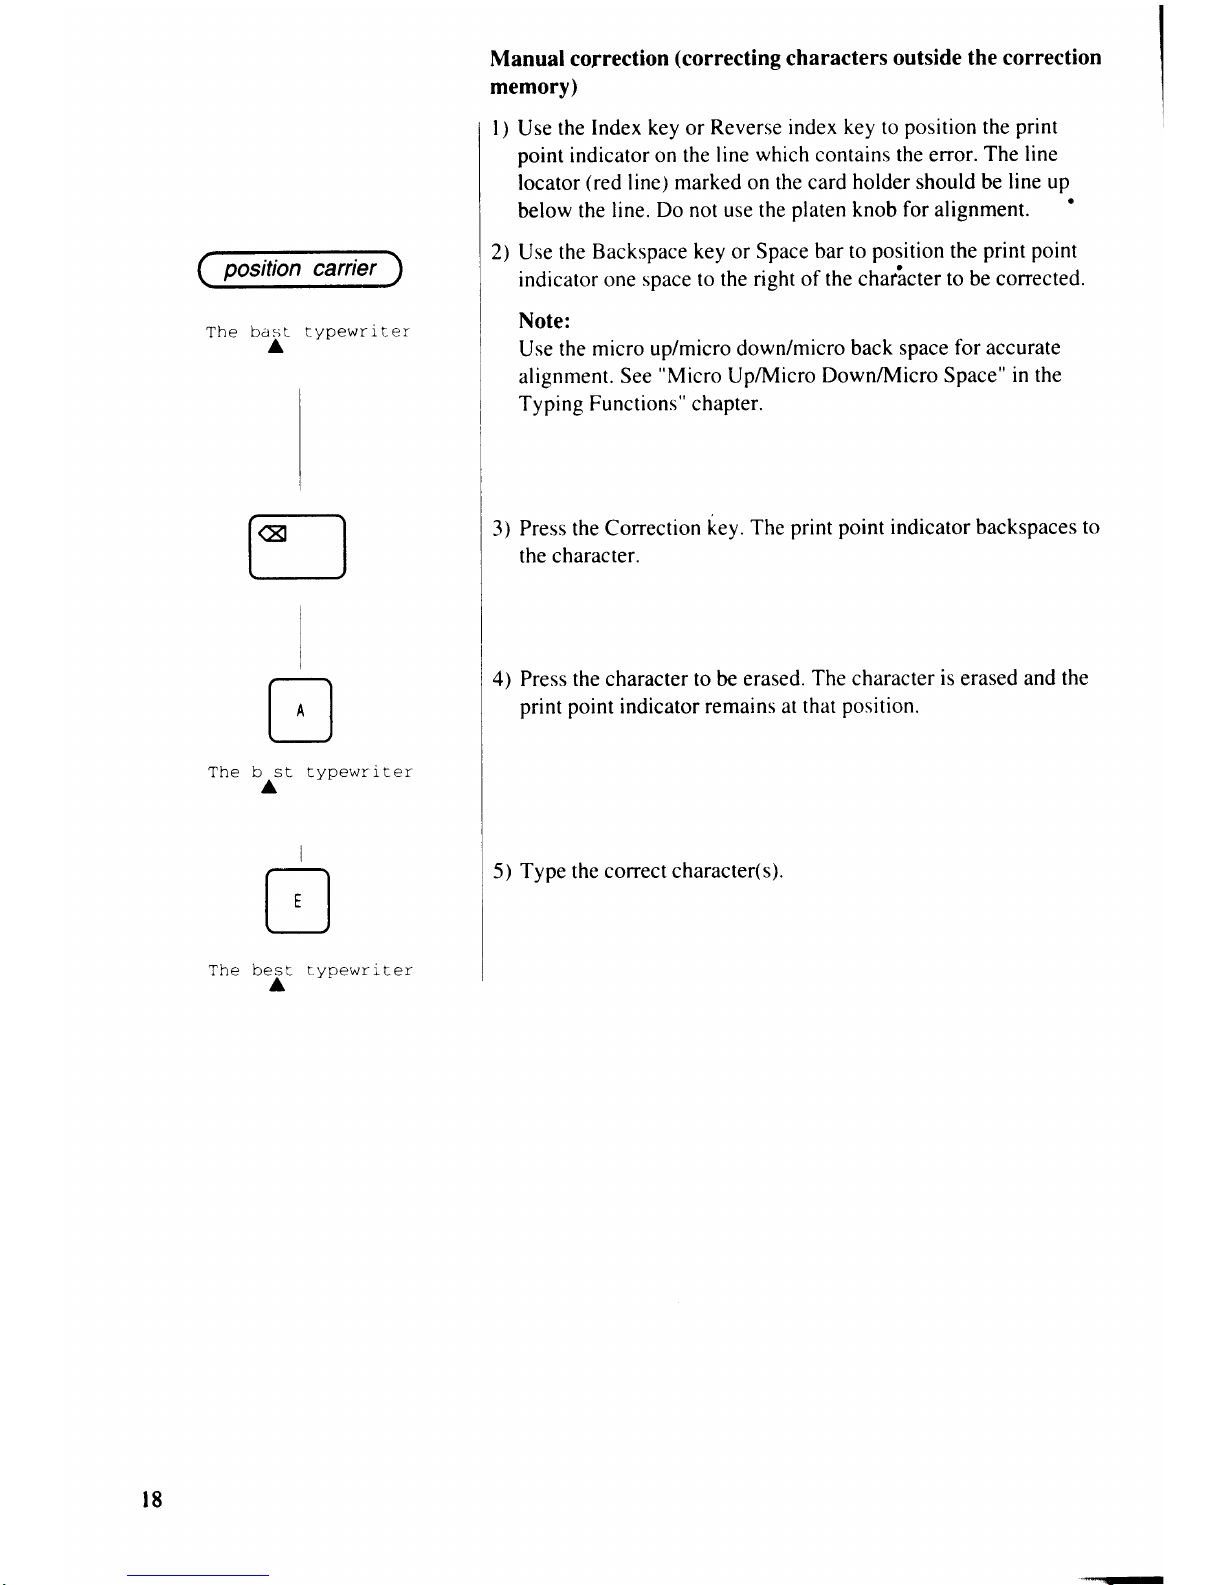
Manual correction
(correcting
characters
outside the correction
memory)
I
)
Use
the
Index key or
Reverse index
key
to
position
the
print
point
indicator on
the line
which
contains the error.
The line
locator
(red
line)
marked on the card
holder should be
line up
below
the line.
Do not use the
platen
knob
for alignment.
'
2) Use
the Backspace
key or Space
bar to
position
the
print point
indicator one
space to the right of
the
charhcter
to be conected.
Note:
Use
the
micro up/micro down/micro
back space
for accurate
alignment.
See
"Micro
UpiTr4icro
Down/Jt4icro Space"
in the
Typing Functions" chapter.
3)
Press the Correction
key.
The
print point
indicator backspaces
to
the character.
4) Press the character to be
erased.
The character
is
erased and
the
print
point
indicator
remains at
that
position.
5) Type the
correct character(s).
i
r-;t
L-J
mh^ h^^F
I lIE Ug5 L
A
Lypewr
i t er
t8
'-"-
besr typewri ter
Corrections
on the
Display
The
best_typewri ter
The best typewriter.
The best-typewri
ter
w
r_l
I
I
f€l
t-l
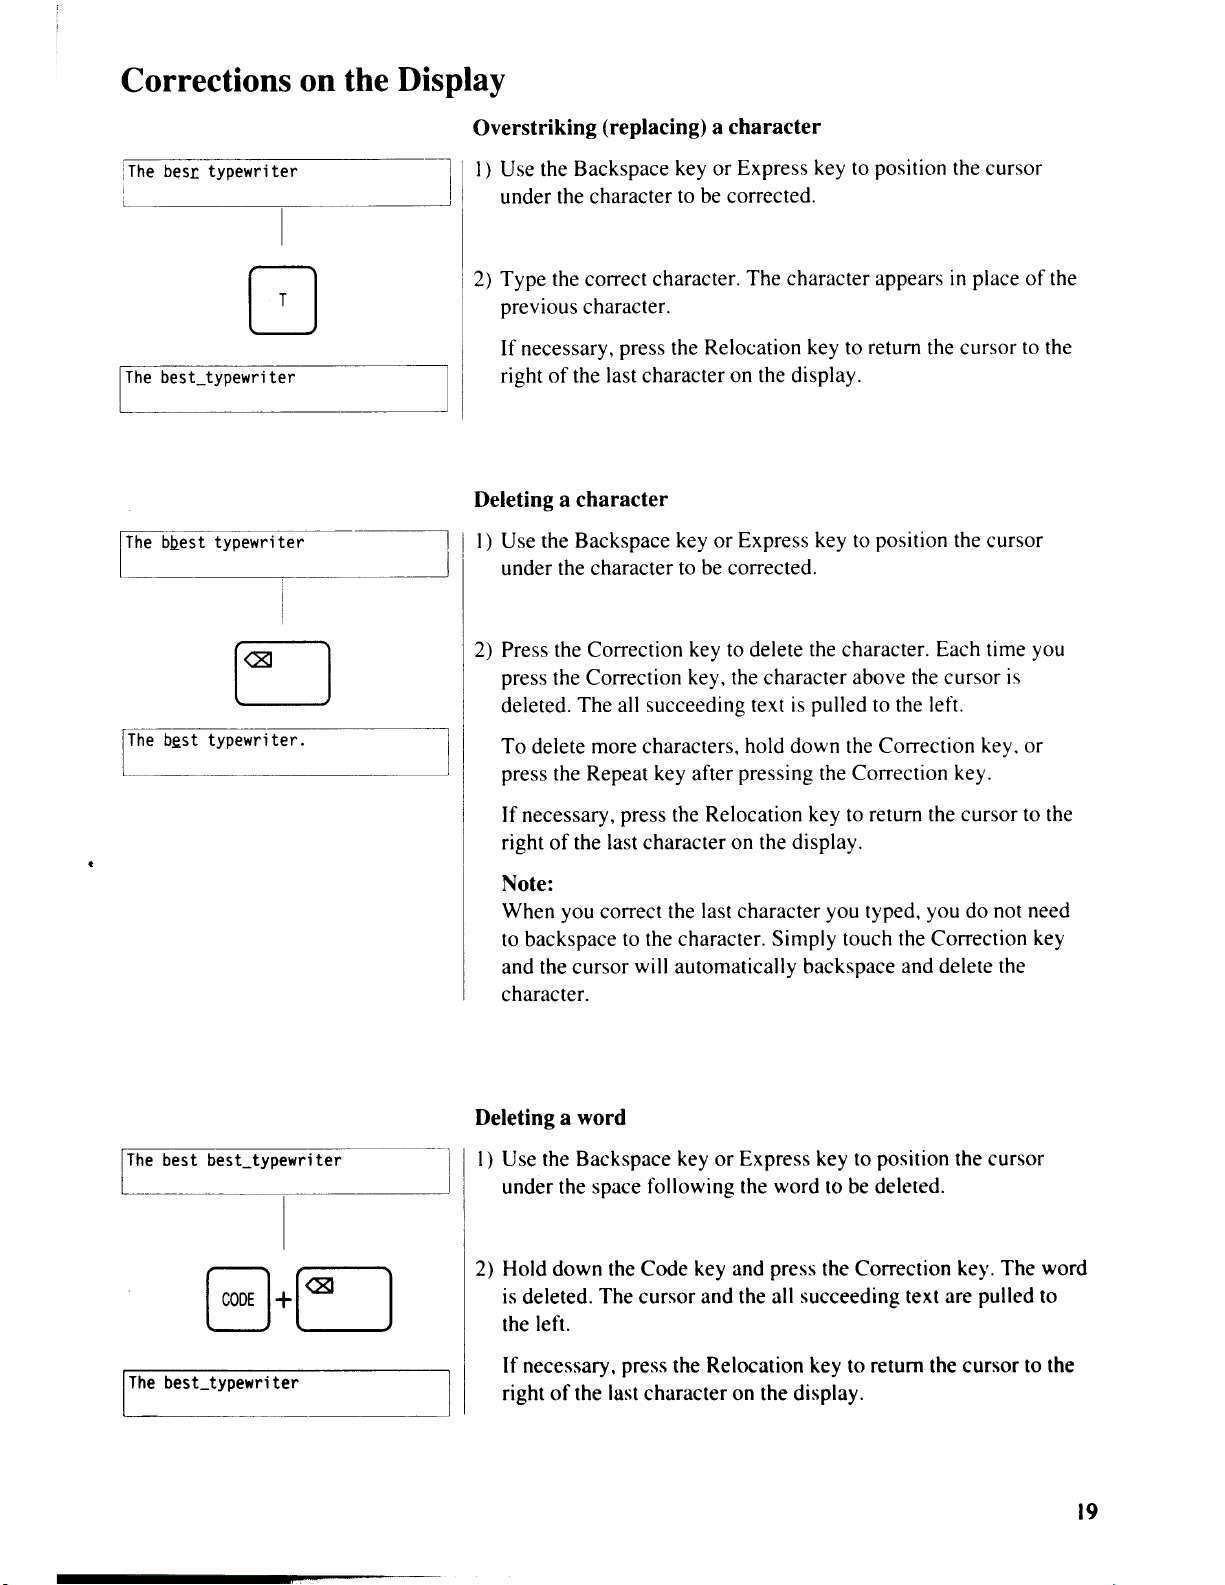
Overstriking
(replacing)
a character
l) Use the
Backspace
key or
Express key to
position
the cursor
under
the character
to be corrected.
2)
Type the correct character.
The character appears in
place
of the
previous
character.
If necessary,
press
the
Relocation key to
return
the cursor to
the
right of
the last character
on the display.
Deleting a character
I ) Use the
Backspace
key
or
Express key to
position
the cursor
under
the character to
be corrected.
2) Press the Correction
key to delete
the
character.
Each time
you
press
the Correction
key, the character above the cursor
is
deleted.
The
all
succeeding text
is
pulled
to the left.
To
delete
more
characters,
hold down the Correction
key, or
press
the Repeat key after
pressing
the Correction
key.
If necessary,
press
the
Relocation
key
to
return the cursor to the
right of the
last
character
on the
display.
Note:
When
you
correct the
last character
you
typed,
you
do not need
to backspace
to the character. Simply touch
the
Correction
key
and the cursor
will
automatically backspace
and delete the
character.
Deleting a
word
l) Use the Backspace
key
or
Express key to
position
the cursor
under the
space following the
word
to be deleted.
2) Hold down the Code
key and
press
the Correction
key'. The
word
is
deleted.
The cursor and the all
succeeding
text are
pulled
to
the
left.
If necessary,
press
the Relocation key to return the cursor
to the
right of the
last
character on the display.
best_typewri ter
l9
@.@
(e.E)
The
best typewfliter
@.@
(e.E)
The
best
typewri
ter
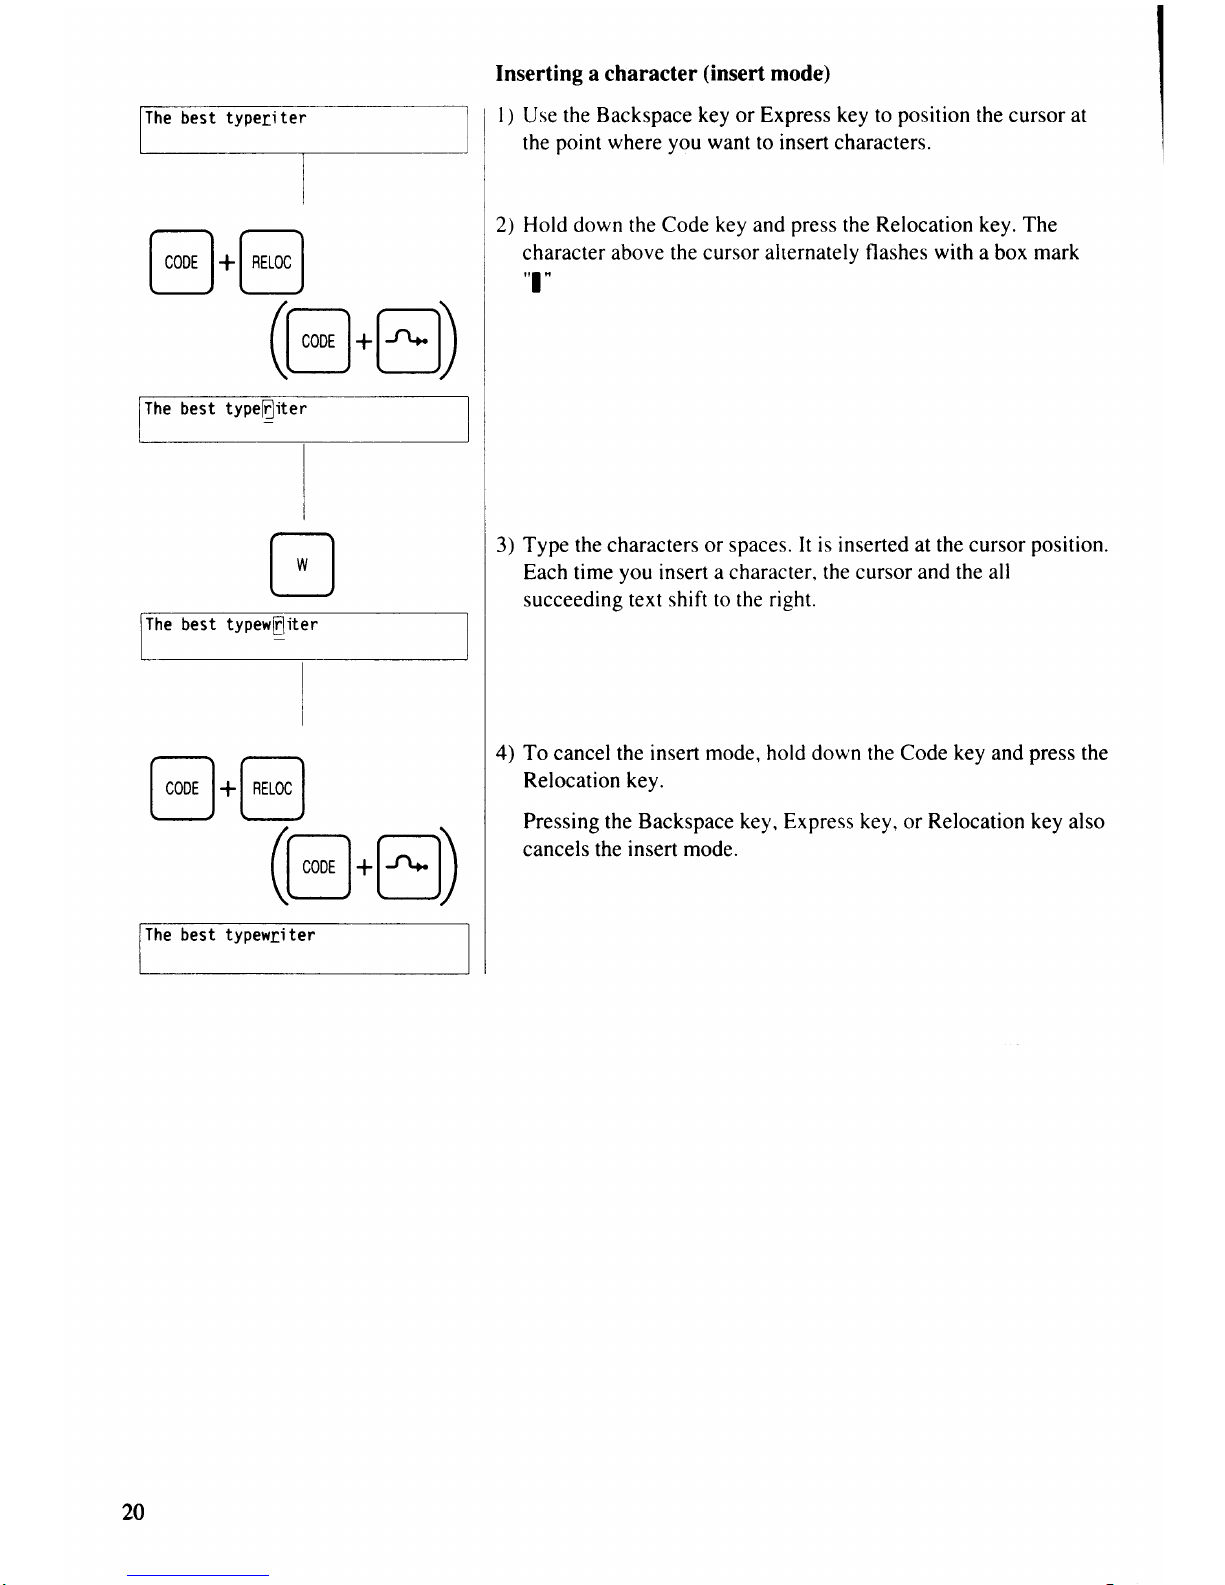
Inserting a character
(insert
mode)
l)
Use the
Backspace key or Express key to
position
the cursor at
the
point where you want
to insert characters.
2) Hold down the Code
key
and
press
the Relocation key.
The
character
above the cursor alternately
flashes with
a box
mark
"l'
3) Type the characters or spaces.
It is inserted at the cursor
position.
Each time
you
insert a character,
the cursor and the all
succeeding text
shift to
the
right.
4) To cancel the insert mode, hold down the Code
key
and
press
the
Relocation key.
Pressing the Backspace key, Express key, or Relocation key also
cancels the
insert
mode.
20
F
t
I
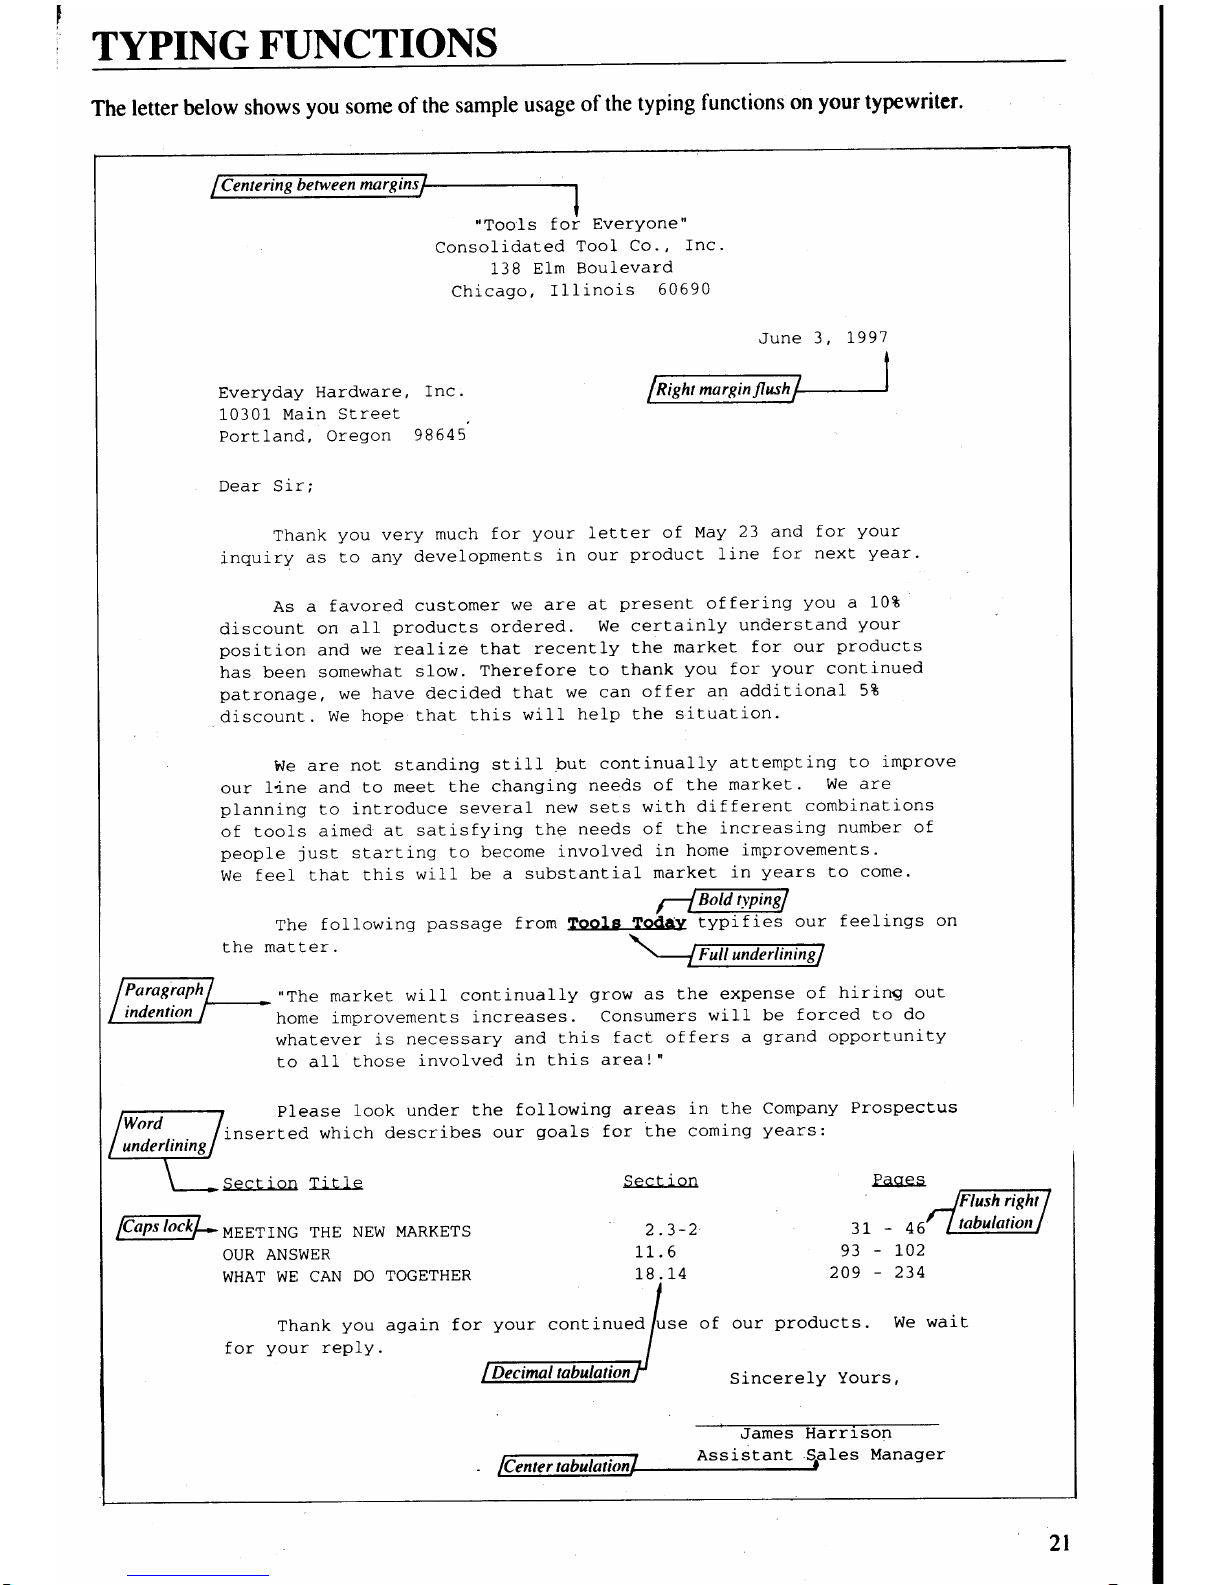
TYPINGFUNCTIONS
The
letter
below
shows
you
some
of the
sample
usage
of
the
typing
functions
on
your
typewriter.
uToo.ls
for
EverYone"
Consolidated
Tool
Co.,
Inc.
138
Elm
Boulevard
Chicago,
Illinois
60690
As a
favored
cusEomer
we are
a!
present
offering
you
a
10t
discount
on
all
products
ordered.
We certainly
understand
your
position
and
we realize
that
recently
the
market
for
our
products
has been
somewhat
slow.
Therefore
to thank
you
for
your
continued
patronage,
we
have
decided
that
we can
offer
an additional
58
discount.
We
hope that
this
wi1J.
help the
situation.
We are
not standing
stil-l-
but.
continually
attemp[ing
to
improve
our
ld-ne and
to
meet
the changing
needs
of
the
market.
We are
planning
to
introduce
several
new
sets
with
different
combinations
of tools
aimed
at satisfying
the
needs
of the
increasing
number of
people
just
starting
to
become
involved
in
home
improvements.
We feel
that
this
will be a
substantial
market
in
years
to come.
/@
Everyday
Hardware,
Inc.
10301
Main
Street
Portland,
Oregon
98645
Dear Srr;
Thank
you
very
much
for
Your
inquiry
as
Lo
any
develoPments
in
The
followrng
the
matter.
letter
of
May
23 and
for
Your
our
product
line
for
next
Year.
passage
from
Tools
Todav
typifies
our
feeli-ngs
on
in the
Company
Prospectus
coming
years:
Sect
ion
lW-.
.:,."r4/-,,The
marker
witl continually
grow
as the
expense
of
hiring out
I
Indenlnn
I
home
improvements
i-ncreases.
Consumers
will
be
forced to
do
whatever
is
necessary
and
this
fact
offers
a
grand
opportunity
to all
those
invol-ved
in this
area!"
r-t
Please
look
under
Lhe
following
areas
lnn:o .. . /ir,=.ta"d
which describes
our
goals
for
the
I
underltntns
I
\-
Section
Title
Sect
j-
16;loc-kl-MEETTNG
rHE
NEW MARKETS
OUR
ANSWER
WHAT
WE CAN
DO
TOGETHER
Thank
you
again
for
for
your
rep1y.
2.3-2
II. b
L8.14
.
Paqes
3L-46
93
-
r02
209 - 234
of our
products.
We
wait
Sincerely
Yours,
James
Harr:-son
t-t
AssistanE SPles
Manager
l('tnto r rn hrt I n, i trn
4
June
3
,
),991
cont
inued
2l
Paragraph
Indention
il-@(D
@.@
@(tr)
fTGiR-l
'E'
(e
I
I
@
I
I
rNpENi-l
@
(e
I
llNp-Effi]
fNo-ml.
.@)
FfrdEi.ril..
.@)
@.
22
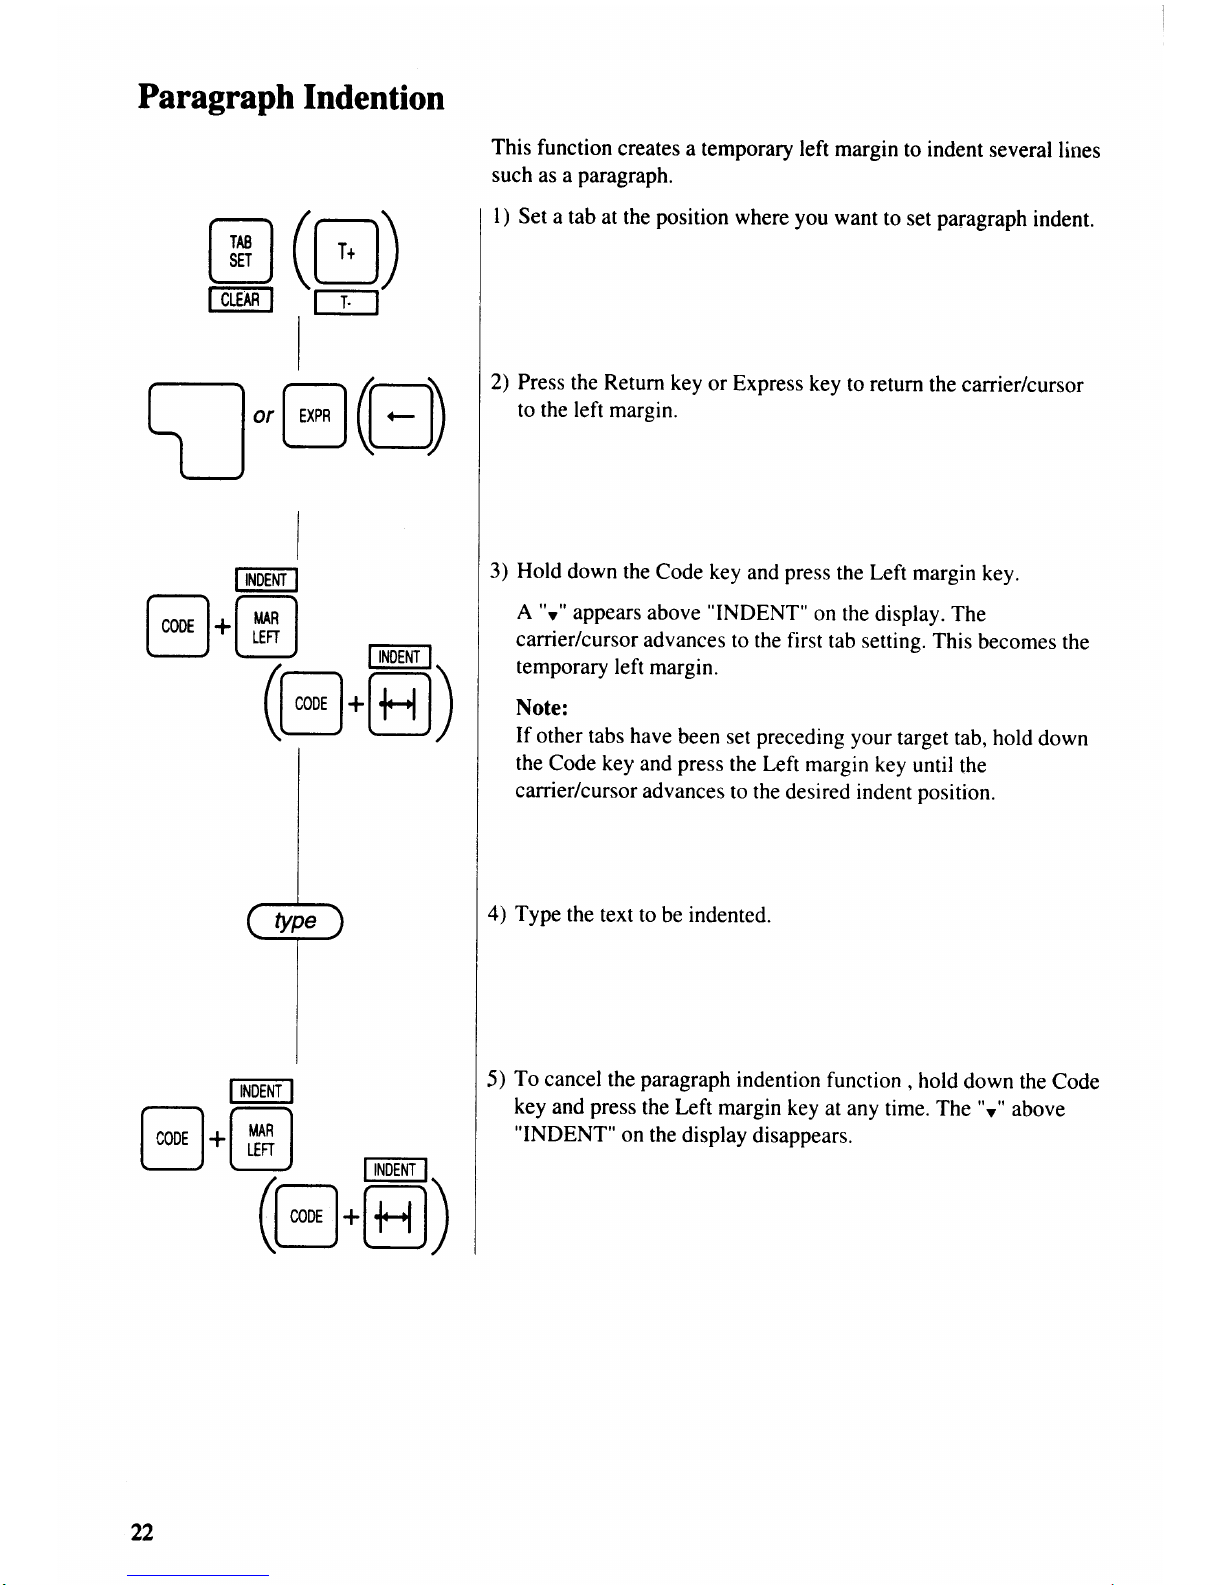
This function
creates
a temporary left
margin
to indent
several
lines
such
as a
paragraph.
I
)
Set
a tab
at the
position
where
you
want
to set
paragraph
indent.
2) Press
the Return
key
or Express
key
to return
the carrier/cursor
to the left
margin.
3) Hold
down the
Code key
and
press
the Left
margin
key.
A
"t"
appears
above
"INDENT"
on
the display.
The
carrier/cursor
advances
to the first
tab
setting. This
becomes the
temporary
left
margin.
Note:
If
other
tabs have
been
set
preceding
your
target
tab, hold
down
the
Code key
and
press
the Left
margin
key
until the
carrier/cursor
advances
to the
desired indent position.
4)
Type
the
text to
be
indented.
5)
To
cancel the
paragraph
indention
function
,
hold
down
the Code
key
and
press
the Left
margin key
at any
time. The
"r"
above
"INDENT"
on
the
display disappears.
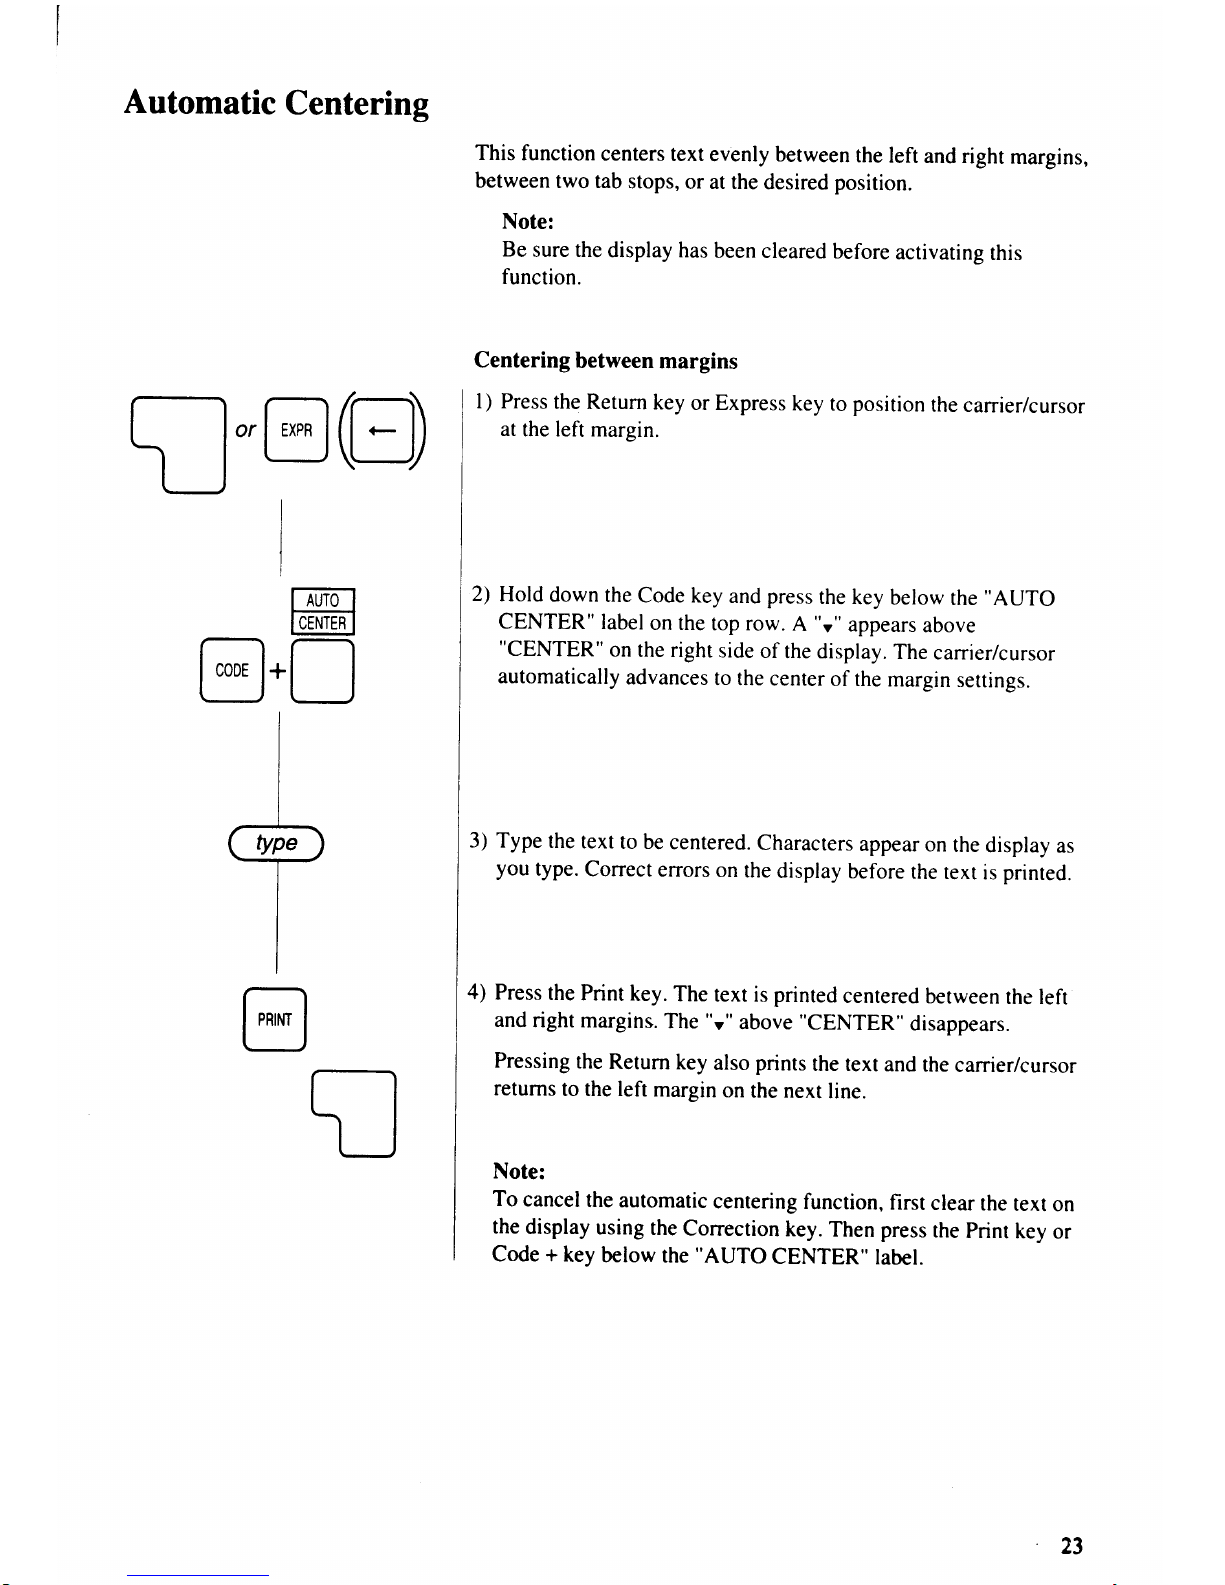
Automatic
Centering
il-@(D
This
function
centers
text
evenly between
the
left
and right
margins,
between
two tab
stops,
or at the
desired
position.
Note:
Be
sure the
display has
been cleared
before
activating
this
function.
Centering
between
margins
I ) Press
the Return
key
or Express
key to
position
the carrier/cursor
at
the left margin.
2)
Hold
down
the
Code key
and
press
the
key
below
the
"AUTO
CENTER"
label
on the
top row.
A
"r"
appears
above
"CENTER"
on
the right
side
of
the display.
The
carrier/cursor
automatically
advances
to the
center
of the
margin
settings.
3) Type
the
text
to be
centered.
characrers
appear
on
the
dispray
as
you
type.
correct
errors
on
the
display
before
the
text
is
printed.
4)
Press
the
Print
key.
The
text is
printed
cenrered
berween
the left
and
right
margins.
The
"v"
above
"CENTER"
disappears.
Pressing
the
Return
key
also
prints
the text
and
the
carrier/cursor
returns
to the left
margin
on
the
next
line.
Note:
To
cancel
the automatic
centering
function,
first
clear
the
text
on
the
display
using
the
conection
key.
Then
press
the
print
key
or
Code +
key
below
rhe
"AUTO
CENTER"
label.
Fulr-l
I
0ENTER
I
@.D
I
P
I
@
23
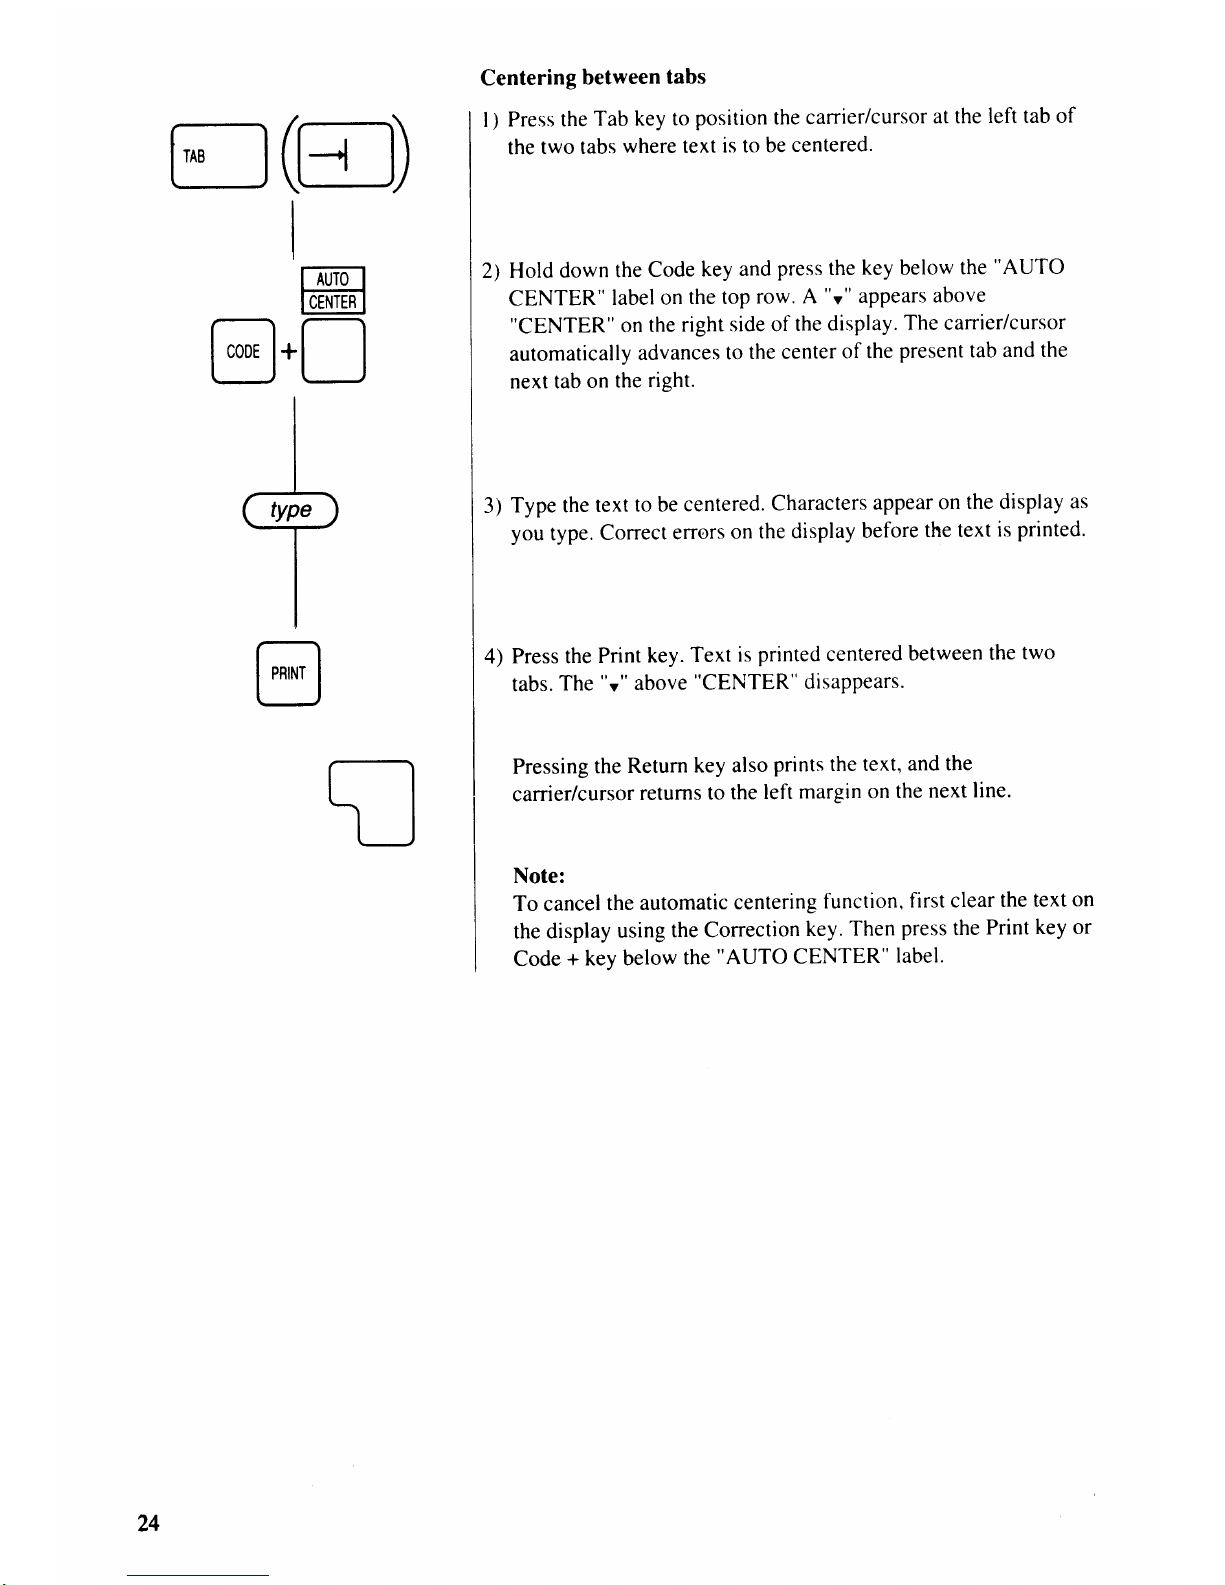
C(E)
Centering
between
tabs
l)
Press the
Tab key
to
position the carrier/cursor
at the
left tab of
the
two tabs
where
text
is to
be
centered.
2) Hold
down
the
Code
key
and
press the
key below
the
"AUTO
CENTER"
label on
the top
row.
A
"t"
appears
above
"CENTER"
on
the
right
side of
the
display.
The canier/cursor
automatically
advances
to
the center
of the
present
tab
and the
next tab
on
the
rieht.
3)
Type the
text
to be
centered.
Characters
appear
on
the display
as
you
type.
Correct
errors
on the
display
before
the text
is
printed.
4)
Press the
Print
key.
Text
is
printed centered
between
the
two
tabs.
The
"v"
above
"CENTER"
disappears.
Pressing
the
Return
key also
prints the text,
and
the
carrier/cursor
returns
to
the
left
margin on
the
next
line.
Note:
To cancel
the
automatic
centering
function,
first clear
the
text
on
the display
using
the Correction
key.
Then
press
the
Print
key or
Code
+ key below
the
"AUTO
CENTER"
label.
f
NTTI
l-{
I
0ENTER
I
@.!
I
I
P
I
I
@
24
I
ffi
[-q.D
I
P
I
@
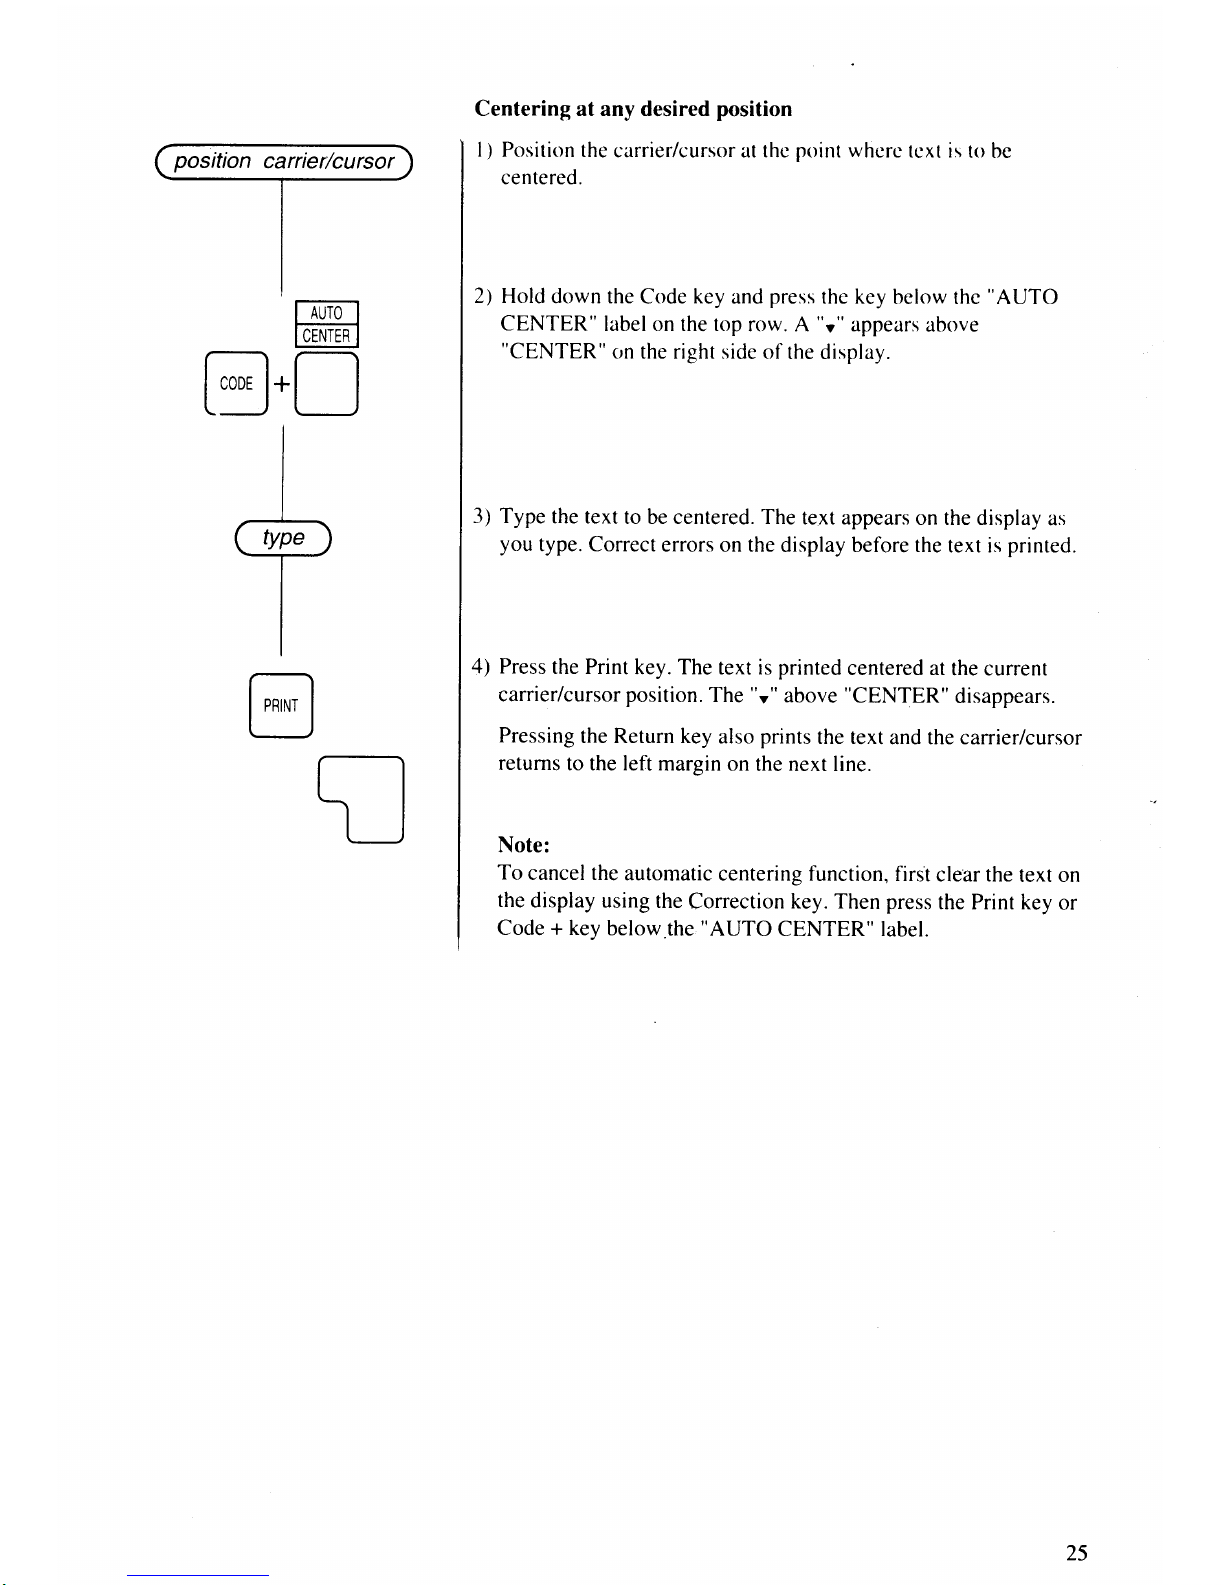
Centering at any desired
position
l)
Position the
carrier/cursor at thc
point
whcrc
tcxt is
to bc
centered.
2) Hold
down the
Code
key
and
press
the key
below thc
"AUTO
CENTER"
label on the top
row. A
"t"
appears
above
"CENTER"
(rn
the right side
of the display.
3) Type
the text
to be centered. The
text appears
on the display
as
you
type. Correct
errors on the
display before the
text is
printed.
4) Press
the Print
key. The
text is
printed
centered at
the current
carrier/cursor
position.
The
"t"
above
"CENTER"
disappears.
Pressing
the Return key
also
prints
the text
and the carrier/cursor
returns
to the left
marein on
the next line.
Note:
To
cancel the
automatic
centering function,
first
clear the
text on
the
display
using the
Correction key. Then press
the Print key
or
Code + key
below.the.
"AUTO
CENTER" label.
25
 Loading...