

Page 1
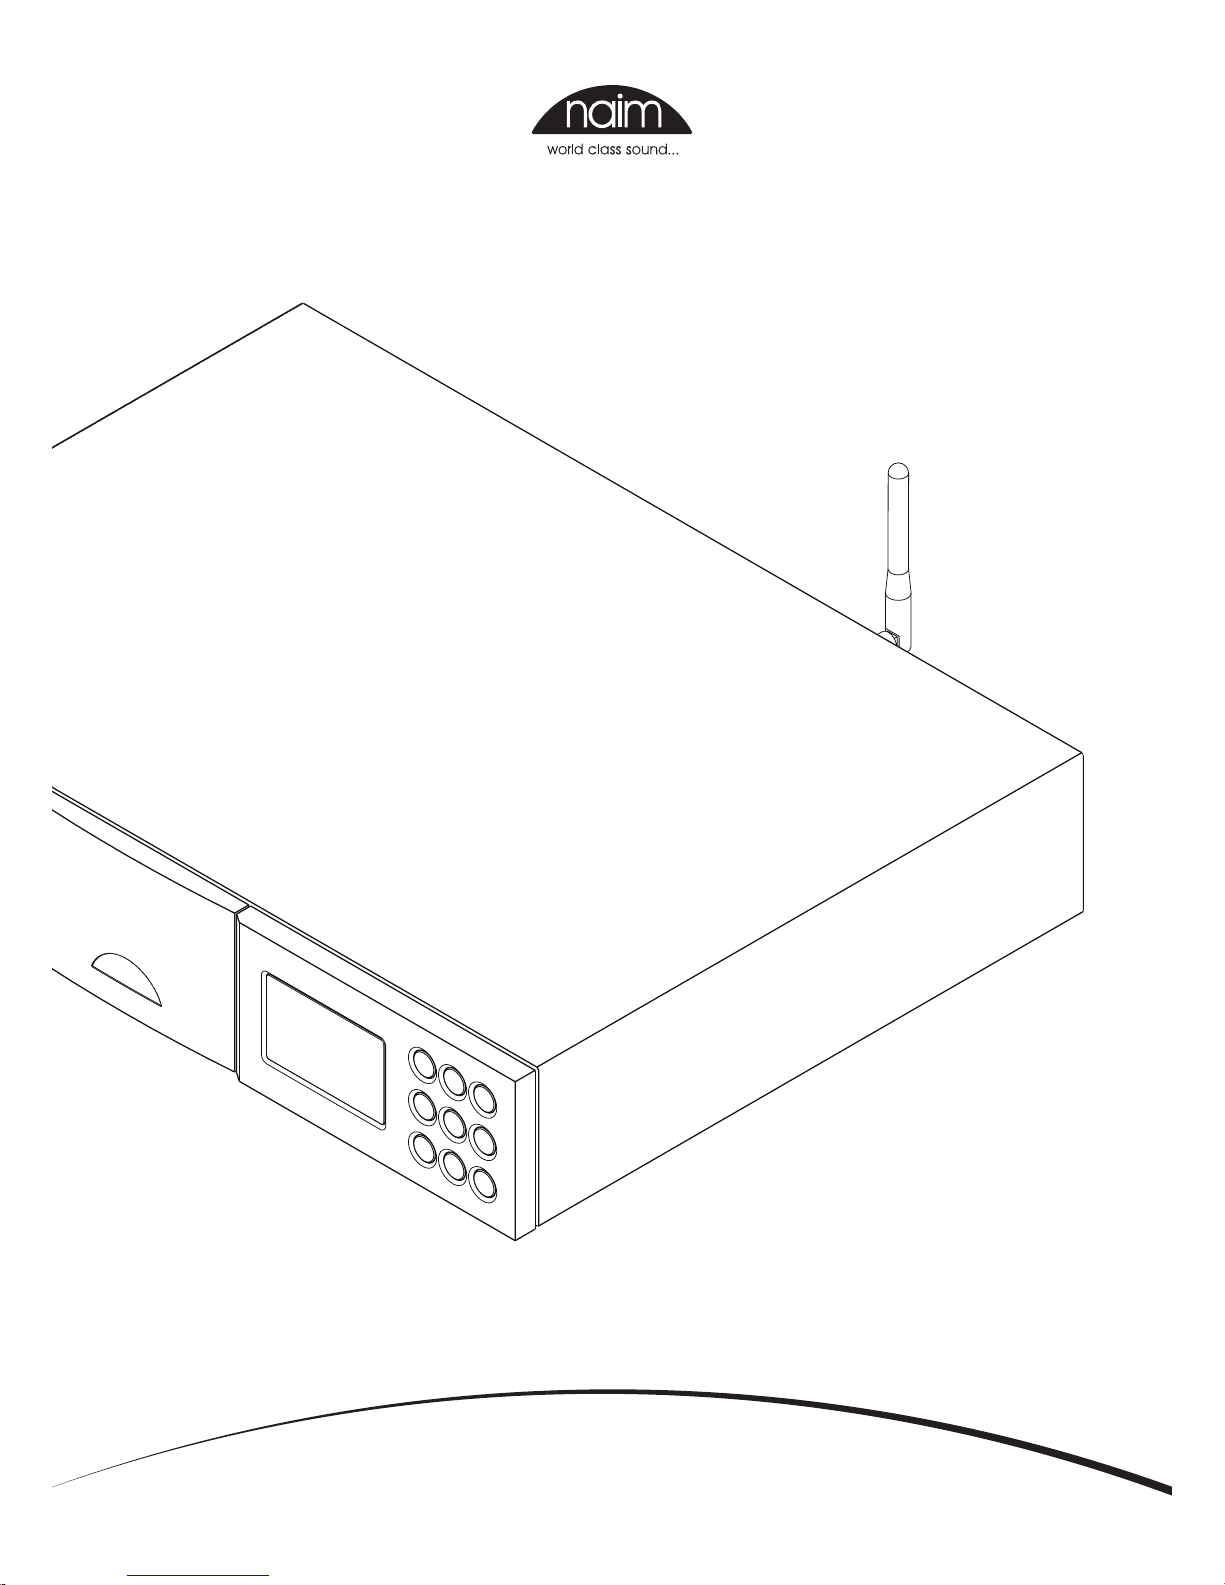
REFERENCE MANUAL
NDX NETWORK AUDIO PLAYER
E N G L I S H
Page 2

Contents
Section Page
Contents
1 NDX Introduction 1
1.1 The Multi-mode Radio 1
1.2 The UPnP™ Audio Interface 1
1.3 The USB/iPod Interface 1
1.4 The Digital to Analogue Converter 1
2 NDX Installation and Connection 2
2.1 NDX Rear Panel 2
2.2 NDX Connected To Optional
XPS Power Supply 2
2.3 Mains Power Connection 3
2.4 Power Supply Upgrade 3
2.5 FM/DAB Aerial Connection 3
2.6 Audio Inputs and Outputs 3
2.7 USB/iPod Interface 3
2.8 Network Connections 3
2.9 System Automation 4
2.10 External Control 4
2.11 Signal Ground Switch 4
3 NDX Operation 5
3.1 Front Panel Features 5
3.2 Front Panel Buttons 5
3.3 Front Panel Display (normal play mode) 5
3.4 Front Panel Display (list display mode) 6
3.5 Front Panel Display (setup mode) 6
3.6 NDX Remote Handset 7
3.7 Handset Text Entry 8
3.8 The n-Stream Control App 8
4 NDX Setup 9
4.1 The Setup Home Menu 9
4.2 The Language Menu 9
4.3 The Inputs Menu 9
4.4 The Analogue Outputs Menu 10
4.5 The Network Settings Menu 10
4.6 The Digital Output Menu 12
4.7 The Front Display Menu 12
4.8 The Handset Keys Menu 12
4.9 The System Automation Menu 13
4.10 The Factory Settings Menu 14
5 NDX Multi-mode Radio Tuner 15
5.1 FM Tuner – Seeking Stations 15
5.2 DAB Tuner – Seeking Stations 15
5.3 iRadio Tuner – Seeking Stations 15
5.4 Adding iRadio Stations 16
5.5 Storing Radio Presets 16
5.6 Using Radio Presets 16
6 NDX UPnP™ Audio Interface 17
6.1 UPnP™ Servers 17
6.2 Audio File Compatibility 17
6.3 Scanning Servers and Playing Files 17
7 NDX USB/iPod Interface 18
7.1 USB Media and File Compatibility 18
7.2 iPod Compatibility and Charging 18
7.3 Browsing and Playing USB Files 18
8 NDX Specifications 19
Note: This manual is issue No. 1 and describes the operation of
NDX units running software release version 3.5.
“Made for iPod” and “Made for iPhone” mean that an electronic
accessory has been designed to connect specifically to iPod or iPhone
respectively and has been certified by the developer to meet Apple
performance standards. Apple is not responsible for the operation of this
device or its compliance with safety and regulatory standards.
iPod and iPhone are trademarks of Apple Inc., registered in the U.S. and
other countries.
Windows Media™ is a trademark of Microsoft Corporation.
UPnP™ is a trademark of the UPnP™ Forum.
Page 3
1
NDX Introduction
1 NDX Introduction
The NDX is a highly capable network and digital audio player that will repay time and
effort spent on installation and setup. We strongly recommend that you read this manual.
The NDX incorporates four distinct audio components, each routed to analogue or digital
outputs intended for connection to an appropriate preamplifier input. Each component is
introduced in the paragraphs below and subsequently described in full detail in Sections 5
to 8. The NDX components are:
A Multi-mode Radio
A UPnP™ Audio Interface
A USB/iPod Audio Interface
A Digital to Analogue converter
Prior to the sections describing NDX components, Section 2 covers its installation, Section
3 describes its operation and Section 4 describes its setup.
1.1 The Multi-mode Radio
The NDX multi-mode radio combines an internet radio
(iRadio) player and an optional FM/DAB (Digital Audio
Broadcasting) tuner. A total of 40 radio stations across all
three modes can be stored as presets. In FM and DAB
mode, stations are tuned by NDX scanning the respective
transmission bands. In iRadio mode the NDX receives
data streams and a list of available radio stations from
a dedicated internet server. iRadio requires broadband
internet access via a home network connection.
The NDX DAB module incorporates full broadcast and
station display capabilities. The FM module is fully RDS
(Radio Data System) capable.
Note: DAB and RDS broadcasts are not available in all
territories.
1.2 The UPnP™ Audio Interface
NDX can connect to a home network and play audio files
stored on UPnP™ drives such as the Naim UnitiServe or on
PC and Mac computers.
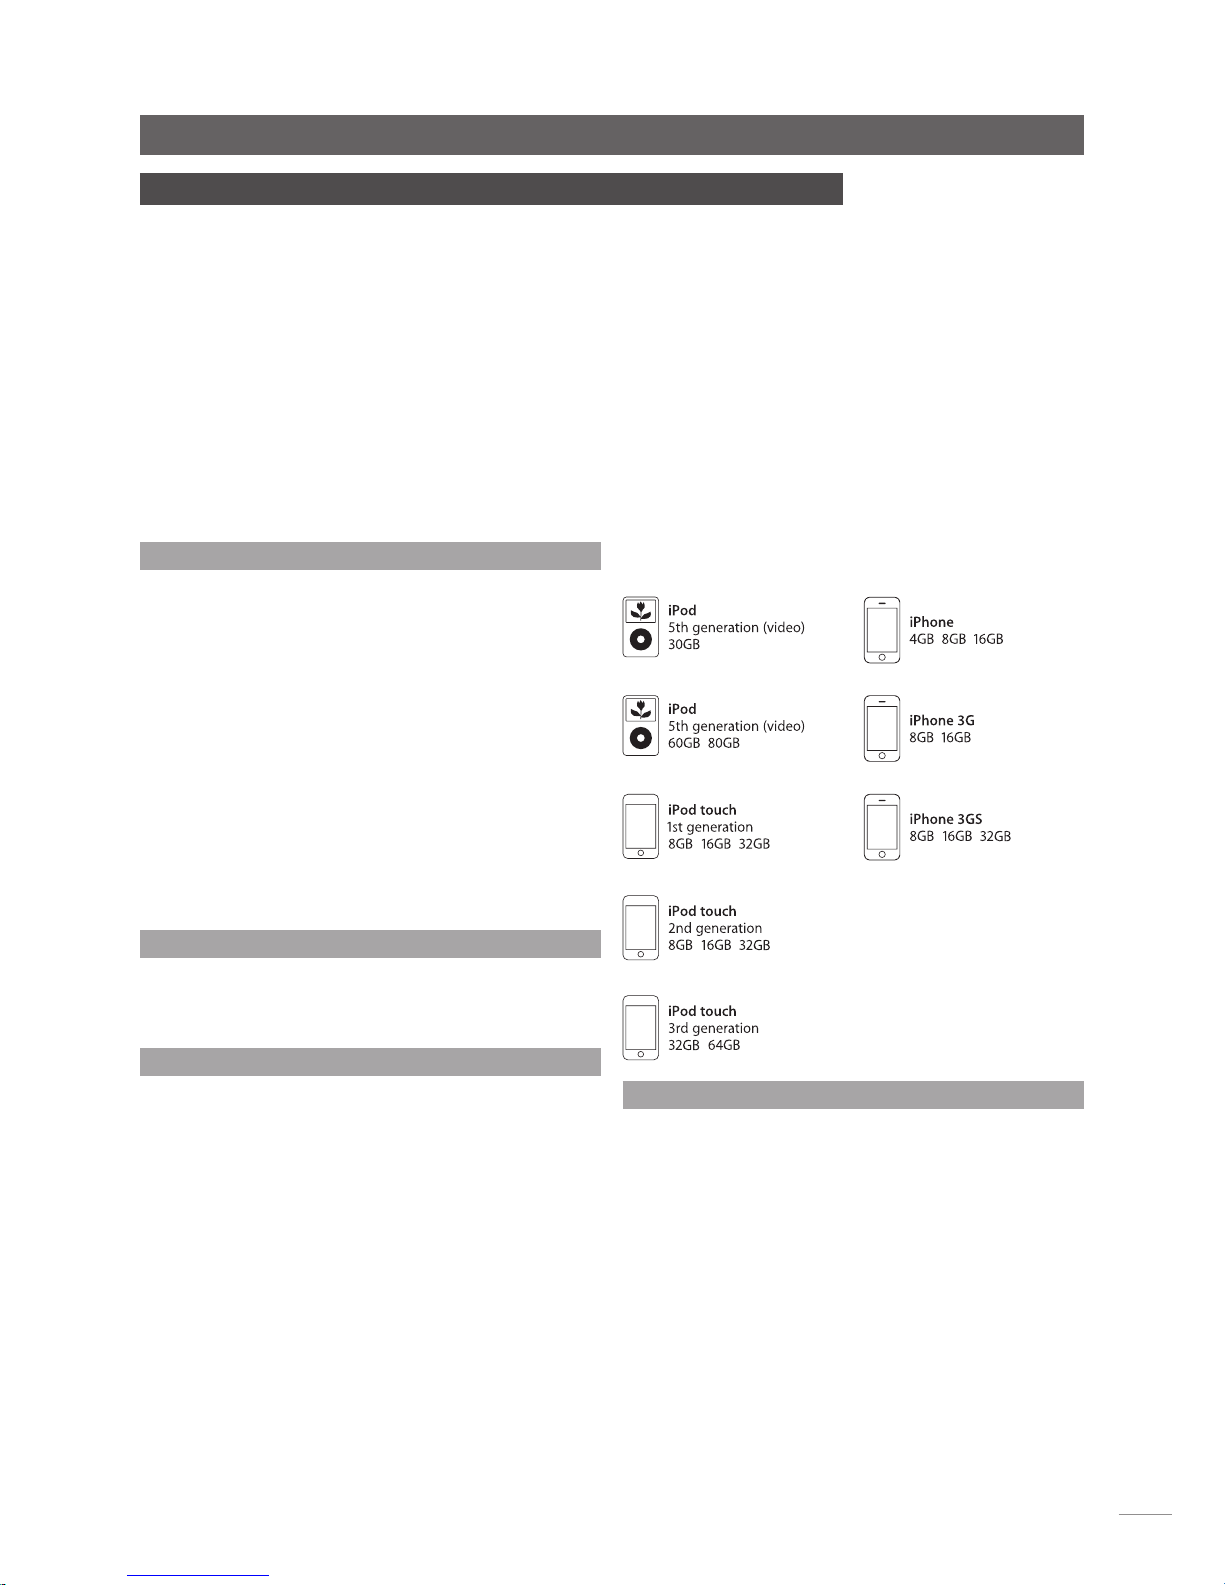
1.3 The USB/iPod Interface
NDX incorporates a front panel USB interface socket that
enables audio files stored on USB memory devices and
Apple iPod and iPhone models to be selected and played.
The NDX is compatible with the iPod and iPhone models
illustrated below.
1.4 The Digital to Analogue Converter
NDX incorporates a three input digital to analogue
converter able to handle S/PDIF format digital audio at
up to 24 bit and 192kHz resolution. The three DAC inputs
comprise one coaxial BNC socket, one coaxial Phono
socket and TosLink optical socket.
Page 4

2
NDX Installation and Connection
2 NDX Installation and Connection
Your NDX should be installed on an equipment stand intended for the purpose. Ensure it is
well ventilated, and do not stand it directly on top of another item of equipment. It should
be installed in its final location before connecting cables or switching on. The NDX has no
standby mode and is intended to be left switched on.
Connecting the NDX to mains power and to a variety of audio peripherals and sources
is described in the following paragraphs. Diagram 2.1 illustrates the NDX rear panel
connection sockets.
The NDX can be upgraded through the use of an external Naim XPS or 555PS power
supply, Connection of an external power supply is illustrated in Diagram 2.2 and
described in Section 2.4.
2.1 NDX Rear Panel
mains input
and fuse
power switch
network
socket
DAB/FM aerial
socket (if option
tted)
signal ground
switch
digital
output
wireless network
(Wi-Fi) antenna
socket
power supply
upgrade socket
(link plug tted)
RS232
serial
interface
remote
in
remote
out 1 & 2
digital inputs
3, 2 & 1
analogue
output
(phono)
analogue
output
(DIN)
2.2 NDX Connected To Optional XPS Power Supply
mains input
and fuse
SXPS Burndy
Cable
Cable
direction
marker
THE NDX MAINS CABLE SHOULD BE REMOVED AND
ITS POWER SWITCH TURNED OFF WHEN AN EXTERNAL
POWER SUPPLY IS USED.
THE SXPS BURNDY CABLE ONLY MUST BE USED TO
CONNECT THE XPS OR 555PS POWER SUPPLIES.
Page 5

3
NDX Installation and Connection
2.3 Mains Power Connection
Connect the NDX to a mains power socket using either the
mains cable supplied or a Naim Power-Line.
2.4 Power Supply Upgrade
The NDX can be upgraded through the use of an external
Naim XPS or 555PS power supply.
If an external power supply is to be used, the link plug on
the rear panel of the NDX should be removed and the
power supply connected in its place using an SXPS Burndy
cable. See Diagram 2.2.
THE SXPS BURNDY CABLE ONLY MUST BE USED TO CONNECT
THE XPS OR 555PS POWER SUPPLIES.
The NDX power switch should be off and the power cable
removed when an external power supply is used. The NDX
is then switched on using the external power supply power
switch.
2.5 FM/DAB Aerial Connection
If the NDX FM/DAB tuner option is fitted it will only be
able to provide high quality FM and DAB radio if a strong,
interference-free radio signal is available. The NDX rear
panel FM/DAB Aerial socket must be connected, via 75
Ohm low-loss coaxial cable, to a suitable aerial. The aerial
should be mounted clear of large obstructions and as high
as possible; ideally on a roof.
Note: Your local retailer should be able to offer advice on
a suitable aerial and aerial installer.
2.6 Audio Inputs and Outputs
2.6.1 Audio Signal Inputs
NDX provides three S/PDIF digital inputs. Connection to the
inputs is made via a variety of socket types. The following
table lists the inputs and their socket types:
Input Socket
dig. 1 Coaxial (BNC)
dig. 2 Coaxial (RCA phono)
dig. 3 Optical (TosLink)
Always use high quality interconnect cables to connect
sources to NDX inputs.
The digital inputs are configured via the NDX Digital Inputs
setup menu. See Section 4.3.6.
2.6.2 Audio Signal Outputs
The NDX provides analogue and digital audio signal
outputs intended for connection to an appropriate
preamplifier or digital to analogue converter input. NDX
output connections are made via the socket types listed
below:
Output Socket
Analogue stereo 5-pin DIN
Analogue stereo RCA phono
S/PDIF digital stereo BNC Coaxial
Note: Output sockets are selected and configured via the
NDX Analogue Outputs and Digital Output setup menus.
See Sections 4.4 and 4.6.
2.7 USB/iPod Interface
The NDX is fitted with a front panel USB interface intended
for the connection of Apple iPod and iPhone models
and USB memory hardware carrying audio files. The USB
interface should not be used for any other purpose.
Depending on the setup options chosen (see Section
4.3.5), iPod and iPhone batteries will be charged when
connected to the USB interface.
2.8 Network Connections
The NDX can be connected to a TCP/IP network via
either a wired or wireless connection. Network connection
enables the NDX to play internet radio data streams
or play audio files stored on UPnP™ servers such as the
Naim UnitiServe and HDX, and appropriately configured
computers and network drives.
2.8.1 Wired Network Connection
The NDX is fitted on its rear panel with a standard ethernet
socket. For wired network connection this socket should
be connected to a spare ethernet socket on your network
router.
Note: Ethernet-over-mains hardware may be used and
provides a simple and convenient method of wired home
network connection. However, depending on mains wiring
factors specific to each home environment, the presence
of network data on the mains supply may compromise
overall system sound quality. If any sound quality
compromise is found to be unacceptable, dedicated
network cabling should be installed or wireless networking
should be employed.
2.8.2 Wireless Network Connection
If NDX is to connect wirelessly to the home network the
supplied Wi-Fi antenna must be fitted to the rear panel
wireless antenna socket. Wireless configuration will also be
necessary before NDX is able to connect to your home
network. See Section 4.5.1.
Page 6

4
NDX Installation and Connection
2.8.3 Network Settings
The NDX is set up when originally shipped not to require
any on-site TCP/IP configuration but to connect to
a network automatically (it uses DHCP by default).
However, if your NDX has been previously used, its network
configuration may have been altered leaving it unable
to connect automatically. If this appears to be the case
ensure that DHCP is selected in the Network Settings
menu (see Section 4.5 of this manual) and re-start NDX. If
problems still persist contact your retailer, installer or Naim
Audio directly.
Note: Before reporting network connection problems carry
out a Factory Reset operation. Select Reset All Settings
from the Factory Settings setup menu. See Section 4.10.
Note: A NDX switched on without a working wired network
connection will only be able to connect to a home
network wirelessly. To use an ethernet (wired) connection,
switch the NDX off, connect the network and switch it on
again.
Note: For internet radio to operate, the NDX requires
connection to a broadband internet service.
2.9 System Automation
NDX control can be linked using System Automation to
the control of some Naim preamplifiers, CD players and
the Naim DAC. System Automation enables for example,
preamplifier inputs to be selected via the NDX, or for
n-Stream transport functions to control a CD player. To take
advantage of System Automation, connect one of the
NDX rear panel Remote Out sockets to a preamplifier, CD
player or DAC Remote In socket. Use a cable terminated
with a 3.5mm jack plug at one end and a 3.5mm jack or
phono plug as necessary at the other end.
Using both NDX Remote Out sockets, for example, one
connected to a preamplifier and one connected to a CD
player enables comprehensive system control via just one
user interface (handset or n-stream iPhone app).
Note: Stereo and mono 3.5mm jack to 3.5mm jack can
be used for System Automation. If a stereo 3.5mm jack to
phono plug cable is used, connect the left channel phono
plug.
Note: NDX System Automation is switched off by default. A
full description of its configuration and use can be found in
Section 4.9.
2.10 External Control
The NDX is fitted on its rear panel with a 3.5mm jack
Remote In socket and a standard RS232 serial interface
socket. The Remote In socket can be used for RC5 remote
control of the NDX via a wired connection or a remote IR
repeater.
The RS232 socket enables firmware upgrades and
diagnostic tests to be carried out. Contact your retailer for
more information if required.
2.11 Signal Ground Switch
The NDX is fitted on its rear panel with a Signal Ground
switch offering two positions: Chassis and Floating. Select
the Chassis position unless NDX is connected in a hi-fi
system incorporating another earthed source component,
or mains “hum” is audible through the loudspeakers.
Contact your retailer, distributor or Naim for advice if
necessary.
Note: “Connected” in the context above means an
analogue audio signal cable that includes an earth
connection.
Note: All Naim CD players are earthed so the Signal
Ground switch should be set to floating if one is connected
in the system (unless a digital signal connection is used).
Note: The Signal Ground switch setting is not affected by
the use of an external power supply.
No damage will be done if the wrong Signal Ground
position is chosen, however the system sound quality may
be compromised.
2.11.1 General Audio Connection Notes
The NDX mains earth (ground) should always be
connected regardless of what other equipment is used.
Note: If an external power supply is used the NDX mains
earth is connected through the Burndy connection cable
to the power supply mains earth.
A mains earth grounds the chassis and the electrostatic
screen within the transformer, and is only connected to the
signal negative if the Signal Ground switch is set to Chassis.
In order to avoid hum loops, the signal negative of the
whole system should be connected to the mains earth in
one place only.
Page 7
5
NDX Operation
3 NDX Operation
The NDX can be operated from either its front panel controls, from the supplied remote
handset or via the n-Stream iPod and iPhone app. Setting up and operating an NDX
requires navigation through a menu-driven user interface. The general principles of the
interface are carried across each of NDX’s components so this section of the manual
describes and illustrates those general principles.
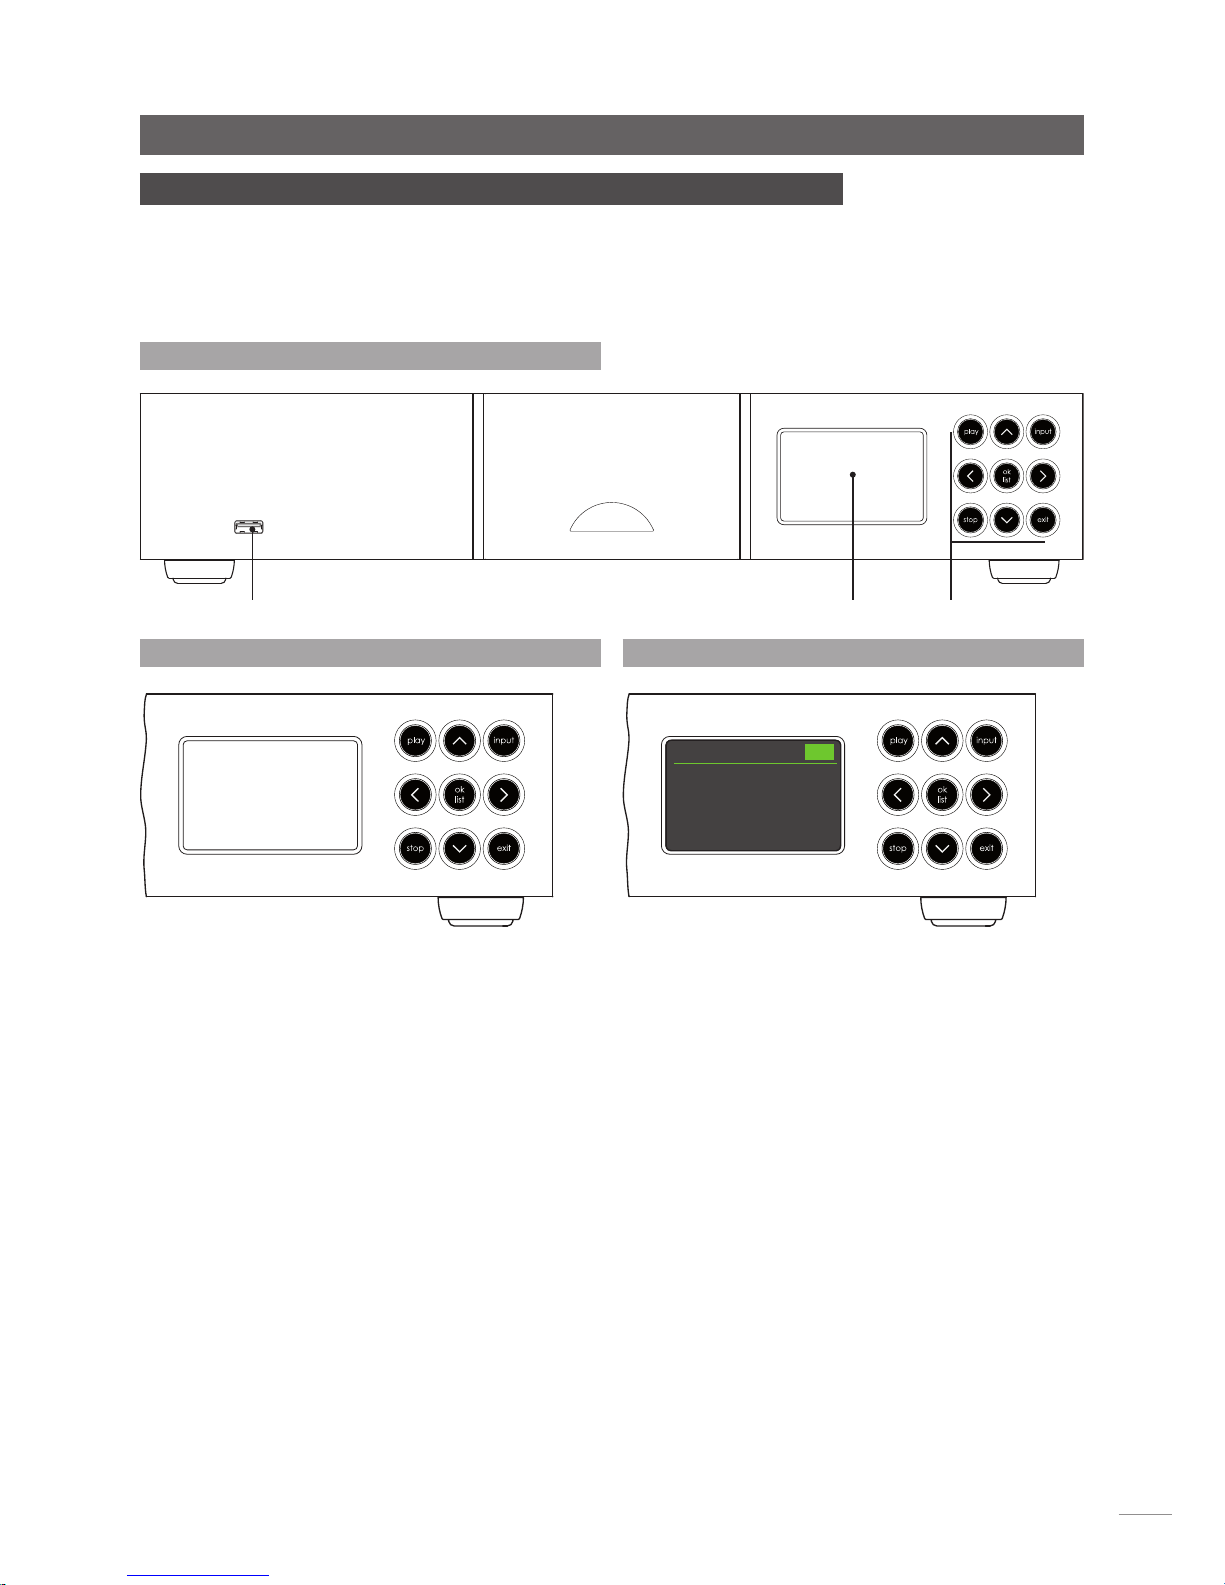
3.1 Front Panel Features
USB interface
front panel
display
front panel
buttons
3.2 Front Panel Buttons
The NDX front panel buttons function as described below:
play
Plays a selected track or radio station.
^ Navigates up a menu or list.
input
Sequentially selects NDX inputs.
< Returns to the previous display menu.
ok/list Enters list display mode.
Confirms menu item selection.
> Advances to the next display menu.
stop Stops playing a track or radio station.
V Navigates down a menu or list.
exit
Exits list display mode.
3.3 Front Panel Display (normal play mode)
In normal play mode the NDX screen provides a variety of
information on the current setup, the input selected and
the material playing. A typical normal play mode screen
is illustrated above showing the internet radio station BBC
6Music playing.
At the top of the screen, “P3” shows that the radio station
is stored as preset 3, and the “iRad” icon shows that
internet radio is selected.
P3
BBCR6MusicL
BBC 6Music
iRAD
Page 8
6
NDX Operation
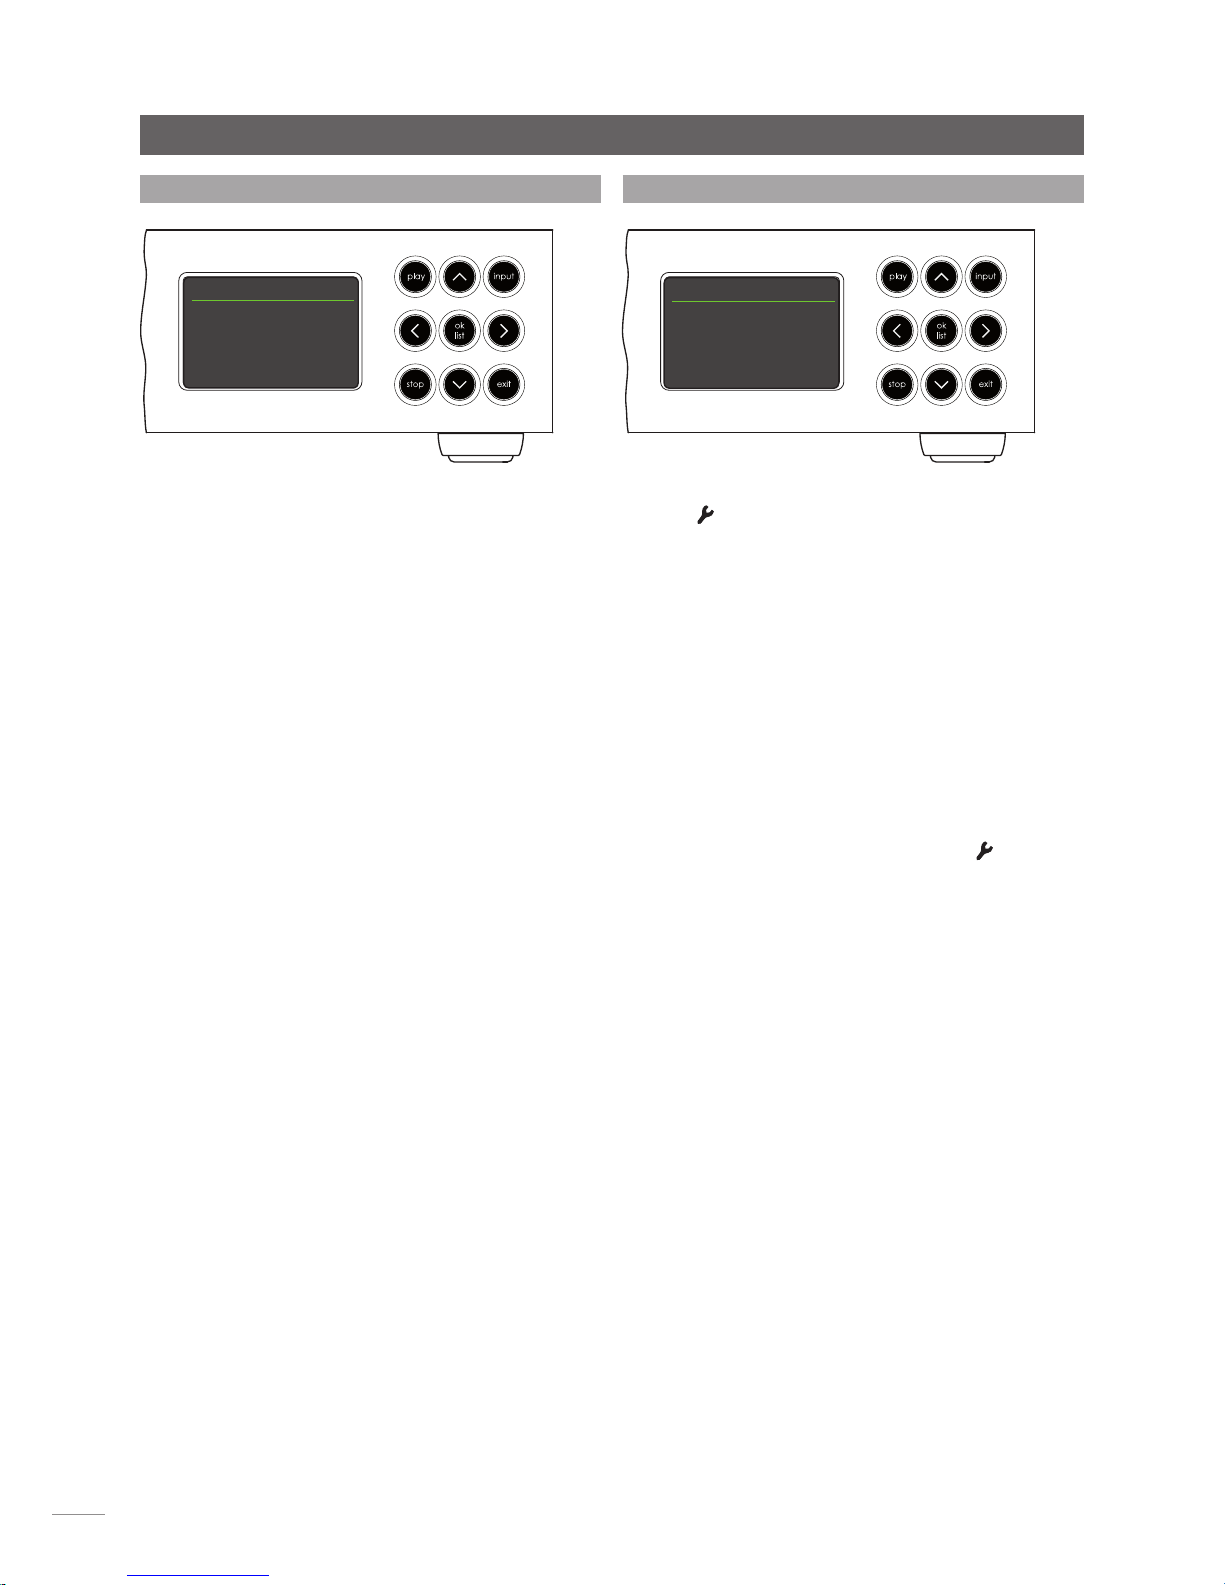
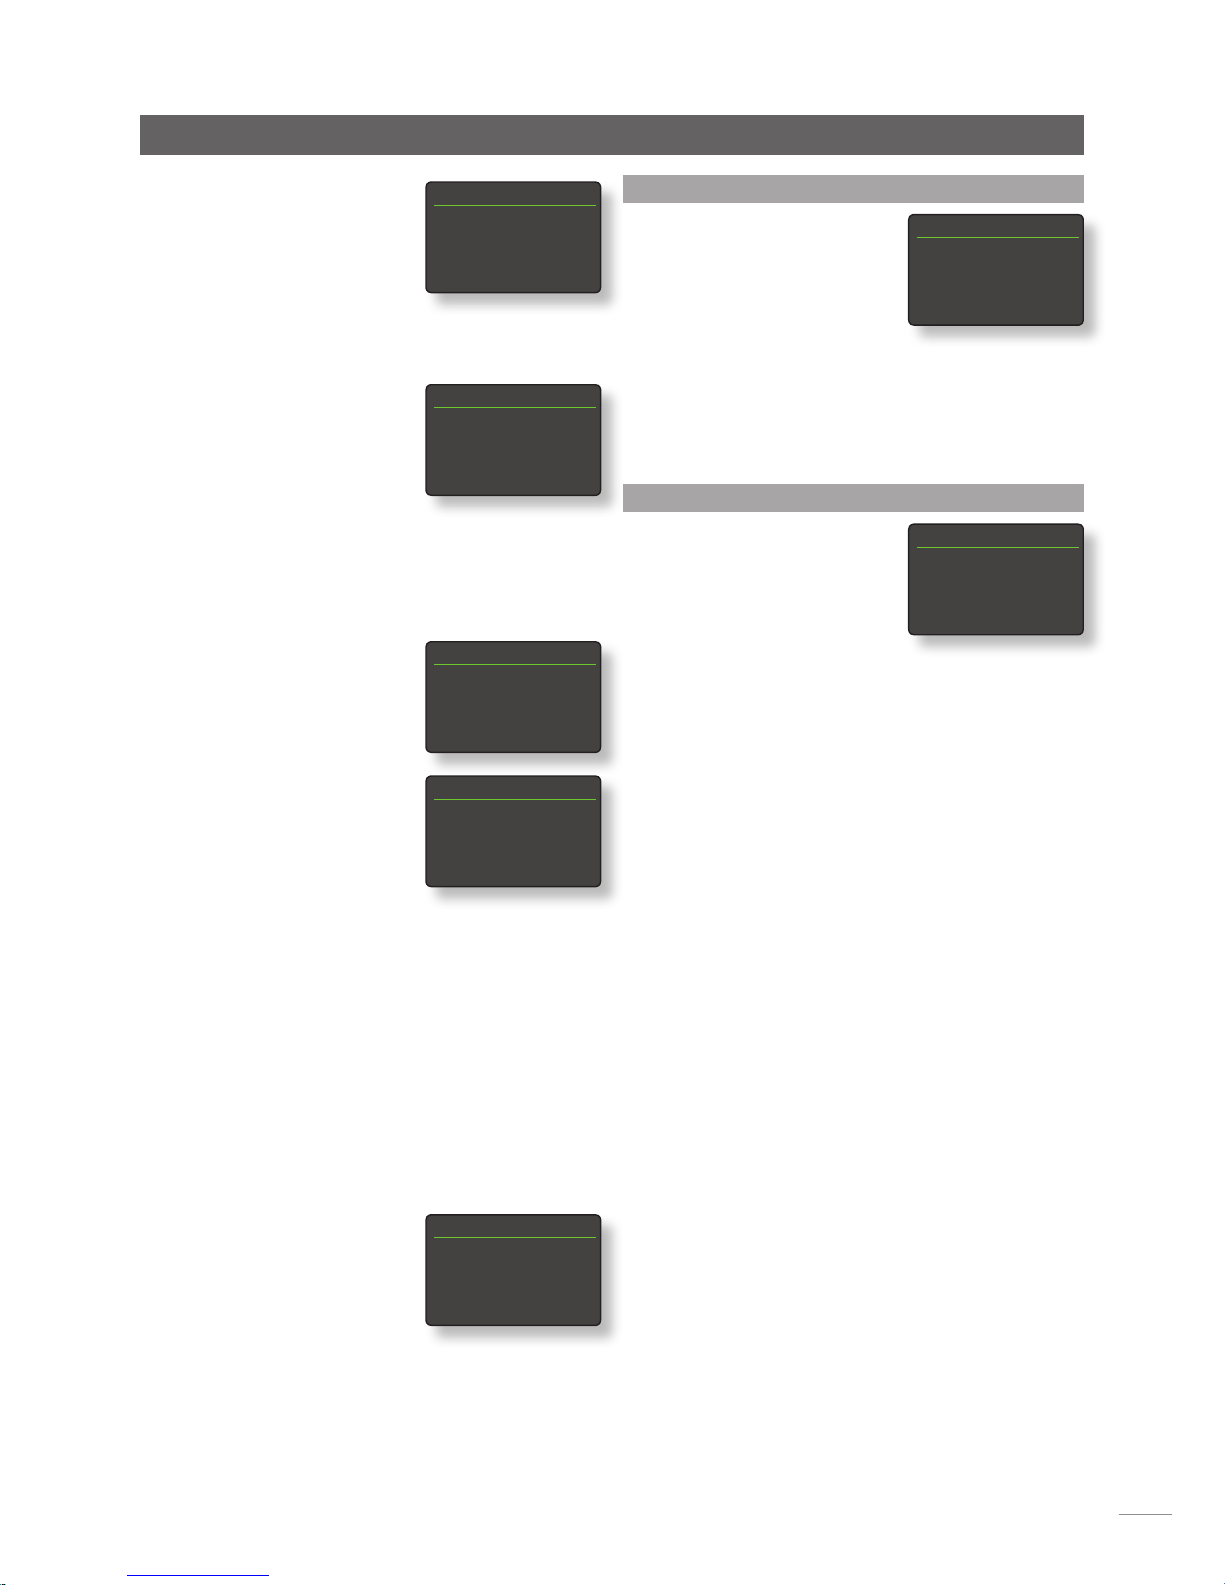
3.5 Front Panel Display (setup mode)
List mode is entered by pressing the front panel ok/list
button or handset ok/list key. List mode is used where NDX
sources provide data that can be browsed: a list of radio
stations or tracks for example.
Lists displayed will depend on the source selected and
data available. A typical list mode screen, illustrated
above, shows the initial internet radio display menu.
At the top right of the screen, “3/7” denotes that the
selected item is number three of seven.
To scroll up and down lists and select items use the
front panel or handset up (
5) and down (6) and ok/
list buttons or keys. To return to normal display press the
handset exit key or front panel list button.
Note: The right (
4) key duplicates the ok/list key when
navigating list mode menus.
In long item lists the handset numeric/text keys can be
used to jump through the list alphabetically.
3.4 Front Panel Display (list display mode)
Setup mode is engaged by pressing the handset
setup ( ) key or pressing and holding the front panel
ok/list button. Setup mode provides access to all NDX
setup functions.
The illustration above shows the setup home screen
displayed when setup mode is engaged. The “1/9” at the
top right denotes that the selected item is number one of
nine.
To navigate around the setup menus and make selections
use the front panel or handset up (
5), down (6) and left
(3) arrow keys to navigate around menus and the ok/list
button or key to confirm a selection.
Note: The right (
4) key duplicates the ok/list key when
navigating setup mode menus.
To exit setup mode press the handset setup (
) key a
second time or press the exit key or front panel list button.
NDX setup is covered in Section 4.
Note: If programme material is playing when NDX enters
setup mode it will continue to play. The volume, mute and
transport (play, pause, stop etc.) keys on the handset will
remain operational.
Setup 1/9
4Language
Inputs
Analogue Outputs
Network Settings
Internet Radio 3/7
4Location
Genre
Podcasts By Location
Podcasts By Genre
Page 9
7
NDX Operation
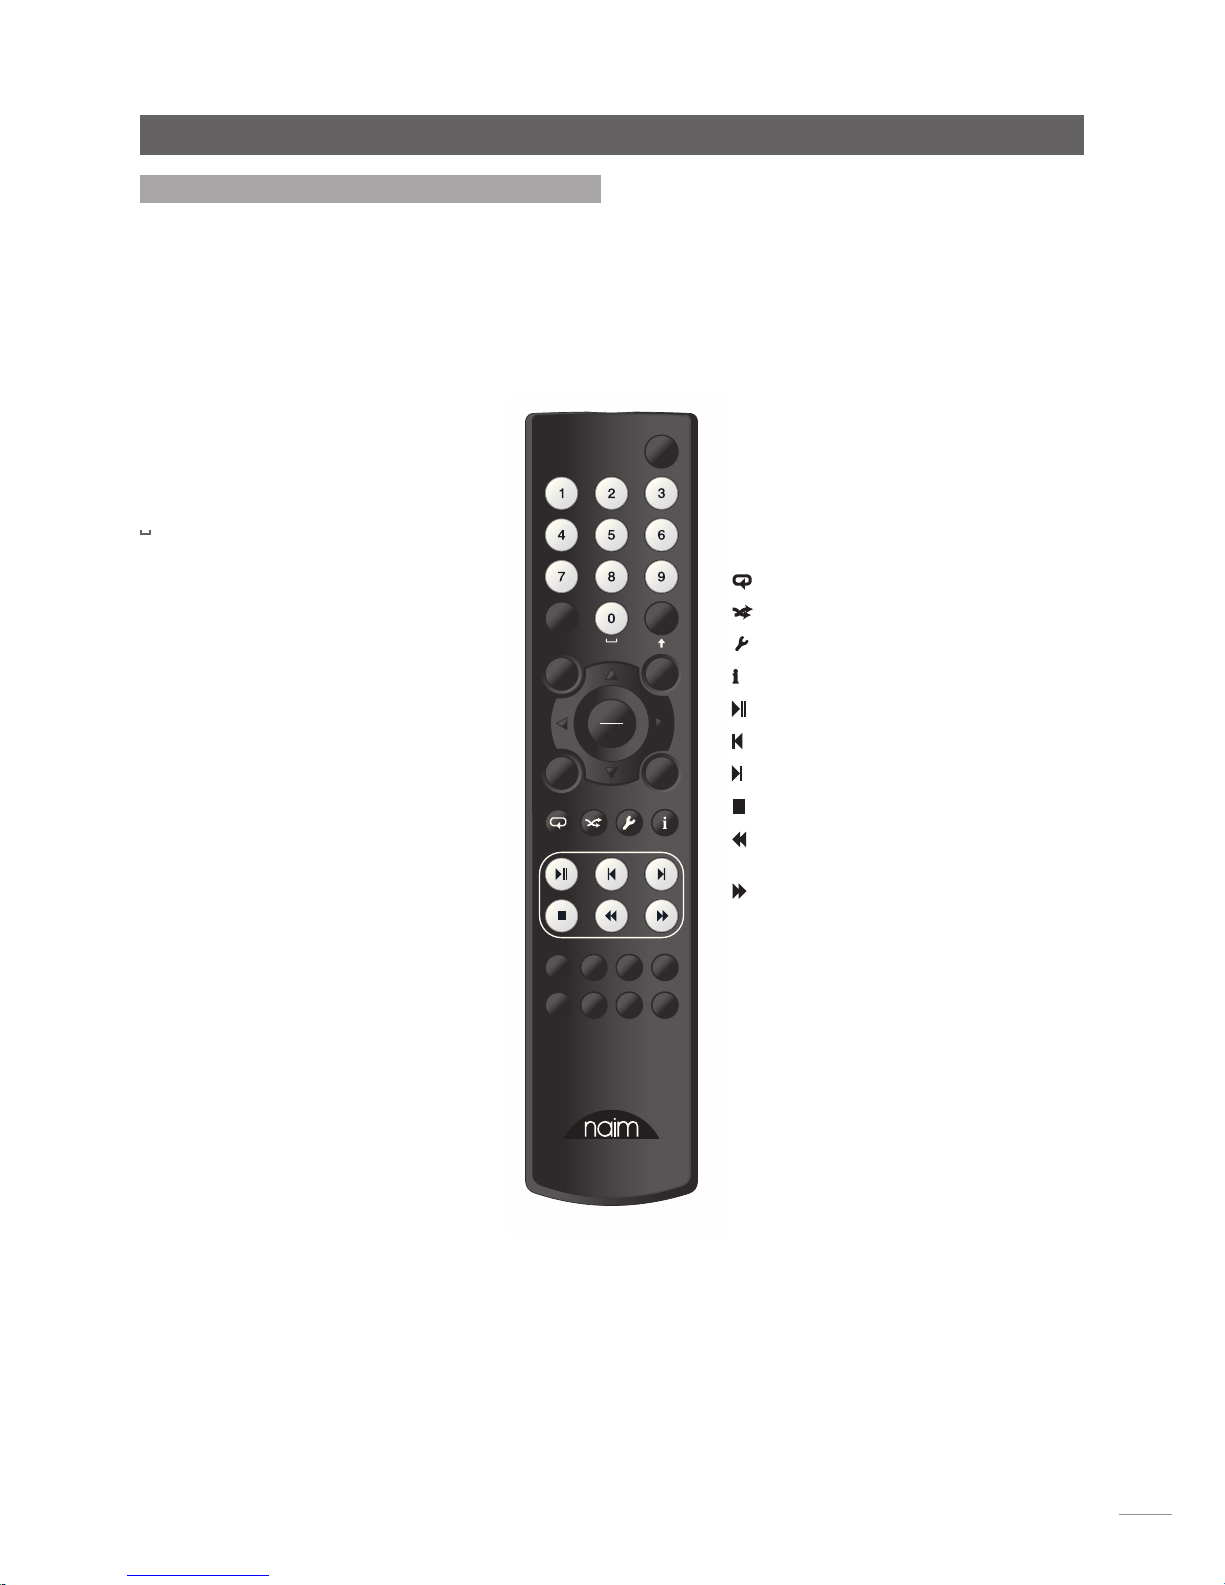
3.6 NDX Remote Handset
The supplied remote control handset is a multifunctional
device designed specifically for the NDX and Naim Uniti
Series products.
To fit batteries, remove the battery cover and insert the
batteries into the body taking care with their orientation.
Replace the battery cover.
The handset key functions are listed and described in the
tables below. Some keys change function when NDX is in
list/setup mode. Normal play mode functions are denoted
by the text on each key and list/setup mode functions are
denoted by the text below each key. Keys with only one
function are listed in the table on the right.
3.6.2 Normal Play Mode Keys
Key Function
disp Switches NDX display on or off
vol + Increase preamp volume
vol – Decrease preamp volume
mute Silence preamp
(repeat) Repeat selected track, or playlist
(shuffle) Play tracks randomly from list
(setup) Display the setup menu
(info) Cycle through input information
(play/pause) Play or pause audio
(previous) Go to previous track/station
(next) Go to next track/station
(stop) Stop audio
(reverse) Fast reverse audio
(with system automation)
(forward) Fast forward audio
(with system automation)
cd Unassigned
radio Sequentially selects the iRadio, FM,
and DAB
pc
Selects the UPnP™ input
iPod Selects the USB/iPod input
tv Selects the Digital 1 input
av Selects the Digital 2 input
hdd Selects the Digital 3 input
aux Unassigned
Note: The default input selection key
assignments can be modified via the Handset
Keys setup menu. See Section 4.8.
Note: Use of system automation can modify the
action of remote handset keys. See section 4.9.
3.6.1 Normal and List/Setup Mode Keys
Key Normal List/Setup
Mode Modes
Numeric Enter digits Enter letters in
text 1 to 9 text
0 Enter 0 (zero) Enter spaces in
text
preset Display the radio Delete last
del preset list letter in text
store Display the radio Switch text case
£ preset menu
input+ Select next input Menu up
5 navigation
input- Select previous Menu down
6 input navigation
3 Input Previous menu
dependent or back one
(see note) character in text
4 Input Next menu
dependent or forward one
(see note) character in text
exit No function Exits current menu
without saving
changes
list/ok Display input Confirm action
dependent list of or selection
tracks/functions
Note: Navigation (3456) key assignments
can be altered via the Handset Keys setup
menu. See Section 4.8.
preset store
mute
exit
cd
radio
pc iPod
tv av
hdd aux
vol +
vol -
ok
list
@# abc def
ghi jkl mno
pqrs
del
input +
input -
tuv
wxyz
disp
Page 10
8
NDX Operation
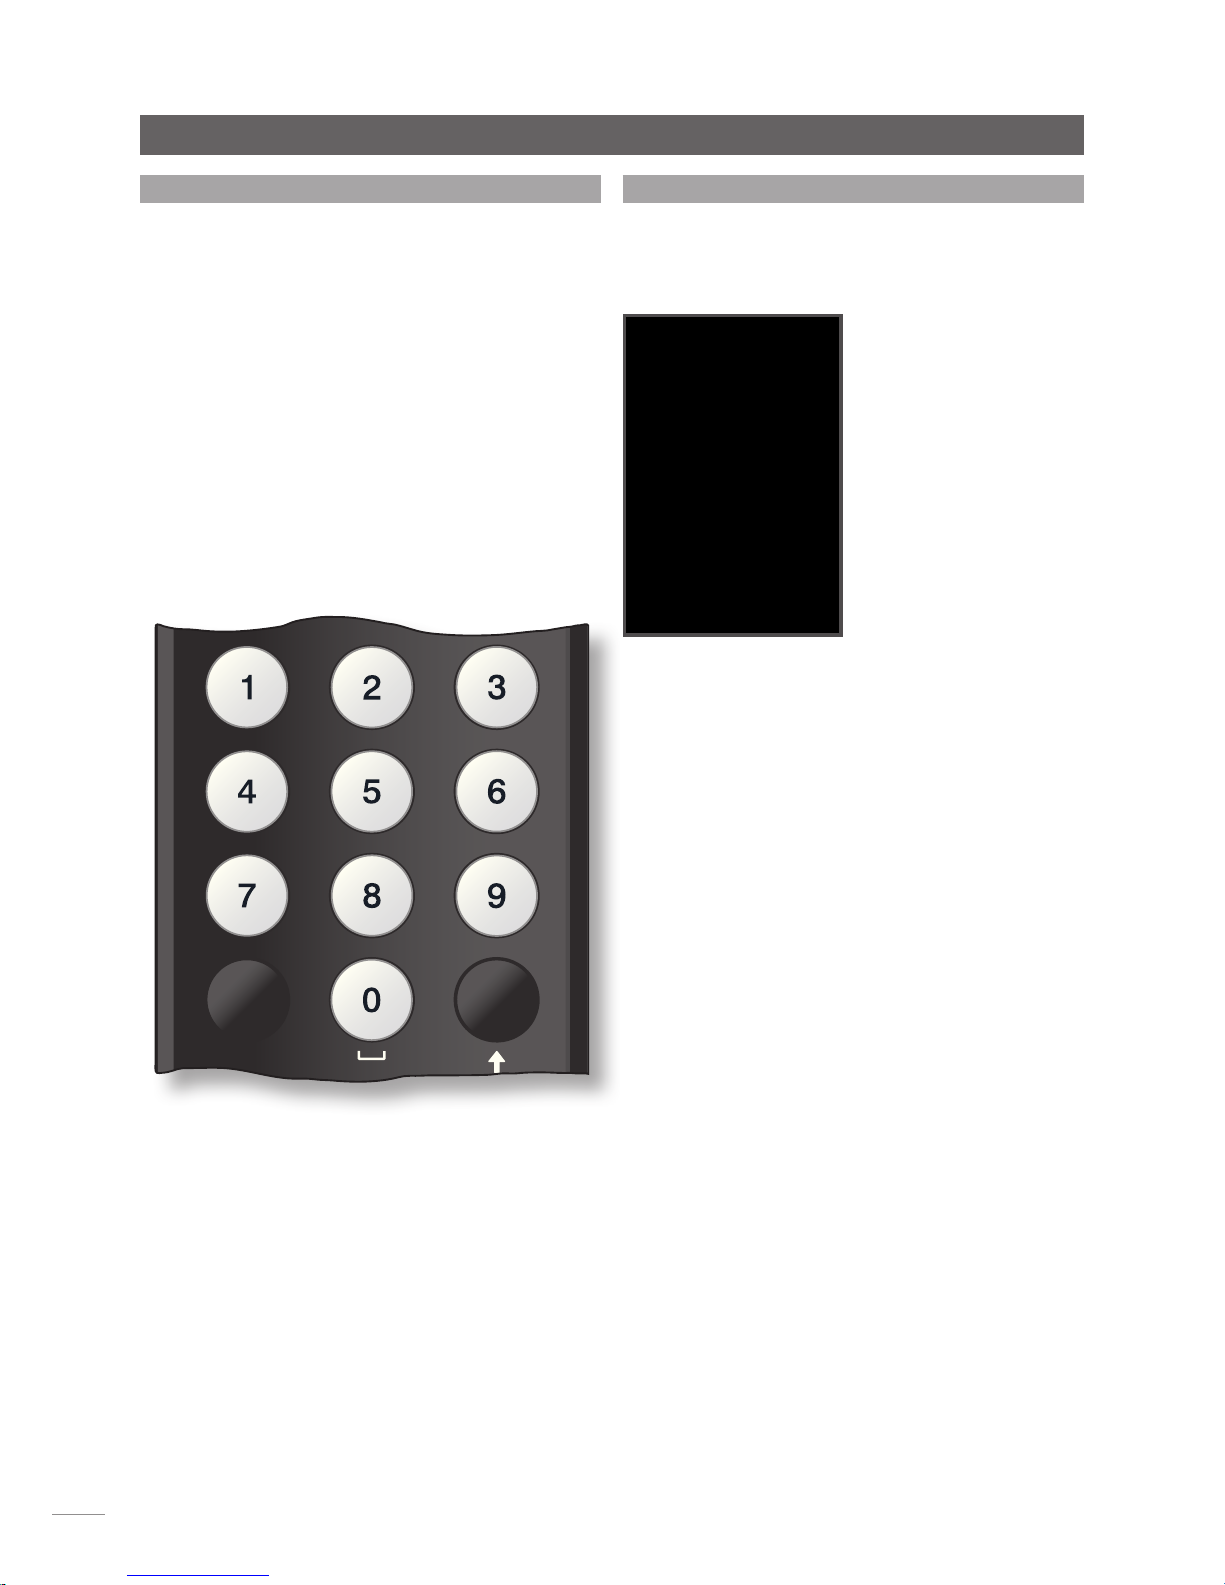
3.7 Handset Text Entry
Some NDX menu screens require text entry - naming inputs
for example. Text entry is carried out using the handset
numerical buttons in a manner similar to mobile phone SMS
text entry.
When text entry is required, multiple presses of a key will
scroll through the characters associated with that key. In
addition to characters, the preset key provides a delete
function, the zero key provides a space and the store key
provides letter case change. The up (
5) and down (6)
keys will also scroll through all the available letters.
The enlarged handset image illustrates the number keys
and the characters associated with each.
When prompted on a NDX screen to enter text, select
characters in turn by pressing each appropriate key
the required number of times. Confirm the text entry by
pressing the ok/list key.
preset store
@# abc def
ghi jkl mno
pqrs
del
tuv
wxyz
disp
3.8 The n-Stream Control App
The n-Stream NDX control application is available from the
iTunes App Store. n-Stream is compatible with iPad, iPhone
and iPod touch models running iOS software Version 3.1.3
or later.
3.8.1 n-Stream Setup
To begin using n-Stream to
control your NDX you must
first install the app on your
iPad, iPhone or iPod touch.
With the app installed and
the iPad, iPhone or iPod
wirelessly connected to the
same network as your NDX,
start the app by touching its
screen icon.
Selecting setup opens a
menu that enables the NDX
to be selected for control.
Touch the appropriate NDX
as identified by its network address or device name; NDXC135 and 192.168.001.065 respectively in the illustration
above.
Note: Your NDX network address and device name can be
found in its Factory Settings setup menu.
Note: The NDX name can be changed from its setup
menu. Doing so can enable individual units in a multiple
installation to be identified more easily.
The setup menu enables the following options to be
selected:
Auto connection:
Select ON for automatic
connection to the NDX whenever
the n-Stream app is running.
Stay connected:
If OFF is selected, the n-Stream
app will “sleep” following a preset
period of inactivity. Selecting
ON will force n-Stream to remain
continuously active.
Note: Continuous connection of n-Stream may result in
your iPad, iPhone or iPod battery draining.
Use Hi-Fi Language:
Select ON for the n-Stream app to
reflect the selected NDX display
language. If NO is selected the
n-Stream app will display in the
default iPad, iPhone or iPod
language.
Clear Image Cache:
Deletes album artwork images
stored by the n-Stream app.
Page 11

9
Selecting Allegro Media
Server followed by items in
the subsequent lists enables
the selection of playlists,
albums or individual tracks for
playback.
The Playing and Library
screens for other inputs follow
the same protocol of item
selection.
The Library screen displays lists
of playback items available
to the selected NDX input.
The adjacent illustration
shows Allegro Media Server is
available to the NDX UPnP™
input.
Note: Allegro Media Server
is an application that makes
iTunes songs and playlists
available to UPnP™ players.
3.8.2 Using n-Stream
The n-Stream app is based on
three main screens. The Inputs
screen, the Playing screen
and the Library screen. These
screens are selected by
touching the icons at the top
of the display.
The inputs screen enables
selection of NDX inputs. Input
names reflect those specified
in the NDX input setup menus
(See Section 4.3) or through
System Automation (See
Section 4.9).
The Playing screen displays
the currently playing item
and provides appropriate
transport controls. When
a Radio station is playing
an icon is also provided to
open a preset station menu
through which presets can be
either stored or recalled.
NDX Operation
Page 12
10
4.2 The Language Menu
The Language setup menu
enables the NDX user interface
language to be changed. Enter
setup mode and use the handset
ok/list key to select Language.
Use the handset up (5) and
down (6) and ok/list keys to select a language. Exit setup
mode by pressing the handset exit key.
4.3 The Inputs Menu
The Inputs setup menu enables a variety of parameters
to be configured for each NDX internal and external
input. The options available for each are described in the
following sections. Two parameters are common to all
inputs:
Enabled: Switches the input on or off and displays or hides
any associated menus.
Name: Enables user specified names to be attached to
inputs. Use the handset to enter text.
4.3.1 iRadio Input
Parameter Options
Enabled: Yes / No
Name: User definable
Auto Disconnect: Select time.
Auto-disconnect
is provided so that internet provider
data usage limits are not inadvertently
exceeded by an NDX left connected to
internet radio.
Browse History: Yes / No. If Yes is specified NDX will select
the last used station if it is available. If No
is specified NDX will display the full list of
available stations.
NDX Setup
4 NDX Setup
Once NDX is installed with mains power and all external connections made, it can be
switched on and set up for use.
The degree to which you modify NDX’s default settings will depend upon the uses to
which you put it and the extent to which you use its capabilities. It may be that you have
no need to modify the default settings at all, however we would encourage you to read
this section of the manual in order that you gain a full understanding of NDX’s abilities. The
following paragraphs describe each NDX setup menu in turn starting with the setup home
menu.
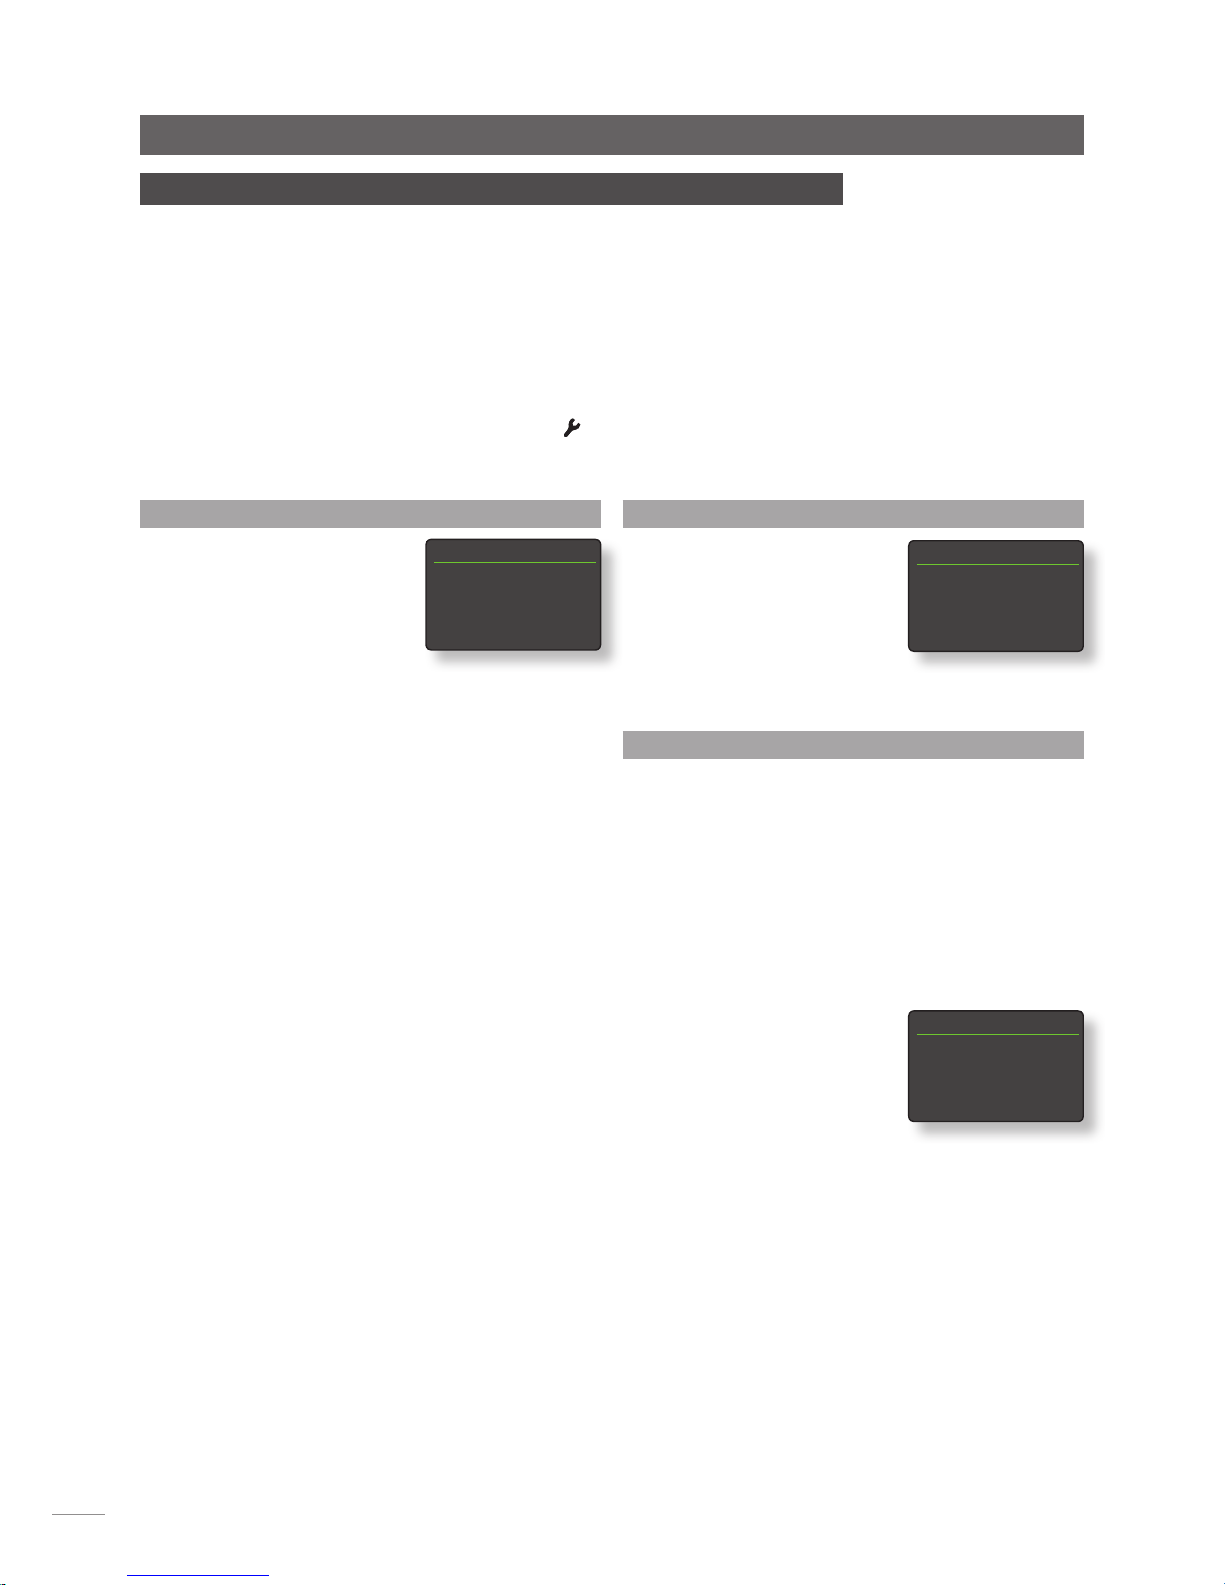
Enter NDX setup mode by pressing the handset setup (
) key. Navigate around the
setup menus using the handset arrow keys and make selections using the ok/list key. Exit
setup by pressing the exit key.
4.1 The Setup Home Menu
The NDX setup home menu
provides access to nine setup
menus. The function of each
menu is listed below:
Language:
Enables
the user
interface language to be changed.
Inputs:
Enables parameters for each internal
and external input to be configured.
Analogue Outputs:
Enables analogue output socket
options to be selected.
Network Settings:
Configures network connection
settings.
Digital Output: Enables digital output options to be
selected.
Front Display: Configures display features.
System Automation: Enables system automation to be
configured.
Handset Keys:
Enables inputs to be assigned to
specific handset keys. Also enables
configuration of the handset
navigation (3456) keys.
Factory Settings:
Enables interrogation of NDX status,
monitoring of handset commands,
deletion of all user presets, reset of
system automation and return to
factory default settings.
Each of the nine setup menus is described in detail in the
following sections. Use the handset up (
5) and down (6)
and ok/list keys to select a setup menu.
Setup 1/9
4Language
Inputs
Analogue Outputs
Network Settings
iRadio 1/4
4Enabled: Yes
Name: iRadio
Auto Disconnect: 4Hrs
Browse History: No
Language 1/7
4English
Français
Deutsch
Italiano
Page 13
11
NDX Setup
4.3.2 FM Input
Parameter Options
Enabled: Yes / No
Name: User definable
Seek Lock: Low / Medium /
High. Sets the FM
signal strength required for the NDX tuner
to identify an FM station.
4.3.3 DAB Input
Parameter Options
Enabled: Yes / No
Name: User definable
Re-scan Stations: Re-scans for DAB
stations.
Note: The NDX DAB input is not implemented in units
distributed in territories where Digital Audio Broadcasting is
unavailable.
4.3.4 UPnP™ (Network) Input
Parameter Options
Enabled: Yes / No
Name: User definable
4.3.5 USB/iPod Input
Parameter Options
Enabled: Yes / No
Name: User definable
Folder History: Yes / No. If Yes
is specified
NDX will
automatically display the last used folder
on the USB device. If No is specified the
top level folder of the device will be
displayed.
Charge: Always / Never. iPod battery charging
takes place always when the iPod is
connected or never takes place.
Note: The non-charging option is provided because
there is a small reduction in iPod sound quality when
simultaneously charging and playing. This means however
that an iPod can potentially run out of power while playing
via the NDX.
4.3.6 Digital Inputs 1, 2 and 3
Parameter Options
Enabled: Yes / No
Name: User definable
Unstable source: Yes / No
Select No unless
the NDX has problems locking to a digital
signal. Selecting Yes will enable the NDX
to lock to unstable digital signals, however
sound quality will be slightly degraded.
4.4 The Analogue Outputs Menu
The Analogue Outputs menu
enables the main DIN or RCA
phono outputs to be disabled
or individually or simultaneously
selected.
Parameter Options
Main out: Disabled / DIN / Phono / DIN-Phono.
Select the appropriate option for your
installation. Only select the DIN-Phono
option if both outputs are simultaneously
required.
4.5 The Network Settings Menu
The Network Settings menu
enables NDX network parameters
to be customised to suit the
router and network. The options
are tabulated and described in
the following sections:
Parameter Options
Name: User definable (text entry)
Default: NDX-xxxx
Wireless: Not Used / Wireless Network Names
Status: Connected / Not Connected / No Signal
/ Login Failure / Busy / Etc.
DHCP: Yes / No
MAC: Displays the NDX MAC address
The Name parameter enables the NDX’s default network
name to be changed.
The Wireless parameter enables a wireless network to be
chosen and joined. See Section 4.5.1 below for detailed
wireless set up notes.
Network Status displays the current network connection
status.
The DHCP parameter enables the NDX network settings
to be modified. In most cases, specifying Yes and leaving
NDX set to DHCP, will be the appropriate option. See
Section 4.5.2 for notes on static address (non-DHCP)
network connection.
Note: Devices installed on a network have an IP address
through which they are identified by all the other items
on the network. DHCP is a set of rules that enable the
automatic allocation of addresses as items are connected
(or switched on while connected) to the network. NDX is
set up by default to use DHCP.
Note: If NDX is connected to the network both wirelessly
and via ethernet (wired), the ethernet connection will take
priority.
DAB 1/3
4Enabled: Yes
Name: DAB
Re-Scan Stations
UPnP 1/2
4Enabled: Yes
Name: UPnP
USB/iPod 1/4
4Enabled: Yes
Name: USB
Folder History: No
Charge: Always
Digital 1 1/3
4Enabled: Yes
Name: Dig 1
Unstable source: No
Analogue Outputs 1/1
4Main Out: DIN
FM 3/3
Enabled: Yes
Name: FM
4
Seek Lock: Medium
Network Settings 1/5
4Name: NDX-C135
Wireless: Not Used
Status: Not Connected
DHCP Yes
Page 14
12
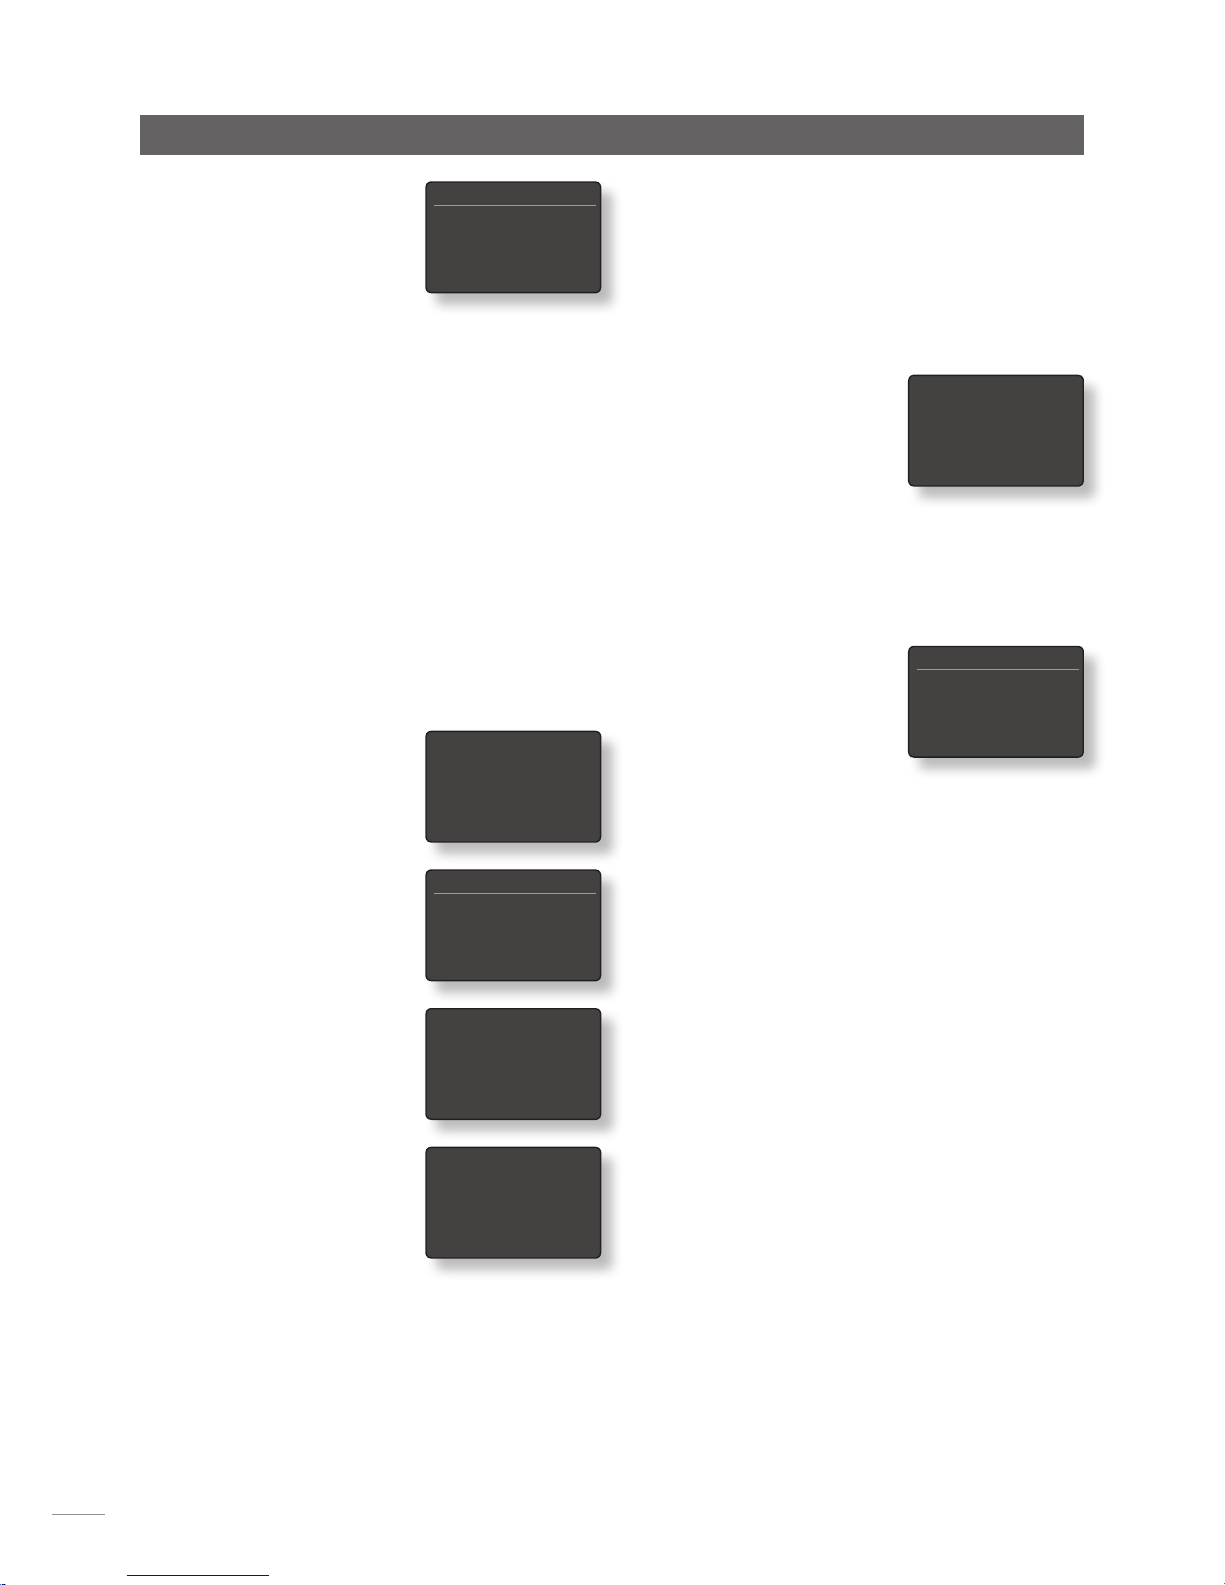
series of numbers and letters. If the passphrase/access key
is not known, check on the router settings page or with the
person who initially set up the router.
Note: If a router offers multiple security configurations, NDX
will automatically offer only the most secure one.
Note: If WEP security is used the router should be set to
“auto” or “open” authentication.
If the selected network is insecure
and requires no passphrase
or access key to join, NDX
will display an alert message.
Pressing the handset ok/list key
will immediately connect NDX
to the network and display a
confirmation screen.
Note: Wireless connection difficulties can sometimes be
resolved by changing the wireless connection channel in
the router settings.
4.5.2 Non-DHCP (Static) Network
Connection
If DHCP is de-selected in the
Network Settings menu, five
further parameters will be
displayed.
Parameter Options
IP: User definable (numerical entry)
Default: 0.0.0.0
Mask: User definable (numerical entry)
Default: 0.0.0.0
Gateway (Gtwy): User definable (numerical entry)
Default: 0.0.0.0
DNS1: User definable (numerical entry)
Default: 0.0.0.0
DNS2: User definable (numerical entry)
Default: 0.0.0.0
These settings enable NDX to connect to a network using a
fixed IP address. On selecting each one in turn, numerical
entry screens will be displayed that require completion
with the appropriate network IP address settings. Consult
your network router’s user documentation for help with
specifying fixed IP address settings.
Network Settings 1/5
4IP: 192.168.0.80
Mask: 255.255.255.0
Gtwy: 192.168.0.1
DNS1: 192.168.0.1
This wireless network is
insecure and requires no
passphrase or access key.
Press OK To Connect
NDX Setup
4.5.1 Wireless Network
Connection Set Up
If the Wireless parameter is
selected in the Network Settings
menu the Select Network menu
will display a list of the available
networks. An option not to use a wireless connection is
also provided. Use the handset up (5) or down (6) keys
to scroll through the list and the ok/list key to select a
network.
Note: NDX is compatible with most commonly used Wi-Fi
standards. Routers that support 802.11b and 802.11g
will work, however those with 802.11g compatibility are
recommended for best results.
Note: As with any wireless network hardware, NDX
connection reliability will be affected by both network
router performance and Wi-Fi signal quality. To minimise
the possibility of poor connection reliability, NDX should be
connected to network audio sources by no more than one
wireless “leg”. Other “legs” necessary between NDX and
the network audio sources should be wired.
Note: NDX cannot connect to a “hidden” wireless network.
If the selected network is secure
and requires a passphrase or
access key to join, NDX will
display an alert message. Pressing
the handset ok/list key will then
open a text entry screen for entry
of the passphrase or access key.
Use the handset numeric/text
keys to enter the passphrase or
access key taking care to ensure
that the letter case is correct.
Press the handset ok/list key
when text entry is complete. In
the illustration the passphrase is
“flatfish”.
If the network is successfully
joined NDX will display a
confirmation screen.
If an incorrect passphrase or
access key is entered NDX will
display an alert message.
Note: As a security measure, a
router may also require the NDX’s
MAC address to be entered before allowing it to join the
wireless network. This type of security feature is known as
‘MAC address filtering’. The NDX MAC address is shown in
the ‘Factory settings > System Status’ page.
Note: The wireless passphrase/access key is created when
the wireless router is first set up and could be a word or a
Select Network 3/6
<Don’t Use Wireless>
LingNet
4GreenNet
TomNet
Now enter your wireless
passphrase or access key.
Press OK to continue
flatfish abc
flatfish
|
Press OK to confirm
Connected
Press OK To Finish
Can’t Login
Press OK To Re-Try
Page 15
13
4.6 The Digital Output Menu
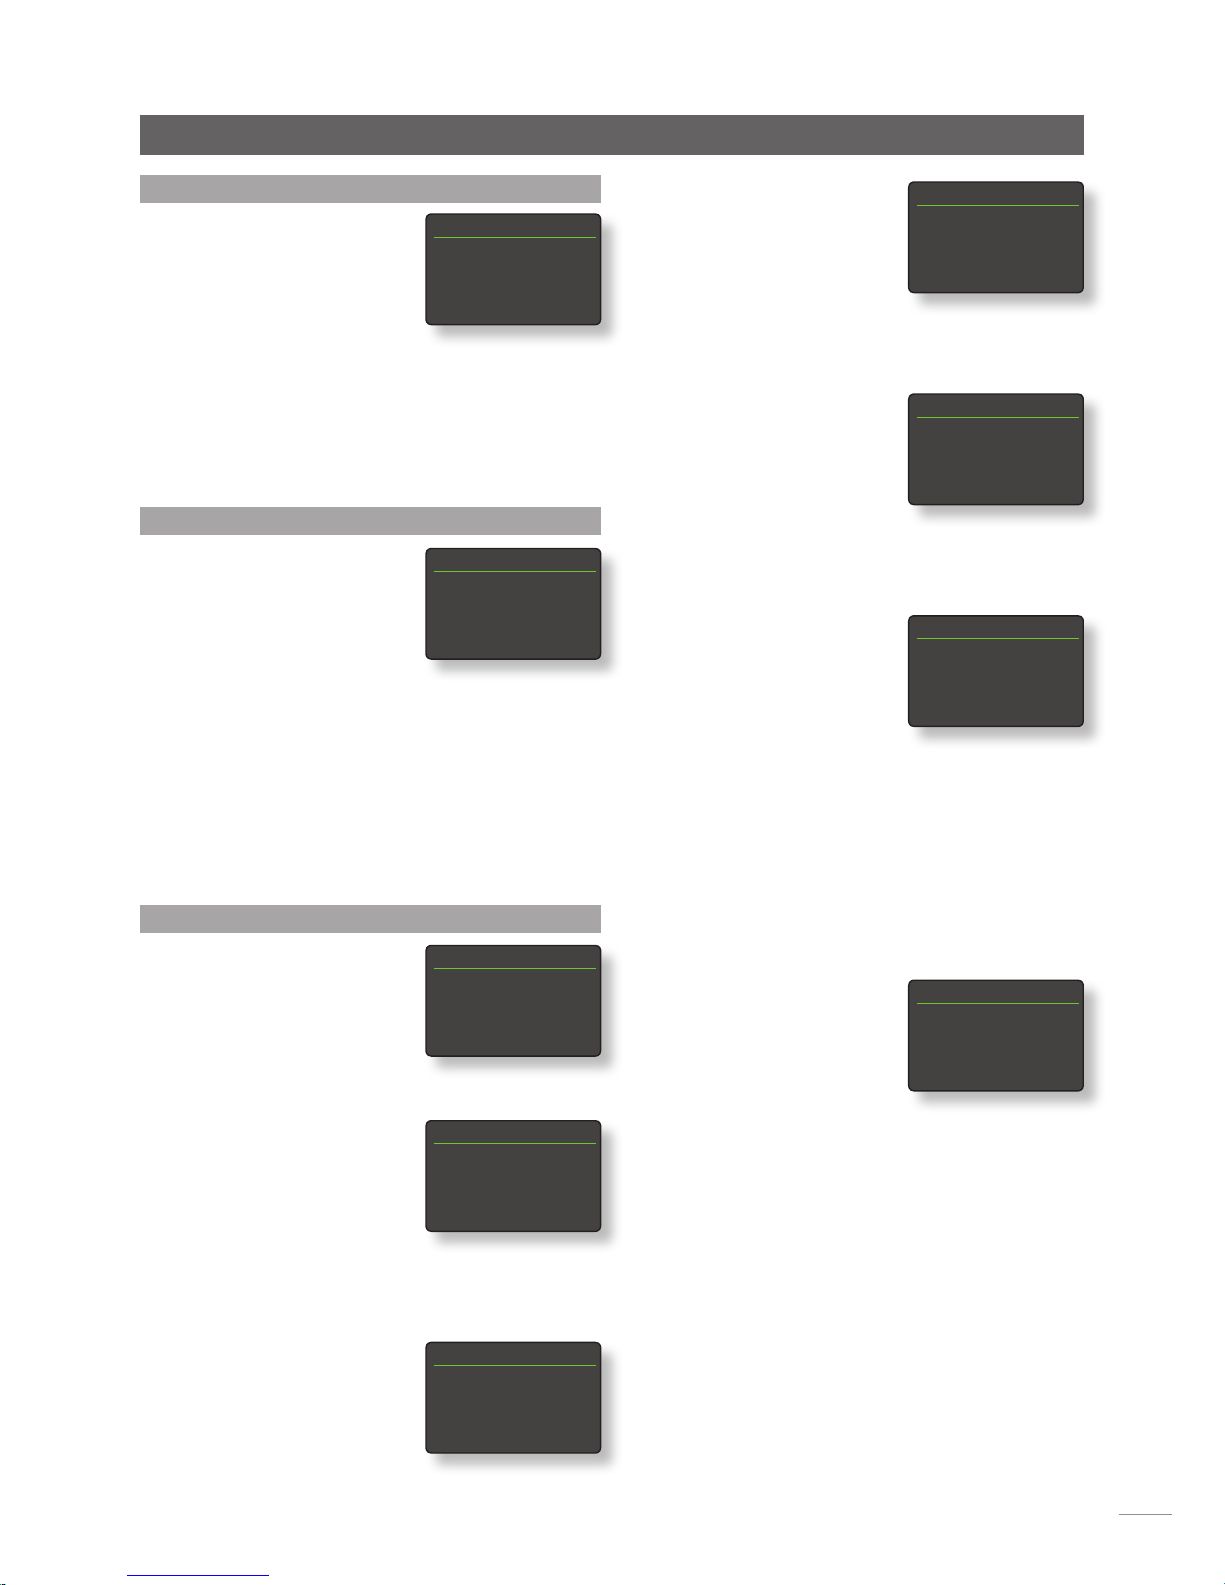
The Digital Output menu allows
the digital output to be enabled
and its data format to be
configured.
Parameter Options
Enabled: Yes / No
The Digital Output should be enabled
only if it is specifically required.
Output: Native / 96kHz 24bit
Select Native unless a subsequent digital
to analogue converter is unable to
process a native clock rate reliably.
4.7 The Front Display Menu
The Front Display setup menu
enables the behaviour of the
NDX front panel display to be
modified.
Parameter Options
Auto Off: Select from list.
Auto Off defines the length of time the display will remain
switched on after the last interface operation is carried
out. Time periods of between 10 seconds and 1 hour can
be selected.
Note: If the display has been switched off using the
handset disp key this setting will take priority over the Auto
Off setting. The display will always switch on briefly when
control commands are received.
4.8 The Handset Keys Menu
The Handset Keys setup menu
enables the function of the
handset navigation keys
(Diagram 4.8.3) to be configured.
and the NDX inputs assigned to
each handset input selection key
(Diagram 4.8.4) to be changed.
4.8.1 Navigation Key Functions
Selecting the Up/Down Actions
parameter from the Handset Keys
menu opens a further menu that
enables the selection from two
modes of handset up (5) and
down (6) key function: Input and Off. If Input is selected
the keys will select inputs and if Off is selected the keys will
be disabled.
Selecting the Left/Right Actions
parameter from the Handset Keys
menu will open further menus
enabling the configuration of
the left (
3) and right (4) keys
Front Display 1/1
4Auto Off: 2 mins
NDX Setup
independently for the iPod,
Radio(s), USB and UPnP™ inputs.
The options available for the
USB, iPod, and UPnP™ inputs
are Track, List and Off. If Track is
selected the left (3) and right
(4) keys will select the previous or next track. If List is
selected the keys will return NDX to list display mode, and if
Off is selected the keys will be disabled.
The options available for the
Radio(s) input are Station, Preset,
List, and Off. If Station is selected
the left (
3) and right (4) keys
will select the next or previous
station. If Preset is selected the
keys will select the previous or next preset. If List is selected
the keys will return NDX to list display mode, and if Off is
selected the keys will be disabled.
4.8.2 Input Key Assignments
Each handset input selection
key may have up to four inputs
assigned to it. The default
assignments are shown in the
following table:
Handset Key NDX Inputs Assigned
cd: None
radio: FM, DAB, iRadio
pc: UPnP™
iPod: USB/iPod
tv: Digital 1
av: Digital 2
hdd: Digital 3
aux: All unassigned
Beneath the Up/Down keys and
Left/Right keys parameters the
Handset Keys menu displays a
list of the eight handset input
keys. Selecting one of the keys
then displays a list of the four
existing assignments to that key (including unassigned).
To change an assignment, select the assignment number
to be altered and, from the subsequent menu, select the
desired input.
Digital Output 1/2
4Enabled: No
Output: 96kHz 24bit
Handset Keys 1/10
4Up/Down
Left/Right
CD
Radio
Left/Right 1/5
4iPod Track
Radios Station
USB Track
UPnP Track
Left/Right Actions 1/3
4Track
List
Off
Left/Right Actions 1/4
4Station
Preset
List
Off
Up/Down Actions 1/2
4Input
Off
Handset Keys 4/10
Up/Down
Left/Right
CD
4Radio
Inputs On:Radio 1/4
41. FM
2. DAB
3. iRadio
4. Unassigned
Page 16
14
4.9 The System Automation Menu
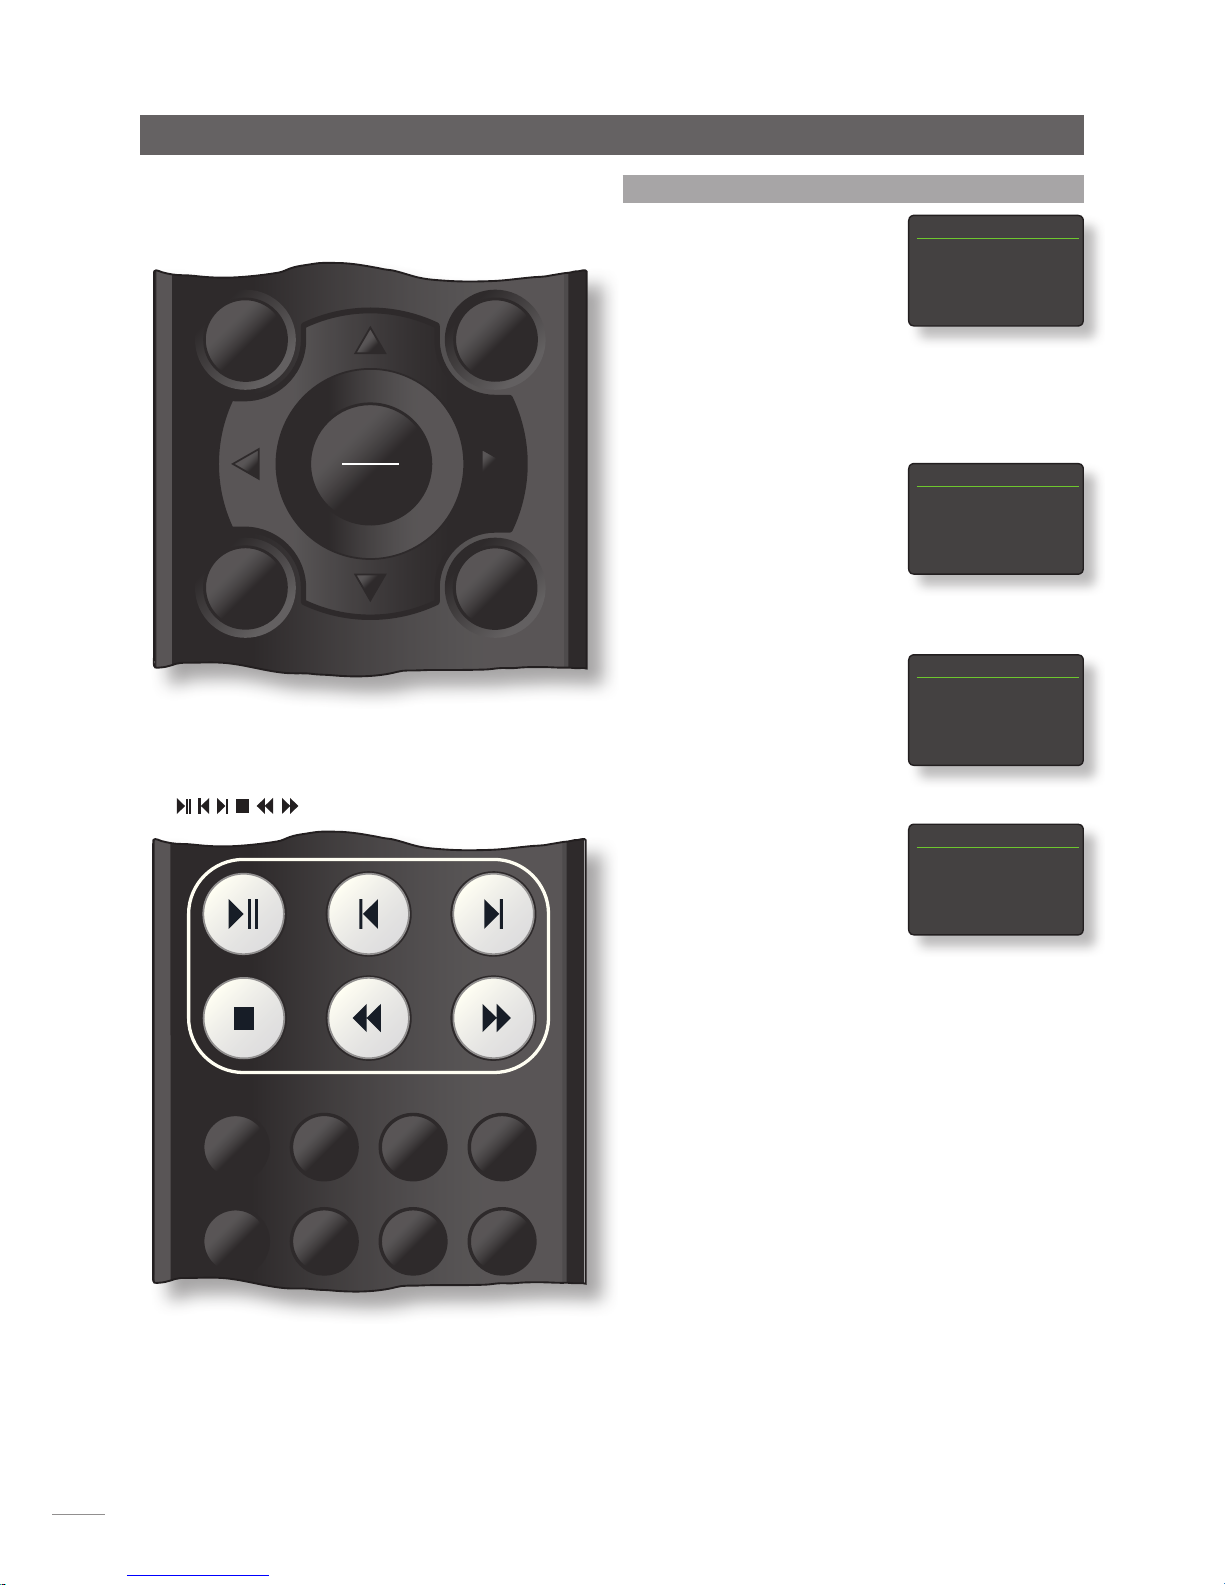
With System Automation enabled
and an NDX Remote Out socket
connected to the Remote In
socket of a Naim preamplifier
(or integrated amplifier), CD
player or the Naim DAC, the
NDX handset and n-Stream App can provide system-wide
control.
The System Automation setup menu comprises five items.
These are explained in the following paragraphs:
Selecting Preamp or Naim DAC
opens a menu that enables
preamplifier or DAC inputs to be
added to the inputs available for
selection via the NDX handset
and n-Stream interfaces. Inputs
can be enabled, disabled and renamed and, as “virtual”
NDX inputs, can be assigned to NDX handset input keys.
Selecting NDX Connection
opens a menu that enables
the preamplifier input to which
the NDX is connected to be
specified. This preamplifier input
is then automatically selected on
selection of NDX inputs.
Selecting CD Player opens a
menu that makes CD transport
control available through the
NDX n-Stream interface. Select
Enabled to enable CD control
and select Input Used to specify
the NDX, preamplifier or DAC input that the CD player is
connected to.
Note: CD player transport control using the NDX handset is
not possible. The n-Stream App must be used.
Selecting Advanced Setup opens a menu that provides
access to a range of advanced configuration parameters.
These parameters will not normally need adjustment.
Contact your retailer, distributor or Naim directly for more
information if required.
NDX Setup
System Automation 1/5
4Preamp
Naim DAC
NDX Connection
CD Player
Preamp 1/7
4Enabled Yes
Pre CD
Pre Tuner-Disabled
Pre HDD-Disabled
NDX Connection 1/1
4Input Used Pre AV
CD Player 1/2
4Enabled No
Input Used Digital 1
preset store
mute
exit
vol +
vol -
ok
list
@# abc def
ghi jkl mno
pqrs
del
input +
input -
tuv
wxyz
disp
4.8.3 Handset Navigation Keys
The navigation (3456) keys are located around the
ok/list key.
preset store
mute
exit
cd
radio
pc iPod
tv av
hdd aux
vol +
vol -
ok
list
@# abc def
ghi jkl mno
pqrs
del
input +
input -
tuv
wxyz
disp
4.8.4 Handset Input Selection Keys
The input selection keys (cd, radio, pc, iPod, tv, av, hdd,
aux) are located beneath the transport keys
( ).
Page 17

15
NDX Setup
4.10 The Factory Settings Menu
The Factory Settings setup menu
enables NDX’s system status
information to be displayed,
handset commands to be
analysed, radio presets to be
deleted, system automation to
be reset, and all settings to be returned to their defaults.
Parameter Options
System Status: Select to display
Handset IR Mon.: Select to display
Clear All Presets: Yes / No
Reset Sys Auto. Yes / No
Reset All Settings. Warning displayed: Resetting to factory
defaults. You will lose ALL user settings.
Press front panel Play to continue.
Factory Settings 1/5
4System Status
Handset IR Monitor
Clear All Presets
Reset Sys. Automation
Page 18
16
5.1 FM Tuner – Seeking Stations
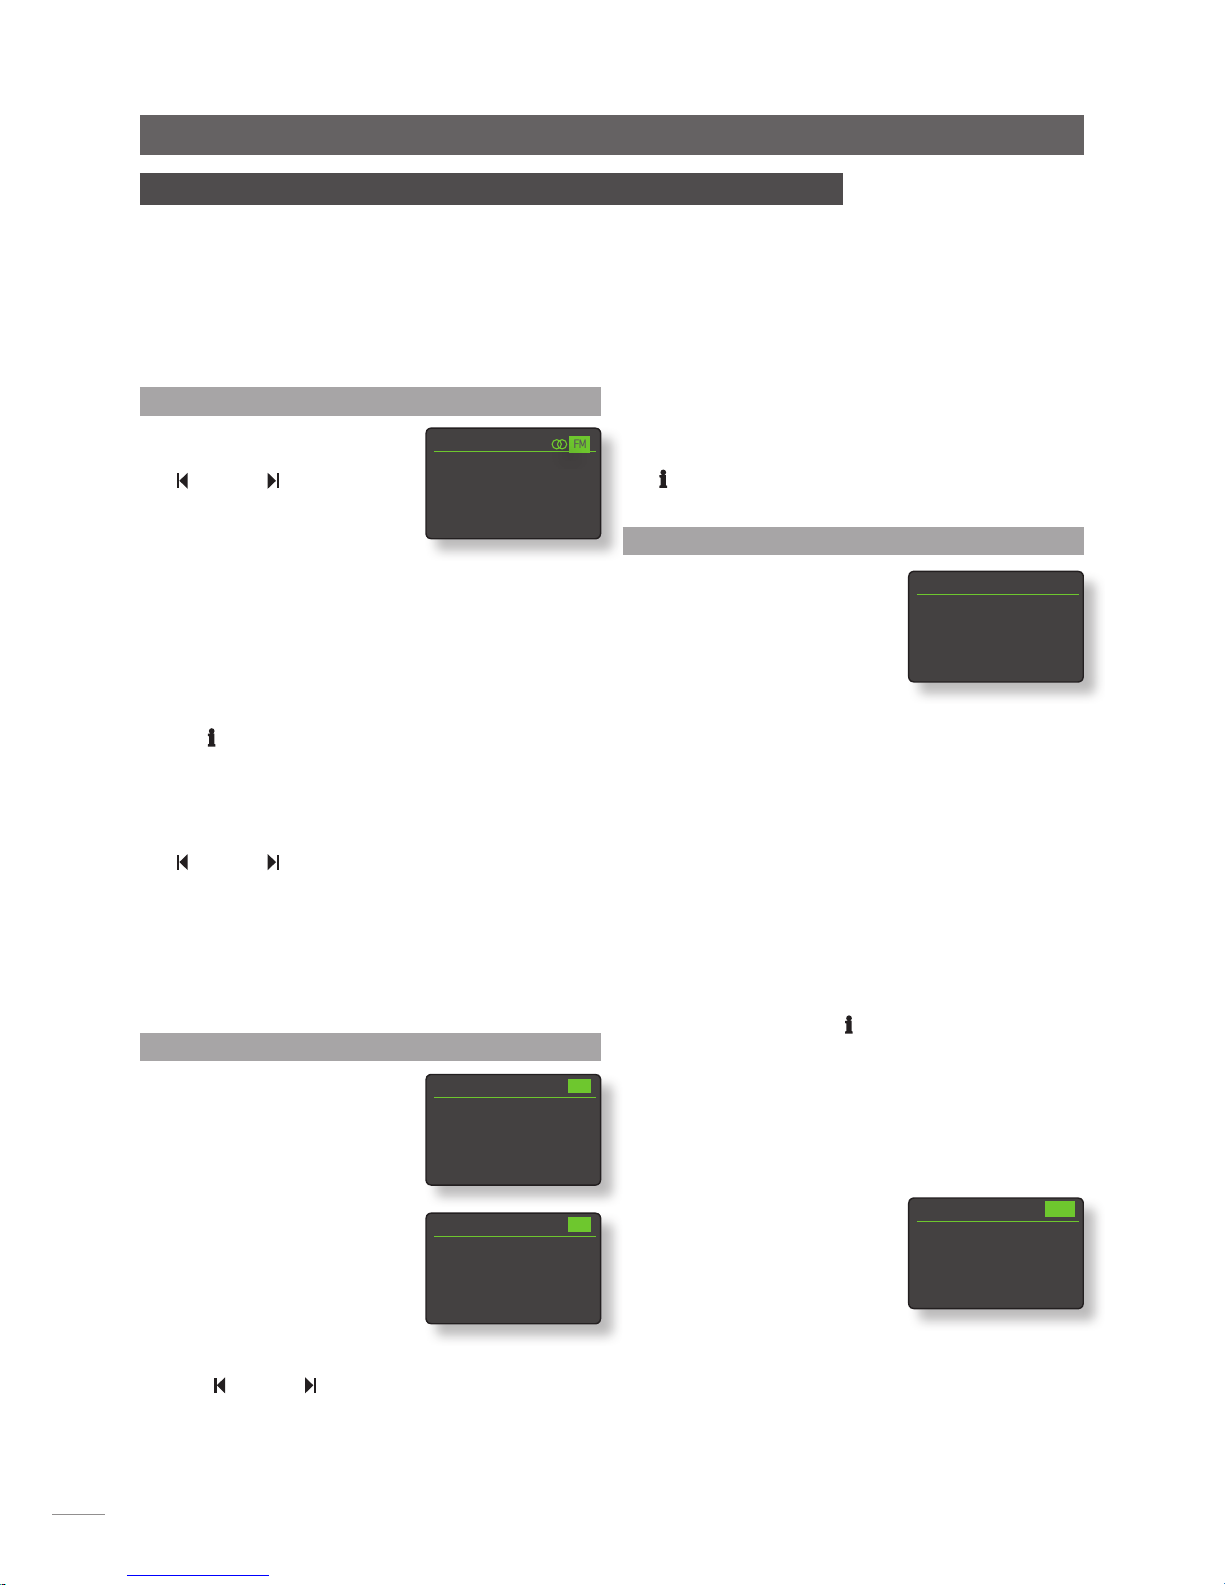
To find FM stations select the FM
input and press the handset prev
( ) or next ( ) keys. The tuner
will scan the FM band locking on
to and stopping at stations that
exceed a specific signal strength.
Note: The interlocked circle icon at the top right of he
display indicates a stereo signal.
Note: The signal strength lock threshold may be altered
within the NDX set up menus. See Section 4.3.2.
If stations are RDS enabled their names, rather than just
their frequencies, will be displayed. Pressing the handset
info (
) key will sequentially display any station info
broadcast, station genres if defined and station frequency.
If stations are not RDS enabled, the info key will display only
the station frequency.
When the scan stops at a station either press the prev
(
) or next ( ) key again to ignore the station and
continue the scan or store the station as a preset favourite
by pressing the handset store key.
Pressing the handset ok/list key displays an FM options
menu that enables mono mode to be selected. Mono
operation can sometimes be useful to reduce noise and
interference.
5.2 DAB Tuner – Seeking Stations
When the NDX DAB Radio input
is first selected it must scan for
stations. Select the DAB input and
press the handset ok/list key to
begin the search. Scan progress
and the number of stations found
will be displayed. When the scan
is complete NDX will order the
stations alphabetically and select
the first station in the list.
DAB stations can be selected
either alphabetically in turn by
pressing the handset
prev (
) or next ( ) keys, or selected in list mode by
pressing the ok/list key and browsing the station list. Use
the handset up (5) or down (6) keys to scroll through the
list and the ok/list key to select a station. In long lists the
handset numeric/text keys can be used to search the list
alphabetically.
Once a station is selected, pressing the handset info
(
) key will sequentially display the station genre, signal
strength, bit rate and any station info broadcast.
5.3 iRadio Tuner – Seeking Stations
When NDX is connected to a
network with high speed internet
access it will automatically
download a list of available
internet radio stations. When
the iRadio input is subsequently
selected, a list mode menu will
be displayed that shows all the available stations sorted
by location, genre, podcast location, podcast genre,
new station and most popular stations. The display will
automatically enter list mode so the handset up (5),
down (6), left (3) and ok/list keys can be used to browse
the menus and select stations. In long lists the handset
numeric/text keys can be used to jump through the list
alphabetically.
Once a station is selected the NDX display will exit from list
mode and revert to normal mode. To re-enter list mode for
further list browsing and selecting press the handset ok/list
key.
Pressing the handset info (
) key while a station is
playing will sequentially display the station (stream) name,
elapsed time, stream info, buffer level and any station info
broadcast.
Note: Buffer level indicates the quantity of stored data
within NDX and reflects the ability of the network to
provide data at the necessary rate.
It is possible for an internet radio
station listed to be “off-line” and
be unavailable when selected. If
this occurs an alert message will
be displayed.
BBC R4
92.9MHz
NDX Multi-mode Radio Tuner
5 NDX Multi-mode Radio Tuner
The NDX incorporates a multi-mode radio tuner able to receive FM and DAB transmissions
and internet radio streams. FM and DAB operation requires the optional module to be
fitted and an appropriate aerial to be connected to the rear panel aerial input. Internet
radio requires the NDX to be connected to a broadband internet service via a network
router that incorporates an appropriate firewall. The NDX is able to store a total of forty
station presets (favourites) across all three tuner modes. Select the FM, DAB or iRadio input
to begin.
No Stations
Press list to rescan
DAB
Can’t Play
Station unavailable
iRAD
DAB Rescan
47% Found 15
DAB
FM
Internet Radio 3/6
Genre
Location
4Podcasts By Location
Podcasts By Genre
Page 19

17
5.4 Adding iRadio Stations
The Naim Radio Guide web site enables iRadio stations
not included in the standard NDX list to be added for
download to your NDX. To access the web site and add
stations follow the steps below.
• With a computer connected to the same network as
the NDX, browse to http://naim.vtuner.com
• Enter the identification (ID) of your NDX where
requested on the web page. The ID is the unit’s
MAC address. This can be found via the following
NDX menus: Setup > Factory Settings > System Status
> MAC.
Note: You can register a username and password so that
the MAC address is not required on any subsequent visit.
• To add stations follow the My Added Stations link and
provide the information required. Click on the arrow
to complete the procedure.
• The added station will then be visible on the Naim
Radio Guide home page.
• To access the stations from the NDX, select the iRadio
input then select Added Stations.
5.5 Storing Radio Presets
When the handset store key is
pressed the display will show a
menu that enables confirmation
of the preset store and options to
rename or delete a stored preset.
Selecting the store option opens
a menu that enables the preset
to be stored in one of the forty
locations. Scroll to the desired
location and press the ok/list key.
Selecting Rename Preset
opens a menu that provides
the opportunity to rename a
previously stored station. Scroll
to the preset to be renamed
and press the ok/list key to
open a text entry screen. Use
the handset numeric/text keys
in text entry mode to select characters. Press the ok/list
key to save the new preset name. See Section 3.7 for a full
description of text entry.
Selecting Delete Preset opens a preset list menu. Scroll to
the desired preset and press the ok/list key.
Note: Preset operations (store, rename or delete) are
not possible directly from list mode. The store key must
be pressed when in normal play mode to access these
options.
NDX Multi-mode Radio Tuner
Store Station 1/40
41 Empty
2 Empty
3 Empty
4 Empty
Rename Preset 3/4
1 BBCR3 FM
2 BBCR4 FM
4
3 91.15MHz FM
4 BBCR1 FM
Browse Presets 3/20
1 BBCR3 FM
2 BBCR4 FM
4
3 91.15MHz FM
4 BBC 6Mus DAB
Presets 1/3
4Store 91.15MHz
Rename Preset
Delete Preset
5.6 Using Radio Presets
To select a preset press the
handset preset key to open the
Browse Presets menu. Scroll to the
desired preset and press the ok/
list key.
Note: The Browse Presets menu
displays presets stored across all three NDX radio modes
(FM, DAB, iRadio). Selecting a preset from a radio mode
other than the one currently selected will automatically
switch NDX to that mode.
Note: It is possible for an internet radio station stored
as a preset to be “off-line” and be unavailable when
subsequently selected. If this occurs an alert message will
be displayed.
Note: Pressing the preset key will display the preset list
regardless of the currently selected input.
Page 20

18
The manner in which the UPnP™
server is set up will define how
the audio files and playlists it
holds are listed and displayed. In
most cases the default setup will
list and display files by artist and
album, but list by genre and predefined playlists may also
be available.
Note: Playlists cannot be generated or stored locally by
NDX. To play a playlist it must reside on the UPnP™ server.
Selecting one of the playlist
categories using the up (
5),
down (6) and ok/list keys
will display a menu showing
items that fall into the selected
category. An entire category can
be selected for playback by using the up (5), down (6)
keys followed by the play/pause ( ) key.
Alternatively, selecting a category using the up (5), down
(6) keys followed by the ok/list key will display the full list
of tracks contained within the category. Tracks can then
be selected for playback by using the up (5), down (6)
and ok/list keys.
In long lists the handset numeric/text keys can be used to
jump through the list alphabetically.
Once playback is underway the NDX display will exit from
list mode and revert to normal mode where the handset
transport keys (
) can be used to control
playback. To re-enter list mode for further list browsing and
selecting press the handset ok/list key.
During playback, pressing the handset info (
) key will
sequentially display the server name, buffer level, track
elapsed time and stream (audio file) information.
Note: Buffer level indicates the quantity of stored data
within NDX and reflects the ability of the network to
provide data at the necessary rate.
NDX UPnP™ Audio Inter face
6 NDX UPnP™ Audio Interface
In addition to providing the network connection required for internet radio playback, the
NDX network interface enables audio files stored on UPnP™ servers to be streamed and
played. NDX must be connected, either wirelessly or via ethernet cabling, to a network
router. If the router provides an internet connection it should incorporate a firewall. If NDX
is already connected to a network, begin by selecting the UPnP™ input.
6.1 UPnP™ Servers
UPnP™ servers incorporate a software application that
allows NDX, or any other UPnP™ compatible player, to
play audio stored and streamed by another device on the
network. The UPnP™ server is usually a PC or Mac home
computer, although some Network Attached Storage
(NAS) drives incorporate a UPnP™ application.
Windows Media™ Player version 11 or above incorporates
built in UPnP™ support and a variety of third party UPnP™
applications are also available that are compatible with
both Windows and Macintosh operating systems.
In the case of the Windows UPnP™ server the following
steps must be taken before music can be streamed to
NDX:
• Ensure Windows Media™ Player version 11 or above is
installed.
• Enable Windows Media™ Player file sharing. From the
Media Player Options dialogue select Library > Configure
Sharing… then select Share my media.
• Ensure the firewall is configured to allow file sharing.
6.2 Audio File Compatibility
The audio files stored on the UPnP™ servers attached to
the network may be in MP3, AAC, FLAC, WMA, WAV or
Ogg Vorbis formats. Files must be free of any digital rights
management playback restrictions such as the Apple
iTunes FairPlay system.
6.3 Scanning Servers and Playing Files
When the NDX UPnP™ input
is selected a list of available
UPnP™ servers on the network
will be displayed. The display will
automatically enter list mode so
the handset up (
5), down (6 )
and ok/list keys can be used to
browse and select the desired server.
Note: Allegro Media Server
(shown in the illustrations) is a
UPnP™ Media Server application
that runs on Apple or Windows
PCs and provides access to
media files and iTunes library
contents from UPnP™ media
players such as NDX.
UPnP 1/2
4Allegro Media Server
NAS Disk
Allegro Media Server 4/4
Albums
Artists
Genres
4Playlists
Playlists 1/12
90s Music
Audiobooks
4Favourites
Party
Favourites 3/22
Ball and Chain
Cycle Song
4Motel Lullaby
Vacant Chair
Page 21

19
7.3 Browsing and Playing USB Files
With a USB memory device, or an
iPod or iPhone connected, and
the NDX USB/iPod input selected,
the display will enter list mode
and show the structure of stored
audio files. Use the handset up
(5), down (6), left (3) and ok/list key to browse and
select items.
Note: The memory device or iPod can be safely
connected or disconnected at any time.
Selecting a folder will display the list of files contained
within and selecting a single file will begin playback.
Playback will continue through any list of files contained
within a folder. The order of play can be shuffled
(randomised) by pressing the handset shuffle (
) key.
In long lists of items the handset numeric/text keys can be
used to search the list alphabetically.
Once playback is underway the NDX display will exit from
list mode and revert to normal mode where the handset
transport keys (
) can be used to control
playback. To re-enter list mode for further list browsing and
selection, press the handset ok/list key.
During playback, pressing the handset info (
) key will
alternately display data stream info and track elapsed
time.
NDX USB/iPod Interface
7 NDX USB/iPod Interface
The NDX can play audio files stored on USB memory hardware or iPod and iPhone models
connected to the front panel USB socket. Begin by connecting a USB memory device,
iPod or iPhone to the USB socket and selecting USB/iPod input.
7.1 USB Media and File Compatibility
USB memory hardware must be in Windows/DOS format
(FAT/FAT32) to be used with the NDX. Macintosh formats
are not compatible.
The NDX can play USB audio files in the following formats:
MP3, AAC, FLAC, WAV, WMA and Ogg Vorbis. Files must
be free of digital rights management playback restrictions
such as the iTunes FairPlay system.
7.2 iPod Compatibility and Charging
The NDX USB audio interface is compatible with 5th
generation and later iPod models and all iPod touch
models.
The NDX can play iPod and iPhone audio files in the
following formats: MP3, AAC, FLAC, WAV, WMA, Apple
Lossless and Ogg Vorbis. Files must be free of digital rights
management playback restrictions such as the iTunes
FairPlay system.
The iPod battery will be charged by default while the iPod
is connected. iPod charging options can be changed in
the USB/iPod input setup menu. See Section 4.3.5.
USB/iPod 4/18
Brilliant Corners.wav
Grace and Danger.wav
Nelly The Elephant.wav
4Solid Air.wav
Page 22

20
NDX Specifications
8 NDX Specifications
Audio Inputs
Sample rates supported: S/PDIF up to 24 bit 192kHz
USB: Front panel socket
UPnP: Hi-Res UPnP playback up to 24bit/96kHz (WAV and FLAC)
Antenna inputs: DAB/FM, WiFi
Tuning range: DAB (Band lll and L Band), FM 87.5-108MHz
Other inputs: Ethernet
Audio Outputs
Analogue outputs: DIN and RCA
Line outputs fixed (level): 2.1V rms at 1kHz
Output impedance: 10Ω maximum
Minimum load impedance: 10kΩ
Frequency response: 10Hz – 20kHz, +0.1/-0.5dB
THD+N: <0.1%, 10Hz –18kHz at full level
Phase response: Linear phase, absolute phase correct
Digital outputs (type): S/PDIF, 75Ω BNC
Upgrades
Power supply: XPS, 555 PS
Other: DAC, Hi-Line, Power-Line
Connectivity
Digital inputs: BNC, Coaxial RCA and TOSLINK
Infra red: RC5
Remote input: 3.5mm jack on rear (RC5)
Remote output: 3.5mm jack on rear (RC5) x2
RS232: DE9 female (For software upgrade only)
Ethernet: RJ-45, Cat5E, WiFi
USB: Front panel socket (Max rating: 5V at 500mA)
Formats
Audio formats supported: Internet radio (Windows Media-formatted content, MP3
streams, MMS)
Playlists (M3U, PLS)
MP3, AAC (up to 320kbit/s, CBR/VBR)
Apple Lossless (from iPod)
Windows Media-formatted content-9 (up to 320kbit/s)
WAV and FLAC (up to 24bit/96kHz via UPnP or USB only)
AIFF, Ogg Vorbis
iRadio service provider: vTuner 5* full service
User Control Interfaces
Front panel: Nine button matrix.
Handheld: Remote handset and optional n-Stream App interface for
iPhone, iPod touch and iPad models. App downloadable
from the iTunes App store.
Power
Supply voltage: 100V, 115V, 230V; 50 or 60Hz
Power supply options: Internal integrated or External
Power consumption 60VA (maximum):
Certifications and Licenses
Certifications: Apple (made for iPod, iPhone), vTuner Premium
Licenses: MP3, AAC, DAB
Physical
Dimensions: 87 x 432 x 314mm (H x W x D)
Weight: 10Kg
Note: Specifications may be subject to revision.
Naim Audio Limited
Southampton Road,
Salisbury,
England SP1 2LN
Tel: +44 (0)1722 426600
Fax: +44 (0)871 230 1012
W: www.naimaudio.com
Part No. 12-001-0143 Iss. 1L
 Loading...