

Page 1

User Guide
POWER AMPLIFIER - NAP350
1
Page 2

Page 3

Contents
Section Page
Introduction 1
1. What’s in the Box 1
2. Features and Connections 2
3. Set Up 3
4. Tips on Installing and Using 6
5. Mains power, Earthing and More 8
6. Further Tips and Advice 9
7. Support 9
8. Service and Updates 10
9. Specications 10
10. Product Recycling 10
Page 4
Introduction
Welcome to your new Naim power amplier. Like all Naim Audio products, the NAP350
puts musical performance rst. To help realise its full potential, it is important to follow
the simple installation and usage guidelines covered in this manual. We start with some
product and set-up essentials, before moving onto more detailed information in section 4
starting on page 6.
Please Note: Full safety
warnings can be found in
the Statutory Safety Manual.
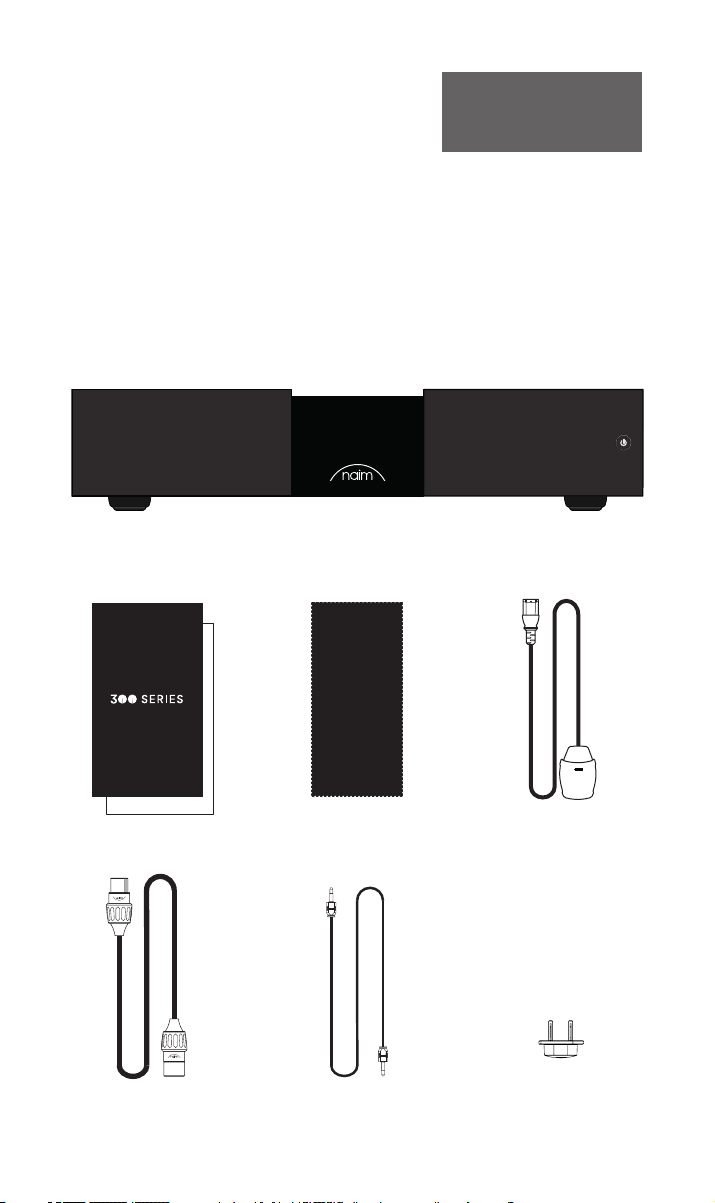
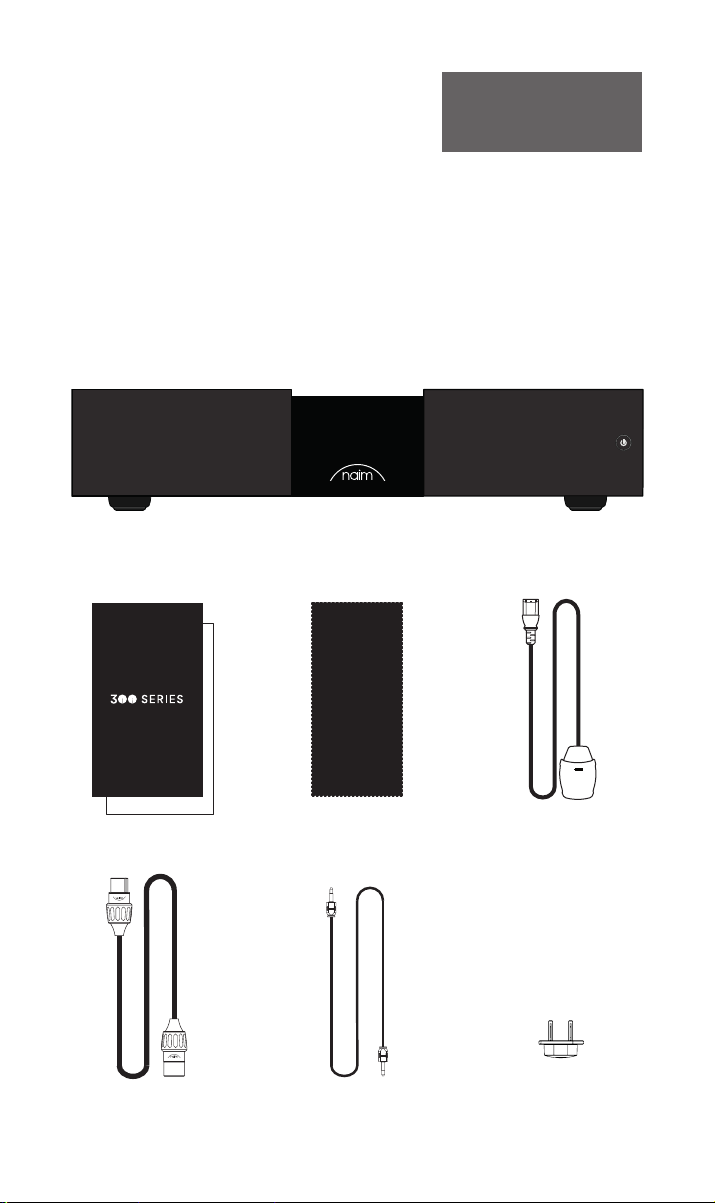
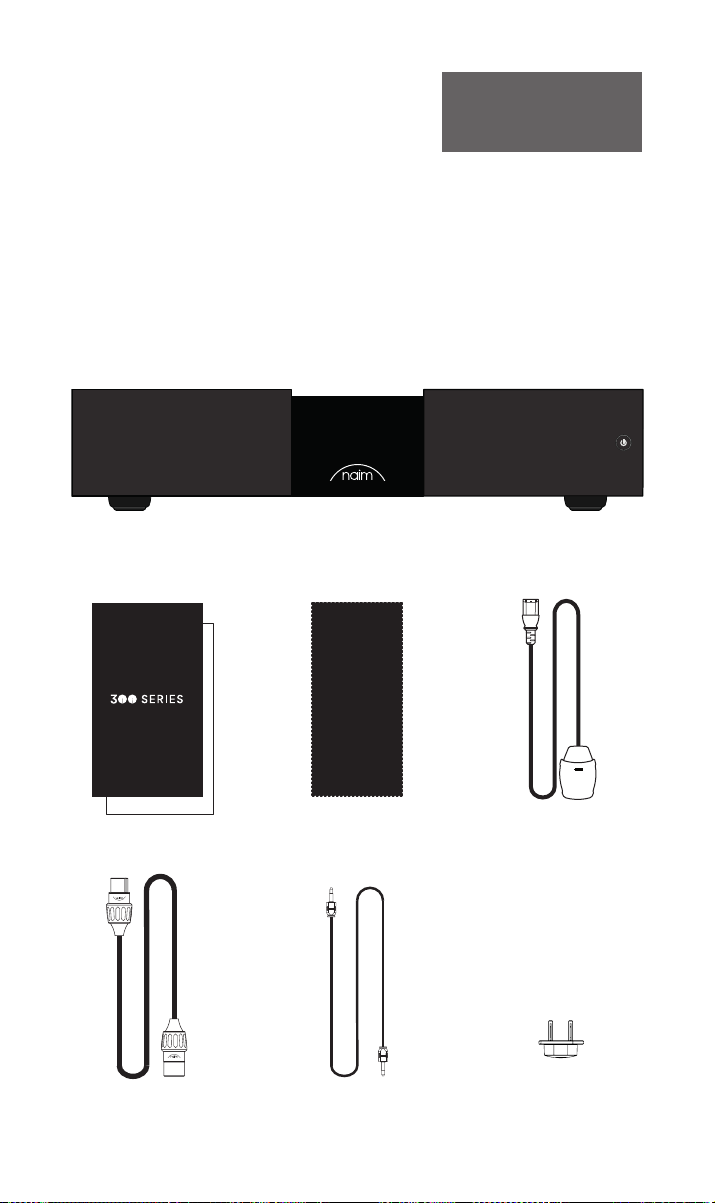
1. What’s in the Box
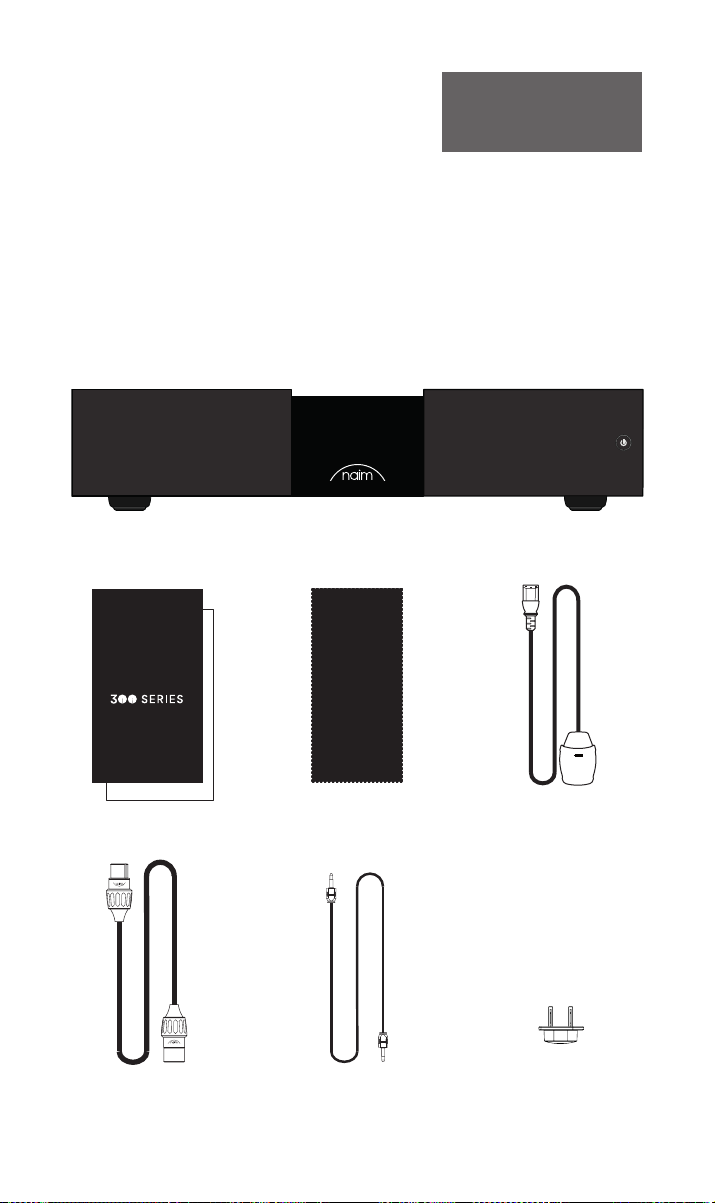
1x NAP350
1x Document Pack
1x XLR – XLR Balanced
Audio Interconnect
1
1x Cleaning Cloth 1x Power-Line Lite
1x Optical System
Automation Cable
1x Speaker Connectors
(pre-installed to unit)
Page 5
Remote
in
Remote
out
Auto
standby
Instant
on
1
2
WARNING:Disconnect power before opening
AC ONLY
FUSE RATING: ANTISURGE
1 0-120 V:1 T6.3AL
2 0-240 V:2 T3.15AL
FREQUENCY: 0 60Hz5 /
I 260VANPUT POWER:
Control
Power
Speakers
WARNING:Do not replace supplied loudspeaker plugs
with individual 4mm plugs
Input
XLR
USB
update
Brightness
Reset/
300 SERIES
POWER
AMPLIFIER
NAP 350
S/No.
DESIGNED AND MADE IN THE UK
BY NAIM AUDIO, SALISBURY, SP1 2LN
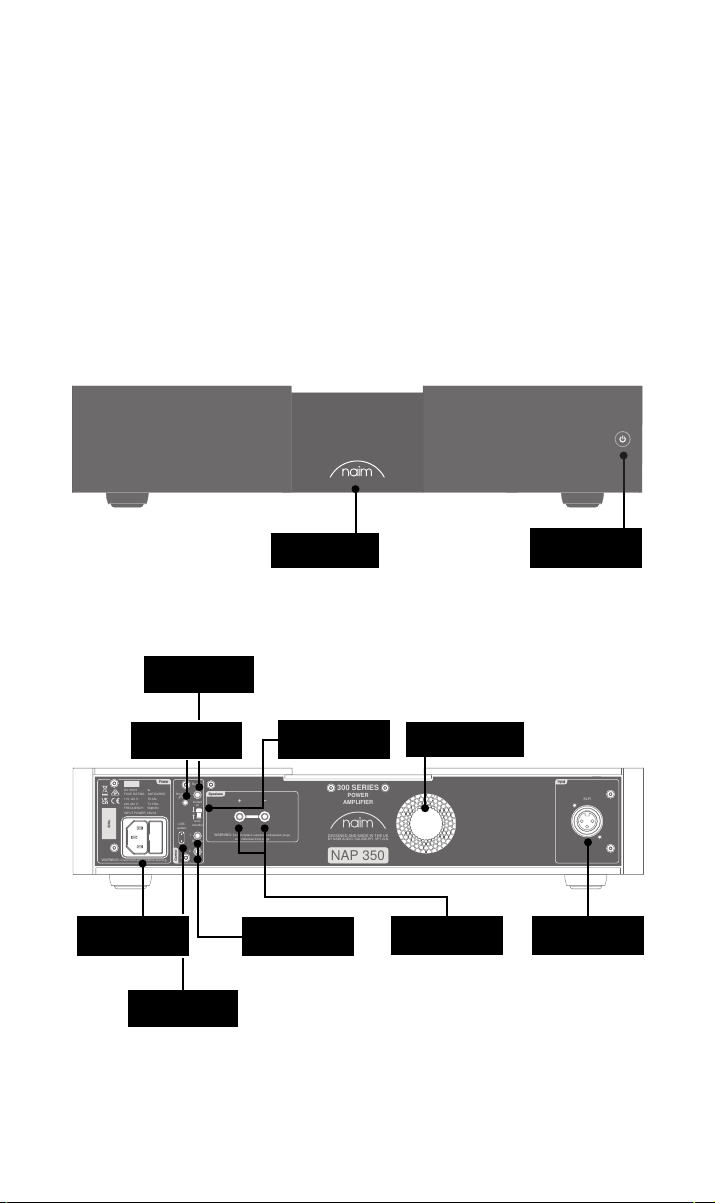
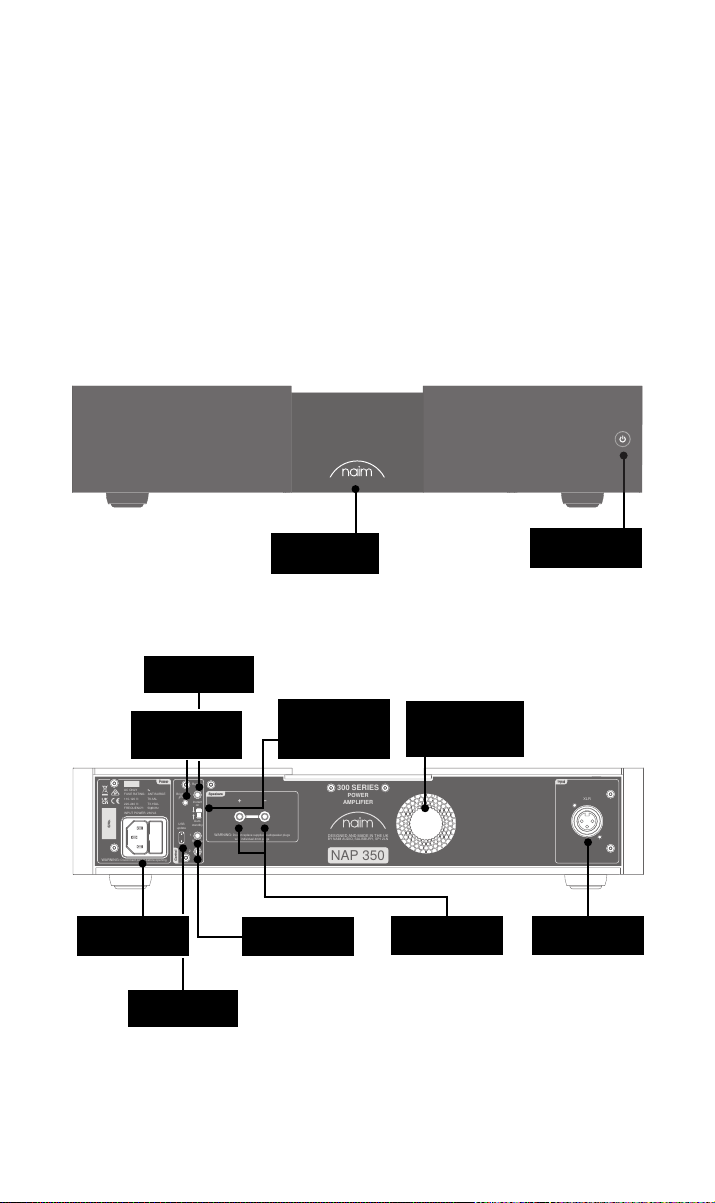
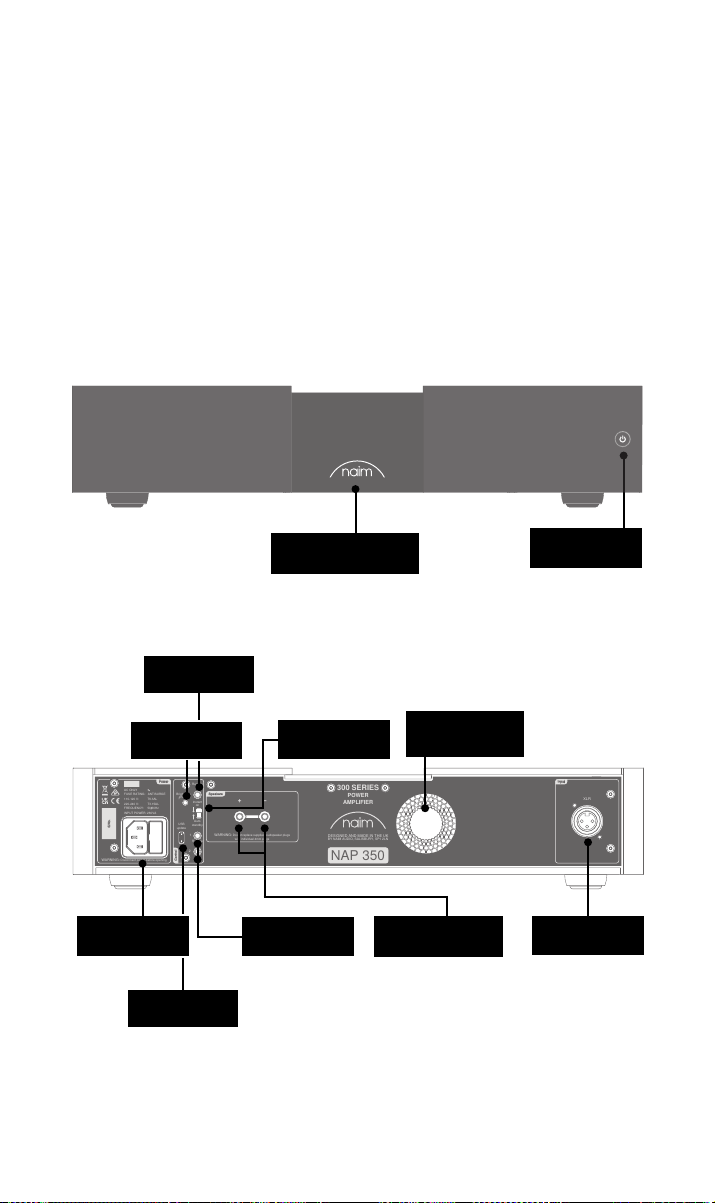
2. NAP350 Features and Connections
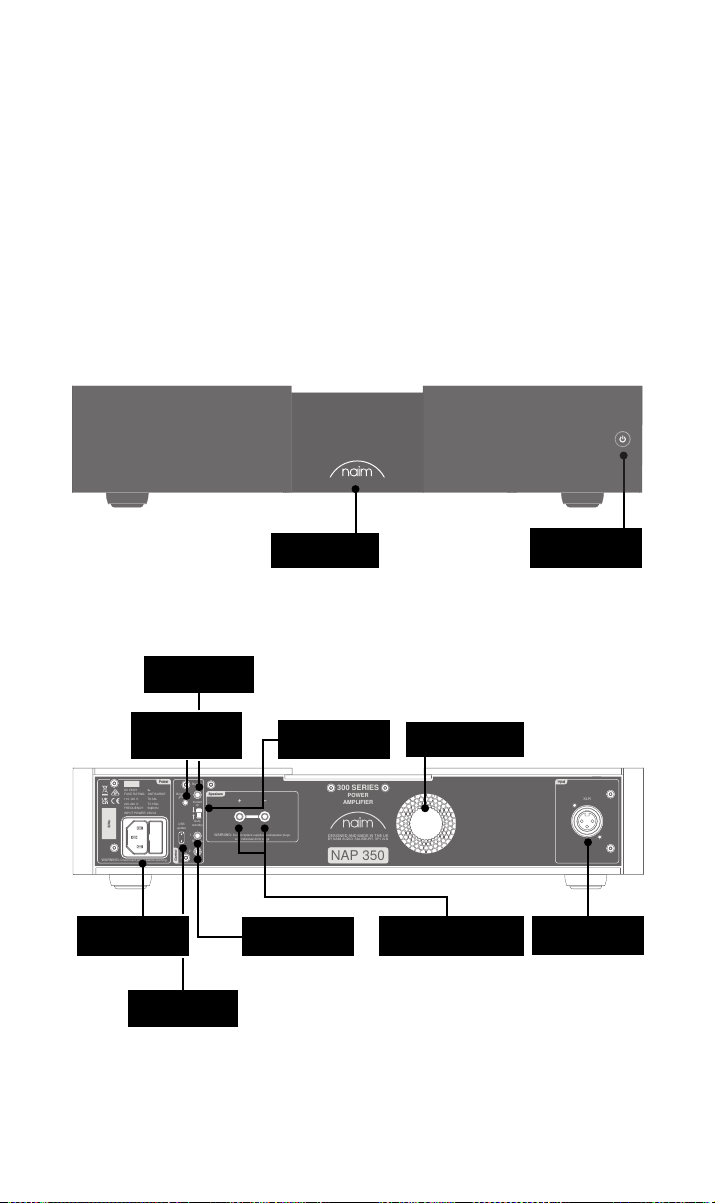
Mains input
& fuse
Remote In
Brightness/Reset
button
USB upgrade
Backlit, dimmable
logo
Instant On/Auto
Standby switch
Remote out
8 step intelligent
fan control
Speaker sockets
Power/Standby
button
Balanced XLR
inputs
2
Page 6
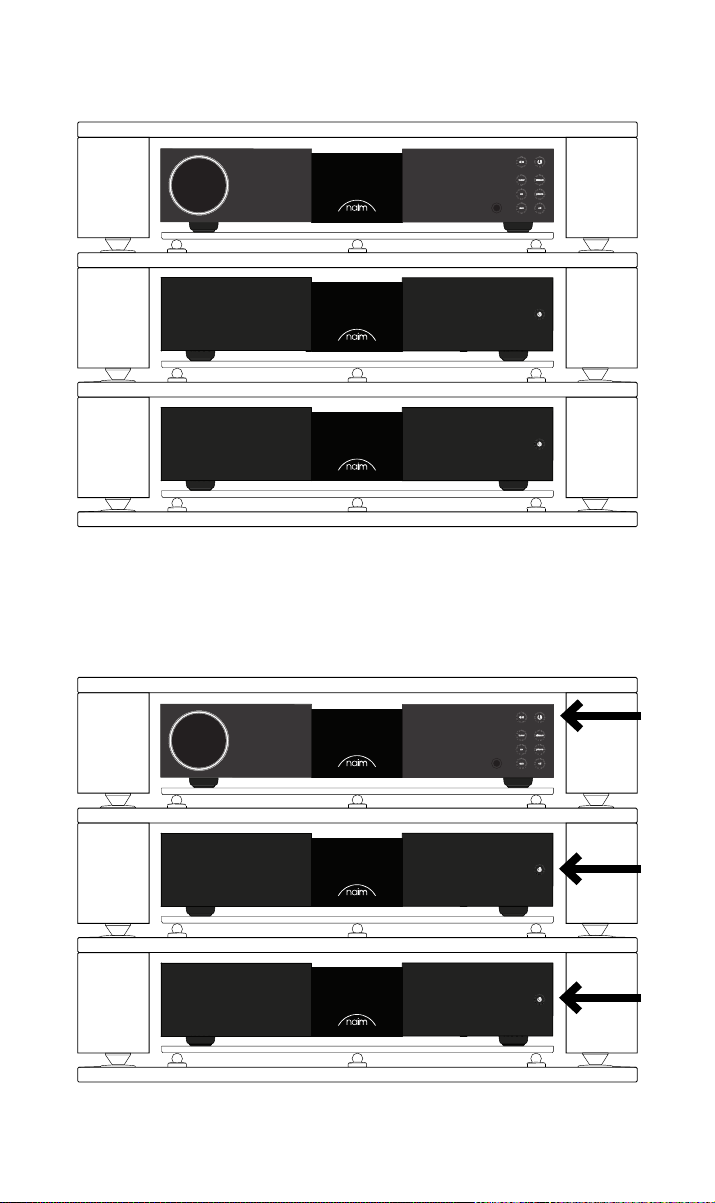
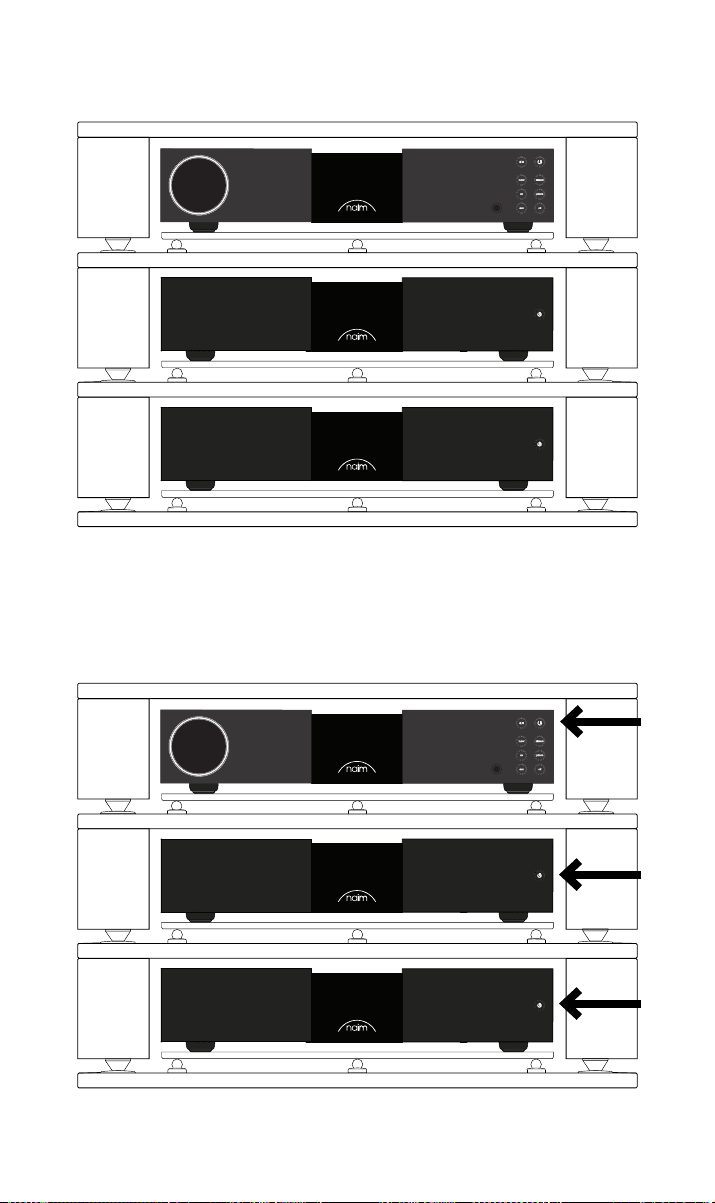
3. NAP350 Set Up
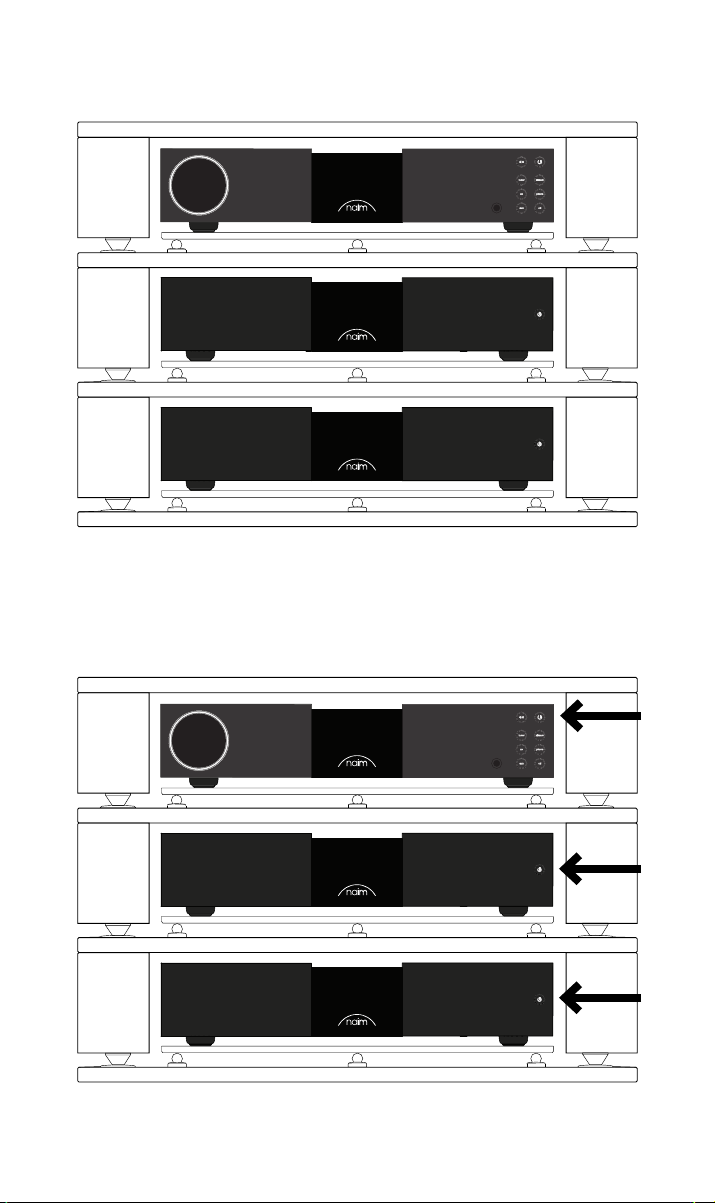
Your pair of NAP350 ampliers needs to be connected to a preamplier (such as the
matching NAC 332), but before you do, please ensure all components are in their nal
positions and disconnected from mains power.
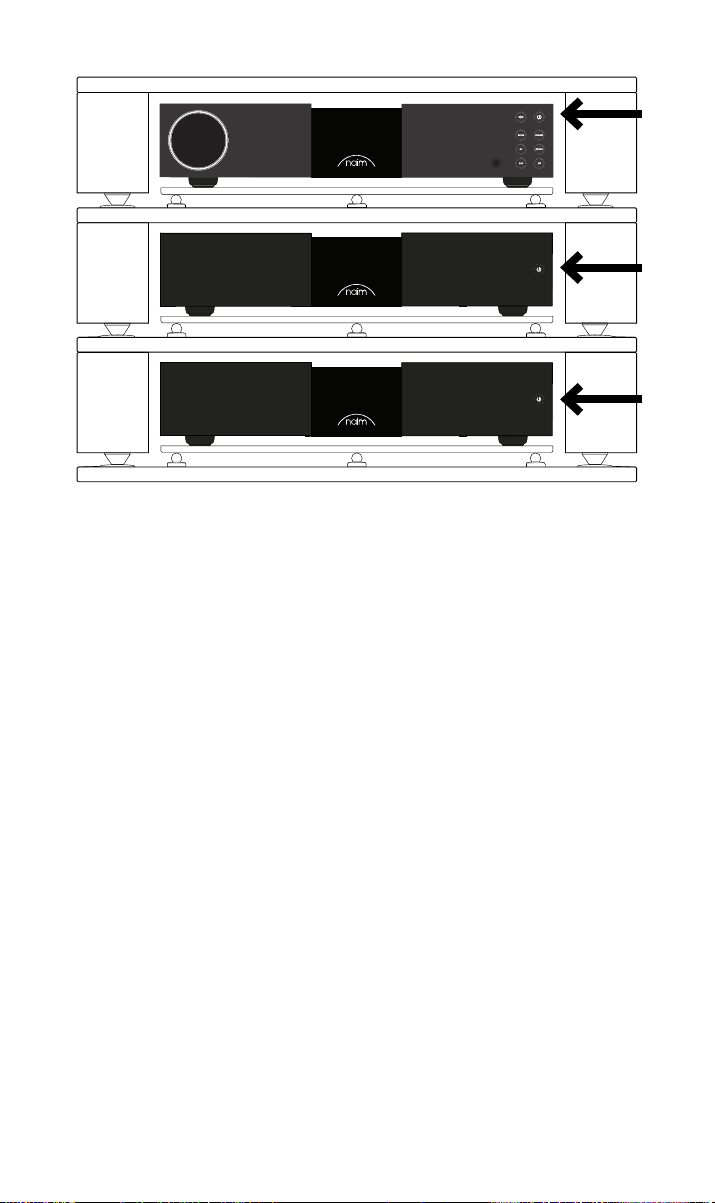
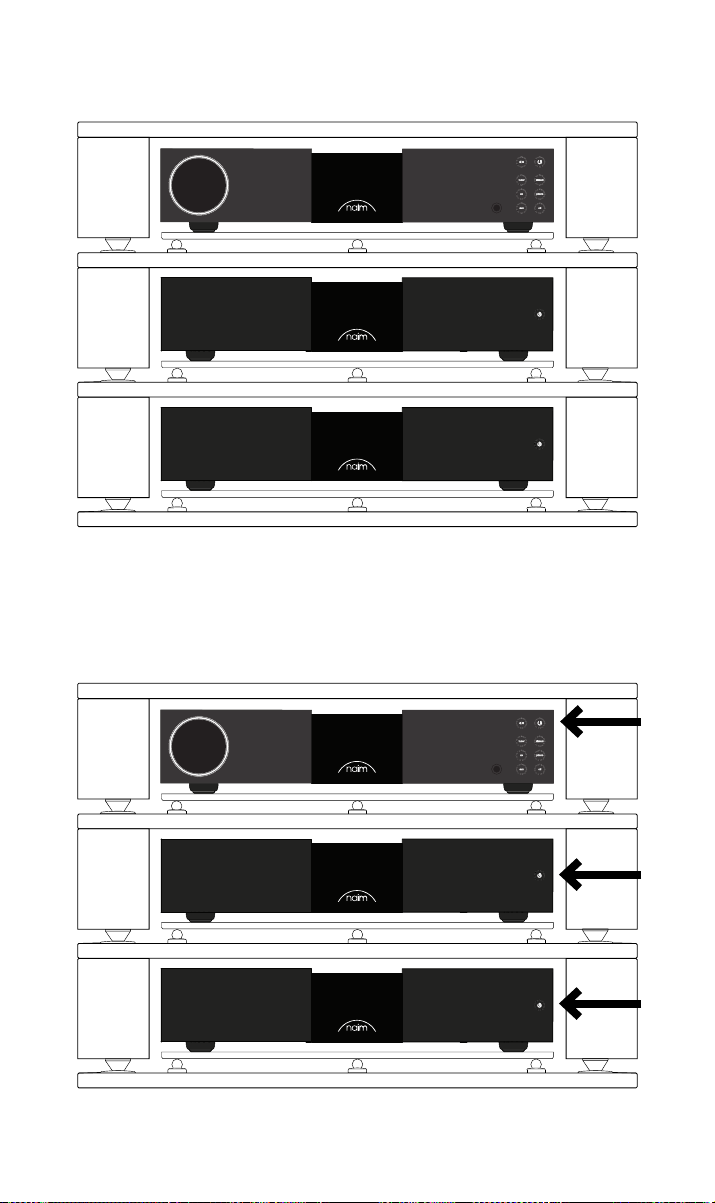
For optimum performance, use a dedicated hi- support – ideally Naim Fraim – with the
preamplier sited above the power amplier, as shown.
Ensure all equipment is o before connecting.
3
Page 7
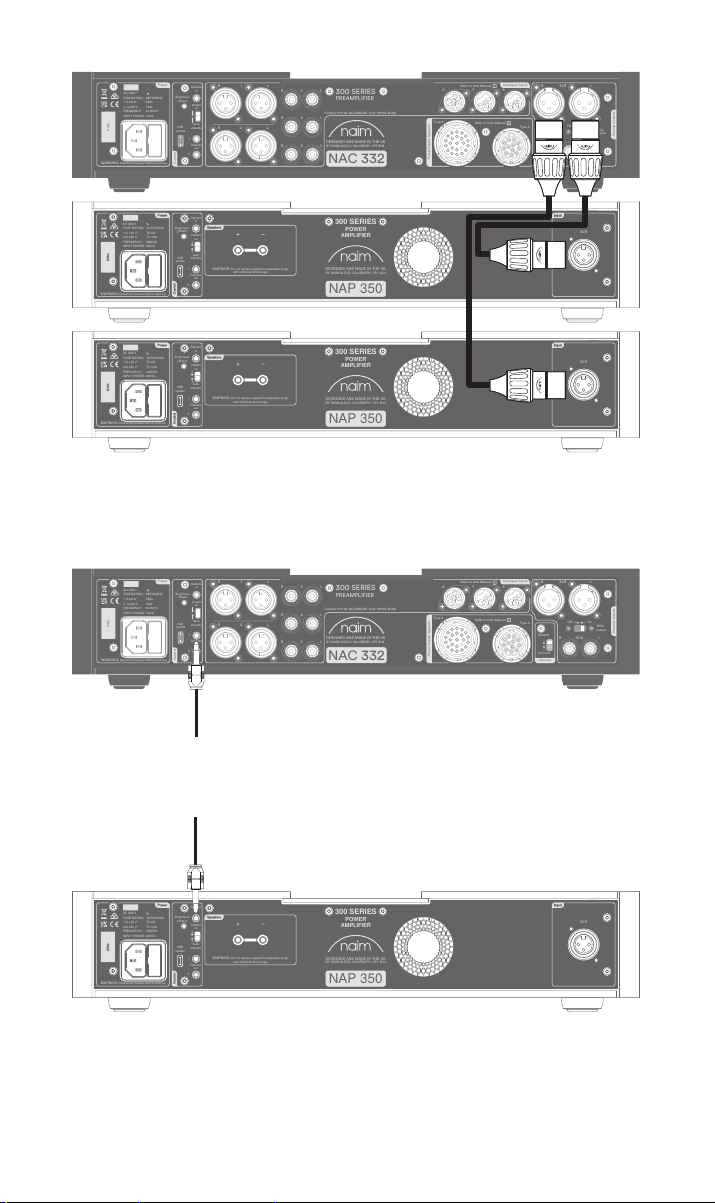
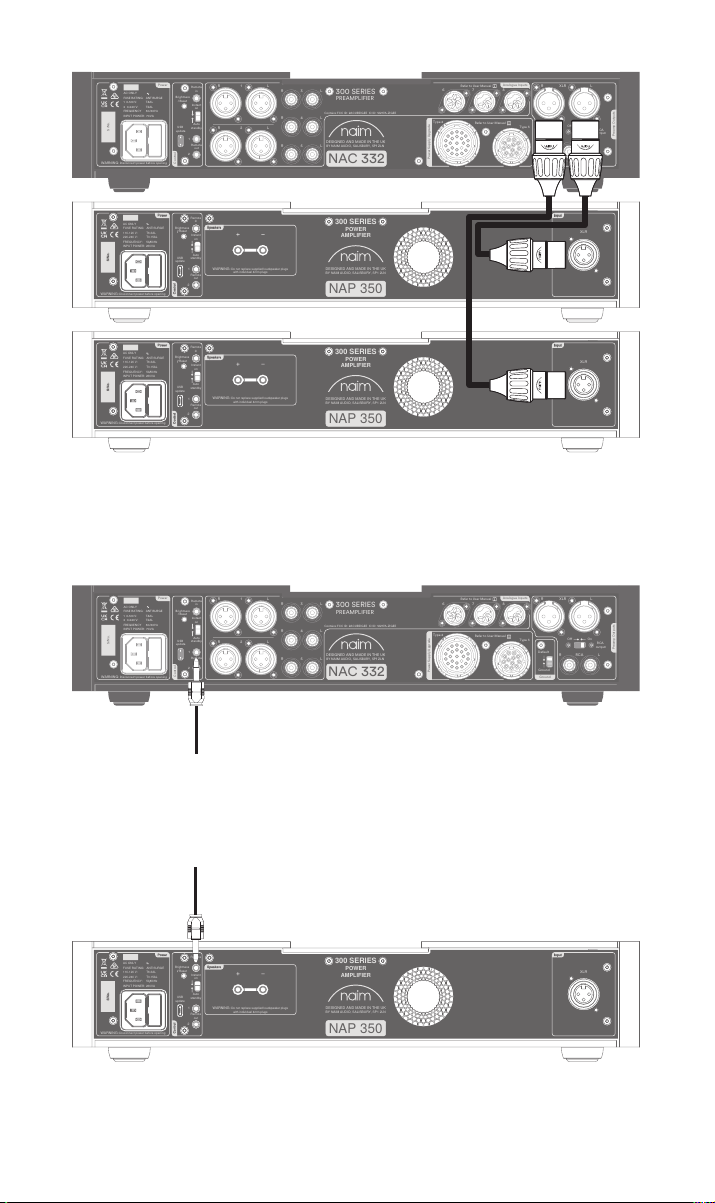
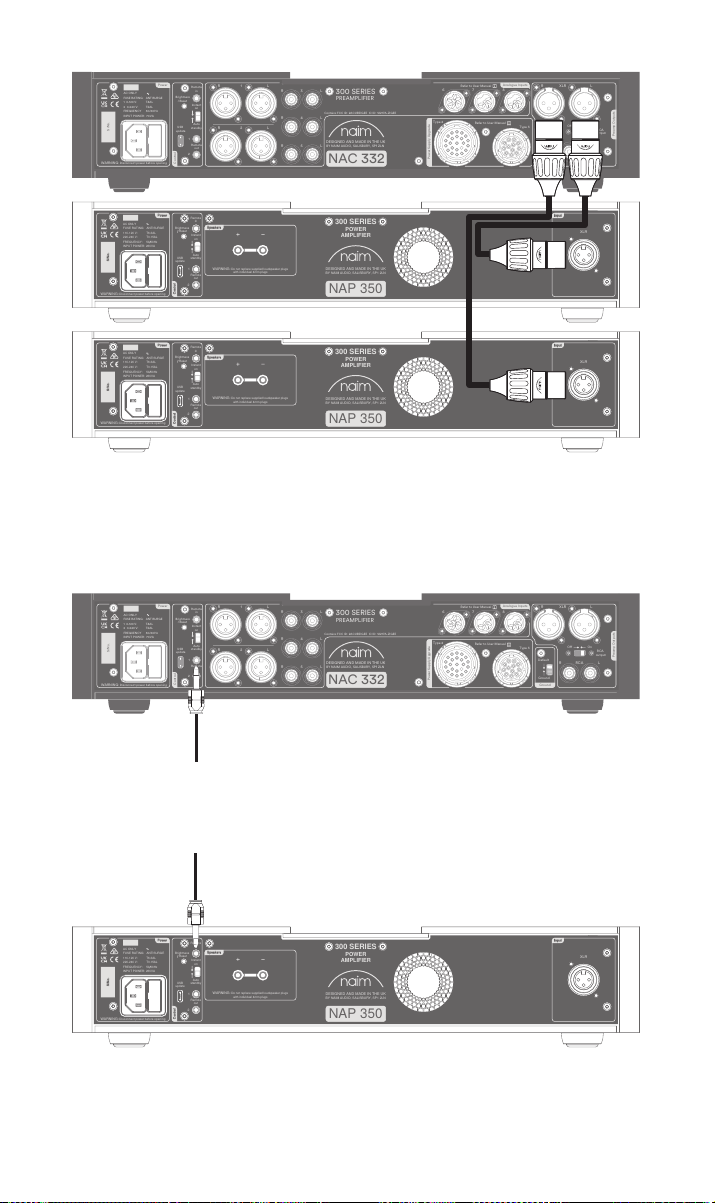
Connect the supplied XLR cable from the balanced XLR outputs of your preamplier to the
WARNING:Disconnect power before opening
AC ONLY
FUSE RATING: ANTISURGE
1 0-120 V:1 T4AL
2 0-240 V:2 T2AL
FREQUENCY: 0 60Hz5/
I 70VANPUT POWER:
Power
300 SERIES
PREAMPLIFIER
NAC 332
DESIGNED AND MADE IN THE UK
BY NAIM AUDIO, SALISBURY, SP1 2LN
/ .oNS
Ground
Power Supply Upgrade
Preamp Outputs
AnalogueInputs
Ground
Default
R L
R
L
RCA
XLR
Refer to User Manual
Type 3
Type 4
Remote
in
Remote
out
Auto
standby
Instant
on
1
2
Control
USB
update
Brightness
Reset/
On
RCA
output
O
3
4
6
AnalogueInputs
R
R
R
L
L
L
5
8
7
1
2
R
L
R
L
Contains FCC ID: 2ACURZIGEE IC ID: 12217A-ZIGEE
Refer to User Manual
WARNING:
Disconnect power before opening
AC ONLY
FUSE RATING: ANTISURGE
1 0-120 V: T
4AL
2 0-240 V: T
2AL
FREQUENCY 50/60Hz
I 70VANPUT POWER:
Power
300 SERIES
PREAMPLIFIER
NAC 332
DESIGNED AND MADE IN THE UK
BY NAIM AUDIO, SALISBURY, SP1 2LN
/ .oNS
Ground
Power Supply Upgrade
Preamp Outputs
AnalogueInputs
Ground
Default
R L
R
L
RCA
XLR
Refer to User Manual
Type 3
Type 4
Remote
in
Remote
out
Auto
standby
Instant
on
1
2
Control
USB
update
Brightness
Reset/
On
RCA
output
O
3
4
6
AnalogueInputs
R
R
R
L
L
L
5
8
7
1
2
R
L
R
L
Contains FCC ID: 2ACURZIGEE IC ID: 12217A-ZIGEE
Refer to User Manual
WARNING:Disconnect power before opening
AC ONLY
FUSE RATING: ANTISURGE
1 0-120 V:1 T4AL
2 0-240 V:2 T2AL
FREQUENCY: 0 60Hz5/
I 70VANPUT POWER:
Power
300 SERIES
PREAMPLIFIER
NAC 332
DESIGNED AND MADE IN THE UK
BY NAIM AUDIO, SALISBURY, SP1 2LN
/ .oNS
Ground
Power Supply Upgrade
Preamp Outputs
AnalogueInputs
Ground
Default
R L
R
L
RCA
XLR
Refer to User Manual
Type 3
Type 4
Remote
in
Remote
out
Auto
standby
Instant
on
1
2
Control
USB
update
Brightness
Reset/
On
RCA
output
O
3
4
6
AnalogueInputs
R
R
R
L
L
L
5
8
7
1
2
R
L
R
L
Contains FCC ID: 2ACURZIGEE IC ID: 12217A-ZIGEE
Refer to User Manual
WARNING:
Disconnect power before opening
AC ONLY
FUSE RATING: ANTISURGE
1 0-120 V: T
4AL
2 0-240 V: T
2AL
FREQUENCY 50/60Hz
I 70VANPUT POWER:
Power
300 SERIES
PREAMPLIFIER
NAC 332
DESIGNED AND MADE IN THE UK
BY NAIM AUDIO, SALISBURY, SP1 2LN
/ .oNS
Ground
Power Supply Upgrade
Preamp Outputs
AnalogueInputs
Ground
Default
R L
R
L
RCA
XLR
Refer to User Manual
Type 3
Type 4
Remote
in
Remote
out
Auto
standby
Instant
on
1
2
Control
USB
update
Brightness
Reset/
On
RCA
output
O
3
4
6
AnalogueInputs
R
R
R
L
L
L
5
8
7
1
2
R
L
R
L
Contains FCC ID: 2ACURZIGEE IC ID: 12217A-ZIGEE
Refer to User Manual
Remote
in
Remote
out
Auto
standby
Instant
on
1
2
WARNING:Disconnect power before opening
AC ONLY
FUSE RATING: ANTISURGE
1 0-120 V:1 T6.3AL
2 0-240 V:2 T3.15AL
FREQUENCY: 0 60Hz5 /
I 260VANPUT POWER:
Control
Power
Speakers
WARNING:Do not replace supplied loudspeaker plugs
with individual 4mm plugs
Input
XLR
USB
update
Brightness
Reset/
300 SERIES
POWER
AMPLIFIER
NAP 350
S/No.
DESIGNED AND MADE IN THE UK
BY NAIM AUDIO, SALISBURY, SP1 2LN
Remote
in
Remote
out
Auto
standby
Instant
on
1
2
WARNING:Disconnect power before opening
AC ONLY
FUSE RATING: ANTISURGE
1 0-120 V:1 T6.3AL
2 0-240 V:2 T3.15AL
FREQUENCY: 0 60Hz5 /
I 260VANPUT POWER:
Control
Power
Speakers
WARNING:Do not replace supplied loudspeaker plugs
with individual 4mm plugs
Input
XLR
USB
update
Brightness
Reset/
300 SERIES
POWER
AMPLIFIER
NAP 350
S/No.
DESIGNED AND MADE IN THE UK
BY NAIM AUDIO, SALISBURY, SP1 2LN
Remote
in
Remote
out
Auto
standby
Instant
on
1
2
WARNING:Disconnect power before opening
AC ONLY
FUSE RATING: ANTISURGE
1 0-120 V:1 T6.3AL
2 0-240 V:2 T3.15AL
FREQUENCY: 0 60Hz5 /
I 260VANPUT POWER:
Control
Power
Speakers
WARNING:Do not replace supplied loudspeaker plugs
with individual 4mm plugs
Input
XLR
USB
update
Brightness
Reset/
300 SERIES
POWER
AMPLIFIER
NAP 350
S/No.
DESIGNED AND MADE IN THE UK
BY NAIM AUDIO, SALISBURY, SP1 2LN
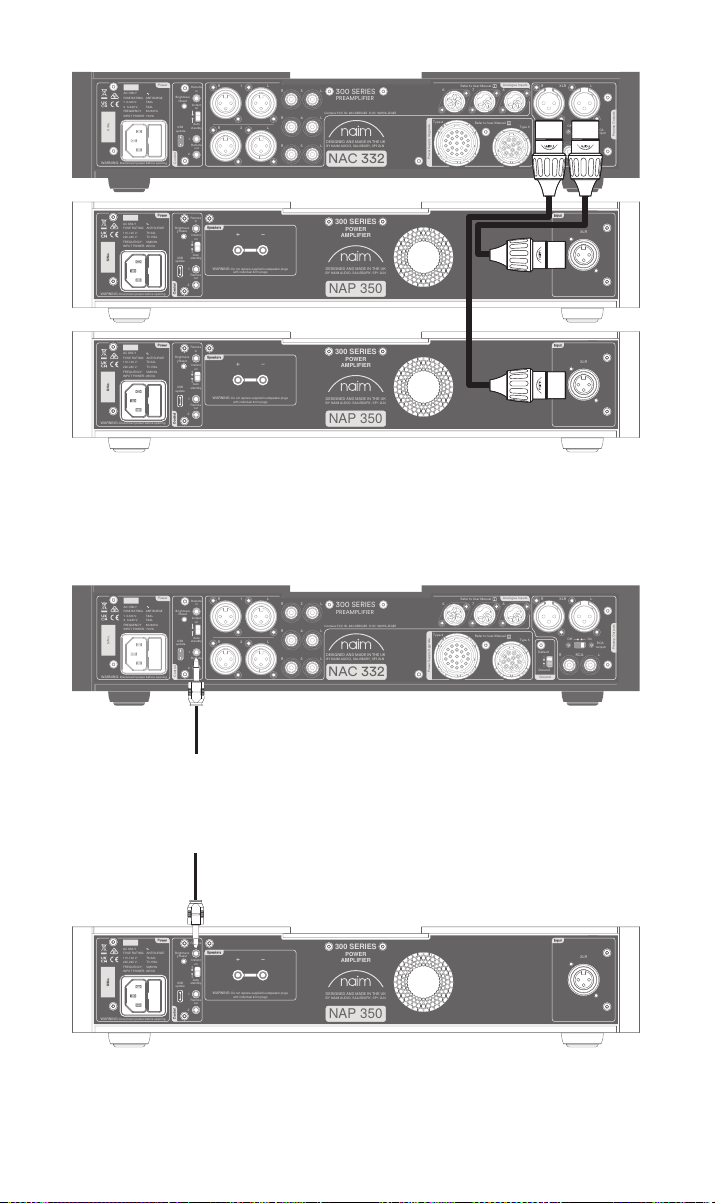
balanced input of the NAP350. Repeat with your other NAP350 and ensure the cables
are channel-matched: the pre-amplier left output connected to the power amplier used
for the left speaker etc. More in section 4.2. Please ensure that the XLR plugs are inserted
correctly, which is achieve with the Naim logo on the plug facing upwards.
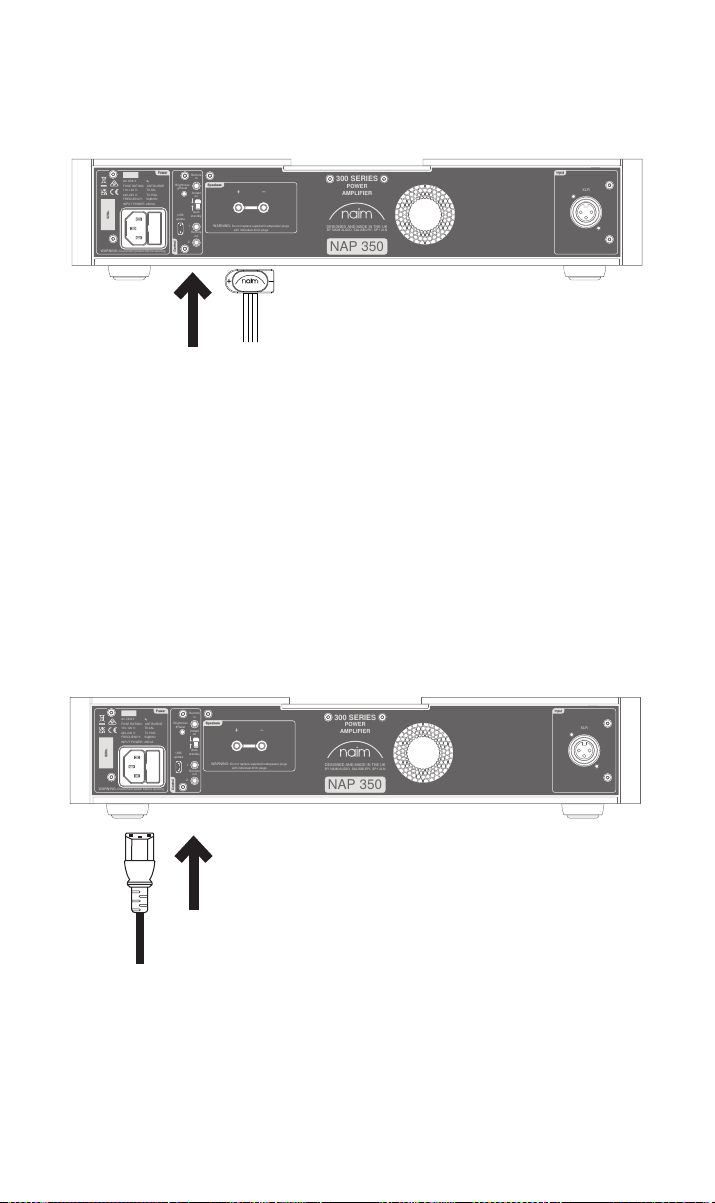
If you are using the NAP350 with matching Naim preamplier (see section 4.4), connect
the supplied system automation cable to the preamplier’s Remote Out terminal.
Connect the other end of the system automation cable to the Remote In terminal on each
NAP350.
4
Page 8
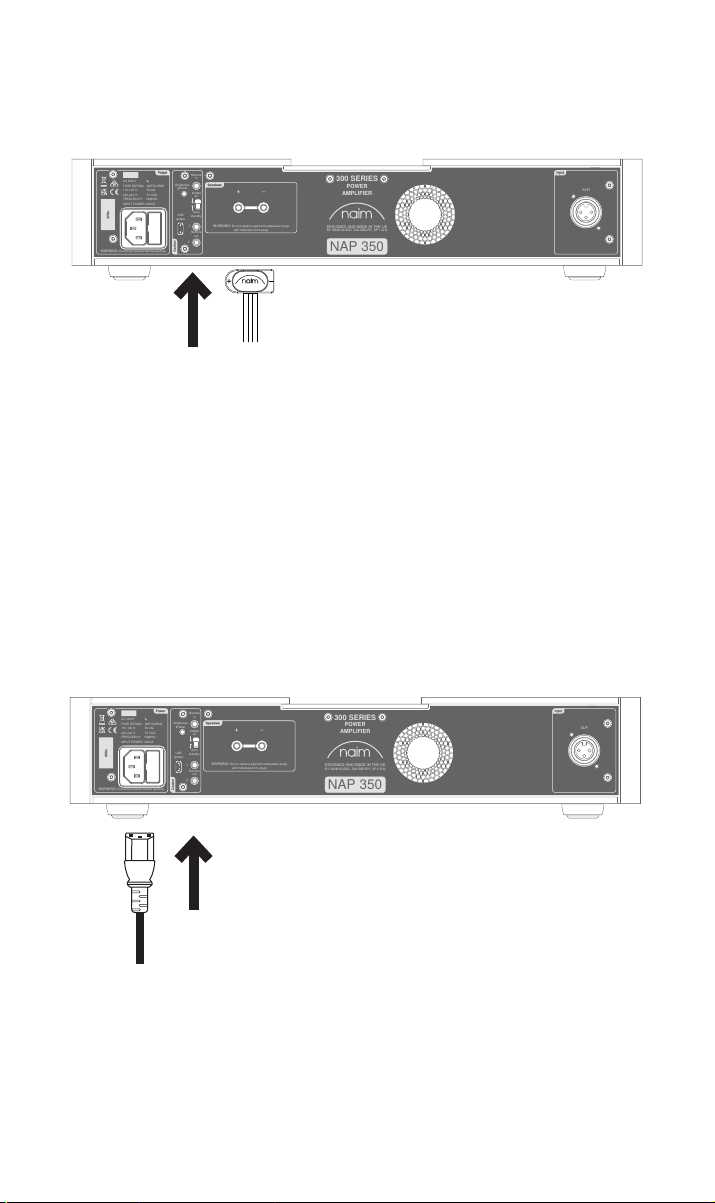
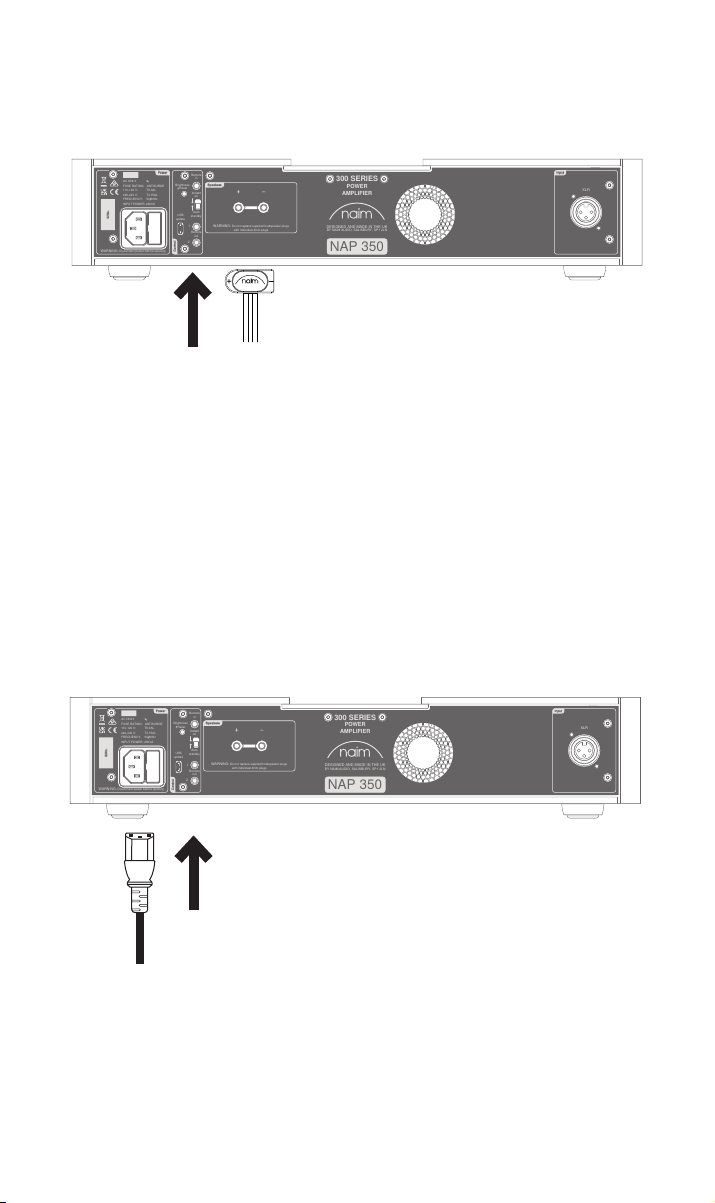
Connect speaker cables to both NAP350 ampliers, ensuring each is connected to the
Remote
in
Remote
out
Auto
standby
Instant
on
1
2
WARNING:Disconnect power before opening
AC ONLY
FUSE RATING: ANTISURGE
1 0-120 V:1 T6.3AL
2 0-240 V:2 T3.15AL
FREQUENCY: 0 60Hz5 /
I 260VANPUT POWER:
Control
Power
Speakers
WARNING:Do not replace supplied loudspeaker plugs
with individual 4mm plugs
Input
XLR
USB
update
Brightness
Reset/
300 SERIES
POWER
AMPLIFIER
NAP 350
S/No.
DESIGNED AND MADE IN THE UK
BY NAIM AUDIO, SALISBURY, SP1 2LN
Remote
in
Remote
out
Auto
standby
Instant
on
1
2
WARNING:Disconnect power before opening
AC ONLY
FUSE RATING: ANTISURGE
1 0-120 V:1 T6.3AL
2 0-240 V:2 T3.15AL
FREQUENCY: 0 60Hz5 /
I 260VANPUT POWER:
Control
Power
Speakers
WARNING:Do not replace supplied loudspeaker plugs
with individual 4mm plugs
Input
XLR
USB
update
Brightness
Reset/
300 SERIES
POWER
AMPLIFIER
NAP 350
S/No.
DESIGNED AND MADE IN THE UK
BY NAIM AUDIO, SALISBURY, SP1 2LN
correct speaker and both are in phase.
For more detailed guidance, see section 4.3.
Finally, connect the mains leads to both NAP350 ampliers. See section 5 for more on
mains power.
5
Page 9
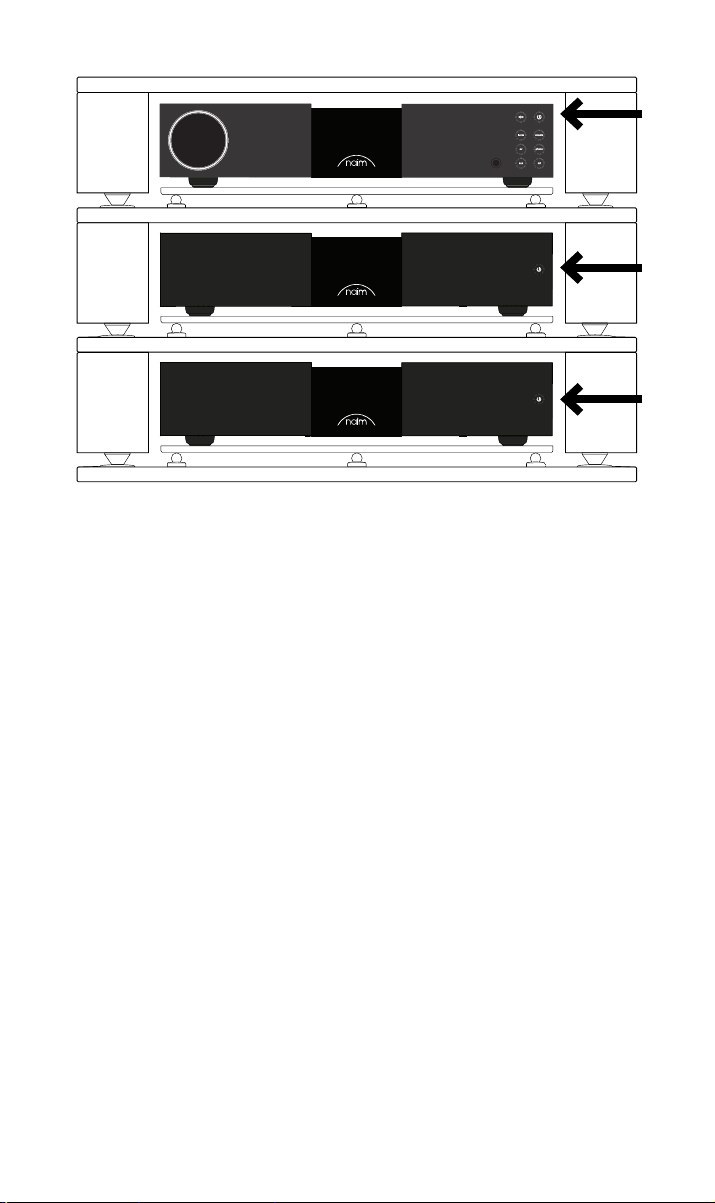
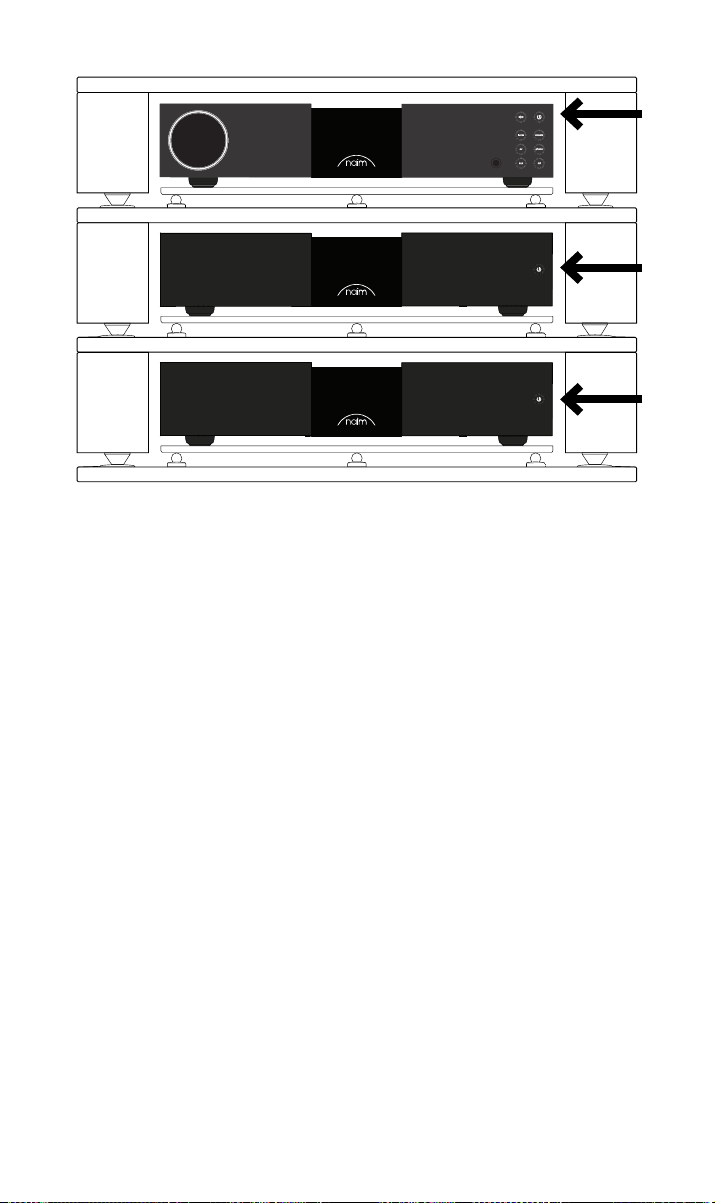
Ensure the volume is turned down on the preamplier before switching on the NAP350
ampliers. If you are using the system automation connection to a Naim preamplier, the
power ampliers will switch on automatically when any of the standby buttons is pressed.
If you are using a dierent preamplier, press the Standby button on the front panel of
both NAP350 ampliers.
4. Tips on Installing and Using Your NAP350
We know you are eager to enjoy your new NAP350, but we promise it will sound even
better once you have followed these guidelines, all designed to help you experience your
power ampliers without compromise.
4.1 Unboxing and positioning
Your NAP 350 uses high-quality components, including a substantial power transformer
and durable aluminium casing. That means the NAP 350 weighs in at 16.5kg, so please
take care when lifting or moving it, and ensure the surface you plan to place it on is stable
and can support its weight.
For optimum performance, use your Naim products on a dedicated hi- equipment rack
– ideally the Naim Fraim or Fraim Lite – to minimise vibrations that can aect sound. No
room for a rack? Consider placing your NAP350 on a Fraim glass shelf on a suitable piece
of furniture, to provide solid but discreet support.
Your NAP350 features fan-assisted cooling, designed to activate when your amplier
runs at high volumes for a sustained time. Please ensure the heat outlet is not covered; we
would not recommend using the NAP350 in a closed, non-vented cabinet.
Never stack Naim products on top of each other, and if you are placing them side-byside, please leave some distance between the units. Equally, connected products should
not sit too far apart: the maximum separation distance is that allowed by the supplied
interconnect lead.
To reduce the risk of audible hum from the loudspeakers do not place power supplies or
power ampliers close to source components.
6
Page 10
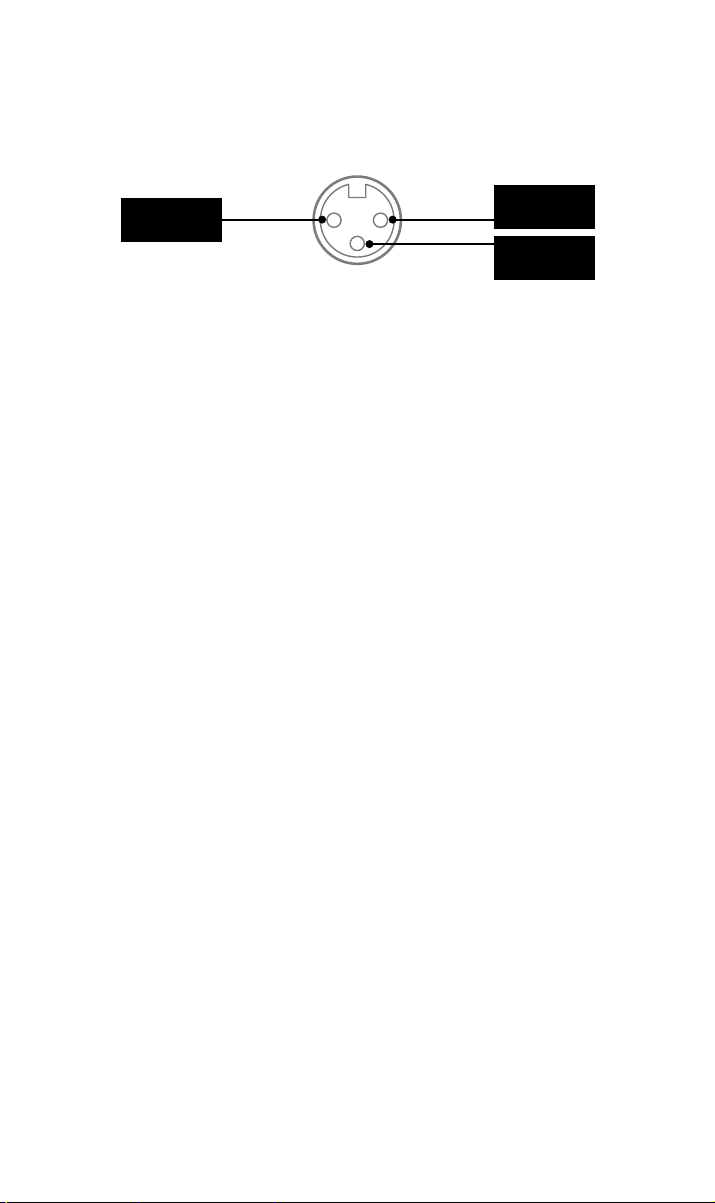
4.2 Input Connection Details
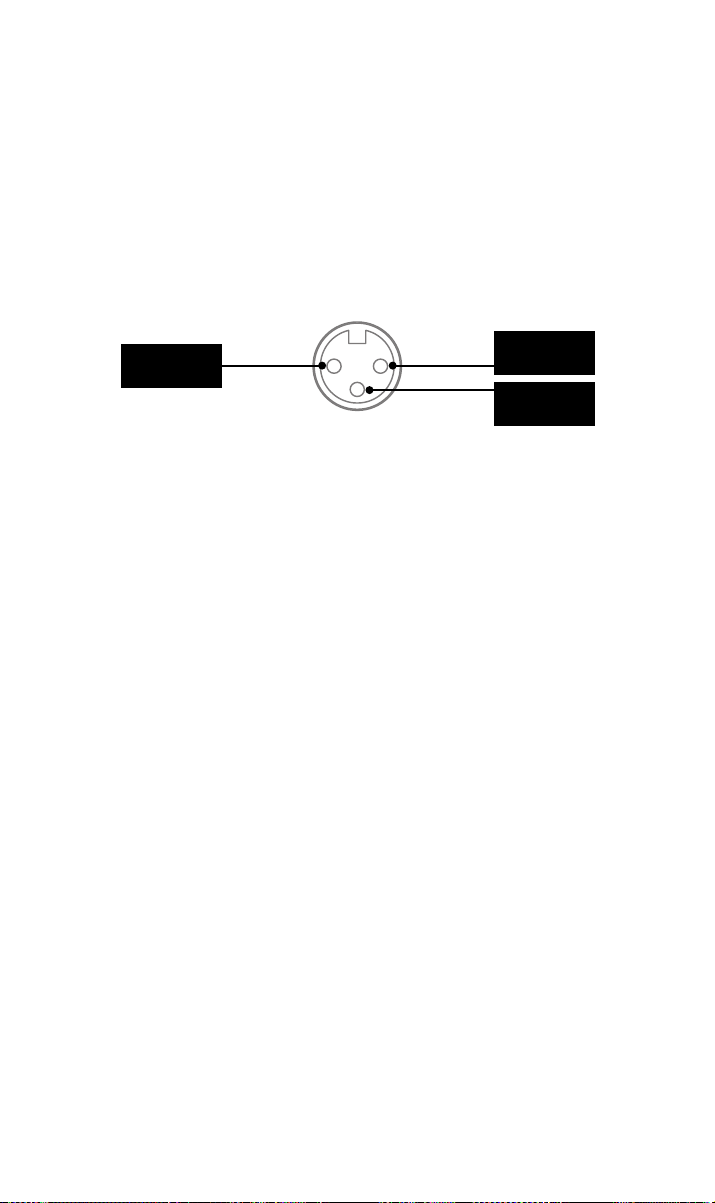
The NAP350 features industry standard XLR balanced inputs for audio. Balanced
connections are a low-noise solution and are able to run over long distances – enabling
more exible placement of the NAP350.
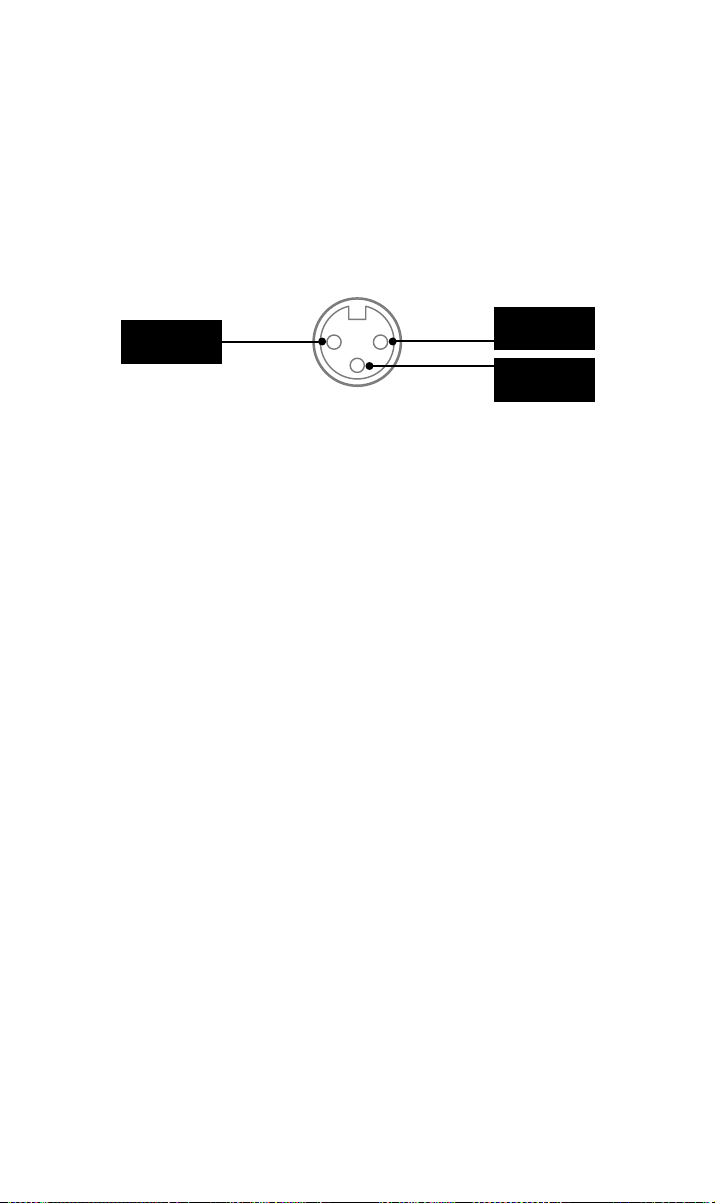
Positive/
Hot
Adapter cables are available to allow you to connect the NAP350 to preampliers with
RCA or DIN outputs.
Ground
Negative/Cold
4.3 Loudspeaker Cable and Connectors
For optimum performance, use Naim NACA5 or Super Lumina speaker cable, connected
in the correct direction (for example, NACA5 printed arrows pointing toward the
loudspeaker).
It is important your pair of speaker cables are both the same length, up to a recommended
maximum of 20m. Unlike some earlier Naim designs, we do not mandate a minimum
speaker cable length, but would still suggest you avoid sub-2m lengths.
Your NAP350 comes with custom Naim Audio loudspeaker connectors – these provide the
best, impedance-matched electrical connection, and ensure your amplier complies with
current safety regulations.
Ensure when connecting speakers that they are ‘in phase’ – meaning the amplier’s
positive loudspeaker output is connected to the positive loudspeaker input – and that the
left and right ampliers go to the correct speaker.
4.4 System Automation
When using the NAP350 with a compatible preamplier – such as the NAC 332 – you can
synchronise power on/o and logo brightness across your system by connecting them
with the supplied Optical System Automation Cables. Simply plug the cables from the
‘Remote Out’ terminals of the preamplier to the ‘Remote In’ terminals on the NAP350
ampliers. It is possible to link further power ampliers using the ‘Remote Out’ terminals
of the NAP350.
If you require a longer distance between your preamplier and the NAP350 than the
supplied cable allows for, you can use a replacement 3.5mm to 3.5mm optical cable
to the required length. It is also possible to use standard analogue cables with 3.5mm
connectors, but an optical cable oers the best performance.
4.5 Powering Up/Down
Once all your input and output connections are made, connect the supplied mains leads to
your NAP350 ampliers and to mains power. Please note: your source - such as a streamer
or CD player – and any associated external power supplies should be switched on before
you switch on your NAP350 ampliers.
You can now power up the NAP350 ampliers either by turning on your Naim preamplier
– connected via System Automation – or by simply pressing the power button on the front
panel of the power ampliers.
It is the same procedure to switch o your NAP350 ampliers: turn o your Naim
preamplier – connected via System Automation – or simply press the power button on
the front panel of the power ampliers, which will put them into standby. Avoid using a
mains outlet switch to turn your ampliers o.
7
Page 11

4.6 Standby Power Settings
By default, the NAP350 is set to ‘Auto Standby’ - it automatically enters Standby mode
(where it consumes less than 0.5W of power) after 19 minutes of inactivity. Music Sensing
will wake the amp from Standby when it detects an input signal.
For the optimum sound quality, switch the Standby setting on the rear panel to ‘Instant on’,
which keeps all sensitive audio circuits permanently powered up.
Please note Music Sensing is disabled when it receives a system automation command; if
the NAP350 is manually put into Standby via the Standby button, or when ‘Instant On’ is
enabled.
4.7 Naim Logo Brightness Settings
You can choose the brightness level of the Naim logo on your NAP350. If you are using a
Naim preamplier connected via System Automation, you can synchronise the brightness
of all the logos from the preamp. Alternatively, you can set the NAP350 via the brightness
toggle switch on the rear panel.
PLEASE NOTE: the brightness button also functions as a full NAP350 reset button when
it is pressed for 3 seconds, so it is best to make your logo brightness choices quick and
decisive!
4.8 USB Update
Your NAP350 has a micro USB terminal, but this is for service use only.
5. Mains power, Earthing and More
Use only the main leads and plugs supplied with your NAP350, or the upgrade Naim
Power-Line mains cable. Where fused plugs are used, 13 amp fuses should be tted. Do
not wire voltage dependent resistors or noise suppressors into mains plugs; they degrade
the mains supply and the sound.
5.1 Earthing
In order to avoid hum loops, the signal ground of the whole system should be connected to
the mains earth in one place. Typically, this is at the primary source. For example, a Naim
streamer has a ground lift switch. Set this to “default” if no other source connects mains
earth to signal ground. This setting will give best sound quality.
5.2 Non-rewirable Mains Plugs
If a non-rewirable plug is cut from a mains lead (for whatever purpose) the plug MUST be
disposed of in a way to render it totally useless. Considerable shock hazard exists if the
cut-o plug is inserted into a mains outlet.
5.3 Mains Circuits and Interference
A hi- system usually shares a mains power circuit with other household equipment,
some of which can cause distortion that may manifest as mechanical hum from mains
transformers, including the large transformer in your NAP350.
Transformer hum is not transmitted through the speakers and has no eect on the
performance of the system; however, careful positioning of your Naim system may
reduce it, as may a separate, dedicated mains circuit. Such a circuit (ideally with a 30 or
45 Amp rating) will also generally improve system performance. Only seek advice on the
installation of a separate mains circuit from a qualied electrician.
5.4 Lightning Precautions
Your Naim system should be turned o and fully disconnected from mains power when
there is a risk of a lightning strike, to protect from potential damage.
8
Page 12

6. Further Tips and Advice
Now you have all the essentials sorted, let us move onto a few more things that you can do
to optimise the performance of your new NAP350.
6.1 Running In
Naim products are handcrafted from a carefully selected range of high- quality
components. Your NAP350 will sound superb out of the box, but its performance may
improve further still as all these various components power up and interact in their rst
few weeks of use. Keeping your system powered up will assist this process.
6.2 Cleaning Your Product and Connections
Naim recommends using only the supplied cleaning cloth to lightly dust any product
surfaces. Cleaning products may contain ingredients that can adversely aect cosmetic
surface treatments and coatings.
Keep interconnect plugs and sockets clean and free from corrosion. The easiest way to
achieve this is to fully power o your Naim product (and any connected equipment),
unplug all connections from their sockets and rmly push them in again. Contact cleaners
and so-called ‘enhancers’ should not be used, as they can leave deposits that can degrade
the sound of your system.
6.3 Resetting your NAP350
To reset your NAP350 to default settings, press the ‘Brightness’ button on the rear panel
for 3 seconds.
7. Support
Consumer protection varies from country to country. In most territories, the retailer you
bought your Naim product from should be your primary contact if you are experiencing
problems with your unit. A problem may be due to a fault in the system or its installation,
so it is essential to make full use of your dealer’s diagnostic skills.
You can nd a range of support articles for each Naim product online at Naimaudio.com
If you are still experiencing an issue with your Naim product, contact us directly for help
and advice, at [email protected]
9
Page 13

8. Service and Updates
Any repairs or hardware updates should only be made by an authorised Naim service
centre or at the Naim HQ itself. Many components are custom made, tested or matched
and appropriate replacements are often unobtainable from other sources. Please contact
your local Naim retailer with any service or repair queries.
9. Specications
300 Series Power Amplifier - NAP350
Power output
Idle consumption
Voltage gain +29 dB
Input impedance 47 k balanced / 34 k singled ended via adaptor lead
Frequency response -3 dB @ 1.4 Hz and 100 kHz
Power supply output None
Dimensions (HxWxD) 91.5 × 432 × 317.5 mm (Including feet)
Weight 16.5 kg
Mains supply 115 V or 230 V, 50/60 Hz
175 Watts, 8
26 W
10. Product Recycling
Products that display the crossed-out wheeled bin logo cannot be disposed of
as domestic waste. These products must be disposed of at facilities capable of
recycling them and appropriately handling any waste by-products.
Contact your local authority for details of the nearest such facility.
Appropriate recycling and waste disposal helps conserve resources and protects the
environment from contamination.
10
Page 14

Page 15

Table des matières
Section Page
Introduction 1
1. Liste des éléments fournis 1
2. Caractéristiques et ports de connexion 2
3. Mise en place 3
4. Conseils pour l’installation et l’utilisation 6
5. Alimentation secteur, mise à la terre et plus 8
6. Autres astuces et conseils 9
7. Support 9
8. Réparation et mises à jour 10
9. Spécications techniques 10
10. Consignes de recyclage du produit 10
Page 16
Introduction
Bienvenue et félicitations pour l’achat de votre nouvel amplicateur de puissance
Naim. Comme tous les produits NaimAudio, le NAP350 donne la priorité absolue à
la performance musicale. Pour l’aider à déployer tout son potentiel, il est important de
suivre les consignes simples pour l’installation et l’utilisation qui sont fournies dans ce
manuel. Nous allons commencer par quelques informations de base concernant le produit
et la mise en place, avant de passer à des informations plus détaillées à la section4 qui
commence à la page 6.
À noter: tous les
avertissements de sécurité se
trouvent dans le manuel de
sécurité agréé.
1. Liste des éléments fournis
1x NAP350
1x Documentation
1x Interconnexion audio
symétrique XLR – XLR
1
1x Chion de nettoyage 1x Câble d’alimentation
1x Câble d’automatisa-
tion système optique
1x Connecteurs d’enceinte
(Pré-installés sur l’appareil)
Page 17
Remote
in
Remote
out
Auto
standby
Instant
on
1
2
WARNING:Disconnect power before opening
AC ONLY
FUSE RATING: ANTISURGE
1 0-120 V:1 T6.3AL
2 0-240 V:2 T3.15AL
FREQUENCY: 0 60Hz5 /
I 260VANPUT POWER:
Control
Power
Speakers
WARNING:Do not replace supplied loudspeaker plugs
with individual 4mm plugs
Input
XLR
USB
update
Brightness
Reset/
300 SERIES
POWER
AMPLIFIER
NAP 350
S/No.
DESIGNED AND MADE IN THE UK
BY NAIM AUDIO, SALISBURY, SP1 2LN
2. Caractéristiques et ports de connexion NAP350
Entrée commande
Bouton de réglage
de la luminosité/
réinitialisation
Entrées secteur et
fusible
Mise à niveau USB
à distance
Logo à variation
d’intensité,
rétroéclairé
Bouton de
démarrage
immédiat/mise en
veille auto
Sortie à distance
Commande
de ventilation
intelligente en 8
étapes
Prises d’enceinte
Bouton de
marche-arrêt/
veille
Entrées XLR
symétriques
2
Page 18
3. Mise en place du NAP350
Votre paire d’amplicateurs NAP350 doit être raccordé à un préamplicateur (tel que
le NAC332 correspondant) mais, avant de le faire, vous devez vous assurer que tous les
composants se trouvent à leur emplacement dénitif et sont débranchés du secteur.
Pour des performances optimales, utilisez un support hi- dédié (idéalement NaimFraim)
et placez le préamplicateur au-dessus de l’amplicateur de puissance, comme illustré.
Avant de procéder au raccordement, vériez que tous les équipements sont éteints.
3
Page 19
Branchez le câble XLR fourni entre les sorties XLR symétriques de votre préamplicateur
WARNING:Disconnect power before opening
AC ONLY
FUSE RATING: ANTISURGE
1 0-120 V:1 T4AL
2 0-240 V:2 T2AL
FREQUENCY: 0 60Hz5/
I 70VANPUT POWER:
Power
300 SERIES
PREAMPLIFIER
NAC 332
DESIGNED AND MADE IN THE UK
BY NAIM AUDIO, SALISBURY, SP1 2LN
/ .oNS
Ground
Power Supply Upgrade
Preamp Outputs
AnalogueInputs
Ground
Default
R L
R
L
RCA
XLR
Refer to User Manual
Type 3
Type 4
Remote
in
Remote
out
Auto
standby
Instant
on
1
2
Control
USB
update
Brightness
Reset/
On
RCA
output
O
3
4
6
AnalogueInputs
R
R
R
L
L
L
5
8
7
1
2
R
L
R
L
Contains FCC ID: 2ACURZIGEE IC ID: 12217A-ZIGEE
Refer to User Manual
WARNING:
Disconnect power before opening
AC ONLY
FUSE RATING: ANTISURGE
1 0-120 V: T
4AL
2 0-240 V: T
2AL
FREQUENCY 50/60Hz
I 70VANPUT POWER:
Power
300 SERIES
PREAMPLIFIER
NAC 332
DESIGNED AND MADE IN THE UK
BY NAIM AUDIO, SALISBURY, SP1 2LN
/ .oNS
Ground
Power Supply Upgrade
Preamp Outputs
AnalogueInputs
Ground
Default
R L
R
L
RCA
XLR
Refer to User Manual
Type 3
Type 4
Remote
in
Remote
out
Auto
standby
Instant
on
1
2
Control
USB
update
Brightness
Reset/
On
RCA
output
O
3
4
6
AnalogueInputs
R
R
R
L
L
L
5
8
7
1
2
R
L
R
L
Contains FCC ID: 2ACURZIGEE IC ID: 12217A-ZIGEE
Refer to User Manual
Remote
in
Remote
out
Auto
standby
Instant
on
1
2
WARNING:Disconnect power before opening
AC ONLY
FUSE RATING: ANTISURGE
1 0-120 V:1 T6.3AL
2 0-240 V:2 T3.15AL
FREQUENCY: 0 60Hz5 /
I 260VANPUT POWER:
Control
Power
Speakers
WARNING:Do not replace supplied loudspeaker plugs
with individual 4mm plugs
Input
XLR
USB
update
Brightness
Reset/
300 SERIES
POWER
AMPLIFIER
NAP 350
S/No.
DESIGNED AND MADE IN THE UK
BY NAIM AUDIO, SALISBURY, SP1 2LN
WARNING:Disconnect power before opening
AC ONLY
FUSE RATING: ANTISURGE
1 0-120 V:1 T4AL
2 0-240 V:2 T2AL
FREQUENCY: 0 60Hz5/
I 70VANPUT POWER:
Power
300 SERIES
PREAMPLIFIER
NAC 332
DESIGNED AND MADE IN THE UK
BY NAIM AUDIO, SALISBURY, SP1 2LN
/ .oNS
Ground
Power Supply Upgrade
Preamp Outputs
AnalogueInputs
Ground
Default
R L
R
L
RCA
XLR
Refer to User Manual
Type 3
Type 4
Remote
in
Remote
out
Auto
standby
Instant
on
1
2
Control
USB
update
Brightness
Reset/
On
RCA
output
O
3
4
6
AnalogueInputs
R
R
R
L
L
L
5
8
7
1
2
R
L
R
L
Contains FCC ID: 2ACURZIGEE IC ID: 12217A-ZIGEE
Refer to User Manual
WARNING:
Disconnect power before opening
AC ONLY
FUSE RATING: ANTISURGE
1 0-120 V: T
4AL
2 0-240 V: T
2AL
FREQUENCY 50/60Hz
I 70VANPUT POWER:
Power
300 SERIES
PREAMPLIFIER
NAC 332
DESIGNED AND MADE IN THE UK
BY NAIM AUDIO, SALISBURY, SP1 2LN
/ .oNS
Ground
Power Supply Upgrade
Preamp Outputs
AnalogueInputs
Ground
Default
R L
R
L
RCA
XLR
Refer to User Manual
Type 3
Type 4
Remote
in
Remote
out
Auto
standby
Instant
on
1
2
Control
USB
update
Brightness
Reset/
On
RCA
output
O
3
4
6
AnalogueInputs
R
R
R
L
L
L
5
8
7
1
2
R
L
R
L
Contains FCC ID: 2ACURZIGEE IC ID: 12217A-ZIGEE
Refer to User Manual
Remote
in
Remote
out
Auto
standby
Instant
on
1
2
WARNING:Disconnect power before opening
AC ONLY
FUSE RATING: ANTISURGE
1 0-120 V:1 T6.3AL
2 0-240 V:2 T3.15AL
FREQUENCY: 0 60Hz5 /
I 260VANPUT POWER:
Control
Power
Speakers
WARNING:Do not replace supplied loudspeaker plugs
with individual 4mm plugs
Input
XLR
USB
update
Brightness
Reset/
300 SERIES
POWER
AMPLIFIER
NAP 350
S/No.
DESIGNED AND MADE IN THE UK
BY NAIM AUDIO, SALISBURY, SP1 2LN
Remote
in
Remote
out
Auto
standby
Instant
on
1
2
WARNING:Disconnect power before opening
AC ONLY
FUSE RATING: ANTISURGE
1 0-120 V:1 T6.3AL
2 0-240 V:2 T3.15AL
FREQUENCY: 0 60Hz5 /
I 260VANPUT POWER:
Control
Power
Speakers
WARNING:Do not replace supplied loudspeaker plugs
with individual 4mm plugs
Input
XLR
USB
update
Brightness
Reset/
300 SERIES
POWER
AMPLIFIER
NAP 350
S/No.
DESIGNED AND MADE IN THE UK
BY NAIM AUDIO, SALISBURY, SP1 2LN
et l’entrée symétrique du NAP350. Faites de même avec l'autre NAP350 et vériez que
les câbles sont bien appariés: la sortie gauche du préamplicateur avec l’amplicateur de
puissance utilisé pour l’enceinte de gauche, etc. Pour plus d’informations, se reporter à la
section4.2. Veillez à ce que les ches XLR soient insérées correctement, ce qui est le cas
quand le logo Naim de la che est vers le haut.
Si vous utilisez le NAP350 avec un préamplicateur Naim correspondant (voir section4.4),
raccordez le câble d’automatisation système fourni avec le port de sortie à distance du
préamplicateur.
Branchez l’autre extrémité du câble d’automatisation système au port d’entrée à distance
de chaque NAP350.
4
Page 20
Branchez les câbles d’enceinte aux deux amplicateurs NAP350, en veillant à ce que
Remote
in
Remote
out
Auto
standby
Instant
on
1
2
WARNING:Disconnect power before opening
AC ONLY
FUSE RATING: ANTISURGE
1 0-120 V:1 T6.3AL
2 0-240 V:2 T3.15AL
FREQUENCY: 0 60Hz5 /
I 260VANPUT POWER:
Control
Power
Speakers
WARNING:Do not replace supplied loudspeaker plugs
with individual 4mm plugs
Input
XLR
USB
update
Brightness
Reset/
300 SERIES
POWER
AMPLIFIER
NAP 350
S/No.
DESIGNED AND MADE IN THE UK
BY NAIM AUDIO, SALISBURY, SP1 2LN
Remote
in
Remote
out
Auto
standby
Instant
on
1
2
WARNING:Disconnect power before opening
AC ONLY
FUSE RATING: ANTISURGE
1 0-120 V:1 T6.3AL
2 0-240 V:2 T3.15AL
FREQUENCY: 0 60Hz5 /
I 260VANPUT POWER:
Control
Power
Speakers
WARNING:Do not replace supplied loudspeaker plugs
with individual 4mm plugs
Input
XLR
USB
update
Brightness
Reset/
300 SERIES
POWER
AMPLIFIER
NAP 350
S/No.
DESIGNED AND MADE IN THE UK
BY NAIM AUDIO, SALISBURY, SP1 2LN
chacun soit raccordé à la bonne enceinte et à ce que les deux soient en phase.
Pour des consignes plus détaillées, voir section4.3.
Enn, branchez les câbles d’alimentation aux deux amplicateurs NAP350. Pour en savoir
plus sur l’alimentation secteur, voir section5.
5
Page 21
Assurez-vous que le volume du préamplicateur est baissé avant d’allumer les
amplicateurs NAP350. Si vous utilisez la connexion d’automatisation système avec un
préamplicateur Naim, les amplicateurs de puissance s’allumeront automatiquement
lorsqu’un des boutons de mise en veille sera appuyé. Si vous utilisez un autre
préamplicateur, appuyez sur le bouton marche-arrêt en façade des deux amplicateurs
NAP350.
4. Conseils pour l’installation et l’utilisation de votre
NAP350
Nous savons que vous êtes impatient de proter de votre nouveau NAP350, mais
nous vous promettons qu’il vous orira un son encore meilleur si vous appliquez bien
ces consignes. Elles vous aideront à retirer la meilleure expérience possible de vos
amplicateurs de puissance.
4.1 Déballage et mise en place
Votre NAP 350 est fabriqué à partir de composants de qualité supérieure, avec un
transformateur robuste et un boîtier en aluminium solide. De ce fait, le NAP 350 pèse
16,5 kg. Soyez prudent lorsque vous le soulevez ou le déplacez et veillez à ce que la surface
où vous l’installerez soit stable et capable de supporter son poids.
Pour atteindre un niveau de performance optimal, utilisez vos produits Naim sur un
support dédié pour les équipements hi- (idéalement NaimFraim ou FraimLite), an de
minimiser les vibrations susceptibles d’altérer la qualité du son. Vous n’avez pas la place
d’installer un tel support? Vous pouvez placer votre NAP350 sur une étagère en verre
Fraim posée sur un meuble adapté, an de créer une installation solide mais discrète.
Votre NAP350 est équipé d’un système de refroidissement assisté par ventilateur, conçu
pour s’activer lorsque votre amplicateur fonctionne à des niveaux élevés pendant
longtemps. Assurez-vous que la sortie de chaleur n’est pas recouverte. Nous déconseillons
d’utiliser le NAP350 dans un caisson fermé et non ventilé.
6
Page 22
N’empilez jamais des produits Naim les uns au-dessus des autres. Si vous placez des
composants côte-à-côte, laissez un peu d’écart entre eux. De même, des produits
raccordés ne doivent pas être trop éloignés les uns des autres. L’écartement maximum est
celui qui est permis par le câble d’interconnexion fourni.
An de réduire le risque de ronement audible au niveau des enceintes, il ne faut pas
placer les alimentations ou les amplicateurs de puissance à proximité des composants
source.
4.2 Informations sur la connexion des entrées
Le NAP350 dispose d’entrées symétriques XLR standard pour le signal audio. Les
connexions symétriques représentent une solution à faible bruit et peuvent fonctionner sur
de longues distances, ce qui permet de positionner le NAP350 de façon plus exible.
Positif / Chaud
Les câbles d’adaptation vous permettent de connecter le NAP350 à des préamplicateurs
grâce aux sorties RCA ou DIN.
Terre
Négatif / Froid
4.3 Câble et connecteurs d’enceintes
Pour des performances optimales, utilisez un câble d’enceinte Naim NACA5 ou Super
Lumina, raccordé dans la bonne direction (par exemple, les èches imprimées sur le câble
NACA5 doivent pointer vers l’enceinte).
Il est important que votre paire de câbles d’enceinte soit de la même longueur, avec une
longueur maximale recommandée de 20m. Contrairement à ce que nous faisions pour
certains modèles Naim antérieurs, nous ne xons pas une longueur de câble d’enceinte
minimale mais nous suggérons tout de même d’éviter des longueurs inférieures à 2m.
Votre NAP350 est fourni avec des connecteurs d’enceinte NaimAudio spéciaux, qui
orent le meilleur raccordement électrique adapté en impédance et qui garantissent que
votre amplicateur respecte les réglementations de sécurité actuelles.
Lorsque vous raccordez les enceintes, veillez à ce qu’elles soient «en phase» – ce qui
signie que la sortie d’enceinte positive est reliée à l’entrée d’enceinte positive – et à ce
que les amplicateurs gauche et droite soient raccordées à la bonne enceinte.
4.4 Automatisation du système
Si vous utilisez le NAP350 avec un préamplicateur compatible, tel que le NAC 332, vous
pouvez synchroniser la mise en marche / l’arrêt et la luminosité du logo sur l’ensemble
de votre système en les raccordant avec les câbles d’automatisation système optique
fournis. Il sut de brancher les câbles entre les ports de sortie à distance (Remote Out) du
préamplicateur et les ports d’entrée à distance (Remote In) des amplicateurs NAP350.
Il est possible de raccorder d’autres amplicateurs de puissance avec les ports «Remote
Out» du NAP350.
Si vous avez besoin de plus de distance entre votre préamplicateur et le NAP350 que
ce que permet le câble fourni, vous pouvez utiliser à la place un câble optique 3,5mm
vers 3,5mm orant la longueur voulue. Il est également possible d’utiliser des câbles
analogiques standard avec des connecteurs de 3,5mm, mais un câble optique ore de
meilleures performances.
7
Page 23

4.5 Mise en marche / Arrêt
Une fois que tous vos branchements d’entrée et de sortie sont réalisés, raccordez les
cordons d’alimentation fournis à vos amplicateurs NAP350 et au secteur. À noter: vous
devez allumer votre source (telle qu’un streamer ou un lecteur CD) et les alimentations
secteur externes associées avant d’allumer vos amplicateurs NAP350.
Vous pouvez à présent mettre en marche les amplicateurs NAP350, soit en allumant
votre préamplicateur Naim raccordé via l’automatisation système, soit en appuyant tout
simplement sur le bouton de mise en marche qui se trouve en façade des amplicateurs de
puissance.
La procédure est la même pour éteindre vos amplicateurs NAP350 : arrêtez votre
préamplicateur Naim
raccordé via l’automatisation système ou appuyez simplement sur le bouton d’arrêt en
façade des amplicateurs de puissance pour qu’ils passent en veille. Évitez d’utiliser un
interrupteur de prise murale pour éteindre vos amplicateurs.
4.6 Réglages de la mise en veille
Par défaut, le NAP350 est réglé sur la mise en veille automatique (Auto standby): il passe
automatiquement en mode veille après 19minutes d’inactivité. Dans ce mode, il consomme
moins de 0,5W. La détection de musique (Music Sensing) réactive l’amplicateur en veille
dès qu’un signal d’entrée est détecté.
Pour une qualité de son optimale, sur le panneau arrière, réglez le mode de veille en
démarrage instantané (Instant on) pour garder tous les circuits audio sensibles allumés en
permanence.
Veuillez noter que la détection de musique est désactivée lorsqu’elle reçoit une commande
d’automatisation système, si le NAP350 est mis en veille manuellement via le bouton de
veille ou si le démarrage instantané est activé.
4.7 Paramètres de luminosité du logo Naim
Vous pouvez choisir le niveau de luminosité du logo Naim sur votre NAP350. Si vous
utilisez un préamplicateur Naim raccordé via le câble d’automatisation système, vous
pouvez synchroniser la luminosité de tous les logos depuis le préamplicateur. Sinon, vous
pouvez régler le NAP350 avec le commutateur de luminosité à l’arrière.
À NOTER: le bouton de réglage de la luminosité sert aussi de bouton de réinitialisation de
l’ensemble du NAP350, lorsqu’il est maintenu enfoncé pendant 3secondes. Il faut donc
choisir rapidement la luminosité du logo!
4.8 Mise à jour USB
Votre NAP350 est muni d’un port micro USB, mais il est réservé à la maintenance.
5. Alimentation secteur, mise à la terre et plus
Utilisez uniquement les câbles et les ches secteur fournis avec votre NAP350 ou le
câble d’alimentation Naim Power-Line de mise à niveau. En cas d’utilisation de prises
avec fusibles intégrés, ces derniers doivent être tarés à 13ampères. Ne pas câbler de
résistances sensibles à la tension, ni de réducteur de bruit au niveau des prises secteur, car
ceux-ci dégradent l’alimentation et le son.
5.1 Mise à la terre
An d’éviter les boucles de masse, la masse du signal de l’ensemble du système doit être
raccordée à la masse en un seul point, généralement au niveau de la source principale.
Par exemple, un streamer Naim est équipé d’un commutateur de masse. Si aucune autre
source ne relie la masse de l’alimentation à la masse du signal, choisissez la position par
défaut. Ce réglage assurera la meilleure qualité de son.
8
Page 24

5.2 Prises secteur moulées (non démontables)
Si, pour une raison quelconque, le câble d’alimentation est sectionné an de déposer la
prise secteur moulée, la prise doit IMPERATIVEMENT être éliminée d’une manière qui la
rend complètement inutilisable. L’insertion d’une prise avec un câble sectionné dans une
prise murale présente un fort risque d’électrocution.
5.3 Circuits secteur et interférences
Un système hi- partage généralement un circuit d’alimentation secteur avec d’autres
équipements ménagers, dont certains peuvent causer des distorsions susceptibles
de se manifester sous forme de ronement mécanique au niveau des transformateurs
d’alimentation. Cela peut arriver à l’imposant transformateur de votre NAP350.
Le ronement du transformateur n’est pas transmis par les enceintes et n’a aucun eet
sur les performances du système; cependant, un bon positionnement de votre système
Naim peut le réduire, tout comme l’utilisation d’un circuit secteur séparé. Un tel circuit
(idéalement de 30 ou 45ampères) améliorera généralement aussi les performances du
système. Si vous souhaitez demander conseil pour l’installation d’un circuit secteur séparé,
contactez impérativement un électricien qualié.
5.4 Précautions contre la foudre
Votre système Naim doit être mis à l’arrêt et entièrement débranché du secteur dès qu’il
existe un risque de foudre, an de le protéger contre d’éventuels dommages.
6. Autres astuces et conseils
À présent que vous avez pris connaissance des consignes les plus importantes, voici
quelques recommandations pour optimiser les performances de votre nouveau NAP350.
6.1 Rodage
Les produits Naim sont fabriqués à la main à partir d’un ensemble soigneusement choisi
de composants de qualité. La qualité de son de votre NAP350 est excellente dès le départ
mais elle peut encore s’améliorer au fur et à mesure que ses divers composants montent
en puissance et interagissent, au cours des premières semaines d’utilisation. Ce processus
sera d’autant plus ecace que vous garderez votre système en fonctionnement.
6.2 Nettoyage du produit et des branchements
Naim recommande d’utiliser uniquement le chion de nettoyage fourni pour épousseter en
douceur les surfaces du produit. Les produits nettoyants peuvent contenir des ingrédients
susceptibles de dégrader les revêtements et les traitements de surface de nition.
Veillez à ce que les ches et prises d’interconnexion restent propres et exemptes de
corrosion. Pour cela, le moyen le plus simple consiste à éteindre complètement votre
produit Naim (et les équipements raccordés), à débrancher tous les raccordements de
leurs prises et à bien les rebrancher à nouveau. Il ne faut pas utiliser de nettoyants pour
contacts ou d’«améliorateurs», car ils peuvent laisser des dépôts susceptibles de dégrader
le son de votre système.
6.3 Réinitialisation de votre NAP350
Pour réinitialiser votre NAP350 et rétablir les paramètres par défaut, appuyez sur le
bouton de luminosité (Brightness) situé à l’arrière pendant 3secondes.
7. Support
La protection des consommateurs varie d’un pays à l’autre. Dans la plupart des pays, le
revendeur auprès duquel vous avez acheté votre produit Naim doit être votre principal
interlocuteur en cas de problèmes avec votre appareil. Un problème peut être dû à
un défaut du système ou à son installation, il est donc essentiel d’avoir recours aux
compétences de diagnostic de votre revendeur.
9
Page 25

Vous pourrez trouver une série d’articles concernant l’assistance des diérents produits
Naim en ligne, sur le site Naimaudio.com
Si vous avez toujours des dicultés avec votre produit Naim, contactez-nous directement
pour obtenir de l’aide et des conseils, à l’adresse [email protected]
8. Réparation et mises à jour
Toutes les réparations et mises à jour matérielles doivent impérativement être réalisées
par un centre de service Naim agréé ou par le siège de Naim lui-même. De nombreux
composants sont fabriqués, testés ou appariés sur mesure et les pièces de rechange
appropriées sont souvent impossibles à obtenir auprès d’autres sources. Veuillez contacter
votre revendeur Naim local pour toute demande concernant l’entretien ou les réparations.
9. Spécications
Amplificateur de puissance de la gamme 300 Series – NAP350
Puissance de sortie
Consommation en veille
Gain de tension +29 dB
Impédance d’entrée 47k symétrique / 34k asymétrique via câble adaptateur
Réponse en fréquence -3dB @ 1,4Hz et 100kHz
Sortie alimentation Aucune
Dimensions (HxLxP) 91,5 × 432 × 317,5mm (pieds inclus)
Poids 16,5 kg
Tension secteur 115V ou 230V; 50/60Hz
175 Watts, 8
26 W
10. Consignes de recyclage du produit
Les produits identiés du logo de la poubelle à roulettes barrée ne peuvent pas
être éliminés en tant qu’ordures ménagères. Ces produits doivent être éliminés
par des organismes capables de les recycler et de traiter les éventuels sousproduits résiduels.
Contactez votre autorité locale pour obtenir les coordonnées du site le plus proche.
L’élimination et le recyclage corrects des ordures contribuent à la conservation des
ressources et à la protection de l’environnement contre les contaminations.
10
Page 26

Page 27

Inhalt
Abschnitt Seite
Einführung 1
1. Kartoninhalt 1
2. Funktionen und Anschlüsse 2
3. Einrichten 3
4. Tipps zur Installation und Verwendung 6
5. Netzstrom, Erdung und mehr 8
6. Weitere Tipps und Empfehlungen 9
7. Support 9
8. Wartung und Updates 10
9. Technische Eigenschaften 10
10. Produktrecycling 10
Page 28
Einführung
Willkommen bei Ihrem neuen Naim Leistungsverstärker. Wie bei allen Produkten von
Naim Audio steht auch bei dem NAP350 die musikalische Leistung an vorderster Stelle.
Um das volle Potenzial der Endstufe auszuschöpfen, sollten die einfachen Installationsund Nutzungsrichtlinien in diesem Handbuch befolgt werden. Wir beginnen mit einigen
grundlegenden Informationen zum Produkt und zur Einrichtung, bevor wir in Abschnitt 4
von Seite 6 an zu genaueren Informationen übergehen.
Hinweis: Alle
Sicherheitshinweise finden Sie
im gesetzlich vorgeschriebenen
Sicherheitshandbuch.
1. Kartoninhalt
1x NAP350
1x Gebrauchsanleitung
1x symmetrisches Audio-Ver-
bindungskabel XLR – XLR
1
1x Reinigungstuch 1x Anschlusskabel
1x Optisches Automati-
sierungskabel
1x Lautsprecheranschlüsse
(am Gerät vorinstalliert)
Page 29
Remote
in
Remote
out
Auto
standby
Instant
on
1
2
WARNING:Disconnect power before opening
AC ONLY
FUSE RATING: ANTISURGE
1 0-120 V:1 T6.3AL
2 0-240 V:2 T3.15AL
FREQUENCY: 0 60Hz5 /
I 260VANPUT POWER:
Control
Power
Speakers
WARNING:Do not replace supplied loudspeaker plugs
with individual 4mm plugs
Input
XLR
USB
update
Brightness
Reset/
300 SERIES
POWER
AMPLIFIER
NAP 350
S/No.
DESIGNED AND MADE IN THE UK
BY NAIM AUDIO, SALISBURY, SP1 2LN
2. Funktionen und Anschlüsse des NAP350
Taste Helligkeit/
Netzeingang &
Sicherung
Remote In
Zurückstellen
USB-Upgrade
Hintergrundbeleuchtetes,
dimmbares Logo
Schalter Instant
on/Auto Standby
Remote Out
Intelligente
Lüftersteuerung mit
8 Stufen
Lautsprecherbuchsen
Einschalt-/
Standby-Taste
Symmetrische
XLR-Eingänge
2
Page 30
3. Einrichten des NAP350
Ihr NAP350 muss an eine Vorstufe (z. B. der passenden NAC 332) angeschlossen werden.
Stellen Sie vorher jedoch sicher, dass sich beide Komponenten in ihrer endgültigen
Position benden und vom Stromnetz getrennt sind.
Verwenden Sie für eine optimale Leistung eine spezielle HiFi-Halterung (z. B. Naim Fraim)
und platzieren Sie die Vorstufe wie abgebildet über den Leistungsverstärker.
Vergewissern Sie sich vor dem Anschließen, dass alle Geräte ausgeschaltet sind.
3
Page 31
Verbinden Sie mit dem mitgelieferten XLR-Kabel den symmetrischen XLR-Ausgang
WARNING:Disconnect power before opening
AC ONLY
FUSE RATING: ANTISURGE
1 0-120 V:1 T4AL
2 0-240 V:2 T2AL
FREQUENCY: 0 60Hz5/
I 70VANPUT POWER:
Power
300 SERIES
PREAMPLIFIER
NAC 332
DESIGNED AND MADE IN THE UK
BY NAIM AUDIO, SALISBURY, SP1 2LN
/ .oNS
Ground
Power Supply Upgrade
Preamp Outputs
AnalogueInputs
Ground
Default
R L
R
L
RCA
XLR
Refer to User Manual
Type 3
Type 4
Remote
in
Remote
out
Auto
standby
Instant
on
1
2
Control
USB
update
Brightness
Reset/
On
RCA
output
O
3
4
6
AnalogueInputs
R
R
R
L
L
L
5
8
7
1
2
R
L
R
L
Contains FCC ID: 2ACURZIGEE IC ID: 12217A-ZIGEE
Refer to User Manual
WARNING:
Disconnect power before opening
AC ONLY
FUSE RATING: ANTISURGE
1 0-120 V: T
4AL
2 0-240 V: T
2AL
FREQUENCY 50/60Hz
I 70VANPUT POWER:
Power
300 SERIES
PREAMPLIFIER
NAC 332
DESIGNED AND MADE IN THE UK
BY NAIM AUDIO, SALISBURY, SP1 2LN
/ .oNS
Ground
Power Supply Upgrade
Preamp Outputs
AnalogueInputs
Ground
Default
R L
R
L
RCA
XLR
Refer to User Manual
Type 3
Type 4
Remote
in
Remote
out
Auto
standby
Instant
on
1
2
Control
USB
update
Brightness
Reset/
On
RCA
output
O
3
4
6
AnalogueInputs
R
R
R
L
L
L
5
8
7
1
2
R
L
R
L
Contains FCC ID: 2ACURZIGEE IC ID: 12217A-ZIGEE
Refer to User Manual
Remote
in
Remote
out
Auto
standby
Instant
on
1
2
WARNING:Disconnect power before opening
AC ONLY
FUSE RATING: ANTISURGE
1 0-120 V:1 T6.3AL
2 0-240 V:2 T3.15AL
FREQUENCY: 0 60Hz5 /
I 260VANPUT POWER:
Control
Power
Speakers
WARNING:Do not replace supplied loudspeaker plugs
with individual 4mm plugs
Input
XLR
USB
update
Brightness
Reset/
300 SERIES
POWER
AMPLIFIER
NAP 350
S/No.
DESIGNED AND MADE IN THE UK
BY NAIM AUDIO, SALISBURY, SP1 2LN
WARNING:Disconnect power before opening
AC ONLY
FUSE RATING: ANTISURGE
1 0-120 V:1 T4AL
2 0-240 V:2 T2AL
FREQUENCY: 0 60Hz5/
I 70VANPUT POWER:
Power
300 SERIES
PREAMPLIFIER
NAC 332
DESIGNED AND MADE IN THE UK
BY NAIM AUDIO, SALISBURY, SP1 2LN
/ .oNS
Ground
Power Supply Upgrade
Preamp Outputs
AnalogueInputs
Ground
Default
R L
R
L
RCA
XLR
Refer to User Manual
Type 3
Type 4
Remote
in
Remote
out
Auto
standby
Instant
on
1
2
Control
USB
update
Brightness
Reset/
On
RCA
output
O
3
4
6
AnalogueInputs
R
R
R
L
L
L
5
8
7
1
2
R
L
R
L
Contains FCC ID: 2ACURZIGEE IC ID: 12217A-ZIGEE
Refer to User Manual
WARNING:
Disconnect power before opening
AC ONLY
FUSE RATING: ANTISURGE
1 0-120 V: T
4AL
2 0-240 V: T
2AL
FREQUENCY 50/60Hz
I 70VANPUT POWER:
Power
300 SERIES
PREAMPLIFIER
NAC 332
DESIGNED AND MADE IN THE UK
BY NAIM AUDIO, SALISBURY, SP1 2LN
/ .oNS
Ground
Power Supply Upgrade
Preamp Outputs
AnalogueInputs
Ground
Default
R L
R
L
RCA
XLR
Refer to User Manual
Type 3
Type 4
Remote
in
Remote
out
Auto
standby
Instant
on
1
2
Control
USB
update
Brightness
Reset/
On
RCA
output
O
3
4
6
AnalogueInputs
R
R
R
L
L
L
5
8
7
1
2
R
L
R
L
Contains FCC ID: 2ACURZIGEE IC ID: 12217A-ZIGEE
Refer to User Manual
Remote
in
Remote
out
Auto
standby
Instant
on
1
2
WARNING:Disconnect power before opening
AC ONLY
FUSE RATING: ANTISURGE
1 0-120 V:1 T6.3AL
2 0-240 V:2 T3.15AL
FREQUENCY: 0 60Hz5 /
I 260VANPUT POWER:
Control
Power
Speakers
WARNING:Do not replace supplied loudspeaker plugs
with individual 4mm plugs
Input
XLR
USB
update
Brightness
Reset/
300 SERIES
POWER
AMPLIFIER
NAP 350
S/No.
DESIGNED AND MADE IN THE UK
BY NAIM AUDIO, SALISBURY, SP1 2LN
Remote
in
Remote
out
Auto
standby
Instant
on
1
2
WARNING:Disconnect power before opening
AC ONLY
FUSE RATING: ANTISURGE
1 0-120 V:1 T6.3AL
2 0-240 V:2 T3.15AL
FREQUENCY: 0 60Hz5 /
I 260VANPUT POWER:
Control
Power
Speakers
WARNING:Do not replace supplied loudspeaker plugs
with individual 4mm plugs
Input
XLR
USB
update
Brightness
Reset/
300 SERIES
POWER
AMPLIFIER
NAP 350
S/No.
DESIGNED AND MADE IN THE UK
BY NAIM AUDIO, SALISBURY, SP1 2LN
Ihrer Vorstufe mit dem symmetrischen Eingang des NAP350. Wiederholen Sie diesen
Schritt mit dem zweiten NAP350 und stellen Sie sicher, dass die Kanäle stimmen: der
linke Ausgang des Vorverstärkers ist mit dem linken Eingang des Leistungsverstärkers
verbunden usw. Mehr dazu erfahren Sie in Abschnitt 4.2. Bitte stellen Sie sicher, dass die
XLR-Stecker korrekt eingesteckt sind, d. h. das Naim-Logo auf dem Stecker muss nach
oben zeigen.
Bei Verwendung des NAP350 mit einer passenden Naim-Vorstufe (Abschnitt 4.4),
schließen Sie das mitgelieferte Automatisierungskabel an den Remote Out-Anschluss der
Vorstufe an.
Schließen Sie das andere Ende des Automatisierungskabels an den Remote In-Anschluss
der beiden NAP350 an.
4
Page 32
Schließen Sie an beiden NAP350 das jeweilige Lautsprecherkabel an. Jedes Kabel ist an
Remote
in
Remote
out
Auto
standby
Instant
on
1
2
WARNING:Disconnect power before opening
AC ONLY
FUSE RATING: ANTISURGE
1 0-120 V:1 T6.3AL
2 0-240 V:2 T3.15AL
FREQUENCY: 0 60Hz5 /
I 260VANPUT POWER:
Control
Power
Speakers
WARNING:Do not replace supplied loudspeaker plugs
with individual 4mm plugs
Input
XLR
USB
update
Brightness
Reset/
300 SERIES
POWER
AMPLIFIER
NAP 350
S/No.
DESIGNED AND MADE IN THE UK
BY NAIM AUDIO, SALISBURY, SP1 2LN
Remote
in
Remote
out
Auto
standby
Instant
on
1
2
WARNING:Disconnect power before opening
AC ONLY
FUSE RATING: ANTISURGE
1 0-120 V:1 T6.3AL
2 0-240 V:2 T3.15AL
FREQUENCY: 0 60Hz5 /
I 260VANPUT POWER:
Control
Power
Speakers
WARNING:Do not replace supplied loudspeaker plugs
with individual 4mm plugs
Input
XLR
USB
update
Brightness
Reset/
300 SERIES
POWER
AMPLIFIER
NAP 350
S/No.
DESIGNED AND MADE IN THE UK
BY NAIM AUDIO, SALISBURY, SP1 2LN
den richtigen Lautsprecher anzuschließen, wobei dieselbe Phase einzuhalten ist.
Weitere ausführliche Informationen nden Sie in Abschnitt 4.3.
Schließen Sie nun an beiden NAP350 Verstärkern das jeweilige Netzkabel an. Weitere
Informationen zum Stromnetz nden Sie in Kapitel 5.
5
Page 33
Stellen Sie sicher, dass die Lautstärke an Ihrer Vorstufe auf ein sicheres Minimum
eingestellt ist, bevor Sie die NAP350 Verstärker einschalten. Wenn Sie eine NaimVorstufe verwenden, die über die Automatisierung angeschlossen ist, dann werden die
Leistungsverstärker automatisch eingeschaltet, wenn irgendeine der Standby-Tasten
gedrückt wird. Bei Verwendung einer anderen Vorstufe, betätigen Sie die Einschalt-Taste
an der Vorderseite des 350.
4. Tipps zur Installation und Verwendung des
NAP350
Wir wissen, dass Sie sich auf Ihrer neuen NAP350 sehr freuen! Dennoch versprechen wir
Ihnen bei Umsetzung der folgenden Hinweise, dass Sie den Leistungsverstärker in seinem
vollen Umfang erleben werden.
4.1 Unboxing und Positionierung
In Ihrem NAP350 kommen hochwertige Komponenten zum Einsatz, darunter ein
beachtlicher Leistungstransformator und ein robustes Aluminiumgehäuse. Das bedeutet,
dass der NAP350 16,5 kg wiegt. Seien Sie daher vorsichtig, wenn Sie ihn anheben oder
bewegen, und stellen Sie sicher, dass die Oberäche, auf der Sie ihn aufstellen möchten,
stabil ist und sein Gewicht tragen kann.
Um eine optimale Leistung zu erzielen, sollten Sie für Ihre Naim-Produkte ein spezielles
HiFi-Regal verwenden, idealerweise den Naim Fraim oder Fraim Lite. Diese Regale dienen
der Minimierung von Vibrationen, die den Klang beeinträchtigen können. Sie haben
keinen Platz für ein Regal? Stellen Sie Ihren NAP350 auf ein Fraim-Glasregal auf einem
geeigneten Möbelstück. Dies dient einem soliden, aber schlichten Halt.
Ihr NAP350 verfügt über einen Lüfter mit Kühlfunktion. Dieser wird aktiviert, wenn Ihr
Verstärker über einen längeren Zeitraum mit hoher Lautstärke läuft. Achten Sie darauf,
dass der Warmluftauslass nicht abgedeckt ist. Es wird nicht empfohlen, den NAP350 in
einem geschlossenen, nicht belüfteten Schrank zu verwenden.
6
Page 34
Stapeln Sie Naim-Produkte niemals übereinander; stellen Sie sie nebeneinander und
lassen Sie bitte etwas Abstand zwischen den Geräten. Ebenso sollten die angeschlossenen
Produkte nicht zu weit voneinander entfernt sein: Der maximale Abstand ist der, den das
mitgelieferte Verbindungskabel zulässt.
Um das Risiko von hörbarem Brummen aus den Lautsprechern zu verringern, sollten Sie
Netzteile oder Leistungsverstärker nicht in der Nähe von Quellkomponenten aufstellen.
4.2 Angaben zum Eingangsanschluss
Der NAP350 verfügt über symmetrische XLR-Eingänge nach Industriestandard für Audio.
Symmetrische Verbindungen sind geräuscharm und können über große Entfernungen
geführt werden. Somit wird eine exiblere Platzierung des NAP350 ermöglicht.
Positiv/Heiß
Adapterkabel für den Anschluss Ihres NAP350 an Vorstufen mit RCA-/DIN-Ausgängen
sind erhältlich.
Masse
Negativ/Kalt
4.3 Lautsprecherkabel und -anschlüsse
Verwenden Sie für eine optimale Leistung die Lautsprecherkabel Naim NACA5 oder Super
Lumina, die in der richtigen Richtung angeschlossen werden (z. B. NACA5 mit Pfeilen, die
zum Lautsprecher zeigen).
Die beiden Lautsprecherkabel sollten die gleiche Länge bis zu max. 20 m haben. Im
Gegensatz zu einigen früheren Naim-Designs schreiben wir keine Mindestlänge für
Lautsprecherkabel vor, empfehlen aber dennoch, keine Längen unter 2 m zu verwenden.
Ihr NAP350 wird mit speziellen Audio-Lautsprecheranschlüssen von Naim geliefert,
die eine optimale, impedanzangepasste elektrische Verbindung gewährleisten und
sicherstellen, dass Ihr Verstärker den geltenden Sicherheitsvorschriften entspricht.
Achten Sie beim Anschließen der Lautsprecher darauf, dass diese „gleichphasig“
sind, d. h. der positive Lautsprecherausgang des Verstärkers ist mit dem positiven
Lautsprechereingang verbunden, und dass der linke und der rechte Ausgang mit dem
richtigen Lautsprecher verbunden sind.
4.4 Automatisierung:
Wenn Sie den NAP350 mit einer kompatiblen Vorstufe (wie der NAC 332) verwenden,
können Sie das Ein- und Ausschalten sowie die Helligkeit des Logos in Ihrem gesamten
System synchronisieren, indem Sie die beiden Geräte mit dem mitgelieferten optischen
Automatisierungskabel verbinden. Verbinden Sie dafür einfach mit dem Kabel den
„Remote Out“-Anschluss der Vorstufe mit dem „Remote In“-Anschluss des NAP350.
Über den „Remote Out“-Anschlüssen des NAP350 können weitere Leistungsverstärker
angeschlossen werden.
Wenn Sie eine größere Entfernung zwischen Ihrer Vorstufe und dem NAP350 benötigen,
als das mitgelieferte Kabel zulässt, können Sie ein optisches 3,5-mm-auf-3,5-mmErsatzkabel in der erforderlichen Länge verwenden. Es ist auch möglich, analoge
Standardkabel mit 3,5-mm-Steckern zu verwenden, aber ein optisches Kabel bietet die
beste Leistung.
4.5 Einschalten/Ausschalten
Sobald alle Eingangs- und Ausgangsverbindungen hergestellt sind, schließen Sie das
mitgelieferte Netzkabel an Ihren NAP350 und an das Stromnetz an. Hinweis: Ihre Quelle,
wie z. B. ein Streamer oder CD-Player, und alle zugehörigen externen Netzteile sollten
eingeschaltet sein, bevor Sie Ihren NAP350 einschalten.
7
Page 35

Sie können nun die NAP350 Verstärker einschalten, entweder indem Sie Ihre Naim
Vorstufe einschalten, wenn diese über die Systemautomatisierung angeschlossen ist, oder
anhand der Einschalt-Taste auf der Vorderseite der beiden Verstärker.
Das Ausschalten erfolgt der NAP350-Verstärker auf dieselbe Weise: schalten Sie Ihre
Naim Vorstufe aus, oder Sie betätigen die Einschalt-Taste auf der Vorderseite der beiden
Verstärker, wodurch diese in den Standby-Modus versetzt werden. Schalten Sie die
Verstärker möglichst nicht mit einem Netzschalter aus.
4.6 Einstellung der Standby-Leistung
Standardmäßig ist der NAP350 auf „Auto Standby“ eingestellt. Er geht nach 19 Minuten
Inaktivität automatisch in den Standby-Modus über (in dem sie weniger als 0,5 W Strom
verbraucht). Die Music Sensing-Funktion weckt den Verstärker aus dem Standby-Modus,
wenn er ein Eingangssignal empfängt.
Zur Erzielung einer optimalen Klangqualität schalten Sie die Standby-Einstellung auf der
Rückseite des Geräts auf „Instant on“, wodurch alle empndlichen Audioschaltungen
permanent eingeschaltet bleiben.
Bitte beachten Sie, dass die Music Sensing-Funktion deaktiviert wird, wenn sie einen
Automatisierungsbefehl erhält, d. h. der NAP350 manuell über die Standby-Taste in den
Standby-Modus versetzt wird oder „Instant On“ aktiviert ist.
4.7 Helligkeitseinstellung des Naim-Logos
Sie können die Helligkeitsstufe des Naim-Logos auf Ihrem NAP350 einstellen. Wenn Sie
eine Naim-Vorstufe verwenden, die über die Automatisierung angeschlossen ist, können
Sie die Helligkeit der Logos von der Vorstufe aus synchronisieren. Alternativ können Sie
den NAP350 auch über den Helligkeits-Kippschalter auf der Rückseite einstellen.
HINWEIS: Die Helligkeitstaste agiert auch als vollständige NAP350-Reset-Taste, wenn sie
3 Sekunden lang gedrückt wird. Am besten ist es also, wenn Sie die Helligkeit Ihres Logos
in sehr kurzer Zeit auswählen!
4.8 USB-Aktualisierung
Ihr NAP350 verfügt über einen Micro-USB-Anschluss, der nur für Servicezwecke bestimmt
ist.
5. Netzstrom, Erdung und mehr
Verwenden Sie nur die mit dem NAP350 mitgelieferten Netzkabel und Stecker oder
das verbesserte PowerLine-Netzkabel von Naim. Bei der Verwendung von gesicherten
Steckern sollten Sicherungen mit 13 Ampere eingesetzt werden. Schließen Sie keine
spannungsabhängigen Widerstände oder Rauschunterdrücker an Netzstecker an. Diese
beeinträchtigen die Netzversorgung und den Klang.
5.1 Erdung
Um Brummschleifen zu vermeiden, sollte die Signalmasse des gesamten Systems an
einer Stelle mit der Netzerde verbunden werden. Dies geschieht üblicherweise an der
Primärquelle. Ein Naim-Streamer hat zum Beispiel einen Groundlift-Schalter. Stellen
Sie diesen auf die „Standard-Funktion“, wenn keine andere Quelle die Netzerde mit der
Signalmasse verbindet. Bei dieser Einstellung wird die beste Klangqualität erreicht.
5.2 Nicht wieder anschließbare Netzstecker
Wenn ein nicht wieder anschließbarer Stecker von einem Netzkabel abgekappt wird (zu
welchem Zweck auch immer), MUSS der Stecker so entsorgt werden, dass er keinesfalls
mehr verwendet werden kann. Es besteht erhebliche Stromschlaggefahr, wenn der
abgeschaltete Stecker in eine Netzsteckdose gesteckt wird.
8
Page 36

5.3 Hauptstromkreise und Störungen
Eine HiFi-Anlage teilt sich meist einen Netzstromkreis mit anderen Haushaltsgeräten, von
denen einige Verzerrungen verursachen können, die sich als mechanisches Brummen von
Netztransformatoren, unter anderem auch des großen Transformators in Ihrem NAP350,
äußern können.
Das Brummen des Transformators wird nicht über die Lautsprecher übertragen und hat
keinen Einuss auf die Leistung des Systems; eine sorgfältige Aufstellung Ihres NaimSystems kann das Brummen jedoch reduzieren, ebenso wie ein separater, spezieller
Netzstromkreis. Ein solcher Stromkreis (idealerweise mit Bemessungsdaten von 30 oder
45 Ampere) verbessert hauptsächlich auch die Systemleistung. Ziehen Sie zur Installation
eines separaten Hauptstromkreises einen Elektronikfachexperten hinzu.
5.4 Vorkehrungen gegen Blitzschlag
Ihr Naim-System sollte bei Blitzeinschlaggefahr ausgeschaltet und vollständig vom
Stromnetz getrennt werden, um es vor möglichen Schäden zu schützen.
6. Weitere Tipps und Empfehlungen
Nachdem wir nun das Wichtigste geklärt haben, wollen wir uns nun einigen weiteren
Dingen widmen, um die Leistung Ihres neuen NAP350 zu optimieren.
6.1 Einlaufzeit
Naim-Produkte werden aus sorgfältig ausgewählten, hochwertigen Komponenten
handgefertigt. Ihr NAP350 wird gleich nach dem Auspacken hervorragend klingen,
aber seine Leistung kann noch weiter verbessert werden, wenn all diese verschiedenen
Komponenten in den ersten Wochen der Nutzung eingeschaltet werden und sich
gegenseitig beeinussen. Bei eingeschaltetem System wird dieser Prozess unterstützt.
6.2 Reinigung Ihres Produkts und der Anschlüsse
Naim empehlt, nur das mitgelieferte Reinigungstuch zu verwenden, um die Oberächen
des Geräts leicht abzustauben. Reinigungsmittel können Inhaltsstoe enthalten, die
sich negativ auf kosmetische Oberächenbehandlungen und Beschichtungen auswirken
können.
Halten Sie Anschlussstecker und -buchsen sauber und korrosionsfrei. Dies erreichen Sie
am einfachsten, indem Sie Ihr Naim-Produkt (und alle angeschlossenen Geräte) vollständig
ausschalten, alle Anschlüsse aus den Buchsen ziehen und sie wieder fest einstecken.
Es sollten keine Kontaktreiniger und „Enhancer" verwendet werden, da die abgelagerte
Filmschicht den Klang beeinträchtigen kann.
6.3 Zurücksetzen Ihres NAP350
Um Ihren NAP350 auf die Standardeinstellungen zurückzusetzen, drücken Sie 3 Sekunden
lang die Taste „Helligkeit“ auf der Rückseite.
7. Support
Der Verbraucherschutz variiert je nach Land. In den meisten Ländern sollte der Händler,
bei dem Sie Ihr Naim-Produkt gekauft haben, Ihr Hauptansprechpartner sein, wenn Sie
Probleme mit Ihrem Gerät haben. Ein Problem kann auf einen Fehler im System oder in der
Installation hinweisen. Daher sollten Sie unbedingt die Diagnosefähigkeiten Ihres Händlers
voll ausschöpfen.
Auf Naimaudio.com nden Sie für jedes Naim-Produkt eine Reihe von Begleitartikeln.
Wenn Sie weiterhin Probleme mit Ihrem Naim-Produkt haben, kontaktieren Sie uns direkt
unter: [email protected].
9
Page 37

8. Wartung und Updates
Reparaturen oder Hardware-Updates sollten nur von einer autorisierten Naim-Servicestelle
oder in der Naim-Zentrale selbst durchgeführt werden. Viele Komponenten werden
kundenspezisch angefertigt, getestet oder aufeinander abgestimmt und geeignete
Ersatzteile sind oft nicht aus anderen Quellen zu erhalten. Bitte wenden Sie sich bei
Service- oder Reparaturanfragen an Ihren Naim-Fachhändler vor Ort.
9. Technische Daten
Das Netzteil der 300 Series – NAP350
Leistung
Leerlauf-Verbrauch
Spannungsverstärkung +29 dB
Eingangswiderstand 47 k symmetrisch / 34 k unsymmetrisch über Adapterkabel
Übertragungsbereich -3 dB @ 1,4Hz and 100 kHz
Stromversorgungausgang Kein
Abmessungen (H x B x T) 91,5 × 432 × 317,5 mm (einschließlich der Füße)
Gewicht 16,5 kg
Netzspannung 115 V oder 230 V, 50/60 Hz
175 Watt, 8
26 W
10. Produktrecycling
Produkte mit dem durchgestrichenen Mülltonne-mit-Rädern-Logo können nicht
über den Hausmüll entsorgt werden. Diese Produkte müssen in Müllanlagen
entsorgt werden, die in der Lage sind, sie wiederzuverwerten und eventuelle
Nebenprodukte angemessen zu behandeln.
Wenden Sie sich an Ihre örtliche Behörde, um Informationen über die nächstgelegene
Müllanlagen zu erhalten.
Sachgerechtes Recycling und Abfallentsorgung helfen, Ressourcen zu schonen und die
Umwelt vor Verunreinigungen zu schützen.
10
Page 38

Page 39

Inhoud
Hoofdstuk Pagina
Inleiding 1
1. Wat is meegeleverd? 1
2. Kenmerken en aansluitingen 2
3. Instellen 3
4. Tips voor installatie en gebruik 6
5. Netvoeding, aarding en meer 8
6. Verdere tips en advies 9
7. Support 9
8. Onderhoud en updates 10
9. Specicaties 10
10. Product recyclen 10
Page 40
Inleiding
Welkom bij uw nieuwe eindversterker van Naim. Net als alle andere producten van Naim
Audio staan ook bij de NAP350 muzikale prestaties voorop. Om zijn volledige potentieel te
realiseren, is het belangrijk dat u de in deze handleiding verstrekte eenvoudige richtlijnen
voor installatie en gebruik volgt. We beginnen met enkele essentiële punten over het
product en de plaatsing daarvan en in hoofdstuk 4, dat begint op pagina 6, geven we u
meer gedetailleerde informatie.
Let op: Volledige
veiligheidswaarschuwingen
zijn te vinden in de wettelijk
verplichte veiligheidshandleiding.
1. Wat is er in de verpakking geleverd?
1x NAP350
1x documentenpakket
1x Audio
verbindingskabel
XLR – XLR gebalanceerd
1
1x Reinigingsdoek 1x Netvoedingskabel
1x Optische kabel voor
systeemautomatisering
1x Luidsprekeraansluitingen
(reeds op de eenheid
geïnstalleerd)
Page 41
Remote
in
Remote
out
Auto
standby
Instant
on
1
2
WARNING:Disconnect power before opening
AC ONLY
FUSE RATING: ANTISURGE
1 0-120 V:1 T6.3AL
2 0-240 V:2 T3.15AL
FREQUENCY: 0 60Hz5 /
I 260VANPUT POWER:
Control
Power
Speakers
WARNING:Do not replace supplied loudspeaker plugs
with individual 4mm plugs
Input
XLR
USB
update
Brightness
Reset/
300 SERIES
POWER
AMPLIFIER
NAP 350
S/No.
DESIGNED AND MADE IN THE UK
BY NAIM AUDIO, SALISBURY, SP1 2LN
2. Kenmerken en aansluitingen van de NAP350
voor helderheid/
Netvoeding en
zekering
Remote In
De schakelaar
reset
USB-upgrade
Backlit, dimbaar
Knop voor direct
aan/auto stand-by
Remote Out
logo
8-staps intelligente
ventilatorregeling
Luidsprekeraansluitingen
Aan/uit / Stand-
Gebalanceerd
XLR-ingangen
byknop
2
Page 42
3. De NAP350 instellen
De twee NAP350-versterkers moeten worden aangesloten op een voorversterker (zoals
de bijbehorende NAC 332) maar voordat u dat doet, moet u er eerst voor zorgen dat alle
componenten op hun denitieve plek staan en van de netvoeding zijn afgesloten.
Voor optimale prestaties gebruikt u een speciale hi-steun, bij voorkeur de Naim Fraim,
met de voorversterker zoals afgebeeld boven de eindversterker geplaatst.
Zorg dat alle apparaten zijn uitgeschakeld alvorens ze aan te sluiten.
3
Page 43
Sluit de meegeleverde XLR-kabel van de gebalanceerde XLR-uitgangen van uw
WARNING:Disconnect power before opening
AC ONLY
FUSE RATING: ANTISURGE
1 0-120 V:1 T4AL
2 0-240 V:2 T2AL
FREQUENCY: 0 60Hz5/
I 70VANPUT POWER:
Power
300 SERIES
PREAMPLIFIER
NAC 332
DESIGNED AND MADE IN THE UK
BY NAIM AUDIO, SALISBURY, SP1 2LN
/ .oNS
Ground
Power Supply Upgrade
Preamp Outputs
AnalogueInputs
Ground
Default
R L
R
L
RCA
XLR
Refer to User Manual
Type 3
Type 4
Remote
in
Remote
out
Auto
standby
Instant
on
1
2
Control
USB
update
Brightness
Reset/
On
RCA
output
O
3
4
6
AnalogueInputs
R
R
R
L
L
L
5
8
7
1
2
R
L
R
L
Contains FCC ID: 2ACURZIGEE IC ID: 12217A-ZIGEE
Refer to User Manual
WARNING:
Disconnect power before opening
AC ONLY
FUSE RATING: ANTISURGE
1 0-120 V: T
4AL
2 0-240 V: T
2AL
FREQUENCY 50/60Hz
I 70VANPUT POWER:
Power
300 SERIES
PREAMPLIFIER
NAC 332
DESIGNED AND MADE IN THE UK
BY NAIM AUDIO, SALISBURY, SP1 2LN
/ .oNS
Ground
Power Supply Upgrade
Preamp Outputs
AnalogueInputs
Ground
Default
R L
R
L
RCA
XLR
Refer to User Manual
Type 3
Type 4
Remote
in
Remote
out
Auto
standby
Instant
on
1
2
Control
USB
update
Brightness
Reset/
On
RCA
output
O
3
4
6
AnalogueInputs
R
R
R
L
L
L
5
8
7
1
2
R
L
R
L
Contains FCC ID: 2ACURZIGEE IC ID: 12217A-ZIGEE
Refer to User Manual
Remote
in
Remote
out
Auto
standby
Instant
on
1
2
WARNING:Disconnect power before opening
AC ONLY
FUSE RATING: ANTISURGE
1 0-120 V:1 T6.3AL
2 0-240 V:2 T3.15AL
FREQUENCY: 0 60Hz5 /
I 260VANPUT POWER:
Control
Power
Speakers
WARNING:Do not replace supplied loudspeaker plugs
with individual 4mm plugs
Input
XLR
USB
update
Brightness
Reset/
300 SERIES
POWER
AMPLIFIER
NAP 350
S/No.
DESIGNED AND MADE IN THE UK
BY NAIM AUDIO, SALISBURY, SP1 2LN
WARNING:Disconnect power before opening
AC ONLY
FUSE RATING: ANTISURGE
1 0-120 V:1 T4AL
2 0-240 V:2 T2AL
FREQUENCY: 0 60Hz5/
I 70VANPUT POWER:
Power
300 SERIES
PREAMPLIFIER
NAC 332
DESIGNED AND MADE IN THE UK
BY NAIM AUDIO, SALISBURY, SP1 2LN
/ .oNS
Ground
Power Supply Upgrade
Preamp Outputs
AnalogueInputs
Ground
Default
R L
R
L
RCA
XLR
Refer to User Manual
Type 3
Type 4
Remote
in
Remote
out
Auto
standby
Instant
on
1
2
Control
USB
update
Brightness
Reset/
On
RCA
output
O
3
4
6
AnalogueInputs
R
R
R
L
L
L
5
8
7
1
2
R
L
R
L
Contains FCC ID: 2ACURZIGEE IC ID: 12217A-ZIGEE
Refer to User Manual
WARNING:
Disconnect power before opening
AC ONLY
FUSE RATING: ANTISURGE
1 0-120 V: T
4AL
2 0-240 V: T
2AL
FREQUENCY 50/60Hz
I 70VANPUT POWER:
Power
300 SERIES
PREAMPLIFIER
NAC 332
DESIGNED AND MADE IN THE UK
BY NAIM AUDIO, SALISBURY, SP1 2LN
/ .oNS
Ground
Power Supply Upgrade
Preamp Outputs
AnalogueInputs
Ground
Default
R L
R
L
RCA
XLR
Refer to User Manual
Type 3
Type 4
Remote
in
Remote
out
Auto
standby
Instant
on
1
2
Control
USB
update
Brightness
Reset/
On
RCA
output
O
3
4
6
AnalogueInputs
R
R
R
L
L
L
5
8
7
1
2
R
L
R
L
Contains FCC ID: 2ACURZIGEE IC ID: 12217A-ZIGEE
Refer to User Manual
Remote
in
Remote
out
Auto
standby
Instant
on
1
2
WARNING:Disconnect power before opening
AC ONLY
FUSE RATING: ANTISURGE
1 0-120 V:1 T6.3AL
2 0-240 V:2 T3.15AL
FREQUENCY: 0 60Hz5 /
I 260VANPUT POWER:
Control
Power
Speakers
WARNING:Do not replace supplied loudspeaker plugs
with individual 4mm plugs
Input
XLR
USB
update
Brightness
Reset/
300 SERIES
POWER
AMPLIFIER
NAP 350
S/No.
DESIGNED AND MADE IN THE UK
BY NAIM AUDIO, SALISBURY, SP1 2LN
Remote
in
Remote
out
Auto
standby
Instant
on
1
2
WARNING:Disconnect power before opening
AC ONLY
FUSE RATING: ANTISURGE
1 0-120 V:1 T6.3AL
2 0-240 V:2 T3.15AL
FREQUENCY: 0 60Hz5 /
I 260VANPUT POWER:
Control
Power
Speakers
WARNING:Do not replace supplied loudspeaker plugs
with individual 4mm plugs
Input
XLR
USB
update
Brightness
Reset/
300 SERIES
POWER
AMPLIFIER
NAP 350
S/No.
DESIGNED AND MADE IN THE UK
BY NAIM AUDIO, SALISBURY, SP1 2LN
voorversterker aan op de gebalanceerde ingang van de NAP350. Herhaal dit voor de
andere NAP350 en zorg dat de kabels op het juiste kanaal worden aangesloten: de
linkeruitgang van de voorversterker op de eindversterker die voor de linkerluidspreker
wordt gebruikt, enz. Zie hoofdstuk 4.2 voor meer informatie. Controleer of de XRL-kabels
goed zijn aangesloten; dit is het geval als het logo op de aansluiting naar boven wijst.
Als u de NAP350 met de bijbehorende voorversterker van Naim gebruikt (zie hoofdstuk
4.4), sluit u de meegeleverde systeemautomatiseringskabel aan op de aansluiting Remote
Out van de voorversterker.
Sluit het andere uiteinde van de systeemautomatiseringskabel aan op de aansluiting
Remote In van elke NAP350.
4
Page 44
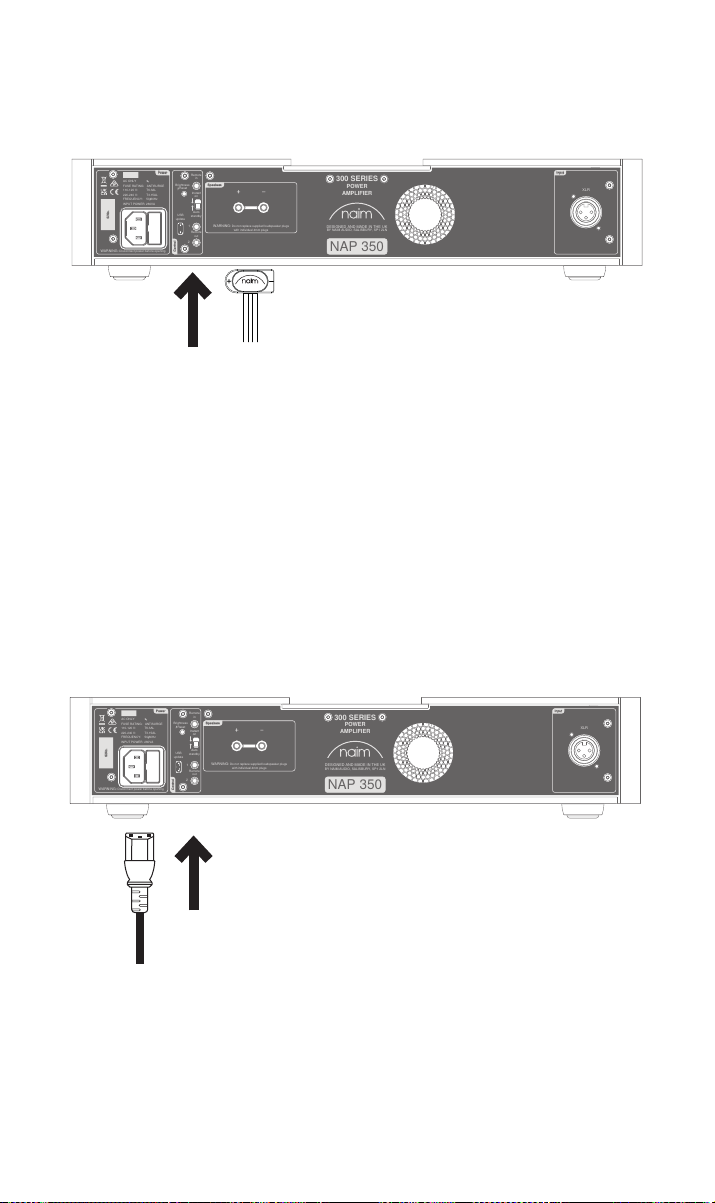
Sluit de luidsprekerkabels aan op beide NAP350-versterkers; let er hierbij op dat elke
Remote
in
Remote
out
Auto
standby
Instant
on
1
2
WARNING:Disconnect power before opening
AC ONLY
FUSE RATING: ANTISURGE
1 0-120 V:1 T6.3AL
2 0-240 V:2 T3.15AL
FREQUENCY: 0 60Hz5 /
I 260VANPUT POWER:
Control
Power
Speakers
WARNING:Do not replace supplied loudspeaker plugs
with individual 4mm plugs
Input
XLR
USB
update
Brightness
Reset/
300 SERIES
POWER
AMPLIFIER
NAP 350
S/No.
DESIGNED AND MADE IN THE UK
BY NAIM AUDIO, SALISBURY, SP1 2LN
Remote
in
Remote
out
Auto
standby
Instant
on
1
2
WARNING:Disconnect power before opening
AC ONLY
FUSE RATING: ANTISURGE
1 0-120 V:1 T6.3AL
2 0-240 V:2 T3.15AL
FREQUENCY: 0 60Hz5 /
I 260VANPUT POWER:
Control
Power
Speakers
WARNING:Do not replace supplied loudspeaker plugs
with individual 4mm plugs
Input
XLR
USB
update
Brightness
Reset/
300 SERIES
POWER
AMPLIFIER
NAP 350
S/No.
DESIGNED AND MADE IN THE UK
BY NAIM AUDIO, SALISBURY, SP1 2LN
kabel op de juiste luidspreker wordt aangesloten en dat beide in fase zijn aangesloten.
Zie hoofdstuk 4.3 voor meer gedetailleerde informatie.
Sluit tot slot de netvoedingskabels op beide NAP350-versterkers aan. Zie hoofdstuk 5
voor meer informatie over netvoeding.
5
Page 45
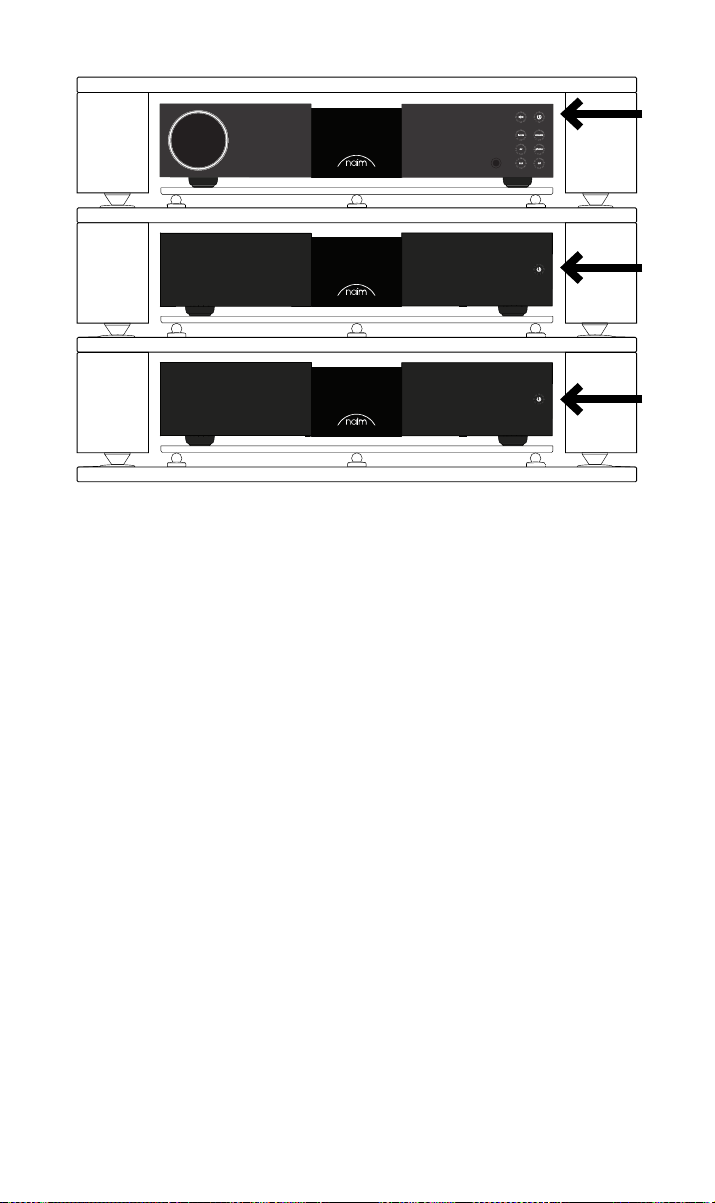
Zorg dat het volume op de voorversterker op een laag niveau staat alvorens de
NAP350-versterkers aan te zetten. Als u de aansluiting voor systeemautomatisering op
een Naim-voorversterker gebruikt, worden de eindversterkers automatisch ingeschakeld
wanneer een van de stand-byknoppen wordt ingedrukt. Als u een andere voorversterker
gebruikt, drukt u op de stand-byknop op het voorpaneel van beide NAP350-versterkers.
4. Tips voor installatie en gebruik van de NAP350
We weten dat u staat te popelen om van uw nieuwe NAP350 te genieten, maar we
beloven u dat hij nog beter zal klinken als u deze richtlijnen volgt, die allemaal zijn bedoeld
om u te helpen uw eindversterker optimaal te gebruiken.
4.1 Uitpakken en plaatsen
Uw NAP 350 bestaat uit hoogwaardige onderdelen, waaronder een krachtige
voedingstransformator en een duurzame aluminium behuizing. Hierdoor weegt de
NAP 350 16,5 kg, dus wees voorzichtig bij het optillen of verplaatsen ervan, en zorg ervoor
dat het oppervlak waar hij op wordt geplaatst stabiel is en dit gewicht kan dragen.
Voor optimale prestaties gebruikt u de producten van Naim op een speciaal rek voor hiapparatuur, bij voorkeur de Naim Fraim of Fraim Lite, om trillingen die een eect op het
geluid kunnen hebben tot een minimum te beperken. Geen ruimte voor een rek? Plaats de
NAP350 dan op een Fraim glazen plank op een geschikt meubelstuk, zodat het apparaat
stevig maar discreet wordt ondersteund.
De NAP350 is voorzien van een koelventilator, die wordt geactiveerd wanneer uw
versterker langere tijd op hoog volume werkt. Zorg ervoor dat de warmte-uitlaat niet is
afgedekt; we raden u af de NAP350 te gebruiken in een gesloten, niet-geventileerde kast.
Stapel producten van Naim nooit op elkaar en als u ze naast elkaar plaatst, zorg dan dat er
wat afstand tussen de eenheden is. Evenzo mogen op elkaar aangesloten producten niet te
ver van elkaar af staan. De maximale afstand is de lengte van de verbindingskabel.
Om het risico van brom via de luidsprekers tot een minimum te beperken, moeten
voedingseenheden en versterkers niet te dicht bij de broncomponenten worden geplaatst.
6
Page 46
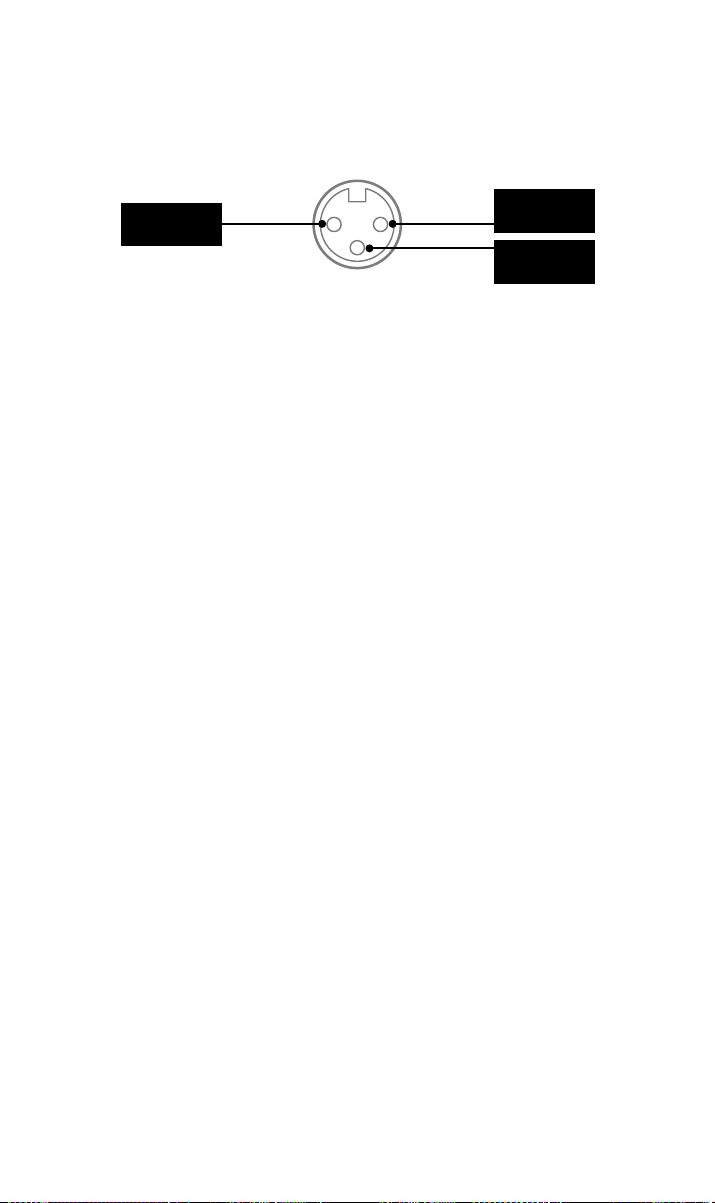
4.2 Ingangen aansluiten
De NAP350 heeft industriestandaard XLR gebalanceerde ingangen voor audio.
Gebalanceerde aansluitingen zijn een ruisarme oplossing en kunnen over lange afstanden
lopen, zodat u exibeler kunt zijn wat betreft de plaatsing van de NAP350.
Positief/Heet
Er zijn adapterkabels verkrijgbaar, zodat u de NAP350 kunt aansluiten op voorversterkers
met RCA- of DIN-uitgangen.
Aarde
Negatief/Koud
4.3 Luidsprekerkabels en stekkers
Voor optimale prestaties gebruikt u de Naim NACA5- of Super Lumina-luidsprekerkabel,
in de juiste richting aangesloten (bijvoorbeeld, NACA5-opdruk langs de kabel in de
richting van de luidspreker).
Het is belangrijk dat de twee luidsprekerkabels even lang zijn, maximaal 20 meter. In
tegenstelling tot bepaalde oudere producten van Naim, geven we geen aanbevelingen wat
betreft de minimale lengte van de luidsprekerkabels, maar we raden u aan kabels korter
dan 2 meter te vermijden.
De NAP350 komt met speciale luidsprekeraansluitingen van Naim Audio; deze bieden
de beste, aan de impedantie aangepaste elektrische aansluiting en waarborgen dat uw
versterker aan de huidige veiligheidsvoorschriften voldoet.
Let er bij het aansluiten van de luidsprekers op dat deze ‘in fase’ zijn aangesloten – dit
betekent dat de positieve luidsprekeruitgang van de versterker is aangesloten op de
positieve luidsprekeringang – en dat de linker- en rechterversterkers naar de juiste
luidspreker gaan.
4.4 Systeemautomatisering
Wanneer u de NAP350 gebruikt met een geschikte voorversterker, zoals de NAC 332,
kunt u voeding aan/uit en de helderheid van het logo in uw systeem synchroniseren door
de apparaten met de meegeleverde optische kabels voor systeemautomatisering op elkaar
aan te sluiten. U sluit de kabels van de aansluitingen ‘Remote Out’ van de voorversterker
gewoon aan op de aansluitingen ‘Remote In’ van de NAP350-versterkers. Het is mogelijk
om verdere eindversterkers aan te sluiten met gebruik van de aansluitingen ‘Remote Out’
van de NAP350.
Als u een langere afstand tussen de voorversterker en de NAP350 nodig hebt dan met de
meegeleverde kabel mogelijk is, kunt u een andere 3,5 mm naar 3,5 mm optische kabel van
de gewenste lengte gebruiken. U kunt ook standaard analoge kabels met 3,5 mm stekkers
gebruiken, maar een optische kabel biedt de beste prestaties.
4.5 In-/uitschakelen
Wanneer alle in- en uitgangen zijn aangesloten, sluit u de meegeleverde netvoedingskabels
aan op de NAP350-versterkers en een stopcontact. Let op: de bron, zoals een streamer
of cd-speler, en bijbehorende externe voedingseenheden moeten worden ingeschakeld
voordat u de NAP350-versterkers aanzet.
U kunt de NAP350 nu inschakelen door de via systeemautomatisering aangesloten
voorversterker van Naim in te schakelen, of door op de aan/uit-knop op het voorpaneel
van de eindversterker te drukken.
7
Page 47

Het is dezelfde procedure om de NAP350-versterkers uit te zetten: zet de Naimvoorversterker uit,
die is aangesloten via systeemautomatisering, of druk op de aan/uit-knop op het
voorpaneel van de eindversterkers om deze in stand-by te zetten. Schakel de versterkers
niet uit door de stekker uit het stopcontact te halen.
4.6 Instellingen stand-by vermogen
Standaard is de NAP350 ingesteld op ‘Auto Stand-by’, wat betekent dat hij na 19 minuten
van inactiviteit automatisch overschakelt naar stand-by (in deze modus verbruikt hij minder
dan 0,5 watt). Music Sensing activeert de versterker uit stand-by wanneer het apparaat
een ingangssignaal waarneemt.
Voor optimale geluidskwaliteit stelt u de knop voor stand-by op het achterpaneel in op
‘Instant on’, zodat alle gevoelige audiocircuits permanent geactiveerd zijn.
Houd er rekening mee dat Music Sensing wordt uitgeschakeld wanneer het systeem een
opdracht voor systeemautomatisering ontvangt, als de NAP350 handmatig in stand-by
wordt gezet via de knop Stand-by, of wanneer ‘Instant On’ is geactiveerd.
4.7 Helderheidsinstellingen voor het Naim-logo
U kunt de helderheid van het Naim-logo op de NAP350 naar wens instellen. Als u een
via systeemautomatisering aangesloten voorversterker van Naim gebruikt, kunt u de
helderheid van alle logo’s via de voorversterker synchroniseren. Maar u kunt voor het
logo op de NAP350 ook de helderheidsschakelaar op het achterpaneel van de NAP 250
gebruiken.
LET OP! De helderheidsschakelaar fungeert tevens als een resetschakelaar. Als u deze
schakelaar 3 seconden lang ingedrukt houdt, worden alle instellingen van de NAP350
gereset, dus het is raadzaam om de helderheid van het logo snel en gedecideerd in te
stellen!
4.8 Updates via USB
De NAP350 heeft een micro-USB-aansluiting, maar die is alleen voor onderhoud bedoeld.
5. Netvoeding, aarding en meer
Gebruik alleen de met de NAP350 geleverde netvoedingskabel en stekkers, of de
opgewaardeerde Naim Power-Line-voedingskabel. Wanneer stekkers met een zekering
worden gebruikt, moeten zekeringen van 13 ampère worden aangebracht. Nooit
spanningsafhankelijke weerstandjes of ruisonderdrukkers op de netstekker aansluiten;
deze hebben een negatieve invloed op de netvoeding en de geluidskwaliteit.
5.1 Aarding
Om brom te voorkomen, moet de signaalaarding van het hele systeem op één plaats op de
netvoedingsaarding worden aangesloten. Doorgaans is dat bij de primaire bron. Een Naimstreamer heeft bijvoorbeeld een ground/lift-schakelaar. Stel deze in op “default” als geen
andere bron de netvoedingsaarding met de signaalaarding verbindt. Deze instelling biedt
de beste geluidskwaliteit.
5.2 Vaste netstekkers
Als een vaste netstekker van de netvoedingskabel wordt afgeknipt (om wat voor reden
dan ook), MOET deze stekker onbruikbaar worden gemaakt en worden weggeworpen.
Er ontstaat een groot risico van elektrische schok wanneer de afgeknipte stekker in een
stopcontact wordt gestoken.
8
Page 48

5.3 Voedingscircuits en storing
Een hi-systeem deelt normaal gesproken een netvoedingscircuit met andere
huishoudelijke apparaten. Sommige daarvan kunnen vervorming veroorzaken die zich
manifesteert als mechanische brom van netvoedingstransformatoren, inclusief de grote
transformator in de NAP350.
Brom van de transformator wordt niet via de luidsprekers uitgezonden en heeft geen
eect op de prestatie van het systeem; zorgvuldige plaatsing van het Naim-systeem of het
gebruik van een apart voedingscircuit kan het brommen echter verminderen. Een dergelijk
circuit (bij voorkeur van 30 of 45 ampère) verbetert doorgaans ook de systeemprestaties.
Vraag een gediplomeerd elektricien om advies over het installeren van een apart
voedingscircuit.
5.4 Voorzorgsmaatregelen bij bliksem
Uw Naim-systeem moet worden uitgeschakeld en helemaal van de netvoeding worden
afgesloten als er een risico van blikseminslag bestaat; dit om potentiële schade te
voorkomen.
6. Verdere tips en advies
Nu u alle essentiële stappen hebt uitgevoerd, gaan we verder met een paar dingen die u
kunt doen om de prestaties van uw nieuwe NAP350 te optimaliseren.
6.1 Inspelen
De producten van Naim zijn met de hand gemaakt met gebruik van zorgvuldig gekozen,
hoogwaardige componenten. De NAP350 klinkt meteen fantastisch, maar de prestaties
kunnen verder worden verbeterd wanneer al deze verschillende componenten worden
ingeschakeld en in de eerste paar weken van gebruik samenwerken. Dit proces verloopt
beter als u uw systeem aan laat staan.
6.2 Het product en de aansluitingen schoonmaken
Naim raadt aan alleen de meegeleverde reinigingsdoek te gebruiken om de oppervlakken
van het product licht af te stoen. Reinigingsproducten bevatten mogelijk ingrediënten
die een nadelige invloed kunnen hebben op cosmetische oppervlaktebehandelingen en
coatings.
Houd verbindingsstekkers en ingangen altijd schoon en roestvrij. De makkelijkste manier
om dit te bereiken, is door uw Naim-product (en aangesloten apparatuur) helemaal uit te
zetten, alle stekkers uit hun ingangen te halen en deze er weer stevig insteken. Gebruik
geen contactreinigers en zogenaamde ‘enhancers’ aangezien die resten kunnen achterlaten
die afbreuk doen aan het geluid van uw systeem.
6.3 De NAP350 resetten
Om de standaardinstellingen van de NAP350 te resetten, houdt u de schakelaar voor
helderheid op het achterpaneel 3 seconden lang ingedrukt.
7. Support
De bescherming van de consument varieert van land tot land. In de meeste regio’s is de
winkel waar u uw Naim-product hebt gekocht uw eerste aanspreekpunt als u problemen
hebt met uw apparaat. Problemen kunnen het gevolg zijn van een fout in het systeem of
de installatie en het is derhalve essentieel dat u de diagnostische vaardigheden van uw
leverancier optimaal benut.
Ook kunt u online een reeks artikelen voor elk Naim-product raadplegen op
Naimaudio.com
Als u nog steeds problemen hebt met uw Naim-product, dan kunt u voor hulp en advies
rechtstreeks contact met ons opnemen via [email protected]
9
Page 49
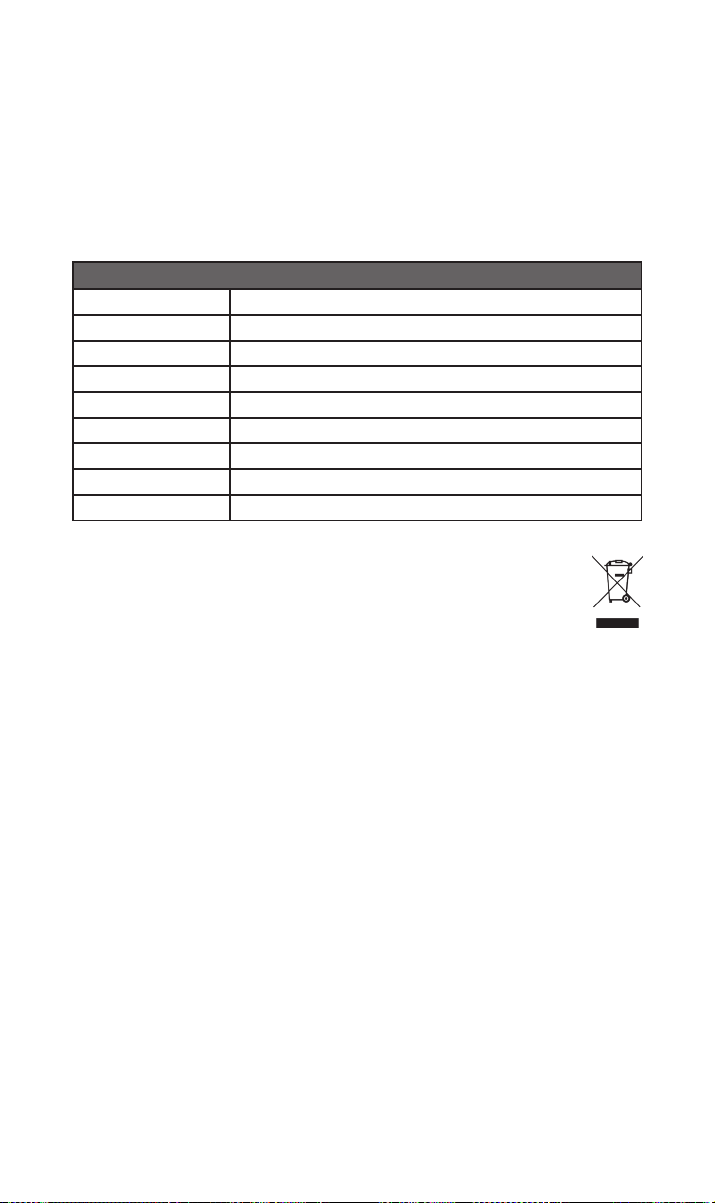
8. Onderhoud en updates
Reparaties en hardware-updates mogen uitsluitend worden uitgevoerd door een
door Naim goedgekeurd onderhoudscentrum of in het hoofdkantoor van Naim. Veel
componenten zijn op maat gemaakt, getest of op elkaar afgestemd en het is vaak niet
mogelijk om geschikte vervangingen bij andere bronnen te kopen. Voor vragen over
onderhoud en reparaties neemt u contact op met uw plaatselijke Naim-leverancier.
9. Specicaties
300 Serie Eindversterker – NAP350
Uitgangsvermogen
Inactief energieverbruik
Spanningsversterking +29 dB
Ingangsimpedantie 47 k gebalanceerd / 34 k enkele verbinding via adapterkabel
Frequentierespons -3 dB bij 1,4 Hz en 100 kHz
Uitgang voedingseenheid Geen
Afmetingen (HxBxD) 91,5 × 432 × 317,5 mm (inclusief pootjes)
Gewicht 16,5 kg
Netvoeding 115 V of 230 V, 50/60 Hz
175 Watt, 8
26 W
10. Product recyclen
Producten waarop het logo van een kliko met een kruis erdoorheen staat
afgebeeld, kunnen niet worden weggeworpen als huishoudelijk afval. Deze
producten moeten worden ingeleverd op locaties waar ze kunnen worden
gerecycled en waar eventuele bijkomstige afvalproducten correct kunnen worden
verwerkt.
Neem contact op met uw lokale afvalverwerkingsbedrijf voor meer informatie over een
dergelijke locatie bij u in de buurt.
Door afval op geschikte wijze te recyclen en weg te werpen, helpt u natuurlijke bronnen te
behouden en milieuvervuiling te voorkomen.
10
Page 50

Page 51

Índice
Sección Página
Introducción 1
1. Contenido de la caja 1
2. Características y conexiones 2
3. Conguración 3
4. Consejos de instalación y uso 6
5. Alimentación de red, puesta a tierra y más 8
6. Más consejos y sugerencias 9
7. Asistencia 9
8. Servicio y actualizaciones 10
9. Especicaciones 10
10. Reciclaje del producto 10
Page 52
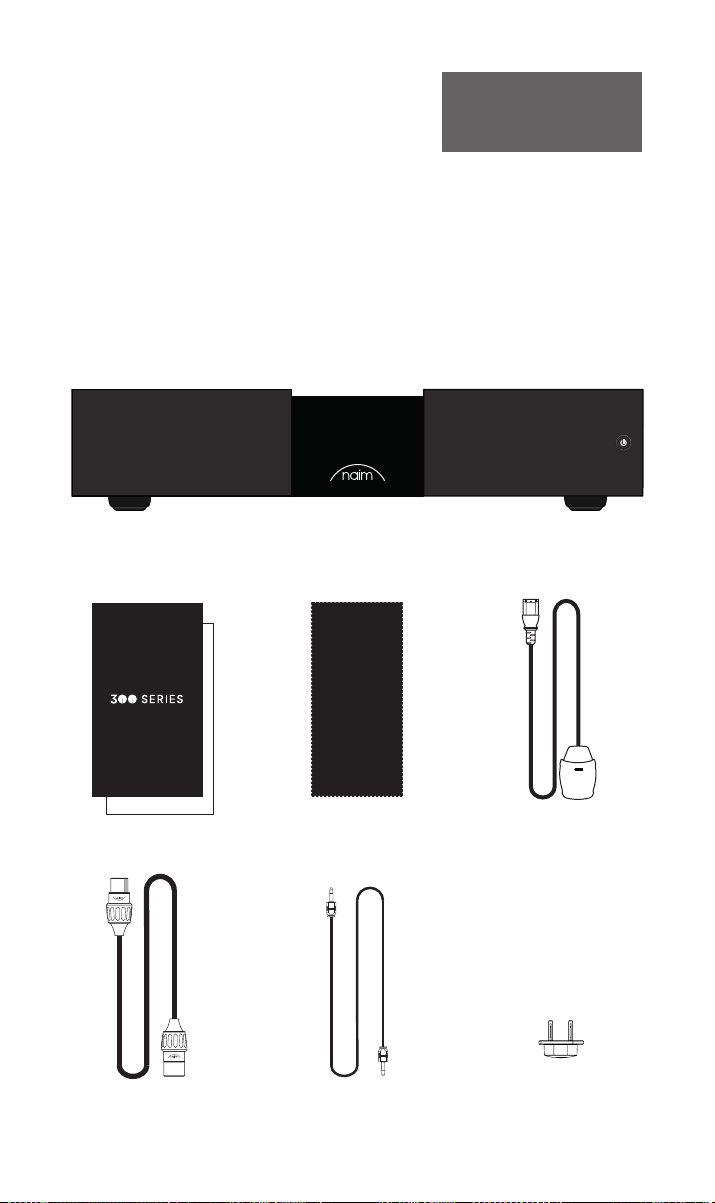
Introducción
Le presentamos su nuevo amplicador de potencia Naim. Como todos los productos
de Naim Audio, el NAP350 da prioridad al rendimiento musical. Para alcanzar todo su
potencial, es importante seguir las sencillas pautas de instalación y uso recogidas en este
manual. Comenzaremos con algunos aspectos básicos del producto y su conguración,
para proporcionarle después información más detallada en el apartado 4 (página 6).
Nota: Todas las advertencias
de seguridad se encuentran
en el manual de seguridad
reglamentario.
1. Contenido de la caja
1x NAP350
1x Paquete de documentación
1x Interconexión audio
XLR – XLR balanceada
1
1x Paño de limpieza 1x Cable de fuente
de alimentación
1x Cable óptico de auto-
matización del sistema
1x Conectores de altavoz
(preinstalados en la unidad)
Page 53
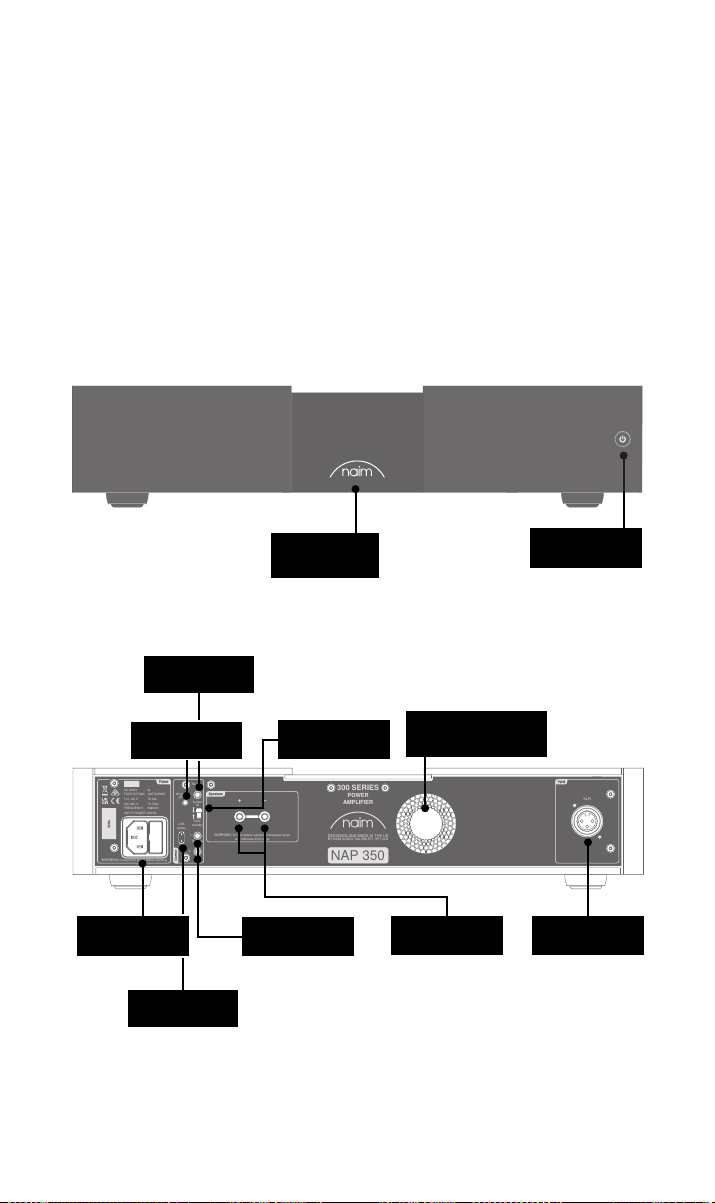
Remote
in
Remote
out
Auto
standby
Instant
on
1
2
WARNING:Disconnect power before opening
AC ONLY
FUSE RATING: ANTISURGE
1 0-120 V:1 T6.3AL
2 0-240 V:2 T3.15AL
FREQUENCY: 0 60Hz5 /
I 260VANPUT POWER:
Control
Power
Speakers
WARNING:Do not replace supplied loudspeaker plugs
with individual 4mm plugs
Input
XLR
USB
update
Brightness
Reset/
300 SERIES
POWER
AMPLIFIER
NAP 350
S/No.
DESIGNED AND MADE IN THE UK
BY NAIM AUDIO, SALISBURY, SP1 2LN
2. Características y conexiones del NAP350
Botón Reset/
Brightness
Entrada de red y
fusible
Actualización del
Remote In
USB
Logotipo con
retroiluminación
ajustable
Interruptor Instant
On/Auto Standby
Remote Out
Control de ventilación
inteligente (8 etapas)
Tomas de altavoz
Botón Power/
Standby
Entradas XLR
balanceadas
2
Page 54
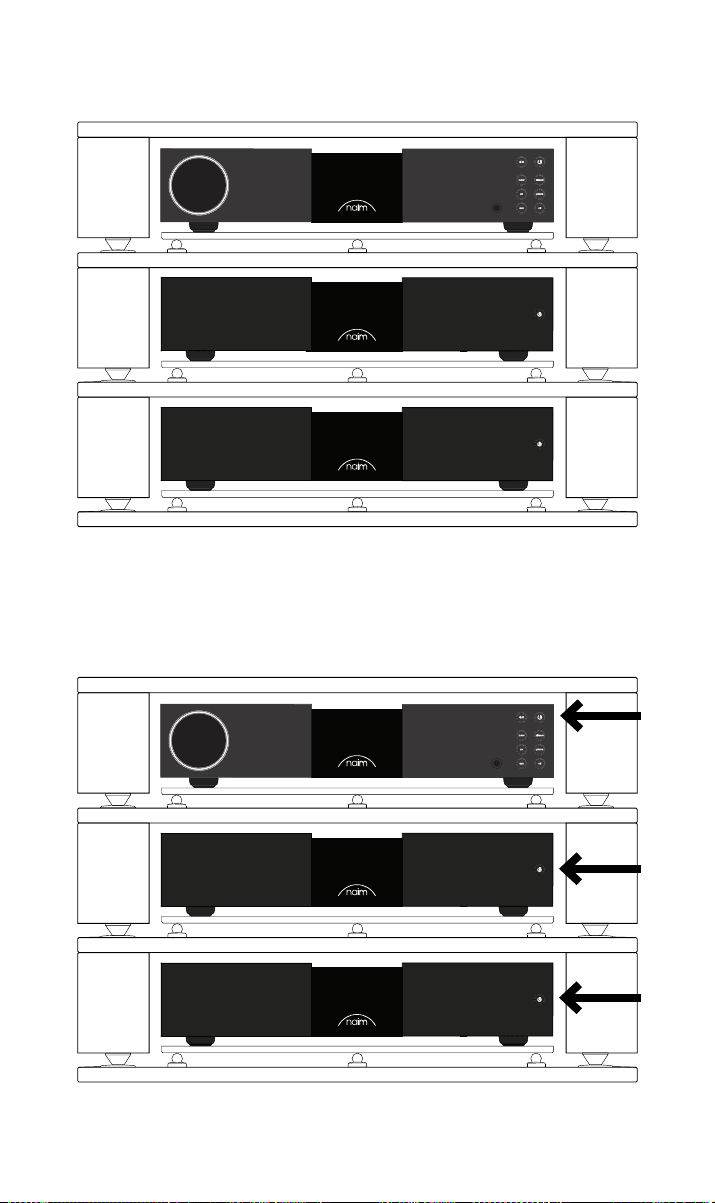
3. Conguración del NAP350
Su pareja de amplicadores NAP350 debe conectarse a un preamplicador (como el NAC
332), pero antes de hacerlo, asegúrese de que ambos componentes están en su posición
denitiva y desconectados de la red eléctrica.
Para obtener un rendimiento óptimo, utilice un soporte de alta delidad especíco (el ideal
sería Naim Fraim) con el preamplicador situado encima del amplicador de potencia, tal
y como se muestra.
Asegúrese de que todo el equipo esté apagado antes de conectarlo.
3
Page 55
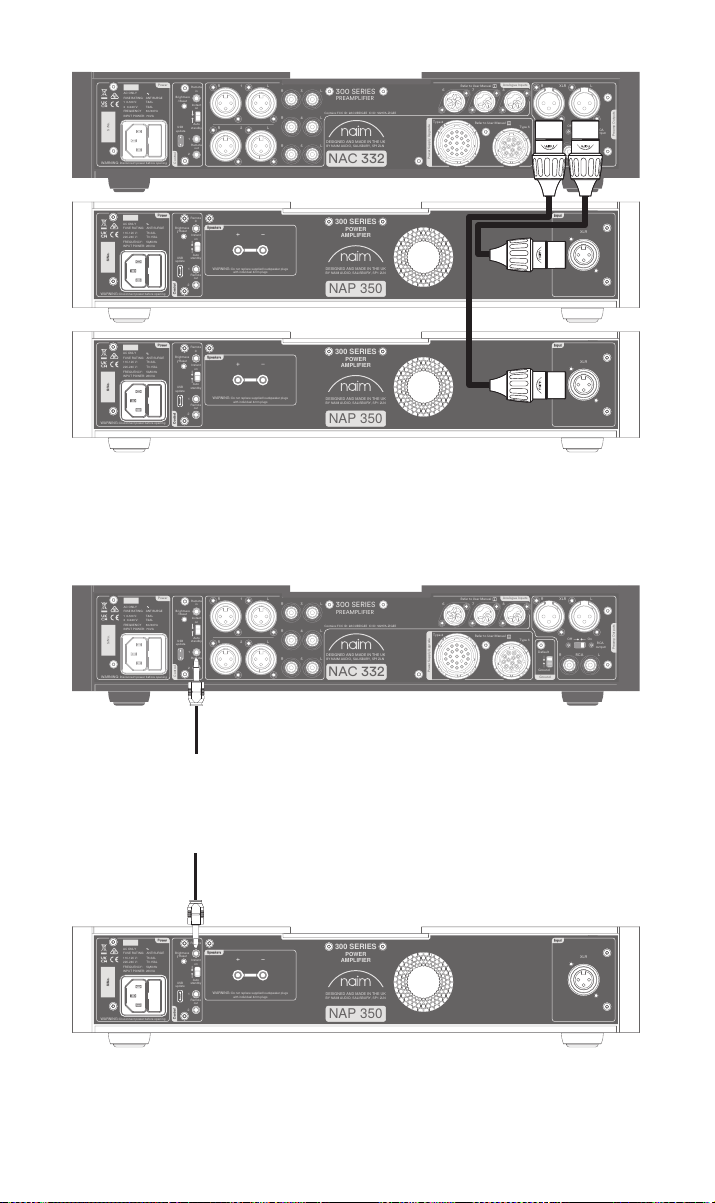
Conecte el cable XLR suministrado desde las salidas XLR balanceadas de su
WARNING:Disconnect power before opening
AC ONLY
FUSE RATING: ANTISURGE
1 0-120 V:1 T4AL
2 0-240 V:2 T2AL
FREQUENCY: 0 60Hz5/
I 70VANPUT POWER:
Power
300 SERIES
PREAMPLIFIER
NAC 332
DESIGNED AND MADE IN THE UK
BY NAIM AUDIO, SALISBURY, SP1 2LN
/ .oNS
Ground
Power Supply Upgrade
Preamp Outputs
AnalogueInputs
Ground
Default
R L
R
L
RCA
XLR
Refer to User Manual
Type 3
Type 4
Remote
in
Remote
out
Auto
standby
Instant
on
1
2
Control
USB
update
Brightness
Reset/
On
RCA
output
O
3
4
6
AnalogueInputs
R
R
R
L
L
L
5
8
7
1
2
R
L
R
L
Contains FCC ID: 2ACURZIGEE IC ID: 12217A-ZIGEE
Refer to User Manual
WARNING:
Disconnect power before opening
AC ONLY
FUSE RATING: ANTISURGE
1 0-120 V: T
4AL
2 0-240 V: T
2AL
FREQUENCY 50/60Hz
I 70VANPUT POWER:
Power
300 SERIES
PREAMPLIFIER
NAC 332
DESIGNED AND MADE IN THE UK
BY NAIM AUDIO, SALISBURY, SP1 2LN
/ .oNS
Ground
Power Supply Upgrade
Preamp Outputs
AnalogueInputs
Ground
Default
R L
R
L
RCA
XLR
Refer to User Manual
Type 3
Type 4
Remote
in
Remote
out
Auto
standby
Instant
on
1
2
Control
USB
update
Brightness
Reset/
On
RCA
output
O
3
4
6
AnalogueInputs
R
R
R
L
L
L
5
8
7
1
2
R
L
R
L
Contains FCC ID: 2ACURZIGEE IC ID: 12217A-ZIGEE
Refer to User Manual
Remote
in
Remote
out
Auto
standby
Instant
on
1
2
WARNING:Disconnect power before opening
AC ONLY
FUSE RATING: ANTISURGE
1 0-120 V:1 T6.3AL
2 0-240 V:2 T3.15AL
FREQUENCY: 0 60Hz5 /
I 260VANPUT POWER:
Control
Power
Speakers
WARNING:Do not replace supplied loudspeaker plugs
with individual 4mm plugs
Input
XLR
USB
update
Brightness
Reset/
300 SERIES
POWER
AMPLIFIER
NAP 350
S/No.
DESIGNED AND MADE IN THE UK
BY NAIM AUDIO, SALISBURY, SP1 2LN
WARNING:Disconnect power before opening
AC ONLY
FUSE RATING: ANTISURGE
1 0-120 V:1 T4AL
2 0-240 V:2 T2AL
FREQUENCY: 0 60Hz5/
I 70VANPUT POWER:
Power
300 SERIES
PREAMPLIFIER
NAC 332
DESIGNED AND MADE IN THE UK
BY NAIM AUDIO, SALISBURY, SP1 2LN
/ .oNS
Ground
Power Supply Upgrade
Preamp Outputs
AnalogueInputs
Ground
Default
R L
R
L
RCA
XLR
Refer to User Manual
Type 3
Type 4
Remote
in
Remote
out
Auto
standby
Instant
on
1
2
Control
USB
update
Brightness
Reset/
On
RCA
output
O
3
4
6
AnalogueInputs
R
R
R
L
L
L
5
8
7
1
2
R
L
R
L
Contains FCC ID: 2ACURZIGEE IC ID: 12217A-ZIGEE
Refer to User Manual
WARNING:
Disconnect power before opening
AC ONLY
FUSE RATING: ANTISURGE
1 0-120 V: T
4AL
2 0-240 V: T
2AL
FREQUENCY 50/60Hz
I 70VANPUT POWER:
Power
300 SERIES
PREAMPLIFIER
NAC 332
DESIGNED AND MADE IN THE UK
BY NAIM AUDIO, SALISBURY, SP1 2LN
/ .oNS
Ground
Power Supply Upgrade
Preamp Outputs
AnalogueInputs
Ground
Default
R L
R
L
RCA
XLR
Refer to User Manual
Type 3
Type 4
Remote
in
Remote
out
Auto
standby
Instant
on
1
2
Control
USB
update
Brightness
Reset/
On
RCA
output
O
3
4
6
AnalogueInputs
R
R
R
L
L
L
5
8
7
1
2
R
L
R
L
Contains FCC ID: 2ACURZIGEE IC ID: 12217A-ZIGEE
Refer to User Manual
Remote
in
Remote
out
Auto
standby
Instant
on
1
2
WARNING:Disconnect power before opening
AC ONLY
FUSE RATING: ANTISURGE
1 0-120 V:1 T6.3AL
2 0-240 V:2 T3.15AL
FREQUENCY: 0 60Hz5 /
I 260VANPUT POWER:
Control
Power
Speakers
WARNING:Do not replace supplied loudspeaker plugs
with individual 4mm plugs
Input
XLR
USB
update
Brightness
Reset/
300 SERIES
POWER
AMPLIFIER
NAP 350
S/No.
DESIGNED AND MADE IN THE UK
BY NAIM AUDIO, SALISBURY, SP1 2LN
Remote
in
Remote
out
Auto
standby
Instant
on
1
2
WARNING:Disconnect power before opening
AC ONLY
FUSE RATING: ANTISURGE
1 0-120 V:1 T6.3AL
2 0-240 V:2 T3.15AL
FREQUENCY: 0 60Hz5 /
I 260VANPUT POWER:
Control
Power
Speakers
WARNING:Do not replace supplied loudspeaker plugs
with individual 4mm plugs
Input
XLR
USB
update
Brightness
Reset/
300 SERIES
POWER
AMPLIFIER
NAP 350
S/No.
DESIGNED AND MADE IN THE UK
BY NAIM AUDIO, SALISBURY, SP1 2LN
preamplicador a la entrada balanceada del NAP350. Repita la operación con el otro
NAP350, y asegúrese de que los cables coincidan con los canales: la salida izquierda del
preamplicador conectada al amplicador del altavoz izquierdo, etc. Más información
en el apartado 4.2. Asegúrese de introducir correctamente los conectores XLR, con el
logotipo Naim del conector orientado hacia arriba.
Si utiliza el NAP350 con un preamplicador Naim compatible (consulte el apartado 4.4),
conecte el cable de automatización del sistema suministrado al terminal Remote Out del
preamplicador.
Conecte el otro extremo del cable de automatización del sistema al terminal «Remote In»
de cada NAP350.
4
Page 56
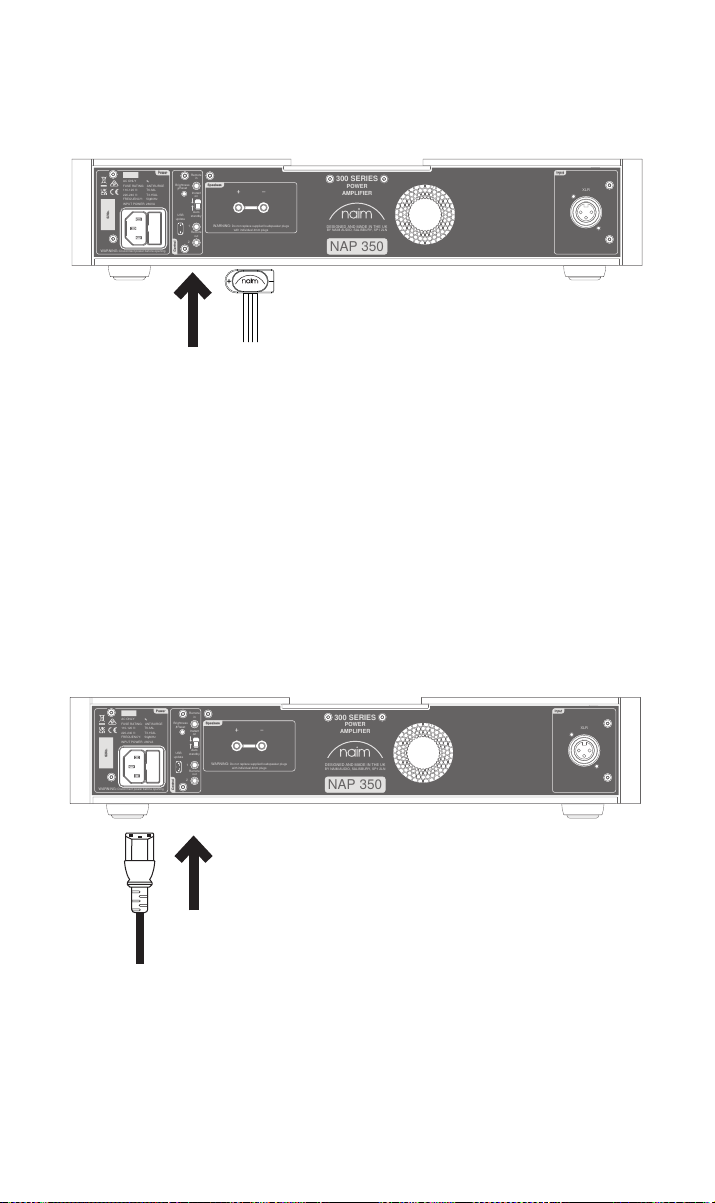
Conecte los cables de los altavoces a los NAP350 y asegúrese de que estén conectados al
Remote
in
Remote
out
Auto
standby
Instant
on
1
2
WARNING:Disconnect power before opening
AC ONLY
FUSE RATING: ANTISURGE
1 0-120 V:1 T6.3AL
2 0-240 V:2 T3.15AL
FREQUENCY: 0 60Hz5 /
I 260VANPUT POWER:
Control
Power
Speakers
WARNING:Do not replace supplied loudspeaker plugs
with individual 4mm plugs
Input
XLR
USB
update
Brightness
Reset/
300 SERIES
POWER
AMPLIFIER
NAP 350
S/No.
DESIGNED AND MADE IN THE UK
BY NAIM AUDIO, SALISBURY, SP1 2LN
Remote
in
Remote
out
Auto
standby
Instant
on
1
2
WARNING:Disconnect power before opening
AC ONLY
FUSE RATING: ANTISURGE
1 0-120 V:1 T6.3AL
2 0-240 V:2 T3.15AL
FREQUENCY: 0 60Hz5 /
I 260VANPUT POWER:
Control
Power
Speakers
WARNING:Do not replace supplied loudspeaker plugs
with individual 4mm plugs
Input
XLR
USB
update
Brightness
Reset/
300 SERIES
POWER
AMPLIFIER
NAP 350
S/No.
DESIGNED AND MADE IN THE UK
BY NAIM AUDIO, SALISBURY, SP1 2LN
altavoz correcto y de que ambos estén en fase.
Para una guía más detallada, consulte el apartado 4.3.
Por último, conecte los cables de alimentación a los dos NAP350. Consulte el apartado 5
para obtener más información sobre la alimentación de red.
5
Page 57
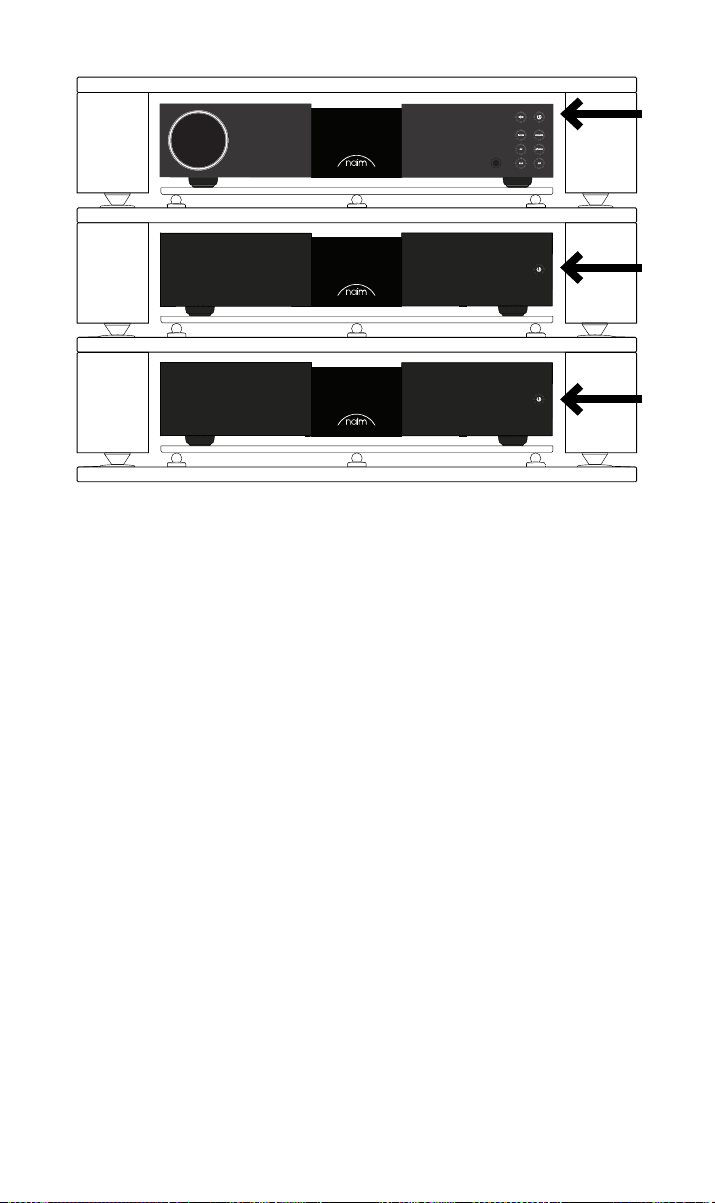
Antes de encender los NAP350, asegúrese de que el volumen del preamplicador esté al
mínimo. Si utiliza la conexión de automatización del sistema con un preamplicador Naim,
los amplicadores de potencia se encenderán automáticamente al pulsar cualquiera de
los botones de puesta en espera. Si utiliza un preamplicador diferente, pulse el botón de
puesta en espera del panel frontal de los amplicadores NAP350.
4. Consejos de instalación y uso del NAP350
Sabemos que está deseando disfrutar de su nuevo NAP350, pero le aseguramos
que sonará aún mejor si sigue estas pautas, que están diseñadas para que utilice su
amplicador de potencia sin riesgos.
4.1 Desembalaje y colocación
El NAP 350 tiene componentes de alta calidad, incluido un sólido transformador de
potencia y una carcasa de aluminio resistente. Es por eso que el NAP 350 pesa 16,5 kg, así
que tenga cuidado al levantarlo o moverlo, y asegúrese de que la supercie sobre la que
piensa colocarlo es estable y puede soportar su peso.
Para obtener un rendimiento óptimo, utilice los productos Naim en un bastidor para
equipos de alta delidad especíco (el ideal sería Naim Fraim o Fraim Lite) para minimizar
las vibraciones que pueden afectar al sonido. ¿No tiene espacio para un bastidor?
Considere la posibilidad de colocar su NAP350 sobre un estante de cristal Fraim en un
mueble adecuado, para proporcionar un soporte sólido pero que pase desapercibido.
El NAP350 cuenta con refrigeración asistida por ventilador, diseñada para activarse
cuando el amplicador funcione a volúmenes altos durante un tiempo prolongado.
Asegúrese de que la salida de calor no esté tapada; no recomendamos utilizar el NAP350
en un armario cerrado y sin ventilación.
No apile nunca los productos Naim uno encima del otro, y si los coloca al lado, deje
cierta distancia entre ellos. Asimismo, los equipos conectados no deben estar demasiado
separados: la distancia máxima de separación es la que permite el cable de interconexión
suministrado.
Para reducir el riesgo de zumbido audible desde los altavoces, no coloque las fuentes de
alimentación y los amplicadores de potencia cerca de los componentes de fuente.
6
Page 58
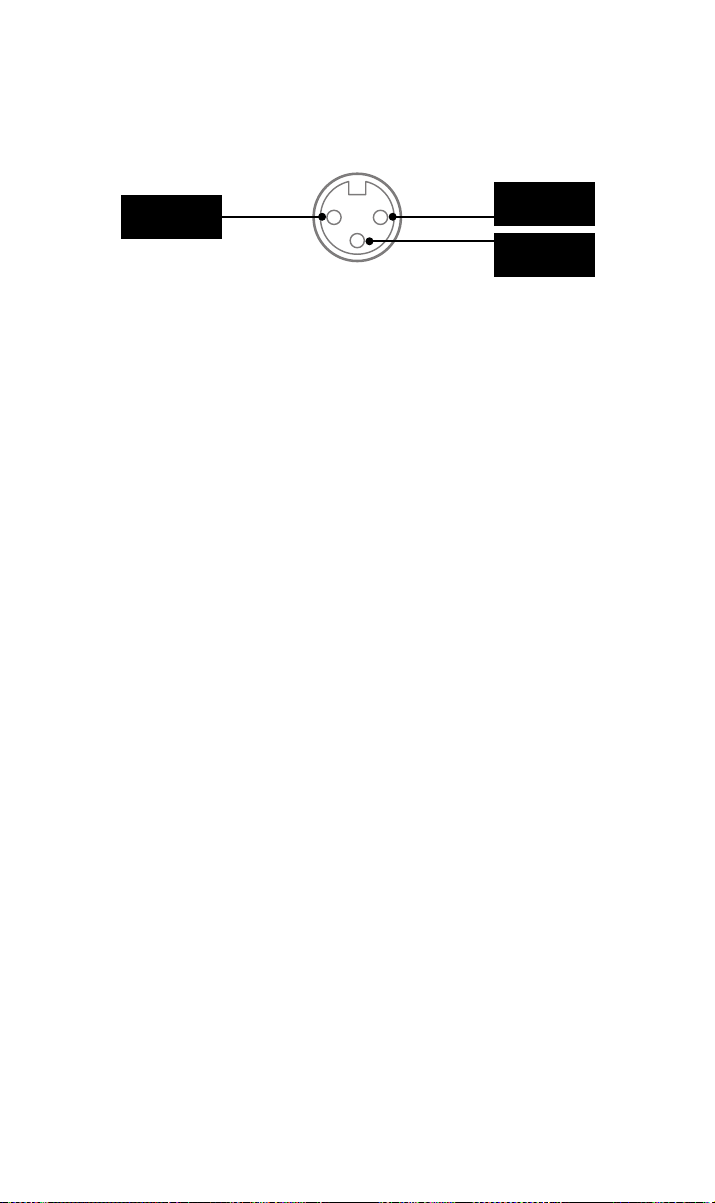
4.2 Información de la conexión de entrada
El NAP350 cuenta con entradas balanceadas XLR estándar de la industria para el audio.
Las conexiones balanceadas son una solución poco ruidosa y pueden recorrer largas
distancias, lo que proporciona más libertad a la hora de colocar el NAP350.
Positivo/Caliente
Existen cables adaptadores para conectar el NAP350 a preamplicadores con salidas RCA
o DIN.
Tierra
Negativo/Frío
4.3 Cable y conectores del altavoz
Para obtener un rendimiento óptimo, utilice el cable de altavoz Naim NACA5 o Super
Lumina, conectado en la dirección correcta (por ejemplo, las echas del NACA5 apuntan
hacia el altavoz).
Es importante que el par de cables del altavoz tengan la misma longitud, hasta un máximo
recomendado de 20m. A diferencia de algunos diseños anteriores de Naim, no exigimos
una longitud mínima del cable del altavoz, pero le sugerimos que evite longitudes
inferiores a 2m.
El NAP350 incluye conectores de altavoz personalizados de Naim Audio, que
proporcionan la mejor conexión eléctrica de impedancia compatible y garantizan que su
amplicador cumpla con la normativa de seguridad vigente.
Cuando conecte los altavoces, asegúrese de que estén «en fase», es decir, que la salida
positiva de altavoces del amplicador esté conectada a la entrada positiva del altavoz, y
que los amplicadores izquierdo y derecho vayan al altavoz correcto.
4.4 Automatización del sistema
Si utiliza el NAP350 con un preamplicador compatible, como el NAC 332, puede
sincronizar el encendido/apagado y el brillo del logotipo en todo el sistema conectándolo
con los cables ópticos de automatización del sistema suministrados. Solo tiene que
conectar los cables desde los terminales «Remote Out» del preamplicador a los
terminales «Remote In» de los NAP350. Puede conectar más amplicadores de potencia
en los terminales «Remote Out» (salida remota) del NAP350.
Si necesita una distancia mayor entre su preamplicador y el NAP350 de la que permite el
cable suministrado, puede utilizar un cable óptico de 3,5mm a 3,5mm de repuesto con la
longitud necesaria. También es posible utilizar cables analógicos estándar con conectores
de 3,5mm, pero un cable óptico proporcionará el mejor rendimiento.
4.5 Encendido y apagado
Cuando haya realizado todas las conexiones de entrada y salida, conecte el cable de
alimentación suministrado a sus NAP350 y a la red eléctrica. Recuerde que su fuente
(como un reproductor streaming o CD), y cualquier fuente de alimentación externa
asociada deberán estar encendidas antes de encender sus amplicadores NAP350.
Ahora, puede encender los amplicadores NAP350, ya sea encendiendo su
preamplicador Naim – conectado a través del sistema de automatización – o
simplemente pulsando el botón de encendido del panel frontal de los amplicadores de
potencia.
7
Page 59

El procedimiento es el mismo para apagar sus amplicadores NAP350: apague su
preamplicador Naim – conectado a través de la automatización del sistema – o pulse
simplemente el botón de encendido del panel frontal de los amplicadores de potencia
para ponerlos en modo de espera. Evite utilizar el interruptor de la toma de corriente para
apagar sus amplicadores.
4.6 Conguración de la energía de reserva
Por defecto, el NAP350 está congurado en "Auto Standby", es decir, entra
automáticamente en el modo Standby (en el que consume menos de 0,5W de potencia)
tras 19 minutos de inactividad. El sensor de música activará el amplicador del modo
Standby cuando detecte una señal de entrada.
Para obtener una calidad de sonido óptima, cambie el ajuste del modo Standby del
panel trasero a "Instant on", que mantiene todos los circuitos de audio sensibles
permanentemente encendidos.
Tenga en cuenta que el sensor de música se desactiva cuando recibe un comando de
automatización del sistema: si el NAP350 se pone manualmente en espera mediante el
botón Standby o cuando se activa "Instant On".
4.7 Ajustes de brillo del logotipo de Naim
Puede elegir el nivel de brillo del logotipo de Naim en su NAP350. Si utiliza un
preamplicador Naim conectado a través de la automatización del sistema, puede
sincronizar el brillo de todos los logotipos desde el preamplicador. También puede
congurar el NAP350 mediante el interruptor Brightness del panel trasero.
TENGA EN CUENTA que el botón Brightness también funciona como un botón de reinicio
completo del NAP350 cuando se deja pulsado durante 3 segundos, por lo que es mejor
que elija el brillo del logotipo de forma rápida y decisiva.
4.8 Actualización del USB
El NAP350 cuenta con un terminal micro USB, pero es solo para uso de servicio.
5. Alimentación de red, toma de tierra y más
Utilice solo los cables de alimentación y los enchufes de red que vienen con el NAP350,
o el cable de alimentación Naim Power-Line. Si se emplean fusibles, deben instalarse de
13A. No conecte resistencias eléctricas que dependan de la tensión ni supresores de ruido
en los enchufes de red, ya que degradan el suministro eléctrico y el sonido.
5.1 Toma de tierra
Para evitar zumbidos, la señal de tierra de todo el sistema debe conectarse a la puesta a
tierra de red solo en un lugar. Lo normal es que esto se haga en la fuente principal. Por
ejemplo, una unidad de transmisión Naim cuenta con un interruptor Ground Lift. Ajústelo
a «Default» si no hay otra fuente que conecte la puesta a tierra de la red a la puesta a tierra
de la señal. Este ajuste proporcionará la mejor calidad de sonido.
5.2 Enchufes de red no recableables
Si se corta un enchufe no recableable de un cable de red (por cualquier motivo), el enchufe
DEBE desecharse de forma que quede totalmente inutilizable. Existe un riesgo de descarga
considerable si el enchufe cortado se inserta en la toma de red.
5.3 Circuitos e interferencias de red
Un sistema de alta delidad suele compartir un circuito de alimentación de red con otros
electrodomésticos. Algunos de ellos pueden causar una distorsión que se manieste como
un zumbido mecánico en los transformadores de red, incluido el gran transformador del
NAP350.
8
Page 60

El zumbido de un transformador no se transmite por los altavoces y no tiene ningún efecto
en el rendimiento del sistema; sin embargo, puede reducirlo si coloca correctamente su
sistema Naim, al igual que un circuito de red separado y especíco. Dicho circuito (con un
valor ideal de 30 o 45A) también mejorará el rendimiento del sistema de manera general.
Para la instalación de un circuito de alimentación independiente, solicite consejo a un
electricista cualicado.
5.4 Precauciones contra los rayos
Cuando exista riesgo de tormenta eléctrica, su sistema Naim deberá estar apagado y
totalmente desconectado de la red de suministro para protegerlo de posibles daños.
6. Más consejos y sugerencias
Ahora que tiene todo lo esencial resuelto, pasemos a otras cosas que puede hacer para
optimizar el rendimiento de su nuevo NAP350.
6.1 Funcionamiento
Los productos Naim se fabrican a mano con una cuidadosa selección de componentes de
alta calidad. Su NAP350 tendrá un sonido magníco nada más sacarlo de la caja, pero su
rendimiento puede mejorar aún más a medida que todos estos componentes se activen e
interactúen en sus primeras semanas de uso. Mantener el sistema encendido ayudará en
este proceso.
6.2 Limpieza del producto y conexiones
Naim recomienda usar únicamente el paño de limpieza incluido para quitar el polvo de las
supercies del producto. Los productos de limpieza contienen ingredientes que pueden
afectar negativamente a los tratamientos y acabados de la supercie.
Mantenga las clavijas y las conexiones limpias y libres de corrosión. La forma más sencilla
de hacerlo es apagar completamente su equipo Naim (y cualquier otro equipo conectado),
desenchufar todas las conexiones de sus tomas y volver a introducirlas rmemente. No se
deben utilizar limpiadores de contactos ni otros productos «mejoradores», ya que pueden
dejar restos que podrían deteriorar el sonido de su sistema.
6.3 Restablecer el NAP350
Para restablecer la conguración predeterminada del NAP350, deje pulsado el botón
"Brightness" del panel trasero durante 3 segundos.
7. Asistencia
La protección del consumidor varía de un país a otro. En la mayoría de los países, el
distribuidor donde adquirió su producto Naim será su contacto principal en caso de
problemas con la unidad. Los problemas pueden deberse a fallos del sistema o de la
instalación, por lo que es esencial emplear al máximo las capacidades de diagnóstico de su
proveedor.
Puede encontrar en línea varios artículos de ayuda para cada producto Naim en
Naimaudio.com
Si sigue teniendo problemas con su producto Naim, póngase en contacto con nosotros
directamente para obtener ayuda y asesoramiento en [email protected]
9
Page 61
8. Servicio y actualizaciones
Las reparaciones y las actualizaciones de hardware solo pueden llevarse a cabo en centros
de servicio autorizados Naim o en la propia sede central de Naim. Muchos componentes
se fabrican, se prueban y se adaptan a medida, y a menudo no es posible conseguir de
otras fuentes las piezas de repuesto adecuadas. Para cualquier solicitud de servicio o
reparación, póngase en contacto con su distribuidor local Naim.
9. Especicaciones
Amplificador de potencia de la serie 300 - NAP350
Salida de potencia 175W, 8
Consumo en reposo 26 W
Ganancia de tensión +29 dB
Impedancia de entrada
Respuesta de frecuencia -3dB @ 1,4Hz y 100kHz
Salida de fuente de
alimentación
Dimensiones (altura x
ancho x profundidad)
Peso 16,5kg
Suministro de red 115V o 230V; 50/60Hz
47k balanceado/34k simple terminado a través de un cable
adaptador
Ninguna
91,5 × 432 × 317,5mm (patas incluidas)
10. Reciclaje del producto
Los productos que muestran el logotipo del contenedor tachado no pueden
eliminarse como un residuo doméstico. Estos productos deben ser eliminados
en centros adecuados para el reciclado y la manipulación adecuada de cualquier
producto residual.
Póngase en contacto con su autoridad local para obtener información sobre el centro más
cercano.
Eliminar y reciclar los residuos adecuadamente contribuye a preservar los recursos y a
prevenir la contaminación medioambiental.
10
Page 62

Page 63

Indice
Sezione Pagina
Introduzione 1
1. Contenuto della confezione 1
2. Caratteristiche e collegamenti 2
3. Congurazione 3
4. Suggerimenti sull’installazione e sull’utilizzo 6
5. Rete elettrica, messa a terra e altre informazioni 8
6. Ulteriori suggerimenti e consigli 9
7. Assistenza 9
8. Assistenza e aggiornamenti 10
9. Speciche 10
10. Riciclaggio del prodotto 10
Page 64
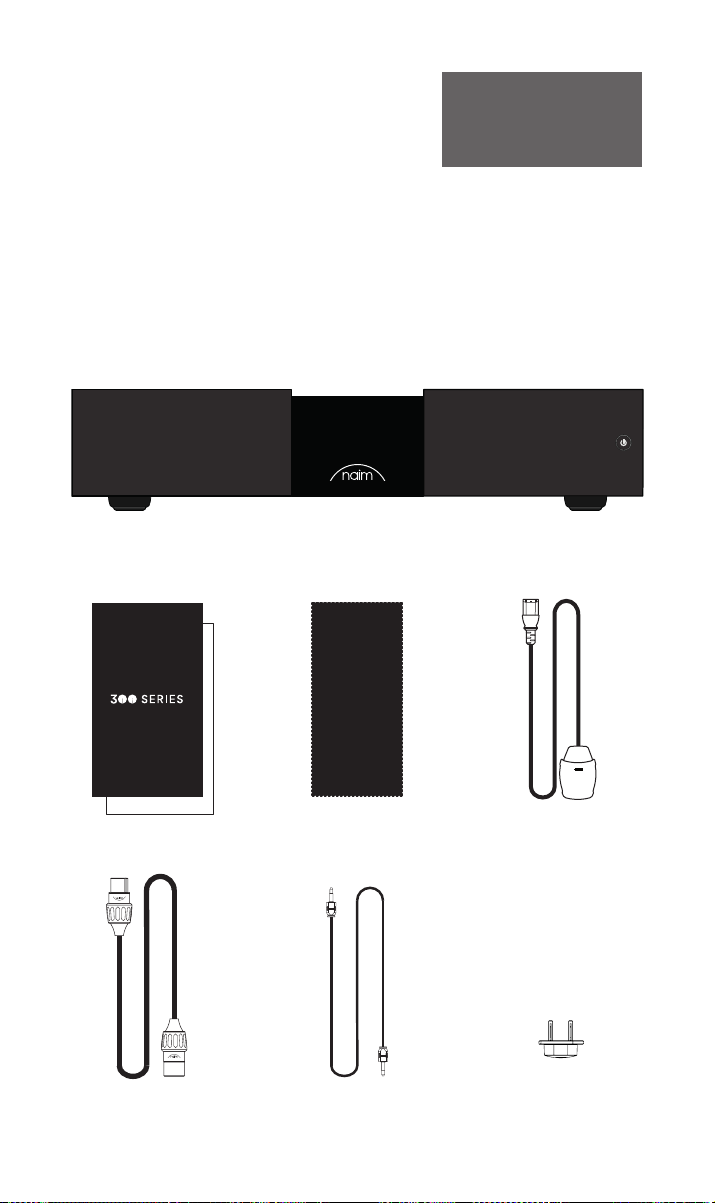
Introduzione
Ti presentiamo il tuo nuovo amplicatore di potenza Naim. Come tutti i prodotti
Naim Audio, il NAP350 mette le performance musicali in primo piano. Per aiutare
a comprendere il suo pieno potenziale, è importante attenersi alle linee guida per
un’installazione e un utilizzo semplici coperte nel presente manuale. Iniziamo con
alcuni aspetti indispensabili relativi al prodotto e alla congurazione prima di passare a
informazioni più dettagliate nella Sezione 4 a pagina 6.
Nota bene: per una versione
completa degli avvertimenti di
sicurezza, consultare il manuale
di sicurezza prescritto dalla
legge.
1. Contenuto della confezione
1x NAP350
1x Pacchetto documenti
1x XLR – XLR Collegamento
di un audio bilanciato
1
1x Panno per pulizia 1x Cavo di alimentazione
1x Cavo ottico di auto-
mazione del sistema
1x Connettore degli altoparlanti
(pre-installato sull’unità)
Page 65
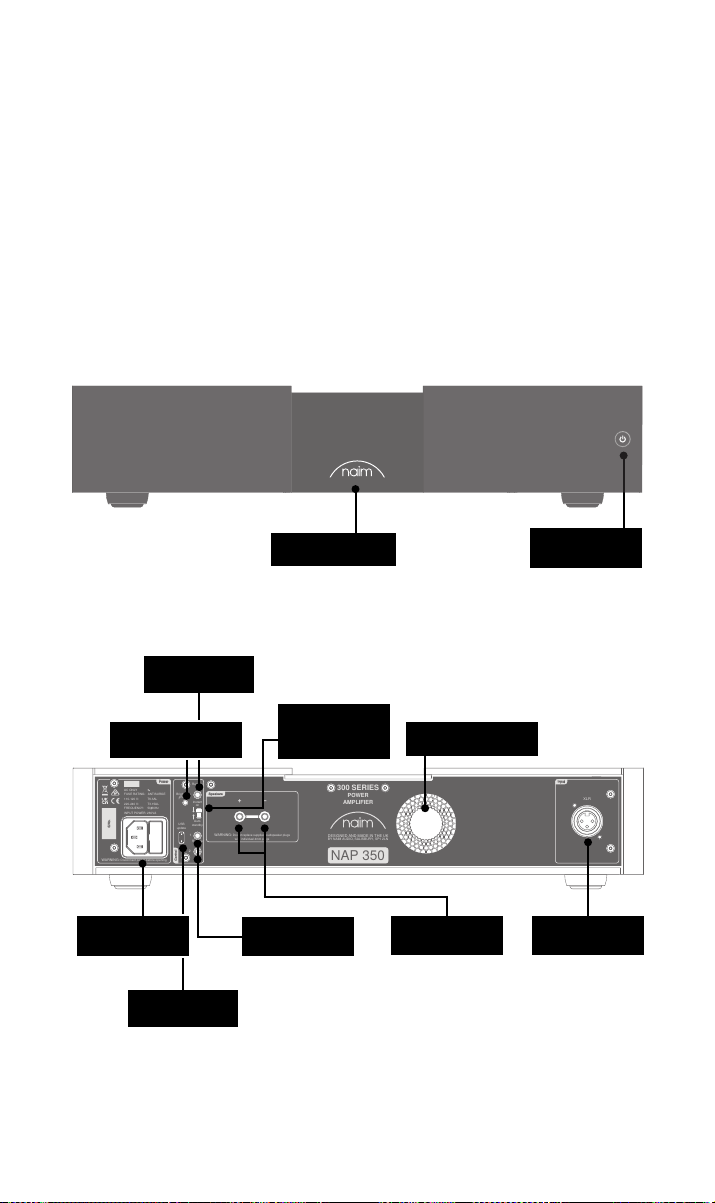
Remote
in
Remote
out
Auto
standby
Instant
on
1
2
WARNING:Disconnect power before opening
AC ONLY
FUSE RATING: ANTISURGE
1 0-120 V:1 T6.3AL
2 0-240 V:2 T3.15AL
FREQUENCY: 0 60Hz5 /
I 260VANPUT POWER:
Control
Power
Speakers
WARNING:Do not replace supplied loudspeaker plugs
with individual 4mm plugs
Input
XLR
USB
update
Brightness
Reset/
300 SERIES
POWER
AMPLIFIER
NAP 350
S/No.
DESIGNED AND MADE IN THE UK
BY NAIM AUDIO, SALISBURY, SP1 2LN
2. Funzionalità e collegamenti del NAP350
Ingresso remoto
Tasto di luminosità/
ripristino
Fusibile e ingresso
alimentazione
Aggiornamento
USB
Logo retroilluminato,
regolabile
Interruttore
di accensione
istantanea/standby
automatico
Uscita remota
Controllo intelligente
della ventola a 8 fasi
Prese degli
altoparlanti
Tasto di
accensione/
standby
Ingressi XLR
bilanciati
2
Page 66
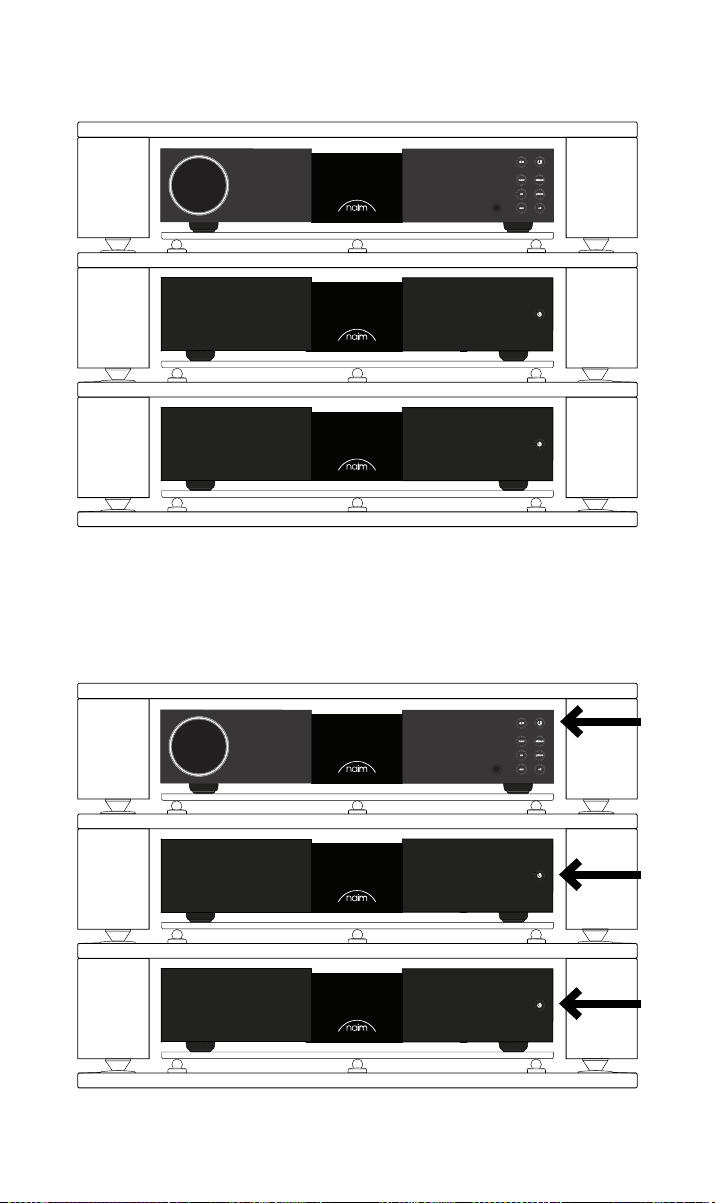
3. Congurazione del NAP350
La tua coppia di amplicatori NAP350 deve essere collegata a un pre-amplicatore (ad
es. il corrispondente NAC 332); tuttavia, prima di procedere, si prega di accertarsi che
entrambi i componenti siano nelle rispettive posizioni nali e scollegati dalla rete elettrica.
Per delle prestazioni ottimali, servirsi di un supporto hi- dedicato, in misura ideale Naim
Fraim, con il pre-amplicatore ubicato sopra l’amplicatore di potenza, come mostrato.
Assicurarsi che tutte le apparecchiature siano spente prima di realizzare i collegamenti.
3
Page 67
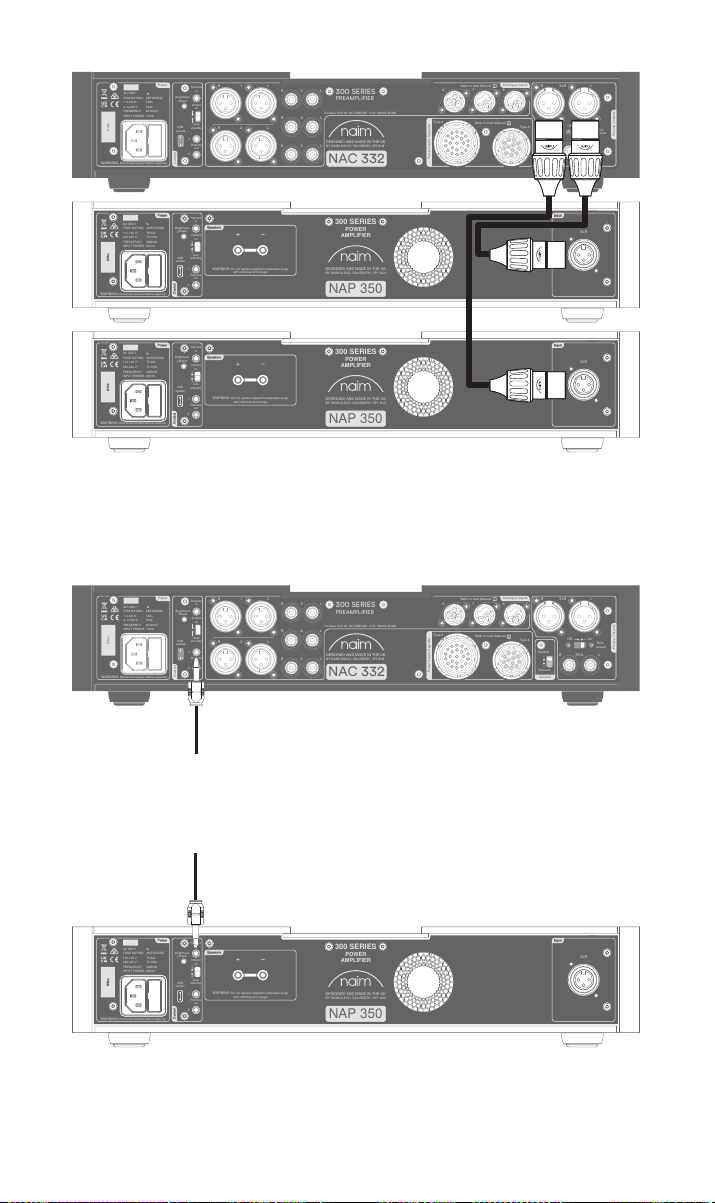
Collegare il cavo XLR in dotazione dalle uscite XLR bilanciate del pre-amplicatore
WARNING:Disconnect power before opening
AC ONLY
FUSE RATING: ANTISURGE
1 0-120 V:1 T4AL
2 0-240 V:2 T2AL
FREQUENCY: 0 60Hz5/
I 70VANPUT POWER:
Power
300 SERIES
PREAMPLIFIER
NAC 332
DESIGNED AND MADE IN THE UK
BY NAIM AUDIO, SALISBURY, SP1 2LN
/ .oNS
Ground
Power Supply Upgrade
Preamp Outputs
AnalogueInputs
Ground
Default
R L
R
L
RCA
XLR
Refer to User Manual
Type 3
Type 4
Remote
in
Remote
out
Auto
standby
Instant
on
1
2
Control
USB
update
Brightness
Reset/
On
RCA
output
O
3
4
6
AnalogueInputs
R
R
R
L
L
L
5
8
7
1
2
R
L
R
L
Contains FCC ID: 2ACURZIGEE IC ID: 12217A-ZIGEE
Refer to User Manual
WARNING:
Disconnect power before opening
AC ONLY
FUSE RATING: ANTISURGE
1 0-120 V: T
4AL
2 0-240 V: T
2AL
FREQUENCY 50/60Hz
I 70VANPUT POWER:
Power
300 SERIES
PREAMPLIFIER
NAC 332
DESIGNED AND MADE IN THE UK
BY NAIM AUDIO, SALISBURY, SP1 2LN
/ .oNS
Ground
Power Supply Upgrade
Preamp Outputs
AnalogueInputs
Ground
Default
R L
R
L
RCA
XLR
Refer to User Manual
Type 3
Type 4
Remote
in
Remote
out
Auto
standby
Instant
on
1
2
Control
USB
update
Brightness
Reset/
On
RCA
output
O
3
4
6
AnalogueInputs
R
R
R
L
L
L
5
8
7
1
2
R
L
R
L
Contains FCC ID: 2ACURZIGEE IC ID: 12217A-ZIGEE
Refer to User Manual
Remote
in
Remote
out
Auto
standby
Instant
on
1
2
WARNING:Disconnect power before opening
AC ONLY
FUSE RATING: ANTISURGE
1 0-120 V:1 T6.3AL
2 0-240 V:2 T3.15AL
FREQUENCY: 0 60Hz5 /
I 260VANPUT POWER:
Control
Power
Speakers
WARNING:Do not replace supplied loudspeaker plugs
with individual 4mm plugs
Input
XLR
USB
update
Brightness
Reset/
300 SERIES
POWER
AMPLIFIER
NAP 350
S/No.
DESIGNED AND MADE IN THE UK
BY NAIM AUDIO, SALISBURY, SP1 2LN
WARNING:Disconnect power before opening
AC ONLY
FUSE RATING: ANTISURGE
1 0-120 V:1 T4AL
2 0-240 V:2 T2AL
FREQUENCY: 0 60Hz5/
I 70VANPUT POWER:
Power
300 SERIES
PREAMPLIFIER
NAC 332
DESIGNED AND MADE IN THE UK
BY NAIM AUDIO, SALISBURY, SP1 2LN
/ .oNS
Ground
Power Supply Upgrade
Preamp Outputs
AnalogueInputs
Ground
Default
R L
R
L
RCA
XLR
Refer to User Manual
Type 3
Type 4
Remote
in
Remote
out
Auto
standby
Instant
on
1
2
Control
USB
update
Brightness
Reset/
On
RCA
output
O
3
4
6
AnalogueInputs
R
R
R
L
L
L
5
8
7
1
2
R
L
R
L
Contains FCC ID: 2ACURZIGEE IC ID: 12217A-ZIGEE
Refer to User Manual
WARNING:
Disconnect power before opening
AC ONLY
FUSE RATING: ANTISURGE
1 0-120 V: T
4AL
2 0-240 V: T
2AL
FREQUENCY 50/60Hz
I 70VANPUT POWER:
Power
300 SERIES
PREAMPLIFIER
NAC 332
DESIGNED AND MADE IN THE UK
BY NAIM AUDIO, SALISBURY, SP1 2LN
/ .oNS
Ground
Power Supply Upgrade
Preamp Outputs
AnalogueInputs
Ground
Default
R L
R
L
RCA
XLR
Refer to User Manual
Type 3
Type 4
Remote
in
Remote
out
Auto
standby
Instant
on
1
2
Control
USB
update
Brightness
Reset/
On
RCA
output
O
3
4
6
AnalogueInputs
R
R
R
L
L
L
5
8
7
1
2
R
L
R
L
Contains FCC ID: 2ACURZIGEE IC ID: 12217A-ZIGEE
Refer to User Manual
Remote
in
Remote
out
Auto
standby
Instant
on
1
2
WARNING:Disconnect power before opening
AC ONLY
FUSE RATING: ANTISURGE
1 0-120 V:1 T6.3AL
2 0-240 V:2 T3.15AL
FREQUENCY: 0 60Hz5 /
I 260VANPUT POWER:
Control
Power
Speakers
WARNING:Do not replace supplied loudspeaker plugs
with individual 4mm plugs
Input
XLR
USB
update
Brightness
Reset/
300 SERIES
POWER
AMPLIFIER
NAP 350
S/No.
DESIGNED AND MADE IN THE UK
BY NAIM AUDIO, SALISBURY, SP1 2LN
Remote
in
Remote
out
Auto
standby
Instant
on
1
2
WARNING:Disconnect power before opening
AC ONLY
FUSE RATING: ANTISURGE
1 0-120 V:1 T6.3AL
2 0-240 V:2 T3.15AL
FREQUENCY: 0 60Hz5 /
I 260VANPUT POWER:
Control
Power
Speakers
WARNING:Do not replace supplied loudspeaker plugs
with individual 4mm plugs
Input
XLR
USB
update
Brightness
Reset/
300 SERIES
POWER
AMPLIFIER
NAP 350
S/No.
DESIGNED AND MADE IN THE UK
BY NAIM AUDIO, SALISBURY, SP1 2LN
all’ingresso bilanciato del NAP350. Ripetere con l’altro NAP350 e assicurarsi che i cavi
presentino una corrispondenza tra i canali: l’uscita a sinistra del pre-amplicatore collegata
all’amplicatore di potenza usato per l’altoparlante a sinistra ecc. Maggiori informazioni
sono disponibili alla Sezione 4.2. Assicurarsi che le spine XLR siano inserite correttamente,
ovvero che il logo Naim riportato sulla spina sia rivolto verso l’alto.
Se si sta utilizzando il NAP350 con il pre-amplicatore Naim (vedere la Sezione 4.4),
collegare il cavo di automazione del sistema in dotazione al terminale di uscita remota del
pre-amplicatore.
Collegare l’altra estremità del cavo di automazione del sistema al terminale d’ingresso
remoto su ciascun NAP350.
4
Page 68
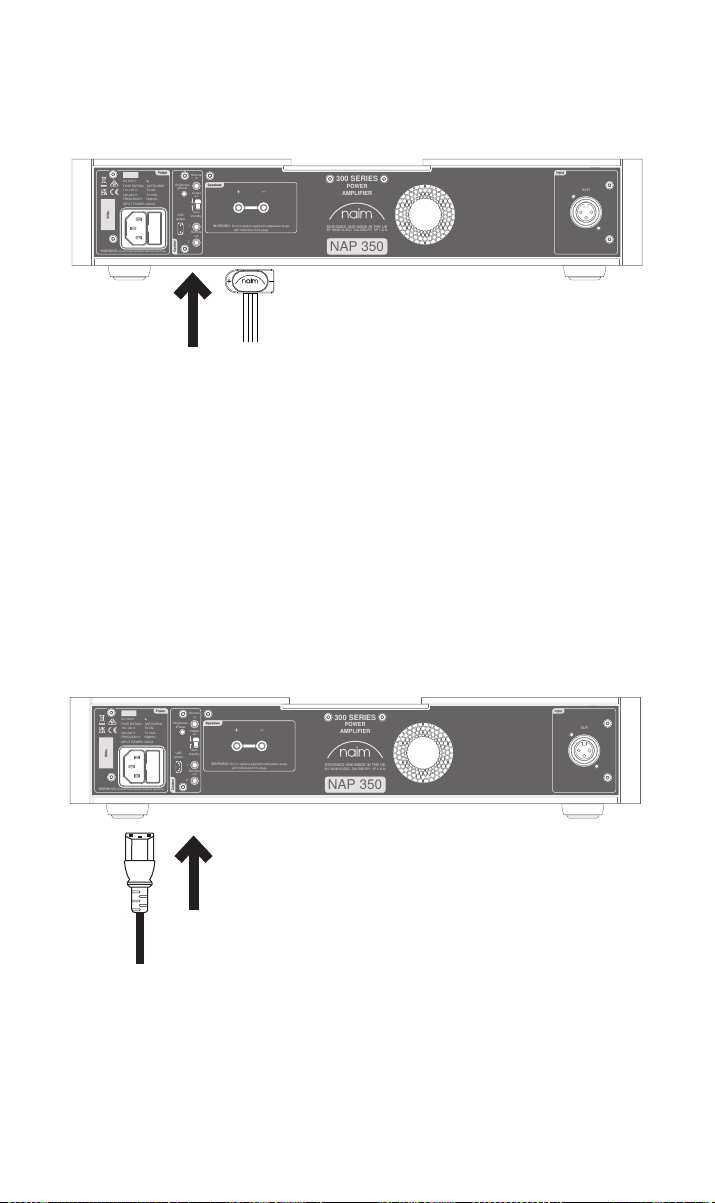
Collegare i cavi degli altoparlanti a entrambi gli amplicatori NAP350, accertandosi che
Remote
in
Remote
out
Auto
standby
Instant
on
1
2
WARNING:Disconnect power before opening
AC ONLY
FUSE RATING: ANTISURGE
1 0-120 V:1 T6.3AL
2 0-240 V:2 T3.15AL
FREQUENCY: 0 60Hz5 /
I 260VANPUT POWER:
Control
Power
Speakers
WARNING:Do not replace supplied loudspeaker plugs
with individual 4mm plugs
Input
XLR
USB
update
Brightness
Reset/
300 SERIES
POWER
AMPLIFIER
NAP 350
S/No.
DESIGNED AND MADE IN THE UK
BY NAIM AUDIO, SALISBURY, SP1 2LN
Remote
in
Remote
out
Auto
standby
Instant
on
1
2
WARNING:Disconnect power before opening
AC ONLY
FUSE RATING: ANTISURGE
1 0-120 V:1 T6.3AL
2 0-240 V:2 T3.15AL
FREQUENCY: 0 60Hz5 /
I 260VANPUT POWER:
Control
Power
Speakers
WARNING:Do not replace supplied loudspeaker plugs
with individual 4mm plugs
Input
XLR
USB
update
Brightness
Reset/
300 SERIES
POWER
AMPLIFIER
NAP 350
S/No.
DESIGNED AND MADE IN THE UK
BY NAIM AUDIO, SALISBURY, SP1 2LN
ciascuno sia collegato all’altoparlante corretto ed entrambi siano in fase.
Per delle istruzioni più dettagliate, consultare la Sezione 4.3.
Inne, collegare il cavo di rete a entrambi gli amplicatori NAP350. Per ulteriori
informazioni sulla rete elettrica, vedere la Sezione 5.
5
Page 69
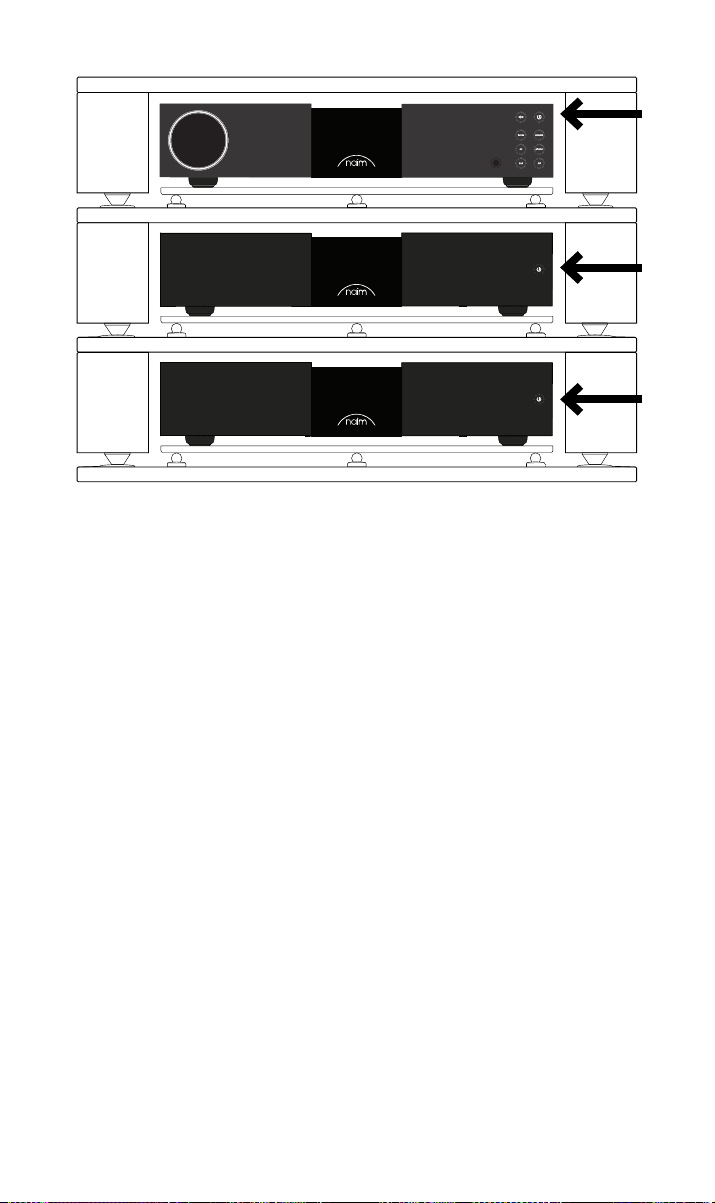
Accertarsi che il volume sia abbassato sul pramplicatore prima di accendere gli
amplicatori NAP350. Se si sta utilizzando un collegamento per l’automazione di sistema
al preamplicatore Naim, gli amplicatori di potenza si accenderanno automaticamente
quando si preme qualsiasi tasto di standby. Se si sta utilizzando un pre-amplicatore
diverso, premere il tasto di standby sul pannello anteriore di entrambi gli amplicatori
NAP350.
4. Suggerimenti sull’installazione e sull’utilizzo del
NAP350
Sappiamo che desideri ardentemente trarre vantaggio da tutti i beneci del tuo nuovo
NAP350, ma ti promettiamo che l’audio sarà persino migliore dopo aver seguito queste
linee guida, tutte studiate per aiutarti a provare l’esperienza del tuo amplicatore di
potenza senza compromessi.
4.1 Disimballaggio e collocazione
NAP 350 sfrutta componenti di alta qualità, tra cui un notevole trasformatore di potenza e
una struttura in alluminio ad elevata resistenza. Per questo motivo NAP 350 arriva al peso
di 16,5 kg, quindi occorre prestare attenzione quando lo si solleva o lo si sposta, nonché
assicurarsi che la supercie su cui si prevede di posizionarlo sia stabile e in grado di
sostenere il suo peso.
Per delle prestazioni ottimali, utilizzare i propri prodotti Naim su uno scaale dedicato
per apparecchiature hi-, idealmente Naim Fraim o Fraim Lite, al ne di ridurre al minimo
le vibrazioni che possono inuire sull’audio. Non c’è spazio per lo scaale? Invitiamo gli
utenti a considerare di posizionare il proprio NAP350 su un ripiano di vetro Fraim, su un
mobile idoneo, al ne di garantire un sostegno solido ma discreto.
Il NAP350 è provvisto di rareddamento a ventola, studiato per attivarsi quando
l’amplicatore funziona a regimi elevati per un periodo prolungato. Si prega di assicurarsi
che l’uscita del calore non sia coperta; sconsigliamo di utilizzare il NAP350 in un
armadietto chiuso e non ventilato.
6
Page 70
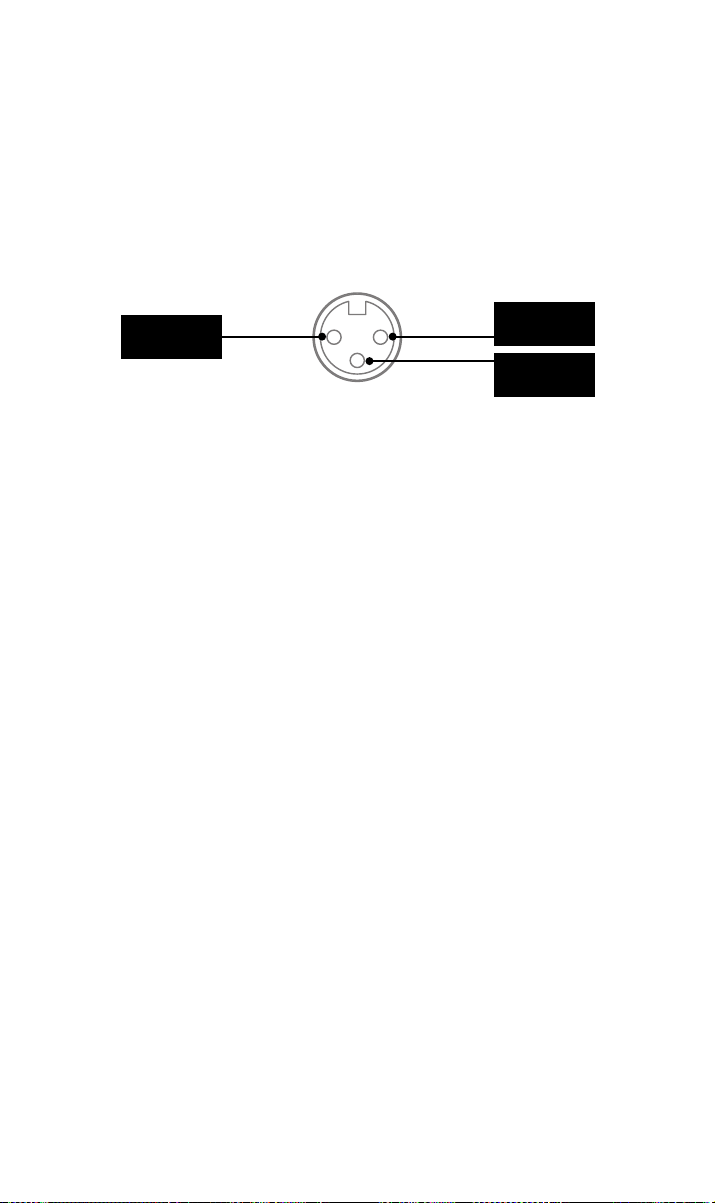
Non impilare mai i prodotti Naim uno sopra l’altro; inoltre, se sono collocati a anco, si
prega di lasciare uno spazio tra le unità. In egual misura, i prodotti collegati non devono
essere posizionati a una distanza eccessiva: la distanza di separazione massima è quella
consentita dal cavo di collegamento in dotazione.
Per ridurre il rischio di ronzio dagli altoparlanti, si prega di non posizionare gli alimentatori
o gli amplicatori di potenza in prossimità di componenti sorgente.
4.2 Dettagli del collegamento d’ingresso
Il NAP350 presenta ingressi standard bilanciati XLR per l’audio. I collegamenti bilanciati
costituiscono delle soluzioni a ridotta rumorosità e possono funzionare a distanze estese,
consentendo una collocazione più essibile del NAP350.
Positivo/Caldo
Cavi adattatori sono disponibili per consentire di collegare il NAP350 ai preamplicatori
con uscite RCA o uscite DIN.
Terra
Negativo/
Freddo
4.3 Connettori e cavi degli altoparlanti
Per delle prestazioni ottimali, utilizzare il cavo per altoparlante Naim NACA5 oppure
Super Lumina, collegato nella direzione corretta (ad es. le frecce stampigliate sul NACA5
sono rivolte verso l’altoparlante).
È importante che entrambi i cavi in coppia dell’altoparlante siano della stessa lunghezza,
no al massimo consigliato di 20m. Diversamente dai design Naim precedenti, non
prestabiliamo una lunghezza minima per il cavo dell’altoparlante, tuttavia suggeriamo di
evitare lunghezze inferiori a 2m.
Il NAP350 è fornito con connettori per altoparlanti Naim Audio che si rivelano essere il
miglior collegamento elettrico a impedenza corrispondente e assicurano che il proprio
amplicatore sia conforme alle attuali disposizioni in materia di sicurezza.
Quando si collegano gli altoparlanti, assicurarsi che siano “in fase”, in altre parole,
l’uscita positiva dell’amplicatore per l’altoparlante è collegata all’ingresso positivo
dell’altoparlante, e che gli amplicatori a sinistra e a destra siano diretti verso l’altoparlante
corretto.
4.4 Automazione del sistema
Quando si utilizza il NAP350 con un preamplicatore compatibile, come il NAC 332,
è possibile sincronizzare l’accensione/lo spegnimento e la luminosità del logo in tutto
l’impianto, collegandoli con i cavi ottici di automazione del sistema in dotazione. È
suciente collegare i cavi dai terminali di uscita remota del preamplicatore ai terminali
di ingresso remoto sugli amplicatori NAP350. È possibile collegare altri amplicatori di
potenza impiegando i terminali “Remote Out” (Uscita remota) del NAP350.
Se è necessaria una distanza maggiore tra il proprio pre-amplicatore e il NAP350 rispetto
alla lunghezza consentita dal cavo in dotazione, è possibile impiegare un cavo ottico
sostitutivo da 3,5mm a 3,5mm alla lunghezza desiderata. È anche possibile utilizzare cavi
analogici standard con connettori di 3,5mm, sebbene un cavo ottico ora le prestazioni
migliori.
4.5 Accensione/Spegnimento
Una volta realizzati tutti i collegamenti in ingresso e uscita, collegare i cavi di rete in
dotazione ai propri amplicatori NAP350 e alla rete elettrica. Nota bene: la sorgente,
come ad esempio un dispositivo di streaming o lettore CD, ed eventuali alimentatori
esterni associati devono essere accesi prima di accendere i propri amplicatori NAP350.
7
Page 71

Ora è possibile accendere il NAP350 attivando il pre-amplicatore Naim, collegato
mediante automazione di sistema, oppure semplicemente premendo il tasto di accensione
sul pannello anteriore dell’amplicatore di potenza.
Si tratta della stessa procedura per accendere gli amplicatori NAP350: spegnere il
preamplicatore Naim - collegato tramite automazione di sistema - oppure semplicemente
premere il tasto di accensione sul pannello frontale degli amplicatori di potenza, il che
li metterà in standby. Evitare di utilizzare un interruttore su presa elettrica per spegnere i
propri amplicatori.
4.6 Impostazione energetica standby
Per impostazione predenita, il NAP350 è congurato su “standby automatico”; infatti,
passa automaticamente alla modalità di standby (laddove consuma meno di 0,5W di
potenza) dopo 19 minuti di inattività. Il rilevamento della musica riattiverà l’amplicatore
dalla modalità di standby quando individua un segnale in ingresso.
Per la migliore qualità del suono, attivare l’impostazione di standby sul pannello posteriore
selezionando “Instant on”, che tiene tutti i circuiti audio sensibili permanentemente attivi.
Si prega di notare che il rilevamento della musica è disattivato quando riceve un comando
di automazione di sistema; se il NAP350 è messo manualmente in standby tramite il
pulsante di “Stanby”, oppure quando “Instant On” è abilitato.
4.7 Impostazioni di luminosità del logo Naim
È possibile selezionare il livello di luminosità del logo Naim sul proprio NAP350. Se si sta
usando un pre-amplicatore Naim collegato mediante automazione di sistema, è possibile
sincronizzare la luminosità di tutti i loghi dal preamplicatore. In alternativa, è possibile
impostare il NAP350 tramite l’interruttore a bilanciere della luminosità sul pannello
posteriore.
NOTA BENE: il tasto della luminosità funziona anche come un tasto di ripristino completo
del 350 se premuto per 3 secondi; di conseguenza, è meglio scegliere rapidamente la
luminosità del logo!
4.8 Aggiornamento USB
Il proprio NAP350 dispone di un terminale micro-USB, sebbene sia esclusivamente per
l’uso in assistenza.
5. Rete elettrica, messa a terra e altre informazioni
Usare solo i cavi di alimentazione e i connettori in dotazione con il proprio NAP350,
oppure il cavo di alimentazione Naim Power-Line aggiornato. Laddove siano utilizzati
dei fusibili, si raccomanda di utilizzare fusibili con un valore di 13Amp. Non cablare
resistenze dipendenti di tensione o soppressori di rumore ai connettori di rete, in quanto
diminuiscono il valore nominale della corrente elettrica e del suono.
5.1 Messa a terra
Per evitare il rumore di alternata, la massa del segnale dell'intero impianto deve essere
collegata alla messa a terra in un solo punto. Generalmente, questa è la sorgente primaria.
Ad esempio, un dispositivo di streaming Naim ha un interruttore Ground Lift. Impostare
quest’ultimo su “Default” se nessun'altra sorgente collega la terra alla massa del segnale.
Questa impostazione consente di fornire la migliore qualità del suono.
5.2 Spine termoformate
Se il connettore termoformato viene tagliato dal cavo di alimentazione (per qualsiasi
motivo), il connettore DEVE essere smaltito in modo da renderlo totalmente inservibile. Se
un connettore tagliato viene inserito in una presa elettrica, il rischio di incorrere in scariche
elettriche è considerevole.
8
Page 72

5.3 Circuiteria elettrica e interferenza
Solitamente, un impianto hi- condivide un circuito di rete elettrica con altri
elettrodomestici, alcuni dei quali possono causare una distorsione che può manifestarsi
sottoforma di un ronzio meccanico dai trasformatori di corrente, compreso il grande
trasformatore nel NAP350.
Il ronzio di un trasformatore non viene trasmesso attraverso gli altoparlanti e non ha
alcun eetto sulle prestazioni dell’impianto; tuttavia, una collocazione attenta del proprio
impianto Naim potrebbe ridurlo, così come potrebbe una circuiteria elettrica dedicata
a parte. Tale circuito (idealmente con una portata di 30 o 45Amp) migliorerà inoltre
le prestazioni generali del sistema. Si consiglia di consultare un elettricista qualicato
soltanto per ottenere opportuni suggerimenti sull'installazione di un circuito di corrente
separato.
5.4 Precauzioni contro i fulmini
Il proprio impianto Naim deve essere spento e completamente scollegato dalla rete
elettrica, qualora sussista il rischio di fulmini, al ne di proteggerlo da potenziali danni.
6. Ulteriori suggerimenti e consigli
Ora che si hanno a disposizione tutti gli elementi essenziali, passiamo ad alcuni altri aspetti
che si potrebbero considerare al ne di ottimizzare le prestazioni del nuovo NAP350.
6.1 Rodaggio
I prodotti Naim sono realizzati a mano in seguito a un’attenta selezione di componenti di
alta qualità. Appena uscito dalla sua scatola, il NAP350 presenterà un suono accattivante,
ma le sue prestazioni possono migliorare sensibilmente dal momento che tutti questi
diversi componenti si attivano e interagiscono nelle loro prime settimane di utilizzo.
Mantenendo il sistema acceso è possibile agevolare questo processo.
6.2 Pulizia del prodotto e dei collegamenti
Naim consiglia di utilizzare esclusivamente il panno per pulizia in dotazione per spolverare
delicatamente le superci del prodotto. Eventuali prodotti per la pulizia utilizzati
potrebbero contenere ingredienti dannosi per i rivestimenti e i trattamenti cosmetici delle
superci.
Le spine e le prese di collegamento devono essere sempre tenute pulite e senza tracce
di corrosione. Il modo più semplice per ottenere questo risultato è spengendo il proprio
prodotto Naim (ed eventuali apparecchiature collegate), scollegare tutti i collegamenti
dalle rispettive prese e premerli di nuovo fermamente. Detergenti per contatti o cosiddetti
“enhancer” non devono essere utilizzati, dal momento che possono lasciare dei residui che
inuiscono negativamente sul suono del proprio impianto.
6.3 Ripristino del NAP350
Per ripristinare il NAP350 alle impostazioni predenite, premere il tasto della luminosità
sul pannello posteriore per 3 secondi.
7. Assistenza
La legge sulla tutela dei consumatori varia di stato in stato. Nella maggior parte dei
territori, il rivenditore presso cui è stato acquistato il prodotto Naim deve essere il primo
punto di contatto qualora si abbiano problemi con la propria unità. Un problema può
essere causato da un guasto dell’impianto o dalla sua installazione. È quindi essenziale fare
pieno adamento sull'esperienza e le conoscenze tecniche del rivenditore.
È possibile trovare una serie di articoli di supporto per ciascun prodotto Naim online su
Naimaudio.com
9
Page 73

Qualora si continuino ad avere problemi con il proprio prodotto Naim, si prega di
contattarci direttamente per richiedere una consulenza o aiuto, scrivendo all’indirizzo
[email protected]
8. Assistenza e aggiornamenti
Eventuali interventi di riparazione o aggiornamenti dell’hardware devono essere eseguiti
esclusivamente da un centro di assistenza autorizzato Naim oppure presso la sede
principale di Naim. Molti componenti sono personalizzati e collaudati e molto spesso non
è possibile ottenere ricambi adeguati da altre fonti. Rivolgersi al proprio rivenditore locale
Naim con eventuali richieste di assistenza o riparazione.
9. Speciche
Amplificatore di potenza Serie 300 - NAP350
Uscita di alimentazione
Consumo al minimo
Guadagno di tensione +29 dB
Impedenza in ingresso 47k bilanciati / 34k single-ended mediante cavo adattatore
Risposta in frequenza -3dB @ 1,4 Hz e 100 kHz
Uscita di alimentazione Nessuno
Dimensioni (AxLxP) 91,5 × 432 × 317,5mm (inclusi i piedini)
Peso 16,5kg
Alimentazione elettrica 115 V o 230 V, 50/60 Hz
175Watt, 8
26 W
10. Riciclaggio del prodotto
I prodotti che riportano il simbolo del bidone crociato non possono essere smaltiti
come riuti domestici. Tali prodotti devono essere smaltiti presso gli opportuni
centri di riciclaggio e opportunamente trattati.
Per maggiori informazioni sul centro di smaltimento più vicino contattare le autorità locali.
Uno smaltimento e riciclaggio appropriati aiutano la conservazione e prevengono eventuali
contaminazioni delle risorse ambientali.
10
Page 74

Page 75

Spis treści
Rozdział Strona
Wstęp 1
1. Zawartość opakowania 1
2. Budowa i złącza 2
3. Konguracja 3
4. Wskazówki dotyczące instalacji i użytkowania 6
5. Zasilanie sieciowe, uziemienie i inne 8
6. Dodatkowe wskazówki i porady 9
7. Wsparcie 9
8. Serwis i modernizacja 10
9. Dane techniczne 10
10. Utylizacja zużytego produktu 10
Page 76
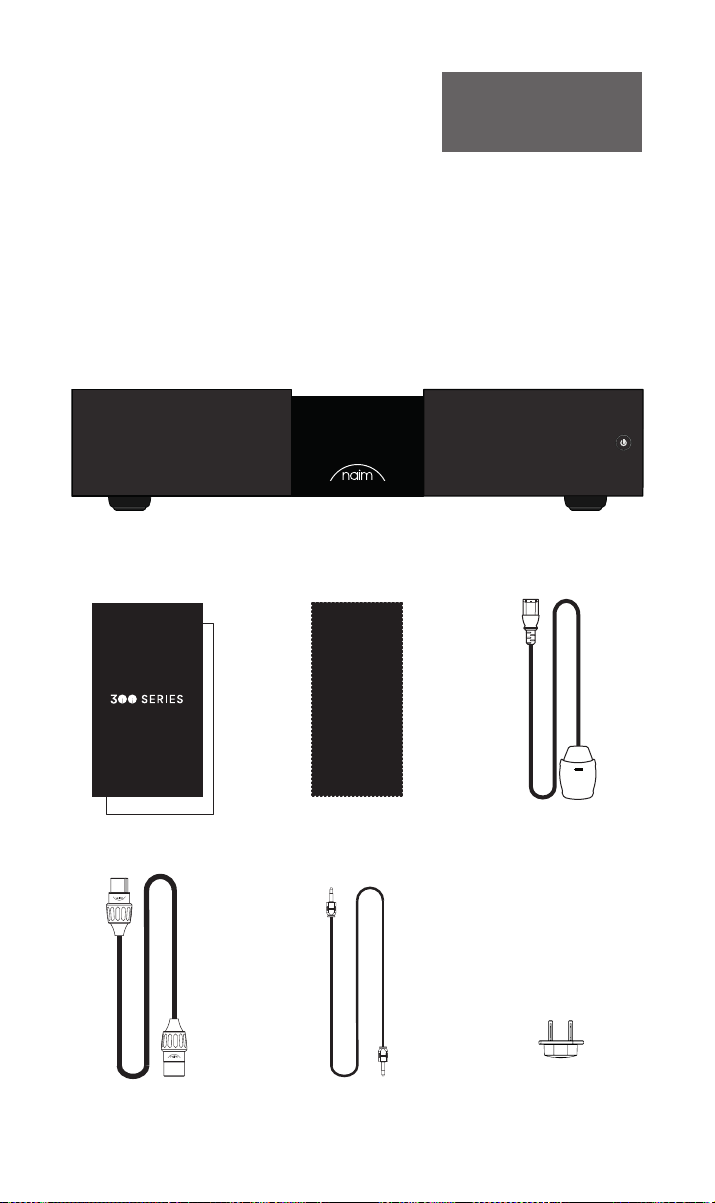
Wprowadzenie
Przedstawiamy nowy wzmacniacz mocy Naim. Jak wszystkie produkty Naim Audio,
NAP350 stawia na pierwszym miejscu brzmienie muzyczne. Aby w pełni wykorzystać
jego potencjał, należy postępować zgodnie z prostymi wytycznymi dotyczącymi instalacji
i użytkowania zawartymi w niniejszej instrukcji. Na początku przedstawimy kilka
podstawowych informacji o produkcie i konguracji, a następnie przejdziemy do bardziej
szczegółowych informacji w części 4, która zaczyna się na stronie 6.
Uwaga: Pełna treść zasad
bezpieczeństwa i ostrzeżeń
zawarta jest w instrukcji
bezpieczeństwa.
1. Zawartość opakowania
1x NAP350
1x Komplet dokumentacji
1x XLR – kabel połączeniowy
XLR (zbalansowany)
1
1x Chusteczka do czyszczenia
1x Kabel optyczny auto-
matyzacji systemu
1x Przewód zasilania
1x Złącza głośnikowe
(fabrycznie zainstalowane w
urządzeniu)
Page 77
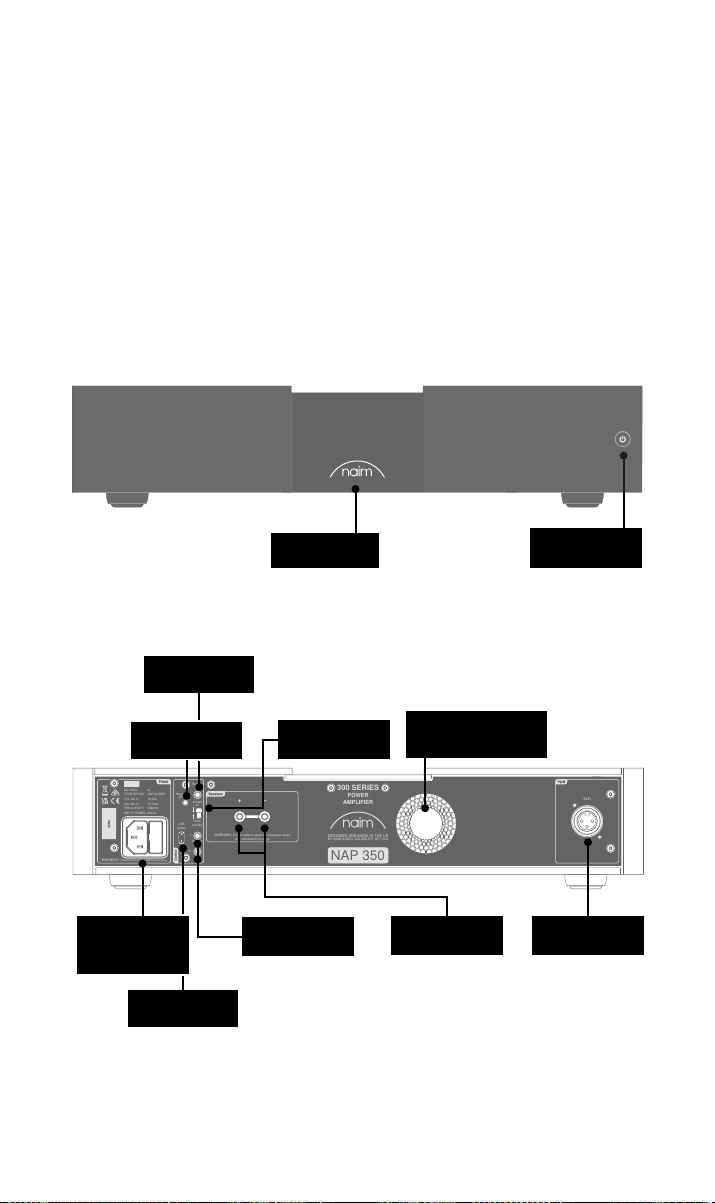
Remote
in
Remote
out
Auto
standby
Instant
on
1
2
WARNING:Disconnect power before opening
AC ONLY
FUSE RATING: ANTISURGE
1 0-120 V:1 T6.3AL
2 0-240 V:2 T3.15AL
FREQUENCY: 0 60Hz5 /
I 260VANPUT POWER:
Control
Power
Speakers
WARNING:Do not replace supplied loudspeaker plugs
with individual 4mm plugs
Input
XLR
USB
update
Brightness
Reset/
300 SERIES
POWER
AMPLIFIER
NAP 350
S/No.
DESIGNED AND MADE IN THE UK
BY NAIM AUDIO, SALISBURY, SP1 2LN
2. Budowa i złącza NAP350
Wejście i
bezpiecznik
zasilania
sieciowego
Gniazdo Remote
Przycisk jasności/
resetowania
Gniazdo
aktualizacji USB
Podświetlane,
ściemniane logo
Przycisk zasilania/
gotowości
In
Przełącznik Instant
On/Auto Standby
Gniazdo Remote
out
8-stopniowa
inteligentna regulacja
wentylatora
Gniazda
głośnikowe
Wejścia XLR
(zbalansowane)
2
Page 78
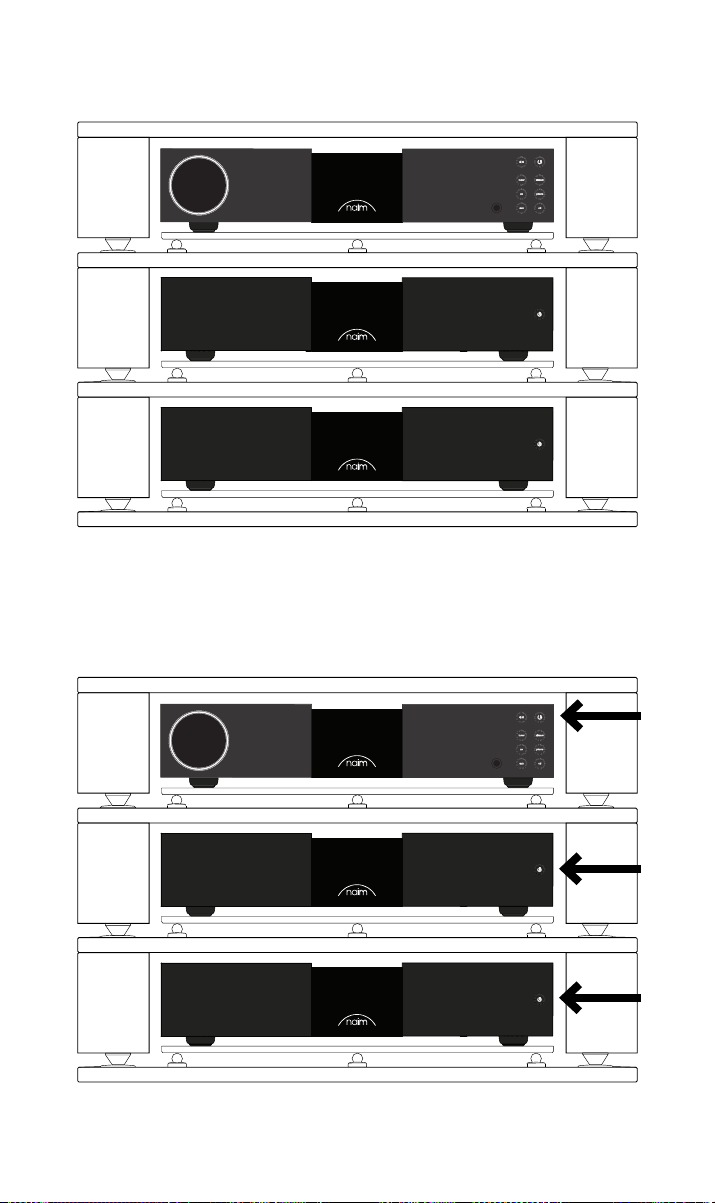
3. Konguracja NAP350
NAP350 musi być podłączony do przedwzmacniacza (np. dopasowany NAC 332), ale
zanim to zrobisz, upewnij się, że oba urządzenia są ustawione na swoich miejscach i
odłączone od zasilania.
Aby zapewnić optymalne działanie, należy użyć specjalistycznego regału hi- – najlepiej
Naim Fraim – i ustawić przedwzmacniacz nad wzmacniaczem mocy, jak pokazano na
rysunku.
Przed podłączeniem upewnij się, że wszystkie urządzenia są wyłączone.
3
Page 79
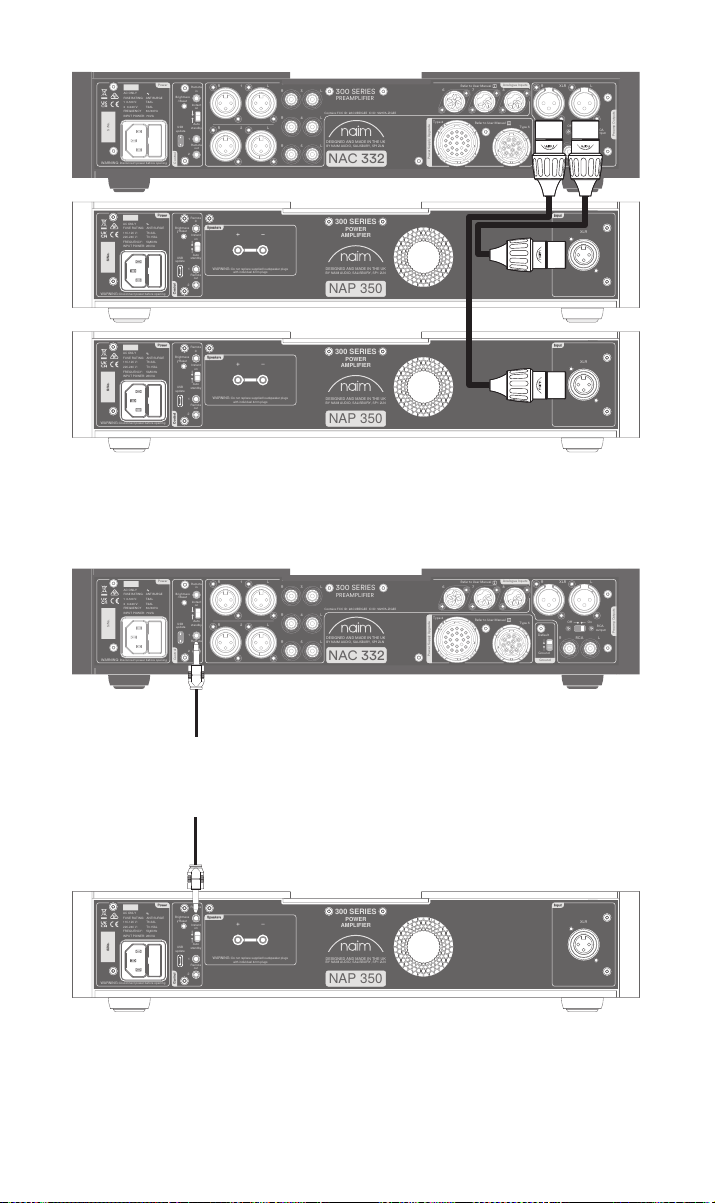
Podłącz dostarczony kabel XLR ze zbalansowanych wyjść XLR przedwzmacniacza do
WARNING:Disconnect power before opening
AC ONLY
FUSE RATING: ANTISURGE
1 0-120 V:1 T4AL
2 0-240 V:2 T2AL
FREQUENCY: 0 60Hz5/
I 70VANPUT POWER:
Power
300 SERIES
PREAMPLIFIER
NAC 332
DESIGNED AND MADE IN THE UK
BY NAIM AUDIO, SALISBURY, SP1 2LN
/ .oNS
Ground
Power Supply Upgrade
Preamp Outputs
AnalogueInputs
Ground
Default
R L
R
L
RCA
XLR
Refer to User Manual
Type 3
Type 4
Remote
in
Remote
out
Auto
standby
Instant
on
1
2
Control
USB
update
Brightness
Reset/
On
RCA
output
O
3
4
6
AnalogueInputs
R
R
R
L
L
L
5
8
7
1
2
R
L
R
L
Contains FCC ID: 2ACURZIGEE IC ID: 12217A-ZIGEE
Refer to User Manual
WARNING:
Disconnect power before opening
AC ONLY
FUSE RATING: ANTISURGE
1 0-120 V: T
4AL
2 0-240 V: T
2AL
FREQUENCY 50/60Hz
I 70VANPUT POWER:
Power
300 SERIES
PREAMPLIFIER
NAC 332
DESIGNED AND MADE IN THE UK
BY NAIM AUDIO, SALISBURY, SP1 2LN
/ .oNS
Ground
Power Supply Upgrade
Preamp Outputs
AnalogueInputs
Ground
Default
R L
R
L
RCA
XLR
Refer to User Manual
Type 3
Type 4
Remote
in
Remote
out
Auto
standby
Instant
on
1
2
Control
USB
update
Brightness
Reset/
On
RCA
output
O
3
4
6
AnalogueInputs
R
R
R
L
L
L
5
8
7
1
2
R
L
R
L
Contains FCC ID: 2ACURZIGEE IC ID: 12217A-ZIGEE
Refer to User Manual
WARNING:Disconnect power before opening
AC ONLY
FUSE RATING: ANTISURGE
1 0-120 V:1 T4AL
2 0-240 V:2 T2AL
FREQUENCY: 0 60Hz5/
I 70VANPUT POWER:
Power
300 SERIES
PREAMPLIFIER
NAC 332
DESIGNED AND MADE IN THE UK
BY NAIM AUDIO, SALISBURY, SP1 2LN
/ .oNS
Ground
Power Supply Upgrade
Preamp Outputs
AnalogueInputs
Ground
Default
R L
R
L
RCA
XLR
Refer to User Manual
Type 3
Type 4
Remote
in
Remote
out
Auto
standby
Instant
on
1
2
Control
USB
update
Brightness
Reset/
On
RCA
output
O
3
4
6
AnalogueInputs
R
R
R
L
L
L
5
8
7
1
2
R
L
R
L
Contains FCC ID: 2ACURZIGEE IC ID: 12217A-ZIGEE
Refer to User Manual
WARNING:
Disconnect power before opening
AC ONLY
FUSE RATING: ANTISURGE
1 0-120 V: T
4AL
2 0-240 V: T
2AL
FREQUENCY 50/60Hz
I 70VANPUT POWER:
Power
300 SERIES
PREAMPLIFIER
NAC 332
DESIGNED AND MADE IN THE UK
BY NAIM AUDIO, SALISBURY, SP1 2LN
/ .oNS
Ground
Power Supply Upgrade
Preamp Outputs
AnalogueInputs
Ground
Default
R L
R
L
RCA
XLR
Refer to User Manual
Type 3
Type 4
Remote
in
Remote
out
Auto
standby
Instant
on
1
2
Control
USB
update
Brightness
Reset/
On
RCA
output
O
3
4
6
AnalogueInputs
R
R
R
L
L
L
5
8
7
1
2
R
L
R
L
Contains FCC ID: 2ACURZIGEE IC ID: 12217A-ZIGEE
Refer to User Manual
Remote
in
Remote
out
Auto
standby
Instant
on
1
2
WARNING:Disconnect power before opening
AC ONLY
FUSE RATING: ANTISURGE
1 0-120 V:1 T6.3AL
2 0-240 V:2 T3.15AL
FREQUENCY: 0 60Hz5 /
I 260VANPUT POWER:
Control
Power
Speakers
WARNING:Do not replace supplied loudspeaker plugs
with individual 4mm plugs
Input
XLR
USB
update
Brightness
Reset/
300 SERIES
POWER
AMPLIFIER
NAP 350
S/No.
DESIGNED AND MADE IN THE UK
BY NAIM AUDIO, SALISBURY, SP1 2LN
Remote
in
Remote
out
Auto
standby
Instant
on
1
2
WARNING:Disconnect power before opening
AC ONLY
FUSE RATING: ANTISURGE
1 0-120 V:1 T6.3AL
2 0-240 V:2 T3.15AL
FREQUENCY: 0 60Hz5 /
I 260VANPUT POWER:
Control
Power
Speakers
WARNING:Do not replace supplied loudspeaker plugs
with individual 4mm plugs
Input
XLR
USB
update
Brightness
Reset/
300 SERIES
POWER
AMPLIFIER
NAP 350
S/No.
DESIGNED AND MADE IN THE UK
BY NAIM AUDIO, SALISBURY, SP1 2LN
Remote
in
Remote
out
Auto
standby
Instant
on
1
2
WARNING:Disconnect power before opening
AC ONLY
FUSE RATING: ANTISURGE
1 0-120 V:1 T6.3AL
2 0-240 V:2 T3.15AL
FREQUENCY: 0 60Hz5 /
I 260VANPUT POWER:
Control
Power
Speakers
WARNING:Do not replace supplied loudspeaker plugs
with individual 4mm plugs
Input
XLR
USB
update
Brightness
Reset/
300 SERIES
POWER
AMPLIFIER
NAP 350
S/No.
DESIGNED AND MADE IN THE UK
BY NAIM AUDIO, SALISBURY, SP1 2LN
zbalansowanego wejścia NAP350. Powtórz czynności dla drugiego NAP350 i upewnij
się, że kable są podłączone do tych samych kanałów: lewe wyjście przedwzmacniacza do
lewego wejścia wzmacniacza mocy itd. Więcej informacji w części 4.2. Upewnij się, że
wtyczki XLR są włożone poprawnie, czyli tak, by logo Naim na wtyczce było u góry.
Jeśli używasz NAP350 z dopasowanym przedwzmacniaczem Naim (patrz część
4.4), podłącz dostarczony kabel automatyzacji systemu do gniazda Remote Out
przedwzmacniacza.
Podłącz drugi koniec kabla automatyzacji systemu do gniazd Remote In obu NAP350.
4
Page 80
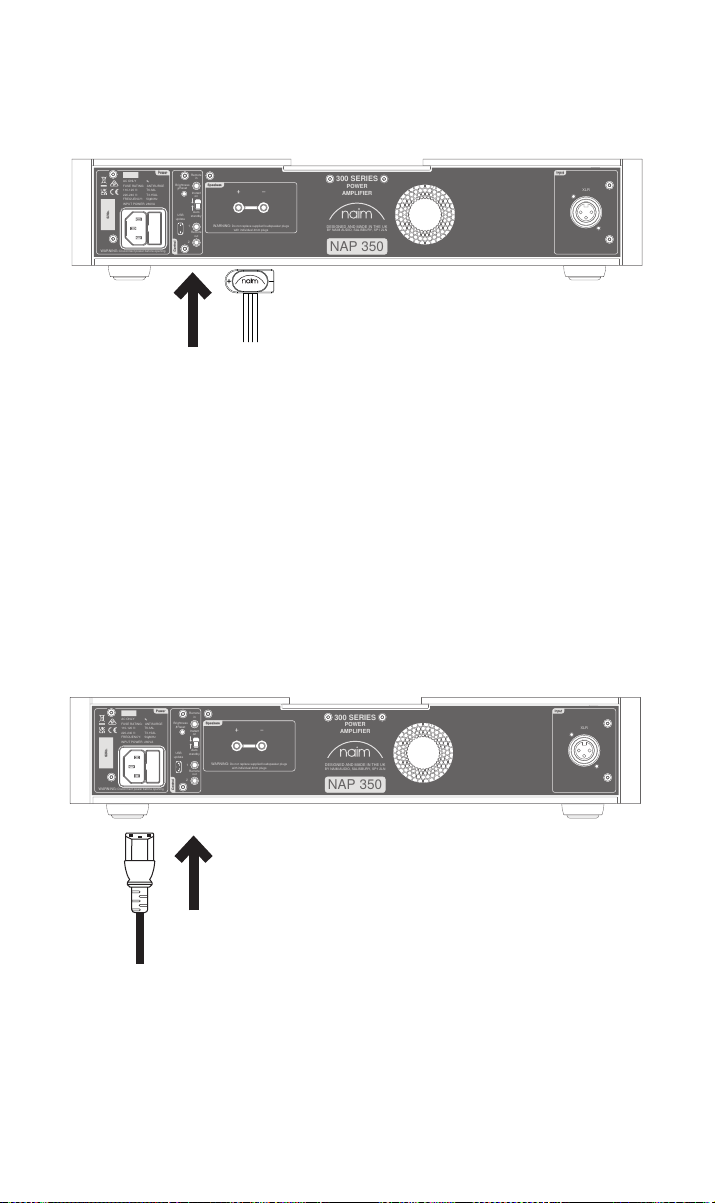
Podłącz kable głośnikowe do obu wzmacniaczy NAP350, upewniając się, że każdy z nich
Remote
in
Remote
out
Auto
standby
Instant
on
1
2
WARNING:Disconnect power before opening
AC ONLY
FUSE RATING: ANTISURGE
1 0-120 V:1 T6.3AL
2 0-240 V:2 T3.15AL
FREQUENCY: 0 60Hz5 /
I 260VANPUT POWER:
Control
Power
Speakers
WARNING:Do not replace supplied loudspeaker plugs
with individual 4mm plugs
Input
XLR
USB
update
Brightness
Reset/
300 SERIES
POWER
AMPLIFIER
NAP 350
S/No.
DESIGNED AND MADE IN THE UK
BY NAIM AUDIO, SALISBURY, SP1 2LN
Remote
in
Remote
out
Auto
standby
Instant
on
1
2
WARNING:Disconnect power before opening
AC ONLY
FUSE RATING: ANTISURGE
1 0-120 V:1 T6.3AL
2 0-240 V:2 T3.15AL
FREQUENCY: 0 60Hz5 /
I 260VANPUT POWER:
Control
Power
Speakers
WARNING:Do not replace supplied loudspeaker plugs
with individual 4mm plugs
Input
XLR
USB
update
Brightness
Reset/
300 SERIES
POWER
AMPLIFIER
NAP 350
S/No.
DESIGNED AND MADE IN THE UK
BY NAIM AUDIO, SALISBURY, SP1 2LN
jest podłączony do właściwego głośnika i oba są w fazie.
Bardziej szczegółowe wskazówki znajdują się w części 4.3.
Na koniec podłącz przewód zasilający tylko do obu wzmacniaczy NAP350. Więcej
informacji o bezpiecznym podłączeniu zasilania w rozdziale 5.
5
Page 81
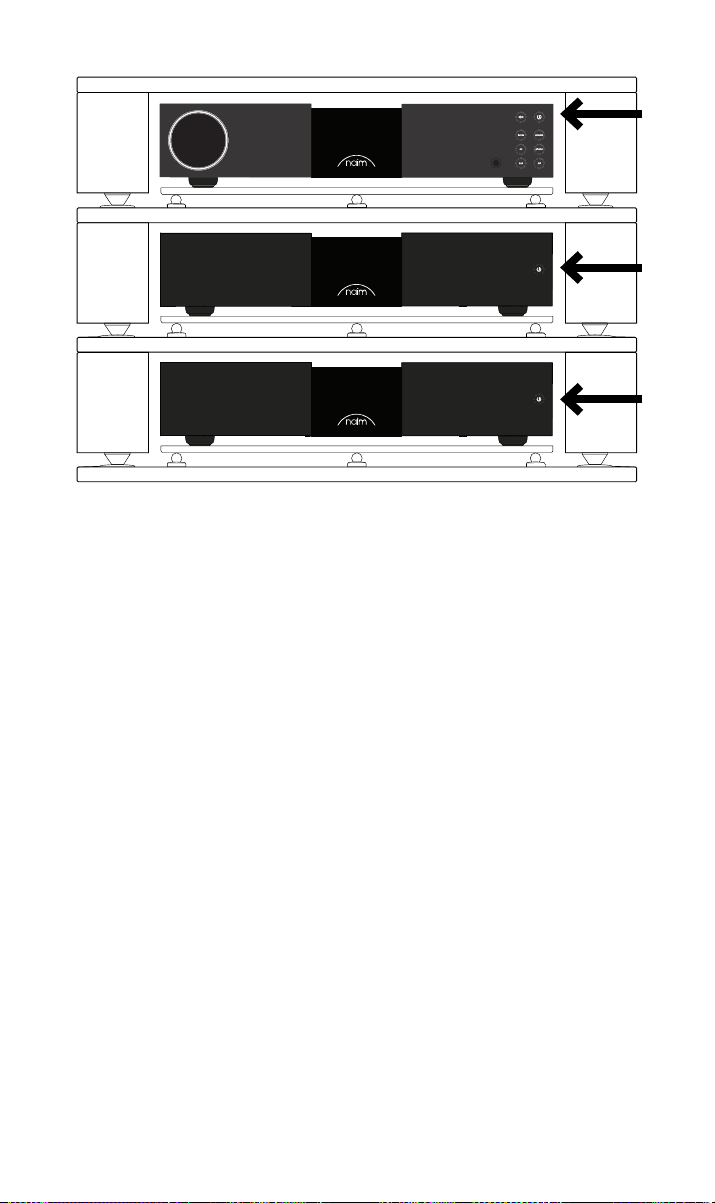
Przed włączeniem wzmacniaczy NAP350 upewnij się, że poziom głośności
przedwzmacniacza jest ustawiony na minimalny. Jeśli korzystasz z podłączenia
automatyzacji systemu z przedwzmacniaczem Naim, wzmacniacze mocy włączą się
automatycznie po naciśnięciu któregokolwiek z przycisków trybu gotowości. Jeśli
używasz innego przedwzmacniacza, naciśnij przycisk Standby na panelach przednich obu
wzmacniaczy NAP350.
4. Wskazówki dotyczące instalacji i użytkowania
NAP350
Wiemy, że nie możesz się doczekać, aby cieszyć się swoim nowym wzmacniaczem
NAP350, ale obiecujemy, że będzie on brzmiał jeszcze lepiej, gdy zastosujesz się do
poniższych wskazówek, które pomogą w wykorzystaniu pełnych możliwości wzmacniacza
mocy.
4.1 Rozpakowanie i ustawienie
Twój NAP 350 składa się z elementów wysokiej jakości, takich jak potężny transformator
mocy i trwała aluminiowa obudowa. Oznacza to, że NAP 350 waży 16,5 kg, dlatego należy
zachować ostrożność przy jego podnoszeniu lub przenoszeniu oraz upewnić się, że
powierzchnia, na której ma zostać umieszczony, jest stabilna i może utrzymać jego ciężar.
Aby zapewnić optymalne działanie ustaw urządzenia Naim na specjalistycznym regale
na sprzęt hi- – najlepiej Fraim Naim lub Fraim Lite – aby zminimalizować wibracje, które
mogą wpływać na dźwięk. Brak miejsca na regał? Warto rozważyć umieszczenie NAP350
na szklanej półce Fraim na odpowiednim meblu, aby zapewnić solidne, ale dyskretne
podparcie.
NAP350 wyposażony jest w system chłodzenia wspomagany wentylatorem, który
aktywuje się, gdy wzmacniacz pracuje przez dłuższy czas z wysokim poziomem głośności.
Upewnij się, że otwór wentylacyjny nie jest zakryty; nie zalecamy używania NAP350 w
zamkniętej, niewentylowanej szafce.
6
Page 82
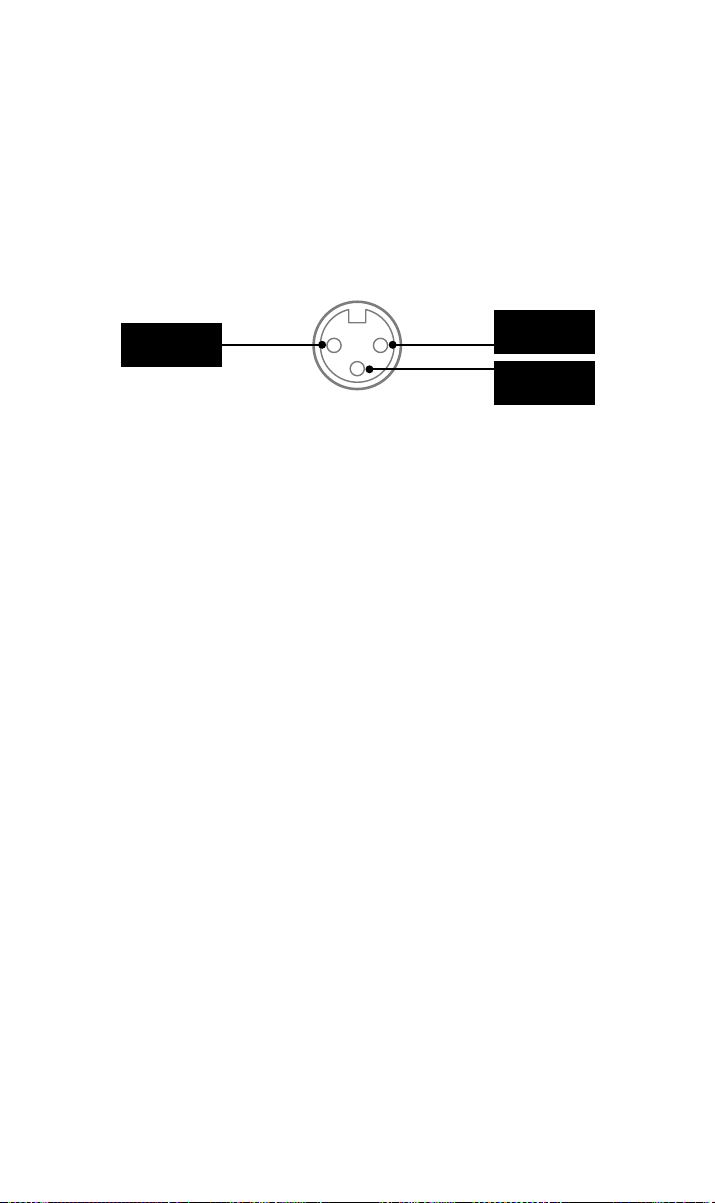
Nigdy nie stawiaj produktów Naim jeden na drugim, a jeśli umieszczasz je obok siebie,
pozostaw pewien odstęp między urządzeniami. Z drugiej strony podłączone produkty nie
powinny znajdować się zbyt daleko od siebie: maksymalna odległość między nimi jest
taka, na jaką pozwala dostarczony przewód połączeniowy.
Aby zmniejszyć ryzyko wystąpienia słyszalnego szumu z głośników, nie należy umieszczać
zasilaczy ani wzmacniaczy mocy w pobliżu komponentów źródłowych.
4.2 Szczegóły połączeń wejściowych
NAP350 ma standardowe, zbalansowane wejścia XLR dla sygnałów audio. Połączenia
zbalansowane są rozwiązaniem o niskim poziomie szumów i mogą być stosowane na
dużych odległościach, co umożliwia bardziej elastyczne rozmieszczenie NAP350.
Dodatni/Gorący
Dostępne są kable adaptacyjne umożliwiające podłączenie NAP350 do
przedwzmacniaczy z wyjściami RCA lub DIN.
Uziemienie
Ujemny/Zimny
4.3 Kable i złącza głośnikowe
Aby uzyskać optymalną jakość, należy użyć kabla głośnikowego Naim NACA5 lub Super
Lumina, podłączonego w odpowiednim kierunku (na przykład NACA5 z nadrukowanymi
strzałkami skierowanymi w stronę głośnika).
Ważne jest, aby oba przewody głośnikowe były samej długości, do zalecanej maksymalnej
długości 20 m. W odróżnieniu od niektórych wcześniejszych konstrukcji Naim, nie
narzucamy minimalnej długości przewodu głośnikowego, ale sugerujemy unikać kabli
krótszych niż 2 m.
NAP350 jest wyposażony w niestandardowe złącza głośnikowe Naim Audio – zapewniają
one najlepsze, dopasowane do impedancji połączenie elektryczne i gwarantują, że
wzmacniacz jest zgodny z obowiązującymi przepisami bezpieczeństwa.
Podczas podłączania głośników należy upewnić się, że są one w fazie – co oznacza,
że dodatnie wyjście głośnikowe wzmacniacza jest podłączone do dodatniego wejścia
głośnikowego – oraz że lewy i prawy wzmacniacz są podłączone do odpowiednich
głośników.
4.4 Automatyzacja systemu
W przypadku korzystania z NAP350 z kompatybilnym przedwzmacniaczem – takim jak
NAC 332 – można zsynchronizować włączanie/wyłączanie zasilania i jasność logo w całym
systemie, łącząc oba urządzenia za pomocą dołączonego kabla optycznego automatyzacji
systemu. Wystarczy podłączyć kable z gniazd Remote Out przedwzmacniacza do gniazd
Remote In wzmacniaczy NAP350. Istnieje możliwość podłączenia kolejnych wzmacniaczy
mocy za pomocą gniazda Remote Out wzmacniacza NAP350.
Jeśli wymagana jest większa odległość między przedwzmacniaczem a NAP350 niż
pozwala na to dostarczony kabel, można zamiennie użyć kabla optycznego 3,5 mm
na 3,5 mm o wymaganej długości. Możliwe jest również użycie standardowych kabli
analogowych ze złączami 3,5 mm, ale kabel optyczny zapewnia najlepsze działanie.
4.5 Włączanie/Wyłączanie
Po wykonaniu wszystkich połączeń wejściowych i wyjściowych, podłącz dostarczony
przewód zasilający do NAP350 i do gniazdka elektrycznego. Uwaga: Żródła – takie jak
streamer lub odtwarzacz CD – i wszelkie związane z nim zewnętrzne zasilacze powinny
być włączone przed włączeniem wzmacniaczy NAP350.
7
Page 83

Możesz teraz włączyć wzmacniacze NAP350 albo poprzez włączenie przedwzmacniacza
Naim – podłączonego kablem automatyzacji systemu – albo po prostu naciskając
przyciski zasilania na panelach przednich wzmacniaczy mocy. Procedura wyłączania
wzmacniaczy NAP350 jest taka sama: wyłącz przedwzmacniacz Naim – podłączony
kablem automatyzacji systemu – lub po prostu naciśnij przyciski zasilania na panelach
przednich wzmacniaczy mocy, co spowoduje przejście w stan czuwania. Unikaj wyłączania
wzmacniaczy za pomocą przełącznika w gniazdku elektrycznym.
4.6 Ustawienia stanu gotowości
Domyślnie, NAP350 jest ustawiony w trybie „Auto Standby” – automatycznie przechodzi
w tryb gotowości (w którym pobiera mniej niż 0,5 W) po 19 minutach bezczynności.
Funkcja Music Sensing wybudza wzmacniacz z trybu czuwania, gdy wykryty zostanie
sygnał wejściowy.
Aby uzyskać najwyższą jakość dźwięku, należy zmienić ustawienie trybu gotowości na
panelu tylnym na „Instant on” (natychmiastowe włączenie), dzięki czemu wszystkie czułe
obwody audio będą stale zasilane.
Należy pamiętać, że funkcja Music Sensing jest wyłączana po otrzymaniu polecenia
automatyzacji systemu; jeżeli urządzenie NAP350 zostanie ręcznie przełączone w tryb
gotowości za pomocą przycisku Standby lub gdy wybrane jest ustawienie „Instant On”.
4.7 Ustawienia jasności logo Naim
Możesz wybrać poziom jasności logo Naim na wzmacniaczu NAP350. Jeśli używasz
przedwzmacniacza Naim podłączonego przez kabel automatyzacji systemu, możesz
zsynchronizować jasność logo na wszystkich urządzeniach. Alternatywnie można użyć
przełącznika jasności na tylnym panelu NAP350.
UWAGA: przycisk jasności działa również jako przycisk pełnego resetowania NAP350, gdy
zostanie przytrzymany przez 3 sekundy – lepiej więc dokonać wyboru jasności logo szybko
i zdecydowanie!
4.8 Aktualizacja przez USB
NAP350 ma gniazdo micro USB przeznaczone wyłącznie do użytku serwisowego.
5. Zasilanie sieciowe, uziemienie i inne
Podłączenie musi być wykonane przy użyciu przewodu i wtyczki sieciowej dostarczonej
wraz z NAP350 lub kabla sieciowego Naim Power-Line. Jeśli wtyczka zawiera wbudowany
bezpiecznik, jego wartość znamionowa musi wynosić 13A. W obwodzie wtyczki sieciowej
nie należy umieszczać rezystorów nieliniowych ani reduktorów szumu. Obniżają one jakość
zasilania i dźwięku.
5.1 Uziemienie
Aby uniknąć tętnienia, uziemienie całego systemu powinno być podłączone do uziemienia
tylko w jednym punkcie. Zazwyczaj jest to główne źródło. Przykładowo, streamer Naim
posiada przełącznik uziemienia. Ustaw go w pozycji „default”, jeśli żadne inne źródło nie
łączy uziemienie sieci z uziemieniem sygnału. To ustawienie zapewnia najlepszą jakość
dźwięku.
5.2 Wtyczki sieciowe wbudowane w kablu
Jeśli zintegrowana wtyczka elektryczna zostanie odcięta od przewodu sieciowego (z
dowolnego powodu), musi zostać zutylizowana, ponieważ nie będzie nadawać się do
użytku. Włożenie odciętej wtyczki do gniazdka elektrycznego grozi porażeniem prądem.
8
Page 84

5.3 Obwody zasilania sieciowego i interferencja
System hi- zazwyczaj dzieli obwód zasilania z innymi urządzeniami domowymi, a niektóre
z nich mogą powodować zniekształcenia, objawiające się jako mechaniczne buczenie
transformatorów sieciowych, w tym dużego transformatora NAP350.
Buczenie transformatora nie jest emitowane przez głośniki i nie ma wpływu na działanie
systemu; można jednak mu przeciwdziałać, zmieniając położenie systemu Naim lub
odseparowując obwód zasilania sieciowego. Posiadanie takiego obwodu (najlepiej o
prądzie znamionowym 30 lub 45A) będzie miało też ogólnie pozytywny wpływ na
działanie systemu. Szczegółowych porad dotyczących wykonania oddzielnego obwodu
zasilania sieciowego może udzielić wykwalikowany elektryk.
5.4 Środki ochrony przeciwprzepięciowej
System Naim powinien być wyłączony i całkowicie odłączony od sieci zasilającej, gdy
istnieje ryzyko uderzenia pioruna, w celu ochrony przed potencjalnymi uszkodzeniami.
6. Dodatkowe wskazówki i porady
Po omówieniu najważniejszych kwestii, możemy przedstawić kilka rzeczy, które możesz
zrobić, aby zoptymalizować działanie nowego NAP350.
6.1 Docieranie
Produkty Naim są wykonywane ręcznie ze starannie dobranej gamy wysokiej jakości
komponentów. NAP350 będzie brzmiał znakomicie po wyjęciu z pudełka, ale jego
brzmienie może się jeszcze poprawić, gdy wszystkie te różne komponenty będą zasilane
i będą współpracować w ciągu pierwszych kilku tygodni użytkowania. Utrzymywanie
systemu pod napięciem ułatwi ten proces.
6.2 Czyszczenie urządzenia i połączeń
Firma Naim zaleca używanie wyłącznie dostarczonej chusteczki do czyszczenia, aby lekko
odkurzyć wszystkie powierzchnie produktu. Środki czyszczące mogą zawierać składniki,
które mogą mieć negatywny wpływ na kosmetyczne środki powierzchniowe i powłoki.
Wtyki i gniazda połączeniowe muszą być utrzymywane w czystości i bez korozji.
Najprostszym sposobem osiągnięcia tego celu jest całkowite wyłączenie zasilania
urządzenia Naim (i wszelkich podłączonych urządzeń), odłączenie wszystkich połączeń
z gniazd i ponowne ich mocne wciśnięcie. Nie należy stosować środków do czyszczenia
styków oraz tak zwanych „ulepszaczy”, ponieważ mogą one pozostawiać osady, które
mogą pogorszyć brzmienie systemu.
6.3 Resetowanie NAP350
Aby przywrócić ustawienia domyślne urządzenia NAP350, należy nacisnąć przycisk
„Brightness” na panelu tylnym i przytrzymać go przez 3 sekundy.
7. Wsparcie
Ochrona konsumenta różni się w zależności od kraju. W większości krajów głównym
partnerem kontaktowym w przypadku problemów z urządzeniem powinien być
sprzedawca, u którego zakupiono produkt rmy Naim. Problem może wynikać z usterki w
systemie lub nieprawidłowości instalacji, co sprzedawca powinien ustalić, korzystając z
własnych umiejętności diagnostycznych.
Na stronie internetowej Naimaudio.com można znaleźć wiele artykułów dotyczących
wszystkich produktów Naim.
Jeśli nadal masz problem z produktem Naim, skontaktuj się z nami bezpośrednio, aby
uzyskać pomoc i poradę, pod adresem [email protected].
9
Page 85

8. Serwis i modernizacja
Wszelkie naprawy lub aktualizacje sprzętu powinny być wykonywane wyłącznie przez
autoryzowany punkt serwisowy rmy Naim lub w centrali rmy Naim. Wiele podzespołów
jest wykonywanych, testowanych i dopasowywanych indywidualnie i uzyskanie ich
zamienników z innych źródeł jest często niemożliwe. W przypadku pytań dotyczących
serwisu lub naprawy prosimy o kontakt z lokalnym sprzedawcą produktów Naim.
9. Dane techniczne
Wzmacniacz mocy Series 300 – NAP350
Moc wyjściowa 175 W, 8
Zużycie energii w trybie
gotowości
Wzmocnienie napięcia +29 dB
Impedancja wejściowa 47 k zbalansowane / 34 k przez przewód adaptacyjny
Pasmo przenoszenia -3 dB przy 1,4 Hz i 100 kHz
Wyjście zasilania Brak
Wymiary (wys. x szer.
x gł.)
Waga 16,5 kg
Źródło prądu 115 V lub 230 V, 50/60 Hz
26 W
91,5 × 432 × 317,5 mm (z nóżkami)
10. Utylizacja zużytego produktu
Produktów na których znajduje się logo z przekreślonym pojemnikiem na
odpady nie można wyrzucać razem z odpadami komunalnymi. Produkty te
należy utylizować w zakładach zdolnych do ich recyklingu i odpowiedniego
przetwarzania wszelkich będących odpadami produktów ubocznych.
Aby dowiedzieć się gdzie znajduje się najbliższy zakład tego typu, skontaktuj się z
lokalnymi władzami.
Odpowiedni recykling i utylizacja odpadów pozwalają na oszczędzanie zasobów i chronią
środowisko przed zanieczyszczeniem.
10
Page 86

Page 87

Содержание
Раздел Страница
Введение 1
1. Что входит в комплект? 1
2. Функции и подключения 2
3. Настройка 3
4. Рекомендации по установке и эксплуатации 6
5. Сетевое питание, заземление и другая информация 8
6. Дополнительные рекомендации и указания 9
7. Поддержка 10
8. Обслуживание и обновления 10
9. Технические характеристики 10
10. Вторичная переработка продукта 10
Page 88
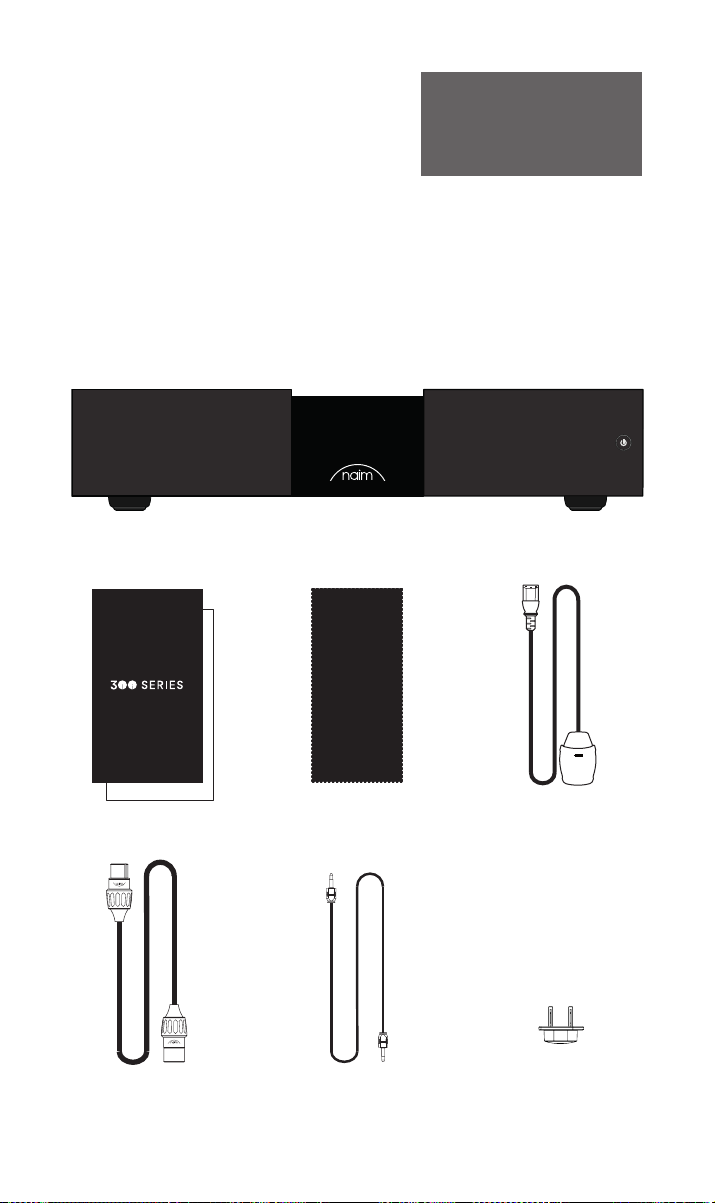
Введение
Представляем вам новый усилитель мощности Naim. Как и вся остальная продукция
Naim Audio, NAP350 предназначен для повышения качества воспроизведения музыки.
Чтобы полностью реализовать его потенциал, важно следовать простым инструкциям по
установке и эксплуатации, приведенным в данном руководстве. Сначала мы рассмотрим
несколько основных моментов, связанных с изделием и настройкой, а затем перейдем к
подробной информации в разделе 4, который начинается на стр. 6.
Обратите внимание: полная
информация о предупреждениях по
технике безопасности содержится
в Руководстве по предусмотренным
законом положениям о технике
безопасности.
1. Что входит в комплект?
NAP350, 1 шт.
Комплект документов,
1 шт.
XLR – для подключения
симметричных
разъемов XLR, 1 шт.
1
Ткань для очистки, 1 шт. Кабель электропитания,
Оптический кабель
для автоматизации
системы, 1 шт.
Соединительные разъемы для
динамиков (установлены в
1 шт.
устройство), 1 шт.
Page 89
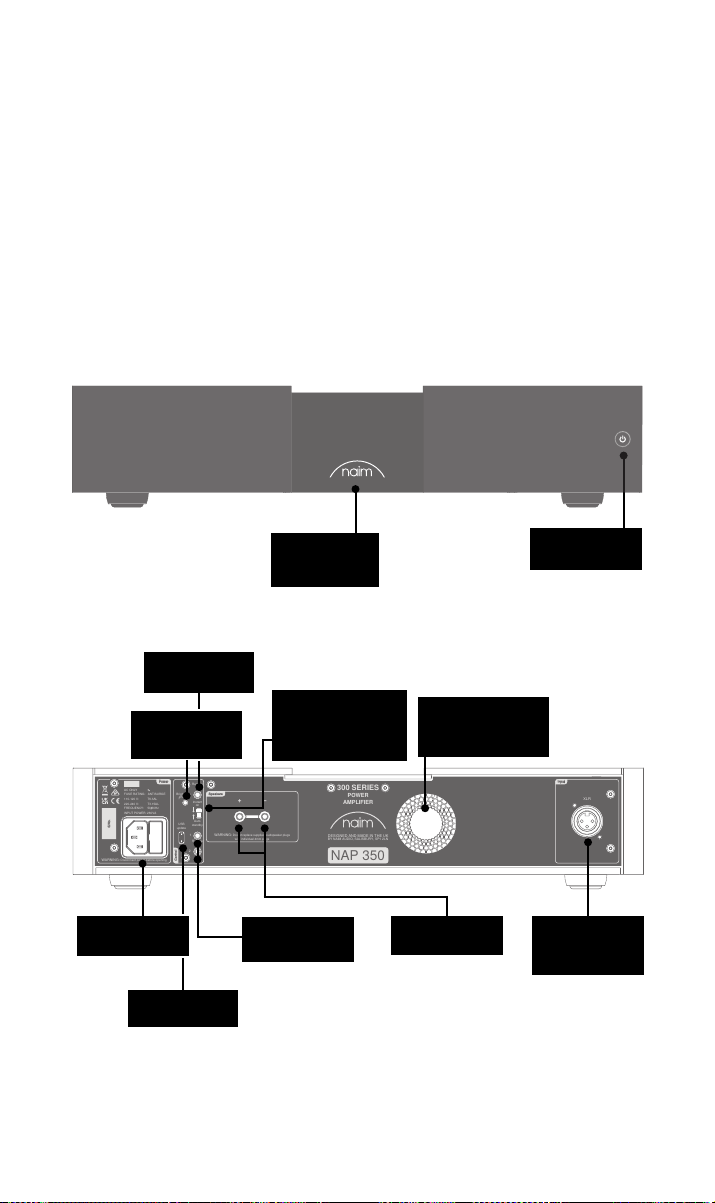
Remote
in
Remote
out
Auto
standby
Instant
on
1
2
WARNING:Disconnect power before opening
AC ONLY
FUSE RATING: ANTISURGE
1 0-120 V:1 T6.3AL
2 0-240 V:2 T3.15AL
FREQUENCY: 0 60Hz5 /
I 260VANPUT POWER:
Control
Power
Speakers
WARNING:Do not replace supplied loudspeaker plugs
with individual 4mm plugs
Input
XLR
USB
update
Brightness
Reset/
300 SERIES
POWER
AMPLIFIER
NAP 350
S/No.
DESIGNED AND MADE IN THE UK
BY NAIM AUDIO, SALISBURY, SP1 2LN
2. Функции и подключения NAP350
дистанционного
Brightness/Reset
(Яркость/сброс)
Сетевой вход и
предохранитель
Обновление
через USB
Вход
управления
Кнопка
Логотип с
подсветкой с
регулируемой
яркостью
Переключатель Instant
On/Auto Standby
(Быстрое включение/
Автоматический
режим ожидания)
Выход
дистанционного
управления
8-ступенчатое
интеллектуальное
управление
вентилятором
Разъемы для
динамиков
Кнопка Power/
Standby (Питание/
режим ожидания)
Входные
разъемы XLR для
симметричного
подключения
2
Page 90
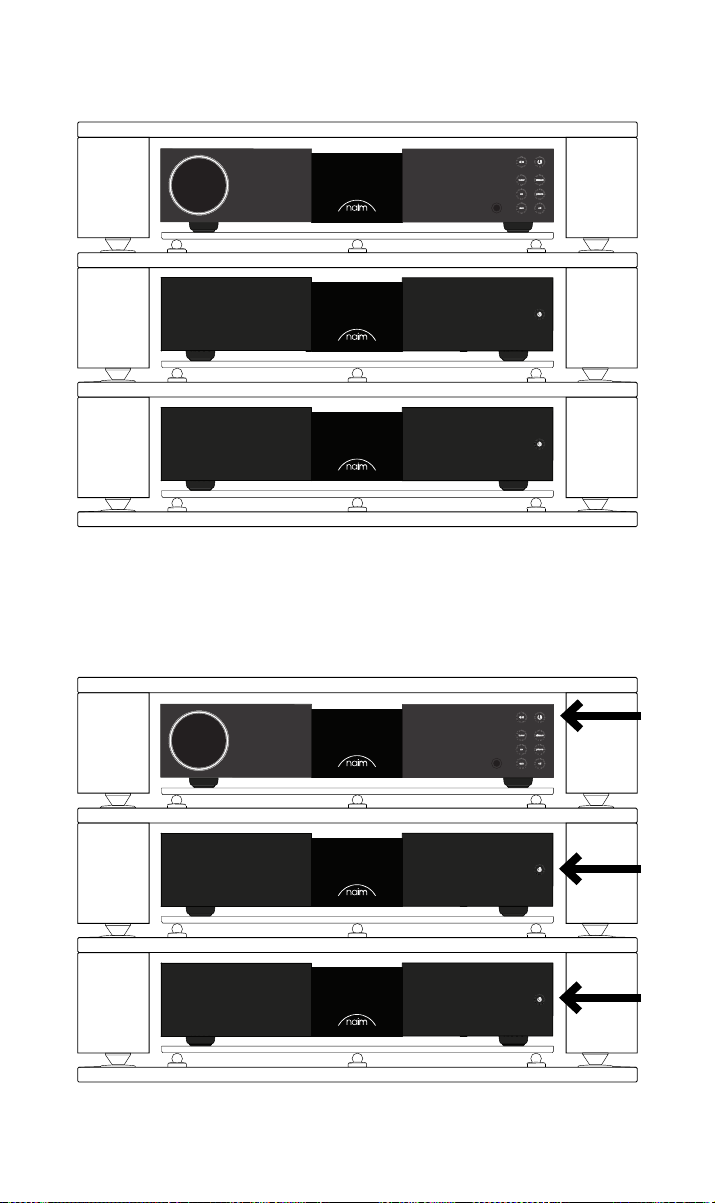
3. Настройка NAP350
Вашу пару усилителей NAP350 необходимо подключить к предусилителю (например,
соответствующему NАC 332), но перед этим следует убедиться, что оба компонента
находятся в конечном положении и отключены от сети.
Для обеспечения оптимальной работы используйте специальную hi-fi опору (в идеале
Naim Fraim), на которой предусилитель располагается над усилителем, как показано на
рисунке.
Перед подключением убедитесь, что все оборудование выключено.
3
Page 91
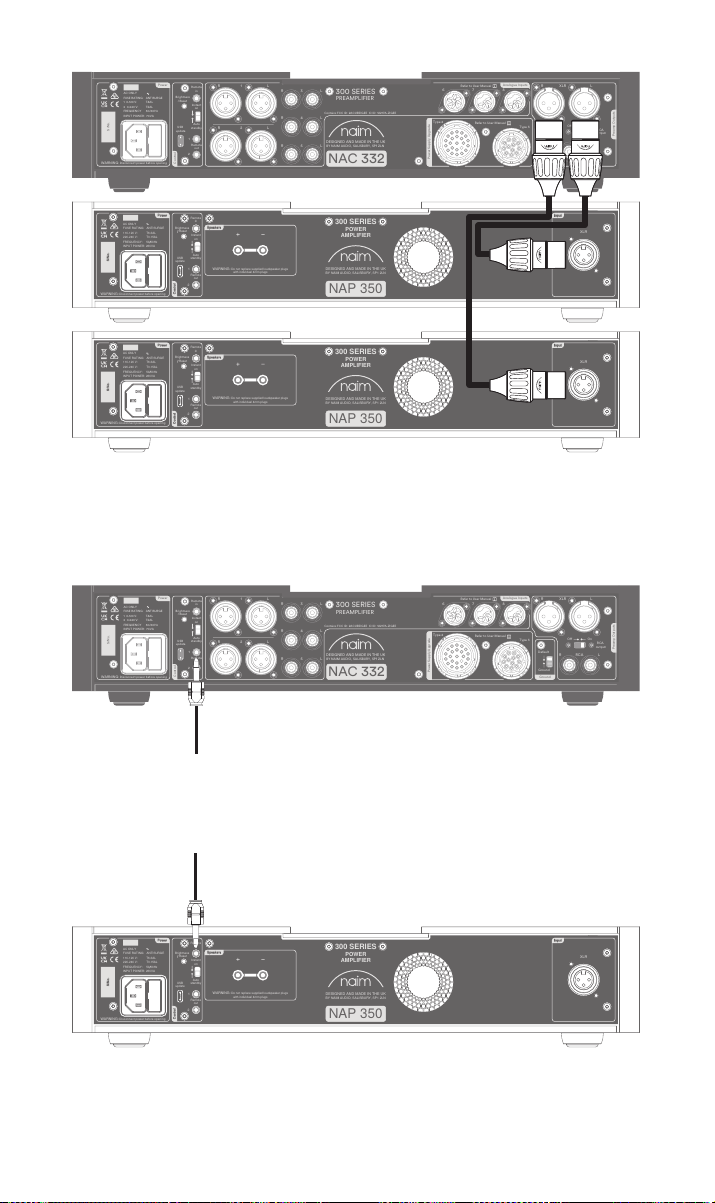
Подключите комплектный кабель XLR от симметричных выходов XLR предусилителя к
WARNING:Disconnect power before opening
AC ONLY
FUSE RATING: ANTISURGE
1 0-120 V:1 T4AL
2 0-240 V:2 T2AL
FREQUENCY: 0 60Hz5/
I 70VANPUT POWER:
Power
300 SERIES
PREAMPLIFIER
NAC 332
DESIGNED AND MADE IN THE UK
BY NAIM AUDIO, SALISBURY, SP1 2LN
/ .oNS
Ground
Power Supply Upgrade
Preamp Outputs
AnalogueInputs
Ground
Default
R L
R
L
RCA
XLR
Refer to User Manual
Type 3
Type 4
Remote
in
Remote
out
Auto
standby
Instant
on
1
2
Control
USB
update
Brightness
Reset/
On
RCA
output
O
3
4
6
AnalogueInputs
R
R
R
L
L
L
5
8
7
1
2
R
L
R
L
Contains FCC ID: 2ACURZIGEE IC ID: 12217A-ZIGEE
Refer to User Manual
WARNING:
Disconnect power before opening
AC ONLY
FUSE RATING: ANTISURGE
1 0-120 V: T
4AL
2 0-240 V: T
2AL
FREQUENCY 50/60Hz
I 70VANPUT POWER:
Power
300 SERIES
PREAMPLIFIER
NAC 332
DESIGNED AND MADE IN THE UK
BY NAIM AUDIO, SALISBURY, SP1 2LN
/ .oNS
Ground
Power Supply Upgrade
Preamp Outputs
AnalogueInputs
Ground
Default
R L
R
L
RCA
XLR
Refer to User Manual
Type 3
Type 4
Remote
in
Remote
out
Auto
standby
Instant
on
1
2
Control
USB
update
Brightness
Reset/
On
RCA
output
O
3
4
6
AnalogueInputs
R
R
R
L
L
L
5
8
7
1
2
R
L
R
L
Contains FCC ID: 2ACURZIGEE IC ID: 12217A-ZIGEE
Refer to User Manual
Remote
in
Remote
out
Auto
standby
Instant
on
1
2
WARNING:Disconnect power before opening
AC ONLY
FUSE RATING: ANTISURGE
1 0-120 V:1 T6.3AL
2 0-240 V:2 T3.15AL
FREQUENCY: 0 60Hz5 /
I 260VANPUT POWER:
Control
Power
Speakers
WARNING:Do not replace supplied loudspeaker plugs
with individual 4mm plugs
Input
XLR
USB
update
Brightness
Reset/
300 SERIES
POWER
AMPLIFIER
NAP 350
S/No.
DESIGNED AND MADE IN THE UK
BY NAIM AUDIO, SALISBURY, SP1 2LN
WARNING:Disconnect power before opening
AC ONLY
FUSE RATING: ANTISURGE
1 0-120 V:1 T4AL
2 0-240 V:2 T2AL
FREQUENCY: 0 60Hz5/
I 70VANPUT POWER:
Power
300 SERIES
PREAMPLIFIER
NAC 332
DESIGNED AND MADE IN THE UK
BY NAIM AUDIO, SALISBURY, SP1 2LN
/ .oNS
Ground
Power Supply Upgrade
Preamp Outputs
AnalogueInputs
Ground
Default
R L
R
L
RCA
XLR
Refer to User Manual
Type 3
Type 4
Remote
in
Remote
out
Auto
standby
Instant
on
1
2
Control
USB
update
Brightness
Reset/
On
RCA
output
O
3
4
6
AnalogueInputs
R
R
R
L
L
L
5
8
7
1
2
R
L
R
L
Contains FCC ID: 2ACURZIGEE IC ID: 12217A-ZIGEE
Refer to User Manual
WARNING:
Disconnect power before opening
AC ONLY
FUSE RATING: ANTISURGE
1 0-120 V: T
4AL
2 0-240 V: T
2AL
FREQUENCY 50/60Hz
I 70VANPUT POWER:
Power
300 SERIES
PREAMPLIFIER
NAC 332
DESIGNED AND MADE IN THE UK
BY NAIM AUDIO, SALISBURY, SP1 2LN
/ .oNS
Ground
Power Supply Upgrade
Preamp Outputs
AnalogueInputs
Ground
Default
R L
R
L
RCA
XLR
Refer to User Manual
Type 3
Type 4
Remote
in
Remote
out
Auto
standby
Instant
on
1
2
Control
USB
update
Brightness
Reset/
On
RCA
output
O
3
4
6
AnalogueInputs
R
R
R
L
L
L
5
8
7
1
2
R
L
R
L
Contains FCC ID: 2ACURZIGEE IC ID: 12217A-ZIGEE
Refer to User Manual
Remote
in
Remote
out
Auto
standby
Instant
on
1
2
WARNING:Disconnect power before opening
AC ONLY
FUSE RATING: ANTISURGE
1 0-120 V:1 T6.3AL
2 0-240 V:2 T3.15AL
FREQUENCY: 0 60Hz5 /
I 260VANPUT POWER:
Control
Power
Speakers
WARNING:Do not replace supplied loudspeaker plugs
with individual 4mm plugs
Input
XLR
USB
update
Brightness
Reset/
300 SERIES
POWER
AMPLIFIER
NAP 350
S/No.
DESIGNED AND MADE IN THE UK
BY NAIM AUDIO, SALISBURY, SP1 2LN
Remote
in
Remote
out
Auto
standby
Instant
on
1
2
WARNING:Disconnect power before opening
AC ONLY
FUSE RATING: ANTISURGE
1 0-120 V:1 T6.3AL
2 0-240 V:2 T3.15AL
FREQUENCY: 0 60Hz5 /
I 260VANPUT POWER:
Control
Power
Speakers
WARNING:Do not replace supplied loudspeaker plugs
with individual 4mm plugs
Input
XLR
USB
update
Brightness
Reset/
300 SERIES
POWER
AMPLIFIER
NAP 350
S/No.
DESIGNED AND MADE IN THE UK
BY NAIM AUDIO, SALISBURY, SP1 2LN
симметричному входу NAP350. Повторите процедуру для второго устройства NAP350 и
убедитесь, что кабели соответствуют каналам: левый выход предусилителя подключен
к левому входу усилителя мощности, который используется для левого динамика, и т.д.
Подробнее в разделе 4.2. Удостоверьтесь в правильности установки разъемов XLR. В
правильном положении логотип Naim на вилке смотрит вверх.
Если NAP350 используется с соответствующим предусилителем Naim (см. раздел 4.4),
подключите прилагаемый кабель для автоматизации системы к выходному разъему
дистанционного управления.
Другой конец кабеля для автоматизации системы подключите к входному разъему
дистанционного управления на каждом NAP350.
4
Page 92
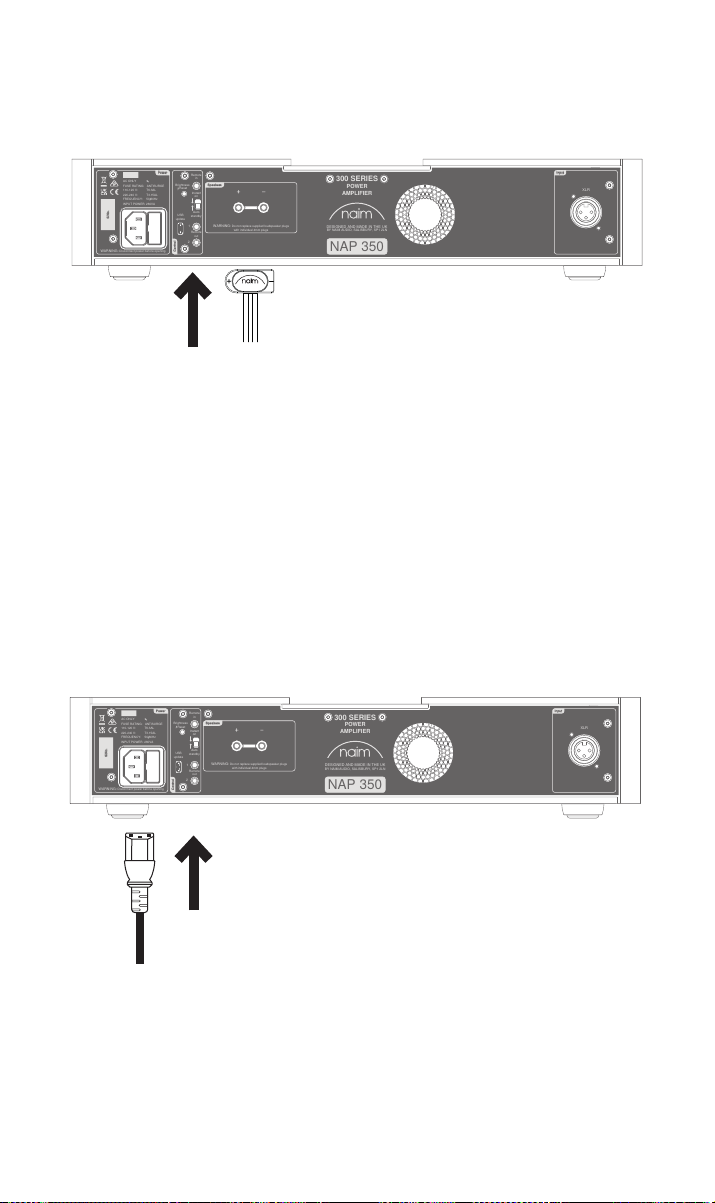
Подсоедините акустические кабели к обоим усилителям NAP350, убедившись, что
Remote
in
Remote
out
Auto
standby
Instant
on
1
2
WARNING:Disconnect power before opening
AC ONLY
FUSE RATING: ANTISURGE
1 0-120 V:1 T6.3AL
2 0-240 V:2 T3.15AL
FREQUENCY: 0 60Hz5 /
I 260VANPUT POWER:
Control
Power
Speakers
WARNING:Do not replace supplied loudspeaker plugs
with individual 4mm plugs
Input
XLR
USB
update
Brightness
Reset/
300 SERIES
POWER
AMPLIFIER
NAP 350
S/No.
DESIGNED AND MADE IN THE UK
BY NAIM AUDIO, SALISBURY, SP1 2LN
Remote
in
Remote
out
Auto
standby
Instant
on
1
2
WARNING:Disconnect power before opening
AC ONLY
FUSE RATING: ANTISURGE
1 0-120 V:1 T6.3AL
2 0-240 V:2 T3.15AL
FREQUENCY: 0 60Hz5 /
I 260VANPUT POWER:
Control
Power
Speakers
WARNING:Do not replace supplied loudspeaker plugs
with individual 4mm plugs
Input
XLR
USB
update
Brightness
Reset/
300 SERIES
POWER
AMPLIFIER
NAP 350
S/No.
DESIGNED AND MADE IN THE UK
BY NAIM AUDIO, SALISBURY, SP1 2LN
каждый из них подключен к соответствующему динамику и оба находятся «в фазе».
Более подробные инструкции см. в разделе 4.3.
Затем подключите силовые кабели к обоим усилителям NAP350. Дополнительная
информация о сетевом питании приведена в разделе 5.
5
Page 93
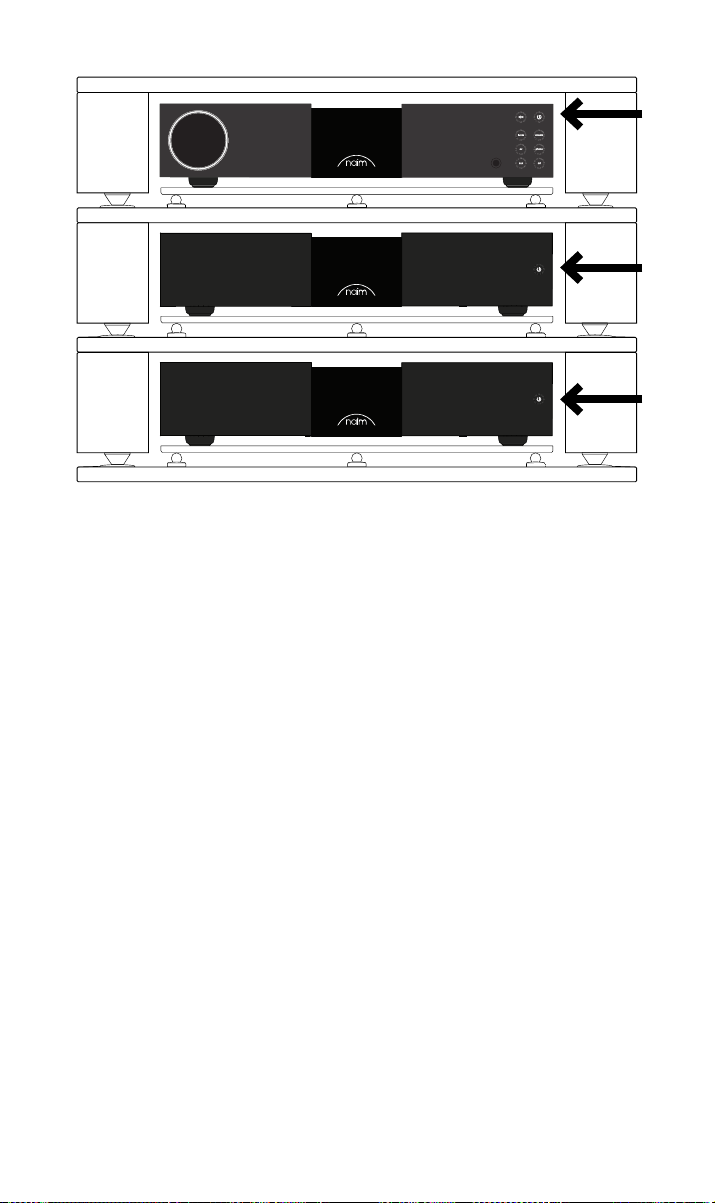
Перед включением усилителей NAP350 сначала убедитесь, что громкость на
подключенном предусилителе уменьшена. Если для подключения к предусилителю
Naim используется автоматизация системы, то усилители мощности включатся
автоматически при нажатии кнопок режима ожидания (Standby). Если вы используете
другой предусилитель, нажмите кнопку режима ожидания (Standby) на передней панели
обоих усилителей NAP350.
4. Рекомендации по установке и эксплуатации
NAP350
Мы уверены, что вам не терпится насладиться вашим новым NAP350, но, безусловно,
качество воспроизведения станет еще лучше, если вы выполните рекомендации,
разработанные для оптимизации работы усилителя мощности.
4.1 Распаковка и установка
При производстве NAP 350 используются высококачественные компоненты, включая
надежный силовой трансформатор и долговечный алюминиевый корпус. По этой
причине вес NAP 350 составляет 16,5 кг, поэтому поднимайте и передвигайте
оборудование с осторожностью и устанавливайте только на устойчивую поверхность с
соответствующей несущей способностью.
Для обеспечения оптимального воспроизведения продукция Naim должна
устанавливаться на специальной стойке для hi-fi оборудования (в идеале Naim Fraim
или Fraim Lite), чтобы минимизировать вибрации, могущие повлиять на звук. Нет места
для стойки? Разместите NAP350 на стеклянной полке Fraim на подходящем предмете
мебели, чтобы обеспечить надежную и незаметную поддержку.
NAP350 оснащен вентиляторной системой охлаждения, которая включается при
длительной работе усилителя на большой громкости. Убедитесь, что отверстия для
отвода тепла не закрыты; мы не рекомендуем использовать NAP350 в закрытом корпусе
без вентиляции.
Запрещается устанавливать изделия Naim друг на друга, а если они размещаются
рядом друг с другом, то между ними должен обеспечиваться достаточный зазор. Кроме
того, подключенные устройства не должны располагаться слишком далеко друг от друга:
6
Page 94
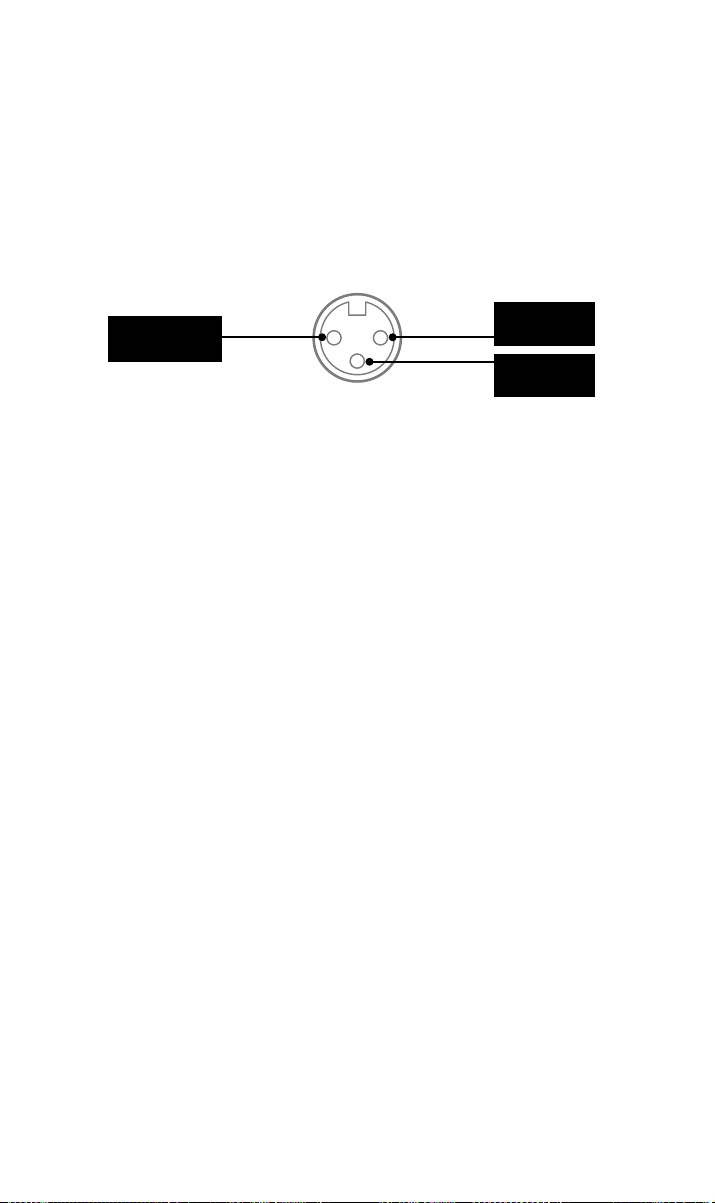
максимальное расстояние между ними ограничивается длиной соединительного кабеля
из комплекта поставки.
Чтобы минимизировать риск возникновения слышимого шума с колонок, не следует
размещать источники питания или усилители мощности вблизи силовых элементов.
4.2 Характеристики входного подключения
NAP350 оснащен стандартными промышленными аудиовходами XLR для
симметричного подключения. Симметричное подключение характеризуется низким
уровнем шумов и походит для больших расстояний, что обеспечивает более удобное
размещение NAP350.
Положительный/
горячий
Для подключения NAP350 к предусилителям с выходами RCA или DIN предусмотрены
переходные кабели.
Заземление
Отрицательный/
холодный
4.3 Кабели и разъемы для подключения динамиков
Для обеспечения оптимального воспроизведения следует использовать акустический
кабель Naim NACA5 или Super Lumina, подключенный в правильном направлении
(например, стрелки на NACA5 указывают в направлении динамика).
Важно, чтобы оба акустических кабеля были одинаковой длины и не превышали
рекомендуемую максимальную длину 20 м. В отличие от некоторых предыдущих
моделей Naim мы не устанавливаем минимальную длину акустического кабеля, но
рекомендуем использовать кабели длиной не менее 2 м.
В комплект поставки NAP350 входят специальные разъемы Naim Audio для динамиков.
Они обеспечивают высококачественное электрическое соединение с согласованием
импедансов и гарантируют соответствие усилителя действующим нормам техники
безопасности.
При подключении динамиков убедитесь, что они находятся «в фазе». Это означает, что
положительный выход усилителя для динамика подключен к положительному входу
динамика, а левый и правый усилители соединены с соответствующими динамиками.
4.4 Автоматизация системы
При использовании NAP350 с совместимым предусилителем, например NАC332, вы
можете синхронизировать включение/выключение питания и яркость логотипа в вашей
системе, соединив их с помощью прилагаемых оптических кабелей для автоматизации
системы. Просто подключите кабели от выходных разъемов дистанционного управления
предусилителя к входным разъемам дистанционного управления на усилителях
NAP350. Также можно подключить дополнительные усилители мощности, используя
разъемы «Remote Out» (удаленный вывод) на NAP350.
Если между предусилителем и NAP350 требуется большее расстояние, чем позволяет
длина кабеля из комплекта поставки, вместо него можно использовать оптический
кабель 3,5 мм необходимой длины. Кроме того, можно использовать стандартные
аналоговые кабели с разъемами 3,5 мм, но оптический кабель обеспечивает более
качественное воспроизведение.
7
Page 95

4.5 Включение/выключение питания
После монтажа всех входных и выходных соединений подключите прилагаемые
силовые провода к усилителям NAP350 и электросети. Обратите внимание:
ваш источник (например, стример или проигрыватель компакт-дисков) и все
соответствующие внешние источники питания должны быть включены до включения
усилителей NAP350.
После этого можно подать напряжение на усилители NAP350 включением
предусилителя Naim – подключенного через автоматизацию системы – либо
нажатием кнопки включения питания на передней панели усилителей мощности.
Отключение усилителей NAP350 выполняется аналогичным образом: выключите свой
предусилитель Naim – подключенный через автоматизацию системы – или просто
нажмите кнопку включения питания на передней панели усилителей мощности, и
они перейдут в режим ожидания. Не используйте выключатель электророзетки для
выключения усилителей.
4.6 Настройки питания в режиме ожидания
По умолчанию NAP350 установлен в автоматический режим ожидания – он
автоматически переходит в режим ожидания (потребление менее 0,5 Вт), если
бездействие длится более 19 минут. Функция Music Sensing (Распознавание музыки)
выводит усилитель из режима ожидания, когда он регистрирует входной сигнал.
Для достижения оптимального качества звука переключите «Режим ожидания» на
задней панели в режим «Быстрое включение», при котором питание постоянно подается
на все чувствительные контуры для аудиосигналов.
Обратите внимание, что «Распознавание музыки» отключается при получении команды
автоматизации системы, при переводе NAP350 в режим ожидания вручную с помощью
кнопки «Режим ожидания» или при включении режима «Быстрое включение».
4.7 Настройки яркости логотипа Naim
Вы можете установить уровень яркости логотипа Naim на NAP350. Если вы используете
предусилитель Naim, подключенный через автоматизацию системы, вы можете
синхронизировать яркость всех логотипов с предусилителя. Кроме того, можно
настроить NAP350 с помощью тумблера яркости на задней панели.
ОБРАТИТЕ ВНИМАНИЕ: кнопка яркости также используется для полного сброса
NAP350 при нажатии и удержании в течение 3 секунд, поэтому рекомендуем быстро
устанавливать яркость логотипа!
4.8 Обновление через USB
NAP350 оснащен разъемом микро-USB, но он предназначен только для сервисного
использования.
5. Сетевое питание, заземление и другая
информация
Используйте только силовые кабели и штекеры, входящие в комплект поставки
NAP350, или сетевой кабель Naim Power-Line. При использовании штекеров с
предохранителями следует применять 13-амперные предохранители. Не соединяйте
проводом нелинейные резисторы или шумоподавители с сетевыми вилками; это
приведет к перебоям в подаче питания и ухудшению качества звука.
8
Page 96

5.1 Заземление
Во избежание появления земляных петель и вызываемого ими фона, сигнальное
заземление всей системы должно быть соединено с заземлением электропитания
только в одной точке. Как правило, это делается на первичном источнике. Например,
стример Naim оснащен переключателем разрыва земли. Установите значение «по
умолчанию», если никакой другой источник не соединяет заземление питающей сети с
сигнальной землей. Такая настройка обеспечит наилучшее качество звука.
5.2 Неразборные сетевые вилки
Если неразборная вилка отсоединена от силового кабеля (независимо от причины),
ее ОБЯЗАТЕЛЬНО необходимо утилизировать таким способом, чтобы ни при каких
обстоятельствах не допустить ее повторного использования. Имеется значительная
опасность поражения током при подключении обрезанной вилки в розетку.
5.3 Цепи и помехи
Система hi-fi обычно имеет общую цепь питания с другими бытовыми приборами,
которые могут вызывать искажения, проявляющиеся в виде механического шума от
сетевых трансформаторов, включая большой трансформатор в NAP350.
Шум от трансформатора не передается через колонки и не влияет на
производительность системы, но его можно снизить, тщательно продумав расположение
системы Naim, а также за счет использования отдельной цепи питания. Такая цепь (в
идеальном варианте с номиналом 30 или 45ампер), как правило, также улучшает работу
системы. Для получения консультации по установке отдельной цепи питания следует
обратиться к квалифицированному электрику.
5.4 Меры предосторожности при грозе
Систему Naim следует выключить и отключить от сети при угрозе поражения молнией,
чтобы предотвратить возможное повреждение.
6. Дополнительные рекомендации и указания
Вы ознакомились со всей основной информацией, и теперь мы можем перейти к
расширенным настройкам, которые помогут оптимизировать работу нового NAP350.
6.1 Наладка
Продукция Naim изготавливается вручную из тщательно отобранных
высококачественных компонентов. NAP350 отличается превосходным звучанием
прямо с завода, но его воспроизведение можно еще улучшить при включении и
взаимодействии различных компонентов в течение первых недель использования.
Этому процессу способствует постоянное питание системы.
6.2 Чистка устройства и соединений
Naim рекомендует использовать только входящую в комплект поставки ткань для
легкой очистки от пыли поверхностей продукта. Чистящие средства могут содержать
ингредиенты, способные отрицательно влиять на косметическую обработку поверхности
и покрытия.
Следите за чистотой соединительных штекеров и розеток и не допускайте
возникновения коррозии. Самый простой способ – полностью выключите питание
устройства Naim (и подключенного оборудования), извлеките все разъемы из гнезд
и плотно установите их на место. Не следует использовать очистители контактов и
усиливающие агенты, так как могут образоваться отложения, которые снизят качество
воспроизведения вашей системы.
6.3 Сброс настроек NAP350
Чтобы вернуть заводские настройки NAP350, нажмите кнопку яркости на задней панели
и удерживайте ее в течение 3 секунд.
9
Page 97

7. Поддержка
В зависимости от страны принципы защиты прав потребителей могут быть различными.
В большинстве стран при возникновении проблем с устройством следует обращаться
к продавцу, у которого было приобретено оборудование Naim. Проблема может быть
связана с неисправностью системы или неправильной установкой, поэтому важно в
полной мере использовать диагностические возможности вашего дилера.
На веб-сайте Naimaudio.com можно найти статьи для каждого изделия Naim
Если вы еще не решили проблему с устройством Naim, свяжитесь с нами напрямую для
консультации и получения помощи по адресу электронной почты support@naimaudio.
com
8. Обслуживание и обновления
Любые работы по ремонту и модернизации аппаратных средств должны выполняться
только в авторизованных сервисных центрах Naim или в штаб-квартире Naim. Многие
компоненты изготавливаются на заказ, тестируются или специально подбираются,
поэтому подходящие запасные детали часто невозможно получить из других источников.
По всем вопросам, касающимся обслуживания и ремонта, обращайтесь к местному
представителю Naim.
9. Технические характеристики
Усилитель мощности серии 300 – NAP350
Выходная мощность
Потребление
реактивного тока
Усиление по напряжению +29 дБ
Входной импеданс
Частотный диапазон -3дБ при 1,4Гц и 100кГц
Подача питающего
напряжения
Размеры (ВхШхГ) 91,5 x 432 x 317,5мм (вместе с опорами)
Вес 16,5 кг
Питание от сети
переменного тока
175Ватт, 8Ом
26Вт
47 кОм симметричный / 34 кОм заземленный, завершающий
адаптерный кабель
Нет
115В или 230В, 50/60Гц
10. Вторичная переработка продукта
Продукты, которые имеют изображение перечеркнутого мусорного бака, не
могут быть утилизированы вместе с бытовыми отходами. Эти продукты должны
быть утилизированы на объектах, способных осуществлять их обработку с
целью повторного использования с соответствующей утилизацией побочных продуктов.
Свяжитесь с местным органом власти для получения информации о ближайшем
подобном объекте.
Надлежащая переработка и утилизация отходов позволяет экономить ресурсы и
защищает окружающую среду от загрязнения.
10
Page 98

Page 99

目录
章节 页码
简介 1
1.箱内物品 1
2.功能和连接 2
3.设置 3
4.安装和使用技巧 6
5.主电源、接地及其他 8
6.其他提示及建议 9
7.支持 9
8.服务和更新 10
9.规格 10
10.产品回收 10
Page 100
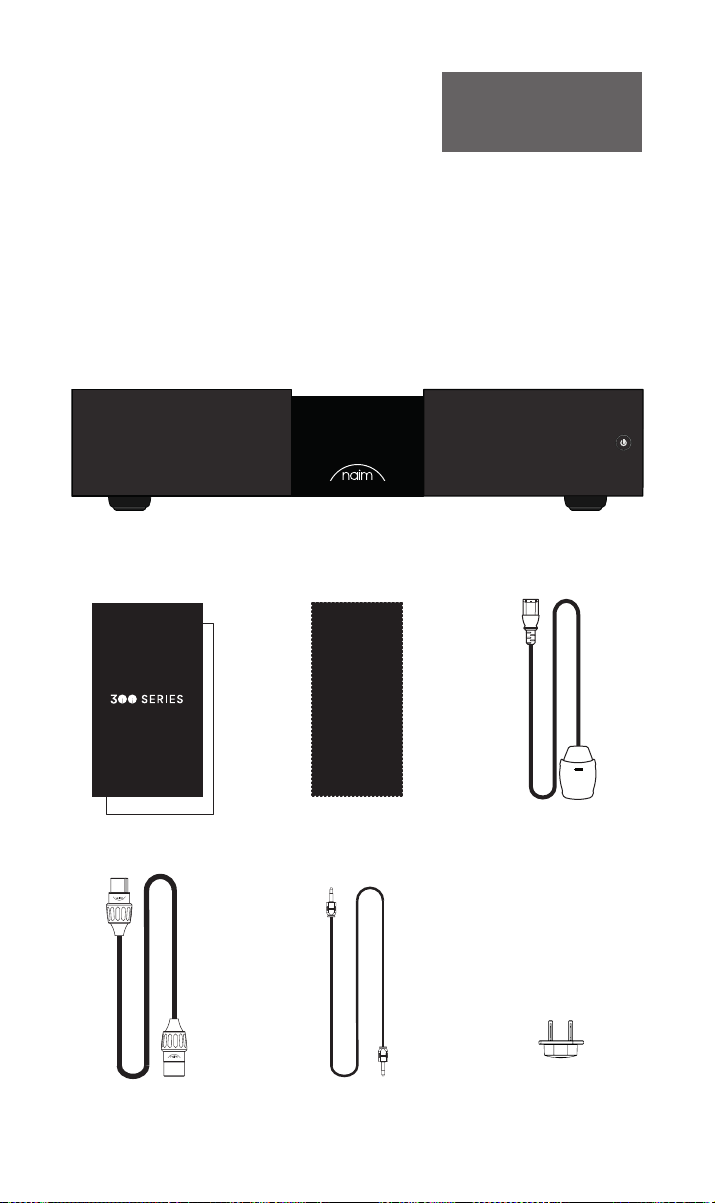
简介
请注意:完整的安全警告可以在
法定安全手册中找到。
欢迎使用全新的Naim功率放大器。与所有NaimAudio产品一样,NAP350将音乐体验放在
首位。为帮助产品发挥全部潜力,请务必遵循本手册中介绍的简单安装和使用指南。我们首
先了解一些产品和设置要点,然后在第4节(从第6页开始)中介绍详情。
1.包装盒内容
1xNAP350
1x文件包
1xXLR–XLR平衡音频互
联插头
1
1x清洁布 1x电源线
1x根光学系统自动化缆线 1x个扬声器连接器(预装在
装置上)(预装在装置上)
 Loading...