

Page 1
DSM-1X
Digital Sound Level Meter
Owner's Manual
Page 2

Page 3

Contents
1. Safety .......................................................................... 1
2. Applications and Features........................................... 2
3. Specifications ............................................................. 3
4. Meter Description ....................................................... 4
5. LCD Display Description ........................................... 5
6. Operation Instruction .................................................. 6
7. Calibration Procedure ................................................. 9
8. Basic Operation ........................................................ 10
9. Notes..........................................................................11
10. Accessories ............................................................. 12
Page 4

1. Safety
Read the following safety information carefully before attempting
to operate or service the meter.
Use the meter only as specified in this manual; otherwise, the
protection provided by the meter may be impaired.
◆ Environment conditions:
Altitude: up to 2000 meters
RH≤90%(Non-Condensation)
Operating Temperature: -20~60℃
◆ Maintenance
Repairs or servicing not covered in this manual should only be
performed by qualified personnel.
Wipe the unit with a dry soft cloth. Do not use abrasives or
solvents on this instrument.
◆ Safety Symbol
Comply with EMC
Page 5

2. Applications and Features
This Sound Level Meter is designed to meet the measurement
requirements of safety Engineers, Health, Industrial safety offices
and sound quality control in various environments like factory,
school, construction, etc.
◆ Comply with IEC61672-1 CLASS2 Standard
◆ Max/Min/Data Hold
◆ Over range indication
◆ Under range indication
◆ A & C Weighting
◆ FAST & SLOW response
Page 6

3. Specifications
Applied standard
IEC61672-1 CLASS2
Frequency range
31.5Hz~8kHz
Dynamic range
50dB
Measuring level
range
Lo:30dB~80dB Med:50dB~100dB
Hi:80dB~130dB Auto:30dB~130dB
Accuracy
±1.4dB
Time weighting
FAST 125ms;SLOW ( 1s )
Microphone
1/2 inch electret condenser microphone
Display
3½ digits LCD display with a resolution of 0.1dB
Frequency weighting
A & C
Data update
2 times/sec
Alarm function
“OVER”is when input is more than upper limit of range.
“UNDER” is when input is less than lower limit of range.
Auto power off
Meter automatically shuts down after approx. 15 minutes
inactivity.
Power supply
One 9V battery, 006P or IEC 6F22 or NEDA 1604.
Battery life
at least 30 hours
Operating conditions
-20℃~60℃,10%RH~90%RH
Storage conditions
-20℃~60℃,10%RH~75%RH
Weight
178g
Dimension(L*W*H)
158*62*32mm
Page 7

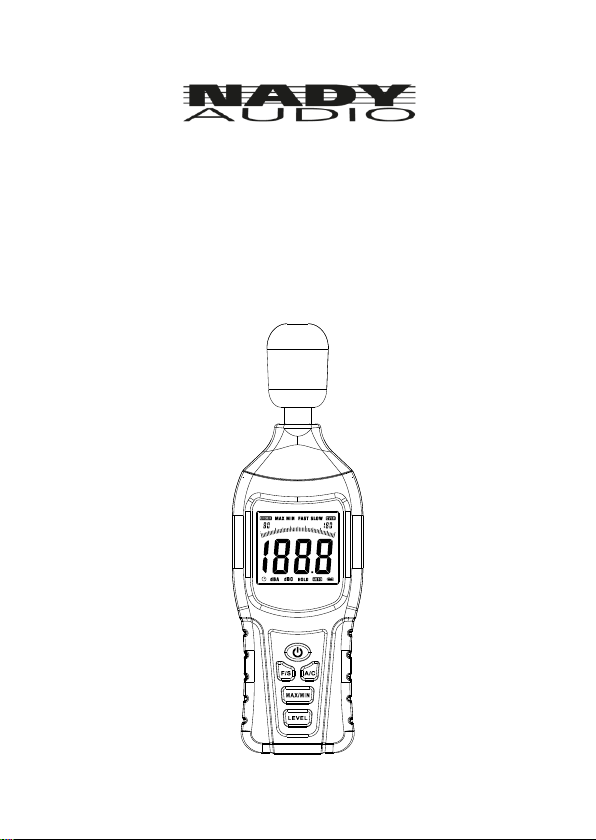
4. Meter Description
①Microphone ②LCD display
③Weighting A/C select button
④MAX/MIN button
⑤Level Range select button
⑥Response time FAST/SLOW select button
⑦Power ON/OFF button ⑧Battery Compartment
Page 8

5. LCD Display Description
①Under-range icon
②MAX hold
③MIN hold
④Fast sampling time icon
⑤Slow sampling time icon
⑥Over-range icon
⑦Level range display
⑧Analog bar
⑨Measurement reading
⑩Battery icon
⑪Auto range icon
⑫Data hold icon
⑬dBC icon
⑭dBA icon
⑮Auto power off icon
Page 9

6. Operation Instruction
(1) Power ON/OFF: Turn the meter on by pressing the " "
button for 1 second. Turn the meter off by pressing and holding
the " " button for approx. 3 seconds then release the button.
(2) Backlight
After turning the meter on, momentarily press the " " button,
to turn the backlight on/off. The backlight will automatically turn
off after approx. 30 seconds of inactivity.
(3) Frequency weighting A/C selection
Press the " " button to select A or C.
dBA: Follows the frequency sensitivity of the human ear at low
levels
dBC: Follows the frequency sensitivity of the human ear at high
levels
Page 10

(4) FAST/SLOW selection
After turning the meter on, press “ ” to select the desired
response time:
FAST: Fast sampling time measurement,1 time per 125ms.
SLOW: Slow sampling time measurement, 1 time per second.
(5) MAX/MIN
After turning the meter on, press the " " button for three
seconds to enter MAX measurement, „MAX‟ will appear on the
LCD and the captured maximum sound level will be displayed.
Press the key again, „MIN‟ will appear on the LCD and the
minimum sound level will be displayed. Hold the button for three
seconds to exit MAX/MIN measurement mode.
Page 11

(6) Data HOLD:
After turning the meter on, momentarily press the " " button.
The "HOLD" icon will appear on the LCD, which freezes the
reading on the display. To exit Data Hold mode, press the button
again.
(7) Level range selection:
Press the “ ” button, the level range will toggle between the
different options:
Lo:30dB~80dB Med:50dB~100dB
Hi:80dB~130dB Auto:30dB~130dB
Page 12

7. Calibration Procedure
(1) Select the following switch settings:
Frequency weighting: A
Response time: FAST
Level range: 50 ~100dB
(2) Insert the microphone housing carefully into the 1/2 inch
insertion hole of the calibrator (94dB @ 1kHZ).
(3) Turn on the calibrator and adjust the CAL potentiometer
until 94.0dB is displayed.
NOTE: Our products are carefully calibrated before delivery.
Recommended recalibration cycle: 1 year.
Page 13

8. Basic Operation
(1) Open the battery cover and install a 9-volt battery in the
battery compartment.
(2) Turn on the power and select the desired level range.
(3) Select „dBA‟ for low sound levels and „dBC‟ for high sound
levels.
(4) Select „FAST‟ for short sound bursts and „SLOW‟ for average
sound level.
(5) Press the „ ‟ button for measuring maximum and
minimum noise level.
(6) Hold the meter in hand or let it stand in upright position on a
table top. The best measuring distance is 1~1.5m away from the
microphone to the sound source.
Page 14

9. Notes
(1) Do not store or operate the meter in high temperature or
humidity.
(2) Remove the battery when the meter is to be stored for long
periods of time to avoid battery leakage.
(3) Wind blowing across the will bring unwanted noise. Use the
supplied windscreen to cover the microphone when necessary.
(4) Keep microphone dry and avoid severe vibration.
(5) When the low battery icon " " appears, replace the meter's
battery.
Page 15

10. Accessories
① Owner's manual
② Windscreen
③ Calibration screwdriver
④ 9V battery
⑤ Carrying pouch
 Loading...