

Page 1
VISO TWENTY
VISO THIRTY
Owner’s Manual
Page 2
IMPORTANT SAFETY INSTRUCTIONS
1. Read these instructions.
2. Keep these instructions.
3. Heed all warnings.
4. Follow all instructions.
5. Do not use this apparatus near water.
6. Clean only with dry cloth.
7. Do not block any ventilation openings. Install in accordance with the manufacturer's instructions.
8. Do not install near any heat sources such as radiators, heat registers, stoves, or other apparatus (including
amplifiers) that produce heat.
9. Do not defeat the safety purpose of the polarized or grounding-type plug. A polarized plug has two blades
with one wider than the other. A grounding type plug has two blades and a third grounding prong. The wide
blade or the third prong is provided for your safety. If the provided plug does not fit into your outlet, consult
an electrician for replacement of the obsolete outlet.
10. Protect the power cord from being walked on or pinched particularly at plugs, convenience receptacles, and
the point where they exit from the apparatus.
11. Only use attachments/accessories specified by the manufacturer.
12. Unplug this apparatus during lightning storms or when unused for long periods of time.
13. Refer all servicing to qualified service personnel. Servicing is required when the apparatus has been
damaged in any way, such as power-supply cord or plug is damaged, liquid has been spilled or objects have
fallen into the apparatus, the apparatus has been exposed to rain or moisture, does not operate normally, or
has been dropped.
14. WARNING: To reduce the risk of fire or electric shock, this apparatus should not be exposed to rain or
moisture and objects filled with liquids, such as vases, should not be placed on this apparatus.
15. To completely disconnect this equipment from the mains, disconnect the power supply cord plug from the
receptacle.
16. The mains plug of the power supply cord shall remain readily operable.
The lightning flash with arrowhead symbol within an equilateral triangle is intended to
alert the user to the presence of uninsulated "dangerous voltage” within the product's
enclosure that may be of sufficient magnitude to constitute a risk of electric shock to
persons.
The exclamation point within an equilateral triangle is intended to alert the user to the
presence of important operating and maintenance (servicing) instructions in the literature
accompanying the product.
Notes on environmental protection
At the end of its useful life, this product must not be disposed of with regular household
waste but must be returned to a collection point for the recycling of electrical and
electronic equipment. The symbol on the product, user's manual and packaging, point
this out.
The materials can be reused in accordance with their markings. Through re-use,
recycling of raw materials, or other forms of recycling of old products, you are making
an important contribution to the protection of our environment.
Your local administrative office can advise you of the responsible waste disposal
point.
2
Page 3

Table of Contents
I. Quick Start 4
II. More on Speaker Positioning 5
A. Main Speakers
B. Surround Speakers
C. Subwoofer
D. Wall Mounting
III. Additional Details on Configuring Your VISO System 7
A. Important
B. Selecting Speaker Wire
C. Configurations
D. Tighten Terminals
E. NAD VISO DVD Receiver Setup
F. Subwoofer Level
G. Subwoofer LED Indicator
H. AC Power Switch
IV. Protecting Your Speakers 15
V. Cabinet Care 15
VI. In Case of Problems 15
VII. In Case of Problems with your Subwoofer 16
VIII. Specifications 20
3
Page 4

Thank you for your purchase. The NAD VISO speakers are designed to deliver
high performance in many uses, and we hope they add much enjoyment to your
listening life.
I. QUICK START
A. Attach the supplied adhesive backed bumpers near the corners of the LR5’s
and C20’s bottom surface to protect the finish of speakers and furnishings.
B. Position LR5 speakers as symmetrically as possible, at a comfortable
distance from your seating position—slightly closer to each other than they
are to you. Position the C20 center channel directly above or underneath
your TV screen. (Keep its front as much in line as possible with the front of
the picture.)
C. Using standard lamp “zip cord” (18 gauge/1.0mm dia) wire or better, connect
the Red (positive) binding post of each speaker to the Red terminal of your
signal source on the channel. Similarly, connect Black (ground) on each
speaker to Black on that channel's signal source. (If the output of the signal
source is via a proprietary cable with a jack at one end, connect the colorcoded wires at the other end of the cable to the speaker's similarly-coded
posts.) Be sure to follow color-coding to make sure that your speakers
are “in phase” for smoothest sound with deepest bass.
D. The loudest bass output from a subwoofer will come from corner placement.
As you position the subwoofer outward from the corner along one wall or
another, bass output diminishes somewhat, it also becomes more uniform
throughout the room, with fewer of the “standing waves” that produce peaks
and nulls at various points. Turn off all other components, and follow one of
the connection diagrams. Connect the supplied power cord to the AC power
socket, then plug the subwoofer into an active AC outlet. The same receptacle
as the rest of your audio/video system or another on the same electrical
circuit should be used to avoid ground hum. Set the subwoofer’s phase switch
to 0° and volume switch to 0dB. Flip the Power Switch to the on position.
E. Turn ON your NAD VISO DVD Receiver. If you're using an NAD VISO FIVE
DVD Receiver, ensure that the settings for “Front”, “Centre” and “Surround”
speakers are all set to “Small” via the “Speaker Settings” section of the Audio
Setup menu.
pressing the button on the remote control select Center Channel speaker
and using the button select -3dB.
Receiver, configure the following settings via the Audio Setup Menu—in
“Listening Mode” set the mode to “DVS Reference” and in “Speaker Settings”
menu set “Front” to “Small”. Refer to the item about NAD VISO DVD
RECEIVER SETUP under the ADDITIONAL DETAILS ON CONFIGURING
YOUR VISO SYSTEM section to learn more about configuring your NAD
VISO system.
F. Find a comfortable volume setting and play a bass-rich program source.
Slowly adjust the [SUB] level button on the remote control of your NAD VISO
DVD Receiver until the subwoofer contributes a natural level of low frequency
sound. Now, please read the rest of this guide and fine-tune your installation
accordingly—it will be time well spent!
Return to Audio Setup menu and select Channel Levels. By
[?]
[<] If you're using an NAD VISO TWO DVD
4
Page 5
II. MORE ON SPEAKER POSITIONING
A. Main Speakers
The three factors to adjust according to your own tastes—keeping in mind
that you are the judge and the one(s) to be satisfied-are:
1. The closer you place speakers to room surfaces, the greater the
proportion of bass in their sound, because of the “focusing” effects of
nearby surfaces on lower, longer-wavelength frequencies. Positioning the
speakers near the intersection of two surfaces (wall and wall, wall and
floor, or wall and ceiling) will produce more apparent bass than placing
them near a single surface (a wall or floor or ceiling). The greatest
apparent bass will result from placement near the intersection of three
surfaces-in a room corner, near the floor or ceiling, where there will be a
reinforcing effect which is somewhat uneven, like that of a megaphone.
2. Distances of speakers from the wall can make a great difference in
the frequency balance, sonic spaciousness, and definition in their
sound, because of changes in the number, strength, and particular
frequencies of secondary reflections from surfaces. The sound will
generally have greater spaciousness, especially depth, if they are out at
least a foot (30cm) from the nearest wall.
3. Small changes in positioning may make a big difference in sound
quality. Because of the varying relationships of the dimensions of a room
and their relation both to where you place the speakers and where you sit,
the wavelengths of sound and their interaction both with you and with the
room can vary a great deal. There can be sharp increases or decreases in
the relative loudness of different frequency bands, greatly amplifying or
almost nullifying whole ranges. Since VISO Speakers are small and easy
to position, it's easy to experiment with small, incremental changes until
you are satisfied.
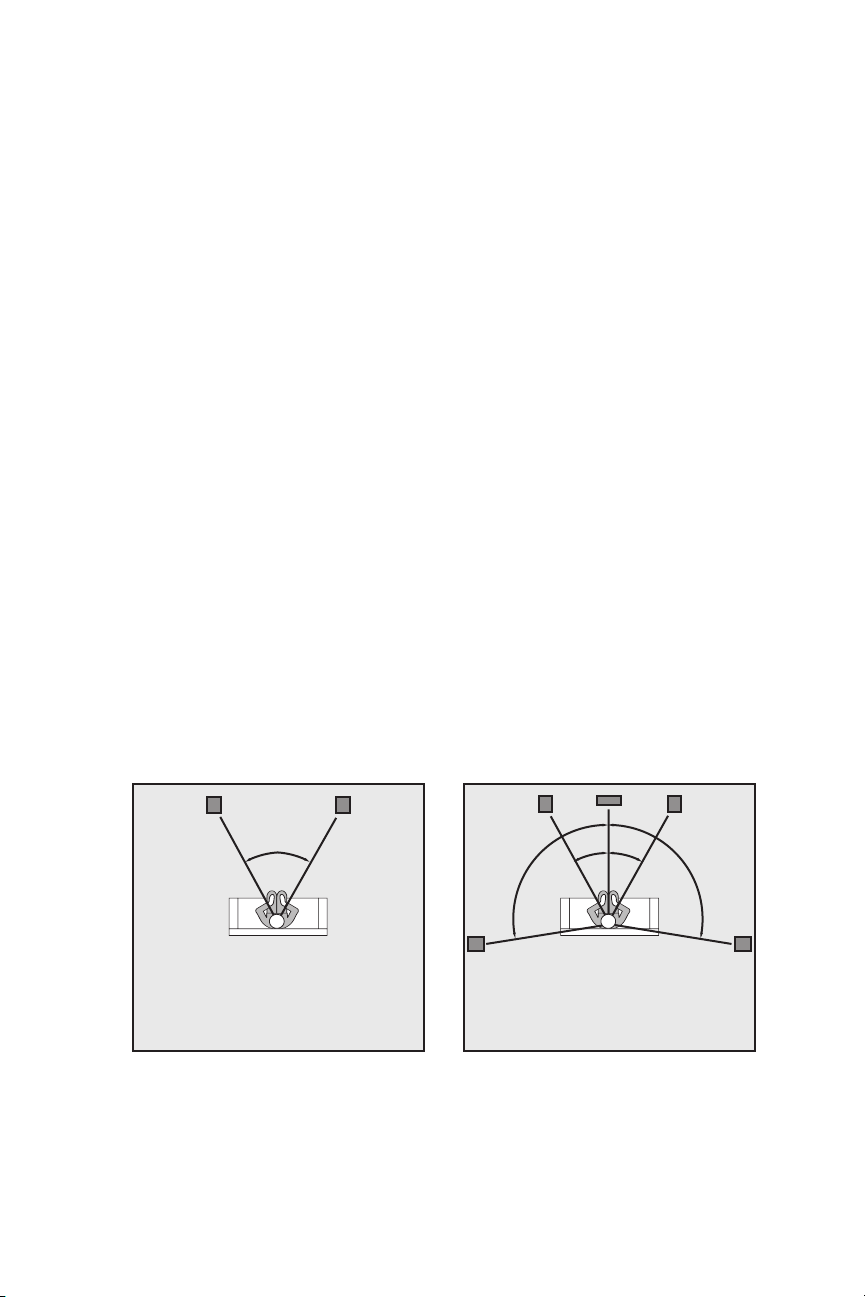
60°
Ideal speaker placement: 2.1
Ideal speaker placement: 5.1
30° 30°
100°100°
B. Surround Speakers
Begin with the knowledge of the above factors about main speakers. Then
modify things as needed for your convenience and the surround effect that
works best for you. If you want maximum localization and definition, you
probably will want to aim the speakers toward your seating area, both
5
Page 6
horizontally and vertically. If you prefer the surround effect to be more
diffused rather than pinpointed, aiming the speakers somewhat away from
your ears probably will be more satisfying. You may want even to place them
to reflect their sound off the sides or rear of you room rather than have them
radiate toward you. Side-wall positioning, slightly behind you as specified in
our Quick Start tips, is preferable to most listeners, but rear-wall placement
can work well-especially for bouncing the sound off the side walls.
C. Subwoofer
There is no argument among audiophiles that the loudest bass output from a
subwoofer comes from corner placement. The natural megaphone-like flaring
outward of walls from a room corner focuses low frequencies—giving them no
place to go but toward you. It may be too much bass for your room or (more
particularly) your favorite listening spot in the room, but unless you are seated
in a “null” spot, where sound from the sub is cancelled or diminished by out-of
phase reflections from elsewhere, there should be plenty of bass from corner
placement.
If you are seated in such a null spot, your only real choices are generally to
move either the subwoofer or your listening position until bass returns to the
point that satisfies. Cranking up the level control almost certainly won’t help
much. But flipping the phase control 180 degrees sometimes may make a
difference, especially if the null is a product of cancellations caused by
interaction with low frequencies from your main speakers.
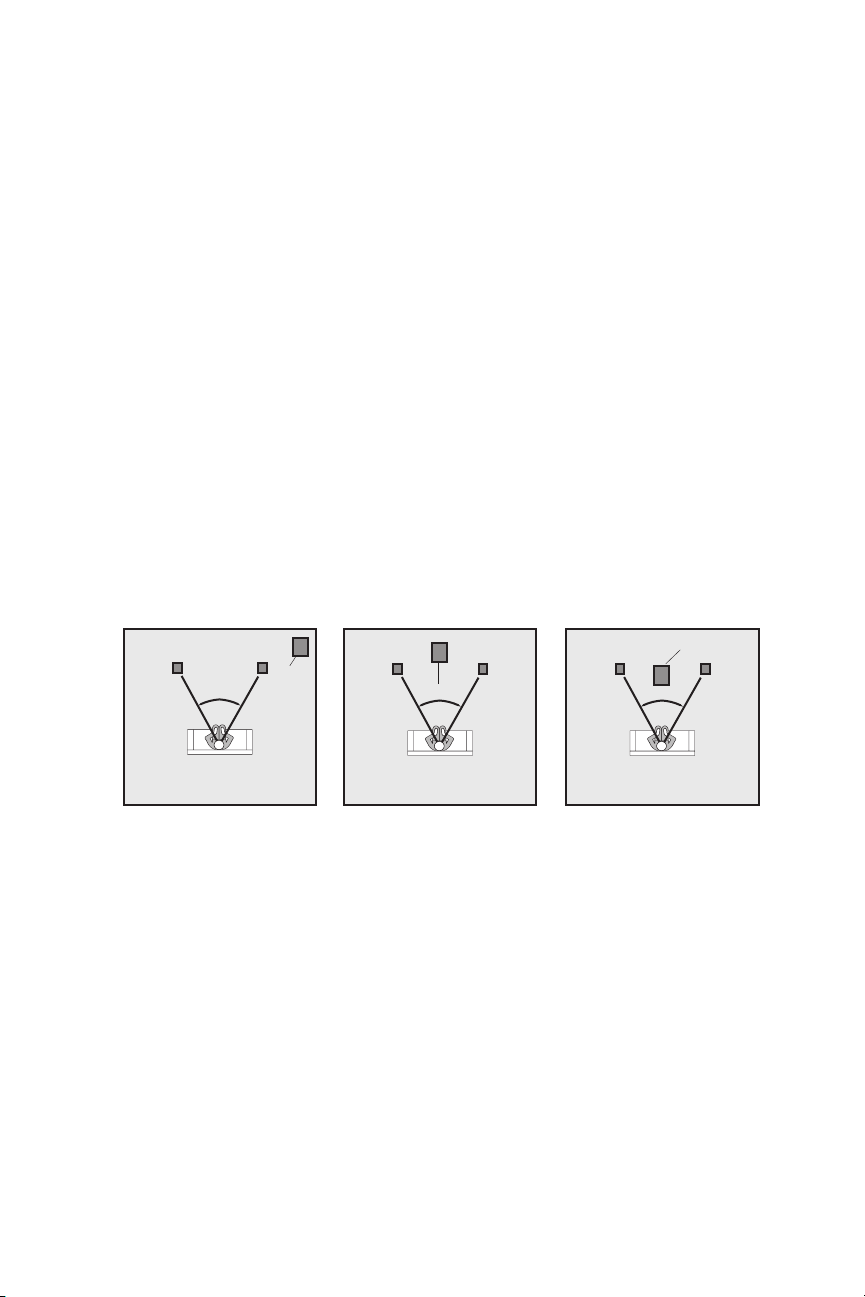
Subwoofer
Subwoofer
60°
Subwoofer
60°
60°
Most bass output; least
even bass response
Moderate bass output;
more even bass response
Lowest bass output;
most even bass response
If you are in the opposite sort of situation, where direct and reflected bass
waves converge in phase and produce a strong peak at your listening
location, you can—if you like—deal with that both with changes in placement
or in the position of your sub’s level control (or, less likely but possible, the
crossover frequency chosen). We say “if you like” because there is no such
thing as too much bass for some listeners, and we don’t want to be dogmatic.
You are definitely the one who has to be pleased, unless your Significant
Other chimes in to the contrary. As you go outward from the corner along one
wall or another, the general consensus (with which we tend to agree) is that
while bass output diminishes somewhat, it also becomes more uniform
throughout the room, with fewer of the “standing waves” that produce peaks
and nulls at various points.
Chances are things won’t be so simple, so the best method for positioning a
subwoofer, although a rather undignified-looking one, is to put the subwoofer
in your listening chair, then play music with lots of bass through the system
6
Page 7

something with steady low frequencies (such as organ music) or continuous
test tones, not movie material. Move around the room and note where the
bass sounds best; if you place the subwoofer there and yourself in your chair,
you should get the same bass performance. Bear in mind that the test only
works if you have your ears as high off the floor as the subwoofer will be, so
don’t be afraid to crawl around. A recommended starting point for the
placement of this subwoofer would be in either of the front corners of the room
(on either side of the main speakers).
D. About Wall-Mounting for Surround and Other Uses
The VISO speaker’s rear baffle incorporates pilot holes which can easily
secure speakers to Vogel VLB50 brackets.
III. ADDITIONAL DETAILS ON CONFIGURING YOUR VISO SYSTEM
A. Important:
Always turn off your electronic equipment before connecting speakers.
If you don’t, severe damage to equipment and/or your ears may result.
B. Selecting Speaker Wire
We recommend the following gauge (thickness) of standard two-conductor
wire for the wiring distances specified; if you prefer you can use thicker
(lower-gauge) wire.
Under 25 ft (<7.5m) 18-gauge or 1.0 mm dia (lamp cord)
25 - 50 ft (7.5 - 15 m) 16-gauge or 1.3 mm dia (heater cord)
50 - 100 ft (15 - 30 m) 14-gauge or 1.6 mm dia
Over 100 ft (>30 m) 12-gauge or 2.0 mm dia
C. Configurations
Connect speakers identically to your amplifier or receiver on each
channel—Red amp/receiver terminal to Red speaker terminal, Black to
Black. This will ensure that the diaphragms of the speakers of both channels
move forward and backward together (”in-phase”), rather that in opposition
(”out-of-phase”). In-phase connection provides maximum clarity and bass,
while out-of-phase connection results in frequency cancellations and
produces thinner and less distinct sound —with less bass, vague vocal
quality, and no solid center image. To help ensure the proper connection, the
two separate conducting wires in a standard two-conductor speaker cable are
coded in one way or another to be distinguishable from each other. (The
jacket of one wire may be ribbed or marked with “+” signs, or one wire under
the insulation may be a different colour from the other.) Use this wire-coding,
together with the amp/receiver and speaker colour-coding, to be sure you are
connecting the same wire of a given pair to a like-coded terminal at both ends
of your connection. (See figures 1 & 2)
D. Tighten Terminals
Be sure all wiring terminals, are tightened firmly and securely, but be careful
7
Page 8

not to over-tighten and damage the connectors.
E. NAD VISO DVD Receiver Setup
NAD VISO FIVE
If you're using an NAD VISO FIVE DVD Receiver connected to an NAD VISO
THIRTY and NAD VISO TWENTY, you must configure the Speaker Settings
to calibrate the frequency response of the system. The following steps will
guide you in configuring your NAD VISO FIVE with respect to NAD VISO
THIRTY and NAD VISO TWENTY speakers.
Ensure that your NAD VISO FIVE is unplugged when you connect the
speakers. It is also advisable to power-down or unplug all associated
components while making or breaking any signal or AC power connections.
Connect at least one of the NAD VISO FIVE Monitor Outputs (Component
Video, S-Video or Composite Video Monitor Out) to a corresponding video
input of a compatible TV/Monitor.
A. With NAD VISO THIRTY and NAD VISO TWENTY speakers connected to
the corresponding speaker terminals of your NAD VISO FIVE, connect the
supplied AC cord to NAD VISO FIVE's AC Mains input and then plug into
an AC outlet.
B. The Standby LED indicator embedded around the bezel of the POWER
button in the front panel will illuminate amber. Press the POWER button to
turn ON the NAD VISO FIVE. The Standby LED indicator will turn from
amber to blue. Turn ON also your TV/Monitor and set it to the
corresponding video input setting.
You may operate the NAD VISO FIVE from its front panel in combination with
the supplied HTR 7 remote control. Since the remote control will be the
primary controller for most cases, the following procedures are all made with
reference to the use of the appropriate HTR 7 button controls.
Speaker Settings
1. Using the HTR 7 remote control, press the [SETUP] button. Below OnScreen-Display (OSD) will appear in your connected TV/Monitor.
Setup Menu
Audio Setup Menu
Video Setup Menu
OSC Language
Exit
8
Page 9

2. With “Audio Setup Menu” highlighted, press [ENTER] button to select
“Audio Setup Menu” and correspondingly bring up the Audio Setup Menu
OSD.
Audio Setup Menu
Listening Mode
Input Settings
Speakers Settings
Speakers Distance
Channel Levels
Exit
3. Use the [?] button to scroll down to “Speaker Settings”. Press [ENTER] to
select “Speaker Settings” menu.
4. At “Speaker Settings” OSD menu and with “Front” speaker item
highlighted, set “Front” speaker to “Small” by pressing [<] button until
“Small”. Then, press [?] button to select “Small” and at the same time
move on to the next item – “Center”. Follow the same procedure – set
“Center” to “Small” and also “Surround” to “Small”.
Speaker Settings
Front Small
Center Small
Surround Small
Subwoofer On
Enhanced Bass Off
Do not Save & Exit
Save & Exit
5. With “Front”, “Center” and “Surround” all set to “Small”, press [?] button to
scroll down to “Save & Exit”.
6. Press [ENTER] to save the new settings and at the same time exit the
Speaker Settings menu. Press [SETUP] button to completely exit the
Setup menu OSD.
7. Center
Channel Level Setting as a default setting, we suggest adjusting
the Center Channel level to -3dB.
Follow steps 1. and 2. above to arrive at Audio Setup menu.
In Audio Setup menu select Channel Levels. Press the button on the
[?]
9
Page 10

remote to select Center speaker. Then by pressing the [<] button set the
level to -3dB.
Channel Levels
Front L
Center
Front R
Surr L
Surr R
Subwoofer
Do not Save & Exit
Save & Exit
8. [?] .
Press button to scroll down to "Save & Exit
9.
Press [ENTER] to save the new setting and at the same time exit the
0dB
-3dB
0dB
0dB
0dB
0dB
Channel Levels menu. Press [SETUP] button to completely exit the Setup
menu OSD.
10.
Confirm the relative balance of your system's loudspeakers including the
Center speaker by following the instructions in the section of the VISO
FIVE DVD Receiver Owner's Manual entitled "USING THE VISO FIVE -AUDIO SETUP MENU".
NAD VISO TWO
If you're using an NAD VISO TWO DVD Receiver, you must configure the
menu items “Listening Mode” and “Speaker Settings” to calibrate the
frequency response of the system. The following steps will guide you in
configuring your NAD VISO TWO receiver with respect to NAD VISO
TWENTY speakers.
Ensure that your NAD VISO TWO is unplugged when you connect the
speakers. It is also advisable to power-down or unplug all associated
components while making or breaking any signal or AC power connections.
Connect at least one of the NAD VISO TWO Monitor Outputs (Component
Video, S-Video or Composite Video Monitor Out) to a corresponding video
input of a compatible TV/Monitor.
A. With NAD VISO TWENTY speakers connected to the corresponding
speaker terminals of your NAD VISO TWO, connect the supplied AC cord
to NAD VISO TWO's AC Mains input and then plug into an AC outlet.
B. The Standby LED indicator embedded around the bezel of the POWER
button in the front panel will illuminate amber. Press the POWER button to
turn ON the NAD VISO TWO. The Standby LED indicator will turn from
amber to blue. Turn ON also your TV/Monitor and set it to the
corresponding video input setting.
You may operate the NAD VISO TWO from its front panel in combination with
10
Page 11

the supplied HTR 6 remote control. Since the remote control will be the
primary controller for most cases, the following procedures are all made with
reference to the use of the appropriate HTR 6 button controls.
Listening Mode
1. Using the HTR 6 remote control, press the [SETUP] button. The SETUP
menu On-Screen-Display (OSD) will be shown in your connected
TV/Monitor.
Setup Menu
Audio Setup Menu
Video Setup Menu
OSC Language
Exit
2. With “Audio Setup Menu” highlighted, press [ENTER] and you will be
directed to the “Audio Setup Menu” OSD.
Audio Setup Menu
Listening Mode
Input Settings
Speakers Settings
Channel Levels
Exit
3. With “Listening Mode” highlighted, press [ENTER] for you to be directed to
the “Listening Mode” menu OSD.
Listening Mode
Mode Stereo
Do not Save & Exit
Save & Exit
11
Page 12

4. While at the “Listening Mode” menu item, use the [<] button to select “DVS
Reference” – this is the calibrated listening mode setting when using the
NAD VISO TWENTY speakers.
Listening Mode
Mode DVS Reference
Do not Save & Exit
Save & Exit
5. Use the [?] button to scroll down to the “Save & Exit” menu item. Press
[ENTER] to save the new settings and at the same time exit the Listening
Mode menu. Press [SETUP] button to completely exit the Setup menu
OSD.
NOTE
The Listening Mode can also be alternatively set to “DVS Reference” by
directly pressing the front panel [SURROUND MODE] button. With disc loaded
or while at other Sources, toggle the front panel [SURROUND MODE] button
until “DVS Reference” mode.
Speaker Settings
1. Using the HTR 6 remote control, press the [SETUP] button. The SETUP
menu On-Screen-Display (OSD) will be shown in your TV/Monitor.
Setup Menu
Audio Setup Menu
Video Setup Menu
OSD Language
Exit
2. With “Audio Setup Menu” highlighted, press [ENTER] button and you will
be directed to “Audio Setup Menu” OSD. Use the [?] button to scroll down
to the “Speaker Settings” menu item.
12
Page 13

Audio Setup Menu
Listening Mode
Input Settings
Speakers Settings
Channel Levels
Exit
3. Press [ENTER]. While at the “Front” menu item, use the [<] button to
select the “Small” setting - this is the calibrated Speaker Setting when
using the NAD VISO TWENTY speakers.
Speaker Settings
Front Small
Subwoofer On
Enhanced Bass Off
Do not Save & Exit
Save & Exit
4. Use the [?] button to scroll down to the “Save & Exit” menu item. Press
[ENTER] to save the new settings and at the same time exit the Speaker
Settings menu. Press [SETUP] button to completely exit the Setup menu
OSD.
F. Subwoofer Level
When calibrated, the bass reproduced by the subwoofer is on the same
relative level as the signal reproduced by the full range speakers.
Always start your subwoofer volume adjustments from the calibrated
subwoofer reference level. The calibrated subwoofer reference level is
achieved when the volume switch on the VISO subwoofer is set to the 0dB
position (factory default) and subwoofer level is set to 0dB on the VISO
receiver. Use the [?] or [>] buttons on your receiver’s remote control to adjust
the subwoofer level.
Another setting that achieves the calibrated subwoofer reference level is the
+10dB position on the VISO subwoofer and the -10dB subwoofer level on the
VISO receiver.
With the subwoofer volume set to 0dB, if by gradually increasing bass output
at the VISO receiver a point is reached at which the subwoofer starts audibly
13
Page 14

to clip and/or the bass output from the subwoofer is insufficient, this indicates
that the volume on the subwoofer is set too low. In such a case, turn down the
subwoofer level on the VISO receiver to -10dB and set the volume switch on
the subwoofer to the +10dB position. Then by adjusting again the subwoofer
level on the VISO receiver, set the desired bass level.
G. Subwoofer LED Indicator
When the LED is red this indicates a stand-by mode. When the subwoofer
senses a program signal at its input the LED turns green. After approximately
15 to 20 minutes with no signal at its input, the subwoofer will switch to a
stand-by mode and the LED turns red.
H. AC Power Switch
The Power Switch turns the NAD VISO subwoofer on and off. As the
subwoofer draws only an extremely small current when idle, this may be left
normally on and turned off only when you do not expect to use the subwoofer
for an extended period. The Power Switch must be in the on position for
normal operation.
IV. PROTECTING YOUR SPEAKERS
A. First and foremost, respect your speaker's limits. Never turn up the
volume all the way to see how loud your system will play. And avoid
larger-than-life playback of music or movies, especially in a large room.
B. When listening at loud volumes, do not turn the bass or treble up all
the way or close thereto. This sends greatly increased, disproportionate
power into the speakers and may well damage them. Loudness
compensation controls, which are intended for low level listening, should
be turned off at normal and loud listening levels.
C. Turning amplifiers up to their limits to produce loud sound may drive
them into “clipping” and cause severe speaker damage. Often the
damage is done by underpowered amplifiers, which when clipping may
generate “spikes” of tremendous momentary power.
D. If you are using your speakers at loud volume, listen carefully for any sign
of harsh, garbled midrange and diminishing intelligibility. If you detect any
problem, turn the volume down right away.
V. CABINET CARE
Cabinets have varying materials and finishes, including high gloss “poly
lacquers”, vinyl, and anodized aluminum. They should be treated as you would
furniture with similar finishes. Dust lightly with a soft cloth; avoiding abrasives.
If necessary, wipe carefully with a cloth slightly dampened with glass cleaner
to remove heavy soil. Avoid touching speaker diaphragms. In particular
pushing in domes will permanently damage tweeters.
14
Page 15

VI. IN CASE OF PROBLEMS
A. If a speaker begins to sound distorted, or seems to be missing certain
frequencies, check first to see whether playing at somewhat lower volume
seems to clear up the problem. It can be especially important to turn down
the volume right away if you have pushed an amplifier or receiver past its
comfortable limits.
B. Determine if the problem is the speakers, the electronics, or the wire
connections. If a problem on one speaker doesn't go away, interchange
the speaker wire connections on your amplifier or receiver, so that the left
speaker is connected to the right channel, and vice versa. If the problem
shifts to the other speaker, the problem is not in the speaker. (Another
component-or, very often, a cable or connection problem between
components-may be at fault.) If the problem stays in the same speaker,
swap the speaker cables next. If the problem remains in the same
speaker, irrespective of the channel to which it's connected and the
connecting wire used, the speaker itself probably needs service.
C. See your dealer if you require service. NAD dealers are equipped to
handle almost all problems. If you have moved since your purchase, the
nearest authorized NAD dealer should be able to help you. If the problem
is not resolved, please contact us, providing the Model name, Serial
Number, date of purchase, dealer name, and a full description of the
problem.
VII. IN CASE OF PROBLEMS WITH YOUR SUBWOOFER
Symptom Action
No sound/power
indicator not lit
No sound/power
indicator remains red
Ensure the main power switch is toggled to the “Power” position.
This switch is located at the back of the subwoofer.
Ensure the power cord is connected to the subwoofer and plugged
into a live AC outlet.
Check the main fuse located in the power cord socket and replace
as required. If the new fuse also blows, the subwoofer amplifier
requires service.
The VISO S10 subwoofer utilizes signal sensing auto on/off circuitry.
If no signal is sent to the subwoofer, it will not power up and the front
panel power indicator will remain red. When using the subwoofer
output of the VISO receiver, no signal may be immediately present in
this output. The subwoofer will only power up when a signal appears
at the subwoofer input.
If the signal cable connection is poor or has been severed, the
subwoofer will not power up. Swap cables to determine if this is the
source of the problem.
To ensure the problem is not associated with the subwoofer, rapidly
15
Page 16

disconnect and connect the subwoofer input signal. If the subwoofer
power indicator color changes to green, the VISO receiver may not
be sending a signal to the subwoofer. Ensure the VISO receiver is
correctly configured to provide signal at the subwoofer output.
Sounds distorted
Hum
Thank you again for your purchase. We hope this owner's guide helps you enjoy
the exceptional satisfaction that NAD VISO speaker systems have to offer. And
we wish you many years of enjoyable listening!
Lower volume if the subwoofer begins to sound distorted to
determine if playback at a lower level solves the problem. If a slight
reduction in level solves the problem, were you being realistic in your
subwoofer level setting? If the distorted sound remains at a low
level, the woofer may be damaged.
Hum is usually caused by using an inferior, damaged, exceptionally
long signal cable or cables routed near high current
wiring/appliances. Replace/shorten the cable connecting the
subwoofer to the VISO receiver. Cable runs of longer than 20 feet
may require the use of a line driver (not available from PSB).
Setting the volume switch of the subwoofer to 0dB and increasing
the volume control of the VISO receiver subwoofer output can
sometimes reduce hum to an acceptable level.
16
Page 17

FIGURE 1
5.1 System with VISO FIVE
VISO S10
120V Model Only
120V 60HZ 1.6A
AC FUSE
T1.6AL 250V
VOLUME
PHASE
+10db0 db
180°0°
VISO S10
Powered Subwoofer
VISO LR5
Right Front
Speaker
+ -
+ -
+ -
VISO C20
Centre Speaker
VISO LR5
Left Front
Speaker
VISO LR5
Right Rear
Speaker
+ -
+ -
VISO LR5
Left Rear
Speaker
18
Page 18

FIGURE 2
2.1 System with VISO TWO
VISO S10
120V Model Only
120V 60HZ 1.6A
AC FUSE
T1.6AL 250V
VOLUME
PHASE
+10db0 db
180°0°
VISO S10
Powered Subwoofer
+ -+ -
VISO LR5
Right Front
Speaker
19
VISO LR5
Left Front
Speaker
Page 19

VIII. SPECIFICATIONS
VISO LR5 VISO C20 VISO S10
Compact Monitor Centre Subwoofer
FREQUENCY RESPONSE
(Anechoic)
On Axis @ 0° ± 3dB 75-23,000Hz 75-23,000Hz 36-150Hz
Off Axis @ 30° ± 1.5dB 80-10,000Hz 80-10,000Hz
LF cutoff - 10dB 65Hz 65Hz 32Hz
AMPLIFIER POWER
Continuous 110 Watts
Dynamic 140 Watts
Dynamic Peak 280 Watts
Type Class AB Discrete MOSFET
Output Devices
SENSITIVITY (1W (2.83V) @ 1m, IEC-filtered Pink Noise, C-weighted)
Anechoic Chamber 84dB 87dB
Typical Listening Room 86dB 89dB
IMPEDANCE
Nominal 8 Ohms 8 Ohms
Minimum 6 Ohms 6 Ohms
INPUT POWER (RMS, Clipping < 10% Time)
Recommended 15-80 Watts 15-80 Watts
Program 60 Watts 60 Watts
ACOUSTIC DESIGN
Tweeter (Nominal) 1” (25mm) 1” (25mm)
Aluminum Dome Aluminum Dome
with Ferrofluid with Ferrofluid
Woofer (Nominal) 4” (102mm) 2 x 4” (102mm) 8” (203mm)
Injection Molded Metalized Injection Molded Metalized Injection Molded Metalized
Polypropylene cone Polypropylene cone Polypropylene cone
Rubber surround Rubber surround Rubber surround
Crossover 3,000Hz, B3 3,000Hz, B3 Fixed
Internal Volume 0.10 cu ft (2.8 liters) 0.15 cu ft (4.3 liters) 0.68 cu ft (19.3 liters)
Design Type Bass Reflex Sealed Bass Reflex
1” (25mm) Rear Port 2 ½” (64mm)
Down Firing Port
SIZE (W x H x D) 5” x 8” x 7” 13 3/4” x 5 1/4” x 7” 9 3/8” x 14 3/4” x 15 1/2”
129mm x 205mm x 178mm 350mm x 134mm x 178mm 244mm x 375mm x 395mm
WEIGHT
Net 5.3lb ( 2.4kg)/each 8.7lb (4.0kg)/each 22.8lb (10.4kg)/each
Shipping
VISO TWENTY 42lb (19kg)/system
VISO THIRTY 25lb (11kg)/system
FINISH High Gloss Black High Gloss Black Textured Black Sleeve with
High Gloss Black Baffle
FEATURES Gold Plated Binding Post Gold Plated Binding Post Phase Switch
ABS Grille ABS Grille 10dB Volume Switch
Rubber Bumpers Rubber Bumpers On-Standby/Off
Gold Plated RCA
All specifications are subject to change without notice. NAD is a trademark of Lenbrook Corp., used under licence by NAD Electronics , a division of Lenbrook Industries
Limited. ©2009 NAD Electronics. All rights reserved.
® ®
20
Page 20

www.NADelectronics.com
©2009 NAD ELECTRONICS INTERNATIONAL
A DIVISION OF LENBROOK INDUSTRIES LIMITED
All rights reserved. No part of this publication may be reproduced, stored or transmitted in any form without the written permission of NAD Electronics International
VISO FIVE Owner’s Manual Issue 2-01/08
 Loading...