

Page 1
Page 2
LUMINAIRE PROFILÉ / SLIM LIGHT PANEL
IMPORTANT : Lire toutes les instruc
IMPORTANT: Read all instruc
IS-SL3-4-6-NAD
ons avant d'installer les appareils. Conserver pour référence future.
ons before installing xtures. Retain for future reference.
- Scie
OUTILS REQUIS:
- Ruban à mesurer
- Câblage électrique (u
type adapté à l'applica
iser seulement le
on pour ces appareils)
SÉCURITÉ / AVERTISSEMENT
SÉCURITÉ : Pour votre sécurité, cet appareil doit être raccordé
conformément aux codes et règlements électriques locaux. Tout
travail doit être e ectué par un électricien quali é.
AVERTISSEMENT : Assurez-vous que le courant est coupé à par
du panneau électrique avant de commencer l'installa
l'entre
en.
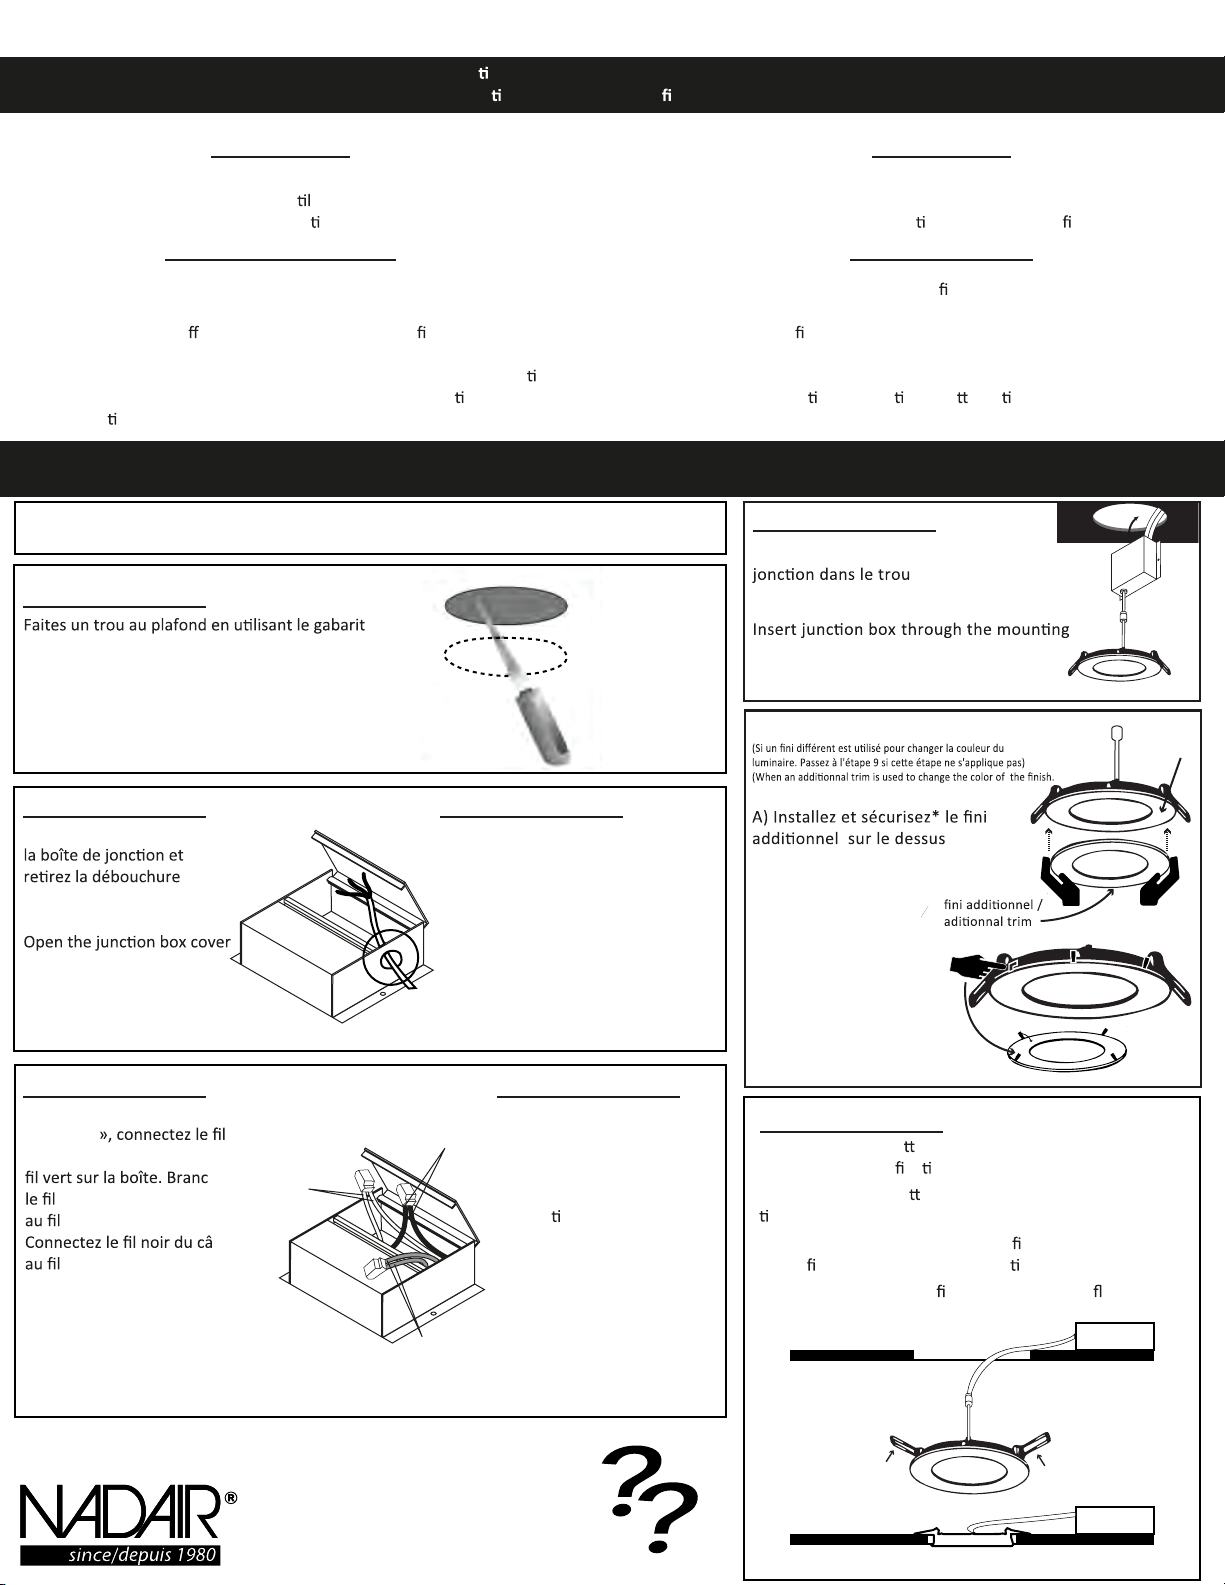
ÉTAPE / STEP 1:
Coupez le courant / Shut power OFF
ÉTAPE / STEP 2:
au dos de la boîte
Cut ceiling hole using stencil on the back of the
box
r
on ou
INSTRUCTIONS
stencil
gabarit
- Saw
TOOL REQUIRED:
- Measuring Tape
- Electrical Wiring (use type and gauge
suitable for applica
on to connect the xtures)
SAFETY / WARNING
SAFETY: For your safety, this xture must be wired in accordance
to local electrical codes and ordinances. All work should be done
by a quali ed electrician.
WARNING: Make certain power is OFF from the electrical panel
before star ng installa on or a emp ng any maintenance.
ÉTAPE / STEP 7:
Insérez la boite de
du plafond
hole
ÉTAPE / STEP 3: ÉTAPE / STEP 4:
Ouvrez le couvercle de
sur le panneau latéral.
and remove the appropriate
knockout(s) on the side
panel
ÉTAPE / STEP 5:
À l'aide des «QUICK
CONNECT
vert («ground») du câble au
blanc (neutre) du câble
blanc de la boîte.
noir de la boîte.
Using the QUICK Connect, connect
green (ground) wire of cable to
green wire in the box. Connect
white (neutral) wire of cable to
white wire of box. Connect black
wire of cable to black wire of box.
her
ble
Fil blanc
(Neutre)
White wire
(Neutral)
Fil noir(Courant)
Black wire (Live)
Insérez le câble électrique par la
débouchure.
Insert the electrical cable trough the
knockout.
ÉTAPE / STEP 6:
Placez tout le câblage et les
connexions dans la boîte et
fermez le couvercle.
Place all wiring and
connec
and close the cover
Fil vert («Ground»)
Green wire (Ground)
ons back in to the box
ÉTAPE / STEP 8 :
luminaire /
slim
If this step don't apply, g o to step 9 )
du luminaire.
A
A) Install and secure* the trim
on top of the slim light
B
B) * assurez-vous que le fini est bien appuyé lors
de la pose sur le luminaire et que vous avez plié
les languettes sur le luminairepour éviter
que le fini tombe et éviter ainsi des blessures
B) * Make sure the trim sits perfectly on the slim and
that you have folded the tabs of the trim to the back
of the slim This will prevent the trim from falling
and/or causing injuries.
FOLD / PLIEZ
STEP / ÉTAPE 9:
A Poussez les clave es sur le montage vers le haut et
insérez la base de
xa on dans le trou de montage.
B Relâchez les clave es et l'appareil sera
ré au ras du plafond.
A Push spring loaded clips on the xture upwards and
xture base in to the moun
insert
ng hole.
B Release the clips and xture will be pulled ush to the
ceiling.
A
QUESTIONS
T: 1 (800) 776-7891
www.nadair.com
B
 Loading...