

Page 1
RC-500
RACING SEAT
SIÈGE DE COURSE
RENNSITZ
RACESTOEL
ASIENTO DE CARRERAS
SEDILE DA CORSA
BANCO DE CORRIDA
RACING SEAT
BB5124
Made in China
396 Rue de la Voyette, CRT2 - Fretin,
CS90414, 59814 LESQUIN Cedex
Page 2
EN
na
RC-500
1
3
5
7
2
4
6
8
screw 1
screw 2
①
②
①
②
Page 3
EN
na
RC-500
9
11
13
15
10
12
14
16
②
①
Page 4

EN
na
RC-500
Thank you for purchasing the NACON RC-500 Racing Seat. This product
has been designed to enhance your video gaming experience. Please keep this
instruction manual for future reference.
WARRANTY
This product bearing the NACON trademark, is guaranteed by the manufacturer
for a period of 2 years from the date of purchase, and will, during this period be
replaced with the same or a similar model, at our option, free of charge, if there
is a defect due to faulty material, or workmanship. This guarantee does not cover
defects arising from accidental damage, misuse or wear and tear. This does not
aect your statutory rights. Please retain your proof of purchase, for the duration
of the warranty period, in case of a product replacement claim. Without this
unfortunately we cannot process your claim.
PACKAGE CONTENTS
1 x Installation guide
1 x Seat with rails and lever
1 x Security mat
2 x Seat brackets
1 x Front frame with foot plate
1 x Back frame
8 x Frame feet
2 x Lower wheel support stand
2 x Upper wheel support stand
2 x Connecting tubes
1 x Gear shift plate
1 x Gear shift plate arm
4 x Knurled screws short
2 x Knurled screws long
4 x Velcro cable holders
1 x Blister card with screws, nuts and tools
ASSEMBLY
We recommend to assemble the RC-500 Racing Chair with the help of a second
person, as assistance may be required to assemble the chair.
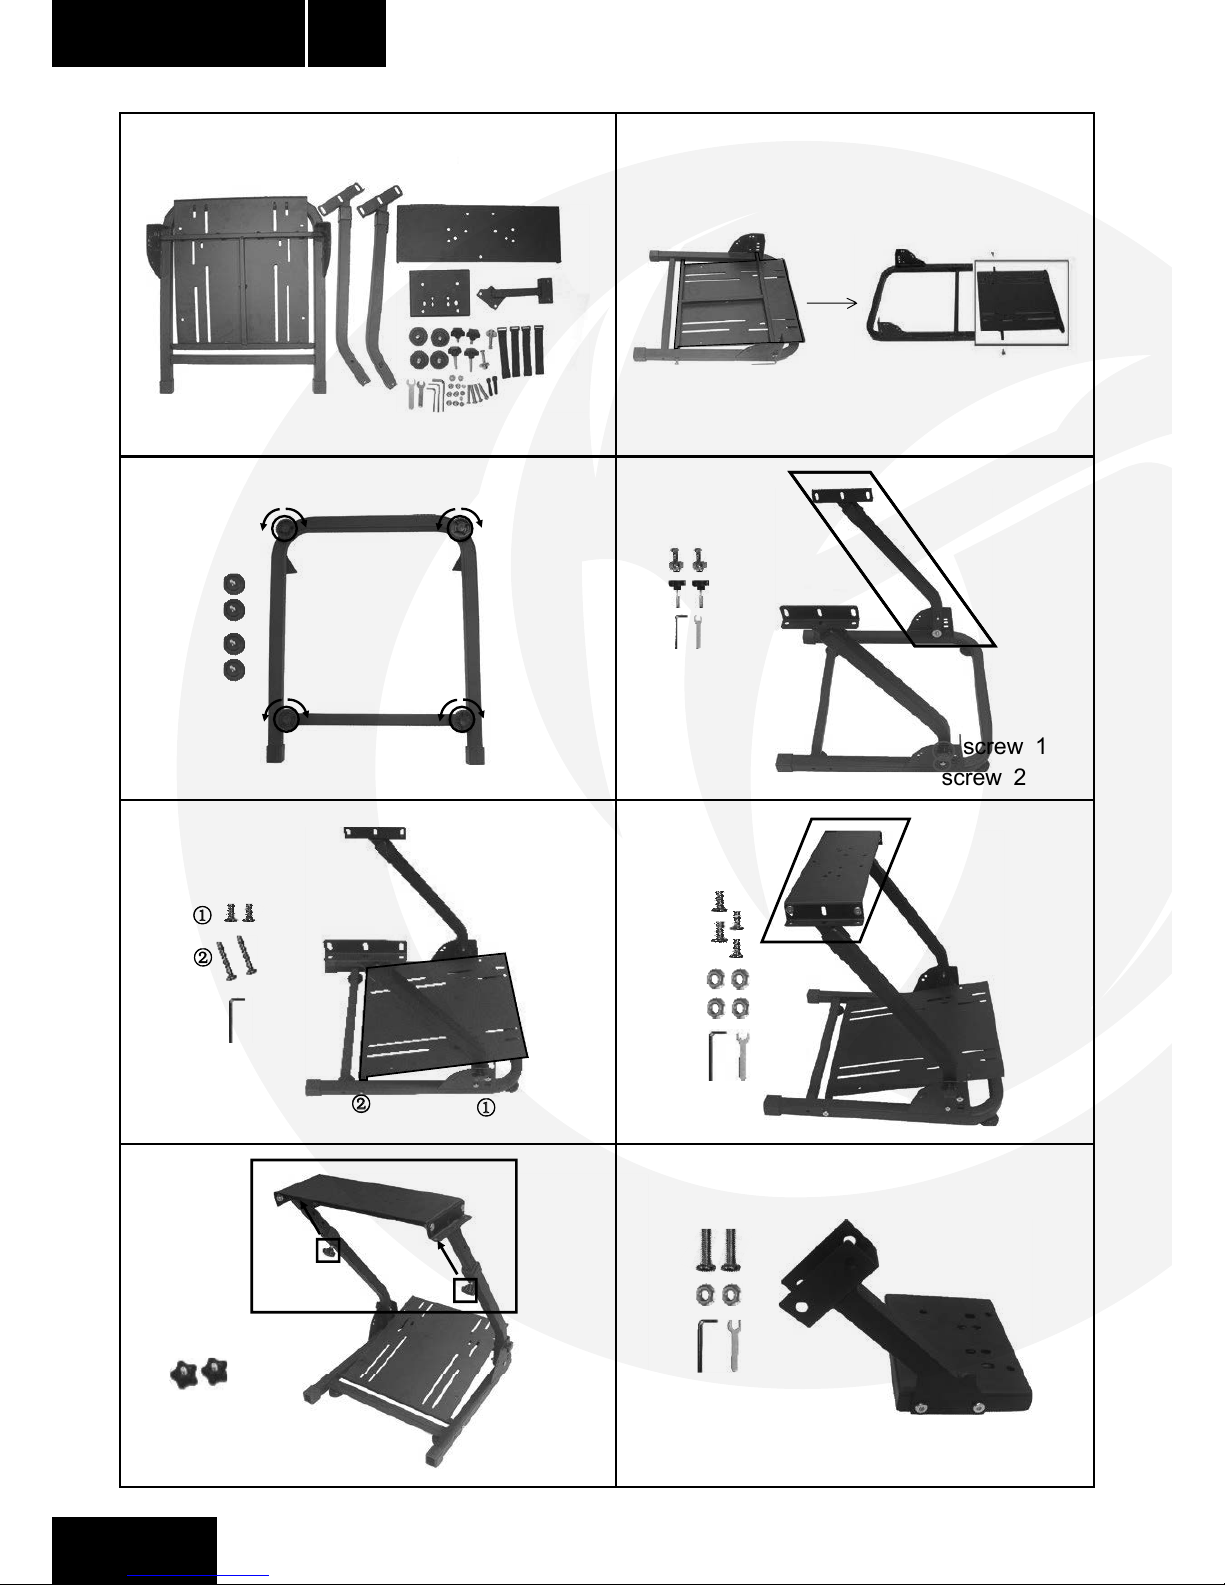
1. Remove the foot plate from the front frame by unscrewing and put the screws
and frame aside for future use.
2. Insert 4 of the frame feet into the prepared holes and screw them in tightly.
3. Attach the lower wheel support stand to the side plates of the front frame by
using a screw and a nut and a long knurled screw for each. The dierent holes
for the screws allow you to select your preferred angle for the wheel support.
Then insert each upper wheel support stand into the tube of the lower one with
the vertical area facing inwards.
4. Attach the foot plate with the NACON logo closest to the seat area.
5. Screw the wheel support onto the support stands using a total of 4 screws
and nuts.
6. Adjust the wheel support to the desired height and x it on each side with a
knurled screw.
7. (Optional) If you wish to use a gear shift with your steering wheel, attach the
gear shift plate to the gear shift plate arm, the side depending on the hand you
want to use the gear shift with. Then attach the plate to either the left or right
wheel support stand, as indicated in the picture.
8. Insert the tubes which will later connect the front and the back frame. Attach
them with screws, using the pre-drilled holes. The front frame is now prepared
and can be placed on the security mat!
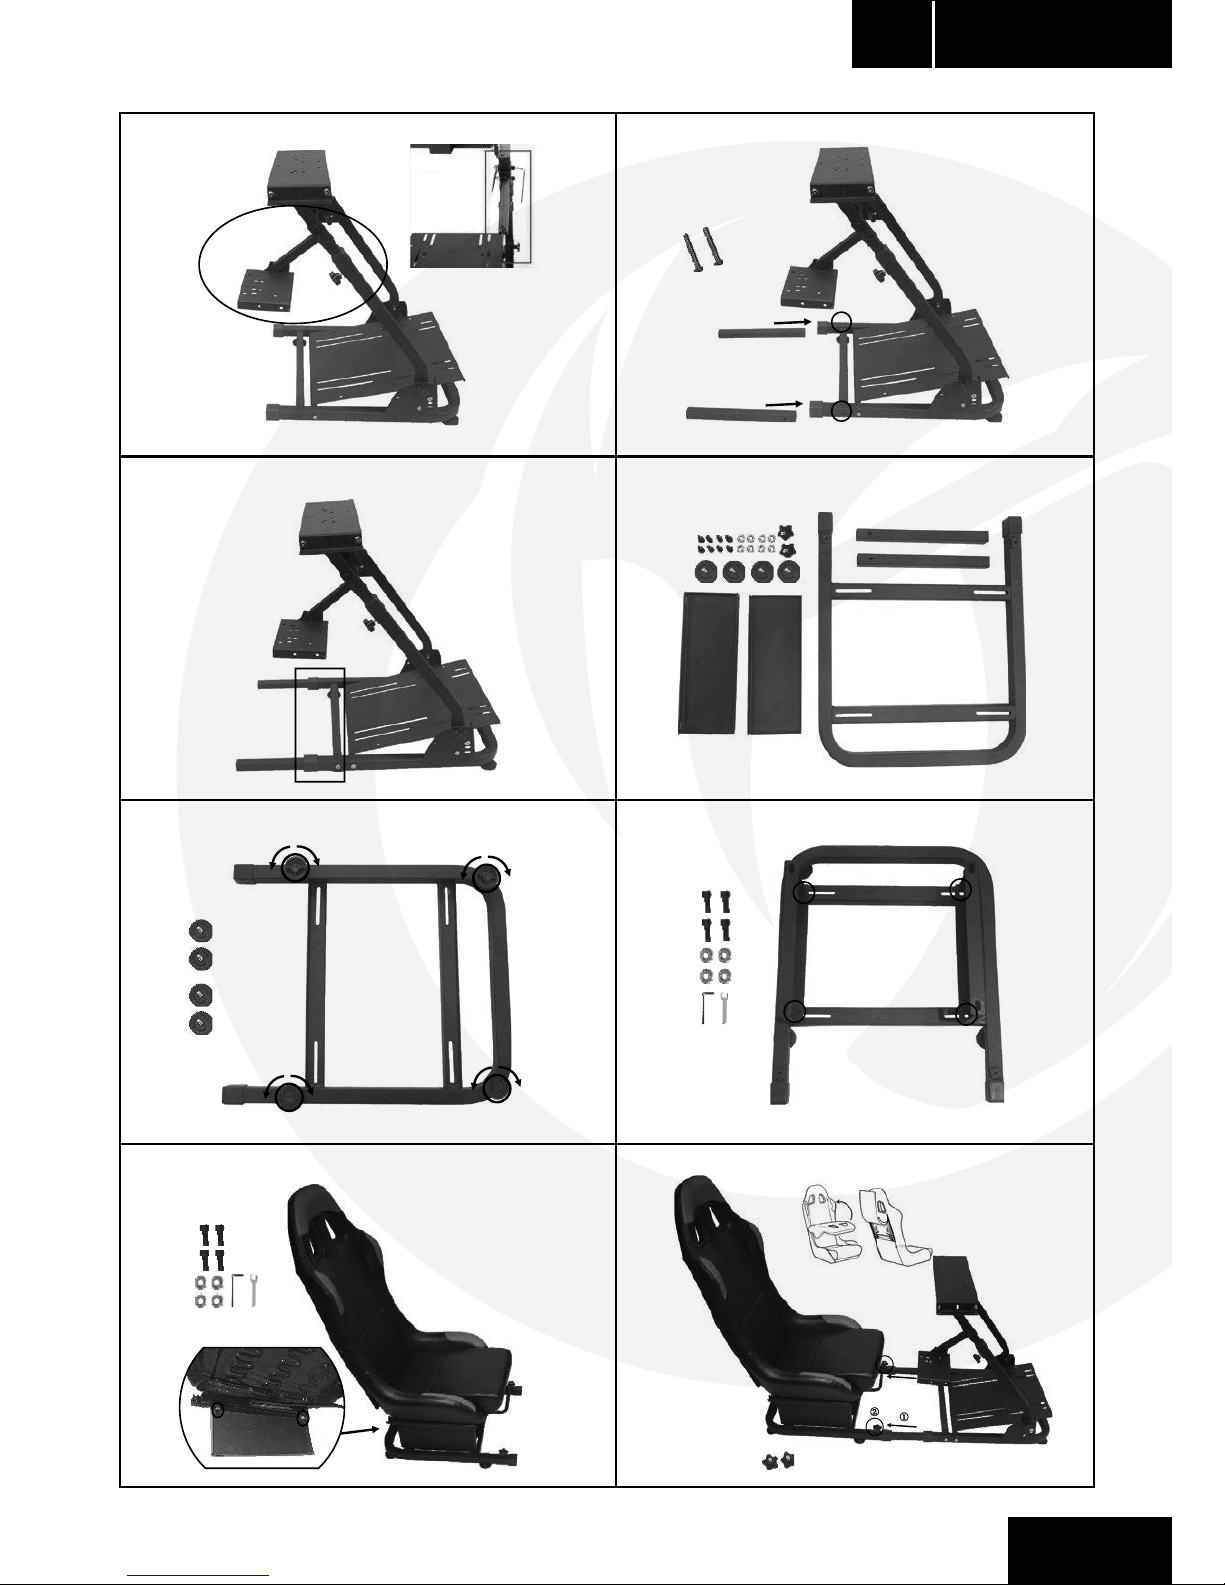
9. Insert the remaining frame feet to the back frame just like you did with the
front one.
10. Attach the two seat brackets to the back frame, but don’t tighten the screws
yet.
11. Check the correct position of the brackets, by loosely placing the seat with
its rails extended on top and conrming that the drilled holes align with the holes
in the rails. Once conrmed, tighten the screws of the brackets.
12. Attach the seat to the back frame by using four screws and nuts. The easiest
way is to slide the seat forward by pulling up on the handle underneath. Screw
the seat to the brackets on the front end rst. After this has been done, slide the
seat to the front (again use the handle for this) to expose the holes on the back
of the rails. Now attach the back to the brackets.
13. Attach the back frame with the seat to the front frame by placing the
connecting tubes into the open tubes of the back frame. Check the preferred
distance for the seat and use the remaining knurled screws to x it, by screwing
them into the upward facing holes o the back frame. Don’t forget that you can
adjust the distance later more easily by using the lever on the seat.
14. The seat is folded for shipping and easy storage. To lock the back into place,
fold it upright, open the ap at the rear of the seat and lock the 2 securing bolts
into place on the left and right edges.
SECURITY MAT
We highly recommend to only use the RC-500 when placed on the included
security mat. The mat provides a secure stand for the seat and protects your
oor surface.
ADJUSTING THE DISTANCE BETWEEN WHEEL/PEDALS AND SEAT
Use the handle underneath the seat to easily slide the seat forward backward.
If you further need to adjust the distance, you can also re-adjust the position of
the front and back of the RC-500 by using the knurled screws at the bottom of
the seat.
NOTICE: To avoid injury, please pay attention when operating the handle and
sliding the seat into a new position.
MOUNTING OF RACING WHEELS
The wheel support has been prepared with holes which t the majority of
racing wheels in the market. The screws are included with your RC-500.Simply
attach the screws through the wheel support plate and into the holes set in the
underside of your wheel.
NOTICE: The maximum height is marked by two lines on the tubes. To ensure a
stable wheel support, do not extend the frame beyond these points.
STORAGE
When you’re not using the RC-500, you can disassemble it easily, by unscrewing
the two knurled screws at the bottom of the seat and separating the front from
the back frame. Furthermore you can fold the seat, for easier storage. Simply
open and lift the attached cover on the back and pull out the metal rods which
hold back and seat together.
WEIGHT NOTICE
Please note that this seat is only suitable to be used by persons with less than
110kg body weight.
IMPORTANT SAFEGUARDS & PRECAUTIONS
1. This product is for indoor use only. Never expose to wet weather
conditions.
2. Do not expose the unit to splashing, dripping, rain or moisture. Do not
immerse in liquid.
3. Do not expose to dust, high humidity, high temperatures or mechanical
shock.
4. Do not use if the equipment is damaged.
5. For external cleaning, use a soft, clean, damp cloth only.
6. This device is not designed to be used by anyone (including children)
with impaired physical, sensory or mental capacity, or by anyone without
appropriate experience or knowledge unless they have received prior
guidance or instructions related to the use of this device from someone who
is responsible for their safety. Children should be supervised to ensure that
they do not play with the device.
7. Take care of your extremities while operating the sliding handle of the chair.
CUSTOMER SUPPORT
For UK support contact: support@nacongaming.com
Page 5

FR
na
RC-500
Merci d’avoir acheté le Siège de course NACON RC-500. Ce produit a été
conçu pour améliorer votre expérience vidéoludique. Veuillez conserver ce
manuel d’utilisation en lieu sûr an de pouvoir vous y reporter en cas de besoin.
GARANTIE
Ce produit de la marque de commerce NACON est garanti par le fabricant
pendant une période de 2 ans à compter de la date d’achat. Au cours de cette
période, en cas de défaut de matériau ou de fabrication, ledit produit sera
remplacé gratuitement par le même modèle ou un article similaire, et ce, à notre
seule et entière discrétion.Cette garantie ne couvre pas les défauts survenant à
la suite de dommages accidentels, d’un usage abusif ou d’une usure normale.
Ces dispositions ne modient en rien vos droits statutaires. Au cas où vous
demanderiez un remplacement de cet article, veuillez conserver votre preuve
d’achat en lieu sûr pendant toute la durée de la garantie. Sans ce document,
nous ne pourrions malheureusement pas traiter votre demande.
CONTENU DE L’EMBALLAGE
1 x guide d’installation
1 x siège avec rails et levier
1 x tapis de sécurité
2 x supports de siège
1 x châssis avant avec repose-pieds
1 x châssis arrière
8 x pieds de châssis
2 x barres de châssis inférieur de volant
2 x barres de châssis supérieur de volant
2 x tubes de xation
1 x support de boîte de vitesses
1 x bras de support de boîte de vitesses
4 x vis moletées courtes
2 x vis moletées longues
4 x porte-câbles en velcro
1 x emballage-coque avec vis, écrous et outils
MONTAGE
Comme il est possible que vous ayez besoin d’aide, nous vous recommandons
de monter le siège de course RC-500 avec une deuxième personne.
1. Retirez le repose-pieds du châssis avant en le dévissant, puis rangez-les les
vis en vue d’une utilisation ultérieure.
2. Insérez 4 des pieds de châssis dans les orices prévus à cet eet et xez
solidement.
3. Fixez chacune des deux barres de châssis inférieur du support de volant
aux plaques latérales du châssis avant à l’aide d’une vis, d’un écrou et d’une
longue vis moletée. Les diérents orices pour les vis vous permettent d’incliner
le support de volant comme vous le souhaitez.
Insérez ensuite les barres de châssis supérieur du support de volant dans les
barres inférieures avec la zone verticale vers l’intérieur.
4. Fixez le repose-pieds de manière à ce que le logo NACON soit le plus proche
possible de la zone du siège.
5. Fixez le support de volant au châssis à l’aide de 4 vis et écrous.
6. Ajustez le support de volant à la hauteur souhaitée, puis xez-le de chaque
côté à l’aide d’une vis moletée.
7. (Facultatif) Si vous souhaitez utiliser une boîte de vitesses avec votre volant,
xez le support de boîte de vitesses au bras prévu à cet eet (xez à gauche ou
à droite selon la main que vous voulez utiliser pour changer de rapports). Fixez
ensuite la plaque à droite ou à gauche du bras de support de boîte de vitesses
(comme le montre l’illustration).
8. Insérez les tubes qui raccorderont les châssis avant et arrière. Fixez-les en
vissant les vis dans les orices déjà percés. Le châssis avant est désormais prêt,
vous pouvez le placé sur le tapis de sécurité.
9. Insérez dans le châssis arrière les pieds qu’il vous reste. Procédez de la même
manière qu’avec le châssis avant.
10. Fixez les deux supports de siège au châssis arrière, mais ne serrez pas
encore les vis.
11. Vériez que les supports sont correctement positionnés. Pour cela, posez le
siège sans le xer, en ayant déployé les rails de la partie supérieure et en vous
assurant que les orices du siège sont alignés avec ceux des rails. Ensuite,
serrez les vis des supports.
12. Fixez le siège au châssis arrière à l’aide de 4 vis et écrous. La manière la
plus facile est de faire glisser le siège vers l’avant en tirant vers le haut la poignée
se trouvant sous le siège. Vissez le siège aux xations en commençant par la
partie frontale. Ensuite, faites glisser le siège vers l’avant (en utilisant de nouveau
la poignée) pour pouvoir accéder aux orices se trouvant à l’arrière des rails. À
présent, xez l’arrière aux supports.
13. Fixez le châssis arrière (comportant le siège) au châssis avant en insérant les
tubes dans le châssis arrière via les emplacements prévus à cet eet. Positionnez
le siège à la distance souhaitée, puis xez-le à l’aide des vis moletées qu’il vous
reste (vissez dans les orices supérieurs orientés à l’opposé du châssis arrière.
N’oubliez pas que vous pouvez régler ultérieurement la distance plus facilement
à l’aide du levier se trouvant sur le siège.
14. Le siège est plié pour en faciliter l’expédition et l’entreposage. Pour xer
l’arrière, pliez-le verticalement, ouvrez le volet se trouvant au dos du siège et
verrouillez les deux écrous de sécurité situés aux extrémités gauche et droite.
TAPIS DE SÉCURITÉ
Nous vous recommandons vivement d’utiliser le RC-500 exclusivement après
l’avoir positionné sur le tapis de sécurité fourni. Celui-ci ore une meilleure
stabilité et protège votre sol.
RÉGLER LA DISTANCE ENTRE LE VOLANT/LES PÉDALES ET LE SIÈGE
Utilisez la poignée située sous le siège pour le faire facilement glisser vers l’avant
et l’arrière. Si vous avez besoin d’ajuster davantage la distance, vous pouvez
également modier la position de l’avant et de l’arrière du RC-500 à l’aide des
vis moletées se trouvant sous le siège.
AVERTISSEMENT : pour éviter toute blessure, soyez vigilant lorsque vous
utilisez la poignée et faites glisser le siège pour le mettre dans une nouvelle
position.
MONTAGE DES VOLANTS DE COURSE
Les orices du support de volant ont été positionnés de manière à être
compatibles avec la majorité des volants de course disponibles sur le marché.
Les vis sont fournies avec votre RC-500. Fixez simplement le volant à son
support à l’aide des orices se trouvant sur le support et dans la partie inférieure
de votre volant.
AVERTISSEMENT : la hauteur maximale est indiquée par deux lignes sur les
tubes. Pour garantir une bonne stabilité du volant, ne pas déployer le châssis
au-delà de cette limite.
ENTREPOSAGE
Lorsque vous n’utilisez pas le RC-500, vous pouvez le démonter facilement en
dévissant les deux vis moletées qui se trouvent en bas du siège et en détachant
le châssis avant du châssis arrière. En outre, il est également possible de plier le
siège pour en faciliter le rangement. Ouvrez simplement le couvercle et relevez-
le, puis sortez les tiges métalliques qui xent le siège au châssis arrière.
AVERTISSEMENT DE POIDS
Veuillez noter que ce siège est conçu pour des utilisateurs pesant moins de
110 kg.
SÉCURITÉ ET PRÉCAUTIONS IMPORTANTES
1. Ce produit est destiné à une utilisation en intérieur uniquement. Ne pas
l’exposer aux intempéries.
2. Ne pas exposer le périphérique aux éclaboussures, à la pluie, aux
égouttements ni à l’humidité. Ne pas plonger dans un liquide.
3. Ne pas exposer à la poussière, à une humidité élevée, à des températures
extrêmes ou à des chocs mécaniques.
4. Ne pas utiliser si l’équipement est endommagé.
5. Pour tout nettoyage externe, utiliser exclusivement un chion doux, propre
et humide.
6. Le périphérique n’est pas conçu pour une personne (enfant y compris)
sourant d’un handicap physique, sensoriel ou mental, ou pour un
utilisateur ne possédant pas l’expérience ou les connaissances nécessaires
et pertinentes (à moins d’avoir préalablement reçu des conseils et des
instructions relatifs à l’utilisation de ce périphérique, conseils et instructions
fournis par une personne responsable de l’utilisateur). Il est primordial de
surveiller les enfants pour s’assurer qu’ils ne jouent pas avec le périphérique.
7. Faites attention à vos pieds et mains lorsque vous actionnez la poignée
pour faire glisser le siège.
SERVICE CLIENT
Pour tout renseignement vous pouvez prendre contact avec un service de
Hotline. Avant tout appel, assurez-vous avoir pris le maximum d’informations sur
le problème rencontré et sur le produit.
Email : support.fr@nacongaming.com
Site Internet : www.nacongaming.com
Adresse : BIGBEN INTERACTIVE SA 396, Rue de la Voyette, CRT-2 - FRETIN,
CS 90414, 59814 LESQUIN Cedex
Du lundi au vendredi (sauf jours fériés) : De 9h à 19h
En Belgique :
Email : support.be@nacongaming.com
Site Internet : www.nacongaming.com
Adresse : Bigben Interactive Belgium s.a./n.v. Waterloo Oce Park / Bâtiment
H Drève Richelle 161 bte 15, 1410 Waterloo, Belgium
Page 6

DE
na
RC-500
Danke für den Kauf des NACON RC-500 Rennsitzes. Dieses Produkt wurde
entwickelt, um das Videospielerlebnis zu verbessern. Diese Anleitung sollte zum
späteren Nachschlagen aufbewahrt werden.
GARANTIE
Für dieses Produkt mit dem Markenzeichen NACON, übernimmt der Hersteller
die Garantie für einen Zeitraum von 2 Jahren ab Kaufdatum. Während dieses
Zeitraums wird es durch ein gleiches oder ähnliches Modell, nach unserer
Wahl, kostenlos ersetzt, wenn ein Defekt aufgrund von Material- oder
Verarbeitungsfehlern vorliegt. Diese Garantie erstreckt sich nicht auf Mängel,
die durch zufällige Beschädigung, Missbrauch oder Abnutzung entstehen. Die
gesetzlichen Rechte des Kunden bleiben hiervon unberührt. Den Kaufbeleg bitte
für die Dauer der Garantiezeit für den Fall eines Reklamationsfalles aufbewahren.
Ohne diesen können wir eine Reklamation leider nicht bearbeiten.
LIEFERUMFANG
1 x Aufbauanleitung
1 x Sitz mit Schienen und Hebel
1 x Sicherheitsbodenmatte
2 x Sitzhalterung
1 x Vordergestell mit Fußplatte
1 x Hintergestell
8 x Gestellfuß
2 x Unterer Lenkradträger
2 x Oberer Lenkradträger
2 x Verbindungsrohr
1 x Gangschaltungsplatte
1 x Gangschaltungsplattenarm
4 x Rändelschraube, kurz
2 x Rändelschraube, lang
4 x Velcro-Kabelbinder
1 x Blisterkarte mit Schrauben, Muttern und Werkzeugen
AUFBAU
Wir empfehlen, den RC-500 Rennsitz mit Hilfe einer zweiten Person zu montieren,
da bei der Montage eventuell Hilfe benötigt wird.
1. Die Fußplatte vom Vordergestell abschrauben und Schrauben und Gestell
zum späteren Gebrauch beiseitelegen.
2. Vier Gestellfüße in die vorgesehenen Löcher stecken und fest anschrauben.
3. Die untere Lenkradhalterung mit je einer Schraube und Mutter und einer
langen Rändelschraube an den Seitenplatten des Vordergestells befestigen.
Die verschiedenen Bohrungen für die Schrauben ermöglichen die Wahl des
gewünschten Winkels für den Lenkradträger.
Dann jeden oberen Lenkradträger mit der vertikalen Fläche nach innen in das
Rohr des unteren einsetzen.
4. Die Fußplatte anbringen, das NACON-Logo muss zur Sitzäche weisen.
5. Lenkradträger mit insgesamt 4 Schrauben und Muttern auf die Halterungen
schrauben.
6. Lenkradträger auf die gewünschte Höhe einstellen und auf jeder Seite mit
einer Rändelschraube xieren.
7. (Optional) Falls eine Gangschaltung mit dem Lenkrad verwendet werden
soll, muss die Gangschaltungsplatte am Gangschaltungsplattenarm befestigt
werden, wobei die gewünschte Seite abhängig von der Hand ist, mit der die
Gangschaltung betätigt wird. Zum Schluss die Platte entweder am linken oder
rechten Lenkradträger befestigen, wie in der Abbildung gezeigt.
8. Die Rohre, die später vorderes und hinteres Gestell verbinden, einsetzen und
mit Schrauben in den vorgebohrten Löchern befestigen. Das Vordergestell ist
nun vorbereitet und kann auf der Sicherheitsbodenmatte platziert werden!
9. Die verbleibenden Gestellfüße in das Hintergestell einsetzen, auf die gleiche
Weise wie beim Vordergestell.
10. Die beiden Sitzhalterungen am Hintergestell befestigen, die Schrauben aber
nicht zu fest anziehen.
11. Die korrekte Position der Halterungen überprüfen, indem der Sitz mit den
nach oben ausgefahrenen Schienen lose platziert wird. Die Bohrungen müssen
mit den Löchern in den Schienen übereinstimmen. Nach erfolgter Prüfung die
Schrauben der Halterungen festziehen.
12. Den Sitz mit vier Schrauben und Muttern am Hintergestell befestigen. Am
einfachsten ist es, den Sitz nach vorne zu schieben, indem man den unteren
Hebel nach oben zieht. Zuerst den Sitz an die Halterungen am vorderen Ende
schrauben. Danach den Sitz nach vorne schieben (wieder mit dem Hebel), um
die Löcher auf der Rückseite der Schienen freizulegen. Nun wird die Rückseite
an den Halterungen befestigt.
13. Das Hintergestell mit Sitz am Vordergestell befestigen, indem die
Verbindungsrohre in die oenen Rohre des Hintergestells eingesetzt werden.
Den gewünschten Abstand für den Sitz prüfen und mit den restlichen
Rändelschrauben in die nach oben weisenden Löcher am Hintergestell
schrauben. Der Abstand kann später mit dem Sitzhebel problemlos eingestellt
werden.
14. Der Sitz ist zum Transport und zur einfachen Lagerung zusammengeklappt.
Um die Rückenlehne in Position zu bringen und zu arretieren, muss sie
hochgeklappt werden. Dann die Klappe an der Rückseite des Sitzes önen und
die beiden Sicherungsbolzen an der linken und rechten Kante arretieren.
SICHERHEITSBODENMATTE
Wir empfehlen dringend, den RC-500 nur auf der mitgelieferten
Sicherheitsbodenmatte zu verwenden. Die Matte bietet einen sicheren Stand für
den Sitz und verhindert eine Beschädigung des Fußbodens.
ABSTAND ZWISCHEN LENKRAD/PEDALEN UND SITZ EINSTELLEN
Mit dem Hebel unter dem Sitz lässt sich der Sitz leicht vor- und zurückschieben.
Falls der Abstand weiter angepasst werden muss, kann die Position des Vorder-
und Rückteils des RC-500 mit Hilfe der Rändelschrauben an der Unterseite des
Sitzes neu eingestellt werden.
HINWEIS: Um Verletzungen zu vermeiden, sollten Hebelbetätigung und
Verschieben des Sitzes in eine neue Position mit Bedacht vorgenommen werden.
LENKRÄDER MONTIEREN
Der Lenkradträger ist mit Löchern versehen, die für die meisten Lenkräder auf
dem Markt geeignet sind. Die Schrauben sind im Lieferumfang des RC-500
enthalten und werden einfach durch die Lenkradträgerplatte in die Löcher an der
Unterseite des Lenkrads geschraubt.
HINWEIS: Die maximale Höhe ist durch zwei Linien am Rohr gekennzeichnet.
Um eine stabile Lenkradbefestigung zu gewährleisten, darf der Rahmen nicht
über diese Punkte hinausragen.
LAGERUNG
Wird der RC-500 nicht verwendet, kann er leicht demontiert werden, indem
man die beiden Rändelschrauben an der Unterseite des Sitzes herausdreht und
das vordere vom hinteren Gestell trennt. Außerdem kann der Sitz zur leichteren
Aufbewahrung zusammengeklappt werden. Einfach die angebrachte Abdeckung
auf der Rückseite önen und anheben und die Metallstifte herausziehen, die
Rückenlehne und Sitz miteinander verbinden.
HINWEIS ZUR TRAGLAST
Bitte beachten: Dieser Sitz ist nur für Personen mit weniger als 110 kg
Körpergewicht geeignet.
WICHTIGE SCHUTZ- UND VORSICHTSMASSNAHMEN
1. Dieses Produkt ist nur zur Verwendung im Innenbereich bestimmt. Niemals
nassen Witterungsbedingungen aussetzen.
2. Das Gerät nicht Spritzwasser, Tropfen, Regen oder Feuchtigkeit aussetzen.
Nicht in Flüssigkeit eintauchen.
3. Nicht Staub, hoher Luftfeuchtigkeit, hohen Temperaturen oder
mechanischen Erschütterungen aussetzen.
4. Gerät nicht verwenden, wenn es beschädigt ist.
5. Zur äußeren Reinigung nur ein weiches, sauberes und feuchtes Tuch
verwenden.
6. Dieses Gerät ist nicht für den Gebrauch durch Personen (einschließlich
Kinder) mit eingeschränkter körperlicher, sensorischer oder geistiger
Leistungsfähigkeit oder durch Personen ohne entsprechende Erfahrung oder
Kenntnisse bestimmt, es sei denn, sie haben von einer Person, die für ihre
Sicherheit verantwortlich ist, eine vorherige Einweisung oder Anleitung zur
Verwendung dieses Geräts erhalten. Kinder sollten beaufsichtigt werden, um
sicherzustellen, dass sie nicht mit dem Gerät herumspielen.
7. Beim Betätigen des Schiebehebels des Stuhls auf die eigenen Gliedmaßen
achten.
KUNDENDIENST
Telefon: 09001 – 84 30 44* (Montag bis Sonntag von 8:00 bis 24:00 Uhr, 0,49
€/Min. aus dem deutschen Festnetz, Anrufe aus allen Mobilfunknetzen nicht
möglich.)
*Minderjährige müssen vorher einen Erziehungsberechtigten um Erlaubnis fragen
Per Email erreichen Sie uns über support.de@nacongaming.com oder direkt
über das Online-Support-Formular (www.nacongaming.com/de/).
Distribution Deutschland:
Bigben Interactive GmbH
Walter-Gropius-Straße 28
50126 Bergheim
www.nacongaming.com/de/
Page 7

NL
na
RC-500
Bedankt voor de aankoop van de NACON RC-500 Racestoel. Dit product is
ontworpen om je game-ervaring te verbeteren. Bewaar deze handleiding goed
om hem later te kunnen raadplegen.
GARANTIE
Dit product met het handelsmerk NACON heeft een fabrieksgarantie van 2
jaar vanaf het moment van aankoop en zal gedurende deze periode kosteloos
worden vervangen door hetzelfde of een vergelijkbaar model, door ons te
bepalen, als er een defect optreedt als gevolg van ondeugdelijk materiaal of
productiefouten. Deze garantie is niet van toepassing op defecten die het
gevolg zijn van opzettelijke schade, onjuist gebruik of slijtage. Dit is niet van
invloed op je wettelijke rechten. Bewaar je aankoopbewijs voor de duur van de
garantieperiode voor het geval dat je een beroep op de garantie moet doen.
Zonder dit bewijs kunnen we je claim helaas niet in behandeling nemen.
INHOUD VERPAKKING
1x installatiegids
1x zitting met rails en hendel
1x veiligheidsmat
2x zittingbeugels
1x voorframe met voetplaat
1x achterframe
8x voeten frame
2x onderste stuurstandaard
2x bovenste stuurstandaard
2x verbindingsbuizen
1x versnellingsplaat
1x arm versnellingsplaat
4x kartelschroeven kort
2x kartelschroeven lang
4x kabelhouders met klittenband
1x kaart met schroeven, bouten en gereedschap
MONTAGE
We raden je aan de RC-500 Racestoel met hulp van een tweede persoon in
elkaar te zetten.
1. Verwijder de voetplaat van het voorframe door hem los te schroeven en leg de
schroeven en het frame voorlopig opzij.
2. Plaats vier van de framevoeten in de daarvoor bestemde gaten en schroef ze
stevig vast.
3. Bevestig de onderste stuurstandaard aan de zijplaten van het voorframe
met een schroef en een bout en een lange kartelschroef in elke plaat. Met de
verschillende schroefgaten kun je de gewenste hoek voor de stuursteun kiezen.
Plaats dan elk van de bovenste stuurstandaarden in de buizen van de onderste
met het verticale gedeelte naar binnen gericht.
4. Bevestig de voetplaat met het NACON-logo aan de kant van het zitgedeelte.
5. Schroef de stuursteun op de standaarden met in totaal vier schroeven en
bouten.
6. Breng de stuursteun op de gewenste hoogte en zet hem aan beide kanten
vast met een kartelschroef.
7. (Optioneel) Als je een versnellingspook wilt gebruiken met je stuur, bevestig je
de versnellingsplaat op de bijbehorende arm aan de kant waar je wilt schakelen.
Bevestig dan de plaat op de linker- of de rechterstuurstandaard, zoals afgebeeld.
8. Plaats de buizen die later het voor- en achterframe met elkaar zullen verbinden.
Zet ze vast met schroeven in de voorgeboorde gaten. Het voorframe is nu klaar
en kan op de veiligheidsmat worden geplaatst!
9. Bevestig de overgebleven framevoeten op het achterframe op dezelfde
manier als je dat bij het voorframe hebt gedaan.
10. Bevestig de twee zittingbeugels aan het achterframe, maar draai de
schroeven nog niet vast.
11. Controleer de positie van de beugels door de zitting er losjes op te plaatsen
met de rails uitgeschoven en te kijken of de voorgeboorde gaten zijn uitgelijnd
met de gaten in de rails. Als dat zo is, draai je de schroeven van de beugels vast.
12. Bevestig de zitting op het achterframe met vier schroeven en bouten. De
gemakkelijkste manier is de zitting naar voren schuiven door de hendel eronder
naar boven te trekken. Schroef de zitting eerst aan de voorkant op de beugels.
Schuif daarna de zitting naar voren (gebruik hiervoor ook weer de hendel) zodat
je bij de gaten aan de achterkant van de rails kunt. Bevestig nu de achterkant
op de beugels.
13. Bevestig het achterframe met de zitting aan het voorframe door de
verbindingsbuizen in de open buizen van het achterframe te plaatsen. Controleer
of de afstand van de zitting goed is en gebruik de overgebleven kartelschroeven
om hem vast te zetten door deze in de gaten aan de bovenzijde van het
achterframe te draaien. Vergeet niet dat je de afstand later eenvoudiger kunt
aanpassen met de hendel van de zitting.
14. De zitting is opgevouwen voor het transport en om hem gemakkelijk op te
bergen. Om de rugleuning in de juiste positie te zetten, open je de ap aan de
achterkant van de zitting en zet je de twee bouten aan de linker- en rechterkant
vast.
VEILIGHEIDSMAT
We raden je dringend aan de RC-500 alleen te gebruiken op de meegeleverde
veiligheidsmat. De mat zorgt ervoor dat de zitting stevig staat en voorkomt dat
je vloer beschadigt.
DE AFSTAND TUSSEN STUUR/PEDALEN EN ZITTING AANPASSEN
Gebruik de hendel onder de zitting om de zitting gemakkelijk naar voren en
achteren te schuiven. Als je de afstand nog verder moet aanpassen, kun je ook
de positie van het voor- en achterframe van de RC-500 afstellen met behulp van
de kartelschroeven aan de onderkant van de zitting.
OPMERKING: Wees voorzichtig als je de hendel gebruikt om de zitting in een
andere positie te schuiven, om letsel te voorkomen.
BEVESTIGING VAN RACESTUREN
De stuurstandaard is voorzien van gaten waarin de meeste verkrijgbare
racesturen passen. De schroeven zijn meegeleverd met de RC-500. Draai de
schroeven door de stuurplaat in de gaten aan de onderkant van je stuur.
OPMERKING: De maximale hoogte is aangegeven met twee vierkante gaten in
de buis. Schuif het frame niet verder uit dan deze punten, om te voorkomen dat
het instabiel wordt.
OPBERGEN
Als je de RC-500 niet gebruikt, kun je hem eenvoudig demonteren door de twee
kartelschroeven aan de onderkant van de zitting los te draaien en het voor- en
achterframe uit elkaar te halen. Daarnaast kun je de zitting opvouwen om hem
gemakkelijker te kunnen opbergen. Open de klep aan de achterkant en til deze
op en trek de metalen stangen die de zitting en de rugleuning bij elkaar houden
eruit.
MAXIMAAL GEWICHT
Merk op dat deze stoel alleen geschikt is voor personen met een lichaamsgewicht
van minder dan 110 kg.
BELANGRIJKE VEILIGHEIDS- EN VOORZORGSMAATREGELEN
1. Dit product is uitsluitend bestemd voor gebruik binnenshuis. Stel het nooit
bloot aan natte weersomstandigheden.
2. Niet blootstellen aan spatten, regendruppels of vocht. Niet onderdompelen
in vloeistof.
3. Niet blootstellen aan stof, hoge luchtvochtigheid, hoge temperaturen of
mechanische schokken.
4. Niet gebruiken als het apparaat beschadigd is.
5. Gebruikt uitsluitend een zachte, schone, vochtige doek om de buitenkant
te reinigen.
6. Dit apparaat is niet ontworpen voor gebruik door personen (onder wie
kinderen) met lichamelijke, zintuiglijke of verstandelijke beperkingen of door
personen zonder voldoende ervaring of kennis, tenzij zij vooraf van iemand
die verantwoordelijk is voor hun veiligheid begeleiding of instructies hebben
ontvangen met betrekking tot het gebruik van het apparaat. Houd toezicht
op kinderen om te voorkomen dat zij met het apparaat spelen.
7. Pas op je vingers als je de schuivende handgreep van de zitting gebruikt.
KLANTENSERVICE
Email : support.nl@nacongaming.com
In Nederland gedistribueerd door:
Bigben Interactive Nederland B.V
Franciscusweg 249-3B
1216 SG Hilversum
www.nacongaming.com
Email : support.be@nacongaming.com
In België gedistribueerd door:
Bigben Interactive Belgium S.A./N.V.
Waterloo Oce Park / Bâtiment H
Drève Richelle 161 bte 15,
1410 Waterloo, Belgium
www.nacongaming.com
Page 8

ES
na
RC-500
Gracias por comprar el asiento de carreras NACON RC-500. Este producto
ha sido diseñado para mejorar tu experiencia de juego. Por favor, conserva este
manual de instrucciones para futura referencia.
GARANTÍA
Este producto con la marca registrada NACON está garantizado por el
fabricante durante un periodo de 2 años a partir de la fecha de compra, y
durante este periodo se sustituirá de forma gratuita por el mismo modelo u
otro similar, a nuestra discreción, si existe un defecto debido a deciencias del
material o la fabricación. Esta garantía no cubre defectos producidos por daños
accidentales, uso indebido o desgaste. Esto no afecta a tus derechos legales.
Te rogamos que conserves tu prueba de compra durante el periodo de garantía,
por si tuvieras que solicitar la sustitución del producto. Sin dicha prueba no
podríamos procesar tu solicitud.
CONTENIDO DEL PAQUETE
1 guía de instalación
1 asiento con rieles y palanca
1 alfombrilla de seguridad
2 soportes de asiento
1 estructura delantera con placa para los pies
1 estructura trasera
8 pies para la estructura
2 soportes inferiores para el volante
2 soportes superiores para el volante
2 tubos de conexión
1 placa de cambio de marchas
1 brazo de la placa de cambio de marchas
4 tornillos moleteados cortos
2 tornillos moleteados largos
4 sujetacables de velcro
1 blíster con tornillos, tuercas y herramientas
MONTAJE
Recomendamos montar el asiento de carreras RC-500 junto a otra persona, ya
que puede ser necesaria su ayuda para el montaje.
1. Retira la placa para los pies de la estructura delantera quitando los tornillos y
guárdalos junto con la estructura para usarlos más adelante.
2. Introduce 4 de los pies de la estructura en los agujeros preparados y
atorníllalos con rmeza.
3. Ajusta los soportes inferiores del volante a las placas laterales de la estructura
delantera usando un tornillo y una tuerca y un tornillo moleteado largo para cada
uno. Los distintos agujeros para los tornillos te permiten seleccionar el ángulo
que preeras para el soporte del volante.
Después, introduce cada soporte superior del volante en el tubo del inferior con
el área vertical mirando hacia dentro.
4. Ajusta la placa para los pies con el logotipo de NACON más cerca del área
del asiento.
5. Atornilla la placa del volante a los soportes usando un total de 4 tornillos y
tuercas.
6. Ajusta el soporte del volante a la altura deseada y fíjalo en cada lado con un
tornillo moleteado.
7. (Opcional) Si quieres usar un cambio de marchas con tu volante, ajusta la
placa del cambio de marchas al brazo de la placa del cambio de marchas:
el lado dependerá de la mano que quieras usar para controlar el cambio de
marchas. Después, ajusta la placa al soporte del volante izquierdo o derecho,
como se indica en la imagen.
8. Introduce los tubos que luego conectarán las estructuras delantera y trasera.
Ajústalos con tornillos usando los agujeros ya realizados. La estructura delantera
ya está lista y se puede colocar sobre la alfombrilla de seguridad.
9. Introduce los pies restantes en la estructura trasera, tal y como hiciste con
la delantera.
10. Ajusta los dos soportes de asiento a la estructura trasera, pero no aprietes
los tornillos todavía.
11. Comprueba la posición correcta de los soportes colocando el asiento sin
ajustarlo, con los rieles extendidos encima, y comprueba que los agujeros se
alinean con los de los rieles. Una vez conrmado, aprieta los tornillos de los
soportes.
12. Acopla el asiento a la estructura trasera usando cuatro tornillos y tuercas. La
manera más fácil es deslizando el asiento hacia delante tirando hacia arriba asa
que hay debajo. Primero atornilla el asiento a los soportes de la parte delantera.
Después, desliza el asiento hacia delante (vuelve a usar el asa para ello) y deja al
descubierto los agujeros de la parte trasera de los rieles. Ahora, ajusta la parte
trasera a los soportes.
13. Acopla la estructura trasera con el asiento a la estructura delantera
colocando los tubos de conexión en los tubos abiertos de la estructura trasera.
Comprueba la distancia deseada para el asiento y usa los tornillos moleteados
restantes para jarlo, atornillándolos en los agujeros que miran hacia arriba de
la estructura trasera. No olvides que luego podrás ajustar la distancia con más
facilidad usando la palanca del asiento.
14. El asiento está doblado para facilitar el almacenamiento y transporte. Para
jar la parte trasera, ponla de pie, abre la solapa de la parte trasera del asiento
y ja los 2 pernos de seguridad en su lugar en los bordes izquierdo y derecho.
ALFOMBRILLA DE SEGURIDAD
Recomendamos encarecidamente usar el RC-500 solo cuando esté situado
sobre la alfombrilla de seguridad incluida. La alfombrilla ofrece un soporte
seguro para el asiento y evita daños en el suelo.
AJUSTAR LA DISTANCIA ENTRE VOLANTE/PEDALES Y ASIENTO
Usa el asa que hay debajo del asiento para deslizarlo con facilidad adelante
y atrás. Si necesitas anar la distancia aún más, también puedes reajustar
la posición de las partes delantera y trasera del RC-500 usando los tornillos
moleteados de la parte inferior del asiento.
ATENCIÓN: Para evitar lesiones, presta mucha atención al utilizar el asa y
deslizar el asiento a una nueva posición.
MONTAJE DEL VOLANTE
El soporte del volante cuenta con agujeros que se ajustan a la mayoría de los
volantes del mercado. Los tornillos están incluidos con el RC-500. Solo tienes
que meter los tornillos por la placa del volante y en los agujeros de la parte
inferior del volante.
ATENCIÓN: La altura máxima está marcada por dos agujeros cuadrados en
el tubo. Para asegurar la estabilidad del soporte de volante, no extiendas la
estructura más allá de estos puntos.
ALMACENAMIENTO
Cuando no estés utilizando el RC-500, puedes desmontarlo fácilmente con solo
desatornillar los dos tornillos moleteados de la parte inferior del asiento y separar
la parte delantera de la estructura trasera. Además, puedes plegar el asiento
para guardarlo con más facilidad. Solo tienes que abrir y levantar la cubierta
acoplada a la parte trasera y sacar las barras de metal que unen la parte trasera
y el asiento.
ADVERTENCIA DE PESO
Ten en cuenta que este asiento solo es adecuado para personas de menos de
110 kg de peso.
PRECAUCIONES IMPORTANTES
1. Este producto solo es apto para uso en interiores. No exponer al tiempo
húmedo.
2. No exponer la unidad a salpicaduras, goteos, lluvia o humedades. No
sumergir en líquidos.
3. No exponer al polvo, niveles altos de humedad o temperatura, o golpes.
4. No usar si el producto está dañado.
5. Para la limpieza externa, usar exclusivamente un paño suave, limpio y
húmedo.
6. Este dispositivo no está diseñado para ser utilizado por alguien (niños
incluidos) que tenga reducidas sus capacidades físicas, sensoriales o
mentales, ni por alguien sin la experiencia o el conocimiento apropiados, a
menos que haya recibido orientación anterior o instrucciones relativas al uso
de este dispositivo por parte de personas responsables de su seguridad.
Los niños deben ser supervisados para asegurarse de que no jueguen con
el dispositivo.
7. Ten cuidado con las extremidades al utilizar el asa de deslizamiento del
asiento.
ATENCIÓN AL CLIENTE
Para cualquier información, puede contactar con el servicio de atención al
cliente. Para esto, le recomendamos que se asegure previamente de disponer
de un máximo de información acerca del problema y el producto.
Dirección electrónica: sat@bigbeninteractive.es
Página web: www.nacongaming.com
Dirección postal:
Bigben Interactive - C/ Musgo 5, 2ª planta, 28023 Madrid, Spain
Page 9

IT
na
RC-500
Grazie per aver acquistato il Sedile da corsa NACON RC-500. Questo
prodotto è pensato per migliorare l’esperienza videoludica. Conservare questo
manuale di istruzioni per consultazioni future.
GARANZIA
Questo prodotto a marchio NACON è garantito dal produttore per 2 anni a
partire dalla data d’acquisto. Durante questo periodo, in caso di difetti relativi
alla lavorazione o al materiale, il prodotto verrà sostituito gratuitamente con un
modello identico o simile, a nostra discrezione. Questa garanzia non copre difetti
dovuti a danni accidentali, utilizzo improprio o normale usura e non modica i
diritti di cui l’utente gode ai sensi di legge. Nell’eventualità di una richiesta di
sostituzione, conservare la prova d’acquisto del prodotto per tutta la durata del
periodo di garanzia. In mancanza di una prova d’acquisto non potremo prendere
in carico la richiesta.
CONTENUTO DELLA CONFEZIONE
1 guida di installazione
1 sedile con guide e leva
1 tappetino di sicurezza
2 sostegni del sedile
1 telaio anteriore con poggiapiedi
1 telaio posteriore
8 piedini del telaio
2 supporti volante inferiori
2 supporti volante superiori
2 tubi di collegamento
1 piastra di ssaggio leva del cambio
1 tubo della piastra di ssaggio leva del cambio
4 perni con pomello corti
2 perni con pomello lunghi
4 fascette fermacavi in velcro
1 blister con viti, dadi e strumenti
ASSEMBLAGGIO
È consigliabile assemblare il Sedile da corsa RC-500 con l’aiuto di una seconda
persona in grado di fornire eventuale assistenza.
1. Rimuovere la base dal telaio anteriore svitandola e conservare le viti e il telaio
per le operazioni successive.
2. Inserire 4 piedini nei fori e avvitarli saldamente.
3. Fissare il supporto volante inferiore alle piastre laterali del telaio anteriore
usando una vite, un dado e un perno con pomello lungo per ciascun lato. I
diversi fori in cui inserire le viti consentono di scegliere l’angolazione desiderata
per il supporto del volante.
A questo punto, inserire i sostegni del supporto volante superiore nel tubo del
supporto inferiore con la supercie verticale rivolta verso l’interno.
4. Fissare il poggiapiedi in modo che il logo NACON si trovi sul lato più vicino
al sedile.
5. Avvitare il supporto del volante sugli appositi sostegni usando un totale di 4
viti e dadi.
6. Regolare il supporto del volante all’altezza desiderata e ssarlo ai lati usando
un perno con pomello.
7. (Facoltativo) Per utilizzare una leva del cambio insieme al volante, ssare la
piastra della leva del cambio all’apposito tubo sul lato desiderato. A questo
punto, ssare la piastra al supporto del volante a sinistra o a destra, come
indicato nella gura.
8. Inserire i tubi che collegheranno la parte anteriore del telaio a quella posteriore.
Fissarli inserendo le viti negli appositi fori. Il telaio anteriore è ora completato e
può essere posizionato sul tappetino di sicurezza.
9. Inserire nel telaio posteriore i piedini rimasti, come già fatto con il telaio
anteriore.
10. Fissare i due sostegni del sedile al telaio posteriore, ma senza stringere le viti.
11. Vericare che la posizione dei sostegni sia corretta poggiandoci sopra il
sedile con le guide estese e controllando che i fori siano allineati con quelli delle
guide. Dopo questa verica, stringere le viti dei sostegni.
12. Fissare il sedile al telaio posteriore usando quattro viti e dadi. Il modo più
semplice consiste nell’inserirlo facendolo scorrere in avanti, tirando verso l’alto
l’impugnatura posizionata sotto il sedile. Avvitare prima il sedile sui sostegni nel
lato anteriore. A questo punto, far scorrere il sedile in avanti (utilizzando di nuovo
l’impugnatura) per scoprire i fori sul lato posteriore delle guide, quindi ssare la
parte posteriore ai supporti.
13. Collegare il telaio posteriore con il sedile al telaio anteriore inserendo i tubi di
collegamento nelle estremità aperte dei tubi del telaio posteriore. Posizionare il
sedile alla distanza desiderata e utilizzare i perni con pomello rimasti per ssarlo,
avvitandoli nei fori rivolti verso l’alto del telaio posteriore. Successivamente sarà
possibile regolare la distanza con maggiore facilità utilizzando la leva del sedile.
14. Il sedile è ripiegato per ragioni di imballaggio e per riporlo con semplicità. Per
sollevare e bloccare lo schienale, piegarlo verso l’alto, aprire la linguetta posta sul
retro del sedile e ssare i 2 bulloni di sicurezza sui bordi sinistro e destro.
TAPPETINO DI SICUREZZA
Consigliamo vivamente di utilizzare il sedile RC-500 solo se posizionato sul
tappetino di sicurezza incluso. Il tappetino ore una base d’appoggio sicura per
il sedile e consente di evitare danni al pavimento.
REGOLAZIONE DELLA DISTANZA TRA VOLANTE/PEDALI E SEDILE
Usare l’impugnatura posta sotto il sedile per farlo scorrere in avanti e all’indietro.
Per regolare ulteriormente la distanza, è inoltre possibile eseguire nuovamente la
regolazione della parte anteriore e di quella posteriore dell’RC-500 tramite i perni
con pomello della parte inferiore del sedile.
AVVERTENZA: per evitare incidenti, prestare attenzione quando si usa
l’impugnatura e si fa scorrere il sedile in una posizione diversa.
MONTAGGIO DI VOLANTI DA CORSA
Il supporto del volante dispone di fori compatibili con la gran parte dei volanti da
corsa disponibili sul mercato. Le viti sono fornite insieme all’RC-500. È suciente
farle passare attraverso la piastra di supporto del volante per poi avvitarle nei fori
posizionati sul lato inferiore del volante stesso.
AVVERTENZA: l’altezza massima è indicata da due fori quadrati sul tubo. Per
assicurare un sostegno stabile al volante, non estendere il telaio oltre il limite
indicato.
CONSERVAZIONE
Quando l’RC-500 non viene utilizzato, è possibile smontarlo facilmente svitando
i due perni con pomello posizionati nella parte inferiore del sedile in modo da
separare il telaio anteriore da quello posteriore. È inoltre possibile ripiegare il
sedile per riporlo. Per farlo, aprire e sollevare il coperchio sul retro, quindi tirare
verso l’esterno le asticelle metalliche che ssano lo schienale al sedile.
AVVERTENZA SUL PESO
Questo sedile è adatto a persone di peso non superiore ai 110 kg.
IMPORTANTI INFORMAZIONI SULLA SICUREZZA E PRECAUZIONI
1. Questo prodotto è destinato esclusivamente all’uso in ambienti chiusi.
Non utilizzare in ambienti particolarmente umidi.
2. Non esporre il prodotto a pioggia o umidità e fare attenzione che non
venga esposto a gocciolamento o spruzzi di liquidi. Non immergere in liquidi.
3. Evitare polvere, alti livelli di umidità, alte temperature o urti meccanici.
4. Non utilizzare il prodotto se risulta danneggiato.
5. Per le operazioni di pulizia esterna, utilizzare un panno morbido, pulito e
inumidito.
6. Questo prodotto non è stato progettato per essere utilizzato da persone
(bambini inclusi) con ridotte capacità siche, sensoriali o mentali, o da
persone con conoscenze o esperienza insucienti, a eccezione del caso
in cui agiscano sotto la supervisione di una persona responsabile della loro
incolumità che le abbia istruite sul corretto utilizzo del prodotto. I bambini
vanno sorvegliati per assicurarsi che non giochino con il prodotto.
7. Fare attenzione alle dita quando si usa l’impugnatura per far scorrere il
sedile.
SERVIZIO DI ASSISTENZA
Per qualsiasi informazione, potete contattare il nostro servizio Hotline, ma
vi consigliamo di raccogliere prima tutte le informazioni inerenti il problema
riscontrato e il prodotto.
Email: support.it@nacongaming.com
Sito Internet: www.nacongaming.com
Indirizzo:
Bigben Interactive – Corso Sempione - 221 - 20025 Legnano (MI) Italia
Page 10

PT
na
RC-500
Obrigado por comprar o banco de corrida NACON RC-500. Este produto foi
criado para melhorar a
sua experiência com videojogos. Guarde este manual de instruções para
referência futura.
GARANTIA
Este produto com a marca comercial NACON tem garantia do fabricante
durante um período de 2 anos a partir da data de compra e será, durante este
período, substituído por um modelo igual ou semelhante, à nossa escolha, e
sem custos caso exista um defeito devido a material ou fabrico defeituoso. Esta
garantia não cobre defeitos que surjam de danos acidentais, uso indevido ou
desgaste. Isto não afeta os seus direitos previstos pela lei. Guarde a sua prova de
compra durante o período coberto pela garantia, caso seja necessário substituir
o produto. Sem uma prova de compra, não nos será possível processar um
pedido de substituição.
CONTEÚDOS DA EMBALAGEM
1 x guia de instalação
1 x banco com calhas e alavanca
1 x tapete de segurança
2 x suportes para o banco
1 x estrutura frontal com placa dos pés
1 x estrutura posterior
8 x pés da estrutura
2 x suportes inferiores para o volante
2 x suportes superiores para o volante
2 x tubos de ligação
1 x placa para caixa de velocidades
1 x braço da placa para caixa de velocidades
4 x parafusos serrilhados curtos
2 x parafusos serrilhados compridos
4 x xadores de cabos em velcro
1 x cartão blister com parafusos, porcas e ferramentas
MONTAGEM
Recomendamos que monte o banco de corrida RC-500 com a ajuda de uma
segunda pessoa, já que poderá necessitar de assistência para montar a cadeira.
1. Desaparafuse e remova a placa dos pés da estrutura frontal e coloque os
parafusos e a estrutura de lado.
2. Insira 4 dos pés da estrutura nos buracos preparados e aperte-os bem.
3. Fixe o suporte inferior para o volante às placas laterais da estrutura frontal
com um parafuso, uma porca e um parafuso serrilhado comprido para cada
uma delas. Os vários buracos diferentes para os parafusos permitem que
escolha o seu ângulo predileto para o suporte do volante. De seguida, insira os
suportes superiores para o volante nos tubos dos inferiores com a área vertical
virada para dentro.
4. Fixe a placa dos pés de modo a que o logótipo da NACON que mais perto
da área do banco.
5. Aparafuse o suporte para o volante nos suportes com um total de 4 parafusos
e porcas.
6. Ajuste o suporte para o volante de acordo com a altura desejada e xe-o de
cada lado com um parafuso serrilhado.
7. (Opcional) Se desejar usar uma caixa de velocidades juntamente com o seu
volante, xe a placa para a caixa de velocidades no braço da placa para a caixa
de velocidades, escolhendo o lado de acordo com a mão que deseja utilizar
para operar a caixa de velocidades. De seguida, xe a placa à esquerda ou à
direita do suporte para o volante, tal como indicado na imagem.
8. Insira os tubos que mais tarde servirão para ligar as estruturas frontal e
posterior. Fixe-os com parafusos através dos buracos pré-existentes. A estrutura
frontal está agora terminada e pode ser colocada no tapete de segurança!
9. Insira os restantes pés da estrutura na estrutura posterior, tal como fez com
a estrutura frontal.
10. Fixe os dois suportes para o banco na estrutura posterior, mas não aperte
os parafusos ainda.
11. Verique a posição correta dos suportes ao colocar o banco de forma
solta com as calhas estendidas em cima e conrmando que os buracos préexistentes se alinham com os buracos nas calhas. Depois de o conrmar, aperte
os parafusos dos suportes.
12. Fixe o banco na estrutura posterior com quatro parafusos e porcas. A forma
mais fácil de o fazer é deslizar o banco para a frente ao puxar a alavanca por
baixo para cima. Aparafuse o banco aos suportes na parte da frente primeiro.
Quando terminar, deslize o banco para a frente (mais uma vez, use a alavanca)
para expor os buracos na parte de trás das calhas. Agora, xe as costas aos
suportes.
13. Fixe a estrutura posterior com o banco à estrutura frontal ao colocar os
tubos de ligação nos tubos abertos na estrutura posterior. Conrme a sua
distância de eleição para o banco e use os restantes parafusos serrilhados para
o xar ao aparafusá-los nos buracos virados para cima da estrutura posterior.
Não se esqueça que mais tarde pode ajustar a posição mais facilmente ao
recorrer à alavanca por baixo do banco.
14. O banco encontra-se dobrado para facilitar o transporte e o armazenamento.
Para xar as costas no sítio, endireite o banco, abra a aba na parte de trás do
banco e xe as 2 cavilhas de segurança nas extremidades esquerda e direita.
TAPETE DE SEGURANÇA
Recomendamos veementemente que utilize apenas o RC-500 quando este se
encontrar colocado sobre o tapete de segurança incluído. O tapete providencia
uma base estável para o banco e protege o seu soalho de possíveis danos.
AJUSTAR A DISTÂNCIA ENTRE O VOLANTE/PEDAIS E O BANCO
Use a alavanca localizada sob o banco para deslizar o banco para a frente e
para trás com facilidade. Se isto não for o suciente para atingir a distância
pretendida, pode também reajustar a posição da frente e das costas do RC-500
através dos parafusos serrilhados no fundo do banco.
AVISO: para evitar possíveis ferimentos, tenha atenção ao utilizar a alavanca
para deslizar o banco para uma nova posição.
MONTAGEM DE VOLANTES
O suporte para volantes está preparado com buracos compatíveis com a maior
parte dos volantes do mercado. Os parafusos estão incluídos com o seu RC-
500. Basta xar os parafusos através da placa do suporte para volantes e nos
buracos localizados por baixo do seu volante.
AVISO: a altura máxima encontra-se marcada por dois buracos quadrados
no tubo. De modo a assegurar a estabilidade do suporte para o volante, não
prolongue a estrutura além destes dois pontos.
ARMAZENAMENTO
Quando não estiver a utilizar o RC-500, pode desmontá-lo com facilidade ao
desaparafusar os dois parafusos serrilhados no fundo do banco e separando
as estruturas frontal e posterior. Além disso, pode dobrar o banco para um
armazenamento ainda mais conveniente. Basta abrir e levantar a aba na parte
de trás e puxar as varas de metal que mantêm o banco direito.
AVISO RELATIVO AO PESO
Este banco está preparado para ser utilizado por pessoas com menos de 110
kg.
SALVAGUARDAS E PRECAUÇÕES IMPORTANTES
1. Esta unidade destina-se apenas a uso interior. Nunca a exponha à chuva.
2. Não exponha a unidade a salpicos, pingas, chuva ou humidade. Não
mergulhe o produto em líquido.
3. Não exponha a unidade a pó, humidades elevadas, temperaturas
elevadas ou choques mecânicos.
4. Não utilize a unidade caso esta se encontre danicada.
5. Para limpeza da unidade, utilize apenas um pano suave, limpo e húmido.
6. Este aparelho não foi criado para ser utilizado por pessoas (incluindo
crianças) com capacidades físicas, sensoriais ou mentais reduzidas, ou
por pessoas sem a experiência ou conhecimento apropriados a menos
que tenham recebido orientação ou instruções prévias relacionadas com
a utilização deste aparelho de alguém responsável pela sua segurança. As
crianças devem ser supervisionadas para que não utilizem este aparelho
como um brinquedo.
7. Tenha atenção às suas extremidades ao utilizar a alavanca de ajuste do
banco.
ASSISTÊNCIA TÉCNICA
Para mais informações poderá contactar o nosso serviço Hotline, mas
recomendamos que antes recolha o máximo de informações sobre o problema
que encontrar neste produto.
support@nacongaming.com
Page 11

Page 12

nacongaming.com
 Loading...