

NaceCare Solutions TTV5565 User Manual
Owner Instructions
Original Instructions
Warning! Read instructions before using the machine
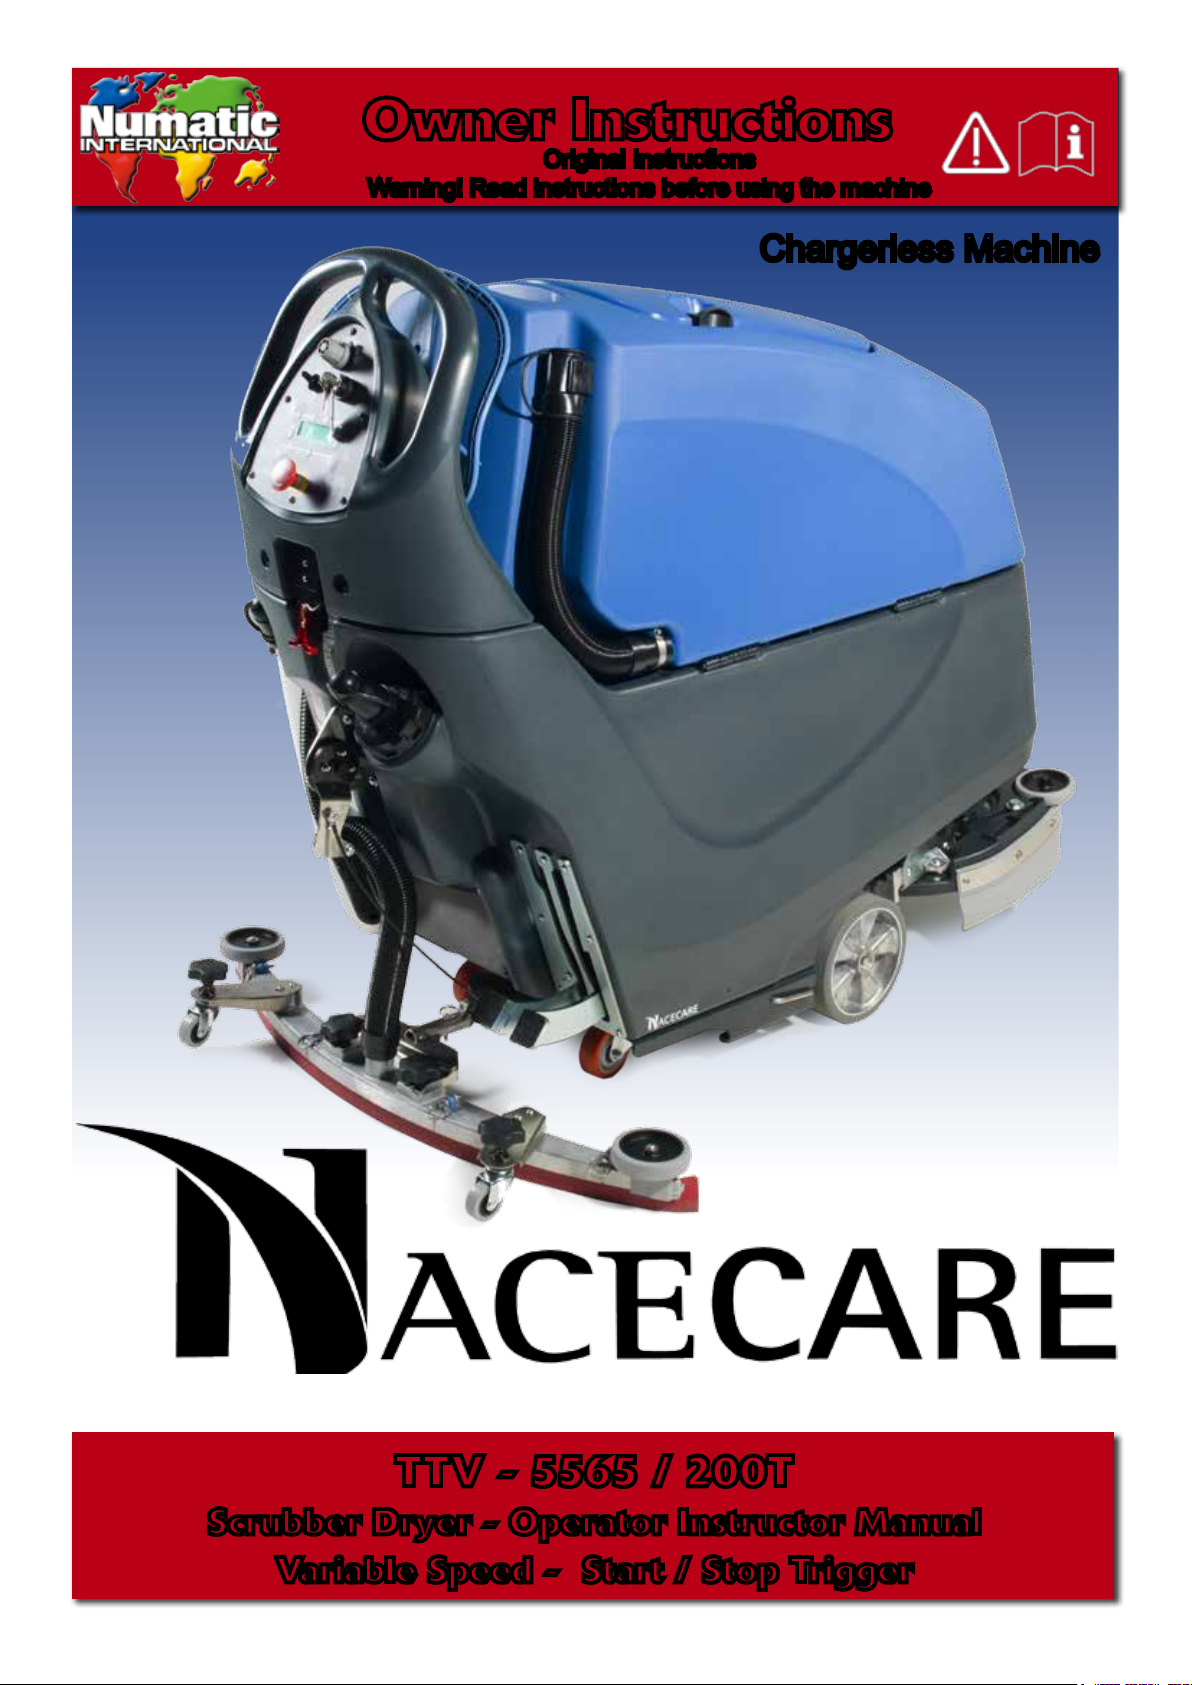
Chargerless Machine
TTV - 5565 / 200T
Scrubber Dryer - Operator Instructor Manual
Variable Speed - Start / Stop Trigger

!
Before continuing, please refer to Quick Set Up Guide on Page 8
!
Index
Machine overview
Control panel overview
Rating label / Personal Protective Equipment / Specications
Safety Precautions
Quick set-up guide
Machine set-up
Fitting the oor-tool
Setting the width
Fitting the brushes
Filling the clean-water tank
Fill level indicator
Chemical dosing system
Pre-cleaning advice
Machine Operation
Page 2
Page 3
Page 4
Page 5
Page 6 / 7
Page 8
Page 9
Page 10
Page 10
Page 11
Page 11
Page 12
Page 12
Lowering the oor-tool
Lowering the brush-deck
Brush pressure / load adjustment
Waste tank warning light
Breakaway oor-tool feature
Machine usage advice
Off-aisle cleaning kit ( optional )
Changing the Floor Tool Blades
Changing the oor tool
Battery Care
Motor brake disengage lever / Free-wheel function
Warning light ashes explained
LCD Display and fault codes
Trouble Shooting
Spare parts
Wiring Diagram
Page 13
Page 13
Page 15
Page 15
Page 16
Page 16
Page 17
Page 19
Page 20
Page 21
Page 22
Page 23
Page 24
Page 24
Page 26 / 27
2
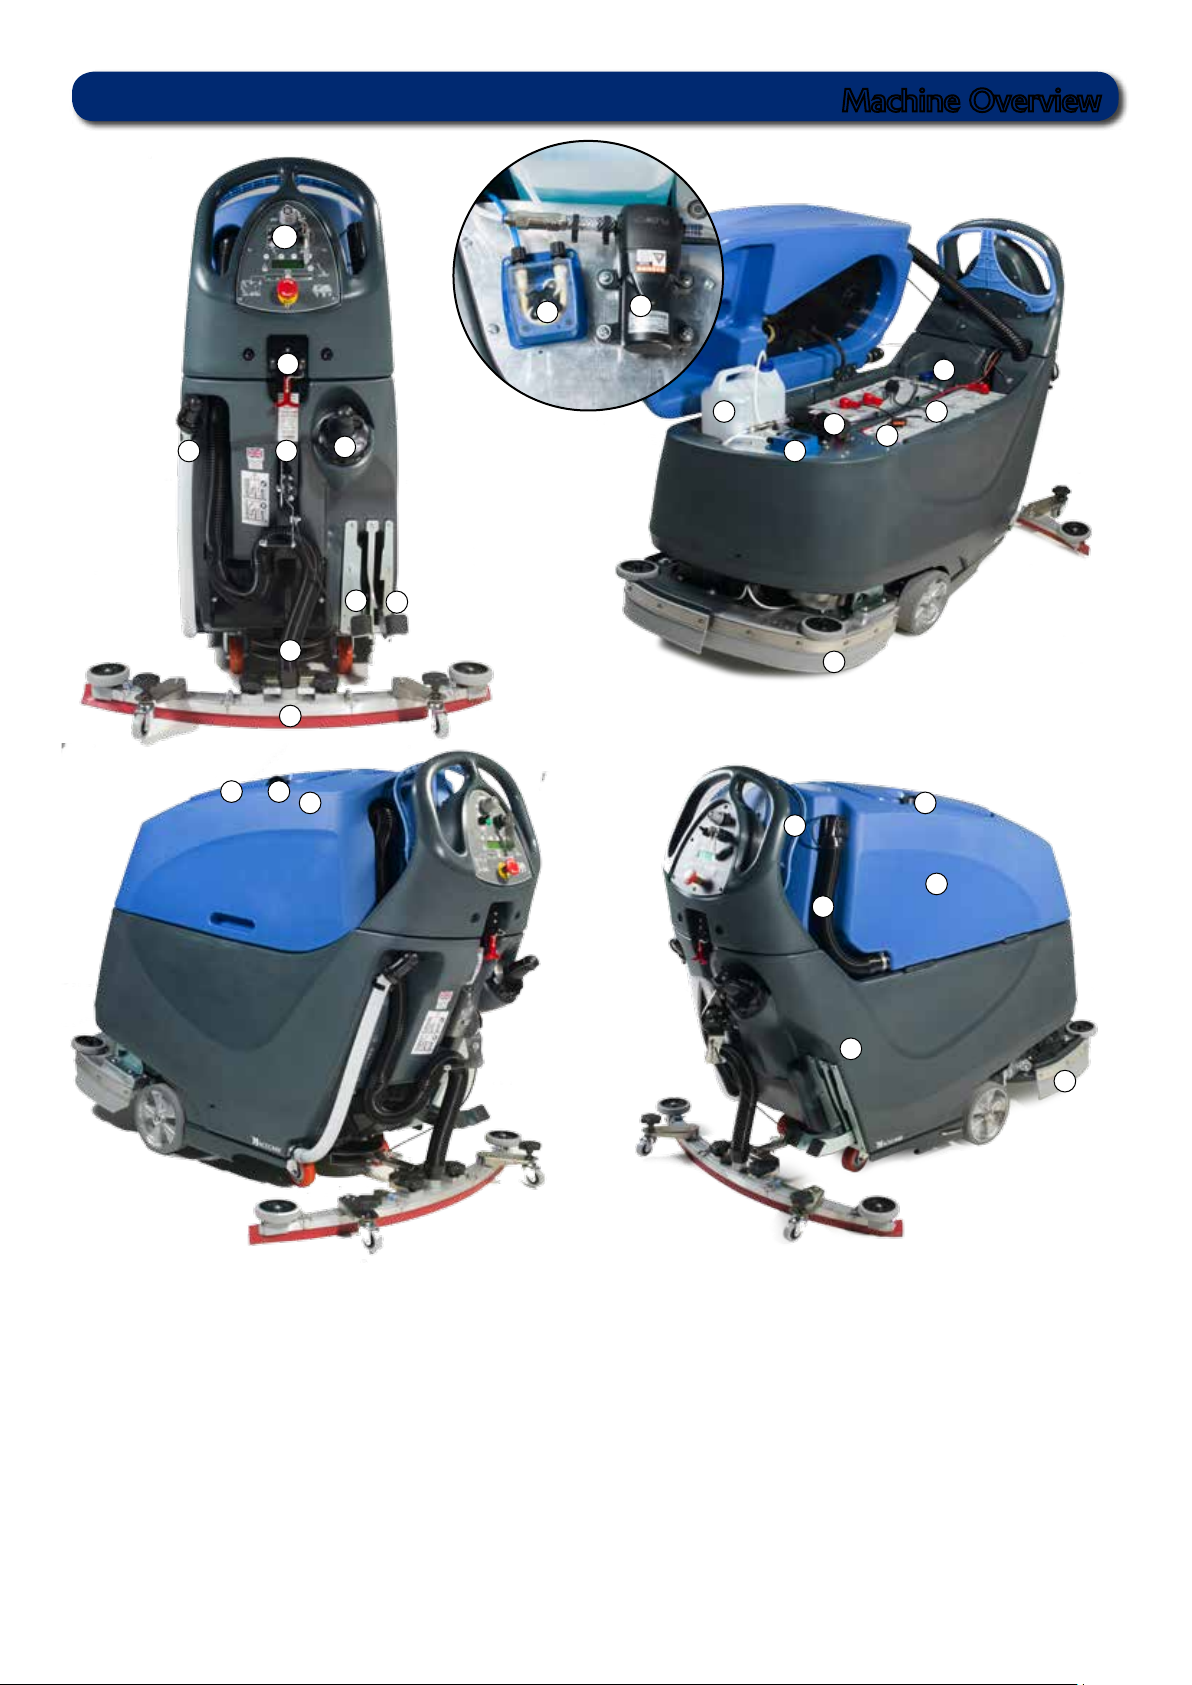
Machine Overview
1
23 18
12
2
3
45
7
8
6
9
24
13
16
11
13
12
10
22
17
14
15
18
19
1. Operator control panel ( see page 4 )
2. Charger inhibit lead
3. Clean-water tank ll point
4. Floor-tool raise / lower lever
5. Clean-water tank emptying hose & ll level
6. Floor-tool vacuum hose
7. Brush deck-lifting Pedal
8. Extra brush load Pedal
9. Semi parabolic oor-tool
10. Brush deck (aluminium)
11. Chemical dosing tank ( 5 litre )
12. Chemical dosing Pump
20
21
13. Water pump
14. Gel batteries
15. 40 Amp battery fuses x2
16. Clean Water Filter
17. Waste water emptying hose
18. Top tank hood release catches
19. Top tank (waste water)
20. Bottom tank (clean water)
21. Adjustable side skirt
22. Control handle (Variable Speed - start / stop trigger)
23. Top tank hood
24. Basket Filter
3
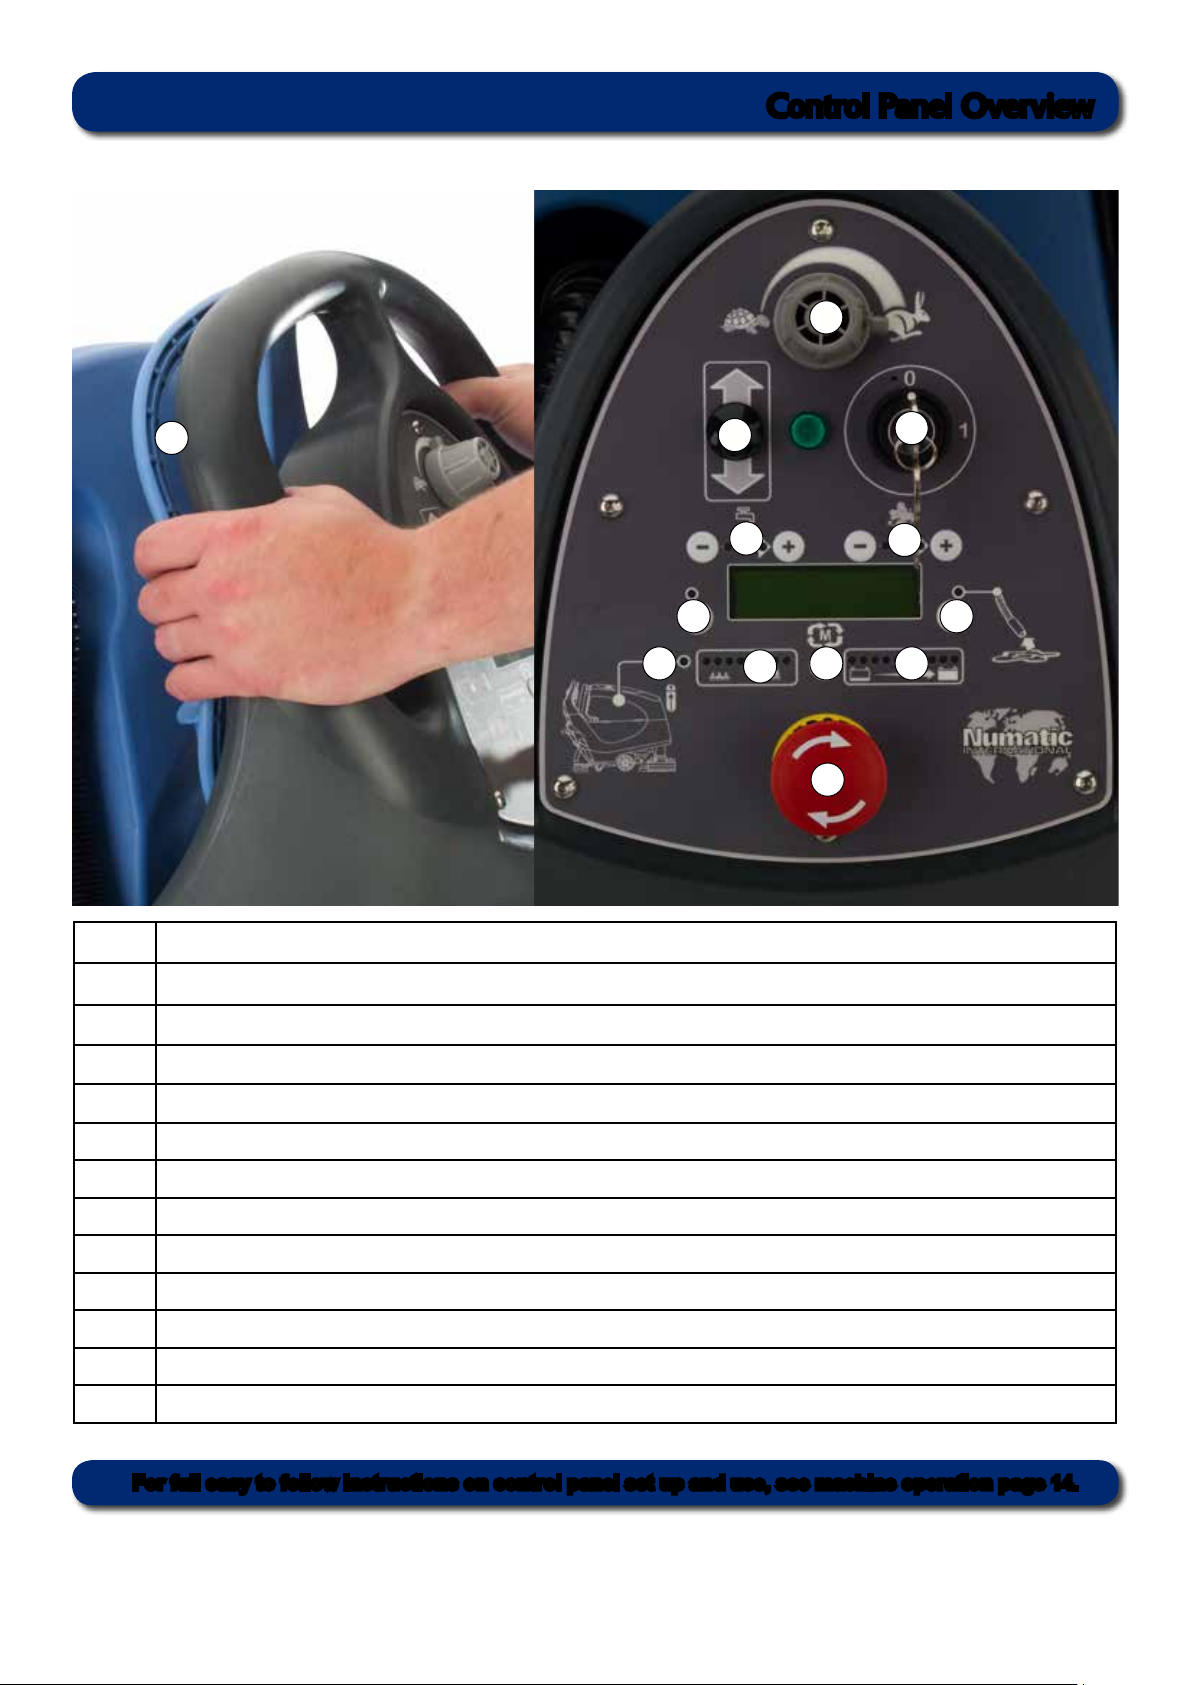
Control Panel Overview
2
1
1 Variable Speed - Start / Stop Trigger
2 Speed Control
3
4
5
6
12
13
7
8
9
1011
3 Forward / Reverse Switch
4 Water Flow Rate Adjustment
5 Hi - Lo Button
6 Recovery Tank ‘Full’ Indicator
7 Main Control On / Off Key
8 Chemical Mix Adjustment
9 Off Aisle Vacuum Button / Whisper mode
10 Battery Charge Level Indicator
11 Hours Meter toggle Button
12 Brush Pressure / Load Indicator
13 Emergency Stop Button
For full easy to follow instructions on control panel set up and use, see machine operation page 14.
4

Rating label
1
Company name and address
2
Machine Description
3
Voltage Frequency
4
Weight
5
Max Gradient
6
Machine yr/ wk / serial number
7
Noise Level
8
Hand Arm Vibration
About the Machine
1
2
3
7
8
4
6
5
PPE (Personal Protective Equipment)
That may be required for certain operations.
Ear
Protection
Safety
Footwear
Head
Protection
Safety
Gloves
Dust/Allergens
Protection
Eye
Protection
Protective
Clothing
Note: A risk assessment should be conducted to determine which PPE should be worn.
Specication
Caution
Floor Sign
Transaxle Brush Motor Vac Motor Speed
600W
Run
Time
3.5 Hrs 22.5 gall 1.32 gall
Scrub
Widths
400W /
400W
Water
Capacity
Brush
Speed
Nuchem
Capacity
Scrub
Pressure
Standard
600W 4.2Kph
Water
Flow rate
0.13 G/ Min
0.264 G/ Min
0.528 G/ Min
0.793 G/ Min
Nuchem
Mix
100:1
75:1
50:1
25:1
Scrub
Pressure
Heavy
21.6
to
26
inch
200
Rpm
37.4 lbs 66 lbs 110.2 lbs
Brush
Sizes
11.02 inch
13 inch
Transit
Speed
0-4.2Kph 0-4.2Kph
Scrub
Pressure
Extra Heavy
Pad
sizes
11.02 inch
13 inch
Cleaning
Speed
Gross
Weight
(Full)
820 lbs IPX4 1050
Max decibel level at 1
68.6 @ 1.0m
64.0 dB @ 1.7m
(Uncertainty: 0.2 dB(A)
Dimensions
Width = 23 inch
Length = 55.2 inch
Height = 44.7 inch
Floor tool = 41.3 inch
Noise
meter
Protection
Class
Hand Arm Vibration
Floor
Tool
size
Net
Weight
632.7
lbs
Maximum Climbing
Gradient
Scrubbing
9%
0.44m/s
2
5

Information for Scrubber Dryer.
ORIGINAL INSTRUCTIONS
READ MANUAL BEFORE USE
Component Interval Inspect for
Brushes DAILY Bristle damage, wear, drive collar wear
Squeegee Blade BEFORE EACH USE Wear, cracks, splits
Filters BEFORE EACH USE Clogging and debris retention
Tanks AFTER EACH USE Rinse dirty water tank after use
Caution
Read the instruction manual before using the appliance.
This product meets the requirements of IEC 60335-2-72
Warning
As with all electrical equipment care and attention must be exercised at all times during its use, in addition to ensuring
that routine and preventative maintenance is carried out periodically in order to ensure its safe operation.
Failure to carry out maintenance as necessary, including the replacement of parts to the correct standard could render
this equipment unsafe and the manufacturer can accept no responsibility or liability in this respect.
When ordering spare parts always quote the Model Number / Serial Number specied on the Rating Plate.
Warning do not use on slopes exceeding 9%.
This appliance is not intended for use by persons (including children) with reduced physical, sensory or mental
capabilities, or lack of experience and knowledge, unless they have been given supervision or instruction concerning
use of the appliance by a person responsible for their safety.
Children should be supervised to ensure that they do not play with the appliance.
This product does not have a factory installed Numatic battery charger, then it is the responsibility of the owner and
user of the product to ensure that the charging system and battery combination are compatible, t for purpose and
safe to use.
Note
This machine is also suitable for commercial use, for example in hotels, schools, hospitals, factories, shops and
ofces for other than normal housekeeping purposes.
Caution
This machine is not suitable for picking up hazardous dust.
Do not use on surfaces having a gradient exceeding that marked on the appliance.
The machine is not to be stored outdoors in wet conditions.
This machine is for indoor use only.
Do’s and Dont’s
DO ensure only competent persons unpack/assemble the machine.
DO keep your machine clean.
DO keep your brushes in good condition.
DO replace any worn or damaged parts immediately.
DO ensure that the work area is clear of obstructions and / or people.
DO ensure that the working area is well illuminated.
DO pre-sweep the area to be cleaned.
DON’T use steam cleaners or pressure washers to clean the machine or use in the rain.
DON’T attempt machine maintenance or cleaning unless the power plug has been removed from the supply outlet.
DON’T allow any inexperienced repairs. Call the experts.
DON’T leave the brush pad on the machine when not in use.
DON’T allow the machine to be used by inexperienced or unauthorised operators or without appropriate training.
DON’T use the machine without the solution tanks properly positioned on the machine, as shown in the instructions.
DON’T expect the machine to provide trouble-free, reliable operation unless maintained correctly.
DON’T lift or pull the machine by any of the operating triggers - Use the main handle.
DON’T remove the handle from the machine except for service and repair.
6

Warning
Only use brushes provided with the appliance or those specied in the instruction manual.
The use of other brushes may impair safety.
A full range of brushes and accessories are available for this product.
Only use brushes or pads which are suitable for the correct operation of the machine for the specic task being
performed.
It is essential that this equipment is correctly assembled and operated in accordance with current safety regulations.
When using the equipment always ensure that all necessary precautions are taken to guarantee the safety of the
operator and any other persons who may be affected.
Wear non-slip footwear when scrubbing. Use a respiratory mask in dusty environments.
The machine, while charging, must be positioned so that the mains plug is easily accessible.
When cleaning, servicing or maintaining the machine, replacing parts or converting to another function the power
source shall be switched off.
Battery operated machines shall be disconnected by removing the fuses.
In order to prevent unauthorised use of the machine the power key must be removed after use.
Machines left unattended shall be secured against unintentional movement.
Operators shall be adequately instructed as to the correct use of the machine.
When detergents or other liquids are used, read the manufacturer’s instructions.
Precaution when working with batteries
1. Always wear protective clothing e.g. face visor, gloves and overalls when working with batteries.
2. Whenever possible always use a properly designated and well-ventilated area for charging. Do not smoke or bring
naked ames into the charging area.
3. Remove any metallic items from hands, wrists and neck i.e. rings, chains etc. before working on a battery.
4. Never rest tools or metallic objects on top of the battery.
5. When charging is complete disconnect from the mains supply.
6. The batteries must be removed from the machine before it is scrapped.
7. The machine must be disconnected from the supply when removing the battery.
8. To remove the batteries:- Disconnect machine from the mains supply (if charging) and ensure batteries are
switched off with circuit disconnect switch (see page 17). Disconnect hoses from separator and tanks.
Remove separator and tanks . Unscrew battery strap xings and remove.
Undo battery terminals and remove. Remove batteries.
9. The batteries are to be disposed of safely and in accordance with the battery directive.
10. Only use genuine NUMATIC replacement batteries.
11. Do not allow the batteries to become fully discharged; it may not be possible to recharge them.
12.Do not allow one battery to be discharged separately to the other.
13.Do not mix batteries from different machines.
14. The batteries tted to this product are Valve Regulated Lead Acid (VRLA) gel electrolyte type. The tting of any
other type of battery may cause a safety hazard.
Battery Care
1. Always recharge the batteries after use. This can be done at any time its not necessary to wait until they are fully
discharged; they do not develop a “memory”.
2. Do not store the machine with the batteries discharged.
7
!
1
2
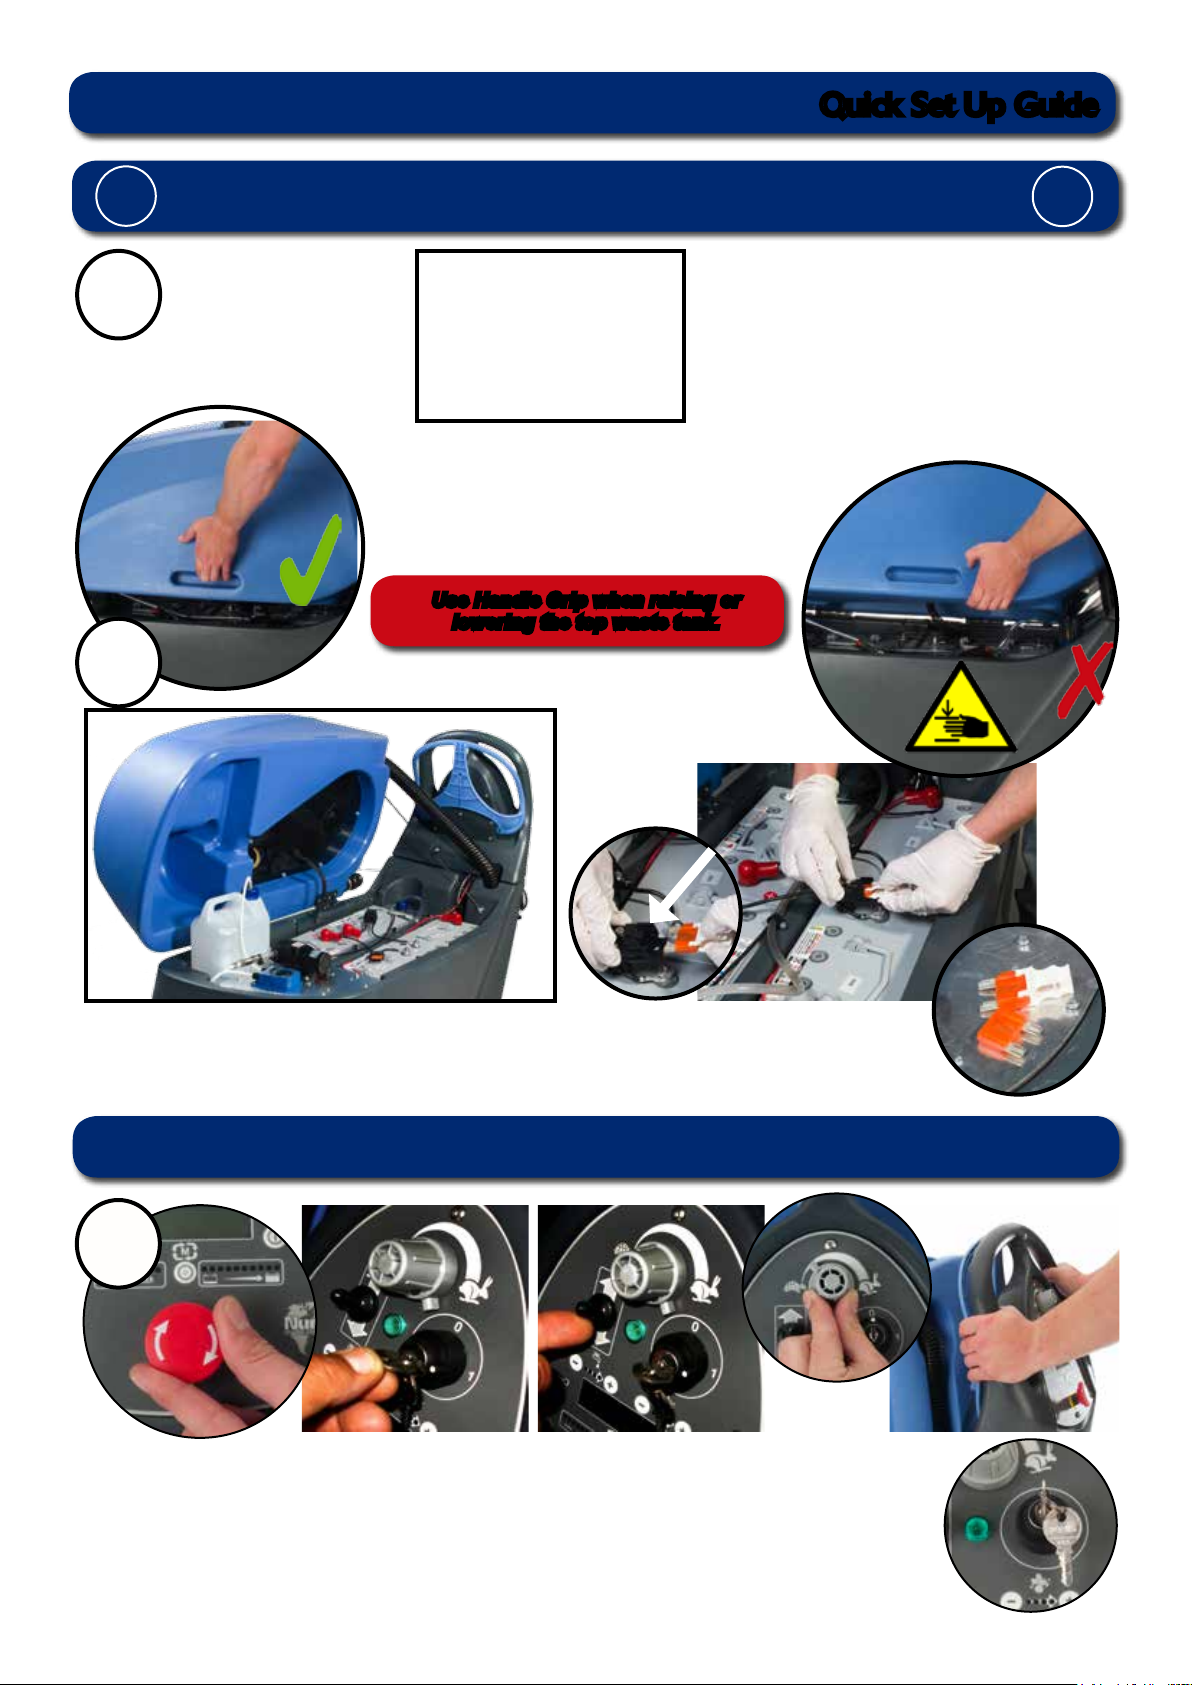
Quick Set Up Guide
Please read before commencing any operation.
After the removal of all the packaging, carefully open and check the contents of the start up pack (Fig.1).
Contents:
1 x Operator Manual
2 x Keys
3 x 40 amp fuses (1 x spare)
1 x Maxi fuse-puller
Fig.1
Use Handle Grip when raising or
lowering the top waste tank.
!
Fig.2
Lift top tank assembly to reveal battery compartment, ensuring you use the handle grip
provided (Fig.1).
Fit battery fuses (contained in start-up pack) into the battery fuse holders as illustrated (Fig.2).
Note: Wear suitable gloves when inserting fuses.
Note: Ensure that no metal objects come into contact with battery terminals while the batteries are exposed.
When inserting the rst fuse you may notice a spark, this is normal.
3
Fig.3
Ensure the Emergency Stop button is released (Fig.3).
Insert key into master control on/off and turn quarter-turn clockwise to the ‘On’ position.
Ensure that the forward/reverse switch is set to forward position (Fig.4).
Select the slow speed setting.
Depress control handle with both hands and slowly drive machine off of the pallet (Fig.5),
this control panel has been designed with a built in variable speed control trigger.
When the machine is removed and in a safe position, turn key back to the off position (Fig.6).
8
Fig.4 Fig.5
Fig.6
ALWAYS ENSURE THAT THE MACHINE IS SWITCHED OFF
!
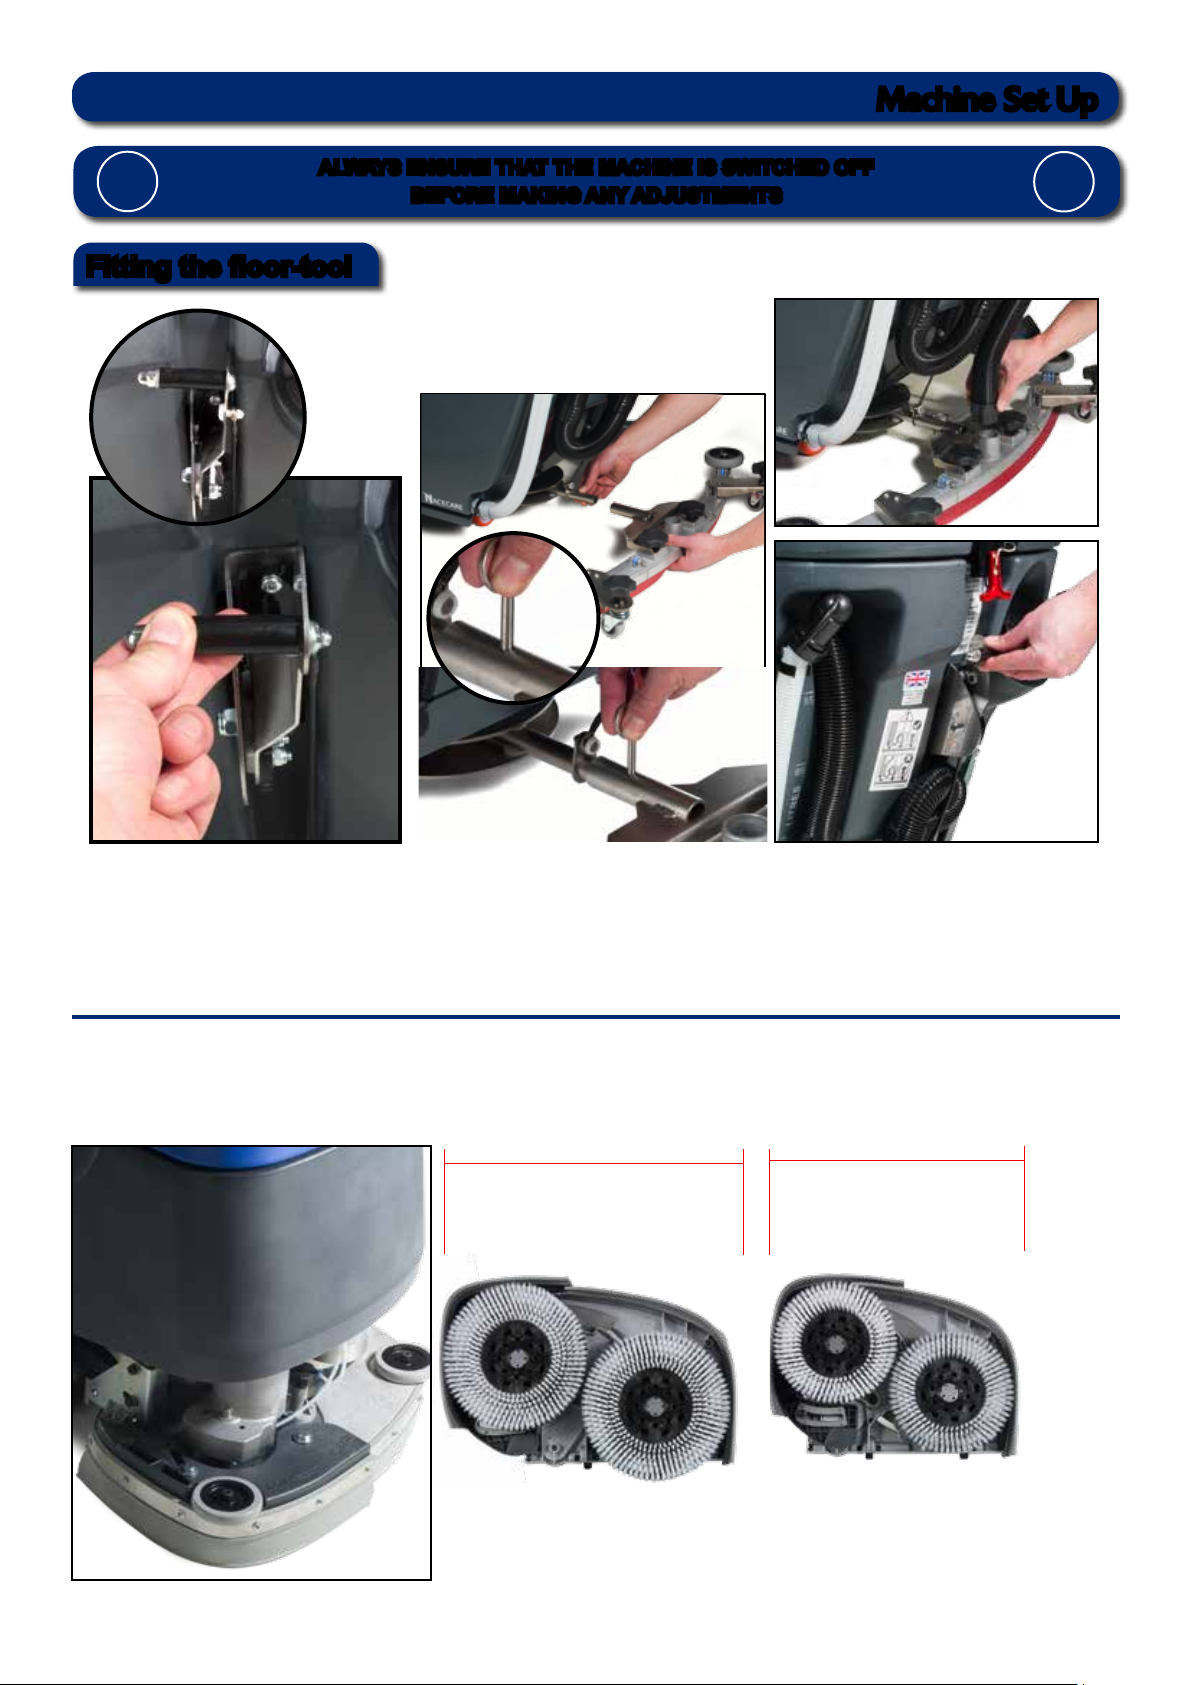
Fitting the oor-tool
BEFORE MAKING ANY ADJUSTMENTS
Machine Set Up
!
Fig.9
!
Fig.7
Lower the oor-tool arm by moving the release lever to the lower position (Fig.7).
Push oor-tool onto the holder and secure with the easy-t securing pin (Fig.8).
Push waste collection pipe onto the oor-tool; ensure a tight t (Fig.9).
Note: Raise oor-tool again before driving to the cleaning area (Fig.9a).
Owning the TTV-5565 scrubber dryer is like having 2 machines in one.
With two width settings the operator can quickly adapt the machine to any cleaning situation;
without the need for any tools. The machine can be set to clean anything from a narrow corridor to
a large warehouse. The TTV-5565 is a totally versatile machine. (see Fig.10)
650mm
Fig.8
550mm
Fig.9a
Fig.10
9
 Loading...