

Page 1

OWNERS MANUAL
ST60BT
1205 Britannia Road East, Mississauga, ON L4W 1C7
Phone: 1-800-387-3210 Fax: 1-800-709-2896
Page 2

SUMMARY
SUMMARY............................................................................................................................................................................................................ 2
ON DELIVERY OF THE MACHINE................................................................................................................................................................... 3
INTRODUCTION................................................................................................................................................................................................. 3
DATA FOR IDENTIFICATION ........................................................................................................................................................................... 3
TECHNICAL DATA.............................................................................................................................................................................................. 4
SYMBOLS.............................................................................................................................................................................................................. 5
PREPARATION OF THE MACHINE.................................................................................................................................................................. 6
UNPACKING THE MACHINE.....................................................................................................................................................................................................................................................................6
SLIDING THE MACHINE DOWN OFF THE PALLET....................................................................................................................................................................................................................6
SLIDING THE MACHINE DOWN OFF THE PALLET....................................................................................................................................................................................................................7
BATTERIES ASSEMBLY AND CONNECTION (battery machine only)....................................................................................................................................................................7
TRACTION MOTOR CONNECTION (battery machine only).....................................................................................................................................................................................7
BATTERY CHARGER CONNECTION...................................................................................................................................................................................................................................................7
BATTERIES RECHARGING............................................................................................................................................................................................................................................................................8
BATTERY CHARGE LEVEL INDICATOR ..............................................................................................................................................................................................................................................8
GENERAL SAFETY REGUL ATIONS...................................................................................................................................................................9
OPERATING THE MACHIN E ..........................................................................................................................................................................10
WORKING POSITION...................................................................................................................................................................................................................................................................................10
STARTING...............................................................................................................................................................................................................................................................................................................11
USAGE.................................................................................................................................................................................................................12
BATTERY MACHINE........................................................................................................................................................................................................................................................................................13
DUMPING HOPPER.......................................................................................................................................................................................................................................................................................14
AT THE END OF USE.....................................................................................................................................................................................................................................................................................14
MAINTENANCE PROCEDURES .....................................................................................................................................................................15
CLEANING THE FILTER ................................................................................................................................................................................................................................................................................15
MAINTENANCE PROCEDURES .....................................................................................................................................................................16
ADJUSTMENT OF SIDE BRUSH..............................................................................................................................................................................................................................................................16
SIDE BRUSH REPLACEMENT...................................................................................................................................................................................................................................................................16
ADJUSTMENT OF CENTRAL BROOM .............................................................................................................................................................................................................................................16
CENTRAL BROOM REPLACEMENT..................................................................................................................................................................................................................................................16
TROUBLE SHOOTING GUIDE........................................................................................................................................................................17
THE CENTRAL BROOM DOES NOT CLEAN..............................................................................................................................................................................................................................17
THE MACHINE CREATES AIRBORNE DUST IN USE ..................................................................................................................................................................................................................17
HIGH NOISE OR ABNORMAL NOISE FROM THE CENTRAL BROOM..................................................................................................................................................................17
SCRAPPING OF THE MAC HINE ...................................................................................................................................................................18
2
Page 3
When the machine is delivered to the customer, an
immediate check must be performed to ensure all the
material mentioned in the shipping documents have been
received and also to che ck that the machine has not suffered
any damage during transportation. If damage has occurred,
get the shipping agent to verify immediately the amount and
nature of the damage suffered and at the same time inform
our claim department. It is only by prompt action of this type
that compensation for damage may be successfully claimed.
Any machine can only work efficiently when it is used correctly
and it is maintained in full, efficient working order. We therefore
encourage you to read this instruction manual thoroughly and
to always refer to it first if any difficulties arise while using the
machine. In addition we would inform you that our customer
service department (in co-operation with our agents /
distributors) is always at your complete disposal to answer any
queries.
On delivery of the machine
Introduction
Figure 1
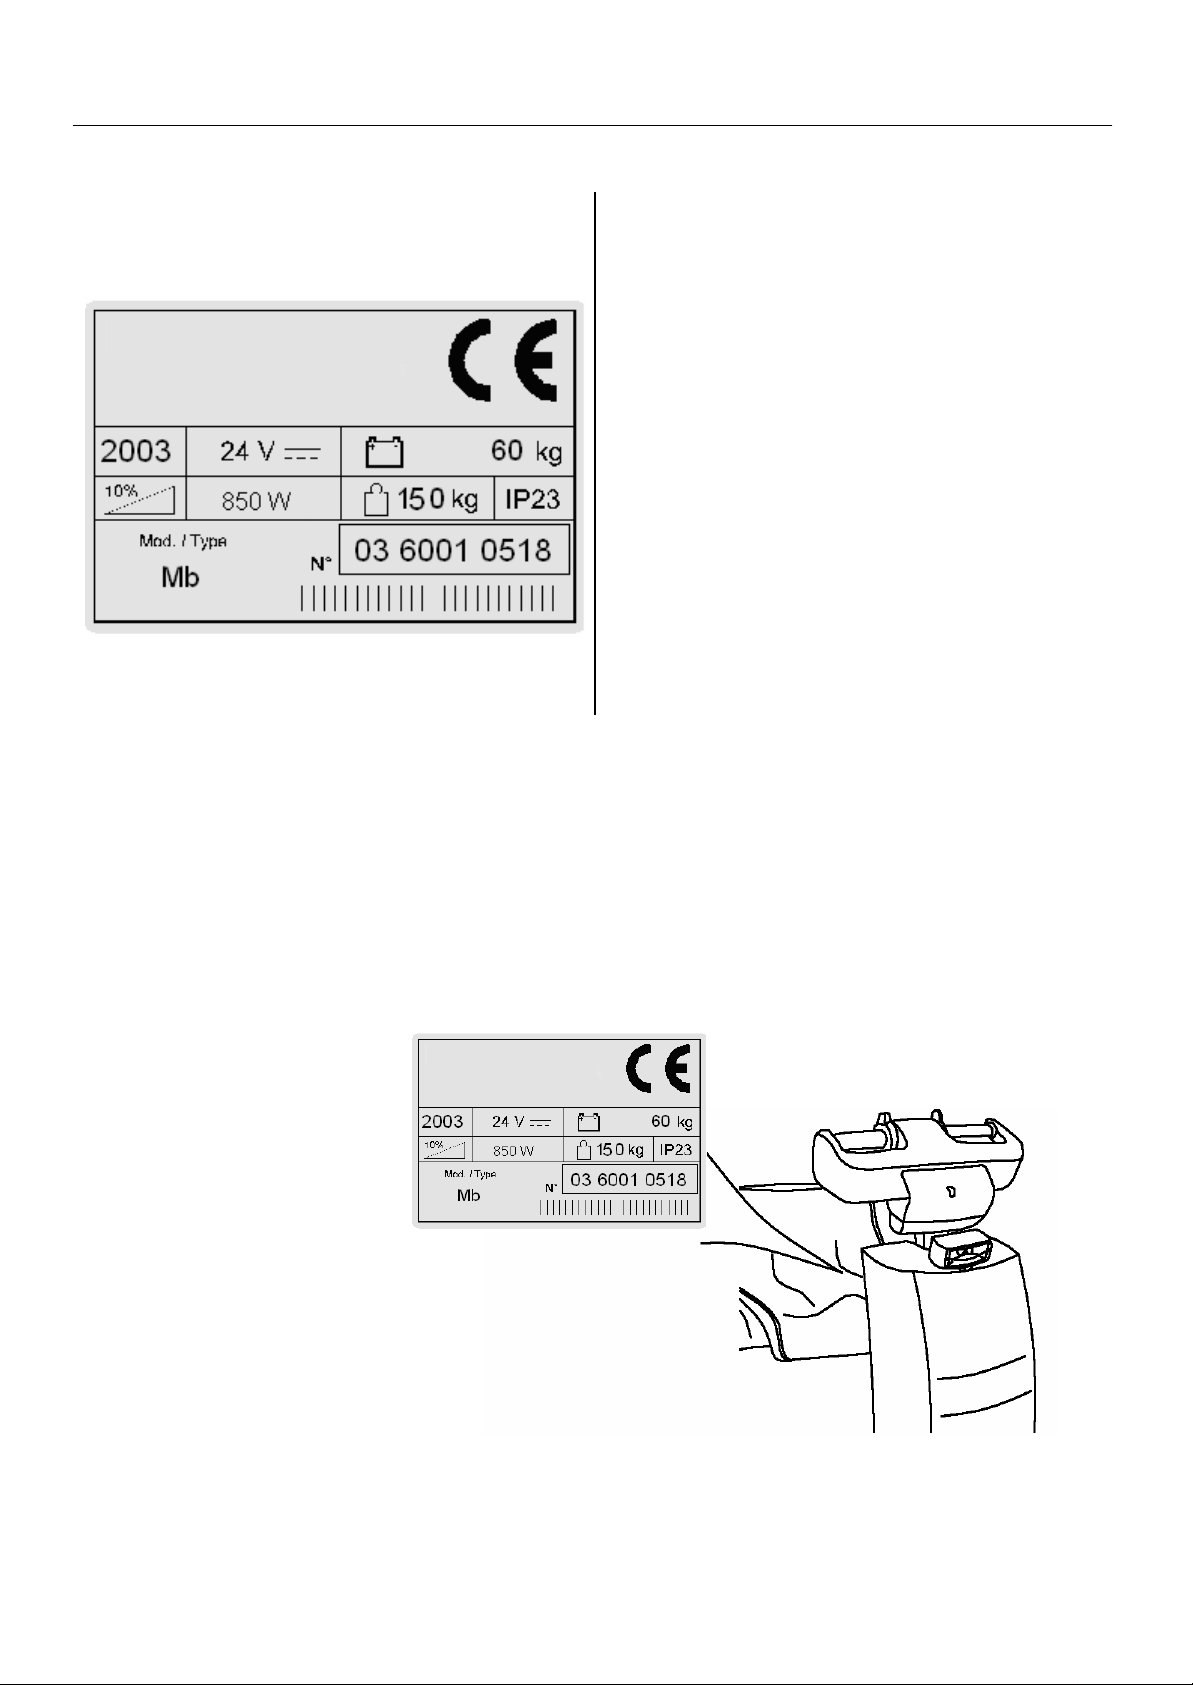
Data for identification
For Technical service or when requesting spare parts, always
state the model, the version and the serial number. These can
be found on the serial plate.
3
Page 4

Machine width
TECHNICAL DATA
DUSTER M is a ride -on sweeping machine. The ‘B’ model is an electrically operated machine powered by traction batteries,
used for cleaning internal or external hard floor surfaces eg tile, concrete or asphalt.
This machine is designed to be operated on dry surfaces, however if it is used on wet surfaces the suction must be kept closed.
The machine is characterized by a self-levelling main brush for wide-area sweeping, a side brush for corner, edge and
perimeter cleaning and a vacuum suction system with filter to prevent dust being exhausted. A large hopper is provided for
collection of the swept material which is manually emptied using the mechanical dumping system.
TECHNICAL DATA U/M Mb
Working width excluding side brush mm 600
Working capacity m2/h 2700
Max gradient % 10 %
Dimensions of the central broom (Width x Dia.) mm 600x265
Dirt hopper volume l 50
Electric traction motor V/W 24/250
Electric brush motor V/W 24/600
Filter surface area m2 3,2
Type of drive Autom. traction
Forward speed km/h 0-4,5
Machine length mm 1250
Machine height mm 1200
mm 750
Traction battery set V/Ah 24/140
Battery weight kg 70
Machine weight (without batteries) kg 150
Noise level (IEC 704/1) dB (A) 72
Hand vibration level m/sec.2 1,86
Body vibration level m/sec.2 0,23
4
Page 5
SYMBOLS
OFF/0-ON/1
Filter shaker
Side brush
Central broom
ON/OFF ( battery machine)
Suction
Central broom rotation
(automatic/manual traction)
Open book symbol.
Points out to read manual before
using the machine.
Warning symbol
Read with care all instructions with
this symbol to ensure operator and
machine safety.
Batteries charge
Parking brake
Service brake
Forward or reverse running
Flap lifting pedal
5
Page 6

PREPARATION OF THE MACHINE
UNPACKING THE MACHINE
Figure 2
The machine is delivered packed on a pallet. To move it use a fork truck or a pulley
block with sling.
Figure 3
To remove the package proceed as follows:
1. Remove the fixing tapes
2. Remove the metal staples at package base.
3. Take off the carton.
Package size : 135x93x130.
Weight of packed machine without batteries: 170 kg
SLIDING THE MACHINE DOWN OFF THE PALLET
Figure 4
1. Use a hammer to remove the front crosspiece of the pallet to create a ramp.
6
Page 7

PREPARATION OF THE MACHINE
SLIDING THE MACHINE DOWN OFF THE PALLET
Figure 5
1. Close the bonnet and pull the machine forward such that it slides to the ground
along the board.
BATTERIES ASSEMBLY AND CONNECTION (battery machine only)
Figure 6
For the best mix of economy and usage we suggest fitting 2 x 12V / 140Ah batteries.
Before assembly, ensure the batteries are charged.
Assembly instructions:
1. Remove the ‘on/off’ key from the lock.
2. Open the bonnet of the machine.
3. Using a suitable lifting method, position the batteries correctly in the
compartment observing the polarity as in the attached picture.
4. Connect the bridge cables and the positive and the negative connections as in
the at tached picture.
TRACTION MOTOR CONNECTION (battery machine only)
Figure 7
1. Take the key out of the instrument board
2. Connect the traction motor cable marked with the card.
3. Insert the key again
BATTERY CHARGER CONNECTION
Figure 8
Open the front bonnet. Inside there is a female connector (see the picture) into which
the male connector, (fixed to the battery charger cables), must be inserted. The male
coupling connector is delivered in the bag containing this instruction catalogue and
must be assembled on the charger cable. Pay attention to the polarities.
7
Page 8

PREPARATION OF THE MACHINE
BATTERIES RECHARGING
In order to avoid damage to the batteries, it is necessary to avoid their complete
discharge. At the signal “0” flashing on the display of the charge indicator, the main
broom stops, whilst vacuum and traction continue to work. There is therefore enough
capacity left in the batteries to reach the recharge point.
ATTENTION: Never leave the batteries completely discharged, even if the machine is
not used. During the recharge check the level of the electrolyte and top up with
distilled water.
BATTERY CHARGE LEVEL INDICATOR
Figure 9
The battery charge level indicator is digital with 4 fixed positions and a blinking one.
The numbers which appear on the display show the approximate charge level.
4= maximum charge, 3= charge ¾, 2= charge 2/4, 1= charge ¼
0= (blinking) discharged batteries
ATTENTION: A few seconds after the meter reads “0” it will start blinking, the brush
motor will then automatically switch off.
8
Page 9

GENERAL SAFETY REGULATIONS
The rules below must be followed carefully in order to avoid injury to the operator and damage to the machine
r Read the labels carefully on the machine. Do not cover them for any reason and replace them immediately if damaged
r The machine must only be used by authorised staff who have been instructed in its use.
r During the operation of the machine, pay attention to other people around you, especially children.
r Do not place any liquid containers on to the machine .
r The storage temperature has to be between - 25°C and + 55° C.
r The perfect operating temperature should be between 0°C and 40°C.
r The humidity should be between 30 and 95 %.
r Do not use the machine in explosive atmospheres.
r Do not use the machine as a means of transport.
r Do not use acid solutions which could damage the machine and/or people.
r In order to prevent floor damage, do not leave brushes running when machine is standing still.
r Do not vacuum inflammable and/or explosive liquids or substances.
r In case of fire, use a powder extinguisher. Do not use water.
r Do not strike shelving or scaffoldings, where there is danger of falling objects.
r Adapt the speed of operation to the floor conditions to avoid skidding.
r Do not exceed the declared hill climbing capacity, otherwise the machine could become unstable.
r When the machine is in parking position, remove the key and apply the parking brake.
r If the machine does not work properly, check by conducting simple maintenance procedures. Otherwise, it is better to ask for
NACE technical service.
r Where parts are required, ask for ORIGINAL spare parts from your agent and/or from an authorized NACE dealer.
r Prior to any maintenance operation remove the power supply from the machine.
r Do no t remove any parts which require the use of tools to be removed except for maintenance.
r Do not wash the machine with direct water jets or with high water pressure nor with corrosive material.
r After every 200 working hours have a machine checked by a NACE service department.
r The machine should not be abandoned, because of the presence of toxic -harmful materials (batteries, oil etc.). This disposal
must be subject to the rules which provide for its scrapping in appropriate centres.
r When scrapping the batteries refer to their proper ‘Use and Maintenance’ book.
9
Page 10

OPERATING THE MACHINE
WORKING POSITION
Figure 10
The user operates while sitting, having manual lever and pedal controls on the
instruments control board.
Figure 11
a. Battery control indicator
b. Central broom switch device
c. Key start
b
Figure 12
a. Brake pedal.
a c
a
10
Page 11

OPERATING THE MACHINE
Figure 13
a. Side brush pedal
b. Flap pedal
c. Suction closing /filter shaker starting lever.
Figure 14
a. Hopper handle
b. Hopper opening lever
a b
c
a
b
STARTING
1. Make sure that the brushes are switched off, therefore the levers must be lifted
(in a lifted position).
2. Turn the key on ON position.
OFF/0-ON/1
11
Page 12

USAGE
Figure 15
1. Make sure that the parking brake is released.
Figure 16
1. Make sure that the suction is opened
Figure 17
1. Use the side brush only to clean borders since it is not provided with suction.
2. Using your foot, lower the external lever and the brush locates automatically.
3. To stop the side brush only, push the lever outwards and the brush automatically
retracts..
Figure 18
1. The central broom can work either with continuous or automatic working
connected directly to the machine traction with the button (a) on the instrument
board
NOTE: The use of the automatic system increases the batteries charge.
a
12
Page 13

a a
USAGE
BATTERY MACHINE
Figure 19
1. Select the direction of driving with the button (a) on the instrument board.
2. Adjust the machine speed according to the conditions and volume of dust and
debris to collect.
3. When moving the machine the brushes must be raised.
Figure 20
For the best suction performance clean the filter every 10 minutes and always
before emptying the hopper proceed as follows :
1. Close the suction by pulling on knob “a”; after pulling completely the filter
shaker starts automatically.
NOTE: avoid prolonged working of the filter shaker motor
a
Figure 21
NOTE: Interrupt, or close suction whenever approaching wet surfaces to prevent any
damage to the filter.
Figure 22
1. To slow down or stop, apply the brake by pushing the pedal.
2. When not in use, always apply the parking brake for parking especially on any
inclines.
3. To insert it push the pedal and fasten it by pulling it
NOTE: It can be also used as an emergency brake.
13
Page 14

a
b
USAGE
Figure 23
Push the flap lifting pedal when there is bulky debris to collect in order to allow its
entry and collection into the central broom. Do not keep the pedal pressed.
Periodically check the level of debris in the hopper and eventually empty it. Keep in
mind that the weight of the collected waste is proportionate to the specific weight of
the swept material. In case of heavy material such as sand, piece of soil, gravel, etc.
we suggest you do not fill up the hopper more than about 70% otherwise emptying
could prove difficult.
DUMPING HOPPER
Figure 24
1. Rotate lever “a”. counter clockwise and pull the hopper from the machine
2. Transport it to a dump area by using the handle “b” on the hopper itself.
3. For a better dust tight seal it may be necessary to clean the hopper basket with a
low-pressure air line. In case of damage or wear replace it immediately.
4. To assemble the hopper again, push it fully into place and fasten it with lever ‘a’.
AT THE END OF USE
1. Stop the machine.
2. Apply the parking brake
3. Activate the filter shaker.
4. Dump the debris hopper
5. Switch off the machine by turning the key to the OFF position
14
Page 15

b a b
c
c
MAINTENANCE PROCEDURES
ATTENTION : Before any adjustment and/or maintenance procedure always
switch off the machine.
ATTENTION: disconnect the battery before starting any cleaning or
maintenance procedure on the machine.
CLEANING THE FILTER
ATTENTION: use gloves for protection when performing the steps listed below.
Once a week clean thoroughly the filter as follow :
Figure 25
1. Switch off the machine.
2. Remove the debris hopper.
3. Disconnect the connector of the filter shaker “a”
4. Slightly loosen (not completely) the lower knobs “b”
5. Rotate by 180° the upper locking levers “c”, take out the filter support frame using the
same levers.
Figure 26
1. Carefully clean the filter using a vacuum cleaner or (if a vacu um is not available)
gently shake the filter manually.
2. Reassemble all parts following the above operations in reverse.
15
Page 16

b c
MAINTENANCE PROCEDURES
ADJUSTMENT OF SIDE BRUSH
Figure 27
The regulation of the brush pressure on the floor can be made by adjusting the screw
behind the brush arm itself:
1. Loosen the lock nut .
2. Rotate the register screw counter clockwise until the bristles rest on the floor by about
2 cm.
SIDE BRUSH REPLACEMENT
Figure 28
1. Unscrew the brush fixing knob. Remove the brush paying attention not to lose the
washer and the knob .
2. Grease the shaft
3. Insert the new brush by putting the key into its place. Reassemble the washer and
the knob.
ADJUSTMENT OF CENTRAL BROOM
Figure 29
To adjust loosen the knob “a” and position the lever “b” in the following eyelets “c”.
Make the same adjustment on the opposite side.
During adjustment follow the broom al ignment.
CENTRAL BROOM REPLACEMENT
Figure 30
1. Unscrew and remove all the knobs shown in the picture, and take out the brush
support group.
2. Remove the worn broom and insert the new broom. ATTENTION: keep the same
sense of direction of the bristles.
3. Reassemble the support group and the knobs in reverse order.
a
16
Page 17

TROUBLE SHOOTING GUIDE
THE CENTRAL BROOM DOES NOT CLEAN
1. The broom is worn or improperly positioned: adjust its position or, if necessary have it
replaced at your nearest NACE service center.
2. The waste bin is full: empty it.
THE MACHINE CREATES AIRBORNE DUST IN USE
1. The flaps that ensure good suctions are torn. Replace them.
2. The front flap is broken and the machine throws heavy dirty and waste forward:
replace the front flap.
3. The filter is clogged: thoroughly clean the filter.
HIGH NOISE OR ABNORMAL NOISE FROM THE CENTRAL BROOM
1. Material is wound around the broom: remove.
17
Page 18

SCRAPPING OF THE MACHINE
The machine is composed of: iron materials, plastics, rubber. The battery-operated
version of the machine is also equipped with a battery which may have to be replaced
several times during the working life of the machine. We advise you use authorised
waste collection and disposal agencies to ensure ecological waste dispos al when
replacing the battery or dismantling the machine.
For batteries replacement, please read batteries’ use and maintenance book, either
for their maintenance or their scrapping.
18
 Loading...