

Nacecare ETB 1120 Owner's Instructions Manual
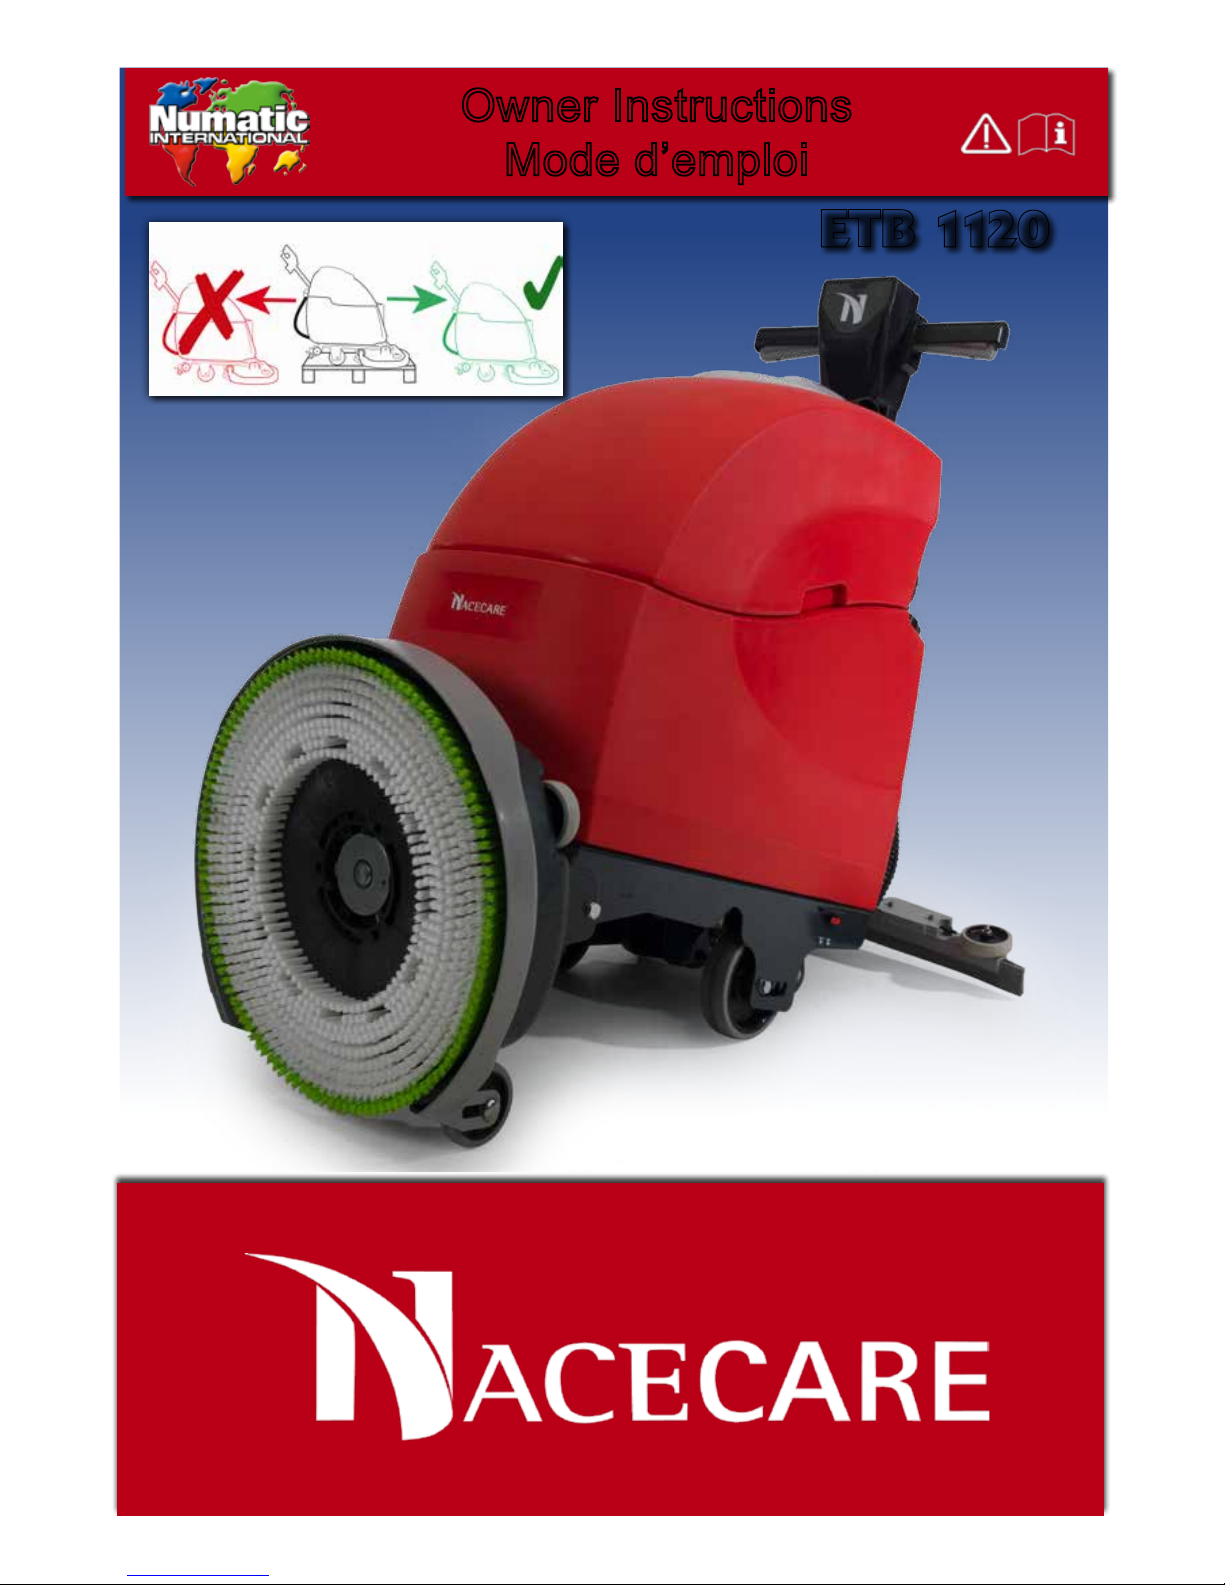
Original Instructions - Warning! Read instructions before using the machine.
Attention - Lisez la notice avant d’utiliser la machine.
Owner Instructions
Mode d’emploi
www.nacecare.com
ET B 112 0

2
Please read BEFORE commencing any operation.
Removal of all the packaging.
Ensure all batteries are charged before use.
Before contunuing, Please refer to Quick Set up guide
on Page 8.
À lire AVANT d’entreprendre toute opération.
Après avoir retiré tous les emballages, vériez le
contenu.
Assurez-vous que les batteries sont chargées avant
l’utilisation.
Veuillez vous référer au Guide d’installation rapide,
pages 23,
Index Page 2 Index Page 2
Machine overview Page 3 Description de la machine Page 3
Control panel overview Page 4 Description du panneau de commande Page 4
Rating label / Personal
Protective Equipment /
Recycling
Page 5
Plaque signalétique/Équipement de
protection individuelle/Recyclage
Page 18
Safety Precautions
Page
6 / 7
Précautions à prendre Page 19 / 20
Quick set-up guide Page 8 Guide d’installation rapide Page 21
Machine set-up Préparation de la machine
Fitting the brushes Page 10 Préparation de la machine Page 23
Tipping the brush deck Page 10 Inclinaison du plateau de brosses Page 23
Fitting and lowering the oor tool Page 10 Montage et abaissement du suceur Page 23
Filling the clean-water tank Page 11 Remplissage du réservoir d’eau propre Page 24
Machine Operation Fonctionnement de la machine
Pre-cleaning advice Page 11 Conseils de pré-nettoyage Page 24
Pre-scrub mode Page 12 Mode prélavage Page 25
Floor tool in use Page 12 Utilisation du suceur Page 25
Break away oor tool feature Page 12 Fonction de détachement du suceur Page 25
Setting the cleaning controls Page 13 Utilisation des commandes de nettoyage Page 26
Brush overload (Over Current) Page 13 Surcharge de la brosse (surintensité) Page 26
Regular Maintenance Entretien régulier
Cleaning Tanks and Filters Page 14 Nettoyage des réservoirs et des ltres Page 27
Separator removal and
cleaning
Page 14 Démontage et nettoyage du séparateur Page 27
Cleaning the bottom tank and lter Page 14
Nettoyage du réservoir inférieur et du
ltre
Page 27
Changing the oor-tool blades Page 15 Remplacement des lamelles du suceur Page 28
Battery care Entretien de la batterie
Battery care Page 16 Entretien de la batterie Page 29
Trouble shooting Page 17 Dépannage Page 30
Specications Page 17 Caractéristiques Page 30
Recommended spare parts Page 17 Pièces de rechange recommandées Page 30
Wiring diagrams Page 31
Schémas de câblage
Page 31
Company addresses Page 32 Adresses de l’entreprise Page 32

3
Machine Overview
3
4
5
6
8
10
9
1
7
12
14
15
16
17
11
2
13
Description de la machine
1. Accesoires 10. Tuyau de vidange du réservoir supérieur (eau sale)
2. Réservoir d’eau sale 11. Bouchon et tuyau de remplissage du réservoir d'eau propre
3. Réservoir d’eau propre 12. Tuyau d’aspiration du suceur
4. Plateau de brosses 13. Tuyau d’aspiration
5. Filtre d'eau propre 14. Clé d’isolation
6. Roues arrière 15. Levier de levage du suceur
7. Robinet marche-arrêt de l’eau propre 16. Lamelles
8. Séparateur 17. Mécanisme de verrouillage du plateau
9. Tuyau de vidange de l'eau propre
Machine Overview
1. Accessory pack 10. Top tank (waste water) drainage hose
2. Waste water tank 11. Clean-water ller cap and hose
3. Clean water tank 12. Floor-tool vacuum hose
4. Brush deck 13. Vacuum hose
5. Clean Water Filter 14. Isolator Key
6. Rear moving wheels 15. Floor tool Lifting Lever
7. Clean-water on / off tap 16. Squeegee blades
8. Separator 17. Deck Locking Mechanism
9. Clean-water emptying hose
4
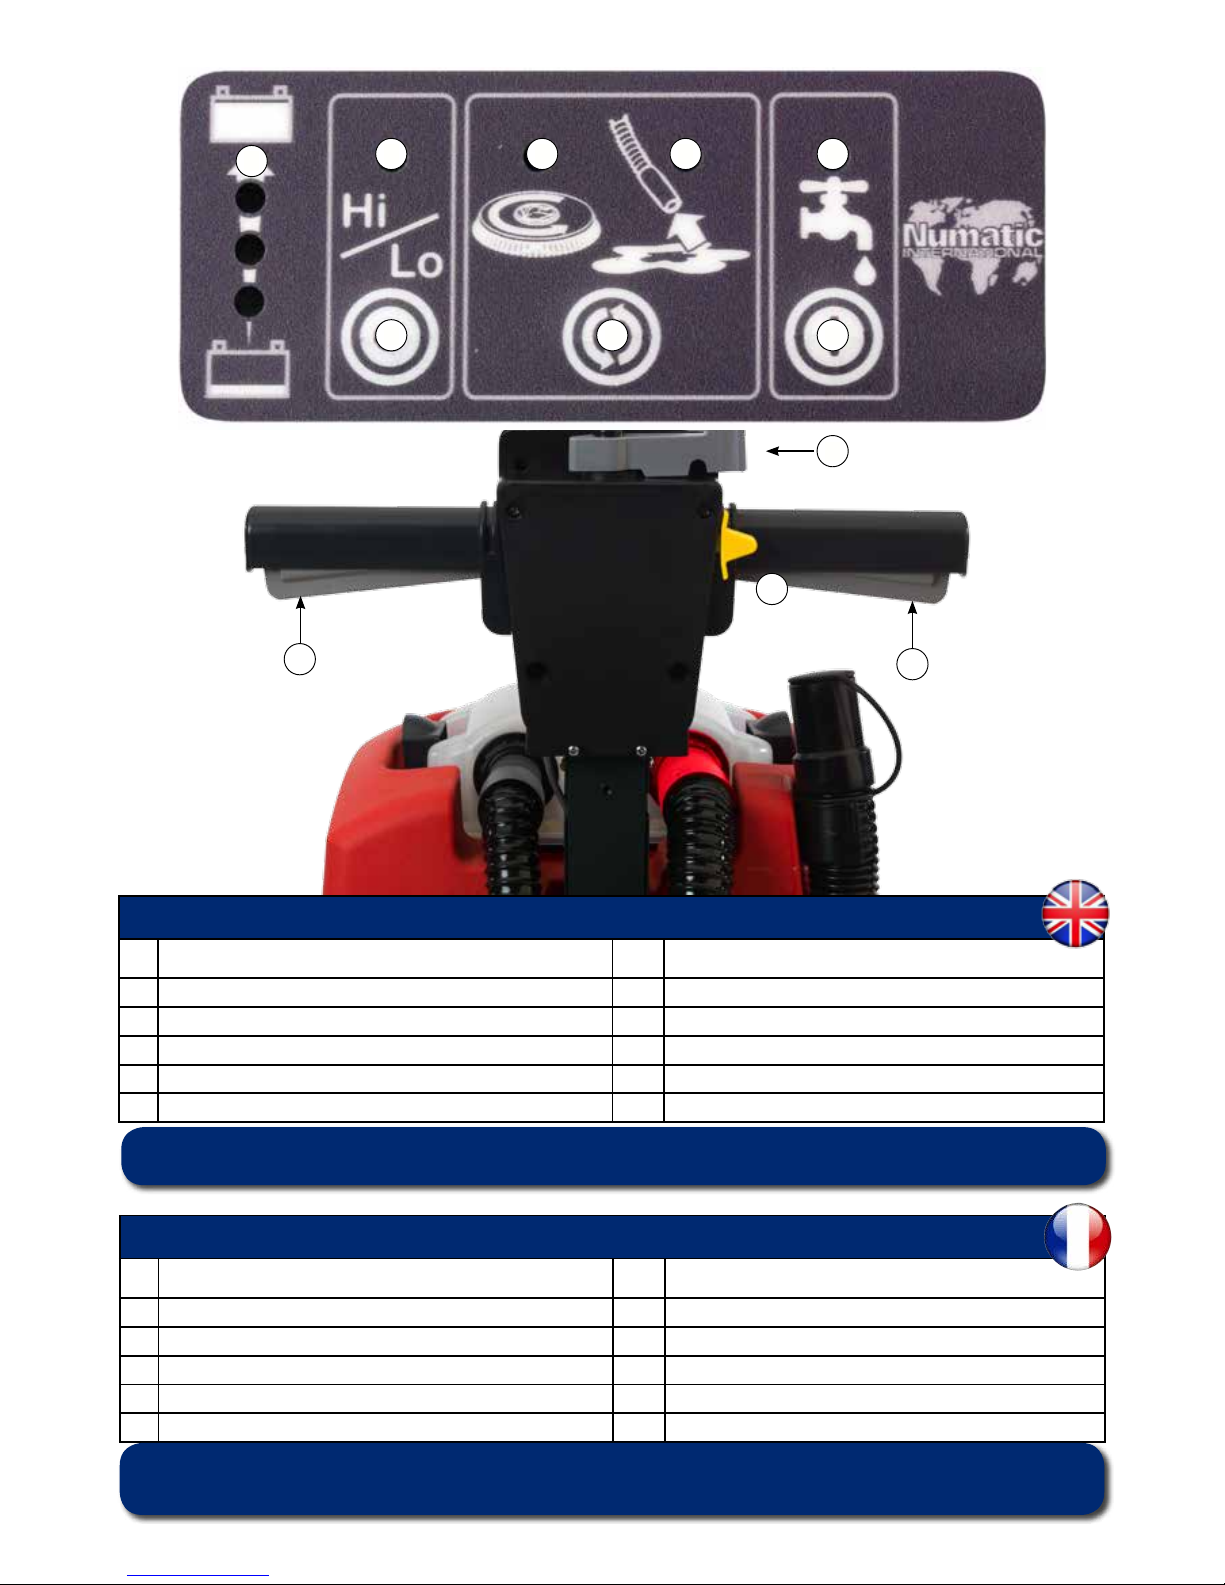
For full easy to follow
Instructions on control panel set up and use, see Setting the cleaning controls, page 13.
1
2 3 4
6 7
5
8
Description du panneau de commande
1. Indicateur de niveau de charge de la batterie 7. Bouton de séquence de cycle
2. Indicateur Faible-Fort 8. Bouton marche-arrêt du débit d’eau
3. Indicateur de fonctionnement/charge de la brosse 9. Levier de positionnement de poignée
4. Indicateur d’aspiration 10. Commutateur marche-arrêt
5. Indicateur de débit d'eau 11. Gâchettes marche-arrêt
6. Bouton Faible-Fort
Pour des instructions complètes et faciles à suivre
sur la conguration et l’utilisation du panneau de commande, reportez-vous à la partie
Utilisation des commandes de nettoyage, page 26.
9
11
11
10
Control Panel Overview
1. Battery Charge Level Indicator 7. Cycle sequence button
2. Hi / Lo Indicator 8. Water Flow On / Off Button
3. Brush Operation / Load Indicator 9. Handle Position Lever
4. Vacuum Indicator 10. On / Off Switch
5. Water Flow Indicator 11. On / Off Triggers
6. Hi / Lo Button
5
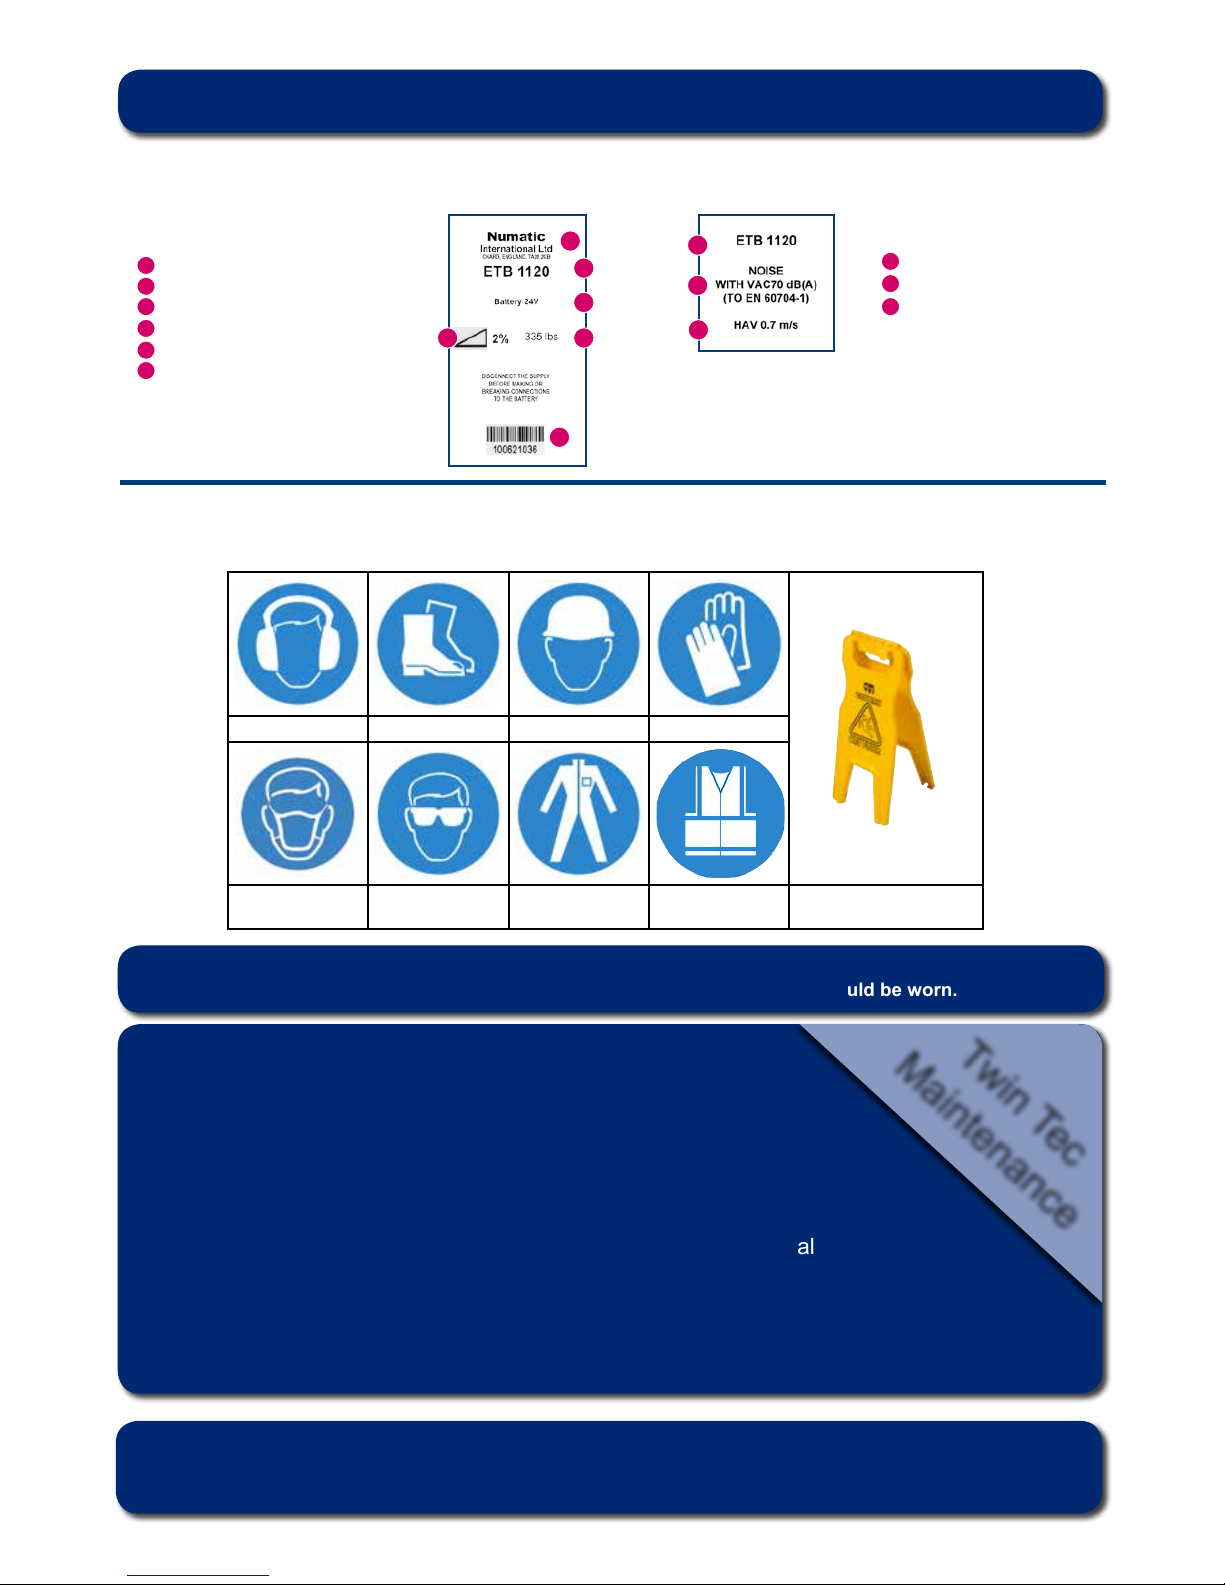
Rating Label
About the Machine
1
2
3
4
5
6
7
8
9
1
2
3
4 5
6
Company Name & Address
Machine Description
Voltage Frequency
Max Gradient
Weight (ready to use)
Machine yr/wk Serial number
Failure to rectify the problem or in the event of a breakdown contact your
Nacecare dealer or the Nacecare Technical help line +44 (0) 900 1 905 785 0038
Machine Description
Noise Rating
Hand Arm Vibration
Ear Protection Safety Footwear Head Protection Safety Gloves
Dust/Allergens
Protection
Eye Protection Protective
Clothing
Hi-Vis Jacket
Caution
Wet Floor Sign
Note:
A risk assessment should be conducted to determine which PPE should be worn.
PPE
(Personal protective equipment) that may be required for certain operations).
9
8
7
Daily
Keep the machine clean
Ensure brushes/ pads/ squeegee/ lters are in good condition
Check for any worn or damaged parts and replace immediately
Drain and rinse dirty water tank after every use
Store machine with brush deck secured in tilted position
Weekly – as daily and –
Check brush or pad and skirt and rinse
Check oor tool blades for wear and wipe clean
Clean separator assembly including lter and check condition of seal
Flush out system with clean water and clean lters
Do not steam clean or pressure wash
Batteries
Always recharge the batteries after use
Twin Tec
Maintenance
6
As with all electrical equipment care and attention must be exercised at all times during its use, in addition
to ensuring that routine and preventative maintenance is carried out periodically in order to ensure its safe
operation.
Failure to carry out maintenance as necessary, including the replacement of parts to the correct standard could render
this equipment unsafe and the manufacturer can accept no responsibility or liability in this respect.
When ordering spare parts always quote the Model Number / Serial Number specied on the Rating Plate.
This appliance is not intended for use by persons (including children) with reduced physical, sensory or mental
capabilities, or lack of experience and knowledge, unless they have been given supervision or instruction concerning
use of the appliance by a person responsible for their safety.
Children should be supervised to ensure that they do not play with the appliance.
This machine is not suitable for picking-up hazardous dust.
Do not use on surfaces having a gradient exceeding that marked on the appliance.
The machine is not to be stored outdoors in wet conditions.
This machine is for indoor use only.
Read the instruction manual before using the appliance.
This product meets the requirements of CAN / CSA 60335-2-72
NOTES
This machine is also suitable for commercial use, for example in hotels, schools, hospitals, factories, shops and
ofces for other than normal housekeeping purposes.
• Ensure only competent persons unpack/assemble the machine.
• Keep your machine clean.
• Keep your brushes in good condition.
• Replace any worn or damaged parts immediately.
• Regularly examine the power cord for damage, such as cracking or ageing. If damage is found,
replace the cord before further use.
• Ensure that the work area is clear of obstructions and / or people.
• Ensure that the working area is well illuminated.
• Pre-sweep the area to be cleaned.
• Use steam cleaners or pressure washers to clean the machine or use in the rain.
• Attempt machine maintenance or cleaning unless the power plug has been removed from the supply
outlet.
• Allow any inexperienced repairs. Call the experts
• Strain cable or try to unplug by pulling on cable.
• Leave the brush pad on the machine when not in use.
• Allow the machine to be used by inexperienced or un-authorised operators or without appropriate
training.
• Use the machine without the solution tanks properly positioned on the machine, as shown in the instructions.
• Expect the machine to provide trouble-free, reliable operation unless maintained correctly.
• Lift or pull the machine by any of the operating triggers - Use the main handle.
• Remove the handle from the machine except for service and repair.
• Use on surfaces having a gradient exceeding that marked on the machine.
ORIGINAL INSTRUCTIONS
READ MANUAL BEFORE USE
Information for Scrubber Dryer
Component Interval Inspect for
Charging Lead DAILY Scufng, cracks, splits, conductors showing
Brushes DAILY Bristle damage, wear, drive collar wear
Squeegee Blade BEFORE EACH USE Wear, cracks, splits
Filters BEFORE EACH USE Clogging and debris retention
Tanks AFTER EACH USE Rinse dirty water tank after use
WARNING
CAUTION
DO
DON’T

7
Only use brushes provided with the appliance or those specied in the instruction manual.
The use of other brushes may impair safety.
A full range of brushes and accessories are available for this product.
Only use brushes or pads which are suitable for the correct operation of the machine for the specic task
being performed.
It is essential that this equipment is correctly assembled and operated in accordance with current safety regulations.
When using the equipment always ensure that all necessary precautions are taken to guarantee the safety of the
operator and any other persons who may be affected.
Wear non-slip footwear when scrubbing. Use a respiratory mask in dusty environments.
The machine, while charging, must be positioned so that the mains plug is easily accessible.
When cleaning, servicing or maintaining the machine, replacing parts or converting to another function the power
source shall be switched off.
Mains operated machines shall be disconnected by removing the power plug, and battery operated machines shall be
disconnected by switching off the isolating key.
Machines left unattended shall be secured against unintentional movement.
When detergents or other liquids are used, read the manufacturer’s instructions.
Operators shall be adequately instructed as to the correct use of the machine.
WARNING
1. Always wear protective clothing e.g. Face visor, gloves and overalls when working with batteries
2. Whenever possible always use a properly designated and well-ventilated area for charging. Do not smoke or bring
naked ames into the charging area.
3. Remove any metallic items from hands, wrists and neck i.e. Rings, chains etc. before working on a battery.
4. Never rest tools or metallic objects on top of the battery.
5. When charging is complete disconnect from the mains supply.
6. The batteries must be removed from the machine before it is scrapped.
7. The machine must be disconnected from the supply when removing the battery.
8. The batteries are to be disposed of safely and in accordance with the battery directive.
9. Do not allow the batteries to become fully discharged; it may not be possible to recharge them.
10. Do not allow one battery to be discharged separately to the other.
11.Do not mix batteries from different machines.
PRECAUTIONS WHEN WORKING WITH BATTERIES
1. Always recharge the batteries after use.
2. Do not store the machine with the batteries discharged.
BATTERY CARE
8
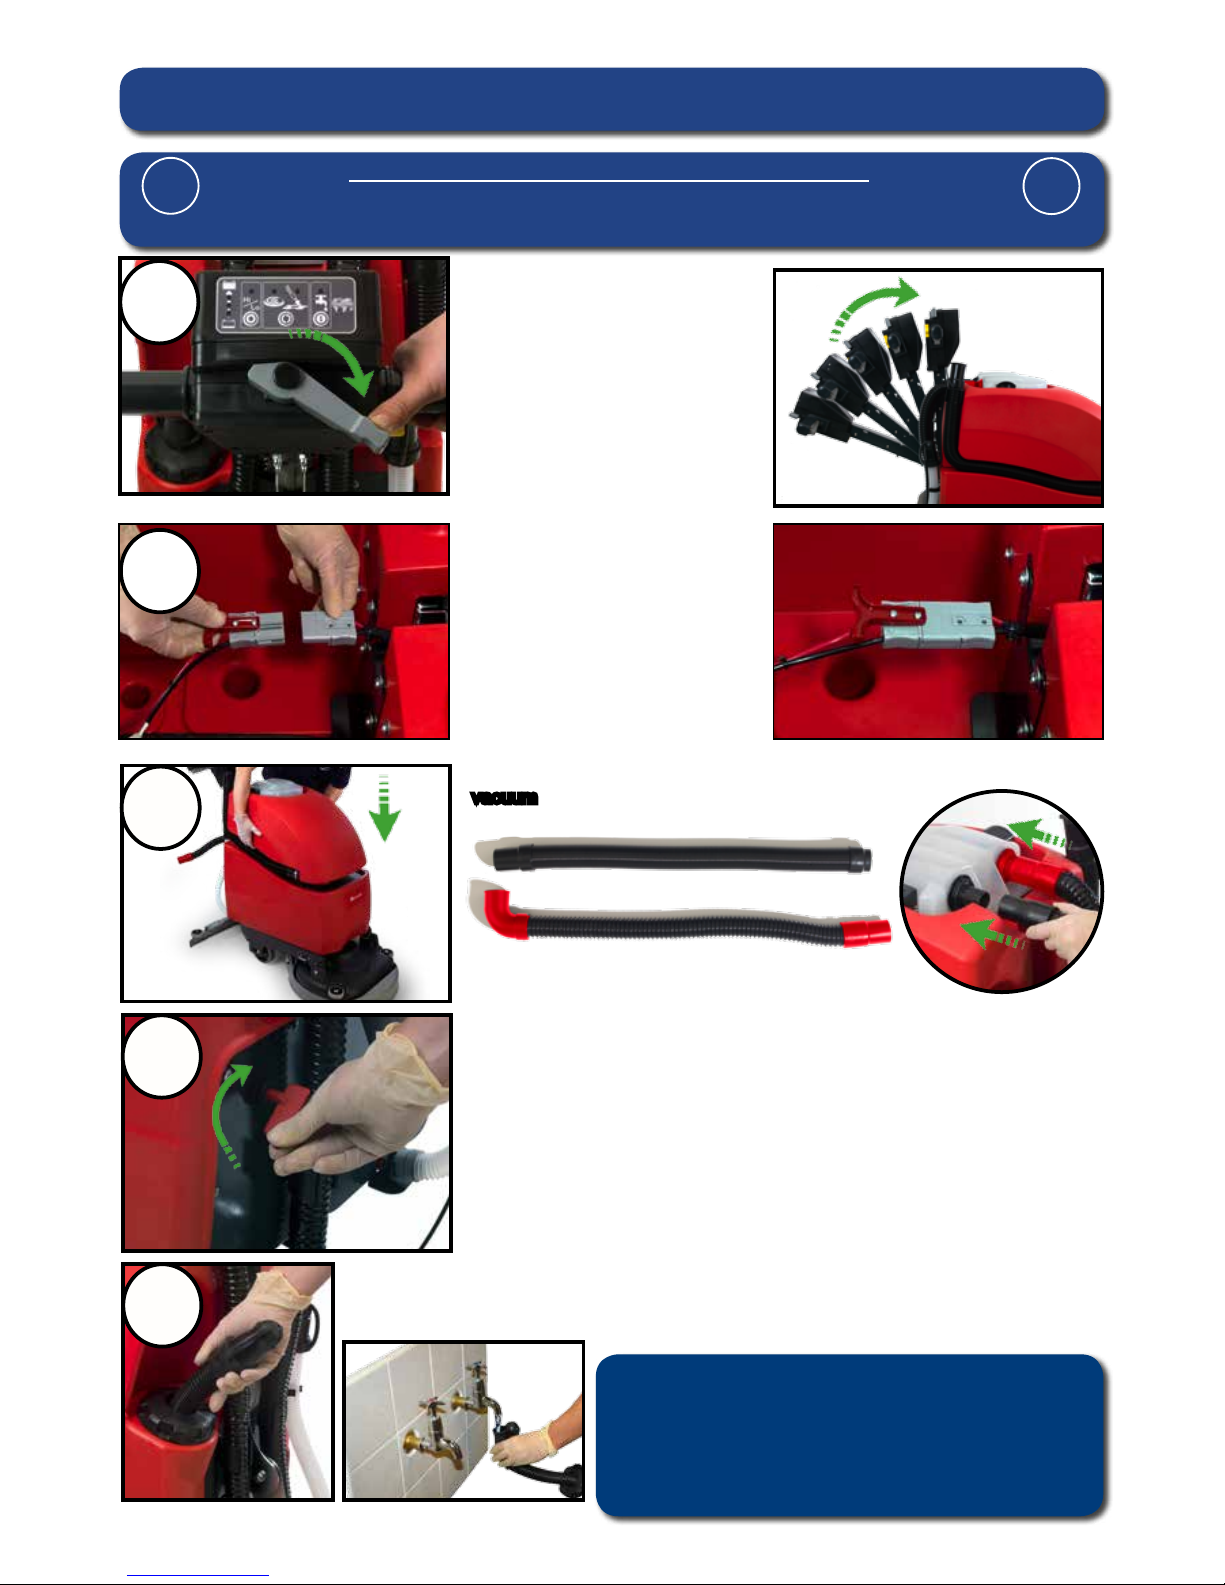
Using the handle position lever
(Fig 1), move the handle into the
upright position. (Fig 2).
PLEASE READ BEFORE COMMENCING ANY OPERATION.
After the removal of all the packaging, carefully open and check the contents.
Ensure the Batteries are charged before use.
!
!
1
4
5
Fit the isolator key and switch the machine on (Fig 7).
Fig 1
Quick Set-Up Guide
2
Fig 3
Place the top tank (waste water) into the machine (Fig 5) and connect the
vacuum and oor tool hose to the separator (Fig 6).
3
Fig 5
Fill the bottom tank (Clean Water) from a tap or hose pipe using the Flexi-Fill pipe tted to
the ller cap (Fig 8). Add Non foaming cleaning uid as required (See page 11).
The ETB 1120 has a water capacity of 11 gal
Fig 2
Fig 4
Fig 6
Fig 7
Fig 8
Note:
Great care must be taken to ensure that contaminants
(leaves, hair, dirt, etc.) are not allowed to enter the
clean-water tank during the lling process.
If using a bucket or similar, ensure it is always clean
and free from debris.
Connect 24V power supply to
the machine
9
6
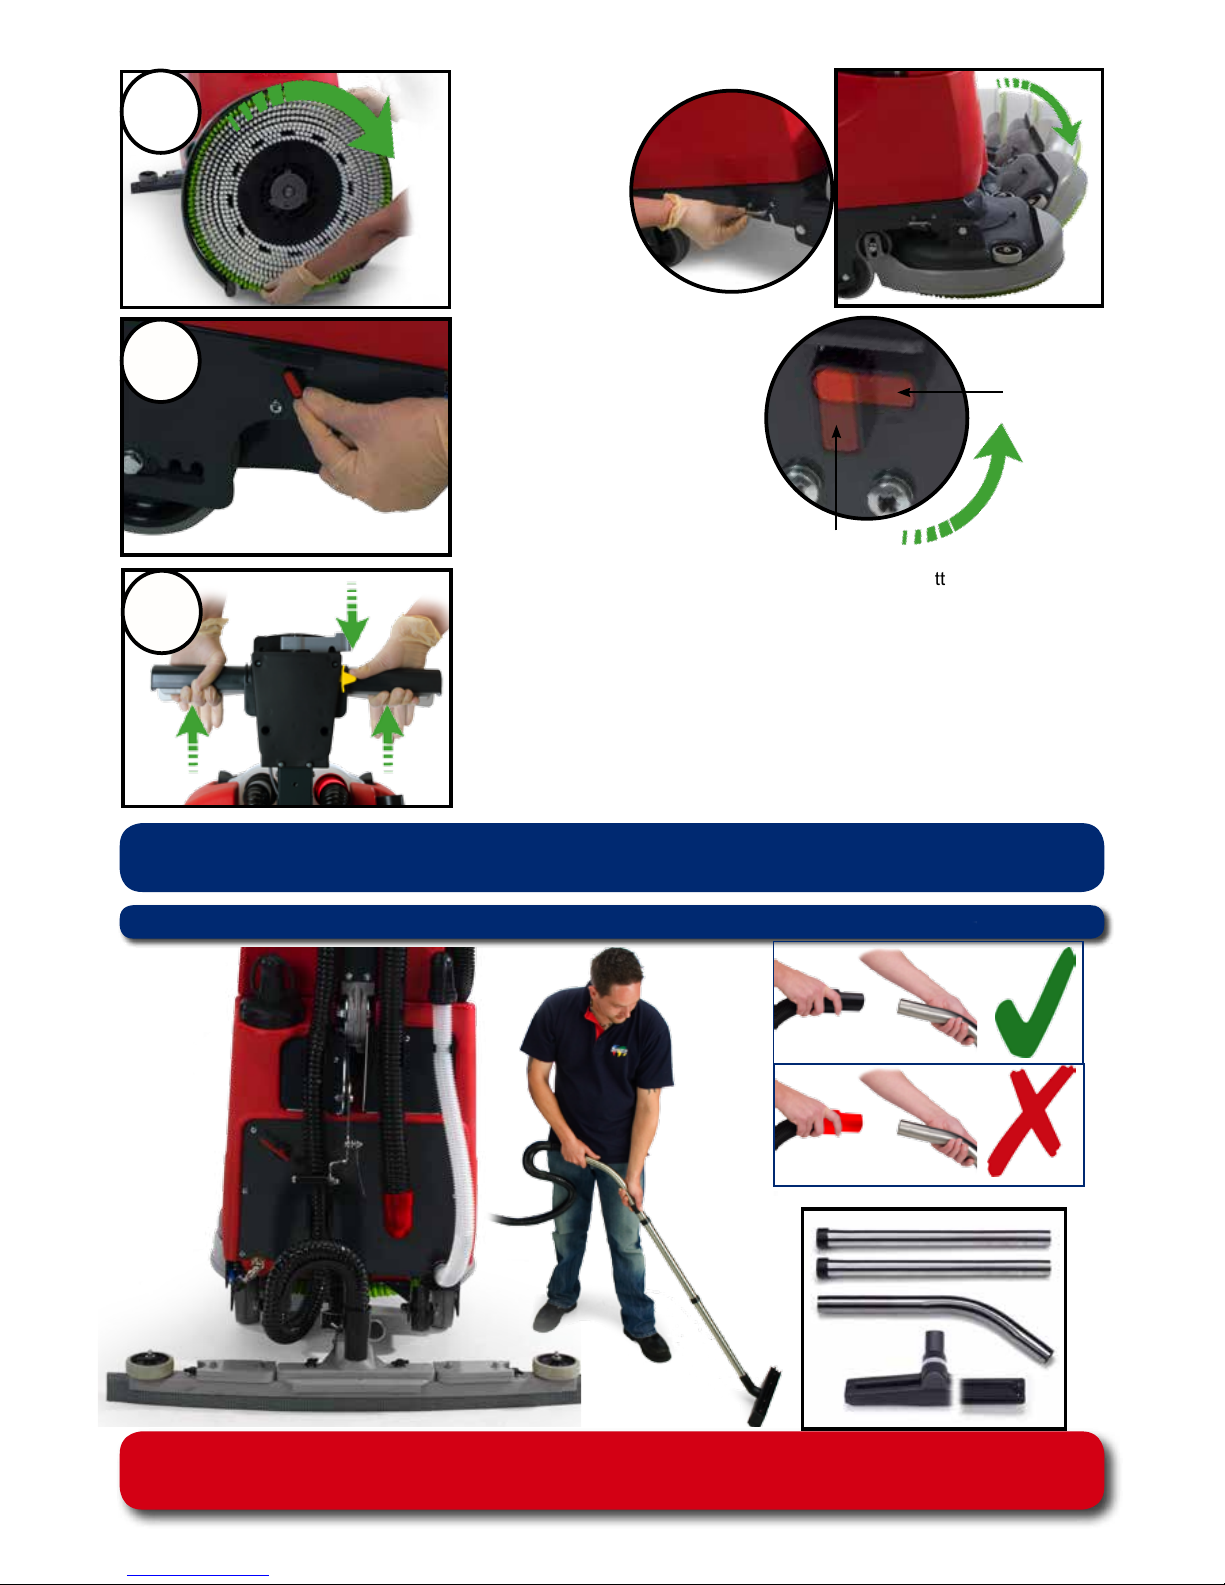
Fit the Brush / Pad (Fig 9).
Push in the deck
locking pin (Fig 10)
and rotate the
brush deck into
the operating
position (Fig 11).
Fig 9
7
Turn on the clean water tap (Fig 12).
8
To start: hold either trigger and press the yellow start button once
(Fig 13).
Brush, vacuum and water settings can be controlled by the control panel
(See Page 13).
Fill the clean-water tank to a Max of 11 gal (see page 11)
For operation and cleaning controls (see page 13)
Failure to rectify the problem or in the event of a breakdown contact your
Nacecare dealer or the Nacecare Technical help line +44 (0) 900 1 905 785 0038
Fig 12
Fig 13
Fig 10
Fig 11
On
Off
Off-Aisle Cleaning Kit (Optional Extra Accessory) 606168
10
ALWAYS ENSURE THAT THE BATTERY IS DISCONNECTED
BEFORE MAKING ANY ADJUSTMENTS
!
!
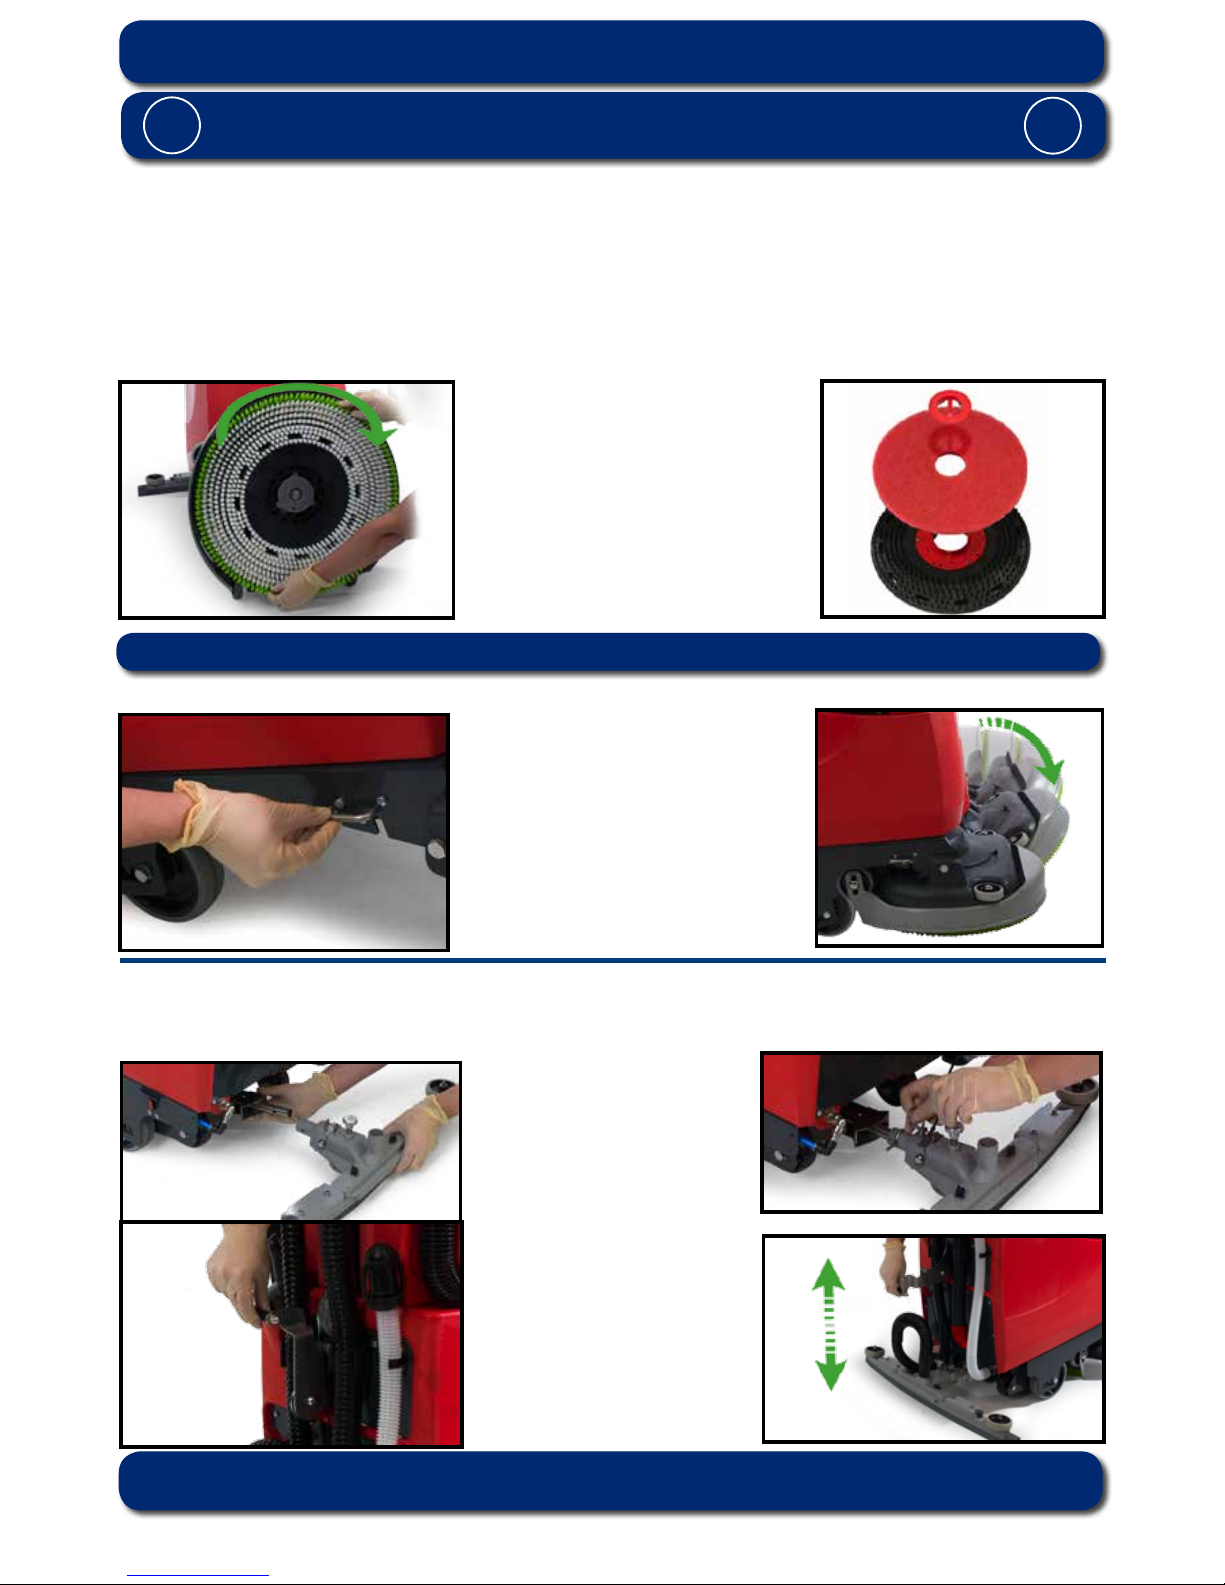
Fitting the brushes
Featuring the Nulock brush system.
The brush is simply pushed and twisted to lock, making tting and removal a simple process.
The Pad is retained using Numatic’s own PadLoc system. (Ask your supplier for details)
Only use manufacturer supplied brushes / pads.
ETB 1120 requires a 20’’ brush or pad
Fitting and lowering the Floor Tool
The oor tool has been designed for quick tting, allowing easy squeegee blade replacement.
Raise the oor tool for transit or
lower for cleaning operation using
the lifting handle tted to the back
of the machine (Fig 20).
We are now ready to set the
controls to suit the cleaning
conditions.
Before any settings can be
applied, ensure the brush deck is
lowered.
Safety gloves are recommended for the changing of used brushes.
Note:
It is easier to t the oor-tool if the weight of the machine is resting on the brush. Ensure the brush is tted rst.
Machine Set-Up
Fit the brush /pad to the drive chuck,
twist to lock the brush
(Fig 14) / pad in place (Fig 15).
Tipping the Brush Deck
To tip the deck into the down position
(Operating mode) Press in the brush
deck locking bar (Fig 16) and rotate the
brush deck (Fig 17).
To change to brush deck up position,
(Transit mode) simply lift the deck and
the sprung loaded locking bar will active
to hold the deck up.
Fig 15
Fig 17
Fig 20
Fig 19
Fig 18
Fig 16
Fig 14
Fit the oor tool and retain using
the detent Pin (Fig 18).
The lifting strap is held by a
detent pin (Fig 19).
 Loading...