

Page 1
Version 1.0 2016
READ AND SAVE THESE INSTRUCTIONS
OWNER’S MANUAL
Model: FS40-16J
Attention: Pictures in the IM are for reference only.
CAUTION
Read Rules for Safe Operation and Instructions Carefully.
WARNING
1. If the supply cord is damaged, it must be replaced by manufacturer
or its service agent or a similarly qualified person in order to avoid
a hazard.
2. Indoor use only.
3. To protect against the risk of electrical shock, do not immerse the
unit, cord or plug in water or other liquid.
4. This appliance can be used by children aged from 8 years and
above and persons with reduced physical, sensory or mental
capabilities or lack of experience and knowledge if they have been
given supervision or instruction concerning use of the appliance in
a safe way and understand the hazards involved. Children shall not
play with the appliance. Cleaning and user maintenance shall not be
made by children without supervision.
5. When the appliance is not in use and before cleaning, unplug the
appliance from the outlet.
6. When the fan was assembled, the rotor blade guard shall not be
taken off anymore。
7. Correct Disposal of this product
This marking indicates that this product should not be
disposed with other household wastes throughout the EU. To
prevent possible harm to the environment or human health from
uncontrolled waste disposal, recycle it responsibly to promote the
sustainable reuse of material resources. To return your used
device, please use the return and collection systems or contact
the retailer where the product was purchased. They can take this
product for environmental safe recycling.
RULES FOR SAFE OPERATION
1. Never insert fingers, pencils, or any other object through the grille when fan is
running.
2. Disconnect fan when moving from one location to another.
3. Be sure fan is on a stable surface when operating to avoid overturning.
4. DO NOT use fan in window, rain may create electrical hazard.
5. Household use only.
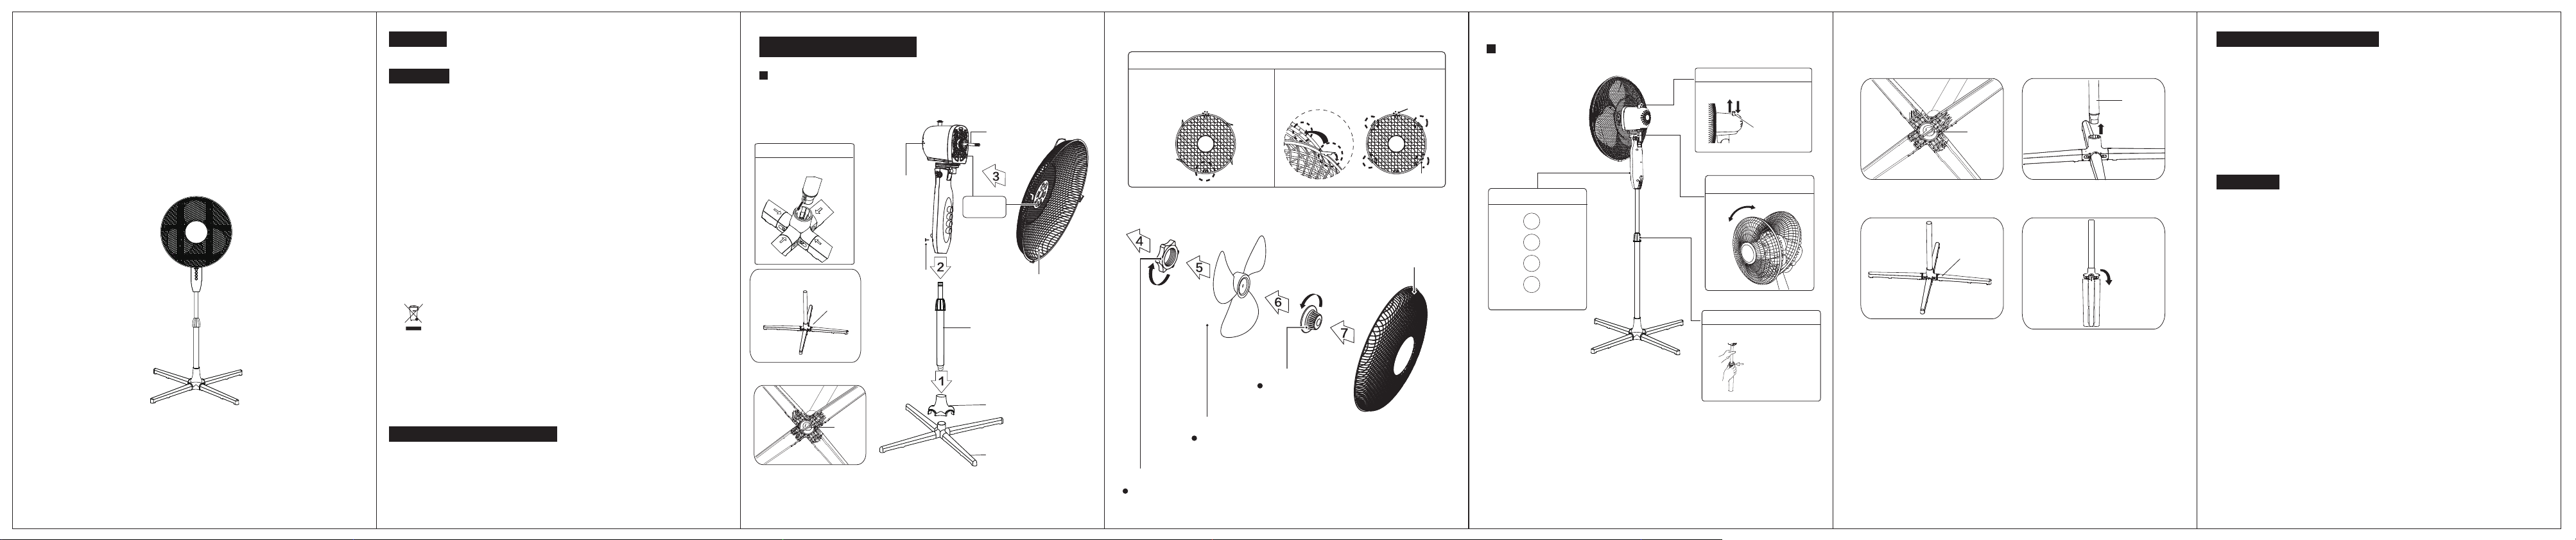
INSTALLATION INSTRUCTIONS
Name of components
Mounting and Supporting Type of
Connecting Rods
Step I: the card position is aligned at any
four arrows and installed.
Step II: The four supporting and positioning
frames boost supporting connection base.
Supporting and
positioning frame
Step III: Rotate rotary knob clockwise
and tighten
Rotary knob
Motor
Tighten
knob
Motor shaft
Install by
aligning
Pole
Stand ornament
Supporting
Rear grill
Front and Rear Guard Installation
1. Align Screw Holes on the outer ring
of both the Front and Rear Guards,
with the Positioning Clip aligned as
illustrated.
Blade
Pull the blade to rotate after installing,
so as to ensure that the blade can be
normally rotated.
Lock nut of grill
Screw the lock nut of grill clockwise,
and in the meantime, fix the rear grill.
2. Press down all the Buckles to fasten the
Front Guard with the Rear Guard. At the
Screw Holes, tighten the separated screw
and nut.
Lock nut of blade
Lock nut of blade
anticlockwise,
and then install the
front fan cover.
Screw
Buckle
Front grill
Instructions for operation of body
Body key
3
2
1
0
Horizontal Swing
Pull-up for static
Push-down to swing
Swing Pull-knob
Tilt Adjustment
Manual
Height Adjustment
Turn counterclockwise and loosen for
performing height adjustment.
Height Adjustment Key
Storing way of supporting frame:
Step I. Loosen the rotary knob.
Rotary knob
Step II. Four supporting and
positioning frames are pulled back.
Support and
positioning frame
Step II. Pull out the column.
Column
Step IV. The four frames are rotated
90 degrees and folded together.
MAINTENANCE INSTRUCTION
The fan requires little maintenance. Do not try to fix it by yourself. Refer it to
qualified service personnel if service is needed.
1. Before cleaning and assembling, fan must be unplugged.
2. To ensure adequate air circulation to the motor, keep vents at the rear of the
motor free of dust. Do not disassemble the fan to remove dust.
3. Please wipe the exterior parts with a soft cloth soaking a mild detergent.
4. Do not use any abrasive detergent or solvents to avoid scratching the surface.
Do not use any of the following as a cleaner: gasoline, thinner.
5. Do not allow water or any other liquid into the motor housing or interior parts.
CLEANING
1. Be sure to unplug from the electrical supply source before cleaning.
2. Plastic parts should be cleaned with a soft cloth moisten with mild soap.
Thoroughly remove soap film with dry cloth.
DISPOSAL:Do not dispose of electrical appliances as unsorted
municipal waste, use separate collection facilities. Contact your
local government for information regarding the collection systems
available. If electrical appliances are disposed of in landfills or dumps, hazardous
substances can leak into the groundwater and get into the food chain, damaging
your health and well-being.
 Loading...