

Page 1
Bedienungsanleitung
Manual
Notice d’utilisation
Gebruiksaanwijzing
Starter Set Güterzug
29309
D
USA UK
F
NL
Page 2
2
F
NL
D
USA UK
Lesen Sie die Bedienungsanleitung vor der ersten
Inbetriebnahme aufmerksam durch. Die Bedienungsanleitung ist Bestandteil des Produktes und
muss deshalb aufbewahrt sowie bei Weitergabe
des Produktes an Dritte mitgegeben werden.
Inhaltsverzeichnis: Seite
1. Bestimmungsgemäße Verwendung 3
2. Sicherheitshinweise 3
3. Lieferumfang 3
4. Technische Daten 3
5.
Hinweise zur ersten Inbetriebnahme 3
6. Vorbereitungen 3
7. Gleise aufbauen 5
8. Inbetriebnahme 6
9. Betriebshinweise 8
10. Funktionsstörungen 9
11. Reinigung und Wartung 9
12. Entsorgung 10
13. Garantie 10
Carefully read through the operating instructions
before using the model for the first time. The
operating instructions come with the product
and must therefore be kept as well as passed on
when giving the product to a third party.
Table of Contents: Page
1. Using the Product as Intended 11
2. Safety Notes 11
3. Contents 11
4. Technical Information 11
5. Notes about Using this Model for
the First Time 11
6. Preparations 11
7. Track to build 13
8. Running the Train for the First Time 14
9. Information about Operating the Train 16
10. Trouble Running the Train 17
11. Cleaning and Maintenance 17
12. Disposing 18
13. Warranty 18
Lire attentivement la notice d’utilisation avant la
première mise en service. La notice d‘utilisation
fait partie intégrante du produit ; elle doit donc
être conservée et, le cas échéant, transmise avec
le produit.
Sommaire : Page
1. Utilisation conforme à sa destination 19
2. Remarque sur la sécurité 19
3. Matériel fourni : 19
4. Caractéristiques techniques 19
5. Indications relatives à la première
mise en service 19
6. Préparatifs 19
7. Des voies développer 21
8. Mise en service 22
9. Indications relatives à l’exploitation 24
10. Dysfonctionnements 25
11. Nettoyage et entretien 25
12. Elimination 26
13. Garantie 26
Lees voor het in bedrijfnemen van het product,
eerst de gebruiksaanwijzing aandachtig door. De
gebruiksaanwijzing is een wezelijk bestandsdeel
van het product en dient derhalve bewaard en
meegegeven te worden bij het afstaan van het
product aan derden.
Inhoudsopgave: Pagina
1. Verantwoord gebruiken 27
2. Veiligheidsvoorschriften 27
3. Leveringsomvang: 27
4. Technische gegevens 27
5. Aanwijzingen voor het in gebruiknemen 27
6. Voorbereidingen 27
7. Spoorwegen bouwen 29
8. In gebruik nemen 30
9. Aanwijzingen voor het gebruik 32
10. Storingen 33
11. Reinigen en onderhoud 33
12. Afdanken 34
13. Garantie 34
Page 3
3
1 Fernsteuerung
1 Ladekabel (USB/Mini-USB)
2 Batterien Type AAA/LR 03 1,5V
1 Stickerbogen
Bedienungsanleitung
D
USA UK
F NL
Bedienungsanleitung
S DK
Garantieurkunde
Werbefaltblatt
4. Technische Daten
• Spannungsversorgung Zug: fest eingebauter
Akku (wiederaufladbar über beigefügtes Ladekabel)
•
Spannungsversorgung Fernsteuerung: 2 x 1,5 V DC
• Batterietyp: 2 x 1,5V Micro, AAA, LR 03
• Spurweite H0 (Maßstab 1:87)
5.
Hinweise zur ersten Inbetriebnahme
• Fernsteuerung und Zug gemäß Kapitel 6.2 und
6.3 vorbereiten.
• Gelangt der Zug außerhalb der Reichweite der
Fernsteuerung (ca. 6 m), fährt er weiter, kann
jedoch nicht mehr gesteuert werden.
• Es können max. zwei Züge parallel benützt
werden.
• Sofern ein anderes Gerät mit der gleichen Frequenz in Reichweite des Zuges betrieben wird,
können Störungen auftreten.
6. Vorbereitungen
6.1 Hinweise zum Umgang mit Batterien:
Hinweise zu Batterien und wiederaufladbaren
Akkus
• Dieses Spielzeug enthält einen nicht austauschbaren Akku im Zug / in der Lok.
• ACHTUNG! Der Akku des Zuges kann nur im
ausgeschalteten Zustand des Zuges über das
beigefügte USB-Ladekabel geladen werden.
• Batterien sollten ausschließlich von Erwachsenen eingesetzt und ausgetauscht werden.
•
Nicht wiederaufladbare Batterien dürfen nicht
aufgeladen werden.
• Falls für die Fernsteuerung wiederaufladbare
Batterien verwendet werden, müssen diese vor
dem Laden herausgenommen werden.
• Aufladbare Batterien (Akkus) nur unter Aufsicht
Erwachsener laden. Beachten Sie dazu die
Bedienungsanleitungen des jeweiligen Ladegerätes.
• Ungleiche Batterietypen oder neue und
1. Bestimmungsgemäße Verwendung
Dieses Produkt ist eine Modelleisenbahn für Kinder
ab 3 Jahren in der Spurweite HO (Maßstab 1:87).
Der batteriebetriebene Zug kann auf Modellbahn
anlagen, welche mit dem Märklin-C-Gleis ausgestattet sind, betrieben werden.
• Die beiliegenden Gleise sind für den Betrieb mit
Transformator/Digitalfahrgerät nicht geeignet.
• Der Zug kann nicht auf Teppichböden betrieben
werden.
• Der Zug kann auf glattem und sauberem Unter-
grund, auf dem my world Kunststoffgleis oder
auf H0 C-Gleisen betrieben werden.
2. Sicherheitshinweise
• Das Produkt darf nur in geschlossenen Räumen
verwendet werden.
• Setzen Sie das Produkt keiner direkten Son-
neneinstrahlung, starken Temperaturschwankungen oder hoher Luftfeuchtigkeit aus.
• ACHTUNG! Nicht geeignet für Kinder unter 3
Jahren. Funktionsbedingte scharfe Kanten und
Spitzen. Erstickungsgefahr wegen abbrech- und
verschluckbarer Kleinteile.
• ACHTUNG! Den eingeschalteten Zug nicht in
das Gesicht oder in die Haare halten.
• ACHTUNG! Sollte ein Schaden an einem
Fahrzeug des Zuges aufgetreten sein, darf
das beschädigte Fahrzeug nicht mehr weiter
verwendet werden.
• ACHTUNG! Dieses Produkt enthält Magnete in
der Kupplung. Das Verschlucken von einem oder
mehreren Magneten kann unter Umständen
tödlich wirken. Suchen Sie sofort einen Arzt auf.
• Das mitgelieferte USB-Ladekabel nicht biegen
und regelmäßig auf Beschädigungen am Kabel,
Stecker und anderen Teilen überprüfen. Bei
einem Schaden das Spielzeug so lange nicht
benutzen, bis der Schaden repariert ist.
• Verbaute LED`s entsprechen der Laserklasse 1
nach Norm EN 60825-1.
3. Lieferumfang
Zug 3-teilig
21 gebogene Gleise R1
2 gebogene Gleise R2
4 gerade Gleise 188 mm
7 gerade Gleise 172 mm
1 Weiche links
1 Weiche rechts
1 Kreuzung 30°
1 Aufgleishilfe 72240
D
Page 4
4
Batterien nur paarweise entsprechend
den Markierungen einlegen oder tauschen! Polarität beachten!
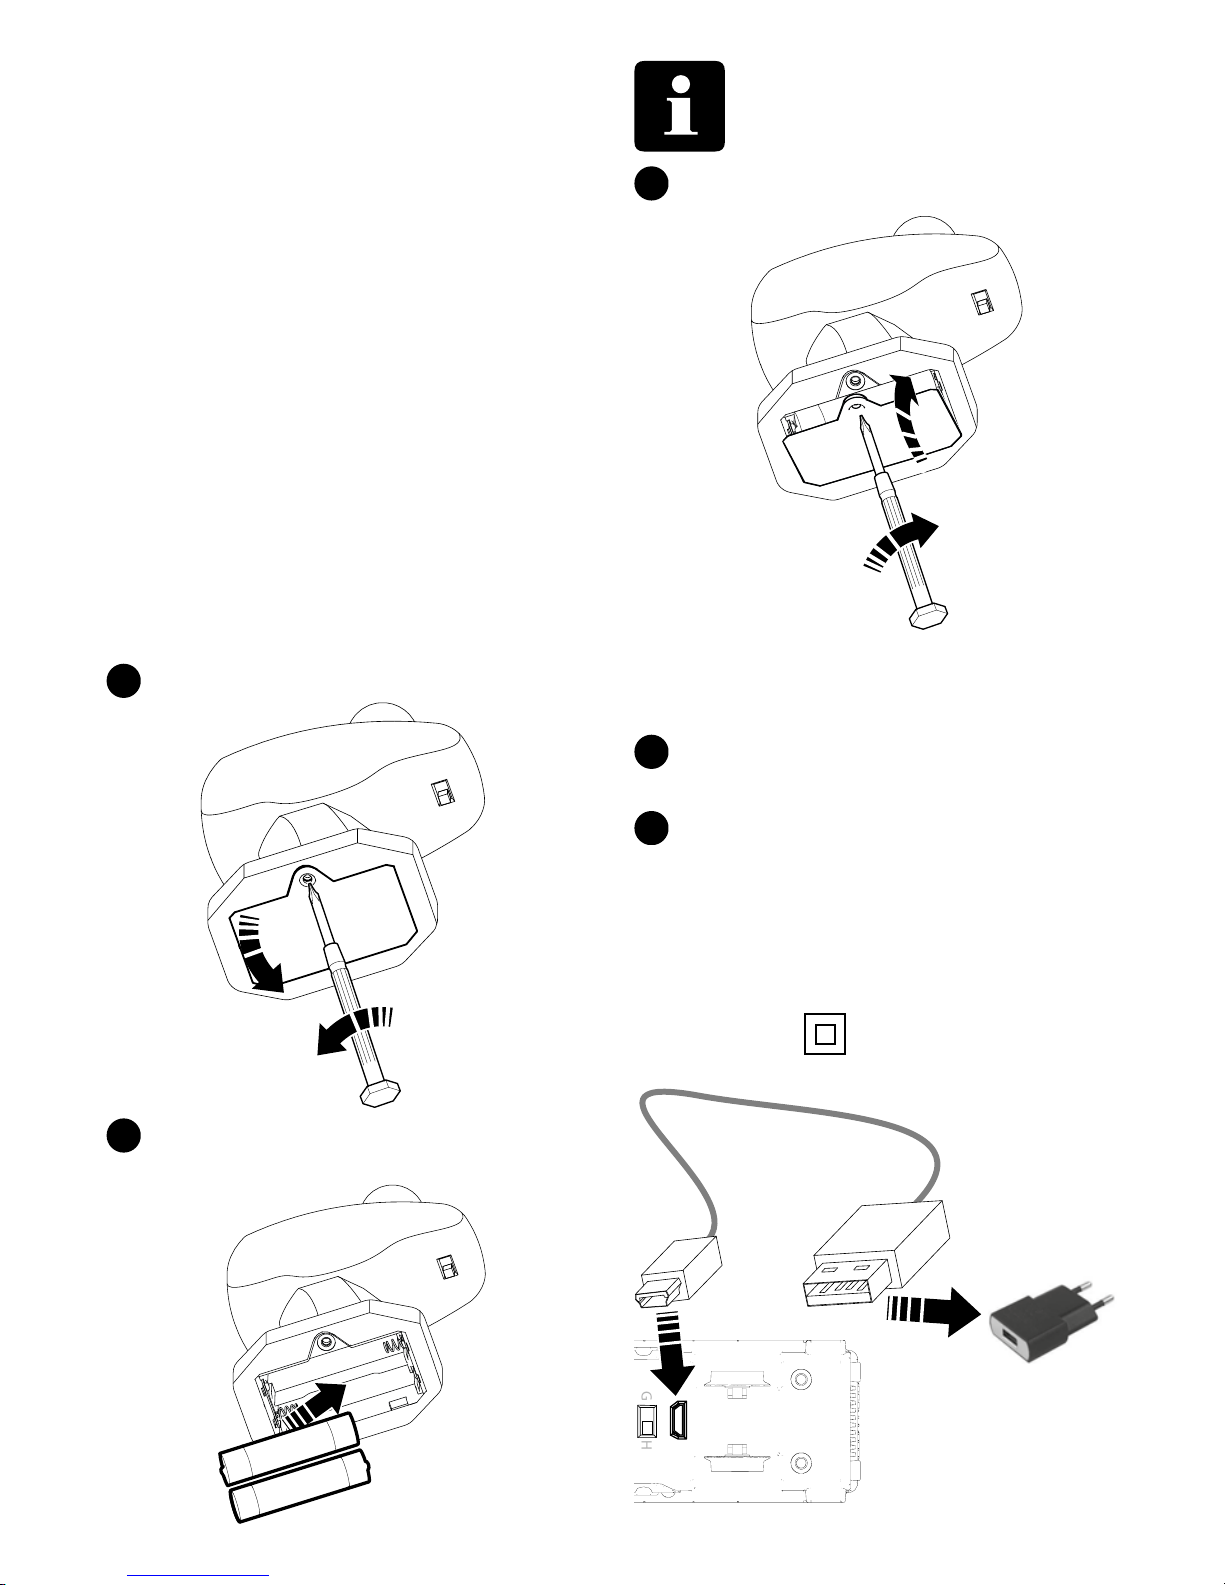
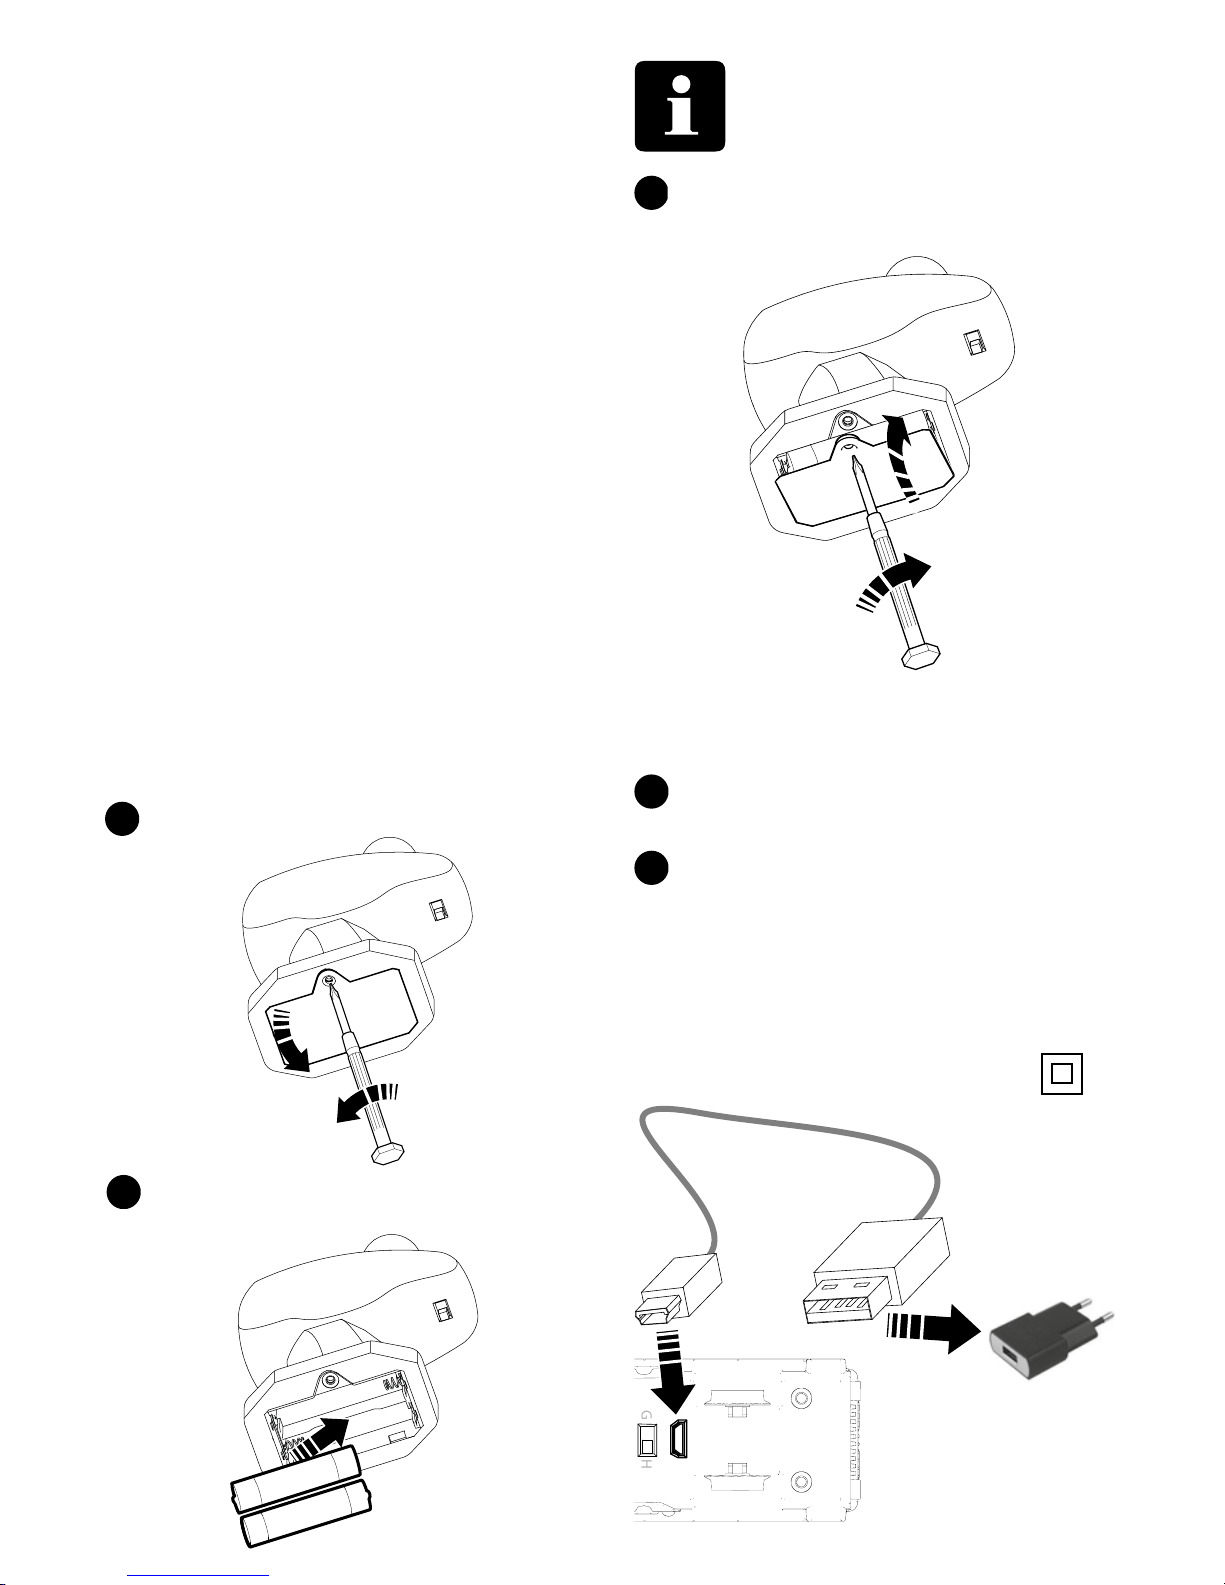
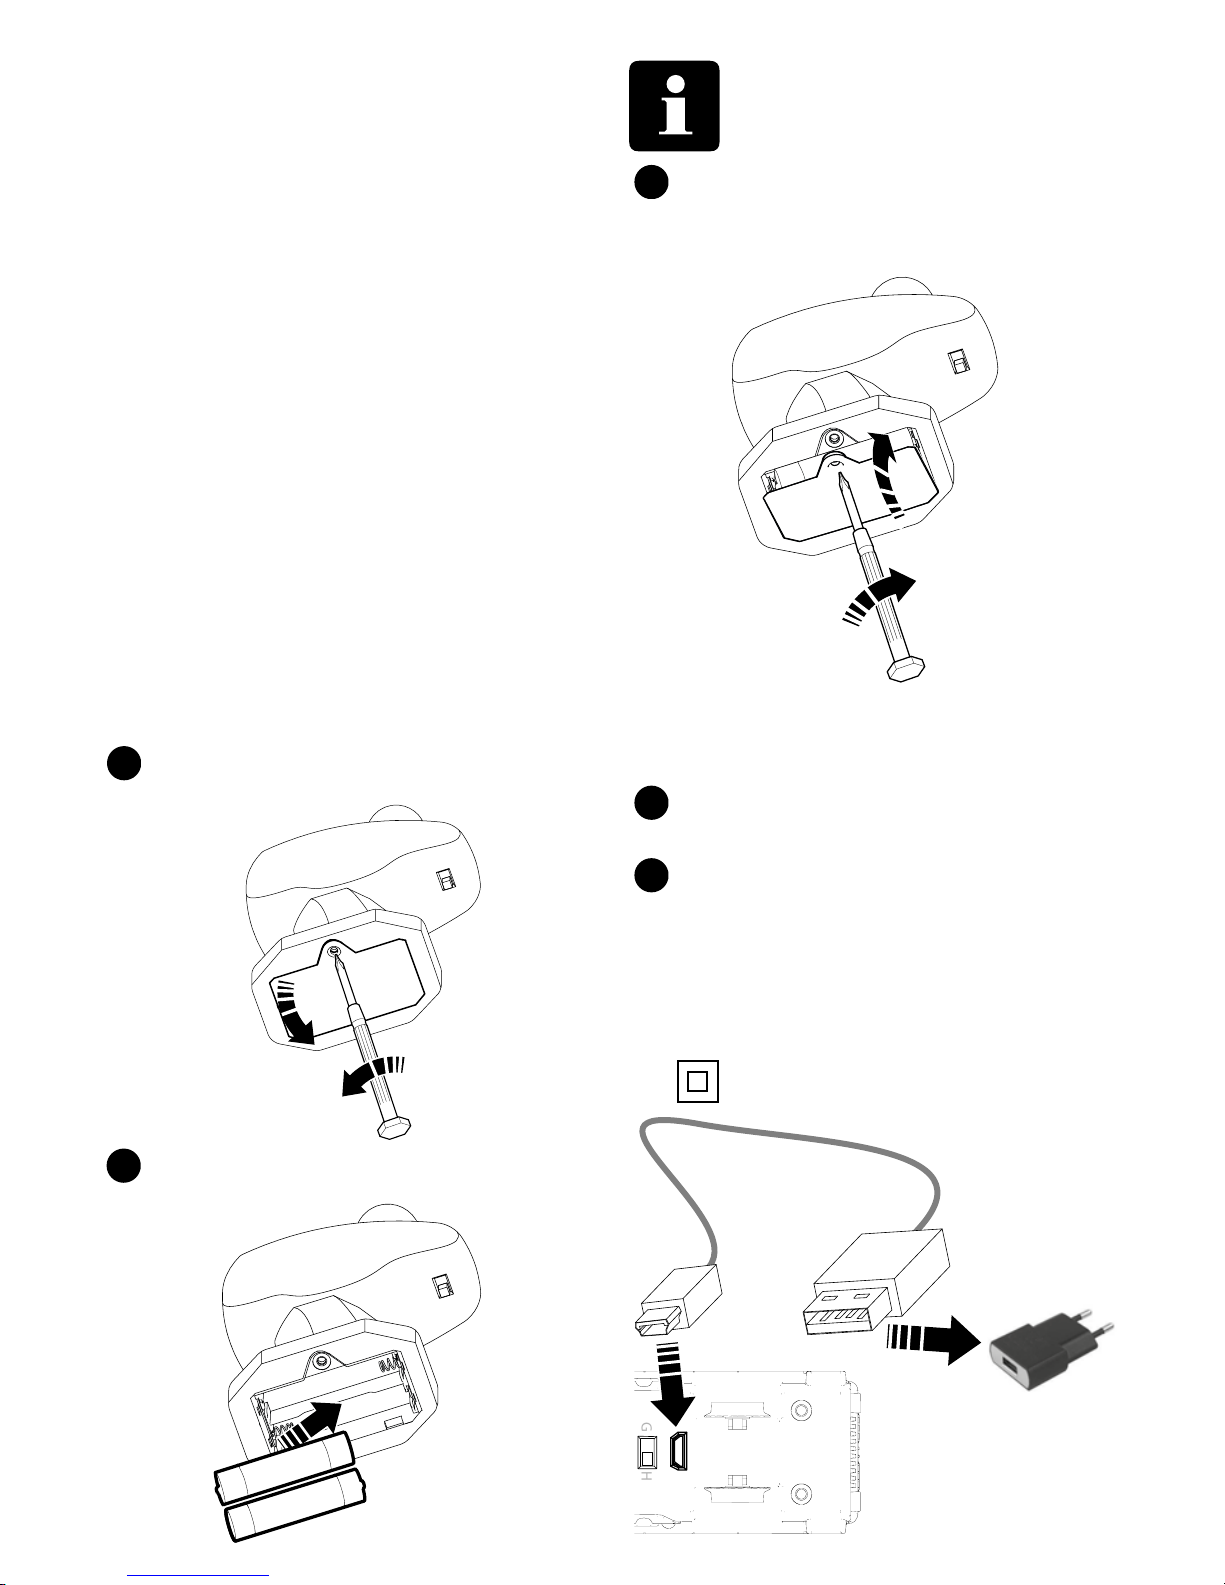
Batteriefach aufschrauben und abheben
Zwei Batterien Type AAA/LR 03 gemäß Zeichnung einlegen
6.2 Fernsteuerung
6.3 Zug
Vor dem ersten Betrieb des Zuges muss der integrierte Akku geladen werden!
Batteriefachdeckel auflegen und festschrauben
Den Mini-USB-Stecker des mitgelieferten
Ladekabels in die Mini-USB-Buchse des
Zuges stecken.
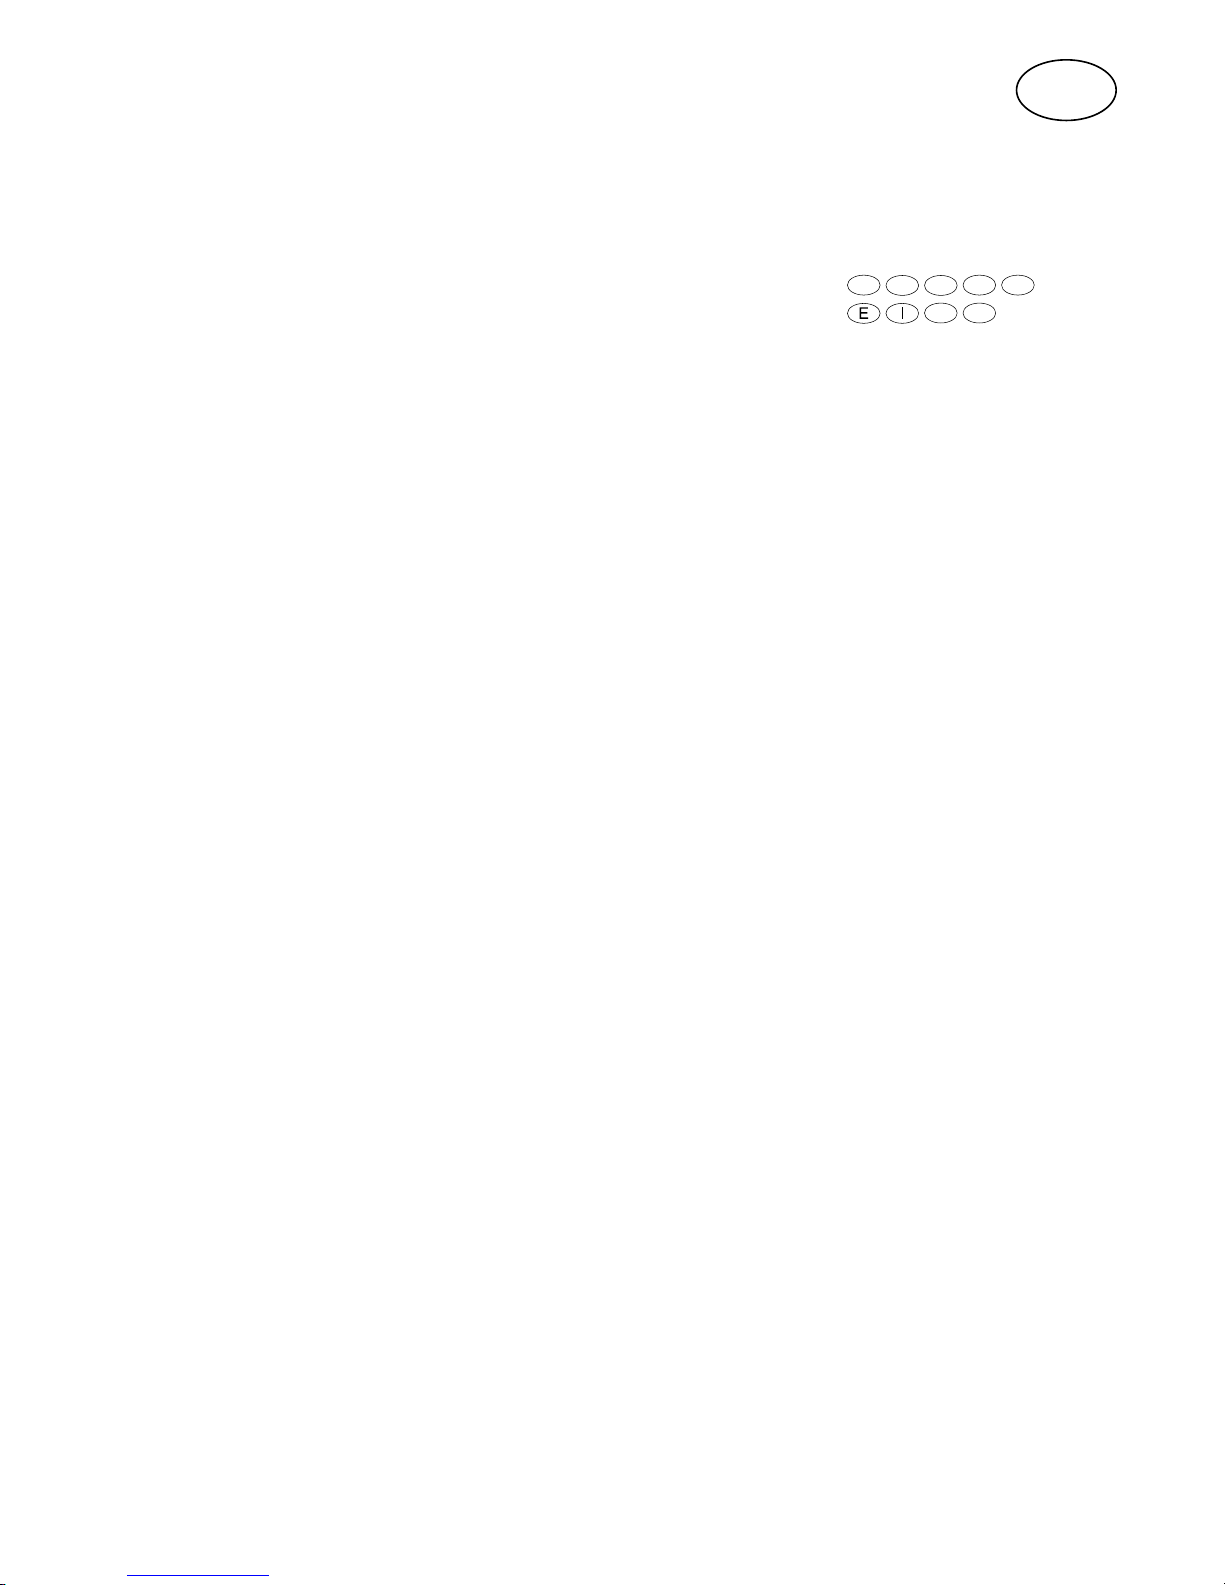
Der USB-Stecker des mitgelieferten Ladekabels darf nur an ein Ladegerät der Schutzklasse II (z.B. vom Handyladegerät) angeschlossen werden, welches mit folgendem Symbol
versehen ist:
gebrauchte Batterien dürfen nicht zusammen
verwendet werden.
• Batterien mit der richtigen Polarität einlegen.
• Leere Batterien aus der Fernsteuerung heraus-
nehmen.
• Kontakte dürfen nicht kurzgeschlossen werden.
• Wenn Sie den Zug längere Zeit nicht benutzen,
entfernen Sie die Batterien aus der Fernsteuerung.
• Bei ausgelaufenen Batterien Schutzhand-
schuhe zum Entfernen der Batterien anziehen.
Anschließend das Batteriefach und die Kontakte mit einem trockenen Tuch reinigen.
• Batterien gehören nicht in die Hände von Kin-
dern. Kinder könnten die Batterien in den Mund
nehmen und verschlucken. Sollte eine Batterie
verschluckt worden sein, muss sofort ärztliche
Hilfe in Anspruch genommen werden.
• Entsorgung siehe Punkt 12.
123
1
2.
3.
1.
G
H
G
H
+
-
-
+
3.
G
H
+
-
-
+
2.
3.
+
-
-
+
1.
5.
4.
G
H
G
H
G
H
+
-
-
+
2.
2
Vor dem Laden ist sicherzustellen, dass der
Zug ausgeschaltet ist.
G
H
1.
* Das USB-Ladegerät
ist nicht im Lieferumfang enthalten!
*
Page 5
5
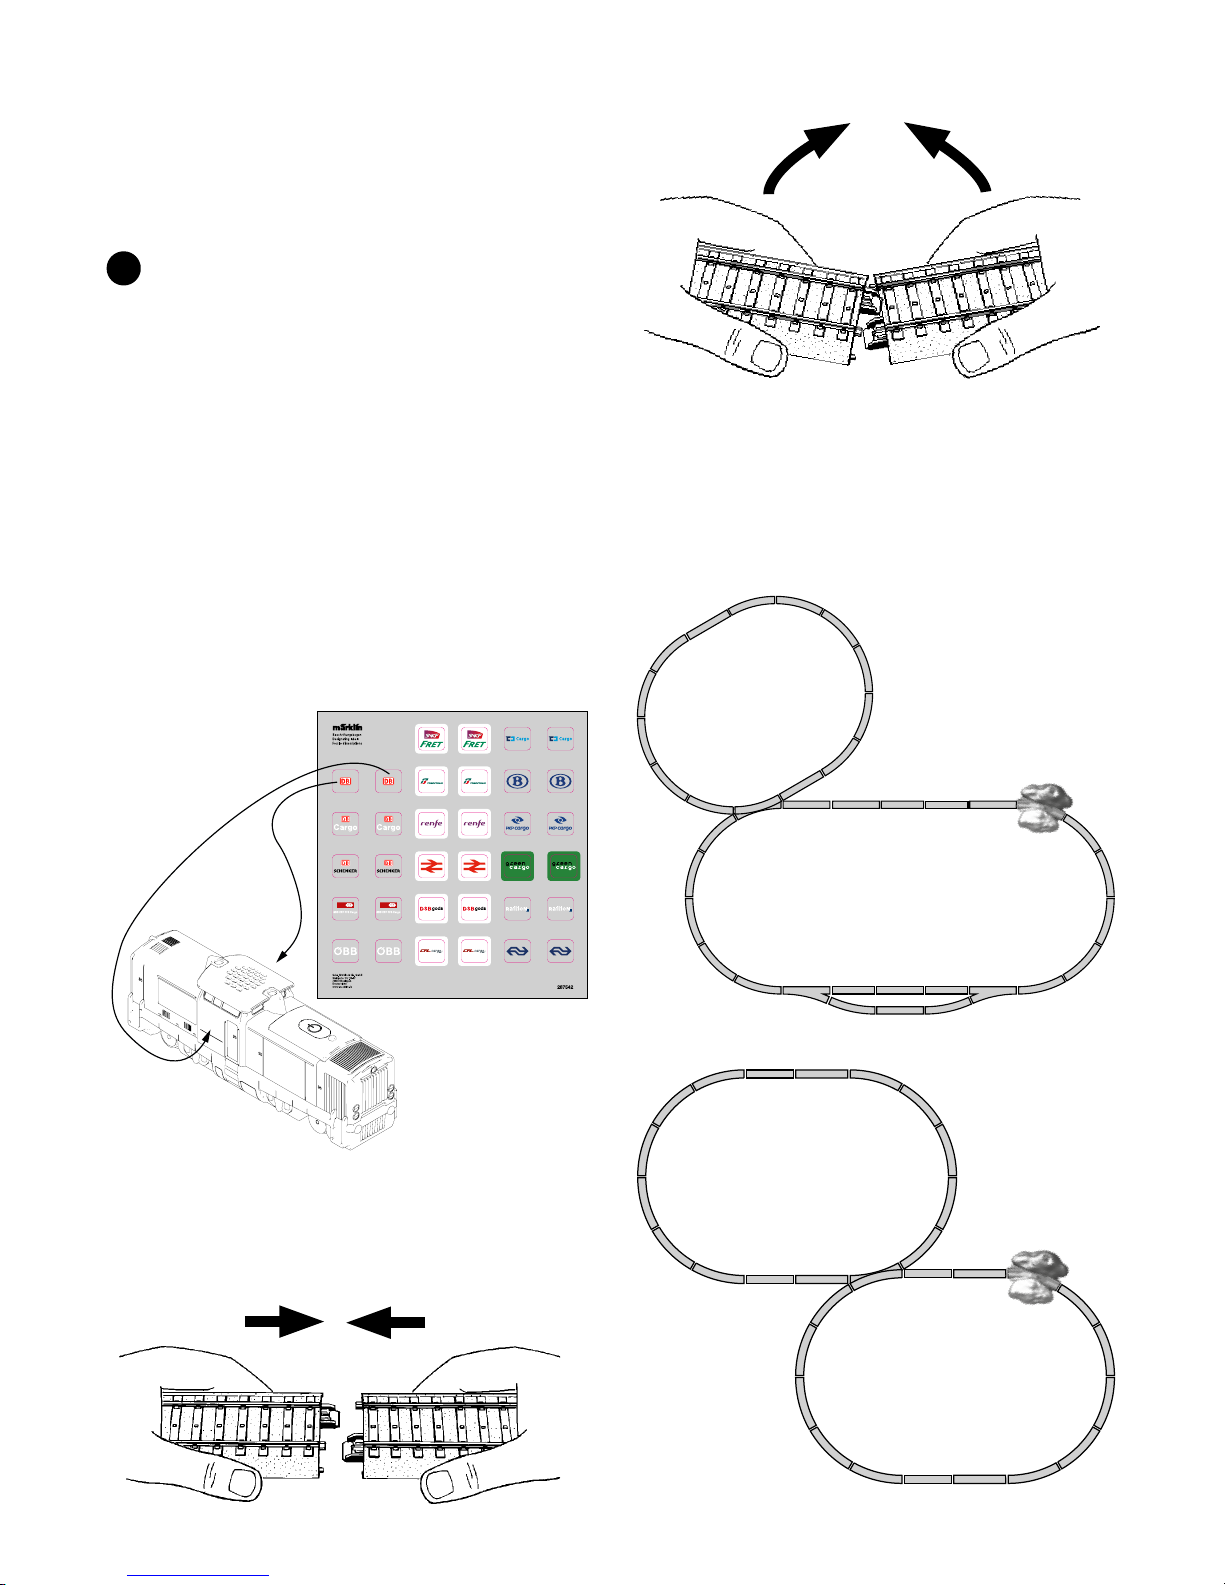
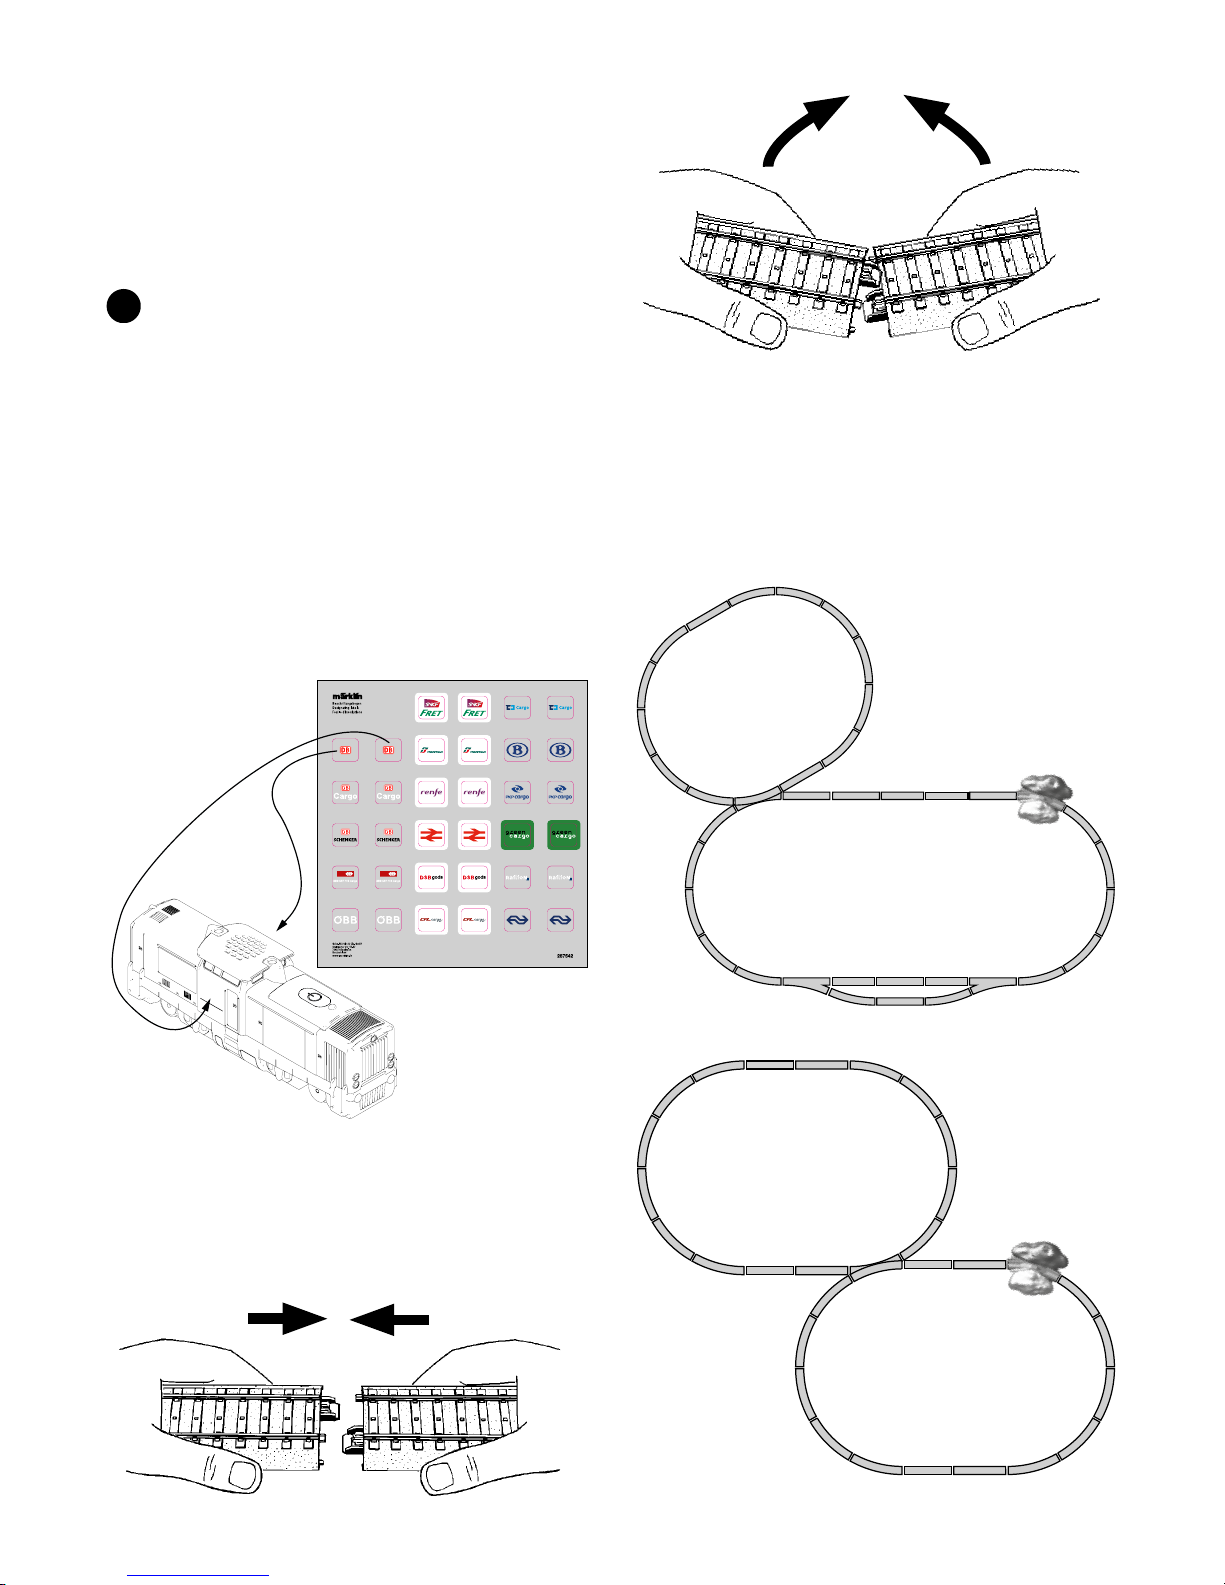
7. Gleise aufbauen
Zusammenstecken
Lösen
Beispiele für den Aufbau (siehe auch Seite 35):
6.4 Sticker am Zug anbringen
Die gewünschte Bahngesellschaft auf dem
Stickerbogen auswählen. Es stehen jeweils 2 Sticker von verschiedenen Bahngesellschaften zur
Verfügung. Diese 2 Sticker werden an der rechten
und linken Zugseite angebracht.
Während des Ladevorgangs leuchtet die rote
Leuchte im Zug.
Mit beiliegendem Kabel beträgt die Ladezeit
ca. 3 Stunden.
Der Zug ist aufgeladen, wenn die rote Leuchte
im Zug erlischt.
3
Nachdem der Akku vollständig geladen
wurde, muss das Ladekabel aus dem Zug und
dem Ladegerät entfernt werden.
Mit vollem Akku kann der Zug ca. 2,5 Stunden
gefahren werden.
Page 6
6
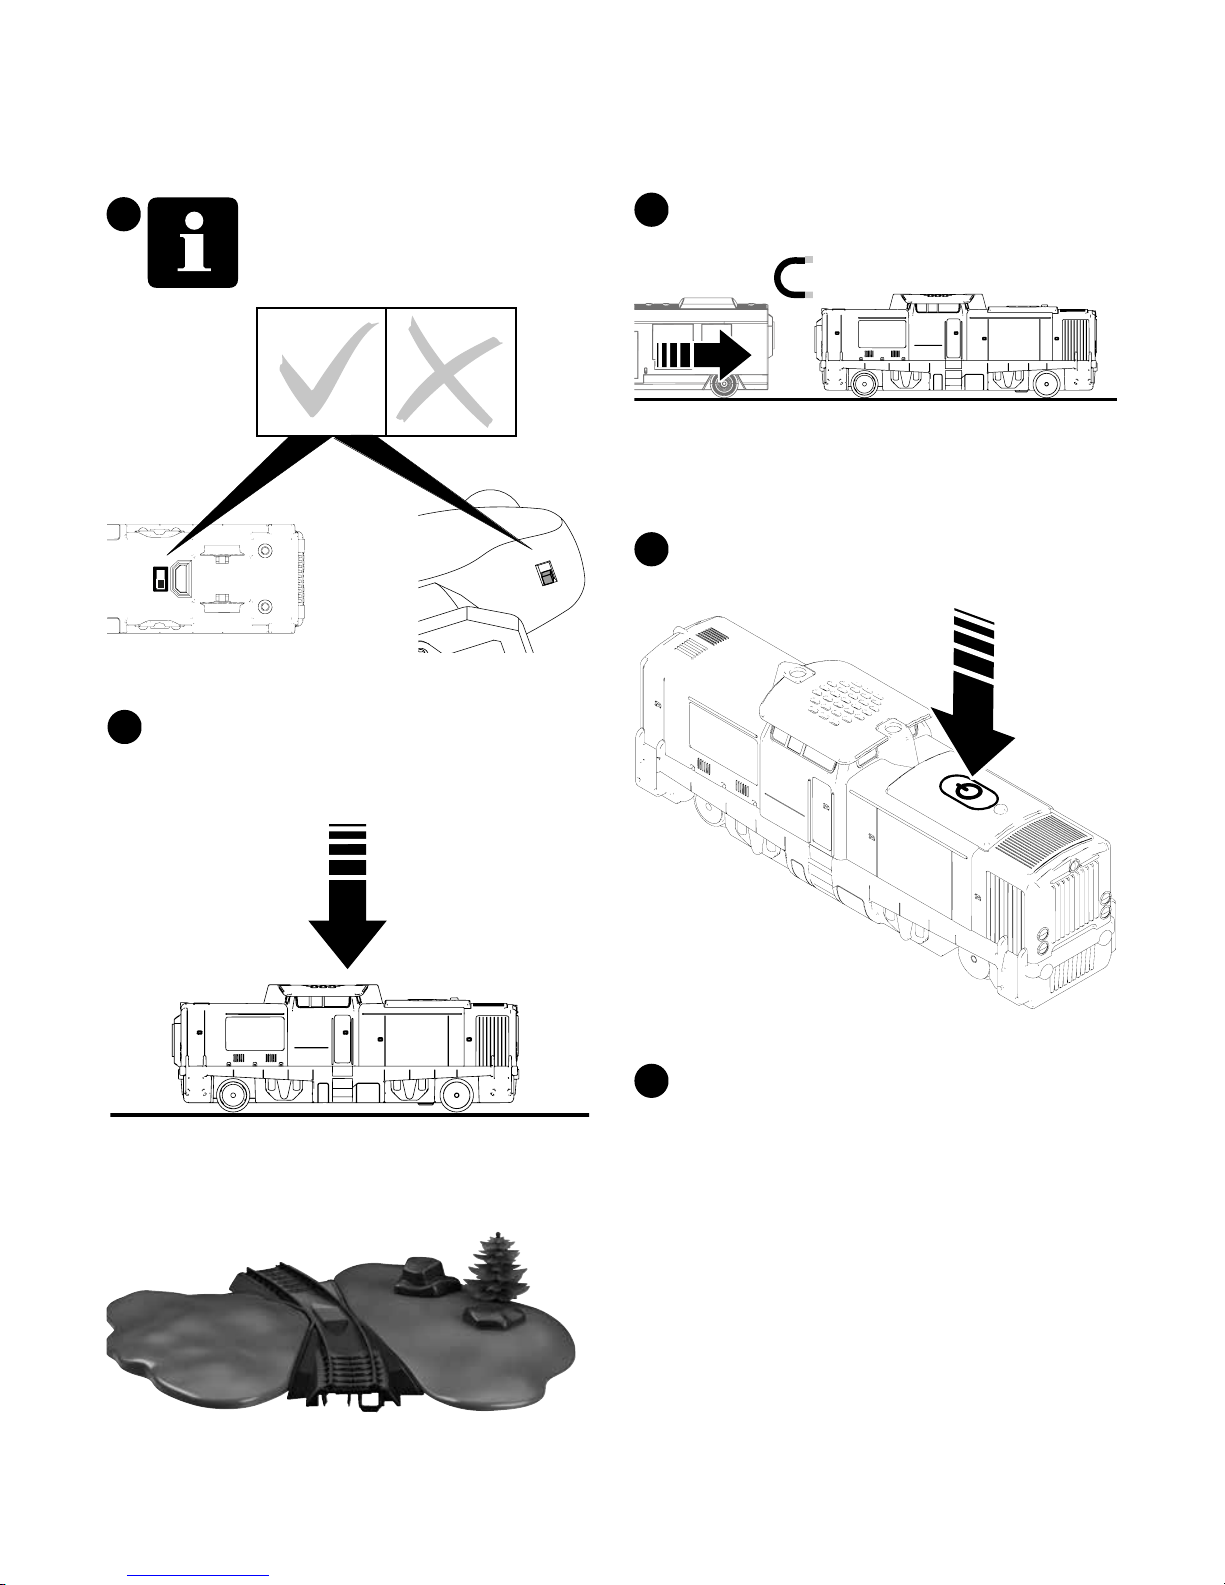
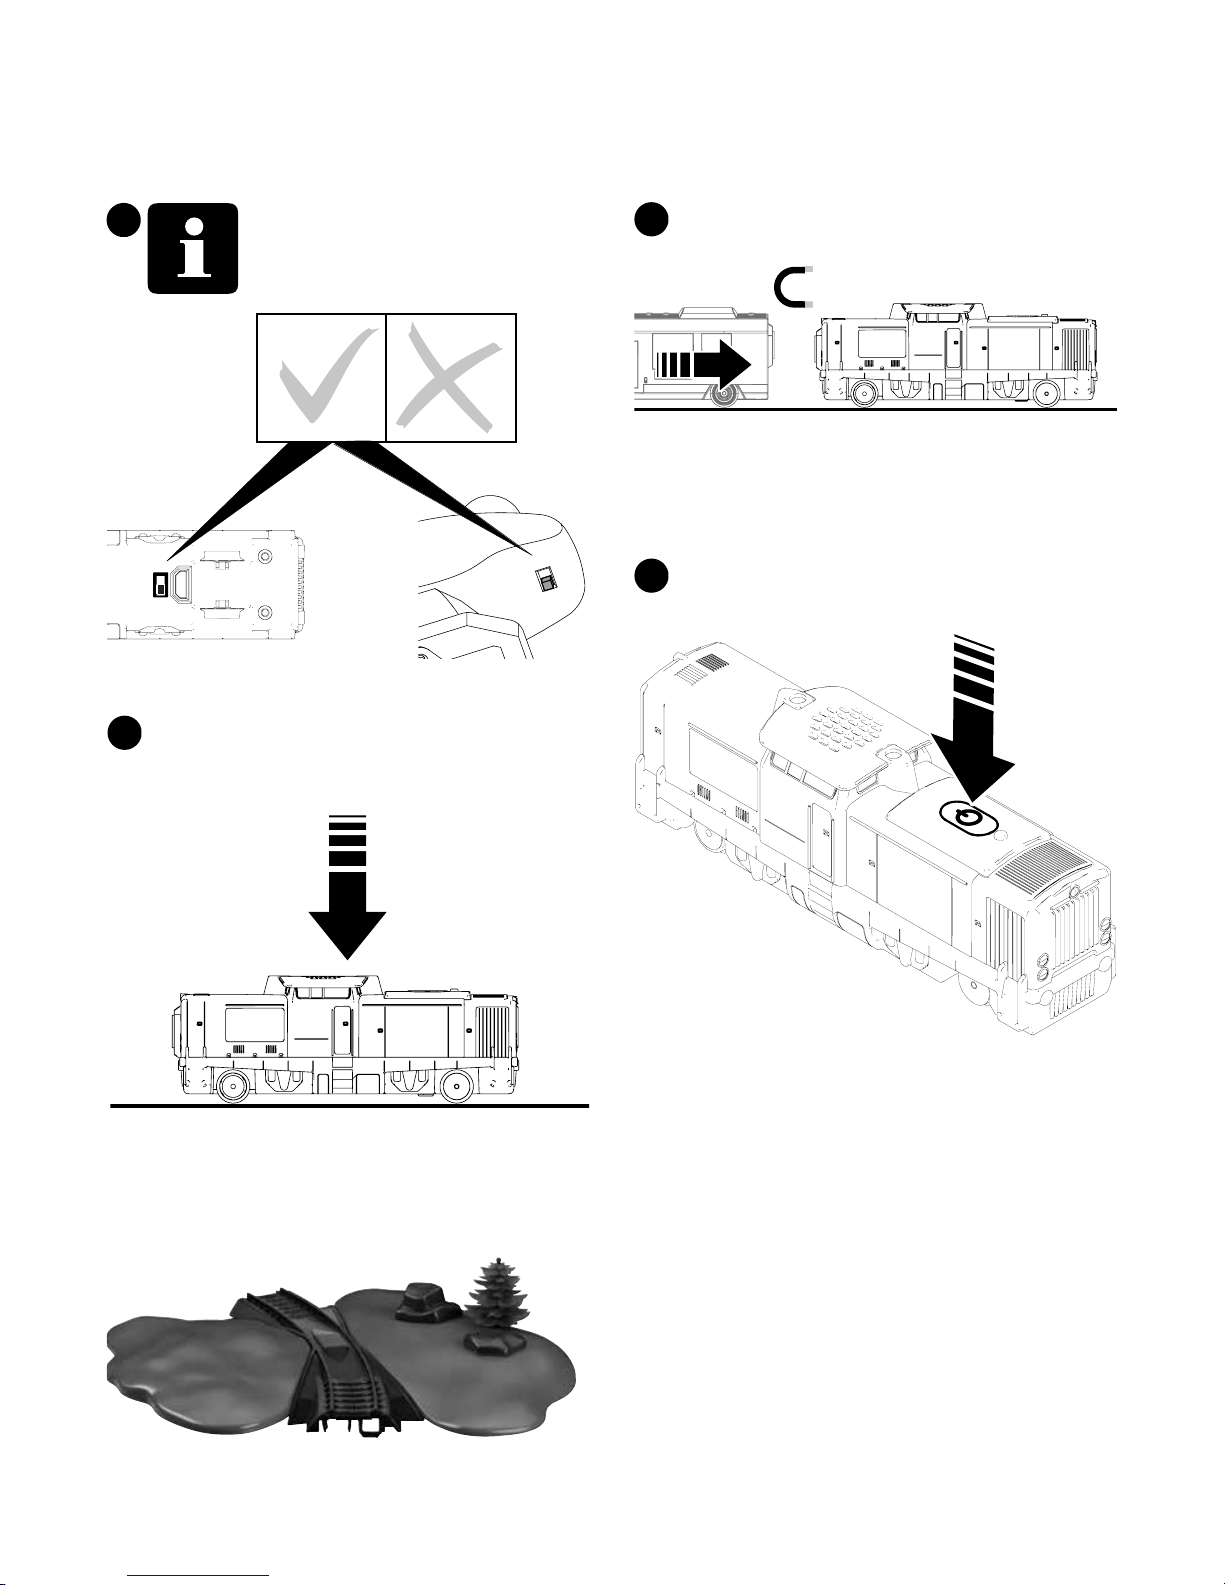
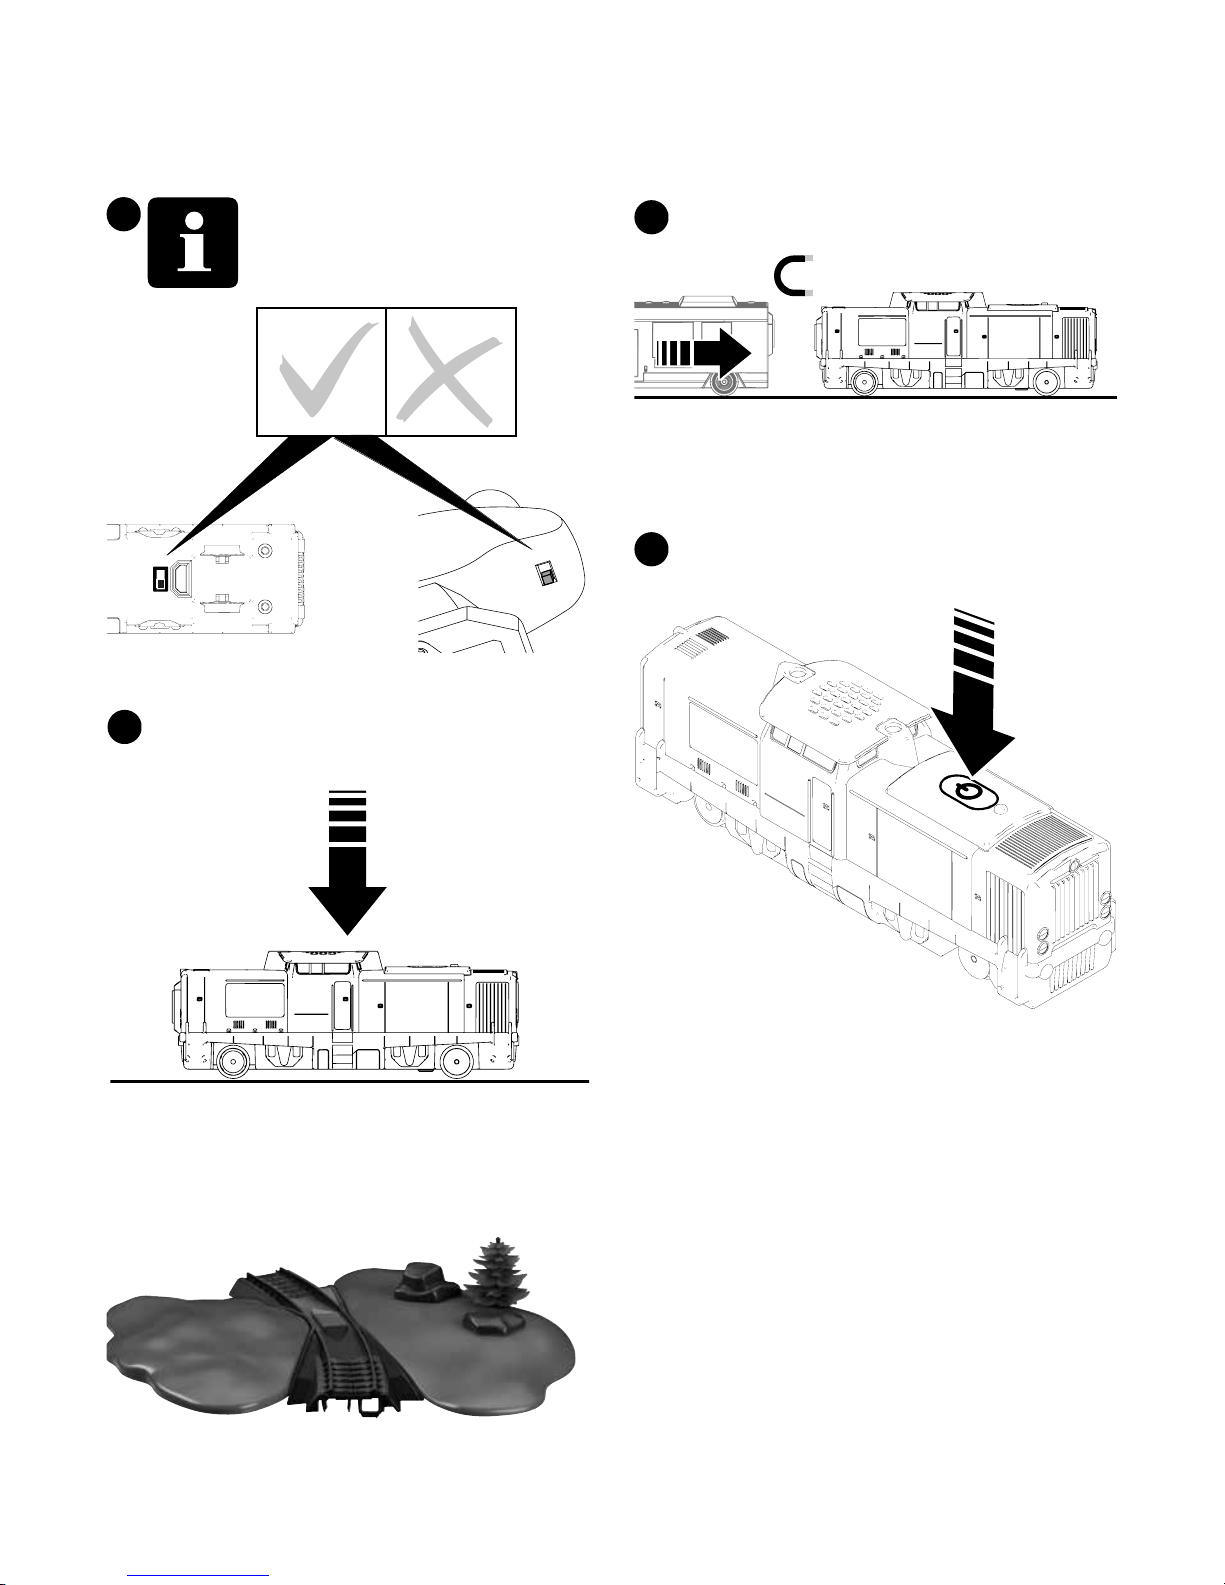
Zug einschalten, 1 x drücken
4
8. Inbetriebnahme
Wagen zusammenkuppeln.
Den Zug auf die Gleise aufgleisen oder auf
den glatten, ebenen Boden stellen.
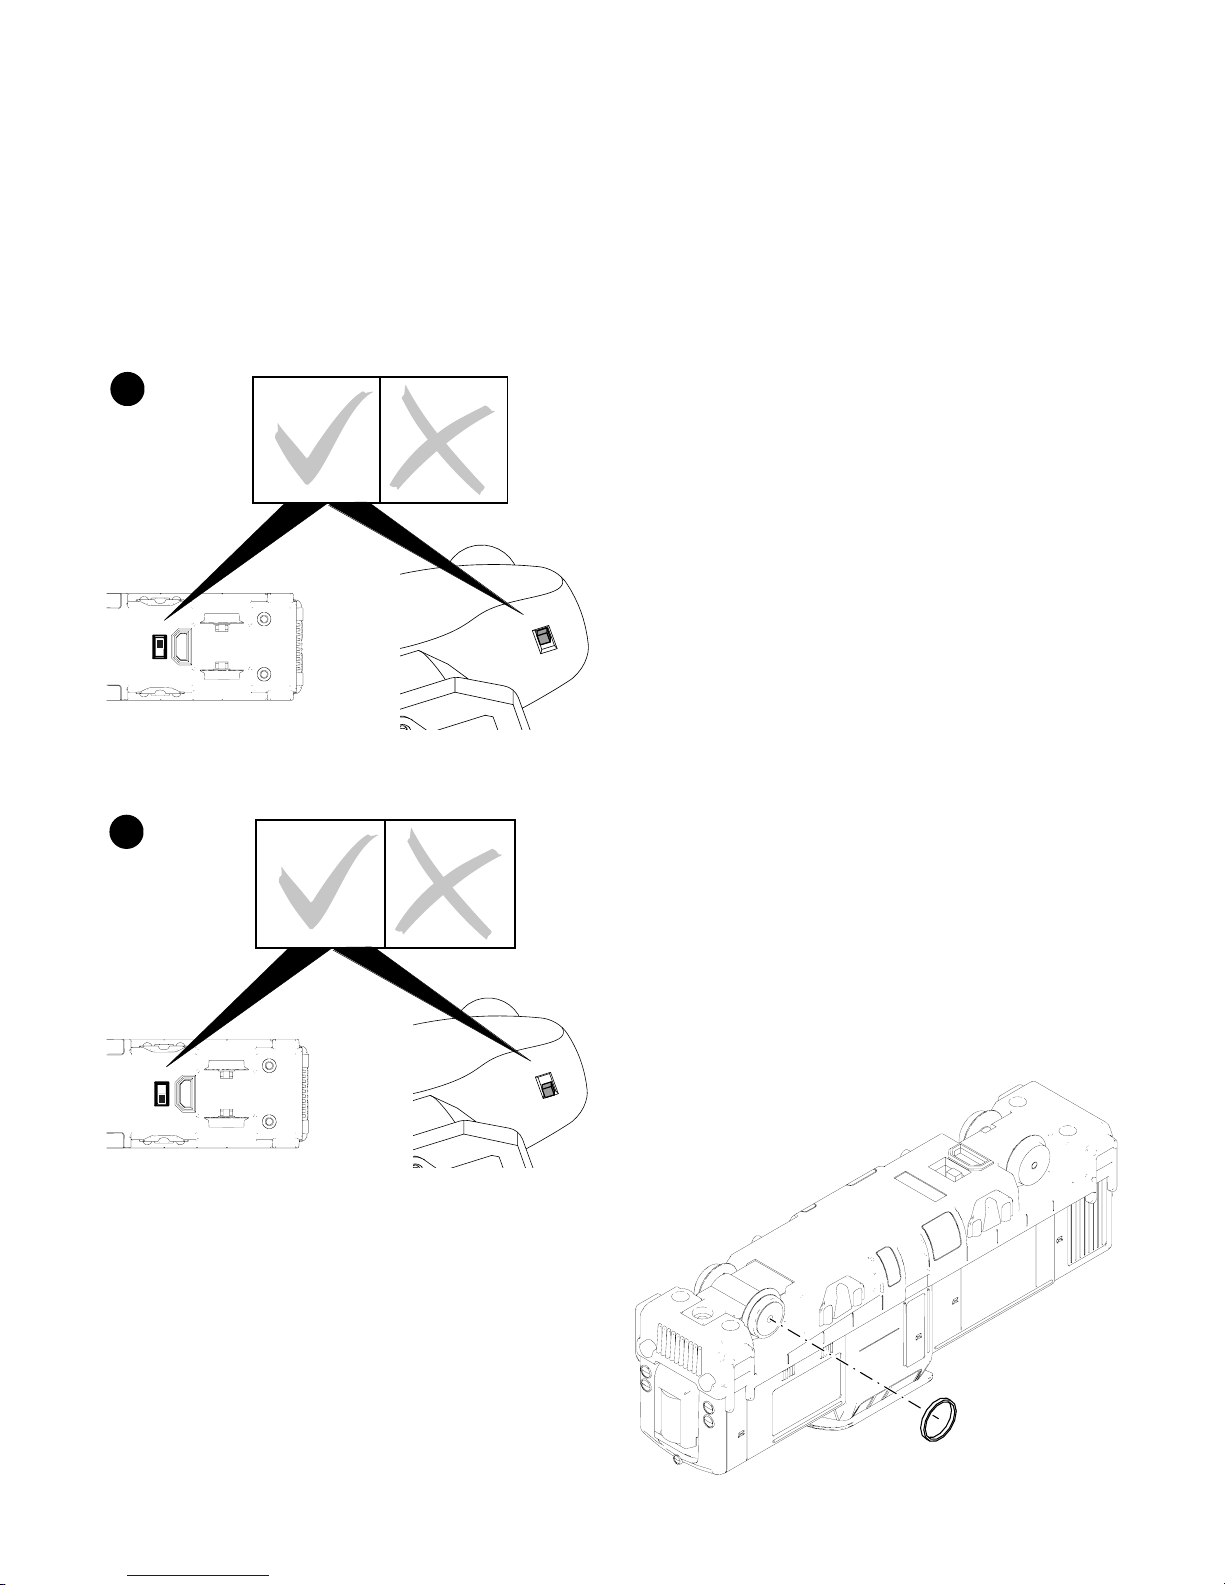
Schalterstellungen des Zuges und
der Fernsteuerung müssen übereinstimmen.
8.1 Zug vorbereiten/einschalten
3
2
1
G - G
H - H
G - H
H - G
G
H
G
H
Die Aufgleishilfe 72240 erleichtert das Aufsetzen
von Loks und Wagen auf das Gleis.
5
Page 7
7
3
3
2
1
0
1
2
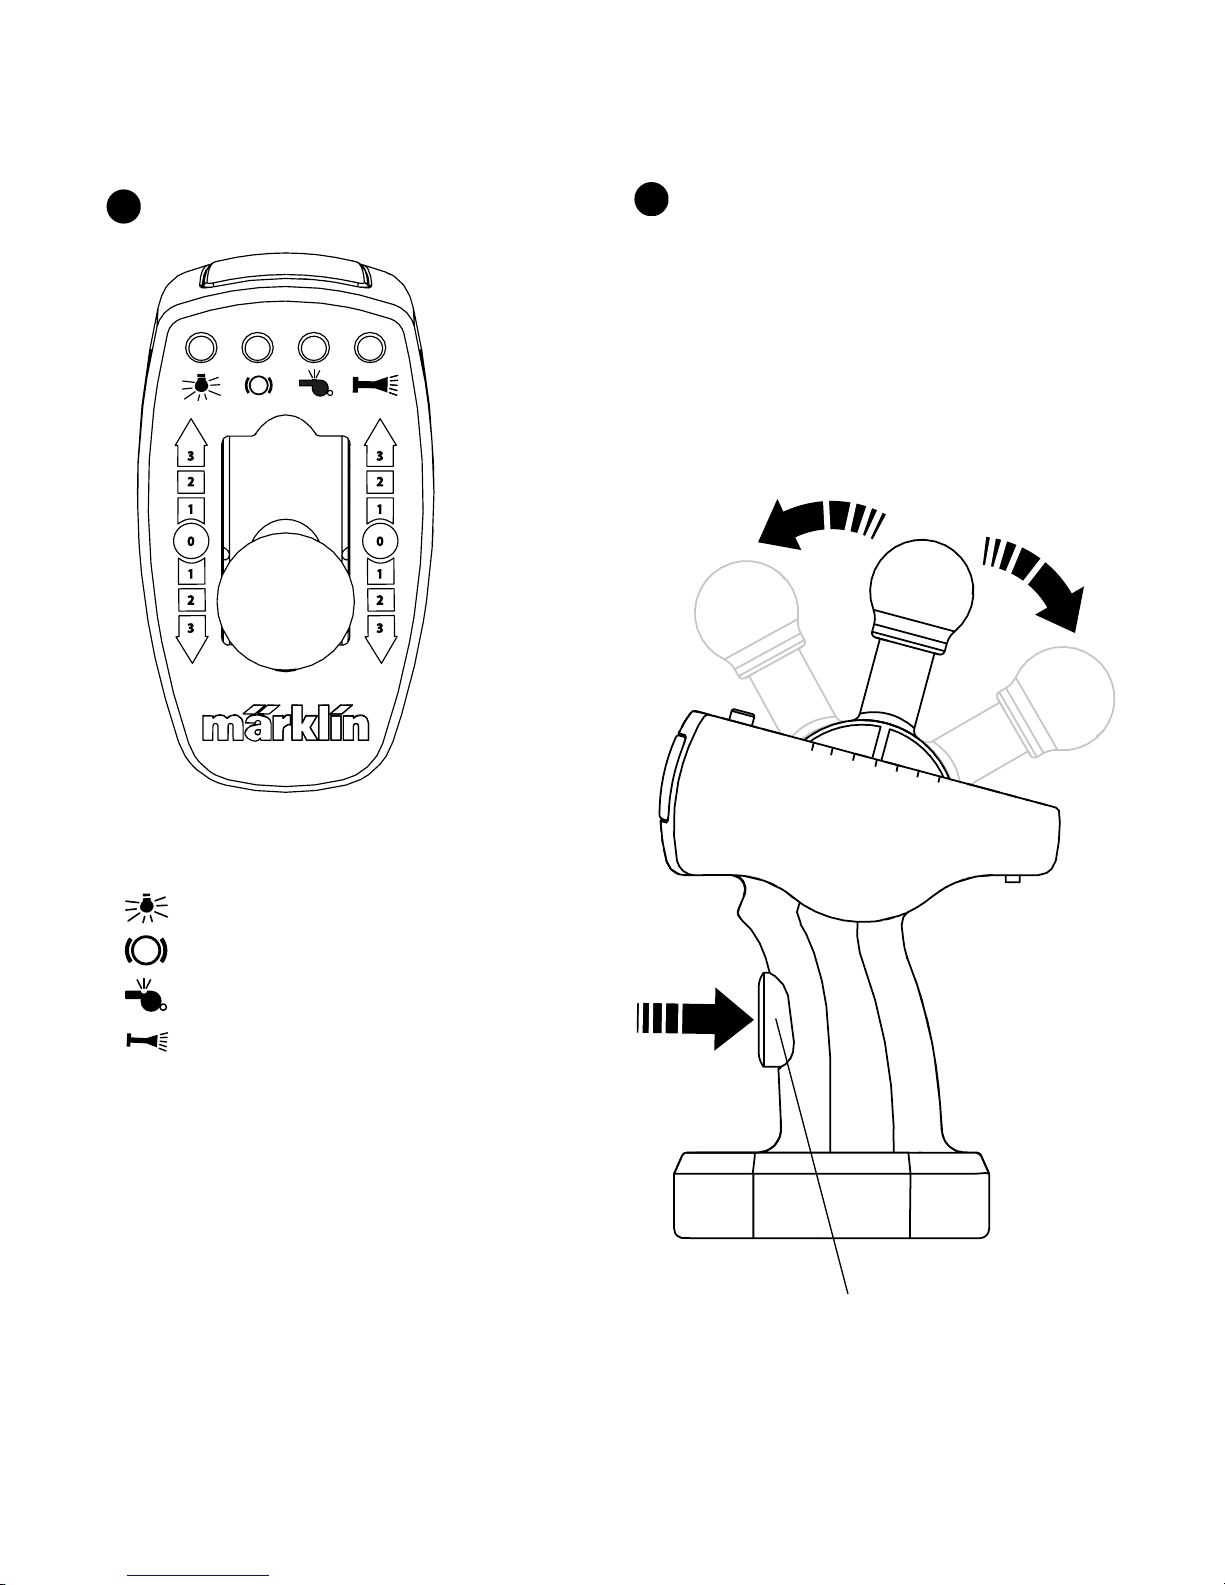
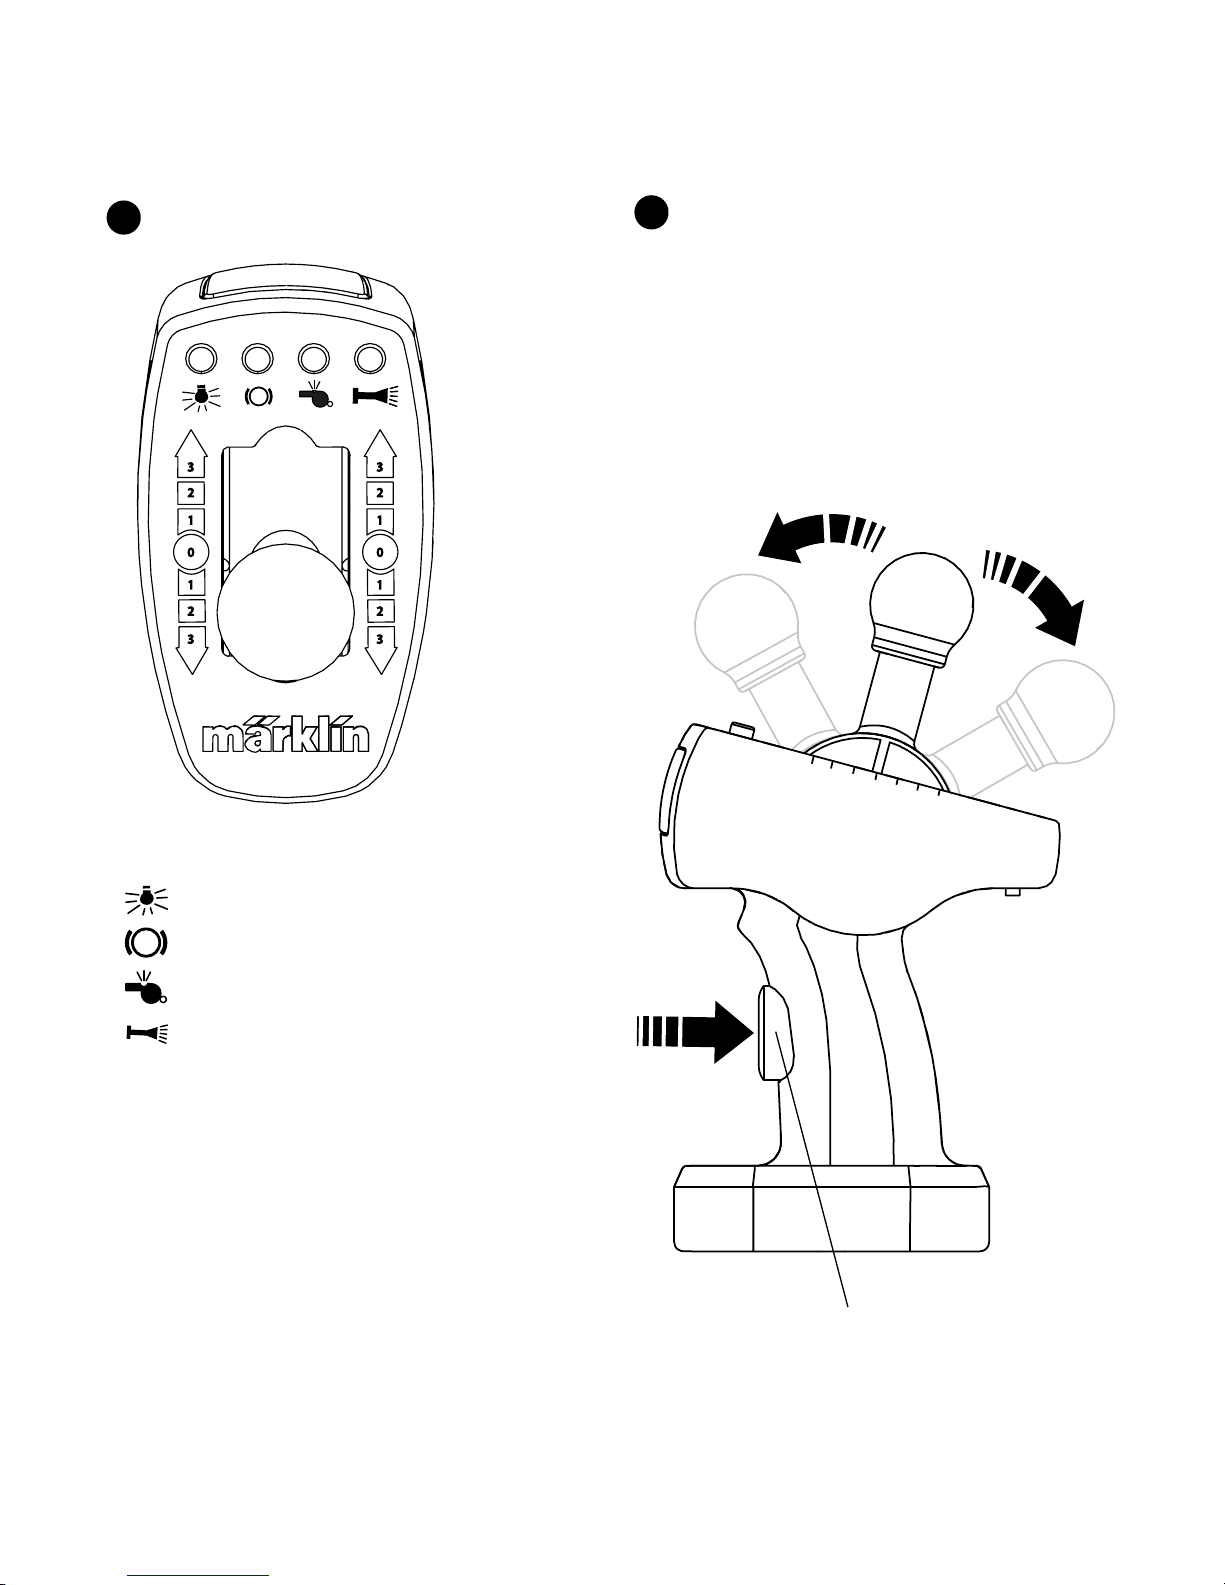
8.2 Fernsteuerung bedienen
Tastenfunktion
Funktionen schalten
Spitzensignal (Licht vorne)
Geräusch: Bremsenquietschen
Geräusch: Schaffnerpfiff
Geräusch: Signalhorn
1
1
3
1
2
3
2
1
3
1
2
3
2
0 0
Zughalt
Geschwindigkeit und Fahrtrichtung
2
StopPosition (0)
Vorwärtsfahrt (1/2/3)
Rückwärtsfahrt (1/2/3)
0: Stop-Position
1: langsam
2: mittelschnell
3: schnell
Page 8
8
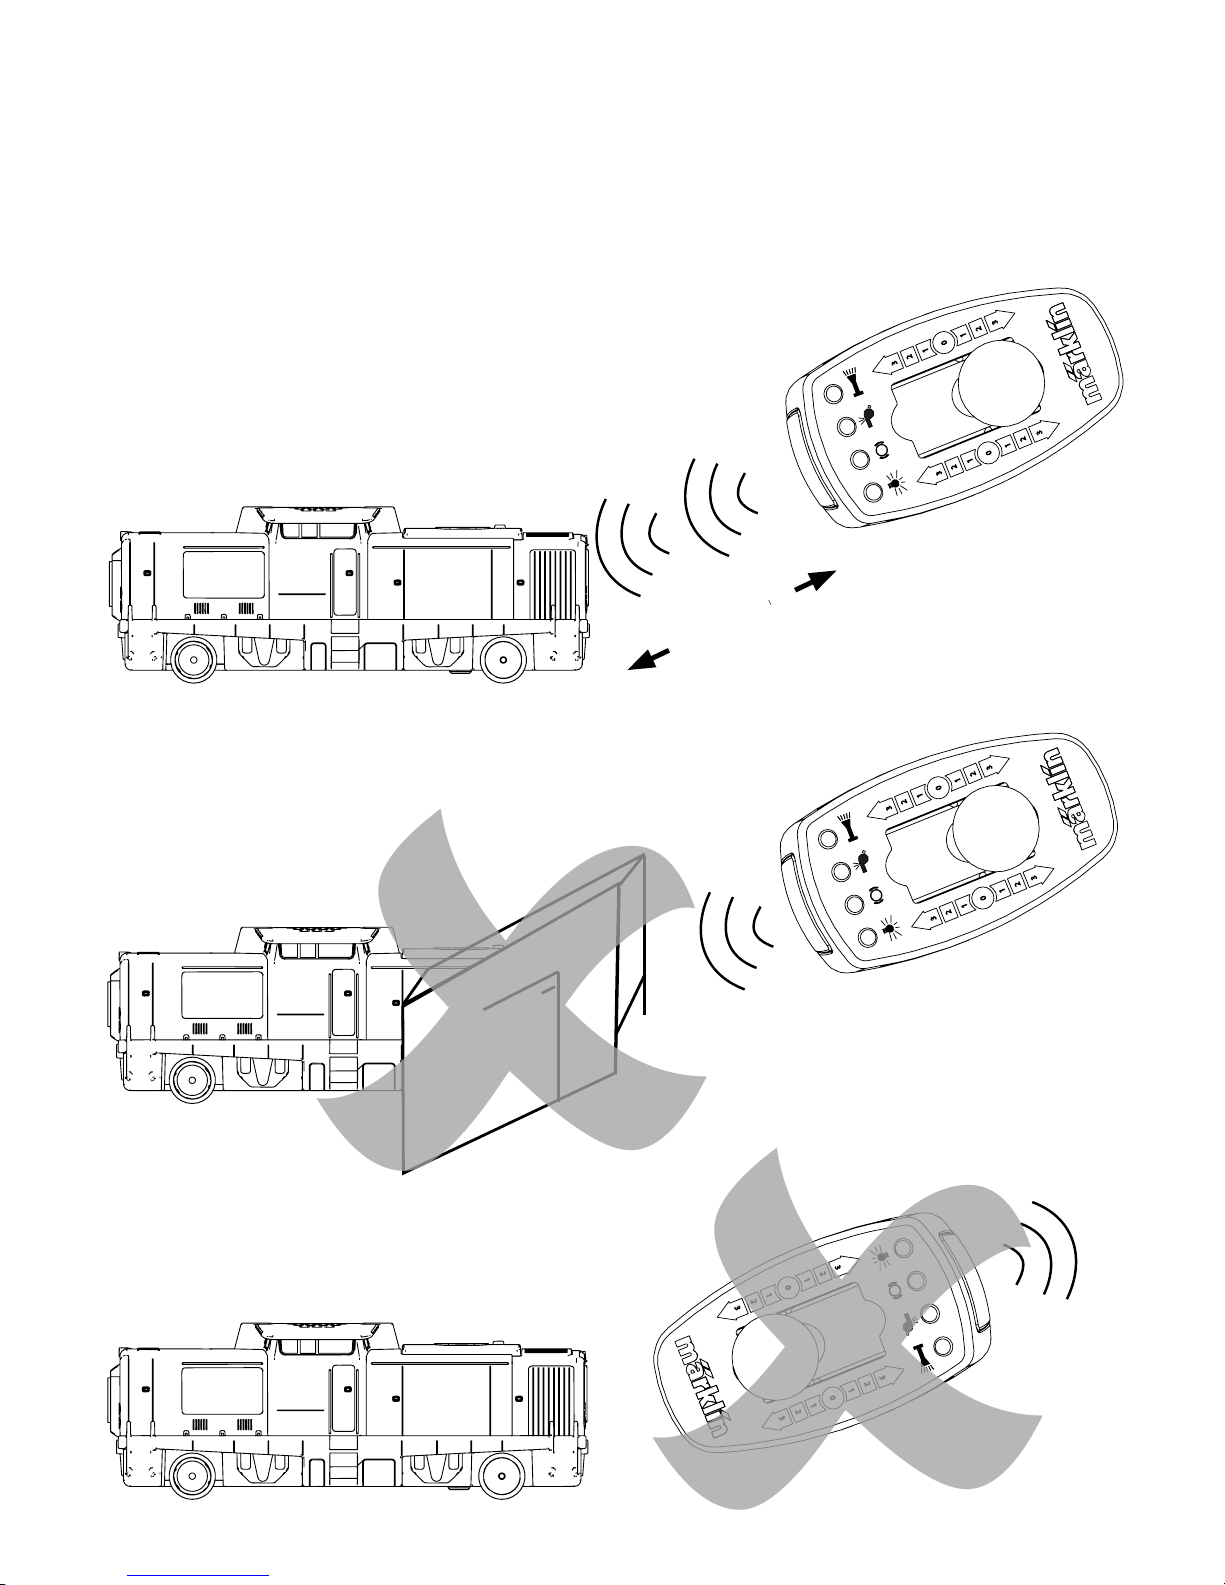
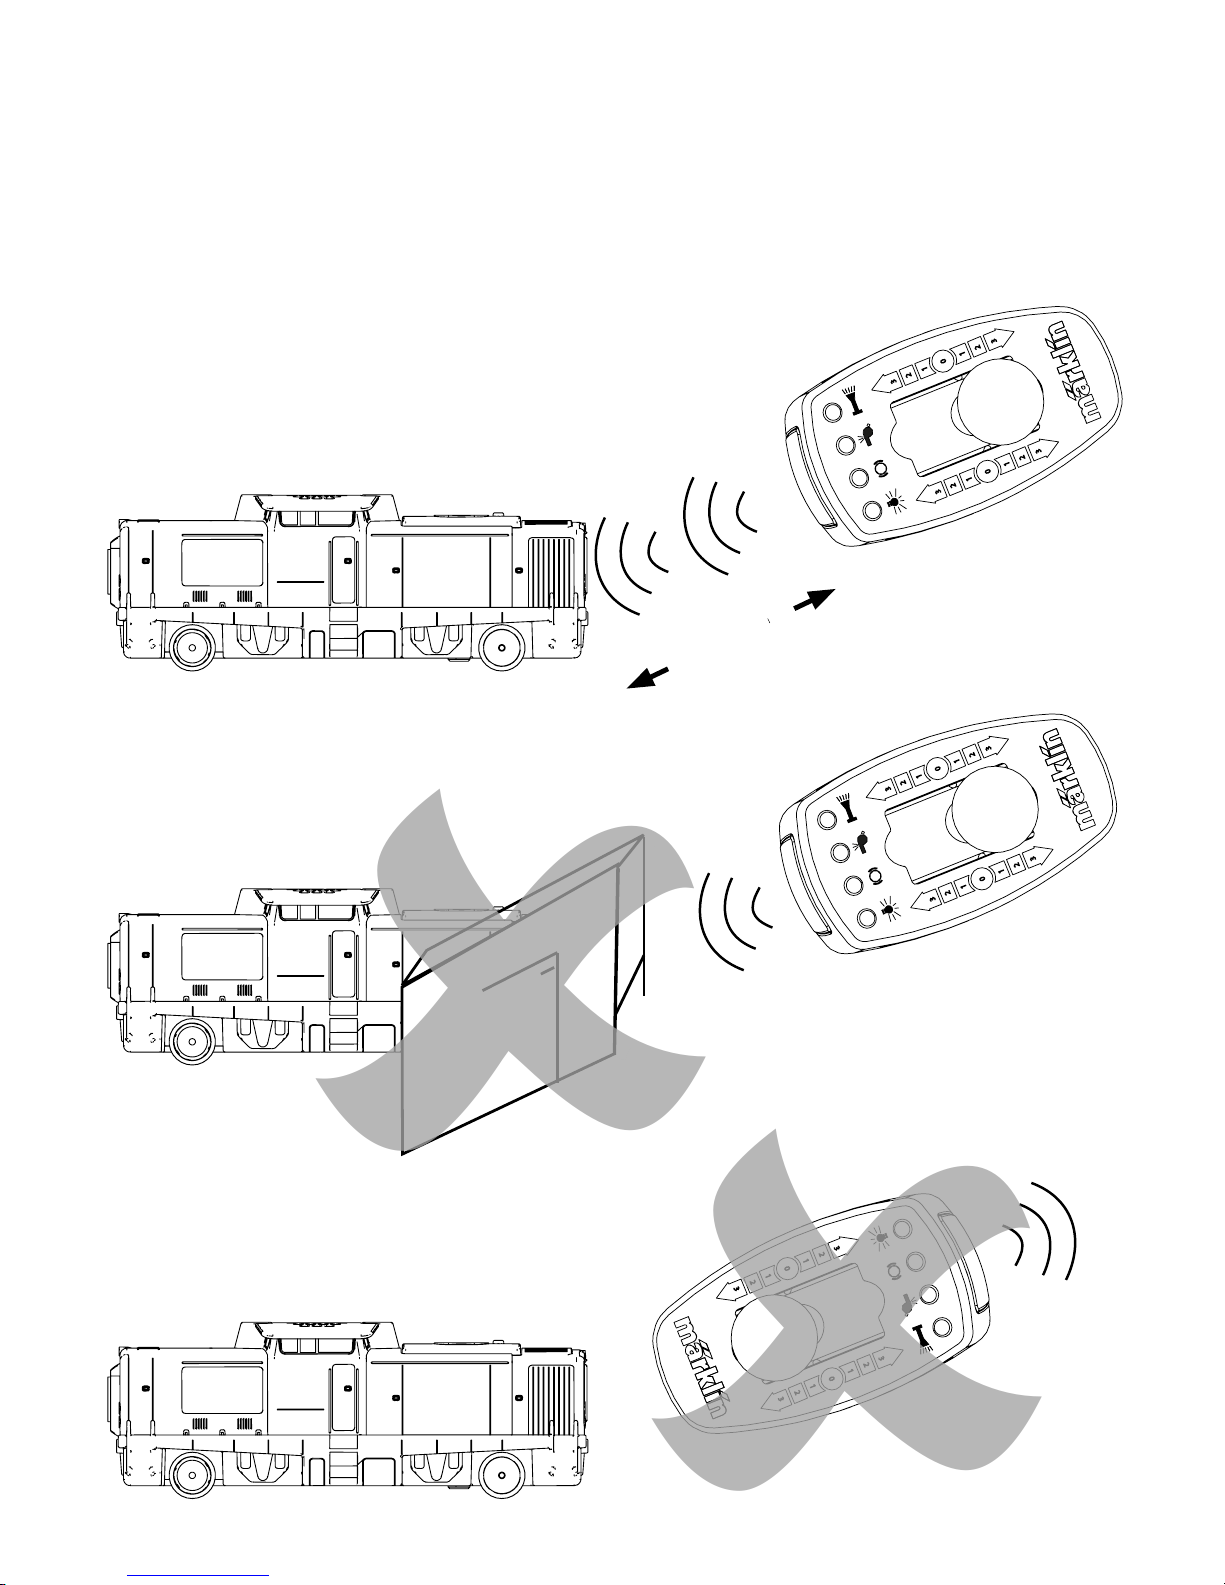
9. Betriebshinweise
- Achten Sie beim Fahren darauf, dass die Fern-
steuerung immer auf den Zug gerichtet ist.
- Gerät der Zug außerhalb der Reichweite der
Fernsteuerung (ca. 6 m), fährt er weiter, kann
jedoch nicht mehr gesteuert werden.
- Nach 5 Minuten ohne Fahrsignal von der Fern-
steuerung bleibt der Zug stehen. Er kann durch
ein beliebiges Fahrsignal wieder angefahren
werden.
Nach 10 Minuten ohne Fahrsignal schaltet sich
der Zug ab. Um ihn wieder anzufahren muss der
Zug zunächst am Schalter neu eingeschaltet
werden.
1
3
1
2
3
2
1
3
1
2
3
2
0 0
max. 6 m
- Es darf sich kein Hindernis zwischen dem Zug
und der Fernsteuerung befinden.
1
3
1
2
3
2
1
3
1
2
3
2
0
0
- Die Fernsteuerung nicht vom Zug abwenden.
1
3
1
2
3
2
1
3
1
2
3
2
0
0
Page 9

9
9.1 Betrieb mit 2 Zügen
Es können 2 Züge unabhängig voneinander
auf der selben Anlage betrieben werden. Dazu
müssen Sie einen Zug und die Fernsteuerung auf
Schalterstellung G-G (1), den zweiten Zug und
Fernsteuerung auf H-H (2) einstellen. Die Schalterstellungen von Zug und Fernsteuerung müssen
übereinstimmen!
1
G - G
G - H
H - G
G
H
G
H
2
H - H
G - H
H - G
G
H
G
H
10. Funktionsstörungen
• Fährt der Zug nicht, prüfen Sie bitte, ob der
Akku des Zuges geladen ist. Gegebenenfalls
den Akku des Zuges aufladen. Ist der Akku des
Zuges geladen und der Zug reagiert trotzdem nicht, prüfen Sie bitte die Batterien der
Fernsteuerung. Gegebenfalls die Batterien der
Fernsteuerung erneuern.
• Wird der Zug deutlich langsamer oder bleibt
während des Spielens stehen, Akku aufladen.
Automatische Abschaltzeit beachten!
(siehe Kap. 9)
• Ist der Zug beschädigt, darf dieser nicht mehr
verwendet werden. Ist ein anderes Fahrzeug
beschädigt, dieses aus dem Zug nehmen und
nicht mehr verwenden.
• Verringert sich die Reichweite der Fernsteuerung, müssen die Batterien der Fernsteuerung
erneuert werden.
11. Reinigung und Wartung
• Kontrollieren Sie, ob sich Haare oder Schmutz
an den Achsen befinden und entfernen Sie
diese Verunreinigung gegebenenfalls mit Hilfe
einer Pinzette von den Achsen.
• Der Zug kann mit einem trockenen, fusselfreien
Tuch abgerieben werden.
• Den Akku bei Nichtbenutzung spätestens nach
6 Monaten laden, um eine Tiefentladung zu
vermeiden. Tiefentladungen schädigen den
Akku, verringern die Leistung und verkürzen die
mögliche Fahrdauer des Fahrzeugs.
• Bei Bedarf können die Haftreifen an der Antriebsachse erneuert werden. Der Haftreifen ist
unter der Ersatzteilnummer E284 219 erhältlich.
E284 219
Page 10
10
12. Entsorgung
Hinweise zum Umweltschutz:
Produkte, die mit dem durchgestrichenen Mülleimer gekennzeichnet
sind, dürfen am Ende ihrer Lebensdauer nicht über den normalen
Haushaltsabfall entsorgt werden,
sondern müssen an einem Sammelpunkt für das
Recycling von elektrischen und elektronischen
Geräten abgegeben werden. Das Symbol auf dem
Produkt, der Bedienungsanleitung oder der
Verpackung weist darauf hin. Die Werkstoffe sind
gemäß ihrer Kennzeichnung wiederverwertbar.
Mit der Wiederverwendung, der stofflichen
Verwertung oder anderen Formen der Verwertung
von Altgeräten leisten Sie einen wichtigen Beitrag
zum Schutze unserer Umwelt. Bitte erfragen Sie
bei Ihrer Gemeindeverwaltung die zuständige
Entsorgungsstelle.
Batterien gehören nicht in den
Hausmüll! Jeder Verbraucher in der
EU ist gesetzlich verpflichtet,
Batterien bei einer Sammelstelle
seiner Gemeinde oder im Handel
abzugeben. Die Batterien werden dadurch einer
umweltschonenden Entsorgung zugeführt.
Batterien, die Schadstoffe enthalten, sind durch
chemische Symbole gekennzeichnet (Cd = Cadmium, Hg = Quecksilber, Pb = Blei).
Weitere Informationen:
www.maerklin.com/en/imprint.html
13. Garantie
Gewährleistung und Garantie gemäß der beiliegenden Garantieurkunde.
• Für Reparaturen wenden Sie sich bitte an Ihren
Märklin-Fachhändler oder an
Gebr. Märklin & Cie. GmbH
Reparaturservice
Stuttgarter Str. 55 - 57
73033 Göppingen
Germany
Tel: +49 7161 608 222
E-Mail: Service@maerklin.de
Page 11
11
1 Rerailer Ramp 72240
1 remote controller
1 Recharging cable (USB / mini USB)
2 type AAA/LR 03 1.5 volt batteries
1 Sheets of Stickers
Operating instructions
D
USA UK
F
NL
Operating instructions S
DK
Warranty card
Advertising sheet
4. Technical Information
• Voltage supplied to the train: permanently builtin rechargeable battery (can be recharged with
the recharging cable included with the set)
• Voltage supplied to the remote controller:
2 x 1.5 volts DC
• Battery type: 2 x 1.5 volts Micro, AAA, LR 03
• H0 Gauge (1:87 scale)
5. Notes about Using this Model for
the First Time
• Prepare the remote controller and the train
according to Sections 6.2 and 6.3.
• If the train goes outside of the range of the
remote controller (approximately 6 meters / 20
feet) it will go further but cannot be controlled
any more.
• A maximum of two trains can be used at the
same time.
• You may have problems if another controller
with the same frequency is operated in the
range of the train.
6. Preparations
6.1 Notes about Handling Batteries:
Notes about Batteries and Rechargeable Batteries
• This toy contains a rechargeable battery in
the train / in the locomotive that cannot be
exchanged.
• WARNING! The rechargeable battery in the train
can only be recharged with the USB charging
cable included with the train when the train is
turned off.
• Batteries should only be used and replaced by
adults.
• Batteries that cannot be recharged must not be
put into a recharger.
• If rechargeable batteries are being used for the
1. Using the Product as Intended
This product is an H0 Gauge (1:87 scale) model
train for children ages 3 and above. This batterypowered train can be operated on model railroad
layouts equipped with
Märklin C Track.
• The track included in this set are not suitable
for use with a transformer / digital locomotive
controller.
• This train may not be run on a rug or carpet.
• This train can be run on a smooth, clean base
or floor, on the my world plastic track, or on H0
C-Track.
2. Safety Notes
• This product may only be used indoors.
• Do not expose the model to direct sunlight, extreme changes in temperature, or high humidity.
• WARNING! Not suitable for children under 3
years. Sharp edges
and points required for
operation. Danger of
choking due to detachable small parts that
may be swallowed.
• WARNING! Do not hold this product close to
your face or in your hair when it is turned on.
• WARNING! If one of the cars in the train becomes damaged, the damaged car may not be
used any longer.
• WARNING! This product contains magnets in
the couplings. Swallowing one or more of the
magnets may be deadly under certain circumstances. Go to the emergency room of your
local hospital immediately.
• Do not bend the USB charging cable included
with this set. Check it regularly for damage to the
cord, plug, enclosure and other parts, and in the
event of such damage, they must not be used
until the damage has been repaired.
• The LEDs in this item correspond to Laser Class
1 according to Standard EN 60825-1.
3. Contents
3-part train
21 sections curved track R1
2 sections curved track R2
4 sections straight track 188 mm
7 sections straight track 172 mm
1 tournout left
1 tournout right
1 crossing track
UKUSA
Page 12
12
2.
3.
1.
G
H
G
H
+
-
-
+
remote controller, they must be removed from the
controller before recharging them!
• Rechargeable batteries should be charged up
only under the supervision of adults. Make sure
that you pay attention to the instructions for
operating the recharger you are using.
• Inequality of battery types, or new and used
batteries can not be used together.
• Batteries with the correct polarity insert.
• Remove run down batteries from the remote
controller.
• Contacts should not be shorted.
• If you are not going to use the train for a longer
time, remove the batteries from the remote
controller.
• Put on protective gloves to remove run down
batteries.Then clean the battery holder and the
contacts with a dry cloth.
• Batteries should not be handled by children.
Children could put batteries in their mouth and
swallow them. If a battery should be swallowed
take your child immediately to a hospital emergency room.
• See Section 12 about disposing of batteries.
Install or change the batteries only in
pairs according to the markings!
Pay attention to the polarity!
Insert two (2) type AAA/LR 03 batteries as
shown in the drawing
Put the cover for the battery holder back in
place.
Screw the battery holder down into place.
2
3
3.
G
H
+
-
-
+
2.
3.
+
-
-
+
1.
5.
4.
G
H
G
H
G
H
+
-
-
+
6.3 Train
The built-in rechargeable battery must be charged
up before operating the train for the first time!
Plug the mini USB plug on the recharging
cable included with the train into the mini
USB socket on the train.
The USB plug for the charging cable included
with this set may only be connected to a
charging device from Protection Class II
(example: from a cell phone charger), which
is provided with the following symbol:
1
2.
2
Make sure the train is turned off before char-
ging the battery.
Unscrew the battery holder and lift up the cover
6.2 Remote Controller
1
G
H
1.
* The USB charger is
not included in the
package contents!
*
Page 13

13
The red light in the train will be on during the
charging process.
The charging time with the cable included
with the train is approximately 3 hours.
The train is recharged when the red light in
the train goes out.
3
After the rechargeable battery is fully charged, the charging cable must be removed
from the train and the charging device.
The train can be run approximately 2.5 hours
with a complete charge in the battery.
7. Track to build
Put together
Disassemble
Ideas for setting up the track (see also Page 35):
6.4 Mounting Stickers on the Train
Select the desired railroad on the sheet of
stickers. There are 2 stickers for each railroad.
These 2 stickers are mounted on the right and left
side of the train.
Page 14
14
Turn the train on by pressing the button once.
4
8. Running the Train for the First Time
Couple the cars together.
Set the train on the track or on a smooth flat
base.
The switch settings on the train
and on the remote controller must
agree with each other.
8.1 Preparing the Train / Turning the Train on
3
2
1
G - G
H - H
G - H
H - G
G
H
G
H
The 72240 rerailer makes it easier to set locomotives and cars on the track.
Page 15
15
8.2 Operating the Remote Controller
Key functions
Controllable Functions
Headlights (Front)
Sound effect: Squealing brakes
Sound effect: Conductor‘s whistle
Sound effect: Horn
1
1
3
1
2
3
2
1
3
1
2
3
2
0 0
3
3
2
1
0
1
2
Train stop
Speed and Direction
2
stop
position (0)
Forward
(1/2/3)
Reverse
(1/2/3)
0: stop position
1: slow
2: medium fast
3: fast
Page 16
16
1
3
1
2
3
2
1
3
1
2
3
2
0
0
max. 6 m
- No obstacle can be allowed between the train
and the remote controller.
1
3
1
2
3
2
1
3
1
2
3
2
0
0
- Do not turn the remote controller away from the
train.
1
3
1
2
3
2
1
3
1
2
3
2
0
0
9. Information about Operating the Train
- When running the train, make sure that the
remote controller is always pointed at the train.
- If the train goes outside of the range of the
remote controller (approximately 6 meters / 20
feet) it will go further but cannot be controlled
any more.
- After 5 minutes without a signal set at go by the
remote control, the train remains stopped. It
can be started again by any signal set at go.
After 10 minutes without a signal set at go, the
train shuts off. The train must first be turned
on again at the controller in order for it to start
again.
Page 17
17
9.1 Operating with 2 Trains
Two trains can be operated independently of each
other on the same layout. To do this, you must set
one train and remote controller to switch setting
G-G (1) and the second train and remote controller
to H-H (2). The switch settings for the train and
remote controller must agree with each other!
1
G - G
G - H
H - G
G
H
G
H
2
H - H
G - H
H - G
G
H
G
H
10. Trouble Running the Train
• If the train does not run, check to make sure
that the rechargeable battery for the train is
charged up. If necessary, charge up the rechargeable battery for the train. If the rechargeable
battery for the train is charged up and the train
still does not react, check the batteries for the
remote controller. If necessary, replace the
batteries for the remote controller.
• If the train runs noticeably slower or comes
to halt while you are playing with it, charge up
the rechargeable battery. Pay attention to the
automatic shutoff time! (See section 9)
• If the train is damaged, it may not be used
anymore. If another car or powered car is
damaged, take it out of the train and do not use
it anymore.
• If the range of the remote controller decreases,
then the batteries for the remote controller
need to be replaced.
11. Cleaning and Maintenance
• Check to see if hair or dirt gets on the axles on
the train and remove this hair or dirt from the
axles with the help of a pair or tweezers so that
the train runs correctly.
• The train can be wiped with a dry, lint-free cloth.
•
Recharge the battery no later than 6 months
after not being used in order to avoid deep
discharge. Deep discharges damage the battery,
reduce the performance, and shorten the possi
-
ble running time for the unit.
• The traction tire on the powered axle can
be replaced if necessary. The traction tire is
available under item number E284 219.
E284 219
Page 18

18
12. Disposing (only EU)
Products marked with a trash
container with a line through it may
not be disposed of at the end of their
useful life in the normal household
trash. They must be taken to a
collection point for the recycling of
electrical and electronic devices. There is a
symbol on the product, the operating instructions,
or the packaging to this effect. The materials in
these items can be used again according to this
marking. By reusing old devices, materially
recycling, or recycling in some other form of old
devices such as these you make an important
contribution to the protection of our environment.
Please ask your city, town, community, or county
authorities for the location of the appropriate
disposal site.
Batteries Do Not Belong in the
Household Trash! Every user in the
EC area is legally obligated to turn in
batteries at a collection point in his
community or at a dealer. The
batteries are then disposed of appropriately in
order to protect the environment. Batteries containing dangerous materials are marked with this
symbol and with chemical symbols (Cd =
Cadmium, Hg = Mercury, Pb = Lead).
Other information:
www.maerklin.com/en/imprint.html
13. Warranty
The warranty card included with this product
specifies the warranty conditions.
• Please contact your authorized Märklin dealer
for repairs or contact:
U.S. only:
Märklin, Inc.
PO Box 510559
New Berlin WI 53151
Phone: 262-522-7080
Fax: 262-522-7288
Email: info@marklin.com
Technical Hotline
Contacts: Curtis Jeung & Rick Sinclair, Digital
Consultants
Telephone: 650-569-1318
Hours: 6:00am – 9:00pm PST, Monday through
Friday
E-mail: digital@marklin.com
GB only
Gebr. Märklin & Cie. GmbH
Reparaturservice
Stuttgarter Str. 55 - 57
73033 Göppingen
Germany
Tel: +49 7161 608 222
E-Mail: Service@maerklin.de
Page 19
19
1 Croisement 30°
1 Railhulpstuk 72240
1 télécommande
1 Câble de chargement (USB/Mini-USB)
2 piles type AAA/LR 03 1,5 V
1 Planche de stickers
Notice d’utilisation
D
USA UK
F NL
Notice d’utilisation
S DK
Bon de garantie
Dépliant publicitaire
4. Caractéristiques techniques
• Alimentation électrique du train : Accu intégré
(rechargeable via le câble de chargement
fourni)
• Alimentation électrique de la télécommande :
2 x 1,5 V DC
• Type de pile : 2 x 1,5V Micro, AAA, LR 03
• Echelle H0 (1/87)
5. Indications relatives à la première
mise en service
• la télécommande et le train conformément aux
instructions des chapitres 6.2 et 6.3.
• Si le train sort de la portée de la télécommande
(environ 6 m), il continue de rouler, mais ne
répond plus aux commandes.
• Au maximum deux trains peuvent être utilisés
en parallèle.
• Si un autre appareil de même fréquence est exploité dans le rayon d’action du train électrique,
des dysfonctionnements peuvent survenir.
6. Préparatifs
6.1 Indications relatives à l’utilisation des
piles :
Indications relatives aux piles et aux accus
rechargeables
• Ce jouet continent un accu non échangeable
dans le train / dans la loco.
• ATTENTION ! L’accumulateur du train ne peut
être chargé via le câble USB fourni que si le train
est hors tension
• Les piles doivent être insérées et échangées
exclusivement par des adultes.
• Ne jamais recharger des piles non rechargeables.
• Si vous utilisez des piles rechargeables pour la
télécommande, celles-ci doivent impérativement
être retirées avant le chargement !
1. Utilisation conforme à sa destination
Ce produit est un train miniature à l’échelle
H0 (1/87) destiné aux enfants à partir de 3 ans.
Ce train fonctionnant avec des piles peut être
exploité sur des réseaux miniatures réalisés avec
de la voie C Märklin.
• Les éléments de voie fournis ne conviennent
pas pour l’exploitation avec transformateur/
régulateur de marche numérique.
• Le produit ne doit pas être utilisé sur les tapis
ou moquettes.
• Le train peut être exploité sur un support lisse
et propre, sur la voie en plastique my world
ainsi que sur la voie C H0.
2. Remarque sur la sécurité
• Le produit doit être utilisé exclusivement dans
des pièces fermées.
• Ne pas exposer le modèle à un ensoleillement
direct, à de fortes variations de température ou
à un taux d‘humidité important.
• ATTENTION ! Ce produit ne convient pas aux
enfants de moins de trois ans. Pointes et bords
coupants lors du fonctionnement du produit.
Danger d’étouffement à cause des petites
pièces cassables et avalables.
• ATTENTION ! Ne pas approcher le produit
allumé du visage ou des cheveux.
• ATTENTION ! Si l’un des véhicules du train est
endommagé, il doit impérativement être exclu
de l’exploitation
• ATTENTION ! Ce produit contient des aimants
dans l’attelage. L’ingestion d’un ou de plusieurs
aimant(s) peut, dans certains cas, s’avérer
mortelle. Consultez immédiatement un médecin.
• Ne pas plier le câble de chargement USB fourni
et vérifier régulièrement que câble, prise et/ou
autres éléments ne sont pas endommagés. En
cas de détérioration, ne pas utiliser le jouet avant
réparation.
• Les DEL installées correspondent à la classe
laser 1 selon la norme EN 60825-1.
3. Matériel fourni :
Train à 3 éléments
21 éléments de voie R1
2 éléments de voie R2
4 éléments droits de voie 188 mm
7 éléments droits de voie 172 mm
1 aiguillage à gauche
1 aiguillage à droite
F
Page 20
20
Insérer ou échanger les piles uniquement par deux, conformément au marquage ! Tenir compte de la polarité !
Dévisser et enlever le couvercle du compartiment des piles
Insérez deux piles type AAA/LR 03 conformément au dessin.
Le boîtier de la batterie à des couvertures
présenter.
Des couvertures de boîtier de la batterie
visser.
6.2 Télécommande
• Ne recharger les piles rechargeables (accus)
qu‘en présence d‘un adulte. A cet effet, tenir
impérativement compte des instructions de la
notice d’utilisation des chargeurs respectifs.
• Des types de batteries inégaux ou des batteries
nouvelles et usagées ne peut pas être utilisés
ensemble.
• Insérer des batteries avec la polarité correcte.
• Retirer les piles déchargées de la télécommande.
•
Des contacts ne peuvent pas être court-circuités.
• Si vous n’utilisez pas le train durant une période
prolongée, retirez les piles de la télécommande.
• Si les piles ont coulé, utiliser des gants de
protection pour les retirer. Nettoyer ensuite le
compartiment à piles ainsi que les contacts à
l’aide d’un chiffon sec.
• Ne pas laisser les piles à la portée des enfants
! Les enfants risquent de les porter à la bouche
et de les avaler. En cas d’ingestion d’une pile,
prévenir immédiatement le médecin.
• Elimination : voir point 12.
1
2
3
2.
3.
1.
G
H
G
H
+
-
-
+
3.
G
H
+
-
-
+
2.
3.
+
-
-
+
1.
5.
4.
G
H
G
H
G
H
+
-
-
+
6.3 Train
Avant la première exploitation du train, l’accu
intégré doit être chargé !
Enficher le mini-connecteur USB du câble de
chargement fourni dans la mini-prise USB du
train.
Le connecteur USB du câble de chargement
fourni doit être raccordé uniquement à un
chargeur de classe II (tel que chargeur de
portable), reconnaissable au symbole suivant:
1
2.
2
Avant le chargement, assurez-vous que le
train est bien hors tension
G
H
1.
* L’appareil de charge
USB n’est pas fourni !
*
Page 21
21
La lumière rouge située dans le train reste
allumée durant le chargement.
Avec le câble fourni, le temps de charge est
d’env. 3 heures.
Le chargement est terminé dès que la lumière
rouge située dans le train s‘éteint.
3
Une fois que l’accu est entièrement chargé, le
câble doit être retiré du train et du chargeur.
Avec un accu chargé, le train peut rouler
environ 2,5 heures.
7. Des voies développer
Mettre ensemble
Résoudre
Exemples pour le montage (voir page 35) :
6.4 Positionnement des stickers sur le train
Choisir la société ferroviaire souhaitée parmi
les stickers proposés. Différentes compagnies
ferroviaires sont représentées par deux stickers
chacune. Ces deux stickers sont à placer sur les
côtés droit et gauche du train.
Page 22
22
Mise en marche du train, appuyer une fois
4
8. Mise en service
Atteler les voitures.
Poser le train sur la voie ou sur un sol lisse
et plan.
La position du commutateur pour le
train et celle de la télécommande
doivent être identiques.
8.1 Préparation/Mise en marche du train
3
2
1
G - G
H - H
G - H
H - G
G
H
G
H
Le dispositif d’aide à l’enraillement réf. 72240
facilite la mise en place des locos et wagons sur
la voie.
Page 23

23
3
3
2
1
0
1
2
8.2 Utilisation de la télécommande
Fonction des touches
Fonctions commutables
Fanal à l’avant
Bruitage : Grincement de freins
Bruitage : Sifflet du chef de gare
Bruitage : Trompe
1
1
3
1
2
3
2
1
3
1
2
3
2
0 0
Arrêt du train
Vitesse et sens de marche
2
Position
Stop (0)
Marche
avant (1/2/3)
Marche
arrière (1/2/3)
0: Position Stop
1: Lente
2: Moyenne
3: Rapide
Page 24

24
1
3
1
2
3
2
1
3
1
2
3
2
0
0
max. 6 m
- Aucun obstacle ne doit perturber le champ
entre le produit et la télécommande.
1
3
1
2
3
2
1
3
1
2
3
2
0
0
- Ne pas détourner la télécommande du train.
1
3
1
2
3
2
1
3
1
2
3
2
0
0
9. Indications relatives à l’exploitation
- Lorsque le train est en marche, veillez à toujours diriger la télécommande sur le produit.
- Si le train sort de la portée de la télécommande
(environ 6 m), il continue de rouler, mais ne
répond plus aux commandes.
- Après 5 minutes sans signal de marche de la
télécommande, le train s’arrête. Il peut être
redémarré par n’importe quel signal de marche.
Après 10 minutes sans signal de marche, le
train se déconnecte. Pour le redémarrer, il faut
d‘abord le reconnecter via l’interrupteur.
Page 25

25
9.1 Exploitation avec 2 trains
Deux trains peuvent être exploités sur le même réseau indépendamment l’un de l’autre. A cet effet,
le premier train et la télécommande doivent être
réglés sur la position G-G (1),le deuxième train et
la télécommande sur H-H (2). La position du commutateur pour le train et celle de la télécommande
doivent être identiques !
1
G - G
G - H
H - G
G
H
G
H
2
H - H
G - H
H - G
G
H
G
H
10. Dysfonctionnements
•
Si le train ne démarre pas, vérifier si l’accu est
bien chargé. Le cas échéant, recharger l’accu.
Si en dépit de l’accu chargé le train ne réagit
pas, vérifier les piles de la télécommande. Le
cas échéant, remplacer les piles de la télécom
-
mande.
• Si le train ralentit sensiblement ou qu’il s’arrête
durant le jeu, recharger l’accu.
Tenir compte de l’extinction automatique du
train !(voir chapitre 9)
• Si le train est endommagé, il ne doit plus être
utilisé. Si un autre véhicule est endommagé, le
retirer et pas le réutiliser.
• Si le champ de portée de la télécommande se
réduit, changez les piles de cette dernière.
11. Nettoyage et entretien
• Vérifiez que les essieux ne soient pas encrassés (cheveux ou poussière) et nettoyez-les, au
besoin à l’aide d’une pincette.
• Le train peut être nettoyé à l’aide d’un chiffon
sec et lisse.
• Afin d’éviter une décharge profonde en cas de
non-utilisation, recharger l’accu au plus tard
au bout de six mois. Les décharges profondes
endommagent l’accu, diminuent la puissance et
raccourcissent la durée de marche possible du
véhicule.
• Si besoin, les bandages d’adhérence de l‘essieu
moteur peuvent être remplacés. Des bandages
de rechange sont disponibles sous la réf.
E284 219.
E284 219
Page 26

26
12. Elimination
Indications relatives à la protection
de l’environnement : Les produits
marqués du signe représentant une
poubelle barrée ne peuvent être
éliminés en fin de vie via les ordures
ménagères normales, mais doivent être remis à un
centre de collecte pour le recyclage des appareils
électriques et électroniques. Le symbole figurant
sur le produit lui-même, la notice d’utilisation ou
l’emballage l’indique. Les matériaux sont
recyclables selon leur marquage. Avec le
recyclage, la récupération des matériaux ou
autres formes de valorisation de vieux appareils,
vous contribuez sensiblement à la protection de
notre environnement. Renseignez-vous auprès de
votre municipalité sur les centres compétents
pour le traitement des déchets.
Ne pas jeter les piles à la poubelle !
Tout consommateur de la CE est tenu
par la loi de rapporter les piles
usagées dans les commerces ou
autres points de collecte, qui veillent
à l’élimination de tels déchets dans le respect de
l’environnement. Les piles contenant des
éléments nocifs sont signalées par le pictogramme ci-contre et les symboles chimiques
correspondants sont indiqués (Cd = cadmium, Hg
= mercure, Pb = plomb).
D‘autres informations :
www.maerklin.com/en/imprint.html
13. Garantie
Garantie légale et garantie contractuelle conformément au certificat de garantie ci-joint.
• Pour toute réparation ou remplacement de
pièces, adresses-vous à votre détaillant-spécialiste Märklin.
Gebr. Märklin & Cie. GmbH
Reparaturservice
Stuttgarter Str. 55 - 57
73033 Göppingen
Germany
Tel: +49 7161 608 222
E-Mail: Service@maerklin.de
Page 27

27
1 Oplaadsnoer (USB/Mini-USB),
2 batterijen type AAA/LR 03 1,5V,
1 Stickerblad
gebruiksaanwijzing,
D
USA UK
F NL
gebruiksaanwijzing,
S DK
garantiebewijs,
Reclameblad
4. Technische gegevens
•
Stroomvoorziening treinstel: vast ingebouwde
accu (oplaadbaar met het meegeleverde oplaad
-
snoer)
• Stroomvoorziening afstandbediening: 4 x 1,5V DC
• Batterijtype: 2 x 1,5V Micro, AAA, LR 03
• Modelschaal H0 (schaal 1:87)
5. Aanwijzingen voor het in gebruiknemen
• Afstandsbediening en trein volgens de aanwij-
zingen in hoofdstuk 6.2 en 6.3 voorbereiden.
• Raakt de trein buiten het bereik van de afstand-
bediening (ca. 6 m) dan rijdt hij wel door, maar
kan niet meer bestuurt worden.
• Er kunnen max. 2 treinen parallel gebruikt wor-
den.
• Zodra er een ander apparaat op dezelfde
frequentie binnen het bereik van de trein komt,
kunnen er storingen op treden.
6. Voorbereidingen
6.1 Aanwijzingen voor de omgang met bat-
terijen
Aanwijzingen voor batterijen en oplaadbare
accu’s
• Dit speelgoed beschikt over een niet vervang-
bare accu in de trein / in de loc.
• OPGEPAST! De accu van de trein kan alleen
in uitgeschakelde toestand van de trein m.b.v.
het bijgevoegde USB-oplaadsnoer opgeladen
worden.
• De batterijen dienen uitsluitend door volwas-
senen geplaatst en vervangen te worden.
• Niet oplaadbare batterrijen mogen niet opgela-
den worden.
• Als in de afstandbediening oplaadbare bat-
terijen worden gebruikt, moeten deze voor het
laden er uit genomen worden!
• Oplaadbare batterijen (accu‘s) alleen onder ou-
derlijk toezicht laden. Neem hierbij de gebruiks-
1. Verantwoord gebruiken
Dit product is een modelspoorbaan in de modelschaal H0 (schaal 1:87) voor kinderen vanaf 3 jaar.
De door batterijen aangedreven trein kan op een
modelbaan welke uitgerust is met Märklin C-rails)
gebruikt worden.
• De meegeleverde rails zijn niet geschikt voor het
bedrijf met een transformator/digitale rijregelaar.
• Het trein mag niet op de vloerbedekking gebruikt worden.
• De trein kan op een vlakke schone ondergrond,
de my-world kunststofrails of op de H0 C-rails
rijden.
2. Veiligheidsvoorschriften
• Dit product mag alleen binnenshuis gebruikt
worden.
• Stel het model niet bloot aan in directe zonnestraling, sterke temperatuurwisselingen of hoge
luchtvochtigheid.
• OPGEPAST! Niet geschikt voor kinderen jonger
dan 3 jaar. Functionele scherpe kanten en
punten. Gevaar op verstikking door kleine delen
die kunnen afbreken of worden ingeslikt.
• OPGEPAST! het ingeschakelde trein niet in het
gezicht of in de haren houden.
• OPGEPAST! Indien een voertuig van de trein beschadigt raakt, mag het beschadigde voertuig
niet langer gebruikt worden.
• OPGEPAST! Dit product bevat magneten in de
koppeling. Het inslikken van één of meerdere
magneten kan onder bepaalde omstandigheden
dodelijk zijn. Bezoek direct een arts.
• De meegeleverde USB-laadkabel niet buigen
en regelmatig op beschadigingen aan kabel ,
stekkers en andere delen controleren. Bij een
beschadiging het speelgoed niet gebruiken tot
dat de beschadiging is hersteld.
• Ingebouwde LED’s komen overeen met de
laserklasse 1 volgens de norm EN 60825-1.
3. Leveringsomvang:
treinstel, 3-delig,
21 gebogen rails R1,
2 gebogen rails R2,
4 rechte rails 188 mm,
7 rechte rails 172 mm,
1 wissel links,
1 wissel rechts,
1 kruising 30°,
1 Enrailleur 72240,
1 afstandsbediening,
NL
Page 28

28
aanwijzing van het desbeteffende laadapparaat
in acht.
• Ongelijkheid van soorten batterijen, of nieuwe
en gebruikte batterijen kunnen niet samen
worden gebruikt.
• Batterijen met de juiste polariteit invoegen.
• Lege batterijen uit de afstandbediening verwijderen.
• Contacten mogen niet worden kortgesloten.
• Als u de trein voor langere tijd niet gebruikt,
verwijder dan de batterijen uit de afstandsbediening.
• Draag bij het verwijderen van lekkende batterijen beschermende handschoenen. Reinig
aansluitend het batterijvak en de contacten met
een droge doek.
• Batterijen behoren niet in kinderhanden.
Kinderen kunnen batterijen in de mond nemen
en inslikken. Indien een batterij toch ingeslikt
wordt, dient u direct een arts te raadplegen.
• Voor het afdanken van batterijen zie punt 12.
Batterijvak los schroeven en deksel afnemen
6.2 Afstandsbediening
1
Batterijen alleen per paar, overeenkomstig de markering, plaatsen of vervangen! Let op de polariteit!
Twee batterijen type AAA/LR 03 volgens de
tekening plaatsen
Batterijvak deksel weer plaatsen.
Batterijvak en vastschroeven
2
3
2.
3.
1.
G
H
G
H
+
-
-
+
3.
G
H
+
-
-
+
2.
3.
+
-
-
+
1.
5.
4.
G
H
G
H
G
H
+
-
-
+
6.3 Trein
Voordat de trein in gebruik word genomen moet
de accu eerst opgeladen worden!
De Mini-USB stekker van het meegeleverde
oplaadsnoer in de Mini-USB stekkerbus van
de trein steken.
De USB-stekker van de meegeleverde
laadkabel mag alleen op een laadapparaat uit
de veiligheidsklasse II ( bijv. lader voor
mobiele telefoon) aangesloten worden welke
voorzien is van het volgende symbool:
1
2.
2
Controleer voor het opladen of de trein
uitgeschakeld is.
G
H
1.
* De USB-oplader
is niet bij levering
inbegrepen!
*
Page 29

29
Tijdens het laden brand de rode lamp in de
trein.
Met het meegeleverde snoer bedraagt de
oplaadtijd ca. 3 uur.
De trein is opgeladen als de rode lamp in de
trein dooft.
3
Nadat de accu volledig is geladen dient de
kabel uit de trein en het laadapparaat genomen te worden.
Met een volle accu kan ca. 2,5 uur met de
trein gereden worden.
7. Spoorwegen bouwen
Samenstellen
Oplossen
Voorbeelden voor de opbouw (zie ook pag. 35).
6.4 Stickers op de trein aanbrengen
Kies de gewenste spoorwegmaatschappij op
het stickerblad. Er zijn telkens 2 stickers van de
verschillende spoorwegmaatschappijen beschikbaar. Deze twee stickers worden op de linker- en
rechterzijde van de trein aangebracht.
Page 30

30
De trein inschakelen, 1x drukken.
4
8. In gebruik nemen
Rijtuigen aan elkaar koppelen.
De trein op de rails zetten of op een vlakke
bodem plaatsen.
De schakelaarstand van de trein en
van de afstandsbediening moeten
met elkaar overeenkomen.
8.1 De trein voorbereiden/inschakelen
3
2
1
G - G
H - H
G - H
H - G
G
H
G
H
Het railhulpstuk 72240 vereenvoudigt het op de
rails plaatsen van loc’s en wagens.
Page 31

31
3
3
2
1
0
1
2
8.2 Afstandbediening gebruiken
Functie van de toetsen
Schakelbare functies
Frontverlichting (voor)
Geluid: piepende remmen
Geluid: Conducteursfluit
Geluid: Signaalhoorn
1
1
3
1
2
3
2
1
3
1
2
3
2
0 0
Trein stopt
Snelheid en rijrichting
2
Stop
positie (0)
Vooruitrijden (1/2/3)
Achteruitrijden (1/2/3)
0: Stop positie
1: Langzaam
2: Gemiddeld
3: Snel
Page 32

32
1
3
1
2
3
2
1
3
1
2
3
2
0
0
max. 6 m
- Er mag zich geen hindernis tussen de trein en
de afstandsbediening bevinden.
1
3
1
2
3
2
1
3
1
2
3
2
0
0
- De afstandsbediening niet van de trein afwenden.
1
3
1
2
3
2
1
3
1
2
3
2
0
0
9. Aanwijzingen voor het gebruik
- Let er bij het rijden op dat de afstandsbediening
altijd op de trein is gericht.
- Raakt de trein buiten het bereik van de afstandbediening (ca. 6 m) dan rijdt het wel door, maar
kan niet meer bestuurt worden.
- Na 5 minuten zonder een rijopdracht van de
afstandsbediening blijft de trein stilstaan. Door
een rijopdracht te geven, gaat de trein weer
rijden.
Na 10 minuten zonder rijopdracht schakelt de
trein zich uit. Om weer te kunnen rijden moet
de trein eerst met de schakelaar opnieuw
ingeschakeld worden.
Page 33

33
9.1 Bedrijf met 2 treinen
Er kunnen 2 treinen onafhankelijk van elkaar op
dezelfde baan bestuurd worden. Hiervoor moet u
één van de treinen en de afstandbediening op de
schakelaarstand G-G (1) en de tweede trein en
afstandbediening op H-H (2) instellen. De schakelaarstand van trein en afstandbediening moeten
overeenstemmen!
1
G - G
G - H
H - G
G
H
G
H
2
H - H
G - H
H - G
G
H
G
H
10. Storingen
• Als de trein niet rijdt, controleer dan a.u.b. of
de accu in de trein opgeladen is. Eventueel
de accu van de trein opladen. Is de accu van
de trein geladen en reageert de trein nog
niet, controleer dan a.u.b de batterijen van de
afstandbesturing. Eventueel de batterijen van
de afstandbediening vervangen.
• Gaat de trein duidelijk langzamer rijden of blijft
deze tijdens het spelen stil staan, dan de accu
opladen. Let op de automatische uitschakeltijd!
(zie hoofdstuk 9)
• Is de trein beschadigd, dan mag deze niet meer
gebruikt worden. Is een ander voertuig beschadigd, dan deze uit het treinverband nemen en
niet meer gebruiken.
• Verminderd de reikwijdte van de afstandsbediening dan dienen de batterijen vervangen te
worden.
11. Reinigen en onderhoud
• Controleer of er geen haren of vuil op de
wielassen zit en verwijder deze eventuele
verontreiniging met behulp van een pincet van
de assen.
• De trein kan met een droge, niet pluizende doek
afgenomen worden.
• Wanneer de accu niet wordt gebruikt, uiterlijk
na 6 maanden opladen om diepontlading te
vermijden. Diepontladingen beschadigen de
accu, verminderen de prestaties en verkorten
de mogelijke rijduur van het voertuig.
• Indien nodig kunnen antislipbandjes op de
aandrijfwielen vervangen worden. Deze zijn
onder onderdeelnummer E284 219 verkrijgbaar.
E284 219
Page 34

34
12. Afdanken
Aanwijzing voor de bescherming van
het milieu: Producten die voorzien zijn
van een merkteken met een doorgekruiste afvalcontainer, mogen aan het
eind van hun levensduur niet met het
normale huisafval afgevoerd worden. Deze
moeten op een inzamelpunt voor het recyclen van
elektrische- en elektronische apparaten ingeleverd worden. Het symbool op het product, de
verpakking of de gebruiksaanwijzing wijst daarop.
De grondstoffen zijn vanwege hun kwaliteiten
opnieuw te gebruiken. Met het hergebruik,
recyclen van grondstoffen of andere vormen voor
het benutten van oude apparaten levert u een
belangrijke bijdrage aan de bescherming van ons
milieu. Vraag bij uw gemeente naar de daarvoor
bestemde inzamelplaats.
Batterijen behoren niet bij het
huisvuil! Elke gebruiker in de EG is
wettelijk verplicht om batterijen in te
leveren bij een daarvoor aangewezen
verzamelplaats in zijn gemeente of af
te geven in de winkel waar batterijen
worden verkocht. De batterijen worden daardoor
op een milieuvriendelijke wijze verwerkt.
Batterijen die schadelijke stoffen bevatten zijn
voorzien van dit symbool en van de chemische
symbolen (Cd = cadmium, Hg = kwik, Pb = lood).
Meer informatie:
www.maerklin.com/en/imprint.html
13. Garantie
Vrijwaring en garantie overeenkomstig het bijgevoegde garantiebewijs.
Neem voor reparaties contact op met uw Märklin
dealer of stuur het op aan het Märklin service
centrum.
Gebr. Märklin & Cie. GmbH
Reparaturservice
Stuttgarter Str. 55 -57
73033 Göppingen
Germany
Tel: +49 7161 608 222
E-Mail: Service@maerklin.de
Page 35

35
Gleise und Weichen • Track and Turnouts • Eléments de voie et aiguilles •
Rails en wissels
Die verschiedenen Gleise und Weichen sind auf der Rückseite mit einem farbigen runden Aufkleber
gekennzeichnet.
The different track sections and turnouts are identified on the back with a colored round sticker.
Les différents éléments de voie et aiguilles sont marqués au dos par un pastille autocollante ronde de
couleur.
De verschillende rails en wissels zijn op de achterzijde gemerkt d.m.v. een gekleurde ronde sticker.
≠
Page 36

Gebr. Märklin & Cie. GmbH
Stuttgarter Str. 55 - 57
73033 Göppingen
Germany
www.maerklin.com
287629/1118/Sc3Dt
Änderungen vorbehalten
© by Gebr. Märklin & Cie. GmbH
This device complies with Part 15 of the FCC Rules.
Operation is subject to the following two conditions:
(1) This device may not cause harmful interference, and
(2) this device must accept any interference received, including
interference that may cause undesired operation.
www.maerklin.com/en/imprint.html
Weitere Aufbaumöglichkeiten z.B. mit Ergänzungspackung 23300 unter
www.maerklin.de > Service > Downloads > Produktunterstützung > Gleispläne my world
Additional setup possibilities such as with the 23300 extension set at
www.maerklin.de > Service > Downloads > Produktunterstützung > Gleispläne my world
Autres possibilités de montage par ex. avec coffret de complément réf. 23300 sous
www.maerklin.de > Service > Downloads > Produktunterstützung > Gleispläne my world
Verdere opbouwmogelijkheden bijv. uitbreidingsset 23300 vindt u onder
www.maerklin.de > Service > Downloads > Produktunterstützung > Gleispläne my world
Page 37

S
DK
Instrucciones de empleo
Istruzioni di impiego
Bruksanvisningen
Betjeningsvejledningen
Starter Set Güterzug
29309
Page 38

DK
S
2
Antes de la puesta en servicio por primera vez,
lea detenidamente las instrucciones de empleo.
Las instrucciones de empleo forman parte del
producto y, por este motivo, deben conservarse
y entregarse a terceros en el caso de venta del
producto.
Indice de contenido: Página
1. Uso correcto 3
2. Instrucciones de seguridad 3
3. Alcance de suministro 3
4. Datos técnicos 3
5. Indicaciones para la puesta en servicio por
primera vez 3
6. Preparativos 3
7. Montaje de las vías 5
8. Puesta en servicio 6
9. Instrucciones de uso 8
10. Anomalías funcionales 9
11 . Limpieza y mantenimiento 9
12. Eliminación 10
13. Garantía 10
Prima della prima messa in funzione, leggete attentamente sino in fondo le istruzioni di impiego.
Tali istruzioni di impiego sono parte integrante
del prodotto e devono pertanto venire conservate
nonchè consegnate accluse in caso di ulteriore
cessione a terzi.
Indice del contenuto: Page
1. Impiego commisurato alla destinazione 11
2. Avvertenze per la sicurezza 11
3. Corredo di fornitura 11
4. Dati Tecnici 11
5. Avvertenze per la prima messa in esercizio 11
6. Preparativi 11
7. Ferrovie di costruire 13
8. Immissione in esercizio 14
9. Avvertenze di funzionamento 16
10. Difetti nel funzionamento 17
11. Pulizia e manutenzione 17
12. Smaltimento 18
13. Garanzia 18
Læs brugsanvisningen opmærksomt igennem,
inden du tager toget i brug for første gang. Brugsanvisningen er en bestanddel af produktet ig skal
derfor opbevares samt medleveres, hvis produktet gives videre til tredjemand.
Indholdsfortegnelse: Side
1. Hensigtsmæssig anvendelse 27
2. Sikkerhedsanvisninger 27
3. Leverancens omfang: 27
4. Tekniske data 27
5. Når toget bruges for første gang 27
6. Forberedelser: 27
7. Opbygning af sporet 29
8. Toget tages i brug 30
9. Driftsanvisninger 32
10. Funktionsforstyrrelser 33
11. Rengøring og vedligeholdelse 33
12. Bortskafning 34
13. Garanti 34
Läs noga igenom bruksanvisningen innan den
tas i bruk för första gången. Bruksanvisningen
ingår i och tillhör denna produkt och måste därför
sparas samt medfölja produkten om den överlåts
till tredje man.
Innehållsförteckning: Sidan
1. Användningsområde 19
2. Säkerhetsanvisningar 19
3. Tågsatsen innehålle: 19
4. Tekniska data 19
5. Innan tåget används för första gången 19
6. Beredningar 19
7. Järnvägar för att bygga 21
8. Tåg tas i drift 22
9. Anvisningar om tågets drift 24
10. Funktionsstörningar 25
11. Rengöring och underhåll 25
12. Hantering som avfall 26
13. Garanti 26
Page 39

3
7 vías rectas 172 mm
1 desvío a la izquierda
1 desvío a la derecha
1 Travesía ordinaria
1 Elemento auxiliar para encarrilamiento 72240
1 control remoto
1 Cable de carga (USB/Mini-USB)
2 pilas tipo AAA/LR 03 1,5 V
1 Pliego de etiquetas adhesivas
Instrucciones de empleo
D
USA
F NL
Instrucciones de empleo
S DK
Documento de garantía
Tríptico publicitario
4. Datos técnicos
• Alimentación eléctrica del tren: Batería recargable montada fija (recargable mediante cable
de carga adjunto)
• Alimentación eléctrica de control remoto:
2 pilas de 1,5 V c.c.
• Tipo de pila: 2 pilas de 1,5 V Micro, AAA, LR 03
• Ancho de vía H0 (escala 1:87)
5. Indicaciones para la puesta en
servicio por primera vez
• Preparar el control remoto y el tren conforme a
los apartados 6.2 y 6.3.
• Si el tren se sitúa fuera del alcance del control
remoto (aprox. 6 m), seguirá circulando, pero
ya no podrá controlarse a distancia.
• Pueden utilizarse como máx. dos trenes en
paralelo.
• Siempre que se esté utilizando otro aparato a
idéntica frecuencia dentro del alcance del tren,
pueden producirse averías.
6. Preparativos
6.1 Indicaciones sobre el manejo de las
pilas:
Notas sobre las baterías (pilas) y las baterías
(pilas) recargables
• Este juguete contiene una batería recargable
no sustituible en el tren/la locomotora.
• ¡ATENCIÓN! La batería recargable del tren se
puede cargar únicamente con el tren en estado
desconectado mediante el cable de carga USB
adjunto.
• Las baterías deben ser colocadas y sustituidas
1. Uso correcto
Este producto es una maqueta de trenes en ancho
de vía H0 (escala 1:87) destinada a niños a partir
de 3 años de edad. El tren alimentado por pilas
puede utilizarse en maquetas de trenes equipadas
con la vía C de Märklin.
• Las vías adjuntas no son adecuadas para su
uso con transformador/regulador de marcha
digital.
• No está permitido utilizar el producto sobre
suelos de moqueta.
• El tren puede emplearse sobre un suelo liso
y limpio, sobre una vía de plástico my world o
sobre vías C para H0.
2. Instrucciones de seguridad
• Está permitido utilizar el producto únicamente
en locales cerrados.
• No exponer el modelo en miniatura a la radiación solar directa, a oscilaciones fuertes de
temperatura o a una humedad del aire elevada..
• ¡ATENCIÓN! No es adecuado para niños
menores de 3 años. Esquinas y puntas afiladas
condicionadas a la función. Peligro de asfixia a
causa de piezas pequeñas que pueden romperse y tragarse.
• ¡ATENCIÓN! No mantener el producto conec-
tado sobre la cara o sobre el cabello.
• ¡ATENCIÓN! Si sufriera daños un coche del
tren, no está permitido reutilizar el coche dañado.
• ¡ATENCIÓN! Este producto contiene imanes en
el acoplamiento. Si una persona ingiere uno o
varios imanes, esto puede resultar mortal en
determinadas circunstancias. Acuda inmediatamente a un médico.
• No doblar el cable de carga USB incluido en
el suministro y comprobar con regularidad la
existencia de posibles daños en el cable, el
conector y otras piezas. Si se han producido
daños, no utilizar el juguete hasta que se hayan
reparado los daños.
• Los LEDs incorporados corresponden a la clase
de láser 1 según la norma europea EN 60825-1.
3. Alcance de suministro
Tren de 3 coches
21 vías en curva R1
2 vías en curva R2
4 vías rectas 188 mm
Page 40

4
¡Insertar o sustituir las baterías siempre
por pares, fijándose en las marcas!
¡Tener presente la polaridad!
Atornillar y retirar el compartimento de pilas
Insertar dos baterías tipo AAA/LR 03 conforme al dibujo.
Vuelva a colocar la cubierta de la batería.
Tornillo de la tapa de la batería.
6.2 Control remoto
exclusivamente por adultos.
• No está permitido recargar pilas que no sean
recargables.
• ¡Si es preciso utilizar baterías recargables para el
control remoto, éstas se deben extraer antes de
la carga!
• Cargar las baterías (pilas) recargables siempre
bajo la vigilancia de adultos. Para tal fin, observar las instrucciones de empleo del cargador
en cuestión.
•
No está permitido utilizar juntas baterías (pilas)
de tipos distintos o mezclar baterías nuevas y
usadas.
• Colocar las baterías (pilas) con la polaridad correcta.
• Extraer las baterías recargables del control
remoto.
• No está permitido cortocircuitar los contactos.
• Si tiene previsto no utilizar el tren durante
mucho tiempo, retire las baterías recargables
del control remoto.
• Si se han agotado las pilas, utilice guantes de
protección para retirar las pilas. A continuación, limpie el compartimento de las pilas y los
contactos con un paño seco.
• No permita que las pilas vayan a parar a las
manos de un niño. Éste podría meterse las pilas
en la boca y tragárselas. Si hubiera tragado una
pila, debe solicitarse inmediatamente ayuda a
un médico.
• Para la eliminación de las pilas, véase el
apartado 12.
2
3
1
2.
3.
1.
G
H
G
H
+
-
-
+
3.
G
H
+
-
-
+
2.
3.
+
-
-
+
1.
5.
4.
G
H
G
H
G
H
+
-
-
+
6.3 Tren
¡Antes del primer uso del tren, se debe cargar la
pila recargable integrada!
Enchufar el conector Mini-USB del cable de
carga proporcionado en la hembrilla MiniUSB del tren.
Está permitido conectar el conector USB del
cable de carga suministrado únicamente a un
cargador de la clase de protección II (p. ej.,
un cargador de teléfonos móviles) con el
siguiente simbolo estampado en su superficie:
1
2
Antes de la carga, asegurarse de que el tren
esté desconectado.
Page 41

5
7. Montaje de las vías
Enchufar
Desacoplar
2.
Durante el proceso de carga, la luz roja del
tren permanece encendida.
Con el cable adjunto, el tiempo de carga es
de aprox. 3 horas.
El tren estará cargado cuando se apague la
luz roja del mismo.
3
Una vez se haya cargado por completo la
batería recargable, se debe retirar el cable de
carga del tren y del cargador.
El tren puede circular aprox. 2,5 horas una
vez se ha cargado por completo la batería
recargable.
Ejemplo de montaje (véase además página 35):
G
H
1.
6.4 Colocar etiquetas adhesivas en el tren
Seleccionar la compañia ferroviaria deseada en el
pliego de etiquetas adhesivas. El pliego proporciona 2 etiquetas adhesivas de cada una de varias
compañías ferroviarias. Estas 2 etiquetas se colocan en los lados derecho e izquierdo del tren.
* ¡El cargador USB
no se incluye en el
suministro!
*
Page 42

6
Conectar la alimentación eléctrica del tren
pulsando 1 vez
4
8. Puesta en servicio
Acoplar los coches.
Encarrilar el tren en las vías o colocarlo
sobre el suelo nivelado liso.
Las posiciones de los interruptores
del tren y del control remoto deben
coincidir.
8.1 Preparación/conexión del tren
3
2
1
G - G
H - H
G - H
H - G
G
H
G
H
El elemento auxiliar de encarrilamiento 72240
facilita la colocación de locomotoras y vagones/
coches en la vía.
Page 43

7
3
3
2
1
0
1
2
8.2 Manejo del control remoto
Función de las teclas
Funciones conmutables
Faros frontales
Ruido: Chirrido de los frenos
Ruido: Silbato de revisor
Ruido: Bocina de señalización
1
1
3
1
2
3
2
1
3
1
2
3
2
0 0
Parada del tren
Velocidad y sentido de circulación
2
Posición
Stop (0)
Marcha
adelante1/2/3)
Marcha
atrás (1/2/3)
0: Posición Stop
1: Marcha lenta
2: Marcha semirrápida
3: Marcha rápida
Page 44

8
1
3
1
2
3
2
1
3
1
2
3
2
0
0
max. 6 m
- No debe haber ningún obstáculo entre el tren y
el control remoto.
1
3
1
2
3
2
1
3
1
2
3
2
0
0
- No dejar de apuntar hacia el producto con el
control remoto.
1
3
1
2
3
2
1
3
1
2
3
2
0
0
9. Instrucciones de uso
- La posición del interruptor del ICE y del control
remoto deben coincidir.
- Si el producto se sale de los límites de alcance
del control remoto, (aprox. 6 m), continúa su
marcha, pero ya no puede controlarse.
- Si al cabo de 5 minutos no se ha recibido una
señal de marcha desde el control remoto, el
tren permanece en reposo. Se puede reanudar
la marcha mediante una señal cualquiera de
marcha.
Si al cabo de 10 minutos no se ha recibido una
señal de marcah, el tren se desconecta. Para
ponerlo de nuevo en marcha, se debe reconectar previamente el tren con el interruptor.
Page 45

9
9.1 Servicio con 2 trenes
Es posible crear en la misma maqueta de trenes
un servicio de circulación de dos trenes independientes. Para ello, debe configurar un tren y
el control remoto a la posición de interruptor G-G
(1) y el segundo tren y el control remoto a H-H (2).
¡Las posiciones de los interruptores del tren y del
control remoto deben coincidir!
1
G - G
G - H
H - G
G
H
G
H
2
H - H
G - H
H - G
G
H
G
H
10. Anomalías funcionales
• Si el tren no circula, compruebe si está cargada
la batería recargable del tren. En su caso,
recargar la batería recargable del tren. Si la
batería recargable del tren está cargada y, a
pesar de ello, el tren no reacciona, compruebe
las baterías recargables del control remoto. En
su caso, sustituir las baterías del control remoto.
• Si el tren se ralentiza demasiado o se queda
parado durante el juego, recargar la batería recargable. ¡Tener presente el tiempo de parada
automática! (véase Cap. 9)
• Si el tren está dañado, no está permitido utilizarlo. Si está dañado otro vehículo, retirarlo del
tren y dejar de utilizarlo.
• Si la locomotora está dañada, dejar de utilizar
la locomotora y retirar las pilas. Si está dañado
otro vehículo, retirarlo del tren y dejar de utilizarlo.
11. Limpieza y mantenimiento
• Compruebe si hay cabello o suciedad acumulados en los ejes y, en su caso, elimine esta
suciedad de los ejes con ayuda de unas pinzas.
• El tren puede frotarse con un paño sin hilachas
seco.
• En el caso de que no se utilice, cargar la batería
recargable como tope al cabo de 6 meses, para
evitar una descarga profunda. Las descargas
profundas provocan daños a la batería recargable, reducen la potencia y acortan el tiempo que
el vehículo puede permanecer en circulación.
• Si es preciso, es posible cambiar los aros de
adherencia del eje motor. El aro de adherencia
se puede obtener con el número de pieza de
repuesto E284 219.
E284 219
Page 46

10
12. Eliminación
Indicaciones para la protección del
medio ambiente: Los productos
identificados con el contenedor de
basura tachado no deben eliminarse
como basura doméstica normal y
corriente al final de la vida útil, sino que deben
entregarse en un punto de recogida para
reciclado de aparatos eléctricos y electrónicos. El
símbolo en el producto, las instrucciones de
empleo o el embalaje hace referencia a este
hecho. Los materiales son reaprovechables en
función de la identificación que lleven. Con el
reaprovechamiento, la reutilización de materiales
u otras formas de aprovechamiento de aparatos
viejos contribuimos de manera importante a la
protección del medio ambiente. Consulte a su
Ayuntamiento para conocer la ubicación del
punto de evacuación competente.
¡Nunca tirar las baterías junto con la
basura doméstica!! Todo consumidor
de la CE está obligado por ley a
entregar las baterías a un punto de
recogida de su municipio o de
establecimientos especializados. De este modo,
las baterías se eliminan de forma respetuosa con
el medio ambiente. Las baterías que contienen
sustancias nocivas están identificadas por este
símbolo y por símbolos químicos (Cd=Cadmio,
Hg=Mercurio, Pb=Plomo).
Información adicional:
www.maerklin.com/en/imprint.html
13. Garantía
Responsabilidad y garantía conforme al documento de garantía que se adjunta.
• Para reparaciones o recambios contacte con
su proveedor Märklin especializado o
Gebr. Märklin & Cie. GmbH
Reparaturservice
Stuttgarter Str. 55-57
73033 Göppingen
Germany
Tel: +49 7161 608 222
E-Mail: Service@maerklin.de
Page 47

11
2 binari curvi R2
4 binari da 188 mm
7 binari da 172 mm
1 deviatoio sinistro
1 deviatoio destro
1 Intersezione
1 Scivolo per inserzione sul binario 72240
1 comando a distanza
1 Cavetto di ricarica (USB/Mini-USB)
2 batterie tipo AAA/LR 03 1,5V
1 Foglio di adesivi
Istruzioni di impiego
D
USA
F NL
Istruzioni di impiego
S
DK
Certificato di garanzia
Pieghevole pubblicitario
4. Dati Tecnici
• Tensione di alimentazione del treno: accumulatori incorporati in modo fisso (ricaricabili
tramite il cavetto di ricarica accluso)
• Tensione di alimentazione del telecomando:
2 x 1,5 V DC
• Tipo di batterie: 2 x 1,5 V Micro, AAA, LR 03
• Scartamento H0 (scala 1:87)
5. Avvertenze per la prima messa in
esercizio
• Preparare telecomando e treno conformemente
ai Capitoli 6.2 e 6.3.
• Qualora tale treno si allontani all’esterno
dell’area di copertura del comando a distanza
(circa 6 m), esso continua a marciare, tuttavia
non può più venire comandato.
• Si possono utilizzare al massimo due treni in
parallelo.
•
Nel caso in cui un altro apparato con la stessa frequenza venga fatto funzionare nell’area di copertura del treno, possono intervenire dei disturbi.
6. Preparativi
6.1 Avvertenze per la manipolazione delle
batterie:
Avvertenze per batterie ed accumulatori ricaricabili
• Questo giocattolo contiene un accumulatore
non sostituibile nel treno / nella locomotiva.
• ATTENZIONE! Gli accumulatori del treno pos-
1. Impiego commisurato alla destinazione
Questo prodotto costituisce una ferrovia in
miniatura per bambini a partire da 3 anni, nello
scartamento H0 (scala 1:87). Tale treno azionato a
batterie può venire messo in funzione su impianti
di ferrovia in miniatura, i quali siano equipaggiati
con il binario C Märklin
• Gli acclusi binari non sono adatti per il funziona-
mento con trasformatore/regolatore di marcia
Digital.
• Tale treno non può venire messo in esercizio su
pavimenti con tappeto
• Tale treno può venire messo in funzione su un
sottofondo liscio e pulito, sul binario di materiale sintetico my world oppure sui binari C in H0.
2. Avvertenze per la sicurezza
• Tale prodotto deve venire impiegato soltanto in
ambienti chiusi.
• Non esponete tale modello ad alcun irraggia-
mento solare diretto, a forti escursioni di temperatura oppure a elevata umidità dell’aria.
• AVVERTENZA! Non adatto ai bambini sotto i
3 anni. Per motivi funzionali i bordi e le punte
sono spigolosi. Pericolo di asfissia, poiché le
parti piccole e spezzabili potrebbero essere
ingerite.
• ATTENZIONE! Non mantenere tale prodotto
acceso sulla faccia oppure nei capelli.
• ATTENZIONE! Qualora avvenga un difetto in un
rotabile del treno, tale rotabile danneggiato non
deve più venire ulteriormente utilizzato.
• ATTENZIONE! Questo prodotto contiene dei
magneti nell’agganciamento. La deglutizione di
uno o più magneti può in determinate circostanze avere effetti mortali. Vogliate chiamare
immediatamente un medico.
• Non piegare il cavetto di ricarica USB fornito in
dotazione e verificare regolarmente circa danneggiamenti al cavetto, spina ed altri componenti.
In caso di un danno, non utilizzare il giocattolo
per il tempo fino a quando il danno è riparato.
• I LED incorporati corrispondono alla categoria
di laser 1 secondo la Norma EN 60825-1.
3. Corredo di fornitura
Treno a 3 elementi
21 binari curvi R1
Page 48

12
sono venire ricaricati soltanto in condizione del
treno disattivata tramite il cavetto di ricarica USB
accluso.
• Le batterie devono venire installate e sostituite
esclusivamente da parte di adulti.
• Le batterie non ricaricabili non devono venire
ricaricate.
• Qualora per il comando a distanza vengano
utilizzate delle batterie ricaricabili, queste devono
venire estratte prima della ricarica!
• Le batterie ricaricabili (accumulatori) si cari-
chino solo sotto la sorveglianza di un adulto.
Prestate attenzione a questo scopo alle istruzioni di impiego del rispettivo apparato di ricarica..
•
Tipi di batterie diseguali oppure batterie nuove
ed usate non devono venire impiegate insieme.
•
Inserire le batterie con la corretta polarità.
• Rimuovere le batterie scariche dal comando a
distanza.
•
I contatti non devono venire messi in corto circuito.
• Qualora Voi non utilizziate tale treno per un
periodo piuttosto lungo, vogliate rimuovere le
batterie dal comando a distanza.
• In caso di batterie che hanno avuto perdite, si
prega di indossare dei guanti protettivi per la
rimozione delle batterie. Al termine si pulisca
il cassetto delle batterie ed i contatti con un
panno asciutto.
• Le batterie non sono appropriate nelle mani
dei bambini. I bambini potrebbero prenderle in
bocca e inghiottirle. Qualora una batteria sia
stata inghiottita, deve venire chiamato immediatamente il pronto soccorso medico.
• Per lo smaltimento si veda il punto 12.
Svitare il comparto batterie e sollevarlo
Introdurre due batterie di tipo AAA/LR 03 in
conformità al disegno
6.2 Comando a distanza
2
1
Installare o sostituire le batterie solamente a coppie, in corrispondenza ai
contrassegni!
Prestare attenzione alla polarità!
Sostituire il coperchio della batteria.
Sovrapporre il coperchio del comparto batte-
rie e fissarlo con le vite.
3
2.
3.
1.
G
H
G
H
+
-
-
+
3.
G
H
+
-
-
+
2.
3.
+
-
-
+
1.
5.
4.
G
H
G
H
G
H
+
-
-
+
6.3 Treno
Prima del primo funzionamento del treno gli accumulatori incorporati devono venire caricati!
Innestare la spina Mini-USB del cavetto di
ricarica fornito in dotazione nella presa MiniUSB del treno.
La spina USB del cavetto di ricarica fornito
incluso deve venire collegata soltanto ad un
apparecchio di ricarica della classe di
protezione II (ad es. ad un apparato di ricarica
del portatile da palmo), il quale sia provvisto
del seguente simbolo:
1
2
Prima della ricarica ci si deve assicurare del
fatto che il treno sia disattivato.
Page 49

13
2.
Durante il procedimento di ricarica sta accesa la luce rossa nel treno.
Con l’accluso cavetto il tempo di ricarica
ammonta a circa 3 ore.
Il treno è ricaricato quando la luce rossa nel
treno si spegne.
3
Dopo che l’accumulatore è stato completamente ricaricato, il cavetto di ricarica deve
venire rimosso dal treno e dall’apparato di
ricarica.
Con gli accumulatori pieni il treno può venire
fatto marciare per circa 2,5 ore.
Esempi per il montaggio (si veda anche pagina 35):
7. Ferrovie di costruire
Assemblare
Smontaggio
G
H
1.
6.4 Applicazione degli adesivi al treno
Selezionare la Compagnia ferroviaria desiderata sul foglio di adesivi. Si hanno a disposizione
rispettivamente 2 adesivi di differenti Compagnie
ferroviarie. Questi 2 adesivi vengono applicati sui
lati destro e sinistro del treno.
* L’apparecchio di
ricarica USB non
è contenuto nel
corredo di fornitura!
*
Page 50

14
Attivare il treno, premere 1 volta
4
8. Immissione in esercizio
Accoppiare tra loro le carrozze.
Collocare il treno sui binari oppure disporlo
sul pavimento liscio, in piano.
Le disposizioni dei commutatori
del treno e del comando a distanza
devono essere concordanti.
8.1 Preparativi/accensione del treno
3
2
1
G - G
H - H
G - H
H - G
G
H
G
H
Lo scivolo per inserzione sul binario 72240 facilita
il piazzamento di locomotive e carri sul binario.
Page 51

15
3
3
2
1
0
1
2
8.2 Azionamento del comando a distanza
Funzione dei tasti
Funzioni commutabili
Illuminazione di testa (anteriore)
Rumore: Stridore dei freni
Rumore: Fischio del conduttore
Rumore: Tromba di segnalazione
1
1
3
1
2
3
2
1
3
1
2
3
2
0 0
Arresto del treno
Velocità e direzione di marcia
2
Posizione di
fermo (0)
Marcia in
avanti (1/2/3)
Marcia indietro (1/2/3)
0: Posizione di fermo
1: lento
2: media velocità
3: rapido
Page 52

16
1
3
1
2
3
2
1
3
1
2
3
2
0
0
max. 6 m
- Tra il treno e il comando a distanza non deve
trovarsi nessun impedimento.
1
3
1
2
3
2
1
3
1
2
3
2
0
0
- Non distogliere il comando a distanza dal
prodotto.
1
3
1
2
3
2
1
3
1
2
3
2
0
0
9. Avvertenze di funzionamento
- Durante la Marcia prestate attenzione affinché
il comando a distanza sia sempre direzionato
verso il prodotto.
- Qualora tale prodotto si allontani all’esterno
dell’area di copertura del comando a distanza
(circa 6 m), esso continua a marciare, tuttavia
non può più venire comandato.
- Dopo 5 minuti senza segnale di marcia dal
comando a distanza il treno rimane fermo. Esso
può venire nuovamente fatto partire tramite un
qualsivoglia segnale di marcia.
Dopo 10 minuti senza segnale di marcia il treno
si disattiva. Per farlo ripartire di nuovo il treno
deve anzitutto venire attivato dal commutatore.
Page 53

17
9.1 Funzionamento con 2 treni
Si possono mettere in funzione 2 treni sullo stesso
impianto in modo indipendente uno dall’altro. A
tale scopo Voi dovete impostare un treno ed il comando a distanza sulla posizione del commutatore
G-G (1), il secondo treno ed il comando a distanza
su H-H (2). Le disposizioni dei commutatori del
treno e del comando a distanza devono essere
concordanti.
1
G - G
G - H
H - G
G
H
G
H
2
H - H
G - H
H - G
G
H
G
H
• Se il treno diventa notevolmente più lento
oppure rimane fermo durante il gioco, ricaricare
gli accumulatori. Prestate attenzione alla durata
automatica di disattivazione! (si veda il Cap. 9)
• Qualora il treno sia guasto, questo non deve
più venire utilizzato. Se è danneggiato un altro
rotabile, si rimuova questo dal treno e non lo si
utilizzi più.
• Se si riduce l‘ampiezza di copertura del telecomando, devono essere rinnovate le batterie del
telecomando.
11. Pulizia e manutenzione
• Vogliate controllare su sugli assi si trovano
capelli oppure sporcizia ed eliminate dagli assi
questi contaminanti se necessario con l’aiuto di
una pinzetta.
• Il treno può venire pulito con un panno asciutto
esente da lanugine.
• In caso di non utilizzo, ricaricare l’accumulatore
al più tardi dopo 6 mesi, per evitare una scarica
profonda. Le scariche profonde danneggiano
l’accumulatore, fanno diminuire la potenza ed abbreviano la durata possibile di marcia del rotabile.
• In caso di bisogno le cerchiature di aderenza
sull’asse motore possono venire rinnovate. La
cerchiatura di aderenza è disponibile sotto il
numero di parte di ricambio E284 219.
E284 219
10. Difetti nel funzionamento
• Se il treno non marcia, vogliate verificare se gli
accumulatori del treno sono carichi. Eventualmente ricaricare gli accumulatori del treno.
Se gli accumulatori del treno sono carichi e
malgrado ciò il treno non reagisce, siete pregati
di verificare le batterie del comando a distanza.
Eventualmente mettete delle batterie nuove nel
comando a distanza.
Page 54

18
12. Smaltimento
Avvertenze per la protezione
ambientale: I prodotti che sono
contraddistinti con il bidone della
spazzatura cancellato alla fine della
loro durata di vita non possono venire
eliminati mediante i normali rifiuti domestici, bensì
devono essere conferiti ad un apposito punto di
raccolta per il riciclaggio di apparecchi elettrici
ed elettronici. Il simbolo su tale prodotto, le
istruzioni di impiego oppure la confezione dà
avviso riguardo a ciò. I materiali costituenti sono
riutilizzabili in conformità al loro contrassegno.
Con il riutilizzo, la valorizzazione delle sostanze
oppure altre forme di valorizzazione delle vecchie
apparecchiature Voi fornite un importante
contributo alla protezione del nostro ambiente. Vi
preghiamo di richiedere i punti di smaltimento
autorizzati presso la Vostra amministrazione
municipale.
Le batterie non fanno parte dei rifiuti
domestici!
Ciascun consumatore nella CE è
obbligato per legge a conferire le batterie presso un apposito punto di rac-
colta del suo municipio
oppure dal negoziante.
Le batterie vengono in tal modo inviate ad
uno smaltimento rispettoso dell’ambiente. Le
batterie che contengono materiali dannosi
sono contraddistinte tramite questo simbolo
e mediante simboli chimici (Cd = cadmio, Hg
= mercurio, Pb = piombo).
Per maggiori informazioni:
www.maerklin.com/en/imprint.html
13. Garanzia
Prestazioni di garanzia e garanzia in conformità
all’accluso certificato di garanzia.
• Per riparazioni Vi preghiamo di rivolgerVi al
Vostro rivenditore specialista Märklin oppure
Gebr. Märklin & Cie. GmbH
Reparaturservice
Stuttgarter Str. 55 - 57
73033 Göppingen
Germany
Tel: + 49 7161 608 222
E-Mail: Service@maerklin.de
Page 55

19
1. Användningsområde
Denna produkt är en modelljärnväg i skala H0
(skala 1:87), avsedd för barn över 3 års ålder. Det
batteridrivna tåget kan köras på modelljärnvägar
som består av Märklins C-skenor (se innehållsförteckningen).
• De medföljandeskenornaärinteavseddaförkör-
ning medtransformator/digitalkörenhet.
• Tåget kan ej köras på golv med någon form av
mattor.
• Tåget kan köras på ett slätt och rent underlag,
på my worlds plasträls eller på vanliga H0 Cskenor.
2. Säkerhetsanvisningar
• Produkten får endast användas inomhus i slutna
rum.
• Modellen får inte utsättas för direkt solljus, häf-
tiga temperaturväxlingar eller hög luftfuktighet.
• VARNING! Ej lämplig för barn under 3 år.
Funktionsbetingade vassa kanter och spetsar.
Kvävningsrisk på grund av smådelar som kann
lossna.
• VARNING! Igångvarande tåg får aldrig hållas
nära eller i kontakt med ansikte eller hår.
• VARNING! Om någon del av tåget skadas, så
ska den skadade tågdelen tas ur trafik och ej
användas mer.
• VARNING! Denna produkt innehåller magneter
i kopplen. Att svälja en eller flera magneter kan
under vissa omständigheter leda till döden.
Skulle en eller flera magneter sväljas måste
läkare genast uppsökas.
• Medföljande UB-kabel får ej böjas/bockas och
måste regelbundet kontrolleras så att inga
skador på kabel, stickkontakter och andra delar
uppstått. Vid skador på leksak eller kabel får
leksaken inte användas förrän skadan/skadorna
är reparerade.
• Inbyggda LED (lysdioder) motsvarar laser-klass
1 enligt Ennorm 60825-1.
3. Tågsatsen innehålle:
Tåg bestående av3 delar
21 böjda skenor R1
2 böjda skenor R2
4 Raka skenor 188 mm
7 Raka skenor 172 mm
1 Vänstra valdeltagandet
1 Rätt valdeltagandet
1 Kryssväxel, vinkel 30
1 Rerailer ramp 72240
1 fjärrstyrning
1 Laddningskabel (USB/Mini-USB)
2 batterier typ AAA/LR 03 1,5V
1 Dekalark
Bruksanvisning
D
USA
F NL
Bruksanvisning S DK
Garantisedel
Reklambroschyr
4. Tekniska data
• Tågets körspänning: fast inbyggda batterier/
ackumulatorer (laddningsbara via bifogad
laddningskabel)
• Fjärrstyrningens körspänning:2 x1,5 V DC
• Batterityp:2 x1,5V Micro, AAA, LR 03
• Spårvidd: H0 (skala 1:87)
5. Innan tåget används för första
gången
• Förbered fjärrstyrning och tåg enligt kapitel 6.2
och 6.3.
• Om tåget körs utanför fjärrstyrningens räckvidd
(ca. 6 m) kommer det att fortsätta köra utan att
längre kunna styras eller kontrolleras.
• Max 2 tåg kan köras samtidigt.
• Om någon annan apparat som använder samma
frekvens körs eller nyttjas inom tågets räckvidd
kan störningar uppstå.
6. Beredningar
6.1 Hur man hanterar batterier:
OBS! Information beträffande batterier och återuppladdningsbara el-ackumulatorer.
• Denna leksak innehåller ett icke utbytbart elbatteri i tåget/loket.
•
VARNING! Tågets laddningsbara batterier kan
laddas endast när tåget är avstängt. Laddning får
endast göras med den bifogade USB-laddningskabeln
.
• Batterier får endast hanteras, monteras och
bytas ut av vuxna personer.
• Icke återuppladdningsbara batterier får aldrig
någonsin återuppladdas.
S
Page 56

20
Batterierna får endast sättas i eller
bytas ut parvis, se markeringarna!
Observera polariteten!
Öppna batterifacket genom att skruva loss
locket.
Två batterier typ AAA/LR 03 skall sättas i, så
som visas på bilden.
Sätt tillbaka batterifackets lock.
Sätt tillbaka batterifackets skruva fast det .
6.2 Fjärrstyrning
• Om laddningsbara batterier används i tågets
fjärrstyrningsenhet, så måste batterierna tas ur
fjärrstyrningsenheten innan de laddas!
• Laddningsbara batterier (ackumulatorer) får endast laddas under uppsikt av en vuxen person.
Följ alltid batteriladdarens bruksanvisning.
•
Batterier av olika typer samt nya och begagnade batterier får aldrig blandas samman eller
användas tillsammans.
• Se till att batterierna alltid monteras med polariteten vänd åt rätt håll.
• Tomma/urladdade batterier skall tas ut ur
fjärrstyrningen.
• Anslutningar och kontakter får aldrig kortslutas.
• Skall tåget ställas undan och inte användas på
en längre tid, så måste man ta ur fjärrstyrningens batterier.
• Använd skyddshandskar när gamla batterier
avlägsnas. Använd en torr trasa och rengör
batterifacket och kontakterna..
• Batterier skall aldrig hanteras av barn. Barn kan
stoppa batterierna i munnen och svälja dem.
Om ett batteri sväljs måste man omedelbart
söka läkarhjälp.
• Omhändertagande som avfall.
2
3
1
2.
3.
1.
G
H
G
H
+
-
-
+
3.
G
H
+
-
-
+
2.
3.
+
-
-
+
1.
5.
4.
G
H
G
H
G
H
+
-
-
+
6.3 Tåget
Innan tåget körs för första gången måste de
inbyggda batterierna laddas!
Den medföljande laddningskabelns Mini-USBstickkontakt skall stickas in i tågets
Mini-USB-kontaktingång.
USB-kontakterna tillhörande den medföljande
laddningskabeln får endast anslutas till en
laddarem med skyddsklass II (t.ex. laddare till
mobiltelefon), märkt med följande symbol:
1
2
Innan laddning av batterierna påbörjas måste
man kontrollera att tåget är helt avstängt.
Page 57

21
2.
Under pågående laddning av batterierna lyser
tågets röda lyktor.
Laddning med hjälp av den medföljande
kabeln tar ca 3 timmar.
Laddningen är klar när tåget röda lyktor
slocknar.
3
Ëfter att batteriet/ackumulatorn är fullständigt
laddad måste laddarens kabel avlägsnas från
tåget och laddaren.
Med fulladdade batterier kan tåget köras i ca
2,5 timmar.
7. Järnvägar för att bygga
Tillsammans
Att lösa
Exempel på spåranläggningar (se även sidan 35):
G
H
1.
6.4 Montage av dekaler på tåget
Välj ut dekalarket med det önskade
järnvägsbolaget. Det finns 2 ark med dekaler till
vart och ett av de olika järnvägsbolagen. De 2 dekalerna ska monteras på höger respektive vänster
sida av tåget.
* USB-laddare medföl-
jer inte vid leverans!
*
Page 58

22
Starta tåget, 1x tryckning
4
8. Tåg tas i drift
Sammankoppling av vagnarna.
Ställ tåget på rälsen eller på en slät, jämn yta.
Inställningen av tågets och
fjärrstyrningens reglage/kontrollspakar måste vara identiska.
8.1 Förberedelse/inkoppling av tåget
3
2
1
G - G
H - H
G - H
H - G
G
H
G
H
Påspårningsskena nr 72240 gör det enklare att
ställa lok och vagnar på spåret.
Page 59

23
3
3
2
1
0
1
2
8.2 Användning av fjärrkontrollen
Knapparnas funktion
Ställbara funktioner
Frontstrålkastare
Ljud: Bromsgnissel
Ljud: Konduktörsvissla
Ljud: Signalhorn
1
1
3
1
2
3
2
1
3
1
2
3
2
0 0
Tågstopp
Hastighet och körriktning
2
Stopp-läge
(0)
Hastighet
framåt (1/2/3)
Hastighet
bakåt (1/2/3)
0: Stopp-läge
1: Långsam fart
2: Mellanfart
3: Hög hastighet
Page 60

24
1
3
1
2
3
2
1
3
1
2
3
2
0
0
max. 6 m
- Det får inte finnas några hinder mellan tåget
och fjärrstyrningen
1
3
1
2
3
2
1
3
1
2
3
2
0
0
- Fjärrstyrningen får inte vändas bort från tåget.
1
3
1
2
3
2
1
3
1
2
3
2
0
0
9. Anvisningar om tågets drift
- Vid körning: Se till att körkontrollen alltid är
riktad mot tåg.
- Om tåget/produkten avlägsnas utom räckhåll för
körkontrollen (ca. 6 m), så kör tåget vidare, men
kan då inte längre styras eller kontrolleras.
- Efter 5 minuter utan körsignal från fjärrstyrningen stannar tåget. Tåget kan åter startas genom
att en körsignal åter aktiveras.
Efter 10 minuter utan körsignal stängs tåget av
automatiskt. För att kunna köra tåget igen måste
tåget på nytt kopplas in via körkontrollen.
Page 61

25
9.1 Körning med 2 tåg
Man kan köra med 2 tåg på samma anläggning,
helt oberoende av varandra.
Då måste man på ett tåg och på fjärrstyrningen
ställa om reglagen till läge G-G(1) - och på det
andra tåget och den andra fjärrstyrningen ställer
man in reglagen på H-H(2). Reglagen på tåget och
fjärrstyrningen måste vara identiska.
1
G - G
G - H
H - G
G
H
G
H
2
H - H
G - H
H - G
G
H
G
H
10. Funktionsstörningar
• Om tåget inte fungerar, kontrollera om tågets
batterier är laddade. Om så ej är fallet laddar
man tågets batterier. Om tågets batterier är laddade och tåget ändå inte fungerar, så kontrollerar man fjärrstyrningens batterier. Fungerar
inte tåget ändå så byter man ut fjärrstyrningens
batterier.
• Om tåget börjar gå långsammare eller blir
stående under körningen skall batterierna
laddas. Beakta urkopplingen av tåget under
laddningen! (se kapitel 9 ovan).
• Är tåget skadat får det inte längre användas.
Har något annat tåg skadats så måste även det
tas ur drift och ej användas igen.
• Om loket är skadat skall det ej användas mer
och batterierna avlägsnas. Skulle någon annan
tågdel av tåget skadas skall den skadade
tågdelen avlägsnas från tåget och ej användas
mer.
11. Rengöring och underhåll
• Var god kontrollera att inte hårstrån eller smuts
fastnar på tågets hjulaxlar. Avlägsna hårstrån
och smuts från hjulaxlarna med hjälp av en
pincett.
• Tåget kan torkas rent med en torr, luddfri duk.
• Ackumulatorn måste återladdas senast inom 6
månader, för att undvika att ackumulatorn töms
helt. Total tömning skadar ackumulatorn/batteriet, minskar dess effekt och förkortar fordonets
körtid.
• Vid behov kan slirskydden på lokets drivhjul
bytas mot nya. Slirskydd finns att tillgå, reservdelsnummer E284 219.
E284 219
Page 62

26
12. Hantering som avfall
Beträffande miljöskydd: För alla
produkter som markerats med
symbolen “överstruken soptunna”
gäller följande: När produkten är
slutförbrukad får den inte slängas i
hushållsavfallet, utan måste lämnas in till av
kommunen anvisat ställe för återvinning av
elektrisk och elektroniskapparatur. Symbolen
“överstruken soptunna” kan återfinnas på
produkten, på bruksanvisningen eller på förpackningen. Materialet i produkter med denna
märkning är återvinningsbart. All återvinning och
återanvändande av gamla produkter och
produkters material bidrar till att skydda vår miljö.
Kommunen kan informera om var den lokala
återvinningsstationen finns.
Batterier hör inte hemma bland
hushållssoporna! Alla konsumenter
inom EU är enligt lag förpliktigade att
lämna in förbrukade batterier till
därför anvisad återvinningsstation
eller att återlämna dem till inköpsstället. Batterierna omhändertas då på ett miljövänligt och säkert
sätt. Batterier som innehåller miljöfarliga ämnen
är markerade med symbolen “överstruken
soptunna” och är även märkta med symboler för
de kemiska ämnen som ingår i batterierna (Cd =
kadmium, Hg = kvicksilver, Pb = bly).
Mer information:
www.maerklin.com/en/imprint.html
13. Garanti
Garantivillkor framgår av bifogade garantibevis.
• Kontakta din Märklinfackhandlare för reparatio-
ner och reservdelar eller:
Gebr. Märklin & Cie. GmbH
Reparaturservice
Stuttgarter Str. 55 - 57
73033 Göppingen
Germany
Tel: +49 7161 608 222
E-Mail: Service@maerklin.de
Page 63

27
1. Hensigtsmæssig anvendelse
Dette produkt er en modeljernbane til børn fra 3 år
på sporvidden H0 (målestok 1:87). Det batteridrevne tog kan benyttes på modelbaneanlæg, som er
udstyret med Märklin C-spor (se pakkens indhold).
• De ledsagende spor er designet til drift med
Transformator / digitale drev enhed ikke er
egnet.
• Produktet kan ikke benyttes på gulvtæppe.
• Toget kan bruges på glatte og rene overflader,
på myworld plastikskinner, samt på H0 Cskinner.
2. Sikkerhedsanvisninger
• Produktet må kun anvendes indendørs.
• Udsæt ikke produktet for direkte sollys, stærke
temperaturudsving eller høj luftfugtighed.
• BEMÆRK! Ikke egnet til børn under 3 år.
Funktionsbetingede skarpe kanter og spidse
punkter. Fare for kvælning ved smådele, som
kan knække af og sluges.
• BEMÆRK! Hold ikke det tændte produkt op i
ansigtet eller håret.
• BEMÆRK! Skulle der opstå en skade på et
af togets led, må det beskadigede led ikke
anvendes mere.
• BEMÆRK! Dette produkt indeholder magneter
i koblingen. Det kan under bestemte omstændigheder medføre døden at sluge en eller flere
magneter. Søg i givet fald omgående lægehjælp.
• Medfølgende USB-opladekabel må ikke bøjes og
skal regelmæssigt efterses for beskadigelser på
kabel, stik og andre dele. I tilfælde af skader, må
legetøjet ikke bruges, før skaden er repareret.
• De indbyggede lysdioder svarer til laserklasse 1
i henhold til normen EN 60825-1.
3. Leverancens omfang:
Tog i 3 dele
21 buede spor R1
2 buede spor R2
4 lige spor 188 mm
7 lige spor 172 mm
1 sporskifte venstre
1 sporskifte højre
1 kryss 30°
1 Rerailer Rampe 72240
1 fjernstyring
1 opladningskabel (USB/Mini-USB)
2 batterier type AAA/LR 03 1,5V
DK
1 Klistermærkeark
Brugsanvisning D
USA
F
NL
Brugsanvisning
S
DK
Garantibevis
Reklamefolder
4. Tekniske data
• Strømforsyning tog: Fast integreret batteri (genopladeligt ved hjælp af medfølgende opladningskabel)
• Strømforsyning fjernstyring: 2 x 1,5 V DC
• Batteritype:2 x 1,5V Micro, AAA, LR 03
• Sporvidde H0 (målestok 1:87)
5. Når toget bruges for første gang
• Forbered fjernstyring og tog som beskrevet i
kap. 6.2 og 6.3.
• Kommer toget udenfor fjernbetjeningens ræk-
kevidde, (ca. 6 m) kører det videre, men kan
dog ikke længere styres.
• Der kan maksimalt benyttes to tog parallelt.
• Hvis der benyttes et andet produkt med samme
frekvens indenfor togets rækkevidde, vil der
kunne forekomme forstyrrelser.
6. Forberedelser:
6.1 Råd om håndtering af batterier:
Råd om batterier og genopladelige akkus
• Dette legetøj indeholder et ikke-udskifteligt
batteri i toget/i lokomotivet.
• BEMÆRK! Togets batteri kan kun oplades, når
toget er slået fra, ved hjælp af vedlagte USBopladningskabel.
• Batterier bør udelukkende isættes og skiftes af
voksne.
• Ikke genopladelige batterier må ikke genoplades.
• Hvis der bruges genopladelige batterier til
fjernstyringen, skal disse fjernes inden opladning!
• Oplad kun opladelige batterier (akkus) under
voksnes tilsyn. Vær i den forbindelse opmærksom på brugsanvisningen til det pågældende
ladeapparat.
•
Forskellige batterityper eller nye og brugte batterier må ikke anvendes sammen.
•
Sæt batterierne i med polerne den rigtige vej.
Page 64

28
• Tomme batterier skal tages ud af fjernstyringen.
•
Kontakter må ikke kortsluttes.
• Hvis toget ikke bliver brugt i længere tid, skal
batterierne tages ud af fjernstyringen.
• Hvis batterierne er løbet du, tag da beskyttelseshandsker på, når du skal fjerne batterierne.
Rengør derefter batteridåsen og kontakterne
med en tør klud.
• Batterier hører ikke hjemme i hænderne på
børn. Børn kan tænkes at putte batterierne i
munden og sluge dem. Hvis nogen er kommet
til at sluge et batteri, kræves der omgående
lægehjælp.
• Bortskafning se punkt 12.
Skru batteridåsen op og løft låget af
6.2 Fjernstyring
1
Isæt eller udskift kun batterierne parvis,
jfr. markeringerne! Vær opmærksom på
at polerne vender rigtigt!
Læg to batterier af type AAA/LR 03 i som vist
på tegningen
Læg batteridåsens låg på.
Skru batteridåsen fast.
2
3
2.
3.
1.
G
H
G
H
+
-
-
+
3.
G
H
+
-
-
+
2.
3.
+
-
-
+
1.
5.
4.
G
H
G
H
G
H
+
-
-
+
6.3 Tog
Det integrerede batteri skal lades op inden første
brug af toget!
Sæt Mini-USB-stikket på medfølgende
opladningskabel i togets mini-USB-port.
USB-stikket på det medfølgende opladerkabel
må kun tilsluttes en oplader af beskyttelsesklasse II (f. eks. oplader til mobiltelefon), som
er forsynet med følgende symbol:
1
2.
2
Kontrollér, at toget er slukket inden batteriet
oplades.
G
H
1.
* USB-oplader
medfølger ikke!
*
Page 65

29
Den røde lampe på toget lyser under opladning.
Opladningstiden med medfølgende kabel er
ca. 3 timer.
Toget er ladet op, når den røde lampe på toget
slukker.
3
Efter fuld opladning af batteriet, skal opladerkablet tages ud af toget og opladeren.
Med fuldt opladet batteri kan toget køre i ca.
2,5 timer.
7. Opbygning af sporet
Sammensætning
Adskillelse
Eksempler på opbygning (e også side 35):
6.4 Sæt klistermærket på toget
Vælg det ønskede jernbaneselskab på arket, der
indeholder 2 klistermærker fra hvert af de forskellige jernbaneselskaber. Påfør de 2 klistermærker
på henholdsvis højre og venstre side af toget.
Page 66

30
Tænd for toget, 1 x tryk
4
8. Toget tages i brug
Kobl vognene sammen.
Stil toget på skinnerne eller på det glatte og
jævne gulv.
Togets og fjernstyringens indstillinger skal stemme overens.
8.1 Forberede/tænde for toget
3
2
1
G - G
H - H
G - H
H - G
G
H
G
H
Skinnehjælpen 72240 gør det lettere at stille lokomotiver og vogne på skinnerne.
Page 67

31
3
3
2
1
0
1
2
8.2 Betjening af fjernstyring
Tastefunktion
Skift mellem funktioner
Forlygte
Lyd: Pibende bremser
Lyd: Konduktørens fløjte
Lyd: Signalhorn
1
1
3
1
2
3
2
1
3
1
2
3
2
0 0
Standsning af toget
Hastighed og kørselsretning
2
Stop-position
(0)
Kørsel
fremad (1/2/3)
Kørsel
bagud (1/2/3)
0: Stop-position
1: langsomt
2: mellemhurtigt
3: hurtigt
Page 68

32
1
3
1
2
3
2
1
3
1
2
3
2
0
0
max. 6 m
- Der må ikke befinde sig forhindringer mellem
toget og fjernstyringen.
1
3
1
2
3
2
1
3
1
2
3
2
0
0
- Vend ikke fjernstyringen bort fra toget.
1
3
1
2
3
2
1
3
1
2
3
2
0
0
9. Driftsanvisninger
- Vær under kørslen opmærksom på, at fjernstyringen altid er rettet mod produktet.
- Kommer produktet udenfor fjernstyringens rækkevidde, (ca. 6 m) kører det videre, men kan dog
ikke længere styres.
- Efter 5 minutter uden køresignal fra fjernbetjeningen, bliver toget stående. Det kan igen
aktiveres ved at trykke på et køresignal efter
eget valg.
Efter 10 minutter uden køresignal, slukkes toget.
For at genaktivere toget, skal det tændes ved at
trykke på kontakten.
Page 69

33
9.1 Kørsel med 2 tog
Det er muligt at køre med 2 tog uafhængigt af
hinanden i samme anlæg. Dertil indstilles et tog og
fjernstyring på indstilling G-G (1), og det andet tog
og fjernstyring på H-H (2). Togets og fjernstyringens indstillinger skal stemme overens!
1
G - G
G - H
H - G
G
H
G
H
2
H - H
G - H
H - G
G
H
G
H
10. Funktionsforstyrrelser
• Hvis toget ikke kører, kontrollér om togets
batteri er ladet op. Lad togets batteri op efter
behov. Hvis togets batteri er ladet op og toget
stadig ikke reagerer, bør fjernstyringens batteri
kontrolleres. Udskift fjernstyringens batteri efter
behov.
• Hvis toget bliver betydeligt langsommere eller
bliver helt stående under legen, skal batteriet
lades op. Vær opmærksom på automatisk afbrydelse! (se kap. 9)
• Hvis toget er beskadiget, bør det ikke anvendes.
Hvis et andet køretøj er beskadiget, bør det
adskilles fra toget og ikke anvendes.
• Forringes fjernstyringens rækkevidde, skal
fjernstyringens batterier fornyes.
11. Rengøring og vedligeholdelse
• Kontroller om der er kommet hår eller snavs på
akslerne og fjern i givet fald med en pincet dette
snavs fra akslerne.
• Toget kan tørres af med en tør, fnugfri klud.
• I tilfælde af manglende brug, skal batteriet
oplades efter senest 6 måneder, for at undgå
fuld afladning. Fuld afladning er skadelig for
batteriet, minimerer effekten og forkorter
køretøjets køretid.
• Traktionsdækkene på drivakslen kan udskiftes
efter behov. Traktionsdæk fås under reservedelsnummer E284 219.
E284 219
Page 70

34
12. Bortskafning
Anvisninger til miljøbeskyttelse:
Produkter, der er mærket med en
overstreget affaldsspand, må ved
afslutningen af deres levetid ikke
bortskaffes sammen med det normale
husholdningsaffald, men skal afleveres ved et
indsamlingssted for genbrug af elektriske og
elektroniske apparater. Symbolet på produktet,
brugsanvisningen eller emballagen gør opmærksom herpå. Materialerne kan genbruges jævnfør
deres mærkning. Med genbrug af materialet og
andre former for genbrug af brugte apparater yder
du et vigtigt bidrag til beskyttelsen af vort miljø.
Spørg hos din kommune, hvor du finder det rigtige
indsamlingssted.
Batterier må ikke bortskaffes som
husholdningsaffald!! Alle forbrugere i
EU er ifølge lovgivningen forpligtet til
at aflevere batterierne på et indsam-
lingssted i kommunen eller i en
forretning.Batterierne bortskaffes derefter
miljøvenligt. Batterier, der indeholder skadelige
stoffer, er kendetegnet med dette tegn og med
kemiske symboler (Cd =cadmium, Hg = kviksølv,
Pb = bly).
Yderligere oplysninger på:
www.maerklin.com/en/imprint.html.
13. Garanti
Garanti ifølge vedlagte garantibevis.
• I tilfælde af reparationer ret da henvendelse til
din Märklin-forhandler eller til
Gebr. Märklin & Cie. GmbH
Reparaturservice
Stuttgarter Str. 55 - 57
73033 Göppingen
Germany
Tlf: +49 7161 608 222
E-mail: Service@maerklin.de
Page 71

35
Vías y desvíos • Binari e deviatoi • Spår och växlar • Skinner og sporskifte
Las diferentes vías y desvíos están identificadas en el lado posterior por una etiqueta adhesiva redonda
de color.
I differenti binari e deviatoi sono contrassegnati sul lato posteriore con un adesivo tondo colorato.
De olika spåren och växlarna är på baksidan märkta med ett runt, färgat klistermärke.
De forskellige skinner og sporskifte er markeret på bagsiden med runde, farvede klistermærker.
≠
Page 72

Gebr. Märklin & Cie. GmbH
Stuttgarter Str. 55 - 57
73033 Göppingen
Germany
www.maerklin.com
287631/1118/Sc3Dt
Änderungen vorbehalten
© by Gebr. Märklin & Cie. GmbH
www.maerklin.com/en/imprint.html
Encontrará otras posibilidades de montaje, p. ej., con la caja complementaria 23300 en
www.maerklin.de > Service > Downloads > Produktunterstützung > Gleispläne my world
Ulteriori possibilità di montaggio, ad es. con la confezione di completamento 23300, sotto
www.maerklin.de > Service > Downloads > Produktunterstützung > Gleispläne my world
Anläggningen kan byggas ut med t. ex. utbyggnadssats 23300, v.g. se
www.maerklin.de > Service > Downloads > Produktunterstützung > Gleispläne my world
Yderligere opbygningsmuligheder f. eks. med tillægspakke 23300 på
www.maerklin.de > Service > Downloads > Produktunterstützung > Gleispläne my world
 Loading...