

My Water Filter Xstream 7 Installation Manual

)
-
REVERSE
OSMOSIS
INSTALLATION
7
Stage
Hydrogen
Rich
High
Alkaline
BRIEF
TECHNICAL
ASPECT
OF
THE
WATER
TREATMENT
SYSTEM
This
Water
Filter
Treatment
System
utilizes
a
process
called
reverse
osmosis
(RO)
.
As
the
heart
of
the
purification
system
,
the
RO
process
uses
semi
-
permeable
spiral
-
wound
membranes
to
separate
and
remove
dissolved
solids
,
organic
,
pyrogens
,
sub-micron
colloidal
particles
and
bacteria
from
water
.
Feed
water
is
delivered
under
pressure
at
about
60
PSI
through
the
permeator
where
water
permeates
the
minute
pores
of
the
membrane
and
is
delivered
as
purified
water
.
Impurities
in
the
water
are
concentratedinthe
reject
stream
and
flushed
to
drain.Your
newly
purchased
Reverse
Osmosis
System
is
capable
of
removing
between
90
%
to
96
%
of
the
total
dissolved
solids
(
TDS
)
,
organics
,
and
bacteria
.
Important
We
suggest
you
read
and
become
familiar
with
all
instructions
,
processes
,
and
parts
prior
to
proceeding
with
the
installation.Please
see
back
page
for
information
on
protection
equipment
.
BEFORE
YOU
START
:
PLEASE
NOTE
-
All
components
that
come
pre
-
assembled
will
require
tightening
and
checking
before
installation.Due
to
transit
,
fittings
and
other
components
may
be
loosened
or
unseated
from
vibrations
so
please
go
along
and
check
all
things
including
but
not
limited
to
:
Tubing
,
Fittings,tubing
connections(between
tube
and
fitting
)
,
O
-
rings
,
housings
and
filters
.
Prior
to
installing
the
feed
water
assembly
,
please
make
sure
that
the
following
water
conditions
are
met
:
•
Feed
Water
Condition
Inlet
Pressure
Temperature
pH
Level
TDS
Level
Min
.
40
PSI
4.5
°
C
2
0
mg
/
L
Max
.
100
PSI
38
°
C
11
2000
mg
/
L
•
All
local
plumbing
codes
must
be
followed
.
•
All
tubing
must
be
cut
in
a
straight
line
with
a
clean
,
sharp
Stanley
Knife
.
Ready
to
start
•
Locate
cold
water
supply
,
suitable
hanging
and
fitment
room
for
system
and
tank
.
Locate
the
drain
point
,
and
sink
faucet
placement
.
FEED
WATER
INSTALLATION
:
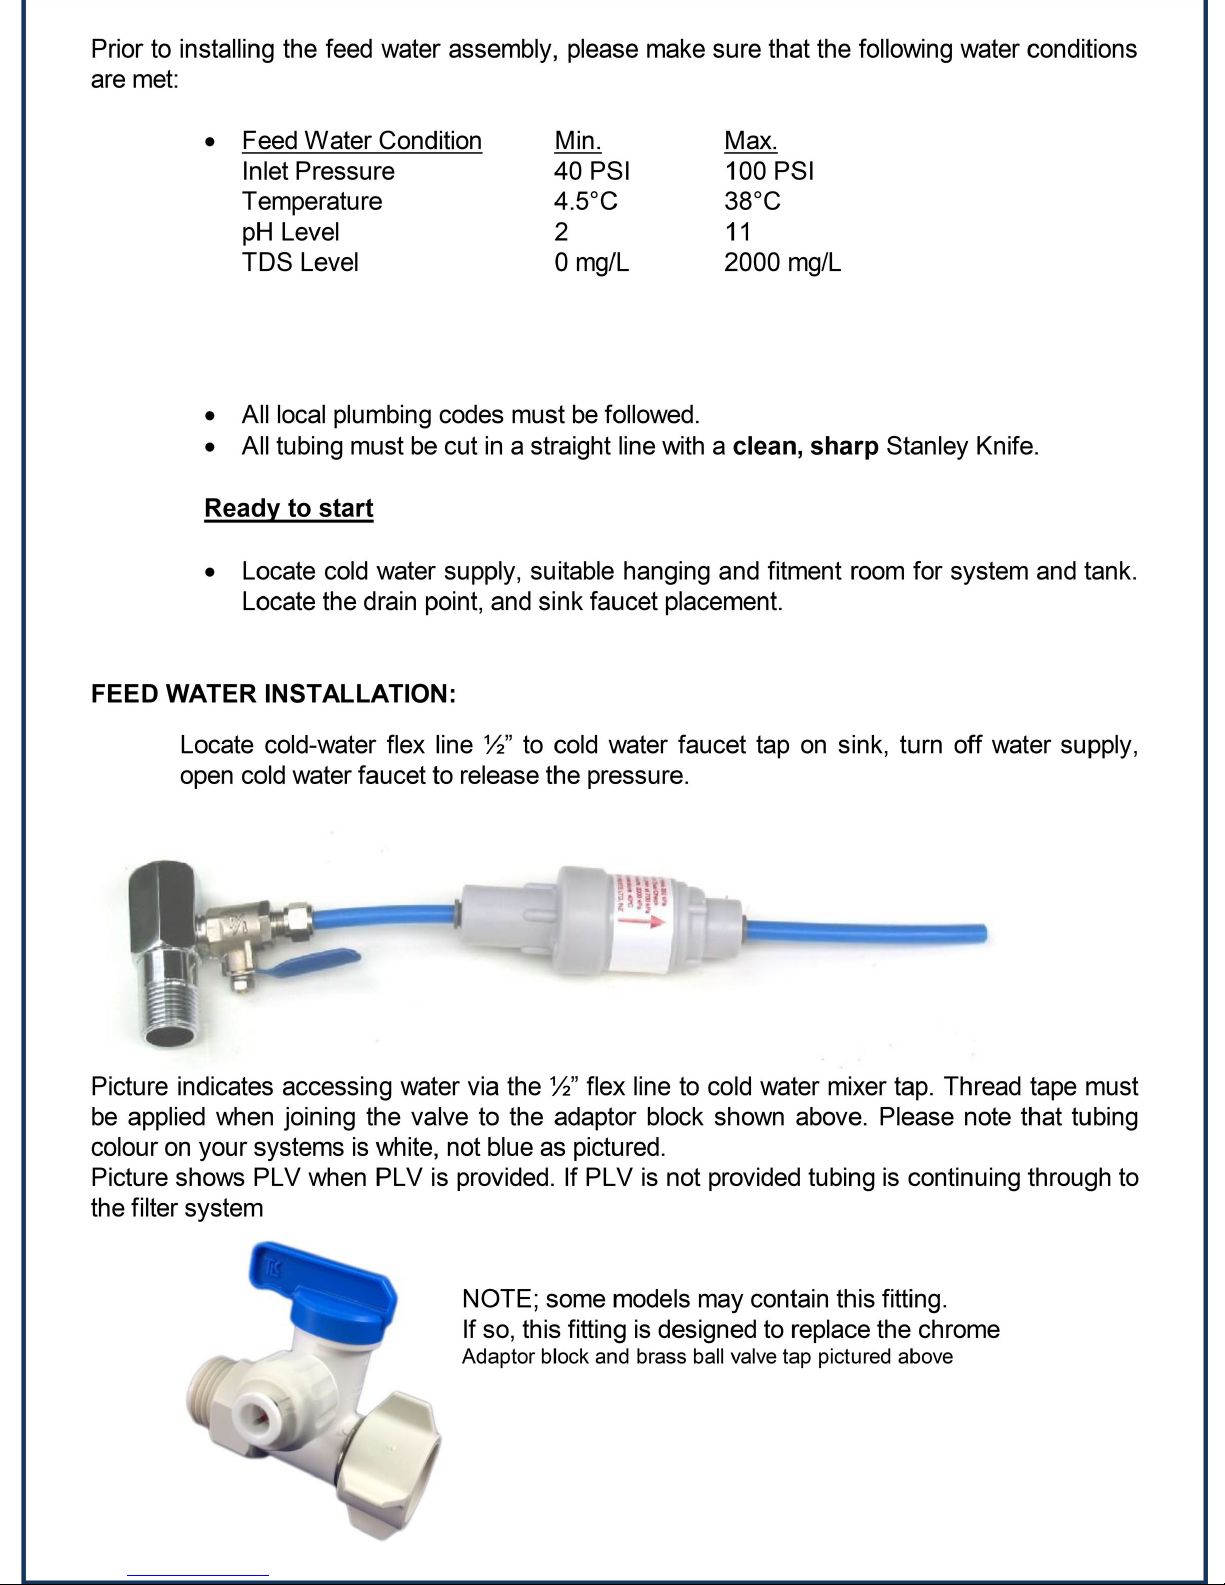
Locate
cold
-
water
flex
line
V
2
”
to
cold
water
faucet
tap
on
sink
,
turn
off
water
supply
,
open
cold
water
faucet
to
release
the
pressure
.
Picture
indicates
accessing
water
via
the
!
4
”
flex
linetocold
water
mixer
tap
.
Thread
tape
must
be
applied
when
joining
the
valve
to
the
adaptor
block
shown
above.Please
note
that
tubing
colour
on
your
systems
is
white
,
not
blue
as
pictured
.
Picture
shows
PLV
when
PLV
is
provided
.
If
PLV
is
not
provided
tubingiscontinuing
through
to
the
filter
system
NOTE
;
some
models
may
contain
this
fitting
.
If
so
,
this
fitting
is
designed
to
replace
the
chrome
Adaptor
block
and
brass
ball
valve
tap
pictured
above
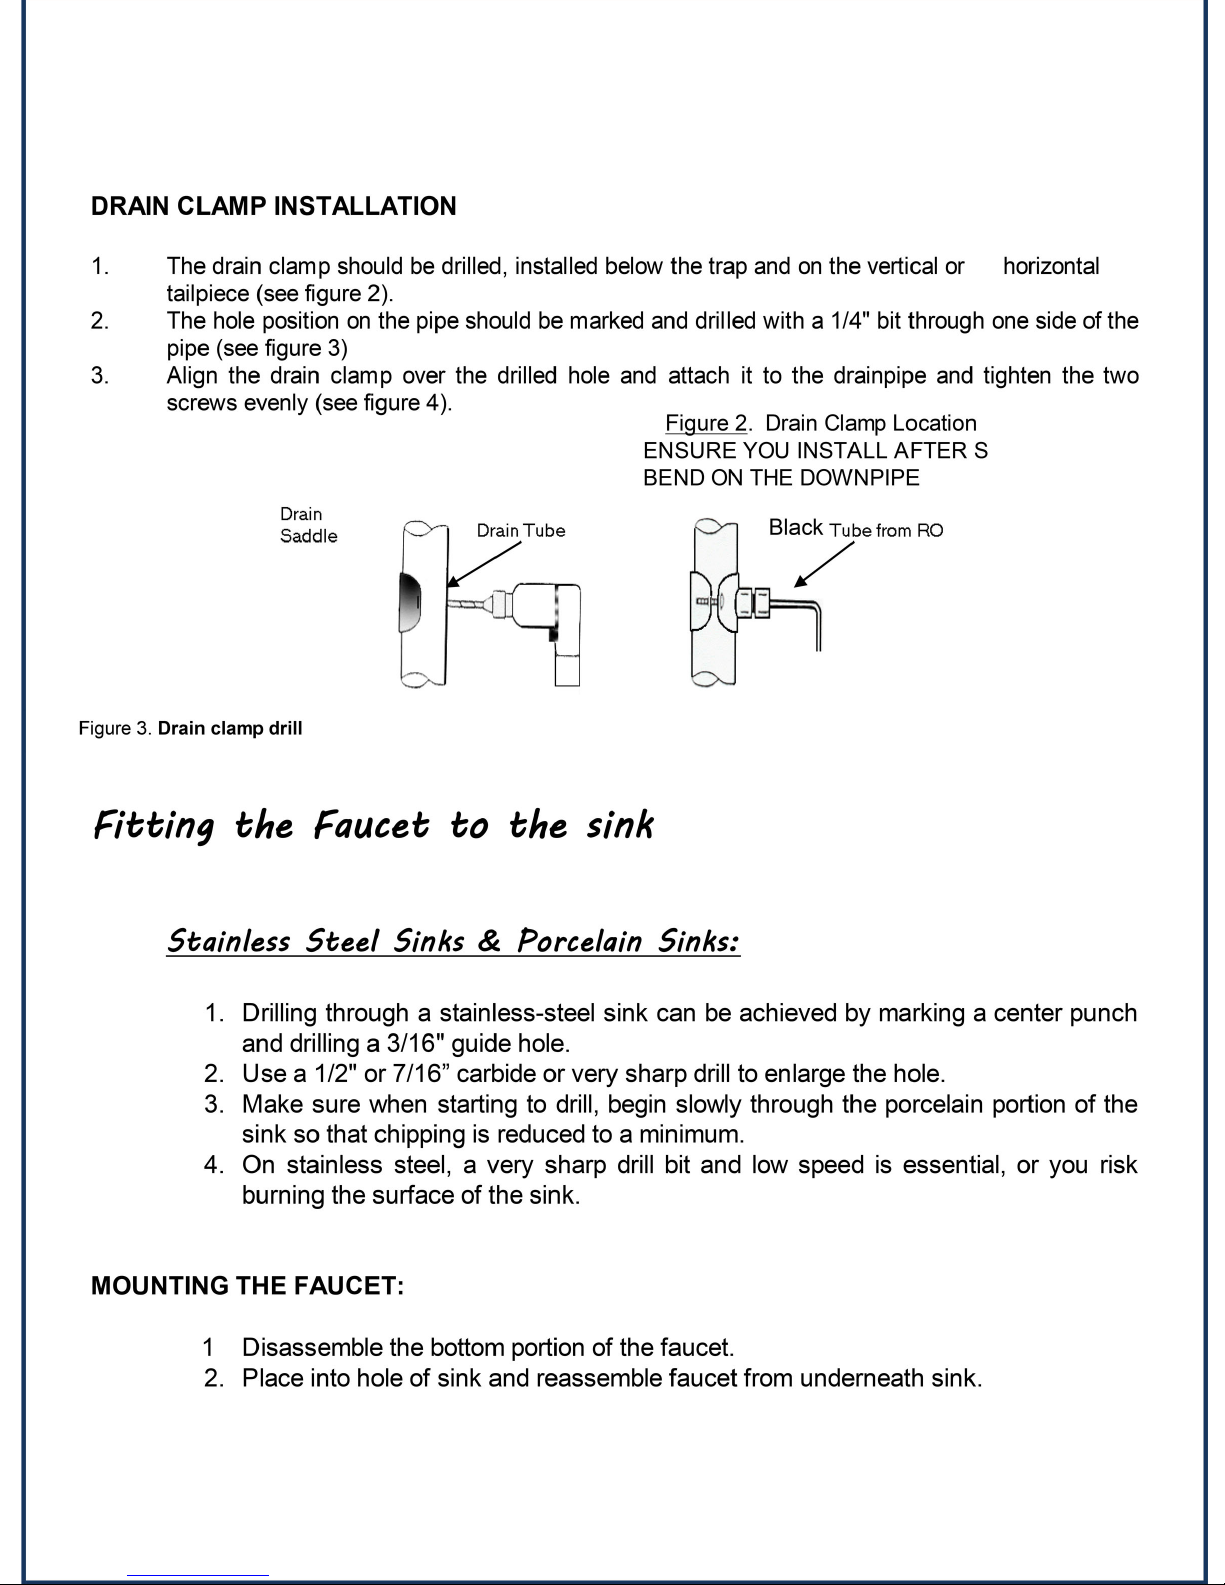
DRAIN
CLAMP
INSTALLATION
1
.
2
.
3
.
The
drain
clamp
shouldbedrilled,installed
below
the
trap
andonthe
vertical
or
horizontal
tailpiece
(
see
figure2)
.
The
hole
position
on
the
pipe
shouldbemarked
and
drilled
with
a
1
/
4
"
bit
through
one
sideofthe
pipe
(
see
figure
3
)
Align
the
drain
clamp
over
the
drilled
hole
and
attach
it
to
the
drainpipe
and
tighten
the
two
screws
evenly
(
see
figure
4
)
.
Figure
2
.
Drain
Clamp
Location
ENSURE
YOU
INSTALL
AFTER
S
BEND
ON
THEDOWNPIPE
Drain
Saddle
Drain
Tube
Black
Tube
from
RO
HQ
Figure
3
.
Drain
clamp
drill
Fitting
the
Faucet
to
the
sink
Stainless
Steel
Sinks
&
Porcelain
Sinks
:
1
.
Drilling
through
a
stainless-steel
sink
can
be
achieved
by
marking
a
center
punch
and
drilling
a
3
/
16
"
guide
hole
.
2
.
Use
a
1/2
"
or
7
/
16
”
carbide
or
very
sharp
drill
to
enlarge
the
hole
.
3
.
Make
sure
when
starting
to
drill
,
begin
slowly
through
the
porcelain
portion
of
the
sinksothat
chipping
is
reduced
to
a
minimum
.
4
.
On
stainless
steel
,
a
very
sharp
drill
bit
and
low
speed
is
essential
,
or
you
risk
burning
the
surface
of
the
sink
.
MOUNTING
THE
FAUCET
:
1
Disassemble
the
bottom
portion
of
the
faucet
.
2
.
Place
into
holeofsink
and
reassemble
faucet
from
underneath
sink
.
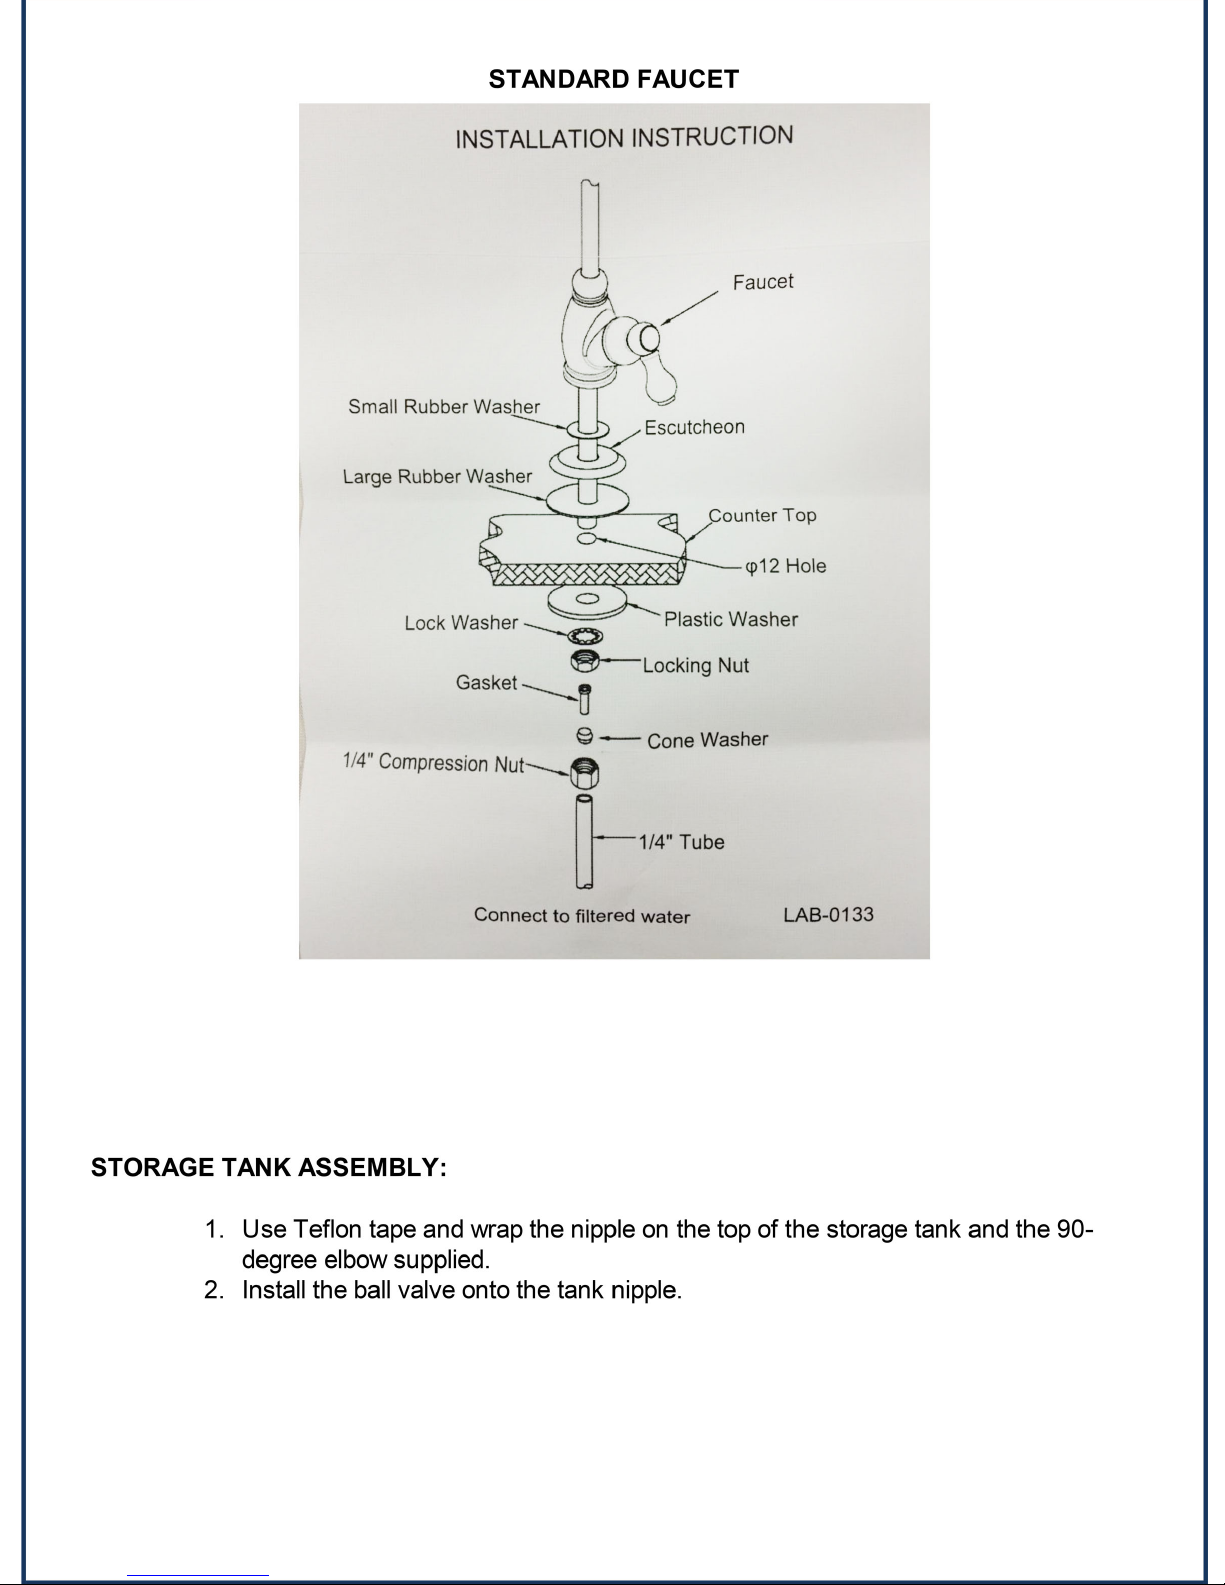
STANDARD
FAUCET
INSTALLATION
INSTRUCTION
PH
&
Faucet
Small
Rubber
Washer
Large
Rubber
Washer
Escutcheon
pounterTop
q
>
12
Hole
o
Lock
Washer
'
Plastic
Washer
^
—
Locking
Nut
Gasket
©
—
—
Cone
Washer
1
/
4
"
Compression
Nut
"
—
^
'
1
/
4
"
Tube
Connect
to
filtered
water
LAB
-
0133
STORAGE
TANK
ASSEMBLY
:
1
.
Use
Teflon
tape
and
wrap
the
nipple
on
the
top
of
the
storage
tank
and
the
90
-
degree
elbow
supplied
.
2
.
Install
the
ball
valve
onto
the
tank
nipple
.
 Loading...