

Page 1
Mytek DIO MADI Card – User Manual
Mytek DIO MADI Card
User Manual
ver. 1.4 / May 2011
© Mytek 2011
www.mytekdigital.com Page: 1 / 24
Page 2

Mytek DIO MADI Card – User Manual
This manual may be updated
Download the newest version at:
http://www.mytekdigital.com/download_library/
For technical support, technical tips and support check:
http://www.mytekdigital.com
or contact Mytek tech support at:
highend@mytekdigital.com
or at:
tel. (347) 384-2687
fax (212) 202-5331
Mytek Digital
148 India St. FL 1
Brooklyn, NY 11222
USA
www.mytekdigital.com Page: 2 / 24
Page 3

Mytek DIO MADI Card – User Manual
Content
Introduction.............................................................4
Before You Begin.....................................................4
Quick Start................................................................5
Card Installation......................................................6
Connecting Clock Signal......................................11
DipSwitch configuration......................................12
MADI Card Connectors........................................13
Other settings.........................................................13
Signal routing.........................................................14
RME Madiface ExpressCard................................15
Multiple Converter Configurations....................15
Mainboard firmware update................................19
Important Safety Instructions..............................23
www.mytekdigital.com Page: 3/24
Page 4

Mytek DIO MADI Card – User Manual
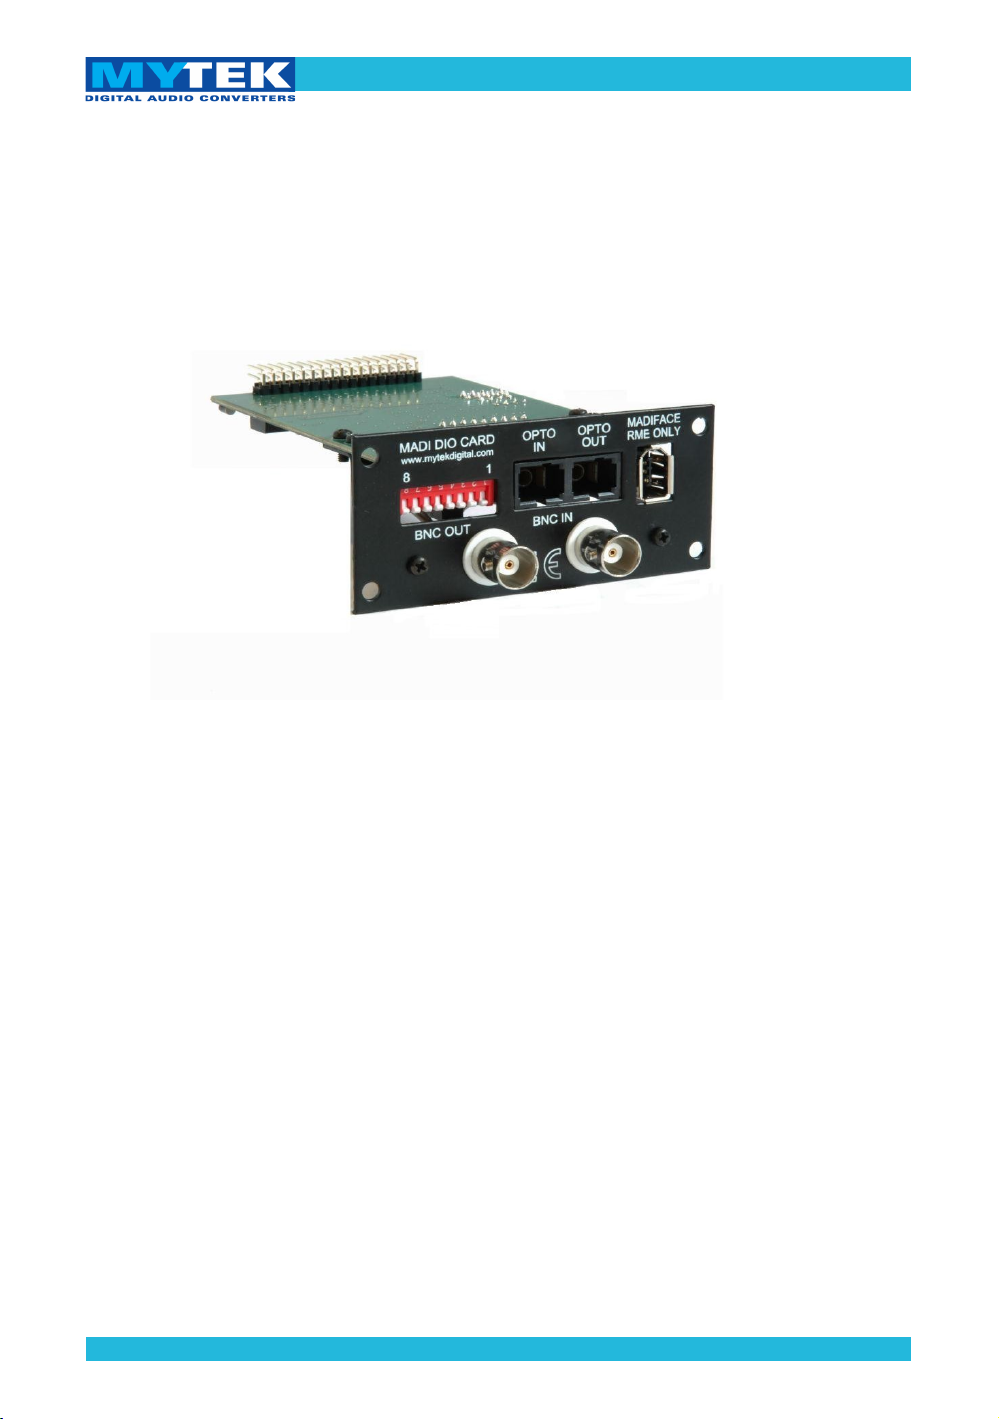
Introduction
The Mytek DIO MADI Card is a physical card that
plugs into the back of the Mytek 8X192 ADDA
converter.
With this card installed the Mytek 8X192 ADDA can
directly interface with other MADI capable
equipment. The card can be installed by the user as
described further in the manual.
Before You Begin
Before connecting the DIO MADI card, check if the
most current firmware (version 4.5.5 or later) is
installed in the 8X192 converter. To verify your
current version locate the firmware chip on the main
converter board or contact Mytek via email and
provide the serial number of converter.
(If necessary contact Mytek and request appropriate
firmware.)
www.mytekdigital.com Page: 4/24
Page 5

Mytek DIO MADI Card – User Manual
Quick Start
1. Installation of DIO MADI card
Remove the top cover from the converter,
unscrew the DIOCARD1 or DIOCARD2 slot plate
and install the DIO MADI card using the existing
screws. Double check if all the connector pins
match properly with the pins of the connector on
the main converter board.
2. Operation
The card is ready for operation immediately after
installing it in the converter.
3. Configuration
After turning on the 8x192ADDA converter you
should select the settings appropriate for your
configuration needed on the front panel. The DIO
MADI card should be connected to another
MADI device by one of three cables: optical, BNC
or FireWire.
Remember to turn
off and disconnect
power and signal
cables while working
with the top cover
removed.
www.mytekdigital.com Page: 5/24
Page 6
Mytek DIO MADI Card – User Manual
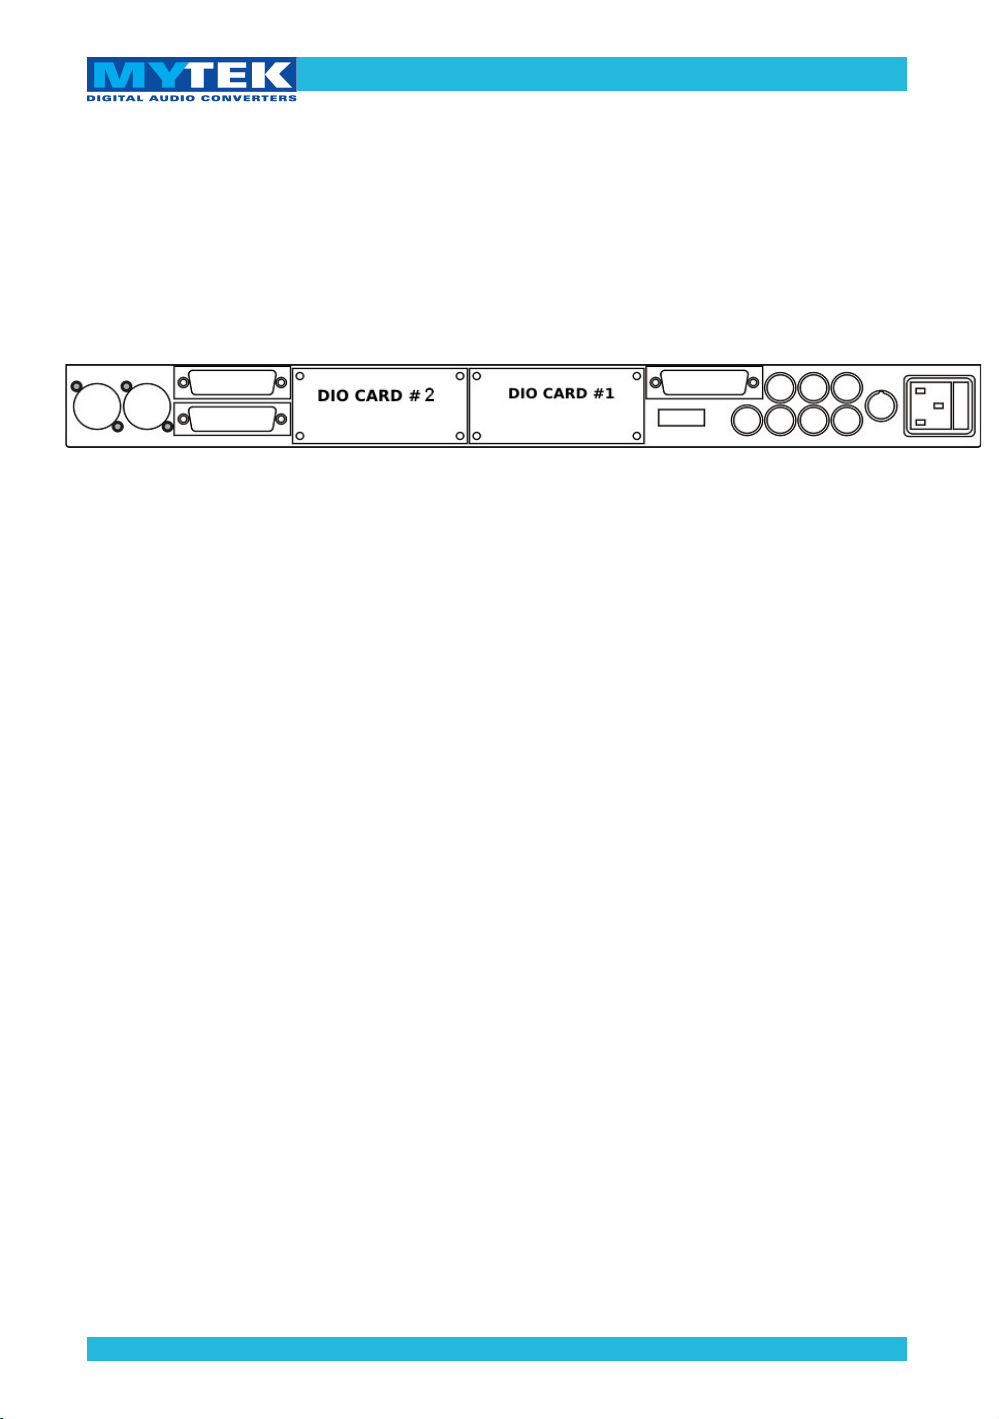
Card Installation
The DIO MADI card can be installed in either
DIOCARD1 or DIOCARD2 slot. The card can be
installed with any card available for the 8x192 converter.
8x192 ADDA converter’s rear panel
WARNING!
Remember to follow basic safety rules on electronic
device handling while opening the converter:
✔ Keep your hands dry,
✔ Turn off power and detach power and signal cables
while working with the top cover removed.
To install the DIO MADI card:
1. Find the DIOCARD1 or DIOCARD2 expansion
slot at the mainboard’s layout.
2. Make sure that the power cord and all signal and
clock lines are disconnected.
www.mytekdigital.com Page: 6/24
Page 7
Mytek DIO MADI Card – User Manual
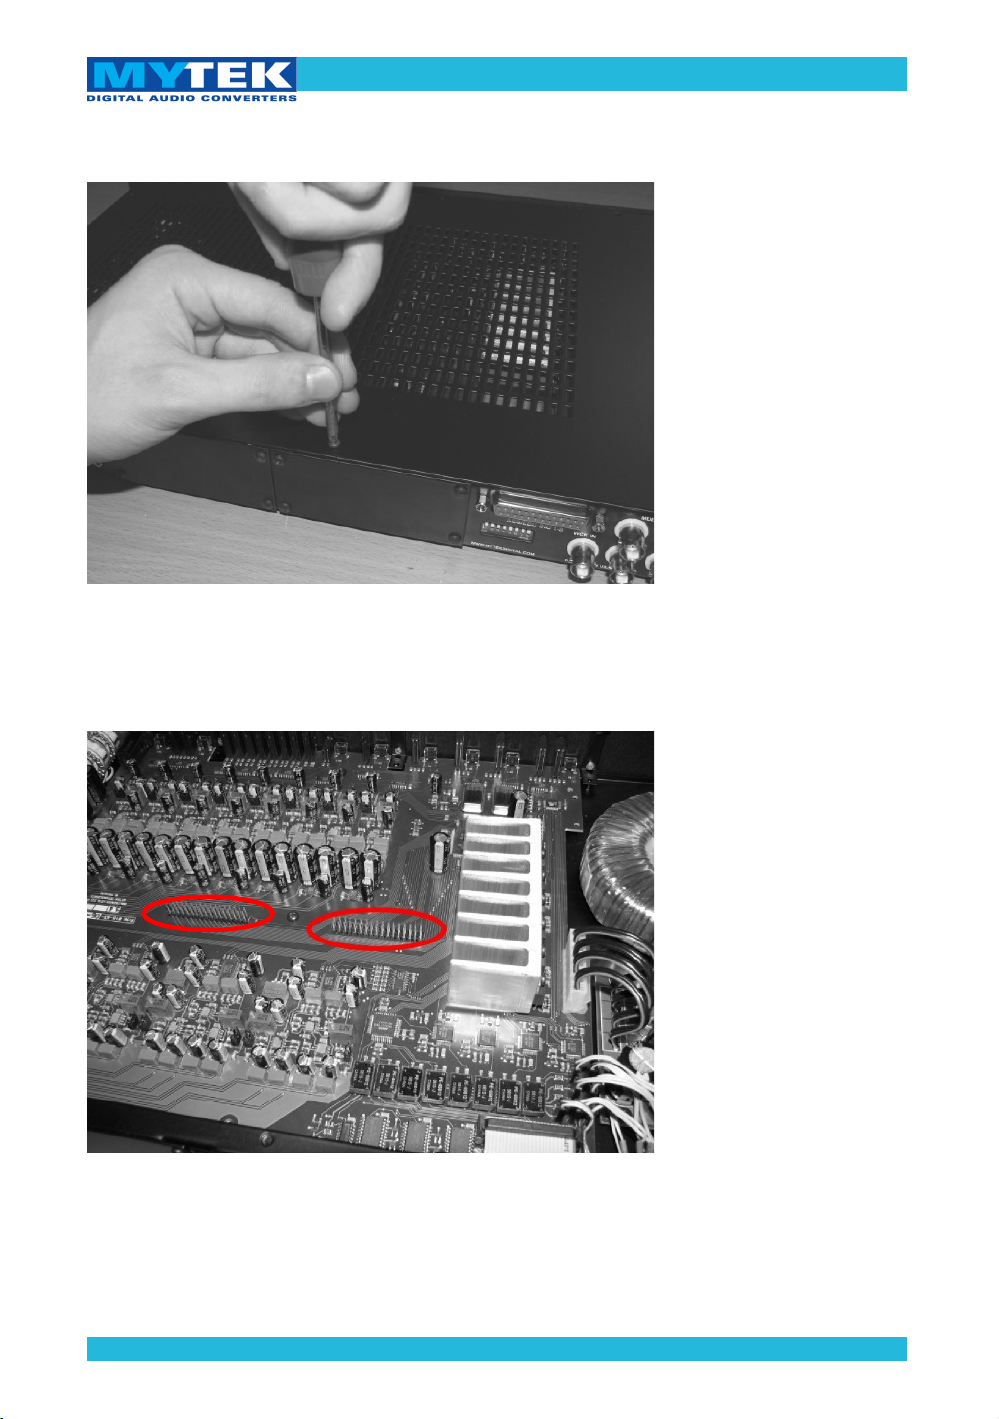
3. Remove the top cover.
4. Locate the DIOCARD1 or DIOCARD2
expansion slot on the mainboard.
www.mytekdigital.com Page: 7/24
Page 8
Mytek DIO MADI Card – User Manual
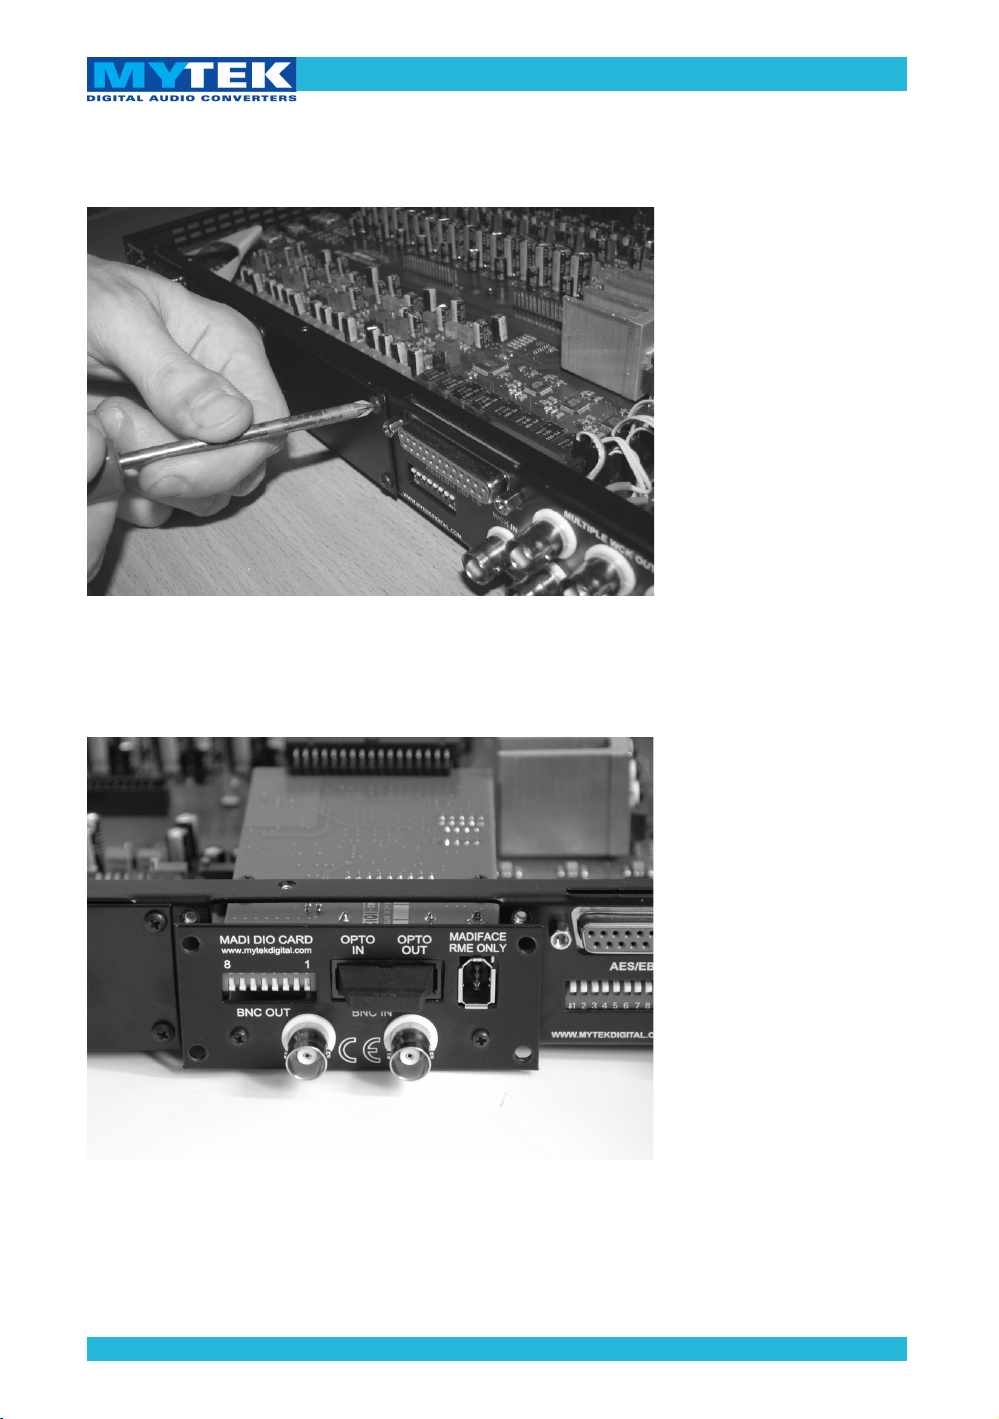
5. Unscrew the cover plate of the chosen slot
from the rear panel.
6. Partially insert the card from the back of the
converter.
www.mytekdigital.com Page: 8/24
Page 9

Mytek DIO MADI Card – User Manual
7. Attach card ribbon cable to DIOCARD1 or
DIOCARD2 connector on the mainboard.
8. Gently push the card inside and secure it
using the pre-existing screws.
www.mytekdigital.com Page: 9/24
Page 10

Mytek DIO MADI Card – User Manual
9. Screw on the converter top cover.
10. Connect power and signal lines.
11. Turn the converter on.
After boot up (which takes approx 30 sec), the
converter will switch to regular mode, and DIO
MADI Card (DIOCARD1 or DIOCARD2) can now be
selected as signal source.
www.mytekdigital.com Page: 10/24
Page 11

Mytek DIO MADI Card – User Manual
Connecting Clock Signal
If the DIO MADI card is connected to a device that
has no external input clock, the device should be set
to Slave or AutoSync mode.
Our recommended setup is to use the Mytek
8X192ADDA as the clock source feeding all other
converters from it's multiple clock outputs to all
slave devices in a star configuration.
Clock connections
www.mytekdigital.com Page: 11/24
Page 12

Mytek DIO MADI Card – User Manual
DipSwitch configuration
1,2,3 - channel position (transmitter and receiver)
1 – OFF , 2 – OFF , 3 – OFF: channels 1 – 8
1 – ON , 2 – OFF , 3 – OFF: channels 9 - 16
1 – OFF , 2 – ON , 3 – OFF: channels 17 - 24
1 – ON , 2 – ON , 3 – OFF: channels 25 - 32
1 – OFF , 2 – OFF , 3 – ON: channels 33 – 40
1 – ON , 2 – OFF , 3 – ON: channels 41 - 48
1 – OFF , 2 – ON , 3 – ON: channels 49 - 56
1 – ON , 2 – ON , 3 – ON: channels 57 – 64
4 – format (64 channels - OFF , 56 channels - ON)
5 – frame (48k – OFF , 96k – ON)
7,8 – input selector:
7-OFF , 8-OFF – MADIFACE
7-OFF , 8-ON – BNC
7-ON , 8-ON – OPT
www.mytekdigital.com Page: 12/24
Page 13

Mytek DIO MADI Card – User Manual
MADI Card Connectors
All outputs of the DIO MADI card are simultaneous. 7
and 8 DipSwitch positions are used to select inputs.
1. Opto IN
To use optical input set the 7th and 8th DipSwitch
positions both to ON.
2. BNC IN
To use BNC input set the 7th DipSwitch position to
OFF and 8th to ON. BNC connectors are used to
transmit MADI signal, do not connect to them
Wordclock signal.
3. Madiface RME
To use RME Madiface set the 7th and 8th DipSwitch
positions both to OFF. Madiface connector is
compatible with RME Madi, do not connect it to
FireWire (IEEE 1394) signal.
Other settings
4th DipSwitch position is used to change format of
channels. There are two modes available:
• At frequency of 44.1 and 48 kHz 4
th
DipSwitch
OFF – 64 channels, ON – 56 channels.
• At frequency of 88.2 and 96 kHz 4
th
DipSwitch
OFF – 32 channels, ON – 28 channels.
• At frequency of 176.4 and 192 kHz 4
th
DipSwitch
OFF – 16 channels, ON – 14 channels.
Note!
When connecting or
disconnecting optical
connectors an output
noise can appear. To
prevent this you
should first connect
the optical connector
and then select the
card.
www.mytekdigital.com Page: 13/24
Page 14

Mytek DIO MADI Card – User Manual
5th DipSwitch position is responsible for the selection
frame type. At 44.1 and 48 kHz frame type 48k is used
only. At 88.2 and 96 kHz frame type 48k and 96k can be
used, and at 176.4 and 192 kHz frame type 48k is used
only.
Signal routing
The DIO MADI card works in both DIOCARD1 and
DIOCARD2 slots.
If ADC (Source To Digital Out) is set to MADI
(DIOCARD1 or DIOCARD2), then the signal incoming to
the card is routed to all available digital outputs
(AES/EBU or second card plugged in to the converter).
If ADC (Source To Digital Out) is set to Analog or
AES/EBU, then those 8 channels are routed to the selected
MADI channels (DipSwitch 1-3).
If DAC (Source To Analog Out) is set to MADI
(DIOCARD1 or DIOCARD2), then the incoming signal to
the card is routed to the analog outputs.
All connected devices
must operate at
identical frequencies,
the same formats, and
the same Frame set.
www.mytekdigital.com Page: 14/24
Page 15

Mytek DIO MADI Card – User Manual
RME Madiface ExpressCard
The Mytek DIO MADI card can directly interface
with RME's HDSPe Madiface ExpressCard. There are
many advantages to using the Madiface ExpressCard
such as:
• Full use of the PCI Express bus
• High track count mobile solution
• Low latency operation with RME's robust
drivers and TotalMix cue mixing software
• Use of an adapter allows the card to be used
on a desktop system
The breakout box can be bypassed by directly
connecting the Madiface to the MADI DIO card. The
connection is made with a standard 6 pin FireWire
cable, but the signal does not use the FireWire
protocol. To avoid the risk of damaging the card,
please do not connect a FireWire signal to the
Madiface port on the DIO card or on the Madiface
ExpressCard itself.
Multiple Converter Configurations
MADI is capable of carrying 64 channels of I/O over
BNC, Optical, or through RME's proprietary
Madiface port. You can chain multiple converters
together using any combination of the three. The
following diagrams will detail how to connect the
signal lines and jumper settings.
www.mytekdigital.com Page: 15/24
Page 16

Mytek DIO MADI Card – User Manual
Long optical cable run with BNC converter chain
MADI Host
Using optical cables to
connect the main
converter to the host is
recommended for long
cable runs.
www.mytekdigital.com Page: 16/24
Page 17

Mytek DIO MADI Card – User Manual
RME Madiface with BNC converter chain
RME
Madiface
www.mytekdigital.com Page: 17/24
Page 18

Mytek DIO MADI Card – User Manual
All BNC or optical connections
MADI Host
Out
Optical connections
follow the same signal
flow as BNC except
you set the dipswitch
to receive optical on
each unit.
(7-ON, 8-ON)
MADI Host
In
www.mytekdigital.com Page: 18/24
Page 19

Mytek DIO MADI Card – User Manual
Mainboard firmware update
WARNING!
Remember to follow basic safety rules about handling of
electronic device while opening the converter:
✔ keep your hands dry,
✔ remember to turn off power and disconnect
power and signal cables while working with the
top cover removed.
To perform firmware update of 8X192 ADDA converter:
1. Check if the power cord and signal and clock lines
are disconnected.
2. Remove the top cover.
www.mytekdigital.com Page: 19/24
Page 20

Mytek DIO MADI Card – User Manual
3. Locate the memory socket on the converter main
board.
4. Gently remove the old memory chip.
To avoid damaging
memory pins,
remove the chip
vertically. Retain old
memory chip.
www.mytekdigital.com Page: 20/24
Page 21

Mytek DIO MADI Card – User Manual
5. Carefully insert new memory chip in the socket.
The chip slot (pin1) should be matching the socket
slot i.e. must be facing back of the unit. If
necessary gently manually bend pins inward, to
match the holes in the slot.
6. Mount the top cover back.
During installation
check correct chip
orientation.
www.mytekdigital.com Page: 21/24
Page 22

Mytek DIO MADI Card – User Manual
7. Attach power cord and other cabling.
8. Turn on the converter.
For about 2 seconds no LED should be lit on the
converter’s front panel, as new software is copied from
memory to the main board chips. Then, all LEDs should
turn on momentarily for about 10-30sec, and
subsequently the unit should begin normal operation.
Check Mytek webpage for information on the latest
firmware versions.
www.mytekdigital.com
www.mytekdigital.com Page: 22/24
Page 23

Mytek DIO MADI Card – User Manual
Important Safety Instructions
• Read these instructions.
• Keep these instructions.
• Heed all warnings.
• Follow all instructions.
• Do not use this apparatus near water.
• Clean only with dry cloth.
• Do not block any ventilation openings. Install in accordance
with the manufacturer's instructions.
• Do not install near any heat sources such as radiators, heat
registers, stoves, or other apparatus (including amplifiers) that
produce heat.
• Do not defeat the safety purpose of the polarized or
grounding-type plug. A polarized plug has two blades with
one wider than the other. A grounding-type plug has two
blades and a third grounding prong. The wide blade or the
third prong are provided for your safety. If the provided plug
does not fit into your outlet, consult an electrician for
replacement of the obsolete outlet.
• Protect the power cord from being walked on or pinched
particularly at plugs, convenience receptacles, and the point
where they exit from the apparatus.
• Only use attachments/accessories specified by the
manufacturer.
• When a cart is used, use caution when moving the
cart/apparatus combination to avoid injury from tip-over.
• Unplug this apparatus during lightning storms or when
unused for long periods of time.
• Refer all servicing to qualified service personnel. Servicing is
required when the apparatus has been damaged in any way,
such as power-supply cord or plug is damaged, liquid has been
spilled or objects have fallen into the apparatus, the apparatus
has been exposed to rain or moisture, does not operate
normally, or has been dropped.
www.mytekdigital.com Page: 23/24
Page 24

Mytek DIO MADI Card – User Manual
WARNING
Excessive sound pressure from speakers and headphones can
cause hearing loss. In order to use this product safely, avoid
prolonged listening at excessive sound pressure levels.
For the customers in the U.S.A.
This equipment has been tested and found to comply with the
limits for a Class A digital device, pursuant to Part 15 of the
FCC Rules. These limits are designed to provide reasonable
protection against harmful interference when the equipment is
operated in a commercial environment. This equipment
generates, uses, and can radiate radio frequency energy and, if
not installed and used in accordance with the instruction
manual, may cause harmful interference to radio
communications.
You are cautioned that any changes or modifications not
expressly approved in this manual could void your authority to
operate this equipment.
All interface cables used to connect peripherals must be
shielded in order to comply with the limits for a digital device
pursuant to Subpart B of Part 15 of FCC Rules.
This device complies with Part 15 of the FCC Rules. Operation
is subject to the following two conditions: (1) this device may
not cause harmful interference, and (2) this device must accept
any interference received, including interference that may cause
undesired operation.
This product with the CE marking complies with the EMC
Directive issued by the Commission of the European
Community. Compliance with this directive implies conformity
to the following European standards:
• EN55103-1 : Electromagnetic Interference (Emission)
• EN55103-2 : Electromagnetic Susceptibility (Immunity)
This product is intended for use in the following
Electromagnetic Environments: E1 (residential), E2 (commercial
and light industrial), E3 (urban outdoors), E4 (controlled EMC
environment, ex. TV studio).
www.mytekdigital.com Page: 24/24
 Loading...