

Mytee Mytee-Lite II 8020, Mytee-Lite II 8070, Mytee-Lite II A8020, Mytee-Lite II A8070 Parts Manual
Page 1
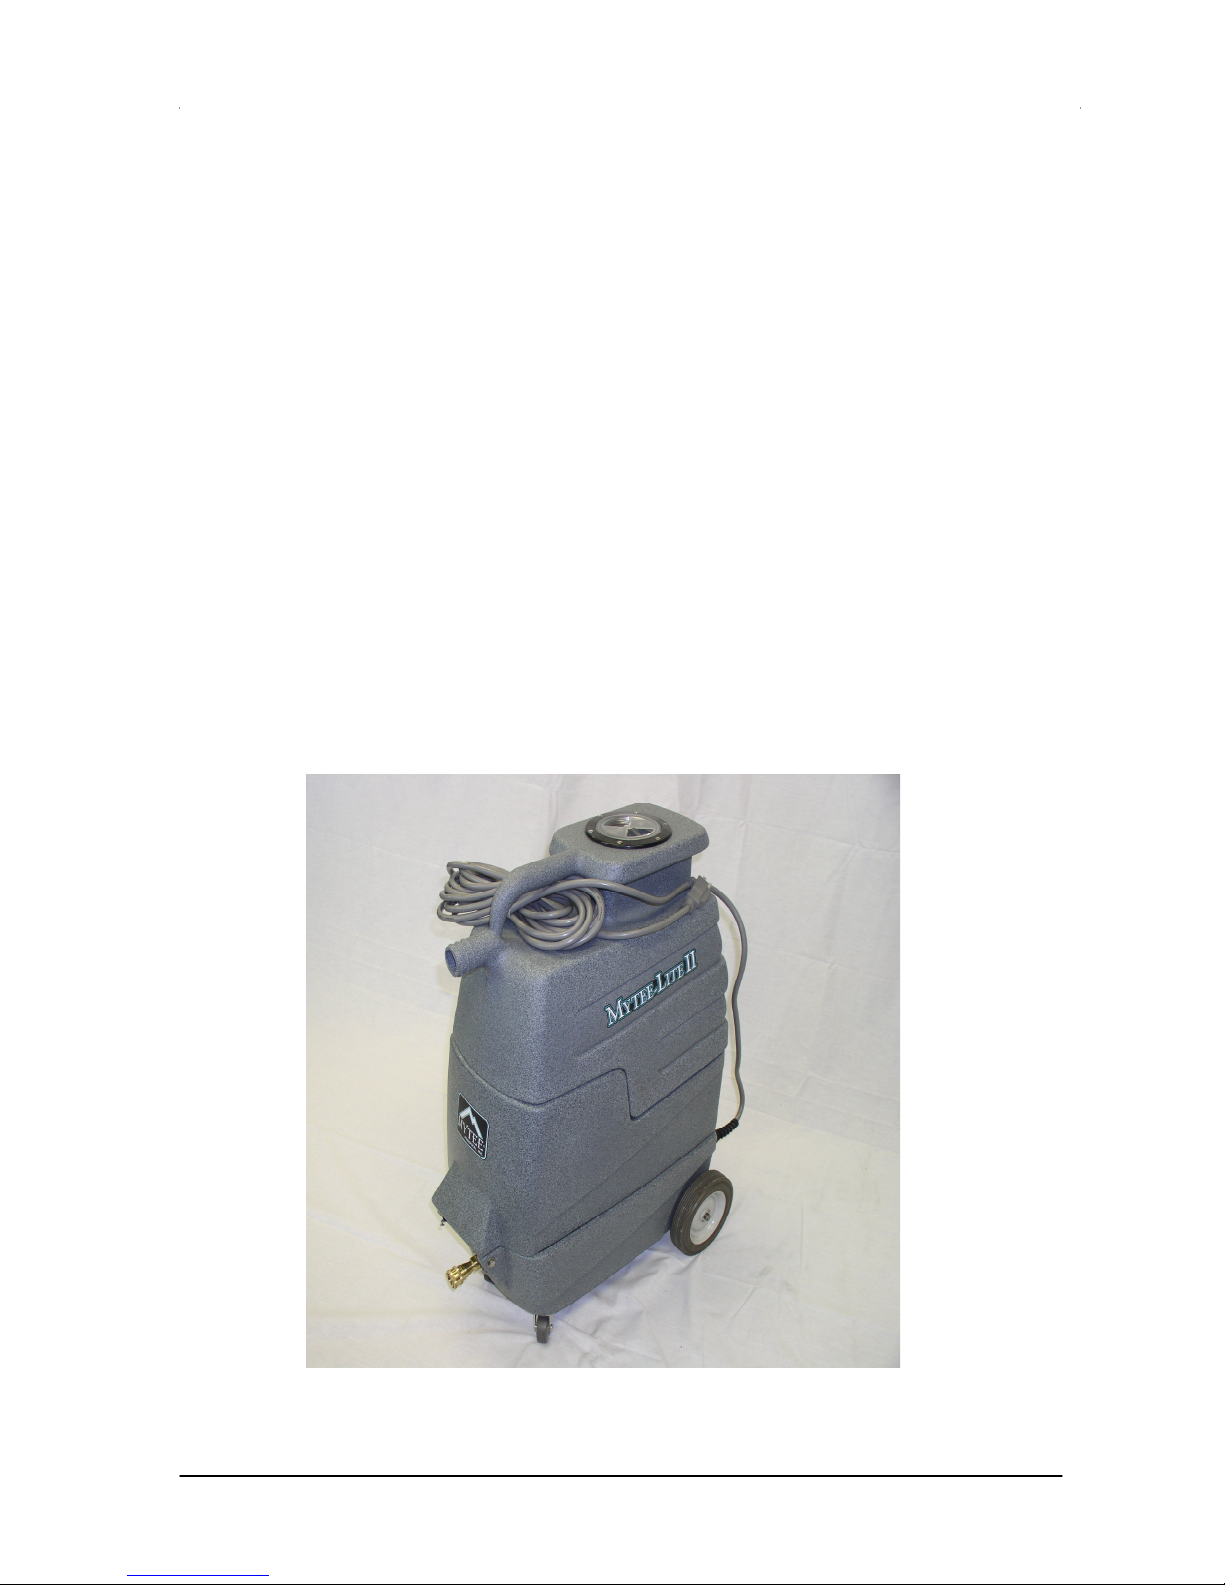
MYTEE-LITE II
Extractor
Model Numbers:
8020 cold water
A8020 w/ upholstery tool
8070 w/ Heater
A8070 w/ Heater & upholstery tool
User and Parts Manual
www.mytee.com
Page 2

MYTEE-LITE II
2
This manual is furnished with each new model. It
provides necessary operation and maintenance
instructions and an illustrated parts list.
Read this manual completely and understand the
machine before operating or servicing it.
Use the illustrated Parts List to order parts. Before
ordering parts or supplies, be sure to have your
machine model number and serial number handy.
Parts and supplies may be ordered by phone or mail
from any authorized parts and service center,
distributor or from any of the manufacturer’s
subsidiaries.
• The machine is operated with reasonable
care.
• The machine is maintained regularly – per
the maintenance instructions provided.
• The machine is maintained with
manufacturer supplied or equivalent parts.
MACHINE DATA
Please fill out at time of installation for future
reference.
Model No. – _____________________________
Install Date – ____________________________
Serial No. – _____________________________
TABLE OF CONTENTS:
SAFETY PRECAUTIONS 3
SAFETY LABELS 4
MACHINE COMPONENTS 5
MACHINE SET UP 5
MACHINE OPERATION 7
PRE-OPERATION 7
WHILE OPERATING 7
DRAINING RECOVERY TANK 8
MACHINE MAINTENANCE 8
DAILY MAINTENANCE 8
WEEKLY MAINTENANCE 8
STORING MACHINE 9
TROUBLESHOOTING 10
SPECIFICATIONS 12
MACHINE DIMENSIONS 12
ELECTRICAL DIAGRAMS DWG 1 of 1
ASSEMBLY PARTS LIST DWG 5 of 5
GROUNDING INSTRUCTIONS 3
www.mytee.com
Page 3
MYTEE-LITE II
designed to clean carpet and upholstery in an indoor
All operators must read, understand and practice the
en read
Do not pull cord around sharp edges or
electrocution can result. Always unplug machine
cause an explosion or fire. Do not use flammable
malfunction or breakdown, grounding provides a
3
SAFETY PRECAUTIONS
This machine is intended for commercial use. It is
environment and is not constructed for any other
use. Use only recommended cleaning solutions and
accessory tools.
following safety precautions.
The following safety alerts symbols are used
throughout this manual as indicated in their
description:
WARNING: To warn of hazards or unsafe
practices which could result in severe personal
injury or death.
FOR SAFETY: To identify actions which must be
followed for safe operation of equipment.
The following information signal potentially
dangerous conditions to the operator or equipment:
FOR SAFETY:
1. Do not operate machine:
-Unless trained and authorized.
-Unless operator manual has be
and understood.
-In flammable or explosive areas.
-Unless cord is properly grounded.
-With damaged cord or plug.
-If not in proper operating condition.
-In outdoor areas.
-In standing water.
-With the use of an extension cord.
2. Before operating machine:
-Make sure all safety devices are in
place and operate properly.
3. When using machine:
-Do not run machine over cord.
-Do not pull machine by plug or cord.
corners
-Do not unplug by pulling on cord.
-Do not stretch cord.
-Do not handle plug with wet hands.
-Keep cord away from heated surfaces.
-Report machine damage or faulty
operation immediately to your
distributor.
-Follow mixing and handling
instructions on chemical containers.
4. Before leaving or servicing machine:
-Turn off machine.
-Unplug cord from wall outlet.
5. When servicing machine:
-Unplug cord from wall outlet.
-Avoid moving parts.
-Do not wear loose jackets, shirts, or
sleeves.
-Use manufacturer supplied or
approved replacement parts.
WARNING: Hazardous Voltage. Shock or
before servicing.
WARNING: Flammable materials can
materials in tank(s).
WARNING: Flammable materials or
reactive metals can cause an explosion or fire.
Do not pick up.
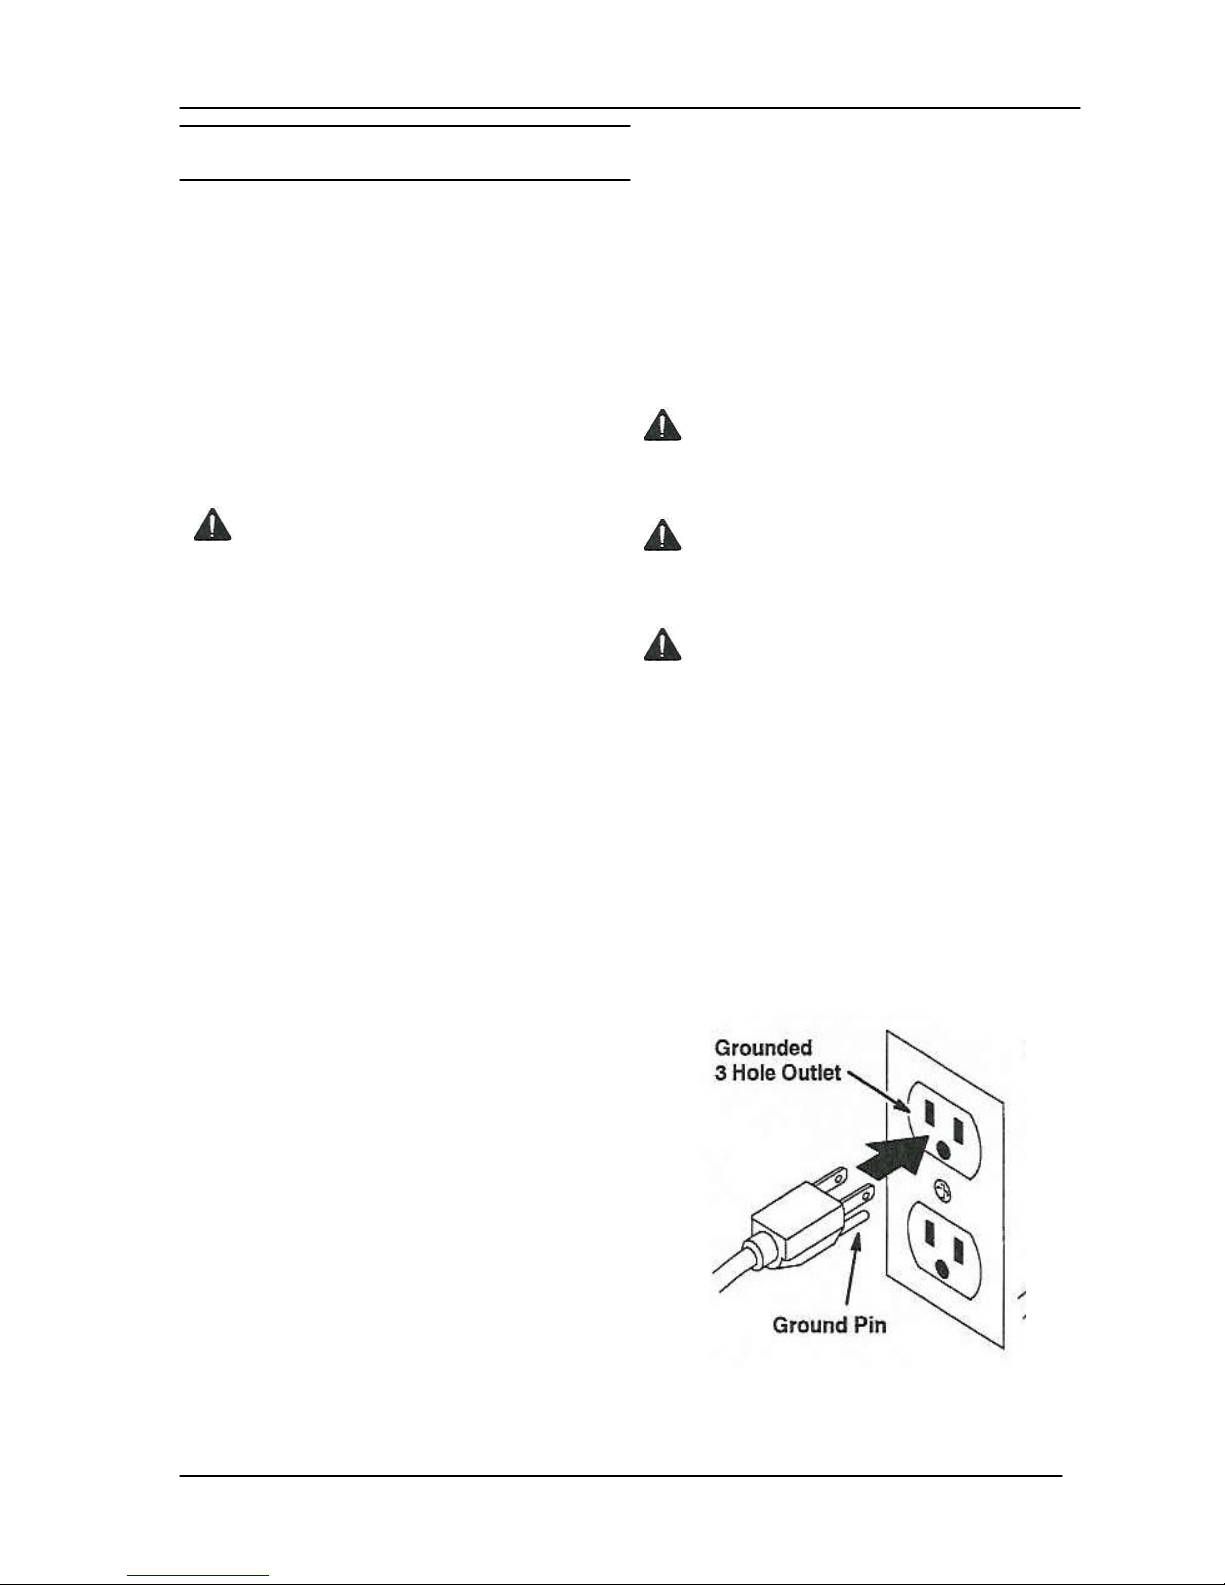
GROUNDING INSTRUCTIONS
Machine must be grounded. If it should
path of least resistance for electrical shock. This
machine is equipped with a cord having an
equipment-grounding conductor and grounding
plug. The plug must be plugged into an
appropriate outlet that is properly installed in
accordance with all local code and ordinances.
Do not remove ground pin; if missing, replace
plug before use.
www.mytee.com
Page 4
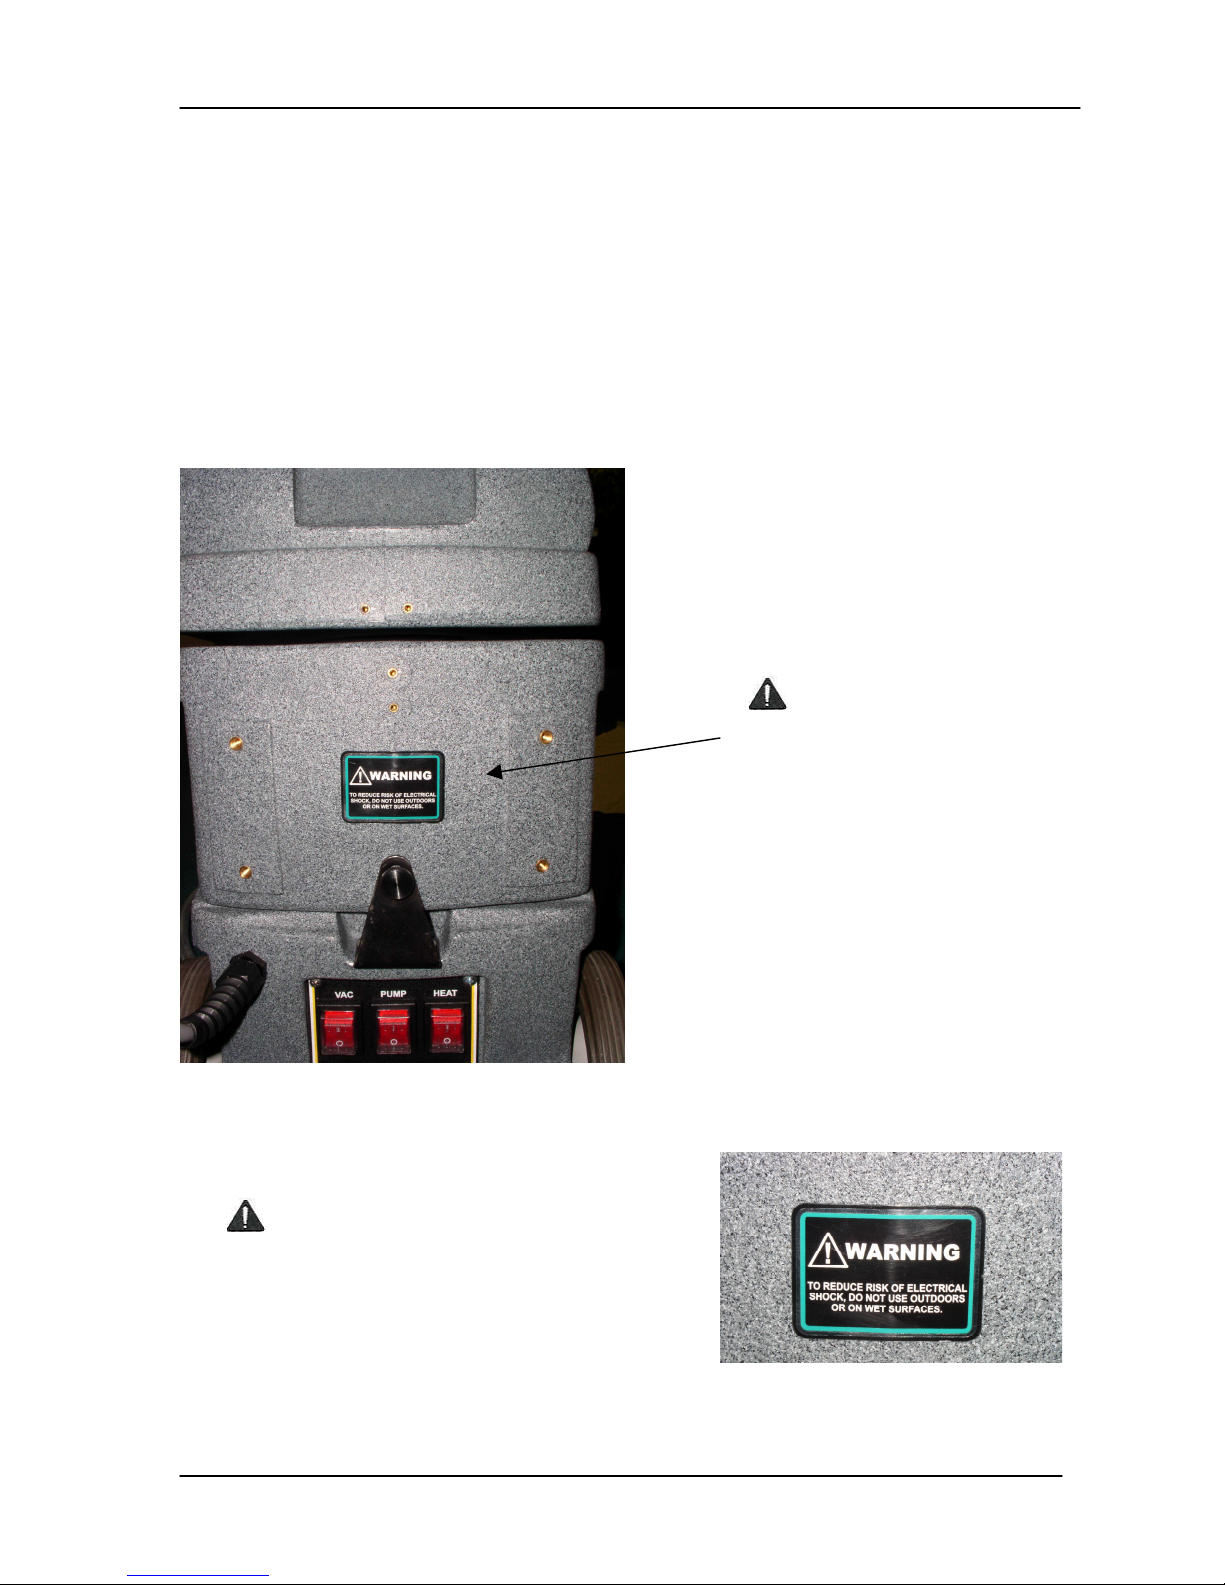
SAFETY LABELS
4
explosion or fire. Do not pick up.
The safety labels appear on the machine in
the locations indicated. Replace labels if
they become damaged or cannot be read.
WARNING: Flammable materials can
cause an explosion or fire. Do not use
flammable materials in tank(s). Flammable
materials or reactive metals can cause
MYTEE-LITE II
WARNING LABEL- Located on back.
Label warns operator of safe practices of
equipment – English text.
www.mytee.com
Page 5

MACHINE COMPONENTS MACHINE SET UP
5
1
1. Carefully check carton for signs of damage.
Report damage at once to freight carrier. The
machine is shipped fully assembled and is
ready for use.
2. Unlock latch connecting recovery tank and
solution tank.
2
3
3. Remove recovery tank from solution tank.
1. Recovery Tank
2. Solution Tank
3. Motor housing/ Base
MYTEE-LITE II
www.mytee.com
Page 6

hine unless
the use of an extension cord.
6
cause an explosion or fire. Do not use flammable
4. Carefully fill up solution tank. (Do not
spill fluid in to vacuum chamber)
6. Lock latch.
Vacuum
chamber
7. Plug machine’s cord into a
grounded wall outlet.
ATTENTION: Do not use recovery tank to fill
solution tank. Residual dirt or debris will cause
damage to solution pump.
WARNING: Flammable materials can
materials in tank(s).
FOR SAFETY: When using machine, follow
mixing and handling instructions on chemical
containers.
ATTENTION: If using powdered cleaning
chemicals, mix prior to adding.
FOR SAFETY: Do not operate mac
cord is properly grounded.
FOR SAFETY: Do not operate machine with
8. Connect solution hose and make sure it is
firmly secured.
5. Replace recovery tank onto solution tank.
MYTEE-LITE II
www.mytee.com
Page 7

4. Begin cleaning
7
9. Connect vacuum hose to recovery tank.
3. Inspect power cord for damage.
Always turn pump on and prime
FOR SAFETY: Do not operate machine unless
operator manual is read and understood.
PRE-OPERATION
1. Vacuum carpet and remove other debris.
2. Perform MACHINE SETUP procedures.
MACHINE OPERATION
1. Turn pump switch on.
NOTE: When cleaning upholstery, always check
cleaning instructions sewn in furniture by
manufacturer.
2. Hold down upholstery trigger lever to
clear air out of line. Do this until there is
a consistent flow of water. This will
prime the pump
NOTE:
pump first before turning on heater.
3. Turn on heater. Wait a few minutes
for water to heat up.
WARNING: Flammable materials or
reactive metals can cause an explosion or fire.
Do not pick up.
1. Work away from outlet and power cord to
prevent cord damage.
2. Use a recommended foam control solution to
prevent vacuum motor damage. Periodically
check for excessive foam buildup in solution
tank.
3. To clean heavily soiled areas, repeat cleaning
path from different direction.
MYTEE-LITE II
D. Turn on vacuum power
WHILE OPERATING
www.mytee.com
Page 8

8
: When servicing machine, unplug
Remove vacuum hose.
2. Wipe off power cord and check for damage, replace if
2. Unlock latch connecting recovery tank and
4. When ball float shuts off vacuum, it is time to
empty the dirty water from the recovery tank, and
refill solution tank.
3. Remove recovery tank from solution tank.
5. After cleaning, relieve water pressure from tool
before disconnecting hose. Squeeze trigger for five
seconds after turning main power switch off.
4. Empty recovery tank.
DRAINING RECOVERY TANK
FOR SAFETY
cord from wall outlet.
1. Turn machine off and unplug power cord.
MACHINE MAINTENENCE
To keep machine in good working condition,
simply follow machine’s daily and weekly
maintenance procedures.
FOR SAFETY: When servicing machine,
unplug cord from wall outlet.
solution tank.
DAILY MAINTENANCE
1. Empty and rinse out solution tank thoroughly.
necessary. Coil cord neatly after use.
3. Clean machine with an all purpose cleaner and damp
cloth.
MYTEE-LITE II
www.mytee.com
Page 9

and
9
WEEKLY MAINTENANCE
follow mixing and handling instructions on
(EVERY 20 HOURS OF OPERATION)
1. Flush solution system with Mytee system
maintainer to dissolve normal chemical buildup.
a. Pour 7.5L (2 gal) of hot water 60°C (140°F)
into solution tank. Add Mytee system
maintainer according to mixing instructions
on bottle
FOR SAFETY: When using machine,
chemical containers.
b. Operate machine for one minute.
c. Shut off machine and allow
remaining solution to break down
chemical buildup overnight.
d. Next day, spray out remaining
solution and flush system with
11L (3gal) of clean water.
2. Inspect vacuum hoses for holes and loose cuffs.
3. Inspect spray pattern for clogging. If clogged,
remove spray tips and soak them in a
recommended liquid neutralizer for up to six
hours. To remove spray tip, twist spray tip body
counter-clockwise. Do not use pointed objects to
unplug tips, damage will occur.
4. Lubricate wheels with water resistant oil.
5. Inspect machine for water leaks and loose
hardware.
6. Remove float shut-off screen from recovery
tank and clean.
NOTE: The float shut off screen is not glued on.
Simply pull it off.
MYTEE-LITE II
STORING MACHINE
1. Before storing machine, be certain to completely drain
rinse tanks of all water and solution.
2. Drain and dry the vacuum hose as well, using the drain
hose provided
3. Store machine in a dry area in the upright position.
4. Open recovery tank cover to promote air circulation.
ATTENTION: Do not expose to rain. Store indoors.
ATTENTION: If storing machine in freezing temperatures,
be sure that machine and solution system are completely
drained and dry.
www.mytee.com
Page 10

MYTEE-LITE II
10
TROUBLESHOOTING
SYMPTOM: UNIT WILL NOT TURN ON:
PROBLEM: Not plugged in.
SOLUTION: Plug machine in proper outlet.
PROBLEM: Circuit breaker has popped.
SOLUTION: Reset circuit breaker. Make sure no other items are running on the same circuit as
machine. Outlet must be a 15-amp circuit.
PROBLEM: Wire from power cord has become disconnected from terminal block.
SOLUTION: Reattach wire to terminal block.
SYMPTOM: PUMP IS NOT RUNNING PROPERLY:
PROBLEM: Quick disconnects are not completely locked together.
SOLUTION: Snap quick disconnects firmly together.
PROBLEM: The solution tank is empty.
SOLUTION: Fill the solution tank up with a premixed detergent.
PROBLEM: Jet on upholstery tool is clogged.
SOLUTION: Clean jet with soft wire brush or remove jet and flush clean.
PROBLEM: Filters are clogged.
SOLUTION: Remove filters and rinse clean with water.
PROBLEM: Heater is blocked with hard water deposits.
SOLUTION: Flush out heaters with system maintainers. If they are still blocked, replace heaters.
PROBLEM: Brass check valve is stuck.
SOLUTION: Replace with new check valve.
PROBLEM: Pump wire has become disconnected.
SOLUTION: Reconnect wire.
PROBLEM: Switch on switch plate is bad.
SOLUTION: Replace switch.
PROBLEM: Pump motor brushes are worn out.
SOLUTION: Replace pump.
SYMPTOM: HEATER IS NOT WORKING PROPERLY:
PROBLEM: The back up sensor, mounted on the heater has popped.
SOLUTION: Reset sensor by pushing in button.
PROBLEM: The automatic sensor mounted to the heater has worn out.
SOLUTION: Replace with a new automatic sensor.
www.mytee.com
Page 11

PROBLEM: Heater wire has become disconnected.
11
SOLUTION: Reconnect wire.
PROBLEM: Switch on switch plate is bad.
SOLUTION: Replace switch.
PROBLEM: Heating element is bad.
SOLUTION: Replace element.
SYMPTOM: VACUUM MOTOR IS NOT WORKING PROPERLY:
PROBLEM: Hose not connected tightly to upholstery tool or machine.
SOLUTION: Connect hose tightly.
PROBLEM: Drain valve is not shut completely.
SOLUTION: Close drain valve completely.
PROBLEM: Vacuum tank lid is not on tightly.
SOLUTION: Secure the vacuum tank tightly.
PROBLEM: Ball float is shut off.
SOLUTION: Empty the vacuum tank of all wastewater.
PROBLEM: Water is coming out of vacuum motor.
SOLUTION: Use a low foaming detergent.
PROBLEM: Upholstery tool is clogged with hair, carpet fibers and or debris.
SOLUTION: Clean upholstery tool.
PROBLEM: Ball float is not installed correctly.
SOLUTION: Make sure that ball float is firmly installed on the elbow.
PROBLEM: Switch on switch plate is bad.
SOLUTION: Replace switch.
PROBLEM: Vacuum motor armature is worn out.
SOLUTION: Replace vacuum motor.
MYTEE-LITE II
www.mytee.com
Page 12

MYTEE-LITE II
12
SPECIFICATIONS
Model 8020, A8020, 8070, A8070,
LENGTH
WIDTH
HEIGHT
WEIGHT
SOLUTION TANK CAPACITY
RECOVERY TANK CAPACITY
SOLUTION PUMP
VACUUM MOTOR
SEALED WATER LIFT
TOTAL POWER CONSUMPTION w/ heater
TOTAL POWER CONSUMPTION w/o heater
POWER CORD
DECIBEL RATING AT OPERATOR’S EAR
INDOOR ON CARPET
26 in
12 in
29 in
45 lbs
3 gal
3 gal
55 psi
2 stage
85”
1610 Watts
839 Watts
25’, 14ga x 3
<72 db (A)
MACHINE DIMENSIONS
www.mytee.com
 Loading...