

Page 1

1
Instructions for
Firebird
™
VS1500
Please read before use.
Model #
Serial #
Form # ADM-FVS
9-12
Unit & Accessories p.3
Set up p.4
General & Maintenance information p.12
13655 Stowe Dr., Poway, Ca. 92064
Register your product at
www.mytee.com/support/register
Page 2

2
Page 3

3
FIREBIRD™ VS1500
FIREBIRD™ & ACCESSORIES
1. Steamer
2. Funnel
3. Measuring cup
4. Steam gun with hose
5. Accessory adaptor
6. Detail nozzle
7. Gum scraper tool
8. Jet nozzle attachment
9. Metal brush
10. Small nylon brush
11. Large nylon brush
12. 2-in-1 steam attachment
10
2
3
1
4
5
6
7
89
11
1213
14
15
16
17
13. Cotton cover
14. 2-in-1 window attachment
15. Micro ber cleaning cloth
16. Floor nozzle
17. Floor extensions
Page 4

4
REMOVE COMPARTMENT - 2REMOVE COMPARTMENT -1
REMOVE STEAM HOSEATTACH STEAM HOSE
The FIrebird™ has an accessories compartment that houses the
detail nozzle, both brush nozzles, the jet nozzle and the 2-in-1
nozzle. Open the accessories compartment by pulling the blue
locking handle upwards and lifting the transparent cover of the
accessories compartment off towards the front.
To remove the steam hose, press in both release buttons on the
right and left hand sides of the steam connector and pull it out of
the steam socket.
Remove the required steam accessory and replace the cover.
Slide the nose of the cover into the recess above the steam
socket and press it down rmly at the back until the cover clicks
into place.
The steam hose with steam gun must be
connected to the appliance and the desired
accessory must be attached before the
steamer can be used.
First of all connect the steam hose to the steam socket on the
front of the Firebird™. To do this, ip the black cover ap down
and push the connector of the steam hose rmly into the steam
socket until it clicks into place.
NOTE
1.
2.
FIREBIRD™ VS1500
Page 5

5
The oor nozzle is delivered with a separate
connector for packaging reasons. Assemble
the connector as illustrated below.
ATTACH FLOOR NOZZLE
EXTENSION TUBES
Assemble the extension hoses if the steam cleaner is to be used
to clean oors or difcult to reach areas. To do this, push the open
end of a tube onto the steam gun. Push it onto the steam gun until
the release button of the steam gun clicks into place. Add one, two
or all three extension tubes as needed.
RELEASE EXTENSION TUBES
Press in the appropriate release button and pull the tubes apart
with a downward movement to remove extension tubes.
SECURING CLEANING CLOTH
Place the oor nozzle on the cleaning cloth and secure the
overhanging material under the cleaning cloth clips on the left and
right. Press on the inner sides of the blue holder, then open the
clips and the cleaning cloth can be secured in place. To take the
oor nozzle off again, press in the appropriate release button and
pull the nozzle off with a downward movement.
Attach the oor nozzle to the end of the extension tube. Ensure
that the nozzle clicks into place on assembly. The oor nozzle is
ideal for cleaning washable wall and oor coverings. It may be
used with or without the cleaning cloth. However, we recommend
using the cloth to protect coverings in the case of sensitive
surfaces such as wood or linoleum.
NOTE
1.
2.
FIREBIRD™ VS1500
Page 6
6
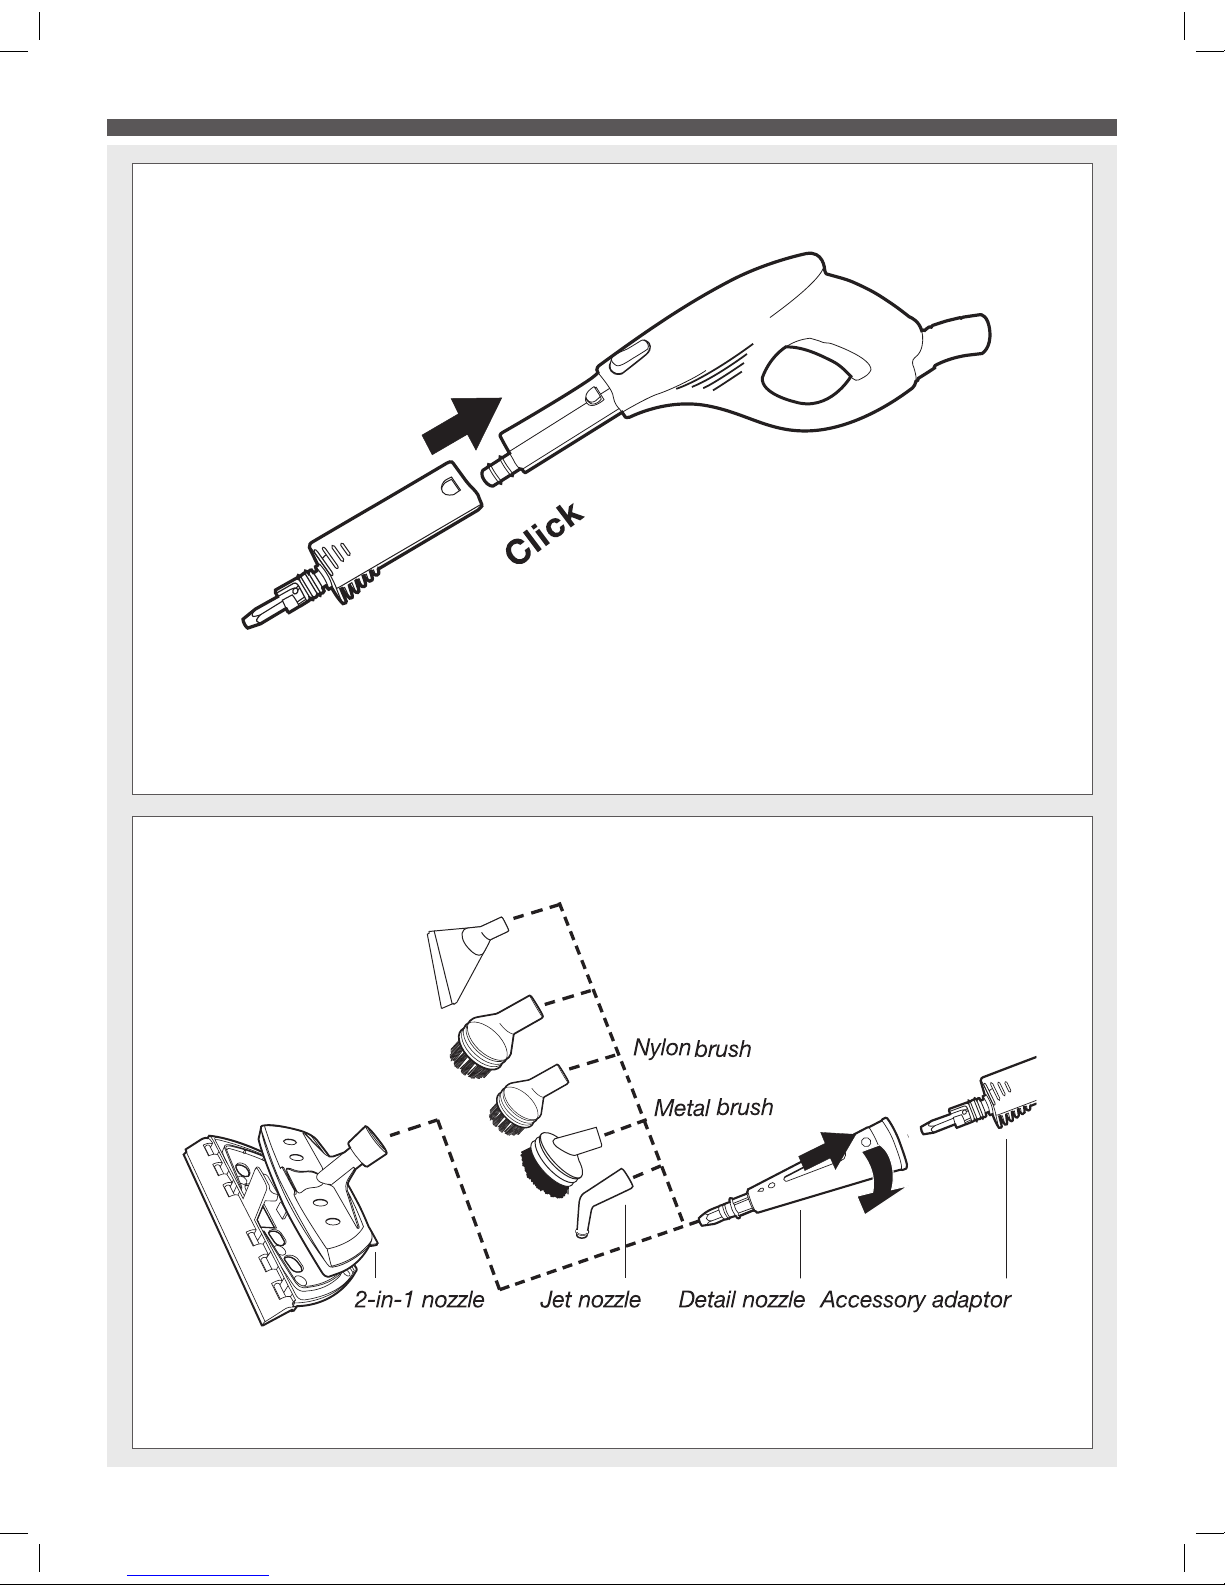
DETAIL NOZZLE
The Firebird™ has a range of varied attachment nozzles to enable the most effective and thorough cleaning of different surfaces. First
assemble the accessory adaptor so that these attachments can be connected to the steam hose. The accessory adapter can be attached
directly to both the steam gun and the end of one or more extension tubes. Ensure that the adaptor is rmly pushed on until it clicks into
place. Press in the appropriate release button and pull apart with a downward movement to take the adapter off again.
ACCESSORY ADAPTOR
Largenylon
brush
GumScraper
tool
The detail nozzle may be used on its own for cleaning or may also be tted with one of the brush nozzles, the jet nozzle or the 2-in-1
nozzle. This detail nozzle is attached using the bayonet principle. Push the nozzle onto the accessory adaptor and give it a rm quarter
turn in the direction of the arrow stamped on the nozzle. Reverse the sequence to take the detail nozzle off again: twist the nozzle
a quarter of a turn in the opposite direction to the arrow and pull it off with a downward movement.
FIREBIRD™ VS1500
Page 7

7
FIREBIRD™ VS1500
2 - in - 1 Nozzle
JET NOZZLE
Simply push the jet nozzle rmly onto the detail nozzle to attach it.
This nozzle makes it possible to clean hard to reach places such
as corners, joints and toilets with ease. The jet nozzle may be
removed by pulling it off with a downward movement.
BRUSH NOZZLE
The three brush attachments are pushed rmly onto the detail
nozzle in the same way as the jet nozzle. Even the most stubborn
dirt can be removed, e.g. from blinds, central heating radiators,
etc. using the small nylon brush. The larger metal brush is suitable
for heavy staining on less sensitive materials such as stainless
steel or stone. The brush nozzles are removed by simply pulling
them off with a downward movement.
(1.) The 2-in-1 nozzle consists of a right-angled steam attachment onto which the window cleaner can be attached. Push the right-angled
steam attachment rmly onto the detail nozzle. Pull the cotton cover over the nozzle for more thorough cleaning and to protect the work
surface. (2.) Fix the window cleaner with the rubber blade to the rightangled steam attachment if windows, mirrors or tiles are to be cleaned.
Metalbrush
Nylonbrushes
Steam
attachment
Cottoncover
Steam
attachment
Window
cleaning
attachment
1. 2.
Glass may crack if subjected to thermal shock! Pre-heat areas of glass prior to steam cleaning by spraying steam in a wider arc
from a distance of 7 – 9 inches. Slowly reduce the distance to 4 – 5 inches to heat the glass up further.
Page 8

8
FILLING THE WATER TANK
REMOVING THE WATER TANK CAP
The Firebird™ has a built-in water tank holding 1.5 Qts. Switch the Firebird™ off and remove the plug from the socket. The Firebird™ must
always be unplugged when lling with water. Unscrew the tank cap by pressing the cap down and simultaneously turning it anti-clockwise.
Use the funnel and measuring cup supplied when lling with water. Only ll with pure water without additives of any kind, e.g. perfume,
cleaning agents, alcohol, as they could damage the machine and make it dangerous to use. It is advisable to use distilled water to prevent
limescale deposits if your water is very hard (over 2.5 mmol/l or 21 °dH). Otherwise boil the water rst to extend the appliance’s service life.
Screw the tank cap rmly back on by turning it clockwise under pressure.
Do not exceed the maximum
quantity of 1.5 quarts when
lling the tank.
The heating up time is shortened if warm
water is used when lling.
NOTE:
FIREBIRD™ VS1500
Page 9

9
FIREBIRD™ VS1500
GUN SAFETY LOCK
PLUG
Plug the Firebird™ into a properly installed socket.
POWER BUTTON
The above arrow points to the power button. Pressing this button
will turn the unit “On” or “Off”.
The green operating pilot lamp and the orange heating pilot lamp
light up. The operating pilot lamp lights up as soon as the Firebird™
has been plugged in and switched on. The heating pilot lamp indicates that the steam cleaner is currently heating up. The operating
temperature is reached after approx. 11 minutes and the orange
heating pilot lamp goes out. The appliance is now ready for use.
Release the locking device (child-proof device) by pushing the yellow triangular pin on the right-hand side of the Firebird™ in towards the left.
Hot steam now escapes if the steam button is operated. First of all hold the steam gun over an old cloth to absorb any initial spray water.
Operate the steam button until the steam is emitted evenly. Cleaning can now begin.
Never aim the steam outlet of the steam gun at people,
animals, plants or electrical systems (e.g. oven or
socket). There is a risk of scalding or electric shock!
Always test the steam cleaner rst on inconspicuous
or invisible areas of the surfaces or fabrics to be cleaned
to check their tolerance to hot steam.
- Steam may result in bleaching of painted/varnished wood.
- Steam may discolor shiny plastics.
- Acrylic, velvet and linen react very sensitively to the
temperature of steam.
- Do not use the steam cleaner on Dralon bres
without rst having carried out a suitability test on a
concealed area.
For understandable reasons, the manufacturer cannot
be held responsible for damage to objects, materials,
people, animals or plants that occurs due to unsuitable
use of hot steam or due to improper use of the appliance.
Residual steam continues to escape for a few seconds
after switching off the steam function.
NOTE:
Page 10

10
STEAM CONTROL
FILLING THE TANK
Do not aim the steam outlet at one point for too long. Loosen the dirt by moving the steam jet backwards and forwards. The ow rate of
the steam emitted can be regulated by turning the steam controller and can be adjusted to the level of dirtiness. Turn the steam controller
clockwise for less steam, and anti-clockwise for more steam.
Do not tip or tilt the appliance by more than 45° during use and ensure that the appliance always stands on a rm base. One full tank is
enough for a maximum of 50 minutes use. Do not leave the machine unsupervised while switched on and if necessary use the childproof
lock to secure the steam switch. To do this, press the triangular blue pin on the left-hand side of the steam gun in to the right.
The tank must be lled if the steam ow emitted starts to decrease. Switch off the Firebird™ by pressing the On/Off switch. The green
operating pilot lamp goes off. Press the steam button on the steam gun to release the remaining pressure and then lock the gun. Unplug the
unit and allow the appliance to cool down. Take care; the water in the tank is still hot even after 5 minutes! Open the tank cap by pressing it
down and slowly turning it anti-clockwise.
Hot steam may escape on opening! There is a
risk of burns from the cap thread and the tank!
Fill the Firebird™ up with water using the measuring cup and funnel then carefully close the tank cap
again. The Firebird™ can now be plugged in again and
switched on. The Firebird™ is ready for use as soon as
the heating pilot lamp goes off.
The housing and accessories become hot during operation! Allow the appliance to cool down before changing the
accessories. Never open the tank cap when the steam
cleaner is switched on as the tank is under pressure!
The Firebird™ is tted with an overheating cut-out.
The appliance switches off automatically on reaching
a temperature of 350 °F to prevent overheating.
Disconnect from the mains immediately by removing
the plug. The appliance may be operated again after a
30-minute cooling period.
NOTE:
NOTE
FIREBIRD™ VS1500
Page 11

11
ENDING OPERATION & STORAGE
SWITCHING OFF
Switch the appliance off. The green operating pilot lamp goes off. Press the steam button on the steam gun to release the remaining
pressure. Secure the steam gun by pushing the locking pin on the lefthand side of the handle in to the right. Unplug the unit and allow the
appliance to cool down.
Empty the water tank so that no deposits can settle. Do not close the water tank until it has dried out completely. The Firebird™ must have
cooled down completely before being put away. Store the appliance so that it is out of the reach of children. The extension tube with assembled oor nozzle may be inserted in the parking holder on the back of the appliance for storage purposes or for short breaks when working.
FIREBIRD™ VS1500
The housing and accessories become hot during operation! Allow the appliance to cool down before changing the
accessories. Never open the tank cap when the steam
cleaner is switched on as the tank is under pressure!
The Firebird™ is tted with an overheating cut-out.
The appliance switches off automatically on reaching a
temperature of 350°F to prevent overheating. Unplug the
unit. The appliance may be operated again after a
30-minute cooling period.
NOTE:
Always ensure before cleaning or maintaining the
steam cleaner that it is switched off and unplugged.
Page 12

12
Dear Customer:
Congratulations on the purchase of your new Firebird™ steamer. Your
new steam cleaner is a very versatile appliance for many different cleaning tasks. Only with the help of high-temperature steam is it possible to
remove stubborn dirt quickly and without trace from smooth surfaces, e.g.
wall and oor tiles, work surfaces, cooking utensils, windows and mirrors
and at the same time to kill harmful bacteria. This is the environmentally
acceptable way to remove baked on food, mould, grease, soap scum,
solid and loose dirt completely without chemical solvents.
Like any other piece of machinery or technology, the Firebird™ also
requires the proper maintenance and care to keep the product working
over extended use. Neglecting your machine, abusing it or not operating it
properly can void its warranty and prevent the machine from performing to
the quality and standard you’d expect out of the Mytee Products Inc. line.
If you have any warranty concerns or questions, please review this manual
thoroughly or do not hesitate to contact your distributor. If there are questions regarding maintenance, replacement or ordering parts please contact
an authorized Mytee Products Inc. Service Center. To see an updated list
please visit our website at http://www.mytee.com/support/manuals/.
Before using your Mytee Product, please read this manually thoroughly.
Sincerely,
Mytee Customer Care Dept.
Grounding Instructions
This machine must be grounded. If it should malfunction or breakdown,
grounding provides a path of least resistance for electrical shock. This machine is equipped with a cord having an equipment-grounding conductor
and grounding plug. The plug must be plugged into an appropriate outlet
that is properly installed in accordance with all local code and ordinances.
Do not remove ground pin; if missing, replace plug before use.
Improper installation of the equipment-grounding conductor can result
in a risk of electric shock. Be sure to check with a qualied electrician
or service person if you are in doubt as to whether the outlet is properly
grounded. If the plug will not t in the outlet do not modify either the plug
nor the machine’s cord, instead have a proper outlet installed by a qualied technician.
This machine is for use on a nominal 120-volt circuit and with a grounding
plug similar to the one in Figure 1 below. If a proper outlet is not available,
follow the illustrations of Figure 2 & 3 to install a temporary-grounding
plug. This temporary work-around should be used only until a proper outlet
(Figure 1) can be installed by a qualied electrician. When and if this type
of adapter is employed, screw the adapter’s extended tab into place with
a metal screw. However, grounding adapters are not approved for use
in Canada.
Again, be sure to check the grounding pin for damages and replace if
necessary.
The Green, or Green-Yellow, wire in the cord is the grounding wire. When
replacing a plug, this wire must be attached to only the grounding pin.
DO NOT use extension cords.
Please Note for America use only
Parts and Service
Please contact a Mytee service personnel or Mytee authorized Service
Center using Mytee original replacement parts and accessories for repairs
are needing to be performed. When and if calling Mytee for support,
please have your Model and Serial Number available for faster assistance.
Name Plate
The Model and Serial Number are located on the lower half of the back
of the machine near the power plugs and will be required for ordering
replacement parts. You can use the space provided on the front of this
manual to note down both for future referencing.
Unpacking the Machine
When your new machine is delivered, please carefully inspect both the
shipping carton and the machine for damages. If damage is evident, save
both the shipping carton and machine so that the delivering carrier can
inspect it. Contact the carrier immediately to le a freight claim if there has
been any damage.
Ensure that the packaging materials (plastic lm) do not
get into the hands of children. Danger of suffocation!
Caution and Warnings
Symbols
Mytee uses the symbols below to signal potentially dangerous conditions.
Always read this information carefully and take the necessary steps to
protect personnel and property.
Is used to warn of immediate hazards that will cause severe personal
injury or death.
Is used to call attention to a situation that could cause severe personal
injury.
Is used to call attention to a situation that could cause minor personal
injury or damage to the machine or other property. When using an electrical appliance, basic precautions should always be followed, including the
following: Read all instructions before using this machine. This product is
intended for commercial use only.
Important Safety Regulations
• Please ensure that the voltage shown on the rating plate matches
that of your socket prior to connecting the steam cleaner to your
main power supply.
• Only connect the appliance to a properly grounded socket.
• The appliance’s plug must t into the socket. The plug may not be
modied in any way. Unmodied plugs and appropriate sockets reduce
the risk of an electric shock.
• We recommend that the appliance only be operated from a socket
protected by a residual current circuit-breaker. Please consult an
electrician if necessary.
• Never touch the plug with wet hands.
• Always disconnect the appliance by removing the main plug from the
socket. Never pull on the cable!
• A faulty connection cable may only be replaced by a cable with
identical connection values. Send the appliance to the point of
purchase for repair.
• Ensure that the connection values match those of the steam cleaner
if using an extension cable. Ask a specialist dealer if necessary.
Figure 1
Grounding Pin
Grounded Outlet
Grounded Outlet Box
Adapter
Tab for Grounding
Screw
Metal
Screw
Figure 2 Figure 3
GENERAL INFORMATION
Page 13

13
• Ensure that the cable does not become a tripping hazard. It may
not be kinked, pinched or run over.
• Take extreme care if using the appliance in the presence of children
or the handicapped!
• Never leave the Firebird™ unattended particularly if children or
handicapped persons are in the same room.
• The appliance must be stored out of the reach of children.
• Do not allow children to play with the packaging materials (plastic
lm).
• Never unscrew the tank cap during use. The tank is under
pressure.
• The appliance may not be tilted by more than 45° during operation.
• Never immerse the appliance in water or other liquids.
• Keep the appliance away from rain and moisture. The appliance is not
suitable for outdoor use.
• Do not use the steamer to clean swimming pool where water is present
or where it is in direct contact with water.
• Do not operate the appliance without water in the tank. Always ll up
with water in good time.
• Empty the water tank when the appliance is not in use.
• Never ll the tank with anything other than water. Never put
additives (such as perfume, stain remover or products containing
alcohol) in the water as they may damage the appliance or make it
dangerous to use.
• Always remove the main plug from the socket and allow the
appliance to cool down completely before lling with water.
• Do not overll the tank. Do not exceed the maximum prescribed
lling level. Please use the measuring cup and funnel included with
the Firebird™.
• Ensure that the water tank’s closure cap has been screwed down
carefully before use.
• Only carry the appliance by the handle.
• Do not touch any hot areas on the appliance. It is normal for the
steam cleaner to heat up during operation.
• Do not use the Firebird™ to treat any items of clothing that are still
being worn on the body.
• A little water may drip out of the nozzle from time to time. This is
completely normal and it is merely condensation.
• The force and heat of the steam may have an adverse effect on
some materials. Always check whether a surface is suitable for
treatment with the steamer by carrying out a test beforehand on a
concealed area.
• Always include these operating instructions if passing the steam
cleaner on to a third party.
For Maintenance & Cleaning
• Use only the original accessories.
• To avoid risks, never carry out repairs yourself. Consult an
authorised Service Center for this and have the appliance repaired
by qualied skilled staff using original spare parts.
• Always switch the appliance off, remove the main plug and allow
the Firebird™ to cool down before cleaning or maintaining it.
Preparation
• Check the appliance, cable and accessories regularly for damage.
Do not operate a damaged appliance or damaged accessories.
• Never aim the Firebird™ at people, animals or plants (risk
of scalding)! Do not aim the Firebird™ at electrical systems
or wiring, elements or oven interiors.
• Do not operate the appliance without supervision. Please always
switch the appliance off and remove the main plug from the socket
if leaving the work area.
• The appliance is tted with a thermostat and a thermal cut-out as
protection against overheating.
• Accessories become hot during use – allow them to cool down
before changing over.
Starting Up
Only ll with pure water without additives of any kind, e.g. perfume,
cleaning agents, alcohol, as they could damage the machine and make
it dangerous to use. It is advisable to use distilled water to prevent
limescale deposits if your water is very hard (over 2.5 mmol/l or 21 °dH).
Otherwise boil the water rst to extend the appliance’s service life.
•Do not exceed the maximum quantity of 1.5 quarts when lling the tank!
•Screw the tank cap rmly back on by turning it clockwise under
pressure.
*The heating up time will be shortened if warm water is used when lling.
Cleaning
Only clean the appliance by wiping over the housing with a slightly
moistened cloth. Do not use any cleaning agents, abrasives or alcohol
since they may damage the housing.
We recommend that the tank be rinsed out after 5 lling operations at
the latest if your water hardness is above 1.8 mmol/l (10°dH). Information
regarding local water hardness may be obtained from your water or utility
company. We recommend lling the water tank with water and giving it a
good shake to clean it. This will loosen any limescale that has been deposited on the bottom of the Firebird™. Then pour out the water and allow
the tank to dry out completely before closing it.
The water tank should be treated with limescale remover approx. every
6 months to prolong the steam cleaner’s life.
Place one or at most two limescale removal sticks in 1 quart of warm
water (120°F) and ll the water tank with it. Allow the solution to work
for approx. 30 minutes and then pour away the water with the dissolved
solids. Repeat this process if necessary and then rinse out the
tank with water.
Maintenance Schedule
Maintenance item Daily Every 6 mths.
Clean and inspect hoses.
Check power supply cable.
Clean machine (after use)
Rinse tank (after use)
Apply limescale remover
x
x
x
x
x
Trouble Shooting
Problem Possible Cause Solution
The operating pilot
lamp fails to light up.
The appliance is not
plugged into a socket
or is not switched on.
The socket is faulty.
The power cable is
damaged.
Insert the main plug
into a socket or
switch the appliance
on.
Check the socket by
unplugging the Firebird™ and plugging
in a different appliance.
Have the cable
replaced by an
authorised service
agent.
No steam is omitted
when the steam
button is pushed.
The childproof lock is
preventing release of
the steam button.
The water tank is
empty.
Push blue pin on the
right hand side of
steam gun to the left.
Add water.
Only a small amount
of steam ows out.
The steam controller
is on minimum
Turn the steam controller anticlockwise
until sufcient steam
is emitted.
GENERAL INFORMATION
Page 14

14
GENERAL INFORMATION
Trouble Shooting (Cont.)
The appliance takes a
very long time to heat.
The water tank needs
descaling.
Descale the water
tank.
Disposal
If the appliance’s useful life has come to an end, particularly if malfunctions have arisen, the worn out appliance should be rendered unusable
by removing the plug from the socket and cutting off the power cable.
Please dispose of the appliance properly through your public waste
authority. Contact your local waste disposal service.
Mytee Limited Warranty Policy
Mytee Products, Inc. endeavors to provide high quality products and product support to its customers and therefore backs up all of its new products
purchased from Mytee Products Inc. (Mytee) or any authorized Mytee
distributor/service center with this limited warranty.
This limited warranty begins on the date of the customer purchase and is
valid and available to the original purchaser only. Mytee products are for
commercial use only and are not intended for personal, family or household uses.
HOWEVER, OTHER THAN SET FORTH HEREIN, MYTEE GIVES NO
WARRANTY, EXPRESS OR IMPLIED, AS TO DESCRIPTION, QUALITY, MERCHANTABILITY, FITNESS FOR ANY PARTICULAR PURPOSE,
PRODUCTIVENESS, INFRINGEMENT, OR OTHER MATTER, OF ANY
GOODS WHICH MYTEE SHALL SUPPLY. THERE ARE NO WARRANTIES, WHICH EXTEND BEYOND THE DESCRIPTION ON THE FACE
HEREOF. MYTEE SHALL IN NO WAY BE RESPONSIBLE FOR THE
PROPER USE AND APPLICATION OF THE GOODS. MYTEE NEITHER
ASSUMES NOR AUTHORIZES ANY OTHER PERSON TO ASSUME
FOR MYTEE ANY OTHER LIABILITY IN CONNECTION WITH THE
SALE OF MYTEES GOODS. THIS LIMITED WARRANTY POLICY MAY
BE CHANGED OR WITHDRAWN BY MYTEE AT ANY TIME WITHOUT
NOTICE.
90-DAY PARTS AND LABOR LIMITED WARRANTY: Mytee will cover
parts and labor on all components for 90 days from the date of original
purchase. This warranty covers the cost of replacement and labor only,
and does not cover shipping costs.
WEAR PARTS 90-DAY LIMITED WARRANTY: Mytee will replace all
wear parts for 90 days from the date of original purchase. Wear parts are
items which wear out as a result of usage or the passage of time and are
consumed despite attempts to maintain them, such as gaskets, wheels,
brass, cords, wires, electrical terminals, hoses, switches, thermostats,
plastisol parts, lters, bearings, brushes, solenoids, o-rings, bulbs, heating elements, castors, or other parts deemed wear items in Mytee’s sole
discretion. This warranty covers the cost of replacement only and does not
cover shipping or labor costs.
1-YEAR MAJOR COMPONENTS WARRANTY: Mytee warrants that
pumps, vacuum and oor machine motors, and heaters are covered for a
one (1) year limited warranty from the date of original purchase. This warranty does not apply and is void if the pump, vacuum motor, or heater has
worn brush motors, water damage, chemical build-up, chemical damage,
or evidence of abuse, neglect or tampering. This warranty covers the cost
of replacement only, and does not cover shipping or labor costs.
HOUSING LIFETIME LIMITED WARRANTY: Mytee warrants that all rotationally molded housing and tanks will be free from manufacturing defects,
defects in workmanship, and defects in material for the life of the part.
Replacement cost does not include the cost of shipping or labor.
LIMITATION OF DAMAGES: THE REMEDY OF REPLACEMENT OR
REPAIR OF ANY DEFECTIVE GOODS SHALL BE THE EXCLUSIVE
REMEDY UNDER ANY WARRANTY MADE BY MYTEE, WHETHER
EXPRESS OR IMPLIED. IN NO EVENT SHALL MYTEE BE LIABLE FOR
ANY INCIDENTAL OR CONSEQUENTIAL DAMAGES, PROPERTY DAMAGES, OR PERSONAL INJURIES.
All limited warranties are void for, and Mytee does not warrant in any way,
any product that evidences misapplication, improper installation, abuse,
lack of maintenance, negligence in use or care, abnormal use, alteration of design, use of incompatible or corrosive chemicals, use in a rental
service, and/or servicing, installation of parts, or repairs by anyone other
than Mytee or a Mytee authorized distributor or service center. Mytee may
make changes in products it manufactures and markets at any time; these
changes are made without obligation to change, retrot, or upgrade any
product previously sold or manufactured.
Mytee has no obligation to honor the limited warranties set forth herein
unless the original purchaser, promptly upon discovering the warranty
claim and prior to continuing to use the product, contacts Mytee or a
Mytee authorized distributor or service center to describe the claim and to
receive and follow instructions for documenting and resolving the claim.
In addition, the purchaser must provide the product to which the claim
applies to Mytee or a Mytee authorized distributor or service center for a
thorough inspection.
If any provision or portion of this limited warranty policy is found to be
unenforceable, then the remaining provisions and portions shall remain
valid and enforceable. If any provision or portion of this limited warranty
policy is found to be limited by law, then that provision or portion shall
be construed to make it effective within the bounds of law. For example,
if there are legal limitations on the duration of warranties, the warranties
made herein shall be construed to have the minimum duration required by
law, or, if there are legal limitations of exclusion of remedies, the exclusions made herein shall be construed to apply to the fullest extent possible
without violating the law.
The validity, construction and performance of this warranty policy shall be
governed by the laws of the State of California, without respect to conicts
of laws principles. The exclusive jurisdiction of any legal action arising
from or related to this warranty policy shall be in the State of California and
no legal action shall be commenced elsewhere.
Return Material Authorization Procedure
It is the responsibility of any Authorized Service Center (ASC) or Distributor with written authorization to ensure the Customers equipment is
repaired as soon as possible. Only Mytee Products Inc. or it’s authorized
dealers with written authorization, service centers, and agents may make
warranty repairs on these products. All others do so at their own risk and
expense. The Distributor must follow Mytee Products, Inc. standard RMA
procedure:
1. When a repair falls within the Warranty time period for a piece of equipment, the Distributor will ll out a RMA/Warranty claim form. This form will
act as a repair order to replace any defective parts.
2. All defective parts must be returned to Mytee Products, Inc. with the
RMA/claim form for evaluation at the customer’s expense. This shipping is
non-refundable. All warranty claims are subject to an evaluation by Mytee
Products, Inc. to determine if warranty will be approved. Any credit for
repair and/or parts will only be issued upon evaluation and approval from
Mytee Products, Inc.
3. When Warranty is approved, the Distributor’s account will be credited
for the replacement part(s). Mytee Products, Inc. will ship the warranted
replacement part(s) to the Distributor prepaid. If Warranty is denied the
Distributor’s account will not be credited for any parts sent for this claim.
Page 15

15
NOTES
Page 16

16
Myt ee Produc ts I nc.
136 55 Stowe Dr.
Pow ay, C a. 92 064
www. mytee.com
© 20 12 Mytee Pr odu cts Inc .
Pri nted in the U.S .A.
NOTES
 Loading...