

Page 1
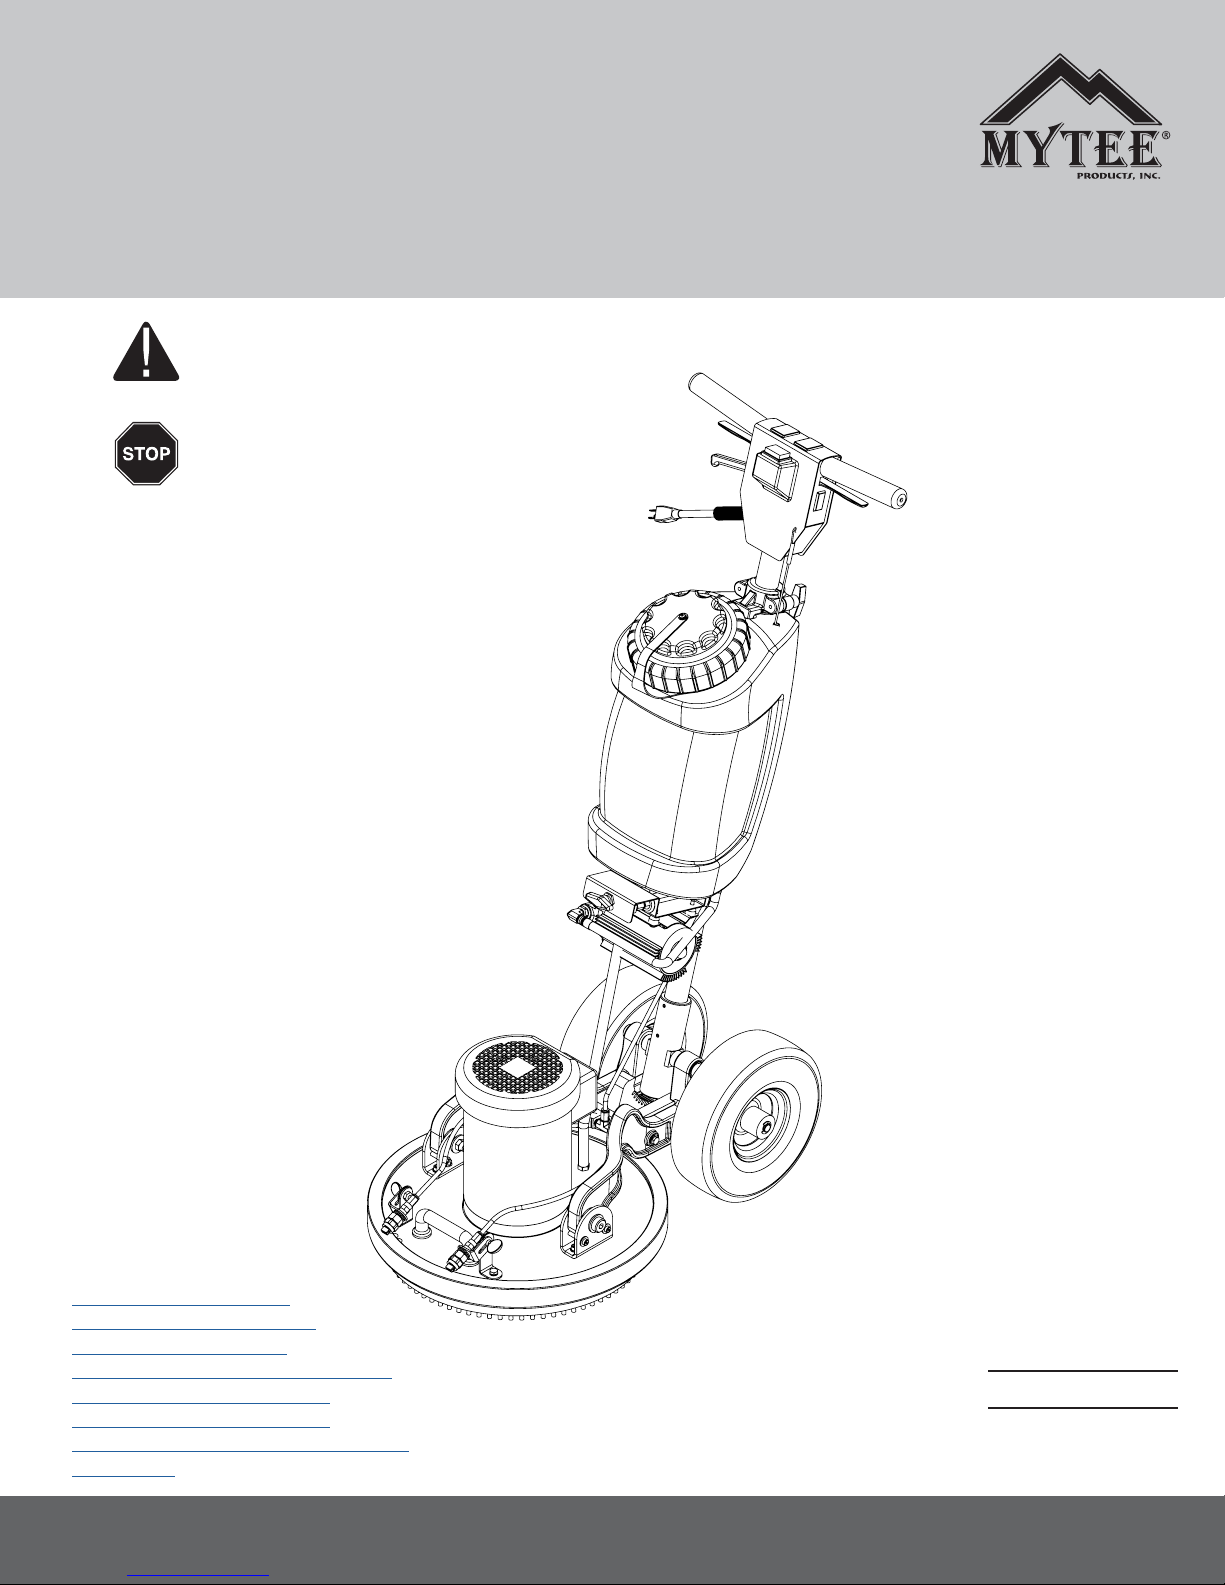
Instructions for
ECO-15 & ECO-17 Orbital Floor Machines
Please read before use.
Register your product
at http://www.mytee.
com/support/register
General Information p. 2
Unboxing & Assembly p. 4
Set Up & Operation p. 5
Flywheel Bearing Replacement p. 9
ECO-15 Parts & Pricing p. 11
ECO-17 Parts & Pricing p. 13
Orbital Machine Wiring Diagram p. 15
Notes p. 16
Model #
Serial #
Form # ADM-ECO17
2-17
13655 Stowe Dr. Poway, CA 92064
1
Page 2
GENERAL INFORMATION
Dear Customer:
Congratulations on the purchase of your new Orbital Floor Machine. As you are
already aware, the sc ene of the equipment world is becoming more high tech, and
we at Mytee Products Inc. strive to keep you on the cutting edge with superior quality and technology.
Keep in mind that the ECO-15 & ECO-17 are machines, so neglect or abuse will
cause unnecessary damage and void the warrant y. However with simple maintenance theOrbital Floor Machines will give quality performance for many years to
come.
If warranty questions arise, please consult your user manual or get in touch with
your distributor. If you have questions about maintenance, replacing par ts or
ordering parts, please call an authorized Mytee Products Inc. Service Center.
To see an updated list, visit our website at www.mytee.com.
Before you begin using your new machine, please read your manual thoroughly.
Sincerely,
Mytee Customer Care Dept.
Grounding Instructions
This machine must be grounded. If it should malfunction or breakdown, grounding
provides a path of least resistance for electrical shock. This machine is equipped
with a cord having an equipment-grounding conductor and grounding plug. The
plug must be plugged into an appropriate outlet that is properly installed in accordance with all local code and ordinances. Do not remove ground pin; if missing,
replace plug before use.
Improper connection of the equipment-grounding conductor can result in a risk
of electric shock. Check with a qualied electrician or ser vice person if you are
in doubt as to whether the outlet is properly grounded. Do not modify the plug
provided with the machine. If it will not t the outlet, have a proper outlet installed
by a qualied electrician.
This appliance is for use on a nominal 120-volt circuit, and has a grounding plug
that looks like the plug illustrated in Figure 1 below. A temporary adapter illustrated
in Figures 2 and 3 may be used~to connect this plug to a 2-pole receptacle as
shown in Figure 2 if a properly grounded outlet is not available. The temporary
adapter should be used only until a properly grounded outlet (Figure 1) can be
installed by a qualied electrician. The green colored rigid ear, tab or the like
extending from the adapter must be c onnected to a permanent ground such as a
properly grounded outlet box cover. Whenever the adapter is used, it must be held
in place by a metal screw. Grounding adapters are not approved for use in Canada.
Replace the plug if the grounding pin is damaged or broken.
The Green (or GreenYellow) wire in the cord is the grounding wire. When replacing
a plug, this wire must be attached to the grounding pin only.
DO NOT use extension cords.
Please Note for America use only
Grounding Pin
Figure 1
Grounded Outlet
Metal
Screw
Grounded Outlet Box
Figure 2 Figure 3
Adapter
Tab for Grounding
Screw
Parts and Service
Repairs, when required, should be performed by Mytee service personnel or Mytee
authorized Service Center using Mytee original replacement parts and accessories. Call Mytee for repair par ts or service. Please specify the Model and Serial
Number when discussing your machine.
Name Plate
The Model and Serial Number of your machine are shown on the Nameplate on the
handle of the machine. This information is needed when ordering repair parts
for the machine. Use the space provided on the front cover to note the Model and
Serial Number of your machine for future reference.
Unpacking the Machine
When the machine is delivered, carefully inspect the shipping cartons and the
machine for damage. If damage is evident, save the shipping car tons so that it can
be inspected by the carrier that delivered it. Contact the carrier immediately to le a
freight damage claim. NOTE: This machine ships in two boxes.
Caution and Warnings
Symbols
Mytee uses the symbols below to signal potentially dangerous conditions. Always
read this information carefully and take the necessary steps to protect personnel
and property.
Is used to warn of immediate hazards that will cause severe personal injury or
death.
Is used to call attention to a situation that could cause severe personal injur y.
Is used to call attention to a situation that could cause minor personal injury or
damage to the machine or other property. When using an electrical appliance, basic precautions should always be followed, including the following: Read all instructions before using this machine. This product is intended for commercial use only.
To reduce the risk of re, electrical shock, or injury:
1. Read all instructions before using equipment.
2. Use only as described in this manual. Use only manufacturer’s recommended
attachments.
3. Always unplug power cord from electrical outlet before attempting any adjustments or repairs.
4. Use care to keep the electrical supply cord from c ontac ting the rotating brush
or drive block.
5. Do not unplug by pulling on cord. To unplug, grasp the plug, not the cord.
6. Do not pull or carr y by cord. Do not close a door on cord or pull cord around
sharp edges or corners.
7. Connect to properly grounded (3 -wire) outlet only. Refer to grounding instructions.
8. Do not run appliance over cord. Keep c ord away from heated surfaces.
9. Do not use with damaged cord or plug. If cord is damaged, repair immediately.
10. Turn off all controls before unplugging.
11. Always unplug or disconnect the appliance from power supply when not in use.
12. Do not handle the plug or oor machine with wet hands.
13. Do not allow to be used as a toy. Close attention is necessar y when used by or
near children.
14. Wind the c ord no tighter than is necessary to retain it during storage.
15. Do not use in areas where ammable or combustible material may be present.
16. Do not leave the unit exposed to harsh weather elements. Temperatures below
freezing may damage components and void warranty.
17. Use only the appropriate handles to move and lift unit. Do not use any other
parts of this machine for this purpose.
18. Keep hair, loose clothing, ngers, and all parts of the body away from all
openings and moving parts.
19. Use extra care when working near stairs.
20. To reduce the risk of re or electric shock, do not use this machine with a
solid-state speed control device.
21. The voltage and frequency indicated on the name plate must correspond to the
wall receptacle supply voltage.
22. When cleaning and servicing the machine, local or national regulations may
apply to the safe disposal of liquids which may contain: chemicals, grease, oil,
acid, alkalines, or other dangerous liquids.
23. Store your oor machine indoors in a cool, dr y area.
24. Keep your work area well lit.
25. Do not leave operating unattended.
Use of ammable chemicals could cause explosion, re, and death.
2
Page 3

GENERAL INFORMATION
Pre-Operation
1. Vacuum carpet and upholstery and remove other debris.
2. Inspect power c ord for damage.
Operation
1. Squeeze the Adjustment Height lever.
2. Pivot handle to desired position (best is at waist height).
3. Release lever to lock handle in place.
4. Place both hands rmly on the handle grips.
5. Flip the power switch to the “on” position.
6. To spray solution, squeeze either spray lever.
7. To stop the machine, simply ip the power switch to the “off” position.
Pad Driver Removal / Installation
1. Disconnect the power cord from the electrical outlet and empty any liquid in
the solution tank before installing a brush or pad driver.
2. Leave the handle in the upright position and tip the machine backwards so it
rests on its wheels and upper handle section.
3. Use an 11mm wrench to loosen and remove the four bolts from the bot tom to
the pad driver.
4. To install the pad driver, place the pad driver into position and bolt into place
with the original four 11mm bolts.
5. Raise the machine back into upright position.
6. To install a cleaning pad, tip the machine back and lower it, with the pad driver
installed, onto the cleaning pad. Keep the pad as centered as possible.
7. When the machine is not in use, store it with the pad attached. This will protect
the pad driver from damage.
1. Work away from outlet and power cord to prevent cord damage.
2. To clean heavily soiled areas, repeat cleaning path from different direction.
Guidelines
1. For ease of operation, always keep the brush or pad surface level, balanced,
and at on the oor at all times.
2. Always adjust the operating handle to a comfortable height at which the brush
or pad surface is balanced before starting the machine.
3. Your oor machine will operate differently on various surfaces. There will be
more resistance when the machine is used with a brush on carpet than when it
is used with a pad on a smooth surface.
4. To move the machine for ward or backward, push or pull in the desired direc -
tion, keeping the pad or brush level on the oor at all times.
After Use
1. Unplug the extension cord from wall and the machine’s power cord pigtail and
loosely wind it up.
2. After each use, wipe your oor machine with a clean, soft, damp cloth.
3. Store in a clean, dr y place with a pad attached to protect the pad driver.
4. Do not expose to rain. Store indoors.
Maintenance Schedule
Maintenance item Daily Once a week
Clean and inspect motor
Check power supply cable
Clean machine with all purpose cleaner and cloth
Inspect machine for water leaks and loose hardware
x
x
x
x
Troubleshooting
There is no power.
1. Plug machine in proper outlet.
2. Ensure that switch is not damaged or defective.
Plug on the power cord doe sn’t light up when plugged in.
1. Replace the power cord.
Plug lights up when plugged in but machine does not turn on.
1. Open the faceplate on the handle and check for loose or disconnected wires.
2. Power switch may be bad. Replace the power switch.
ECO-15 Machine Specications
Motor 1 horsepower
Cleaning Path 15”
Pump Diaphragm spray pump
Pump PSI 100
Pump GPM 1.3
Solution Tank 4 gallons
Levers Stainless steel
Deck Plate Stainless steel
Power
Consumption
Machine Weight 130 l bs.
Machine
Dimensions
Power Cord 50’ 12/3 extension c ord
13 amps @ 115V 60Hz
27” x 15.5” x 49”
ECO-15 230V Conguration Information
Model Number ECO15- 230
Power
Consumption
6.5 amps @ 230V 60Hz
ECO-17 Machine Specications
Motor 1 horsepower
Cleaning Path 17”
Pump Diaphragm spray pump
Pump PSI 100
Pump GPM 1.3
Solution Tank 4 gallons
Levers Stainless steel
Deck Plate Stainless steel
Power
Consumption
Machine Weight 130 l bs.
Machine
Dimensions
Power Cord 50’ 12/3 extension c ord
13 amps @ 115V 60Hz
27” x 17.5” x 49”
ECO-17 230V Conguration Information
Model Number EC O17-2 3 0
Power
Consumption
6.5 amps @ 230V 60Hz
FAQs
Q: What comes standard with the Orbital Floor Machines?
A: The Orbital Floor Machines come with:
• Pad driver (pre-installed)
• 2x microber cleaning pads
• 50’ extension cord (12/3)
Q: Where do I plug the machine in?
A: The Orbital Floor Machines require a grounded circuit. Please note: GFI outlets
may trip before the breaker set ting.
Q: Is there anything I can do to increase the expecte d life of my machine?
A: Check all parts for wear regularly. Keep machine clean.
Motor is drawing too many amps and blowing breakers.
1. Power cord is defective or damaged - replace power cord.
2. Check the power switch for shorts or loose connections. Replace the switch if
nece ss ary.
3. Check if the power c ord from the switch is defective or damaged. Replac e if
nece ss ary.
3
Page 4
ECO-15/ECO-17 UNPACKING & ASSEMBLY
The ECO-15 & ECO-17 ship in two boxes and will
need to be assembled before use. Follow these
directions to assemble the two pieces.
1. Set the handle assembly in place and bolt it in using
the two included bolts. Thread the bolts in by hand as
far as you can in order to prevent stripping of the
threads in the handle. Tighten with 5/16” allen key.
Tools Needed:
• 5/16” allen hex key
• Needle nose pliers
2. Remove both C-clips from the axle using needle nose
pliers. Slide the wheels onto the axle. Use needle nose
pliers to secure wheels with the C-clips.
3. Connect the hoses for solution spray and gravity feed
as shown above.
5. Make sure all bolts are tightened. Your Orbital Floor
Machine is now ready to operate.
IMPORTANT: BEFORE FIRST USE
The new (red bristle) pad-driver may require some
surface preparation before it will uniformly hold to
thin pads.
If necessary, run the bare pad-driver on smooth
concrete for several minutes, checking periodically
that the tallest bristles are then worn down a bit
(~1/8”). This procedure will also atten the tips of
the longest third of the bristles to better grip the
pad tufts (see illustration to the right).
This procedure does not apply to the black
“Mytee-Lok” pad driver.
4. Connect the power cord from the base of the handle to
th e moto r.
BEFORE AFTER
4
Page 5
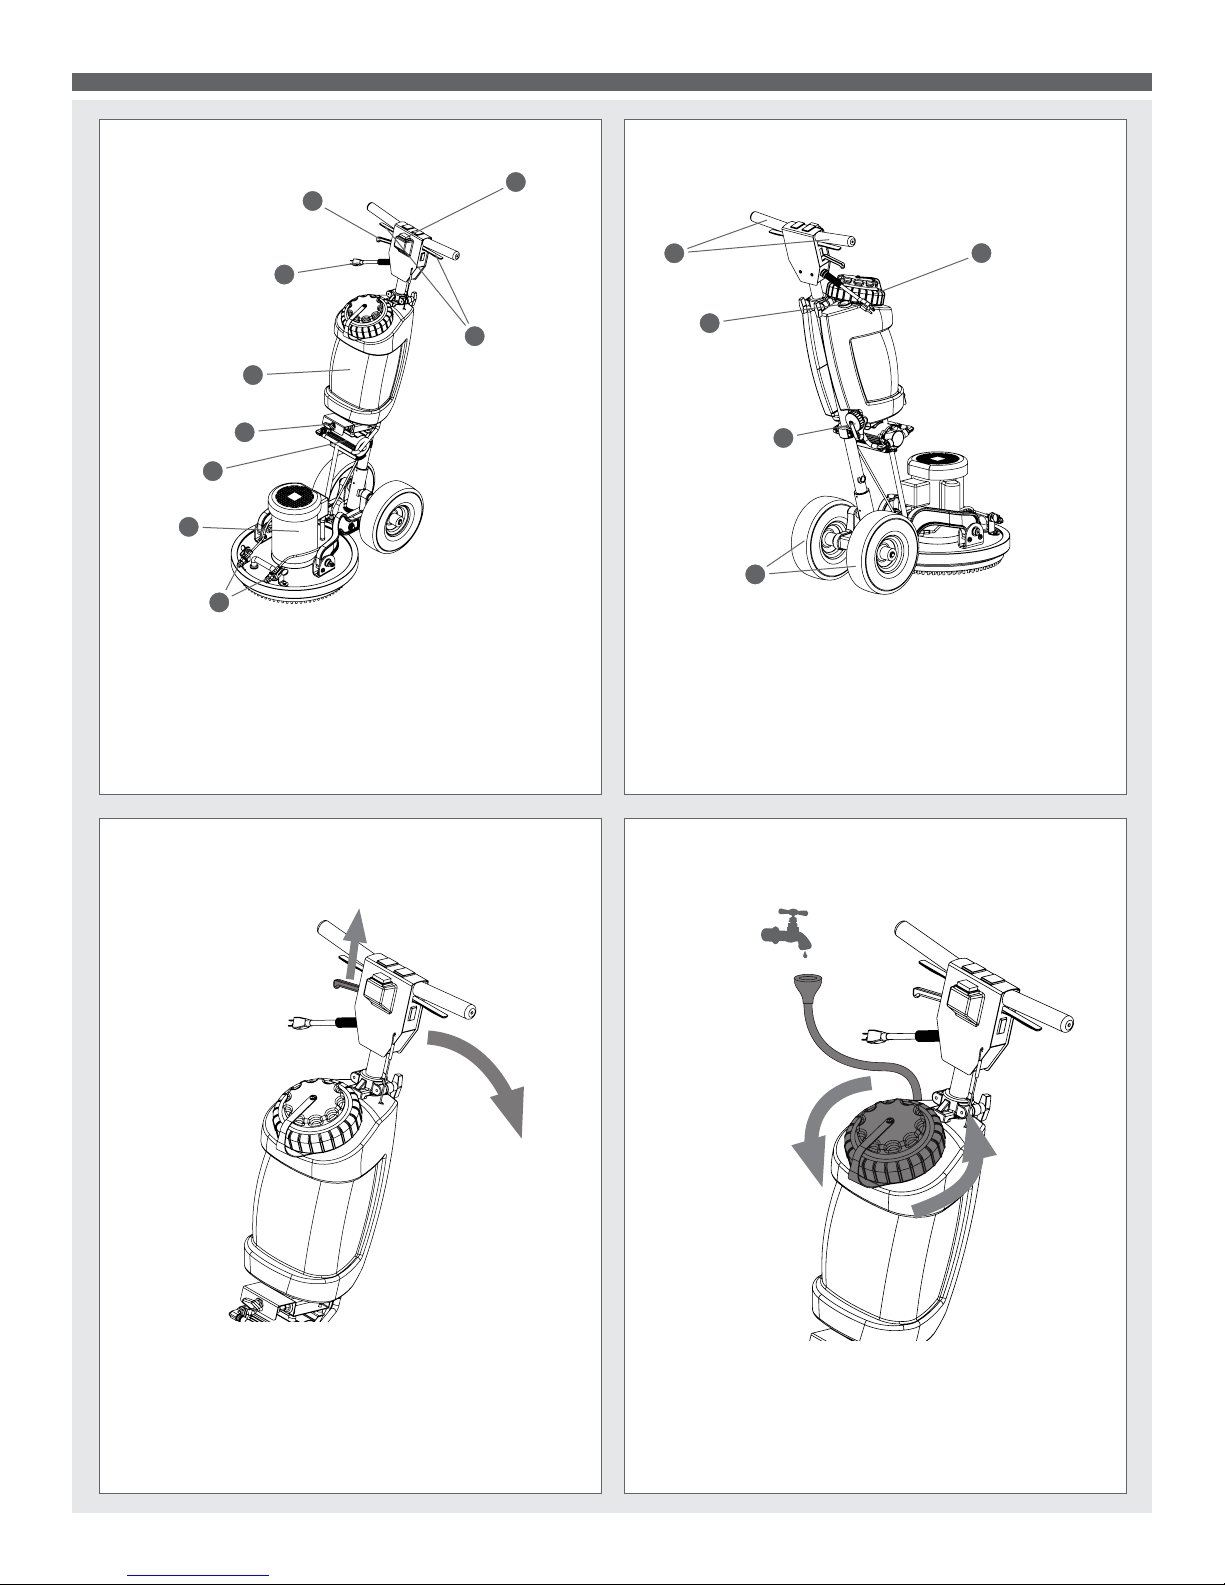
ECO-15/ECO-17 SETUP & OPERATION
3
4
5
6
7
8
1. Power Switch
2. Handle Height
Adjustment Lever
3. Power Cord Pigtail
4. Solution Tank
5. Bi-Directional Valve
FRONT
2
6. Pump
7. Motor
8. Spray Jets
9. Solution Spray Levers
BACK
1
10
9
11
12
13
14
10. Handlebars
11. Faucet Fill Hose
12. Solution Tank Drain Cap
13. Wheels
14. Solution Tank Lid
The handle can be adjusted to any desired working position by simply squeezing the adjustment lever. Move the
handle to the desired position, then release the adjustment lever, locking the handle in place.
SHAMPOO TANK HEIGHT ADJUSTMENT LEVER
To ll the shampoo tank, twist off the large cap and ll
with water from a bucket or ll using the faucet ll hose.
Add desired shampoo or chemical. To drain, lower the
handle a bit, place a bucket under the drain cap, and
unscrew the cap.
5
Page 6

ECO-15/ECO-17 SETUP & OPERATION
PAD DRIVER AND PAD INSTALLATION
Note: Disconnect the power cord from electrical outlet
and empty any solution from the tank before removing or
installing the pad driver. The pad driver is attached with
four bolts (highlighted above). To use a pad, simply lay
the pad on the oor and lower the machine with the pad
driver onto the pad. Try to center the pad as much as
possible.
BI-DIRECTIONAL VALVE
The ECO-15 & ECO-17 feature a valve that allows you to
switch between using the pump to spray solution or using
the gravity-feed hose. Point the valve knob to the left for
gravity feed and to the right to use the spray jets.
POWER SWITCH
To turn the machine on, lower the handle to the desired
position and then ip the power switch to the “on” position.
SOLUTION SPRAY LEVER
Squeeze the left or right solution spray levers to activate
the pump and spray solution.
6
Page 7

ECO-15/ECO-17 SETUP & OPERATION
ECO-15 & ECO-17 CLEANING PATTERN
To effectively clean oors, move the Orbital Floor Machine forwards and backwards, similar to using a
household vacuum cleaner. Wet the oor by spraying solution as you roll the unit forwards.
7
Page 8

ECO-15/ECO-17 SETUP & OPERATION
USING THE ECO-15 & ECO-17 ON VARIOUS SURFACES
IMPORTANT: Ensure that you are using the appropriate pad type
CARPET
depending on the surface you are cleaning.
STONE
TILE & GROUT
EPOXY
VINYL
WOOD
CONCRETE
& MORE
8
Page 9

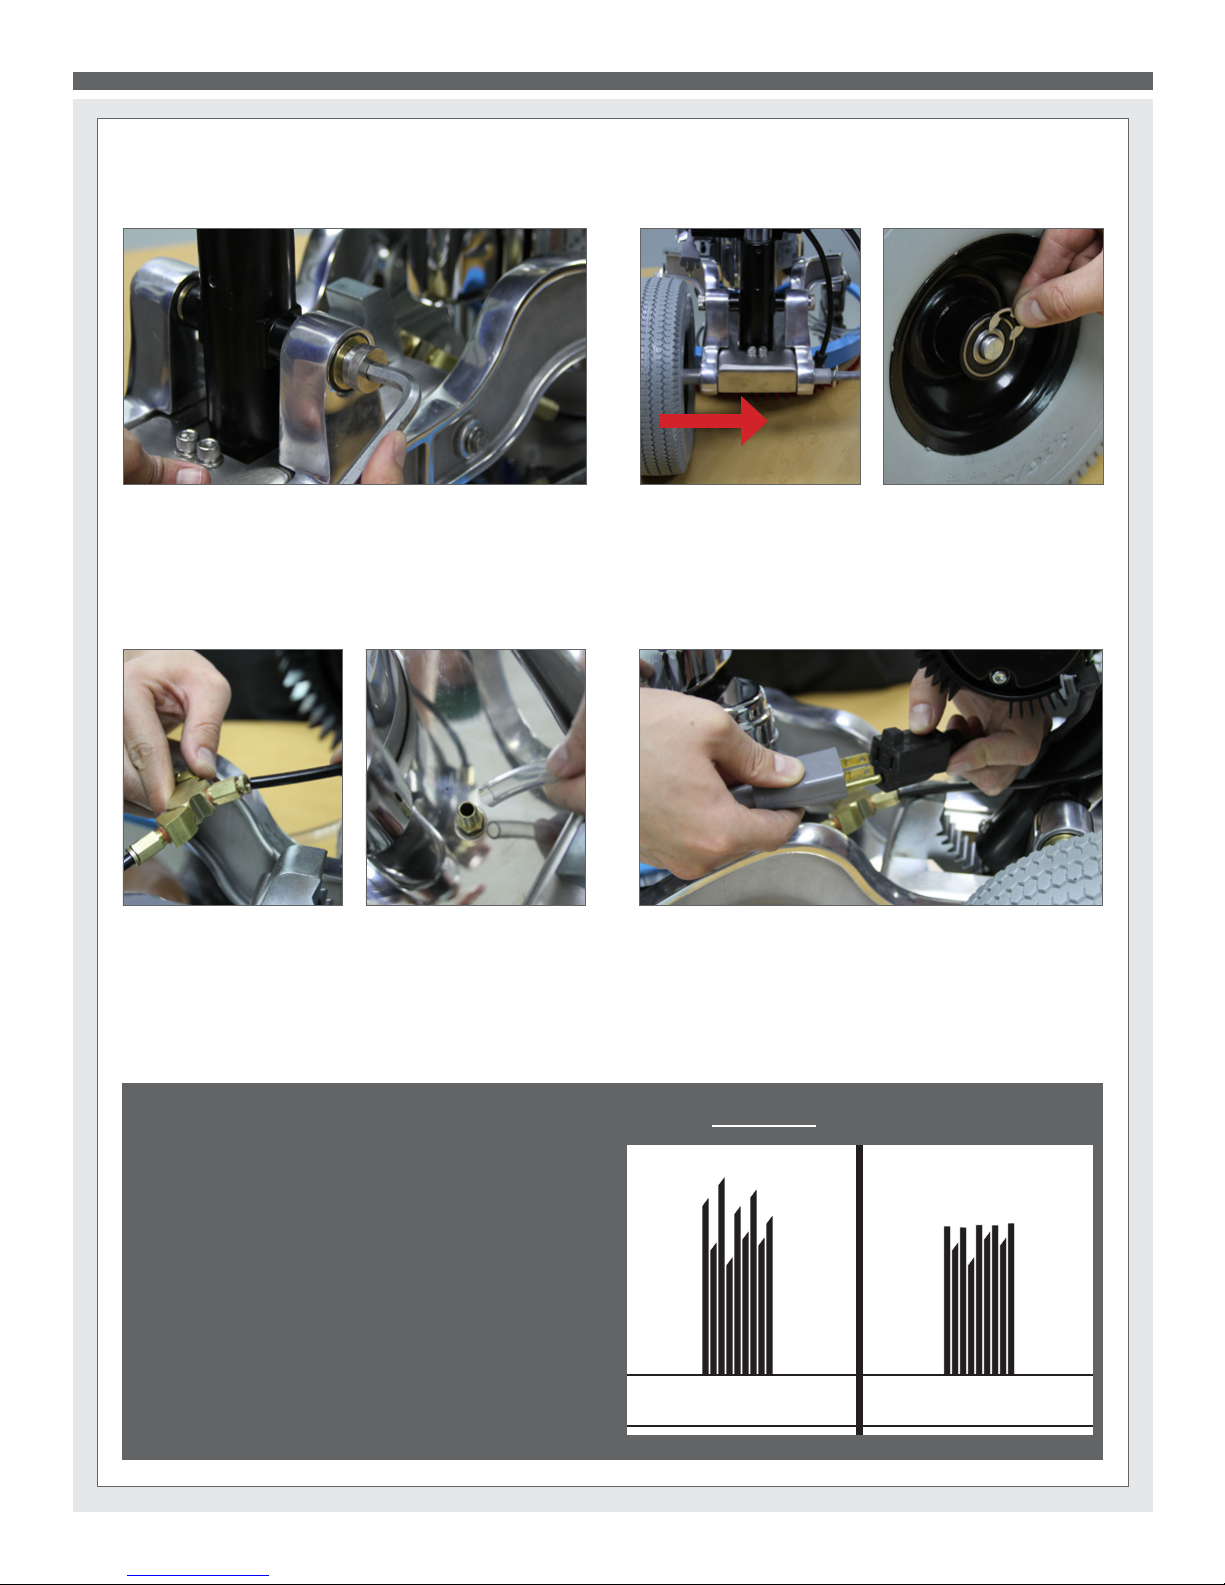
ECO-15/ECO-17 FLYWHEEL BEARING REPLACEMENT
The ywheel bearing is a wear part, similar to rotors on
a car. Over time, the bearing will require replacing.
1. Remove the pad driver assembly by removing the 4 hex
bolts with a 7/16” wrench or socket.
Tools Needed:
• 7/16” open-end wrench
• 15/16” open-end wrench
• Soft-face dead-blow mallet
• Medium-large athead
screwdriver
• 3/16” Allen wrench
• Blue Loctite
®
2. Hold the jam nut, located between the ywheel and mo-
tor, in place with a 15/16” open-end wrench. Using a mallet,
tap the ywheel counter-clockwise to loosen. Hand-turn
the ywheel the rest of the way off.
3. Remove the black plastic plug from the motor fan hous-
ing, using ngers and a screwdriver. Take care not to damage the housing, or the plug.
5. Install the new bearing assembly using the Allen bolts
removed in Step 4. Orient the bearing against the ywheel
plate such that the raised side of the bearing assembly is
against the side of the ywheel plate that has the counterweight.
4. Unscrew the two Allen bolts from the back of the y-
wheel plate, and remove the bearing assembly. Clean the
Allen bolts and coat the rst 4 threads with Blue Loctite
®
.
6. Thread the jam nut all the way down the motor shaft and
hold it with a 15/16” wrench. It may help to use a screwdriver to hold the motor shaft stationary, while threading
the jam nut.
9
Page 10

ECO-15/ECO-17 FLYWHEEL BEARING REPLACEMENT
7. Install the ywheel assembly by hand, threading it onto
the shaft clockwise until it stops at the jam nut. Use the
mallet to strike the ywheel counterweight to tighten the
ywheel against the jam nut.
9. By hand, turn the bearing to assure it rotates smoothly
and freely.
8. By hand, turn the ywheel to assure the ywheel coun-
terweight clears the motor bolt heads.
10. Install the pad driver using the bolts removed in
Step 1. Clean, then apply Blue Loctite
®
to the rst 4 threads
of each bolt. Fasten each bolt by hand. Then use the 7/16”
wrench to gradually tighten each bolt in turns using a crisscross pattern until each bolt is securely tightened.
11. Replace the black plastic plug removed in Step 3,
using ngers only.
10
Page 11

ECO-15 PARTS & PRICING
ITEMS NOT SHOWN
PART NO.
DESCRIPTION
QTY
MSRP
E530
power cord, ext, 50', 12/3
1 $74.99 ea
G127-17
bonnet, micro fiber, 17", ECO-15, 2pack
1 $21.99 ea
P568A
cord lock, s-type
1 $8.99 ea
H689
wrench, allen, 5/16"
1 $1.99 ea
ITEM
NO.
PART NO.
DESCRIPTION
QTY.
MSRP
1
H151
bolt, 5/16-18 x 3/4" Long SHCS
4 $0.99 ea
2
H421
washer, 5/16" lock, s/s
6 $0.99 ea
3
H843
locking arc, handle adj, floor machine
1 $51.99 ea
4
H555
plate, yoke, ECO-17
1 $33.99 ea
5
H216
nut, lock, 1/4-20, nylon insert, s/s
4 $0.99 ea
6
H210
washer, 1/4" flat, s/s
19 $0.99 ea
7
H316
bolt, 1/4-20 x 1-1/2" hex head, s/s
6 $0.99 ea
8
H065
bushing, sleeve, 5/8 i.d. x 1.25" long
2 $9.99 ea
9
H066
bolt, shoulder 5/8" x 1.25", 1/2-13 thrds 2 $14.99
10
H427
washer, wave
2 $1.49 ea
11
H212
flat washer, 9/16"ID x 1 1/16"OD, AN960-C916
9 $0.99 ea
12
H109
wheel, 10", foam filled
2 $79.99 ea
13
H042
c-clip, 12mm, external
2 $0.99 ea
14
H228
axle, 13.10" x .50" dia
1 $9.99 ea
15
H553
arm, left
1 $98.99 ea
16
P607
bushing, flange, .63" i.d. x .38" long
4 $0.99 ea
17
H554
bracket, arm, ECO
2 $28.99 ea
18
P606
bushing, flange, .63" i.d. x .25" long
4 $0.99 ea
19
H242
bolt, shoulder, 5/8" x 1.5", 1/2-13 threads 2 $19.99 ea
20
H252
bolt, shoulder, 1/4" x 1.5", 10-24 threads
4 $3.99 ea
21
H351 screw, 1/4-20 x 3/4", socket head, s/s
4 $0.99 ea
22
H213
washer, 1/4" lock, s/s
11 $0.99 ea
23
C326B
motor, ECO
1 $548.99 ea
24
B140
connector, 1/4" push-in x 1/8" mpt
6 $7.49 ea
25
H559B
plate, ECO-15
1 $308.99 ea
26
G123B
BUMPER, ECO-15
1 $34.99 ea
27
H327
washer, 3/8" lock, s/s
4 $0.99 ea
28
H293
bolt, 3/8-16 x 1", hex head
4 $0.99 ea
29
H558
weight, counter, #3 offset, threaded, ECO
1 $43.99 ea
30
H556
bearing, offset, ECO
1 $30.99 ea
31
H342
bolt, 1/4-20 x 1" hex head, s/s 3 $0.99 ea
32
P608 adapter, pad driver, encap machine
1 $23.99 ea
33
G113B
PAD DRIVER, ECO-15
1 $91.99 ea
34
H202
bolt, 1/4-20 x 3/4" hex head, s/s
8 $0.99 ea
35
H398
nut, hex, 5/8-18
1 $1.99 ea
36
H485
handle, aluminim grip, black
1 $6.99 ea
37
B645A
filter, cap, ECO
2 $4.99 ea
38
B645C
jet, ECO
2 $9.99 ea
39
B645D
filter, strainer, ECO
2 $8.99 ea
40
B645B
filter, body, ECO
2 $5.99 ea
41
H384
washer, 3/8 flat, s/s
6 $0.99 ea
42
H560
L bracket, ECO
2 $3.99 ea
43
H561
jet bracket, ECO
2 $3.99 ea
44
H922
screw, thumb, 1/4-20 x 1/2"
2 $4.99 ea
45
G052
washer, buna 1-1/8" od x 3/16" id
10 $1.99 ea
46
B153
coupling, 1/8" npt, light pattern
2 $5.49 ea
47
PH657-13
tubing, 1/4", nylon, blk
2
$1.99 ft
48
H403
nut, lock, 10-24, nylon insert
4 $0.99 ea
49
H322
nut, hex, 1/2-13, s/s
2 $0.99 ea
50
H552
arm, right
1 $98.99 ea
51
B110
adapter, brass, 1/4" sw barb x 1/4" fpt, w/gasket
1 $3.99 ea
52
B103
elbow, brass, 90 deg, 1/4"mpt x 1/4" fpt
1 $4.49 ea
53
B107 nipple, brass, 1/4"m, hex
1 $3.19 ea
54
B119
filter, strainer, 1/4"
1 $3.99 ea
55
PH634-8 sol hose, 1/4", silicone braided, clear
1
$6.49 ft
56
B170
ferrule, 1/4" brass
4 $0.99 ea
57
B136
elbow, brass, 90 deg, 1/4" mpt x 1/4" mpt
1 $4.99 ea
58
B147
tee, 1/8" fpt x 1/8" fpt x 1/8" fpt
1 $6.49 ea
59
B657
elbow, 45 deg street, 1/8" mpt x 1/8" fpt
2 $4.99 ea
60
B129
nipple, hex, 1/8" mpt x 1/8" mpt
2 $1.99 ea
61
B656C
valve, ball, 1/8" fpt x 1/8" fpt, s/s
1 $10.99 ea
62
PH657-17
tubing, 1/4", nylon, blk
1
$1.99 ft
ITEM
NO.
PART NO.
DESCRIPTION
QTY.
MSRP
63
PH634-12 sol hose, 1/4", silicone braided, clear
1
$6.49 ft
64
B152
elbow, brass, 90 deg, 1/4" barb x 1/4" mpt
1 $5.49 ea
65
B241
adapter, brass, 3/8" barb x 1/4"mpt
2 $1.99 ea
66
PH715-22 sol hose, 3/8", silicone braided, clear
1
$7.99 ft
67
B217
check valve, 1/8" mpt x 1/8" fpt, 5 PSI
1 $8.99 ea
68
B261
valve assy 3 way
1 $54.99 ea
69
B143
street elbow, 90 degrees, 1/8"
2 $2.99 ea
70
B195
barb, 3/8" barb x 1/8" mpt
1 $2.49 ea
71
H164
grommet, 5/8" ID
4 $1.99 ea
72
B131
fitting, 1/4" barb x 1/8" FPT
1 $2.99 ea
73
B105
bushing, brass, 3/8"mpt x 1/4" 2 $3.19 ea
74
C305A
pump, 100 PSI, no pressure switch
1 $136.99 ea
75
H397
bracket, pump mount, ECO
1 $25.99 ea
76
H007
screw, 10-32 x 2", phil pan head, s/s
4 $0.99 ea
77
H915
clamp, shampoo tank
2 $4.99 ea
78
P559
tank, ST-4
1 $39.99 ea
79
PH612-60
clear tubing, 1/2" OD x 3/8" ID, faucet fill
1
$1.99/ft
80
G031
gasket, 3.25" i.d. x 5.88" o.d.
1 $6.99 ea
81
P560
cap, 6", threaded
1 $23.99 ea
82
G055
tether, cap, 6 1/2"
1 $12.99 ea
83
H612
Washer, #8, flat regular
2 $0.99 ea
84
H230
screw, 10-32 x 1/2" phil pan head, s/s 4 $0.99 ea
85
H178
faucet fill
1 $10.99 ea
86
H357
thumb screw, 1/4" - 20, shampoo tank
2 $1.99 ea
87
G036
cap, 2.5" threaded, tethered
1 $3.49 ea
88
H148
washer, 5/16", narrow
3 $0.99 ea
89
H341
handle pivot, floor machine
1 $74.99 ea
90
H705
bolt, giude, locking piston
1 $0.99 ea
91
H847
bushing, locking piston
1 $17.99 ea
92
H152
ring, retaining, internal 1 1/2"
1 $5.99 ea
93
H157
spring, handle adjustment
1 $5.99 ea
94
H844
locking piston, handle adj.
1 $19.99 ea
95
H273
nut, kep, #10-32 zinc
2 $0.99 ea
96
H916
clip, cord, 5/16", nylon- BLACK
1 $0.99 ea
97
P529
spacer, lever, handle adj.
1 $1.99 ea
98
H159
cable, handle adj, floor machine
1 $6.99 ea
99
H149
bolt, 5/16" shldr x 5/8" w/ 1/4-20 thrd
1 $0.99 ea
100
H839
lever, handle adj., floor machine
1 $19.99 ea
101
H216
nut, lock, 1/4-20, nylon insert, s/s
1 $0.99 ea
102
E384
power cord, end, 15.5", 14/3
1 $11.99 ea
103
H144
strain relief, power cord, metal
1 $12.99 ea
104
H167
switch, floor machine
1 $13.99 ea
105
H640
washer, internal star, 3/8" zinc
1 $0.99 ea
106
H166
insulation, switch, floor machine
1 $3.99 ea
107
H855
lever, switch, floor machine
1 $6.99 ea
108
H160
spring, switch/lever
2 $0.99 ea
109
E515
switch, rocker, 2 position
1 $13.99 ea
110
H255
switch cover, EC, floor machine
1 $30.99 ea
111
P967A
plug, switch
2 $1.99 ea
112
G040
grip, handle, floor machine
2 $1.99 ea
113
P524
plug, plastic, floor machine handle
1 $0.99 ea
114
H231
screw, 10-32 x 1" phil pan head, s/s
1 $0.99 ea
115
H215
nut, hex, 1/4-20 s/s
1 $0.99 ea
116
H849
handle, floor machine
1 $89.99 ea
D
C
B
A
B
C
D
1
2
3
4
5
6
7
8
8
7
6
5
4
3
2
1
E
F
E
F
ECO-15
SHEET 1 OF 3
Encap
3/2015
OD
SCALE: 1:24
REV
DWG. NO.
C
SIZE
TITLE:
NAME
DATE
COMMENTS:
CHECKED
DRAWN
PROPRIETARY AND CONFIDENTIAL
THE INFORMATION CONTAINED IN THIS
DRAWING IS THE SOLE PROPERTY OF
MYTEE PRODUCTS, INC. ANY
REPRODUCTION IN PART OR AS A WHOLE
WITHOUT THE WRITTEN PERMISSION OF
MYTEE PRODUCTS, INC. IS
PROHIBITED.
A
DO NOT
SCALE DRAWING
858-679-1191
mytee
PRODUCTS, INC.
M.LaBarbera
11
Page 12

ECO-15 PARTS & PRICING
1
2
3
4
5
7
8
9
10
11
12
13
14
15
16
17
18
19
6
20
21
22
24
23
25
26
27
28
29
30
32
33
34
22
36
22
39
38
40
41
42
43
47
6
48
49
18
16
50
1
2
86
77
78
87
7
88
77
54
24
58
63
74
76
79
65
85
80
81
82
83
84
98
99
88
100
101
97
102
103
104
105
41
41
106
107
108
109
110
84
112
114
115
116
89
90
91
92
93
94
71
95
96
95
84
6
11
37
59
60
61
11
34
6
6
22
31
35
113
111
34
46
24
45
44
53
11
52
51
55
56
75
56
64
66
68
69
70
71
73
62
24
72
60
65
57
45
45
67
D
C
B
A
A
B
C
D
1
2
3
4
5
6
7
8
8
7
6
5
4
3
2
1
E
F
E
F
ECO-15
SHEET 2 OF 3
Encap
SCALE: 1:24
REV
DWG. NO.
D
SIZE
TITLE:
NAME
DATE
CHECKED
DRAWN
PROPRIETARY AND CONFIDENTIAL
THE INFORMATION CONTAINED IN THIS
DRAWING IS THE SOLE PROPERTY OF
MYTEE PRODUCTS, INC. ANY
REPRODUCTION IN PART OR AS A WHOLE
WITHOUT THE WRITTEN PERMISSION OF
MYTEE PRODUCTS, INC. IS PROHIBITED.
mytee
PRODUCTS, INC.
858-679-1191
M. LaBarbera
3/2015
OD
DO NOT SCALE
DRAWING
12
Page 13

ECO-17 PARTS & PRICING
ITEMS NOT SHOWN
ITEM
NO.
PART NO.
DESCRIPTION
QTY.
MSRP
1
H151
bolt, 5/16-18 x 3/4" Long SHCS
4 $0.99 ea
2
H421
washer, 5/16" lock, s/s
6 $0.99 ea
3
H843
locking arc, handle adj, floor machine
1 $51.99 ea
4
H555
plate, yoke, ECO-17
1 $33.99 ea
5
H216
nut, lock, 1/4-20, nylon insert, s/s
4 $0.99 ea
6
H210
washer, 1/4" flat, s/s
19 $0.99 ea
7
H316
bolt, 1/4-20 x 1-1/2" hex head, s/s
6 $0.99 ea
8
H065
bushing, sleeve, 5/8 i.d. x 1.25" long
2 $9.99 ea
9
H066
bolt, shoulder 5/8" x 1.25", 1/2-13 thrds 2 $14.99 ea
10
H427
washer, wave
2 $1.49 ea
11
H212
flat washer, 9/16"ID x 1 1/16"OD, AN960-C916
6 $0.99 ea
12
H109
wheel, 10", foam filled
2 $79.99 ea
13
H042
c-clip, 12mm, external
2 $0.99 ea
14
H228
axle, 13.10" x .50" dia
1 $9.99 ea
15
H553
arm, left
1 $98.99 ea
16
P607
bushing, flange, .63" i.d. x .38" long
4 $0.99 ea
17
H554
bracket, arm, ECO
2 $28.99 ea
18
P606
bushing, flange, .63" i.d. x .25" long
4 $0.99 ea
19
H242
bolt, shoulder, 5/8" x 1.5", 1/2-13 threads 2 $19.99 ea
20
H252
bolt, shoulder, 1/4" x 1.5", 10-24 threads
4 $3.99 ea
21
H351 screw, 1/4-20 x 3/4", socket head, s/s
4 $0.99 ea
22
H213
washer, 1/4" lock, s/s
11 $0.99 ea
23
C326B
motor, ECO
1 $548.99 ea
24
B140
connector, 1/4" push-in x 1/8" mpt
6 $7.49 ea
25
H559
plate, ECO-17
1 $329.99 ea
26
G123
BUMPER, ECO-17
1 $29.99 ea
27
H327
washer, 3/8" lock, s/s
4 $0.99 ea
28
H293
bolt, 3/8-16 x 1", hex head
4 $0.99 ea
29
H558
weight, counter, #3 offset, threaded, ECO
1 $43.99 ea
30
H556
bearing, offset, ECO
1 $30.99 ea
31
H342
bolt, 1/4-20 x 1" hex head, s/s 3 $0.99 ea
32
P608 adapter, pad driver, encap machine
1 $23.99 ea
33
G113A
PAD DRIVER, ECO-17
1 $98.99 ea
34
H202
bolt, 1/4-20 x 3/4" hex head, s/s
8 $0.99 ea
35
H398
nut, hex, 5/8-18
1 $1.99 ea
36
H485
handle, aluminim grip, black
1 $6.99 ea
37
B645A
filter, cap, ECO
2 $4.99 ea
38
B645C
jet, ECO
2 $9.99 ea
39
B645D
filter, strainer, ECO
2 $8.99 ea
40
B645B
filter, body, ECO
2 $5.99 ea
41
H384
washer, 3/8 flat, s/s
6 $0.99 ea
42
H560
L bracket, ECO
2 $3.99 ea
43
H561
jet bracket, ECO
2 $3.99 ea
44
H922
screw, thumb, 1/4-20 x 1/2"
2 $4.99 ea
45
G052
washer, buna 1-1/8" od x 3/16" id
2 $1.99 ea
46
B153
coupling, 1/8" npt, light pattern
2 $5.49 ea
47
PH657-11
tubing, 1/4", nylon, blk
2
$1.99 ft
48
H403
nut, lock, 10-24, nylon insert
4 $0.99 ea
49
H322
nut, hex, 1/2-13, s/s
2 $0.99 ea
50
H552
arm, right
1 $98.99 ea
51
H007
screw, 10-32 x 2", phil pan head, s/s
4 $0.99 ea
52
B110
adapter, brass, 1/4" sw barb x 1/4" fpt, w/gasket
1 $3.99 ea
53
B103
elbow, brass, 90 deg, 1/4"mpt x 1/4" fpt
1 $4.49 ea
54
B107 nipple, brass, 1/4"m, hex
1 $3.19 ea
55
B119
filter, strainer, 1/4"
1 $3.99 ea
56
PH634-8 sol hose, 1/4", silicone braided, clear
1
$6.49 ft
57
H349
heat sink, demand pump
1 $24.99 ea
58
B147
tee, 1/8" fpt x 1/8" fpt x 1/8" fpt
1 $6.49 ea
59
B657
elbow, 45 deg street, 1/8" mpt x 1/8" fpt
2 $4.99 ea
60
B129
nipple, hex, 1/8" mpt x 1/8" mpt
2 $1.99 ea
61
B656C
valve, ball, 1/8" fpt x 1/8" fpt, s/s
1 $10.99 ea
62
PH657-15
tubing, 1/4", nylon, blk
1
$1.99 ft
ITEM
NO.
PART NO.
DESCRIPTION
QTY.
MSRP
63
PH634-12 sol hose, 1/4", silicone braided, clear
1
$6.49 ft
64
B170
ferrule, 1/4" brass
4 $0.99 ea
65
B136
elbow, brass, 90 deg, 1/4" mpt x 1/4" mpt
2 $4.99 ea
66
B105
bushing, brass, 3/8"mpt x 1/4" 2 $3.19 ea
67
C305A
pump, 100 PSI, no pressure switch
1 $136.99 ea
68
H397
bracket, pump mount, ECO
1 $25.99 ea
69
B131
fitting, 1/4" barb x 1/8" FPT
1 $2.99 ea
70
H164
grommet, 5/8" ID
4 $1.99 ea
71
B195
barb, 3/8" barb x 1/8" mpt
1 $2.49 ea
72
B143
street elbow, 90 degrees, 1/8"
2 $2.99 ea
73
B261
valve assy 3 way
1 $54.99 ea
74
PH715-25 sol hose, 3/8", silicone braided, clear
1
$7.99 ft
75
B241
adapter, brass, 3/8" barb x 1/4"mpt
2 $1.99 ea
76
H915
clamp, shampoo tank
2 $4.99 ea
77
P559
tank, ST-4
1 $39.99 ea
78
PH612-60
clear tubing, 1/2" OD x 3/8" ID, faucet fill
1
$1.99/ft
79
G031
gasket, 3.25" i.d. x 5.88" o.d.
1 $6.99 ea
80
P560
cap, 6", threaded
1 $23.99 ea
81
G055
tether, cap, 6 1/2"
1 $12.99 ea
82
H612
Washer, #8, flat regular
2 $0.99 ea
83
H230
screw, 10-32 x 1/2" phil pan head, s/s 4 $0.99 ea
84
H178
faucet fill
1 $10.99 ea
85
H357
thumb screw, 1/4" - 20, shampoo tank
2 $1.99 ea
86
G036
cap, 2.5" threaded, tethered
1 $3.49 ea
87
H148
washer, 5/16", narrow
3 $0.99 ea
88
H341
handle pivot, floor machine
1 $74.99 ea
89
H705
bolt, giude, locking piston
1 $0.99 ea
90
H847
bushing, locking piston
1 $17.99 ea
91
H152
ring, retaining, internal 1 1/2"
1 $0.99 ea
92
H157
spring, handle adjustment
1 $5.99 ea
93
H844
locking piston, handle adj.
1 $19.99 ea
94
H273
nut, kep, #10-32 zinc
2 $0.99 ea
95
H916
clip, cord, 5/16", nylon- BLACK
1 $0.99 ea
96
P529
spacer, lever, handle adj.
1 $1.99 ea
97
H159
cable, handle adj, floor machine
1 $6.99 ea
98
H149
bolt, 5/16" shldr x 5/8" w/ 1/4-20 thrd
1 $0.99 ea
99
H839
lever, handle adj., floor machine
1 $19.99 ea
100
H216
nut, lock, 1/4-20, nylon insert, s/s
1 $0.99 ea
101
E384
power cord, end, 15.5", 14/3
1 $11.99 ea
102
H144
strain relief, power cord, metal
1 $12.99 ea
103
H167
switch, floor machine
1 $13.99 ea
104
H640
washer, internal star, 3/8" zinc
1 $0.99 ea
105
H166
insulation, switch, floor machine
1 $3.99 ea
106
H855
lever, switch, floor machine
1 $6.99 ea
107
H160
spring, switch/lever
2 $0.99 ea
108
E515
switch, rocker, 2 position
1 $13.99 ea
109
H255
switch cover, EC, floor machine
1 $30.99 ea
110
P967A
plug, switch
2 $1.99 ea
111
G040
grip, handle, floor machine
2 $1.99 ea
112
P524
plug, plastic, floor machine handle
1 $0.99 ea
113
H231
screw, 10-32 x 1" phil pan head, s/s
1 $0.99 ea
114
H215
nut, hex, 1/4-20 s/s
1 $0.99 ea
115
H849
handle, floor machine
1 $89.99 ea
PART NO.
DESCRIPTION
QTY
MSRP
E530
power cord, ext, blue lit, 50', 12/3
1 $88.99 ea
G127-19
bonnet, micro fiber, 19"
1 $23.99 ea
P568A
cord lock, s-type
1 $8.99 ea
D
C
B
A
B
C
D
1
2
3
4
5
6
7
8
8
7
6
5
4
3
2
1
E
F
E
F
ECO-17
SHEET 1 OF 3
Encap
3/2015
OD
SCALE: 1:24
REV
DWG. NO.
C
SIZE
TITLE:
NAME
DATE
COMMENTS:
CHECKED
DRAWN
PROPRIETARY AND CONFIDENTIAL
THE INFORMATION CONTAINED IN THIS
DRAWING IS THE SOLE PROPERTY OF
MYTEE PRODUCTS, INC. ANY
REPRODUCTION IN PART OR AS A WHOLE
WITHOUT THE WRITTEN PERMISSION OF
MYTEE PRODUCTS, INC. IS
PROHIBITED.
A
DO NOT
SCALE DRAWING
858-679-1191
mytee
PRODUCTS, INC.
M.LaBarbera
13
Page 14

ECO-17 PARTS & PRICING
1
2
3
4
5
7
8
9
10
11
12
13
14
15
16
17
18
19
6
20
21
22
24
23
25
26
27
28
29
30
6
33
34
34
22
36
42
22
34
43
44
45
46
24
47
6
48
49
18
16
50
1
2
85
76
77
86
7
87
75
76
57
62
24
58
67
51
78
75
84
79
80
81
82
83
97
98
87
99
100
96
101
102
103
104
41
41
105
106
107
108
109
83
111
113
114
115
88
89
90
91
92
93
70
94
95
94
83
6
11
59
60
61
31
22
6
11
32
69
68
52
70
7172
73
60
24
74
41
40
38
37
39
24
66
65
64
56
63
35
110
2
112
53
11
11
54
55
D
C
B
A
A
B
C
D
1
2
3
4
5
6
7
8
8
7
6
5
4
3
2
1
E
F
E
F
ECO-17
SHEET 2 OF 3
Encap
SCALE: 1:24
REV
DWG. NO.
D
SIZE
TITLE:
NAME
DATE
CHECKED
DRAWN
PROPRIETARY AND CONFIDENTIAL
THE INFORMATION CONTAINED IN THIS
DRAWING IS THE SOLE PROPERTY OF
MYTEE PRODUCTS, INC. ANY
REPRODUCTION IN PART OR AS A WHOLE
WITHOUT THE WRITTEN PERMISSION OF
MYTEE PRODUCTS, INC. IS PROHIBITED.
mytee
PRODUCTS, INC.
858-679-1191
M. LaBarbera
3/2015
OD
DO NOT SCALE
DRAWING
14
Page 15

ECO-15/ECO-17 WIRING DIAGRAM
Orbital Machine Wire Schematic
L1
L2
G
Rev.10-16-2016
Pump
+
-
G
To Metal
Plate
Motor
G
E-515
-
+
15
Page 16

NOTES
Mytee Products Inc.
13655 Stowe Dr.
Poway, CA 9 206 4
www.mytee.com
© 2017 M y te e P ro d uct s I nc.
Printed in the U.S.A.
16
 Loading...