


Instructions for
1
REVISIONS
DESCRIPTION
DATE
APPROVED
10/20/2015
JFL
D
C
B
2
1
E
F
8314T Bentley
™
Carpet Wand
Dear Customer:
Congratulations on the purchase of your new Bentley™ Carpet Wand! The scene of
the equipment world is becoming more high tech, and we at Mytee Products Inc.
strive to keep you on the cutting edge with superior quality and technology.
™
With simple maintenance the Bentley
for many years to come. Keep in mind that neglect or abuse to the Bentley™ will
cause unneccessary damage and void the warranty. If warranty questions arise,
please get in touch with your distributor from whom you purchased this equipment.
Before rst use of your new product, please read this manual thoroughly. Thank
you for choosing Mytee®!
Parts & Service
Repairs, when required, should be performed by Mytee service personnel or a Mytee
Authorized Service Center using original Mytee replacement parts and accessories.
Please specify the Model and Serial Number when discussing your product. For a list
of Authorized Mytee Service Centers, visit our website at www.mytee.com.
Pre-Operation
1. Vacuum and remove debris.
2. Pre-spray the area if desired.
Carpet Wand will give quality performance
Operation
1. Attach the vacuum and solution hoses to the wand.
2. Turn on the extractor. If using a heated extractor, be sure to prime the pump before
turning on the heater.
3. Begin cleaning using a back-and-forth motion.We recommend one wet pass
followed by two dry passes.
After Use
8314T Bentley™ Features
1
2
3
4
1. Comfort wand grip
2. 2” Titanium tube
3. Optional height adjustment
coupler
4. Polished aluminum swivel head
Hooking up the Hoses
7
6
5
5. Spray shields
6. Built-in sight window
7. FeatherTouch™ solution spray
valve
1. Squeeze the spray lever to clear any remaining solution from the hose line.
2. Store indoors. In a clean, dry place.
2. Do not expose to freezing conditions.
Required Maintenance
You must lubricate the bearing mechanism on the wand head monthly (more
often if bearing is subject to gritty waste ow that lodges in the bearing).
Proper maintenance of the swivel mechanism is crucial to function of wand and
preservation of the factory warranty.
Instructions (refer to the Parts List section of this manual):
1. Remove swivel nut (Item #19).
2. Remove the swivel (Item #18) and use a rag to wipe off old grease.
3. Apply new, industrial grease to the swivel (Item #18) and bushing (Item #17).
4. Reinstall the swivel and swivel nut.
Troubleshooting
There is weak or no solution ow.
1. Check to make sure there is solution in your extractor.
2. Inspect the jets to make sure they are not clogged.
FAQs
Q: How much does the Bentley™ Wand weigh?
A: 8 lbs.
Q: Can I customize the Bentley
A: Yes. Please read the instructions on the following page. Please Note: Miscut
tubing cannot be replaced and will void tubing warranty.
™
Wand to my height?
After the Vacuum Hose and Solution Hose are attached to the extractor, connect the Solution Hose to the Male Quick Disconnect, and
the Vacuum Hose to wand tube.
Cleaning with the Bentley™
x2
We recommend one wet pass followed by two dry passes. If using a
heated extractor, this allows the machine to heat up more solution.
ADM-8314T Rev. 06-16
1”
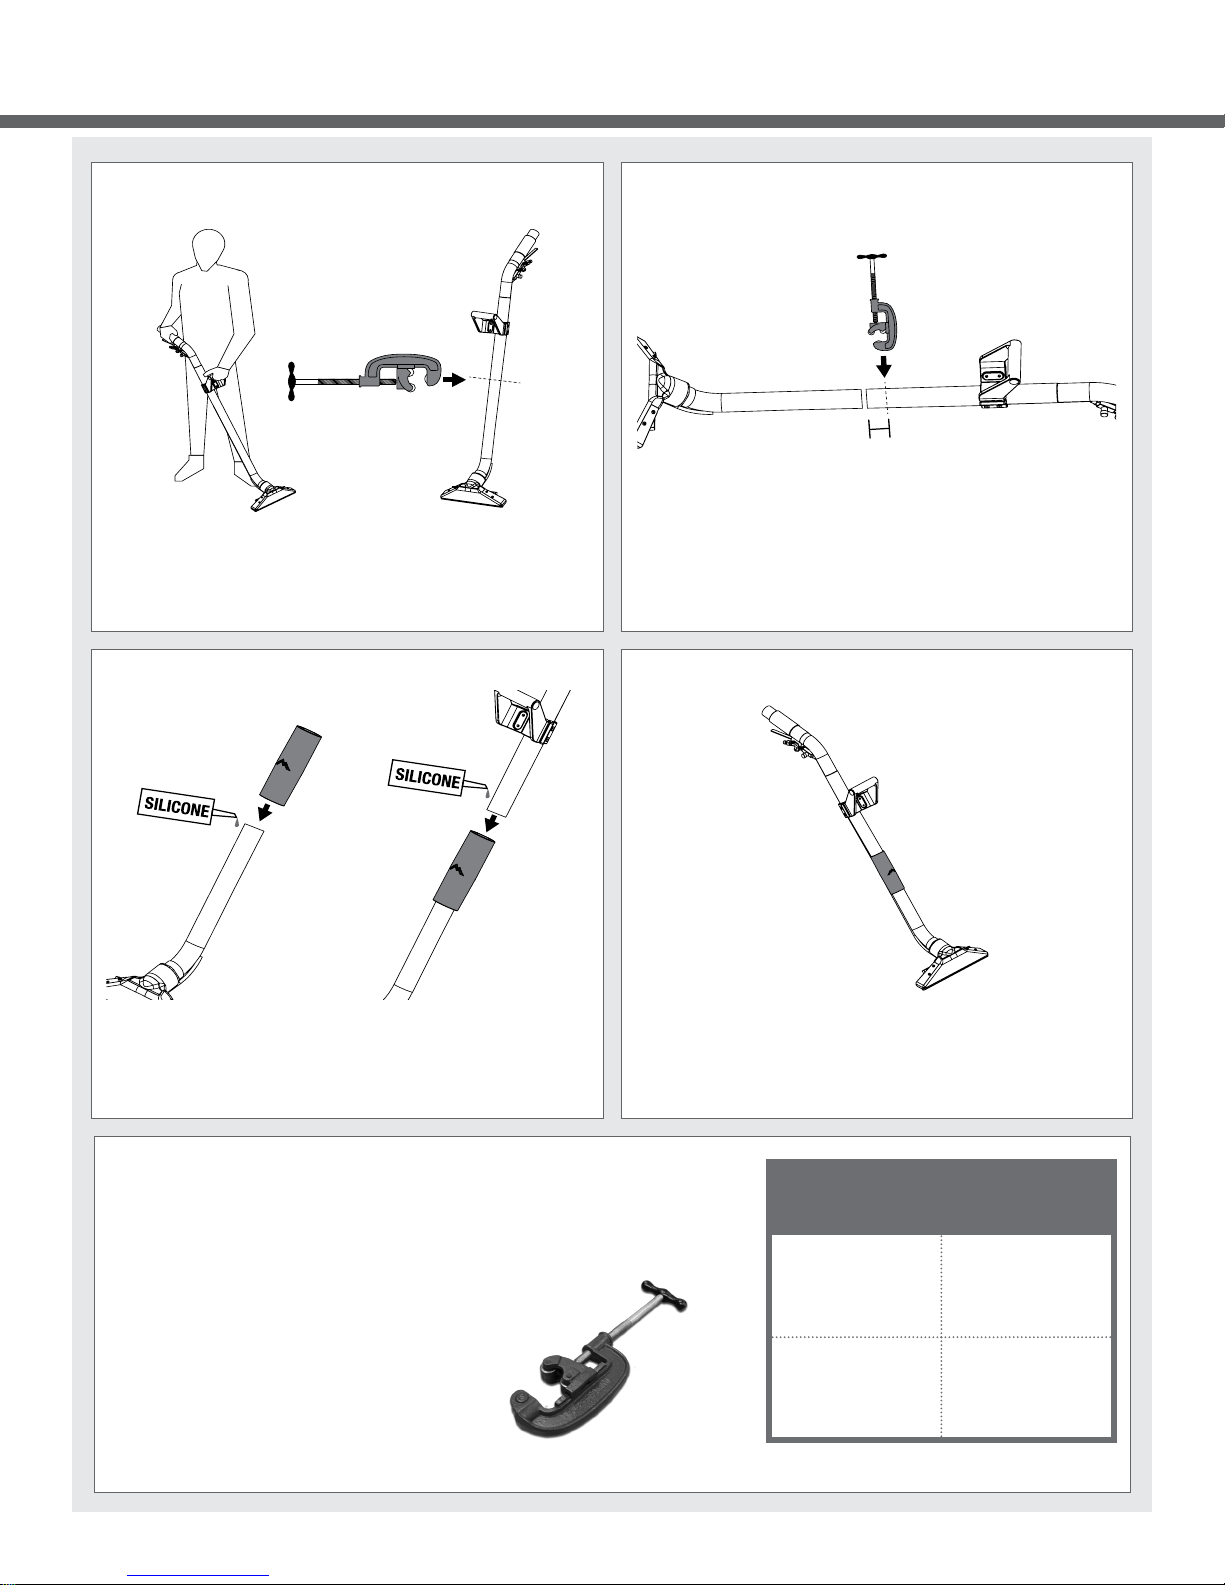
Size Adjustment Guide
Step 1
Try the wand for size to decide how much tubing you want to cut off. Proceed
to cut the wand tube in half using a tube cutter tool.
Step 3
Step 2
Begin to cut your wand to t your height. Cut the tubing in 1” increments
until you get the right size wand for you. Remember: measure twice, cut
once!
Step 4
Once you nd the right measurements for you, attach the tube coupler. Glue
on the included coupler using either a 2-part epoxy (for a more permanent
hold) or a silicone adhesive (which can be broken apart at a later date if
desired). Use enough adhesive to provide an air tight seal and prevent
suction loss.
Wand Sizing Chart
The measurements in this chart are guidelines only. Keep in mind that people vary in height and
arm length. We recommend cutting the tubing in 1” increments until you get the right size wand
for you. Important: Miscut tubing cannot be replaced and will void tubing warranty.
Quick Tip: Solution Hose
After your wand has been resized, you can simply tie back
any slack solution hose, or you can have the solution hose
modied by a local hose company.
What should I use to cut the tubing?
Use a tubing cutter like the one pictured here. Refer to the
tubing cutter’s manual for instructions on how to use.
Allow the adhesive to dry completely before rst use. Refer to the manufacturer’s instructions for drying times.
Operator
Height
5’8” - 5’10”
5’10” - 6’1”
Cut Tubing
Cut off:
Approx. 8”
Cut off:
Approx. 4”
ADM-8314T Rev. 06-16

Parts List & Pricing
1
3
45
6
8
7
9
10
11
12
13
14
8
15
16
18
17
19
20
21
22
23 24
25
26
27
28
OPTIONAL HEIGHT
ADJUSTMENT COUPLER
(INCLUDED)
2
REVISIONS
REV.
DESCRIPTION
DATE
APPROVED
OD
ORIGINAL DRAFT
10/20/2015
JFL
ITEM
NO.
PART NO.
DESCRIPTION
QTY.
MSRP
1
B101
qd, brass, 1/4" m
1
$8.49 ea
2
B247
in-line filter 100 mesh 1/4"NPT M x F
1
$13.99 ea
3
B107 nipple, brass, 1/4"m, hex
1
$3.19 ea
4
B133-A
valve, brass, K, w/ trigger for wands
1
$30.99 ea
5
B646 adapter, 1/4" mpt x 1/8" fpt
1
$5.99 ea
6
AH137
sol hose, 1/8" x 49", 1/8 mpt x 1/8 mpt
1
$45.99 ea
7
B657
elbow, 45 deg street, 1/8" mpt x 1/8" fpt
1
$4.99 ea
8
H233 screw, 10-32 x 1/4", phil pan, s/s
6
$0.99 ea
9
H354B
spraybar, bentley II
1
$64.99 ea
10
B162
jet, 1/8" vv11002, stainless
5
$14.99 ea
11
P588
sprayguard, left, Bentley
1
$0.99 ea
12
H086A glide, 14", bentley II
1
$49.99 ea
13
H599A
manifold, vacuum, 14" bentley II
1
$88.99 ea
14
P589
sprayguard, right, Bentley
1
$0.99 ea
15
P595
window, sight, Bentley II
1
$15.99 ea
16
H751A
bushing, swivel, bentley II
1
$24.99 ea
17
H606A
swivel, 2", bentley
1
$46.99 ea
18
H753A
nut, swivel, bentley II
1
$44.99 ea
19
H597T
tube, titanium, Bentley
1
$258.99 ea
20
H199
coupler, 2", wand tube
1
$24.99 ea
21
H600
grip, 2" dia, wand
1
$24.99 ea
22
H210
washer, 1/4" flat, s/s
4
$0.99 ea
23
H213
washer, 1/4" lock, s/s
4
$0.99 ea
24
H342
bolt, 1/4-20 x 1" hex head, s/s 4
$0.99 ea
25
G049
comfort sleeve, 2" dia, plastisol
1
$6.99 ea
26
H319
clamp, valve, 2"
1
$9.99 ea
27
H458
nut, lock, 10-32, thin, nylon insert
2
$0.99 ea
28
H231
screw, 10-32 x 1" phil pan head, s/s
2
$0.99 ea
D
C
B
A
B
C
D
1
2
3
4
5
6
7
8
8
7
6
5
4
3
2
1
E
F
E
F
8314T
SHEET 1 OF 1
Bentley
10/2015
OD
SCALE: 1:12
REV
DWG. NO.
C
SIZE
TITLE:
NAME
DATE
COMMENTS:
CHECKED
DRAWN
PROPRIETARY AND CONFIDENTIAL
THE INFORMATION CONTAINED IN THIS
DRAWING IS THE SOLE PROPERTY OF
MYTEE PRODUCTS, INC. ANY
REPRODUCTION IN PART OR AS A WHOLE
WITHOUT THE WRITTEN PERMISSION OF
MYTEE PRODUCTS, INC. IS
PROHIBITED.
A
DO NOT
SCALE DRAWING
858-679-1191
mytee
PRODUCTS, INC.
M.LaBarbera
ADM-8314T Rev. 06-16
 Loading...