

MTCP-3126C Big Button Caller ID Speaker Phone with
Remote Control function
1. Changes or modifications not expressly approved by the party responsible for
compliance could void the user's authority to operate the equipment.
2. This device complies with part 15 of the FCC Rules. Operation is subject to the
following two conditions:
(1) This device may not cause harmful interference, and
(2) this device must accept any interference received, including interference that
may cause undesired operation.
1

IMPORTANT SAFETY INSTRUCTIONS
When using any electronic equipment, basic safety precautions should always be followed to
reduce the risk of fire, electric shock, and injury.
1. Read and understan d al l ins t ru ct io ns .
2. Follow all warnings and instructions marked on the Big Button phone.
3. Unplug the Wellness Wizard power and telephone connections before cleaning. Do not use
liquid cleaners or aerosol cleaners. Use a damp cloth for cleaning.
4. Do not use this product near water. Avoid using the Big Button phone near a bathtub, wash bowl,
kitchen sink, laundry tub, in a wet basement, or near a swimming pool.
5. Do not place the Big Button phone on an unstable cart, stand, or table.
6. The Big Button phone should never be placed near or over a radiator, stove or other heat
sources. It should not be placed in a built-in installation, unless proper ventilation is provided.
7. The Big Button phone should be operated only from the type of power source indicated on the
marking label. For information about the type of power your home uses, consult your local utility
company.
8. To prevent fire or shock hazard, do not use this plug with an extension cord or other outlet
unless the blades can be fully inserted to prevent blade exposure.
9. Do not allow anything to rest on any of the connecting cables. Do not locate this product where
cables will be stepped on.
10. Never overload wall outlets and extension cords. This can result in fire or electric shock.
11. Never spill liquid of any kind on the product.
12. Never attempt to service the Big Button phone yourself. The unit may require service by a
qualified technician for the following conditions:
a. When the power supply cord or plug is damaged or frayed
b. If liquid is spilled on the unit
c. If the unit has been exposed to rain or water
d. If the unit has been dropped or the cabinet damaged
e. If the unit exhibits a distinct change in performance.
13. Avoid using a telephone (other than a cordless type) during an electrical storm. There is risk of
electric shock from lightning.
14. Do not use the telephone to report a gas leak in the vicinity of the leak.
15. Only use attachments/accessories specified by the manufacturer.
SA VE THESE INSTRUCTIONS
2
3
INSTRUCTION MANUAL
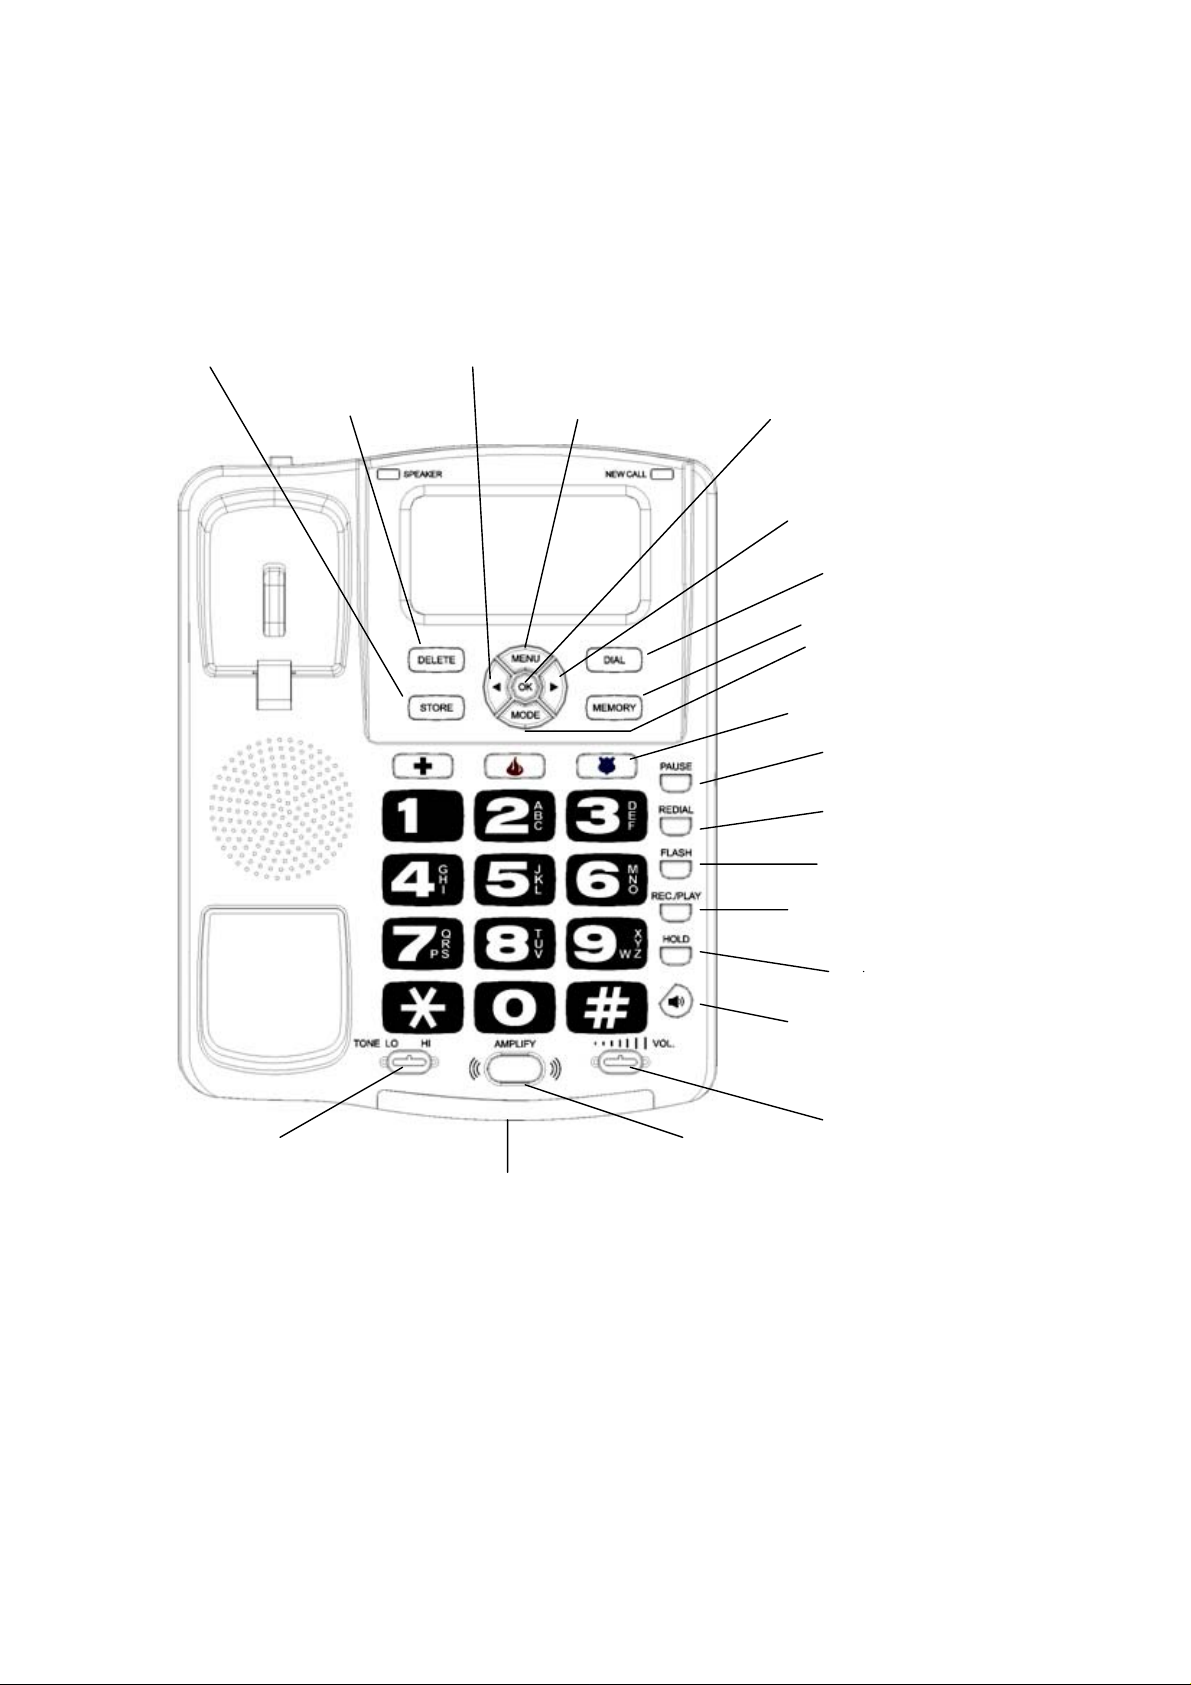
STORE button PREVIOUS button
DELETE button MENU button OK button
DIAL button
MEMORY button
3 Emergency buttons
REDIAL button
TONE slider AMPLIFY button
3 Indicators: Amplify, Hold, Ringer
FORWARD
MODE button
PAUSE
FLASH button
REC./PLAY button
HOLD button
SPEAKERPHONE
button
VOLUME slider
button
button
4
Feature list:
Large LCD Screen with back-light.
Powerf ul adjustable amplifier allows incoming volume up to 43dB
2-way speakerphone with adjustabl e volume control .
3 Emergency buttons for police, fire & EMS.
Amplified Super Loud Ringer with adjustable volume up to 100dB.
90-entry Memory/Phonebook.
99 Missed Call / 20 Answered Calls.
20 Dialed number records.
Review Dialed numbers / Missed / Answered calls.
Cycli c up / down review calls.
VIP Alert.
Name Tagging.
Call Back / Call Waiting.
Super bright LED ringer.
Adjustable ringing volume.
Handset in compatible with hearin g aid T-coil.
Hold on music, Redial/Pause and Flash buttons.
Tone Selector to adjust sound clarify and distinguishing similar sound words.
Clock and Timer functions.
3.5 mm audio jack for a headset or other assistive-listening device.
Desk or Wall-mounted.
5
Remote Control Function:
RF Remote alarm. Up to 3 pagers can be register.
Make 10 emergency calls with the remote cont rol.
Dial emergency call and play the recorded message auto matically.
Rec orded message length 20 seconds.
Remote turn On/Off Speakerphone.
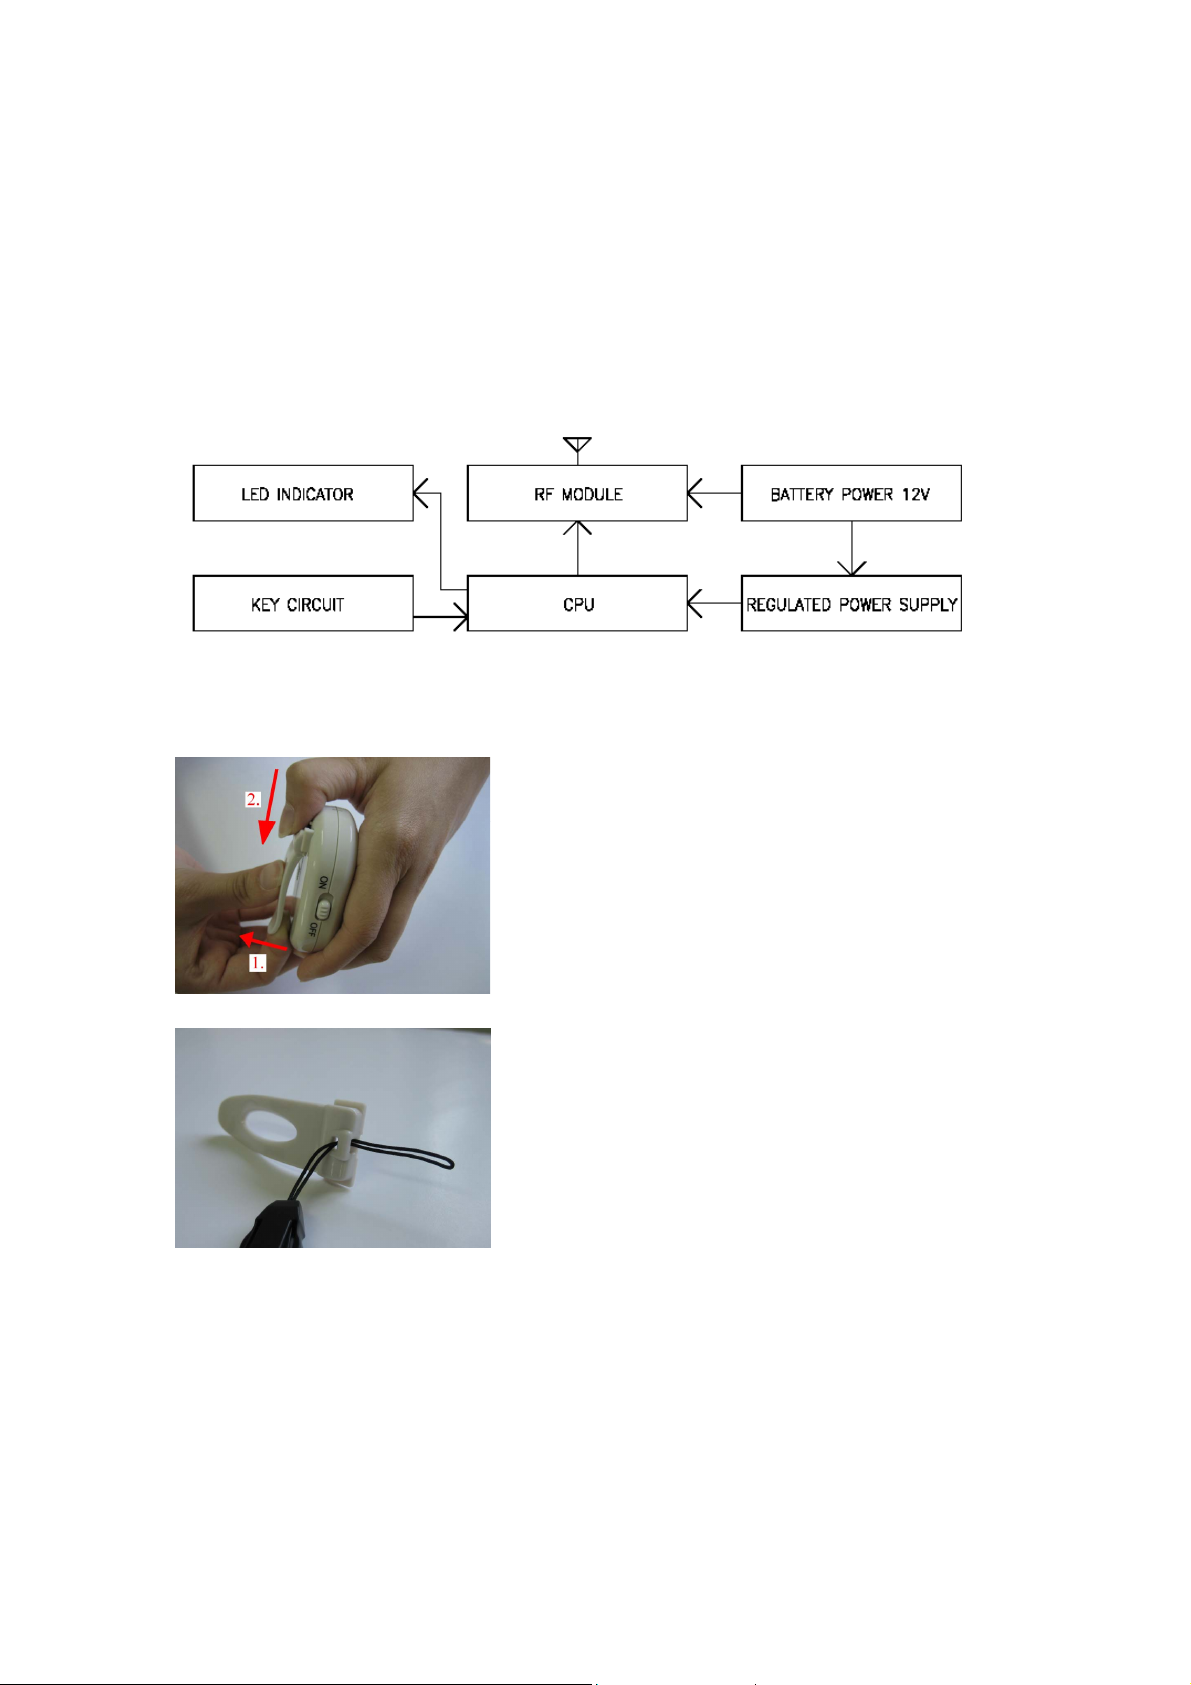
INSTALLING YOUR PHONE
1. Install the battery into the pager.
a. Remove the binder. (Please lift up the binder and push down the top part).
b. Thread the necklace through the binder’s hole.
c Remove the battery compartment cover.
d. Place a 12V alkaline battery into the compartment following the directional.
e. Replace the cover.
f. Replace the binder and switch on.
2. Install the battery into the telephone.
a. Slide and remove the battery cover on the bottom of the unit.
b. Remove the battery compartment cover.
c. Place four AA alkaline batteries into the compartment following the directional.
d. Replace the cover.
6

3. Connect the telephone
Plug one end of the Handset Cord (curly) into the Handset and the other end into the jack on the side of the telephone.
Desktop mounting
a. Align the tabs of the phone bracket with the notches on bottom at the height of the phone. Press inward and downward
firmly on the bracket until it clicks into place.
b. Plug one end of the line cord (straight) into the telephone line jack LINE on the back of the telephone and the other end
into the wall outlet.
Wall mounting
a. Align the tabs of the phone bracket with the notches on bottom at the lower of the phone. Press inward and downward
firmly on the bracket until it clicks into place.
b. Take the handset hook out and flip it to reverse position. It will hold the handset when the phone is in a vertical position.
c. Plug one end of the line cord (straight) into the telephone line jack LINE on the back of the telephone and the other end
into the wall outlet.
4. Connect the adaptor
Plug the AC Adaptor into a standard 120VAC wall outlet and switch it. Plug the AC Adaptor lead into the power socket at
the back of the phone.
If you do not subscribe to a Caller ID service, or you wish to set the TIME/DATE
The telephone will beep and the display will show SET TIME/DATE
Assuming you subscribe to a Caller ID service, the time and date will be automatically updated when the first call is
received. After 10 seconds the display will show the number of calls received MISSED -00-, ANSWER -00-
NOTE: When the telephone is not in use, if the line is being used by another phone, the display shows EXTENSION USE.
12: 0 0
-00- -00-
MISSED ANSWER
BACK UP BATTERY
on the screen. It means the back up battery is either low or not fitted. You need to change a new battery, or there are
no functions include Speakerphone and record/play message.
AM
01/01
→
12:00
EXTENSION USE
AM
01/01
OPERATION
TELEPHONE OPERATION
MAKING AND RECEIVING CALLS
HANDSET SPEAKERPHONE
8:30
MAKING A CALL
RECEIVING A CALL
00-00
1. Pick up the Handset from the Base.
2. Dial desired number.
3. Hang up upon completion of the call.
1. Pick up the Handset from the Base.
2. Speak.
3. Hang up upon completion of the call.
AM
10/20
== TALK ==
→
1. Key in desired telephone number.
2. Press DIAL (The phone goes to
speakerphone mode automatically).
3. To hang up, press SPEAKER key.
1. Press SPEAKER key.
2. Speak
3. To hang up, press SPEAKER key again.
8:30
AM
10/20
5551212
DIALING…
7

8:30
SPEAKERPHONE
NOTE:
While the making a call, the DIAL KEYPAD LED will come on
While the phone is ringing, the super bright ring flasher and the DIAL KEYPAD LED will light
AM
10/20
00-00
→
AM
8:30
10/20
5551212
DIALING…
SPEAKPHONE
You can place a call on Speakerphone mode anytime by pressing SPEAKER during a call, then place the Handset on the
base. Also, you can transfer a call to the Handset anytime during a call by simple picking up the Handset. During the
speakerphone condition, the display will show SPEAKERPHONE, and the SPEAKER LED will light.
During the handset condition, the display will show == TALK == and
will appear.
USING SPEAKERPHONE WITH THE PAGER
During a call but you can’t reach but near the telephone. You can pick up a call on Speakerphone mode by pressing the
on the pager
1. Press and hold the
The SPEAKER LED will light up.
2. Speak
3. To hang up, press and hold the
on the pager until the indicator lights to turn on Speakerphone when the telephone is ringing.
on the pager until the indicator lights.
CALL TIMER
When the handset is picked up or the
and show the elapsed time XX-XX on the display screen.
SPEAKER
is pressed, the call counter will begin
LCD BACKLIGHT DISPLAY
The LCD has a backlight that will turn on under the following conditions;
• Any incoming call
• Picking up the handset
• Pressing any button
NOTE:
The backlight will switch off automatically approximately 15 seconds after the last activity.
The AC Adaptor must be plugged into the unit to enable BACK LIGHT to work.
CONNECTING AN OPTIONAL HEADSET
Your phone is equipped with a headset jack on the base. The jack allows you to connect an optional headset so you move
around within the headset cord's length.
Follow these steps to use a headset:
1. Insert the headset's 3 /32-inch (2.5 mm) plug into the AUDIO jack on the right side of the base. .
2. Place the headset on your head with the earpiece over either ear and adjust the microphone boom until it is about even
with your chin.
PLACING A CALL ON HOLD
1. To place a call on hold, press
2. To begin conversation again, pick up the handset or press SPEAKER or pick up an extension phone (if available), the
hold will then be automatically released.
MUSIC ON HOLD
When a call is placed on hold, the telephone will play a popular melody to reassure your caller that the call has not been
disconnected.
USING FLASH
Press FLASH to perform the switch hook operation for special services, such as Call Waiting. (see the section “SETTING
FLASH TIME”, default time is 600 ms)
For example, if you have Call Waiting, press FLASH to take an incoming call without disconnecting the current call. Press
FLASH again to return to the first call.
NOTE: If you do not have special phone services, pressing FLASH might disconnect the current call.
During the memory storage procedure, you may wish to press FLASH to insert a flash; a ‘F’ will show on the LCD between
and hang up. The
HOLD
HOLD LED
will light; the display will show < CALL ON HOLD >.
8

numbers.
USING TONE SERVICES ON A PULSE LINE
If you have pulse service, you can still use special services that require tone signals, such as bank-by-phone, by following
these steps.
1. Be sure T/P is set to P
2. Dial the service's main number.
3. When the service answers, press
4. After you complete the call and hang up, the phone resets to pulse dialing.
or press #, any additional numbers you dial are sent as tone signals.
PROGRAMMING THE EMERGENCY BUTTONS
3 emergency numbers are provided as one touch speed dial and can be stored. To save precious time in an emergency,
store the numbers of your local police, fire department and EMS services on the Emergency Speed-Dial buttons, so that
you can automatically dial them.
1. Program these numbers by pressing the STORE button, then the Emergency button.
2. Enter the phone number you wish to assign to the emergency button.
3. Press STORE twice.
4. Repeat in turn for each emergency service.
Note: To call any of your three local emergency services, simply lift the handset or press the Speaker button. Press the
corresponding speed-dial button.
REMOTE CONTROL FEATURES
SET ALARM NUMBER
You have 10 alarm number can be set. Please set alarm number first before you use the remote control features.
1. Repeatedly press MENU until “SET ALARM NO “ appears.
2. Press
3. Enter the phone number you wish to assign to the ALARM NO-01
4. Press OK to complete the setting and go to next number setting
5. Press MENU to complete the setting, or press MODE to complete the setting and return to standby mode, or you can do
nothing and wait for 15 seconds to complete the setting and return to standby mode.
button, the display shows “
OK
ALARM NO-01
“
SET PAGER
You can use 3 pagers at the same telephone. But you must register the pager’s code with telephone first before you use
the remote control features.
1. Repeatedly press MENU until beeps once and “SET PAGER-1 “ “-----------“appears.
2. Press any key on the pager until the display shows a set of numbers and beeps twice for the corresponding numbers.
3. Press OK or MENU to complete the setting and go to next pager setting
4. Press OK or MENU to complete the setting, or press MODE to complete the setting and return to standby mode, or you
can do nothing and wait for 15 seconds to complete the setting and return to standby mode.
RECORDING/PLAYING EMERGENCY MESSAGE
NOTES:
1. You must record an emergency message in the phone. The message content is like “This is an emergency notification,
your assistance is needed. After the tone, please press pound (#) and 1 to speak or press pound(#) and 2 to
confirm your help."
2. You can record new emergency message to change the old emergency message. The message can last for up to 20
seconds.
RECORDING:
1. Press REC./PLAY for 2 seconds on standby mode.
After the beep the display shows “00-20“ to start recording.
2. Speak in a normal voice about 8 inches away from the microphone. The display will show “PLAYBACK“ after 20
seconds and it automatically plays back the message
3. Or you can press
back the message.
NOTES:
1. Follow step 1-2 to change the emergency message.
REC./PLAY
to finish recording for the recording time less than 20 seconds and it automatically plays
The unit will emit a long beep and the display shows “RECORDING“.
9

2. You must add an explanation like ” Press pound (#) and 1 to speak or press pound (#) and 2 to confirm your help” in the
emergency message and let the called party know how to do.
PLAYING:
1. Press REC./PLAY on standby mode to start playing. the display shows
“
PLAYBACK
2. To stop playing message just press REC./PLAY again.
“,
MAKING EMERGENCY CALLS WITH THE PAGER
Your phone dials all your emergency contacts automatically.
1. Press and hold
alert you. The emergency message will be played on the speaker for 3 times before starts dialing the alarm number.
Note: You can stop the alarm call procedure if you press any key on the phone for getting help locally first. Or you can
press
2. The phone will dial the first alarm number in the setting list (see the section of ”
Note: Press any key to turn on speakerphone or pick up the handset will stop the alarm call procedure after dialing an
alarm number.
3. The called party will hear the emergency message then with a tone if they pick up the phone. The emergency message
will play five times continuously with 5 seconds pause time.
The called party can press #, 1 or #, 2 on the dial keypad after the tone. The phone will stop playing and emit a tone
if the called party do the two functions.
a. If the called party press #, 1: The phone will turn on speakerphone for 1 minute. The phone will turn off the line
if the called party hang up or there are more 8 seconds of silence. The phone will dial next alarm number after
this procedure.
If you want to speak with the called party with no limit, you can press any key or pick up handset or press the
speaker key on the pager. And the phone will discard the alarm call procedure.
b. If the called party press #, 2: The phone will emit a tone to confirm and turn off the line. And the phone will
discard the alarm call procedure.
Notes:
1. The phone will dial each alarm number make a cycle with three times if the called party don’t pick up phone and press #,
2 to confirm.
2. The phone will dial the setting police, fire department and EMS services on the Emergency Speed-Dial buttons in turn if
there were no alarm numbers were set.
3. The phone will sound beep continuously if the phone is in use when an alarm call procedure is proceeding.
on the pager, the indicator lights and the pager will emit a long beep then 10 short beeps to
on the pager again to release the alarm call procedure if you misemploy to press the pager key.
STORING ALARM NUMBERS
”).
AMPLIFICATION FEATURES
INCOMING VOICE VOLUME
You can adjust the volume of incoming calls by simply sliding the VOL control. This gives you up to18 dB. If you want more
amplification, follow the directions below.
1. While pick up handset, press AMPLIFY to turn the incoming voice amplifier on or off. When AMPLIFY is on, the ))) icon
appears and AMPLIFY LED comes on.
2. Adjust the volume in the earpiece by moving the VOL slide control. With AMPLIFY on; incoming volume will be up to
43dB louder.
In standard use, the amplifier turns off whenever you hang up the telephone. This is a useful feature if many people use the
phone. If you want the amplifier to always remain on, slide the switch underneath the phone to AUTO.
Caution: The handset volume will be up to 43 dB louder if you slide the switch underneath the phone to AUTO. Please be
careful if you pick up handset.
NOTE: (AUTO/MANUAL switch on the back of the phone)
The amplifier will turns off when you switch to Speakerphone mode
INCOMING VOICE TONE
The product provides extra amplification at the sound frequency you need to boost. The identify the sound frequency range
that best suits your need, follow these steps:
1. While pick up handset and hear a voice on the line, press AMPLIFY.
2. Adjust the TONE slide control to suit you hearing.
RINGER VOLUME
While the phone is ringing, you can adjust the ringer volume of your telephone by moving the RINGER VOL. switch,
located at the right side of the telephone, to the desired OFF/LO/HI position
10

BASE SPEAKER VOLUME
While on a call, press
VOLUME + or -
, located at the right side of the telephone, to the desired level.
HANDSET VOLUME
While on a call, adjust the VOL switch, located at the front side of the telephone, to the desired level.
HANDSET TONE
While on a call, adjust the TONE switch, located at the front side of the telephone, to the desired tone level.
ADJUSTING RINGER TONE
While the phone is ringing, you can adjust the ringer tone of your telephone by moving the RINGER TONE switch, located
at the right side of the telephone, to the desired HI/LO position.
MEMORY OPERATION
7th
Press
8th
Press
9th
Press
Note: 90 phone numbers can be programmed into the MEMORY of your telephone
Each memory location can store a maximum of 32 digits and 15 letters.
• You must complete each step within 15 seconds.
• You can store the phone number with the handset on or off hook (except hold mode).
STORING AN ENTRY
Eg : To program MYTECH telephone number, 0295993577 into memory
1. Press STORE (Display shows STORE TO ?)
2. Press either a one-touch memory location or MEMORY (Display shows NUMBER ?)
3. Enter the phone number 0 2 9 5 9 9 3 5 7 7 using the keypad
4. Press STORE or OK (Display shows NAME ?)
*Enter the name M Y T E C H using the keypad
(6 99 8 33 222 44)
5. Press STORE or OK (Display shows VIP ALERT OFF)
6. Press
7. Press STORE or OK, the phone will beep and the display will show STORED
If you do not want to store a name, skip step 4
Figure 1 Figure 2
Figure 3 Figure 4
NOTE:
• To add a space before another word, press number 1 once.
• If you make a mistake while entering the number, or name. Press
to move the cursor left and press DELETE to delete the letter.
• Letters are always inserted to the left of the cursor
• Always store area code together with telephone numbers. This will be useful for CID purposes
Key 1st
1
2
3
4
or to choose VIP ALERT ON/OFF.
AM
6:40
03/05
STORE TO ?
AM
6:40
03/05
0295993577
NAME ?
2nd
Press
Press
-
3rd
Press
’
4th
Press
( ) & , . 1
6:40 AM 03/05
0_
NUMBER ?
6:40 AM 03/05
0295993577
M_
to move the cursor right, press
5th
Press
6th
Press
A B C 2 A B C 2 A
D E F 3 D E F 3 D
G H I 4 G H I 4 G
11

5
6
7
8
9
*
0
#
J K L 5 J K L 5 J
M N O 6 M N O 6 M
P Q R S 7 P Q R S
T U V 8 T U V 8 T
W X Y Z 9 W X Y Z
* * * * * * * * *
0 0 0 0 0 0 0 0 0
# # # # # # # # #
PAUSE
During the memory storage procedure, you may wish to press PAUSE to insert a pause between numbers. (This is
sometimes useful for accessing a switchboard, telephone banking or long distance dialing).
Pressing PAUSE more than once will increase the pause between digits.
Each time PAUSE is pressed, a ‘P’ will show on the LCD to indicate a pause time (see the section “SETTING PAUSE
TIME” default time is 2000 ms) in the dialing sequence. Each pause counts as one digit.
NOTE: press
, upper o appears; or press #, lower o appears
REVIEW A NUMBERS FROM THE MEMORY
Press MEMORY (Disp lay show s I TEM -XXX - , XXX is the number of memories stored in the MEMORY), enter the first letter
of the name (e.g “E” for EMMA): Press number 3 twice and scroll with
that you want to review.
NOTE:
• If the numbers is longer than 15 digits, the number will shift left(1second) automatically until the end of the number has
been reached. The phone will exit automatically approximately 15 seconds after the last activity.
until the display shows the name and number
DIALING A NUMBERS FROM THE MEMORY
There are three different ways to dial a stored speed dial number, depending on your preference.
Way 1: Pick up the handset and follow the sequence ‘REVIEW A NUMBERS FROM THE MEMORY’ until the display
shows the name and number that you want to dial, and then press DIAL.
Way 2: Press SPEAKER and follow the sequence ‘REVIEW A NUMBERS FRO M T HE MEMORY’ until the display shows
the name and number that you want to dial, then press DIAL.
Way 3: Follow the sequence ‘
information. Pick up handset the number will be dialed. Or press SPEAKER or press DIAL (the phone enters
speakerphone mode and dials the displayed number)
REVIEW A NUMBERS FROM THE MEMORY
’ and check the LCD shows the correct
USING THE ONE-TOUCH SPEED DIAL MEMORY
There are two ways to dial a one-touch speed dial memory
Way 1: Press a one-touch memory key,
pick up handset or press SPEAKER or press DIAL. The number displayed on the LCD will be dialed.
Way 2: Pick up the handset or press SPEAKER, then press a one-touch memory key. The phone will dial the number
automatically
the display shows the emergency number that you want to review or dial out, then
CHANGING A SPEED DIAL NUMBER
1. During one-touch memory or MEMORY review.
2. Press OK, the display shows
3. Move the cursor to the number you would like to edit by using
4. Press DELETE to delete the number then key-in the desired number using the keypad
5. Press STORE or OK, the cursor prompt on the right of the last letter
6. Move the cursor to the letter to be edited by using
7. Press DELETE to delete the letter then key-in the desired letter using the keypad
8. Press STORE or OK (Display shows VIP ALERT OFF)
9. Press
10. Press STORE or OK, the phone will beep and the display will show STORED
or to choose VIP ALERT ON/OFF.
NUMBER?
and the cursor prompt on the right of the last digit
or
or
CLONING A SPEED DIAL NUMBER
1. During one-touch memory or MEMORY review.
✒✎ Press STORE, the display shows STORE TO?
3. Press either a one-touch memory location or MEMORY, which place you wish to store the number
4. The display shows NUMBER? and the cursor prompt on the right of the last digit
5. Move the cursor to the number you would like to edit by using
6. Press DELETE to delete the number then key-in the desired number using the keypad
or
12

7. Press STORE or OK, the cursor prompt on the right of the last letter
8. Move the cursor to the letter to be edited by using
9. Press DELETE to delete the letter then key-in the desired letter using the keypad
10. Press STORE or OK (Display shows VIP ALERT OFF)
11. Press
12. Press
NOTE: One-touch memory locations accept duplicate phone numbers, but the MEMORY does not.
If the number that matches the one stored in MEMORY, the phone will show REPLACE?. Press STORE or OK, the phone
will beep and the display will show STORED
or to choose VIP ALERT ON/OFF.
STORE or OK
, the phone will beep and the display will show STORED
or
DELETING A SPEED DIAL NUMBER
1. During one-touch memory or MEMORY review.
2. Press DELETE (Display shows DELETE ?)
3. Press the DELETE or OK
4. The phone beeps and the display shows DELETED.
DELETING ALL MEMORY ENTRY
1. Press MEMORY (Display shows ITEM -XXX-)
2. Press DELETE (Display shows CLEAR MEMORY ? )
3. Press DELETE or OK to confirm your choice and the phone beeps and the display shows DELETED.
REDIAL
If you want to redial the last number dialed,
1. Press REDIAL and the display will show the latest dialed number. Then press the DIAL; the telephone will redial the last
number dialed (the phone enters speakerphone mode and dials the displayed number). Or
2. Pick up the handset or press SPEAKER. Press REDIAL, the telephone will redial the last number dialed.
NOTE:
• The redial memory stores the first 32 digits of any number dialed. If the number you dialed exceeds 32 digits, the redial
memory will store the first 32 digits only.
Caller ID/MEMORY
USING CALLER ID
To make use of these features, you must first subscribe to phone company’s Caller ID Service.
There is usually a fee for this service, and may not be available in all areas.
SETTING THE LONG DISTANCE CODE
The Long Distance Code has a default setting of 1. You can change the code to “9” if you use a PBX telephone system or
“0” if your telephone system requires operator assistance to make a long distance call.
NOTE: If you do not complete each step within 15 seconds, the phone exits setup. Start again at Step 1.
1. Press MENU until-1- and “SET LDS CODE“ appear. 1 flashes.
2. Repeatedly press
3. Press OK or MENU to complete the setting and go to next setting, or press MODE to complete the setting and return to
standby mode, or you can do nothing and wait for 15 seconds to complete the setting and return to standby mode..
SETTING THE AREA CODE
NOTE: If you do not complete each step within 15 seconds, the phone exits setup. Start again at Step 1.
1. Repeatedly press MENU button until ----- and “SET AREA CODE“ appears. The first - flashes
2. Press
following the cursor position.
3. Press OK to move between the different settings.
4. Press MENU to complete the setting and go to next setting, or press MODE to complete the setting and return to standby
mode, or you can do nothing and wait for 15 seconds to complete the setting and return to standby mode.
NOTE:
The default AREA CODE setting is none.
to increase the setting, to decrease the setting. Or use the keypad buttons to set the code manually
PHONE RECORD
When you use this telephone with the Caller ID service, you will see the number of the calling party (unless the call
is blocked or is from a silent number) before you answer the phone. This telephone will store and display information
about the last 99 missed calls received and the last 20 answered calls received. Each call is numbered in the call history,
together with the time and date the call was received. When the memory is full, the oldest call information is deleted to
make room for new incoming call information.
or to set the long distance code to 1, 9 or 0.
13

This telephone also store and display information about the last 10 dialed numbers (max 11 digits)
CALLER ID ON CALL WAITING
This feature allows you to see the number of the calling party (unless the call is blocked or is
from a silent number) and CW icon appears on the display while you are on call. However, you must first subscribe to
Telephone company’s Caller ID Service and activate your call waiting service.
CALLER ID SUMMARY
The display will show the caller ID summary (MISSED -XX-, ANSWER -XX-) in standby (where XX is the missed
(answered) number of calls stored in the memory)
CALL REVIEW
To review call information, you can press MODE. This menu provides functions as MISSED CALL, ANSWERED CALL,
DIALED NUMBER. During review, you can use function key to call, store or delete related phone number.
MISSED CALL
1. Press the MODE, until the display will show primary function MISSED CALL -XX-.
2. Use the
history
-05-
When all missed calls have been reviewed, the new call LED will stop flashing.
or to view the missed calls. The new call LED will flash if there are new missed call store in the call
AM
6:40
MISSED CALL
03/05
6:40 AM 03/05 01
555-1212
JOHN SMITH
ANSWERED CALL
1. Press the MODE, until the display will show primary function ANSWERED CALL -XX-.
2. Use the
-06-
or to view the answered calls.
AM
6:40
03/05
ANSWERED CALL
6:40 AM 03/05 01
555-1212
JOHN SMITH
DIALED NUMBER
20 dialed numbers can be stored into the redial memory. When the redial memory is full, the oldest dialed information is
deleted to make room for new dialed information.
1. Press the MODE; until the display will show primary function DIALED NUMBER -XX-.
2. Use the
-06-
DIALED NUMBER
or to view the dialed calls.
AM
6:40
03/05
6:40 AM 03/05 01
5551212
00-45
Press MODE can return standby
DELETING A CALL FROM THE CALL HISTORY
To delete a call from the call history;
1. Use the
2. Press the DELETE once and the display will show DELETE ?
3. Press the DELETE or OK.
The phone will beep once, the displayed call record will be deleted and the display will show DELETED.
or until the screen displays the information you wish to delete.
DELETING ALL CALLS
To delete all calls from three primary functions individually, the display must be showing one of the primary functions
MISSED CALL, ANSWERED CALL or DIALED NUMBER
14

1. Press the DELETE once and the display will show DELETE ALL ?
2. Press the DELETE or OK.
The phone will beep once, all call records will be deleted and the display will show
NOTE:
New missed calls can not be deleted until they have been reviewed.
DELETED
.
TRANSFERING A CALLER ID NUMBER TO SPEED DIAL MEMORY
1. Use the or to scroll through the call history.
2. When you locate the number you wish to transfer
3. Press STORE when the number displayed is correct. The display will show STORE TO?.
4. Press either a one-touch memory location or MEMORY, which place you wish to store the number
5. The display shows NUMBER? and the cursor prompt on the right of the last digit
6. Move the cursor to the number you would like to edit by using
7. Press
8. Press STORE or OK, the cursor prompt on the right of the last letter
9. Move the cursor to the letter to be edited by using
10. Press DELETE to delete the letter then key-in the desired letter using the keypad
11. Press STORE or OK (Display shows VIP ALERT OFF)
12. Press
13. Press STORE or OK, the phone will beep and the display will show STORED
NOTE: One-touch memory locations accept duplicate phone numbers, but the MEMORY does not.
If the number that matches the one stored in MEMORY, the phone will show REPLACE ?. Press STORE or OK, the phone
will beep and the display will show STORED
DELETE
to delete the number then key-in the desired number using the keypad
or
or to choose VIP ALERT ON/OFF.
or
SPEED DIALING FROM THE CALLER ID LIST
DIFFERENT AREA CODE
When the phone number's area code does not match the area code you stored, the phone provides two different dialing
number selections. Press OK once, the display first shows the ten-digit number (three digits of the area code plus seven
digits of the phone number, for example, 818-555-1212). Press OK again and 1 appears before the ten-digit
number (1-818-555-1212).
SAME AREA CODE
If the phone number's area code matches the area code you stored, the phone provides four different numbers.
Repeatedly press OK, the phone cycles through and displays four patterns for dialing numbers.
• Seven-digit number — for example, 555-1212.
• Eight-digit number (“1” plus the phone number) — for example, 1-555-1212.
• Ten-digit number — for example, 817-555-1212.
• Eleven-digit number (“1” plus the area code plus the phone number) — for example, 1-817-555-1212.
You must store your home area code for Callback to work correctly. If the call came from your home area code, the display
shows only the seven-digit number (without an area code). Follow these steps to dial a phone number from Caller ID
records.
1. Repeatedly press
2. Then, repeatedly press OK to select the suitable dialing pattern for that phone number.
To callback a phone number from Caller records with the speakerphone, press DIAL. Then, after the phone dials the
number, SPEAKERPHONE appears, and the phone starts to count the time.
or to select the desired phone number.
DISPLAY INFORMATION
CALL DISPLAY MESSAGES
PRIVATE on the screen means;
• The caller has chosen to block their number
• A call from an old type of telephone network exchange
• A call from a silent number subscriber
• A call from any analogue cellular mobile telephone
OUT OF AREA on the screen means;
• A call coming from overseas
TOLL on the screen means
If your phone company sends information indicating that the incoming call is long distance, TOLL appears.
15

REPEAT XX on the screen means
If there is the same number entry, the caller’s data and the “
screen of alternate the Caller’s record and repeat counter. The maximum repeat counter is 7
AM
6:40
03/05 01
5551212
JOHN SMITH
REPEAT XX
6:40 AM 03/05 01
555-1212
REPEAT 01
” appear alternately. There will be a display on the
REVIEWING THE CALL FORWARDING INFORMATION
If you subscribe to your phone company's call forwarding service, the phone company will forward the phone call from the
main telephone to the assigned telephone so you will not miss the phone call. To see the call forwarding information, be
sure to connect the phone to the assigned telephone. The phone company offers three call forwarding services — Call
Forward Universal, Call Forward Busy, and Call Forward Unanswer.
If you subscribe to the Call Forward Universal Service, the phone company directly forwards any phone call from the main
telephone to the assigned telephone and “
If you subscribe to the Call Forward Busy Service, the phone company will forward the phone call to the assigned
telephone when the main telephone is busy and “CALL FWD BUSY“ appears.
If you subscribe to the Call Forward Unanswer Service, the phone company will forward the phone call to the assigned
telephone when the main telephone does not answer the call, and “CALL FWD UNANS“ appears.
“END OF LIST“ or “TOP OF LIST“ on the screen means;
• You have reached the end or start of the caller id history information.
MISSED -00- on the screen means;
• No missed calls are stored in the missed caller id history
ANSWER -00- on the screen means;
• No answered calls are stored in the answered caller id history
NO RECORD on the screen means;
• No any calls are stored in the caller id history
CALL FORWARD“
appears.
ADVANCED USER OPTIONS MENU
VIP
When the phone number of an incoming call is matched with the exact number stored in
MEMORY, the symbol VIP
• If the phone number set VIP ALERT ON and the VIP function is setting ON in the section “SETTING VIP ON/OFF”, The
telephone will sound a special VIP tone to alert you to an incoming VIP call.
SETTING VIP ON/OFF
1. Repeatedly press MENU until “SETTING VIP OFF“ appears.
2. Press
3. Press OK or MENU to complete the setting, or press MODE to complete the setting and return to standby mode, or you
can do nothing and wait for 15 seconds to complete the setting and return to standby mode.
NOTE:
With VIP alert set to ON, the symbol
The default VIP alert setting is ON.
or to choose SETTING VIP OFF/ SETTING VIP ON.
NAME TAGGING
When the phone number of an incoming call is matched with the exact number stored in
MEMORY, the name stored in the MEMORY will automatically be displayed together with the caller id number.
It is useful because the name stored in the speed dial memory can be personalised to suit your particular situation.
Example
If the number ‘5551212’ and the name ‘JOHN SMITH’ is stored into MEMORY and the caller id number ‘5551212’ is sent by
the Caller ID network, the name ‘JOHN SMITH’ will be automatically displayed together with the phone number, time and
date of the call.
NOTE:
You must subscribe to a Caller ID Service for this feature to work.
TIP:
• Always store names with the numbers in your MEMORY to maximize the benefit of this feature.
will be displayed
will be displayed.
16

SETTING THE LANGUAGE
You can choose ENGLISH (default), FRENCH (FRANCAIS), SPANISH (ESPANNOL), DUTCH, GERMAN, ITALIAN,
CZECH language as message showing.
1. Press MENU display shows “ENG FRN SPN DUT GER ITA CZE “ and the current setting language flashes.
2. Press
3. Press OK or MENU to complete the setting and go to next setting, or press MODE to complete the setting and return to
or to choose language ENGLISH, FRENCH, SPANISH, DUTCH, GERMAN, ITALIAN, CZECH
standby mode, or you can do nothing and wait for 15 seconds to complete the setting and return to standby mode.
SETTING TIME/DATE
Follow these steps so the phone can record the correct time and date each call record.
Note: If you do not complete each step within 15 seconds, the phone exits setup. Start again at Step 1.
1. Repeatedly press MENU button until “SET TIME/DATE“ appears and the hour flashing.
2. Press
manually following the cursor position. Press
3. Press OK to move between the different settings. The default time/date setting is 12:00 am 01/01(hh:mm mm/dd). The
local clock will also be updated automatically when a caller ID is received.
4. Press MENU to complete the setting and go to next setting, or press MODE to fail the setting and return to standby mode,
or you can do nothing and wait for 15 seconds to fail the setting and return to standby mode.
to increase the setting, to decrease the setting. Or use the keypad buttons to set the time and date
or to choose AM, PM.
LCD CONTRAST
1. Press MENU until -5- and “LCD CONTRAST“ appear. -5- flashes.
2. Use the dial pad to key in the value or press
Note: The phone has six (1–6) display contrast settings.
3. Press OK or MENU to complete the setting and go to next setting, or press MODE to complete the setting and return to
standby mode, or you can do nothing and wait for 15 seconds to complete the setting and return to standby mode.
The default LCD CONTRAST setting is 5.
to increase the setting, to decrease the setting.
CALL WAIT ID ON/OFF
1. Repeatedly press MENU until “CALL WAIT ID OFF“ appears.
2. Press
3. Press OK or MENU to complete the setting, or press MODE to complete the setting and return to standby mode, or you
can do nothing and wait for 15 seconds to complete the setting and return to standby mode.
NOTE:
The default CALL WAIT ID setting is OFF.
or to choose CALL WAIT ID ON/ CALL WAIT OFF.
SETTING FLASH TIME
1. Repeatedly press MENU until “FLASH TIME“ and the current setting value appears.
2. Press
3. Press OK or MENU to complete the setting, or press MODE to complete the setting and return to standby mode, or you
can do nothing and wait for 15 seconds to complete the setting and return to standby mode.
NOTE:
The default FLASH TIME setting is 600ms.
or to choose 600, 100, 300 (ms).
SETTING PAUSE TIME
1. Repeatedly press MENU until “PAUSE TIME“ and the current setting value appears.
2. Press
3. Press OK or MENU to complete the setting, or press MODE to complete the setting and return to standby mode, or you
can do nothing and wait for 15 seconds to complete the setting and return to standby mode.
NOTE:
The default PAUSE TIME setting is 2000 ms.
or to choose 2000, 4000, 6000 (ms).
RESETTING THE PHONE
If your phone stops working properly, use a straightened paper clip to press
phone.
on the back of the phone to reset the
RESET
17

18
 Loading...