

Page 1
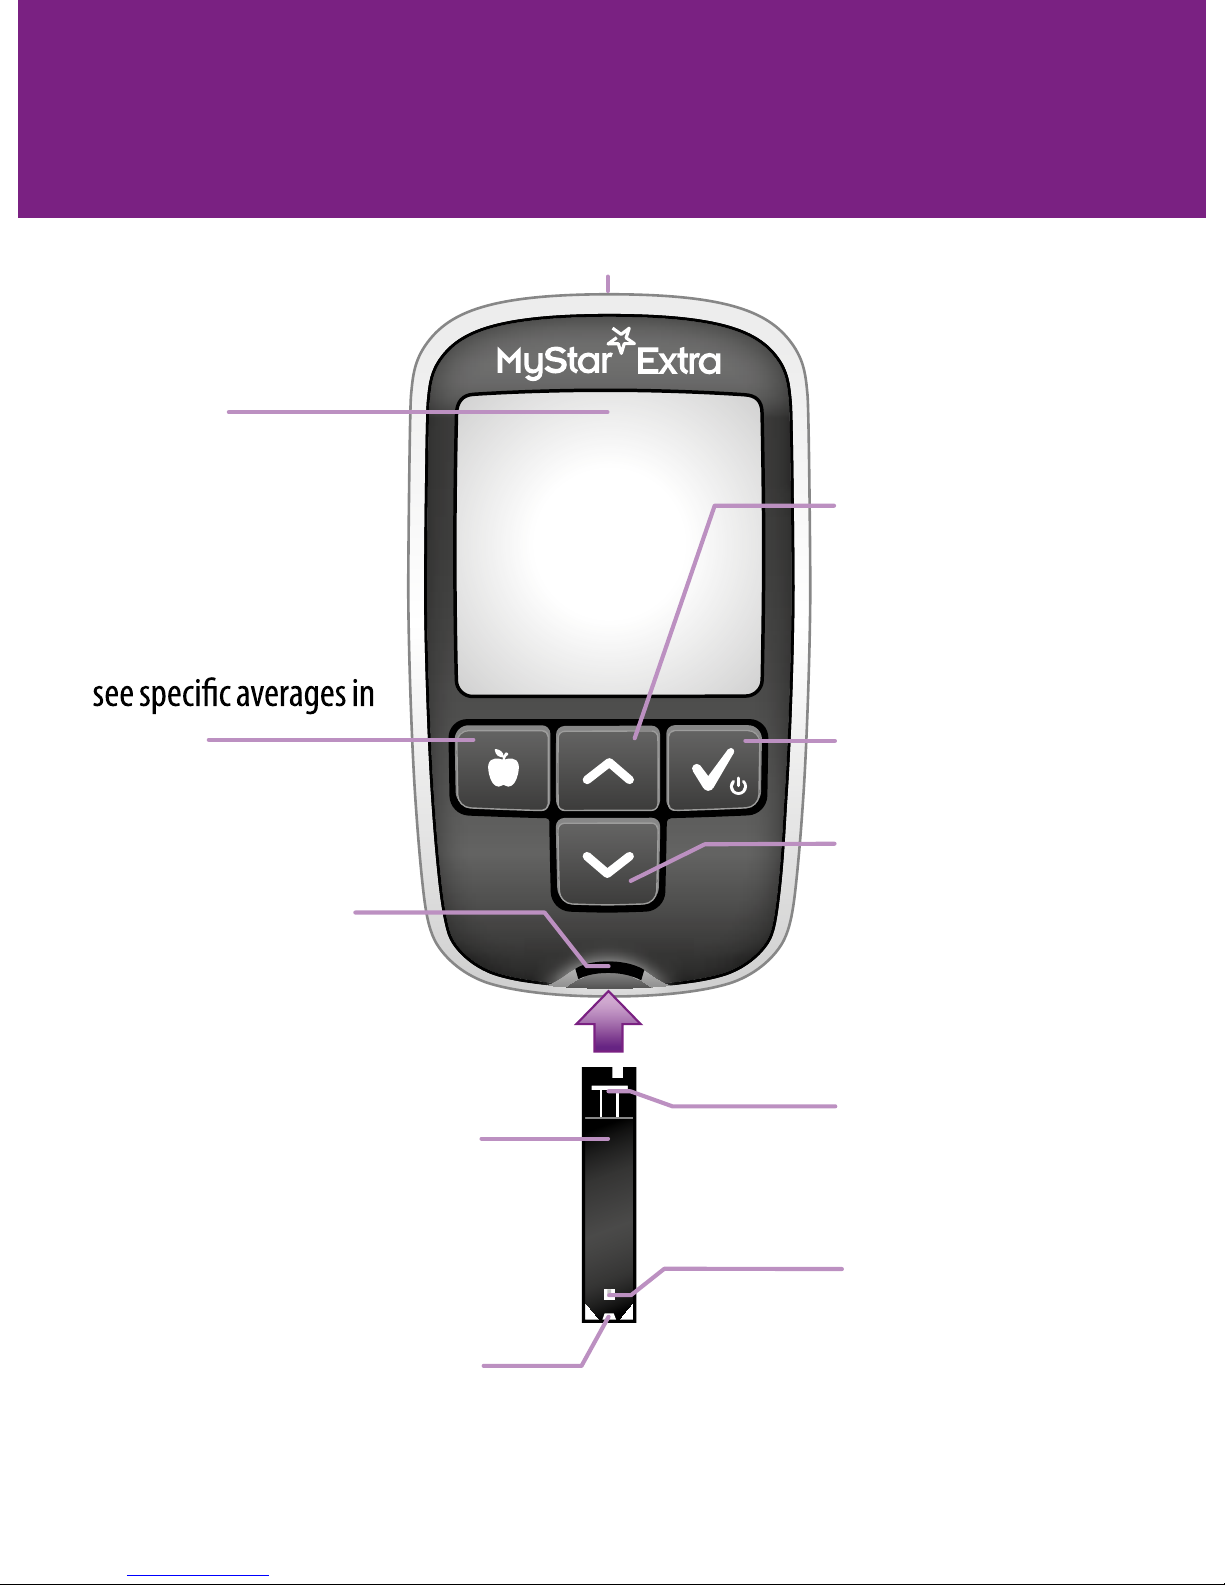
Meter & Test Strip Overview
Display
Mini-USB-Port
Test Strip Port
Front of the Test Strip
(black-coloured side)
Sample Area
Blood should be applied here.
Visual Fill
Window
Turns red when enough
blood has been applied.
Contact Bars
– insert strip with
bars facing up
Mealtime Button
– use to select or
change a meal tag or to
logbook
UP Arrow Button
– use to scroll to a more
recent result in logbook
or to increase a value
(e.g. in settings)
DOWN Arrow
Button
– use to scroll
to a past result in
logbook or to decrease a
value (e.g. in settings)
CHECK Button
– use to accept and/or
move to next step
Refer to the MyStar Extra® Owner’s Guide for complete instructions for use.
Page 2
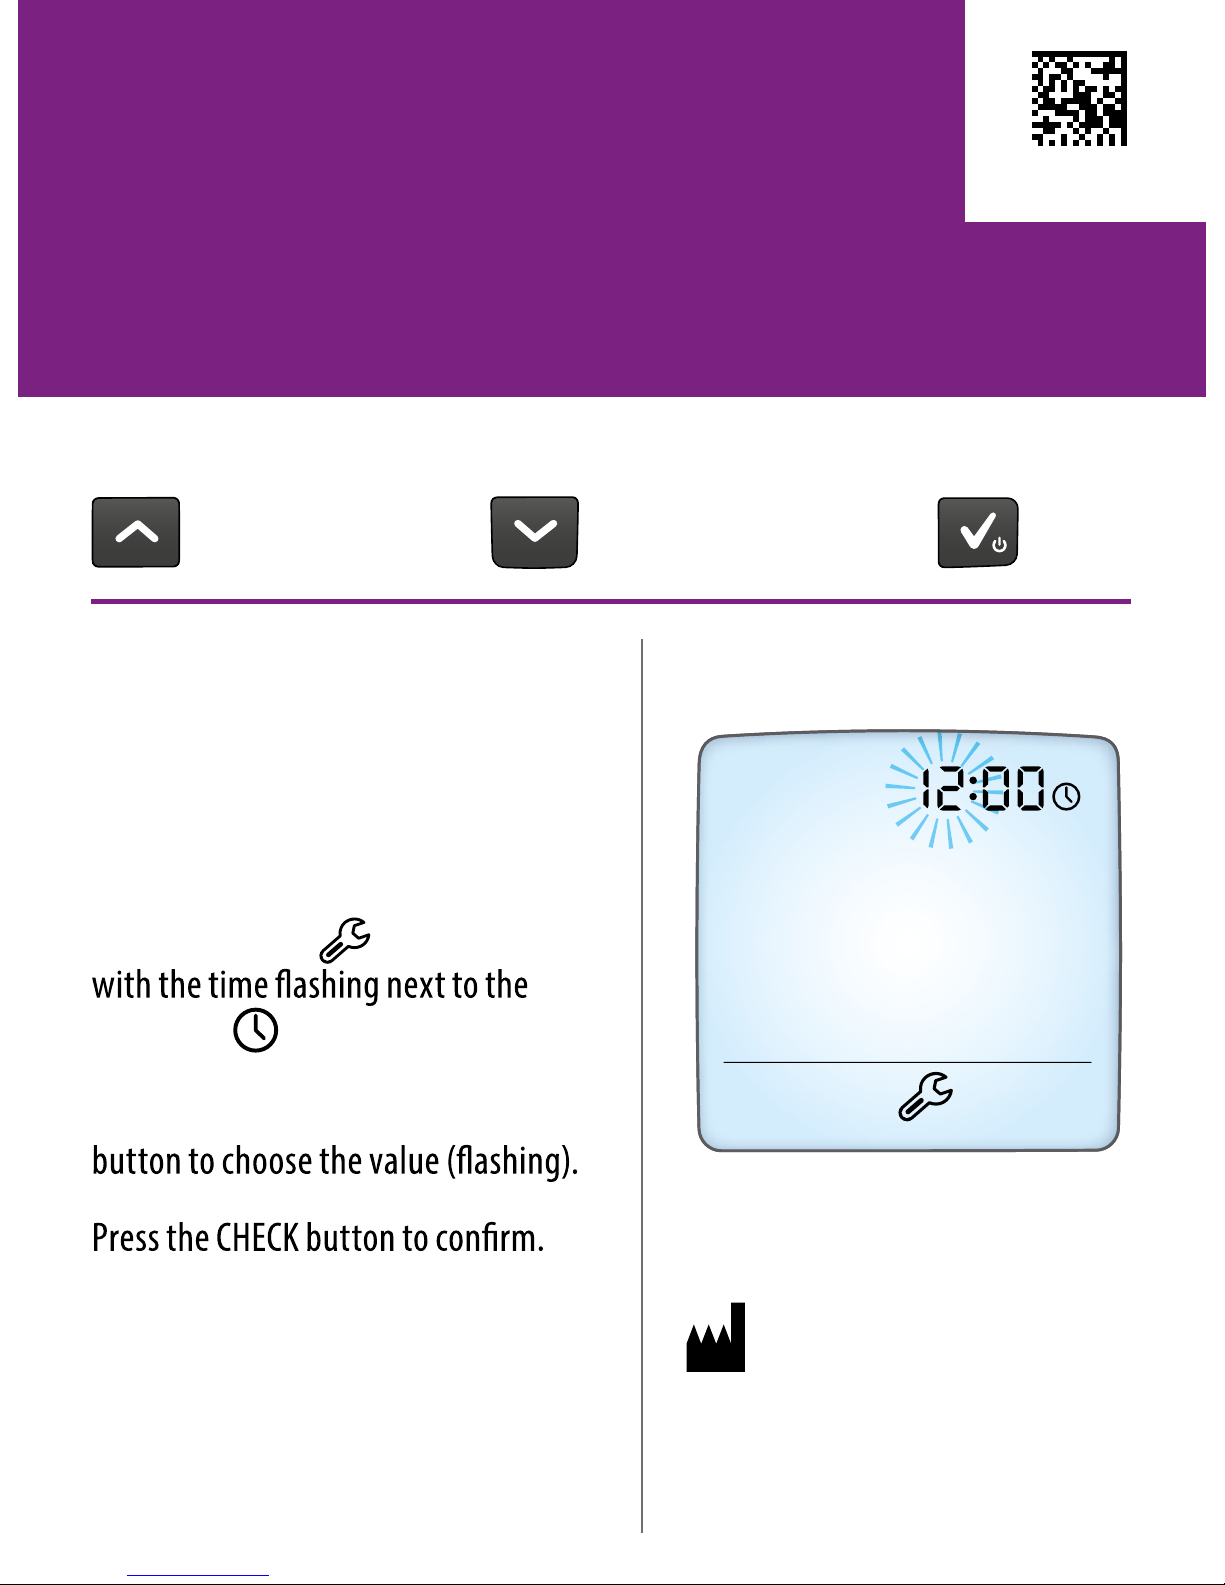
Setting Time & Date
[1] When your meter is deactivated,
press and hold the CHECK button to
enter settings mode.
Select the time format (12 hr vs. 24 hr)
and press the CHECK button to select.
The setting icon ( ) will appear
time icon ( ).
[2] Press the DOWN or UP arrow
Repeat step [2] until time and date
are set correctly
[3] Press and hold the CHECK button
to exit the settings mode.
Toll-Free, 24-Hour Customer
Service: 08000 35 25 25
Manufacturer:
AgaMatrix, Inc.,
7C Raymond Avenue,
Salem, NH 03079 USA
UP Arrow DOWN Arrow CHECK
Meter Buttons:
Refer to the MyStar Extra® Owner’s Guide for complete instructions for use.
Example of
setting hour (ashing):
<MAT>521900
Page 3
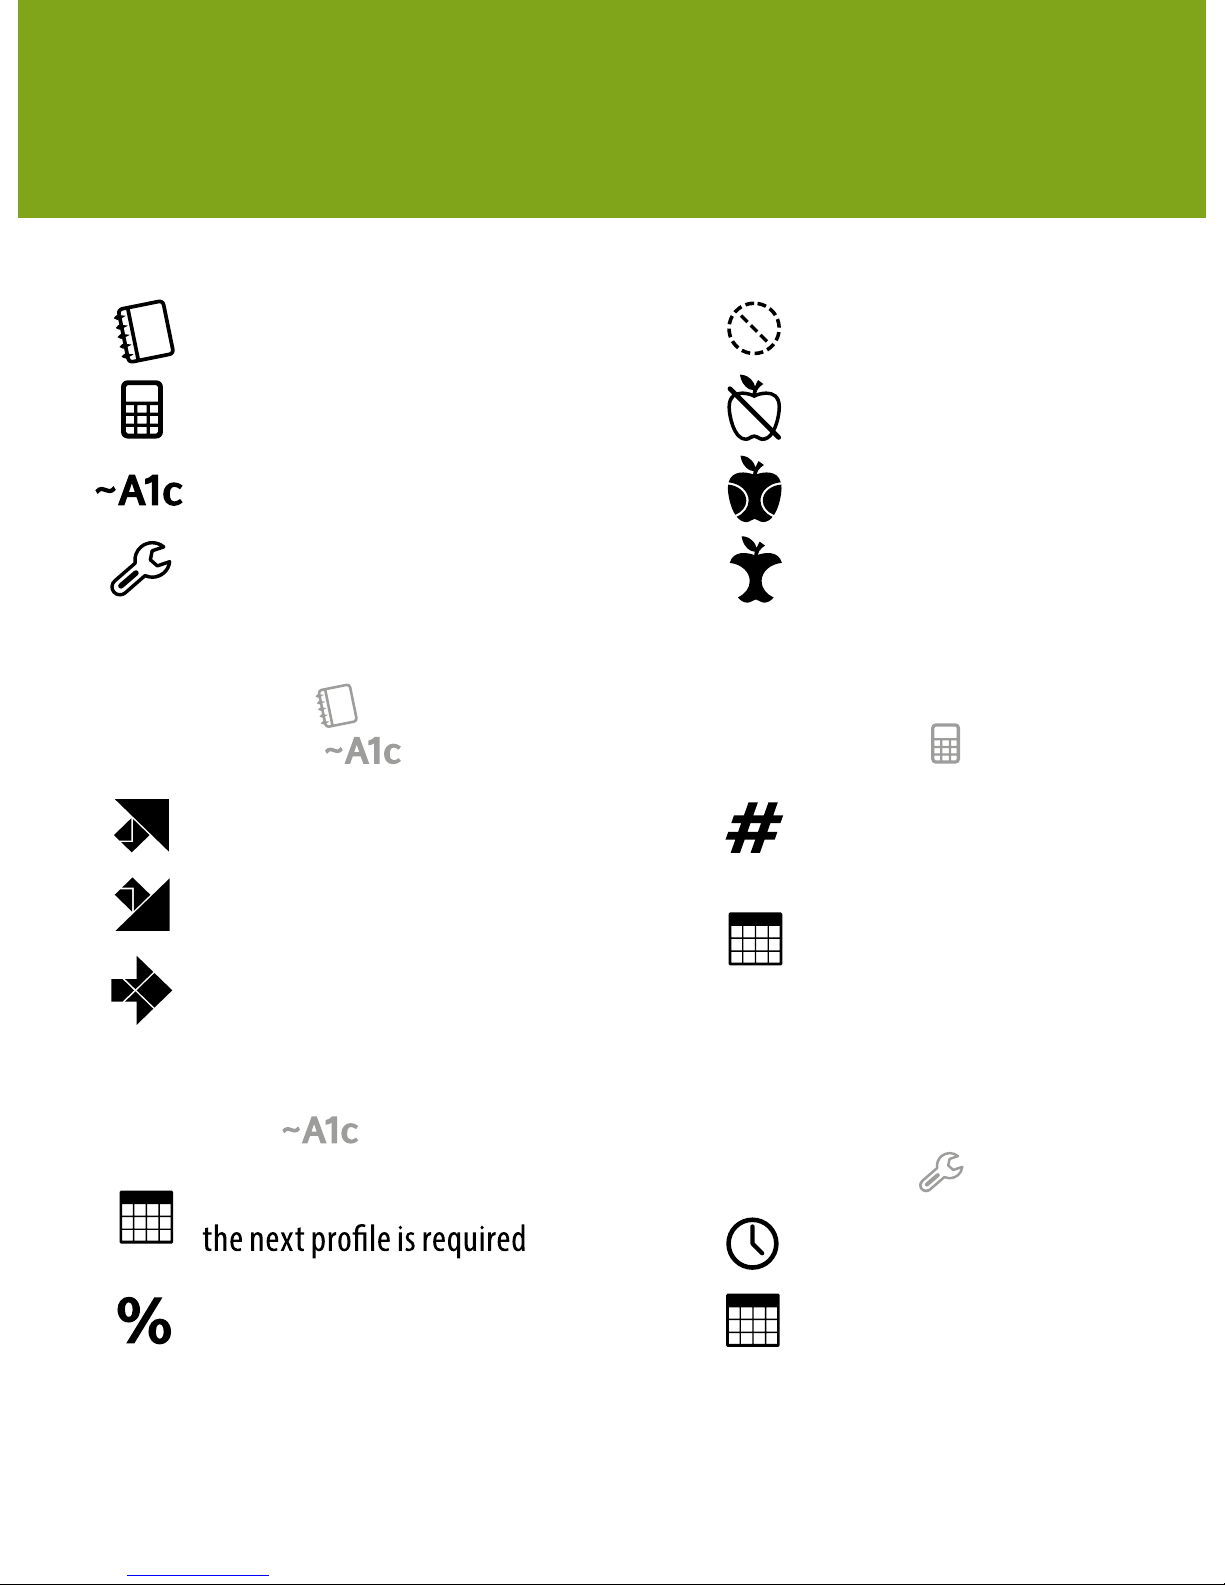
Symbols & Messages
Refer to the MyStar Extra® Owner’s Guide for complete instructions for use.
No Tag
Fasting
Pre Meal
Post Meal
Mealtime Tags
Logbook
Averages
Estimated A1c
Settings
Meter Modes
Time Setting
Date Setting
Time & Date Setting
(in Settings Mode )
Trending Up
Trending Down
Steady
Trending Arrows
(in Logbook Mode )
(and in ~A1c Mode )
Number of days remaining until
~A1c Percentage
Viewing Estimated A1c (~A1c)
(in ~A1c Mode )
Number of readings
used in calculation
Number of days
used in calculation
Viewing Averages
(in Averages Mode )
Page 4
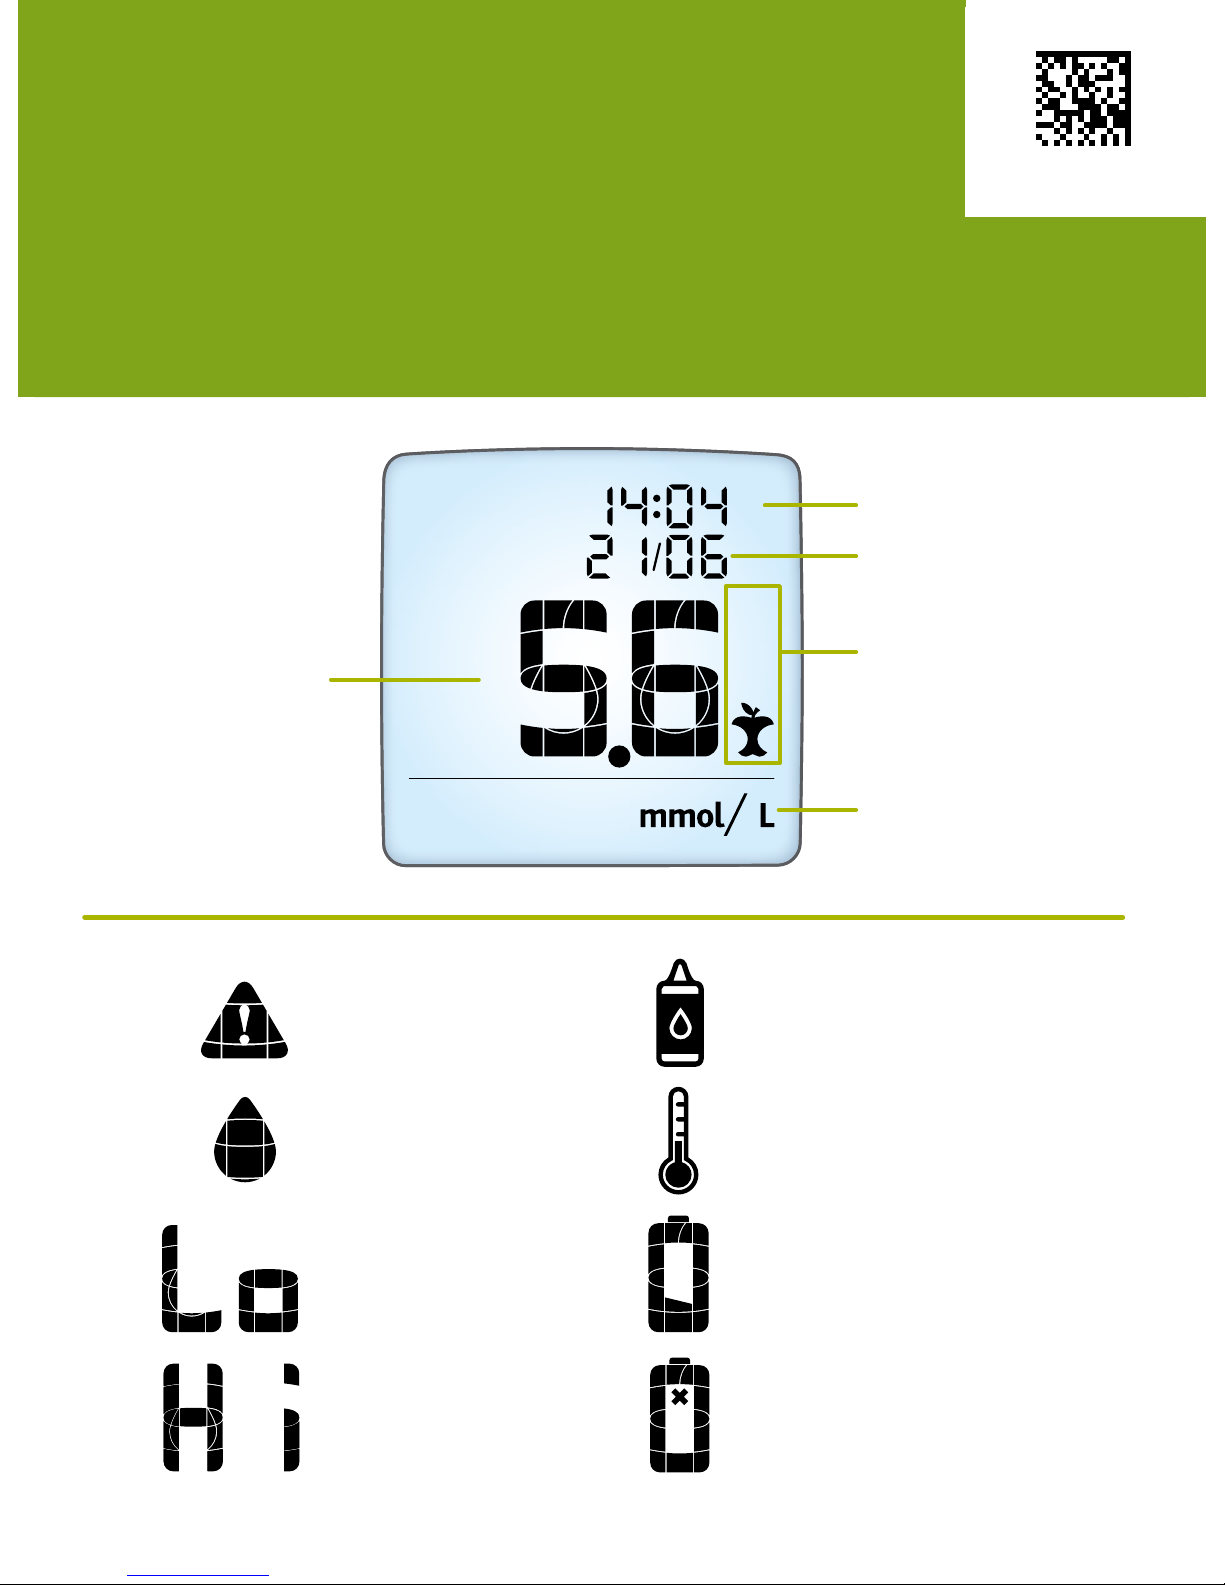
Symbole und Meldungen
Für eine vollständige Information lesen Sie bitte die Bedienungsanleitung
des MyStar Extra™.
Outside operating
temperature range
Low Battery
Dead Battery
An Error occurred
Glucose test result is
lower than 1.11 mmol/L
Glucose test result is
above 33.3 mmol/L
Control Solution result
Apply Sample to
Test Strip
Time
Date
Test Result
Unit of
Measurement
Mealtime Tag
(appears here)
Viewing a
Blood Glucose
Test Result
Symbols & Messages
Refer to the MyStar Extra® Owner’s Guide for complete instructions for use.
<MAT>521878
Page 5
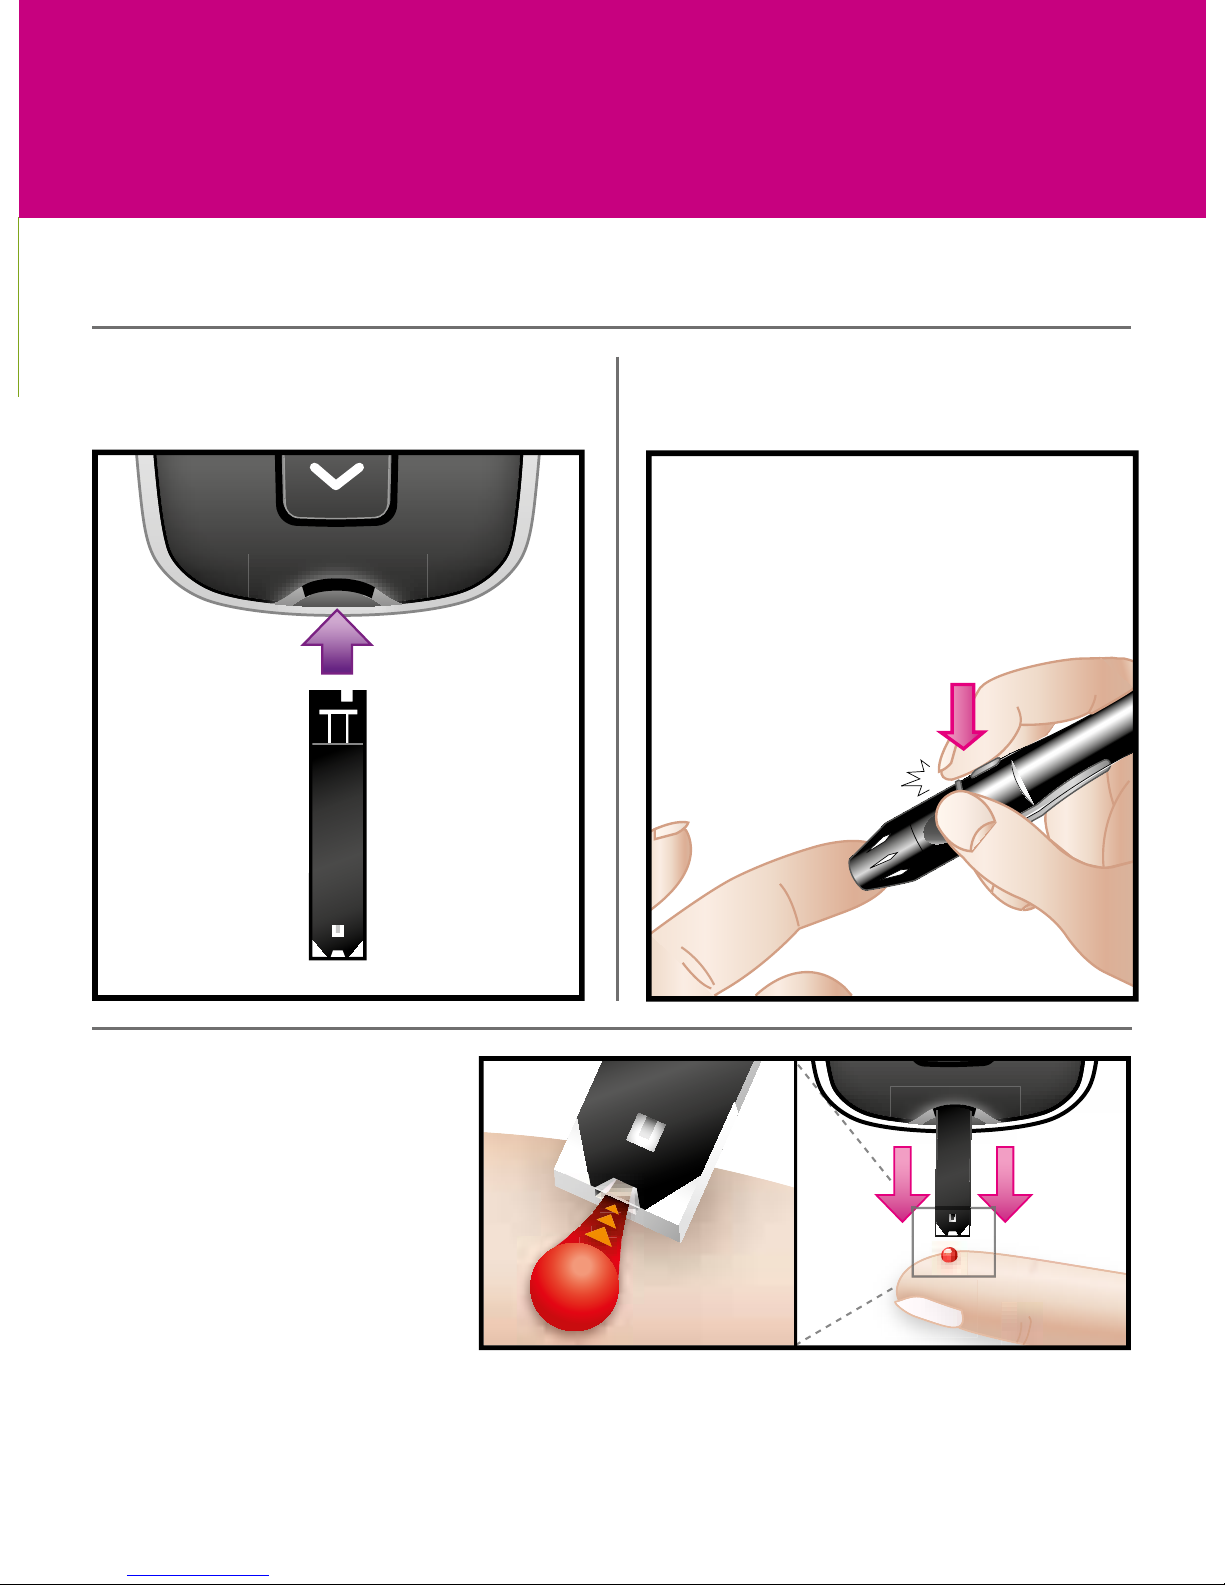
Blood Glucose Test
IMPORTANT: See your MyStar Extra® Owner’s Guide for a more detailed
step-by-step guide on how to perform the test.
[1] Insert the test strip into the
meter
[2] Lance test site
[3] Bring test strip
to blood sample
Refer to the MyStar Extra® Owner’s Guide for complete instructions for use.
Page 6
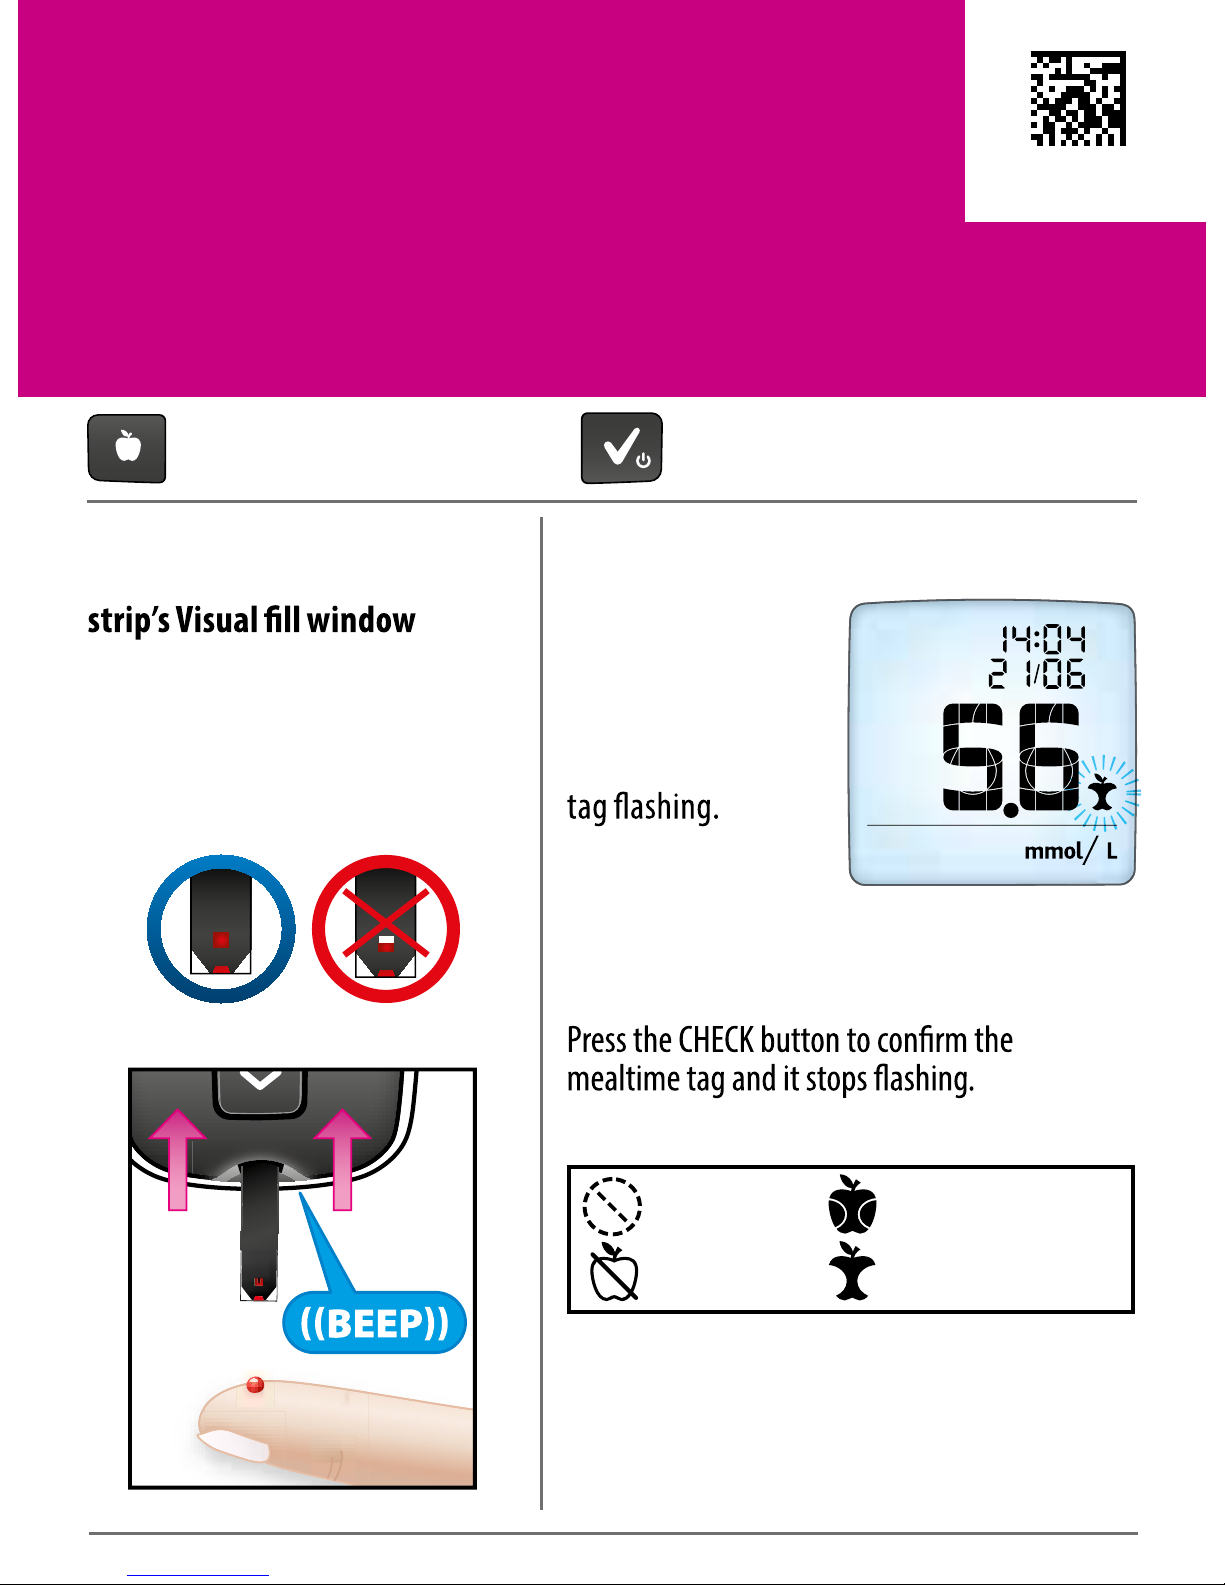
[6] Final Steps
Remove the used test strip. The meter will
automatically deactivate.
[4] Remove test strip from
Blood sample when the test
completely turns red
Your meter will beep once when you
should remove the test strip from
the blood sample.
[5] View Test Result and
Set Mealtime Tag
Blood Glucose Test
Refer to the MyStar Extra® Owner’s Guide for complete instructions for use.
No Tag
Fasting
Pre Meal
Post Meal
CHECK buttonMealtime button
To change the mealtime tag press the
Mealtime button.
Blood glucose test
result with time and
date is shown on the
display with the
suggested mealtime
<MAT>521872
Page 7
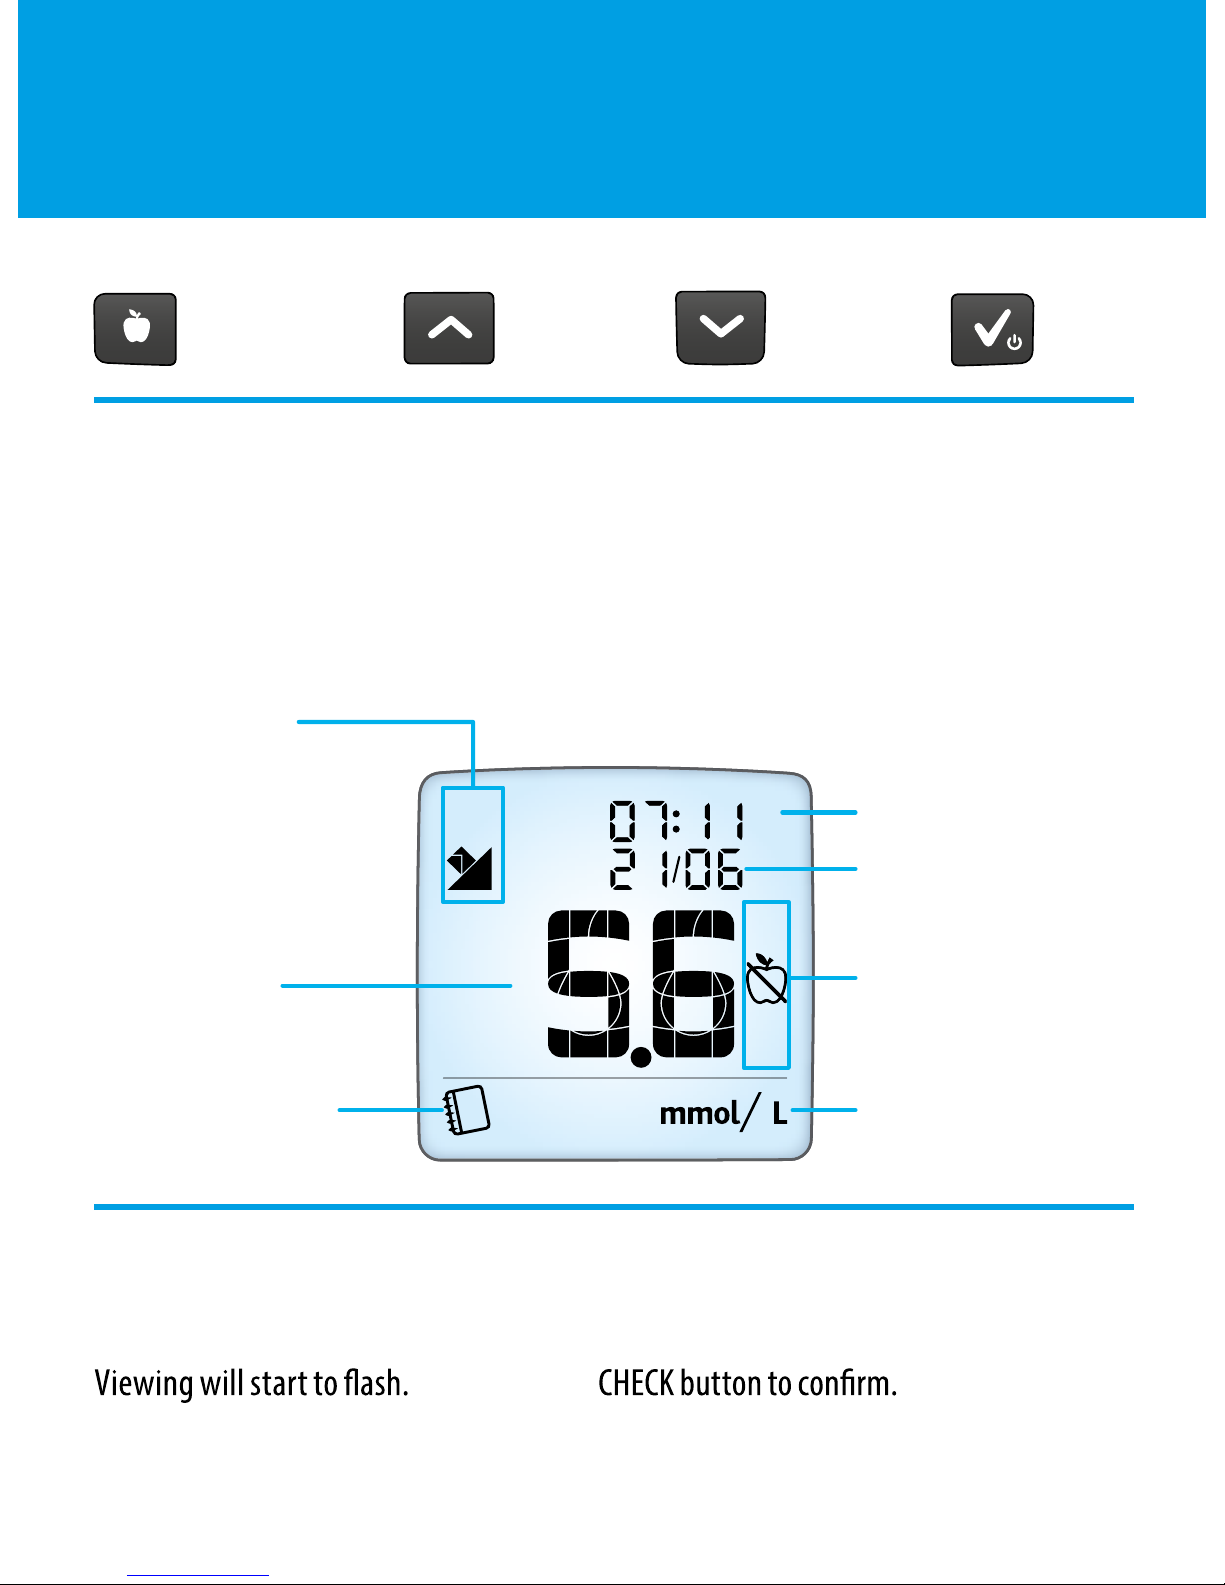
Viewing the Logbook (Past Results)
[1] When your meter is deactivated, press the CHECK button to enter the logbook.
Your most recent result is shown.
[2] Press the UP or DOWN arrow buttons to scroll through the logbook.
Example:
UP
Arrow
DOWN
Arrow
CHECK
Meter Buttons:
Mealtime
[1] Press the Mealtime button. The
mealtime tag on the reading you are
How to Change Mealtime Tags while in Logbook Mode:
[2] Press the Mealtime button to scroll
through mealtime tag options. Press the
Trend Arrow:
Indicates if your
fasting readings are
trending up, down or
steady.
Viewing the Logbook:
Time
Date
Logbook (Mode) Unit of Measurement
Mealtime Tag
(appears here)
Test Results
Refer to the MyStar Extra® Owner’s Guide for complete instructions for use.
Page 8
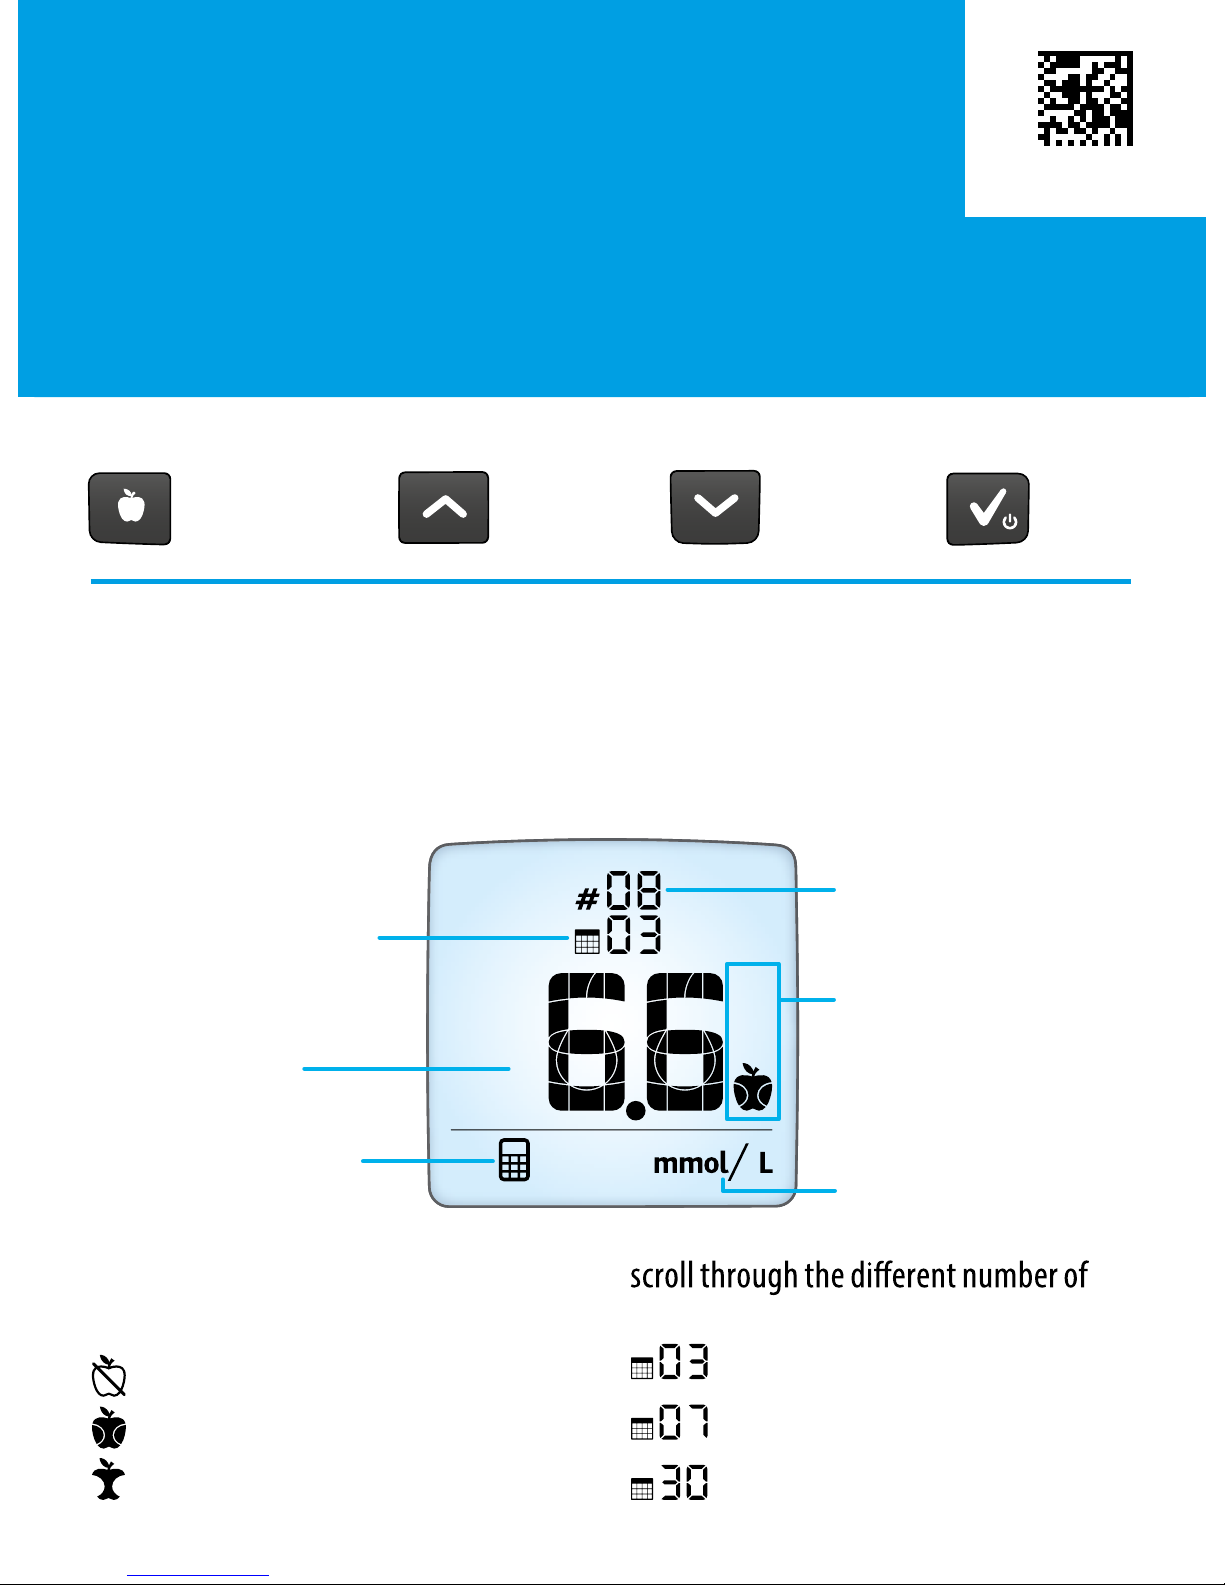
Viewing Averages
Refer to the MyStar Extra® Owner’s Guide for complete instructions for use.
[1] When your meter is deactivated, press the CHECK button to activate the meter.
The most recent result is displayed.
[2] Press the CHECK button again to enter the averages mode.
Viewing Averages:
[3] Press the Mealtime button
scroll through the averages for:
All readings (no icon)
Fasting readings
Pre-meal readings
Post-meal readings
Press the UP or DOWN arrow buttons to
days included in the average:
3 Day
7 Day
30 Day
Number of
readings used in
average
Number of days
used in average
Unit of Measurement
Mealtime Tag
(no icon means all
readings are included)
Average Mode
Calculated
Average
UP
Arrow
DOWN
Arrow
CHECK
Meter Buttons:
Mealtime
Example
<MAT>521901
Page 9
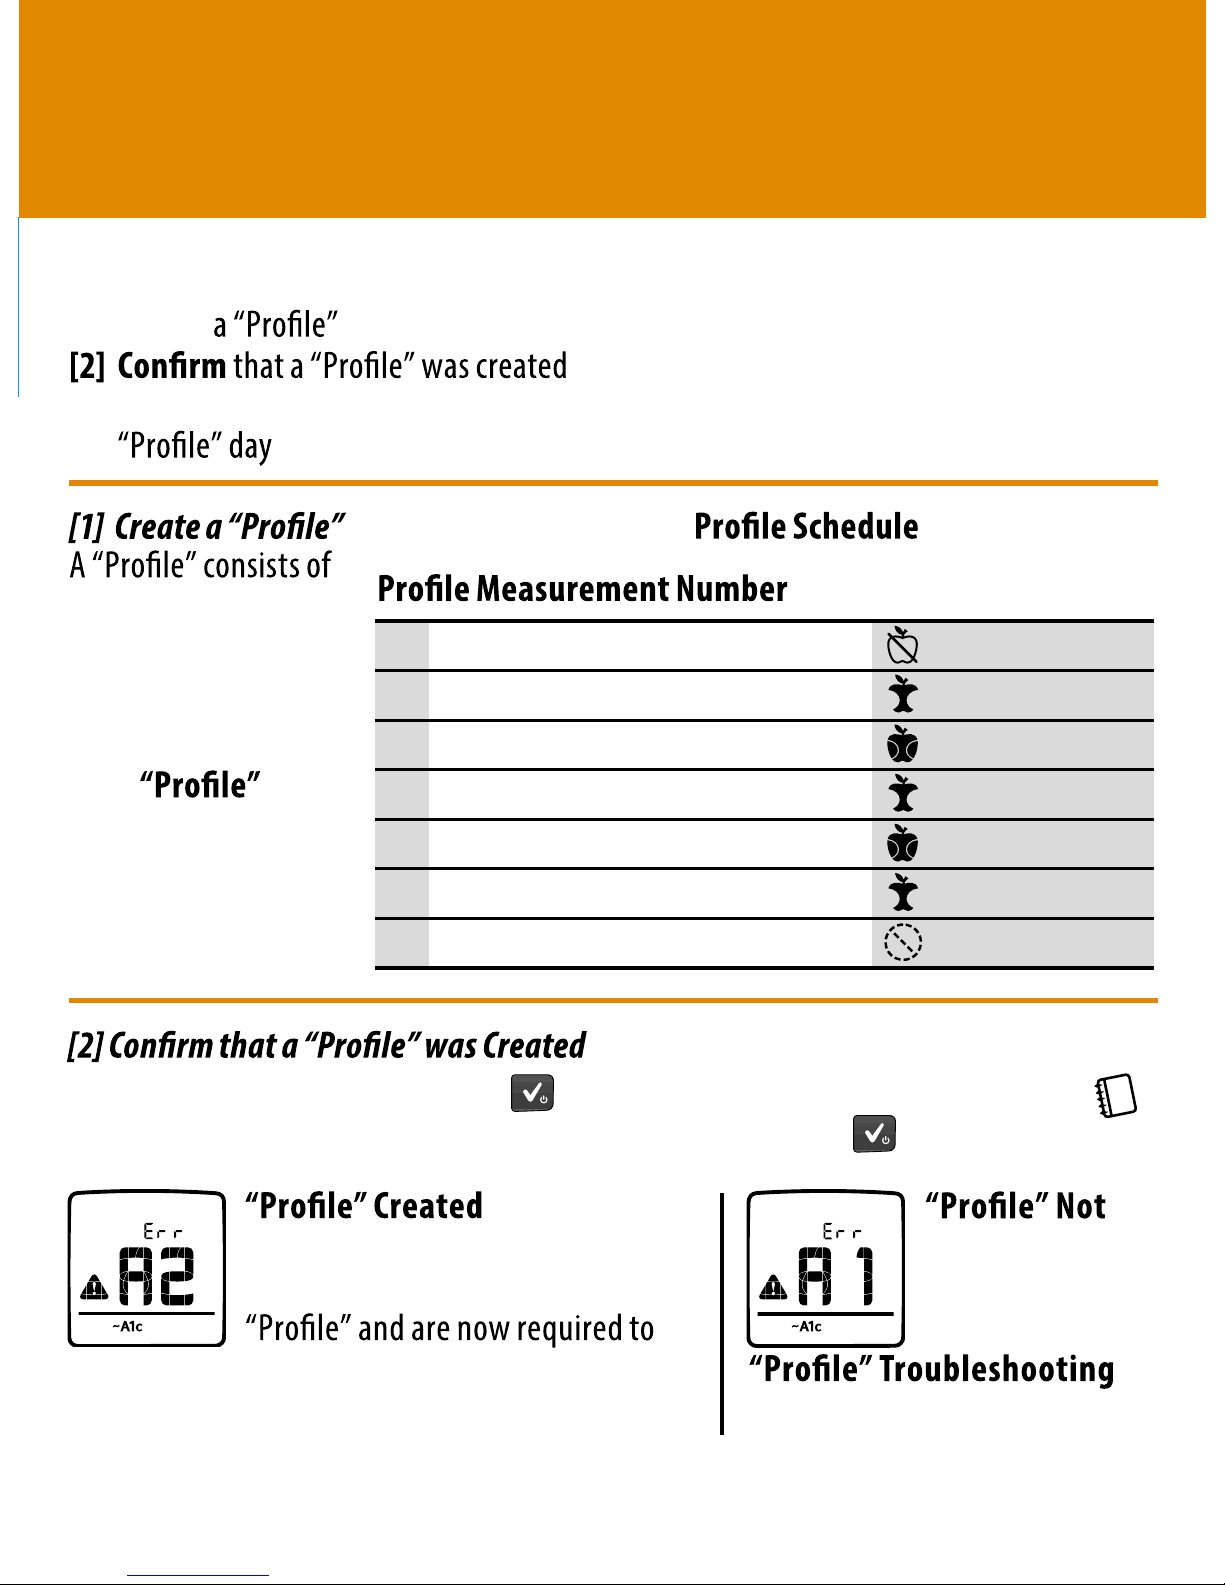
Obtaining an ~A1c result
To obtain an ~A1c result, perform the following steps in order:
[1] Create
[3] Take “Fasting” blood glucose tests every day for the next 6 days after your
Activate the meter by pressing the ( )button. The “Logbook” screen will appear ( )
displaying your most recent blood glucose test result. Press the ( ) button twice more.
Created
If message “A1” is
displayed, refer to
in
the Owner’s Guide.
If message “A2” is displayed, you
have successfully created your
take 6 “Fasting” blood glucose tests (refer to
section
[3] Take “Fasting” Blood Glucose Tests).
7 blood glucose tests
taken in one day.
• Take the 7 blood
glucose tests using
the
Schedule.
Tag
Viewing Estimated A1c (~A1c)
Refer to the MyStar Extra® Owner’s Guide for complete instructions for use.
1.
2.
3.
4.
5.
6.
7.
Fasting (05:00 - 10:59)
Post breakfast (05:00 - 10:59)
Pre Lunch (11:00 - 15:59)
Post Lunch (11:00 - 15:59)
Pre Dinner (16:00 - 20:59 )
Post Dinner (16:00 - 20:59)
Bedtime (21:00 - 23:59)
Fasting
Post-meal
Pre-meal
Post-meal
Pre-meal
Post-meal
No tag
Page 10
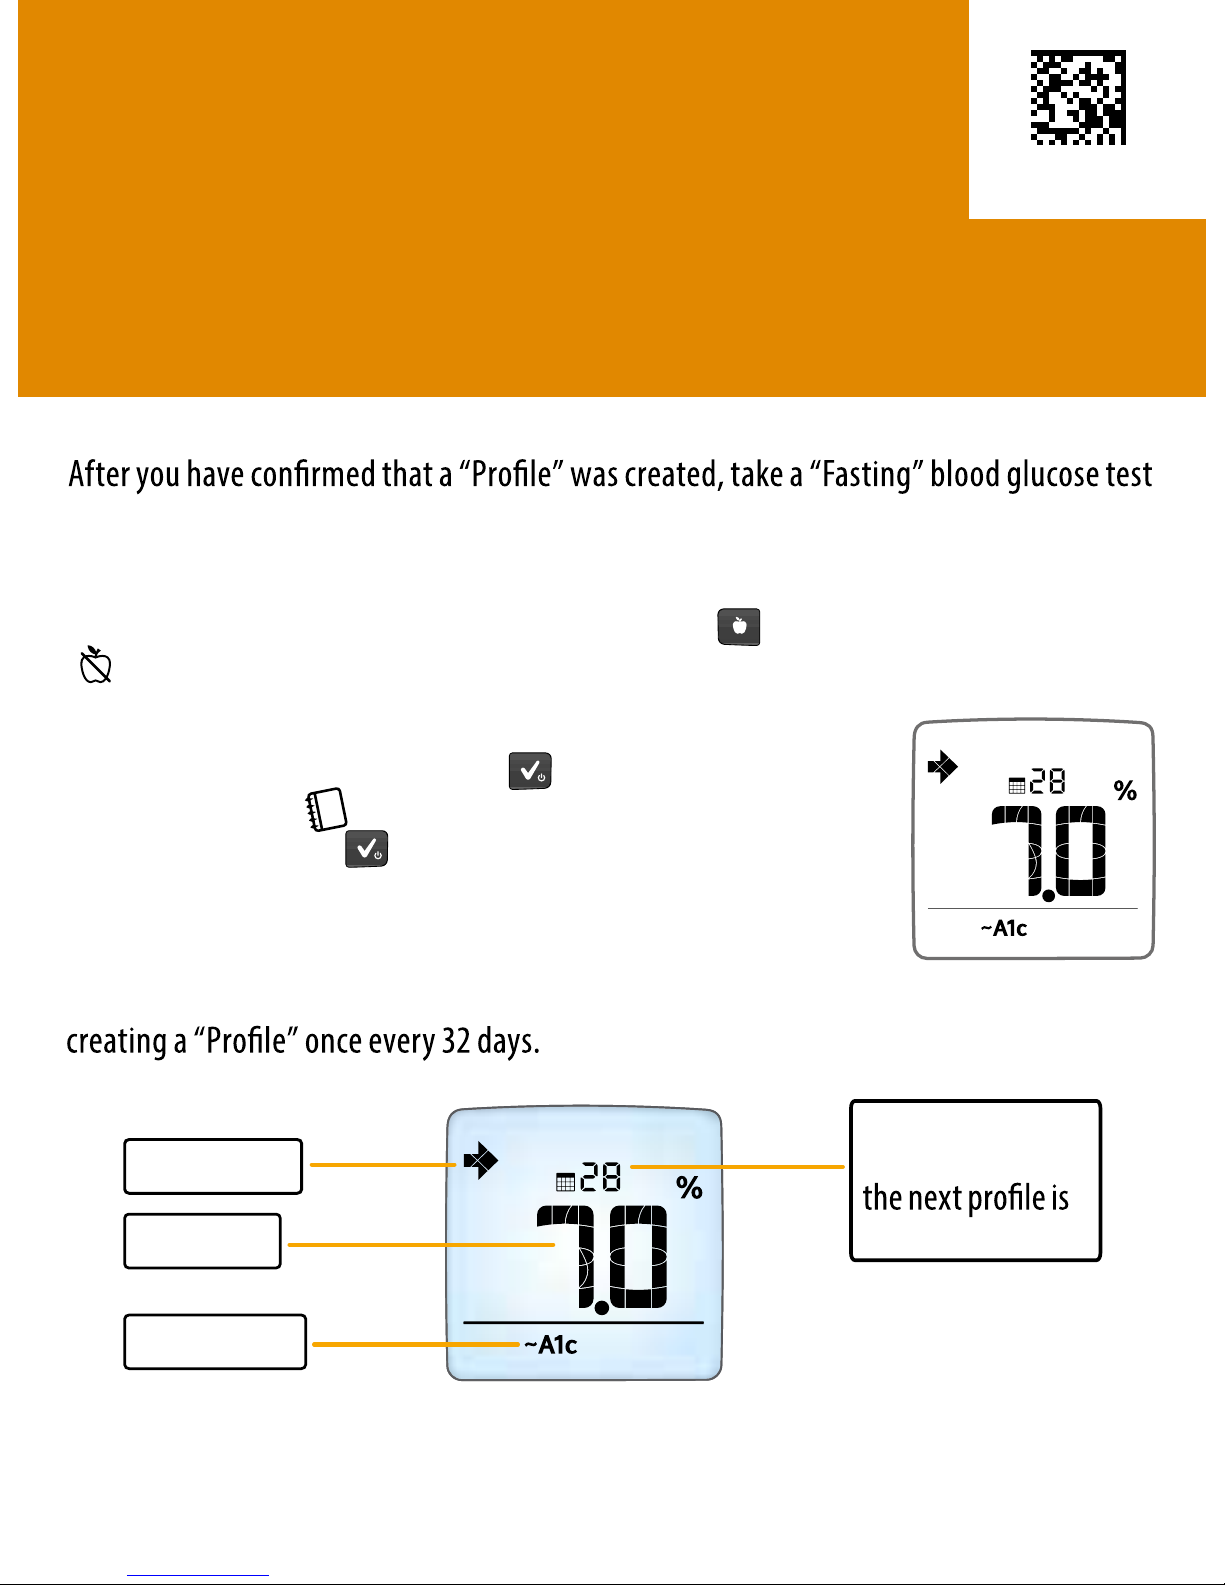
[3] Take “Fasting” Blood Glucose Tests
every day for the next 6 days.
Take a “Fasting” blood glucose test when you have not had any food or drink (except
water) for at least 6-8 hours (usually immediately upon waking up).
Tag the “Fasting” blood glucose test by pressing the ( ) button on the meter until the
( ) is displayed.
View Your ~A1c Result
Activate the meter by pressing the ( ) button. The “Logbook”
screen will appear ( ), displaying your most recent blood glucose
test result. Press the ( ) button twice more.
If you
have taken enough “Fasting” blood glucose tests,
an ~A1c result is displayed (example ~A1c).
Continue to Obtain ~A1c Results by taking “Fasting” blood glucose tests every day and
Example of ~A1c Screen:
Viewing Estimated A1c (~A1c)
Refer to the MyStar Extra® Owner’s Guide for complete instructions for use.
Number of days
remaining until
required.
~A1c (%)
Trend Arrow
~A1c Mode
CAUTION: Do not use these ~A1c values to make treatment decisions.
Any changes in treatment must be done in consultation with your
physician.
Only ~A1c values
between 6% and 10%
will be displayed.
<MAT>521879
 Loading...