

Page 1

User’s Manual
TM
mysmartblinds.com/installation
AUTOMATION KIT
Page 2

QUICK START
1. Download the MySmartBlinds app to your smart
device from the App Store
or Google Play.
2. Visit www.mysmartblinds.
com/installation or
www.youtube.com/c/
mysmartblinds to access
installation and trouble
-
shooting videos.
Apple, the Apple logo, iPhone, and iPod touch are trademarks of Apple Inc., registered in the U.S. and other countries. App Store is a service mark of Apple Inc.
Android, Google Play and the Google Play logo are trademarks of Google Inc.
Page 3

TABLE OF CONTENTS
SAFETY INFORMATION 6
ABOUT MYSMARTBLINDS 9
BLINDS IDENTIFIER 10
PARTS IDENTIFIER 12
ROD RETENTION TYPES 13
INSTALLATION 14
USING THE APP 28
TROUBLESHOOTING 37
LIMITED WARRANTY 40
Page 4
6 7
SAFETY INFORMATION
Do not use the MySmartBlinds automation kit for anything other than its intended use. Any usage of any part
of this kit outside of its intended purpose is not covered
by the warranty.
CAUTION
Existing blinds may have sharp edges. Use gloves to
prevent cuts or abrasions when removing and reinstall
-
ing blinds.
CAUTION
Read all warnings and instructions prior to installing
the MySmartBlinds automation kit. Failure to follow
these instructions may result in property damage or
serious personal injury.
WARNING
FCC STATEMENT:
This device complies with Part 15 of the FCC Rules.
Operation is subject to the following two conditions:
1. This device may not cause harmful interference, and
2. This device must accept any interference received,
including interference that may cause undesired
operation.
Warning: Changes or modications not expressly
approved by the party responsible for compliance
could void the user’s authority to operate the equip
-
ment.
NOTE: This equipment has been tested and found
to comply with the limits for a Class B digital device,
pursuant to Part 15 of the FCC Rules. These limits
are designed to provide reasonable protection against
harmful interference in a residential installation.
This equipment generates uses and can radiate radio
To prevent cable damage or abrasion, do not expose
cables to edges of sheet metal or other sharp objects.
CAUTION
Route cables away from sharp edges and moving parts.
CAUTION
Page 5

8
ABOUT MYSMARTBLINDS
MySmartBlinds is a retrot blinds-automation kit that
uses Bluetooth technology to control tilting in your
existing blinds.
MySmartBlinds ts inside 2-inch horizontal
blinds* and is compatible with Apple devices running
iOS 7 or later (iPhone 4s or newer, iPad 3rd generation
or newer, iPod touch 5th generation or newer, and
Apple Watch) and Android devices with Bluetooth L.E.
support operating OS 4.3 or later.
Visit mysmartblinds.com/installation for a PDF
version of this manual.
*Compatible with 2-inch blinds between 20” and 72” wide with a minimum space of 5” between barrels, or 9” between barrels if the headrail
has only two barrels (see Figures 1 and 2 on page 35). Not compatible
with cordless lift blinds.
9
frequency energy and, if not installed and used in
accordance with the instructions, may cause harmful
interference to radio communications. However, there
is no guarantee that interference will not occur in a
particular installation. If this equipment does cause
harmful interference to radio or television reception,
which can be determined by turning the equipment
off and on, the user is encouraged to try to correct the
interference by one or more of the following mea
-
sures:
• Reorient or relocate the receiving antenna.
• Increase the separation between the equipment
and receiver.
• Connect the equipment into an outlet on a circuit
different from that to which the receiver is con
-
nected.
• Consult the dealer or an experienced radio/TV
technician for help.
RF WARNING STATEMENT:
The device has been evaluated to meet general RF
exposure requirement. The device can be used in por
-
table exposure condition without restriction.
Page 6
10 11
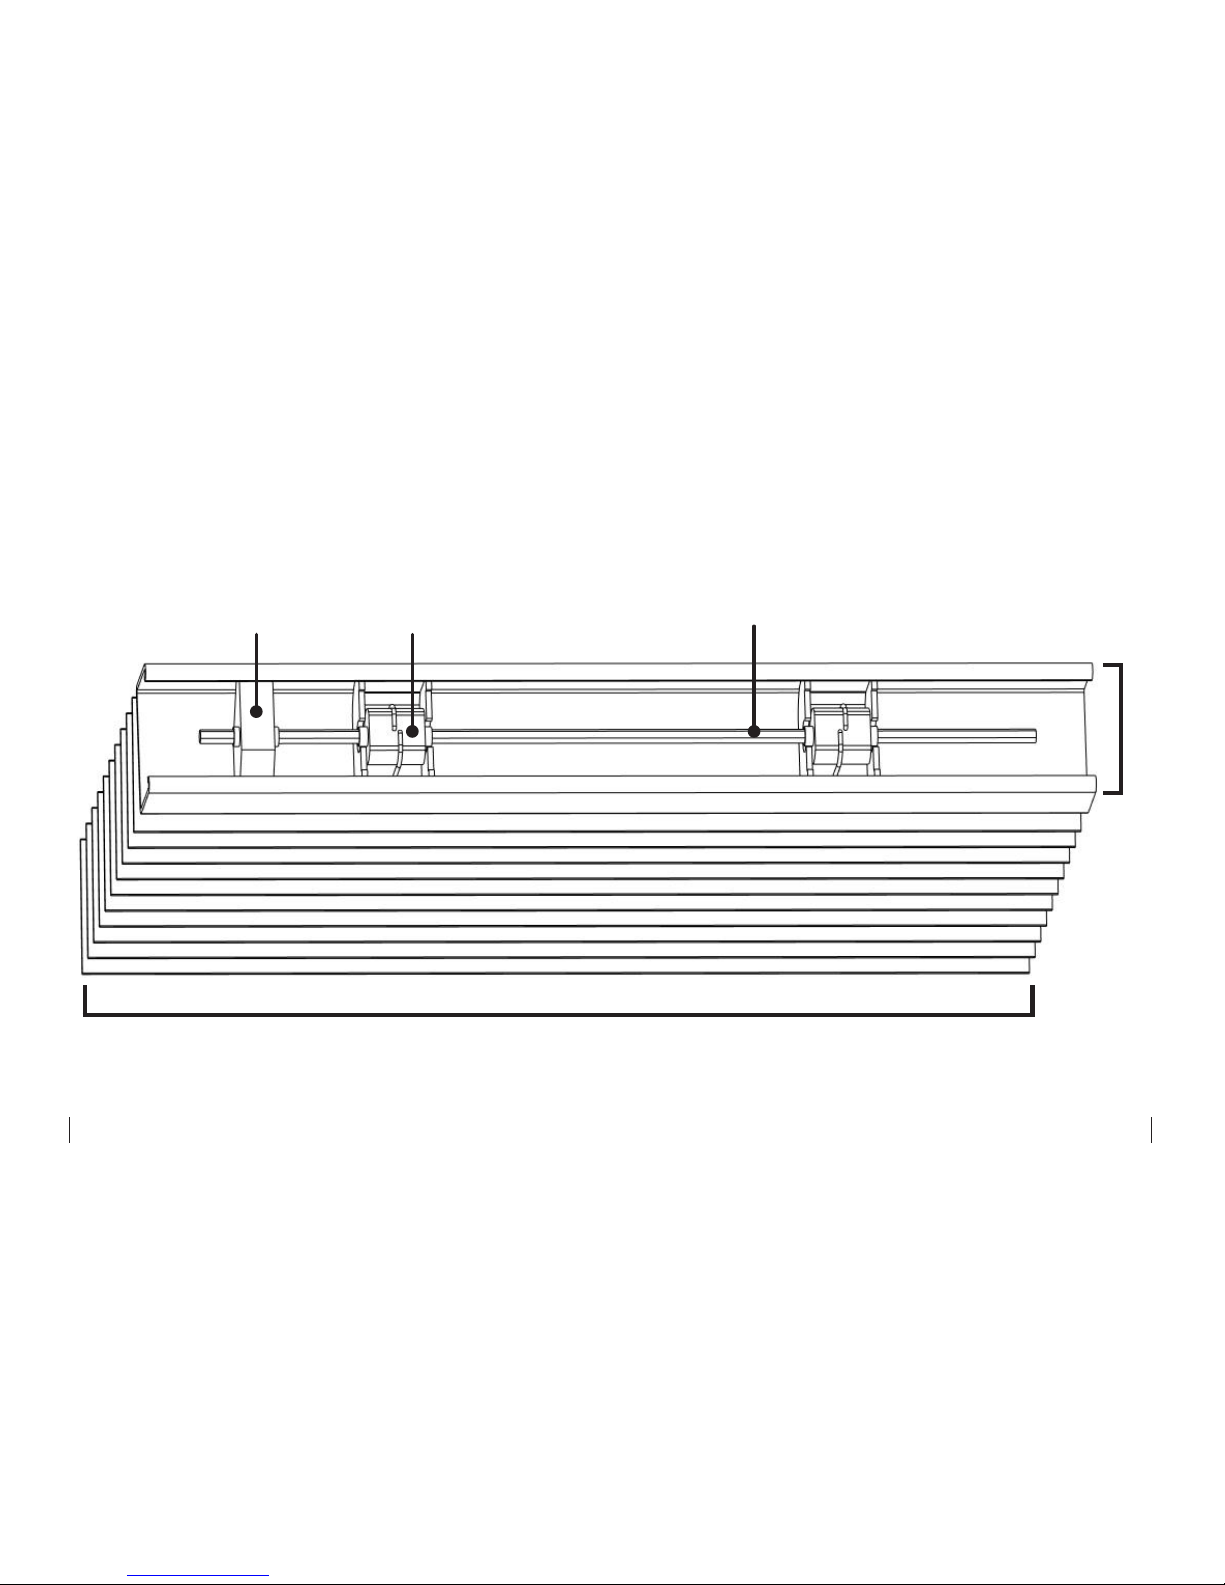
BLINDS IDENTIFIER
Slats
Tilt rod
Barrel
Tilt mechanism
Headrail
Page 7
12 13
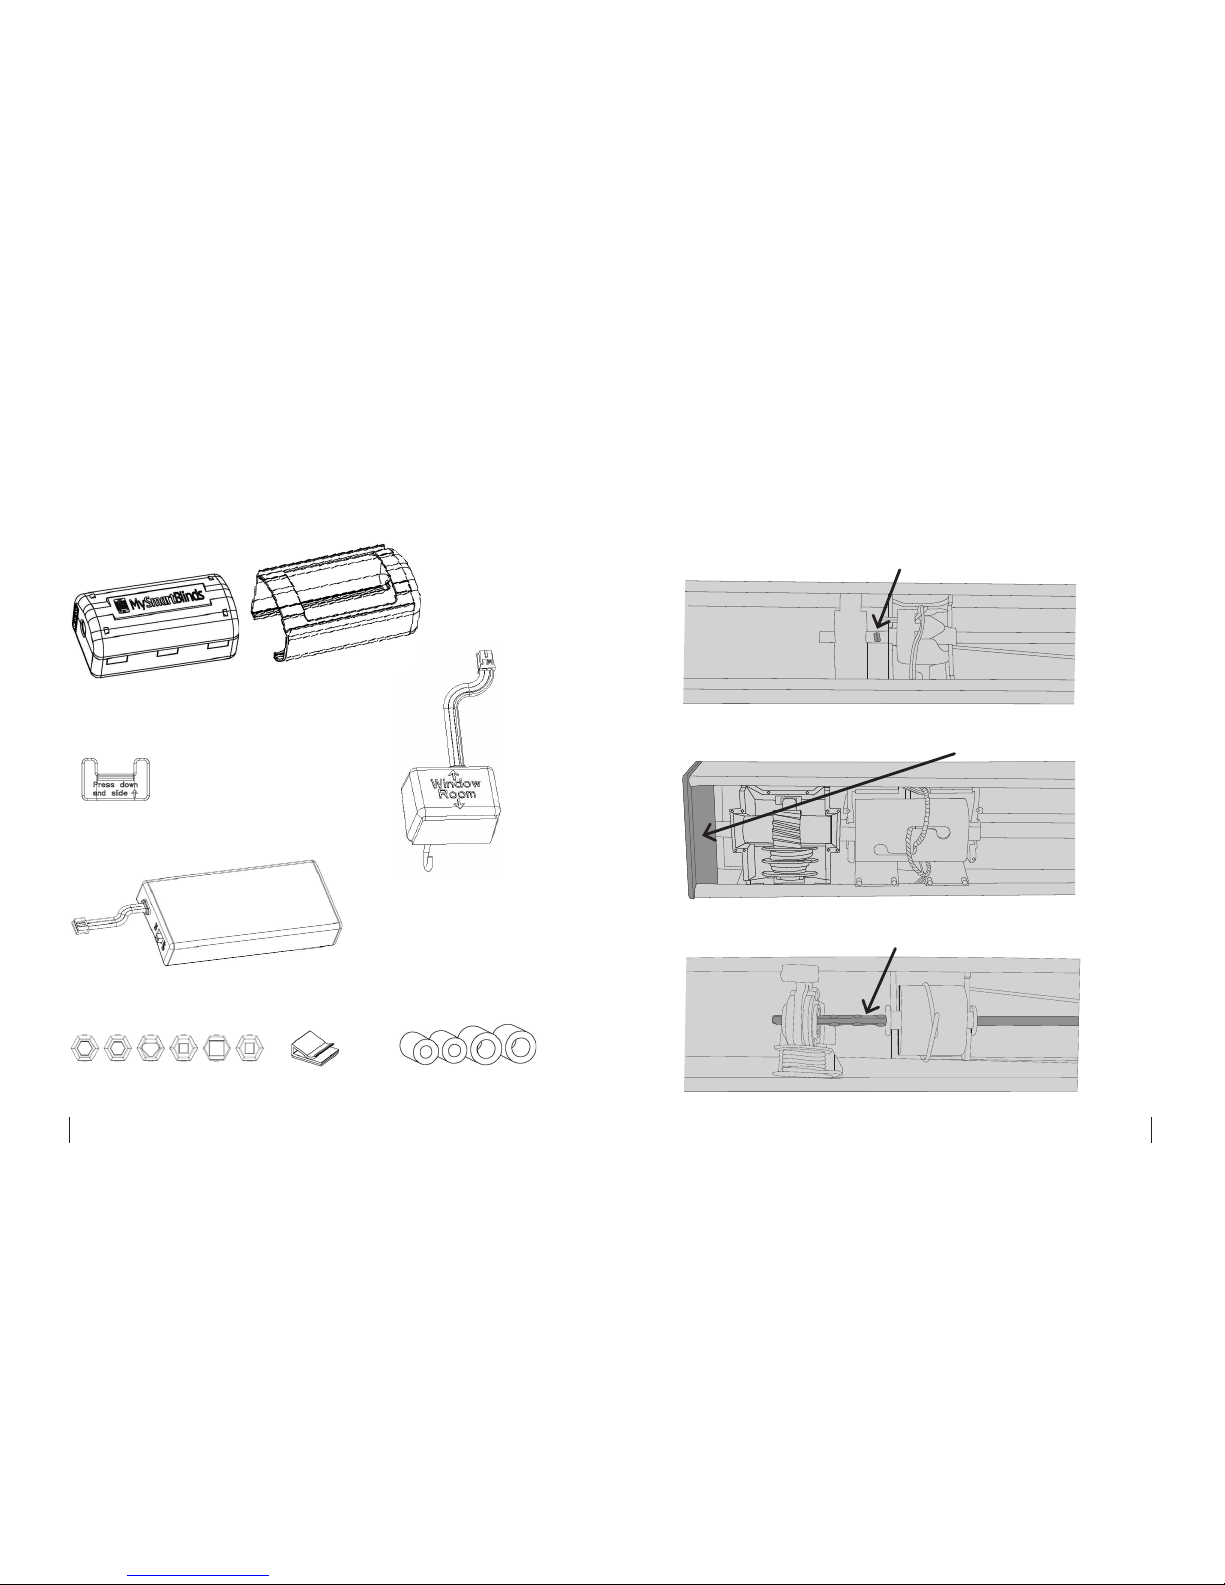
ROD RETENTION TYPES
Version A: Rod pin
Version B: End brackets
Version C: Crimps
PARTS IDENTIFIER
Motor box (A)
Manual switch C-clip (C)
Battery pack (E)
Rod adapters (F) Cable clips (G) 4x Rubber tubing (H)
Manual switch (D)
Motor box bracket (B)
Page 8
14 15
INSTALLATION
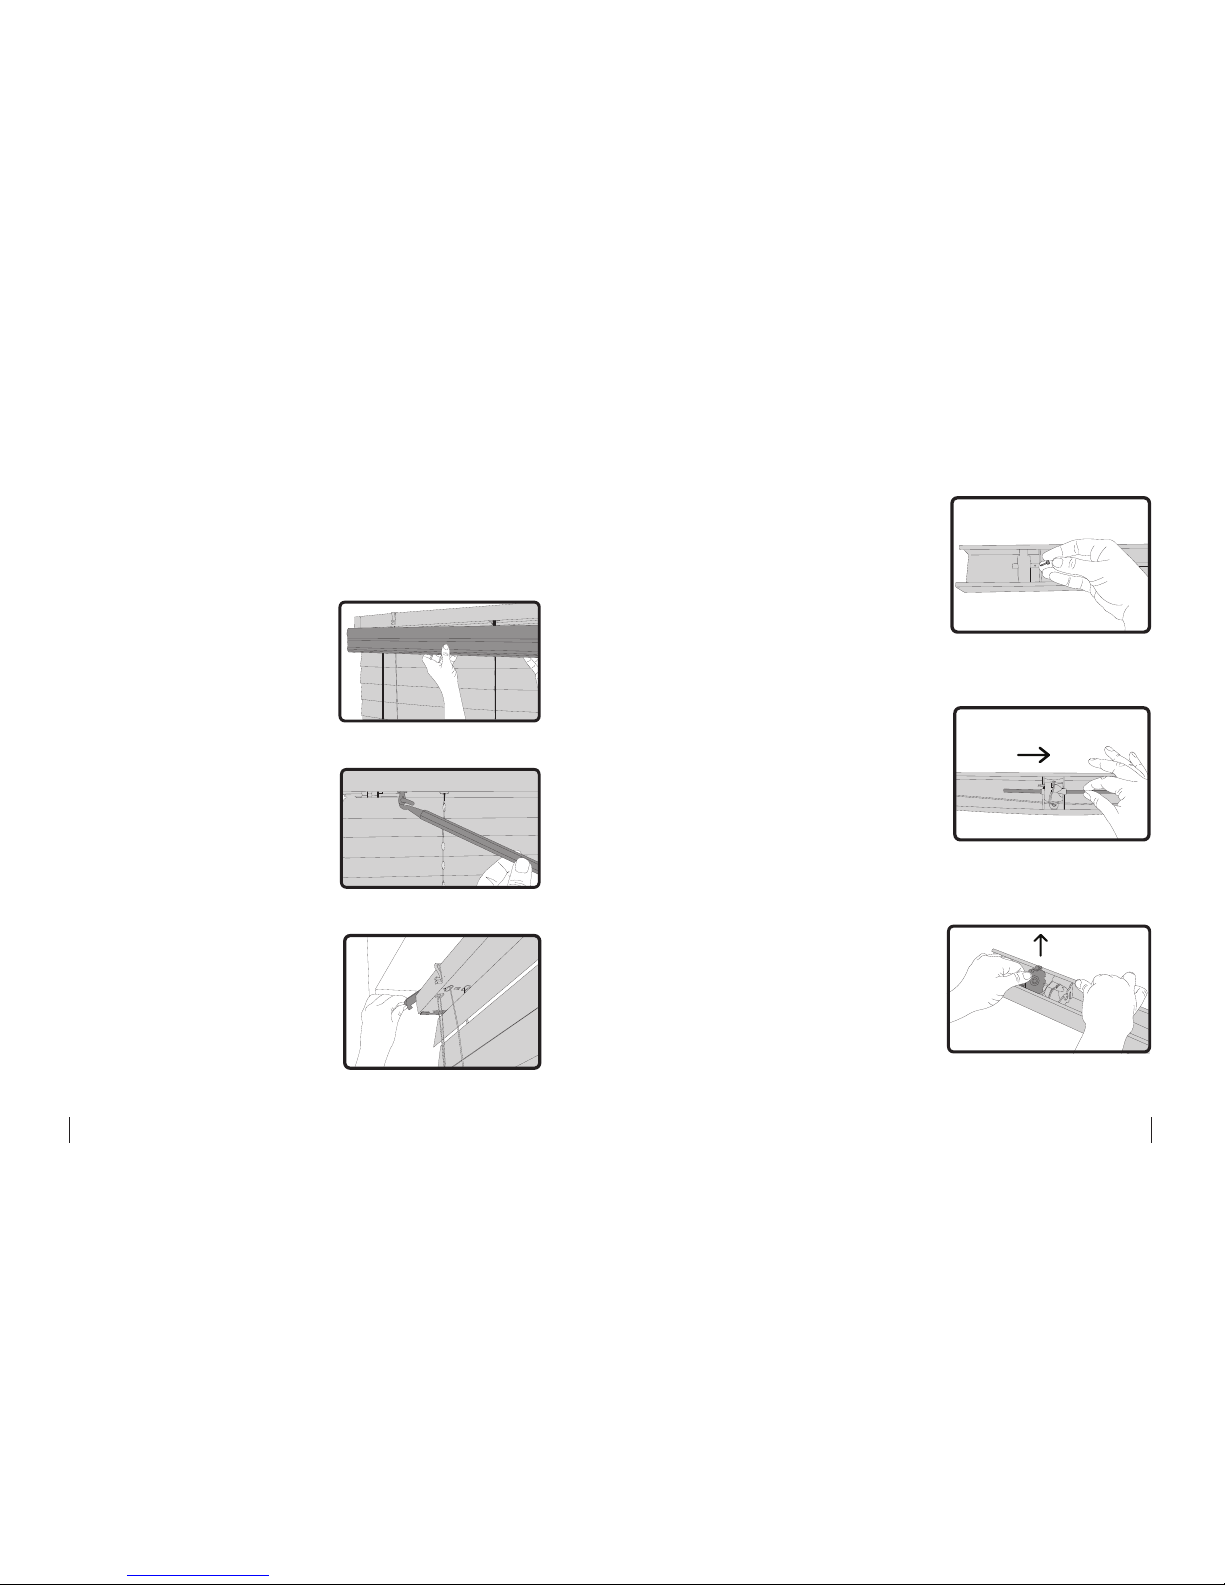
1 Removing Existing Blinds
1. Pull your blind’s cord to
raise the slats.
2. Carefully remove any
valances or trim placed
over your blinds (Fig. 1.1).
3. If your blinds use a tilt
wand, remove the wand
by sliding it out from the
hook, and set aside (Fig.
1.2).
4. Unclip the brackets at the
ends of the headrail (Fig.
1.3), and pull the headrail
out from the brackets.
5. To remove the tilt rod and
tilt mechanism, identify
the type of retention
Fig. 1.3
Fig. 1.2
Fig. 1.1
device on your rod,
according to the images
on page 10:
Version A—Rod pin:
Remove the pin from the
rod (Fig. 1.4), and slide the
rod out of the headrail (or, if
your headrail is exception
ally long, slide the rod as far
as is necessary to install the
MySmartBlinds hardware)
(Fig. 1.5). Bend the headrail
slightly away from the tilt
mechanism, and remove
the mechanism from the
headrail (Fig. 1.6).
Version B—End brackets:
Remove the brackets from
the ends of the headrail,
and slide out the tilt rod
(Fig. 1.5). Bend the headrail
slightly away from the tilt
mechanism, and remove
the mechanism from the
headrail (Fig. 1.6).
Fig. 1.4
Fig. 1.5
Fig. 1.6
Page 9
16 17
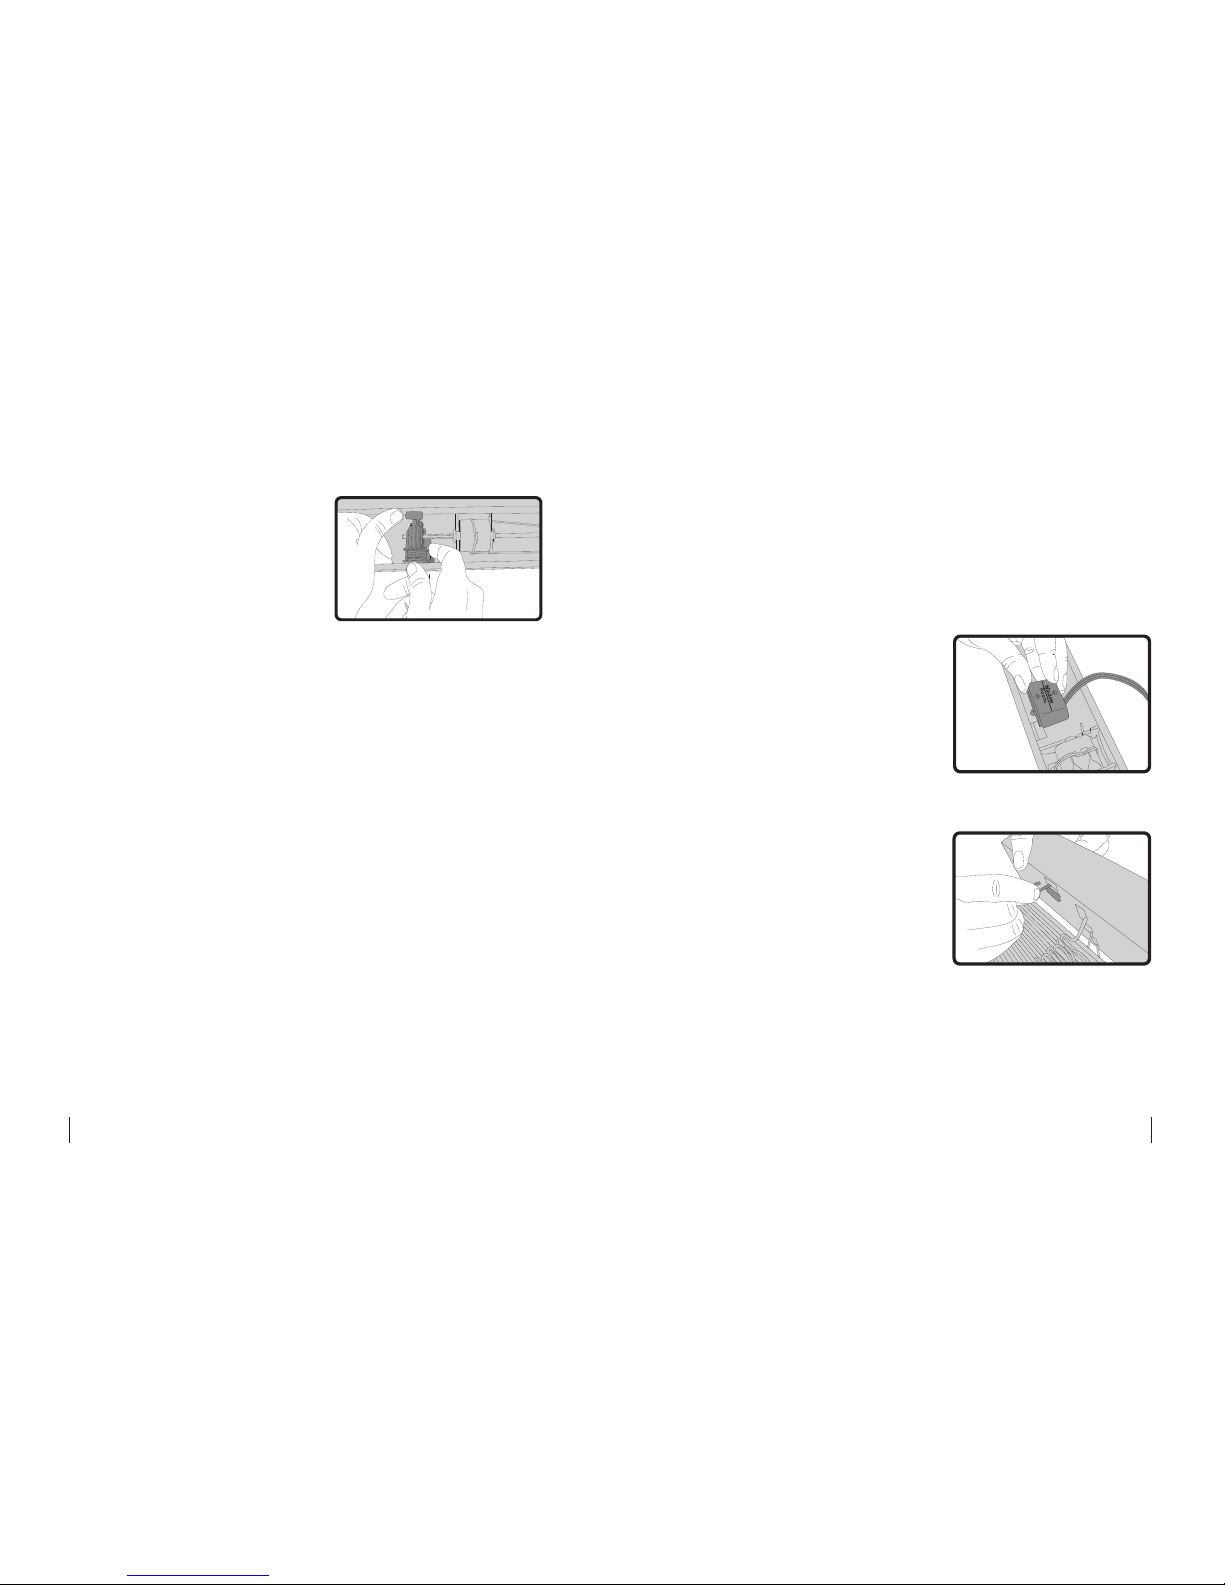
Version C—Crimps:
Bend the headrail gently
away from the tilt mecha
nism, and remove the tilt
mechanism, sliding it off the
end of the tilt rod (Fig. 1.7).
Slide the tilt rod out from the
barrels, removing it from the
headrail (Fig. 1.5).
6. If your blinds use strings
to tilt the slats, you may
need to remove the tassels
on the ends of the strings
in order to remove the tilt
mechanism. Untie the knot
inside of the tassels, slide
the tassels off of the string,
and set the tassels aside.
Fig. 1.7
2 Installing MySmartBlinds Hardware
1. Remove the manual switch C-clip (C) from the
bottom of the manual switch (D) by pressing
down on the clip’s center and sliding it out.
Remove the adhesive
lm from the manual
switch, and insert the
manual switch through
the hole previously occu
-
pied by the tilt mech-
anism, making sure
the switch is properly
oriented (Fig. 2.1).
2. Pull the hook down
through the hole so
that the switch lies flat
against the bottom
surface of the headrail
(Fig. 2.2), and press
the exposed adhesive
against the front of the
headrail.
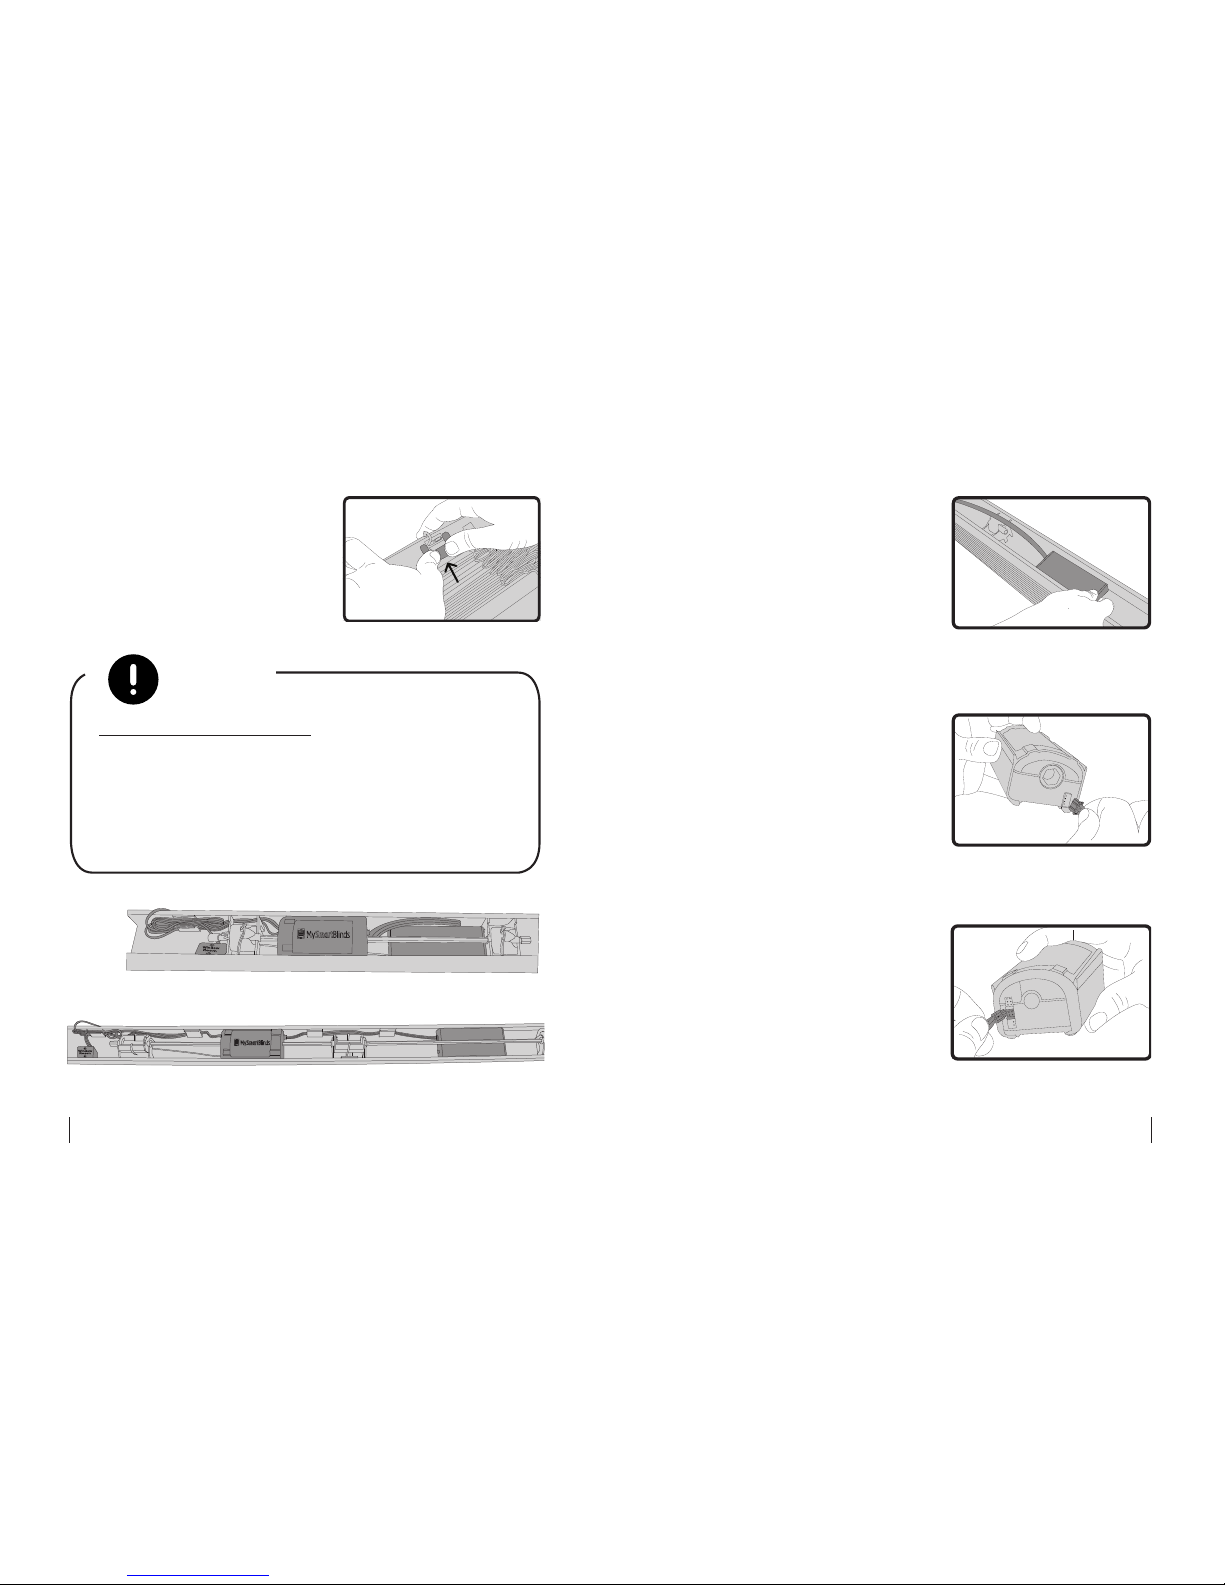
3. Lay the blind on its side, and position the C-clip
(C) beneath the manual switch (D). Press down on
Fig. 2.2
Fig. 2.1
Page 10
18 19
the center of the C-clip
to flatten it, and slide the
clip underneath the man
-
ual switch until the clip
locks in place (Fig. 2.3).
NOTE
HARDWARE PLACEMENT: For the following installation instructions, refer to Figures 2.4 and 2.5
to determine the best hardware placement and
installation method for your set of blinds. Spread
out the hardware as much as your headrail will
allow in order to avoid kinking the cables.
Fig. 2.4
Fig. 2.5
Fig. 2.3
4. Lay the battery pack (E)
inside the headrail so that
the cable is on the top
left side (Fig. 2.6). If your
headrail has more than
two barrels, place the bat
tery two bays away from
the manual switch (D).
5. Connect the battery pack
(E) cable to the white
connector on the motor
box’s (A) right side (Fig
2.7).
6. Connect the manual
switch (D) cable to the
gray connector on the
motor box’s left side (Fig.
2.8).
Fig. 2.6
Fig. 2.7
Fig. 2.8
Page 11
20 21
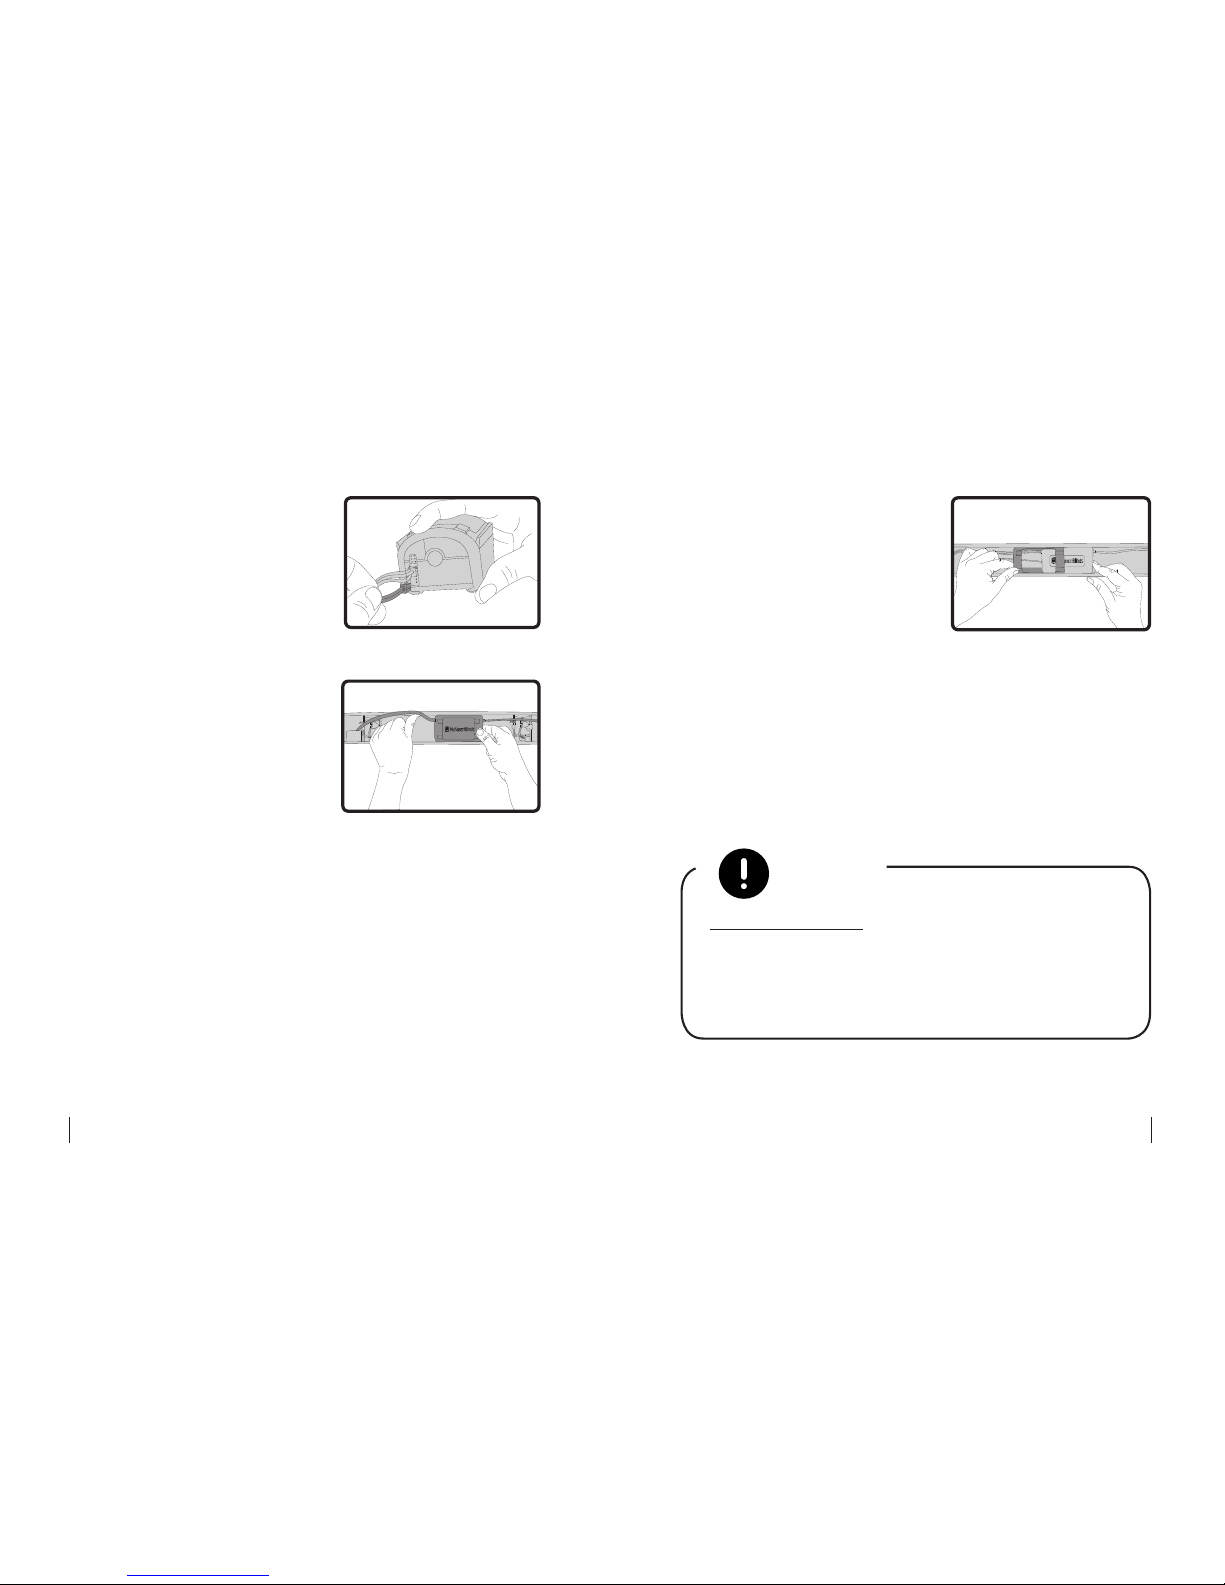
7. If you are installing a
MySmartBlinds solar
panel (sold separately),
connect the solar panel
cable to the black
connector on the motor
box’s left side (Fig. 2.9).
8. Pry open the headrail
gently, using your thumb
to push against the back
edge of the headrail and
your other ngers to
push against the front
edge. With the other
hand, insert the motor box
(A), with the motor box
bracket (B) attached, into the headrail (Fig. 2.10).
If your motor box and motor box bracket do not
t inside the headrail using this method, try the
following:
a. Remove the motor box bracket (B) from the
motor box. Bend open the headrail gently,
and insert the bracket into the headrail.
Insert the motor box to the right of the
bracket into the headrail, and slide the
Fig. 2.10
Fig. 2.9
motor box into
the bracket until
it locks in place
(Fig. 2.11).
b. If your headrail
is exceptionally
shallow, you may
need to install the
motor box without
the motor bracket
in order for the
motor box to t
inside the headrail.
NOTE
MOTOR BRACKET: The motor bracket helps to
both keep the motor box in place and reduce the
motor’s noise level. Remove the motor bracket
only if the motor box will not t inside of it in the
headrail.
Fig. 2.11
Page 12
22 23
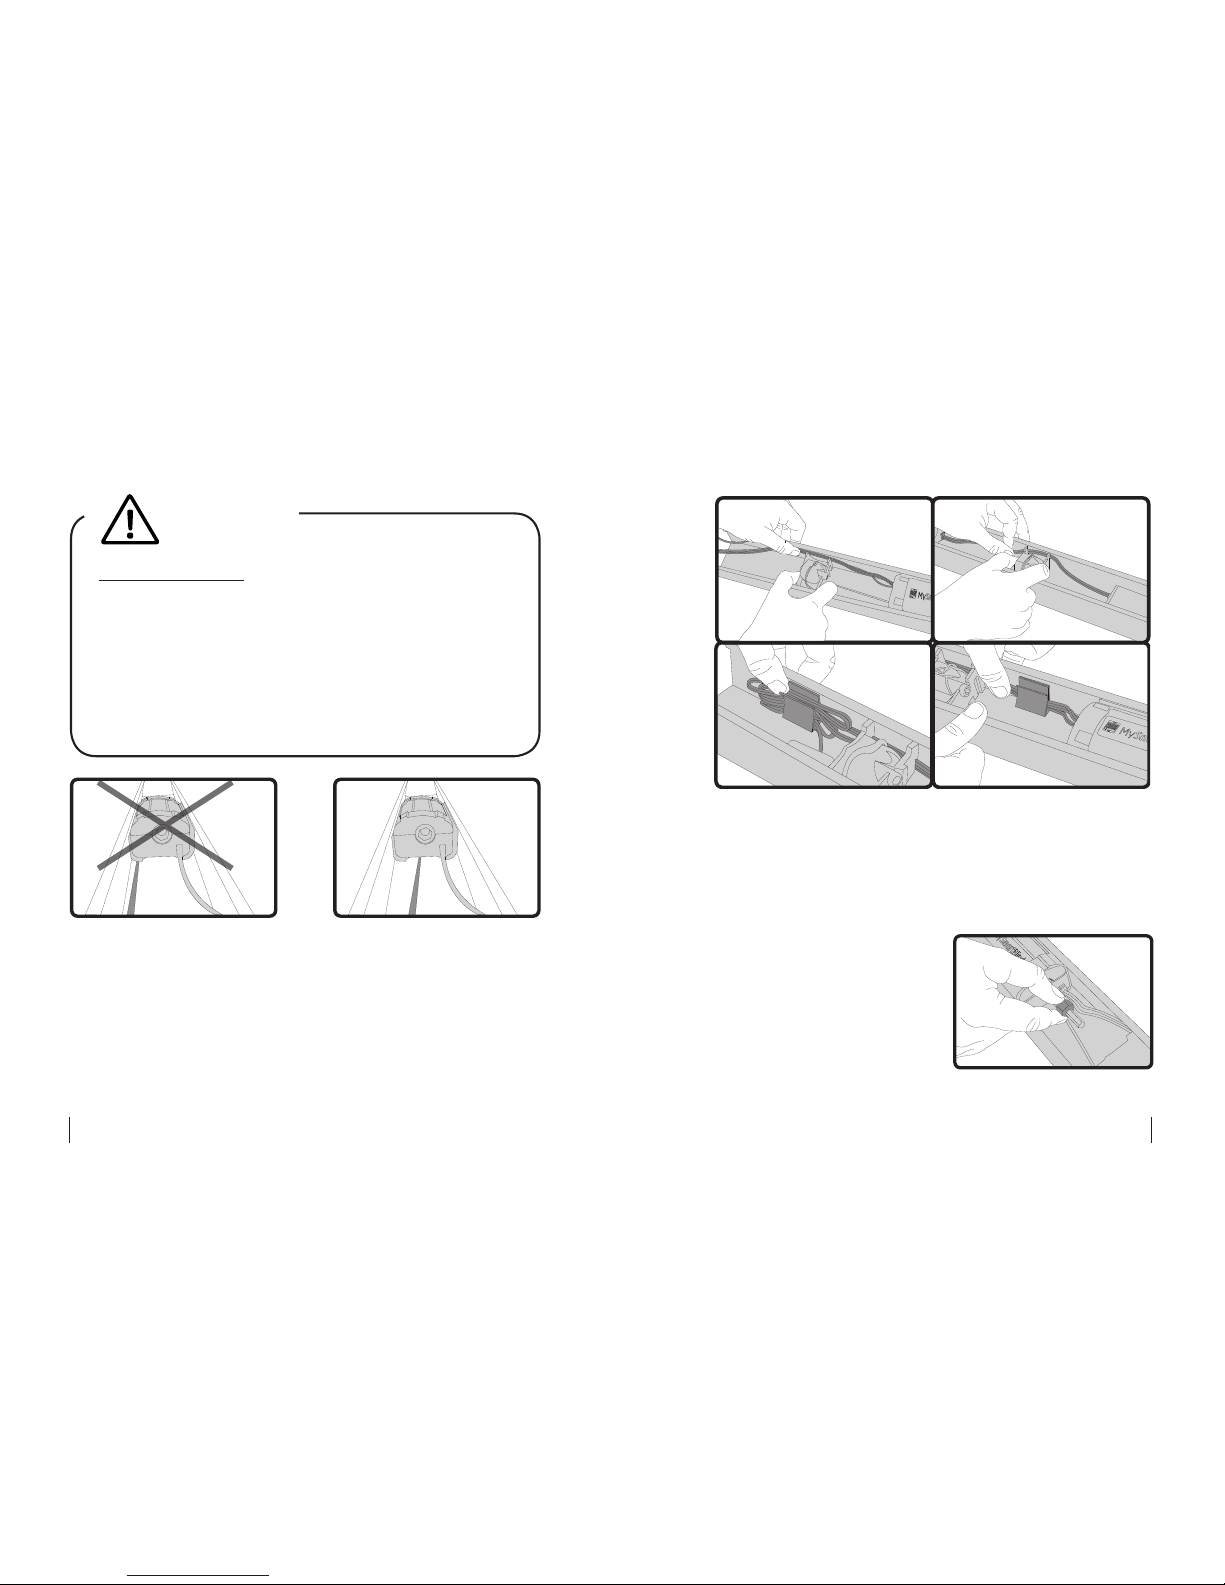
9. Route all cables away from the motor box. Pry the
headrail gently away from the barrels, and route
any nearby cables behind the barrels. Use the
cable clips (G) to hold extra length from the cables
and to protect the cables from the tilt rod and
other moving parts within the headrail (Fig. 2.13).
CAUTION
PINCHED CORDS: Ensure that the motor box does
not pinch any cords from your blinds. Pinched
blinds cords may prevent you from raising and
lowering your blinds. Position the cords so that
they aren’t pinched beneath the motor box brack
-
et’s legs (Fig. 2.12a). Move the cords to either the
outside edge of the motor box bracket or the mid
-
dle indented plane of the motor box (Fig. 2.12b).
Fig. 2.12a
Fig. 2.12b
10. Ensure that the barrels are aligned with each
other, and reinsert the tilt rod until the right end of
the rod is between the motor box and the barrel to
the right of the motor box.
11. Select the rod adapter
(F) that ts over your tilt
rod, and slide the adapter
over the end of the rod
(Fig. 2.14). Ensure that
the rod adapter’s snaps
are oriented toward the
motor.
Fig. 2.13
Fig. 2.14
Page 13
24 25
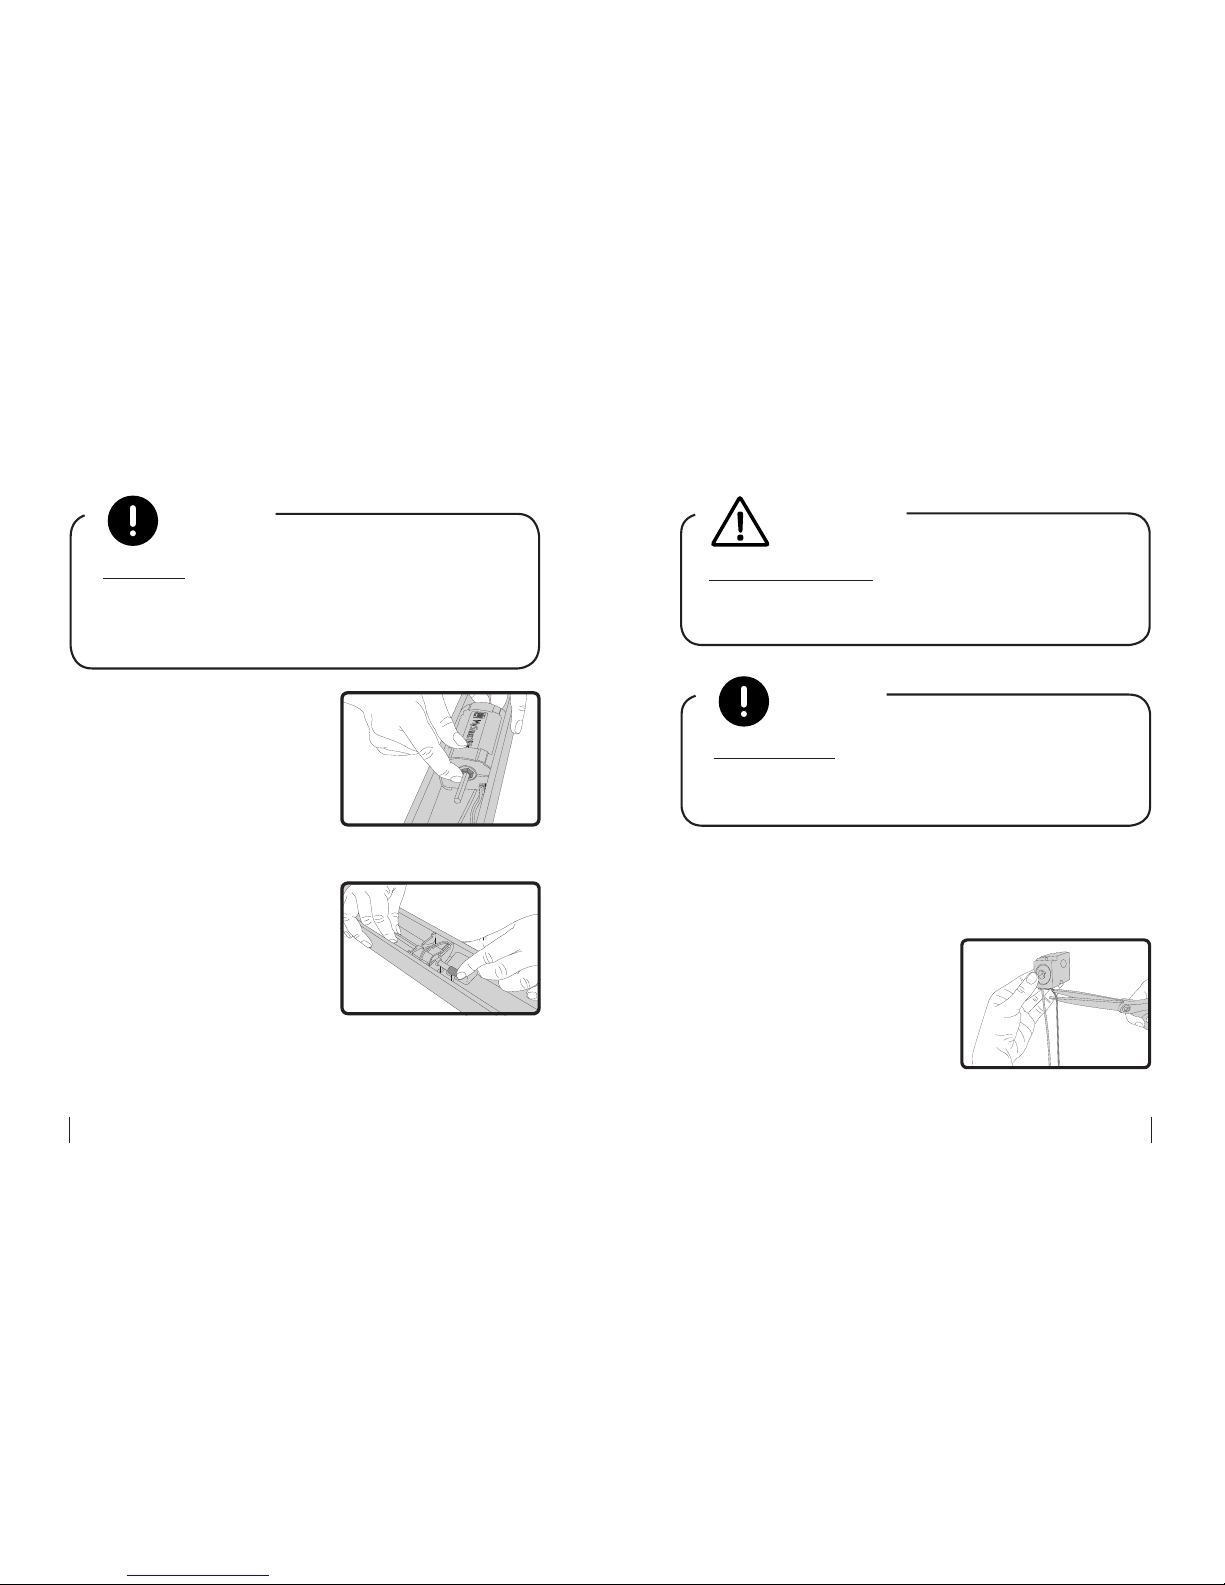
12. Push the rod adapter
into the motor box until
it clicks in place (Fig.
2.15).
13. Continue to slide the
rod through the rest of
the barrels, and place
the rubber tubing (H)
over both ends of the
rod (Fig. 2.16).
14. Turn the battery pack
(E) switch to the ON
position.
Fig. 2.15
Fig. 2.16
TILT ROD: Ensure that the rod adapter can easily
slide over the entire tilt rod. Check for burrs or
deformities along the tilt rod, and, if necessary,
remove them with sand paper or a le.
NOTE
15. Rehang the blinds by
sliding them back into the
brackets and clipping the
brackets closed.
16. If your blinds use a tilt
wand, reconnect the tilt
wand to the hook on the
bottom of the manual
switch (D).
SOLAR PANEL: To nish installing the solar panel,
follow the instructions included with the solar
panel.
NOTE
CAUTION
BARRELS ALIGNED: Make sure the barrels remain
aligned with each other while reinserting the tilt
rod (see Fig. 3 on page 36).
Fig. 2.17
Page 14
26 27
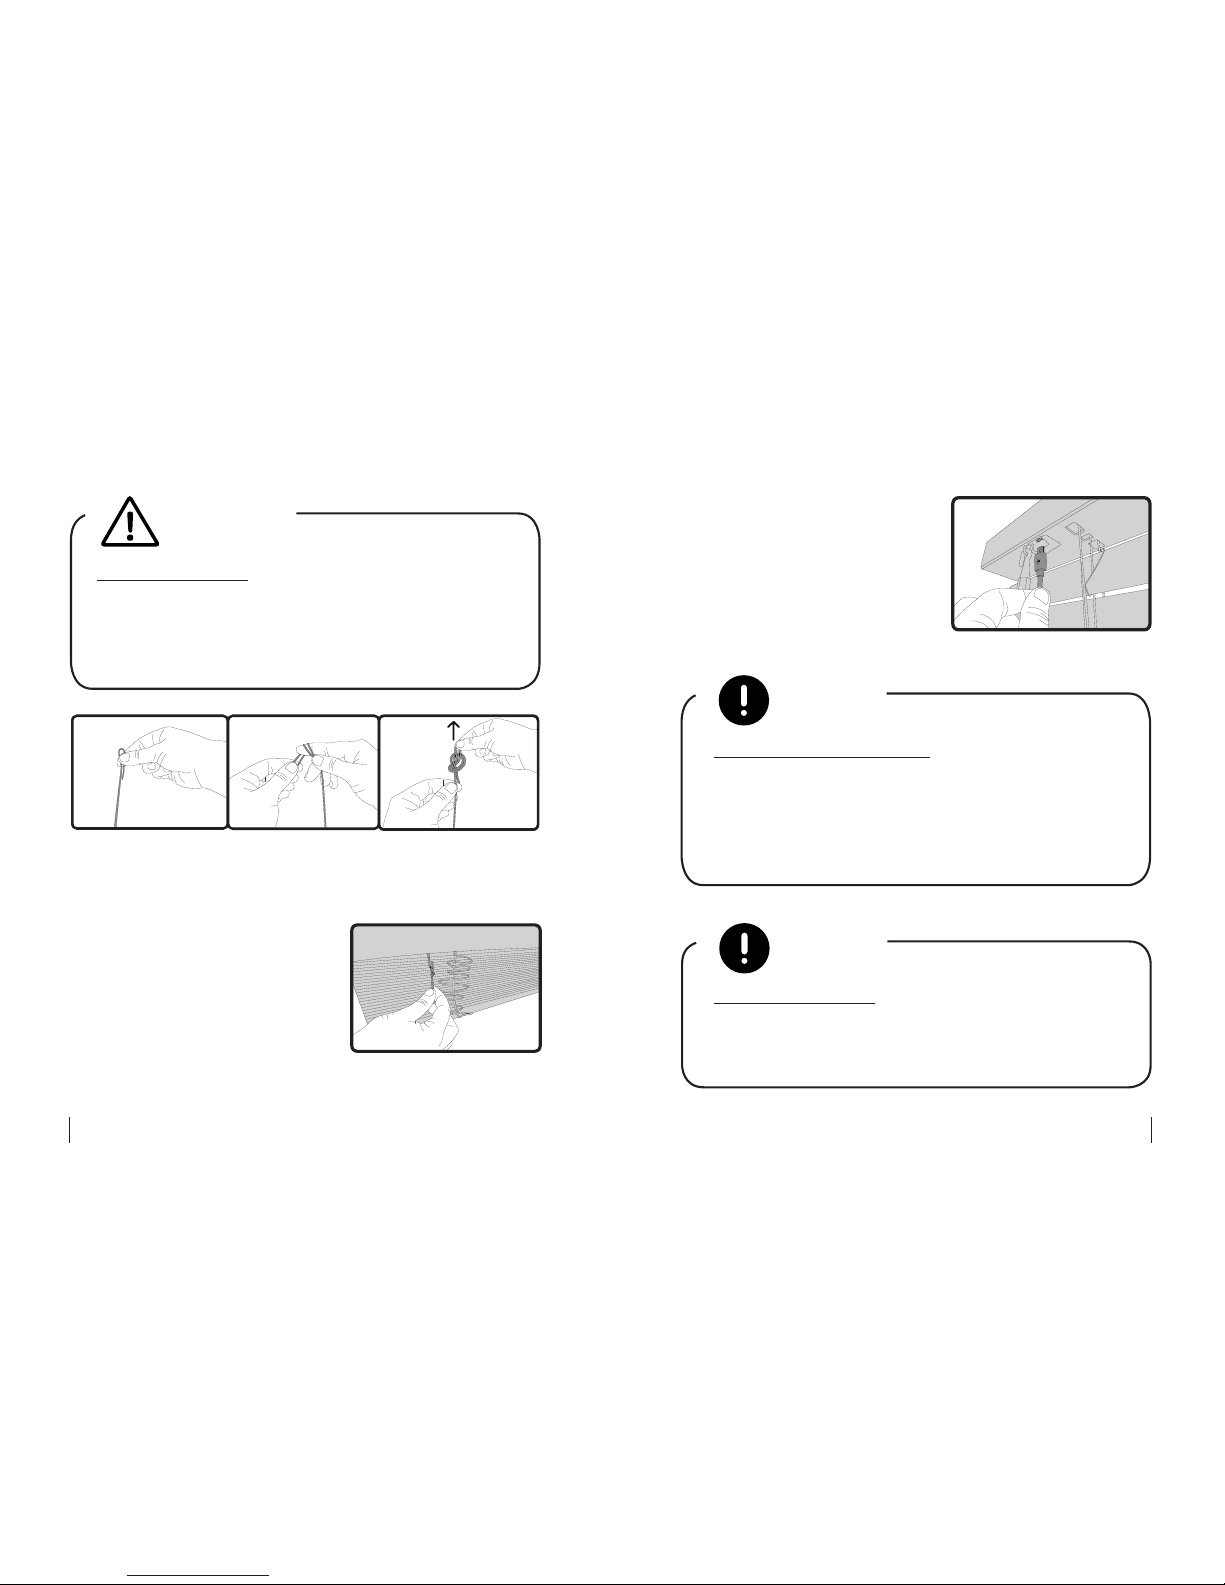
17. If your blinds use tilt
cords, cut one string from
the tilt mechanism (Fig.
2.17), and tie a small over
-
hand loop knot (Fig. 2.18).
Slide the loop through the
hook on the bottom of the
manual switch (Fig. 2.19).
Reattach your cord’s
tassel to the end of the
string.
CAUTION
STRING CUTTING: By cutting the string from your
tilt mechanism, you will not be able to reinstall
your original tilt mechanism. If you plan on replac
ing the original tilt mechanism at a later time,
simply use another piece of string for Step 17.
Fig. 2.19
Fig. 2.18
KIT INSTALLATION: We recommend installing all
MySmartBlinds automation kits before begin
-
ning to pair your blinds to the app. This will
make the pairing process quicker and simpler.
NOTE
18. If applicable, replace the
valance or trim over your
headrail.
CHARGING YOUR BLINDS: If you are not installing
a solar panel, your MySmartBlinds battery pack
will need to be charged periodically. Connect the
MySmartBlinds charging cable (sold separately)
to the micro USB port on the bottom of the man
-
ual switch (Fig 2.20).
NOTE
Fig. 2.20
Page 15
28 29
USING THE APP
1 Setting Up the App
1. Download the MySmartBlinds app to your smart
device from either the App Store or Google Play,
and open the app.
2. Select SIGN UP, and follow the prompts on the
screen to create an account.
3. When you’ve completed setup, click on the conr
-
mation link sent to your e-mail address to verify
your account, and log in from the app’s home
page.
HELP ICON: Tap the HELP ICON in the top right
corner at any time for help understanding icons
within the app.
NOTE
2 Adding New Rooms and Blinds
1. From the home page, tap ADD NEW ROOM, and
enter a name for your room.
2. Select SET UP NEW BLINDS, and follow the
prompts on the screen.
3. Enter a name for your blind, and follow the
on-screen instructions for calibrating your blind.
4. When your blind has nished calibrating, tap ADD
MORE if you would like to add more blinds to the
room.
5. When you have nished adding and calibrating
all blinds for the selected room, select SET UP
EXISTING BLINDS: If you are assigning blinds
that have already been paired to the app, select
ASSIGN EXISTING, and select the blinds you’d
like to assign to your new room.
NOTE
Page 16
30 31
ROOM to adjust the Smart Open and Smart Close
positions and to create schedules for the room.
You can also adjust smart positions and add
schedules at a later time from the room’s main
page (Fig. 6).
6. Select FINISH.
ROOM ASSIGNMENT: Blinds cannot be assigned
to more than one room. To reassign a blind to a
different room, remove the blind from its current
room, and tap ADD BLINDS in the room you
want to reassign the blind to.
NOTE
CALIBRATION: If you need to recalibrate your
blind, from the room main page, tap on the blind
name. If the app detects paired but uncalibrated
blinds, you will be prompted to calibrate the
blinds.
NOTE
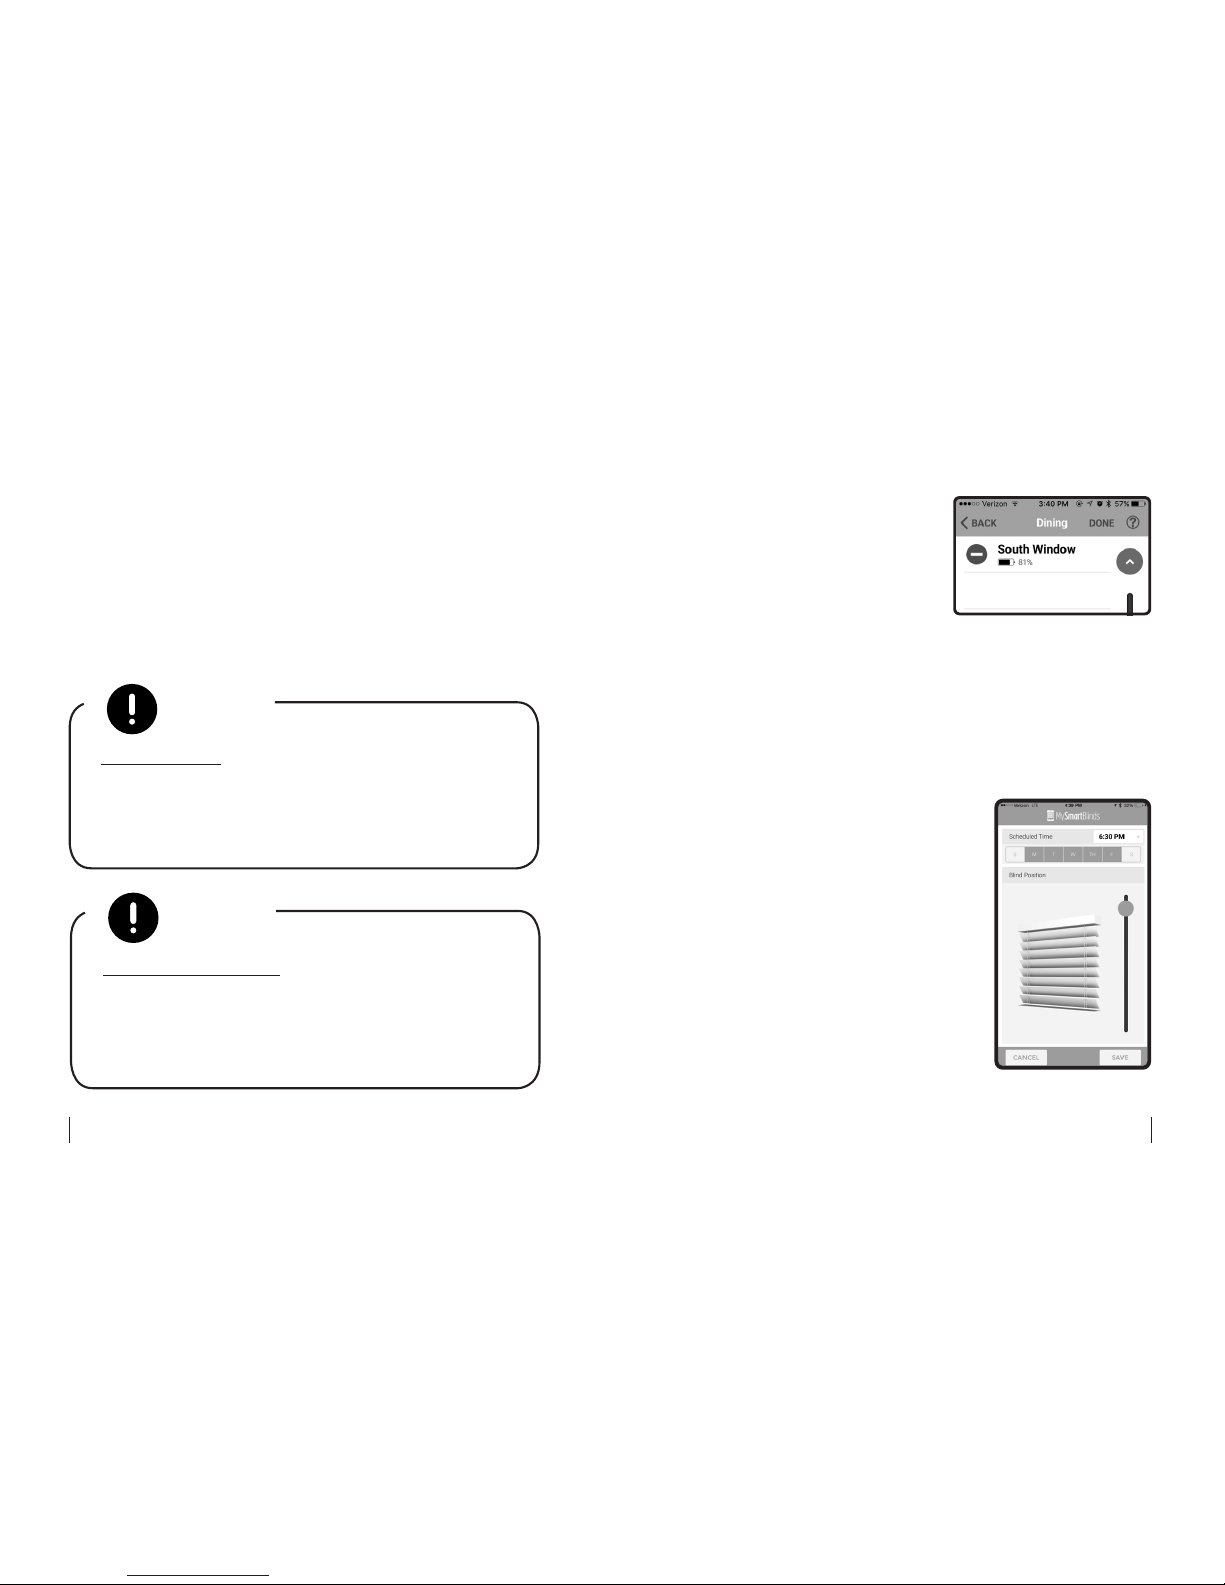
Fig. 2
7. To remove a blind from
a room, tap the name of
the room from the home
page, tap EDIT, and tap
the MINUS ICON (Fig. 2);
or, swipe left on the blind
name, and tap REMOVE.
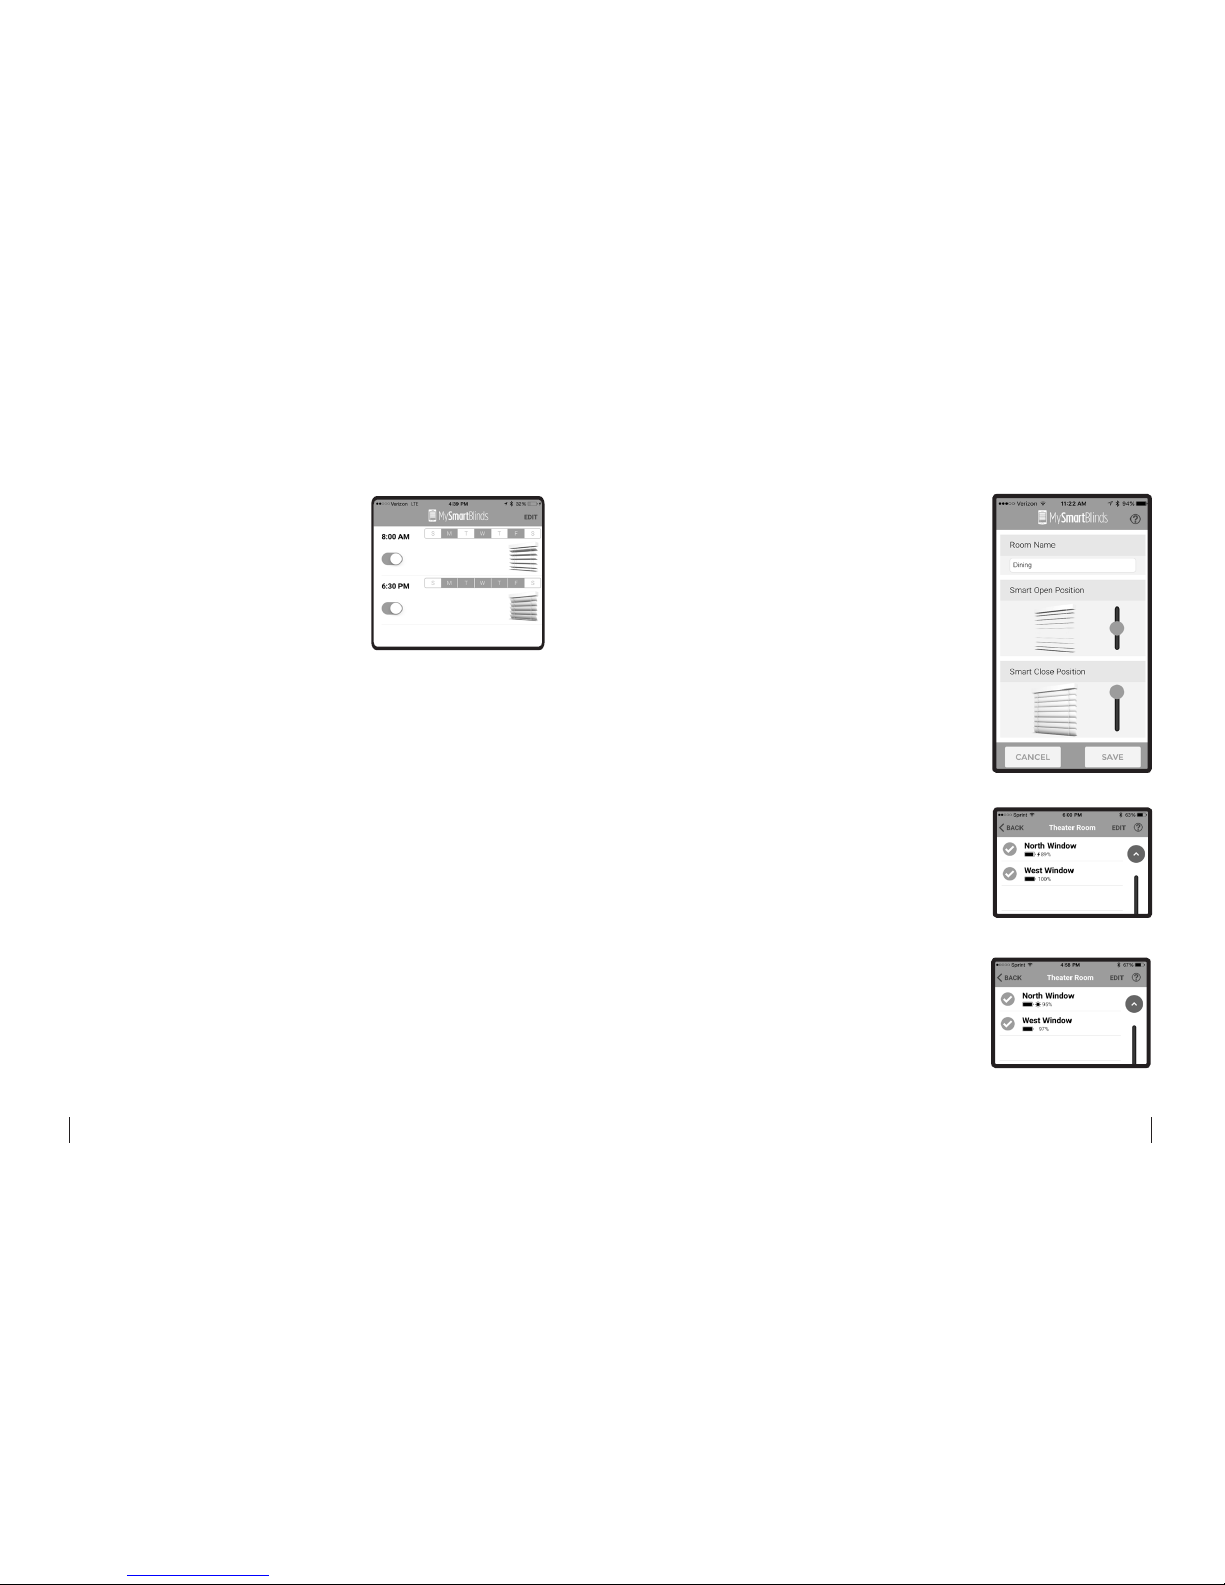
3 Creating Schedules
1. From the home page, tap the name of the room
that you’d like to create a schedule for.
2. Tap SCHEDULE, and then
select ADD EVENT.
3. Use the slider to designate
the position you’d like your
blinds to move to, and select
the time and days you want
the event to occur (Fig. 3.1).
4. When you have completed
creating your schedule, select
SAVE.
Fig. 3.1
Page 17
32 33
5. From the main schedule
page (Fig. 3.2), tap on an
event to edit its contents.
6. To turn an event on or off,
from the main schedule
page, select the event’s
switch button. To access the
option to delete the event, tap
EDIT or swipe left on the event.
4 Using Smart Positions
1. To open all blinds connected to your device, from
the home page, tap the uppermost OPEN-BLINDS
ICON. To close all blinds connected to your device,
tap the uppermost closed-blinds icon.
2. To open or close all blinds in a room, from the
home page, tap the icons next to the room’s name.
3. To edit the default Smart Open and Smart Close
positions in a room, tap the room name from the
home page, and then select ROOM SETTINGS.
Fig. 3.2
Fig. 4
4. Use the sliders to adjust the
smart positions (Fig. 4), and
then select SAVE.
5 Charging the Battery
1. If you are not installing a
solar panel, you will need
to periodically charge the
battery using the MySmart
Blinds charging cable
(sold separately). Plug the
charging cable into an out
let, and connect the micro
USB plug to the bottom of
the manual switch (see Fig.
2.20 on page 25).
2. In the app, your blind should
show a lightning bolt next to
the battery, indicating that it
is charging (Fig. 5).
3. If you are charging via solar
panel, your blind should
show a sun icon (Fig. 6).
Fig. 5
Fig. 6
Page 18
34 35
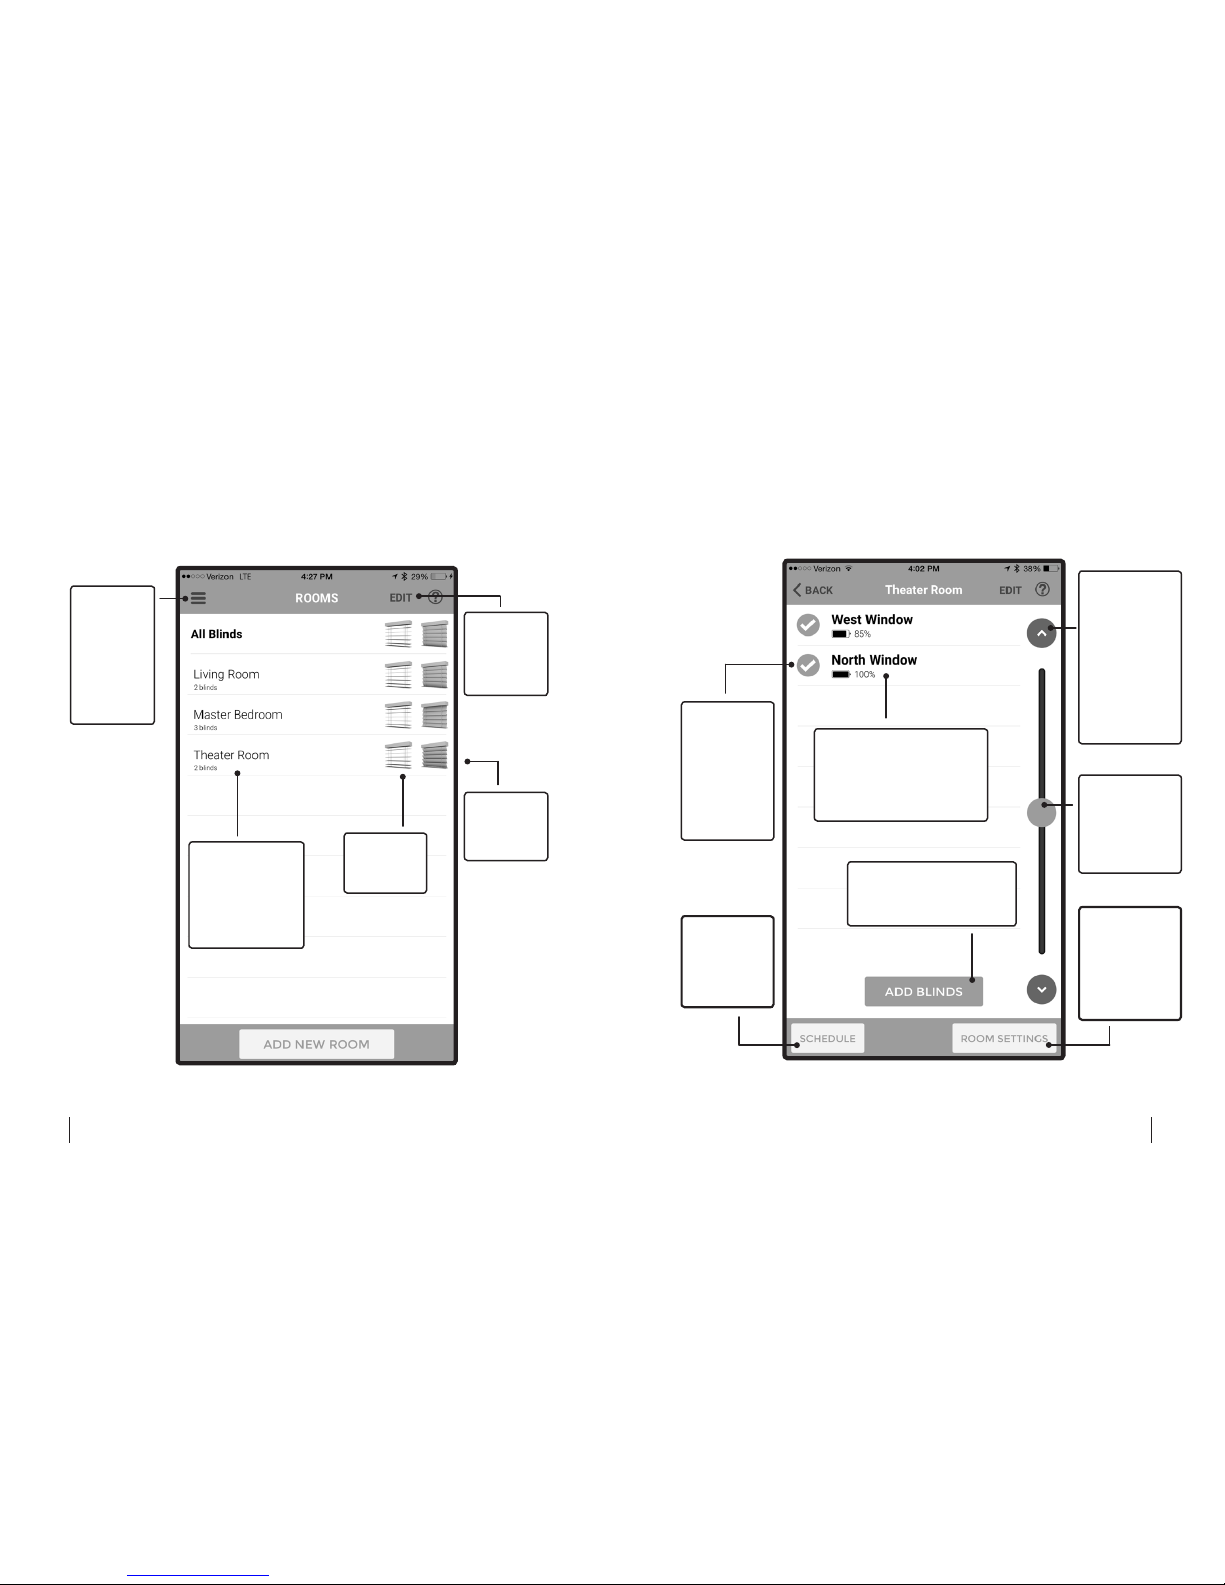
Tap EDIT
to edit
or delete
rooms.
Closes all
blinds in
this room.
Tap the
MENU
BUTTON
to access
settings,
help, feed
-
back, and
more.
5 Home Page
Fig. 5
Tap the room
name to view,
schedule, add
to, and control
the blinds in
that room.
Opens all
blinds in
this room.
Tap the
ARROWS
to move the
blinds in 45°
increments.
Hold down
the ARROWS
for more
ne-tuned
positioning.
Drag the
SCROLLER
for more
ne-tuned
positioning.
Select the
CHECK
MARKS
next to the
blinds you
want to
manually
control.
Tap to
create
schedules
for this
room.
Tap to edit
the room’s
Smart Open
and Smart
Close
positions.
6 Room Main Page
Fig. 6
Tap to add a new blind
to the room and pair it
with your device.
Tap on a blind’s name
to access its advanced
settings, including
rmware upgrades and
calibration.
Page 19
36 37
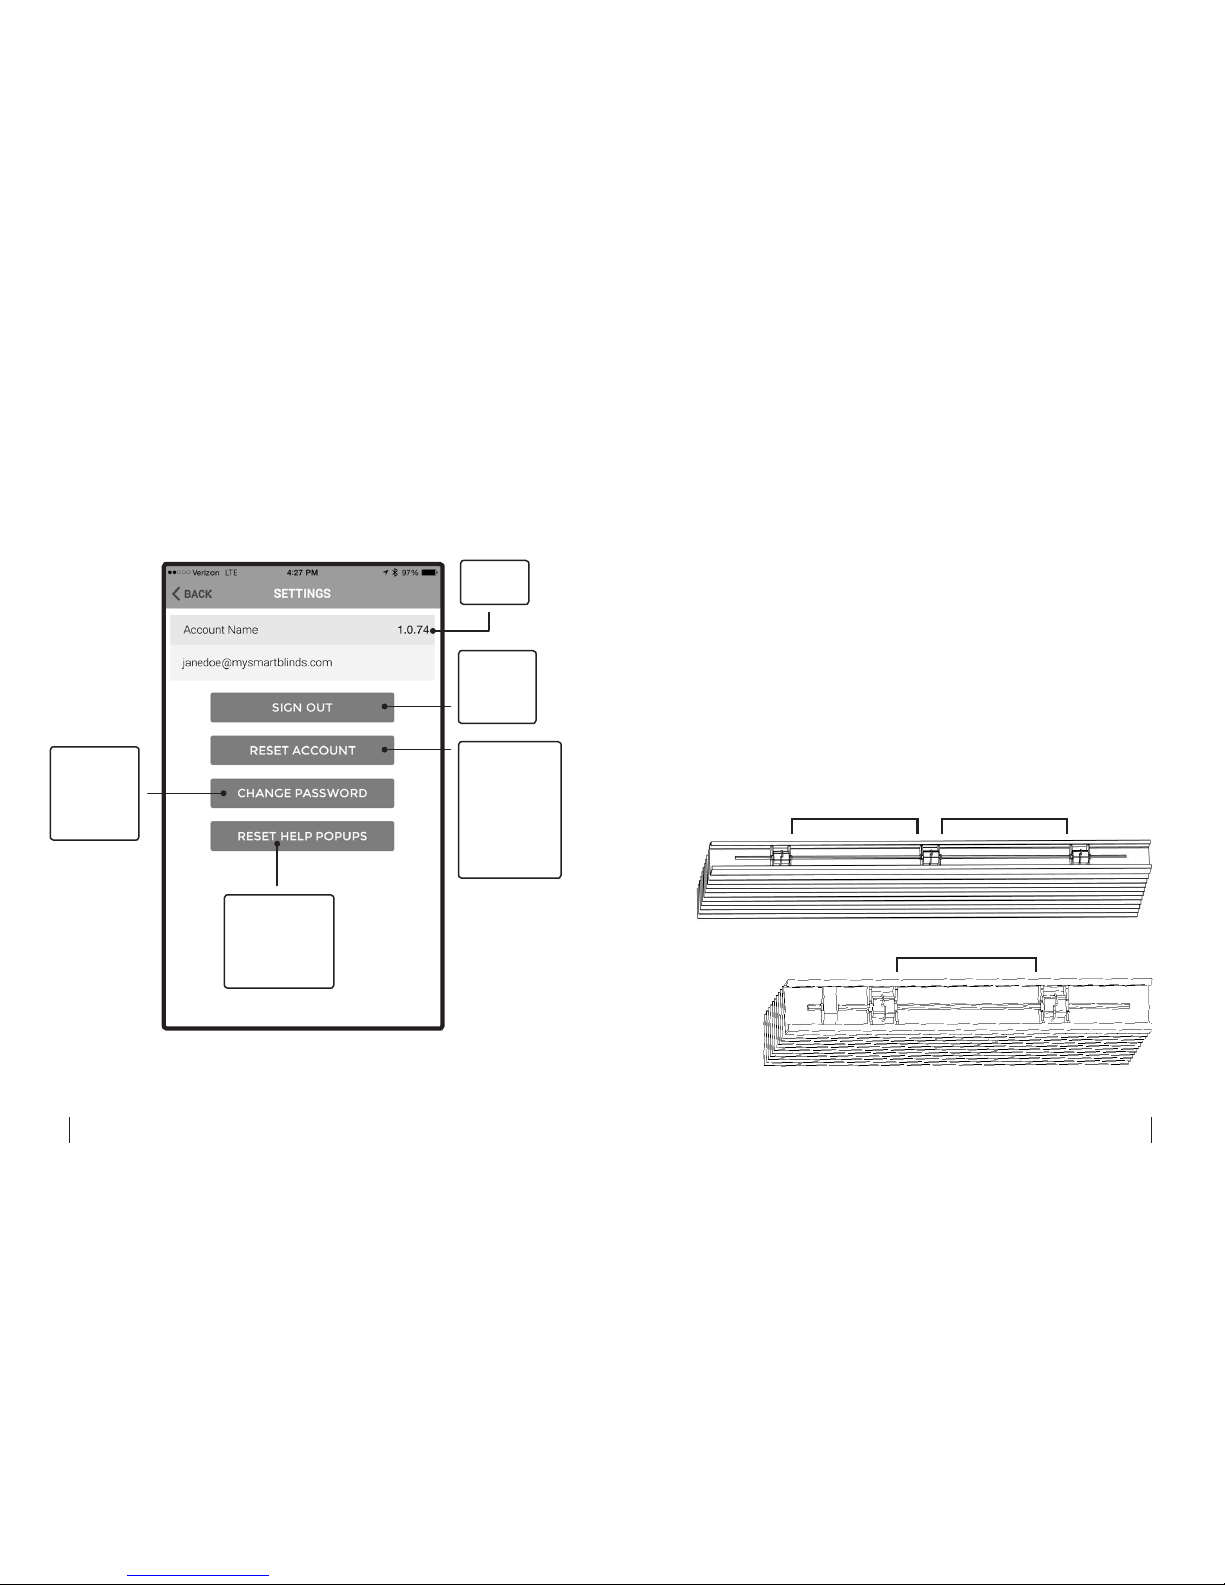
7 Settings Page
Tap to
sign out
of your
account.
Tap to
reset your
account and
delete all of
your rooms,
blinds,
schedules,
and settings.
Tap to
change the
password
on your
account.
Tap to reset
all help dialog
boxes that
appear in the
app.
App
version.
Fig. 7
TROUBLESHOOTING
I can’t remove my existing blinds:
If you’re having trouble opening the brackets that hold
your blinds, you may need to use a scraper or screw
-
driver to help gently pry the brackets open or remove
any excess paint keeping them shut.
The motor box doesn’t t inside my headrail:
MySmartBlinds is designed to t inside 2-inch hori
-
zontal blinds. The space between each barrel in your
headrail should measure at least 5 inches (Fig. 1), or 9
inches if you have only two barrels (Fig. 2).
5" min.
Fig. 1
9" min.
Fig. 2
5" min.
Page 20
38 39
However, some headrails may still be too shallow to
properly t both the motor box and motor box bracket.
Try inserting the bracket separately from the motor
box and sliding the motor box into the bracket (Fig.
2.11 on page 19); otherwise, you may need to insert
the motor box without the bracket.
The app cannot nd or connect to my installed blinds:
Turn the Bluetooth off and back on again on your
device, and restart the app. Your device may also be
out of range of the blind; move closer to it, ensuring
you have a clear line of sight to the blind. Try turning
your smart device off and back on again. Ensure that
the battery is both connected to the motor box and
switched to the ON position. Last, turn the battery to
the OFF position and wait at least 15 seconds before
switching back to the ON position.
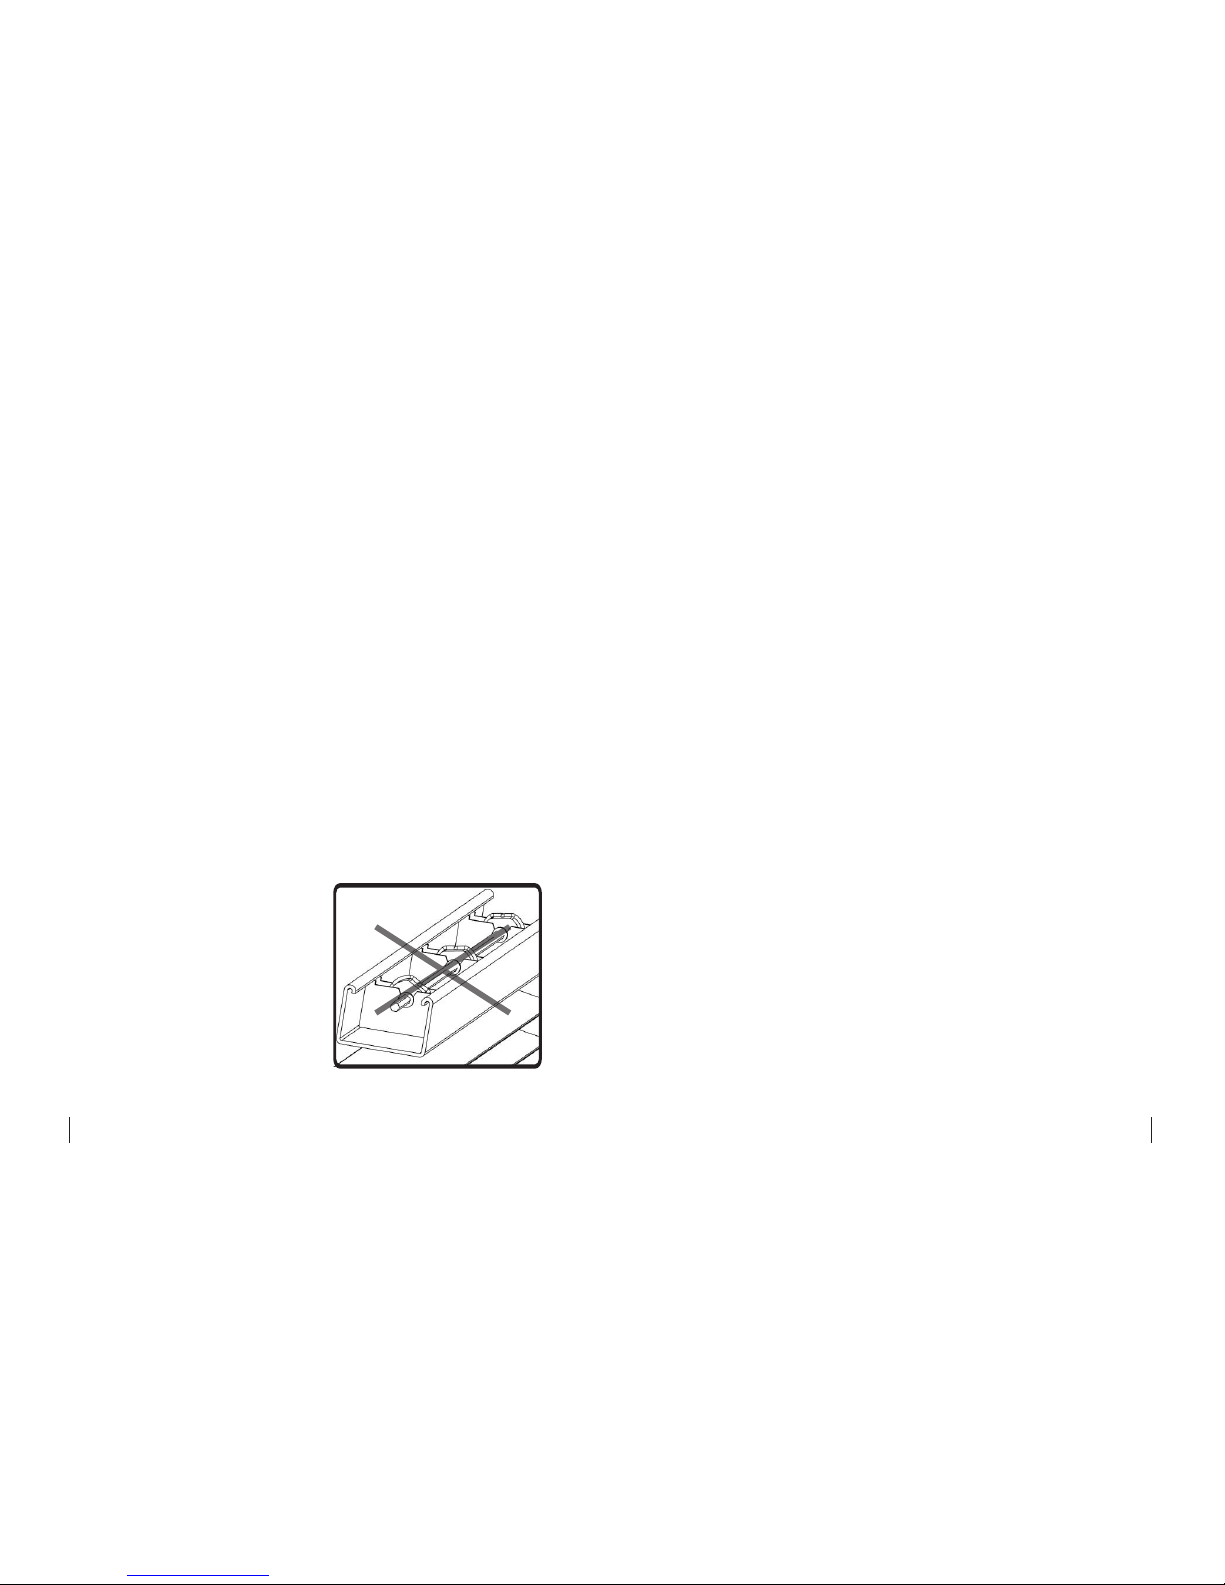
My blinds won’t properly
calibrate:
In order for the blind slats
to rotate to completely
closed and completely open
positions, the headrail must
be free of obstructions.
Ensure that the barrels in
the headrail are all aligned
Fig. 3
with each other (Fig. 3) and that there is nothing preventing the barrels from rotating.
I can’t raise and lower my blind slats anymore:
Ensure that none of the strings are stuck between
or beneath hardware, as explained in the PINCHED
CORDS Caution on page 20.
I need to pair my automation kit to a different account:
Each automation kit can only be paired to one
MySmartBlinds account at a time. If you need to use a
different account to operate your blinds, you’ll need to
perform a factory reset on your automation kit:
1. Turn the battery to the OFF position, then wait at
least 15 seconds.
2. Pull on the manual switch, and while holding the
manual switch, turn the battery to the ON position.
As you continue pulling on the manual switch, you
will see a solid green light appear in the motor box
for ve seconds.
3. Once the green light starts blinking, let go of the
manual switch. The green light will then blink
quickly to conrm that the reset was successful.
4. Last, pair and calibrate the newly reset blinds in
the MySmartBlinds app.
Page 21

40 41
LIMITED WARRANTY
Limited One-Year Warranty on Hardware
MySmartBlinds offers a limited one-year warranty on
the hardware components of its blinds kit. If a defect
in the hardware, or any component thereof, appears at
any time during the rst year after purchase, MySmart
-
Blinds will repair or replace (at its option) the kit or the
defective component at no cost to you beyond the
cost of shipping the defective item to us.
Who Makes This Warranty
This warranty is made by
MySmartBlinds, Inc.
2365 Mountain Vista Lane
Provo, Utah 84606
Who Is Covered
This warranty extends only to the original purchaser
of the product. This warranty is intended for natural
persons only and does not extend to any corporation,
limited liability company, or commercial entity.
What Is Covered
The limited one-year warranty on hardware covers
manufacturing defects and includes parts, labor, and
the cost of shipping the repaired (or replacement)
product from MySmartBlinds to you. The warranty
does not cover installation of repaired or replacement
items. If we send replacement parts, we may use
new or reconditioned parts. If we send a replacement
motor box, we may use a new or reconditioned motor.
Where and How to Obtain Warranty
Service
You can obtain warranty service from MySmartBlinds
at the address indicated below. It is your responsibility
to deliver or ship the defective product to us at your
expense, together with a copy of your receipt showing
date of purchase and a description of the claimed
defect, prior to the expiration of the warranty period.
To obtain information regarding this warranty, you may
contact us by mail, e-mail, or phone:
MySmartBlinds, Inc.
2365 Mountain Vista Lane
Provo, Utah 84606
[email protected]
1-844-762-7840
Page 22

42 43
Exceptions and Exclusions
This warranty does not include damage or defects
resulting from misuse, accident, failure to maintain,
or any other causes following your purchase of the
product.
Use of the MySmartBlinds kit with any other system
or components (including afxing non-MySmartBlinds
attachments or accessories) voids this warranty. Fail
ure to follow the user’s manual in installation or use of
the MySmartBlinds system voids the warranty. Unau
-
thorized repair or modication voids the warranty.
The MySmartBlinds system is intended for personal
home use. MySmartBlinds does not warrant its sys
tem for commercial use, and any such use voids the
warranty.
TO THE GREATEST EXTENT PERMITTED BY LAW,
THIS WARRANTY IS IN LIEU OF AND EXCLUDES ALL
OTHER WARRANTIES NOT EXPRESSLY SET FORTH
HEREIN, WHETHER EXPRESS OR IMPLIED, INCLUD
ING BUT NOT LIMITED TO ANY WARRANTIES OF
MERCHANTABILITY AND FITNESS FOR A PARTICU
-
LAR PURPOSE.
Limitation of Liability
THE SOLE REMEDIES AFFORDED UNDER THIS WARRANTY ARE REPAIR, REPLACEMENT, OR, IF REPAIR
OR REPLACEMENT IS NOT COMMERCIALLY PRAC
TICABLE OR CANNOT BE TIMELY MADE, A REFUND
OF THE PURCHASE PRICE. IN NO EVENT SHALL THE
LIABILITY OF MYSMARTBLINDS RELATED TO ANY
PRODUCT EXCEED THE PURCHASE PRICE OF THE
PRODUCT.
YOUR USE OF MYSMARTBLINDS PRODUCTS IS AT
YOUR SOLE RISK. MYSMARTBLINDS SHALL NOT BE
LIABLE UNDER ANY CIRCUMSTANCES FOR CON
SEQUENTIAL, INDIRECT, SPECIAL, OR INCIDENTAL
DAMAGES ARISING FROM OR IN CONNECTION
WITH THE USE OF ANY MYSMARTBLINDS PRODUCT.
(SOME STATES DO NOT ALLOW THE EXCLUSION OR
LIMITATION OF INCIDENTAL OR CONSEQUENTIAL
DAMAGES, SO THE ABOVE LIMITATION OR EXCLU
-
SION MAY NOT APPLY TO YOU.)
Other Legal Rights
This warranty gives you specic legal rights, and you
may also have other rights, which vary from state to
state.
 Loading...