

Myryad Car Satellite Radio, RS System User Manual
User’s Guide

Contents
Introduction 3
Connections 4
Aerial/Aerial Connector 4
Line out 4
Power Supply Unit 4
Line In 5
Headphone Socket 5
M-Port Connector 5
Quick Start Guide 6
Setting the alarm 7
Silencing an alarm 7
Basic Operation 8
Turning the unit ON/OFF 8
Menu 8
Volume 8
Choosing a Source 9
Display 9
Alarm 9
Tuning 9
Using the 10
Tuning to your favourite radio stations 10
DAB Tuning 10
FM Tuning 11
Storing a Preset 12
Setting the Alarm Time 13
Snooze 14
Using the Menu 15
Adjusting the sound 16
Setting the time 16
Further options 17
Line in Boost 17
Backlight Level 17
Scanning for DAB Stations 17
Setting the Standby Alarm Type 18
Setting the Sleep Timer Option 19
Using the Handset from the
Music Pack 20
Radio Operation 20
Source key 20
Volume UP/DOWN 20
The PLUS and MINUS keys 20
Line In Operation 21
Battery Replacement 21
Using an iPod® with the Cable and
Handset from the Music Pack 22
iPod Operation 22
Source Key 22
Tracks/Albums/Playlists 22
Advanced Functionality 23
Alarm Skip 23
Display Backlight 23
Advanced Menu 24
Turn On Volume 24
Advanced Alarm Settings 25
Factory Reset 25
Index 26

3
Introduction
The Myryad has been designed for ease of use as a complete radio
system.
It features both FM (with RDS) and DAB (Digital Audio Broadcasting)
tuners. It also allows for an auxiliary connections through the LINE IN
on the rear panel and—with the optional Music Pack¹—a full function
connection for an iPod® through the M-PORT.
It has a three-way speaker system with 100mm bass driver, delivering
room–fi lling hi-fi stereo sound and seperate bass/treble controls
allows adjustment of sound.
The LINE OUT connection allows for connection to hi-fi equipment.
The built-in alarm system offers multiple wake-up options.
The headphone socket has a amplifi er with dedicated tone controls,
ensuring the best possible sound quality.
The is highly fl exible and can be tailored to individual preferences.
Doing so will take just a little more investigation but will reward
discerning listeners with exactly the sound and operation that would
be expected from a radio belonging to the Myryad Performance
Lifestyle range.
Note: The fi rst time that the RS is powered up, it will start a DAB scan
which cannot be interrupted unless the unit is powered down. If powered
down, a full DAB scan will need to be done to ensure a complete list
of available DAB stations (refer to ‘Using the Menu–Scanning for DAB
Stations’, page 17).
¹Available separately
4
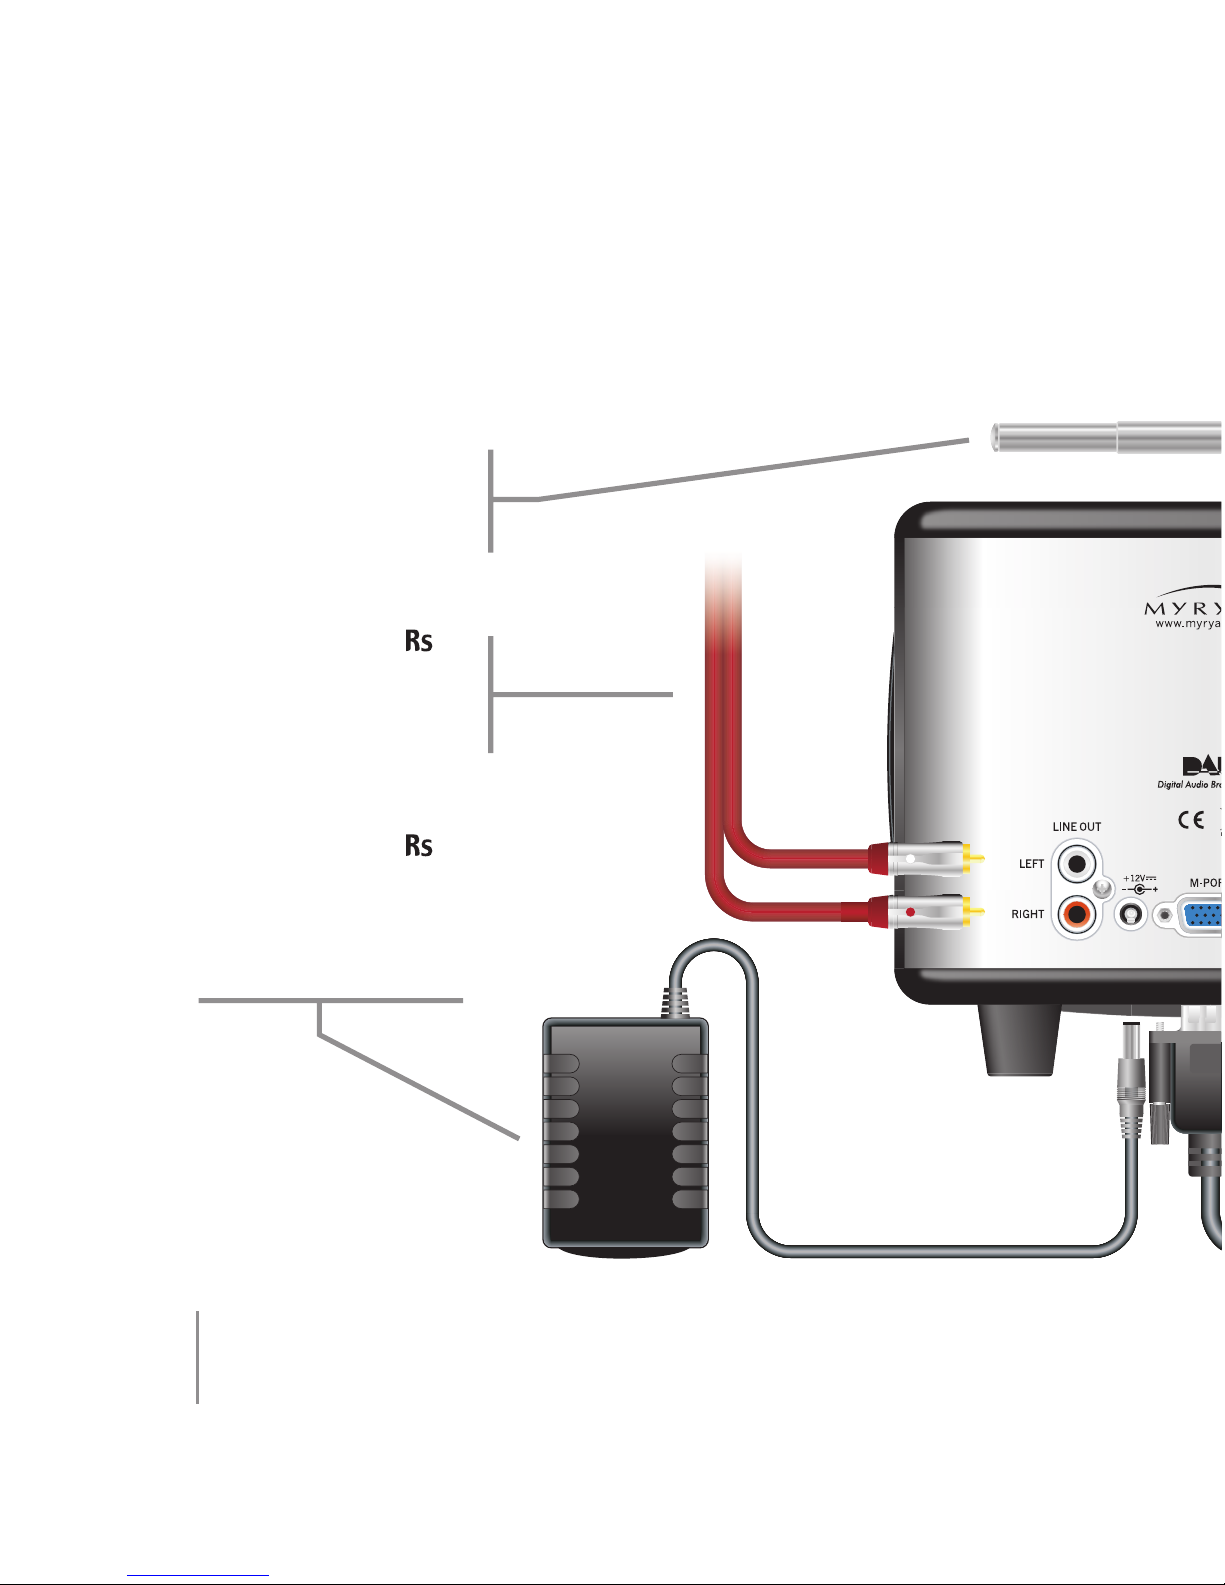
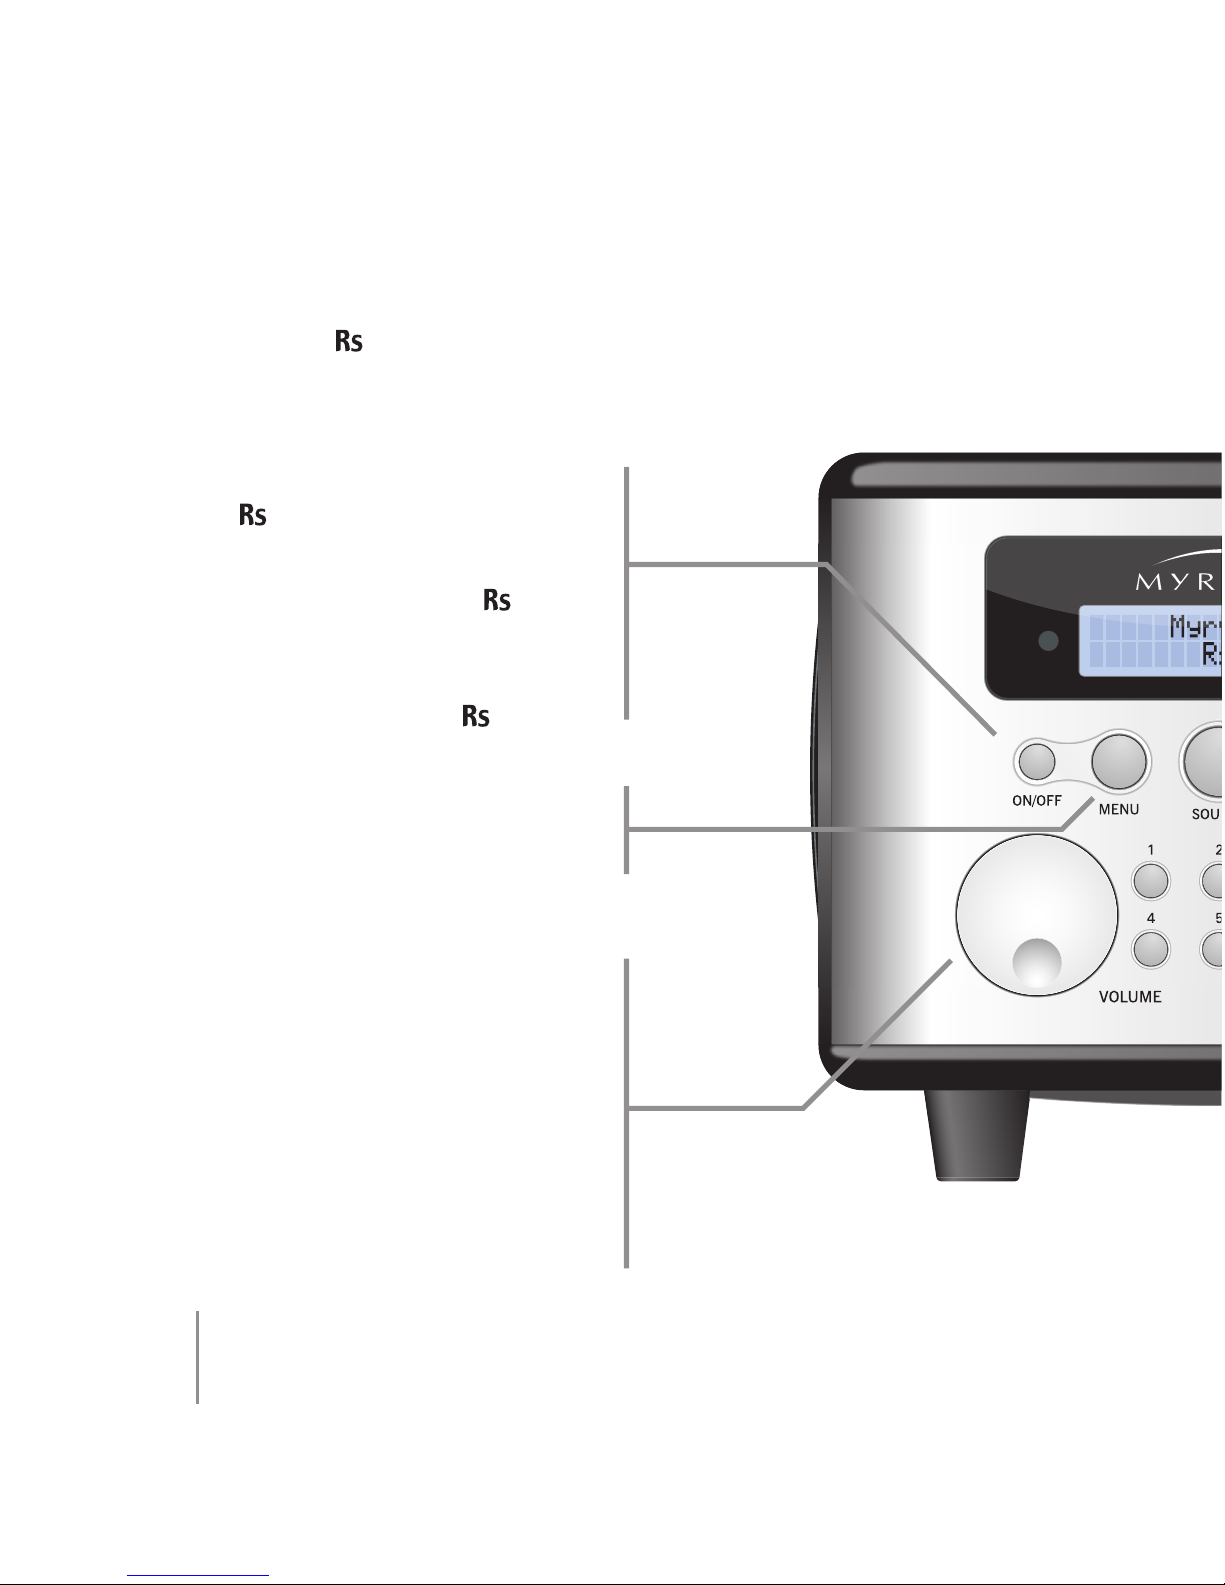
Connections
Aerial/Aerial
Connector
Use to connect the
supplied aerial. It can also
be used to connect an
external aerial.
Line out
Use to connect the
to any line level input,
such as on an amplifi er
or recording device.
Power Supply Unit
Use to connect the
to mains power with the
appropriate plug adapter
(comes with UK, European
and US plug types).
5
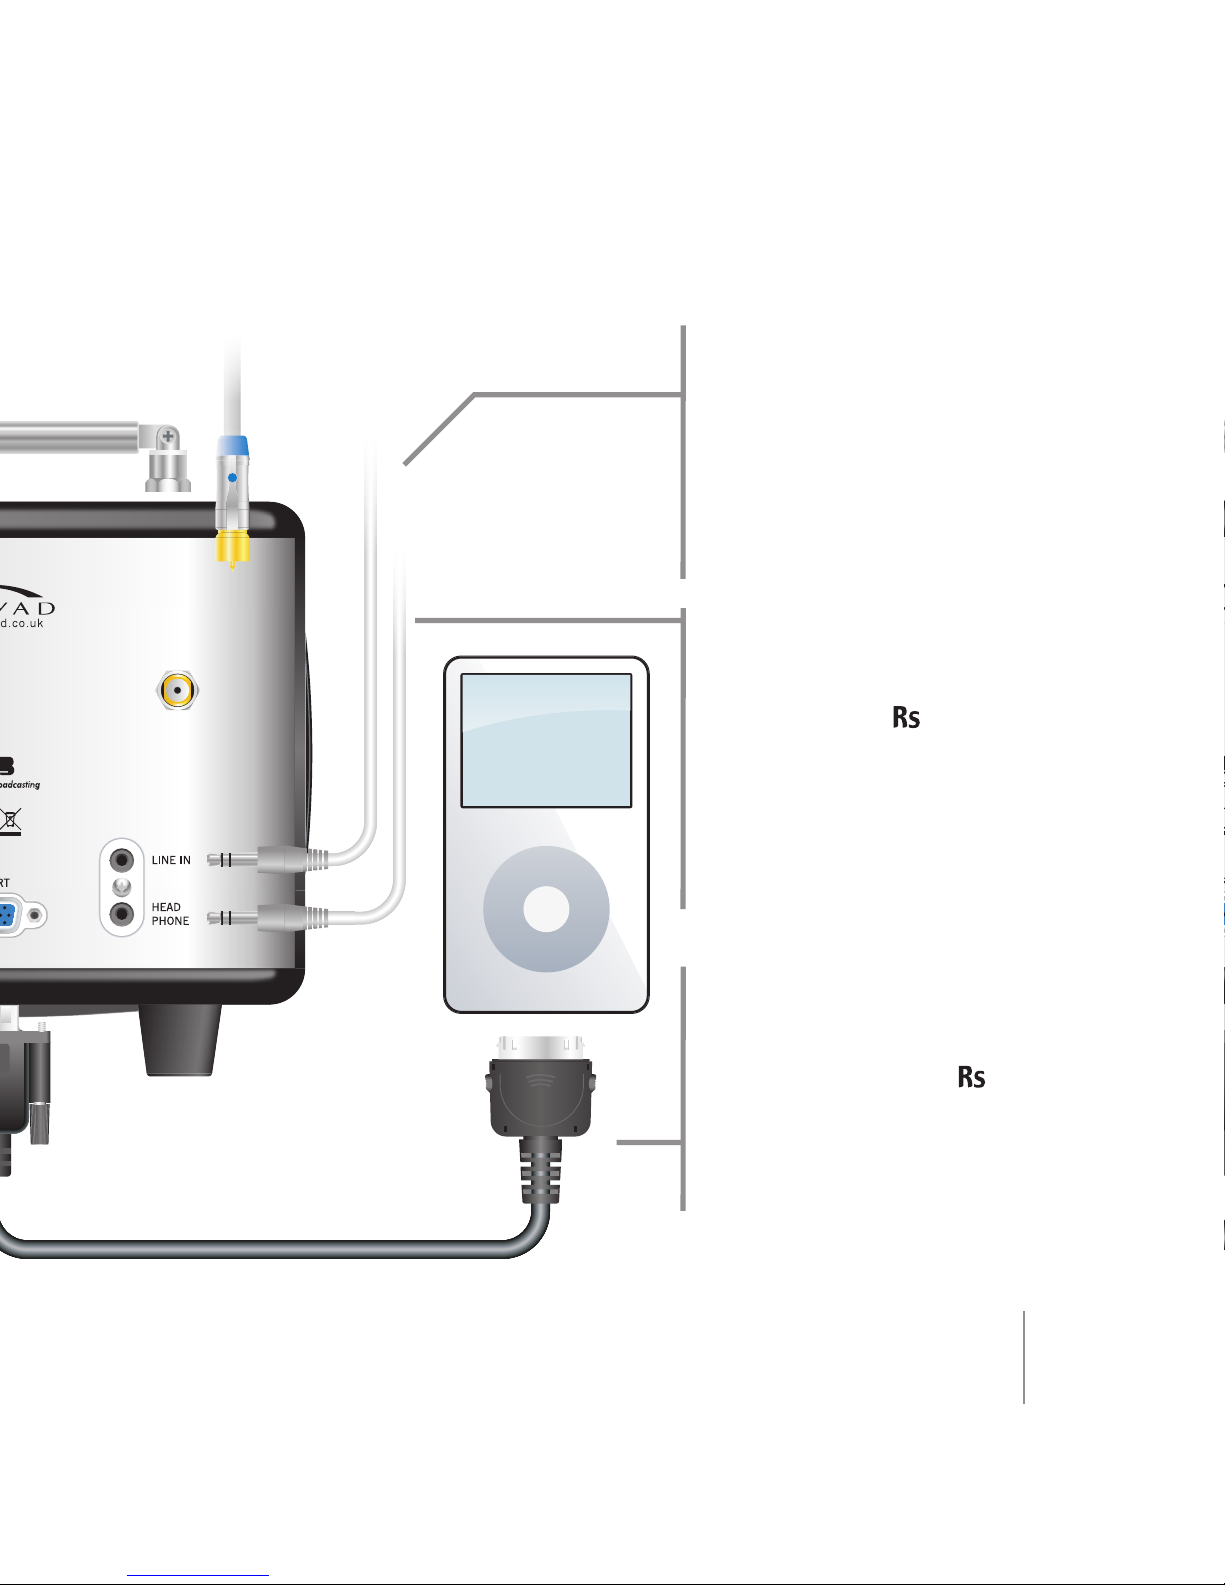
Line In
Use to connect any line level
source equipment such as
MP3 or CD players (a 3.5mm
jack to 3.5mm jack cable is
provided for this purpose).
The ‘Boost’ function in the
options menu can be used if
the sound level of the input
is too low. .
Headphone Socket
Use to connect your
headphones. The will
mute its speakers (except
when an alarm is activated)
and, when plugged in, any
adjustments to the tone and
volume controls will affect
only the headphone output.
M-Port Connector
Use to connect an iPod
to provide extended
functionality. When the
is active, the source will
automatically switch to
M-PORT when an iPod is
connected.
6
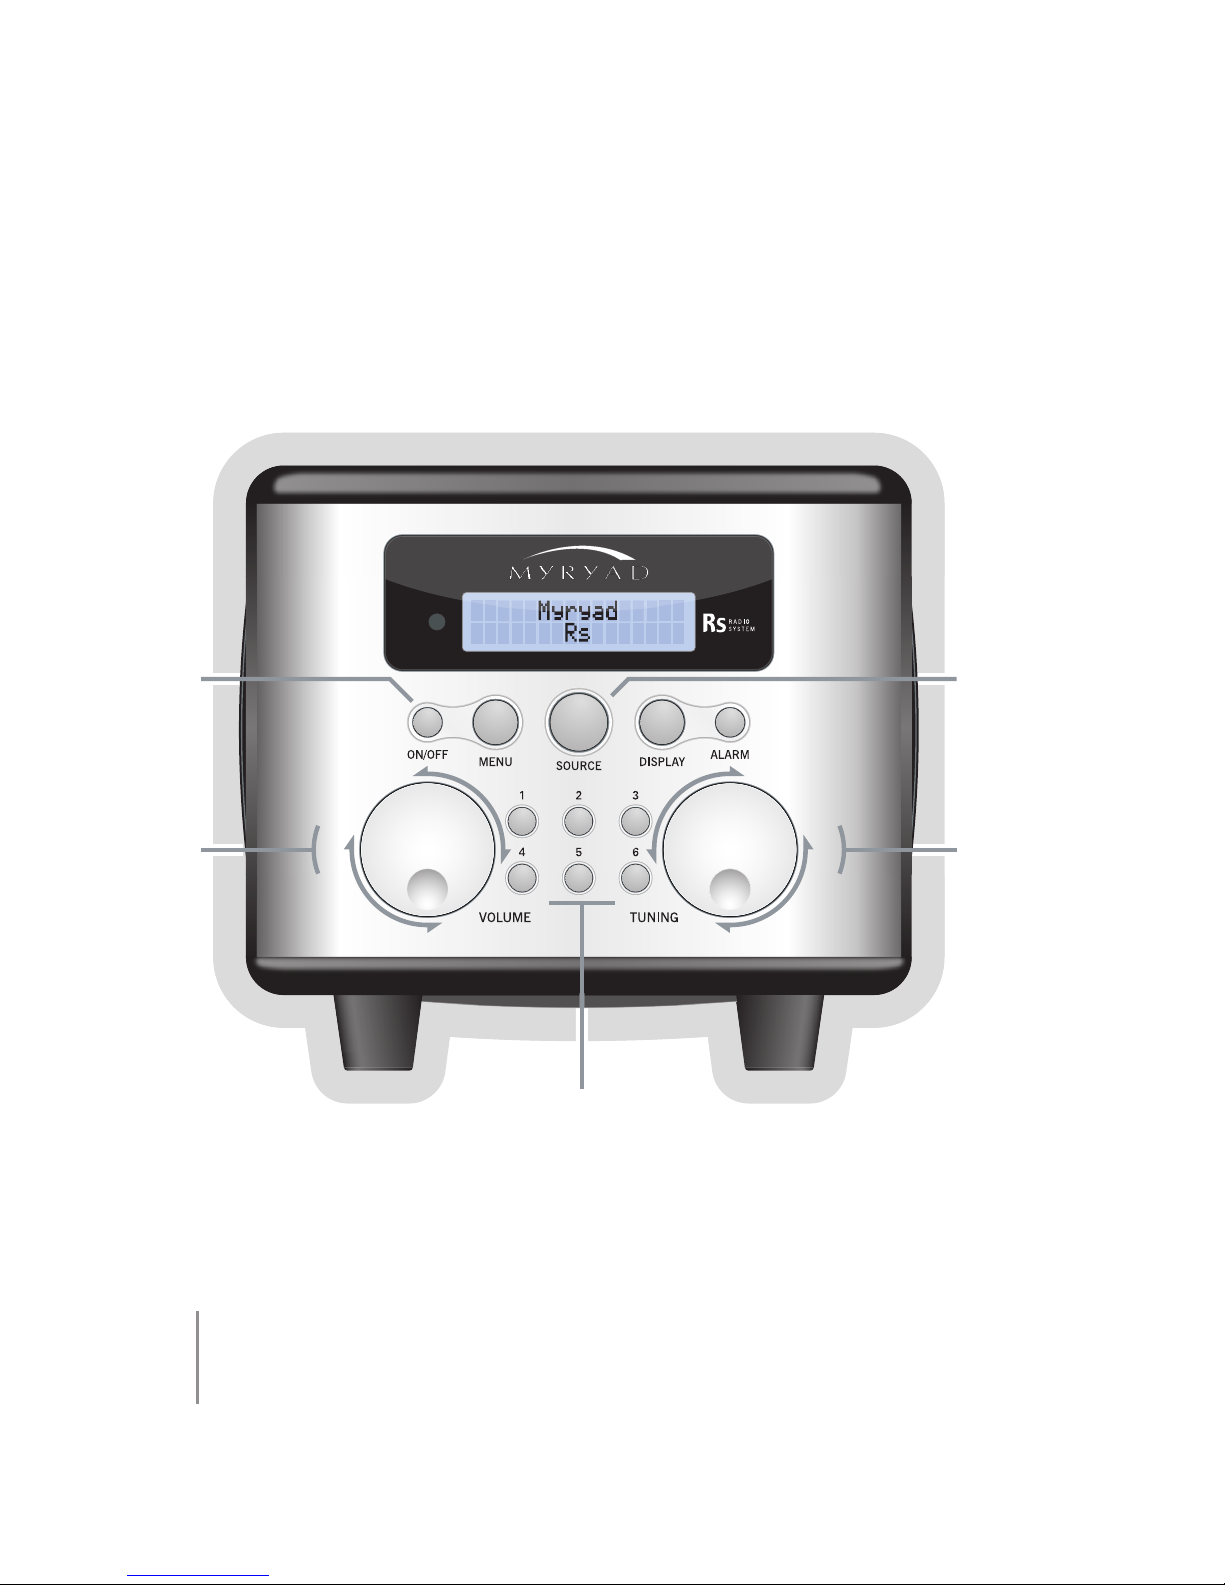
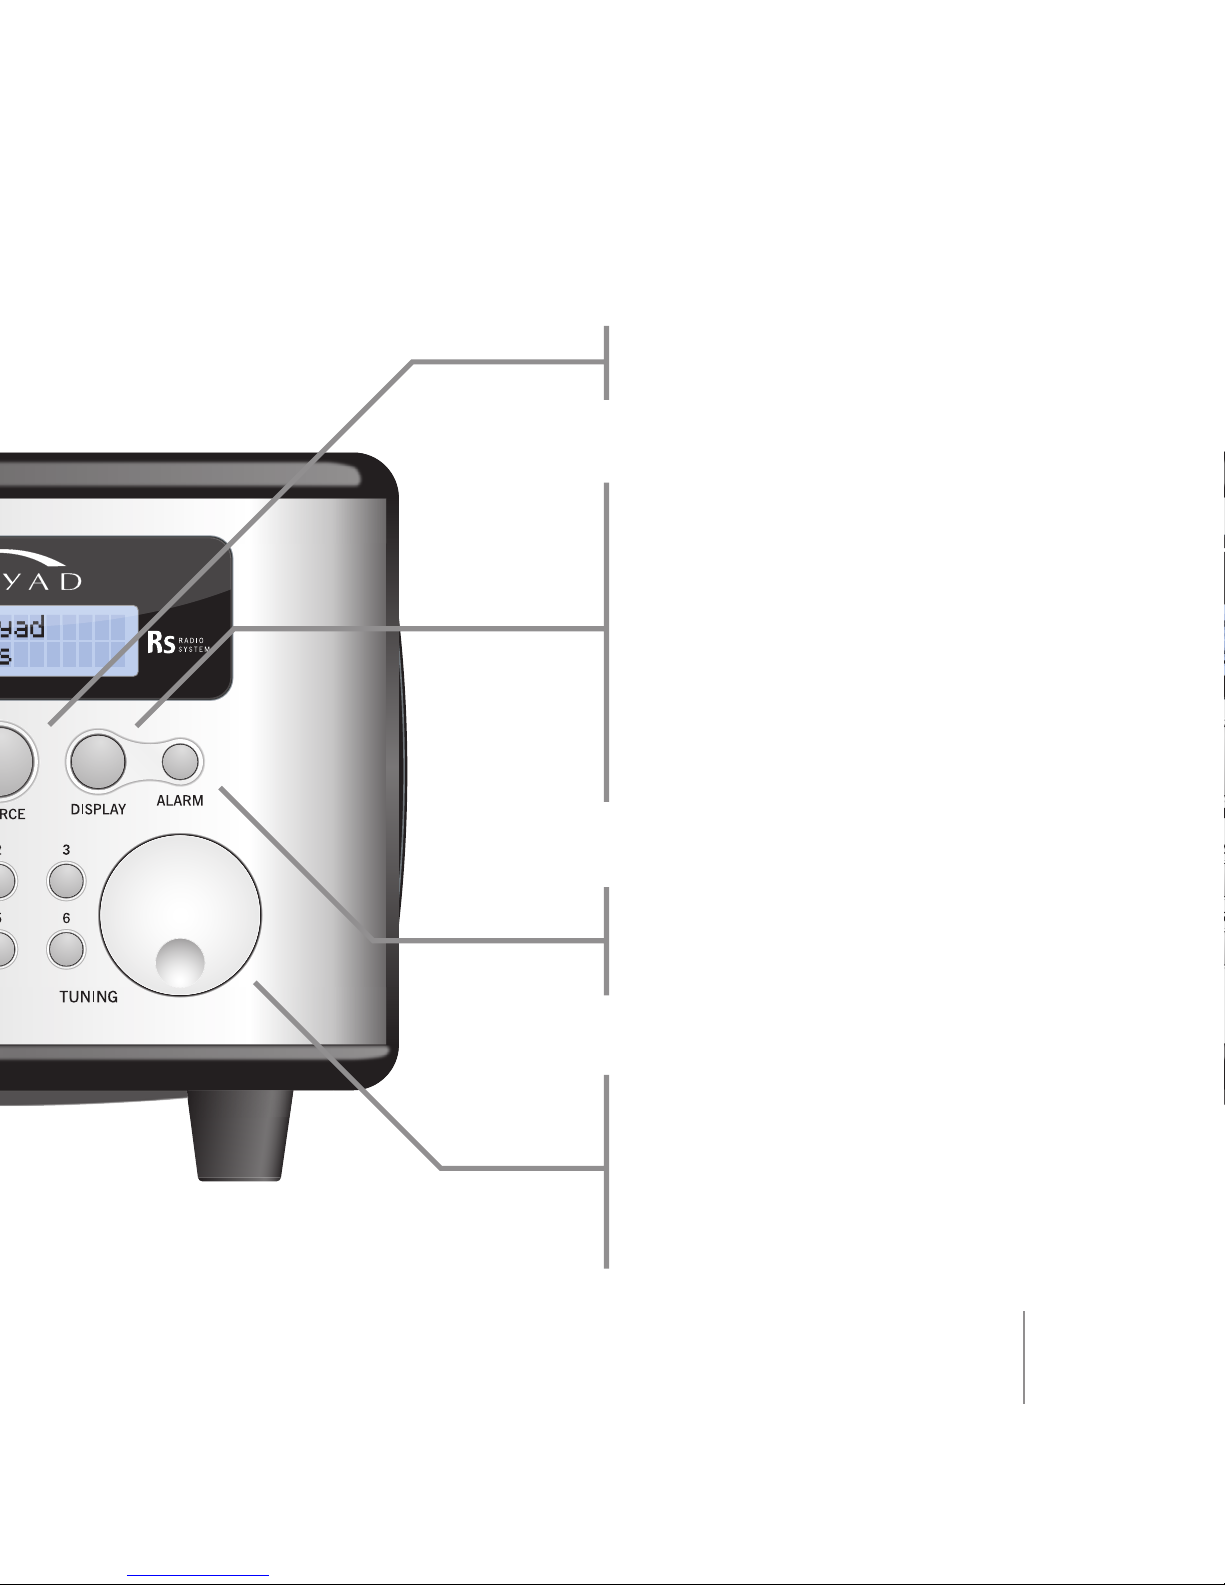
Quick Start Guide
ON/OFF
VOLUME
Click to mute
TUNING
DAB–Turn the
wheel to browse
through stations,
click to select.
FM–Turn the
wheel to tune
through the
frequencies.
SOURCE
Cycles through
DAB, FM and
other sources.
PRESETS
Press to select, press and hold to store
selected station or source.
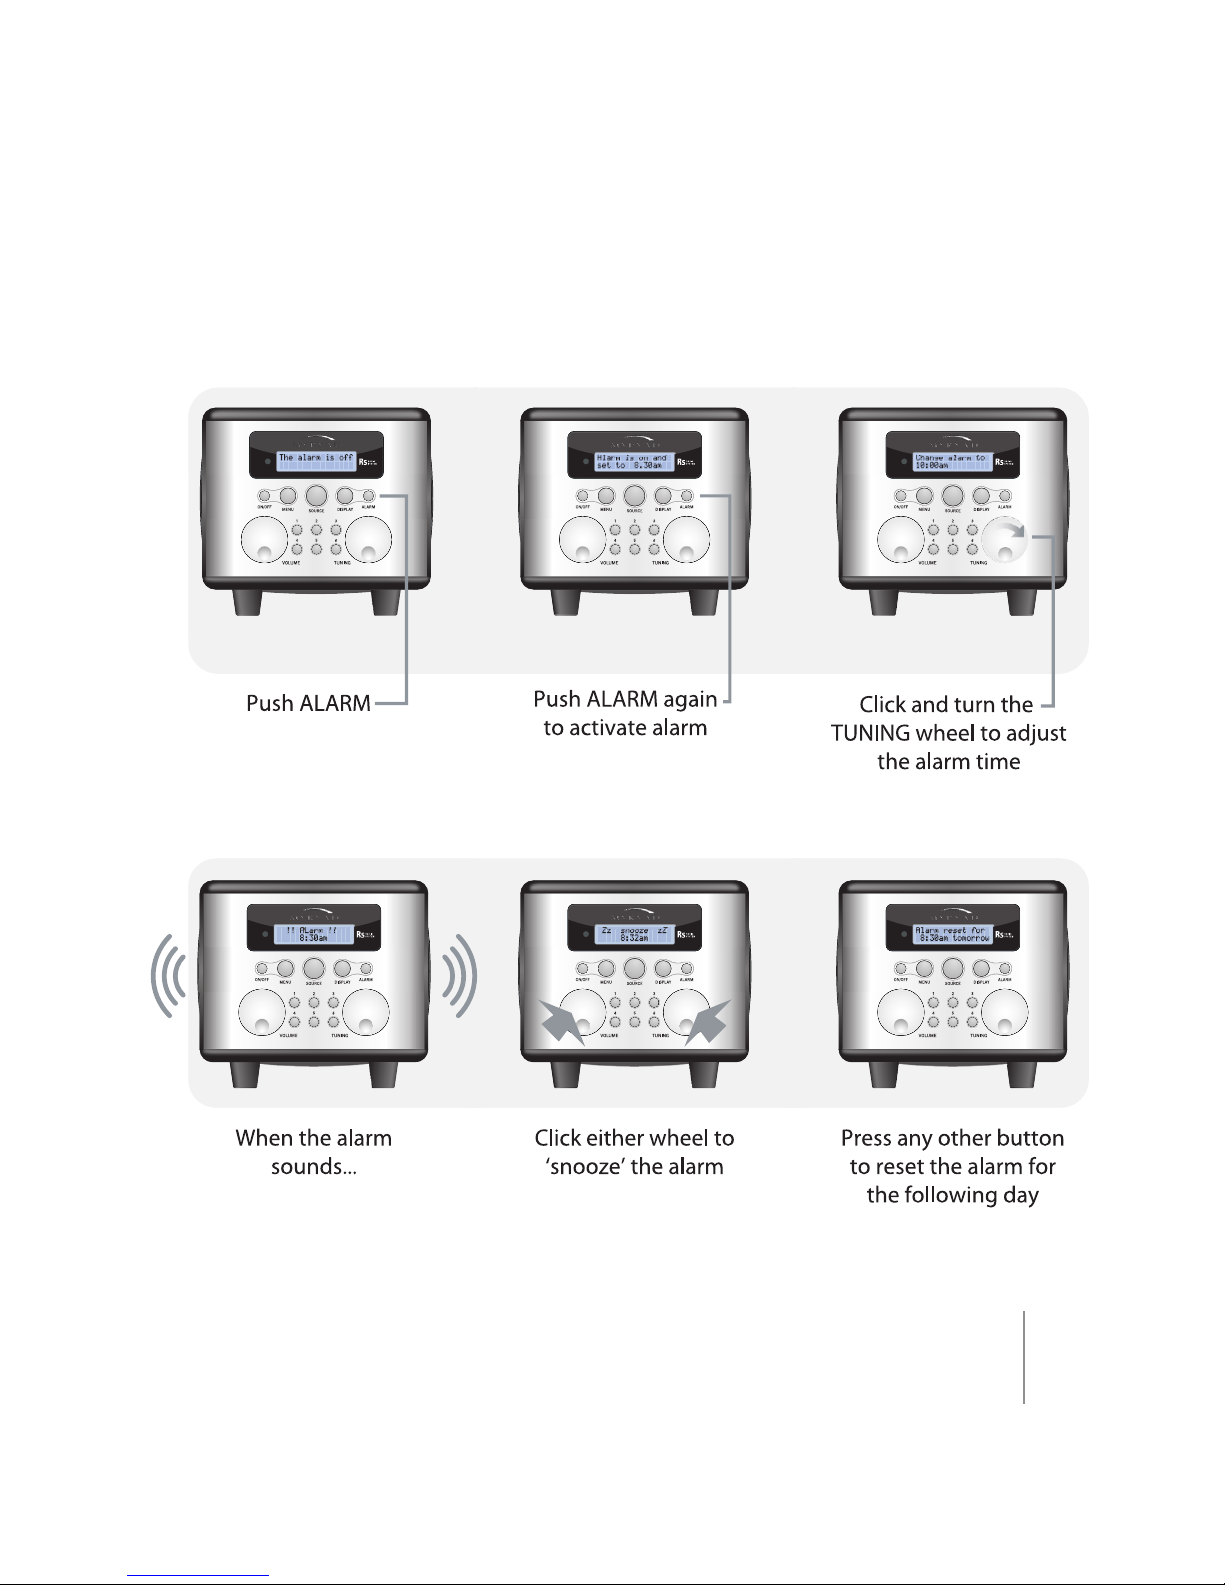
7
Setting the alarm
Silencing an alarm
8
Basic Operation
Connect the to the mains power supply using the supplied plug-top
adapter and ensure that the wall power switch is on.
Turning the unit ON/OFF
Pressing the ON/OFF button will turn
the on.
Pressing any of the preset buttons
(labelled 1–6) will turn the on
to the preprogrammed source or
station.
Press ON/OFF to turn the off.
Menu
Press the MENU button to enter the
setup options menu (refer to ‘Using
the Menu’, page 15).
Volume
Turning the VOLUME wheel
clockwise increases the volume,
anti-clockwise will reduce the
volume. The display will show the
current volume level.
Click the VOLUME wheel to mute the
volume. The display will show ‘Mute’.
Clicking or turning the VOLUME
wheel again will restore the volume.
9
Choosing a Source
Repeatedly pressing the SOURCE
button cycles through the available
sources.
Display
Use the DISPLAY button to see other
information being broadcast by
the current radio station. This can
include the name of the song being
broadcast and other useful items.
Only DAB and FM radio stations
with RDS provide this information.
Repeatedly pressing the DISPLAY
button cycles through the different
kinds of information available.
Alarm
Press the ALARM button to turn the
alarm on and off or to set the alarm
time (refer to ‘Setting the Alarm’,
page 13).
Tuning
Use the TUNING wheel to tune to
new stations or adjust options in
the menu (refer to ‘Tuning to your
Favourite Radio Stations’, page 10).
Click the TUNING wheel to select
options when in the menu.
 Loading...