

Myryad MXV4000 Owner's Manual
1
MXV4000
Remote Controlled
DVD / SACD Player
Owner’s Manual

page 2 of 28
CONTENTS
INTRODUCTION................................................................................................................................................................. 2
ACCESSORIES .................................................................................................................................................................. 2
INSTALLATION AND SAFETY ........................................................................................................................................... 3
DVD REGION CODE .......................................................................................................................................................... 3
PATENT INFORMATION.................................................................................................................................................... 3
SETTING UP YOUR SYSTEM............................................................................................................................................ 4
REAR PANEL CONNECTIONS .......................................................................................................................................... 4
Power ............................................................................................................................................................................. 4
Video Outputs................................................................................................................................................................. 4
Audio Outputs................................................................................................................................................................. 5
Control inputs/outputs etc............................................................................................................................................... 6
OPERATING YOUR SYSTEM ............................................................................................................................................ 7
FRONT PANEL CONTROLS .............................................................................................................................................. 7
SYSTEM OPERATION WITH SMART MY-LINK ................................................................................................................ 8
REMOTE CONTROL OPERATION .................................................................................................................................... 9
1. ESSENTIAL SETUP ........................................................................................................................................... 10
3. PLAYING A CD................................................................................................................................................... 15
4. PLAYING AN SACD ........................................................................................................................................... 15
5. PLAYING AN MP3/WMA/ DivX/XviD/JPEG (PICTURE CD)............................................................................... 16
6. SETUP MENUS.................................................................................................................................................. 17
USE OF MX-700 REMOTE (as supplied with MXD4000/7000 etc.).................................................................................. 22
CARE AND HANDLING OF DISCS .................................................................................................................................. 22
TROUBLE-SHOOTING..................................................................................................................................................... 23
APPENDIX 1 Table of Alternative Languages............................................................................................................. 24
APPENDIX 2 Glossary................................................................................................................................................ 26
SPECIFICATIONS ............................................................................................................................................................ 27
TECHNICAL DATA ........................................................................................................................................................... 27
INTRODUCTION
The Myryad MXV4000 DVD Player has been designed
to offer a combination of high quality sound and video
reproduction together with elegant styling in keeping with
other Myryad MX products. It is a full-function remotecontrolled DVD player that will play a wide variety of
silver disc types. Playback formats accepted include:
DVD-Video, VCD, SVCD, DVD-R/-RW, DVD+R/+RW,
CD, CD-R, CD-RW, HDCD, MP3, WMA, SACD multichannel, SACD stereo, JPEG (picture CD), JPEG with
MP3, Xvid and DivX.
The MXV4000 has composite, s-video and component
analogue video outputs, plus an HDMI digital video
output with upscaling available to 720p or 1080i formats
using a Faroudja DCDi de-interlacer/upscaler. It has
fixed-level low-impedance audio outputs – both 5.1
channel and a separate stereo downmix which is always
present and can be used to feed sound to a second
room/zone if desired. The composite and s-video outputs
are also permanently present so they too can be used
for a second room/zone. Built-in Dolby Digital and DTS
decoding is provided, together with Dolby Pro Logic II
and Virtual Surround options.
The MXV4000 has coaxial and optical digital audio
outputs to feed a surround processor or receiver. In
addition it has a Smart My-Link® control input and output
and an RS232 control port.
The MXV4000 offers a range of expansion possibilities:
• The Smart My-Link® input can be connected to a
Myryad surround preamp-processor or integrated
amplifier or so that the MXV4000 will automatically
be switched on or off when the amplifier is switched
on or off.
• The Smart My-Link® input/output can be coupled to
other Myryad products that can then be remotecontrolled via the MXV4000 's infra-red receiver - or
vice-versa.
• The MXV4000 can be controlled from a remote
room via its Smart My-Link® input.
• When linked via the Smart My-Link® to a
compatible Myryad surround preamp-processor or
integrated amplifier a number of extra features
become available which make the system as a
whole easier and quicker to operate.
• The RS232 port can be used for control of the
MXV4000 in a home automation system.
ACCESSORIES
Your MXV4000 is supplied complete with the following
accessories:
• Separate mains power cord to suit country of sale.
• My-Link interconnect (0.5m RCA-RCA)
• Myryad MSR2 System Remote Control handset.
• Two AAA batteries for handset (not in some
countries)
• Myryad MSR2 System Remote Control Owner’s
Manual
page 3 of 28
INSTALLATION AND SAFETY
This DVD player generates very little heat but still
requires some ventilation. Do not place it on a rug or
other soft surface into which it could sink, obstructing the
air inlets in its underside. Do not allow any obstruction to
block the ventilation slots in the rear panel. The DVD
player should not be installed in a built-in situation such
as a bookcase or rack unless proper ventilation is
provided.
CAUTION: THIS APPARATUS MUST NOT BE
EXPOSED TO DRIPPING OR SPLASHING. OBJECTS
FILLED WITH LIQUIDS SUCH AS VASES MUST NOT
BE PLACED ON THE APPARATUS.
THE REAR PANEL POWER SWITCH DISCONNECTS
MAINS LIVE ONLY. THE POWER CORD MUST BE
DISCONNECTED FROM THE REAR OF THE
APPARATUS, OR THE WALL SOCKET, TO PROVIDE
TOTAL ISOLATION. ONE OR OTHER OF THESE
CONNECTIONS MUST BE READILY ACCESSIBLE
WHEN THE APPARATUS IS IN USE.
Do not remove the cover, or attempt to modify or repair
the DVD player yourself. Refer all servicing to a qualified
technician. The DVD laser radiation is Infra-Red, so you
cannot see it. If the cover is removed for any reason, you
MUST pay attention to the following warning.
CAUTION - INVISIBLE LASER RADIATION WHEN
OPEN. DO NOT STARE INTO BEAM OR VIEW
DIRECTLY WITH OPTICAL INSTRUMENTS.
ATTENTION - RADIATION INVISIBLE DU LASER
QUAND OUVERT. NE PAS REGARDER FIXEMENT LE
RAYON OU DIRECTEMENT AVEC DES
INSTRUMENTS D’OPTIQUE.
WARNUNG - UNSICHTBARE LASERSTRAHLEN IN
GEÖFFNETEM ZUSTAND VORHANDEN. NICHT IN
DEN STRAHL BLICKEN ODER DIREKT MIT
OPTIKINSTRUMENTEN ANSEHEN.
ADVARSEL - USYNLIG LASERSTRÅLING VED
ÅBNING. SE IKKE IND I STRÅLEN - HELLER IKKE
OPTISKE INSTRUMENTER.
ADVARSEL - USYNLIG LASERSTRÅLING NÅR
DEKSEL ÅPNES. STIRR IKKE INN I STRÅLEN ELLER
SE DIREKTE MED OPTISKE INSTRUMENTER.
VARNING - OSYNLIG LASERSTRÅLNING NÄR
DENNA DEL ÄR ÖPPNAD. STIRRA EJ IN I STRÅLEN
OCH BETRAKTA EJ STRÅLEN MED OPTISKA
INSTRUMENT.
VAROI AVATAESSA OLET ALTTIINA NÄKYMÄTÖNTÄ
LASERSÄTEILYLLE. ÄLÄ TUIJOTA SÄTEESEEN
ÄLÄKÄ KATSO SITÄ OPTISEN LAITTEEN LÄPI.
This product complies with DHHS 21 CFR Chapter 1,
Subchapter J.
DVD REGION CODE
DVD discs and players are manufactured under the
worldwide agreed DVD Regional Code System. This
player will operate only with a corresponding disc of the
same Region Code as that marked on the rear panel
Region
code
Region
1 USA, Canada
2 Europe (incl. Poland, Romania, The Czech
Republic), Japan, Middle East (incl. Saudi
Arabia, Egypt, Iran), South Africa
3 East Asia (incl. Hong Kong, Taiwan,
South Korea), South-East Asia
4 Australia, Caribbean, Central & South
America, Mexico, New Zealand
5 Africa, Former Soviet Union, India, Pakistan,
Turkmenistan, North Korea
6 China
PATENT INFORMATION
Manufactured under license from Dolby Laboratories. “Dolby”,
“Pro Logic” and the double-D symbol are trademarks of Dolby
Laboratories.
Manufactured under license under U.S. Patent #’s: 5,451,942;
5,956,674; 5,974,380; 5,978,762; 6,487,535 & other U.S. and
worldwide patents issued & pending. DTS and DTS Digital
Surround are registered trademarks and the DTS logos and
Symbol are trademarks of DTS, Inc. © 1996-2007 DTS, Inc. All
Rights Reserved.
“DivX”, “DivX Certified”, and associated logos are trademarks
of DivXNetworks, Inc and are used under license.
“DCDi” is a trademark of Faroudja, a division of Genesis
Microchip, Inc.
HDMI, the HDMI logo and High Definition Multimedia Interface
are trademarks or registered trademark of HDMI Licensing LLC.
This product incorporates copyright protection technology that is
protected by method claims of certain U.S. patents and other
intellectual property rights owned by Macrovision Corporation
and other rights owners. Use of this copyright protection
technology must be authorized by Macrovision Corporation, and
is intended for home and other limited viewing uses only unless
otherwise authorized by Macrovision Corporation. Reverse
engineering or disassembly is prohibited.
page 4 of 28
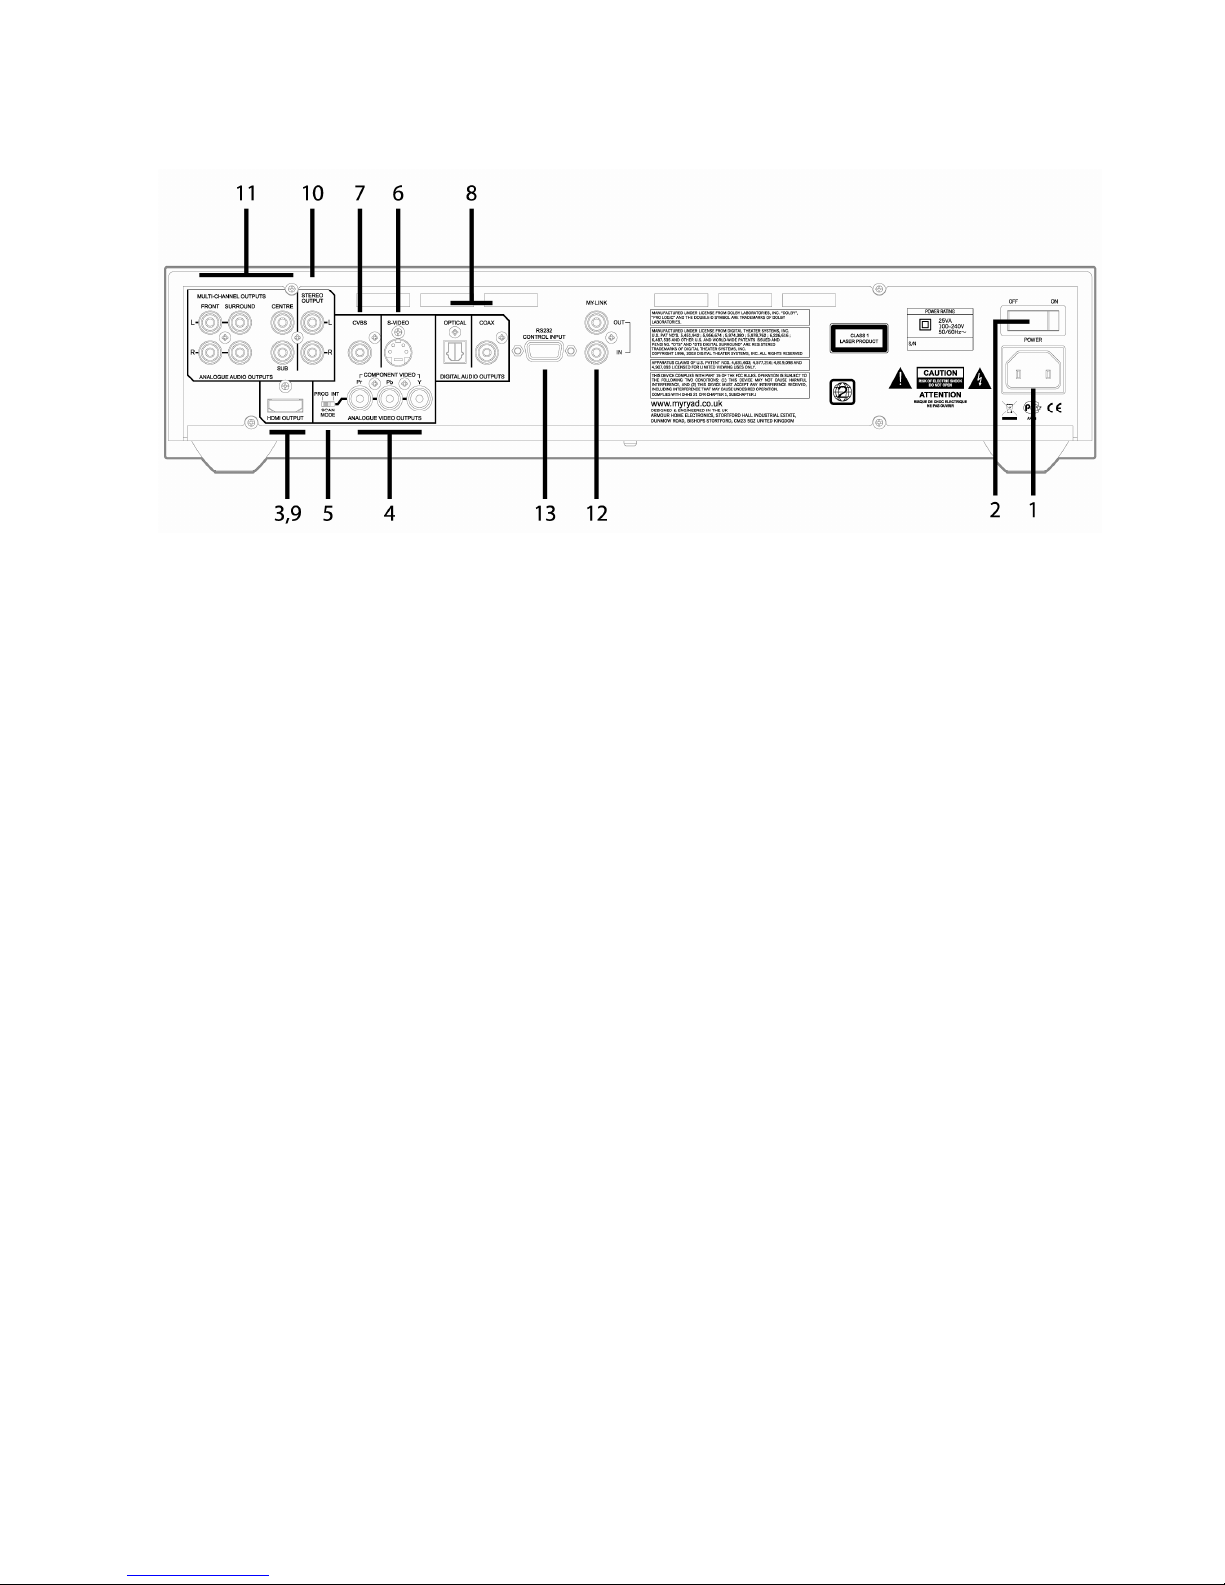
SETTING UP YOUR SYSTEM
REAR PANEL CONNECTIONS
Power
1. Power Inlet
The MXV4000 will operate directly from any line voltage
from 100V to 240V AC, 50 or 60Hz without adjustment.
Plug the female (socket) end of the power cord into the
power inlet on the rear of the unit. Plug the male (plug)
end of the cord into a "live" wall socket or a suitable
heavy-duty extension cable.
2. Power Switch
Press one side of this rocker switch (the side nearer the
edge of the rear panel) to switch the MXV4000 ON and
the other side (towards the output sockets) to switch it
OFF. When the POWER switch is in the OFF position all
power is disconnected from the MXV4000. In this
condition the MXV4000 cannot be powered up from the
front panel or the remote control. When the POWER
switch is in the ON position (and the power cord
correctly inserted and plugged in to a live wall socket)
the unit will power up in standby mode (see FRONT
PANEL CONTROLS, STANDBY, page 7).
It is recommended that the POWER switch is turned
OFF if the MXV4000 is not going to be used for an
extended period of time.
Video Outputs
Make the video connection between the MXV4000 and
your TV first - either direct as described below or via the
video inputs on your surround processor (or AV
receiver). A video connection is required to view the
MXV4000’s setup menu on your TV.
The MXV4000 includes four different types of video
outputs. Choose the best quality video output for which
your TV has a matching input.
- HDMI provides the best picture quality. Only High
Definition or “HD ready” TVs include an HDMI input.
- Component video is the next best and consists of three
separate cables.
- S-video is next, but it’s a big step down in picture
quality from component video.
- Composite video is the lowest quality but is the most
common type of connection, can easily be routed to a
second room, and it is recommended for use during
setup.
Apart from when setting up, connect only one of the
video outputs for your primary viewing area, or “main
zone”. The composite video and s-video outputs are
always active so one of these may be used for a second
TV or second zone.
3. HDMI
(see page 20 for HDMI video setup)
Connect the HDMI output connector of the MXV4000 to
the HDMI input connector on your TV (or to a DVI input
using an adaptor) using a high quality HDMI-certified
cable. If your TV does not have an HDMI or DVI
connector you should skip to “Component video” below.
Note: If connecting to a DVI input, it must support
HDCP (High-bandwidth Digital Content Protection),
otherwise it will not be compatible with the MXV4000.
Some earlier model TVs with DVI inputs are not HDCPcompliant. DVI inputs carry digital video only – the audio
must be connected separately.
4. COMPONENT VIDEO outputs
The three component video jacks are identified with
green, red and blue inserts for Y, Pr and Pb respectively.
Use a high-quality component video cable of 75 ohm
impedance. The cable’s plugs will usually be colourcoded to match the coding on the MXV4000 and your
TV.
Note: The component video output is automatically
switched off when HDMI video signals are being output.
page 5 of 28
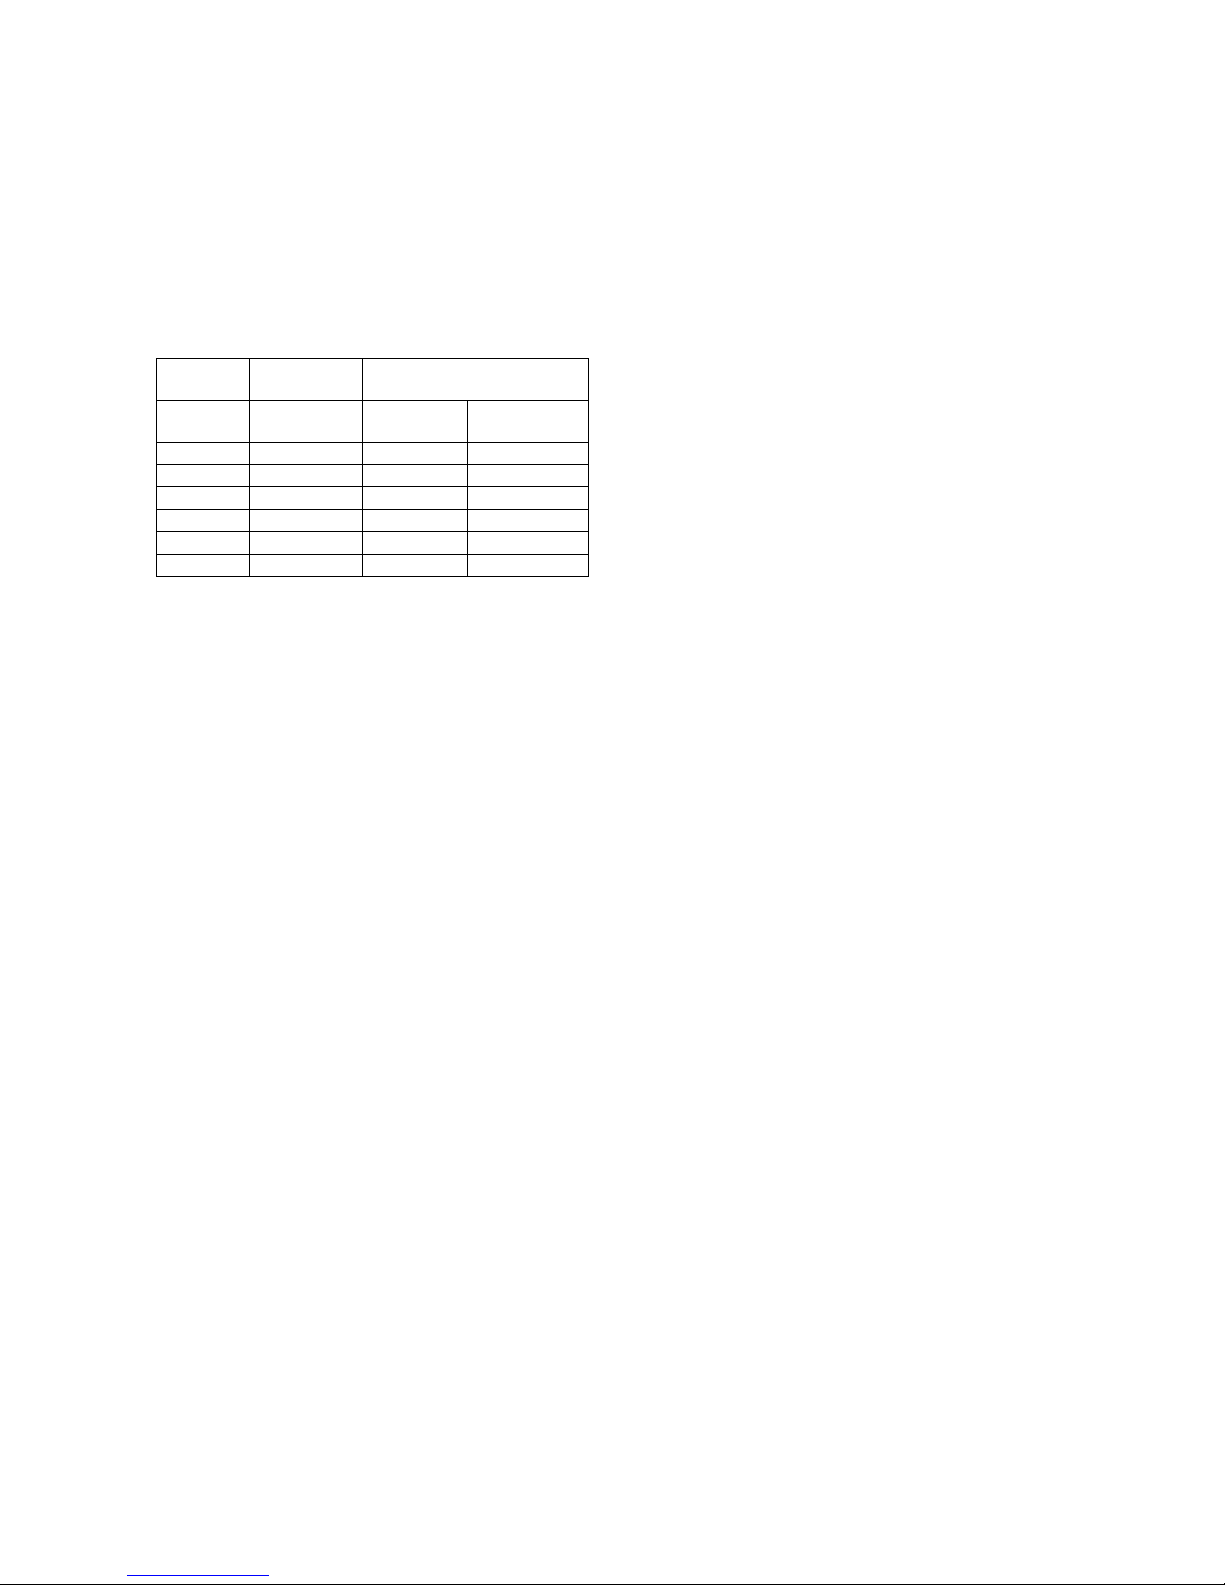
5. SCAN MODE selector switch (Interlaced
/ Progressive)
This switch selects between Interlaced (INT) and
Progressive (PROG) Scan for the component video
outputs only.
Select PROG if your TV accepts progressive scan video.
The PROG SCAN icon on the VF display will illuminate
when progressive scan is set. The states of the various
analogue video outputs will be as summarized in the
table below.
Output Format
(Progressive scan mode)
Disc
Format
TV Type
setting
Component S-video/CVBS
NTSC
PAL 576p 480i
NTSC 480p 480i
MULTI 480p 480i
PAL
PAL 576p 576i
NTSC 480p 576i
MULTI 576p 576i
Notes:
* Some TVs and projectors are not compatible with
progressive scan. If you notice picture distortion
when outputting the progressive signals, switch the
SCAN MODE selector to INT.
* The SCAN MODE switch only affects the
component video outputs, not the HDMI output.
* When SCAN MODE is set to progressive the
s-video and composite video outputs still deliver their
normal interlaced outputs (suitable for sending to a
second TV set), but they will not be affected by the
“TV Type” setting in the Video Setup menu – see
pages 11 and 19.
6. S-VIDEO
The s-video (separated video) connector carries the
colour information separately from the black-and-white
(luminance). It should be connected via a suitable 75
ohm s-video interconnect to the s-video input of an A/V
preamplifier or amplifier – or direct to the s-video input of
a TV.
7. Composite video (CVBS)
This output (also called CVBS) carries the composite
video signal and should be connected via a suitable 75
ohm video interconnect to the composite video input of
an A/V preamplifier or amplifier – or direct to the
composite video input of a TV (sometimes simply called
the VIDEO input).
Note: The composite video and s-video outputs are
active under all conditions – whatever the
interlaced/progressive switch setting and irrespective of
the HDMI output. Either may therefore conveniently be
used to feed a second TV or, a second zone (via the
MXD4000 processor for example).
Audio Outputs
8. DIGITAL - COAX and OPTICAL
Connect either the Digital COAX jack or the OPTICAL
connector (Toslink) to one of the coaxial or optical inputs
on your surround processor or receiver. When using the
coaxial output, make sure to use a digital cable that is
made for this purpose and is of 75 ohms impedance.
Toslink cables are fragile; be very careful not to bend the
fibre optic cable sharply.
Note: The coaxial and optical digital outputs do not carry
SACD digital audio signals – whether from stereo or
multi-channel discs. To play SACDs you must also
connect the 5.1 channel or stereo analogue audio output
jacks.
9. HDMI
The HDMI digital video output also carries digital audio.
Some surround processors and receivers can decode
the audio in the HDMI signal and therefore no other
audio connection is necessary for main zone audio.
When using a surround processor or receiver which
does not have an HDMI input or does not decode HDMI
audio, always connect the Digital Coaxial or Optical
outputs and/or the 5.1 channel analog audio outputs.
Notes:
* The MXV4000 supports HDMI 1.1 which does not
include playback of SACD audio over HDMI.
* HDMI audio can be switched off via the setup
menu – see page 19.
* When HDMI audio is switched On and audio
signals are being set to an HDMI compatible
component (e.g. a TV), the coax and optical digital
audio outputs will be muted.
* The HDMI interface can add significant jitter to
audio signals. For the best audio quality it is often
considered best to carry the audio over a separate
digital cable – coax or optical.
10. STEREO ANALOGUE OUTPUT
The stereo output always carries a down-mixed version
of a multi-channel audio sound track – or a direct stereo
output of any 2-channel sound track (e.g. from a CD).
This output may be used for a stereo main room, or it
can be used to feed audio to a second room or zone.
11. MULTI-CHANNEL ANALOGUE
OUTPUTS
Connect these jacks to the corresponding multi-channel
input jacks of a surround processor or AV receiver.
If you want to reproduce high resolution multi-channel
SACD recordings you must connect these outputs –
there will be no signal on the HDMI or Digital Coaxial or
Optical outputs. If you do not plan on listening to SACD
discs, and your processor or receiver has a digital input
and can decode Dolby Digital and DTS sound tracks,
then you do not need to use these jacks.
It is a special feature of the MXV4000 that both the
Stereo and Multi-channel analogue outputs use high
quality DACs and identical audio circuitry, so the sound
quality will be the same across all the audio outputs.

page 6 of 28
Control inputs/outputs etc.
12. MY-LINK input/output
When this DVD player is used in a system with other
Myryad MX-Series products (or Z-Series), all may be
joined together via My-Link. My-Link is a
communications bus that allows all the linked
components to operate together as a system and
distributes the remote commands received by any one to
each of the others.
The simplest function provided by the My-Link bus is that
all linked units will switch into or out of standby mode
when the processor or amplifier’s front panel or remote
control standby key is pressed.
The My-Link bus allows any linked product to be remotecontrolled via the MXV4000’s infra-red receiver - or viceversa.
The MXV4000 (or any other product on the My-Link bus)
can be controlled from a remote room via a suitable
interface to the My-Link bus.
Use a short RCA-to-RCA (phono-to-phono) interconnect
cable to connect from the MY-LINK IN socket on the
MXV4000 to the MY-LINK OUT socket on the processor
or amplifier. A second cable may then be run from the
MY-LINK OUT socket on MXV4000 to the MY-LINK IN
socket on, for example, a Myryad tuner – “daisy-chain”
fashion. Further compatible Myryad products can be
linked in the same way, running from the MY-LINK OUT
socket on the tuner. Inexpensive interconnects may be
used as the My-Link bus carries only control signals, not
audio, as these cables have no effect on sound quality.
The MXV4000 is Smart My-Link® compatible. When it is
linked to a Myryad Smart My-Link® Processor,
Preamplifier or Integrated Amplifier many more powerful
system features are available (see page 8).
13. RS232 CONTROL input
The MXV4000 can be connected to a home automation
system through this interface. Contact your Myryad
dealer or Armour Home Electronics Ltd. for details or
visit the Myryad website at www.myryad.co.uk.
page 7 of 28
OPERATING YOUR SYSTEM
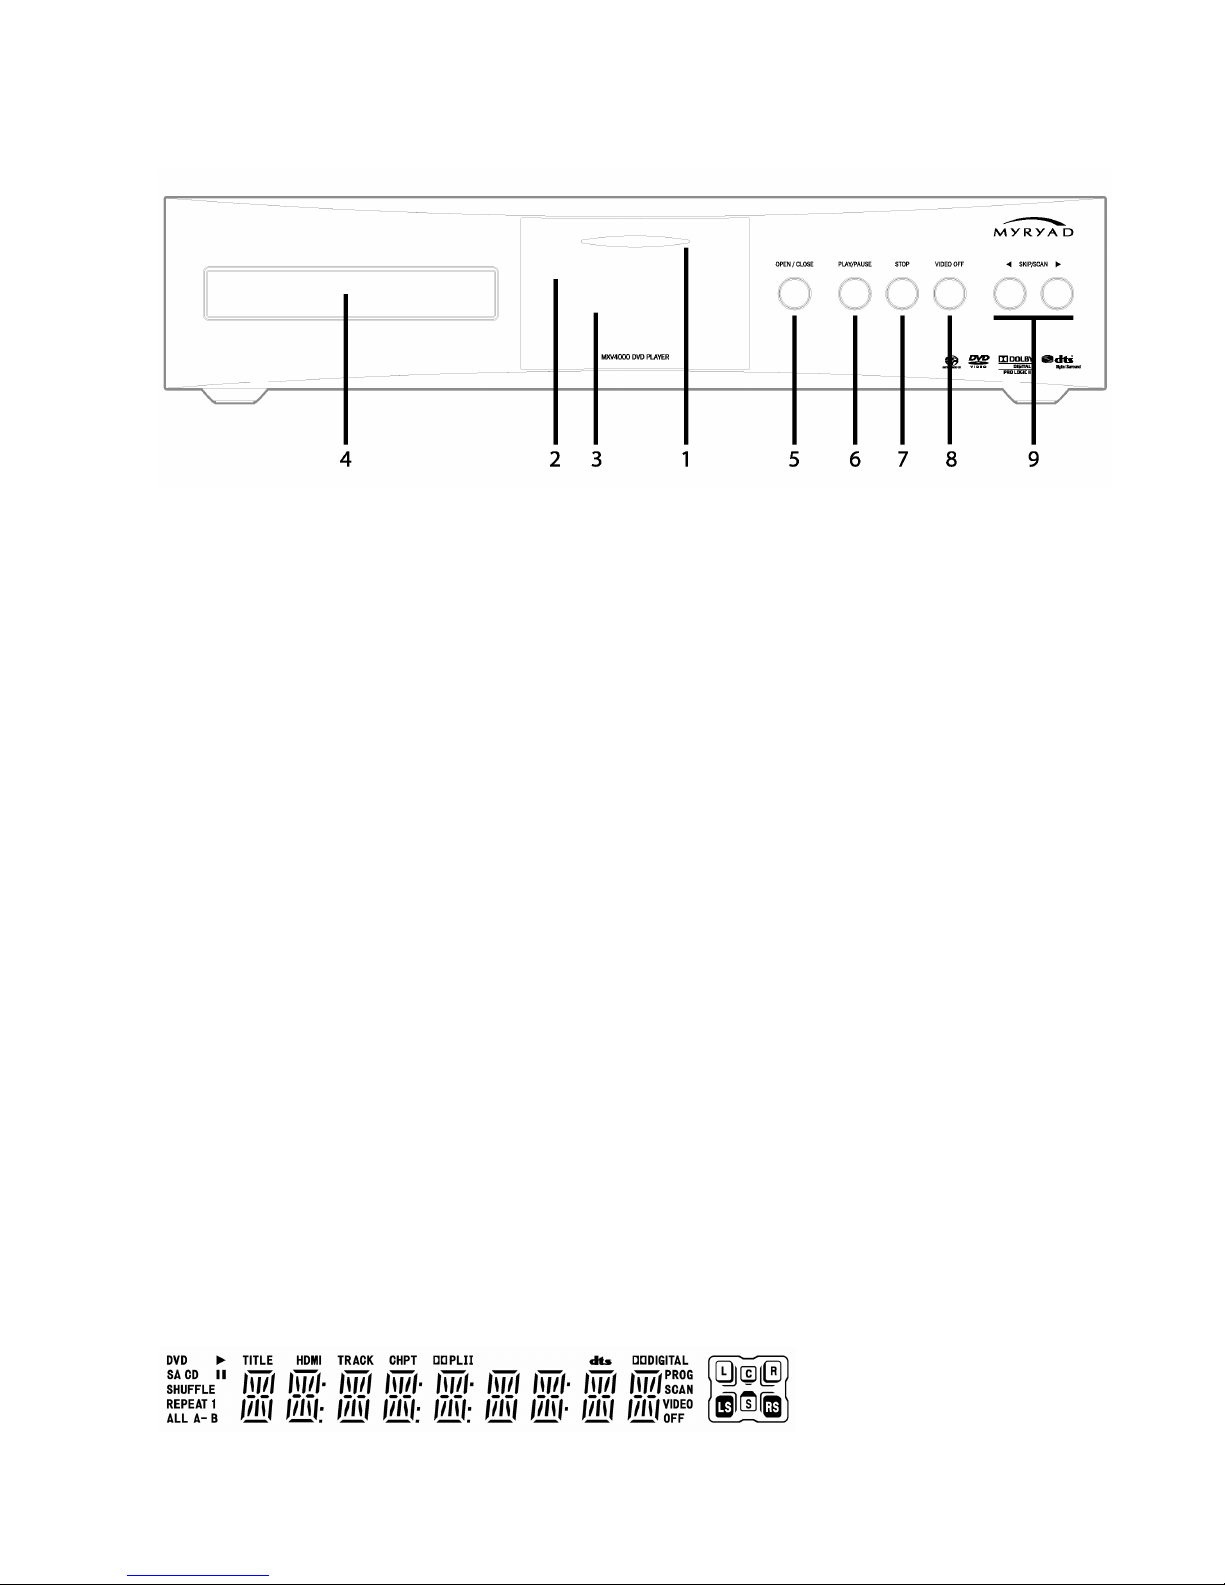
FRONT PANEL CONTROLS
1. Standby
When the MXV4000 is plugged into a live wall socket
and the POWER switch is turned ON, it will power up in
"standby" mode and the LED (Light Emitting Diode) in
the display will glow red. In this mode most of the
internal circuitry of the MXV4000 is switched off so that it
consumes very little power. Only the IR receiver, MyLink and RS232 interface function in standby.
Touch the STANDBY ellipse to turn on the MXV4000
and, after a few seconds delay, the audio and video
outputs will be enabled. During this delay period the LED
in the display will flash blue. When the outputs are unmuted it will glow blue continuously. The blue-coloured
display will illuminate, briefly showing “MXV4000”
followed by “READ”, and then “NO DISC“.
Touch the STANDBY ellipse again - for longer than 2
seconds - to return to standby mode. The drawer, if
open, will close, the LED in the display will glow red
again and the VF display will be extinguished.
CAUTION: WHEN IN STANDBY MODE SOME
INTERNAL CIRCUITRY OF THE MXV4000 IS STILL
LIVE, SO ALL SAFETY PRECAUTIONS MUST BE
FOLLOWED.
2. Infra-red receiver
The infra-red (IR) remote control receiver is mounted
behind the window, just above the left hand end of the
VF display. It must not be obscured when the DVD
player is to be operated using the remote control
handset. The IR receiver should be in "line-of-sight" of
the remote handset.
3. Display
The operation of the player is indicated on a high quality
blue Vacuum Fluorescent Display (VFD) - see below.
4. Disc drawer
The OPEN/CLOSE button controls the drawer. The
drawer will close automatically if left open for two
minutes or more. It will accept either normal 120mm
discs, or small 80mm discs.
5. OPEN/CLOSE
Press this button to open or close the disc drawer. When
the drawer is open the display will read “OPEN”. When
the drawer is closed the display will indicate “CLOSE”
followed by “READ” and then “NO DISC“. The tray will
close automatically if left open for two minutes.
When a disc is inserted and the drawer closed the
display will indicate “READ” briefly and then the disc will
play automatically. The display will briefly indicate the
disc type and default “Sound Mode” (see page 13)
before showing the disc play status. The read process
takes a few seconds while the player assesses what
type of disc has been inserted.
Pressing OPEN/CLOSE cancels SHUFFLE and
REPEAT modes.
6. PLAY/PAUSE
When a disc is present and the player is in STOP mode,
a single press of the PLAY/PAUSE key will start the disc
playing from the first track, and illuminate the symbol
in the VF display. When the disc is playing, pressing
PLAY/PAUSE will put the player in PAUSE mode and
illuminate “
” symbol and the VF display will read
“PAUSE”. When playing a DVD the TV will show a still
frame. In PAUSE mode the disc is still spinning and the
laser head is kept at the same location, so that if
PLAY/PAUSE is pressed yet again the disc will re-start
from exactly the same point in the movie/music at which
it was originally paused.

page 8 of 28
7. STOP
When the STOP button is pressed the disc stops
playing, and the player goes into “Resume Stop” mode –
with the TV displaying “PRESS PLAY KEY TO
CONTINUE” and the VF display reading “STOP”. If
PLAY/PAUSE or PLAY is pressed in Resume Stop
mode the disc will start playing from the same point at
which STOP was pressed.
A second press of STOP will put the player into STOP
mode. After a short time the disc will stop spinning and
the laser head will be returned to the beginning of the
disc. In stop mode the display continues to read “STOP”.
When the player is in “stop” mode, a single press of the
PLAY/PAUSE button will start the disc playing from the
beginning. The player automatically returns to STOP
mode when a disc has finished playing.
There is no Resume Stop mode when playing CDs.
When STOP is pressed the VF display immediately
changes to read the Table of Contents – the total
number of tracks and total playing time of the disc
If the player is left in Stop, Resume Stop, or Pause mode
for more than about 30 minutes, it will automatically
switch to standby to save power.
8. VIDEO OFF
Pressing the VIDEO OFF button when a CD is loaded
and playing will switch off all the analogue video outputs
to provide the best possible audio quality. The VIDEO
OFF icon in the VF display will be illuminated. A second
press will restore the video outputs. The HDMI output is
not affected.
VIDEO OFF only functions with CDs – and can only be
changed when a disc is actually playing. The video state
will be remembered when changing CDs (although the
video output switches on temporarily whilst the drawer is
open), but the video outputs will automatically switch
back on permanently when a DVD or other video disc is
loaded, or when the unit is switched on from Standby.
9. SKIP/SCAN
The SKIP/SCAN keys are used to select the chapter or
track, or section within a chapter/track, to be played. A
brief press of one of these keys invokes the SKIP
function. Pressing the key and holding it down
continuously invokes the SCAN function.
While a disc is playing, pressing SKIP/SCAN briefly
will cause the player to skip to the beginning of the next
chapter or track. If SKIP/SCAN is pressed once, the
player will skip to the beginning of the current
chapter/track. If SKIP/SCAN is pressed twice in quick
succession the player will skip to the beginning of the
previous chapter/track. Repeated pressing of
SKIP/SCAN or will make the player skip forward or
back over any number of chapters/tracks. The SKIP
keys have the same function in PAUSE mode, but
automatically return the player to PLAY mode.
Press and hold SKIP/SCAN or until “SCAN“ is
displayed on the VF display (and “x2” on the TV) and
then release to enter fast reverse/forward play at twice
normal speed. Further shorter presses of the same key
will then increase the scan speed to x4, x8, x16 and x32.
One further press will return to normal speed forward
play. Pressing PLAY/PAUSE at any time during high
speed scan will return to normal speed forward play.
SYSTEM OPERATION WITH
SMART MY-LINK
When used as a linked system (which must include a
Smart My-Link® equipped Preamplifier Processor,
Stereo Preamp or Integrated Amplifier) Myryad products
equipped with Smart My-Link® have a number of extra
features that make the system as a whole easier and
quicker to use than a normal hi-fi. These include:
Start-on-Play (DVD)
Press play on the DVD player (or the remote control)
and both the DVD player and amplifier will switch out of
standby (if necessary) and play the DVD. The amplifier
will automatically select the DVD source.
Start-on-Open (DVD)
Press open/close on the DVD player (or the remote
control) and both the DVD player and amplifier will
switch out of standby and the DVD drawer will open. The
amplifier will automatically select the DVD source.
Intelligent Input Selection (Amplifier)
Press a source select button on the remote control and
the system will awaken (if in standby) only the amplifier
and the selected source.
Mute/Pause Control (Amplifier/DVD)
When using the DVD player, selecting mute from the
remote control will mute the amplifier and pause the
DVD. When the amplifier mute is cancelled, the DVD will
continue playing.
Power-Saving Mode (Amplifier)
The amplifier can switch the DVD Player, Tuner or CD
player into standby if that source remains unselected for
more than ten minutes.
Automatic Switch-On (DVD/Tuner/CD)
If the standby button on the DVD player, Tuner or CD
player is pressed, the amplifier will also awaken and
select the correct source.
page 9 of 28
REMOTE CONTROL OPERATION
The Myryad MSR2 System Remote handset supplied with the MXV4000 has been ergonomically designed to be easy
and comfortable to use. It duplicates all the controls featured on the front panel, and has others required for setup and
more advanced operation. It may also be used to control Myryad Integrated/Pre amplifiers. CD players and Tuners as
described in the separate MSR2 Owner’s Manual supplied with this unit. Please note, The “DVD/Amplifier Mode” section
of the MSR2 Manual does not apply to the MXV4000.
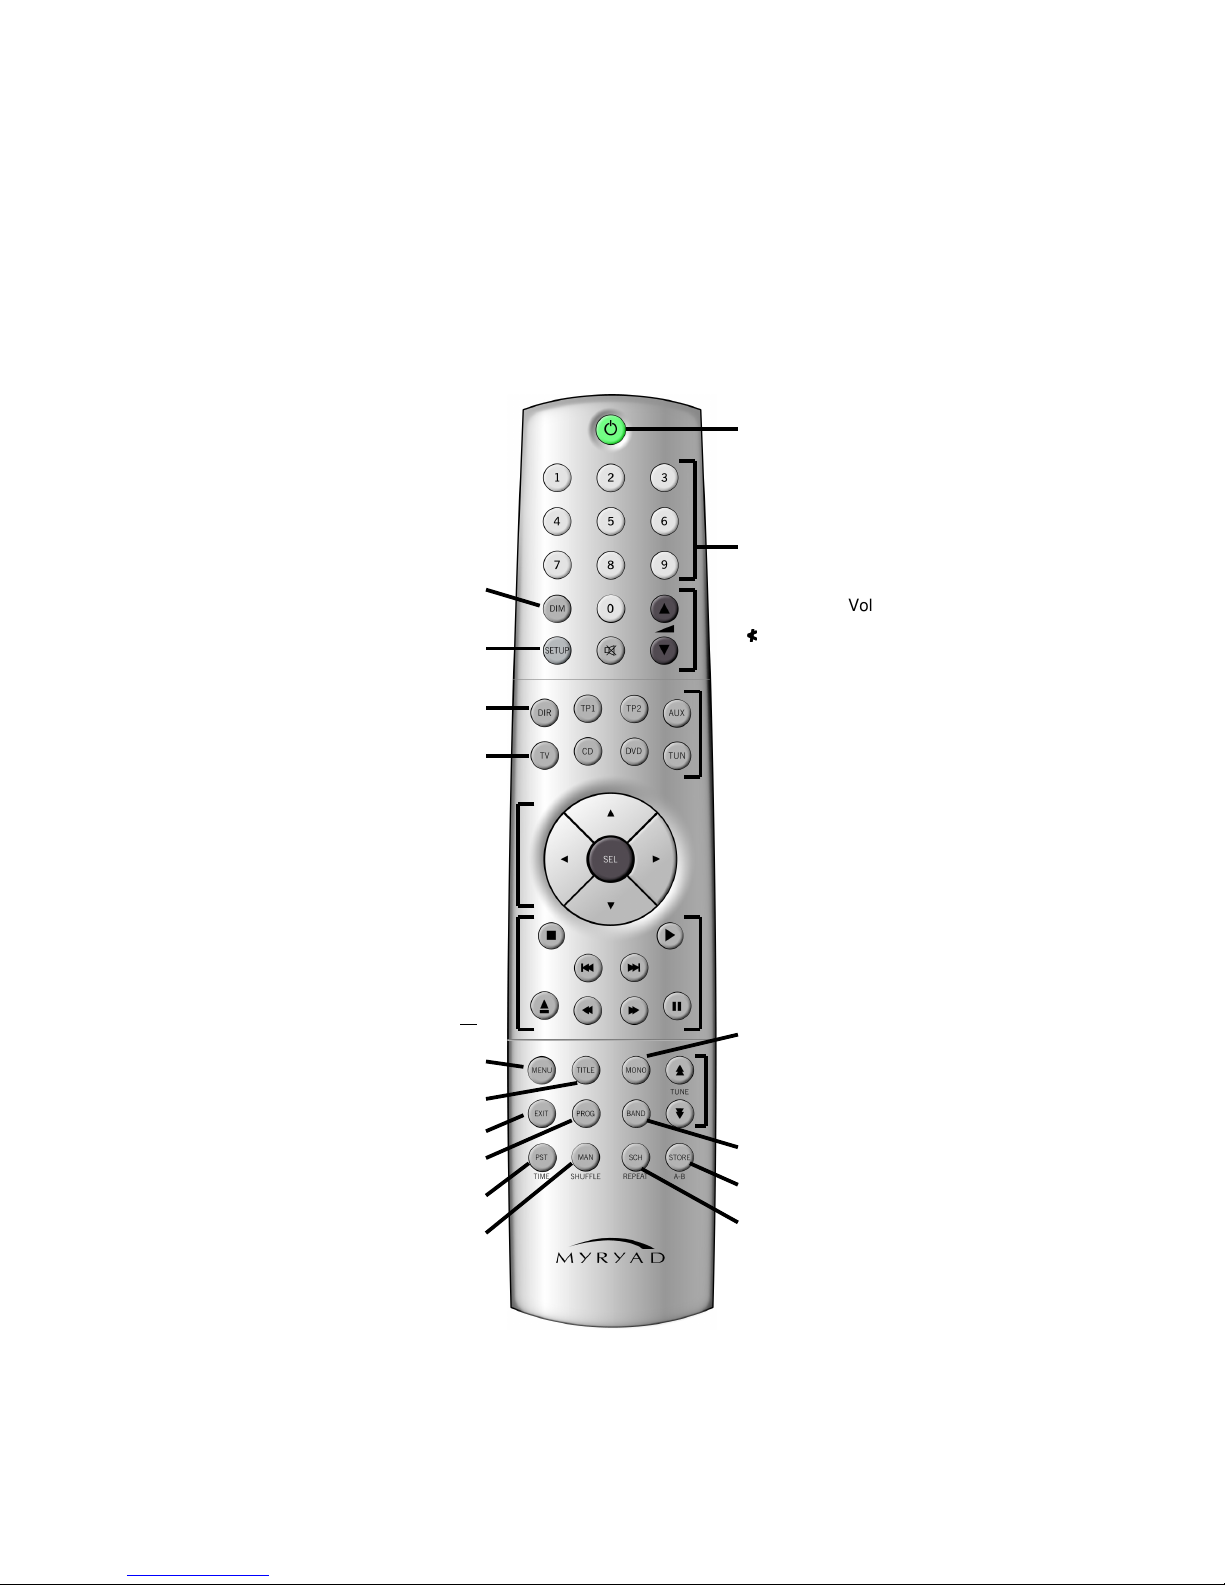
MSR2 System Remote – DVD/Amplifier mode for MXV4000
Important: To control the MXV4000 first press the “DVD” key to switch the remote to “DVD/Amplifier” mode. It will
remain in this mode until either the TUN or CD key is pressed to change to Tuner/Amp or CD Amp mode. When in
“DVD/Amplifier” mode the remote operates as shown below.
Note: The DVD functions marked “1” (SOUND MODE, ZOOM, SUBTITLE, AUDIO, VIDEO OFF and ANGLE) are
printed on a transparent self-adhesive overlay label supplied with this unit, which may be stuck onto the remote if
desired.
Switches off/dim/on front
panel display
DIM
Enter setup menu
SETUP
Selects line direct input
DIR
Select TV input (or Video or
DVD on some models)
TV
Navigate and select
from DVD menus
( and SEL also have
various secondary functions)
SEL
Stop
Scan Forward
Scan Back
Open/Close disc drawer
Go to DVD menu
MENU
Go to DVD title menu
TITLE
VIDEO OFF1
EXIT
ANGLE1
PROG
Access On Screen Display
TIME
Enter shuffle play mode
SHUFFLE
STANDBY
Switches preamp-processor or
integrated amp into/out of
standby. Press and hold down
DVD select key and then press
STANDBY to switch just DVD
player into/out of standby.
0-9
Digit keys 0-9 for direct
track/chapter access
≮≮≮≮
Volume up/down and Mute on
Myryad preamp-processors and
integrateds
TP1
Tape 1 input select
TP2
Tape 2 input select
AUX
Aux or Phono input select
TUN
Tuner input and mode select
DVD
DVD input and mode select
CD
CD input and mode select
Note: The CD, DVD and TUN
keys also change the operating
mode of the remote control.
Play
Skip forward to next chapter
Skip back to previous chapter
Pause / step single frame
MONO
Select SOUND MODE1
ZOOM1
SUBTITLE1
BAND
AUDIO1 – select soundtrack
A-B
Repeat A–B
REPEAT
Repeat chapter/title/disc
 Loading...