

Myryad Mi Music Integrated Owner's Manual
Owner’s Manual
www.myryad.co.uk
FrançaisEnglish ItalianoDeutsch Русский

Owner’s Manual
www.myryad.co.uk

4
INSTALLATION AND
SAFETY
This CD Player generates very little heat but
still requires some ventilation. Do not place
it on a rug or other soft surface into which
it could sink, obstructing the air inlets in its
underside. Do not allow any obstruction to
the ventilation slots in the rear or side panels.
The unit should not be installed in a built-in
situation such as a bookcase or rack unless
proper ventilation is provided.
CAUTION: THIS APPARATUS MUST NOT BE
EXPOSED TO DRIPPING OR SPLASHING.
OBJECTS FILLED WITH LIQUIDS SUCH AS
VASES MUST NOT BE PLACED ON THE
APPARATUS.
THE REAR PANEL POWER SWITCH
DISCONNECTS MAINS LIVE ONLY. THE
POWER CORD MUST BE DISCONNECTED
FROM THE REAR OF THE APPARATUS,
OR THE WALL SOCKET, TO PROVIDE
TOTAL ISOLATION. ONE OR OTHER OF
THESE CONNECTIONS MUST BE READILY
ACCESSIBLE WHEN THE APPARATUS IS IN
USE.
Do not remove the cover, or attempt to modify
or repair the unit yourself. Refer all servicing to
a qualified technician. The CD laser radiation
is infra-red, so you cannot see it. If the cover
is removed for any reason, you MUST pay
attention to the following warning:
CAUTION – INVISIBLE LASER RADIATION
WHEN OPEN. DO NOT STARE INTO BEAM
OR VIEW DIRECTLY WITH OPTICAL
INSTRUMENTS.
ACCESSORIES
The Myryad
is supplied complete with the
following accessories:
• Separate mains power cord to suit country
of sale.
• Remote control handset.
• 3 × AAA batteries for remote control (not in
some countries)
• This owner’s manual
• M-Port Connector cable
• FM aerial with adaptor
• AM Loop antenna (some models only)
• iPod stand
DISPOSAL
This symbol means do not
dispose of as municipal waste.
Re-use or recycle wherever
possible. Electrical/Electronic
Equipment may contain
substances harmful to the
environment. For environmentally sound
methods of disposal, please contact your local
government agency.
RECORD YOUR SERIAL NUMBER
Record the serial number of your unit here.
The number can be found on the rear panel of
the unit or the colour sticker on the outside of
the shipping carton.
Serial No.:

5
WARRANTY
WARRANTY SERVICE FOR THIS PRODUCT IS
ONLY AVAILABLE IN THE U.K.
ARMOUR HOME ELECTRONICS LIMITED
guarantees this component to be free from
all defects in materials and workmanship as
follows:
• Electronic components are fully covered by a
2 year parts and labour Warranty
• UPGRADEABLE TO 3 YEARS PARTS AND
LABOUR WHEN REGISTERED ONLINE AT
www.myryad.co.uk/mi-warranty WHEN
REGISTERED WITHIN 30 DAYS OF PURCHASE
This warranty is valid only in the United
Kingdom. This warranty begins at the date of
purchase and is non-transferable. It is valid for
the first original purchaser, purchasing from an
Authorised Dealer of Myryad products in the
UK. Only Authorised Dealers should represent
themselves as such, and purchasers may
confirm the status of Authorised Dealers by
visiting www.myryad.co.uk/mi-dealers
WHAT IS COVERED BY THE MYRYAD
WARRANTY?
In the unlikely event that your Myryad
component fails to function correctly due to
a fault or a manufacturing defect ARMOUR
HOME ELECTRONICS LIMITED, at its sole
discretion, will repair or replace it free of
charge (a replacement is only considered if it
is returned in a clean and unmarked condition
and complete with original packaging and
accessories) during the warranty period.
HOW TO OBTAIN SERVICE
To obtain warranty service, please take your
unit along with the original invoice or bill of
sale to your UK Myryad dealer. This preferably
should be the dealer where you originally
purchased your unit. If this is not possible you
may call 01483 545613 for further assistance.
Note: The Myryad warranty requires proof
of purchase prior to any in-warranty repairs.
Always retain your original sales receipt.
Service charges may apply if a copy of your
receipt is not supplied.
WHAT COSTS WILL ARMOUR HOME
ELECTRONICS LIMITED COVER?
We will cover all labour and material expenses
for returned warranty items. If the repairs
are covered by the warranty, Armour Home
Electronics Limited will cover the shipping
costs back to the customer.
What is not covered:
1. Damage in transit.
2. Overloading, abuse, misuse, or operating
with faulty or unsuitable equipment, or
contrary to instructions contained in the
accompanying product manual.
3. Servicing by unauthorised personnel.
4. Units where the serial number has been
altered or removed.
5. Acts of God.
In the event of equipment being returned
which on test is found to comply with
published specification, the company reserves
the right to charge a reasonable fee for testing
the equipment and for carriage.
IN NO EVENT SHALL THE WARRANTOR
BE LIABLE FOR INCIDENTAL, OR
CONSEQUENTIAL DAMAGES, whether
damages result from breach of express
or implied warranties, tort, negligence, or
otherwise.
IMPORTANT: This warranty is in addition to,
and in no way detracts from, your statutory
rights as a consumer.
WARNING
THE WARRANTY WILL BE INVALIDATED
IF THE EQUIPMENT CASING IS OPENED
OR ANY REPAIR ATTEMPTED IN ANY WAY,
REGARDLESS OF WHETHER CORRECT
OR INCORRECT PARTS ARE FITTED. THE
WARRANTY WILL ALSO BE INVALIDATED
IF THE EQUIPMENT IS MISUSED OR IS
TAMPERED WITH IN ANY WAY.

6
Contents
1 INTRODUCTION 7
Choosing your language 7
2 CONNECTION DIAGRAM 8
3 REAR PANEL CONNECTIONS 9
Power switch 9
Power inlet 9
Speaker outputs 9
Infrared outputs (IR1/IR2) 9
Infrared input 9
Digital pre-out 10
Optical digital inputs (DIG1/DIG2) 10
USB 10
M-Port 10
TAPE/CD-R input/output 10
Analogue stereo inputs (AUX1/AUX2) 10
Aerial input 10
4 OPERATING YOUR SYSTEM 11
Front Panel 11
Standby 11
Disc drawer 11
Open/close 11
Infra-red receiver 11
Front (JACK) PORT 11
USB 11
Headphone output 11
Display 11
Remote Control 12
Port 12
Standby 12
Source selection 12
Dim 12
Display 12
Navigation 12
Favourites 12
Menu 12
Mute 12
Preset/track skip up/down 12
Volume control 12
Transport controls 12
Number keys 12
Choosing a source 13
Menu navigation 14
Select source 14
More/menu 14
Select source 14
Menu 14
Setup menu 14
Disc operation 15
Disc formats 15
Now playing screen 15
Playing a CD 15
Pausing playback 15
Track selection 15
CD DATA music folder selection 15
Searching backwards/forwards 15
Repeat/shuffle 16
MP3 playback 16
Disc formats 16
MP3 file formats 16
File naming conventions 16
Radio operation 17
Tuning screen 17
Selecting the radio tuning mode 17
Tuning stations 17
Tuning to a DAB station 17
Tuning to an FM or AM station 17
Storing presets 17
Tuning to a preset 18
Searching for DAB stations 18
Favourites 18
My favourites 18
M-Port operation 19
Pausing playback 19
Track selection 19
Album/artist/playlist selection 19
Searching backwards/forwards 19
Repeat/shuffle 19
AUX operation
20
iPod Stand 20
Optical digital inputs (DIG1/DIG2) 20
M-Port 20
Tape/CD-R input/output 20
Analogue stereo inputs (AUX1/AUX2) 20
Care and handling of compact discs 21
Installing and replacing batteries 21
Trouble shooting 21
5 SPECIFICATIONS 22
7
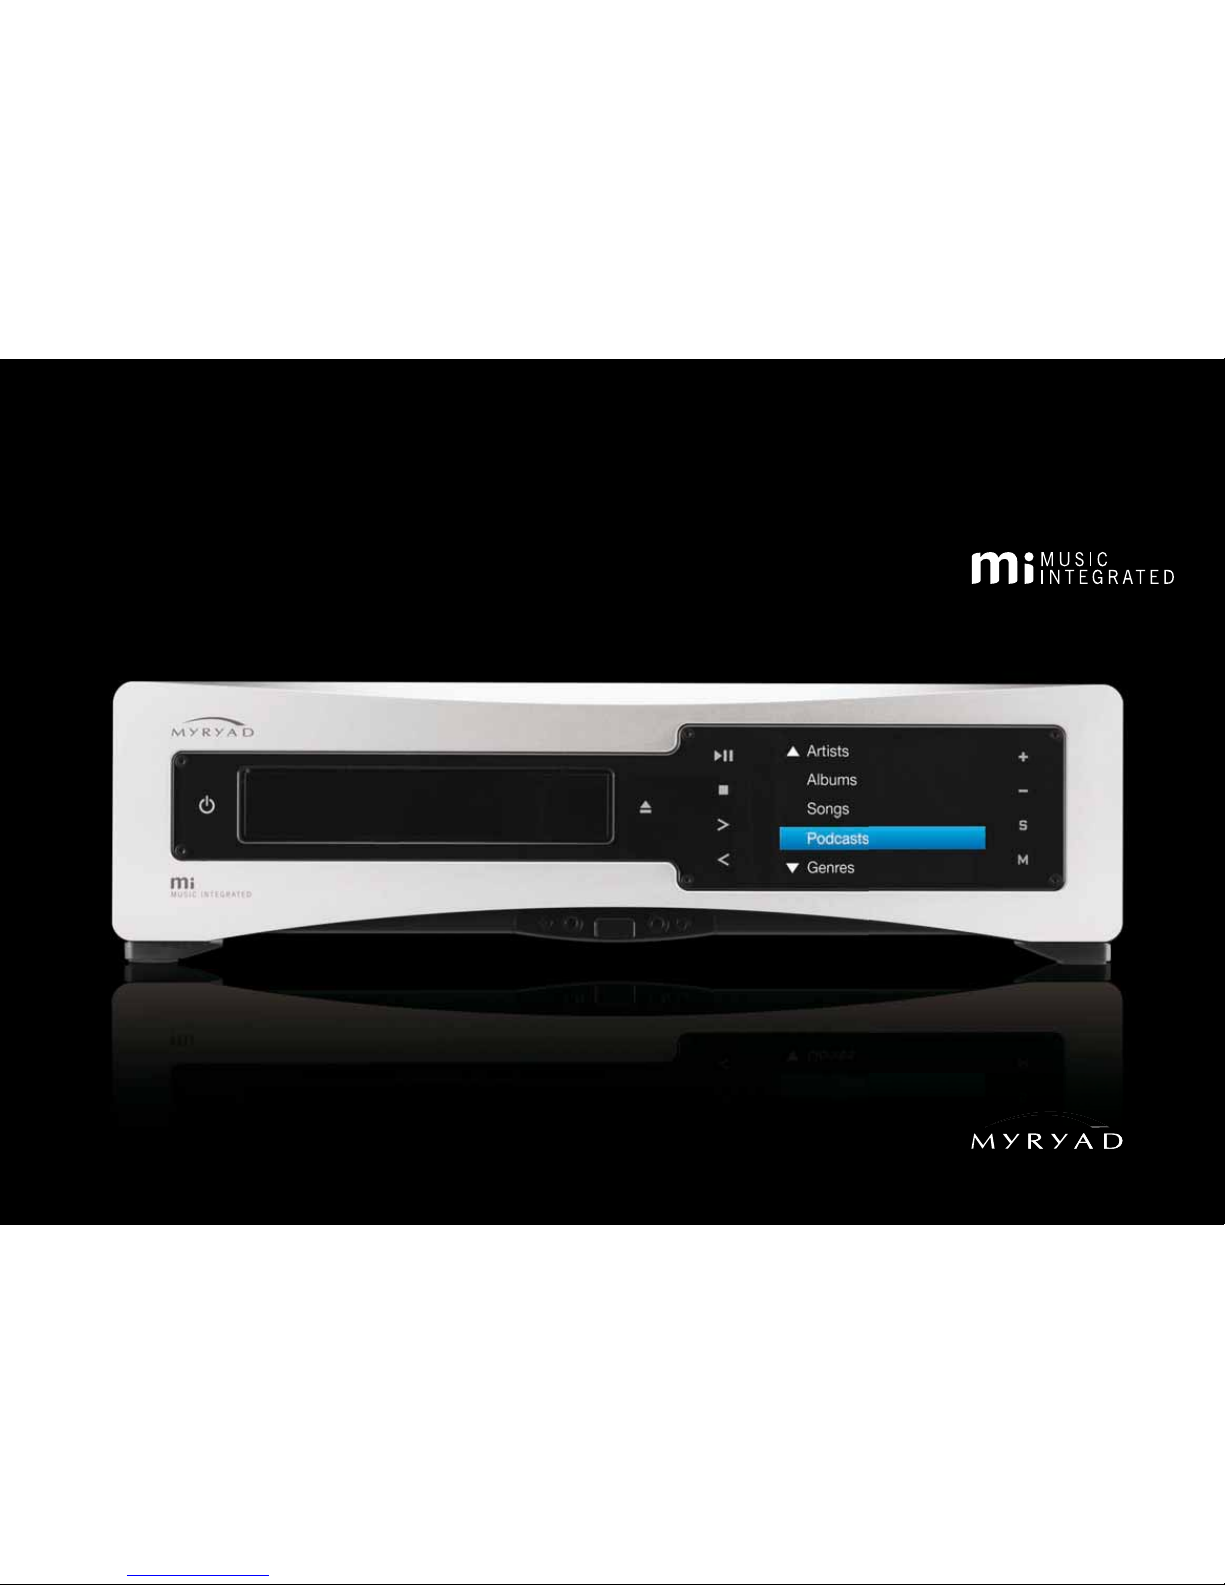
1 INTRODUCTION
The Myryad Music Integrated has been
designed to offer a combination of high
quality sound reproduction and elegant
styling.
The
is a full-function remote-controlled CD
player, DAB/FM Tuner (AM/FM in some regions)
and a high quality integrated amplifier which
will play both standard CDs and CD DATA discs.
The
offers a range of input possibilities:
• The 2 digital and 2 analogue inputs allow
for connection of external devices.
• The M-Port allows for connection and
control of an iPod™ and other M-Port
accessories.
• Analogue recording and playback input/
outputs for connection of recording devices.
CHOOSING YOUR LANGUAGE
When the
is switched on the first time it
will present the option to select the operating
language from the list provided and then the
territory for tuner settings (North America or
the rest of the world). These settings can be
changed later if desired—see page 14.

8
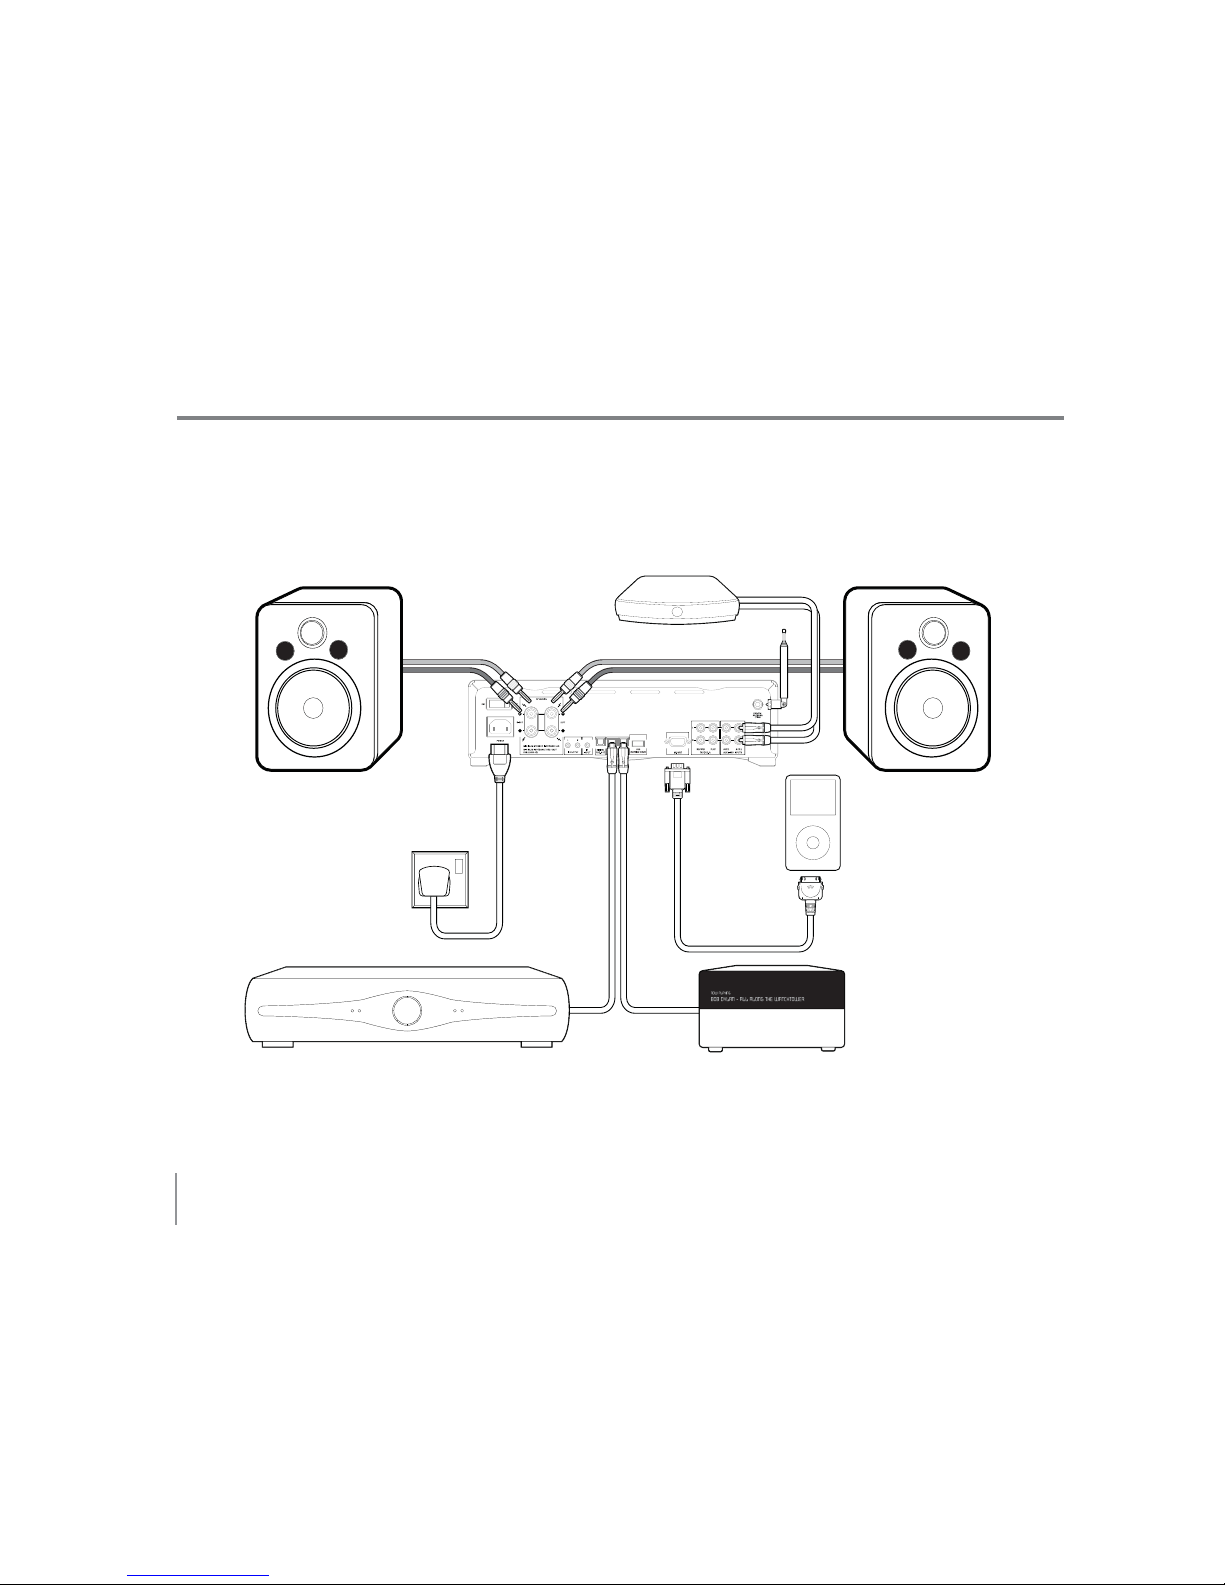
2 CONNECTION DIAGRAM
RIGHT SPEAKER
LEFT SPEAKER
AERIAL
SET-TOP BOX
Or other analogue
connection
DIGITAL TELEVISION
Or other digital connection using optical
digital cable
IPOD
With supplied
M-Port cable
MAINS POWER
Using supplied mains
power cord
NETWORK MUSIC PLAYER
Or other digital connection using optical
digital cable
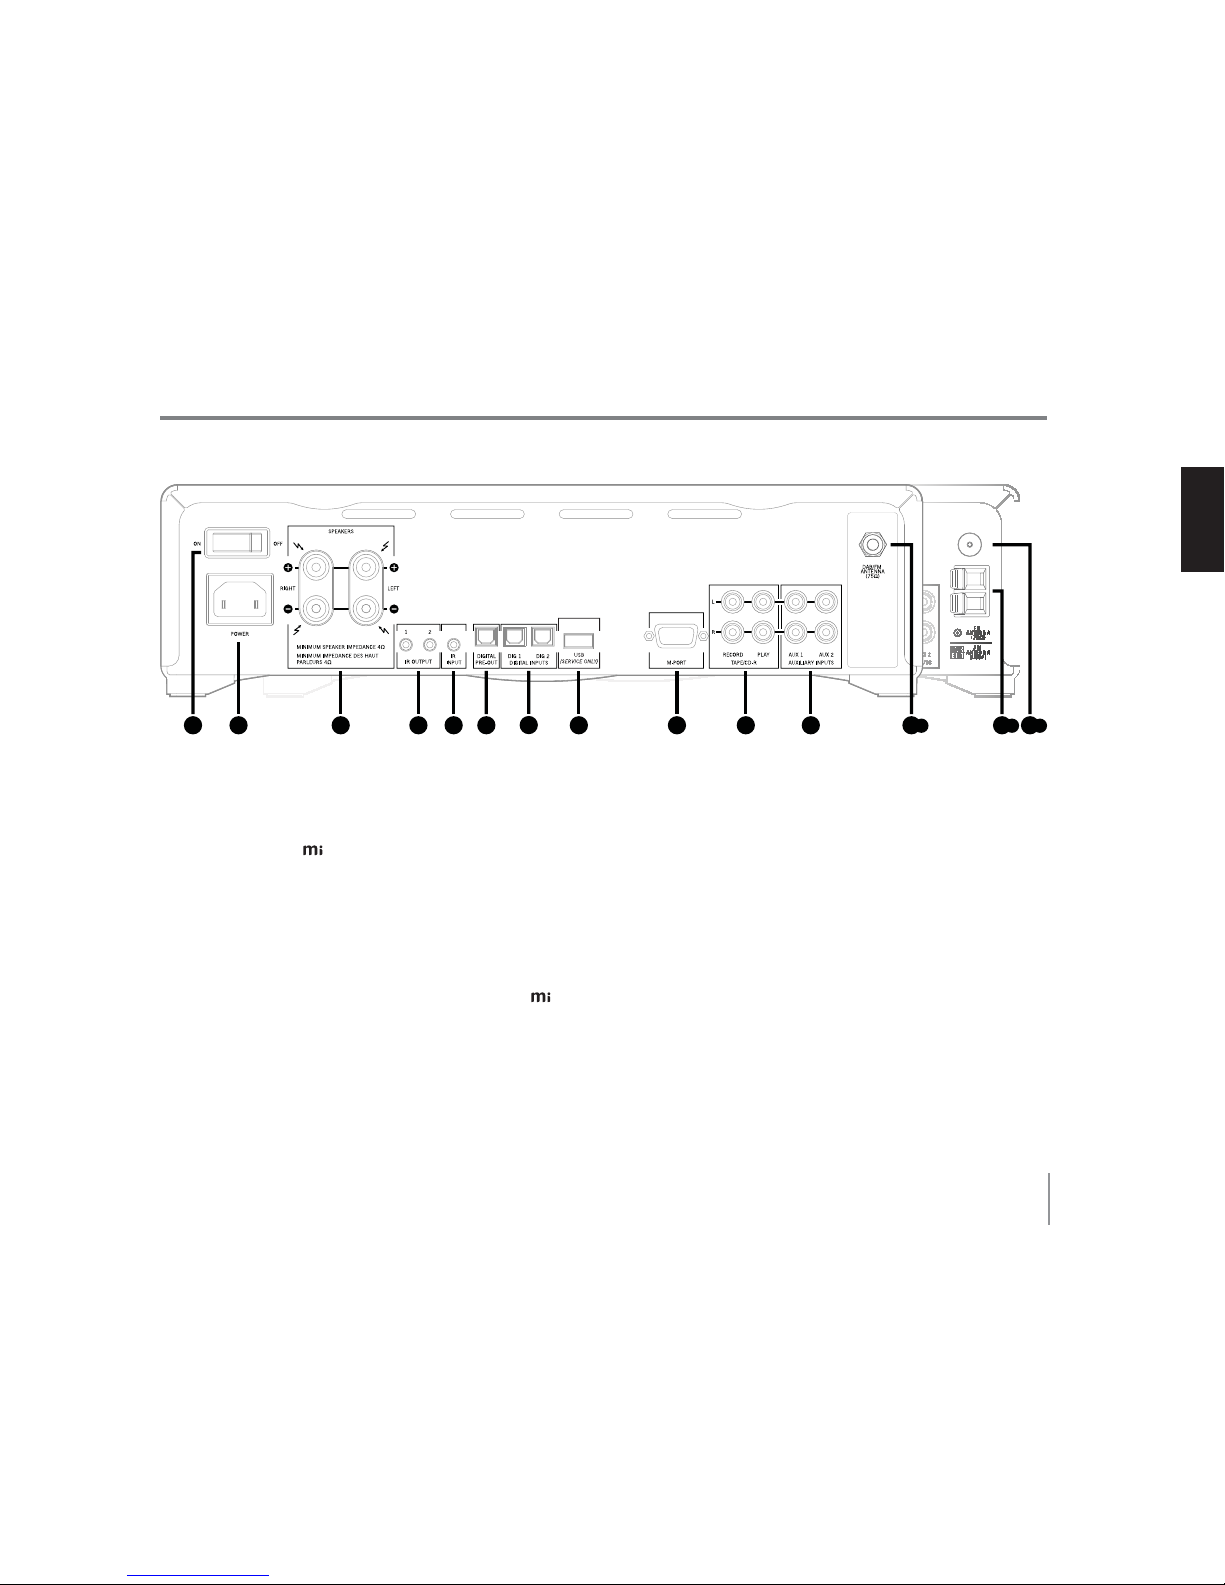
9
12 c1 2 3
7
9
8
54 6 10
11
12 a 12 b
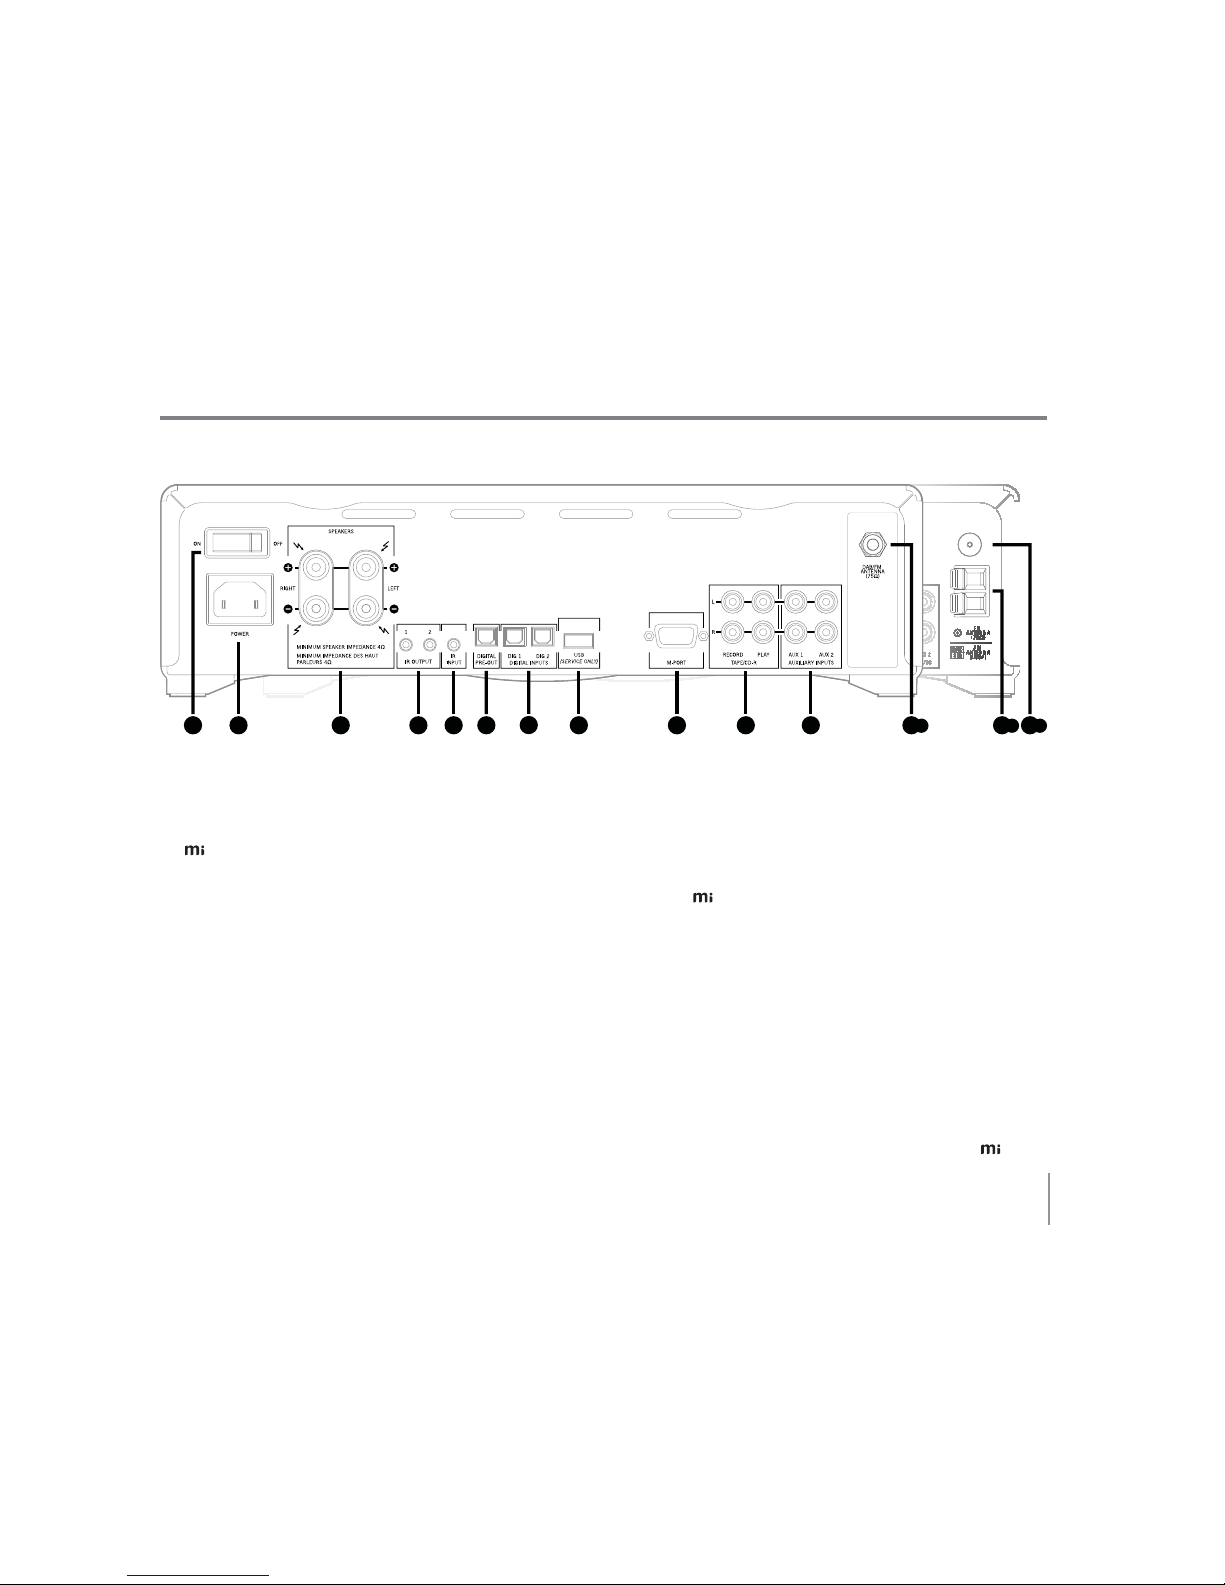
3 REAR PANEL CONNECTIONS
1. POWER SWITCH
Press one side of this rocker switch (the side
nearer the edge of the rear panel) to switch
the ON and the other side (towards the
speaker output sockets) to switch it OFF. When
the POWER switch is in the OFF position all
power is disconnected from the unit. In this
condition the unit cannot be powered up
from the front panel or the remote control.
When the POWER switch is in the ON position
(and the mains power cord correctly inserted
and plugged in to a live wall socket) the
unit will power up with the standby button
continuously illuminated in red and all other
front panel indicators off. The unit is now in
standby mode.
NOTE: It is recommended that the POWER switch
is turned OFF if the unit is not going to be used
for an extended period of time. Disconnect any
iPod when the unit is turned off .
2. POWER INLET
Before making any connection, check that
the mains voltage setting printed on the rear
panel is the same as your local mains supply.
Plug the female (socket) end of the power cord
into the power inlet on the rear of the
.
Plug the male (plug) end of the cord into a ‘live’
wall socket or a suitable heavy-duty extension
cable.
3. SPEAKER OUTPUTS
Each channel is capable of driving any
loudspeaker with a rated impedance of 4
Μ
(Ohms) or greater. The loudspeaker terminals
are high-current binding-posts, coded red and
black.
CAUTION: THE SPEAKER TERMINALS
ARE MARKED WITH A HAZARD SYMBOL
TO INDICATE THAT THEY CAN BE LIVE.
READ ANY WIRING INSTRUCTIONS YOUR
LOUDSPEAKERS MAY HAVE CAREFULLY.
IT IS RECOMMENDED THAT READY-MADE
LEADS BE USED WHERE POSSIBLE.
For correct imaging it is important that all the
loudspeakers used in a single room are wired
‘in phase’. To ensure correct phasing wire the
black (−) terminal on the amplifier to the black
or ‘−’ terminal on the loudspeaker. The red (+)
terminal on the amplifier should be wired to
the red or ‘+’ terminal on the loudspeaker.
4. INFRARED OUTPUTS (IR1/IR2)
These outputs relay infrared which is
presented at the IR input (modulated at
36kHz). Both outputs are the same
(for installer use).
5. INFRARED (IR) INPUT
This 3.5mm jack accepts remote control signals
relayed from remote IR receivers or sensors.
Using a remote IR sensor allows the
to be
10
controlled when installed in a cabinet with
closed doors, or even from another room.
It is recommended that the
and any
remote sensors are positioned such that the
two cannot receive IR signals from the remote
handset at the same time, otherwise the
may not respond correctly to some commands.
6. DIGITAL PRE-OUT
48kHz optical digital output (S/PDIF) for
connection to a digital recording device such
as a CD-R recorder.
7. OPTICAL DIGITAL INPUTS (DIG1/DIG2)
Connect the optical digital audio cables to
these inputs. Supports 16bit PCM Stereo
(44.1kHz/48kHz).
8. USB
Service Only.
9. M-PORT
Connect the supplied M-PORT cable to an iPod
for audio and control options. The iPod will
also charge whilst connected to the
(when
the unit is on).
NOTE: Do not connect the M-PORT cable to an
iPod dock, it must be connected directly to the
iPod itself.
10. TAPE/CD-R INPUT/OUTPUT
The PLAY input carries the output analogue
audio signal from the connected recording
device. The RECORD output carries the signal
from whichever source device is currently
selected. This output may be connected to the
input of any recording device.
11. ANALOGUE STEREO INPUTS (AUX1/AUX2)
Connect the analogue audio output cables of
the appropriate devices to these sockets. Care
should be taken to match left (L) and right (R)
connectors to the correct sockets.
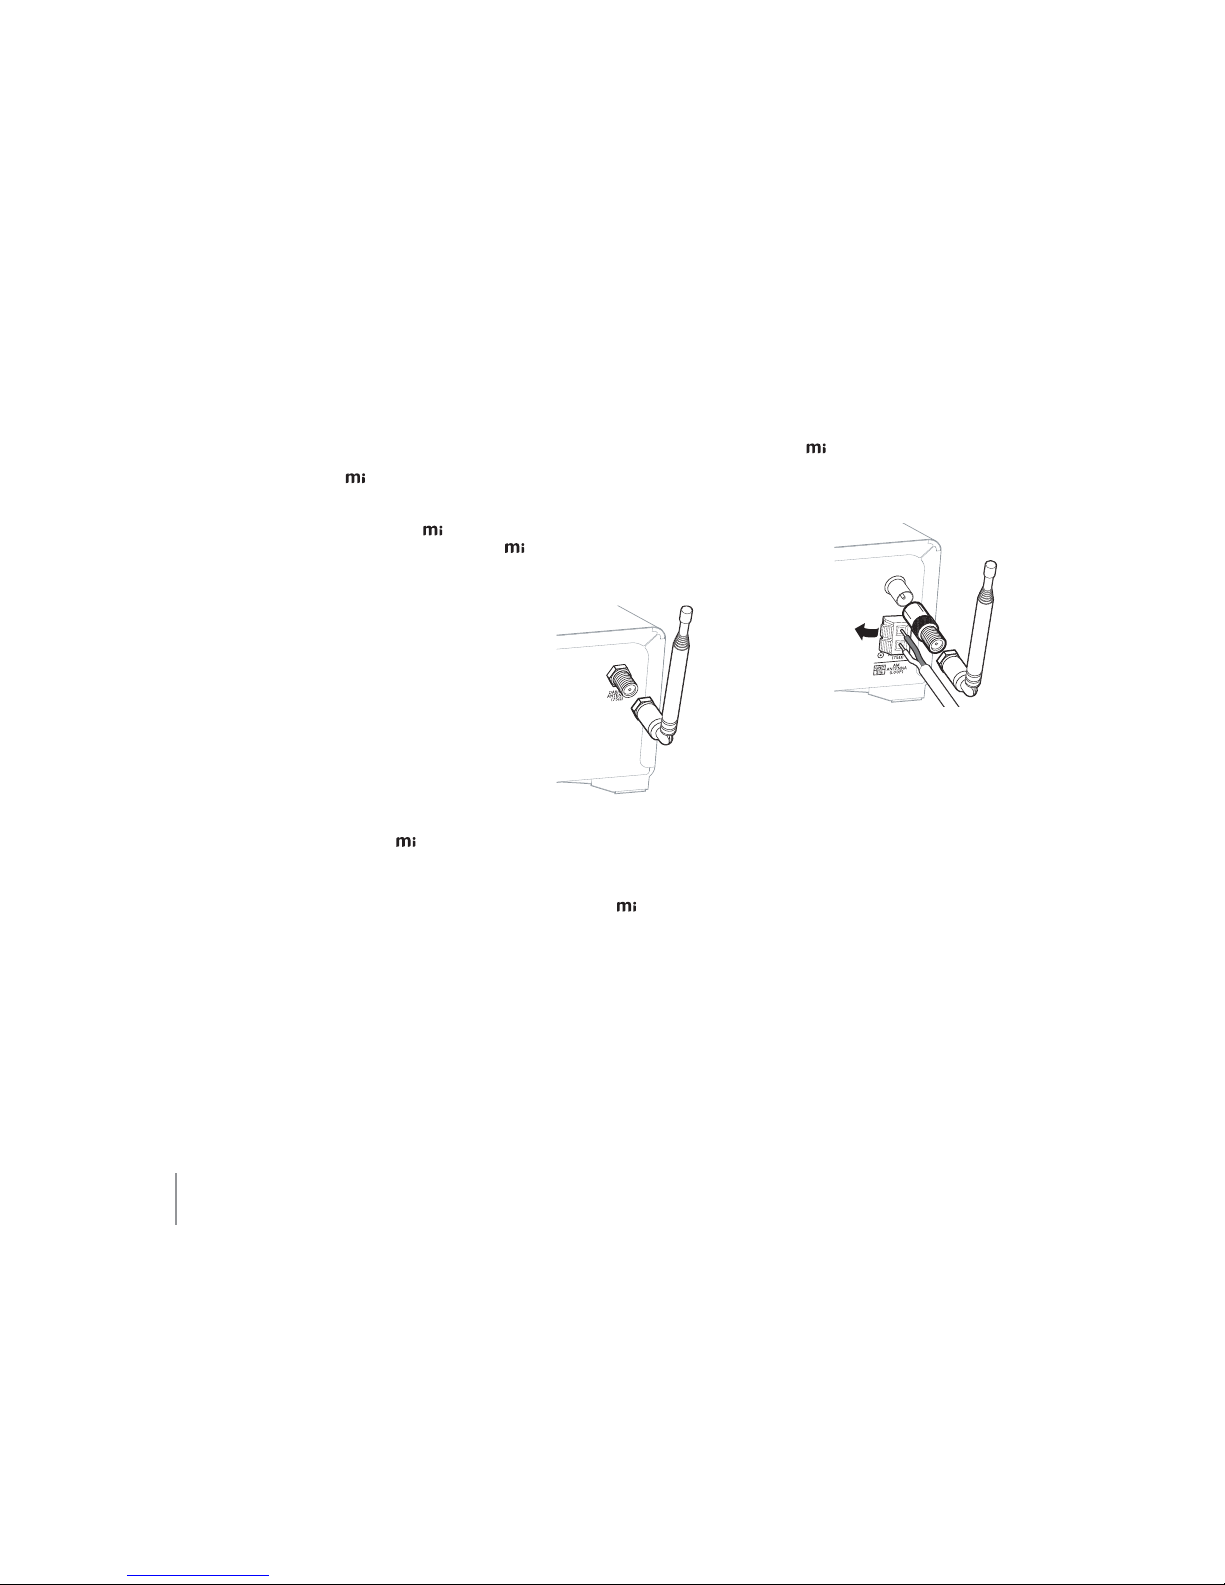
12a. AERIAL INPUT (DAB/FM MODEL ONLY)
The
is fitted with an ‘F’ type antenna
socket, which must be used with an
appropriate antenna (aerial).
Experiment with the position and orientation
of the aerial to obtain the best reception.
NOTE: The supplied aerial is intended for
temporary use until the
can be connected to
a properly installed aerial.
12b/c AERIAL INPUT (FM/AM MODEL ONLY)
The
has different antenna sockets to suit
different countries. FM/AM models are fitted
with separate aerial connections for FM (coaxial) and AM (spring clip).
The AM loop antenna should be connected
to the two spring-clip terminals on the rear
of the unit, with the black wire connected to
the ‘GND’ terminal and the white wire to the
‘SIG’ terminal. To connect each wire, press the
appropriate spring clip tab downwards and
insert the bare end of the wire into the small
hole just above the tab. The antenna should
be positioned and rotated to obtain the
best signal quality. Usually it is best with the
antenna as high as possible.
Also provided is a ‘F’ type to coaxial adapter for
the supplied FM aerial.
11
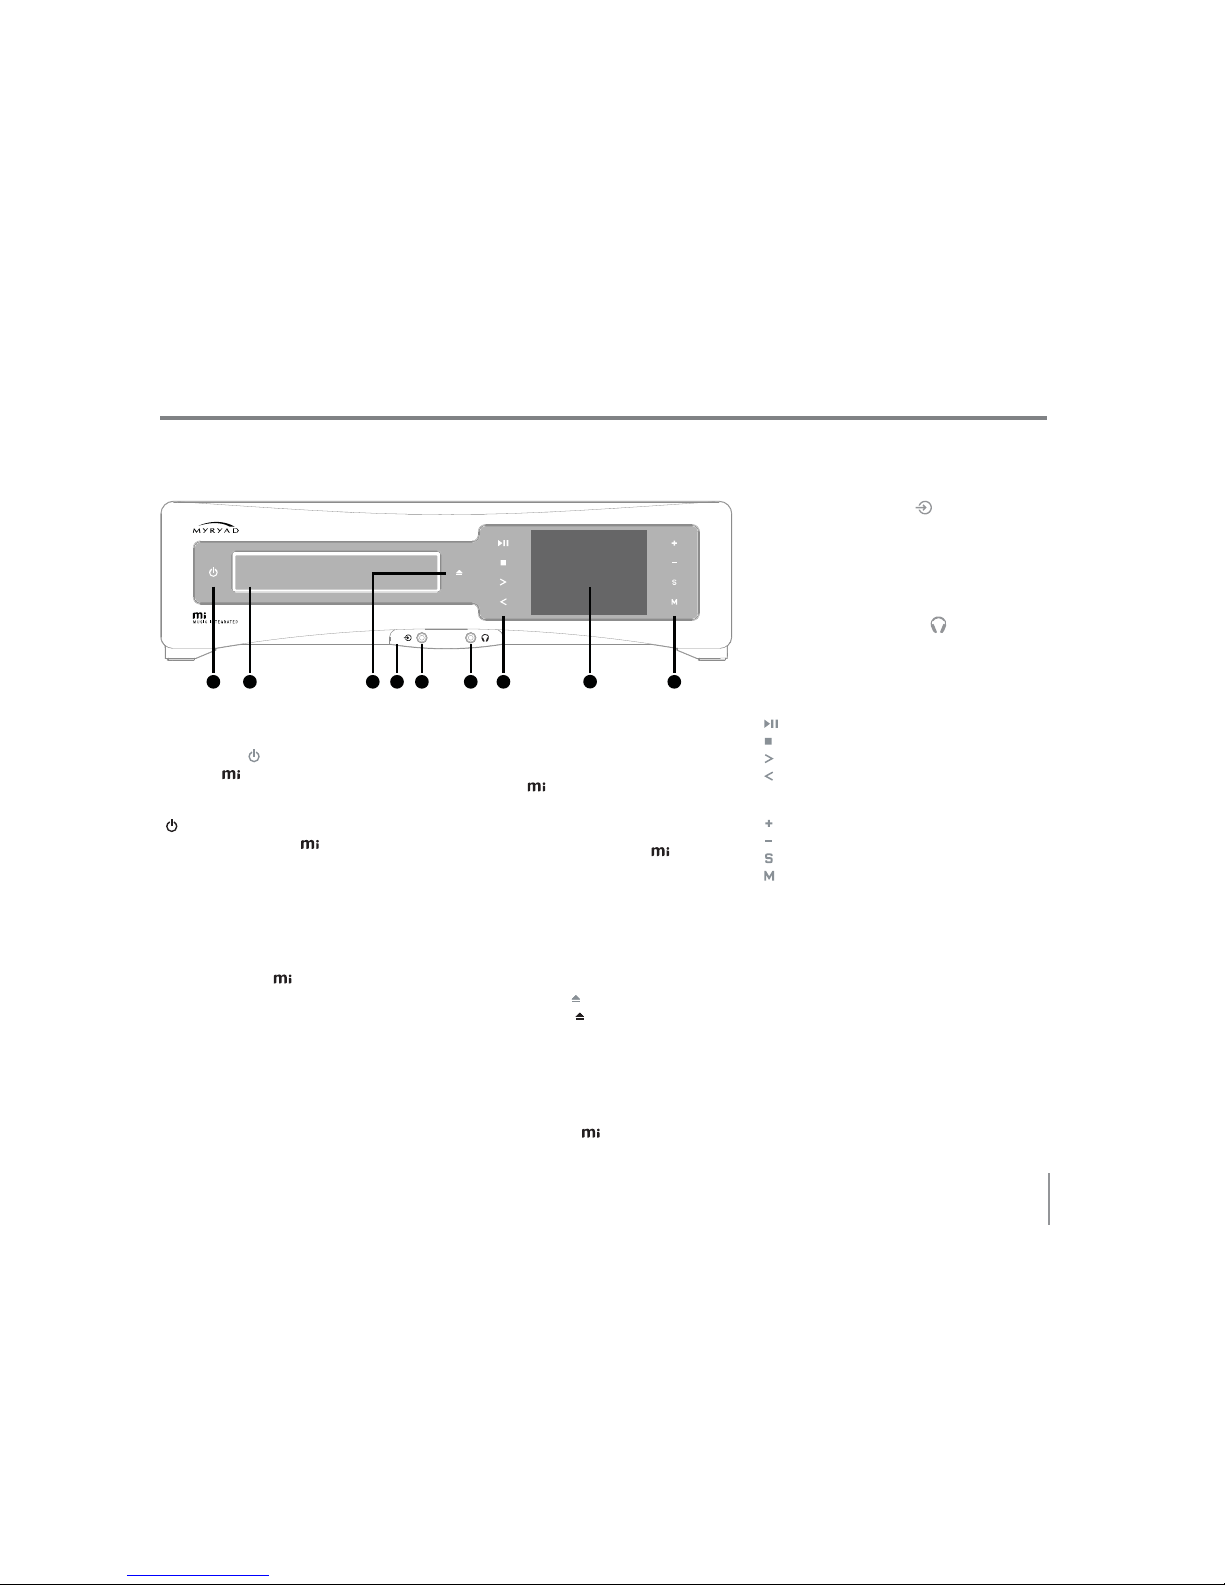
1 2 384 7a 7b5 6
23(5$7,1*<2856<67(0
Front Panel
1. STANDBY ( )
When the is plugged into a live wall socket
and the POWER switch is turned ON, it will
power up in ‘standby’ mode and the STANDBY
( ) button will glow red. In this mode the
internal circuitry of the is powered up but
disabled and its audio output is muted by a
relay.
Touching the standby button will cause the
unit to wake from standby. The button will
flash red for a few seconds before turning
white continuously. The LCD display will
illuminate and the
will select the last source
used before it was switched to standby.
When the unit is on, pressing the standby
button will cause the unit to enter standby
immediately (unless a stored parameter
has changed). The button will glow red
continuously.
If any stored parameter has changed since the
unit was last in standby there will be a short
delay, while the new configuration is stored,
before the
enters standby. The display will
show a disc symbol during this delay period.
CAUTION: WHEN IN STANDBY MODE THE
INTERNAL CIRCUITRY OF THE
IS STILL
LIVE, SO ALL SAFETY PRECAUTIONS MUST
BE FOLLOWED.
2. DISC DRAWER
Place discs, printed side facing up, in the disc
drawer. It will accept either normal 120mm
CDs or small 80mm CDs.
3. OPEN/CLOSE (
)
The OPEN/CLOSE ( ) button controls the disc
drawer. Press this button to open or close the
disc drawer.
4. INFRA-RED RECEIVER
The infrared (IR) remote control receiver is
behind the front panel inputs. It must not be
obscured when the
is to be operated using
the remote control.
5. FRONT (JACK) PORT (
)
Connect the analogue audio output cable of
the appropriate device to this socket. Accepts
stereo on a 3.5mm jack. Use the PORT button
on the handset to toggle between this front
PORT socket and the rear M-PORT input.
6. HEADPHONE OUTPUT (
)
Connect the 3.5mm jack of your headphones
to this socket. The loudspeaker output is
muted when headphones are connected.
7a. SOFT TOUCH KEYS
PLAY/PAUSE
STOP
SKIP/SCAN Forwards
SKIP/SCAN Backwards
7b. SOFT TOUCH KEYS
VOLUME Up
VOLUME Down
SOURCE Selection
MENU/MORE
8. DISPLAY
The operation of the player is indicated on a
high quality, full colour Liquid Crystal Display
(LCD).
12
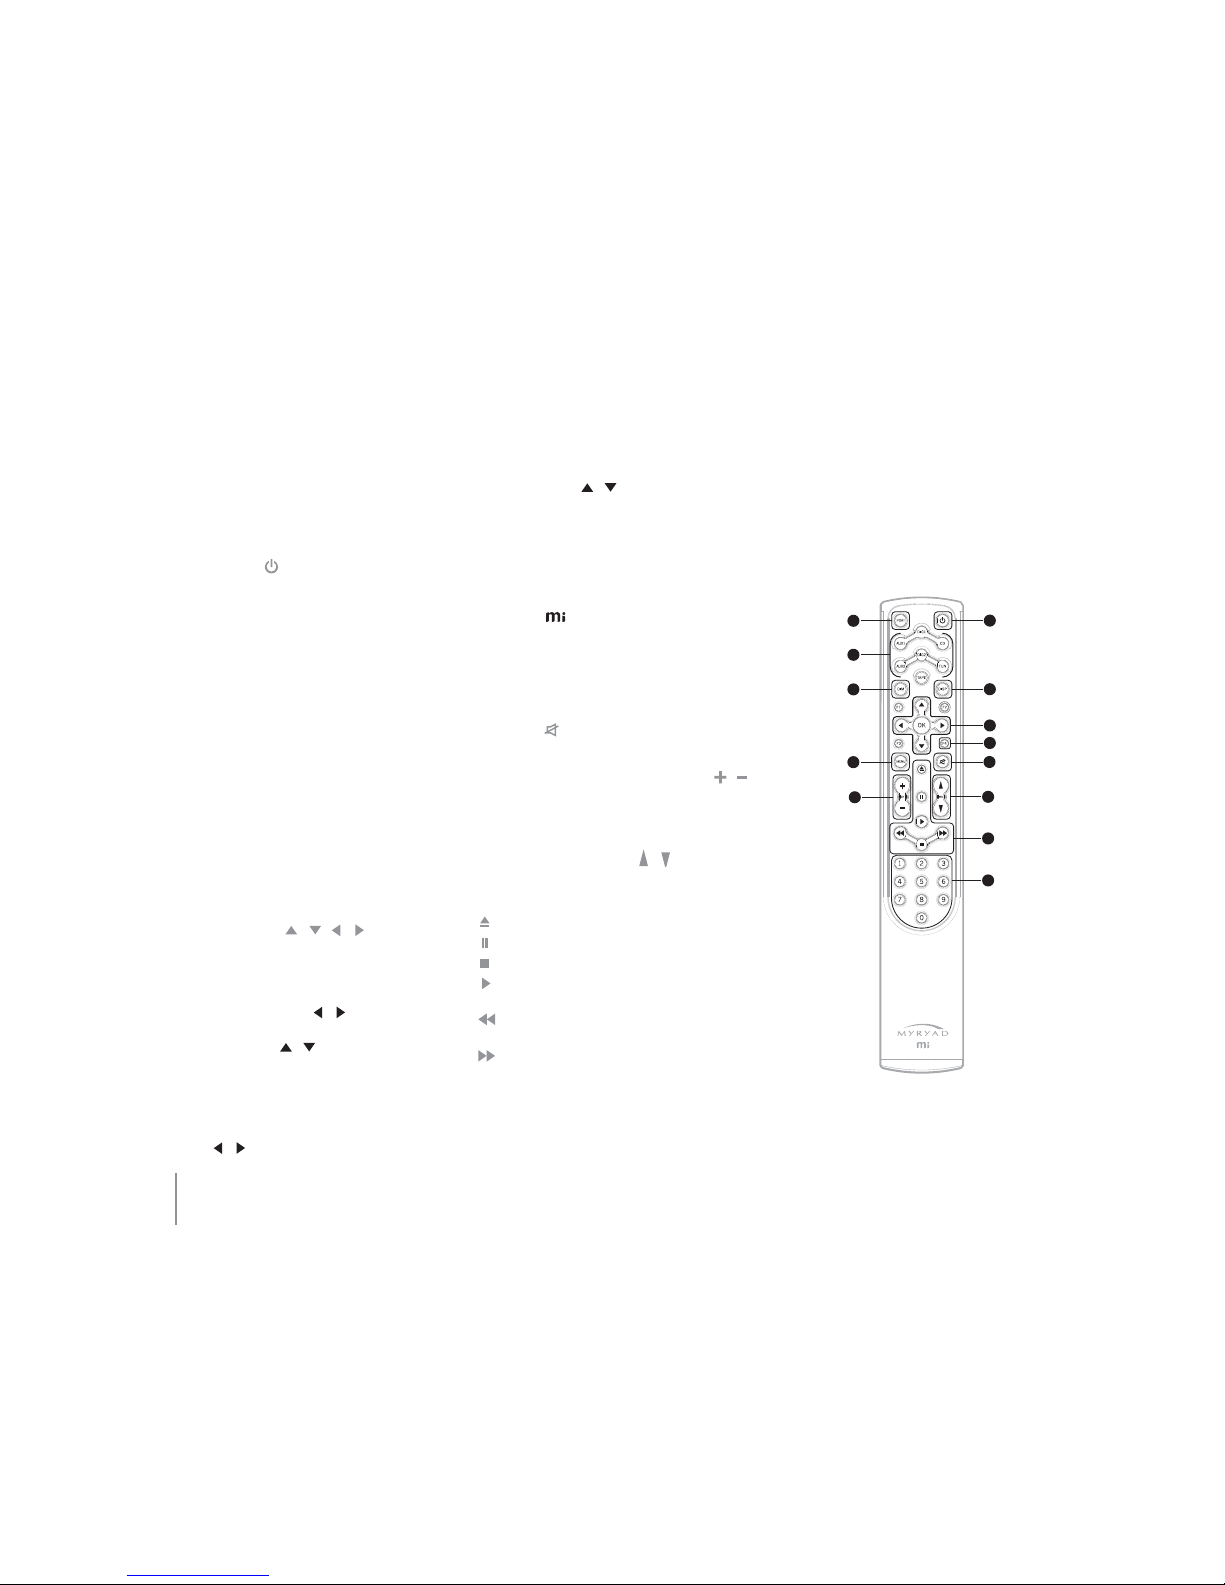
5HPRWH&RQWURO
1. PORT
Selects either the FRONT PORT (3.5mm jack
line level connector) or the M-PORT connector
on the rear panel. Repeatedly pressing the
PORT key cycles between the two inputs.
2. STANDBY (
)
Puts the unit into or wakes it up from standby
mode.
3. SOURCE SELECTION
Allows the direct selection of individual
sources. Repeatedly pressing TUNER will cycle
through DAB/FM (or AM/FM on some models).
4. DIM
Repeatedly pressing DIM cycles the LCD
display in 3 stages—bright, dim and clock
display.
5. DISPLAY (
DISP)
Uses the majority of the screen to display, in
enlarged text, content relevant to the currently
selected source. Repeatedly pressing the
key will cycle through the different types of
information (where available and dependant
on source).
6. NAVIGATION (
/ / / /OK)
Navigates through menus and options, ‘OK’
selects or confirms options.
In CD, CD DATA and iPod operation the left and
right navigation keys (
/ ) can be used to
skip tracks, on CD DATA discs the up and down
navigation keys ( / ) can be used to skip
folders and in iPod operation will skip albums/
artists/playlists dependent upon iPod mode
(see page 19, M-PORT Operation ).
In radio operation the left and right navigation
keys (
/ ) can be used to tune to the
previous or next station, the up and down
navigation keys (
/ ) can be used to skip
presets.
In FM or AM mode,
OK changes between AUTO
and MANUAL tuning modes.
7. FAVOURITES (
F1/F2/F3/F4)
Directly selects preset favourite radio stations
even if the is not in radio mode. It will
switch to radio mode and tune to the stored
station (see page 17, Radio Operation).
8. MENU
Accesses the menu options (see page 14).
9. MUTE (
)
Mutes the audio output of the unit.
10. PRESET/TRACK SKIP UP/DOWN (
/ )
Used to skip forwards or backwards to the
next track or radio preset as appropriate to the
selected source.
11. VOLUME CONTROL (
/ )
Raises or lowers the audio volume level.
12. TRANSPORT CONTROLS
– Open/close the disc drawer
– Pause
– Stop/force mono reception in FM mode
– Play/auto-changes to CD from Tuner and
AUX modes
– CD Skip/scan backwards or previous
radio station
– CD Skip/scan forwards or next radio
station
13. NUMBER KEYS ( 0–9 )
Can be used for direct access of tracks on a CD
or radio presets.
NOTE: The remote will only emit IR codes for a
maximum of 13 seconds if any key is held down,
after which the key will need to be released
and pressed again if necessary. This is to avoid
draining the battery in the event of a key being
accidentally held down for too long.
1
2
3
4
5
7
8
10
11
9
12
13
6
13
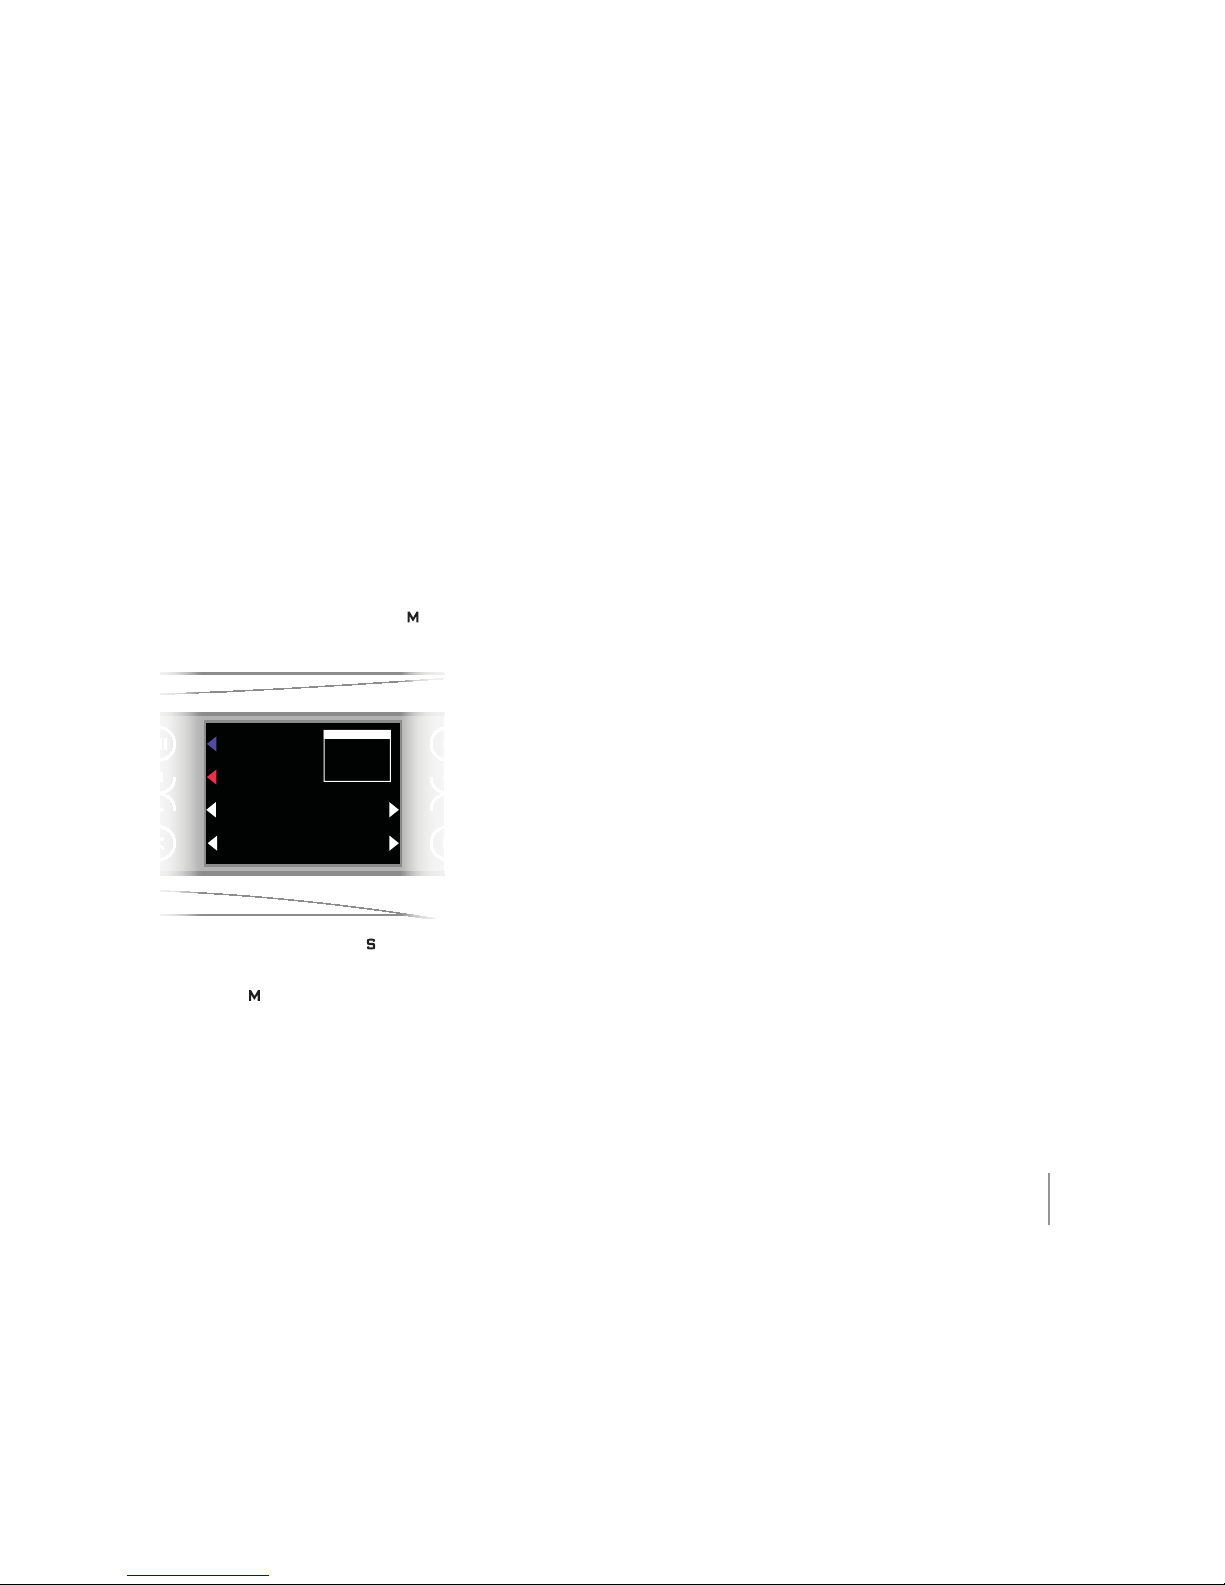
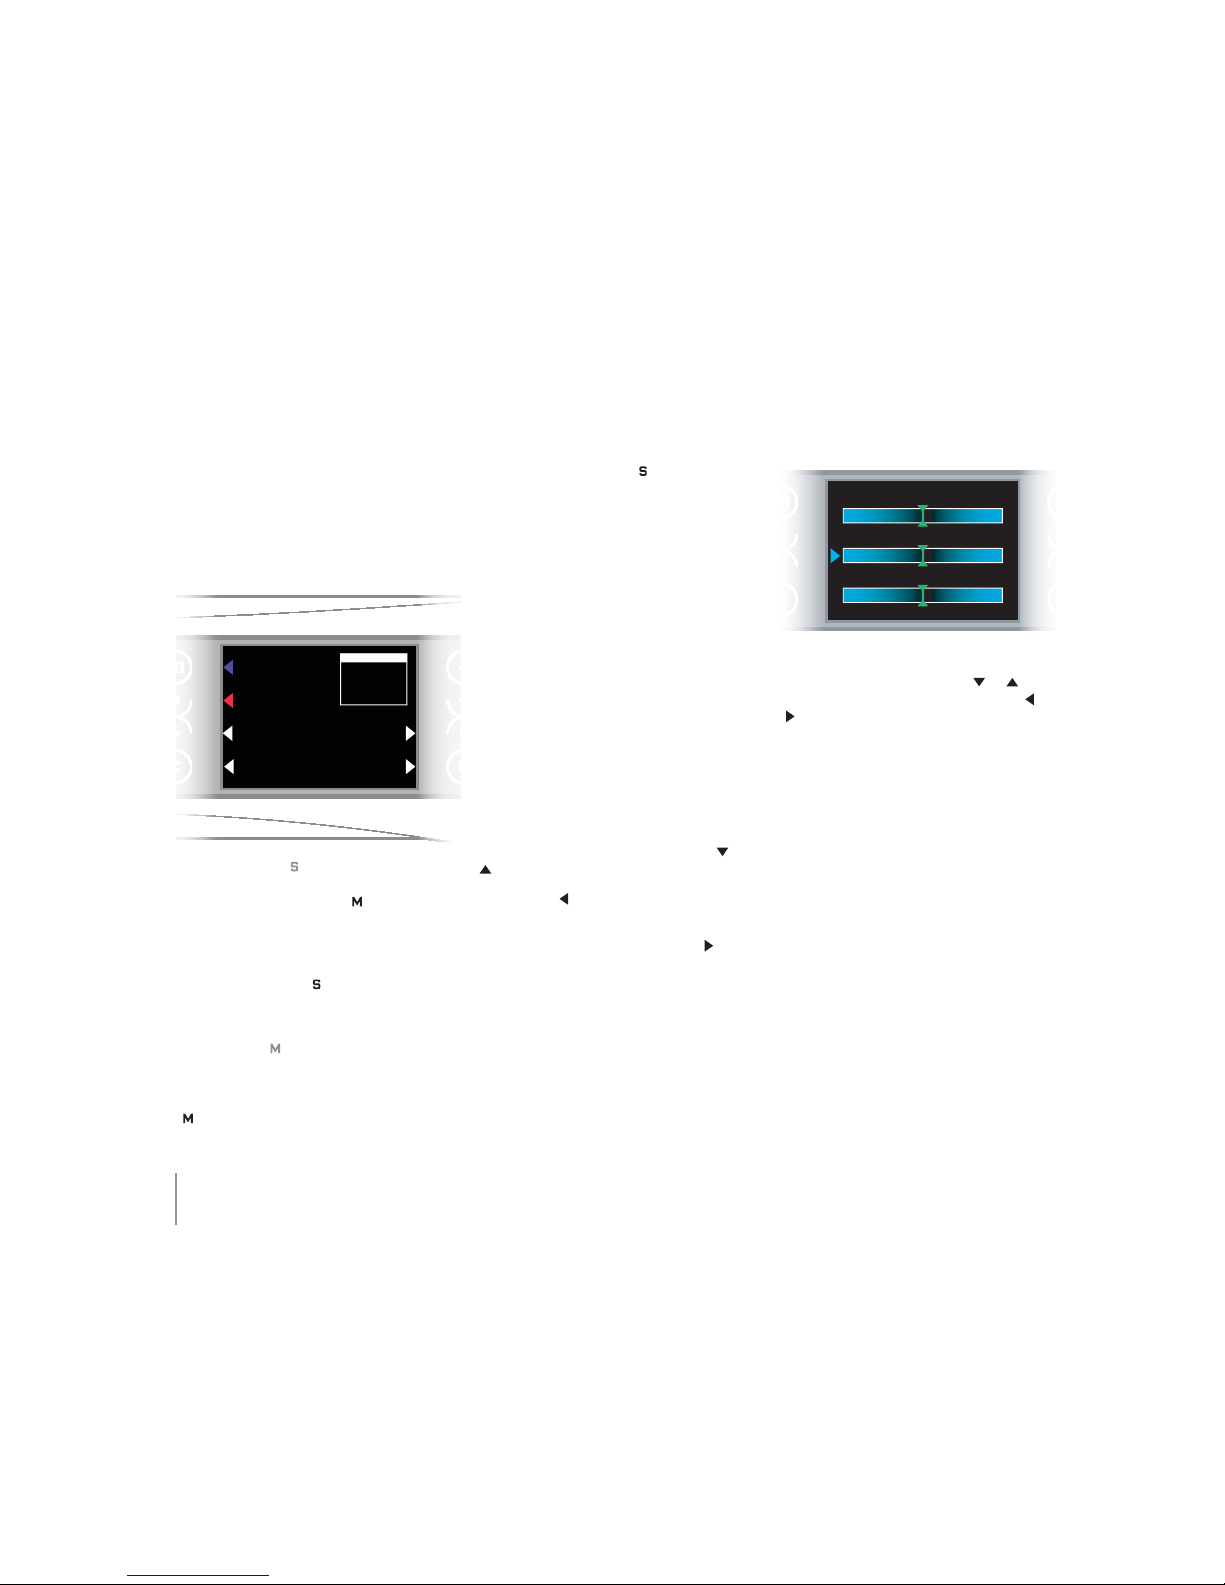
&KRRVLQJD6RXUFH
From the front panel
The front panel buttons are designed for
speed and simplicity. More detailed operations
are reserved for menu navigation using the
supplied remote control handset.
The buttons have a standard function as
labelled but this function changes using
the front panel menu. The MORE/MENU (
)
button on the front panel is used to access the
front panel menu.
DAB Radio
FM Radio
M-Port
CD
Choose
a source
More Sources
Return
Pressing the SOURCE SELECTION ( ) key
displays the first page of the on-screen source
menu, listing the first four sources. Pressing
MORE/MENU ( ) will display more sources
from which to choose.
Press the front panel button nearest the source
to immediately switch to that source.
From the remote control
The remote control handset has dedicated
keys for selecting sources:
CD – Selects the built-in CD player
TUN – Selects the built-in radio tuner, tuned
to the last used radio station or
preset. Repeated presses of the TUN
key cycles between DAB or FM (AM
or FM on certain models)
PORT – Alternates between the front panel
PORT (3.5mm Jack) and rear panel
M-PORT connectors
TAPE – Selects the TAPE/CD-R PLAY input
AUX1 – Selects the AUX1 source input
AUX2 – Selects the AUX2 source input
DIG1 – Selects the DIG1 source input
DIG2 – Selects the DIG2 source input
14
0HQX1DYLJDWLRQ
Menu options can be accessed either directly
from the front panel or from the handset.
The screen format adjusts automatically to
the correct mode of operation depending on
whether the front panel or the remote control
is being used.
From the front Panel
DAB Radio
FM Radio
M-Port
CD
Choose
a source
More Sources
Return
SELECT SOURCE ( )
Provides a list of sources on-screen. Repeated
presses of the MORE/MENU ( ) button will
cycle through more source selection screens.
Use the corresponding front panel button to
directly select and switch to that source.
Pressing the SOURCE (
) button will return
to the ‘Now Playing’ screen without changing
sources.
MORE/MENU (
)
Displays the options menu specifically related
to the source currently selected, e.g. when
playing a CD-Data disc pressing MORE/MENU
( ) will enter the options screen where next/
previous folder selection can be accessed.
Pressing SELECT SOURCE (
) will return to the
‘Now Playing’ screen.
From the remote control
SELECT SOURCE
Sources can be directly selected on the remote
control with the dedicated source selection
keys (CD/TUN etc.).
MENU
Pressing the MENU button on the remote
control displays the particular options menu
that relates to the currently selected source.
A second press of the MENU button will
display the SETUP menu. Pressing the MENU
button again will return to the ‘Now Playing’
screen.
NOTE: Some sources do not have any options
(AUX1/AUX2, DIG1/DIG2). Pressing the MENU
button will go directly to the SETUP menu.
Use the Up and Down navigation keys (
or
) to navigate up and down in menus.
Use the Left (
) or MENU keys to return to the
previous menu screen.
Click OK or the right navigation key (
) to
select an option.
SETUP MENU
From the remote control – press the menu key
twice to enter the setup menu.
Sound Options – selecting any of the sound
options displays the sound options menu.
DAB Radio
FM Radio
MPort
CD Player
Choose
a source
More Sources
Return
Bass
Treble
Balance
Use the navigation buttons to make
adjustments, press up or down ( or ) to
swap between options and left or right ( or
) to make adjustments. When adjustments
are complete, press OK to return to the ‘Now
Playing’ screen.
Balance – adjusts the left/right sound
balance
Treble – increases or decreases the high
frequency output.
Bass – increases or decreases the low
frequency output.
Clock Settings – sets the time.
Language – sets the language settings for
the unit – English, French, German or Italian
Territory – adjusts the regional Tuner
settings. Select “North America” or “Rest of
Worl d”.
15
'LVF2SHUDWLRQ
DISC FORMATS
This player is designed for use with the
following discs:
mp3
Recordable
ReWritable
Audio CD, Audio CD with Text, CD-R, CD-RW
and MP3.
NOTE: The
will not playback DTS encoded
CDs
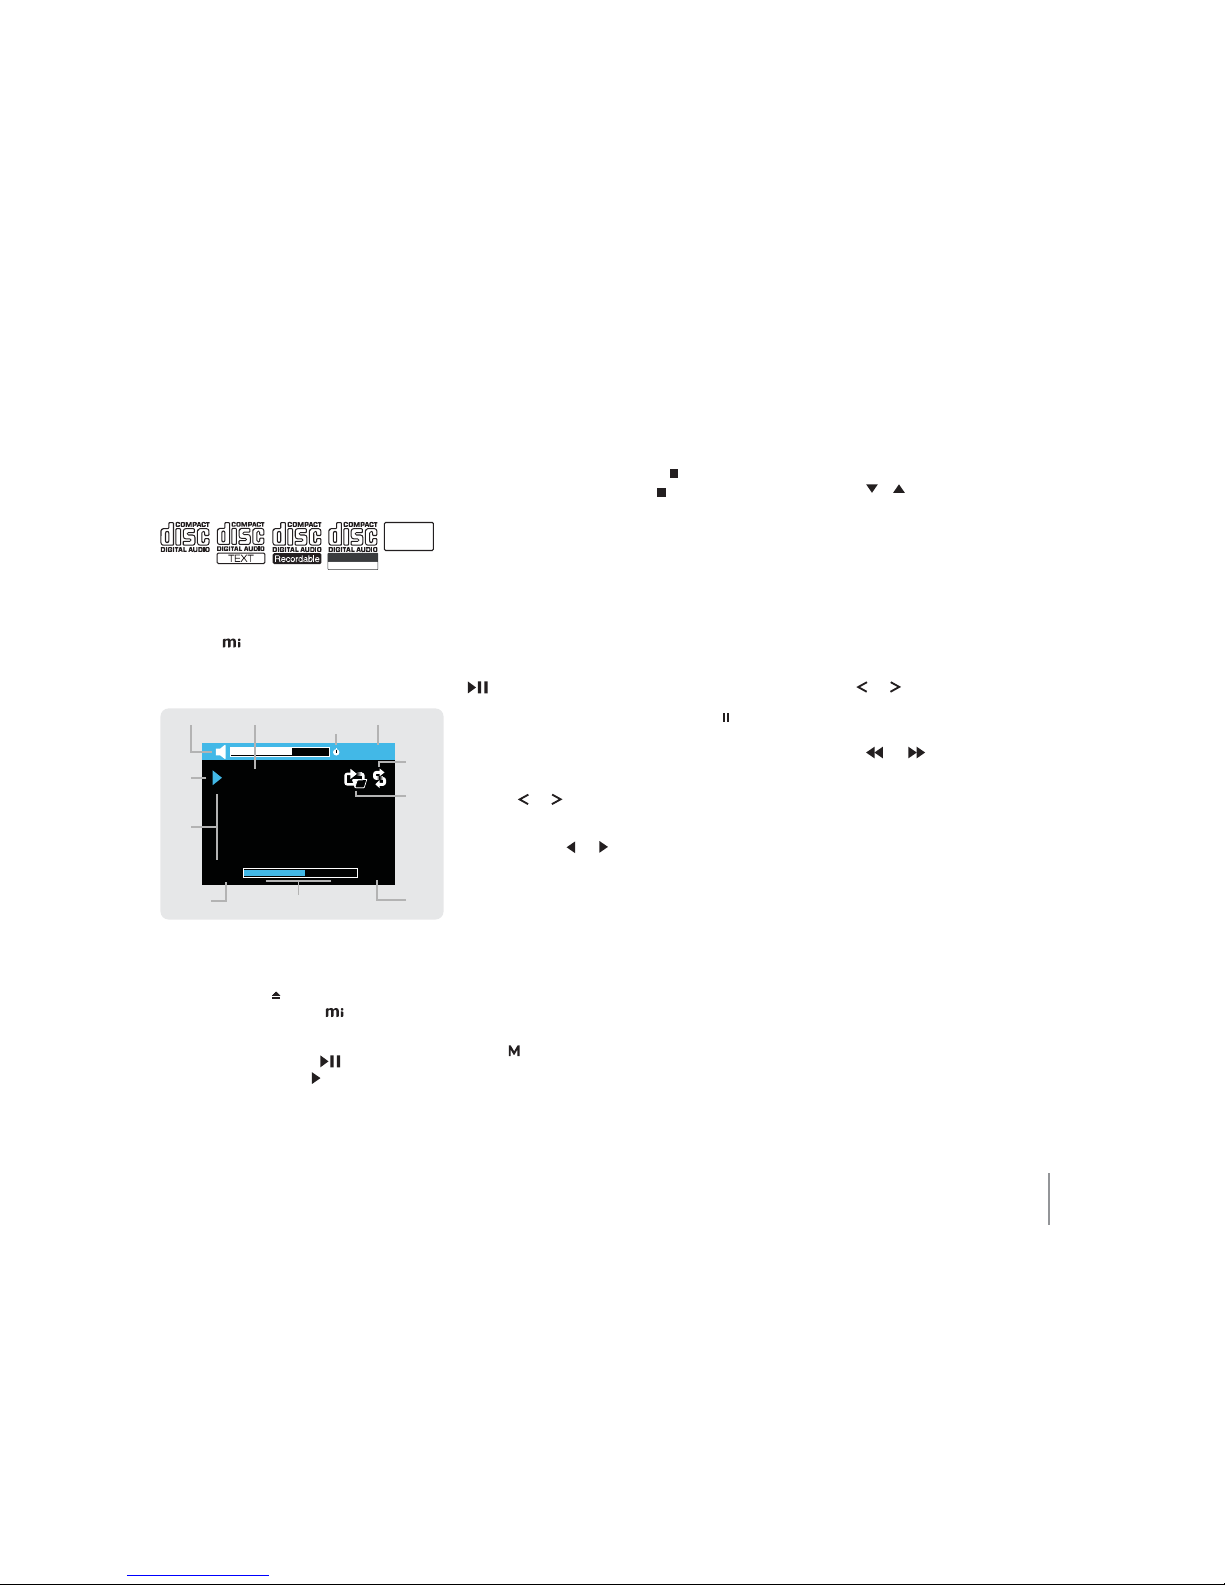
NOW PLAYING SCREEN
CD Text
From a Buick 6
Bob Dylan
Highway 61 Revisited
Track 4/10
02:15 04:36
11:00AM
Disc Type
Play
Status
Song
Info
Shuffle
Icon
Repeat
Icon
Volume
Time
Elapsed
Total
Track
Time
Time Indicator bar
(Not MP3)
ClockWake up
Icon
PLAYING A CD
Open the disc drawer and insert a CD. Pressing
the OPEN/CLOSE ( ) button closes the drawer,
the disc is then read by the and the disc
information displayed on-screen.
Pressing the PLAY/PAUSE (
) button on the
front panel or the PLAY (
) key on the remote
control will automatically close the disc drawer
whilst it is still open and start playing from
the first track of an audio CD or from the first
music file of the first folder of a CD DATA disc.
To stop playback, press the STOP (
) button
on the front panel or STOP key ( ) on the
remote control.
Playback stops automatically after the last
track of an audio CD or after the last file of the
last folder of a CD DATA disc unless a repeat
mode has been engaged.
PAUSING PLAYBACK
During playback of a CD or CD DATA disc:
From the front panel – press the PLAY/PAUSE
(
) button to enter or exit pause mode.
From the remote control – press the PAUSE (
)
key to enter or exit pause mode.
TRACK SELECTION
From the front panel – press the SKIP/SCAN
buttons (
or ) to skip between tracks.
From the remote control – use the left or right
navigation keys (
or ) or CH–/CH+ to skip
between tracks. Use the number keys to access
any track on the CD or within the current
folder. To play a specific track e.g. track 26,
press the track number keys ‘2’ then ‘6’. After
the second key is pressed the player will play
track 26. If only one key e.g. key ‘2’ is pressed,
the player will pause briefly before playing
track 2.
CD DATA MUSIC FOLDER SELECTION
From the front panel – pressing the MORE/
MENU (
) button will enter the options
menu. Press ‘Next Folder’ or ‘Previous Folder’
to navigate through the folders. The currently
selected folder is displayed on-screen and will
change to the new folder name.
From the remote control – Use the up and down
navigation keys (
or ) to skip between
folders. Alternatively, press the MENU key to
enter the options menu. Highlight ‘Folder
Selection’ and press the OK key to select.
A list of folders will be displayed on-screen.
Highlight and select the desired folder.
NOTE: To select an individual track first play the
folder and then select the track by number.
SEARCHING BACKWARDS/FORWARDS
From the front panel – press and hold the SKIP/
SCAN buttons (
or ) to search through a
track.
From the remote control – press and hold the
SKIP/SCAN keys (
or ) to search through
a track.
NOTE: If the key is held down for more than 10
seconds, automatic scan will take over. Press play
to resume.
16
REPEAT/SHUFFLE
From the front panel – press the MORE/MENU
(
) button twice to access second page of the
options menu.
From the remote control – press the MENU
key and select ‘Repeat/Shuffle’ to access the
options menu.
No Repeat or Shuffle
–
Turns off the repeat and
shuffle options.
Repeat All Tracks
Repeats all the tracks on
a disc in order.
Repeat Folder
Repeats all the tracks
in a folder in order (CD
Data disc only).
Repeat One Track
Repeats a single track.
Shuffle All Tracks
Plays all the tracks on a
disc in random order.
Shuffle Folder
Plays all the tracks in a
folder in random order
(CD Data disc only).
Shuffle Folder & Repeat
Plays all the tracks in a
folder in random order
then repeats (CD Data
disc only).
Shuffle All & Repeat.
Plays all the tracks on
a disc in random order
then repeats.
033/$<%$&.
DISC FORMATS
The is compatible with CDs, CD-Rs and CDRWs (ISO9660 formatted).
Discs that have not been finalised and those
with a large number of folders may take a long
time to load.
It is not possible to fast forward or rewind
beyond the bounds of a single track.
NOTE: Not all recordable (CD-R) or rewritable
(CD-RW) discs may play correctly. If there are
playback problems please try another brand of
disc or different CD burning software/equipment.
MP3 FILE FORMATS
The
is capable of playing MP3 encoded
tracks in the following formats:
Sampling Rate: 16kHz–48kHz
Bit Rate: 32kbps–320kbps
NOTE: The
may not play all recordable (CD-R)
or rewritable (CD-RW) discs correctly. If there are
playback problems please try another brand of
disc or different CD burning software/equipment.
FILE NAMING CONVENTIONS
Please note that the
will playback mp3 files
in the order that they appear in the folder i.e.
if the files have a number at the start of the
filename then they play in numerical order
otherwise the order is alphabetical.
NOTE: The
supports up to 99 folders per disc

17
5DGLR2SHUDWLRQ
The has a built in DAB/FM radio tuner, (AM/
FM on certain models).
TUNING SCREEN
DAB
BBC Radio 4
The Material World. Quentin
Cooper and guests discuss
the impact of technology on
our lives
10:21AM
Tuning Mode
Programme Info
(DAB or FM/RDS only)
Volume
Clock
Station
Info
(Frequency
FM Only)
Autotune
Status
(FM Only)
A
SELECTING THE RADIO TUNING MODE
From the front panel – press the SOURCE ( )
button to enter the sources menu, select DAB
or FM as required (FM or AM on some models).
From the remote control – pressing the TUN key
alternates between DAB and FM tuning (FM/
AM on some models). Repeatedly press the key
until DAB is shown.
NOTE: To hear DAB stations, a DAB scan must
have been completed first (see page 18,
Searching for DAB Stations).
TUNING STATIONS
From the front panel – use the SKIP/SCAN
buttons (
or ) to skip stations.
From the remote control – use the
or to
skip stations ( or can also be used).
TUNING TO A DAB STATION
From the front panel – use the SKIP/SCAN
buttons (
or ) to skip stations.
Press the MORE/MENU (
) button to enter
the options menu, select ‘Next Station’ or
‘Previous Station’ until the desired DAB station
is displayed.
From the remote control – use the left or right
navigation keys (
or ) or the fast forward
and rewind ( or ) to tune to the next
DAB station.
Alternatively, press the MENU key to enter the
options menu. Highlight and select ‘Select
Station’ to display the full DAB station list. Use
the up and down navigation keys (
or ) to
highlight the desired station and then OK to
select and tune to that station.
TUNING TO AN FM OR AM STATION
From the front panel – Press the MORE/MENU
(
) button to enter the options menu, select
‘Next Station’ or ‘Previous Station’ until the
desired station is displayed.
From the remote control – pressing the OK key
alternates the tuning mode between:
Auto Tuning Mode (
AUTO
) – directly selects
presets from the number keys of the remote
control i.e. pressing the 1 key will tune to
preset 1.
Pressing the fast forward or rewind keys (
or ) will autotune to the next station ( or
can also be used).
Manual Tuning Mode (
MANUAL
) – allows manual
input of frequency i.e. pressing 9-8-8-0 will
tune the to 98.8MHz.
Pressing the fast forward or rewind keys
(
or ) will tune up or down the
frequency range in 0.05MHz steps (
or can
also be used).
NOTE: If FM stereo reception is poor, press the
MORE/MENU (
) button to enter the options
menu and select Mono.
STORING PRESETS
From the front panel – Press the MORE/MENU
(
) button to enter the options menu,
select the ‘Store Presets’ option. A list of
presets will be shown on-screen, numbered
1,2,3,4,5,6,7,8,9,0 (corresponding to the 10
number keys on the remote control). Those
available will be labelled ‘Empty’.
Only the first 4 presets will be shown, pressing
the MORE/MENU (
) button will cycle through
the other preset menu screens. Pressing one of
the keys next to the displayed preset numbers
will store the currently tuned station in the
corresponding preset number.
From the remote control – press the MENU key
to enter the setup menu, select ‘Store Preset’.
Select a preset number and press ‘OK’ to store
the currently tuned station. If there is already
a station stored on a preset, it will be replaced
with the new station.
NOTE: Pressing and holding a number key (Auto
Tuning Mode only) on the remote control will
store the currently tuned station on that key.
Stations can only appear once in the preset
list. Storing an already preset station in a new
preset will remove that station from the old
preset.

18
TUNING TO A PRESET
From the front panel – press the MORE/MENU
(
) button to enter the options menu, select
‘Choose Preset’ to enter the presets menu. The
first four presets only are displayed, press the
MORE/MENU ( ) button to cycle through the
preset menu screens until the required preset
is displayed on-screen. To tune to that station,
press the appropriate preset button.
From the remote control – press the MENU key
to enter the options menu, select ‘Choose
Preset’. Use the up and down navigation keys
(
or ) to navigate up and down the presets
menu, once the desired station is highlighted
press ‘OK’ to tune to that station.
Alternatively, use the up and down navigation
keys (
or ) or the CH–/CH+ keys to skip
preset stations.
NOTE: Preset stations (Auto Tuning Mode only)
can be directly selected from the number keys of
the remote control.
SEARCHING FOR DAB STATIONS
A DAB scan will search for all available
DAB stations and add them to the internal
database. This will need to be done when
the
is first switched on and should be
performed periodically to scan for any new
stations or when moving between radio
reception areas.
NOTE: A DAB scan may take a few minutes to
complete. Once complete the
will return to
normal operation.
From the front panel – press the MORE/MENU
(
) Button to enter the options menu, select
‘DAB Scan’.
The autotune screen will be displayed. Press
‘OK’ ( MORE/MENU (
)Button) to start the
scan or press the left navigation button (
)
to cancel the scan and return to the DAB tuner
screen.
From the remote control – press the MENU key
to enter the options screen, highlight and
select ‘DAB Scan’.
The autotune screen will be displayed.
Press ‘OK’ to start the scan or press the left
navigation key to cancel the scan and return to
the DAB tuner screen.
NOTE: The number of DAB radio stations may
vary from area to area.
FAVOURITES
The remote control handset has four
‘Favourites’ keys (F1,F2, F3, F4) that can be used
to skip directly to a preprogrammed DAB or
FM/AM preset regardless of what mode the
is in e.g. whilst playing an audio CD, pressing
F1 will switch to tuner and tune to the station
stored on that favourite.
From the remote control only – to store a
favourite it first has to stored as preset. Tune
to the preset to be stored as a favourite. Press
the MENU key to enter the options menu,
select ‘Set as Favourite’. Use the up and down
navigation keys (
or ) to navigate up and
down the favourites menu, press OK to store
the preset on that favourite setting (F1/F2/F3/
F4).
MY FAVOURITES
F1
F2
F3
F4
NOTE: When listening to radio:
Pressing eject will open the CD tray without
interruption. Press the OPEN/CLOSE (
) button
on the front panel or the OPEN/CLOSE ( ) key in
the remote to close the tray again.
Pressing the PLAY/PAUSE (
) button on the
front panel or the PLAY (
) key on the remote
control will automatically switch the to CD
mode and start playing any CD that is loaded in
the tray.

19
*For other M-Port accessories, please refer to the enclosed instructions that accompany that accessory.
03RUW2SHUDWLRQ
NOW PLAYING SCREEN
iPod
From a Buick 6
Bob Dylan
Highway 61 Revisited
Track 4/10
02:15 04:36
11:00AM
Connection Info
Play
Status
Song
Info
Shuffle
Icon
Repeat
Icon
Volume
Time
Elapsed
Total
Track
Time
Time Indicator bar
Clock
USING AN iPod* WITH YOUR MYRYAD
Select the M-Port input and then connect an
iPod (using the supplied M-Port Connector
cable) to the rear M-PORT input.
Pressing the PLAY/PAUSE (
) button on the
front panel or the PLAY (
) key on the remote
control will start playing from the first track
stored on the iPod.
PAUSING PLAYBACK
At any time during iPod playback:
From the front panel – press the PLAY/PAUSE
(
) button to enter or exit pause mode.
From the remote control – press the PAUSE (
)
key to enter or exit pause mode.
NOTE: Pressing the STOP (
) button on the front
panel or STOP key ( ) will also pause playback.
Playback stops after the last track of an album/
playlist.
TRACK SELECTION
From the front panel – press the SKIP/SCAN
buttons (
or ) to skip between tracks.
From the remote control – use the left or right
navigation keys (
or ) or CH–/CH+ to skip
between tracks.
The up and down navigation keys (
/ )
skip between albums except when playing
an audiobook or playlist or having made a
selection at track level.
Whilst playing, tracks can be selected by
number using the number keys on the remote
control.
ALBUM/ARTIST/PLAYLIST SELECTION
From the front panel – pressing the MORE/
MENU (
) button will enter the options menu.
From this menu it is possible to skip a number
of songs according to the context in which
the first song was chosen e.g. if a playlist was
chosen then playlist skip would be available. If
an artist was chosen then artist skip would be
available.
From the remote control – Pressing the MENU
key enters the options menu. Highlight ‘Music’
and press the ‘OK’ key to select.
Use the following remote control keys to
navigate the menus:
OK/
Select
Back
Next item/down
Previous item/up
When returning to this menu, it is possible to
select music starting from the same place as
the previous selection. Use ‘Playing Now’ when
available from the options menu.
SEARCHING BACKWARDS/FORWARDS
From the front panel – press and hold the SKIP/
SCAN buttons (
or ) to search through a
track.
From the remote control – use the Skip/scan
backwards or forwards (
or ) to search
through a track.
NOTE: If the SKIP/SCAN is held down for more
than 10 seconds, automatic scan will take over.
REPEAT/SHUFFLE
From the front panel – press the MORE/MENU
(
) button twice to access second page of the
options menu.
From the remote control – press the MENU
key and select ‘Repeat/Shuffle’ to access the
options menu.
Turn Repeat Off
–
Turns off the repeat
option.
Repeat One Track
Repeats a single track.
Repeat All Tracks
Repeats all the tracks.
Turn Shuffle Off
–
Turns off the shuffle
option.
Shuffle Tracks
Plays tracks in a random
order.
Shuffle Albums
Plays all the tracks in
an album in order but
albums are chosen at
random.
20
iPod COMPATIBILITY
The following iPods are compatible with the
Myryad
:
iPod touch (1st, 2nd & 3rd generations), iPhone,
iPhone 3G and iPhone 3GS.
iPod (4
th
& 5
th
generations) and iPod classic.
iPod nano (1st, 2nd, 3rd, 4
th
& 5
th
generations),
and iPod mini.
NOTE: When connecting an iPhone, the following
message is displayed:
‘This accessory is not optimized for
this iPhone
You may experience noise caused
by cellular interference and a
decrease in cellular signal strength.
’.
This is normal, select ‘Dismiss’ to continue.
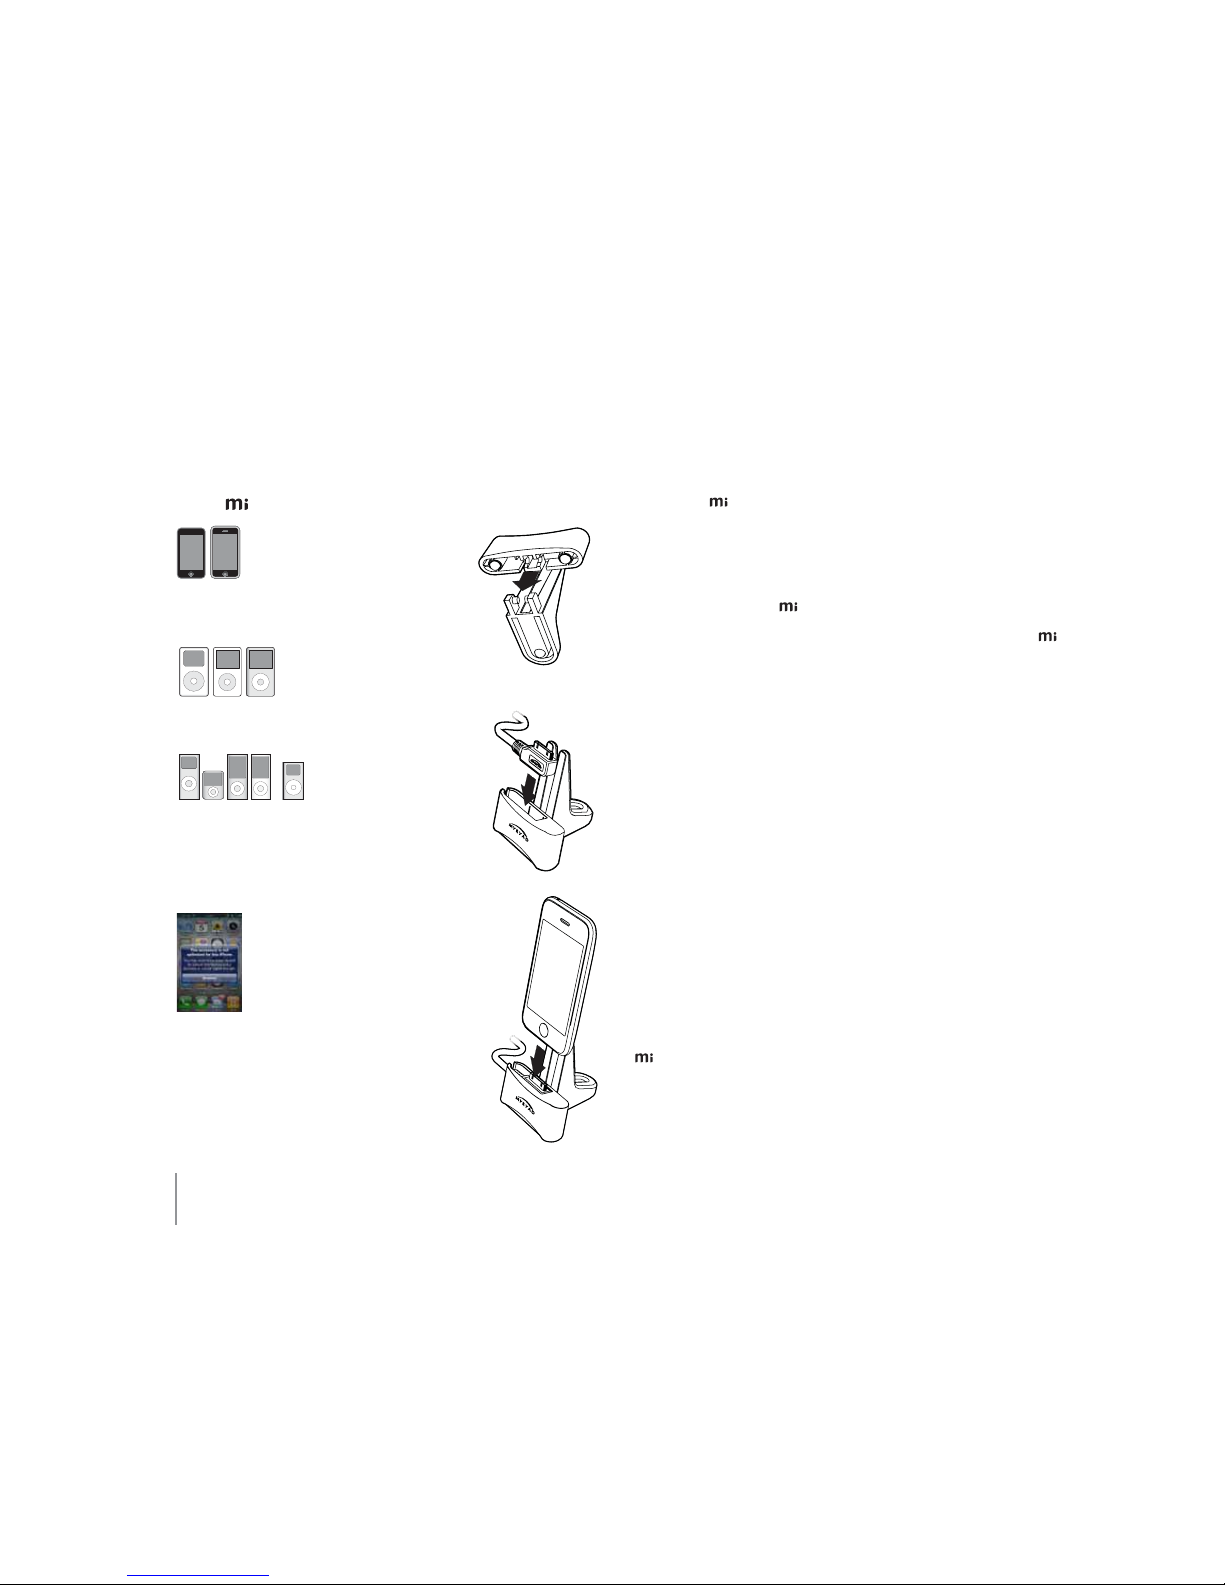
L3RG6WDQG
Use the iPod stand to support to support
and protect your iPod or iPhone while it is
connected via the M-Port lead to your
..
1. Clip the two parts of
the iPod stand together.
2. Clip the iPod
connector end of the
M-Port cable into the
base part of the iPod
stand.
3. Plug the iPod or
iPhone into the iPod
connector and the
other end of the M-Port
cable into the M-Port
connector on the rear of
the
$8;2SHUDWLRQ
OPTICAL DIGITAL INPUTS (DIG1/DIG2)
Connect optical digital audio cables to these
inputs. The inputs support 16bit PCM Stereo
(44.1kHz/48kHz).
M-PORT
Connect the supplied M-Port connector cable
to an iPod for audio and control options. The
iPod will also charge whilst connected to the
when the main power is on.
NOTE: Do not leave the iPod connected if the
power is fully off.
TAPE/CD-R INPUT/OUTPUT
The PLAY input carries the output analogue
audio signal from the connected recording
device. The RECORD output carries the signal
from whichever source device is currently
selected. This output may be connected to the
input of any recording device.
ANALOGUE STEREO INPUTS (AUX1/AUX2)
Connect the analogue audio output cables of
the appropriate devices to these sockets. Care
should be taken to match left (L) and right (R)
connectors to the correct sockets.

21
CARE AND HANDLING
OF COMPACT DISCS
• Fingerprints and dust should be carefully
wiped off the disc’s signal surface (shiny side)
with a soft cloth. Unlike vinyl records, the
CD has no grooves to collect microscopic
debris, so gentle wiping with a soft cloth
should remove most particles. Wipe in a
straight motion from the inside to the outside
of the disc. Small dust particles and light
stains should have absolutely no effect on
reproduction quality.
• Never use chemicals such as record sprays or
fluid, benzene or other solvents to clean CDs.
Such chemicals will irreparably damage the
disc’s plastic surface.
• Discs should be returned to their case after
use to avoid serious scratches that could cause
the laser pickup to skip.
• Do not expose discs to direct sunlight, high
humidity or high temperatures for extended
periods. Long exposure to high temperatures
can warp the disc
• Do not stick paper or write anything with a
ball-point pen on the disc surface.
NOTE: The
may not play all recordable (CD-R)
or rewritable (CD-RW) discs correctly. If there are
playback problems please try another brand of
disc or different CD burning software/equipment.
INSTALLING AND
REPLACING BATTERIES
The remote handset uses three 1.5V type
AAA batteries. To fit new batteries first open
the battery compartment in the rear of the
handset and remove any existing batteries.
Fit the new ones as directed by the symbols
moulded inside the battery compartment,
then replace the battery compartment cover.
The batteries should always be removed if they
are discharged (indicated by no remote control
operation or by operation only at very short
range), or if the remote control is not going to
be used for an extended period.
Please dispose of batteries responsibly.
TROUBLE SHOOTING
Some of the most common problems:
No sound:
• Power turned off or system in standby mode.
Check that the STANDBY (
) button on the
front panel is illuminated (red for standby,
white for powered on).
• UK version only: The fuse in the mains plug has
failed. Check and replace if necessary.
Disc does not play:
• No CD is inserted. Insert a CD, label side up.
• The CD has been loaded upside down. Reload
the disc label side up.
• The CD is badly scratched or dirty. Check the
CD and clean or replace as necessary.
• The CD DATA disc is not compatible with the
. Try another brand of disc or disc burning
software.
• Files are encoded in the wrong format. Ensure
that files encoded in the correct format (see
page 16, MP3 File Formats).
The CD skips part of the music:
• The CD is badly scratched or dirty. Check the
CD and clean or replace as necessary.
Sound in one channel only:
• Interconnect cable pulled loose or making
poor contact. Check and, if necessary, un-plug
and re-plug all cables.
Loud buzz or hum:
• Interconnect cable pulled partially out of its
socket.
• Defective interconnect cable.
For further help please visit the Myryad
website at: www.myryad.co.uk

22
5 Specifications
Inputs
Analogue Analogue Line Level Maximum Input 2.5V
Line Level Input Impedence 100k
Line Level Signal To Noise Level >90dB
Digital S/PDIF Optical Digital Input TOSLINK™
Supported Digital Formats PCM
Supported Digital Specifications 16bit, 48kHz, 44.1kHz
Outputs
Line Out (TAPE/CD-R PLAY) Signal To Noise Ratio (SNR) A-weighted >95dB
Frequency Response (20Hz – 20kHz) +/− 0.5dB
Speaker Terminals Signal To Noise Ratio (SNR) A-weighted >85dB
Frequency Response (20Hz – 20kHz) +/− 0.75dB
Peak Output Power (Per 4 Channel) 100W
Digital Output Sample Rate ( TOSLINK) 48kHz
Tuner
DAB/FM Receiver (where fitted) Tuning Range
Band III 174–240MHz
L-Band 1452–1490MHz
FM Band 87.5–108MHz
FM/AM Receiver (where fitted) Tuning Range
AM Band 522–1611MHz
FM Band 87.5–108MHz
General
Power Voltage 100V–240V AC, 50/60 Hz
Dimensions Size ( W × H × D) 350 × 87 × 330mm
Net weight 5.6kg

23
INDEX
A
Aerial Input 10
Album/Artist/playlist Selection (iPod) 19
Analogue stereo inputs 10
AUX Operation 20
B
Balance Adjustment 14
Bass Adjustment 14
Batteries 21
Bit Rate 16
C
CD
Care and handling 21
Disc Formats 16
File Naming Conventions 16
Folder Selection 15
MP3 file Formats 16
MP3 Playback 16
Pausing 15
Playing 15
Repeat/shuffle 16
Searching Backwards/Forwards 15
Track Selection 15
Clock Settings 14
Connection Diagram 8
D
DAB Scan 18
Disc drawer 11
Disc Formats 16
Display 11
F
Favourites
Remote Control Keys 12
Storing 18
File Naming Conventions 16
Folder Selection 15
Front PORT 11
H
Headphone output 11
I
Infra-red receiver 11
Infrared Input 9
Infrared Outputs 9
iPod
Album/Artist/Playlist Selection 19
Compatibility 20
Connection 10
iPod Stand 20
Other M-port Accessories 19
Pausing Playback 19
Repeat/shuffle 19
Searching Backwards/Forwards 19
Track Selection 19
Using an iPod with your Myryad
19
L
Language 14
Choosing your Language 7
M
M-Port
Operation 20
Rear Panel Connection 10
Using an iPod with your Myryad 19
MP3 file Formats 16
MP3 Playback 16
O
Optical Digital Inputs 10, 20
P
Pausing Playback 15
Power
Power Inlet 9
Power Switch 9
Preset
Tuning 18
Presets 17, 18
R
Radio
Presets 17
Tuning 17
Tuning Mode 17
Tuning Stations 17
Repeat/shuffle 15
Repeat/shuffle (iPod) 19
S
Sampling Rate 16
SETUP Menu 14
Soft Touch Keys (Front Panel) 11
Source
Choosing 14
Sources
From the remote control 13
Selecting from the front panel 13
Speaker Output 9
Specifications 22
Standby 11
T
TAPE/CD-R Input/output 10
Operation 20
Territory (Tuner) 14
Track Selection 15
Transport Controls 12
Treble Adjustment 14
Trouble shooting 21
Tuning Stations 17
Turn On Settings 14


Manuel du propriétaire
www.myryad.co.uk


27
Français
INSTALLATION ET
SÉCURITÉ
Ce lecteur de CD génère très peu de chaleur
mais il nécessite quand même une certaine
ventilation. Ne le placez pas sur un tapis ou autre
surface non rigide où il pourrait s’enfoncer, ce qui
bloquerait les entrées d’air situées sur le dessous.
Ne bloquez jamais les ouïes de ventilation situées
à l’arrière et sur les côtés. L’appareil ne doit pas
être installé dans un endroit confiné comme
dans une bibliothèque, sauf si vous mettez en
place la ventilation adéquate.
ATTENTION : CET APPAREIL NE DOIT PAS
ÊTRE EXPOSÉ À DES PROJECTION NI À DES
COULÉES DE LIQUIDE. NE PLACEZ JAMAIS
D’OBJETS PLEINS DE LIQUIDE, COMME DES
VASES, SUR L’APPAREIL.
LE COMMUTATEUR MARCHE/ARRÊT DU
PANNEAU ARRIÈRE COUPE UNIQUEMENT
L’ALIMENTATION SECTEUR. POUR ISOLER
TOTALEMENT L’APPAREIL, VOUS DEVEZ
DÉBRANCHER LE CORDON D’ALIMENTATION
DE L’APPAREIL OU DE LA PRISE MURALE.
LORSQUE VOUS UTILISEZ L’APPAREIL, L’UNE
OU L’AUTRE DE CES CONNEXIONS DOIT
ÊTRE FACILEMENT ACCESSIBLE.
Ne retirez pas le couvercle, et ne tentez pas de
modifier ou de réparer l’appareil vous-même.
Confiez toutes les tâches de maintenance
à un technicien qualifié. Le lecteur de CD
laser émet un rayon infrarouge invisible. Si,
pour une raison quelconque, le couvercle de
l’appareil est retiré, vous DEVEZ tenir compte
de l’avertissement suivant :
ATTENTION – OUVERT, ÉMET UN RAYON
LASER INVISIBLE. NE FIXEZ PAS CE RAYON,
QUE CE SOIT À L’ŒIL NU OU À L’AIDE
D’INSTRUMENTS OPTIQUES.
ACCESSOIRES
Le Myryad
est livré avec les accessoires
suivants :
• Cordon d’alimentation amovible adapté au
pays de vente du produit.
• Télécommande.
• 3 piles AAA pour la télécommande (dans
certains pays seulement)
• Le présent Manuel du propriétaire
• Câble de connexion M-Port
• Antenne FM et adaptateur
• Antenne cadre AM (sur certains modèles
uniquement)
• Socle iPod
MISE AU REBUT
Ce symbole signale que vous
ne devez pas jeter l’appareil
dans les ordures ménagères.
Réutilisez ou recyclez-le lorsque
c’est possible. Les équipements
électriques/électroniques
peuvent contenir des substances nocives
pour l’environnement. Pour connaître les
méthodes de mise au rebut qui protègent
l’environnement, contactez les autorités
locales.
NOTEZ VOTRE NUMÉRO DE SÉRIE
Notez ici le numéro de série de votre appareil.
Ce numéro figure sur le panneau arrière de
l’appareil ou sur l’autocollant de couleur
apposé à l’extérieur du carton d’expédition.
N° de série :

28
Contents
1 INTRODUCTION 29
Choix de la langue 29
2 SCHÉMA DE CONNEXION 30
3 CONNECTEURS DU PANNEAU ARRIÈRE 31
Commutateur Marche/Arrêt 31
Prise d’alimentation 31
Sorties haut-parleurs 31
Sorties infrarouges (IR1/IR2) 31
Entrée infrarouge (IR) 32
Sortie auxiliaire (pre-out) numérique 32
Entrées numériques optiques (DIG1/DIG2) 32
USB 32
M-Port 32
Entrée/sortie BANDE/CDR 32
Entrées stéréo analogiques (AUX1/AUX2) 32
4 UTILISATION DU SYSTÈME 33
Panneau avant 33
Standby (veille) 33
Tiroir de disque 33
Open/close (ouverture/fermeture ) 33
Récepteur infrarouge 33
Port en façade (prise jack) 33
Sortie casque 33
Écran 33
Télécommande 34
Port 34
Standby (veille) 34
Source selection (choix de la source) 34
Commande DIM 34
Écran (DISP) 34
Navigation 34
Favoris 34
Menu 34
Mode muet 34
Passage à la piste ou station préréglée suivante/
précédente 34
Contrôle du volume 34
Contrôles de transport 34
Touches numérotées 34
Choix d’une source 35
Navigation dans le menu 36
Select source (choix de la source) 36
More/menu (autres/menu) 36
Select source (choix de la source) 36
Menu 36
Menu de configuration 36
Utilisation du disque 37
Formats de disque 37
Écran now playing (lecture en cours) 37
Lecture d’un CD 37
Mise en pause de la lecture 37
Sélection de la piste 37
Sélection du dossier de musique CD DATA 37
Recherche vers l’avant/l’arrière 37
Répétition/lecture aléatoire 38
Lecture de fichiers mp3 38
Formats de disque 38
Formats de fichier MP3 38
Conventions concernant les noms de fichier 38
Utilisation de la radio 39
Écran de réglage des stations 39
Sélection du mode de réglage des stations radio 39
Réglage des stations 39
Réglage d’une station numérique (dab) 39
Réglage d’une station FM ou AM 39
Stockage de préréglages 39
Activation d’une station préréglée 40
Recherche de stations numériques (DAB) 40
Favoris 40
Mes favoris 40
Utilisation du m-port 41
Mise en pause de la lecture 41
Sélection de la piste 41
Sélection de l’album/de l’artiste/de la liste de lecture 4 1
Recherche vers l’avant/l’arrière 41
Répétition/lecture aléatoire 41
Socle iPod
42
Utilisation d’une sortie auxiliaire (AUX) 42
Entrées numériques optiques (DIG1/DIG2) 42
M-Port 42
Entrée/sortie BANDE/CD-R 42
Entrées stéréo analogiques (AUX1/AUX2) 42
Entretien et manipulation des disques
compacts 43
Installation et remplacement des piles 43
5 SPÉCIFICATIONS 44
29
Français
1 INTRODUCTION
Le Myryad Music Integrated est
conçu pour combiner élégance de style et
reproduction sonore de haute qualité.
Le
est un lecteur de CD à télécommande
riche en fonctions, doublé d’un tuner DAB/
FM (AM/FM dans certaines régions) et d’un
amplificateur intégré haute qualité. Il permet
de lire aussi bien les CD standard que les
disques CD DATA.
Le offre une large gamme d’options
d’entrée :
• Les 2 entrées numériques et les 2 entrées
analogiques permettent de connecter des
dispositifs externes.
• Le port M-Port permet de connecter
et de contrôler un iPod™ ou d’autres
accessoires M-Port.
• Les entrées/sorties d’enregistrement et de
lecture analogique prennent en charge la
connexion d’appareils d’enregistrement.
CHOIX DE LA LANGUE
Lorsque le est allumé pour la première
fois, il vous présente une option pour choisir la
langue d’utilisation à partir d’une liste, puis des
paramètres région pour le tuner (Amérique du
Nord ou le reste du monde). Ces paramètres
peuvent être modifiés ultérieurement — voir
page 14
30
2 SCHÉMA DE CONNEXION
HAUT-PARLEUR DROIT
HAUT-PARLEUR GAUCHE
ANTENNE
DÉCODEUR NUMÉRIQUE
Ou autre connexion
analogique
TÉLÉVISION NUMÉRIQUE
Au autre connexion numérique sur câble
numérique optique
IPOD
Avec le câble
M-Port fourni
ALIMENTATION SECTEUR
Avec le cordon d’alimentation
fourni
LECTEUR MUSICAL RÉSEAU
Ou autre connexion numérique sur câble
numérique optique
31
Français
12 c1 2 3
7
9
8
54 6 10
11
12 a 12 b
3 CONNECTEURS DU PANNEAU ARRIÈRE
1. COMMUTATEUR MARCHE/ARRÊT
Appuyez sur un côté de cet interrupteur à
bascule (le côté le plus proche du panneau
arrière) pour allumer le . et sur l’autre côté
(vers les connecteurs de sortie des enceintes)
pour l’éteindre. Lorsque l’interrupteur
d’alimentation est dans la position OFF,
l’appareil n’est plus sous tension. Dans cette
situation l’appareil ne peut être allumé ni par
le panneau avant ni par la télécommande.
Lorsque l’interrupteur d’alimentation est
dans la position ON (et la prise d’alimentation
correctement insérée dans une prise secteur
sous tension) l’appareil s’allume par la touche
veille qui est constamment allumé en rouge
alors que tous les indicateurs du panneau
avant sont éteints. Maintenant l’appareil est en
mode veille.
REMARQUE : Il est recommandé de mettre le
commutateur MARCHE/ARRÊT sur OFF si vous
prévoyez de ne pas utiliser l’appareil pendant
une longue période. Débranchez tous les iPod
lorsque l’appareil est éteint.
2. PRISE D’ALIMENTATION
Avant tout branchement, vérifiez que la
tension secteur indiquée sur le panneau
arrière de l’appareil correspond à votre circuit
électrique local.
Branchez la prise femelle du cordon
d’alimentation sur la prise d’alimentation à
l’arrière du
. Branchez l’extrémité mâle du
cordon sur une prise secteur murale alimentée
ou sur une rallonge à prise de terre compatible.
3. SORTIES HAUT-PARLEURS
Chaque canal peut gérer n’importe quel type
de haut-parleur d’une impédance de 4
Μ
(Ohms) ou supérieure. Les connecteurs de
haut-parleur sont des bornes de raccordement
haute intensité, codées en rouge et noir.
ATTENTION : LES CONNECTEURS DE HAUTPARLEUR SONT MARQUÉS D’UN SYMBOLE
« DANGER » POUR SIGNALER QU’ILS
PEUVENT ÊTRE SOUS TENSION ÉLECTRIQUE.
LISEZ ATTENTIVEMENT LES INSTRUCTIONS
DE CÂBLAGE DE VOS HAUT-PARLEURS.
IL EST RECOMMANDÉ D’UTILISER DES
CONNECTEURS DÉJÀ CÂBLÉS, SI POSSIBLE.
Pour une gestion correcte des images, il est
important de brancher tous les haut-parleurs
d’une même pièce « en phase ». Pour une mise en
phase correcte, assurez-vous que le connecteur
noir (−) de l’amplificateur est branché sur le
connecteur noir (−) du haut-parleur. De même,
branchez le connecteur rouge (+) de l’ampli sur le
connecteur rouge du haut-parleur.
4. SORTIES INFRAROUGES (IR1/IR2)
Ces sorties relaient les rayons infrarouges
destinées à l’entrée infrarouge (modulée à
 Loading...