

Myryad MDP500G6 owners Manual
MDP 500 (G6)
DIGITAL
PREAMPLIFIER-PROCESSOR
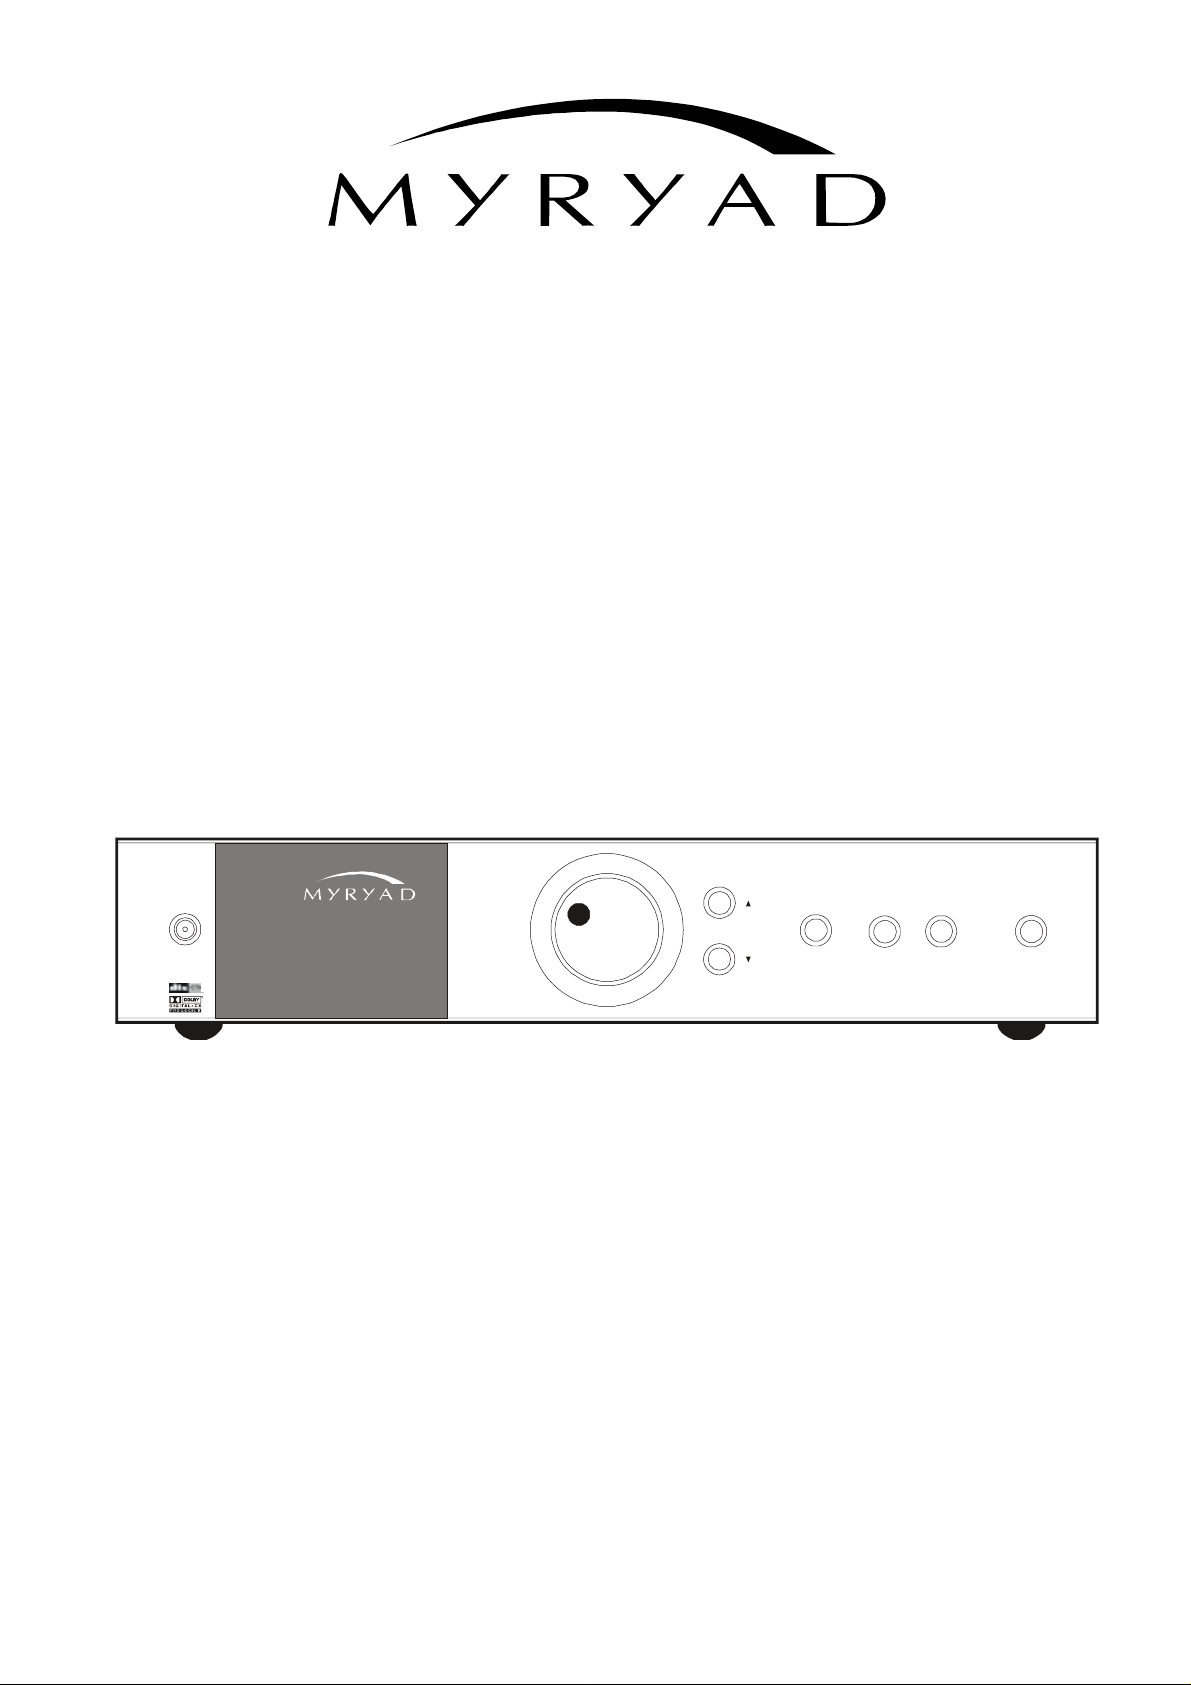
STA N DBY
SO UR CE
SELECT
TAPE
MONITOR MODE CINE EQ
MDP 500
Digital Prea mp lif ie r - P rocess or
7.1 CHAN NEL
INPUT
OWNER’S MANUAL

Contents
• Introduction
• Installation and safety notes
• Accessories
• Setting up your system
• Rear panel connections
• Operating your system
• Front panel controls
• Remote control handset operation
• Setup menus
• Audio setup menu
• Speaker setup menu
• Source setup menu
• Display setup menu
• Trigger setup menu
• Using the remote in CD and DVD modes
• Reprogramming the remote
• Installing and replacing batteries
• Trouble-shooting guide
• Appendix: Details of decoding and processing modes
• Specifications
Page 2
Page 2
Page 2
Page 3
Page 3
Page 6
Page 6
Page 8
Page 10
Page 11
Page 12
Page 14
Page 15
Page 15
Page 16
Page 16
Page 16
Page 17
Page 18
Page 19
1

Introduction
The Myryad MDP 500 Digital Preamplifier-Processor has been designed to offer a combination of high quality audio and
video performance with simple yet elegant styling. The MDP 500 forms the heart of a high-end home cinema and audio
system and should be used with high quality power amplifiers such as the Myryad MA 240, MA 360 and MA 500 two,
three and five channel power amplifiers.
The MDP 500 can decode a wide variety of discrete surround material including Dolby Digital1, Dolby Digital Surround
1
, DTS2, DTS-ES Matrix and Discrete2, DTS Neo:6 2 and a proprietary mode “Surround 6.1” – together with the ability
EX
to down-mix any source to mono or stereo. It also functions as a high quality stereo preamplifier and any stereo
analogue source can be sampled at 48kHz for further digital processing, or at 96kHz for the best sound quality without
any further processing. The 7.1 channel input is equipped with comprehensive volume control facilities and ensures that
the MDP 500 will remain compatible with new multi-channel formats as they appear – as well as providing a “pure
analogue” bypass input for audiophile analogue sources such as DVD-Audio and SACD.
The MDP 500 also has several music modes that may be used to enhance a normal two channel stereo signal. These
modes include Dolby Pro Logic
1
, Dolby Pro Logic II 1, DTS Neo:6 2, and two “music” modes: Natural, and Party.
The MDP 500 can accept up to six digital input sources, eight line-level input sources, plus a tape loop and two
additional record outputs. It has six composite and S-Video inputs, composite and S-Video monitor outputs, composite
and S-video record outputs and an S-Video monitor output without OSD (On Screen Display) for highest quality video
performance.
The MDP 500 automatically senses the type of the incoming digital audio signal and selects the best mode for that
signal. The user can also bypass the digital section of the MDP 500 and connect, for example, a high quality stereo
source to the Left and Right channels of the 7.1 channel input.
The MDP 500 is supplied with a comprehensive learning remote control handset which is pre-programmed to control
the MDP 500 and other Myryad products. In addition to the MDP 500 it can also control up to 7 other products using a
combination of the pre-programmed Myryad codes and either recalling one of its internally stored code sets, or learning
the codes of a product’s own remote.
Options for system integration are provided by My-Link input/output connectors to interface with other Myryad products,
by the three 12VDC trigger outputs to control external equipment and by communication with a PC or home automation
system via the RS 232 interface.
Installation note
This preamplifier generates a modest amount of heat and thus requires ventilation. Do not place it on a rug or other soft
surface into which it could sink. The MDP 500 should not be placed in a built-in installation such as a bookcase or rack
unless proper ventilation is provided.
CAUTION: To prevent a fire or shock hazard, do not permit this product to become wet. If liquid is accidentally
spilled on it, immediately shut off its power at the wall socket and unplug the AC power cord. Allow sufficient time for
complete evaporation to occur before operating the preamplifier again. If the liquid is anything but water and/or alcohol,
the preamplifier should be examined by a qualified service technician before it is used again.
Do not remove the cover, or attempt to modify or repair the preamplifier yourself. Refer all servicing to a qualified
technician.
Accessories - Your MDP 500 is supplied complete with the following accessories:
• Separate mains power cord to suit country of purchase.
• Myryad Audio-Video Learning Remote Control handset.
• Four AAA batteries for handset
• Home Theater Master SL-9000 Operating Manual
1. Manufactured under license from Dolby Laboratories.
Dolby", "Pro Logic", "Surround EX", and the double-D symbol are trademarks of Dolby Laboratories.
2. “DTS”, “DTS-ES Extended Surround”, and “Neo:6” are trademarks of Digital Theater Systems, Inc.
2
A
A
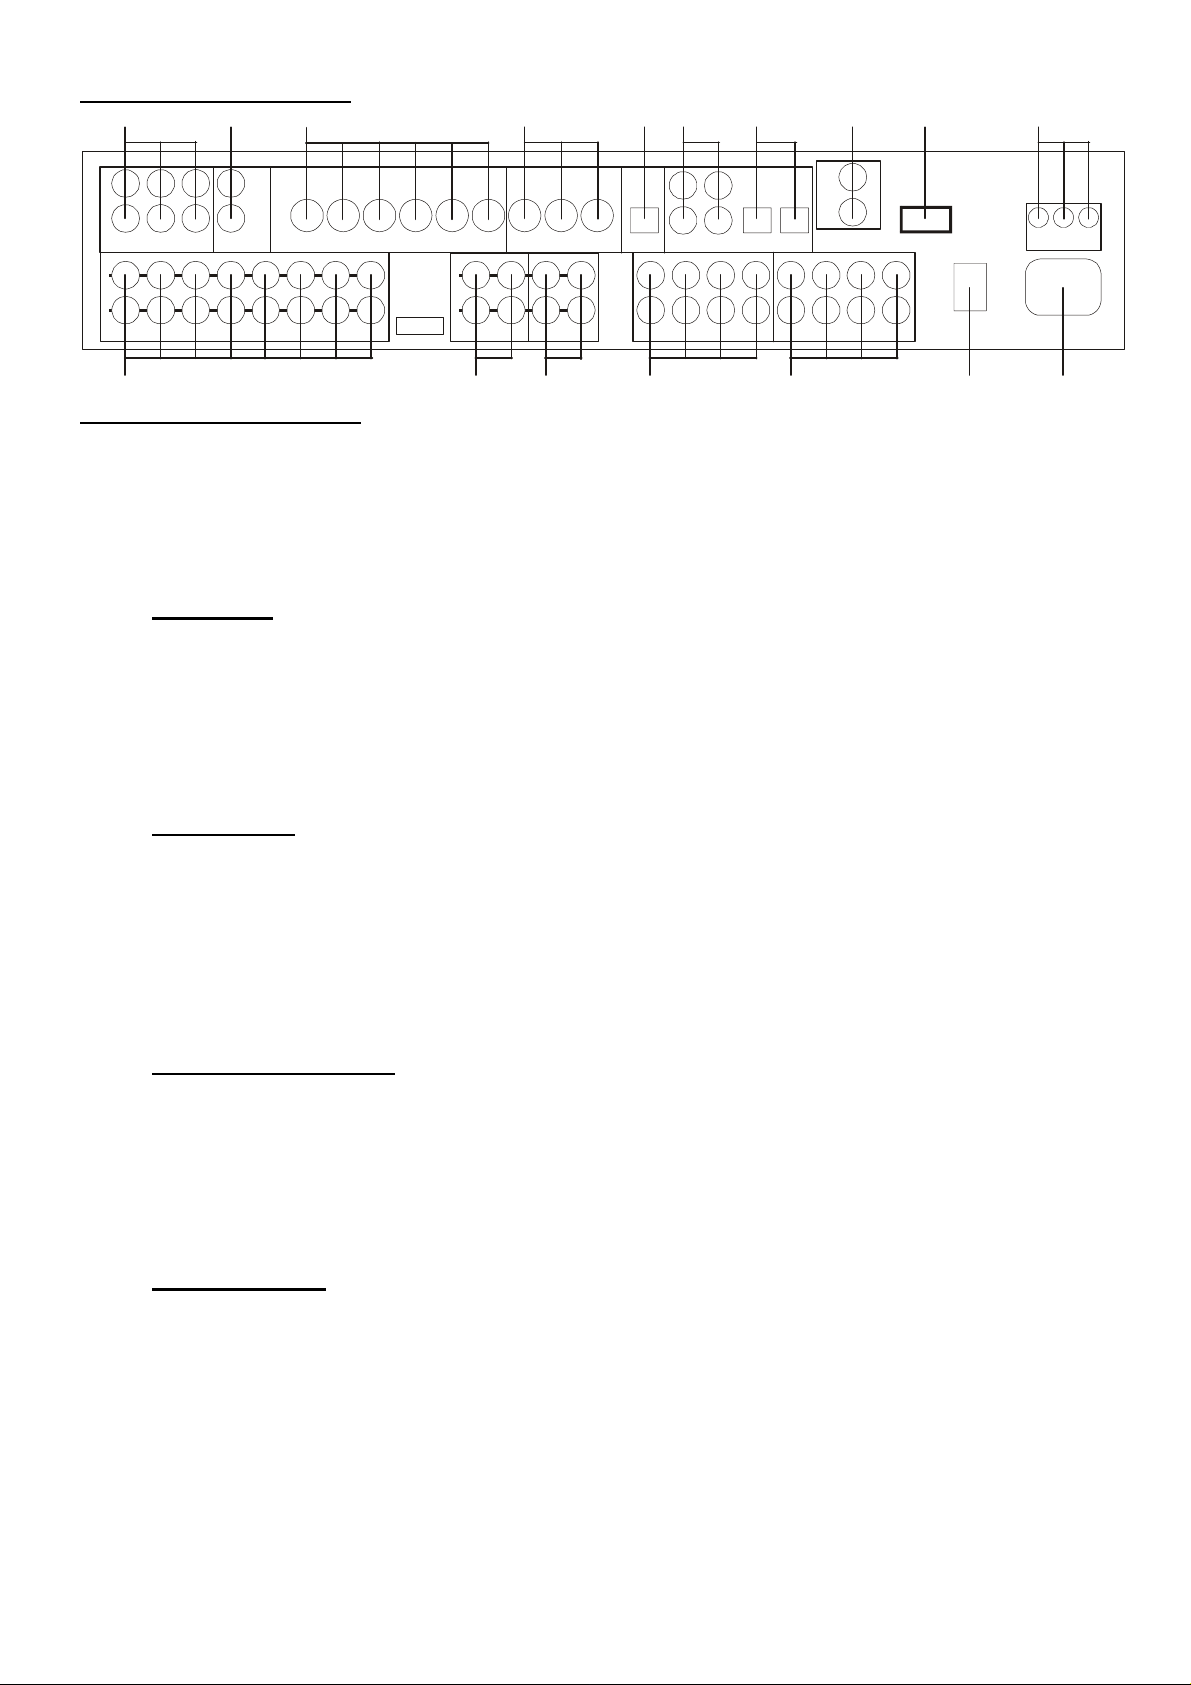
SETTING UP YOUR SYSTEM
58 17910 151614
6
7
OUT
MY-LINK
IN
7.1 CHANNEL OUTPUTS
RS232
CONTROL
INPUT
POWER
OFF
ON
123
REMOTE TR IGGER
OUTPUTS
DVD
REC
MON
COMPOSIT E
VIDEO OUTPUTS
ANALOGU E INPU T S
AUX 2 AUX 1 SAT VCR TV DVD MON-HQ MON-OSD REC
S-VIDEO INPUTS S-VIDEO OUTPUTS
MDP 500
DIGITAL
LL
PREAM PLIFIER
PROCESSOR
SERIAL
RR
NUMBER
RECORD OU TTAPE
UX 2
SAT TV
UX 1 VCR
COMPO SI TE VIDEO I N P UTS
AUX 2 AUX 1 SAT VCR TV DVD CD TUNER PLAY REC 1 2
DIGITAL DIGITAL INP U T S
OUTPUT
COAX 1 COAX 3
COAX 2
COAX 4 OPT 1 OPT 2
LF LFLS LSCTR CTRLB LB
RF RFRS RSSUB SUBRB RB
7.1 CHANNEL INPUTS
3 4 13 11 12 2 1
REAR PANEL CONNECTIONS
CAUTION: Before making any connections to your MDP 500 make sure that it is switched OFF at the rear and that its
power cord is disconnected (either at the wall socket, or at the rear of the MDP 500). All equipment being connected to
the MDP 500, either directly or indirectly, must also be switched OFF before any connections are made.
Failure to follow these precautions may result in excessive ground currents flowing briefly into the MDP 500 which can
permanently damage internal connections and will invalidate your Warranty.
1. POWER inlet
Before making any connection, check that the mains voltage or range of voltages printed on the rear panel includes
your local mains supply voltage.
Plug the female (socket) end of the power cord into the power inlet on the rear of the preamplifier. Plug the male (plug)
end of the cord into a "live" wall socket or a suitable heavy duty extension cable. Connect the MDP 500 only to a
grounded wall socket.
UK version only:
The mains plug is suppli ed fitted with a fuse. It should only be replaced with a fus e of the same rating which complies with BS1362.
2. POWER switch
Press the bottom of this rocker switch to switch the preamplifier ON and the top to switch it OFF. When the POWER
switch is in the OFF position all power is disconnected from the preamplifier. In this condition the MDP 500 cannot be
powered up from the front panel or the remote control. When the POWER switch is in the ON position (and the power
cord correctly inserted and plugged into a live wall socket) the MDP 500 will power up in standby mode (see FRONT
PANEL CONTROLS, STANDBY on page 6).
It is recommended that the POWER switch is turned OFF if the MDP 500 is not going to be used for an extended period
of time. CAUTION: always switch the MDP 500 to STANDBY before switching the POWER off to avoid loud noises
through the loudspeakers.
3. ANALOGUE stereo inputs
Connect the analogue audio output cables of the appropriate devices to these sockets. Always connect these inputs,
even though you may intend to listen only via the digital inputs (for example in the case of a CD or DVD player). This
ensures that a signal will always be present at the record outputs.
The signal from ANALOGUE stereo inputs is fed to an A-D converter that converts the signal to digital format. The
signal can then be processed using Dolby Pro Logic, Pro Logic II, DTS Neo:6 or other modes. The signal is then fed to
D-A converters and thence to the 7.1 channel line outputs. The selected signal is also fed to the three ANALOGUE
record outputs. [A-D = Analogue to Digital; D-A = Digital to Analogue]
4. TAPE input/output
These connectors are suited to any type of tape recorder, including high-quality "3-head" types which allow you to
monitor the signal off the tape whilst it is being recorded. Connect a stereo cable from the TAPE REC output sockets of
the preamp to the LINE IN or RECORD IN sockets on your tape deck. Connect a second stereo cable from the TAPE
PLAY input sockets of the preamp to the LINE OUT or PLAY OUT sockets on your tape deck.
The TAPE loop allows you to monitor the quality of an Analogue recording whilst the recording is taking place. It can
also be used for connecting devices such as equalizers into the analogue signal path. Note: if an equalizer is used it
must be bypassed when listening to Pro Logic sources to ensure correct decoding.
Any ANALOGUE stereo source selected for listening on the MDP 500 will automatically be fed to the TAPE REC output
sockets for recording. Recordings cannot be made from a source connected to the digital inputs or the 7.1-channel
inputs.
3

5. COMPOSITE VIDEO inputs
Connect the composite video output cables from your video sources to these inputs. Be careful to use inputs with the
same name for the composite video, S-Video and analogue audio cables from a single source (e.g. cables from a VCR
should go to the VCR S-VIDEO, VCR COMPOSITE VIDEO and VCR ANALOGUE inputs).
The composite video signal is selected from these sources, and the signal is fed out from the COMPOSITE VIDEO
record (REC) and monitor (MON) outputs. On Screen Display information is added to the monitor (MON) output.
6. COMPOSITE VIDEO RECORD and MONITOR outputs
Connect the composite video input of your VCR to the COMPOSITE VIDEO REC output. Connect the composite video
input of your display device (TV) to the COMPOSITE VIDEO MON output. The On Screen Display (OSD) information is
present on this output. You can also use the COMPOSITE VIDEO MON output even if no composite video source is
connected. The selected S-Video signal is down-mixed to this output and can be used for monitoring. The OSD can be
switched off on the MON output using the Display setup menu.
7. S-VIDEO inputs
Connect the S-Video output cables from your video sources to these inputs. Be careful to use inputs with the same
name for the composite video, S-Video and analogue audio cables from a single source.
S-Video signals are of higher quality than composite video signals. Therefore if your source devices have S-Video
outputs it is recommended that you use them, together with the S-Video inputs on your display. S-Video inputs are also
automatically down-mixed to feed the composite video MON OSD output for displays which do not have S-Video inputs.
8. S-VIDEO RECORD, MONITOR and High Quality MONITOR outputs
Connect the S-Video input of your VCR to the S-VIDEO REC output. Connect the S-Video input of your display device
(TV) to the S-VIDEO MON output. The On Screen Display information is displayed in this output, but may be switched
off using the Display setup menu. The MON HQ output displays the selected source without routing it through the On
Screen Display circuit thus giving the best possible video quality. If a composite video source is selected, the S-Video
outputs will carry only a black-and-white video signal.
9. COAXIAL DIGITAL audio inputs
Connect the coaxial digital output cables of your source devices to these inputs. The digital inputs can be freely
associated to any analogue audio or audio-video sources (see Source setup menu for further reference), but the MDP
500 is supplied set up as follows:
Digital audio input Associated to input Re-assigned to input
COAX 1 AUX 1
COAX 2 AUX 2
COAX 3 SAT
COAX 4 TUNER
OPTICAL 1 CD
OPTICAL 2 DVD
If you re-assign any of the digital inputs to different analogue inputs, record this in the blank column provided. You may
assign a digital input to more than one analogue input if desired.
Note: The “SPDIF” digital interface is very sensitive to the quality of connection when using 96kHz sample rate
sources. Always use a high quality digital coax interconnect if 24bit/96kHz operation is desired.
10. OPTICAL DIGITAL audio inputs
Connect the Optical Digital audio cables to these inputs. These inputs can also be freely associated to any analogue
audio or audio-video sources, but the MDP 500 is supplied set up as shown in the table above.
Note: The “SPDIF” digital interface is very sensitive to the quality of connection when using 96kHz sample rate
sources. Always use a high quality optical interconnect if 24bit/96kHz operation is desired.
4

11. 7.1 CHANNEL INPUTS (Left Front, Centre, Right Front, Left Surround, Right Surround, Left Back, Right
Back and Subwoofer)
Connect the audio line outputs from any multi-channel analogue source such as a DVD-Audio player or Super Audio CD
(SACD) player to these inputs using up to eight interconnect cables (or four stereo cables) as necessary. The Left Back
and Right Back channels are provided for future surround formats. The 7.1 CHANNEL inputs may be used with any
mono, stereo, 5.1 channel or 7.1 channel source.
You may use these inputs as an “Analogue Direct” input if you want to bypass the digital section of the MDP 500 (use
Left Front and Right Front for a stereo source). The record outputs are not active when the 7.1 channel input is
selected.
12. 7.1 CHANNEL OUTPUTS (Left Front, Centre, Right Front, Left Surround, Right Surround, Left Back,
Right Back and Subwoofer)
Connect these outputs to the line inputs of your power amplifier(s), such as the Myryad MA 240, MA 360 or MA 500 two,
three and five channel power amplifiers. The SUB output will normally be fed to the low-level Line Input of an active
subwoofer. Alternatively it may feed a separate power amplifier and passive subwoofer.
If the setup has only one rear speaker, its amplifier should be connected to the Left Back output.
13. RECORD 1 & 2 outputs
The REC outputs carry the signal from whichever ANALOGUE stereo source device is currently selected (except the
source connected to the TAPE PLAY input or the 7.1 CHANNEL input). These outputs may be connected to the inputs
of any recording device, or the signal may be used in a multi-room set-up to feed power amplifiers in other rooms.
14. DIGITAL output
Connect the optical input of your digital recording device to the DIGITAL output. The selected digital source is fed to this
output in optical digital format.
15. MY-LINK input/output
When the MDP 500 is used in a system with other Myryad M-Series products, all may be joined together via the MyLink. The MY-LINK output of the MDP 500 should be connected to the MY-LINK input of the next product and its MYLINK output connected to the MY-LINK input of the next and so on in “daisy-chain” fashion. This inter-linking provides
three main benefits.
Firstly, when the MDP 500 is switched out of (or into) STANDBY, either using the front panel switch or the remote
control, all the other linked Myryad products will switch out of (or into) STANDBY at the same time. Note: there is a short
processing delay (about 1.5 seconds) between the MDP 500 switching into STANDBY and the My-Link control pulse
switching the other linked units into STANDBY.
Secondly, only one linked product with its own Infra Red receiver (e.g. a Myryad CD player, but not a Power Amplifier)
needs to be “in line of sight” of the remote handset. The My-Link will carry the remote command from any IR receiver to
all the other products that are linked together.
Finally, the MY-LINK may be used to interface with various proprietary multi-room control systems. Contact your Myryad
dealer or Myryad Systems Ltd. for details or visit the Myryad website at www.myryad.co.uk.
16. RS 232 CONTROL interface
You can connect the MDP 500 to a home automation system through this interface. Contact your Myryad dealer or
Myryad Systems Ltd. for details or visit the Myryad website at www.myryad.co.uk.
17. REMOTE TRIGGER OUTPUTS – 1. 2 and 3
You can connect the DC trigger inputs of any audio or other equipment to these TRIGGER outputs. The TRIGGER
outputs may be activated when the MDP 500 is switched out of STANDBY and turned off again immediately when the
MDP 500 is switched into STANDBY again. The TRIGGER outputs may be programmed to be activated under other
conditions (see Trigger setup menu section, page 15).
The TRIGGER outputs deliver +12V DC with a maximum current of about 40mA from each of the three trigger outputs.
CAUTION: THE TRIGGERS SHOULD ONLY BE CONNECTED OR DISCONNECTED WHEN THE POWER SWITCH
IS OFF, OR THE UNIT IS DISCONNECTED FROM MAINS POWER.
5
 Loading...