

Page 1

D210c En|
User Guide
Page 2

3
4
7
8
10
12
14
19
22
3
3
4
5
6
12
14
16
16
17
18
19
20
Content
Introduction
Internet Connectivity
How to connect your D210c using Bluetooth
How to connect your D210c using Wi-Fi
How to connect your D210c using SIM Card
Activation
Accepting Payments
D210c Functions
Warranty and Return Policy
Scope
Related Documentation
Using D210c with Mobile Phone
Using D210c with wireless (Wi-Fi) router
Using D210c with SIM card
Activation code
Sales Transaction
Processing Magnetic Stripe Cards
Processing Contactless Cards (PayPass or payWave)
Refund Transaction
Last transaction void
TRANSACTION menu
SETTINGS menu
Page 3

Introduction
Congratulations!
џ
џ
џ
џ
џ
www.myPOS.eu/resources
Your new myPOS D210c (D210c in short) from iPay International is a
revolutionary mobile terminal for securely accepting payments with credit
and debit cards on the go. In order to start using it, you need to register for a
free e-money account (myPOS) to which your funds will be transferred and
to activate the D210c device.
If you need more than one D210c device for your business, you can purchase
and activate additional myPOS devices. The funds from all myPOS devices
will be transferred to your myPOS account.
Scope
This user guide contains step-by-step instructions for using your D210c
device to accept credit and debit card payments on the go. The purpose of
this document is to specify the main functions of the D210c.
The Quick User Guide provides information about:
Internet connectivity capabilities of D210c
How to use Bluetooth, Wi-Fi or SIM card on D210c
Activation
Accepting Payments
Main menus and functions
The Quick User Guide does not include information about the technical
specifications of the device, which is provided separately in D210c Technical
Specifications & Warranty document in your D210c box.
Related documentation
The latest version of this Quick User Guide can be found on-line on
.
EN 3|
Page 4
Internet connectivity
In order to be able to process payments with credit and debit cards, the
D210c device has to be connected to the Internet. Your D210c can use the
internet connection of your mobile phone (via Bluetooth or personal
hotspot), a wireless router or a SIM card.
You can switch between the different connection types any time using the
„Change connection type“ option in the Settings menu.
Using D210c with a mobile phone
(via Bluetooth or personal hotspot)
Make sure you have an internet connection (data) activated on your mobile
phone. In order to connect your D210c device to your mobile phone, please
read carefully the information below. Please be aware that different
operating systems may not support all connectivity modes.
A. iOS 6.0 or later
If you are using an iPhone which runs iOS 6.0 or later, you can
connect your D210c ONLY via Bluetooth.
Download our free myPOS Mobile App from Apple store and install it on your
mobile phone. Starting the Mobile application will automatically launch a
communication service. You can then close your Mobile App as it is not
needed anymore for your D210c operation. Please follow the procedure
described in the “How to connect your D210c with Bluetooth” section.
B. Android 3.0 or later
If you are using a mobile phone which runs Android 3.0 or later,
you can connect your D210c via Bluetooth or Wi-Fi (Personal
Hotspot).
To connect via Bluetooth, download the free myPOS Mobile App from
Google Play Store and install it on your mobile phone. Starting the Mobile
application will automatically launch a communication service. You can then
close your Mobile App as it is not needed anymore for your D210c operation.
Please follow the procedure described in the “How to connect your D210c
with Bluetooth” section.
To connect via Wi-Fi (Personal Hotspot) activated on your mobile phone,
EN 4|
Page 5

please follow the procedure described in the “How to connect your D210c
with Wi-Fi” section. The myPOS Mobile application is not required for using
this type of connection but you can download and use it for managing your
e-money account.
C. Windows Phone 8.0 or later
If you are using a mobile phone which runs Windows Phone 8.0
or later, you can connect your D210c ONLY via Wi-Fi (Personal
Hotspot).
To connect via Wi-Fi (Personal Hotspot) activated on your mobile phone,
please follow the procedure described in the “How to connect your D210c
with Wi-Fi” section. The myPOS Mobile application is not required for using
this type of connection but you can download and use it for managing your
e-money account.
Using D210c with a wireless (Wi-Fi) router
Make sure your Wi-Fi router is connected to the Internet. In order to connect
your D210c device to your Wi-Fi router, please read carefully the information
below. Please be aware that the supported encryption methods for Wi-Fi
networks are WPA and WPA2.
For proper operation of the D210c device, please make sure that:
your router does not have any
network traffic restrictions or filters
your router does not require setting a
special TCP/IP configuration on your
network devices (D210c will use the
default settings only)
network signal is strong enough. The
network signal strength is indicated via
a Wi-Fi signal icon located in the upper
part of your D210c screen.
To connect via a Wi-Fi router, please follow the procedure described in the
“How to connect your D210c with Wi-Fi” section.
џ
џ
џ
EN 5|
Page 6
Using D210c with a SIM card
Make sure your SIM card has the mobile data service activated.
For proper operation of the D210c device, please make sure that:
the SIM card is inserted correctly in SIM
slot. Please refer to pictogram on page
10.
you have a SIM adapter if your SIM card
is micro or nano. Your D210c device is
working with standard SIM card size.
network signal is strong enough. The
network strength is indicated via a signal
strength icon located in the upper part of
your D210c screen.
To connect via a SIM card, please follow the procedure described in the
“How to connect D210c using SIM card” section.
WARNING! Please proceed with caution if you are using SIM card adapter
for fitting a smaller SIM card into a myPOS D210c as there is a high risk of
damaging your POS device. This damage is not covered by the warranty.
We recommend you placing a regular-sized SIM card instead.
џ
џ
џ
EN 6|
Page 7
How to connect your D210c with Bluetooth
Step 1:
Step 2:
Step 3:
Make sure the Bluetooth on your mobile phone is ON (activated). Switch ON
your D210c and wait for a few seconds until it completes the initialization.
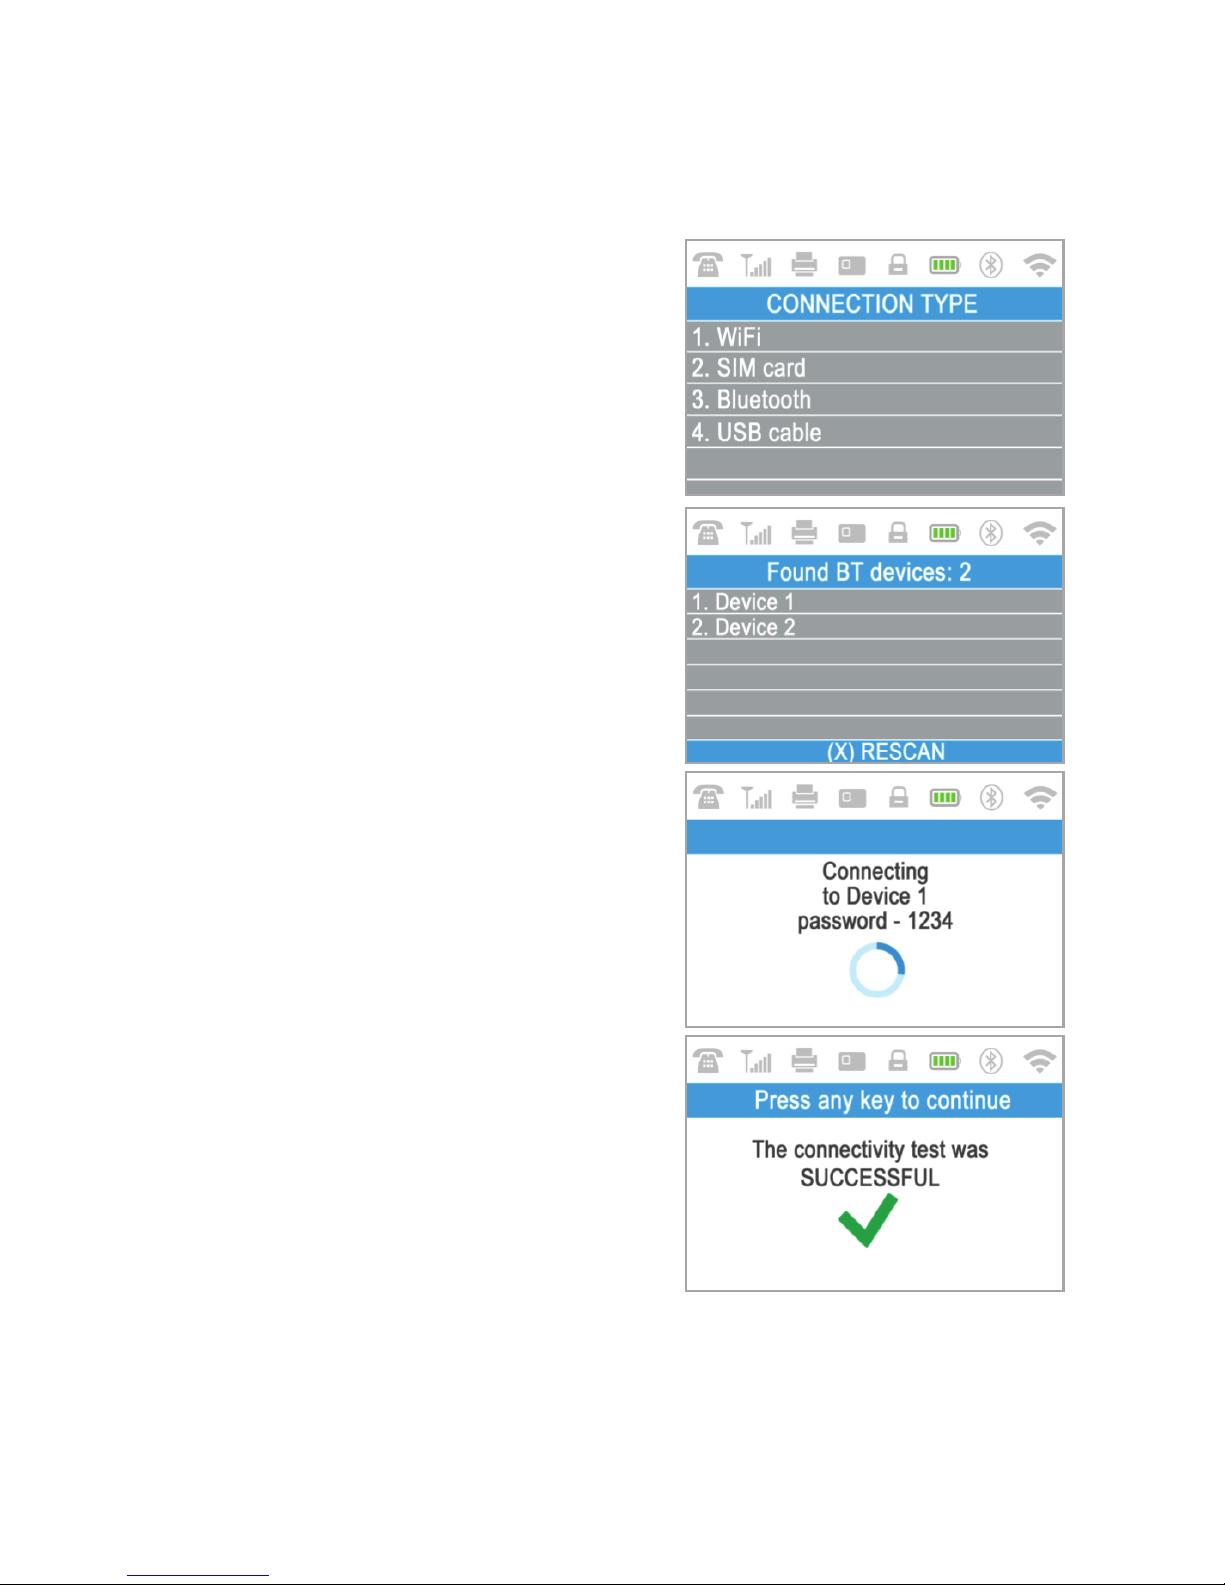
The D210c will scan for available
(discoverable) Bluetooth devices in its
range and will display a list of their names
on the screen.
Choose your mobile phone's
name from the list and select it by pressing
its respective number (from 1 to 6) on the
keyboard. If there are more than 6
available devices on the list, you can
switch to the next page of the list by
pressing the up and down arrow buttons
from the keyboard. If you cannot find your
mobile phone on the list, press (X) and
D210c will rescan (search again) for
available (discoverable) devices. Make
su re you r mo bile pho ne is in a
discoverable mode.
Depending on the device, you might have
to tap Pair to accept the password. The
password is shown on the myPOS device
screen.
Pair the D210c with your mobile
phone. Once it has been paired, D210c will
perform a test of the connection to
myPOS. If the test is successful, the
following D210c screen will appear:
If the connection test is unsuccessful, the
D210c screen will display an error message. Please check and make sure your
mobile phone is connected to the Internet.
When you pair D210c with a Bluetooth device, the information is saved so
that the next time you are within the range of the same Bluetooth device, the
terminal will connect to it automatically.
EN 7|
Page 8
How to connect your D210c with Wi-Fi
Step 1:
Step 2:
џStep 3:
Make sure the D210c is in the range of your Wi-Fi network. Switch ON your
D210c and wait for a few seconds until it completes the initialization.
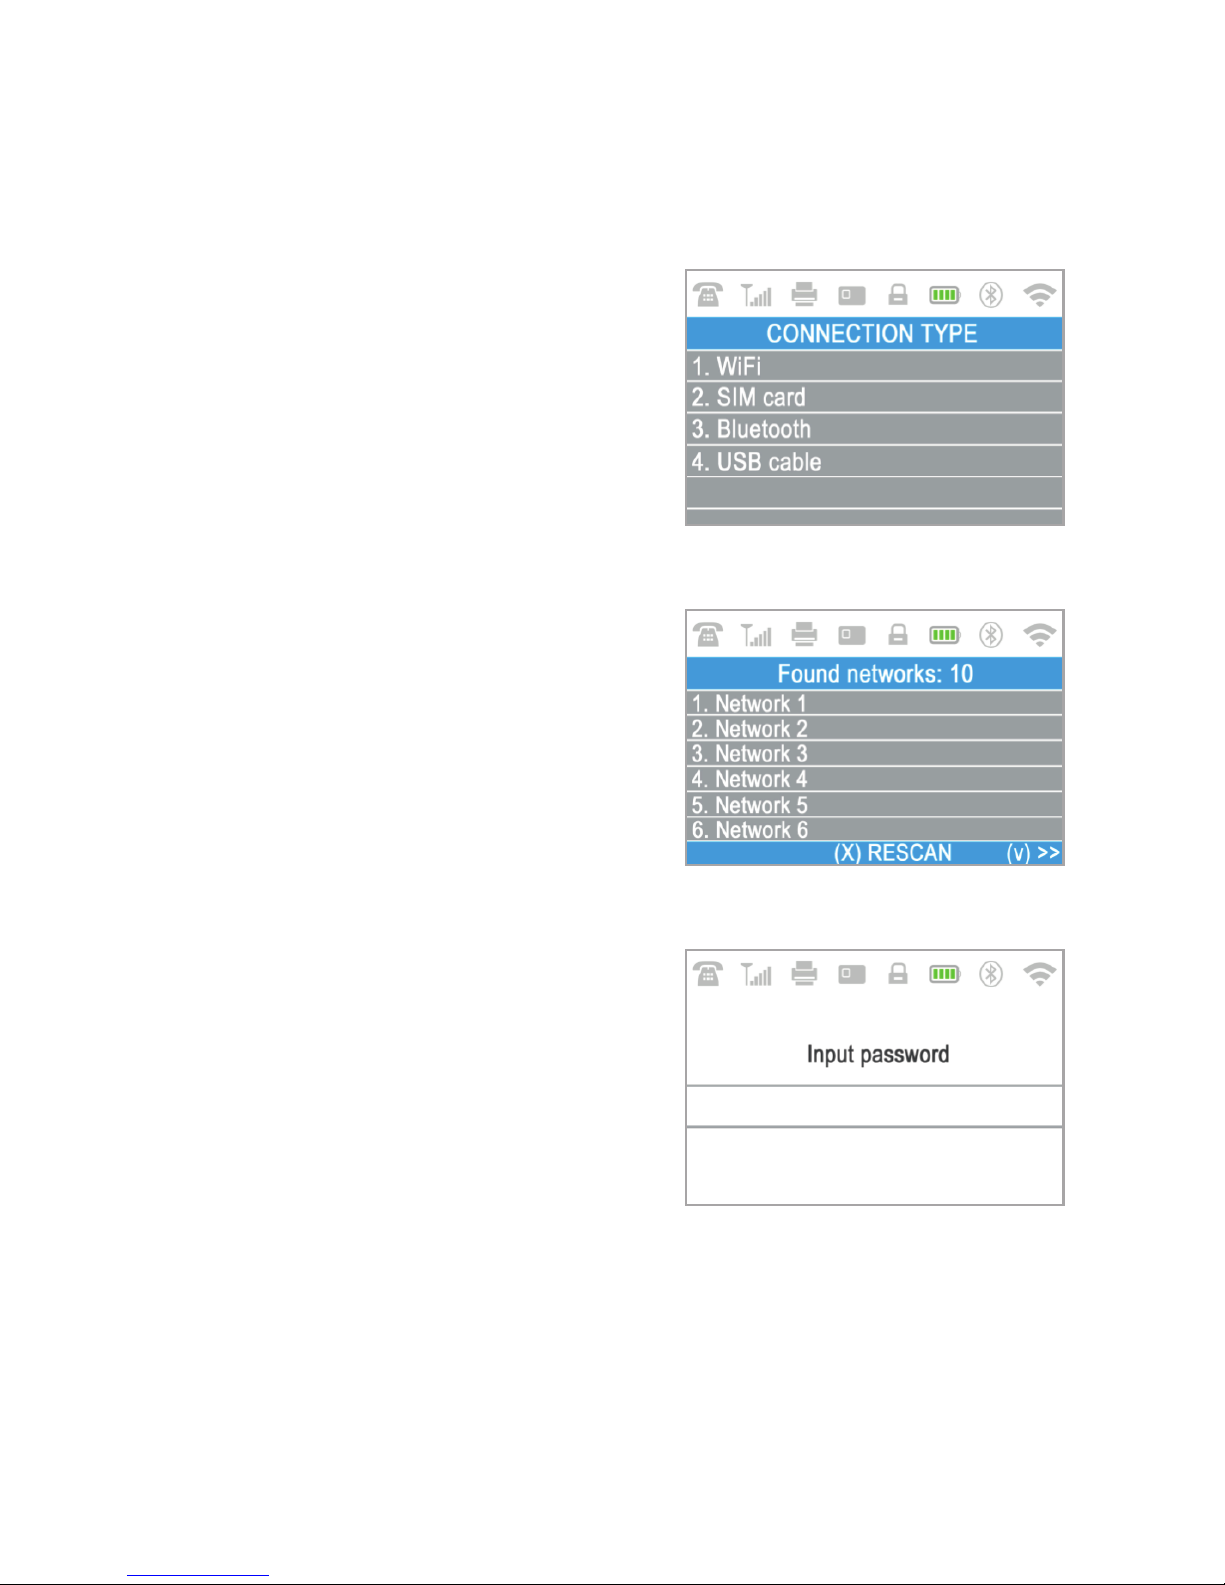
The D210c will scan for available
Wi-Fi networks within its range and will
display a list of their names on the screen.
Find the Wi-Fi network you would
like to use and select it by pressing its
number (from 1 to 6) on the keyboard. If
there are more than 6 available networks
on the list, you can switch to the next page
of the list by pressing the up and down
arrow buttons from the keyboard.
If you cannot find your Wi-Fi network on
the list, press (X) and D210c will rescan
(search again) for available Wi-Fi
networks. Make sure your D210c is in the
range of your network.
If your Wi-Fi network requires a
password, D210c will display the Wi-Fi
Password screen, where you can enter the
network password. In case your password
contains digits , press the relevant
number key. In case your password
contains letters, press the relevant
number key and then switch to letters by
pressing (ALPHA) button from the
keyboard several times in order to select
the required character. If you make a
mistake, press the yellow key ( CLEAR) to
delete the last entry. When you have
entered the password, press the green key
( ENTER) in order to complete the
operation
<
O
EN 8|
Page 9
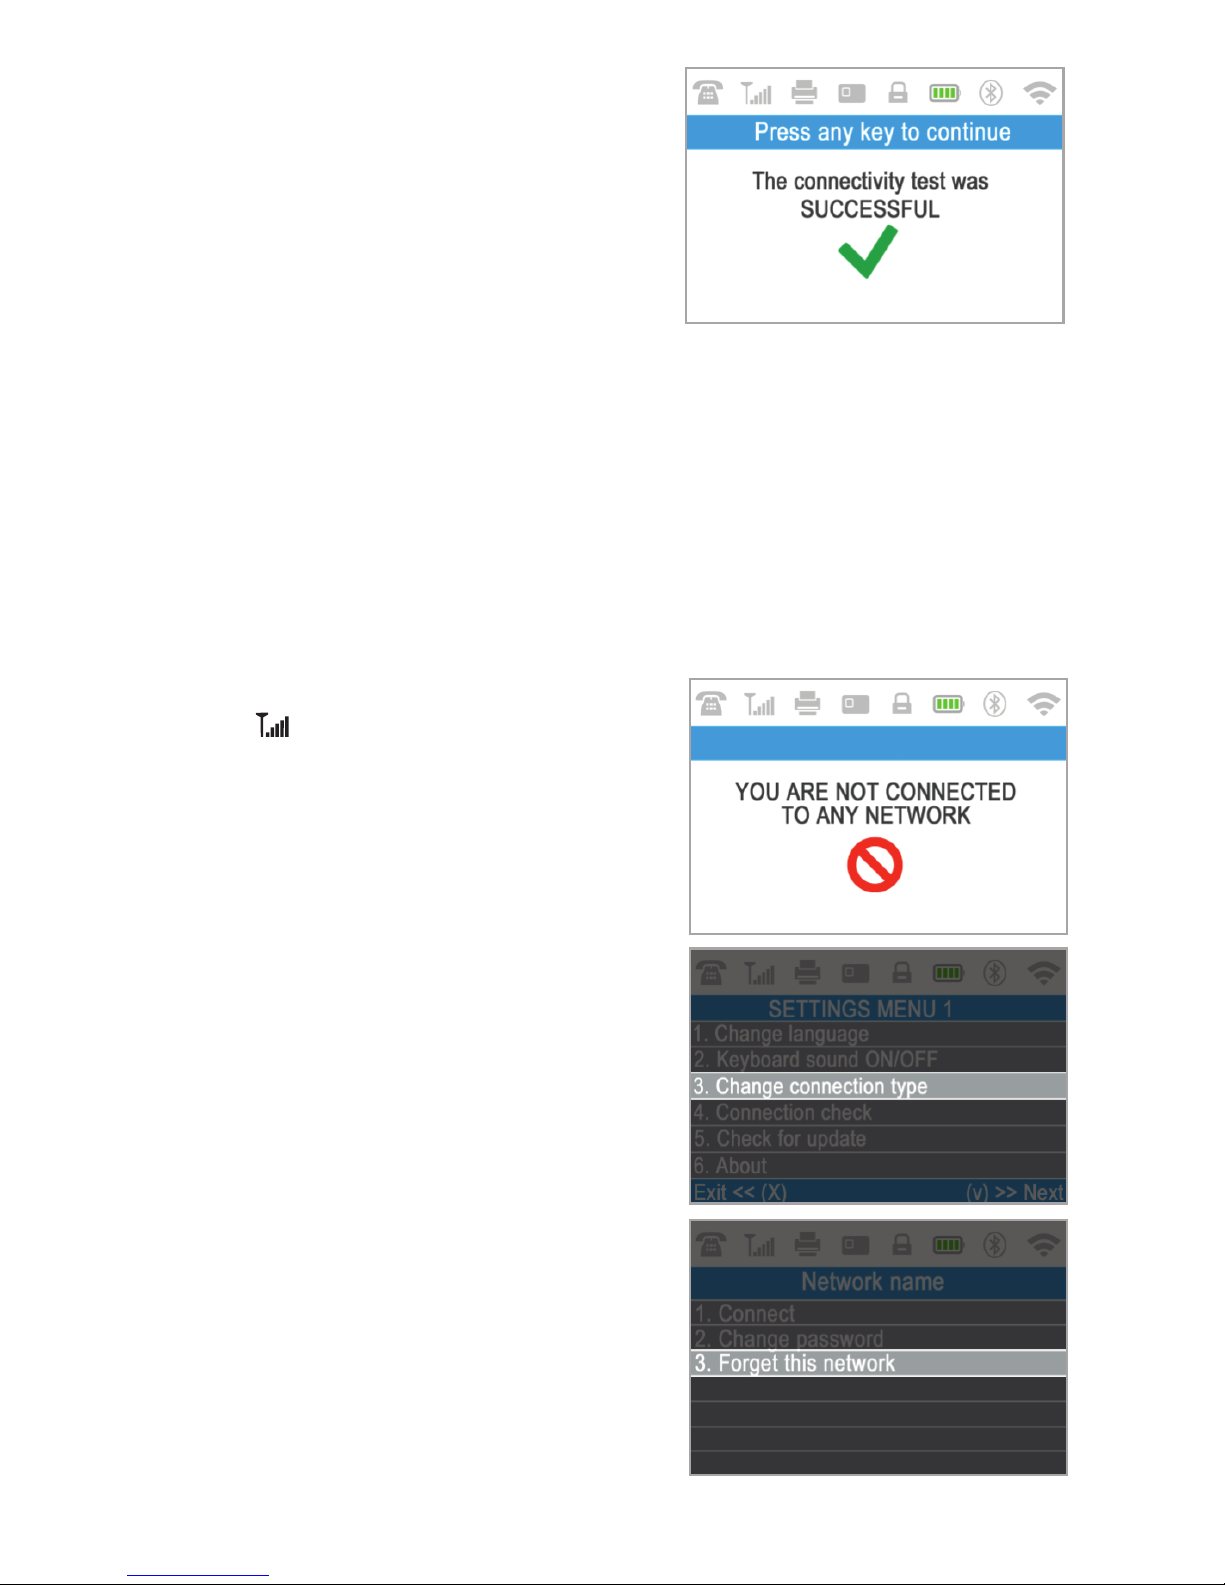
Once it has connected to your Wi-Fi
network, D210c will perform a test of the
connection to myPOS.
If the test is successful the following
D210c screen will appear:
If the connection test is unsuccessful, the
D210c screen will display an error
message.
Useful tips:
When D210c connects to a Wi-Fi network, the information is saved so that
the next time you are within the range of the same network, the terminal will
connect to it automatically.
If the password of your Wi-Fi network has
been changed, the Wi-Fi signal icon on the
screen ( ) will become grey
If you try to make a payment transaction,
the terminal will display an error message
– “You are not connected to any network” and will search for available networks. If a
previously used network is found, the
D2 1 0c de v ice will conne c t to it
automatically and will process the
transaction.
In order to change the saved password,
choose the “Change connection type”
option from the SETTINGS MENU 1 and
enter the new password when prompted.
If you are within a previously used
network range and do not want your
D 2 1 0 c d e v i c e to c o nn ec t t o i t
automatically, you can delete the saved
data by choosing option 3: “Forget this
network”.
џ
џ
џ
џ
џ
EN 9|
Page 10
How to connect D210c using SIM card
Step 1:
Step 2:
џ
џ
Step 3:
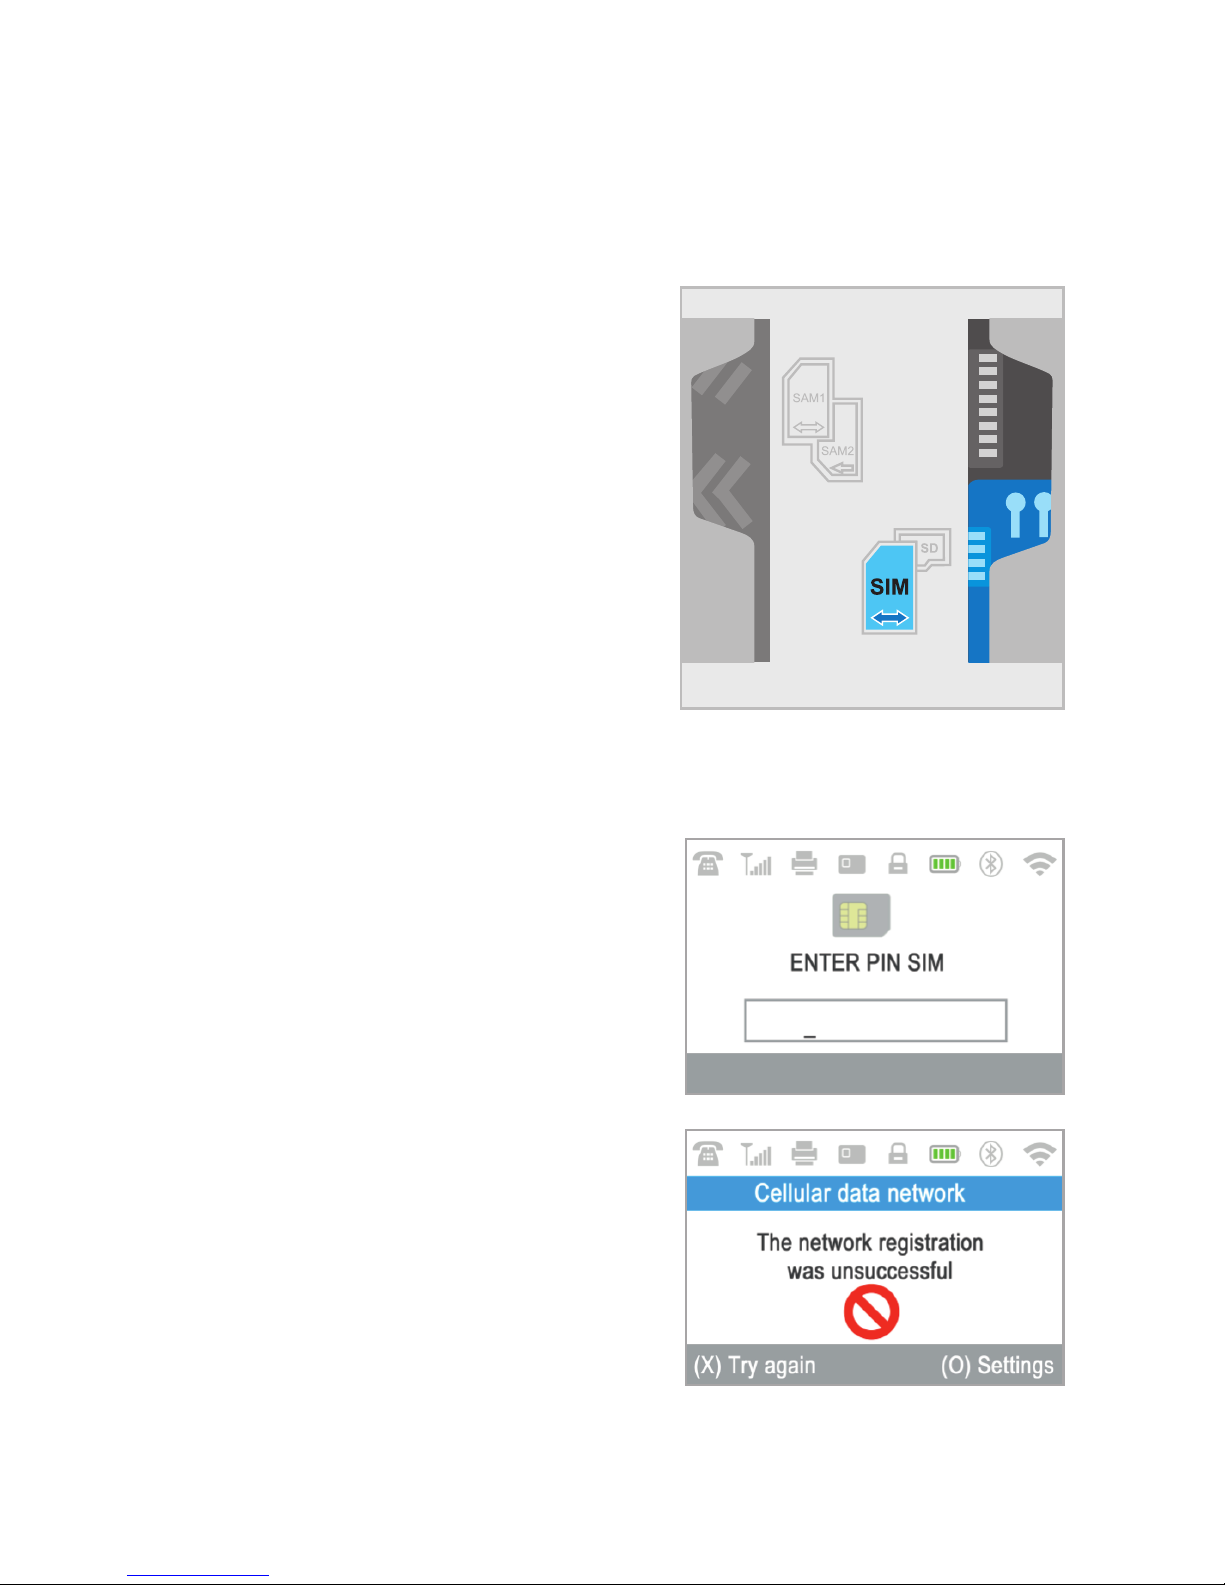
Remove the back cover of the device by unscrewing the bolt and
remove the battery. You will see the SIM and SAM compartments.
Insert you SIM card in the SIM
card slot (on the right side) with the goldcolored contact surface facing down into
the bottom holder (marked in blue on the
scheme).
Make sure that the SIM card is inserted
in SIM slot.
Your D210c device is working with
standard SIM card size. If you have micro
or nano SIM card, please use a SIM
adapter.
Put the battery back into the D210c device, close the cover and switch ON
the device.
Enter your SIM PIN.
Your device supports more than one
connection type, so please choose SIM
card on the Connection type screen.
If the mobile network was not recognized,
the D210c device will display an error
message and two options: to try again (X)
or to manually enter the APN settings (O)
of your mobile network.
Once it has connected to your mobile
network, the D210c will perform a test of
the connection to the myPOS.
EN 10|
Page 11

If the test is successful the following
D210c screen will appear:
If the connection test is unsuccessful, the
D210c screen will display an error
message.
EN 11|
Page 12
Activation
Step 1:
w w w. m y PO S. eu
Merchant Services > myPOS
devices
Step :
Once connected to the Internet, your D210c device needs to be activated
before you start accepting payments with credit or debit cards through it.
Every D210c device has a unique serial number which is used by the myPOS
to identify on which device a payment transaction is being accepted.
During the activation procedure, the myPOS links the serial number of your
new D210c device with your myPOS account. Once your new D210c has
been activated, every transaction accepted through it will be credited to
your myPOS account.
You can link more than one D210c devices to one e-money account. In this
case, payments accepted through all myPOSterminals, will be credited to
one myPOS account.
Activation code
The activation procedure is a one-time process and requires an activation
code generated by the myPOS to be entered manually by you on your D210c
device.
If you do not have an myPOS
a c c o u n t , p l e a s e r e g i s t e r o n
an d fo l lo w t h e
instructions. Once you have been
successfully registered, the system will
automatically generate an activation code
for you. If you have an myPOS account
already, please log in to your account and
go to the
menu. Click on “Activate POS
device” in order to generate an activation
code.
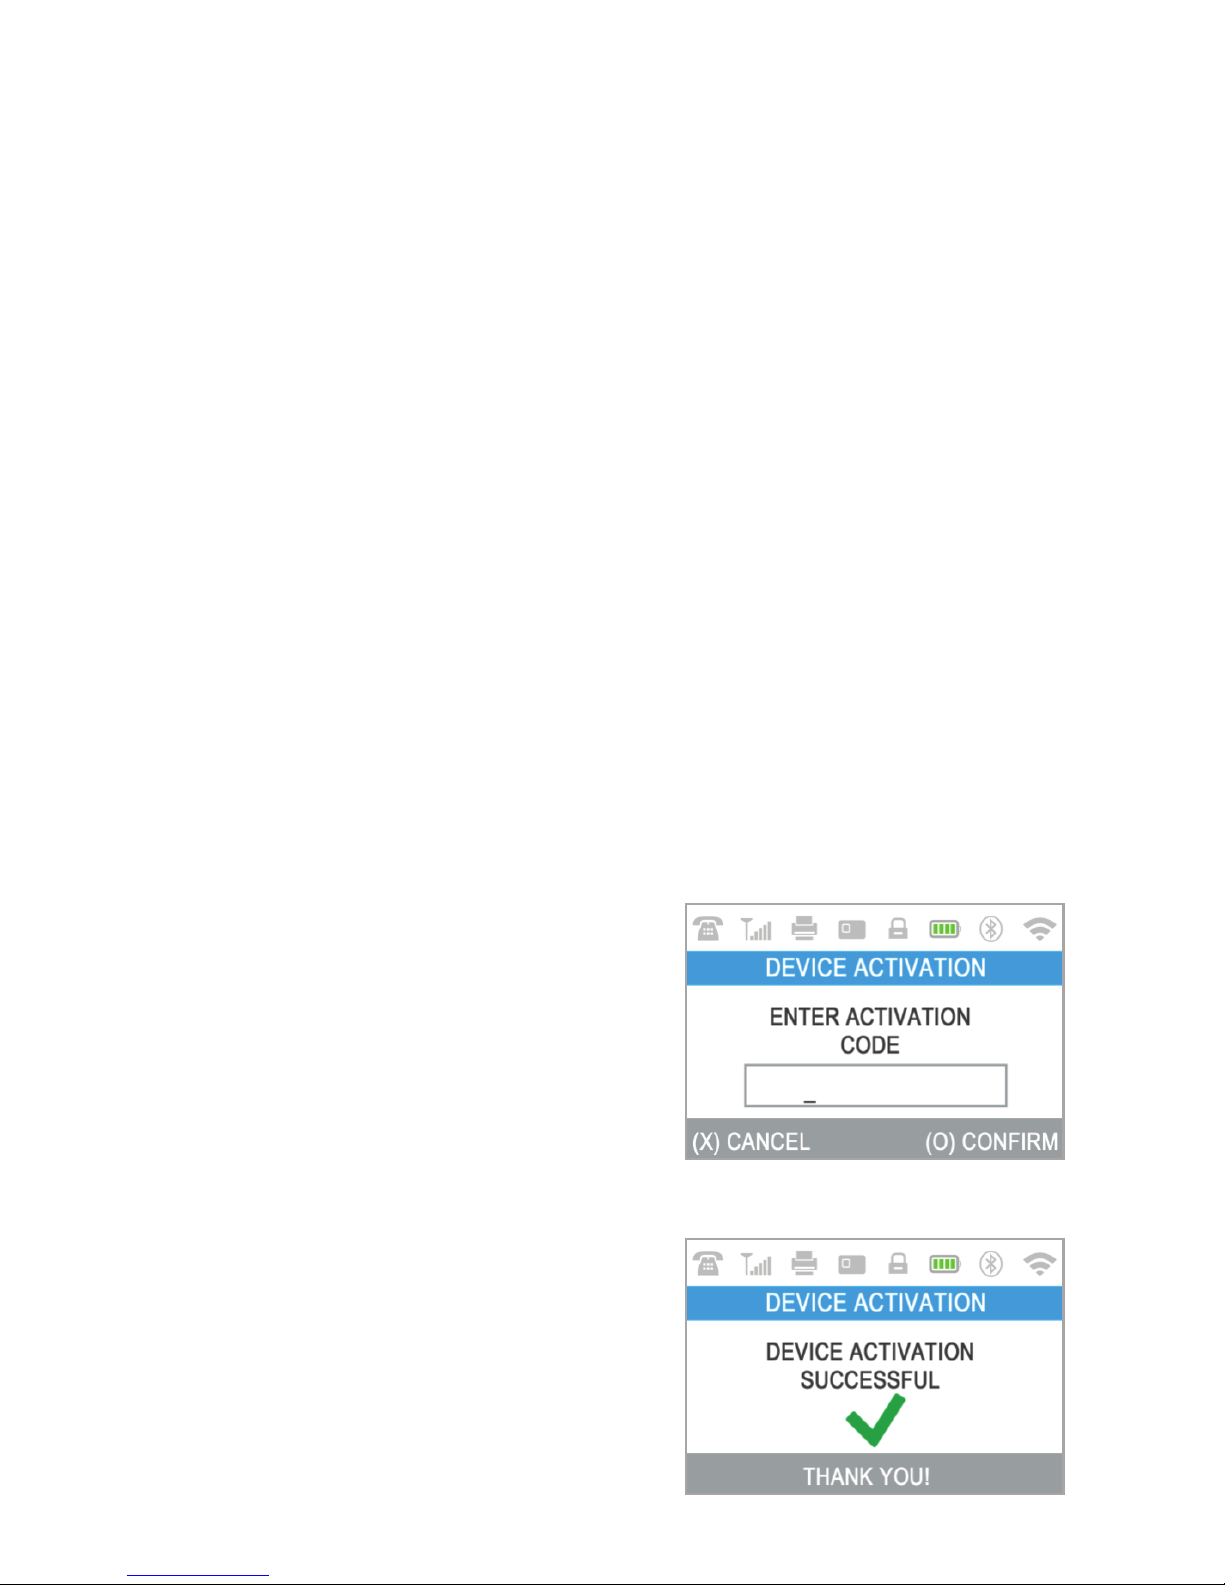
Please enter the activation code
on the D210c device and press the green
key ( ENTER). Your D210c device must be
connected to the Internet in order to
complete the activation process.
2
O
EN 12|
Page 13
EN 13|
Step :
Congratulations!
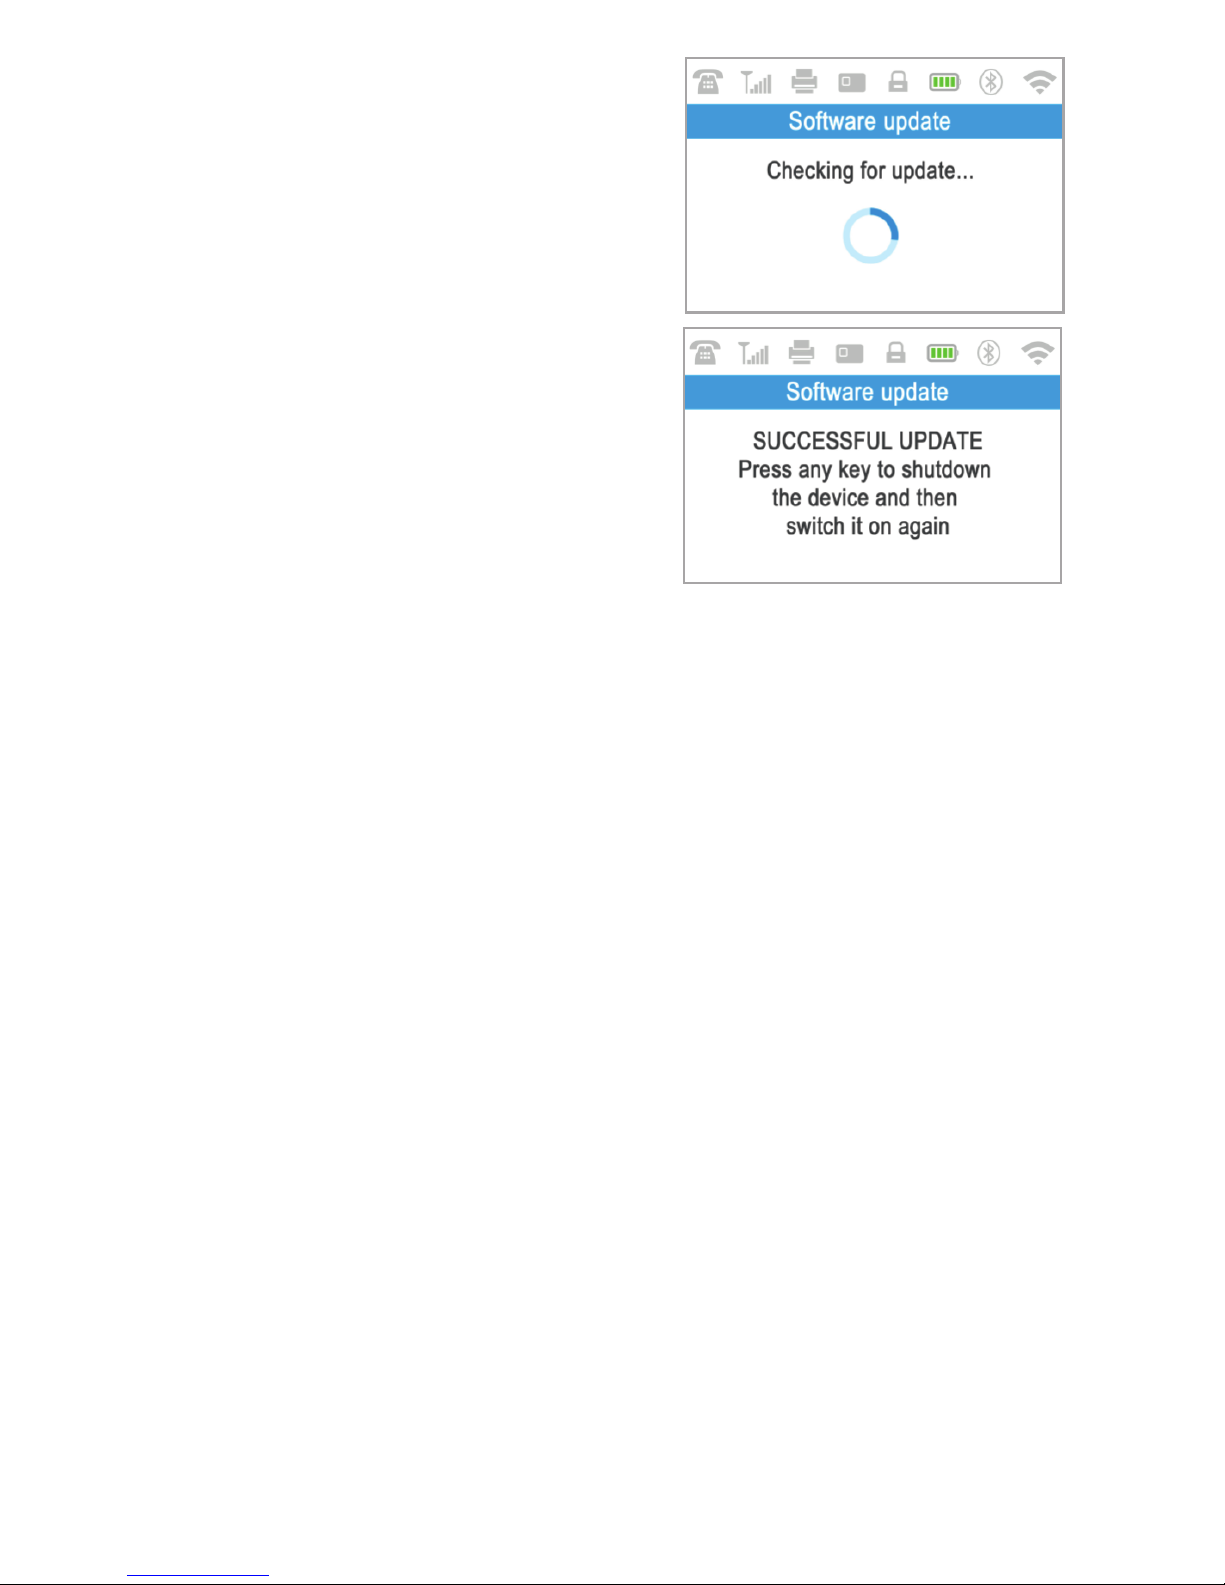
3 Once your D210c has been
successfully activated, your D210c will
display the confirmation screen and will
automatically check for any updates of the
terminal software from iPay International.
If a new update is found, the D210c
terminal will automatically download and
install it.
Your new D210c is now activated and ready to be used. You can find the new
D210c listed in your myPOS account in the POS terminals menu section.
Once D210c device is activated by you, it is permanently linked to your
myPOS account. Even if the device is stolen or lost, any payment transaction
made through it will be credited to your account. In case your device is lost or
stolen, please inform Customer Support Centre immediately.
Page 14
Accepting Payments
Step1:
Once your new D210c device is connected to the Internet and activated, it is
ready to accept payments with credit and debit cards.
Your D210c supports three different methods for accepting payments with
credit and debit cards - Magnetic Stripe, CHIP & PIN and Contactless (NFC).
For this purpose, the D210c incorporates two readers (right and bottom) and
one built-in antenna. The reader located at the right side of the device is
designated for swiping magnetic stripe cards, while the reader located at the
bottom is for CHIP cards. The antenna for contactless cards is located under
the display.
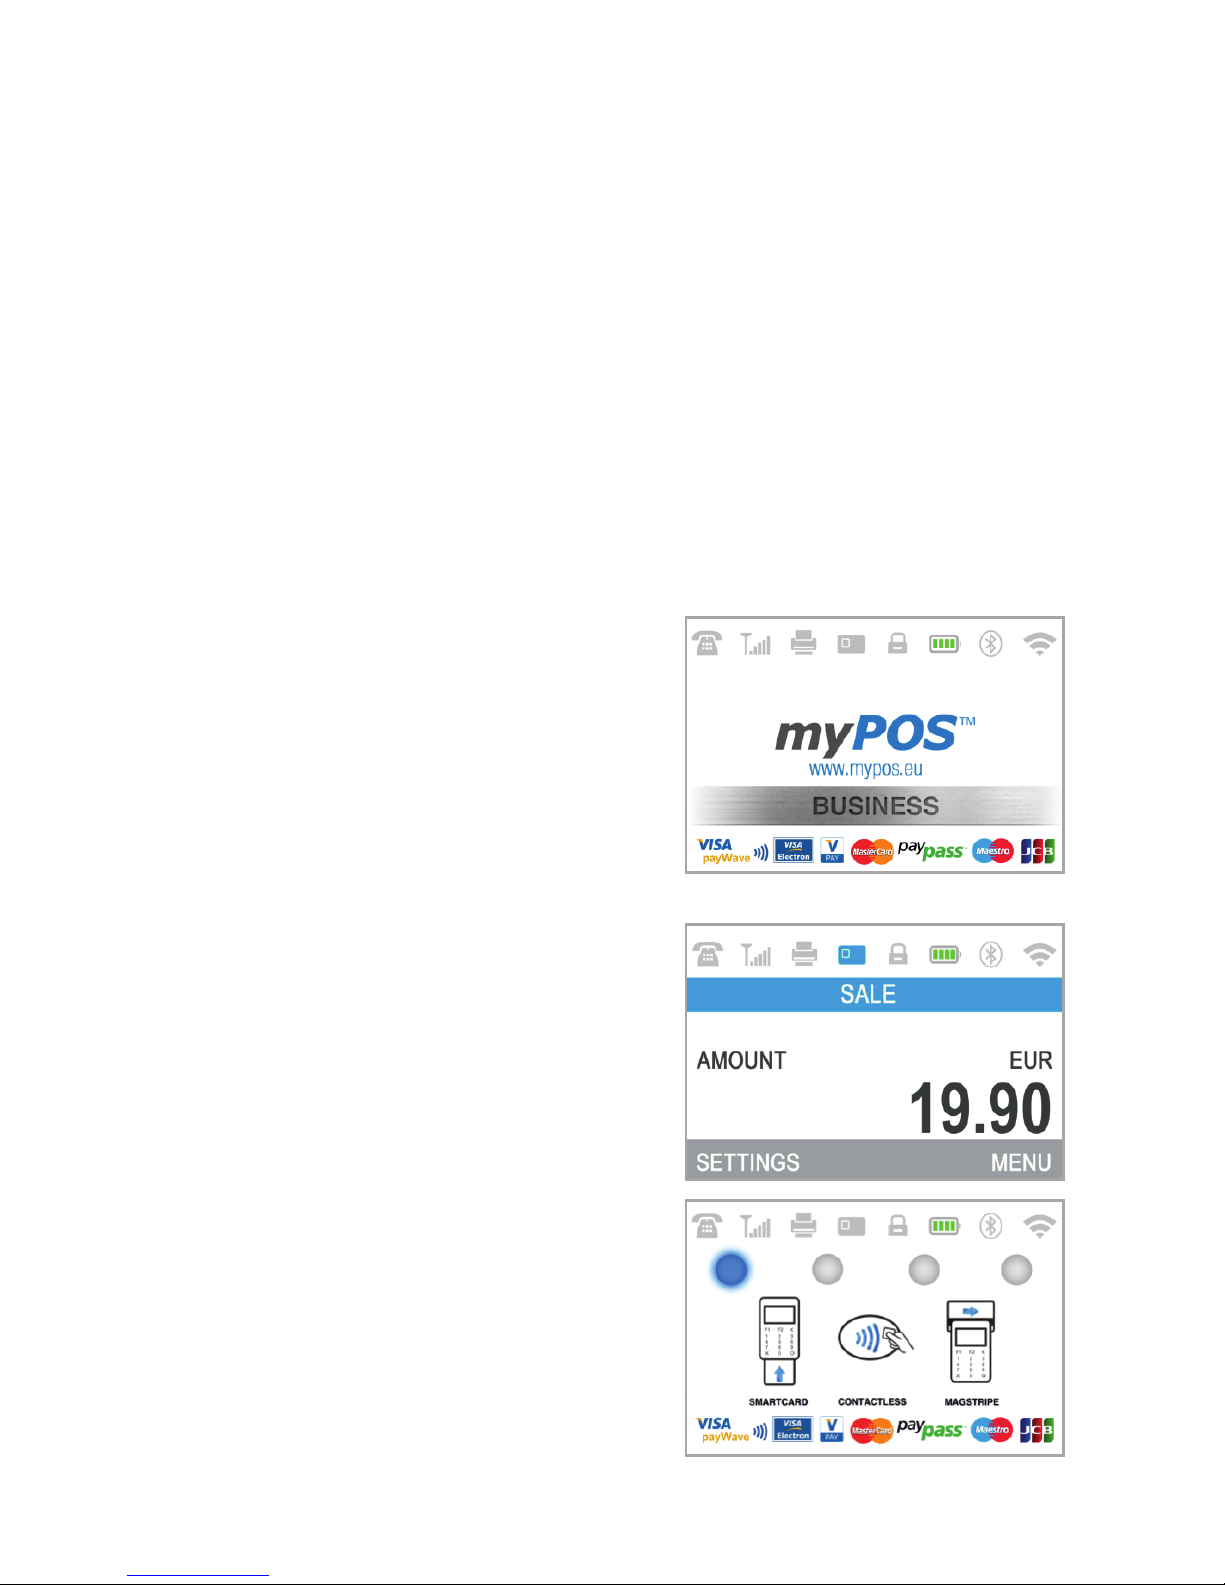
Sale Transaction
Every time you switch on your D210c
terminal, it will automatically connect to
the Internet and will display the home
screen.
When you press the green key ( ENTER),
the terminal will go directly to the SALE
screen ready for performing a Sales
transaction. Making a SALE transaction
with your D210c is easy and convenient.
Please follow the 3 basic steps written
below.
Enter the amount of the
transaction in the SALE Screen. The
amount must be entered without the
decimal point. For example: for an amount
of 5.00, enter 500 on the keyboard. When
the SALE screen display the correct
amount, confirm by pressing the green
key ( ENTER). If you need to correct
the amount, please use the yellow key
( CLEAR) to delete the last entry or the
red key ( CANCEL) to start the process
from the beginning.
O
O
<
X
EN 14|
Page 15
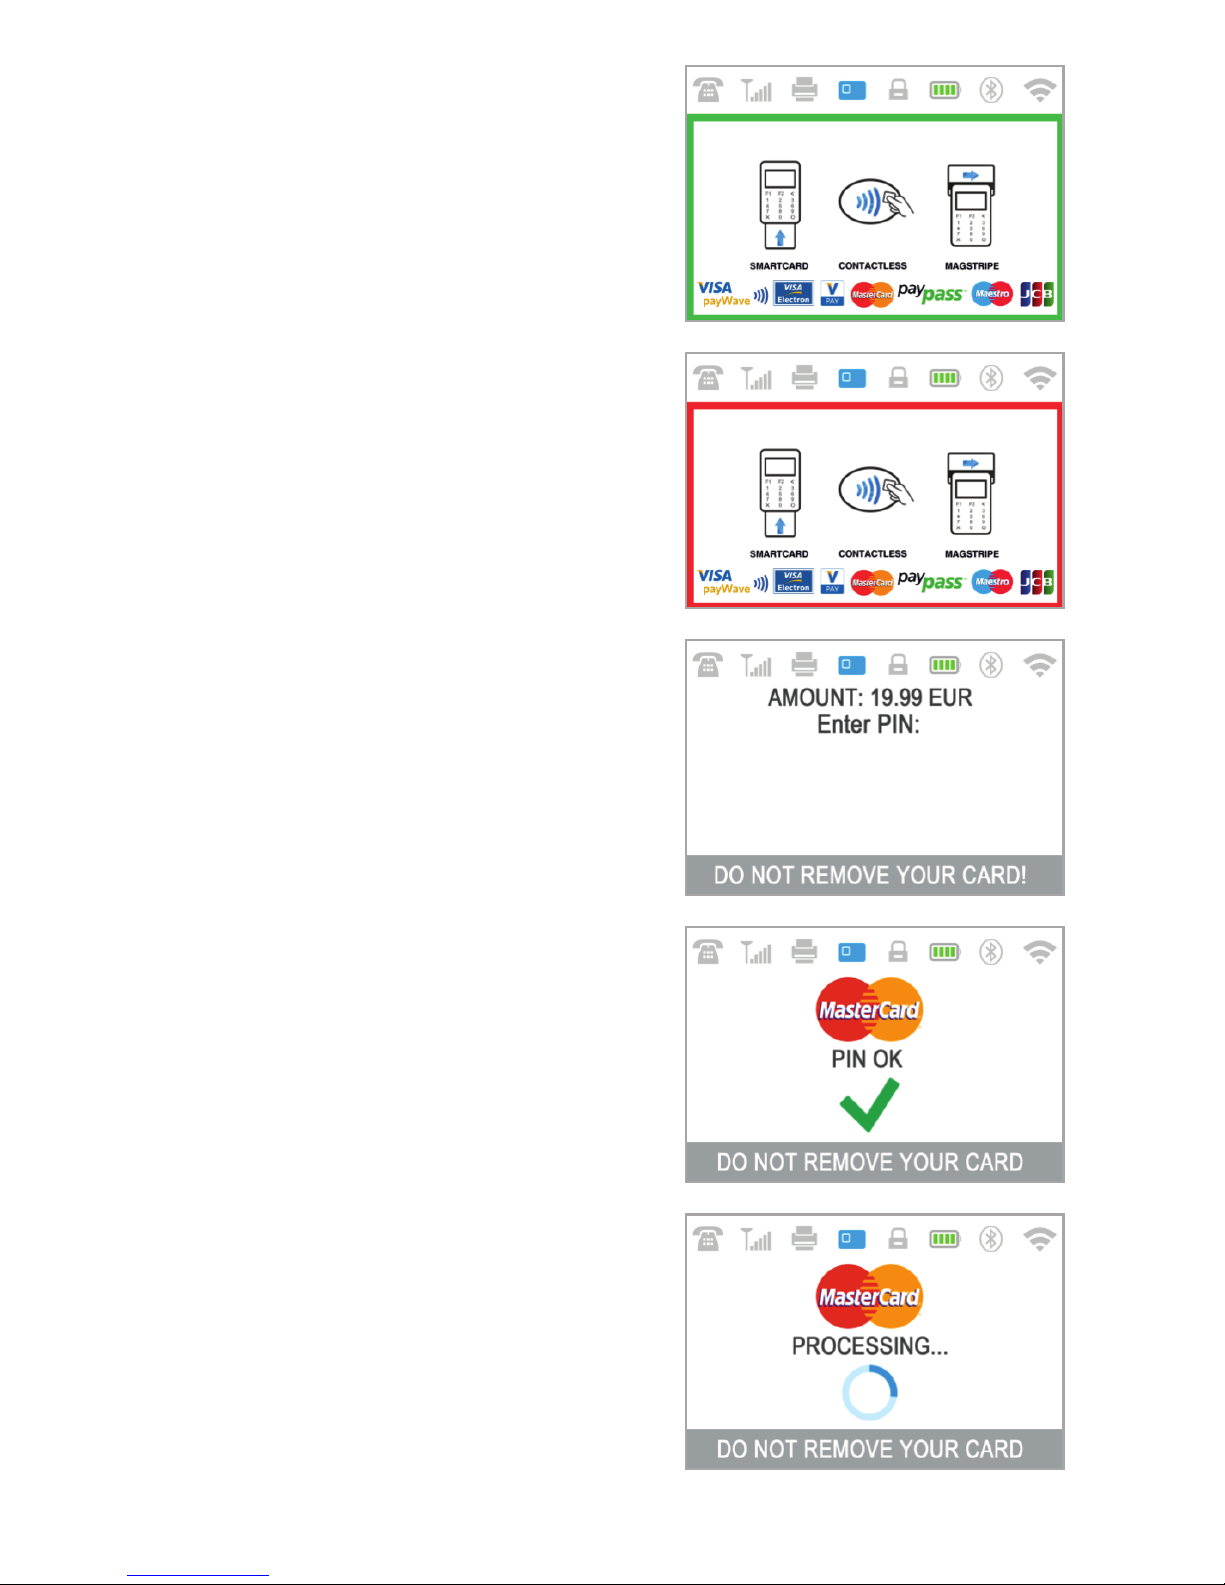
Step2: Ask your customer for his or her
credit or debit card. If the card has a CHIP,
insert the card in the bottom reader with
the CHIP facing towards the keyboard.
When D210c is reading the card, the
screen will flash Green.
If the card is not recognized, the screen
will flash Red.
Please check if the card is inserted
properly in the reader, remove it and try
again. If the problem persists, please ask
your customer for another card.
CHIP cards usually require a PIN code in
order to confirm a transaction. If a PIN
code is required for a card, your D210c
terminal will display the ENTER PIN screen.
Please, hand the terminal to the customer
and ask him or her to enter his or her PIN
code securely and to press the green key
( ENTER) when ready.
If the card supports PIN (personal
identification number) check, the
terminal will process the PIN code and will
display PIN OK if the correct PIN code has
been entered by your customer.
The D210c will initiate the transaction
authorization process by communicating
with myPOS. The PROCESSING screen will
indicate that the procedure is not
completed.
If the transaction request with a card has
been approved by the issuer, the D210c
O
EN 15|
Page 16
terminal will display a confirmation
message: “TRANSACTION IS APPROVED”.
At this point, you can remove the card
from the reader and return it to the
customer.
T h e D 2 10 c d e v ic e w il l
automatically print the merchant's copy of
the receipt for the approved SALE transaction. Then the terminal will wait 3
seconds, beep and start printing the customer's copy of the receipt.
Processing Magnetic Stripe Cards
If your customer's card has only a mag stripe on it, please follow the
procedure below after you enter and confirm the amount of the transaction.
Magnetic stripe cards are swiped with the magnetic stripe side facing up
using the reader located at the right side of the D210c. Make sure the card is
inserted properly and the bottom of the card runs firmly along the bottom of
the card swipe and that the card is swiped at an even speed. The speed of
swiping the card must not be too slow, as this can sometimes cause
problems when the terminal is reading cards.
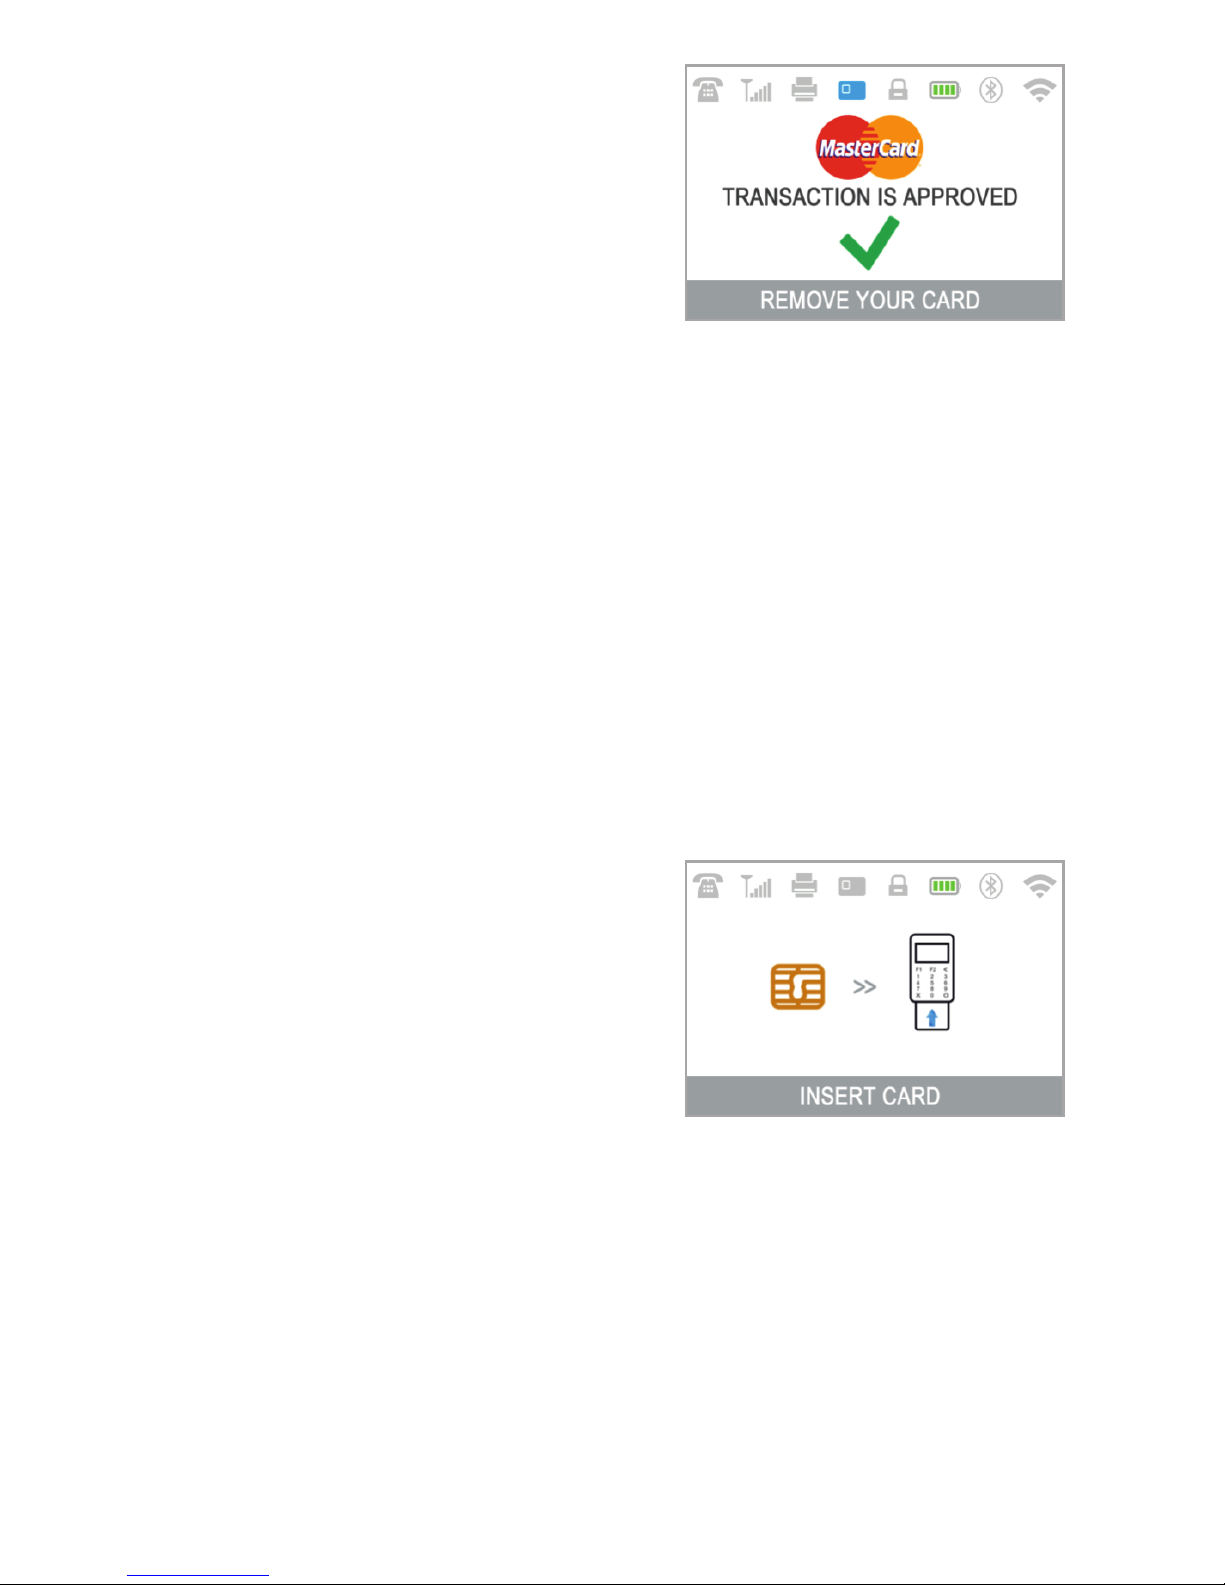
If a CHIP card is swiped as a magnetic one,
the terminal will display the following
screen.
Please, insert the card with the CHIP facing
up into the reader located at the bottom
of the D210c and follow the steps for
accepting CHIP cards laid out in the
previous section.
Complete the transaction as described in Step 3 of the previous section.
Processing Contactless Cards (PayPass or payWave)
The contactless (NFC) technology is gaining popularity and it is very likely
that many of your customers will hand you such cards. Your D210c device
can accept two types of contactless cards - PayPass and payWave, issued by
MasterCard and VISA respectively.
St e p :3
EN 16|
Page 17
Contactless cards always need to have one of the following logos printed on
it.
If your customer has a PayPass or payWave logo on it, please follow the
procedure below after you enter and confirm the amount of the transaction.
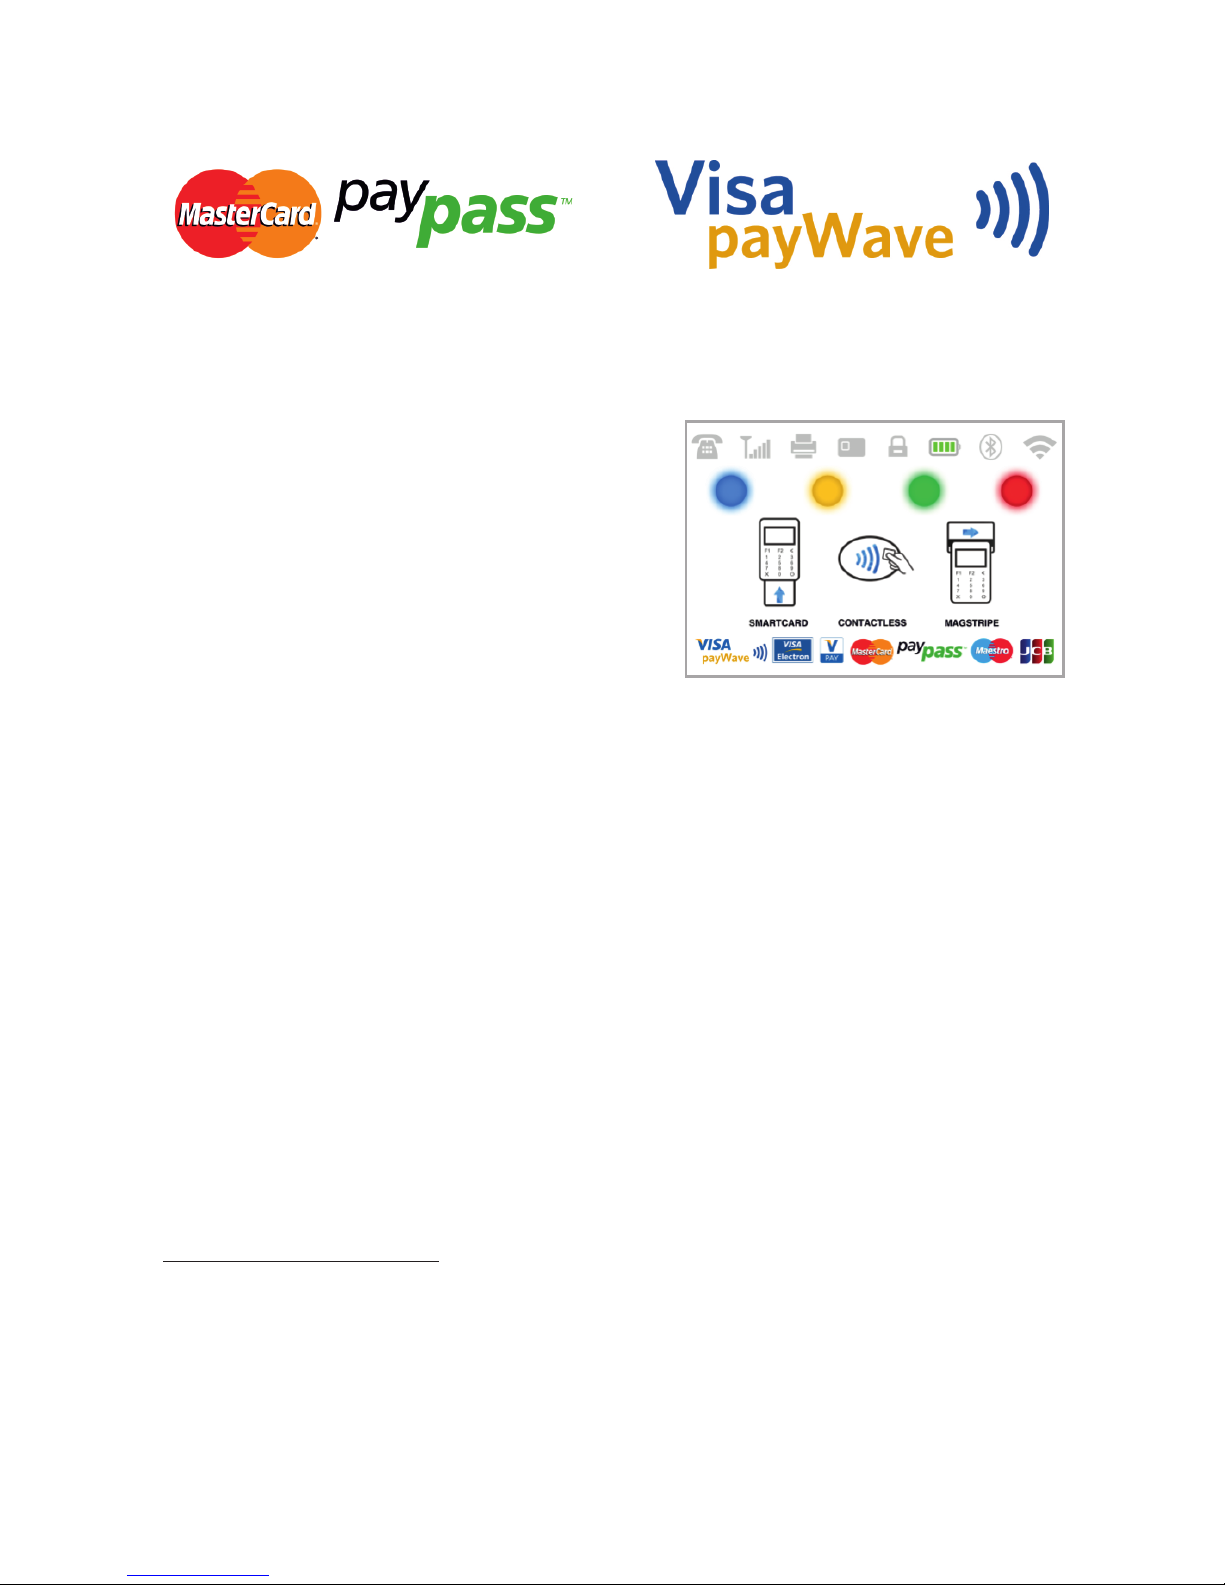
Hold the card (or smartphone) approx.
3cm above the display of your D210c.
When the secure contactless reader
recognizes the card, the four colour
indicators will flash indicating that the
card is being processed. If the card is
successfully read, all four indicators will be
on. The process takes one second and
after you hear a beep, you can remove the
card.
If the card requires a PIN code to be entered, please hand the terminal to the
customer and ask him or her to enter his or her PIN code.
Complete the transaction as described in Step 3 of the previous section.
Refund Transaction
A refund transaction is used in order to issue a refund (credit) to the
customer. When you refund a card transaction, the amount of the refund is
returned to the customer's card account and your myPOS account is debited
with the corresponding amount. You must always make a refund to the card
used for the original purchase.
Before making a refund
Never make a refund unless there has been an original purchase with the
card. If you do, iPay International may block your D210c terminal and
withdraw your card processing facility.
Check that your customer has handed you the card used for the original
transaction – the last four digits have to match those on the e-receipt. If they
do not, ask for the original card.
Never give a cash or cheque refund for a card transaction – fraudsters often
џ
џ
џ
EN 17|
Page 18
џ
џ
Step1:
Step2:
Step3:
Step1:
Step2:
Step3:
try to obtain cash this way.
Never refund more than the original
transaction amount.
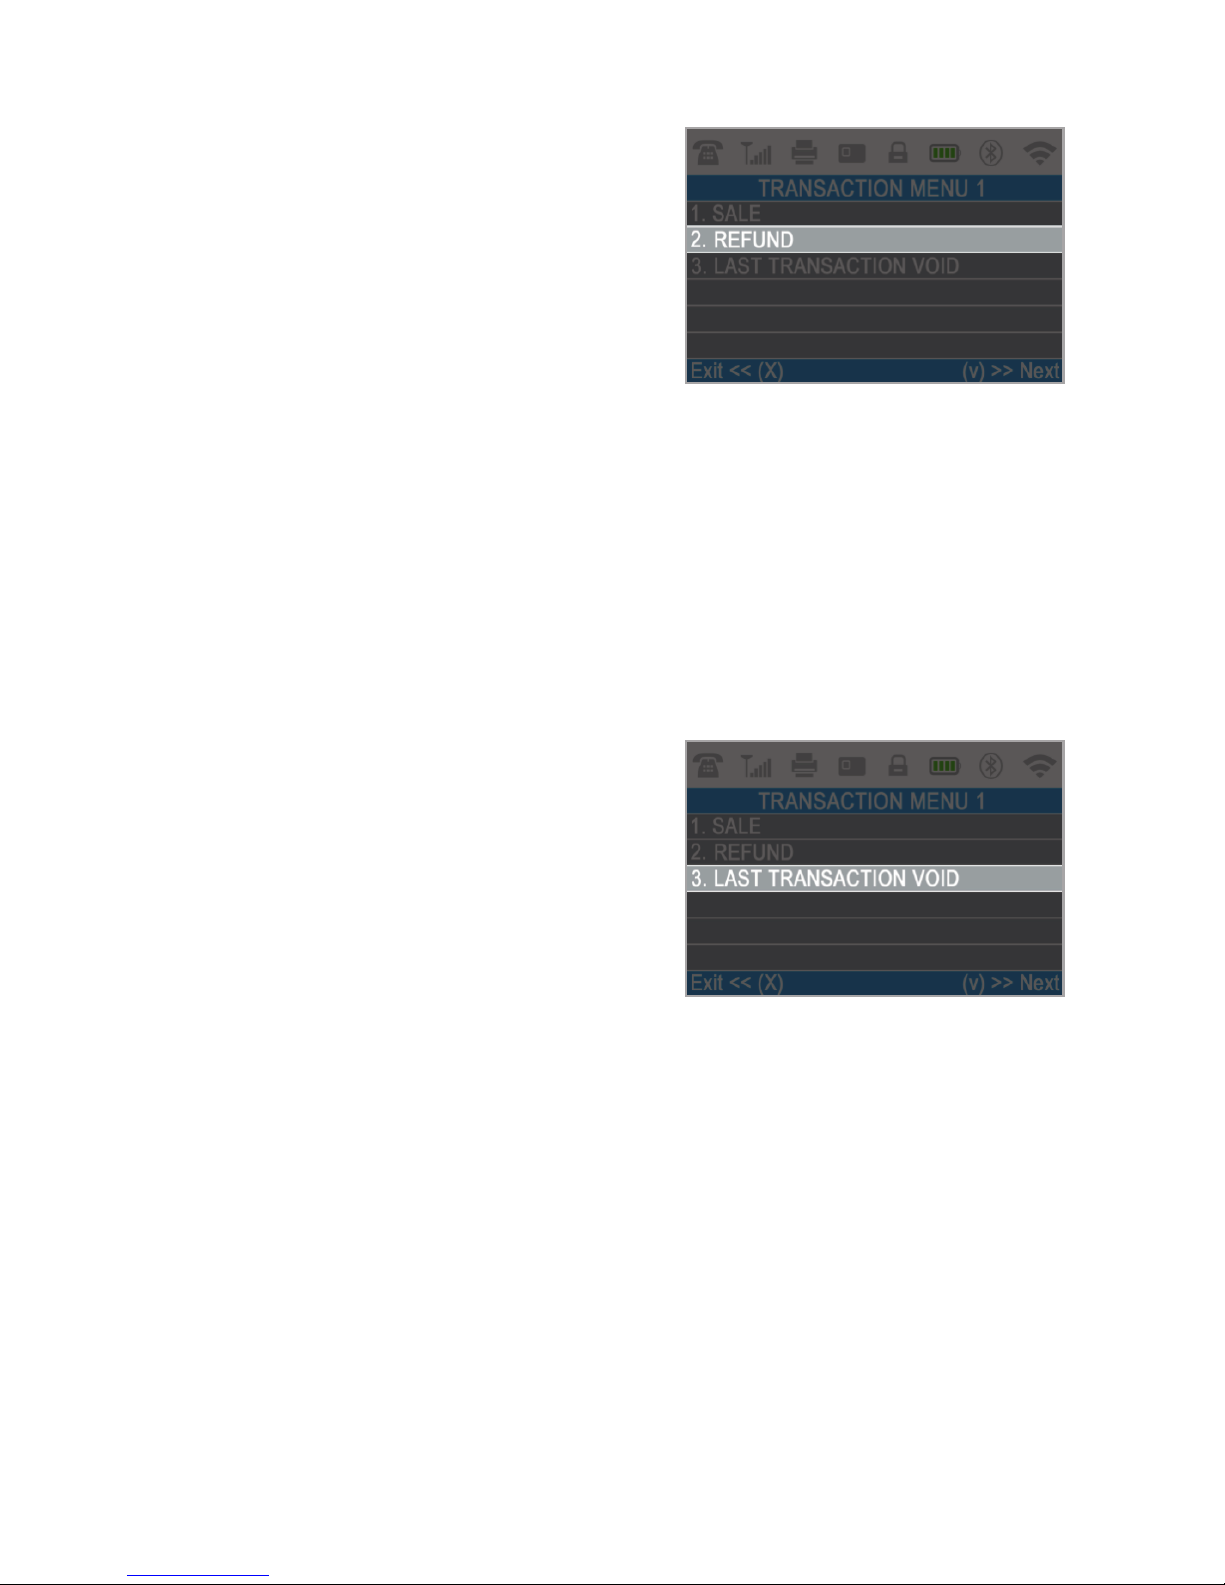
From the home screen, press the
menu button from the keyboard in order
to enter the Transaction type menu. Select
REFUND by pressing key (2) and confirm
with the green key ( ENTER). The D210c
terminal will display the REFUND screen.
Type in the amount of the refund transaction and press the green key
( ENTER) to confirm. Present the customer card to the terminal either via
the Magnetic Stripe, Chip or contactless reader.
Ask your customer to Enter PIN code where required.
Last transaction void
From the home screen, press the
menu button from the keyboard in order
to enter the Transaction type menu. Select
Last Transaction Void by pressing key (3)
and confirm with the green key
( ENTER). The D210c terminal will
display the Last Transaction void screen
showing the amount of your last transaction.
Confirm by pressing the green key ( ENTER) if you want to proceed.
Ask your customer to Enter PIN code where required.
If there is no previous successfully processed transaction or it has been
voided, the D210c terminal will display an error message “No transaction
found”.
If the transaction is declined with a “Transaction is not permitted” message,
then take into account that this type of transaction is forbidden for the
particular D210c device.
O
O
O
O
EN 18|
Page 19
D210c Functions
For better user experience and convenience all functions of your D210c are
divided in two groups – TRANSACTIONS (menu button) and SETTINGS
(FUNC button or up arrow button). From the home screen (any other screen
by pressing red key (X) first) you can select the TRANSACTION menu by
pressing (menu button) key or you can select the SETTINGS menu by
pressing ( FUNC button or up arrow button) key.
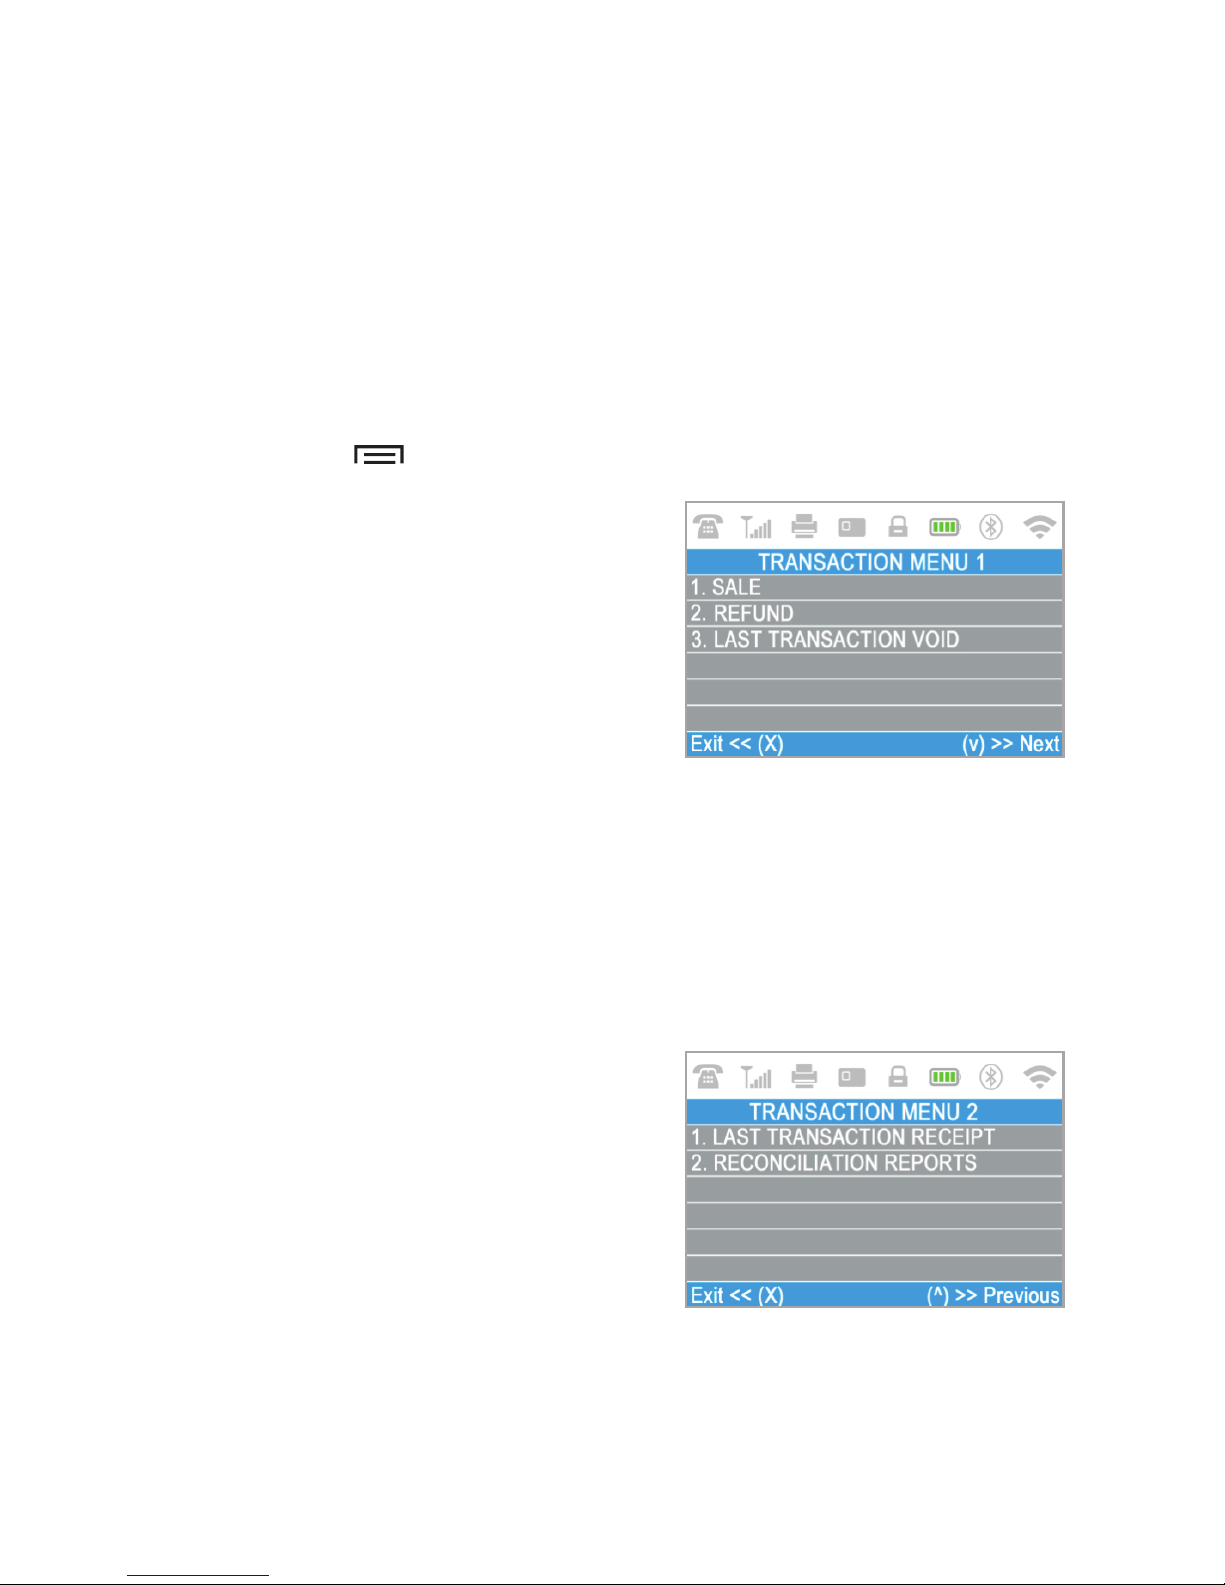
TRANSACTION menu
Menu button ( )
TRANSACTION menu is organized in two
screens with the following options:
TRANSACTION MENU1 shows the list of
supported types of payment transactions
on your D210c device:
1. SALE
2. REFUND
3. LAST TRANSACTION VOID
Please refer to section “Accepting Payment” for a detailed description of each
transaction. The default transaction type for your D210c is Sale.
You cannot change the transaction type during an operation. If you make a
mistake, use ( CANCEL) to cancel the operation.
TRANSACTION MENU2 shows the list of
operations and functions related to
payment transactions:
1. LAST TRANSACTION RECEIPT
Using this function you can print another
copy of the last receipt.
2. RECONCILIATION REPORTS
This function shows reconciliation statements (Reports) of all processed
transactions. By pressing (1) on the keyboard you can select report for Totals
and to visualize summary of all transactions processed for the current
X
EN 19|
Page 20
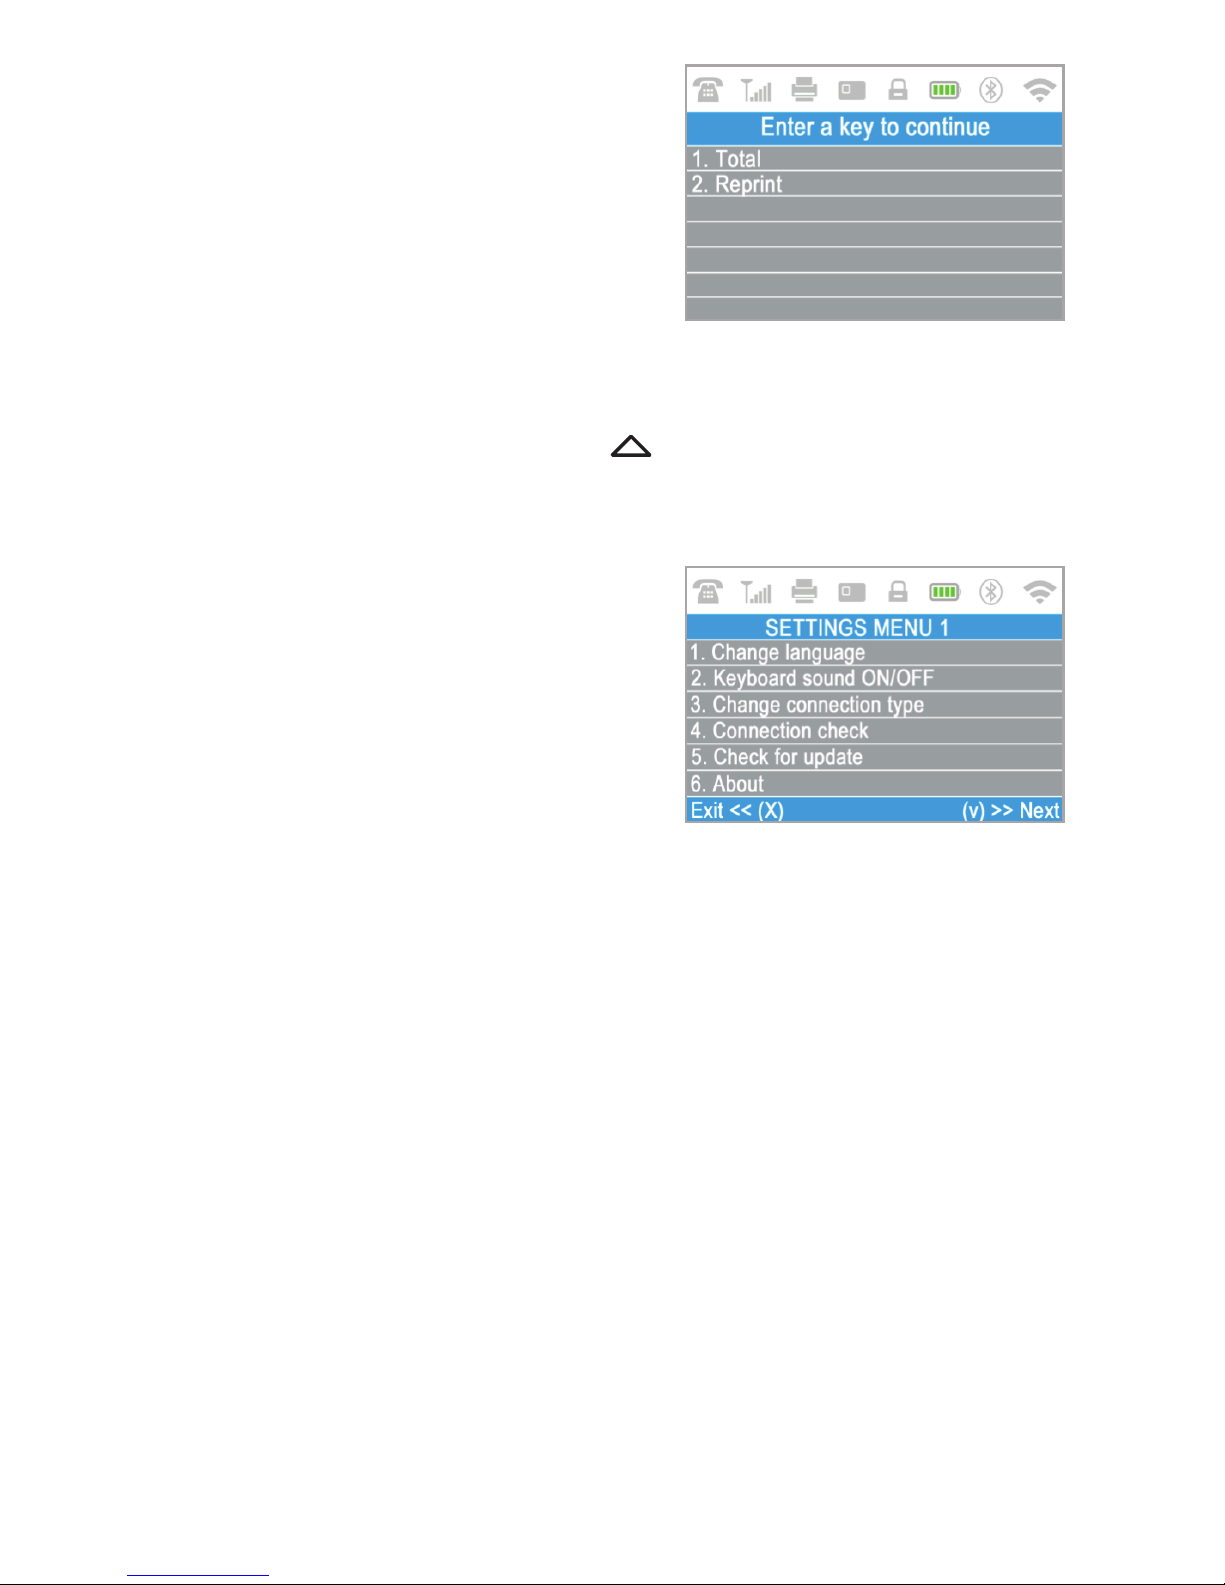
period. Cu r r e n t per i o d inclu d e s
transactions from the last date (time) you
have cleared the report (reset the totals).
In order to start a new period you should
press the green button ( ENTER) Clear.
By pressing (2) on the keyboard you can
reprint the report for the previous period.
SETTINGS menu
FUNC button or Up arrow button ( )
SETTINGS menu is organized in two screens with the following options:
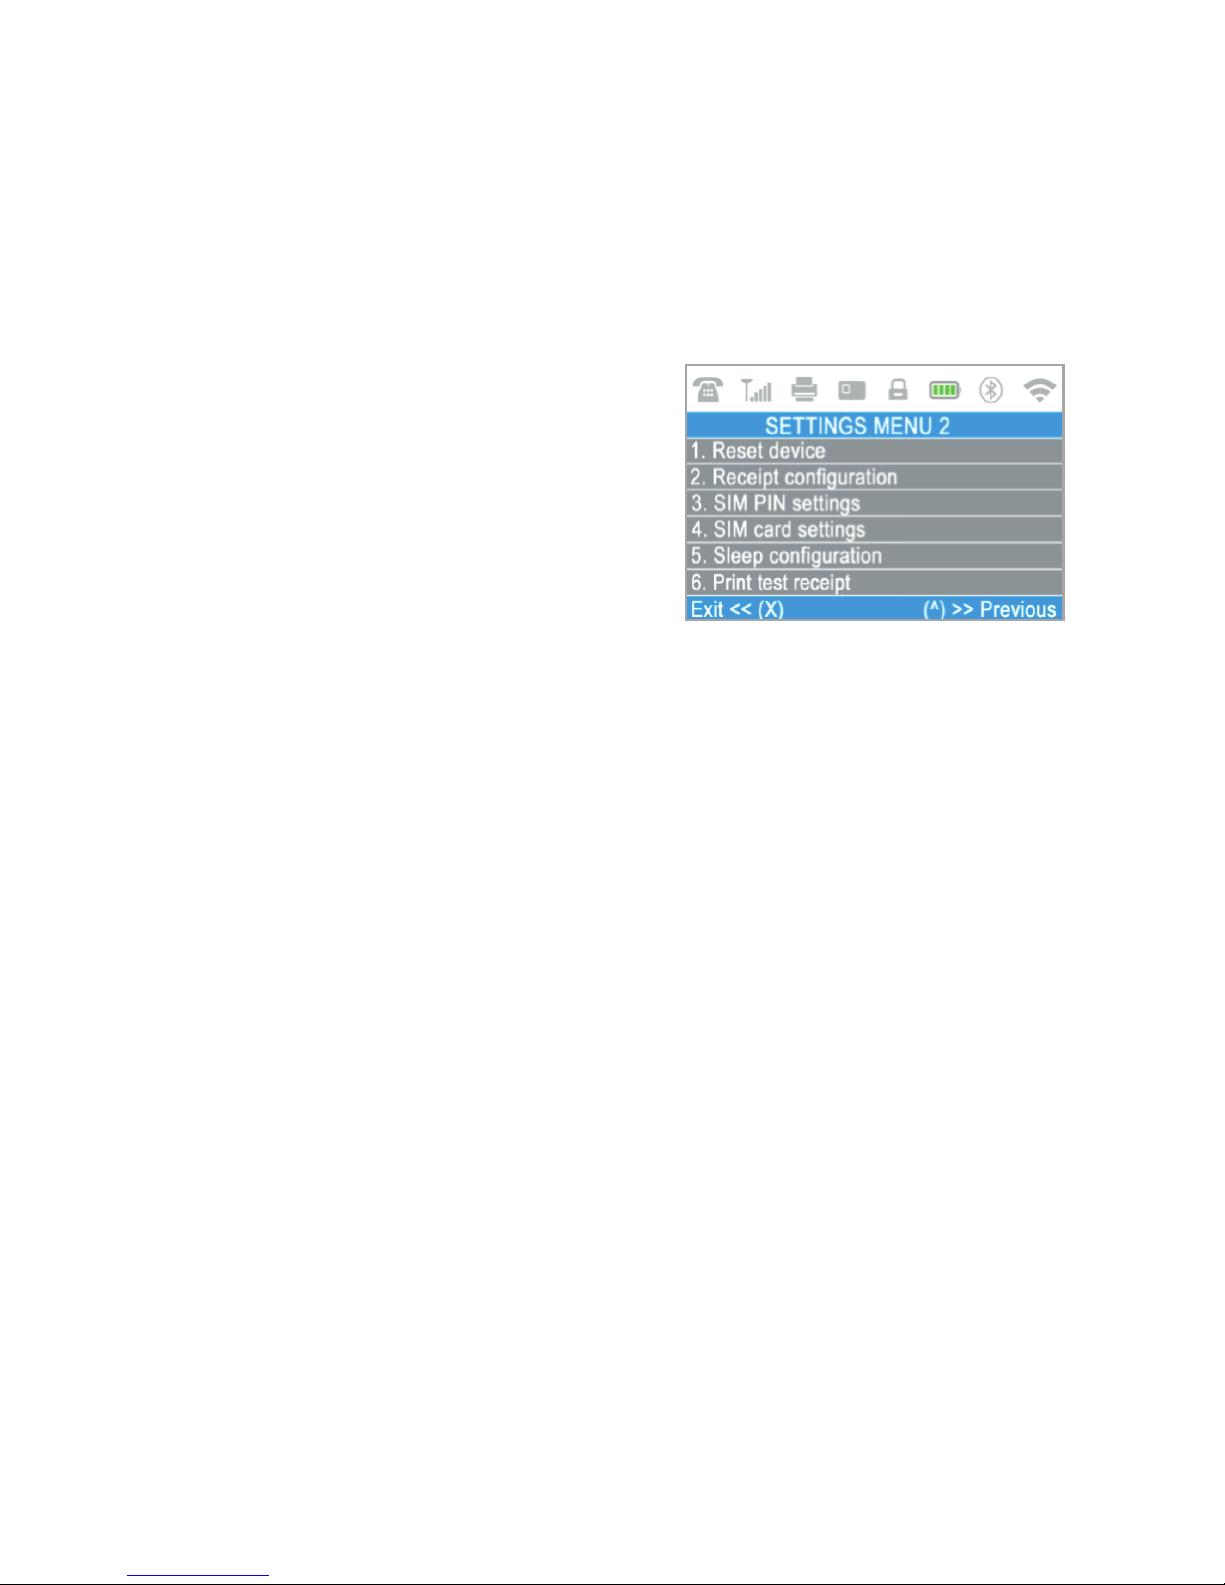
SETTINGS MENU1 shows the list of
supported settings for your D210c device:
1. Change Language
You can change the language of the
menus and messages on your D210c
terminal. The D210c will display a list of all
available languages.
2. Keyboard sound ON/OFF
You can turn Off or On the sound when key is pressed of the D210c.
3. Change Connection type
From this option you can change the chosen network connection. The
D210c will scan for available devices and will display a list with their names
on the screen.
4. Connection check
Use this option to check if your D210c device is properly connected to
internet and test the communication with myPOS.
5. Check for update
From time to time a new version of the software running on your D210c has
new versions released. You can check for software updates at any time by
selecting using option.
O
EN 20|
Page 21
If there is a new software version, the device will display the new version,
how many files will be downloaded and their size. You can confirm and start
the update procedure or cancel it and update the device later.
6. About
By pressing (6) on the keyboard you can find more information about your
D210c device such as terminal ID (TID), name, software and firmware version
and last transaction STAN.
SETTINGS MENU2 shows the second list
of supported settings for your D210c
device:
1. Reset device
Use this option with caution and only if
you want to reset your D210c. The D210c
will display a screen where you need to
enter a deactivation code. The code can be generated when you log in to
menu and chose 'reset'
from the Actions menu of the D210c you want to reset.
Please, take into account that this will restore your device settings to the
default ones and your D210c will no longer be attached to your myPOS
account. If you want to continue accepting payments, you will need to
activate the device again.
2. Receipt configuration
Use this option to change the default settings of the customer receipt copy.
You can choose to print it automatically, after confirmation or not to print
customer receipt copy. By default your new D210c device will print
automatically the customer receipt copy 3 seconds after printing the
merchant receipt.
3. SIM PIN settings
This option is available only if your D210c device is using SIM card
connection. Use this option to change the default security settings of your
SIM card. You can choose to enable or disable the PIN check of your SIM card.
4. SIM card settings
This option is available only if your D210c device is using SIM card
www.myPOS.eu Merchant services » myPOS devices
EN 21|
Page 22

connection. Use this option to change the default APN (Access point name)
on your device. You can choose from the standard APN settings of your
mobile operator or enter manual settings.
5. Sleep configuration
This option is available only if your myPOS device is using SIM card
connection. Use this option to change the default settings of the Sleep mode
of your device. The Sleep mode is switched off by default.
6. Print test receipt
Use this option if you want to print a test receipt.
Important: The product, including D210c device and myPOS Business Card
(“the product”) is not covered by Consumer law, including EC Directives on
Consumer Protection and Distance selling Directives. This product is not
designated to consumers, meaning any natural person who is acting for
purposes, which are outside his trade, business, craft or profession. This
product represents financial services and is designated only for accepting of
payments for services or goods offered by natural or legal persons with a
legal business activity, acting as professionals, sole traders, traders,
merchants, self-employed or otherwise selling goods or services.
Replacement of myPOS Package with defect:
Client must not open the POS terminal device and must not try to repair
the defect by himself/herself. This will be deemed as a defect caused by
Client and iPay International will not be liable for its obligations under the
Return Policy.
Client may return the full package of myPOS Package, including D210c
device and myPOS Business Card, within a deadline of 1 (one) year as of the
date of receipt of myPOS Package by Client upon completion of the
conditions precedents stated in the Return Policy, available at
.
Some Distributors may provide post sale customer support and may be
Warranty and Return Policy
џ
џ
www.myPOS.eu/legal
џ
EN 22|
Page 23

FOR MORE INFORMATION
www.myPOS.eu/resources
For full list of available documenatation, please visit:
џ
џ
www.myPOS.eu/legal
www.myPOS.eu/legal
able to take back the defect D210c device. Please contact first your
Distributor or Agent and check for post sale customer support and if there is
not such, please proceed as instructed by this Return Policy.
The guarantee of iPay International S.A. does not cover any cables,
accessories, plugs, or power supply units or other items, different from the
D210c devices and myPOS Business Card in myPOS Package.
Please read the full text of the Return Policy available at
prior to registration for the service and activation of
the myPOS Package.
Important: Disposal:
You are not allowed to dispose of the D210c device, including its
battery, cables or other components with the general household
waste. If your D210c is not functioning you have to send it for repair
by following the Return policy available at .
EN 23|
Page 24

www.myPOS.eu
 Loading...