

Page 1

© 2019 mPTech. All rights reserved. HALO Q
1
PHONE MANUAL
myPhone HALO Q
Page 2

© 2019 mPTech. All rights reserved. HALO Q
2
Thank you for choosing HALO Q device.
Please read the manual carefully.
myPhone HALO Q is intended for use on the GSM 2G frequencies 850/900/1800/1900
MHz.
It has a contrasting, colourful display, a torch, Bluetooth and support for dual SIM.
Without prior written consent of the manufacturer, no part of this manual may be
photocopied, reproduced, translated or transmitted in any form or by any means,
electronic or mechanical, including photocopying, recording or storing in any systems
of storing and sharing information.
Safety
Read these guidelines carefully. Not following them may be dangerous or illegal.
Depending on the installed version of the software, service provider, SIM card or
country, some of the descriptions in this manual may not match your phone, and the
phone itself and its accessories might differ from the one included in the illustrations
in this manual
—DO NOT RISK—
All wireless devices may cause interferences, which could affect the quality of other
connections.
Do not switch the device on in places which are prohibited from using cell
phones, or when it may cause interferences or other dangers.
Always abide by any
kinds of prohibitions, regulations and warnings conveyed by the staff.
—ROAD SAFETY—
Do not use this device while driving any kind of vehicle.
—RESTRICTED AREAS—
Switch OFF your telephone in an airplane since it may disturb the operation of other
equipment located therein. The telephone may interfere with operation of the medical
equipment in hospitals and health protection entities. Abide by any kinds of
prohibitions, regulations and warnings conveyed by the medical staff or warning sings.
—QUALIFIED SERVICE—
Only qualified personnel or an authorized service center may install or repair this
product. Repairing the device by an unqualified or unauthorized service technician may
result in damage to the device and void the warranty.
—WATER AND OTHER LIQUIDS—
Protect the device from water and other liquids. It can influence work and the life span
of electronic components. Avoid using the device in environments with high humidity
like kitchens, bathrooms or during rainy weather. Particles of water can cause the
liquefaction of moisture in the device, and this may have a negative impact on the
work of electronic components.
—CHILDREN AND PHYSICALLY OR MENTALLY DISABLED PEOPLE—
This device should not be operated by people (including children) with limited physical
or mental abilities, as well as by people with no earlier experience in operation of
electronic equipment. They may use the device only under supervision of people
responsible for their safety. This device is not a toy. Memory card and SIM card are
small enough to be swallowed by a child and cause choking. Keep the device and its
accessories out of reach of children.
—ALARM CALLS—
Making alarm calls may not be possible in some areas or circumstances. It is
recommended to find an alternative way to notify emergency services if you are going
to this type of remote areas.
—PETROL STATIONS—
Always turn off the phone while refueling your car on petrol station. Do not use your
device close to chemicals.
Page 3
© 2019 mPTech. All rights reserved. HALO Q
3
—BATTERY AND ACCESSORIES—
Avoid exposing the battery to very high/low temperatures (below 0°C/32°F and over
40°C/104°F). Extreme temperatures may influence capacity and battery life. Avoid
contact with liquids and metal objects as it may cause partial or complete battery
damage. The battery should be used according to its purpose. Do not destroy, impair
or throw the battery into flames - it might be dangerous and may cause fire. Wornout or impaired battery should be placed in a dedicated container. Excessive charging
the battery can cause damage. Therefore, a single battery charge should not last
longer than 1 day. Installing an incorrect battery type can cause an explosion. Never
open the battery. Please dispose of battery according to the instructions. Disconnect
an unused charger from power grid. In case of the charger wire damage, it should not
be repaired but replaced with a new one. Use the original manufacturer’s accessories
only.
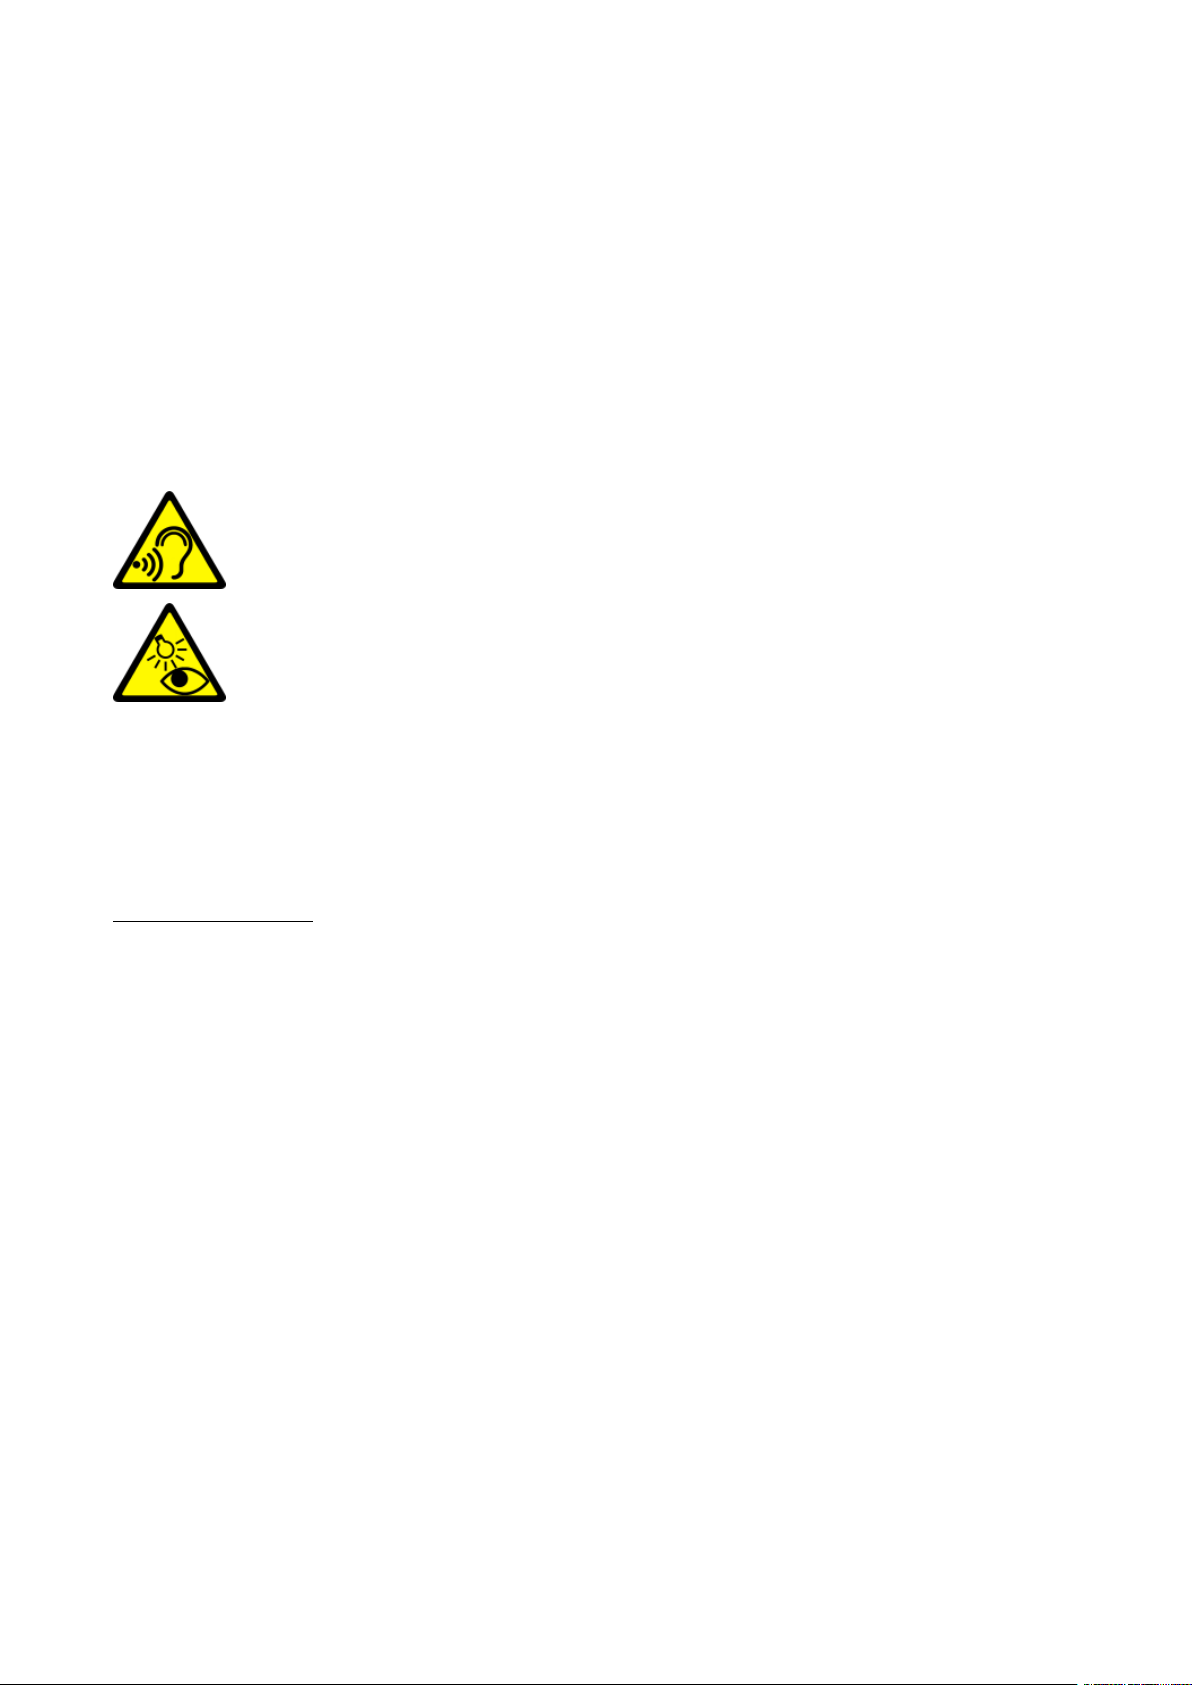
—HEARING—
To avoid hearing damage, do not use the device at high volume levels for
a long period of time, do not put operating device directly to the ear.
—EYESIGHT—
To avoid eyesight damage do not look closely onto the flash light during
its work. A strong bean of light may cause permanent eye damage!
Manufacturer:
mPTech Sp. z o.o.
Nowogrodzka 31
00-511 Warszawa, Poland
Website: myphone.mobile.com
Table of Contents
Table of Contents ............................................................................................................................. 3
Package content ............................................................................................................................... 4
Technical Specifications ................................................................................................................. 5
1. Introduction .................................................................................................................................... 6
Appearance of the phone ........................................................................................................ 6
Turning the phone on/off ........................................................................................................ 8
Inserting SIM, memory cards and the battery............................................................... 8
Charging the battery ................................................................................................................. 8
Charging without the cradle charger ................................................................................ 8
Charging with the cradle charger ....................................................................................... 8
2. Using the basic functions ......................................................................................................... 9
Keypad lock.................................................................................................................................... 9
Phone menu access ................................................................................................................... 9
Customize your phone .............................................................................................................. 9
Sounds and user profiles ........................................................................................................ 9
Switching the "meeting” mode on and off ..................................................................... 9
Call handling functions ........................................................................................................... 10
Calling ............................................................................................................................................. 10
Answering ..................................................................................................................................... 10
News ............................................................................................................................................... 10
Creating and sending text messages ............................................................................. 10
Messages display ...................................................................................................................... 10
Page 4

© 2019 mPTech. All rights reserved. HALO Q
4
List of contacts .......................................................................................................................... 10
Adding a new contact ............................................................................................................. 10
Deleting contacts ....................................................................................................................... 11
SOS button settings ................................................................................................................. 11
3. Using the basic functions ........................................................................................................ 11
Calling a contact from the phone book ............................................................................ 11
Missed calls ................................................................................................................................... 11
Speakerphone mode................................................................................................................. 11
Dual SIM open ............................................................................................................................ 12
Connecting your phone to the computer ........................................................................ 12
International calls ..................................................................................................................... 12
4. Other phone features .............................................................................................................. 12
Time and date settings .......................................................................................................... 12
Menu language Menu ............................................................................................................ 12
Displays setting ......................................................................................................................... 12
Call settings ................................................................................................................................ 13
Call register ................................................................................................................................. 13
Configuration of the alarm.................................................................................................... 13
Calculator ..................................................................................................................................... 13
Factory settings ......................................................................................................................... 13
Torch ............................................................................................................................................... 13
Audio Player ................................................................................................................................ 14
FM Radio ....................................................................................................................................... 14
Calendar ........................................................................................................................................ 14
Bluetooth ...................................................................................................................................... 15
Pairing bluetooth devices...................................................................................................... 15
Sending files via Bluetooth .................................................................................................. 15
Camera .......................................................................................................................................... 15
Taking pictures ........................................................................................................................... 15
Recording videos ....................................................................................................................... 16
Phone icons ................................................................................................................................. 16
Troubleshooting ......................................................................................................................... 16
5. Proper phone maintenance. ................................................................................................... 17
Proper use of the battery ....................................................................................................... 17
Device maintenance .................................................................................................................. 17
Technological criteria ................................................................................................................ 17
Information on certificates (SAR) ........................................................................................ 17
Correct disposal of used equipment. ................................................................................ 18
Correct disposal of used batteries ..................................................................................... 18
Declaration of conformity with European Union Directives........................................... 18
Package content
Before you start using your phone, make sure all of the following items are included
in the box:
• MYPHONE HALO Q phone,
• battery,
• charger (adapter + USB cable),
• cradle charger,
• user manual,
Page 5
© 2019 mPTech. All rights reserved. HALO Q
5
If any of the above items is missing or damaged, please contact your dealer.
It is recommended to keep the packaging in case of any complaint. Keep the
container out of reach of children.
The current manual or a more detailed version of this manual is also available on
the manufacturer's website:
www.myphone.pl/qr/myphone-halo-q
Depending on the installed version of the software, service provider, SIM card or
country, some of the descriptions in this manual may not match your phone.
Depending on the country, service provider, SIM card or device version, the phone and
its accessories may differ from the illustrations included in manual. The descriptions
contained in this manual are based on the default settings of the phone.
Technical Specifications
Two SIM card slots
Speakerphone mode
Torch
FM Radio
2 Mpix camera
SOS button
Display: 2,8”, 240x320 pix
Battery capacity: 1400 mAh
Dimensions: 130 x 56 x 13 mm
Weight: 110 g
Memory cards support up to 32 GB
Input/output parameters Chargers: 100-240 V~ 0.15 A, 50/60 Hz
Output parameters Chargers: 5.0 V 0.5 A
Page 6
© 2019 mPTech. All rights reserved. HALO Q
6
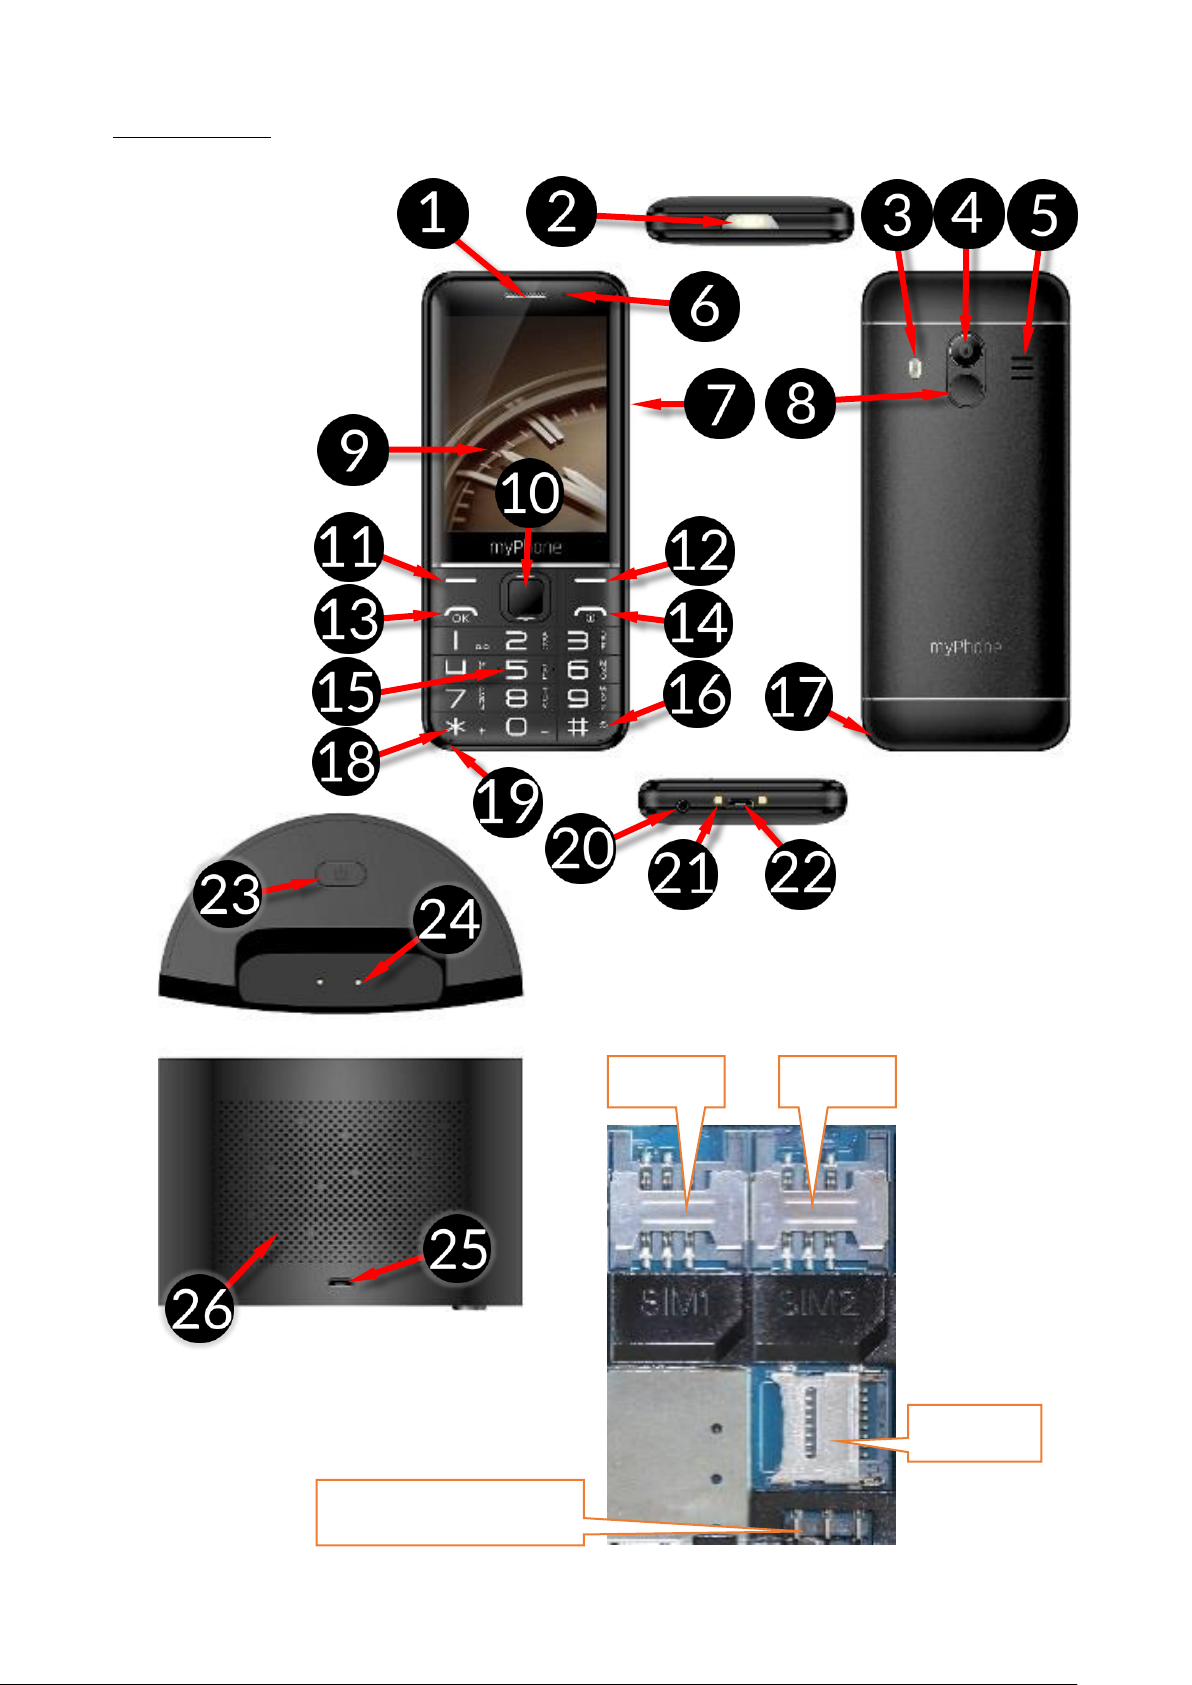
1. Introduction
Appearance of the phone
microSD
SIM1
Battery connector
SIM2
Page 7

© 2019 mPTech. All rights reserved. HALO Q
7
1
Speaker
A speaker used in phone conversations.
2
LEDs
Torch 3 LED
Camera flash
4
Camera
Camera lens
5
External
speaker
Loudspeaker for system sounds, ringtones, music.
6
LED
Multicolor LED for notification of battery charging, incoming
and missed calls and messages, as well as the audio player's
functioning.
7
Torch on-off /
FM Radio
Allows you to quickly turn on the torch (at any time) or FM
radio (only with the active home screen).
8
SOS button
Press and hold to activate an alarm and/or auto-dial of
predefined numbers.
9
Display
LCD display
10
<OK> button
<Up>
<Down>
<Right>
<Left>
The <OK> button on the home screen allows you to enter the
Menu, where it confirms your selection. The direction keys in
the menu allow you to navigate through it. On the home screen
they activate: <Up> - camera, <Down> - photocontacts,
<Right> - On/Off "Find Phone "*, <Left> - calendar.
11
<Menu>
button
While on the main screen enables entering the Menu, and
confirms choice while in the Menu. Locks and unlocks the
phone keypad.
12
<Contacts>
button
On the Mainscreen, launch the Phonebook. While in the menu
you can exit or opt out.
13
<Green
handset>
button
Allows you to receive an incoming call or look through the list
of all calls.
14
<Red
handset>
button
Allows you to reject an incoming call. While in the menu allows
you to return to the main screen. While on the mainscreen it
allows to turn off the display or turn it off or on again.
15
Phone keypad
Keys enabling dialling the phone number in the home screen,
and entering the letters and numbers of the message body in
the SMS writing mode.
16
<#> button
Use this option to increase the volume in multimedia
applications. Allows you to switch between sound modes and
character input modes when writing text messages.
17
Gap
Allows to take off a cover of the phone.
18
<*> button
Use this option to decrease the volume in multimedia
applications. When writing an SMS, it displays symbols for
insertion into the content.
19
Microphone
Do not cover it with your hand while on the phone.
20
3.5 mm
minijack
headphone
It allows you to connect headphones to your phone, so you can
listen to the radio (improve the quality of reception - act as an
additional antenna), music, and also make calls (when
Page 8

© 2019 mPTech. All rights reserved. HALO Q
8
jack
headphones are equipped with a microphone).
21
Phone
connectors
Allows you to connect to the base and charge the battery.
22
MicroUSB port
When connected, the charger enables recharging the battery.
You can transfer data (photos, videos, music) when you
connect it to your computer.
23
<Search>
button
Enables to search for a phone by activating a sound.
24
Base
connectors
Allows you to connect the phone to the base and charge the
battery.
25
Base microUSB
port
When the charger is connected, it allows you to charge the
battery in the phone connected to the base and use the phone
search option.
26
Base LED
diodes
The LED indicates that the power supply is connected to the
charging base.
Turning the phone on/off
To turn the phone on/off press and hold the <Red handset> button. If you are
prompted to enter a PIN code as soon as the phone is switched on, enter the PIN code
(you will see it as ****) and press the [Menu] key.
Inserting SIM, memory cards and the battery
If the phone is switched on - switch it off. Remove the back cover of the phone - use
your fingernail to raise it using the gap in the case. Insert the SIM card/s - Card/s
is/are supposed to be placed with its gold contacts facing down, the way in which the
slot is placed. Insert the memory card - to open the flip of the card reader slide it
delicately down. Insert the microSD memory card with its gold contacts facing down,
the way in which the slot is embossed. Close the flip by sliding it towards the center
of the phone. Insert the battery so that its gold contacts touch the tripple connector
in the phone bay. Put on and gently press down the cover until you hear the click of
the latches. Make sure the cover is well attached.
Charging the battery
Charging without the cradle charger
Plug the microUSB plug of the cable into the charging socket on your phone and the
USB plug into the charging socket on the charger Subsequently connect the charger
plug into the power grid
*Attention: Improper connection of the charger cable can cause serious damage to the
phone and/or the charger. Damage caused by improper use of the phone and its
accessories is not covered by the warranty.
The icon (or similar) will appear during charging and when the battery is fully
charged. When charging is complete unplug the charger from the power outlet. Unplug
the cable from the socket on the phone.
Charging with the cradle charger
Plug the microUSB plug of the cable into the charging socket on your phone and the
USB plug into the charging base socket, then plug the charger plug into the power
oulet. Place the phone in the charging base.
*Attention: Improper connection of the charger cable can cause serious damage to the
Page 9

© 2019 mPTech. All rights reserved. HALO Q
9
phone, charger, and/or the charging base. Damage caused by improper use of the
phone and its accessories is not covered by the warranty.
2. Using the basic functions
Keypad lock
To lock the keyboard press [Menu] > <*> To unlock the keyboard press [Unlock] > <*>
Phone menu access
To access the phone menu, press the <Menu> button above the <green handset> or
<OK> button with the phone's main desktop activated.
By pressing navigation buttons <up>, <down>, <left> or <right>, move to the wanted
menu icon.
Press <Menu> or <OK> button to confirm your choice (and enter the menu item) or
<back> to return to previous menu/desktop.
Customize your phone
myPhone HALO Q can be customized to your needs. This makes its use more enjoyable
and easier.
Sounds and user profiles
To set ringtones and volume in the phone use [Profiles] option. To activate it, select
[Menu] > [Settings] > <OK> > [Profiles] > <OK>. Choose the appropriate sound profile
from the list and select <OK> to activate the selected profile or [Options] > [Customize]
> [Select] to edit the profile according to your preferences. Available sound profile
options:
• [Alert type] - allows to choose from: Ring only, Vibrations only or
• [Ring type] - allows to choose ring type, - "repeat" or "once" mode.
• [SIM 1 Ringtone] or [SIM 2 Ringtone] – this option allows to change incoming call
ringtone melody for SIM 1 or SIM 2. Enter choose the melody and confirm with
<OK> button.
• [Ringtone volume] – allows to adjust the volume of the ringtone with <left> and
<right> buttons. Confirm your choice with <OK> button.
• [SIM1 message] or [SIM1 message] - this option allows you to change the
notification sound for SIM 1 or SIM 2. Enter, select the sound and confirm with
<OK>.
• [Message volume] – allows to adjust the volume of the ringtone with <left> and
<right> buttons. Confirm your choice with <OK> button.
• Keyboard] - allows you to select the type of key sound (Silent, Click, Sound).
Confirm your choice with <OK> button.
• [Keytone volume] – allows to adjust the volume of the keypad with <up> and
<down> buttons. Confirm your choice with <OK> button.
• [System alert] - allows you to turn on or off system sounds of the phone.
Save the changes by [Options] >[Save].
Switching the "meeting” mode on and off
The <#> key is used to switch sounds to vibration in the standby mode. Press and
hold it for approx. 2 seconds until a profile activation message and profile symbol icon
appear. By pressing and holding the <#> key again will return to the previous sound
profile.
Page 10

© 2019 mPTech. All rights reserved. HALO Q
10
Call handling functions
Calling
Enter the number to the main screen using the numeric keypad.
We recommend that you enter the area code prior to the telephone number.
Unlock your phone and select a contact from the phonebook - [Phonebook]. Press
<green handset> button to start the call. Press <red handset> button to finish the
call.
Answering
Press <green handset> to answer an incoming call. Press <red handset> to finish/
reject the call.
News
Creating and sending text messages
Enter: [Menu] > [Messages] > [Write message]. Type in the message using the keypad.
Sings are typed in letter by letter.
The phone is not equipped with a dictionary. <#> button is used to change the writing
mode. You can choose from, among others Abc - the first letter will be capital, the rest
lower case, abc - only lowercase, ABC - only uppercase, 123 - digits only. To enter a
diacritical character i.e. period, comma, dash, etc., press <*> and choose from the list,
or press the 1 a correct number of times. To enter a space between the words press
<0> button.
When you have entered the message, press [Options] > [Send to] and enter the
number using the keypad or add it from the phone list. After entering the
number/choosing a contact enter: [Options] > [Send], to send the message.
Messages display
Enter: [Menu] > [Messages] > [Inbox], choose a message from the list and select <OK>
or [Options] > [View] to see the message itself.
List of contacts
Adding a new contact
Enter [Menu] > [Phonebook] > [Add new contact]. Enter the contact details: name,
phone number, photo. You can also assign a ringtone to a contact.
Press [Options] > [Save] to save the contact.
Search for a contact
Enter [Menu] > [Phonebook]. Enter the first letter of the contact. Phone numbers
beginning with that letter will appear in the list. To find another contact use navigation
buttons <Up> and <Down>. After searching and chosing a contact enter [Options] a
list of available options will appear:
• [View] – to see the details of a chosen contact.
• [Send message] – to send text message to a chosen contact.
• [Call] - to make a call
• [Edit] - to edit the contact details.
• [Delete] – to delete a chosen contact.
• [Copy] - to copy a chosen contact.
• [Add to blacklist] – to add to chosen contact to unwanted and blocked numbers.
Page 11

© 2019 mPTech. All rights reserved. HALO Q
11
• [Photo contacts] - to add chosen contacts to photo contacts.
• [Phonebook settings] - allows you to set the location of contacts (SIM cards,
phone memory, both), view the memory status, copy, move, delete contacts and
also to make a backup copy of the phonebook and retrieve it later on.
Deleting contacts
To delete all contacts from the phone enter:[Menu] > [Contacts] > [Options] >
[Phonebook settings] > [Delete all contacts] > [Ok] choose from [from SIM 1] [from SIM
2] or [from Phone] To delete a single contact enter: [Menu] > [Contacts] and search
for the contact you wish to erase, then enter [Options] > [Delete] and confirm using
<OK>.
SOS button settings
myPhone Halo Q phone has got an SOS button. It is placed at the back of the phone.
To activate the SOS button, select [Menu] > [Settings] > [SOS Settings]. A menu with
the following settings will appear:
• [Status] – Here you can enable or disable the SOS function.
• [SOS number] – You can enter up to 5 numbers that your phone will try to connect
to when you press the SOS button for a long time. Enter the phone numbers in
the desired fields or select them from the phonebook. You can move between
numbers using the <Up> and <Down> buttons. When you have typed in all the
numbers, select [Back].
• [SOS text] - it is possible to activate sending SMS with the given content to
selected numbers or disable it, so that the phone will only try to reach the given
numbers. You can also enter your own content of the emergency message, which
will be sent to the specified number after pressing the SOS button. To save
changes select [Save].
• [Warning tone] - Here you can activate or deactivate the SOS sound alarm, which
is activated by pressing the SOS button on your phone.
We recommend that you enter the number of emergency services in one of the
positions of the numbers, in addition to the nearest ones. The message should contain
your name, home address and any serious illnesses (diabetes, coronary heart disease,
etc.).
3. Using the basic functions
Calling a contact from the phone book
To call a number stored in the [Contacts] submenu (phonebook), select [Menu] >
[Contacts] > search for the corresponding contact (using the contact name keyboard),
then select the contact and make a call by pressing the <green handset> button and
then select the SIM card.
Missed calls
Missed calls are displayed on the screen of the phone. An appropriate icon on the
screen will inform you about a missed call. To check who called, press [View]. Another
option is to enter [Menu] > [Call register] > [Missed Calls]. To connect to the sender of
an unanswered call, select it from the list, press the <green handset> button on your
phone's keypad, and select the SIM card.
Speakerphone mode
During a call press [Speaker], to activate speakerphone mode.
Page 12

© 2019 mPTech. All rights reserved. HALO Q
12
Dual SIM open
Dual SIM function enables using 2 SIM cards simultaneously. To use that function one
should mount two SIM cards in the phone (SIM slots are placed beneath the phone
battery). Subsequently enter [Menu] > [Settings] > [Dual SIM settings] . You have the
following options to choose from:
• [Dual SIM] - so that both SIM cards are enabled,
• [Only SIM 1 open] and [Only SIM 2 open] to activate SIM 1 or SIM 2.
If the Dual SIM option has been chosen on the phone, each time a call is made or a
message sent, the phone will display a question about which SIM card to use.
Connecting your phone to the computer
myPhone HALO Q can be plugged to the PC computer using a USB cable. This allows
you to view and exchange data between your computer and your phone when a
microSD card is installed. To do this, you must:
• Connect the microUSB connector to USB port in your phone then connect the
USB connector to a USB port on your computer.
• An information about USB connection should be displayed on your phone screen.
• Choose [Mass storage].
The phone is now connected to the computer. The contents of the phone memory can
be viewed using Windows Explorer.
International calls
While on the main screen press the <*> button twice until the "+" sign appears. Enter
the full phone number of the recipient (the country code and the telephone number),
and then press <green handset> to make a call.
4. Other phone features
Time and date settings
To set time and date enter: [Menu] > [Settings] > [Phone settings] > [Time and date]
and a list will apear:
• [Set time/date] - to change the date and/or time.
• [Set format] - to set format of date and time.
• [Update with time zone] - to set the automatic time update.
• [Time Update] - to enable or disable the confirmation of a time update from the
operator's network.
Menu language Menu
To set the Menu language, press [Menu] > Down > Right > OK > Down > Down > OK >
Down > Down > OK, while the main screen is active, then select the desired menu
language.
Displays setting
Select [Menu] > [Settings] > [Display], and you will see options:
• [Wallpapers] > [System] if you want to choose from system wallpapers or [User
defined] if you want to add your own wallpaper from microSD memory card and
choose any picture from the list. To see a preview of given picture select <OK>.
To select the chosen picture as a wallpaper press: [View] > [OK].
Page 13

© 2019 mPTech. All rights reserved. HALO Q
13
• [Screen saver] - Determine how long it takes for the screen to lock.
• [LCD backlight] - Set the brightness and how long it takes for the screen to fade
out.
• [Show date and time] - switches on/off displaying the date and time on the main
screen of the phone.
Call settings
Available in [Menu] > [Settings] > [Call settings] You can set the presentation of the
caller ID, call waiting, forwarding, call blocking and line change. In [Advanced settings]
you can set and edit the list of blocked phone numbers - [Blacklist], set the automatic
call duration reminder and select the SMS rejection mode and the method for
answering calls.
Call register
To view the call register select [Menu] > [Call Register]. The following positions are
placed in there:
• Dialled calls
• Missed calls
• Received calls
• All calls
The positions are changed using the <Right> and <Left> buttons.
Configuration of the alarm
Enter: [Menu] > [Organizer] > [Alarm] Select any item in the list and press <OK>. You
can enable/disable the alarm, set the time of its activation, repeat (once, every day,
custom), select the alarm volume and sound, type of alarm (combinations of ringing
and vibration). To confirm alarm setting press <Save>.
Calculator
Enter [Menu] > [Calculator].
Basic arithmetic operations can be performed using the numeric keypad (typing
numbers, digits). Actions can be set using navigation buttons: <Up> - addition, <Down>
- subtraction, <Left> - multiplication and <Right> - division. To see the result press
<OK>.
Factory settings
To get back to factory settings enter [Menu] > [Settings] > [Restore factory settings],
input the phone password and confirm by pressing <OK>. Password required to restore
the factory settings is 1122.
Torch
To turn on the torch, slide the switch on the side of the phone's casing upwards and
the torch on the top of the phone's casing will turn on. Move the switch to the middle
position to turn off the torch.
Attention: The light emitted by the LED has a strong focus therefore it is unadvisable
to look directly into the light. Not following this instruction may cause damage to your
eyesight.
Page 14

© 2019 mPTech. All rights reserved. HALO Q
14
Audio Player
Start the audio player by selecting [Menu] > [Multimedia] > [Audio player]. Audio player
allows to play music files in MP3, AAC, AMR, APE, M4A, WAV formats. To play a music
file it has to be saved on the microSD memory card folder best in “My music” catalogue.
When you start the application, music files will automatically be added to the playlist.
Attention:
Listening to the audio player too long or too loud can cause hearing
damage.
To enjoy the audio player use the following buttons:
Button
Function
<OK>
Play/Pause
<#>
Louder
<*>
Quieter
<Up>
Repeat
<down>
Play songs one by
one or randomly
<Right>
Next track
<Left>
Previous track
FM Radio
To use a build-in FM Radio, enter [Menu] > [Multimedia] > [FM Radio]. Choose [Options]
> [Auto search] > <Select> to search and save the radio stations. All found radio
stations will be saved and available at [Options] > [Channel list].
Listening to FM radio does not require headphones with a 3.5 mm mini-jack plug
to be plugged into the headphone jack, but they do help when the reception of the
station is weak - they act as an additional antenna. The headphones are not an
element of the set.
Radio control is done using the following buttons:
Button
Function
<OK>
On/off
<down>
0.1 MHz down
<Up>
0.1 MHz up
<#>
Louder
<*>
Quieter
<Right>
Searching for stations of
a higher frequency
<Left>
Searching for stations on
lower frequency
Calendar
To switch on the calendar, select [Menu] > [Organizer] > [Calendar].
You can add events to the calendar, to which you can set reminders. Use the <down>,
<up>, <left>, <right> buttons to navigate between calendar dates. Select the date
and press <Options> then select [Add Event]. A screen where you can enter the
following will appear:
• [Subject] - name of the event.
• [Start] - date and time of the beggining of the event.
• [End] - date and time of the ending of the event.
• [Type] - Use this option to set the type of event (reminder, meeting, course,
date, call, anniversary, birthday).
• [Alarm] - how many minutes before the start of the event an alarm should
appear
Page 15

© 2019 mPTech. All rights reserved. HALO Q
15
• [Repeat] - how often the reminder should be repeated (once, every day,
custom, weekly, monthly, annual),
• [Location] - where will the event take place.
• [Details] - where additional information may be written.
To save the entered data, select [Options] > [Save]. The reminder will appear on the
screen on the set date and time.
Bluetooth
The phone is equipped with a Bluetooth. It is used to wirelessly connect and exchange
files with other devices equipped with Bluetooth. To use Bluetooth enter: [Menu] >
[Settings] > [Bluetooth]. The following options are available:
• [Power] – by pressing <ON> or <OFF> the Bluetooth signal is switched off/on.
When the module is switched on, it is indicated by an icon in the upper status
bar.
• [Visibility] – enabling this function allows you to see your phone in the list of
other Bluetooth enabled devices.
• [My device] - an option [Search new device] is situated here which allows you
to display a list of available Bluetooth devices in range. This feature allows you
to connect to a device from the list.
• [Search Audio Devices] - this option allows you to search for Bluetooth enabled
music playback devices.
• [My name] – the name visible to other Bluetooth devices can be typed in here.
Default name is "myPhone Halo_Q".
• [Advanced] - this option allows you to select the audio track, save files sent via
Bluetooth, check the address of the bluetooth module.
Pairing bluetooth devices
To connect to a Bluetooth device, select it from the list of available devices by going
to [Menu] > [Settings] > [Bluetooth] > [My device] > [Search new device], then select
a device from the list and press [Pair]. Both devices will display a message asking you
whether your password is compatible or correct. Enter the same data on both devices
or confirm compatibility and press [OK] to pair the devices.
Sending files via Bluetooth
To send files situated on the memory card to a paired (connected) device enter: [Menu]
> [Files] > [Memory card] or [Phone] and choose a file you want to send. Then choose
[Options] > [Send] > [Bluetooth] and search the device you wish to send the file to or
add it from the list of paired devices. The file will be send after recipient’ approval.
Camera
myPhone HALO Q is equipped with a camera with the possibility of taking pictures and
recording videos.
Taking pictures
To take a picture, open the camera application by pressing <up> from the main screen
or by [Menu] > [Multimedia] > Camcorder]. When you start the camera, place the
subject you wish to photograph in the frame, and then press <OK> to take a photo.
Then you can select [Options] to send or delete a photo or [Back] to return to taking
the photo. Photos are saved by default in a “Photos” file in the phone memory or on
Page 16

© 2019 mPTech. All rights reserved. HALO Q
16
the microSD memory card (if installed). You can view the pictures you have taken and
all other by entering [Menu] > [Multimedia] > [Image viewer].
Recording videos
To record a video, press <Up> while on the mainscreen or Then place the recorded
object in the camera frame and press <OK> (Record) to start recording and [Stop] to
stop. Videos are saved by default in a “Videos” file in the phone memory or on the
microSD memory card (if installed). To watch recorded videos enter: [Menu] >
[Multimedia] > [Video player].
Phone icons
GSM network range
Silent mode activated
“General” mode on
Missed call
Bluetooth ON
Battery charge level
Unread SMS message
Plugged-in earphones
Troubleshooting
Message
Possible solution
Insert SIM card
Make sure SIM card has been correctly installed.
Input PIN
If the SIM card is secured with the PIN code you have to
enter the PIN when turning the phone on and press
<OK>.
Network fail
In areas where signal or reception is weak, calls may not
be possible. Also receiving calls may not be possible.
Move to another location and try again.
No one can call me
The phone has to be on and within GSM network reach.
I cannot hear the
caller./The caller
cannot hear me.
The mic. should be close to mouth.
Check if the built-in mic. is not covered.
When a headset is un use, check if it has been connected
correctly.
Check if the built-in speaker isn’t covered.
Poor sound quality
while on the phone.
Make sure that the speaker and mic. are not covered.
Page 17

© 2019 mPTech. All rights reserved. HALO Q
17
The connection cannot
be established
Check if the typed-in phone number is correct.
Check if the phone number entered to the [Phonebook]
is correct.
Enter the correct phone number if necessary.
If the problem persists, contact service center.
5. Proper phone maintenance.
Proper use of the battery
Battery in this device can be charged with a charger. If the battery level is low, charge
it. To prolong battery life, let it discharge beneath 20% of the battery capacity before
connecting the charger and charge it up to 100%. If not used, unplug the charger from
the phone and power grid. Overcharging or leaving in a too low/too high temperature
or within magnetic field may shorten battery life cycle. The temperature of the battery
has an impact on its charging cycle. Cool the battery or raise its temperature so that
it is similar to the room temperature (approx. 20°C/68°F). If the battery temperature
exceeds 40°C/104°F the battery must not be charged! Use the battery only according
to its intended purpose. Do not use a damaged battery. Do not throw the battery into
flames! Do not throw a worn-out battery – send it or return it to an authorized recycling
point.
Device maintenance
Keep your phone and accessories out of reach of children in a dry place, away from
moisture, for extended the life of your phone. Avoid using the phone in high and low
temperatures; it can shorten the life of phone electronic components, melt the plastic
parts and destroy the battery. It is recommended that the phone is not used at
temperatures higher than 40°C/104°F.
Do not try to disassemble the phone. Tampering with its structure in an unprofessional
manner may cause serious damage to the phone or destroy it completely.
For cleaning use only a dry cloth. Never use any agent with a high concentration of
acids or alkalis. Use the original accessories only. Breaking those rules might cause a
loss of warranty.
Technological criteria
Network:
GSM 2G 850/900/1800/1900 MHz
Some services may depend on your provider, the state of your local cellular network,
version of the SIM card used and the way you use your phone. For more information,
please contact your GSM operator.
Attention
Statement
The manufacturer is not responsible for
any consequences caused by improper
usage of the phone and not obeying
the above instructions.
The software version can be upgraded
without earlier notice. The manufacturer
retains the right to determine the correct
interpretation of the above instructions.
Information on certificates (SAR)
Your mobile phone is a transmitter and receiver of radio waves. It is designed and
manufactured according to current safety standards, so that exposure to radio waves
never exceeds the limits set by the Council of European Union. Those limits establish
the permitted levels of RF energy for the general population and were developed by
Page 18

© 2019 mPTech. All rights reserved. HALO Q
18
independent scientific organizations on the basis of detailed scientific studies,
including a large safety margin. Their purpose is to ensure the safety of all people,
regardless of age and health. With regard to cell phones the level of exposure to radio
waves is measured by the value SAR ( Specific Absorption Rate). SAR is a value
indicating the amount of radiation emitted by the phone. The SAR limit recommended
by the Council of the European Union is 2 W/kg. The highest SAR value for myPhone
HALO Q equals 1.403 W/kg.
The maximum radio frequency power emitted in the frequency range.
Frequency Range
GSM 850/900/1800/1900 MHz
Bluetooth 2402-2480 MHz
Transmit Power
2W/1W
2.1 dBm EIRP
Correct disposal of used equipment.
The device is marked with a crossed-out garbage bin, in accordance with
the European Directive 2012/19/EU on used electrical and electronic
Equipment (Waste Electrical and Electronic equipment - WEEE). Products
marked with this symbol should not be disposed of or dumped with other
household waste after a period of use.
The user is obliged to get rid of used electrical and electronic equipment
by delivering it to designated recycling point in which dangerous waste are being
recycled. Collecting this type of waste in designated locations, and the actual process
of their recovery contribute to the protection of natural resources.
Proper disposal of used electrical and electronic equipment is beneficial to human
health and environment. To obtain information on where and how to dispose of used
electrical and electronic equipment in an environmentally friendly manner user should
contact their local government office, the waste collection point, or point of sale, where
the equipment was purchased.
Correct disposal of used batteries
According to the EU directive 2006/66/EC with changes contained in EU
directive 2013/56/UE on the disposal of batteries, this product is marked
with crossed-out garbage bin symbol. The symbol indicates that the
batteries used in this product should not be disposed with regular
household waste, but treated according to the legal directives and local
regulations. It is not allowed to dispose of batteries and accumulators with unsorted
municipal waste. Users of batteries and accumulators must use the available collection
points of these items, to be returned, recycled and disposed of.
Within the EU, the collection and recycling of batteries and accumulators is a subject
to separate procedures. To learn more about existing procedures of recycling of
batteries and accumulators please contact your local office or an institution for waste
disposal or landfill.
Declaration of conformity with European Union Directives
mPTech Ltd. hereby declares that myPhone HALO Q cellular phone is
compliant with Directive 2014/53/EU. The full text of the EU Declaration of
Conformity is available at the following Internet address:
www.myphone.pl/qr/myphone-halo-q
 Loading...