

Page 1

Copyright © 2011 myPhone. All rights reserved. myPhone 3380 MIDNIGHT
1
Page 2

Copyright © 2011 myPhone. All rights reserved. myPhone 3380 MIDNIGHT
User Manual
myPhone 3380
Thank you for choosing our phone. In order to better understand the
functions of the phone, please read the manual carefully.
myPhone 3380 is intended to be used in GSM network. It supports two SIM
cards simultaneously and this will set you free from problems associated with
having two different mobile phones.
Apart from basic communication functions it also has many practical
features that will make your work and life much easier. This includes: clock,
alarm clock, calendar, calculator, games, music and video player and
microSD slot. It also has user friendly interface and other useful features that
will satisfy all your individual needs.
Always keep in mind that using this mobile phone in extreme
temperatures (below 0 or over 25 degrees Celsius) may cause damage of
phone components or battery.
Wersja: 0.0.3.14042011
2
Page 3

Copyright © 2011 myPhone. All rights reserved. myPhone 3380 MIDNIGHT
Contents
1. Basic Information.............................................................................................................................5
SIM card and memory card.............................................................................................................5
Inserting and removing SIM card.........................................................................................................5
Inserting and removing microSD memory card...................................................................................6
Keypad and other elements..............................................................................................................7
Turning the phone on/off.................................................................................................................7
Keypad lock.....................................................................................................................................8
Icons overview.................................................................................................................................8
Phone battery.................................................................................................................................10
Battery charging.................................................................................................................................12
2. Using the phone..............................................................................................................................12
Contacts – Phone Book..................................................................................................................13
Making a phone call.......................................................................................................................16
Selecting the number from the Phone Book.............................................................................16
Answering the phone call..........................................................................................................16
Rejecting a phone call...............................................................................................................16
Alarm calls................................................................................................................................16
Messages........................................................................................................................................17
SMS ..........................................................................................................................................17
MMS ........................................................................................................................................18
MMS configuration – checking the settings............................................................................20
Chat...........................................................................................................................................22
Voicemail...................................................................................................................................22
Network messages.....................................................................................................................22
Call log...............................................................................................................................................22
3. Multimedia.....................................................................................................................................22
Camera...........................................................................................................................................23
Video recording..............................................................................................................................23
Video Player...................................................................................................................................23
Audio player..................................................................................................................................24
Dictaphone.....................................................................................................................................25
Radio FM ......................................................................................................................................25
4. Network services............................................................................................................................26
Network services............................................................................................................................26
Data account.......................................................................................................................................27
5. Settings...........................................................................................................................................27
Settings...........................................................................................................................................27
Dual SIM Settings.....................................................................................................................27
Phone settings................................................................................................................................28
Phone call settings.........................................................................................................................28
Network configuration...................................................................................................................29
Security..........................................................................................................................................29
Restore default settings..................................................................................................................30
3
Page 4

Copyright © 2011 myPhone. All rights reserved. myPhone 3380 MIDNIGHT
6. Timetable........................................................................................................................................30
File Manager:.................................................................................................................................30
Alarm.............................................................................................................................................30
Calculator ......................................................................................................................................31
Calendar.........................................................................................................................................31
Tasks list........................................................................................................................................31
Stopwatch.......................................................................................................................................32
World clock....................................................................................................................................32
Currency converter........................................................................................................................32
7. User profiles...................................................................................................................................32
8. Games and entertainment...............................................................................................................32
9. Warranty and Reclamation.............................................................................................................33
Door – to – door Warranty........................................................................................................33
Reclamation procedure..............................................................................................................33
10. Care and maintenance...................................................................................................................34
Comments on the proper use of battery.........................................................................................34
Phone maintenance........................................................................................................................35
Safety information.........................................................................................................................35
Safety while driving a car.........................................................................................................35
Safety while flying....................................................................................................................35
Environment safety...................................................................................................................36
Technological criteria................................................................................................................36
SAR Certification information.......................................................................................................36
Statement of compliance with EU Directives................................................................................37
Proper disposal of used electrical and electronic equipment.........................................................37
11. WAP settings for major mobile network.......................................................................................37
SAFETY
Read these simple guidelines. Not following them may be dangerous or
illegal.
DO NOT RISK
Do not switch the telephone on when mobile phone use is prohibited or if it
may cause interference or danger.
ROAD SAFETY
Obey all local laws. Always keep your hands free to operate the vehicle while
driving. Your first consideration while driving should be road safety.
INTERFERANCE
All wireless devices may be susceptible to interference, which could affect
performance.
SWITCH OFF IN RESTRICTED AREAS
Follow any restrictions. Switch the device off in aircraft, near medical
4
Page 5

Copyright © 2011 myPhone. All rights reserved. myPhone 3380 MIDNIGHT
equipment, fuel, chemicals or blasting areas.
QUALIFIED SERVICE
Only qualified personnel may install or repair this product.
ACCESSORIES AND BATTERIES
Use only approved accessories and batteries. Do not connect incompatible
products.
WATERPROOF
This device is not waterproof. Protect it from humidity.
Attention!
• Depending on installed version of software, service provider, SIM card or country, some of
the descriptions used in USER MANUAL may not correspond with functions of the phone
or descriptions or names used in menu.
• Some of the descriptions may be in English.
• Depending on country, SIM card operator, this mobile’s software and all the accessories may
differ from those shown in the pictures in USER MANUAL.
1. Basic Information
SIM card and memory card
Insert at least one SIM card into the phone before you use it. You get the SIM
card from your operator.
All network information, as well as the address book is stored on the SIM
card. Protect your SIM card from short circuit and contact with metal objects
and the magnetic field, which can lead to damage or destruction of the card.
* Attention :
Before inserting or removing the SIM card the phone must be switched off.
Do not insert or remove the SIM card if the phone is connected to a charger.
Before removing the battery from the phone, make sure that the phone is
switched off.
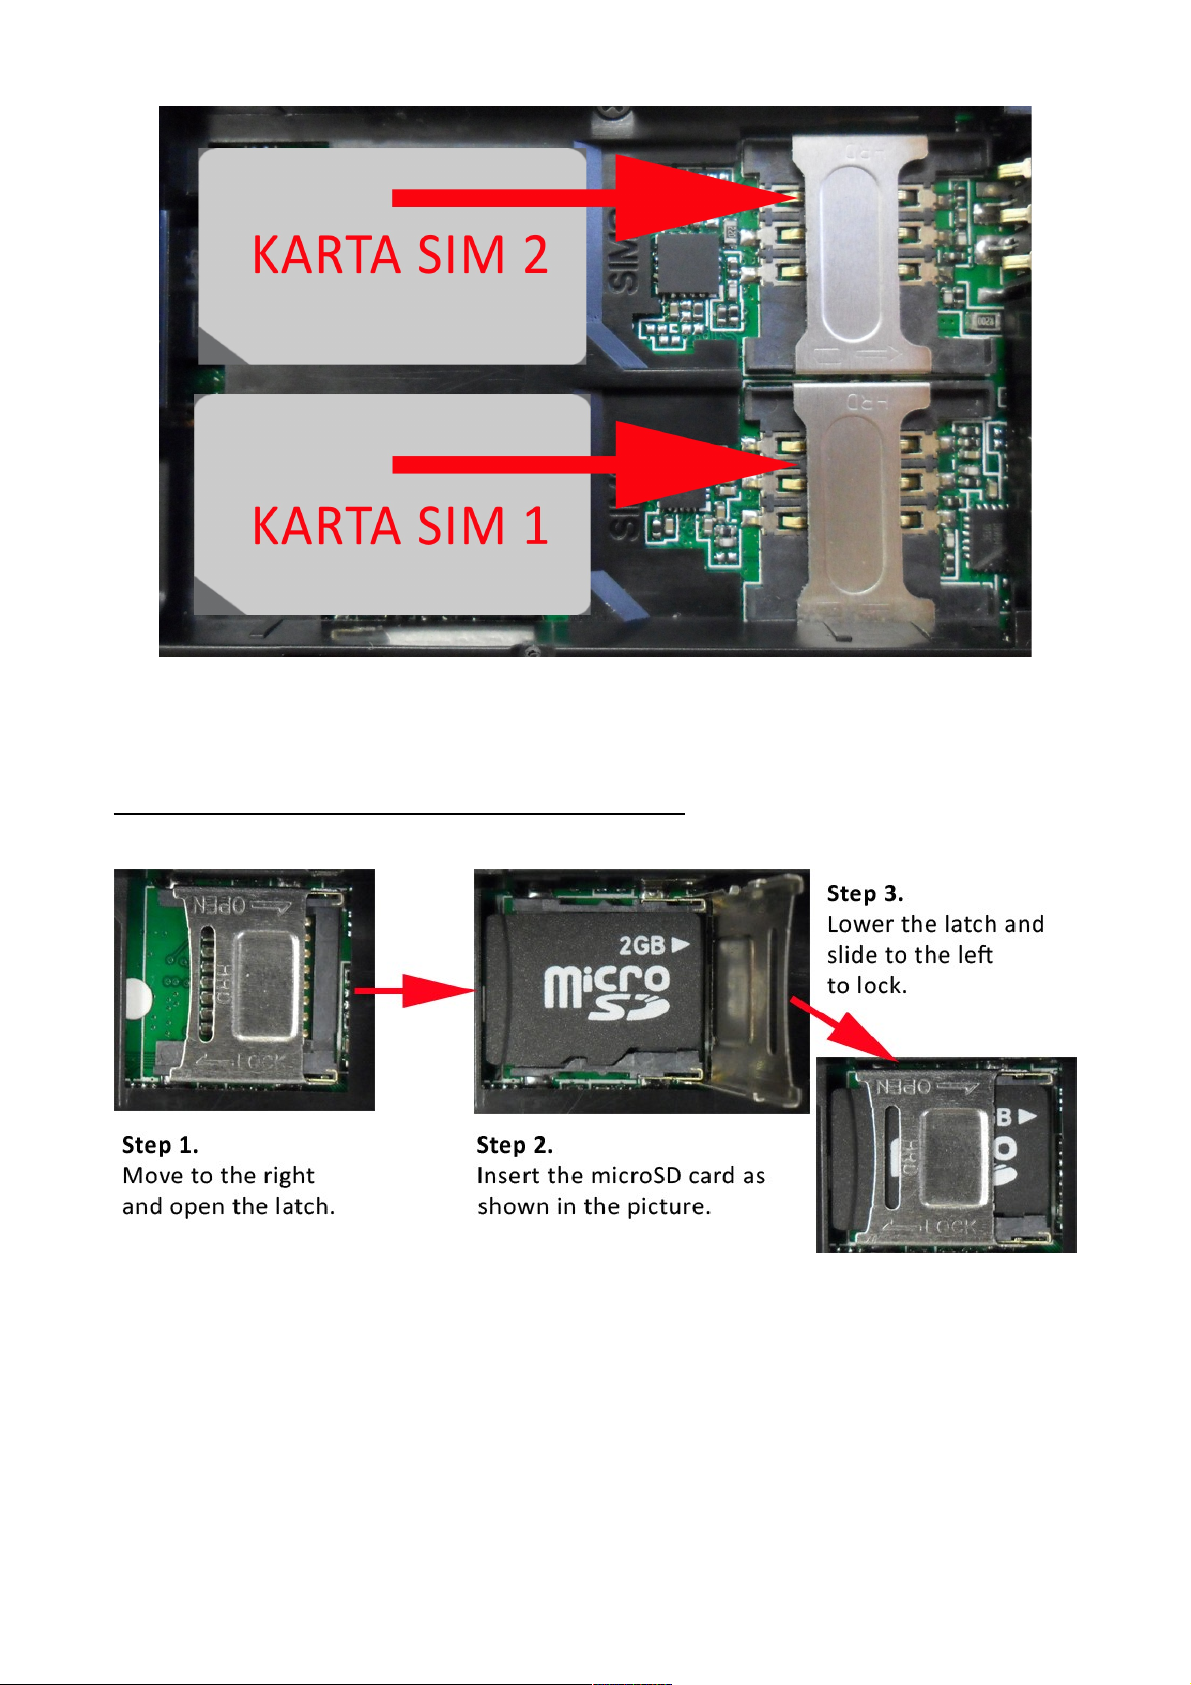
Inserting and removing SIM card
To insert the SIM card turn it so that the gold contacts are facing down and
slide into the slot according to the cutout.
5
Page 6
Copyright © 2011 myPhone. All rights reserved. myPhone 3380 MIDNIGHT
Insert the battery and turn the phone on.
To remove SIM card turn off the phone, take out the battery, gently press the
SIM card and slide it out of the slot.
Inserting and removing microSD memory card
Inserting microSD memory card is shown on the picture below:
After following all of the steps shown above you need to insert the battery and
put on the back cover of the phone.
6
Page 7
Copyright © 2011 myPhone. All rights reserved. myPhone 3380 MIDNIGHT
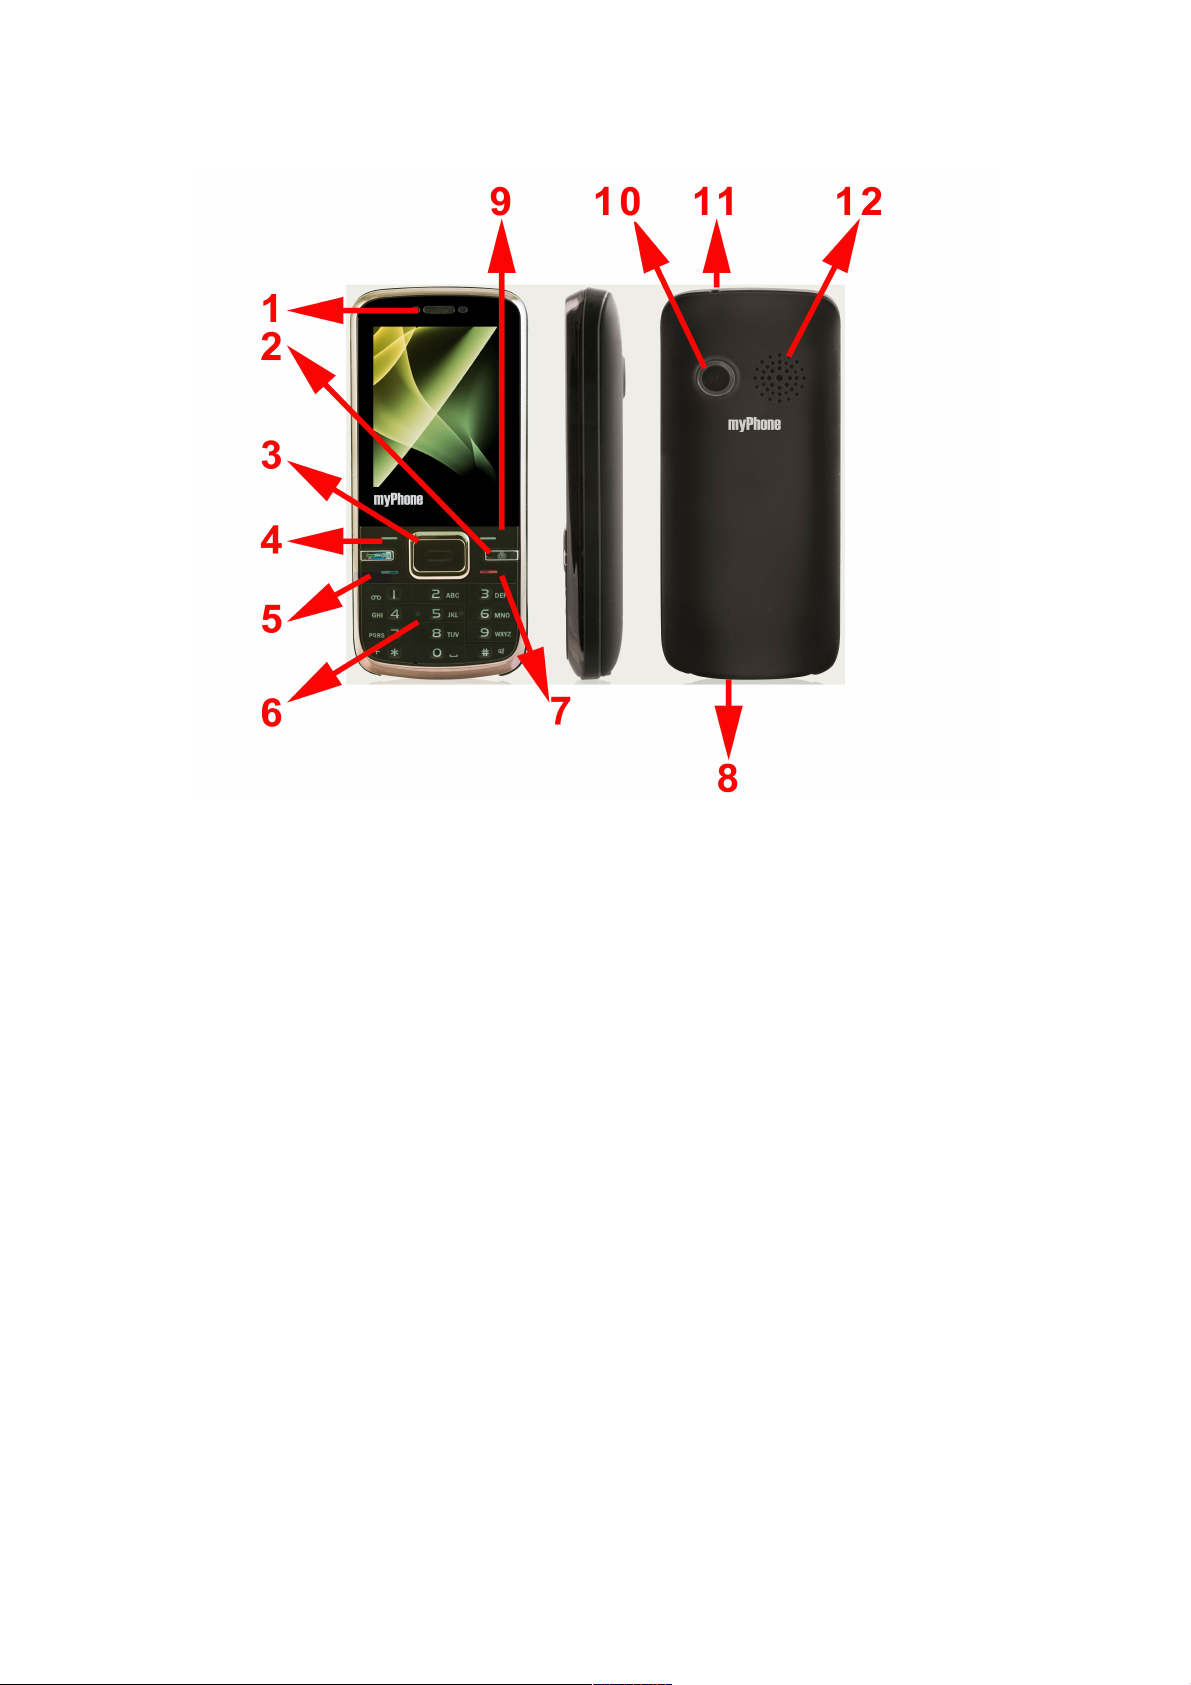
Keypad and other elements
1. Earpiece.
2. Camera key.
3. Navi key.
4. Left Selection Key (LSK) – entering phone`s Menu.
5. Call key for SIM 1.
6. Numeric keypad.
7. Exit key/end key.
8. Charging plug.
9. Right Selection Key (RSK) – entering a phonebook.
10.Camera.
11. Bay for the leash.
12. Loudspeaker.
Turning the phone on/off
Press and hold the exit key (red handset) to turn the phone on/off.
7
Page 8

Copyright © 2011 myPhone. All rights reserved. myPhone 3380 MIDNIGHT
If there is no SIM card or it`s been incorrectly inserted a warning will appear.
Hold the red button once again to turn off the phone and check the SIM card
once again.
Follow the steps displayed:
◦ Enter PIN code
enter your PIN – if there is a PIN please enter it
◦ Enter PIN for SIM1/SIM2
enter your PIN for SIM1/SIM2 and press left selection key or OK
◦ Welcome text
if it has been set, the phone will display it on screen
◦ Searching for network
after switching on the phone and entering PIN searching for network will
start automatically. This phone supports two SIM cards. After the phone
has been turned on and the network has been found for SIM1 and next
for SIM2, the names of networks will show up on display. Depending on
SIM card the phone number may also appear on display.
Keypad lock
To lock/unlock the keypad press LSK (Left Selection Key) and the star key
" * " afterwards. The padlock icon should appear on top of display that
indicates the keypad is blocked.
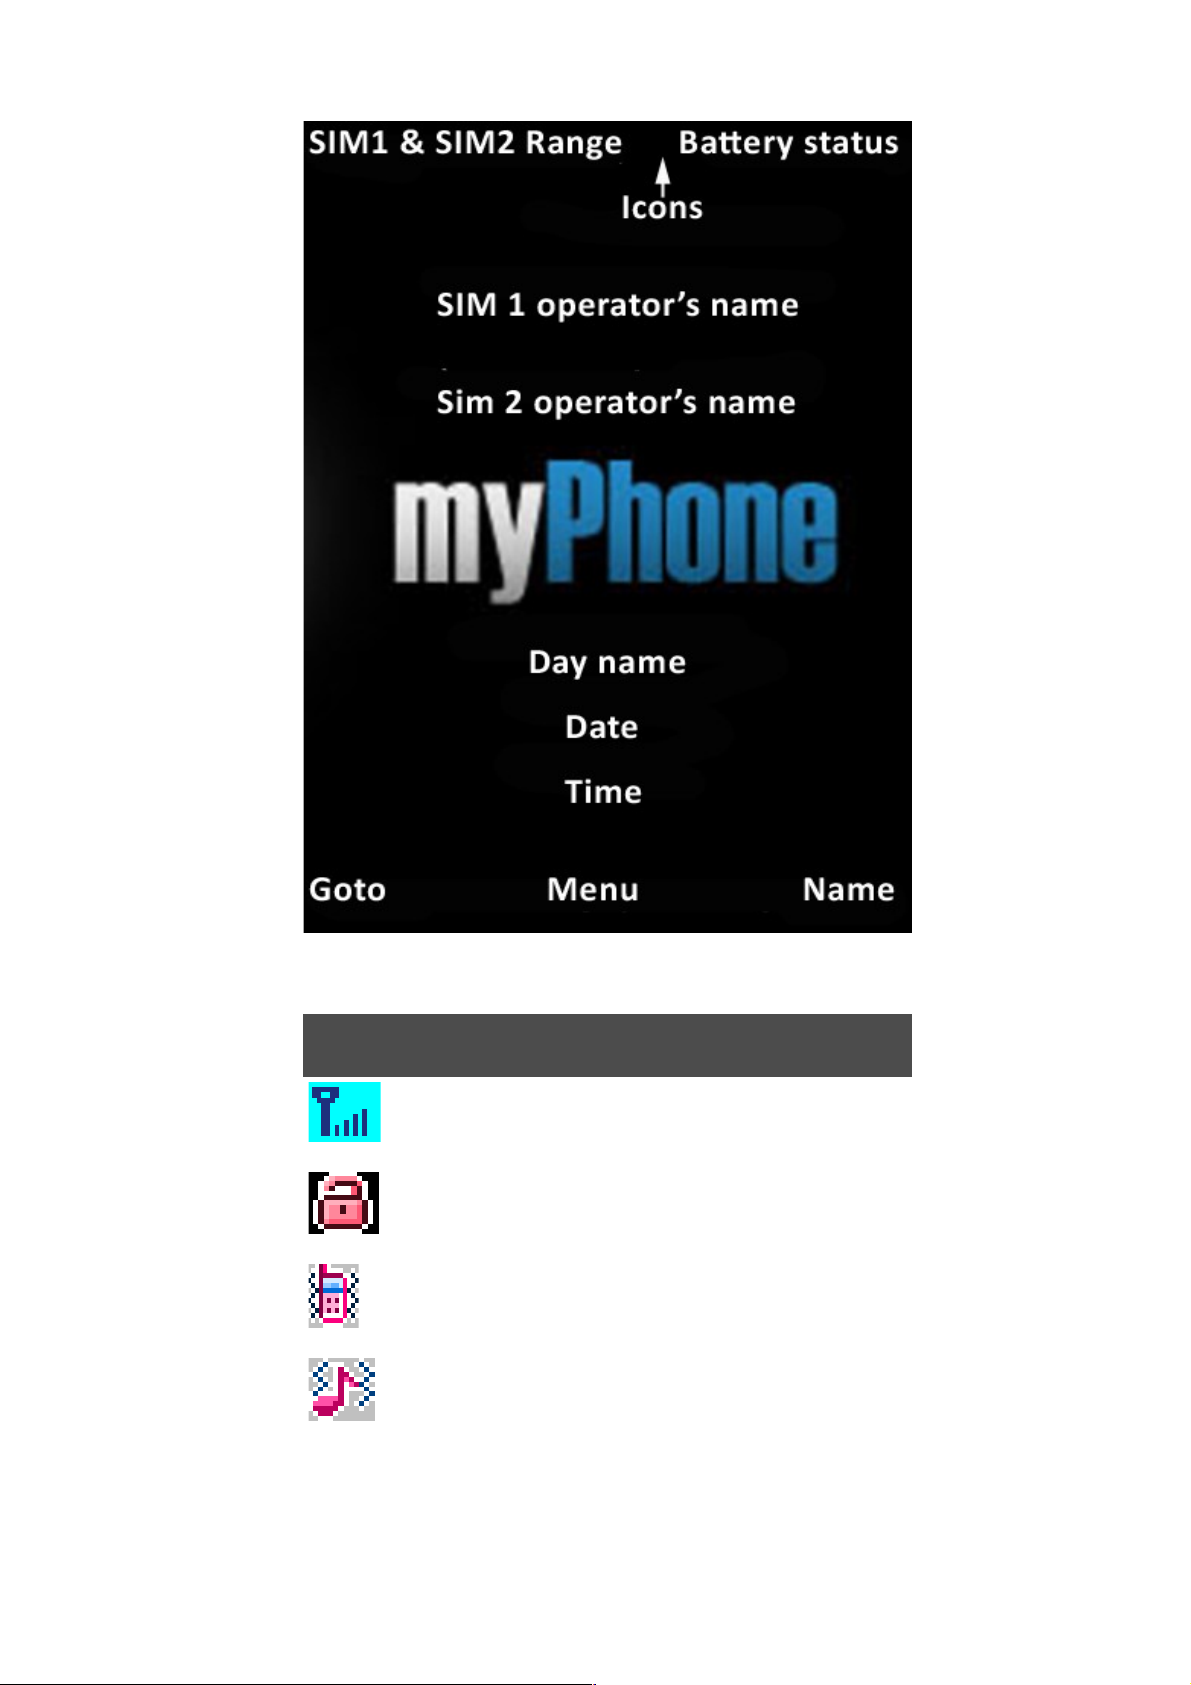
Icons overview
The figure below describes the icons and characters that appear on the
screen when you turn the phone on.
8
Page 9
Copyright © 2011 myPhone. All rights reserved. myPhone 3380 MIDNIGHT
Icon Indication
Signal strength for SIM1and SIM2
Keypad is locked
Vibration is on
Ringtone and vibration profile is on
9
Page 10
Copyright © 2011 myPhone. All rights reserved. myPhone 3380 MIDNIGHT
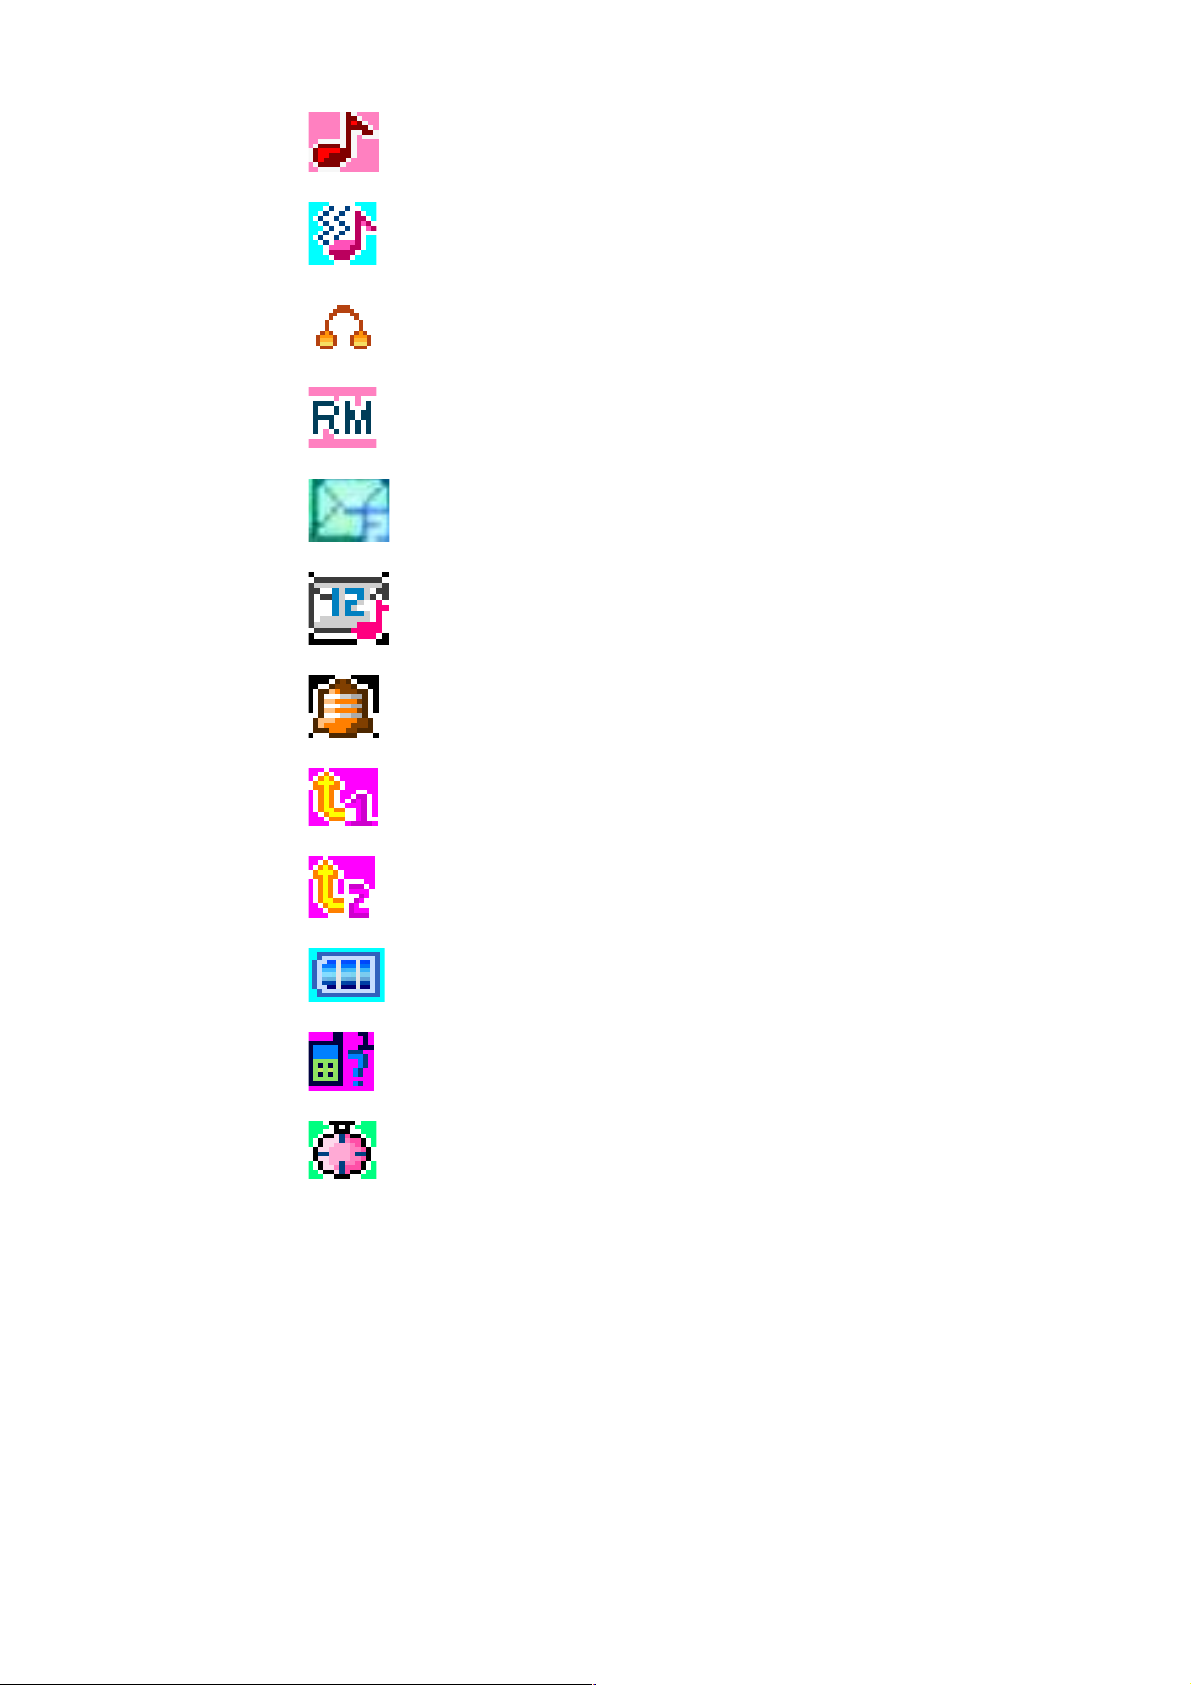
Ringtone profile is on
Vibration followed by ringtone profile is on
The headset is on
Roaming indicator
New incoming message
New voicemail message
Phone battery
The alarm is set
Call forwarding for SIM1
Call forwarding for SIM2
Battery status
Missed calls
Stopwatch is on
Unused battery is charged in 50% of its capacity and it is stored separately. In
few first charging cycles the battery should be fully charged and recharged
completely before next charging. This will ensure optimal battery use for
longer.
You should always try to avoid short-circuit the battery contacts and their contact with metals.
10
Page 11
Copyright © 2011 myPhone. All rights reserved. myPhone 3380 MIDNIGHT
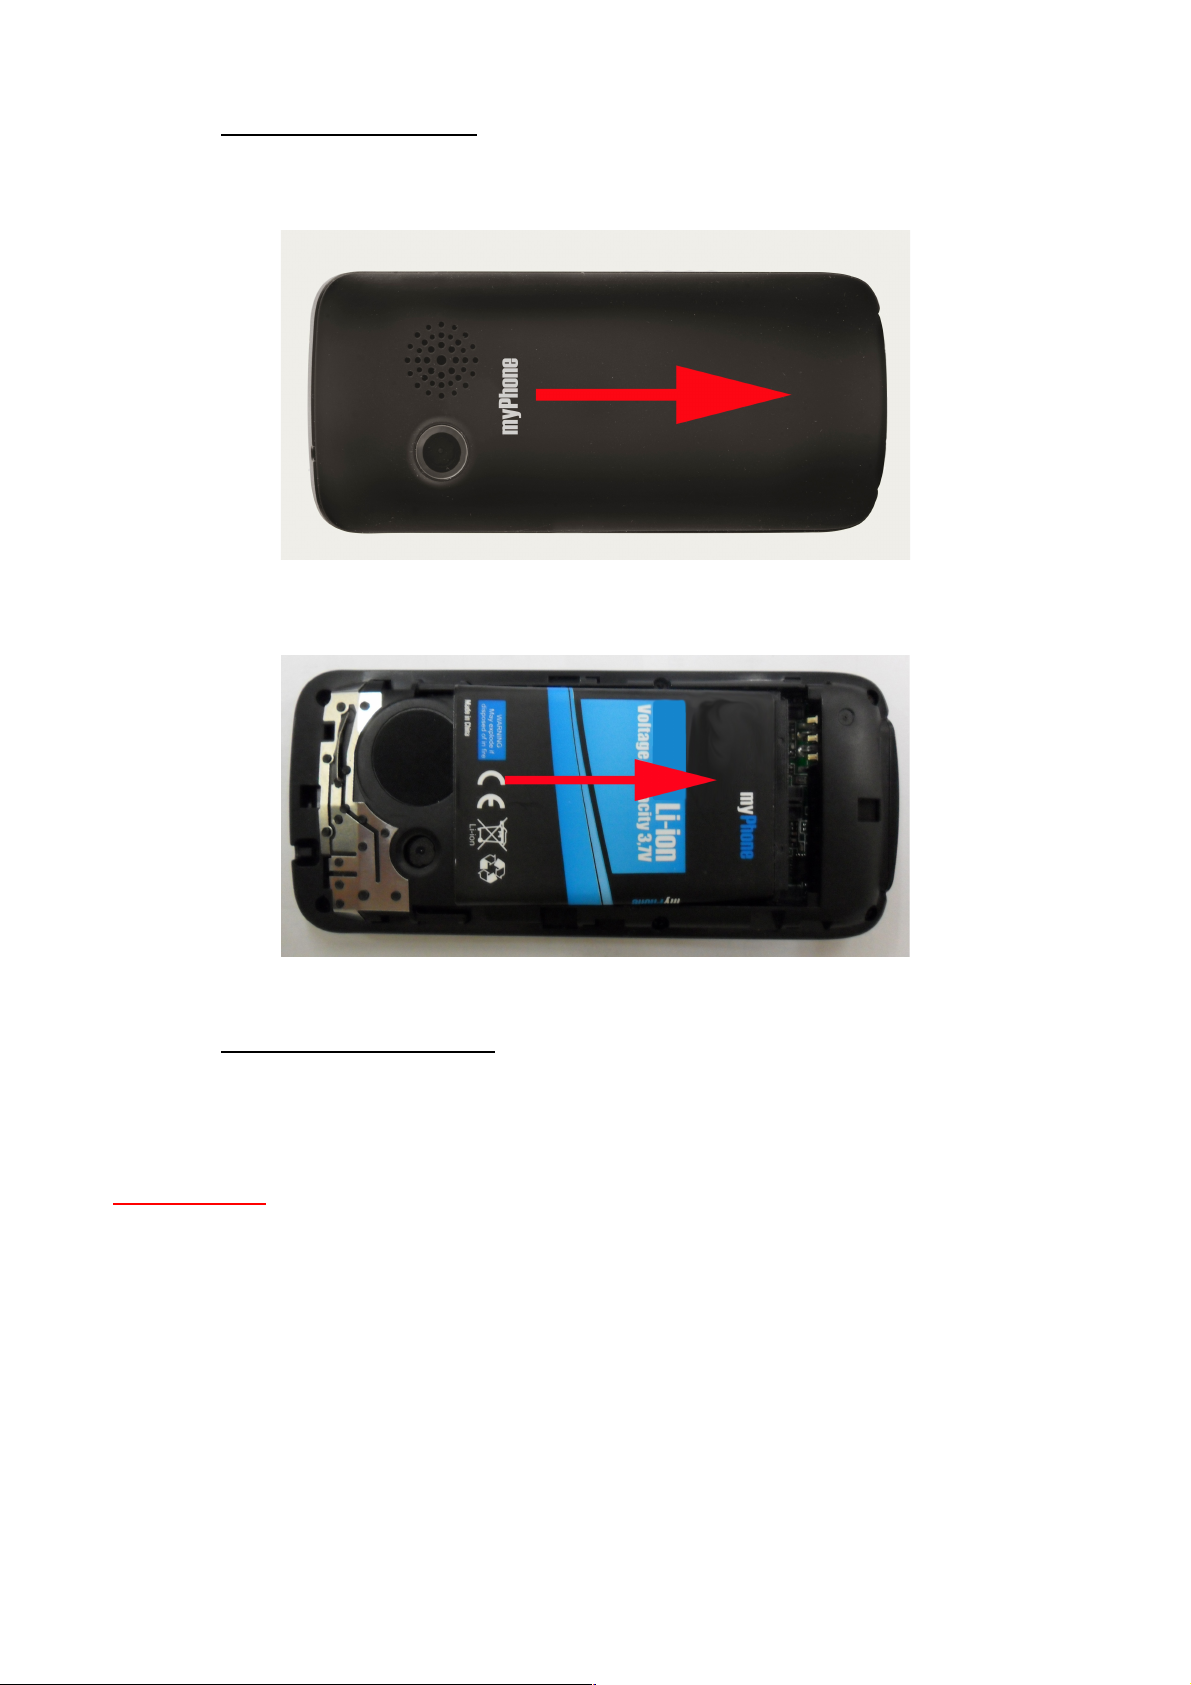
◦ Inserting the battery :
Gently press the battery cover and take it off moving right (see the picture
below).
Put the battery into the phone and press it gently until you hear `click`.
◦ Removing the battery:
Press and hold for few seconds the end key to switch off the mobile phone.
Gently press the battery cover and slide it down. Remove the battery.
WARNING! : Removing battery when the phone is switched on may cause
loss of important data or settings saved on SIM card or memory card. Make
sure that the phone is turned off before removing the battery. Always try to
store the battery in temperatures between 15 and 25 degrees Celsius (59°
and 77° F). Extreme temperatures decrease battery’s capacity and vitality. A
device with superheated or excessively chilled battery may not work
correctly. Batteries efficiency is particularly low in extreme cold.
11
Page 12

Copyright © 2011 myPhone. All rights reserved. myPhone 3380 MIDNIGHT
Battery charging
First plug in the charger and then connect it with the phone. When the phone
is switched on during charging the battery, the battery charge indicator in
upper right corner of the display flashes or in other active way informs us
about charging status. If you charge the battery when your mobile phone is
switched off the only thing you can see on the display is the battery status
indicator.
After the battery is completely charged the battery status indicator is
constantly highlighted. The charging process lasts for 3 – 4 hours.
WARNING! :
Charging the battery before it's completely discharged will significantly
shorten its operating time. It is possible to recover the battery to some extent
by formatting process. There are many different views concerning formatting
Li – Ion or Li – Pol links which apparently do not have a side effect of
recharging but certainly this process won`t do it any harm.
How to format the battery:
1. Use the phone until the battery is completely discharged and your phone
switches off automatically.
2. Connect the phone with the charger and charge it for 12 – 15 hours.
3. After charging switch on your mobile and use it until the battery is
completely discharged.
4. You should charge your phone for another 12 – 15 hours.
5. After three cycles of charging and discharging the battery, it`s operating
time should extend. You can repeat the cycle for better results.
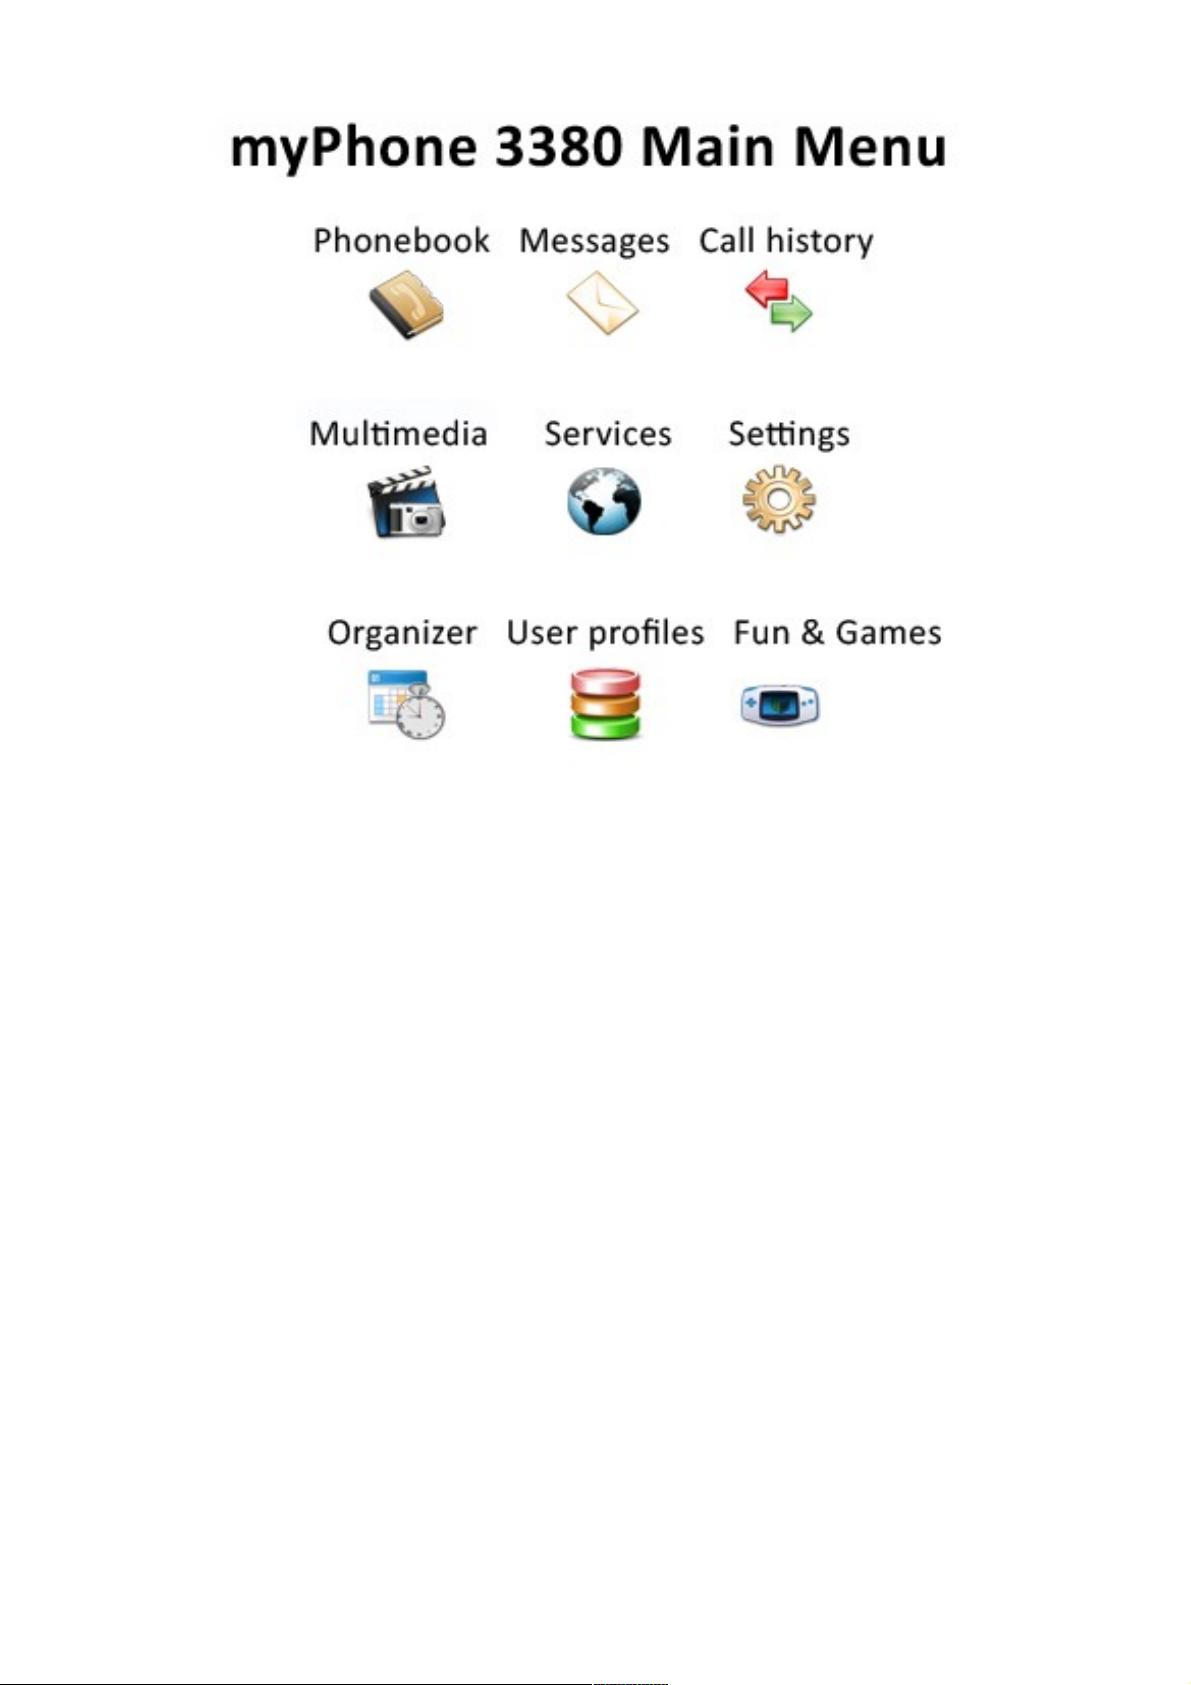
2. Using the phone
Phone`s Menu looks as displayed below:
12
Page 13
Copyright © 2011 myPhone. All rights reserved. myPhone 3380 MIDNIGHT
Contacts – Phone Book
It is possible to store and manage all your contacts In this folder on both SIM
cards or phone`s memory card. Your SIM card size allows you to store up to
250 numbers (it depends on Network operator). Your phone`s memory card
stores 500 numbers.
To save a contact select:
Menu → Contacts → Add new contact
Select where to save a contact. There are three options available:
• on SIM 1;
• on SIM 2;
• on phone`s memory (phone`s internal memory).
When you are saving contacts on your memory card, you may save the
following information:
13
Page 14

Copyright © 2011 myPhone. All rights reserved. myPhone 3380 MIDNIGHT
◦ Name,
◦ Number,
◦ Home number,
◦ Company name,
◦ E-mail address,
◦ Office number,
◦ Fax number,
◦ Associated image,
◦ Associated sound (from the list of system sounds);
◦ Group of contacts (add a contact to a specified group of contacts).
When you are saving contacts on SIM card, you may save the following
information:
◦ Name,
◦ Number.
Phone Book options :
• Quick search
Menu → Phone Book → Quick search
Allows you to find a contact searching through Names.
Quick search options:
• Select – ability to make a phone call from SIM 1 (connect SIM 1)
or SIM 2 (connect SIM 2).
• Send SMS message.
• Send MMS message.
• Preview – view contact details.
• Edit – edit contact.
• Delete – delete contact.
• Copy – copy contact (on the phone, SIM1 or SIM2).
• Move – move contact (from SIM1to the phone, from SIM1 to SIM2
etc.).
• Copy all
Allows you to copy all of the contacts (to multiply them). It is possible to copy
as follows:
◦ from SIM 1 to a phone;
◦ from the phone to a SIM 1;
◦ from SIM 2 to a phone;
◦ from the phone to a SIM 2;
14
Page 15

Copyright © 2011 myPhone. All rights reserved. myPhone 3380 MIDNIGHT
◦ from SIM 1 to SIM 2;
◦ from SIM 2 to SIM 1.
• Delete
This option allows you to delete all the contacts from all of the three media
(from SIM 1, SIM 2, from phone`s memory). Single option allows you to
delete selected contacts from the Phone Book.
• Groups of contacts
Allows you to assign a contact to a specific group of people, such as:
Friends, Family, VIP, Business, or other.
• Additional numbers
This option allows you to check so called additional numbers:
◦ owner`s number SIM 1;
◦ owner`s number SIM 2;
◦ customer service SIM 1;
◦ customer service SIM 2;
◦ SOS SIM 1;
◦ SOS SIM 2.
* Attention! : the location of Customer Service and Owner`s numbers depends
on GSM network operator and sometimes they may not be provided. You may
then edit them by selecting:
Menu → Phone Book → Additional numbers → Owner`s number for SIM
1 (or other selected) → if there is no number entered, select → Options
→ [1] Edit→ enter the name of the option [1] and the number in this
option [2].
It is recommended that in [1] the owner`s phone number should be
entered.
• Settings – allows you to change the settings in submenu Phone Book.
Pressing the Left Selection Key activates options:
◦ Memory status – displays the information about number of contacts
saved and free space left on both SIM cards and in phone`s memory,
e.g. SIM card capacity 1/250 means that there is the ability of saving
250 contacts, there is already 1 contact saved and 249 can still be
saved (SIM card capacity differs depending on card`s type).
NOTE: if the list of contacts in the Phone Book is empty, the proper
information will appear on the display.
15
Page 16

Copyright © 2011 myPhone. All rights reserved. myPhone 3380 MIDNIGHT
◦ Preferred memory – Allows you to choose default place of saving
contacts. You may choose one of three options: SIM 1, SIM 2,
phone`s memory.
◦ Fields – selection of fields that can be filled when the contact will be
stored in phone memory. If one of the options will be unchecked you
cannot fill this field when saving a contact to your phone.
Making a phone call
In standby mode choose number you want to call adding (if necessary) the
prefix number and press the call button (green handset) to make a call using
SIM1 or SIM2. If there is only one SIM card in the phone pressing the call
button will cause dialing the number and starting the call. To terminate the call
press the call end button (red handset).
Selecting the number from the Phone Book
Enter the Phone Book (RSK → Phone Book), Press the left selection key
to enter the Phone Book and then using the navy key choose the contact
you want to call and press the green handset (the call button). To make a call
using SIM1 follow the steps: choose Call using SIM1. Do the same if you
want to call using SIM2.
* Attention! :
To record a phone call you need to inform your interlocutor first and gain his
permission to record. To record a phone call during its term select:
Options → [6] Dictaphone
Answering the phone call
To answer a call select the call key (SIM 1 – black button with a green,
horizontal bar; SIM 2 - silver key with a green horizontal bar and the digit "2").
Rejecting a phone call
If you do not want to answer an incoming call, select the RSK (Right
Selection Key) or the end call button (black button with a red horizontal bar).
Alarm calls
After switching on and unlocking the SIM card the phone will start searching
for network automatically. The name of your wireless network operator will
16
Page 17

Copyright © 2011 myPhone. All rights reserved. myPhone 3380 MIDNIGHT
appear on the display after you log in.
* Attention! : After the phone finds the network and logs your SIM card in, the
name of your network operator and the signal strength will appear on the
display. If the sentence “Emergency Only” appears on the display you
only may call the emergency numbers if the signal strength is good
enough.
International calls
For international calls press and hold the „*” button until the „+” appears and
then enter the country code or area code of the country and the phone
number you want to call.
At tention! : eg.:
◦ Country code for Germany is 49.
◦ Country code for United Kingdom is 44.
◦ Country code for Sweden is 46.
Messages
SMS
When you receive a new message a message icon (closed envelope) will
appear on the top of the display with a proper information. If you want to read
the message at once use left selection key or the OK key; if not – use the
right selection key to go back to main interface.
To create a text message select:
Menu → Messages → SMS → Create a message
Pressing the left selection key in New Message window gives you the
following options:
◦ Send from SIM 1 / Send from SIM 2 – You can select a SIM card
to send a message from. After you have done this, you go to
submenu with the following options:
◦ Send – send without saving;
◦ Send and save – send and save in „Sent”;
17
Page 18

Copyright © 2011 myPhone. All rights reserved. myPhone 3380 MIDNIGHT
◦ Save – save your message in „Sent” without sending it;
◦ Send to many – send a message to more than one
receiver;
◦ Send to a group of contacts – send a message to a
specified group of contacts.
◦ Use a template – possibility to add a template to SMS message.
◦ Add a theme – possibility to add a picture, photo, emot, animation
or sound to your message.
◦ Format the text – possibility to edit the text of the SMS message
(you can edit the style of the text, text settings, going to the next
line).
◦ Add a number from the Phone Book.
◦ Enter the name of the contact from the Phone Book.
To delete incoming message, select:
Menu → Messages → Incoming
Select SIM 1 or SIM 2 and a meesage you want to delete:
OK → Options → [1] Delete.
To delete all messages follow the steps described above and select:
OK → Options → [6] Delete all.
To get a delivery report and answering route, you need to select:
Menu → Messages → SMS → Messages settings → SIM 1 / SIM 2 → [2]
Common settings → Delivery report → on (Left Selection Key)
To choose a place for storing messages, select:
Menu → Messages → SMS → Messages settings → SIM 1 / SIM 2 → [4]
Preferred memory →
and then choose between SIM cards and phone`s internal memory.
MMS
Multimedia messages consist of text, image and sound. You may send and
receive not only text and images but also audio files sent as an attachment.
The phone handles multipictured MMS messages. The size of images
depends on the size of phone`s display (it`s being automatically adjusted).
18
Page 19

Copyright © 2011 myPhone. All rights reserved. myPhone 3380 MIDNIGHT
* Attention : This function needs to be activated with your network operator.
You need to check if GPRS WAP function is active on your SIM card before
you send/receive a MMS message for the first time.
Menu → Messages → MMS
Creating a message
To create a MMS message you need to fill up the following spaces: receiver
(To), copy, secret copy (UDW), topic. Then you need to enter the text of a
message and (optional) add an attachment. To enter a text you need to scroll
‘slide 0’ down, select Edit option (with LSK). You will be transferred to a
typing sheet. To add an image to a text in typing sheet, select:
Options → [3] Add an image → select image location (phone memory,
microSD memory card).
You may add a sound, video or a slide with a text message the same way.
You can send a message, send and save, save in Drafts etc. You will not be
able to send a MMS message if you do not enter receiver`s phone number.
You can only save this message in Drafts.
Inbox
It contains a list of received messages:
Preview – read MMS message.
Respond – send a multimedia message to a sender and
other receivers.
Respond with a SMS
Send forward – send selected MMS message to someone
else.
Delete – delete a message.
Delete all – delete all MMS messages from Received.
Details – check the details such as: address, topic, date,
time and size.
Use a detail – for example sender`s number.
Outbox
It allows to browse through messages sent to contacts from the Phone Book.
Available options:
Preview – read MMS message.
Respond – send a multimedia message to a sender and
19
Page 20

Copyright © 2011 myPhone. All rights reserved. myPhone 3380 MIDNIGHT
other receivers.
Edit – edit message.
Delete – delete a message.
Delete all – delete all MMS messages from Sent.
Details – check the details such as: address, topic, date,
time and size.
Use a detail – for example sender`s number.
Drafts
Templates – ready templates for MMS messages
Messages settings
• Creating – settings concerning MMS creating process –
picture size, text under image etc.
• Send – settings concerning validity period for sent messages,
delivery report, report that the message has been read by
receiver, message priority, slide timing.
• Receive – settings concerning incoming MMS messages.
• Filter – settings concerning receiving MMS messages from
anonymous senders.
• Server profile – setting a profile for specified GSM network
which is necessary for sending and receiving MMS messages.
Default profile is the first profile from the list: MMS Orange. If
the phone owner uses a SIM card from different Network
Operator, the profile has got to be changed (in case of Plus
SIM card: MMS PLUS, Heyah SIM card: MMS HEYAH, Play
SIM card: MMS PLAY, Era SIM card: MMS ERA).
• Memory status – memory usage for MMS messages.
MMS configuration – checking the settings
Step 1 Network Settings
Menu → Settings → Connections → [2] Data accounts → GPRS
After selecting this option, a list of WAP and MMS settings for the
majority of GSM operators in the Republic of Poland will appear.
Settings for MMS.
To view the settings and check if these are correct, select the
appropriate settings (eg MMS, Orange, etc.) and see whether they
match the settings in the following table:
Network settings – MMS settings
20
Page 21

Copyright © 2011 myPhone. All rights reserved. myPhone 3380 MIDNIGHT
Name MMS Orange PLUS HEYAH PLAY ERA
APN mms mms.plusgsm.pl heyahmms mms eramms
User name heyah eramms
Password heyah eramms
Authentication type
Normal Normal Normal Normal Normal
Step 2 MMS message settings
Menu → Messages → Messages settings → MMS → [1] Edit profile
Select the profile of SIM 1 or SIM 2, then select the appropriate settings,
click: Options → Preview to check your settings:
MMS settings – MMS settings part 1
Name MMS Orange MMS Plus MMS heyah
Website
Data account
Connection
type
http://mms.orange.pl http://mms.plusgsm.pl:8002 http://mms.heyah.pl/ser
vlets/mms
MMS Orange PLUS HEYAH
WAP
192.168.006.104
WAP
212.002.096.016
HTTP
213.158.194.226
port 8080
Name
Password
MMS Messages – MMS Settings part 2
name MMS PLAY ERA
MMSC address http://10.10.28.164/mm
s/wapenc
Data account play ERA
Connection type
Name
Password
WAP
010.010.025.005
http://mms.era.pl/ser
vlet/mms
HTTP
213.158.194.226
port 8080
When you find and check the settings are correct, activate the MMS profile by
selecting:
21
Page 22

Copyright © 2011 myPhone. All rights reserved. myPhone 3380 MIDNIGHT
→ ... [1] Activate the profile
Chat
Option allowing you to correspond with any assigned number.
Voicemail
This option allows you to connect with Voicemail service.
Network messages
Allows you to receive network messages from GSM network operator.
Call log
This menu option allows to check a history of your incoming, outgoing and
missed calls.
Menu → Register → SIM 1 register / SIM 2 register
In submenu you can view the list of calls:
• Missed,
• Incoming,
• Outgoing.
Moreover you have the following options available:
• Delete – you can delete a list of calls,
• Call time – option allowing to browse through call times,
• Call cost,
• SMS counter,
• GPRS counter.
3. Multimedia
To go to Multimedia submenu, select:
Menu → Multimedia.
This option allows you to use all of the features described below.
22
Page 23

Copyright © 2011 myPhone. All rights reserved. myPhone 3380 MIDNIGHT
Camera
To activate the camera select :
Menu → Multimedia → Camera
Press the Navi Key (OK key) to take a photo.
Camera options :
After selecting (LSK → Options) camera options, we will be able to set
different camera parameters:
• Camera settings – allow you to set the snapshot sound and frequency
band.
• Image settings – allow you to set the image resolution (you have the
following resolutions available: 160 x 120 pix, 176 x 220 pix, 320 x 240
pix, 640 x 480 pix).
• Program – setting the parameters concerning the shooting mode:
„automatic” mode uses the automatically set parameters, „night” mode
allows to take a photo at night.
• Memory – you may select a place for saving your photos – on the
memory card (if it`s been inserted) or on the phone`s internal memory.
• Restore default – allows you to reset your personal settings to default
settings.
The photo will be automatically saved in the Photo Gallery and in the
Photos folder in the phone`s memory or on the memory card.
* Attention : myPhone 3380 is equipped with VGA 0,3 Mpix camera.
Video recording
Menu → Multimedia → Video recording
It is adviced to record videos on the memory card as the phone`s internal
memory is too small. The saving option may be changed by selecting:
Options (LSK) → Memory. To record a video you need to select Video
recording option from Multimedia submenu and press the Navi Key (OK).
Video Player
Allows you to play videos recorded by the user.
23
Page 24

Copyright © 2011 myPhone. All rights reserved. myPhone 3380 MIDNIGHT
It has the following options available:
• Play : plays the selected video. It's possible to set an auto – repeat.
• Send : ability to send a video via bluetooth.
• Change the name : possibility to change file`s name.
• Delete : delete selected video.
• Delete all : delete all available videos.
• Sort : you may sort the videos by name, type, time and size.
• Memory : select or change a place for saving your videos.
• Files on memory card should all be saved in the Videos folder.
*Attention: some of the file formats (eg. avi, mp4) are not supported in this
phone
* Attention : volume regulation is by pressing the „up” (loud) and „down”
(quiet) keys.
* Attention : to open the file in „full screen” mode press and hold the star key
„*”.
Audio player
You control the audio player with the use of Navi key:
◦ Left Navi Key – previous track, rewind;
◦ Right Navi Key – next track, forward;
◦ Up Navi Key – volume up;
◦ Down Navi Key – volume down;
◦ OK key – play or pause.
Options available:
• Play– playing,
• Details – shows the detailed information about an audio file (name,
size, quality etc.).
• Add to ringtones – allows you to set the file as a ringtone for incoming
calls.
• Refresh the list – refreshes the list of available audio files.
• Settings – allows you to change settings e.g. random playing or
repeating a track. You may set the way of selecting audio files for
playlist (choosing between phone`s memory and a memory card). Files
saved on microSD card should be saved in My Music folder.
• Volume regulation:
▪ Key " up " – louder.
▪ Key " down" – quietly.
24
Page 25

Copyright © 2011 myPhone. All rights reserved. myPhone 3380 MIDNIGHT
Dictaphone
You are able to record a sound from your environment using the option:
Menu → Multimedia → Dictaphone → Options → [1] Record,
You may also record a phone call but remember to inform the caller and get
his/her permission for recording. To record a phone call select (after
answering the call):
Options → Dictaphone
Settings available for recorded sounds (Dictaphone → Options →
Settings):
◦ Place of saving – sounds are being saved on memory card;
◦ File format – WAV, AMR;
◦ Audio quality – high or low;
Options available for recorded sound :
◦ Play – play selected recording;
◦ Change the name – changes the name of selected recording;
◦ Delete – delete selected recording;
◦ Delete all – delete all recordings;
◦ Use – allows to add a recording to a user`s profile.
◦ Send – possibility to send a recording via Bluetooth or MMS.
Radio FM
You need to turn the headset on to be able to listen to radio.
You control the radio using the Navi Key:
◦ Left Navi Key – reduce the frequency of o 0,1MHz;
◦ Right Navi Key – increase the frequency of 0,1MHz;
◦ Up Navi Key – radio FM option;
◦ OK Navi Key – turn the radio on/off;
▪ Left Selection Key – options;
▪ Right Selection Key – go back;
◦ # – loud;
◦ * – quiet.
Options :
◦ List of channels – you can save your favourite radio stations.
Automatically searched stations are also listed in this option;
◦ Manual – enter the frequency of the radio station manually;
25
Page 26

Copyright © 2011 myPhone. All rights reserved. myPhone 3380 MIDNIGHT
◦ Automatic searching for radio stations – allows to search for radio
stations automatically and save them on the list of channels;
◦ Settings
▪ Playing in the background.
▪ Loudspeaker – allows to listen to a radio through the loudspeaker.
▪ Recording format.
▪ Audio quality.
▪ Saving the recording.
◦ Save – saving the broadcast.
◦ Add – add a recording to broadcasts that have been already saved.
◦ List of files – a list of broadcasts.
* Attention : Functioning of the radio can be disrupted by staying indoors or
among electronic devices. Reception quality may be improved by being near
the window, positioning the headphones in a horizontal line or manual
searching for broadcaster`s channel. Antenna is included into the headset
attached to your mobile.
4. Network services
Network services
Menu → Network Services
WAP Browser
Options available in Menu:
• Home page : It is possible to set the Home Page in network
settings. If it will not be changed by user then a default home page set by
device producer will be displayed as a home page.
• Bookmarks : Displays available bookmarks. In order to enter
selected website click Options (or OK Key) and „go to”. You can edit, delete,
send and add new bookmarks.
• History : A list of recently viewed pages.
• Enter the address : You may enter address of any website.
• Service box.
• Settings : Enter settings for website browsing.
◦ Select SIM card : settings are made separately for each SIM card.
◦ Edit profile : you can select one from five defined profiles. You may
also define your own profile adjusting name and data according to
information provided by GSM Network Operators.
26
Page 27

Copyright © 2011 myPhone. All rights reserved. myPhone 3380 MIDNIGHT
◦ Options : set the time limit and images displaying.
◦ Clear memory buffer : memory buffer clearing.
◦ Clear cookies .
◦ Clear handy buffer .
◦ Trusted certificates
* Attention : WAP settings for major mobile phone networks in Poland are
described in chapter 11.
Data account
GPRS profiles settings for the proper configuration and use of the phone for
sending and receiving MMS messages and the use of WAP browser.
In options: Data Account → [2] GPRS there is a list of WAP and MMS
profiles.
If WAP browser does not work properly, there might be a need to edit profile`s
settings.
If it is not possible to send or receive MMS messages, there might be a need
to edit profile`s settings.
* Attention : WAP settings for major mobile phone networks in Poland are
described in chapter 11.
5. Settings
Settings
Dual SIM Settings
Dual SIM option allows to use two SIM cards simultaneously.
To enter dual SIM settings you need to select:
Menu → Settings → Dual SIM settings
Options available in settings:
• Dual SIM – both SIM cards are active;
• SIM1 is on – SIM2 is inactivated;
• SIM2 is on – SIM1is inactivated;
• Flight Mode – turning the phone off;
27
Page 28

Copyright © 2011 myPhone. All rights reserved. myPhone 3380 MIDNIGHT
Phone settings
To enter phone settings you need to select:
Menu → Settings → Phone settings
• Date and Time – watch and calendar settings;
◦ Location – choose a place where you are;
◦ Set time/date – date and time settings, automatically changes time
for summer/winter time.
◦ Time/date format – time format settings (12 or 24 hours), date
(dd/mm/yyyy, mm/dd/yyyy, yyyy/mm/dd) and separator („-”, „.” , „:” ,
„/” )
• Automatic switching on/off the phone – allows you to set the the
time of switching the phone on/off;
• Language – setting the menu language;
• Text input – setting a text input type In SMS and MMS messages (e.g.
only big letters, only small letters);
• Display settings – setting: wallpaper, screensaver, switching on/off
animation, date and time, owners number;
• Welcome text – setting a text displayed when the phone switches on;
• Shortcuts – a list of shortcuts. Select:
Menu → Settings → Phone settings → Shortcuts
• Hotkeys – you may attribute shortcut options to Navi key – ‘up’, ‘down’,
‘left’, ‘right’.
• Highlighting time – setting the time of display highlighting. Option
‘Always’ means constant display highlighting. It is recommended to
specify highlighting time for example for ‘3 minutes’.
Phone call settings
You can find the following options in phone call settings:
• Set the phone call settings for SIM1
◦ Send caller`s ID – shows the caller`s phone number.
◦ Waiting call – you may activate waiting calls.
◦ Call forwarding – you can activate forwarding calls. You
may set forwarding all of the calls, forwarding when the
number is busy etc.
◦ Call barring – enables to restrict or bar certain or all types
of calls
28
Page 29

Copyright © 2011 myPhone. All rights reserved. myPhone 3380 MIDNIGHT
◦ Switching the line – system setting. It is recommended not
to change this setting – to leave the default setting ‘Line 1’.
• Set the phone call setting for SIM2 – options as for SIM1.
• Voice modulator – to set the modulating mode (child`s or women`s
voice) you need to set the selected option after answering the phone
call:
Options (LSK) → [1] Voice modulator → set the modulation sound
• Black list – you may enter phone numbers to your Black List.
• Speed dial – you need to set the status ‘on’ and in option ‘[2] set the
number’ assign a number to a specified key. To make a phone call
using speed dial you have to press the specified key and hold it for
about 3 seconds until it starts dialing.
• Other
◦ Display call duration – option allowing to view the duration
of each call
◦ Call duration reminder – option allowing to display call
duration reminder.
◦ Automatic call end – option allowing to end a phone call
automatically after specified time.
Network configuration
Setting automatic GSM network selection, creating a list of preferred GSM
networks, ability to set manual GSM network selection.
Menu → Settings → Network configuration → SIM1 / SIM2 → Network
selection
Security
To enter security mode, select:
Menu → Settings → Security
Security module settings – available options:
◦ Phone lock – allows you to lock the phone with a safety code.
Default safety code is 1234.
◦ Automatic keypad lock – allows to block the keypad
automatically after a specified time, starting from the last keypad
pressed. Options available: none, 5 sec., 30 sec., 1min., 5min.
◦ Change the password – allows to change a default keypad
lock code into your personal one.
29
Page 30

Copyright © 2011 myPhone. All rights reserved. myPhone 3380 MIDNIGHT
• SIM1 security
You can manage the security features of the SIM card (SIM card
blockade, fixed dialing, call barring).
• SIM2 security
You can manage the security features of the SIM card (SIM card
blockade, fixed dialing, call barring).
*Attention : If you forget the set code, it will be necessary to visit qualified
service. Unlocking may be charged.
Restore default settings
Deletes all of your personal settings and restores the phone to default
settings. This option requires the safety code: 1234.
6. Timetable
File Manager:
Menu → Multimedia → File Manager
This option allows to manage files and folders stored on microSD card and in
phone`s internal memory. Insert the memory card into the phone before you
use this option.
◦ Open – allows you to manage and browse the contents of the
memory card. Files and folders have the following options available:
* create a folder;
* change the name;
* delete;
* sort;
◦ Create a folder – creates a new folder on the memory card.
◦ Format – formats the memory card.
◦
* Attention : formatting option deletes all the data stored on the memory card
or in the phone`s memory. Phone`s internal memory is 506 kB.
Alarm
You can select one out of five different alarm modes. Each of those can be
set according to your personal preferences. The alarm works even when the
phone is turned off.
In alarm`s submenu you can select:
30
Page 31

Copyright © 2011 myPhone. All rights reserved. myPhone 3380 MIDNIGHT
• the time;
• days in which to run the alarm (option ‘Repeat’: once, every day, on
specified days);
• alarm sound – audio sound or FM radio;
• snooze;
• alarm type – vibration, sound, vibration and sound, vibration followed by
sound.
The proper icon will be displayed anytime you set the alarm.
Calculator
The following functions are available :
◦ Left navi key – multiplication (x)
◦ Right navi key – division (÷)
◦ Up navi key – addition (+)
◦ Down navi key – subtraction (–)
◦ # key – comma (dot).
◦ Navi key OK – result.
Right Selection Key deletes recently entered sequence or the result (pressing
and holding it for few seconds deletes all mathematical operations that have
been carried out). If no digits have been entered, pressing this key will close
the Calculator.
Calendar
After selecting this feature the calendar appears, highlighting the current date.
To change the date use the navi key. Please note, that each week starts here
on Sunday so the image and the number of weeks may vary from other
calendars.
Available options:
• Tasks preview;
• Add new task – ability to make a note for a specified date;
• Go to date;
• Week preview.
Tasks list
Allows you to make a note about a task and to set the reminder's date and
time.
To add a task select options:
Add (LSK) → select the type of a task and edit the proper spaces.
31
Page 32

Copyright © 2011 myPhone. All rights reserved. myPhone 3380 MIDNIGHT
Stopwatch
You may use two types of a stopwatch:
• Stopwatch.
• Multi stopwatch – pressing any of the navi keys activates a distinct
timing.
World clock
You can check the time in different cities all over the world.
Currency converter
This option allows to convert a sum of one currency into another using the
exchange rate of your choice. You need to (in the field ‘rate’) enter the current
rate and enter the amount that you want to convert (in the field ‘Local’).
You can save the current exchange rate in the phone`s memory.
7. User profiles
To enter dual SIM settings you need to select:
Menu → User profiles
You can select one of six profiles depending on place and situation. All of the
profiles can be adjusted to your own needs.
You can set the Options in every profile (Options → [2] Adjust):
◦ Select i ncoming call or message sound;
◦ Alarm volum e ;
◦ Alert type (only sound, only vibration etc.);
◦ Alarm type (single sound, repeating, arising sound);
◦ Additional sound s (ex.: error sound, warning, finding a network etc.);
◦ Receiving phone c alls (answering with any key).
8. Games and entertainment
To enter this option ( game ‘Puzzles’ is available), select:
Menu → Games and entertainment.
The following game options are available :
◦ Music in the background – on/off;
◦ Sound effects – on/off;
◦ Game: Vibrations – on/off;
32
Page 33

Copyright © 2011 myPhone. All rights reserved. myPhone 3380 MIDNIGHT
◦ Game sounds volume – level 1 to 7.
9. Warranty and Reclamation
Door – to – door Warranty
Our products range are products of a high standard of quality. High
reputation components are used in the production. These are also the
latest developments in technology. myPhone gives you door-to-door
guarantee on the phone for a period of 24 months . Sending damaged
equipment by courier is done at the expense of service. Fixed device
returns to the owner also at the expense of service.
Attention!: Door–to–door procedure does not concern phone`s
accessories (read below – the warranty period).
Warranty period
The warranty period begins upon the purchase of the original myPhone
product by the first user and is:
• For mobile phones: 24 months from date of purchase.
• For accessories that may be included in the set, like batteries,
headphones, USB cable, charger, microSD card reader - 6 months
from date of purchase.
Reclamation procedure
1. Phone or by email notification of complaints to the myPhone
client`s Service Center :
telephone: (+ 48 71) 717 – 74 – 00
e-mail: pomoc@myphone.pl
2. Service assessment and the notification by giving an RMA
number.
33
Page 34

Copyright © 2011 myPhone. All rights reserved. myPhone 3380 MIDNIGHT
3. Preparation of the goods for courier to collect, according to the
guidelines obtained by telephone or e-mail notification (the way
of packing, securing the necessary documentation, etc.) The
guarantee will be respected only if warranty card, description of
damage and proof of purchase containing the date of sale will
be attached.
4. Acknowledgement of receipt of shipment by the customer
service line.
5. Current status information. Information available on the
reclamations site at: www.myphone-mobile.com
6. Consideration of the complaint and return the device to the
customer.
10. Care and maintenance
Comments on the proper use of battery
- The batteries in this phone may be powered via a charger. If the battery
level is low, charge it. To extend battery life, let it be up to land before
connecting to the charger.
- If you are not using a charger, disconnect it from the phone. Overcharging
will shorten battery life.
- Battery temperature affects the quality of its load. Before you start charging,
the battery can be cooled or heated so that it`s temperature is similar to the
standard conditions of place. If the battery temperature exceeds 40 degrees,
the battery cannot be charged!
- Use the battery only for its intended purpose. Avoid leaving the battery in a
magnetic field, because it shortens its lifetime.
- Do not use the battery if it is damaged.
- Battery life may be shortened if it is exposed to very low or very high
temperatures, this causes interference to the phone, even if the battery is
charged properly.
- Do not dispose of batteries in a fire! Do not throw away used batteries please send it or take it to an authorized place of recycling.
34
Page 35

Copyright © 2011 myPhone. All rights reserved. myPhone 3380 MIDNIGHT
Phone maintenance
To extend the life of your phone, follow the guidelines:
• Keep the phone and its accessories out of reach of children.
• Avoid contact with liquids, it may cause corrosion of metal parts.
• Avoid exposing your phone at high temperatures, it can shorten a
lifetime of electronic components of camera, melt the plastic and damage
the battery.
• Do not attempt to disassemble the device. Unprofessional interference in
the structure of the phone can severely damage or destroy it.
• Do not use a high concentration of acidic or alkaline for cleaning the
phone.
• Use only original accessories; violation of this rule may invalidate the
warranty.
Safety information
While using the phone, take into account the regulations for your and the
environment safety.
Safety while driving a car
Apart from the emergency situations, the use of the phone while driving
should be through a wireless headset that will ensure the security and will not
limit user's movement. If you do not have a headset, and you want to use the
phone, exit onto the side of the road and stop the car.
Please note the legal regulations concerning the use of a mobile phone while
driving. Certain electronic elements of the car, without adequate protection,
may be affected by waves emitted by the phone, it is advisable to use the
phone in the car only when an external antenna of the vehicle is secured. Use
the services of an expert to install the phone in the car.
Safety while flying
Turn off any GSM devices before entering the plane, otherwise they may
affect the operation of aircraft equipment and the entire mobile network.
Using mobile phones in aircraft is prohibited! Those who break the law will be
burdened with additional costs and they will be denied the right to use the
cellular networks.
35
Page 36

Copyright © 2011 myPhone. All rights reserved. myPhone 3380 MIDNIGHT
Environment safety
Read the regulations on the use of mobile phones. Turn off the phone in
places where its use is prohibited or where it may cause disruption and
danger. The use of any devices that use radio waves cause interference
to medical devices (e.g. stethoscope, or pacemaker), if they are not
properly secured (if in doubt, consult your physician or medical device
producer).
Attention!: In potentially explosive enviroments (such as petrol stations,
chemical plants, etc.) it is recommended to switch the phone off. Check
out the regulations governing the use of GSM equipment at these sites.
Technological criteria
Network: GSM 900/DCS1800
Important information: Some services may depend on your network
provider, the state of the local wireless network, version of the SIM card used
in phone and the way you use the phone. For more information, contact your
service provider.
Warning Statement
The manufacturer is not responsible
for the consequences of the
situation caused by improper use or
non-compliance to the above
recommendations.
Version of the phone can be
upgraded without notice.
Representative reserves the right to
decide on the proper interpretation of
the above instructions.
SAR Certification information
This phone meets European Union (EU) requirements concerning exposure
to radio waves. Your mobile phone is a radio transmitter and receiver. It is
designed and manufactured to not exceed the limits for exposure to radiofrequency (RF) energy, as recommended by the EU Council. These limits are
part of comprehensive guidelines and establish permitted levels of RF energy
for the general population. The guidelines were developed by independent
scientific organizations through the periodic and thorough evaluation of
scientific studies. The limits include a substantial safety margin designed to
ensure the safety of all persons, regardless of age and health. The exposure
36
Page 37

Copyright © 2011 myPhone. All rights reserved. myPhone 3380 MIDNIGHT
standard for mobile phones employs a unit of measurement known as
Specific Absorption Rate (SAR).
SAR for myPhone 3380 is 0,419 W/kg.
Statement of compliance with EU Directives
This myPhone Sp. z o.o. declares that this product is compatible with the
essential requirements and other important recommendations of the
European Directive 1999/5/EC – and all other EU directives.
On the website: www.myphone.pl/certyfikaty.aspx
You can see the declaration of compliance for a given product, choosing
its name from the list.
Proper disposal of used electrical and electronic equipment
The device is marked with the symbol of crossed-bin, in accordance with
European Directive 2002/96/EC on waste electrical and electronic equipment
(Waste Electrical and Electronic Equipment - WEEE). Products marked with
this symbol after a period of use should not be utilized or disposed of with
household waste. You must dispose of electrical and electronic equipment,
providing these to the designated point at which such hazardous wastes are
subjected to a process of recycling. Collecting this type of waste in enclosed
places and the correct process of recovery help to protect natural resources.
Proper recycling of waste electrical and electronic equipment has a positive
impact on human health and the environment.
In order to obtain information about where and how to safely dispose of
electrical and electronic equipment waste, users should contact the
appropriate authority of the local authorities, waste collection point or point of
sale where the equipment has been purchased.
11. WAP settings for major mobile network
37
Page 38

Copyright © 2011 myPhone. All rights reserved. myPhone 3380 MIDNIGHT
WAP settings allow you to use the WAP browser on your mobile phone.
You can find them in two places:
The first one is "Data account ":
Menu → Network services → Data account → GPRS
After entering this option a list of 10 profiles appears: Positions "1" to "5" are
designed for WAP profiles.
You have the following WAP profiles available:
◦ WAP Orange;
◦ plus wap;
◦ heyah wap;
◦ play wap;
◦ erawap.
Data presented below need to be entered in the above profiles.
1. Orange WAP Profile:
select WAP Orange Profile → select Edit with LSK*
The name of the account : WAP Orange
APN : wap
User name : field remains empty
Password : field remains empty
Authentication type : normal
* LSK – Left Selection Key.
2. Plus WAP profile:
select Plus wap profile → select Edit with LSK*
The name of the account : plus wap
APN : wap.plusgsm.pl
User name : field remains empty
Password : field remains empty
Authentication type : normal
* LSK – Left Selection Key.
3. Heyah WAP profile:
38
Page 39

Copyright © 2011 myPhone. All rights reserved. myPhone 3380 MIDNIGHT
select Heyah wap profile → select Edit with LSK*
The name of the account : heyah wap
APN : heyah.pl
User name : heyah
Password : heyah
Authentication type : normal
* LSK – Left Selection Key.
4. play WAP profile:
select Play wap profile → select Edit with LSK*
The name of the account : play wap
APN : wap
User name : field remains empty
Password : field remains empty
Authentication type : normal
* LSK – Left Selection Key.
5. era WAP profile:
select Era wap profile → select Edit with LSK*
The name of the account : erawap
APN : erawap (for Era TakTak: erawaptt)
User name : erawap
Password : erawap
Authentication type : normal
* LSK – Left Selection Key.
The second position to edit WAP settings is " WAP Settings".
Menu → Network services → WAP → Settings → [2] Edit profile → SIM 1
or SIM 2
After selecting this option a list of five WAP profiles will appear:
◦ WAP Orange GPRS;
◦ plus wap;
39
Page 40

Copyright © 2011 myPhone. All rights reserved. myPhone 3380 MIDNIGHT
◦ heyah wap;
◦ play wap;
◦ era wap.
The following data need to be entered in each of profiles:
1. WAP Orange GPRS
select OK → Edit profile
Change the name : WAP Orange GPRS
Website : http://mobile.orange.pl
Data account : WAP Orange
Connection type : select HTTP → HTTP
IP address : 192.168.006.102
proxy port : 8080
User name : field remains empty
Password : field remains empty
2. plus wap
select OK → Edit profile
Change the name : plus wap
Website : http://wap.plusgsm.pl
Data account : plus wap
Connection type : select WAP → WAP
IP address : 212.002.096.016
Security : off
User name : field remains empty
Password : field remains empty
3. heyah wap
select OK → Edit profile
Change the name : heyah wap
Website : http://wap.heyah.pl
Data account : heyah wap
Connection type : select WAP → WAP
IP address : 213.158.194.194
Security : off
User name : heyah
Password : heyah
40
Page 41

Copyright © 2011 myPhone. All rights reserved. myPhone 3380 MIDNIGHT
4. play wap
select OK → Edit profile
Change the name : play wap
Website : http://wap.playmobile.pl
Data account : play wap
Connection type : select WAP → WAP
IP address : 010.010.025.005
Security : off
User name : field remains empty
Password : field remains empty
5. era wap
select OK → Edit profile
Change the name : erawap
Website : http://wap.eraomnix.pl
Data account : erawap
Connection type : select WAP → WAP
IP address : 213.158.194.194
Security : off
User name : erawap
Password : erawap
41
Page 42

Copyright © 2011 myPhone. All rights reserved. myPhone 3380 MIDNIGHT
42
Page 43

Copyright © 2011 myPhone. All rights reserved. myPhone 3380 MIDNIGHT
43
 Loading...