

MyOrigio Z1 User Manual

MyOrigo mydevice Z1
Second Edition
This document is provided "as is" without warranty of any kind, either
expressed or implied, including, but not limited to, the implied warranties
of merchant ability, fitness for a particular purpose, or non-infringement.
This manual could include technical or other inaccuracies or typographical
errors. Changes are periodically added to the information herein; these
changes will be incorporated in a new edition of this manual. MyOrigo Oy,
Ltd. reserves the right to make improvements and /or changes in the
product(s) described in this manual at any time.
©MyOrigo Oy, Ltd. 2003
All rights reserved.
Issued by:
MyOrigo Oy, Ltd.
Kasarmintie 28 H25
90230 Oulu
Finland
DRAFT
Publication Number:
intent is a registered trademark of Tao Group Ltd.
espial
1

Introduction
The MyOrigo mydevice Z1 is a triple band phone and can be operated on EGSM 900, GSM 1800 and GSM 1900 networks, which means that you are able
to use the device in many regions across the world.
The device has a large colour display that is also a touch screen with feedback when you press the screen. This feedback from the touch screen is
referred to as Haptitouch. The device has a built in digital camera which can
be used to take photos.
In the device are motion sensors that can be used to control certain movements and functions in the device, like mirroring and zooming the views.
The device supports GPRS (General Packet Radio Services) which means that
you can make fast data connections. MMS, E-mail messaging and Internet
browsing are supported in the device through GPRS connections.
DRAFT
2 Introduction
Getting Started
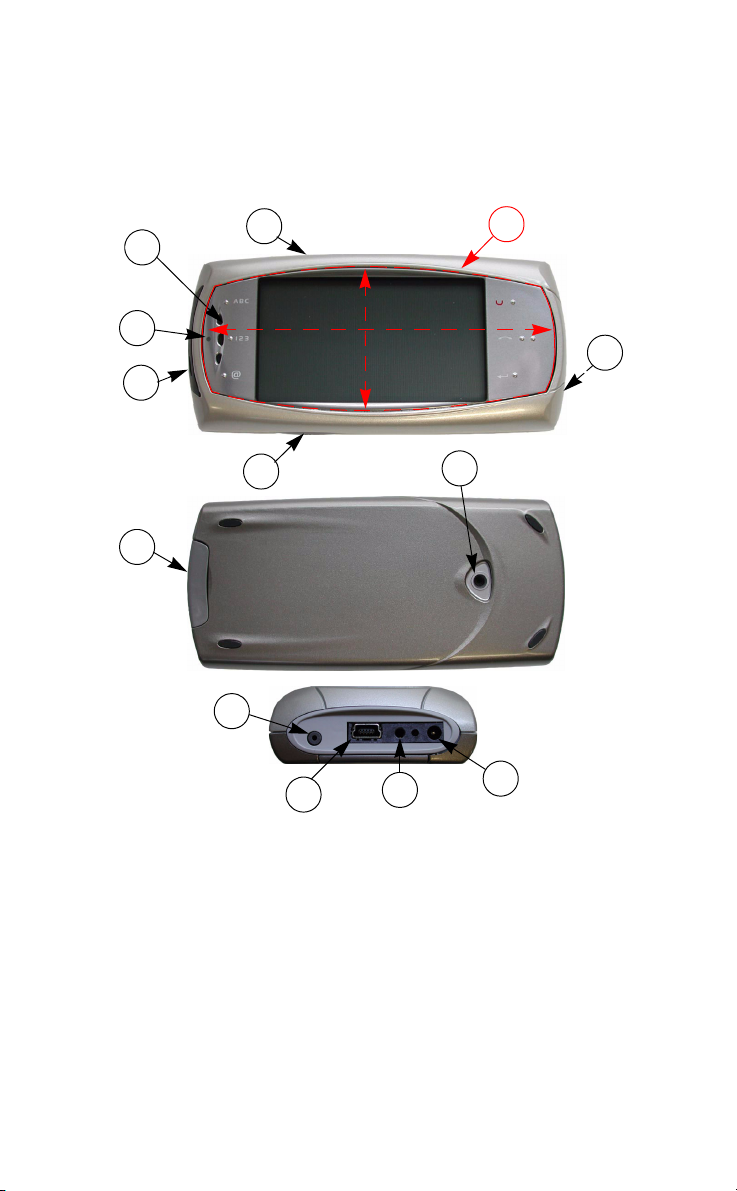
Overview
1
5
4
3
2
6
7
8
DRAFT
9
7
10
11
12
1. Function Key A 2. Function Key B
3. Infrared Port 4. LED Indicator
5. Earpiece 6. Haptitouch Screen
7. Microphone 8. Camera Lens
9. Battery Cover Release 10.Mini USB Data Cable
Connector
11.Headset Connector Port 12.Charger Connector Port
Getting Started 3
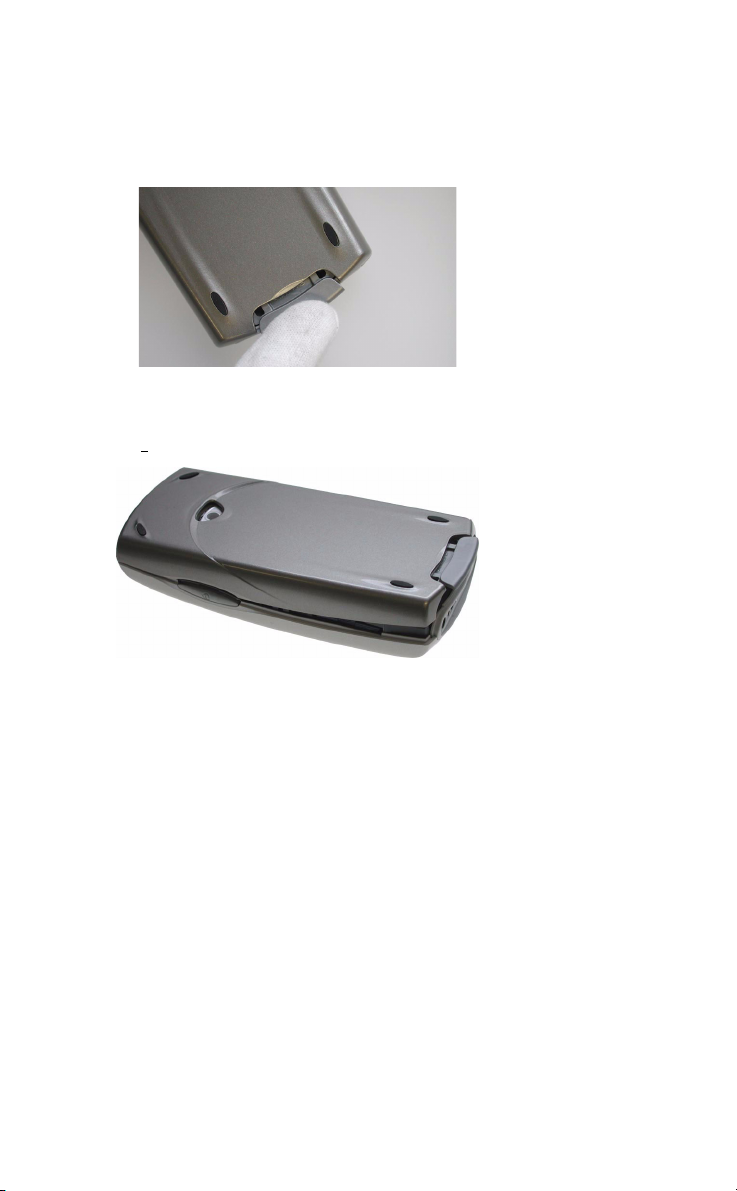
Inserting the Battery
Removing the Battery Cover
1. With your fingernail, pull the battery cover latch downwards
2. Lift the cover slightly at the battery cover latch end and gently slide
upwards to release the battery cover from the upper corner release
catches.
DRAFT
Replacing the Battery Cover
Repeat the Removing the battery Cover in the opposite order.
4Getting Started
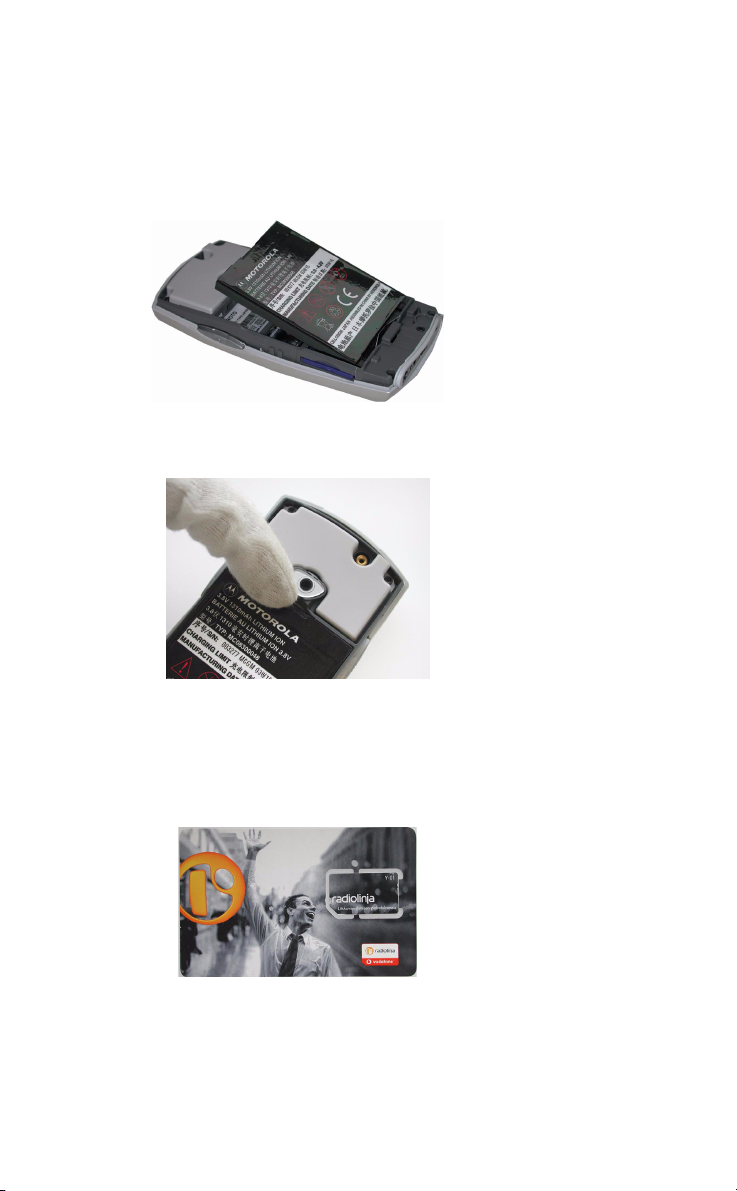
Attaching the battery
1. Place the battery into the back of the phone, with the golden connectors
facing down.
2. Push the battery down at the bottom and then slide up so that the battery
is locked into position by means of the battery locking pins.
Removing the battery
1. With your finger nail pull down and lift out the battery.
DRAFT
NOTE:Always switch the phone off before removing the battery.
Inserting your SIM Card
1. If the SIM card is attached to the plastic surround card, then first snap out
the card pushing it out at the snap points.
Getting Started 5
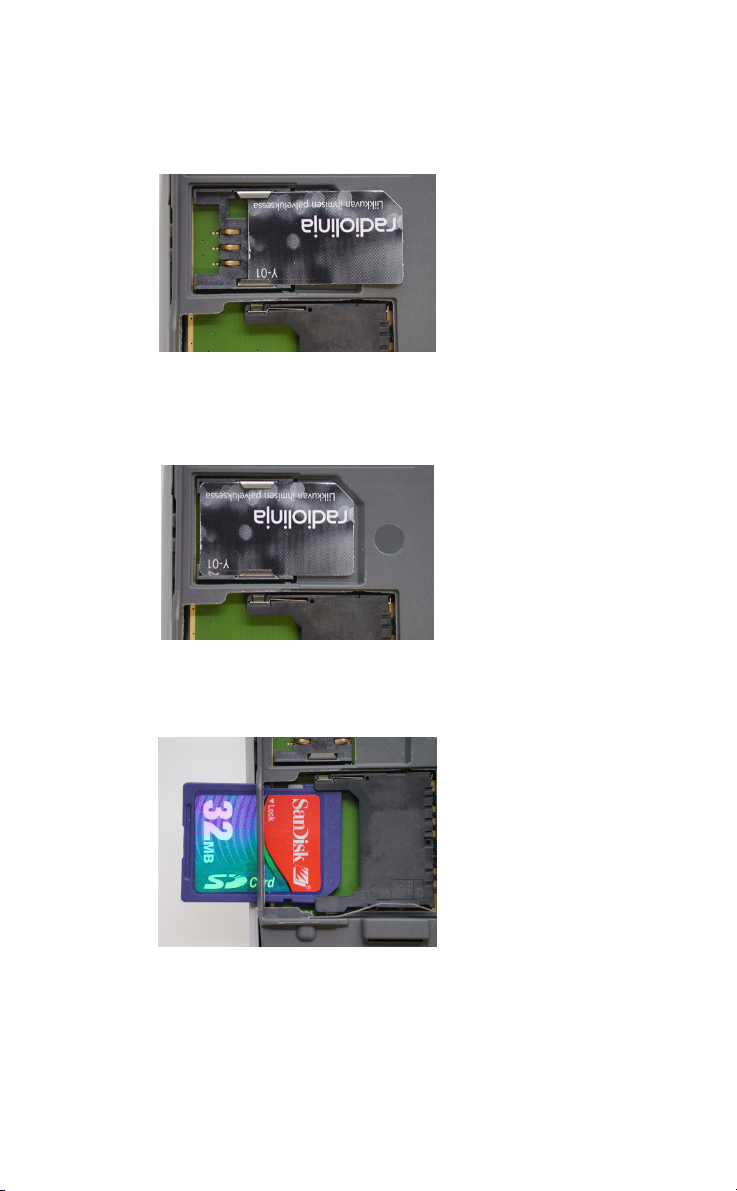
Inserting the SIM card in the device
1. Insert the SIM card with the golden contacts facing down as shown in the
picture.
Removing the SIM card from the device
1. Press lightly on the card and slide out in the opposite direction from
inserting.
DRAFT
Inserting the Multimedia Card
1. Insert the MultiMedia card with the golden contacts facing down and the
cut corner at the bottom right, as shown in the picture.
6Getting Started
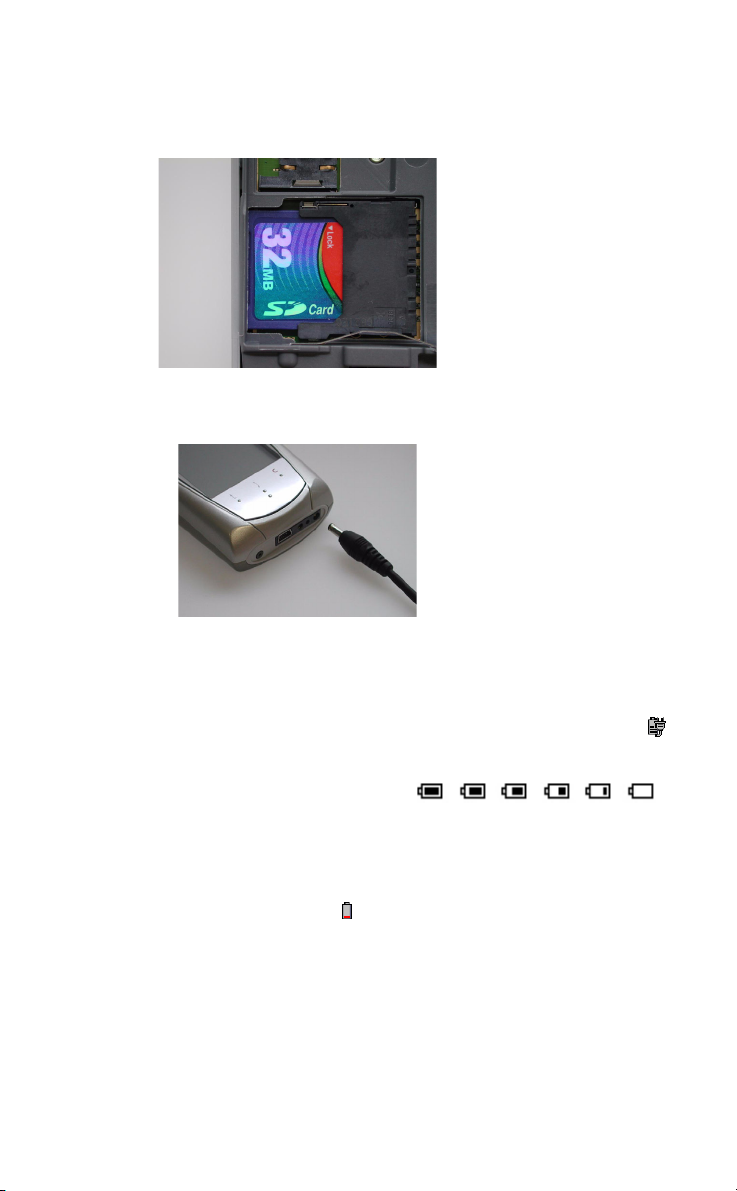
Removing the MultiMedia card
1. Press lightly on the card and slide out in the opposite direction from
inserting.
Charging the device
1. Connect the charger to the mains socket.
DRAFT
2. Connect the other end of the charger lead to the bottom of the device.
When the device is switched off and the charger is connected, Charging...
is displayed on the screen.
If the device is switched on when the charger is connected, Charging
will be briefly displayed.
The battery meter level in the status
field shows the charged state of the
battery. When charging, this will be
animated to show that the battery is
being charged.
When the battery level is low, the device will give a warning signal and
Battery Low, Recharge battery will be briefly displayed.
NOTE:You can use the device whilst the battery is being charged. However, this lengthens the charging time.
Do not connect any chargers to the device other than the charger model
that was provided in the sales package.
Full
Empty
Getting Started 7
LED Indication Lights
Normal blinking is when the LED flashes every 2 seconds. Slow blinking is
when the LED flashes three times slower than normal.
Green LED indications
• Continuously on - the device is in the start up procedure.
•Normal blinking - when a new message is received, missed call etc.
whilst the device is in standby mode.
•Slow blinking - when the device is on and in standby mode.
Red LED indications
• Continuously on - the device is in the shut down procedure.
•Normal blinking - when the battery is low
Switching the device On and Off
Before you try to turn on the power, follow the SIM card and Battery insert
procedure. See.....
Tur ni n g o n t h e d e v i c e
1. Press and hold the function keys A & B simultaneously for approximately 2
seconds until the display comes to life.
DRAFT
Key AKey B
2. Press the icon on the screen to select the mode you wish to use the device
in.
8Getting Started
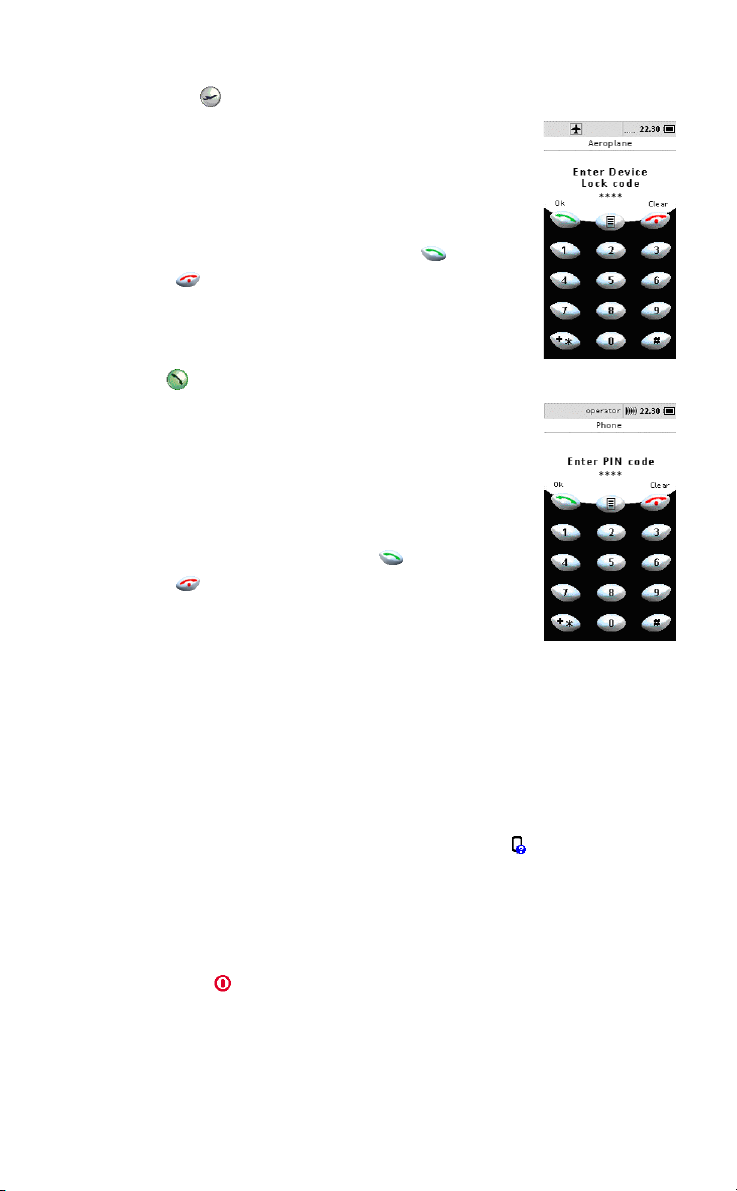
Aeroplane Mode
The aeroplane mode allows you to use the device
without any voice calls and data connections.
You may be asked to provide a Device lock code, the
factory set device lock code is 0000. To change this
code, switch this function off see...
1. Enter your Device lock code and press OK .
Press Clear if you make a mistake whilst entering
the code.
If you enter the code incorrectly Wrong code, Enter
device lock code again is displayed.
Phone Mode
The phone mode allows you to use the device normally
with all the data connections so that it is possible to
make voice calls, data calls, etc.
You may be asked to enter a PIN code, if so this is
supplied by the operator with your subscription. To
change this code, switch this function off see...
1. Enter your PIN number and press OK .
Press Clear if you make a mistake whilst entering
the PIN number.
If you enter the PIN code incorrectly Wrong code, Enter
PIN code again is displayed.
If a PIN code is entered incorrectly 3 times in a row then the SIM card will
be blocked and the message Wrong code, SIM use blocked. Enter PUK code
is displayed. See SIM card locking...
Tuto r i al D e m o
The tutorial demo will be launched the first time the device is started
after the start up mode is selected and the PIN/Device lock codes have
been entered. The tutorial demo can be accessed at any time when the
device is on from the Main index Info/Show tutorial menu.
The tutorial demo shows how to browse the book, open Fast menus and
the mirroring and zooming function.
Tur ni n g o ff t h e d e v i c e
1. Press the function keys A & B simultaneously to display the standby menu.
2. Press Shutdown
DRAFT
Getting Started 9

10 Getting Started
DRAFT
Key Functions
Keys
Lens Keys
Lens
Key
ABC when keyboard is active it will change the
123 when keyboard is active it will change the
@ when keyboard is active it will change the
C to go back a level higher in the book to return to the first main
Phone opens the virtual phone application to shortcut to Dialled calls
Enter when the cursor is in view and mirroring
Press once Long Press
to shortcut to the Notepad
keyboard to the character keyboard
character keyboard to the number keyboard
character keyboard to the symbols keyboard
DRAFT
when an application/operation is in use, to
close application/cancel operation
mode is on to enter to the selected item.
when keyboard is active it will move the
cursor to the next line, if more than one
line can be typed.
Application, opens the keyboard to write a new note
to shortcut to the Calendars,
View today. This shortcut can
be changed in the Settings
menu.
to shortcut to the Contact list
of Contacts. This shortcut can
be changed in the Settings
menu.
index page and closes/cancels
all applications and operations
page of Calls menu
Key AKey B
Key Functions 11

Side Keys
Side
When Half Press to: Full Click to: Long Full Click
Key
A in the book turn 1 page for-
ward
using mirroring
during a
call
B in the book turn 1 page
device is in
use
during a
call
A & B device
power is
off
device
power is
on
device is
locked
lock mirroring
on/off
backward
DRAFT
use the cursor
to enter
increase the
volume
fit to screen /
1:1 scale
decrease the
volume
open the
standby menu
open the virtual
phone for
unlocking
to:
open a Fast
menu
start dragging/
painting
free zooming /
end zooming
switch on the
device
switch off the
device
Continuous
Half Press to:
repeat page
turning forwards
activate mirroring
repeat page
turning backwards
Cursors
The cursor will change shape depending on the position and actions on the
device.
• - Pointed Cursor
• - Link or Active areas
• - Text fields
• - On keypads
• - Browse forward
• - Browse backward
12 Key Functions
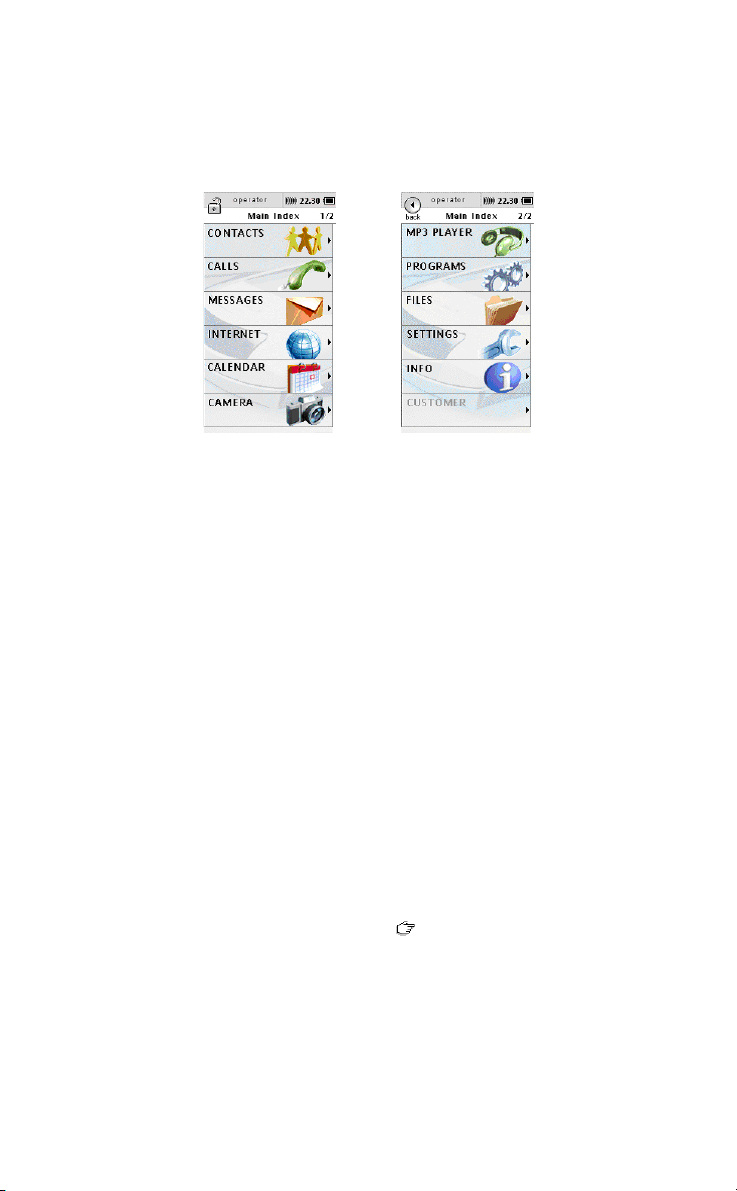
Main Index Pages
The mydevice menu structure is set out like a book with chapters, sub
chapters and pages. There are 12 application chapters which make up the
main index and these are the highest level of the book structure.
It is not possible to change the main index page contents or the order. It is
possible to change the background image and colour of the main index.
Browsing the book
There are several methods you can use to browse the book:
• By a single half press of the A key to move 1 page forward through the
chapters and a single half press of the B key to move 1 page backwards
through the chapters.
• By sliding you finger across the haptitouch screen from right to left will
move 1 page forward and sliding you finger across the haptitouch screen
from left to right will move 1 page backwards.
• By a continuous half press of the A key and tilting the device to forwards
or backwards to view the book contents pages. Depending upon the
degree of angle which you tilt the device will have an effect on the speed
of the page browsing.
Using mirroring to browse the book pages
1. With the display in the book main index view, partially press and hold the
A key.
2. If you are at the first page of the book the direction for browsing will only
be forward.
3. Move the book browser forward cursor to a menu in the book and then
tilt to view the next page in that chapter.
DRAFT
Key Functions 13

Using the cursor in mirroring mode to navigate the menus
1. Partially press and hold the A key.
2. When the cursor is tilted across the menu pages of an application the
cursor changes to and the menu section is highlighted as grey.
3. Fully pressing the A key will enter that menu.
Mirroring
The device has sensors which allow you to control movements by tilting
the device. There are several functionalities behind the mirroring effect
dependant upon what you are viewing. Mirroring can be activated at any
point when the device is switched on.
• Activates the controlling using a cursor
• Activates the cursor
If the page is at 1:1 scale then the cursor will be activated and can be
moved around the screen by tilting the device whilst continuously half
pressing the A key. Fully pressing the A key once will act as an enter button and depending on where the cursor is positioned will enter the
selected function.
Mirroring allows you to view pages that are bigger than the display window. Mirroring is especially useful when browsing pages on the internet
If the 1:1 scale is larger than the device display window, for example a
large image or internet page, then the page view will start in the upper
left corner. continuously half pressing the A key and tilting the device will
navigate through the view of the page.
DRAFT
Picture needed
Zooming
Zooming a view is only possible when the page or image scale is greater
than 1:1 to the device display.
To use zooming to change display views
14 Key Functions

When a internet page or large picture is loaded into the device and displayed on the screen.
• Fully pressing the A key once will switch the view between fit to screen
and 1:1 scale.
Pictures Needed
To zoom by tilting the device
When a internet page or large picture is loaded into the device and displayed on the screen.
• Continuously fully pressing the B key and;
• tilting the device inwards will zoom in
• tilting the device outwards will zoom out.
DRAFT
Pictures Needed
Action Fields
An action field is a field that can contain a specific text format and the
play icon and when pressed it will launch a specific action or an
application dependant upon the data in the field.
An action field for a phone number when pressed will
open the phone application with the number already
inputted and only
call to that number. See the example of a phone number action field.
Action fields for the following formats may be possible:
• Calls -
• E-mail -
needs to be pressed to make a
Key Functions 15
• Web page -
• Object -
Fast Menus
These are option menus that can be activated in the device applications.
These menus are dynamic options, meaning that different options will be
available depending on what function or position in the book you are. With
a long press on an application chapter a fast menu will appear with icons
that will show you options for that specific function or will show you the
details viewer if there are no functions available for that specific
menu.
How to use the Fast menus
In the example we are going to use the fast menus to access the find
function in the contacts application.
1. Long press the Contacts menu in the main index page 1.
2. A fast menu will appear with icons following icons.
3. Press to access the Find function.
4. Enter the contacts name or first letter by which to search the
stored contacts and press OK
A list of contacts will be displayed corresponding to the search criteria
that was entered. Pressing the shortcut will take you to that specific
contact page.
If no contacts are stored on the SIM or in the device then the find page will
remain empty.
DRAFT
Picture
16 Key Functions
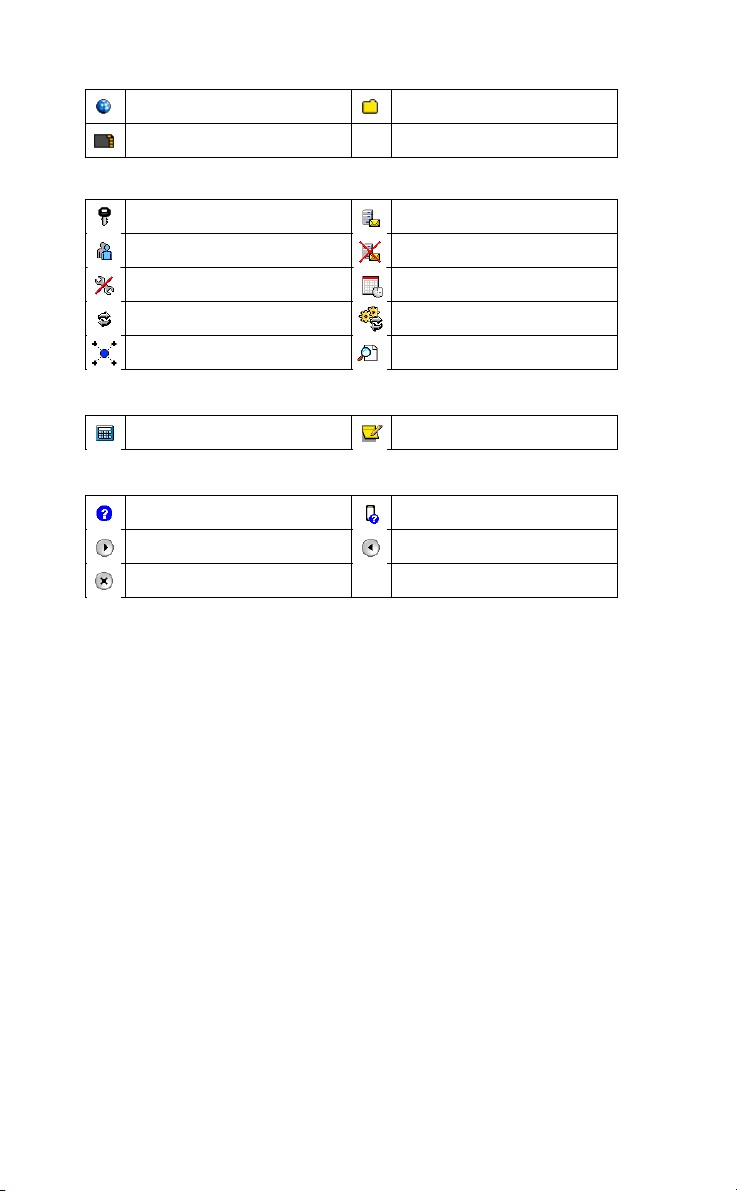
Commands and Icons
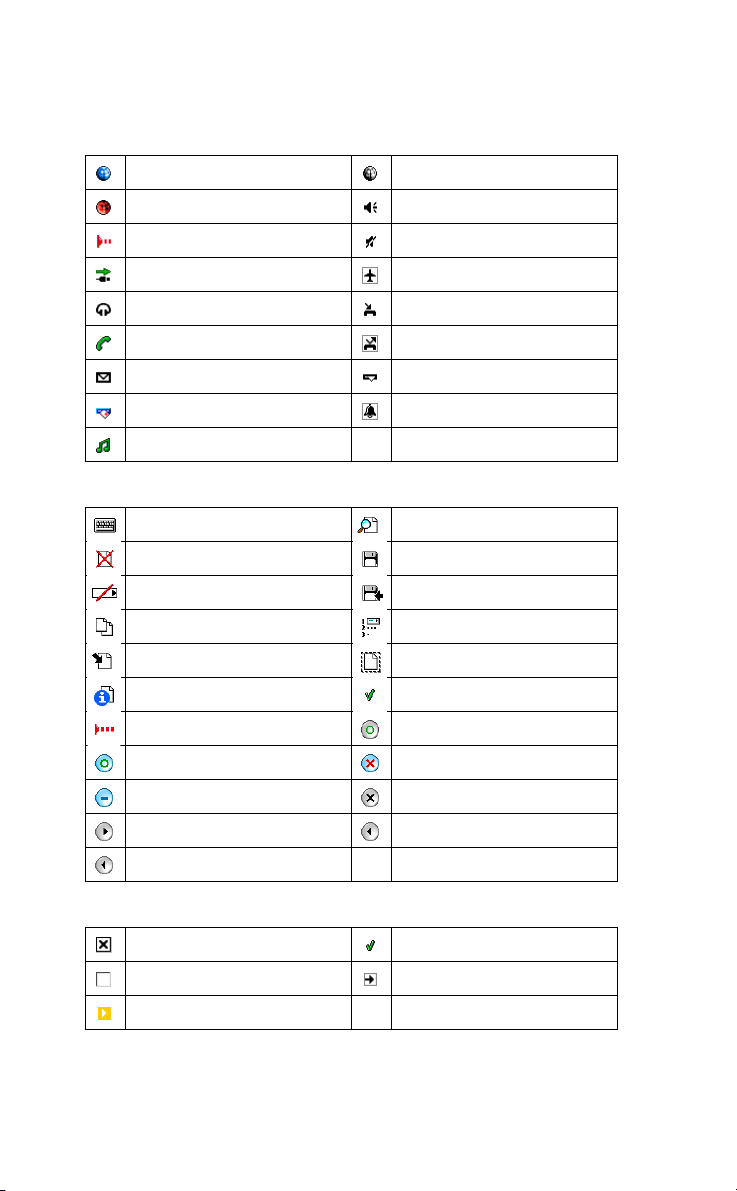
Status bar icons
GPRS connection active GPRS connection inactive
Circuit Switched Dialling Sound on
Irda connection Sound off
USB cable attached Aeroplane mode
Headset attached Missed call
Call active Divert call on
Message received Message in outbox
Sending message in outbox Alarm on
Playing music
Generic commands
Opens keyboard to type or edit Find
Delete Save
Reset value Save to target
Copy Sort
Paste Select all
Details Viewer Set Default
Send Irda OK
Yes No
Cancel Close
Next Previous
Back
General icons
Add to: on Default
Add to: off Link
Action Index
DRAFT
Key Functions 17
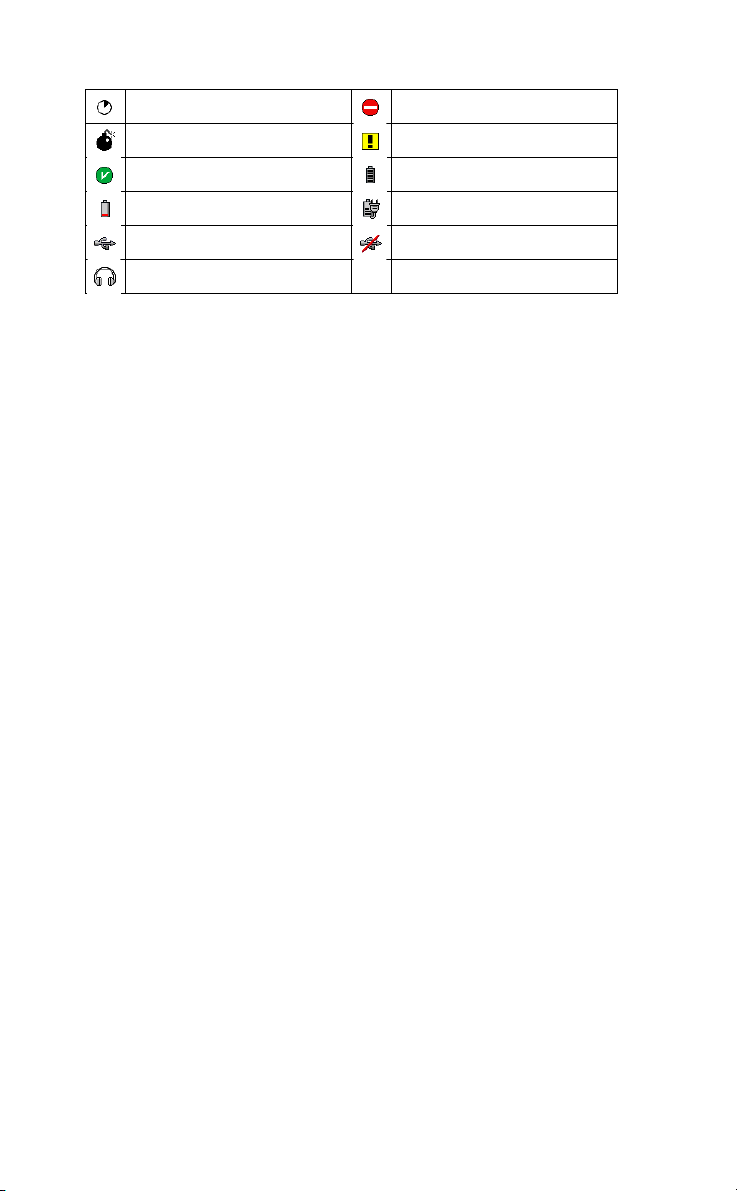
Device Busy Wait Error
Fatal error Warning
Completed Battery full
Battery low Charging battery
USB connection USB disconnected
Headset
DRAFT
18 Key Functions
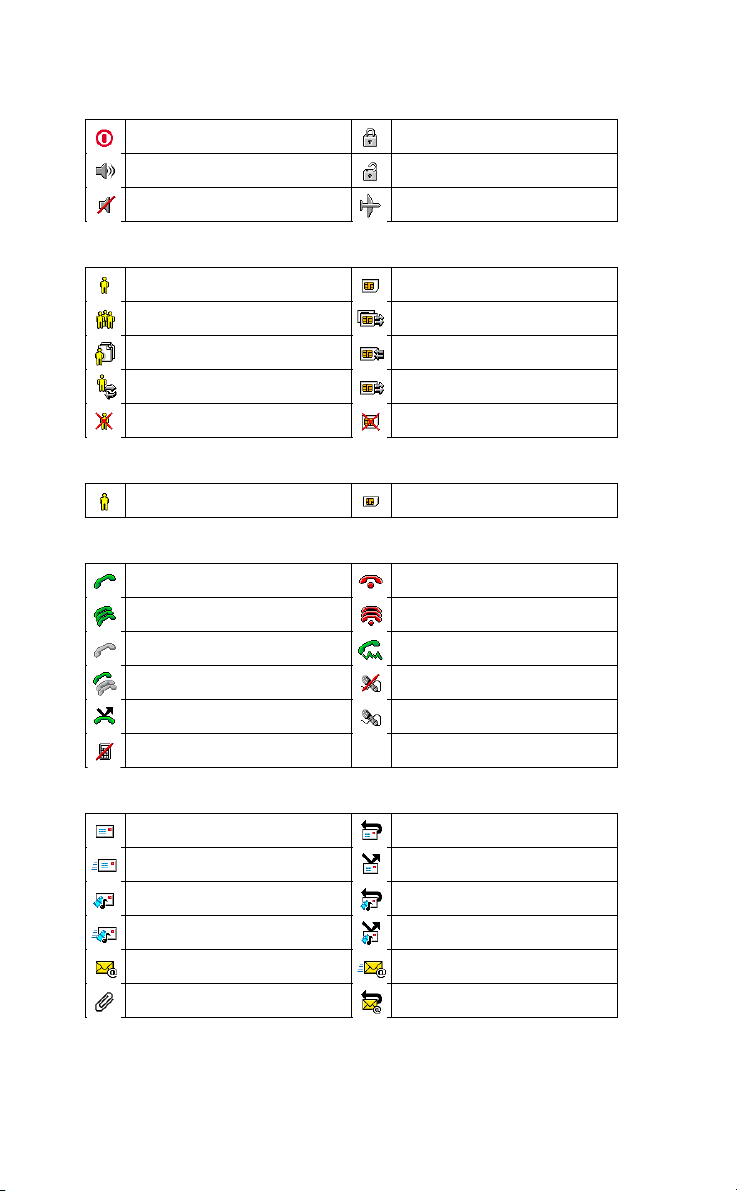
Standby menu commands
Power off Device is locked
Sounds on Device is unlocked
Mute on Flight mode
Contact application commands
Contact Save to SIM
Contact Group Copy from SIM to device
Contact Chooser Move to SIM
Synchronize contacts Move from SIM
Delete contact from device Delete from SIM
Contact application icons
Contact in device Contact on SIM
Calls application commands
Call Close call
Conference call Close all calls
On hold DTMF call
DRAFT
Private call Mute microphone
Divert call Turn on microphone
Reset counter
Messages application commands
Create SMS Reply to SMS
Send SMS Forward SMS
Create MMS Reply to MMS
Send MMS Forward MMS
Create E-mail Send E-mail
Attachment Reply to E-mail
Key Functions 19
Reply E-mail to all Forward E-mail
Send and Receive E-mail
DRAFT
20 Key Functions
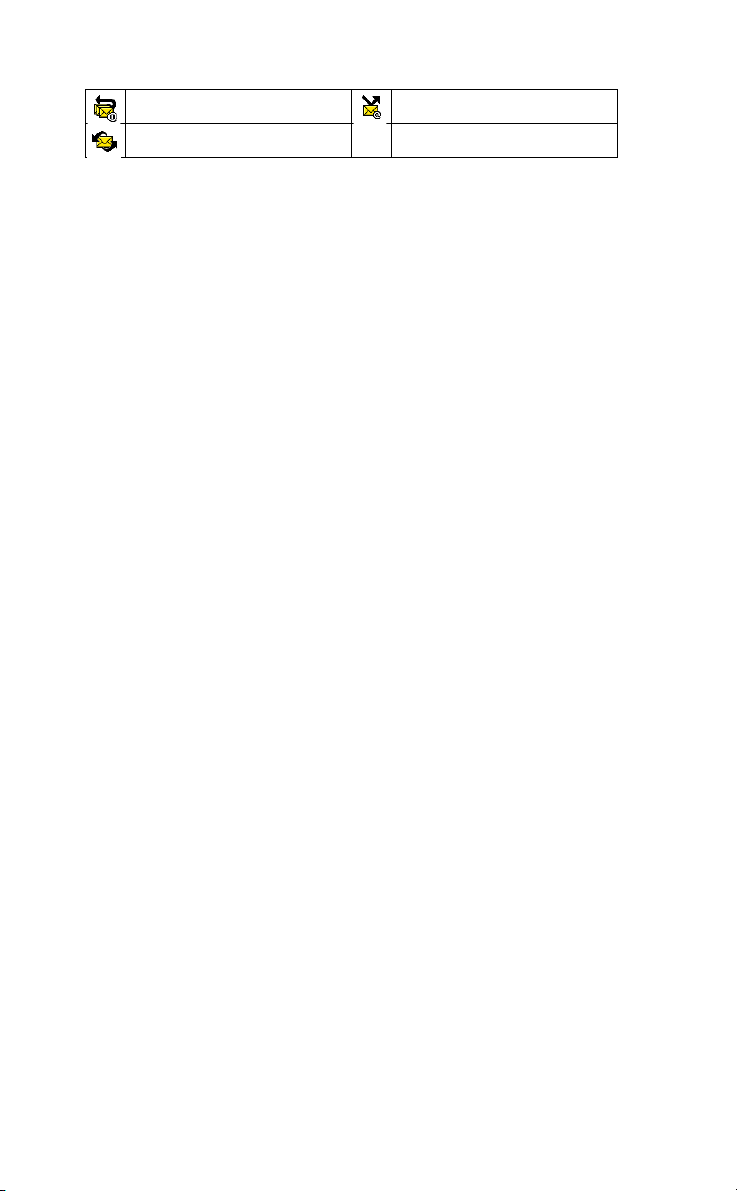
Messages application icons
Received SMS Received SMS on SIM
Opened SMS Opened SMS on SIM
Sent SMS Received MMS
Opened MMS Sent MMS
Received E-mail Received E-mail with attach-
Opened E-mail Opened E-mail with attach-
Replied E-mail Replied E-mail with attach-
Forwarded E-mail Forwarded E-mail with attach-
Sent E-mail Received delivery report
Received configuration message
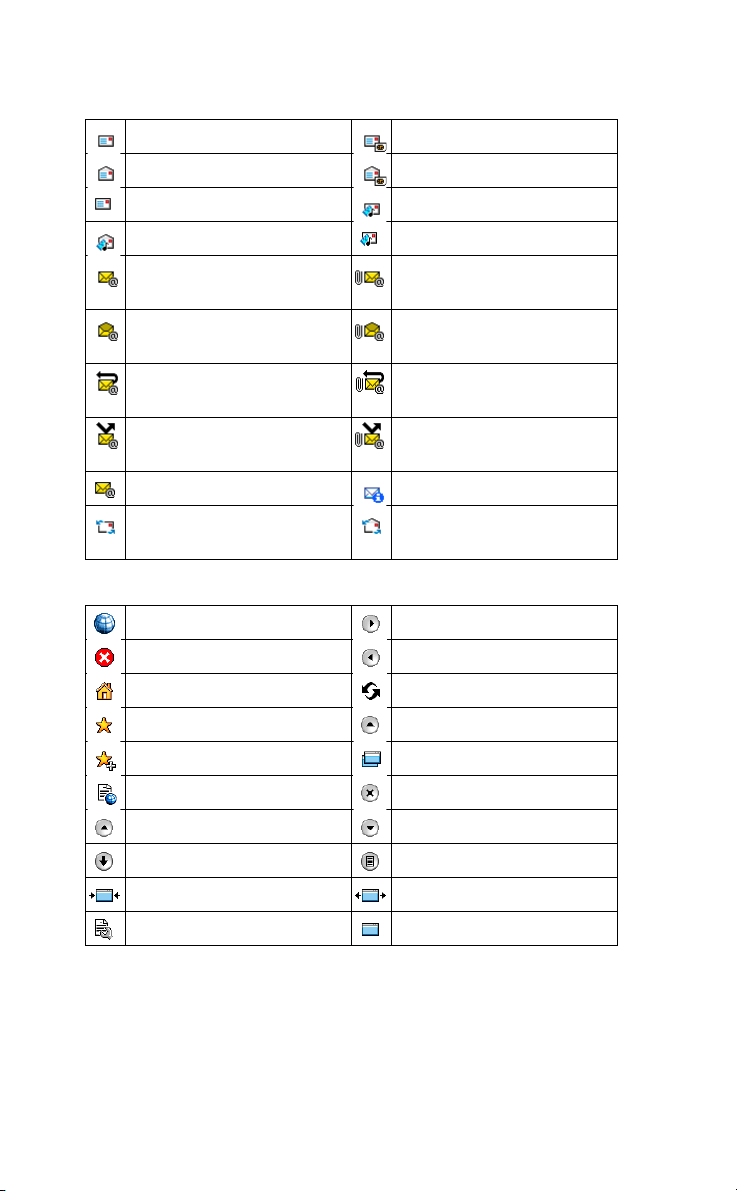
Internet application commands
Start browser Forward
Stop Back
Home Reload
DRAFT
ment
ment
ment
ment
Opened configuration message
Favourites Views
Add to favourites Open new view
History Close view
Windows up Windows down
Hide To book
Fit to width Restore to width
Options Views
Key Functions 21
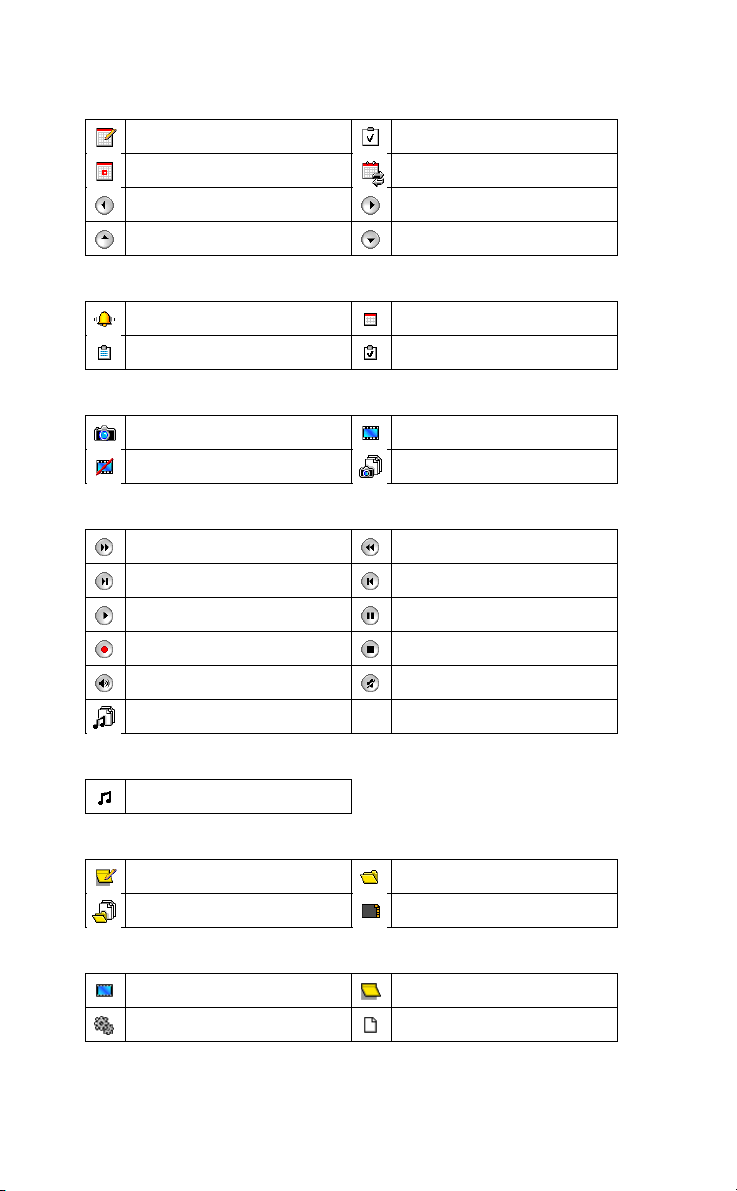
Calendar application commands
New event New task
Select date Synchronise
Move left Move right
Move up Move down
Calendar application icons
Alarm Event
Task Task done
Camera application commands
Take picture Save picture
Cancel picture Picture chooser
Music application commands
Fast forward Fast rewind
Next Previous
Play Pause
Record Stop
Sound on Sound off
Music chooser
Music application icons
Music file
My files application commands
New note New folder
File chooser Save to memory card
My files application icons
Image file Note file
Program file Text file
22 Key Functions
DRAFT
Web page file Folder
Stored on memory card
Settings application commands
Change security code Server
User profile Remove server
Reset device Set time and date
Synchronize Profile synchronization
Calibrate Find time zone
Programs application commands
Calculator Notepad
Info application commands
Help Show tutorial
Next tutorial Previous tutorial
Close tutorial
DRAFT
Standby Menu
The standby menu can be reached at any time when the phone is switched
on by pressing both A & B keys simultaneously.
The standby menu contains the following options;
• Tu r n o n k e y l o c k
• Tu r n o n / o f f s i l e n t
• Shut down
• Ta s k m a n a g e r
• Profiles
• Volume c o ntro l
The key lock
The key lock is a feature that helps to prevent accidentally pressing
buttons or dialling a number, when for example being carried in your
pocket.
The key lock will remain locked unless the following happens:
Key Functions 23

• you unlock the key lock
• you receive an incoming call
• you receive a message
To turn on the key lock
1. Full click the A & B keys simultaneously to access the standby menu.
2. Press Lock
When the device is key locked the virtual phone will be displayed with
Screen locked displayed.
To turn off the key lock
• Press Unlock in the display.
NOTE:With the key lock on you can still access the phone to make an
emergency number call. See....
Silent Mode
The silent mode disables all audible sound with the exception of the alarm
clock signal.
To turn the device audio signals to silent
1. Full click the A & B keys simultaneously to access the standby menu.
2. Select Mute
To switch the silent function off repeat step 1 and select Sound .
DRAFT
Tas k Ma n a ge r
The task manager allows you to view, switch to and stop all tasks and/or
applications that are running in the device.
Profiles
See Settings.....
Volume in Use
The volume in use function allows you to adjust the currently playing
sound/audio volume in the device. If no sound/audio is playing when you
access the standby menu then this volume control will be disabled.
To adjust the volume in use
• Full click the A & B keys simultaneously to access the standby menu.
Slide your finger to move the volume slider to adjust
the volume.
24 Key Functions

Character and Number Input
Character Keyboard
The virtual keyboard is used for entering new text and editing texts in all
the applications that require or need text inputs, for example writing a
note, an SMS message etc.
The title field notifies the text
types. For example this title bar
shows the keyboard has been
opened in the Messages application, there is an indication that the their is
a limit of 160 characters that can be typed to the text field and that the
shift button is active, meaning that the first letter typed will be in
uppercase followed by lower case letters.
The keyboard consists of 3 main
keyboard layouts. The character
keyboard is default keyboard.
The keyboard does not rotate to the
vertical position
To activate the Shift key
• Whilst you are writing text with the
virtual keyboard, press to activate the shift key.
The Shift key will be active for one key press and then will return to
the state.
When the shift key is active you can enter a letter in Upper case and also
the yellow marks . Abc will appear in the header section of the
key pad view.
To activate the Caps lock key
• Whilst you are writing text with the virtual keyboard, press twice or
once to activate the Caps lock key.
The Caps lock key will be active until you press to return to the
normal state.
When the Caps lock key is active you can enter all letters in Upper case
and also the yellow marks . ABC will appear in the header section of the key pad view.
DRAFT
Key Functions 25
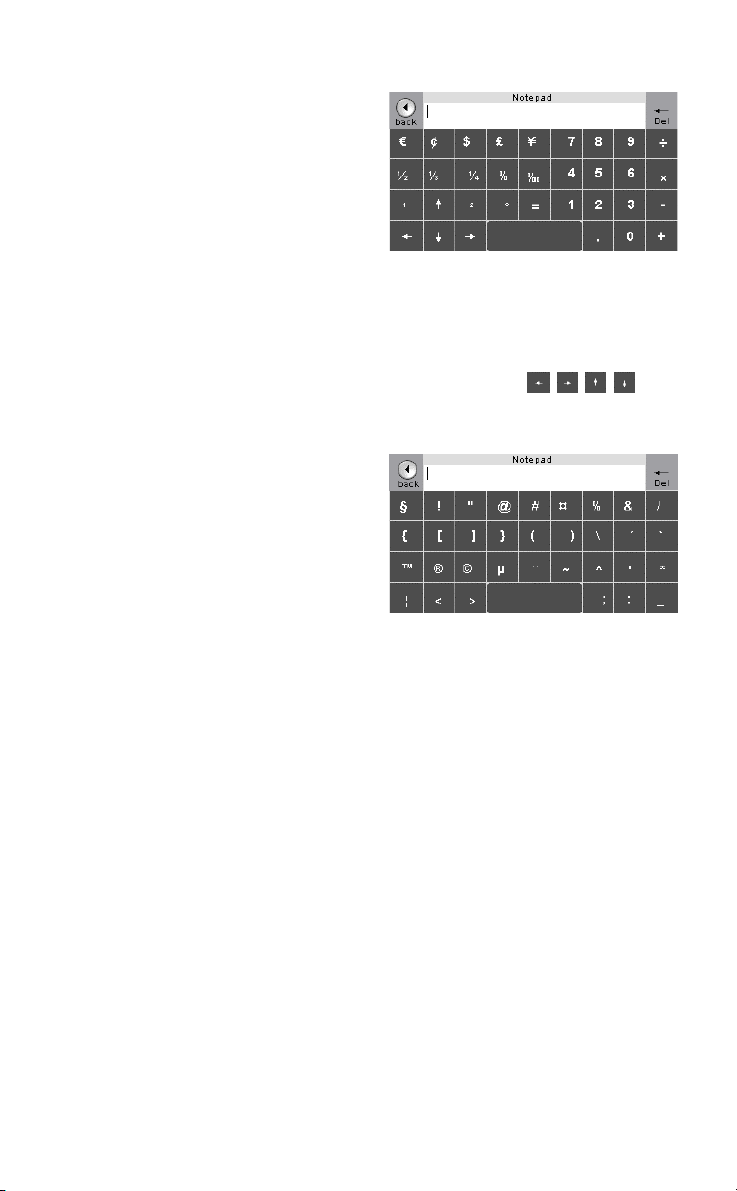
Numeric keyboard
If you want to add a numbers or
numeric signs to the text you are
entering then you can switch the
input keyboard from the character
keyboard to the numeric keyboard
by pressing the lens 123 key. After
entering the symbols you can switch
back to the character keyboard by pressing the lens ABC key.
Scrolling through the text in the keyboard input area
When writing with the keyboard there are two lines of text visible in the
view. When more than two lines of text have been typed in the keyboard
input area, you can scroll through the text by using the keys
which are located in the numeric keyboard. It is also possible to scroll
using mirroring.
Symbolic Keyboard
If you want to add a symbol to the
text you are entering then you can
switch the input keyboard from the
character keyboard to the symbols
keyboard by pressing the lens @ key.
After entering the symbols you can
switch back to the character
keyboard by pressing the lens ABC key.
DRAFT
26 Key Functions

Call Functions
The phone application can be activated in several ways, from the Phone key
on the lens , though the Fast menu or from the Calls/New call field.
Depending on how you are using the device you can choose the most appropriate way to access the phone application.
The Calls chapter contains call management features for this device, dialled,
received and missed calls lists.
CALLS
Making Calls
To m a k e a c al l
1. Press
2. Enter the phone number with the area code if needed.
If you enter the incorrect number press Clear to delete it. Pressing and
holding Clear
3. Press Call
Press End to end the call.
4. To exit the phone application press Close
return to the previous menu.
To create a new contact from the entered number in the phone application
• Press Create contact to create a new contact with that number.
See Creating a contact page.......
To answer a call
• Press Answer to answer the incoming call.
To reject an incoming call
• Press Reject to reject the incoming call.
To mute the audio alert for an incoming call
• Press Mute Tone to mute the audio for the incoming call.
To make international calls
1. Press and hold to enter the + sign.
The + sign replaces the international prefix number.
2. Enter the country code, then the area code (without the first 0) and the
phone number and press Call
To adjust the earpiece volume during a call
will delete the whole number.
DRAFT
when in standby mode to
Call Functions 27

• Press the A key to increase the volume
• Press B key to decrease the volume
High Low
To make a call to a stored contact from the phone application
1. When in standby mode of the phone application, press ABC .
The number buttons will change to letter buttons. To change the buttons
back to numbers press 123
2. Enter the first letter for the contact you wish to recall.
3. Select the contact from the alphabetical list. The contact name will
appear in the phone application.
4. Press Call
Speed Dialling
You can assign contacts numbers to the number buttons in the phone
application, which can then be quickly recalled and dialled. To set a speed
dial number for a contact See page...
To make a call to a speed dial number
• When the phone application is open either:
• Press the corresponding speed dialling key for the contact you have
assigned that number and press Call
• Press and hold the number until the call is started.
DRAFT
Emergency Calls
At any time when the phone is switched on you can make an emergency
call usually even without a SIM card if there is a GSM network in range.
The international emergency numbers that are supported in this device
are 112, 911 & 08.
It is also possible to make an emergency call when the device is locked.
See Locking and unlocking the device page...
To make an emergency call
1. Press
2. Enter 112, the GSM international emergency number.
3. Press Call
Call Details
• You can check the details of calls from the device. From the Details
viewer you can see the following information:
• Start time
28 Call Functions

• Call duration
• Number of calls
• Phone Number
To view the details of a call
1. Select a single call from the Calls menu with a long press to activate the
Fast menu.
2. Press Details .
Call Management
The call management menu is a dynamic menu which contains the in-call
options through the menus. The following in-call options may be available.
• Hold Call
• Activate Call
• Send DTMF
• End all calls
• Mute
• Swap
To turn off the microphone
1. Select a call from the Call Management menu with a long press to activate
the Fast menu.
2. Select Mute Mic .
To turn the microphone back on repeat this process and press Mic On .
DRAFT
Dialled Calls
The device stores the 12 last dialled calls.
To view your received calls
• Select Calls/Dialled calls.
Calling a previously dialled number
1. Select Calls/Dialled calls.
2. Select the number or name that you wish to redial.
3. Press Call
TIP:Dialled calls can also be reached by pressing Dialled when in the
phone application and no numbers have been entered in the phone.
Received Calls
The device stores the 12 last received calls.
To view your received calls
• Select Calls/Received calls.
Call Functions 29

Missed Calls
The device stores the 12 last missed calls, a message 1 missed call will
appear under the Calls chapter in the contents page and also be displayed
as in the status header.
To view your missed calls
• Select Calls/Missed calls.
Call Waiting
See Settings/Phone Settings page...
Diverting Calls
See Settings/Phone Settings page...
DTMF touch tones
Dual Tone Multiple Frequency tones are codes sent as touch tone signals
for use when controlling answering machines or accessing telephone
banking services.
You can also store touch tone codes together with phone numbers in your
contacts so that you can dial automatically into a service.
Sending touch tone signals
During a call:
• pressing 0 - buttons will send numbers
• pressing and holding 0
• pressing and holding #
NOTE:Storing touch tone access codes with a phone number to a tele-
phone service carries some risk if your device is stolen.
DRAFT
will send the pause character P.
will send the .. character W.
Voicemail
Your voice mailbox is an answering service provided by your network or
service provider, which allows callers to leave voice messages for you
when you are unable to answer the call.
You can save your voicemail service number in the device so that you are
able to quickly access the number through the speed dial number 1 which
is reserved for your voicemail. See Creating a contact page......
The voicemail indication....
To call your voice mailbox
• Press and hold 1
30 Call Functions
 Loading...