


User manual appendix C
Specific instructions for your unique MyoPro 2

PN 25623 Rev 011 2

›
MyoPro 2 Motion G Diagram
5
CONTENTS
Finger Support Diagram Close-Up 6
›
Putting Your MyoPro 2 On (“Donning”) 7
›
Taking Your MyoPro 2 Off (“Doffing”) 19
›
› Using Your MyoPro 2 23
› Warnings Review 8
› Steps for Putting Your MyoPro 2 On 9
› Warnings Review 20
› Steps for Taking Your MyoPro 2 Off 20
› Control panel 24
› Modes of Use 25
› Start Mode 25
› Elbow Modes 26
› Grasp Modes 28
› Changing Elbow Modes with the Control Panel 30
PN 25623 Rev 011 3

PN 25623 Rev 011 4

MYOPRO 2 MOTION G DIAGRAM
Component names and references (not every device includes every component).
Multi-Articulating Wrist
Upper-Arm
Sensor Cuff
Harness
Attachment
Point
Upper Arm
Shell
Battery
Compartment
(MAW), Rotational Ring
Hand
Motor
Forearm
Sensor Cuff
Hand
Support Shell
Hand Carrier
Bar
Upper Cuff
Closure
Forearm
Closure
Elbow Motor
Forearm
Shell
Multi-Articulating Wrist
(MAW), Flexion Joint
Forearm Bar
Control Panel
(User
Interface)
PN 25623 Rev 011 5

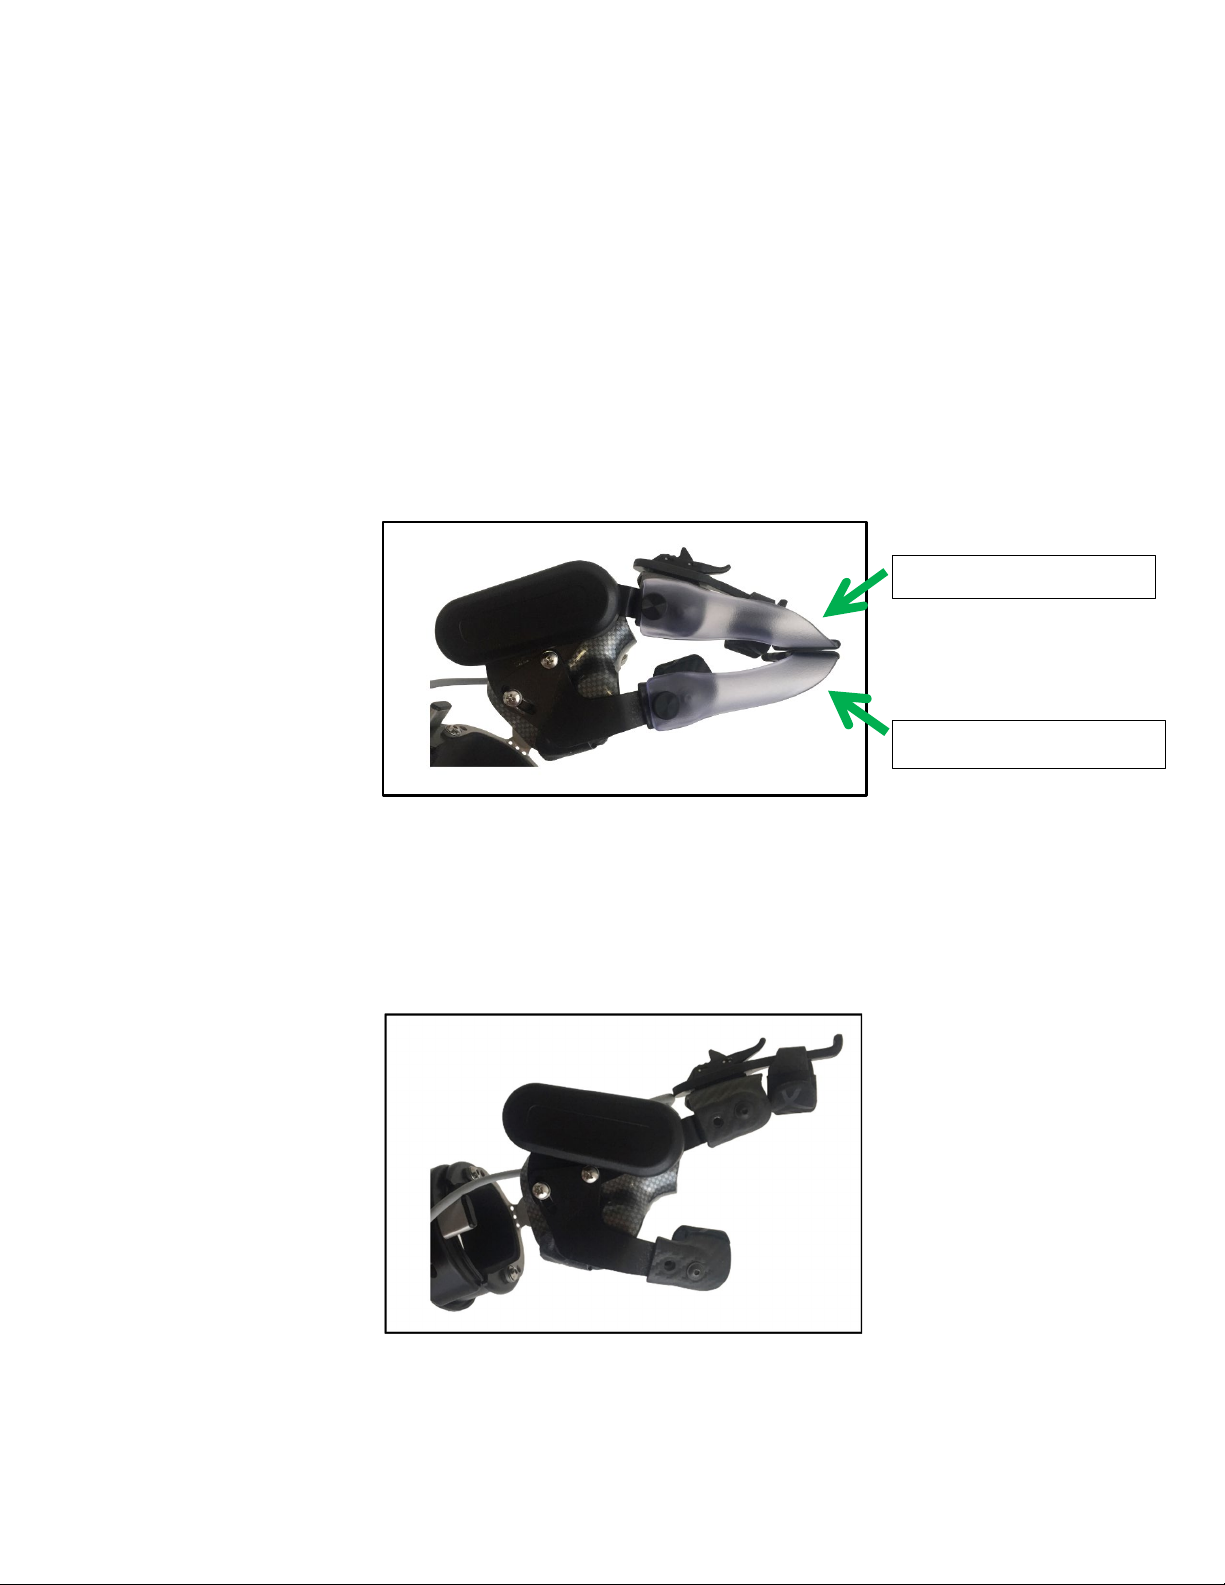
FINGER SUPPORT DIAGRAM CLOSE-UP
Latch
Anvil
Stem
Loop
Dorsal Finger
Hand Strap
Piece
Finger
Saddle
Prehensile
Pinchers
Thumb
Saddle
PN 25623 Rev 011 6

PUTTING YOUR MYOPRO 2
ON
(“DONNING”)
PN 25623 Rev 011 7

PUTTING YOUR MYOPRO 2 ON (“DONNING”)
The following pages include step-by-step instructions for putting the MyoPro 2 on (sometimes referred to as
“donning the MyoPro 2”).
WARNINGS REVIEW
BEFORE donning the MyoPro 2, review the warnings below:
WARNING: DO NOT expose the MyoPro 2 to flame or excessive heat; personal injury may
occur.
WARNING: The MyoPro 2 is a prescription device and should only be used as indicated under
clinical supervision of a Provider, or after receiving instruction from a clinical Provider for athome use.
WARNING: The MyoPro 2 is only to be used by the person for whom it is prescribed.
WARNING: Each component of the device is supplied for safety and best performance. Use all
provided components for optimal operation.
WARNING: ONLY use the MyoPro 2 upper limb orthosis on the prescribed elbow, wrist and
hand joints. Each MyoPro 2 is built specifically for a left arm or a right arm; never wear the
MyoPro 2 on the other arm.
WARNING: Tight straps may restrict the User’s circulation. Therefore, always check that straps
are not too tight throughout the User’s range of motion.
WARNING: Do not sleep while wearing the device as straps may alter the User’s circulation.
▲ CAUTION: If you detect fumes, flames, melting of components around the battery or battery
charger, or the device is hot to touch, TURN THE DEVICE OFF IMMEDIATELY and contact your
Provider.
PN 25623 Rev 011 8

STEPS FOR PUTTING YOUR MYOPRO 2 ON
1. POWER OFF: While donning, the MyoPro 2 should be turned OFF; check that it is OFF before starting to
put the MyoPro on your arm.
NOTE: Pads and straps should be fully air-dried from the previous use.
▲ CAUTION: Do not use a hairdryer to dry components of the MyoPro 2.
2. PREPARE: Place the MyoPro 2 in your lap, or on a flat surface that is not slippery.
3. HAND: Start with the hand support shell: check that the strap around the hand support shell is loose.
Feed your fingers through so the under side of the hand support shell sits in your palm, and your thumb
rests in the Thumb Saddle. Be sure the base of your thumb presses against the hard plastic (opposite of
the hand strap). Leave the fingers free while you continue to put the rest of the device on – we will
secure the finger support as the last step.
NOTE: The motor and battery case should rest on the outside of the arm. If the motor and
battery case is aligned along the interior of the arm, you may be donning upside down or on
the wrong arm.
4. WRIST: Lower your wrist into the multi-articulating wrist (MAW), rotation portion.
5. FOREARM: Lower your forearm into the forearm shell.
6. Secure the Forearm Closure.
7. FINISH LOWER ARM: Tighten and secure the Velcro hand strap. This will keep the MyoPro 2 in place
while you continue to don.
PN 25623 Rev 011 9

STEPS FOR PUTTING YOUR MYOPRO 2 ON, CONTINUED
8. UPPER ARM:
Wrap the Upper Sensor Cuff around your upper arm, keeping attention on the Biceps and Triceps sensors;
when the Upper Sensor Cuff is properly fit, the sensors should be centered over the biceps and triceps
muscles. Secure the Upper Cuff Closure and pull to tighten before securing the strap’s Velcro.
NOTE: the sensor with the BLUE Velcro goes on biceps, the sensor with the RED Velcro goes on
triceps.
Upper Sensor Cuff
Upper Cuff Closure
PN 25623 Rev 011 10

STEPS FOR PUTTING YOUR MYOPRO 2 ON, CONTINUED
9. FOREARM SENSOR: Slide the Forearm Sensor Cuff onto the forearm. Tuck the Forearm Sensor Cuff’s
Velcro strap under the forearm bar and secure the Velcro.
NOTE: The sensor with the GREEN Velcro goes on the inner side of the forearm (aligned with
the palm), and the sensor with the YELLOW Velcro goes on the outer side of the forearm
(aligned with the back of the hand).
PN 25623 Rev 011 11

STEPS FOR PUTTING YOUR MYOPRO 2 ON, CONTINUED
10. HARNESS: Secure the harness:
• Rest the shoulder pad on the shoulder of your MyoPro 2 arm.
• Wrap the strap under your non-MyoPro 2 arm.
• Secure the Quick Release tab.
PN 25623 Rev 011 12

STEPS FOR PUTTING YOUR MYOPRO 2 ON, CONTINUED
11. FINGER SUPPORT:
Start with the finger
support detached from
the Anvil.
Work the Finger Saddle
under your fingers while
holding the Stem and
Loop.
Lift the Stem upward to
position the Loop over the
Anvil.
You can hang the Loop
from the Anvil to take a
break or to reposition
your other hand for the
next step.
PN 25623 Rev 011 13

STEPS FOR PUTTING YOUR MYOPRO 2 ON, CONTINUED
11. FINGER SUPPORT, continued:
Technique A
Continue to guide the
Loop over the Anvil. The
instructions below outline
two different techniques
for this:
Push down on the end of
the Loop to engage the
Latch.
Technique b
Lift your fingers from
underneath the Finger
Saddle.
Since the Stem is rigid,
this will cause the end of
the Loop to rotate over
the Latch. (You may also
push down on the stem
for additional leverage.)
Done!
PN 25623 Rev 011 14
Dorsal Prehensile Pincher
Palmar Prehensile Pincher
MyoPro 2 Prehensile Pinchers
Prehensile Pinchers are provided with each MyoPro 2 to aid grasping light weight ( under 1 lb). objects. Use of the Prehensile
Pinchers is optional (not required) and they may be attached or removed as desired.
NOTE: if used, it is recommended to limit use for therapy sessions and then remove for routine daily activities.
Please note the angle between the thumb and index finger may require adjustment to ensure contact between the Prehensile
Pinchers. Consult a trained MyoPro 2 therapist or CPO if assistance is required.
▲ Caution: Do not lift heavy objects with the prehensile pinchers attached. They are designed to lift lightweight objects
( under 1 lb.)
Grasp Module
Each MyoPro 2 is provided with two Prehensile Pinchers and two thumb screws for attaching the Prehensile Pinchers to the
Grasp Module. The Palmer Prehensile Pincher will only attach to the Thumb Saddle while the Dorsal Prehensile Pincher will only
attach to Dorsal Finger Piece.
Assistance may be necessary for attaching the Prehensile Pinchers. The Prehensile Pinchers may be attached and removed with
the MyoPro 2 donned or doffed. Follow the instructions below to attach the Prehensile Pinchers.
1. Open the MyoPro 2 hand. Ensure the thumb is in the fully open position.
PN 25623 Rev 011 15

2. Align the Dorsal Prehensile Pincher with the Dorsal Finger Piece. Ensure the holes of each align. If the surfaces of the
Prehensile Pincher and Dorsal Finger Piece do not align, try the other Prehensile Pincher.
3. Insert the provided Thumb Screw into the aligned holes. Turn clockwise to tighten until secure.
4. Repeat steps for the Palmar Prehensile Pinchers. Align the Palmar Prehensile Pincher with the Palmar Thumb Piece. Ensure
the holes of each align. If the surfaces of the Prehensile Pincher and thumb saddle do not align, try the other Prehensile
Pincher.
PN 25623 Rev 011 16

5. Insert the provided Thumb Screw into the aligned holes. Turn clockwise to tighten until secure.
▲ CAUTION:
• Do not over tighten Thumb Screw. - Over tightening Thumb Screw may excessively stress the Prehensile Pincher and may
cause failure and/or risk of personal injury. Do not use tools to tighten Thumb Screw.
• Do not under tighten Thumb Screw. - Under tightening Thumb Screw may cause the Prehensile Pincher to rotate while
picking up an object and may cause failure and/or risk of personal injury.
1. To remove the Prehensile Pinchers, loosen the Thumb Screws by turning counterclockwise until detached. When not
in use, the Prehensile Pinchers may be stored in the MyoPro carrying case.
2. Upon removal, the Prehensile Pinchers should be inspected for wear and tear, fatigue cracking, and damage.
Contract Myomo Customer Support for replacement if needed as they are a serviceable item.
▲ CAUTION:
• Do not use Prehensile Pinchers with or near hot objects. Excessive heat may deform the Prehensile Pinchers.
• It is recommended to remove the Prehensile Pinchers after therapy as the Prehensile Pinchers may get caught on
surrounding objects which may cause them to break.
• Do not pick up or carry objects greater than 1 lb. while using the Prehensile Pinchers as this may cause failure of the
Prehensile Pinchers and/or risk of personal injury.
• Do not apply excessive force to the Prehensile Pinchers such as using them as
a tool for prying, hitting, etc. Applying excessive force may cause failure of the Prehensile Pinchers and/or risk of personal injury.
PN 25623 Rev 011 17

PN 25623 Rev 011 18

TAKING YOUR MYOPRO 2 OFF
(“DOFFING”)
PN 25623 Rev 011 19

TAKING YOUR MYOPRO 2 OFF (“DOFFING”)
WARNINGS REVIEW
WARNING: If at any time during the use of this device, you notice any of the following,
discontinue use and seek guidance from your Provider.
• Movement does not match the User’s desired motion.
• Persistent redness, swelling, or skin breakdown (bleeding, chafing, etc.)
• Rash on the arm, hand, or fingers.
• Pain associated with wearing the MyoPro 2 orthosis.
• Unusual noises from the orthosis (popping, clicking, etc.)
• Smells from the orthosis (smoking, burning plastic, etc.)
• Odor from the orthosis (sour smells or other indications of bio-contamination.)
STEPS FOR TAKING YOUR MYOPRO 2 OFF
1. Turn the MyoPro 2 OFF.
2. Place the MyoPro 2 in your lap, or on a flat surface that is not slippery.
3. Undo the harness Quick Release tab.
4. Release the Finger Support (see Page 17 for images).
5. Loosen the hand strap.
6. Remove the Forearm Sensor Cuff from your forearm.
7. Undo the Upper Cuff Closure.
8. Undo the Forearm Closure.
9. Gently slide your hand back through the loosened hand strap and Hand Support Shell
10. Rest the MyoPro 2 in a clean, dry location to ensure it will fully air-dry before next use.
11. Place the MyoPro 2 into the carrying bag for travel or storage.
NOTE: The MyoPro 2 should remain OFF any time the MyoPro 2 is not being worn.
PN 25623 Rev 011 20

STEPS FOR TAKING YOUR MYOPRO 2 OFF, CONTINUED
Push/pull the slider
forward to release the
loop.
The loop will slide over
the Anvil as soon as it is
free.
Remove the “W”, Stem
and Loop from under your
fingers and store in the
MyoPro 2’s carrying bag.
PN 25623 Rev 011 21

PN 25623 Rev 011 22

USING YOUR MYOPRO 2
PN 25623 Rev 011 23

CONTROL PANEL
See the User Manual – Sections for All MyoPro 2 Devices document for a comprehensive Control Panel
Buttons & Lights Diagram.
Power Button
Mode Buttons
PN 25623 Rev 011 24

MODES OF USE
WARNING: Use caution when using the device in shoulder positions where it is possible for the
User to hit him or herself.
The MyoPro 2 may be used in a variety of modes. The different modes allow you to operate the MyoPro 2
by tensing or relaxing different muscles. You may find that you want to use different muscles – and
therefore different modes – when performing specific tasks with your MyoPro 2. Modes may be changed
using the buttons on the control panel.
When the device is fit to you, your Provider will optimize the sensitivity settings within each mode
depending on the strength of your EMG signal at that time. If over time you feel that the MyoPro 2 is not
assisting your arm or hand adequately, please contact your Provider; the sensitivity settings may need to be
readjusted.
START MODE
When you first power on the MyoPro 2, the elbow will be in Standby Mode. This setting may be changed by
your Provider.
ELBOW MODES
The elbow has four distinct modes of use when the MyoPro 2 is powered on.
1. Standby mode
2. Biceps mode
3. Triceps mode
4. Dual mode
These are explained in the following pages.
GRASP MODES
The grasp has four distinct modes of use when the MyoPro 2 is powered on.
1. Standby mode
2. Open mode
3. Close mode
4. Dual mode
These are explained in the following pages.
NOTE: You may experience a slight vibration of the finger support when the grasp reaches a
fully closed or fully open position. This would be caused by the hand motor turning on and off
as it detects the limits of its range of motion. This is normal operation, and nothing to worry
about.
PN 25623 Rev 011 25

ELBOW MODES
In this mode, neither the Biceps or Triceps Light will be
illuminated. The elbow motor will not respond to your EMG
signal from either muscle group.
Though the MyoPro 2 is powered on, no assistance is being
given to your elbow, and the arm will neither flex nor extend.
The sensors will be reading your EMG signal from both
biceps and triceps, but the motor response is paused.
Standby mode
Actions:
• This can be useful as a resting mode if straps or sensors
need to be adjusted, or if you want to take a short break
without turning the device off.
In this mode, the Biceps Light will be illuminated. The elbow
motor will respond to your biceps EMG signal.
Actions:
• When you relax your biceps, the device will extend.
• When you contract your biceps, the device will flex.
Biceps mode
PN 25623 Rev 011 26

ELBOW MODES, CONTINUED
In this mode, the Triceps Light will be illuminated. The elbow
motor will respond to your triceps EMG signal.
Actions:
• When you relax your triceps, the elbow will flex.
• When you contract your triceps, the elbow will extend.
Triceps mode
In this mode, both the Biceps and Triceps Light will illuminate.
The elbow motor will respond to your biceps and triceps EMG
signal.
The elbow will only respond to muscle contraction (not
Dual mode
relaxation, as in other modes) to assist you with active flexion
and active extension of your elbow.
You must engage both muscle groups in order for your arm to
move in both directions. The MyoPro 2 will respond to
whichever muscle signal is stronger at a given moment in time.
In order for Dual mode to be most effective, you should be able
to isolate the desired muscle (biceps or triceps) and have a
limited number of co-contractions prior to using Dual mode.
When used well, this mode should allow you greater ability to
hold an arm position at a mid-point between fully flexed and
fully extended.
Actions:
• When you contract your biceps, the elbow will flex, as long
as your biceps signal is greater than your triceps signal.
• When you contract your triceps, the elbow will extend, as
long as your triceps signal is greater than your biceps signal.
PN 25623 Rev 011 27

GRASP MODES
Standby mode
In this mode, neither the Close or Open Light will be
illuminated. The grasp motor will not respond to your EMG
signal.
Though the MyoPro 2 is powered on, no assistance is being
given to your hand, and the grasp will neither open nor close.
The sensors will be reading your EMG signals from both wrist
flexor and extensor muscle groups, but the motor response is
paused.
Actions:
• This can be useful as a resting mode if straps or sensors
need to be adjusted, or if you want to take a short break
without turning the device off.
In this mode, the Close Light will be illuminated. The grasp
motor will respond to your wrist flexor EMG signal.
Actions:
• When you relax your wrist flexors, the grasp will open.
• When you contract your wrist extensors, the grasp will
Close mode
close.
PN 25623 Rev 011 28

GRASP MODES, CONTINUED
In this mode, the Open Light will be illuminated. The grasp
motor will respond to your wrist extensor EMG signal.
Actions:
• When you relax your wrist extensors, the grasp will close.
• When you contract your wrist extensors, the grasp will
open.
Open mode
In this mode, both the Close and Open Light will illuminate.
The grasp motor will respond to your wrist flexor and wrist
extensor EMG signal.
The grasp will only respond to muscle contraction (not
relaxation, as in other modes) to assist you with active close and
active open of your hand.
Dual mode
You must engage both muscle groups in order for your hand to
move in both directions. The MyoPro 2 will respond to
whichever muscle signal is stronger at a given moment in time.
In order for Dual mode to be most effective, you should be able
to isolate the desired muscle group (wrist flexors or wrist
extensors) and have a limited number of co-contractions prior
to using Dual mode. When used well, this mode should allow
you greater ability to hold a hand position at a mid-point
between fully closed and fully open.
Actions:
• When you contract your wrist flexors, the grasp will close,
as long as your wrist flexor signal is greater than your wrist
extensor signal.
• When you contract your wrist extensors, the grasp will
open, as long as your wrist extensor signal is greater than
your wrist flexor signal.
PN 25623 Rev 011 29

CHANGING ELBOW MODE WITH THE CONTROL PANEL
The elbow mode button cycles through the 4 elbow modes, moving to the next mode each time you press
the mode button.
When the MyoPro 2 is turned ON, the elbow will be in Standby mode unless it has been changed by your
Provider.
Press the elbow mode button one time to put the elbow into Biceps mode
Press the elbow mode button again (a second time) to put the elbow into Triceps mode
Press the elbow mode button again (a third time) to put the elbow in Dual mode
Press the elbow mode button again (a fourth time) to return the elbow Standby mode
Repeat the above cycle to scroll through and change to another mode at any point during your MyoPro 2
use.
CHANGING GRASP MODE WITH THE CONTROL PANEL
The grasp mode button cycles through the 4 grasp modes, moving to the next mode each time you press
the mode button.
When the MyoPro 2 is turned ON, the grasp will be in Standby mode unless it has been changed by your
Provider.
Press the grasp mode button one time to put the grasp into Close mode
Press the grasp mode button again (a second time) to put the grasp into Open mode
Press the grasp mode button again (a third time) to put the grasp in Dual mode
Press the grasp mode button again (a fourth time) to return the grasp Standby mode
Repeat the above cycle to scroll through and change to another mode at any point during your MyoPro 2
use.
PN 25623 Rev 011 30
 Loading...