

myomo MyoPro 2 Motion E User Manual

Specific instructions for your unique MyoPro 2
User manual appendix A

PN26035 Rev5
2

CONTENTS
› MyoPro 2 Motion E Diagram 5
› Putting Your MyoPro 2 On (“Donning”) 7
› Steps for Putting Your MyoPro 2 On 10
› Taking Your MyoPro 2 Off (“Doffing”) 11
› Steps for Taking Your MyoPro 2 Off 13
› Using Your MyoPro 2 15
› Control panel 17
› Modes of Use 19
› Start Mode 19
› Elbow Modes
19
› Changing elbow Modes with the Control Panel 22
Dansk 23
Deutsch 46
PN26035 Rev5
3

PN26035 Rev5 4
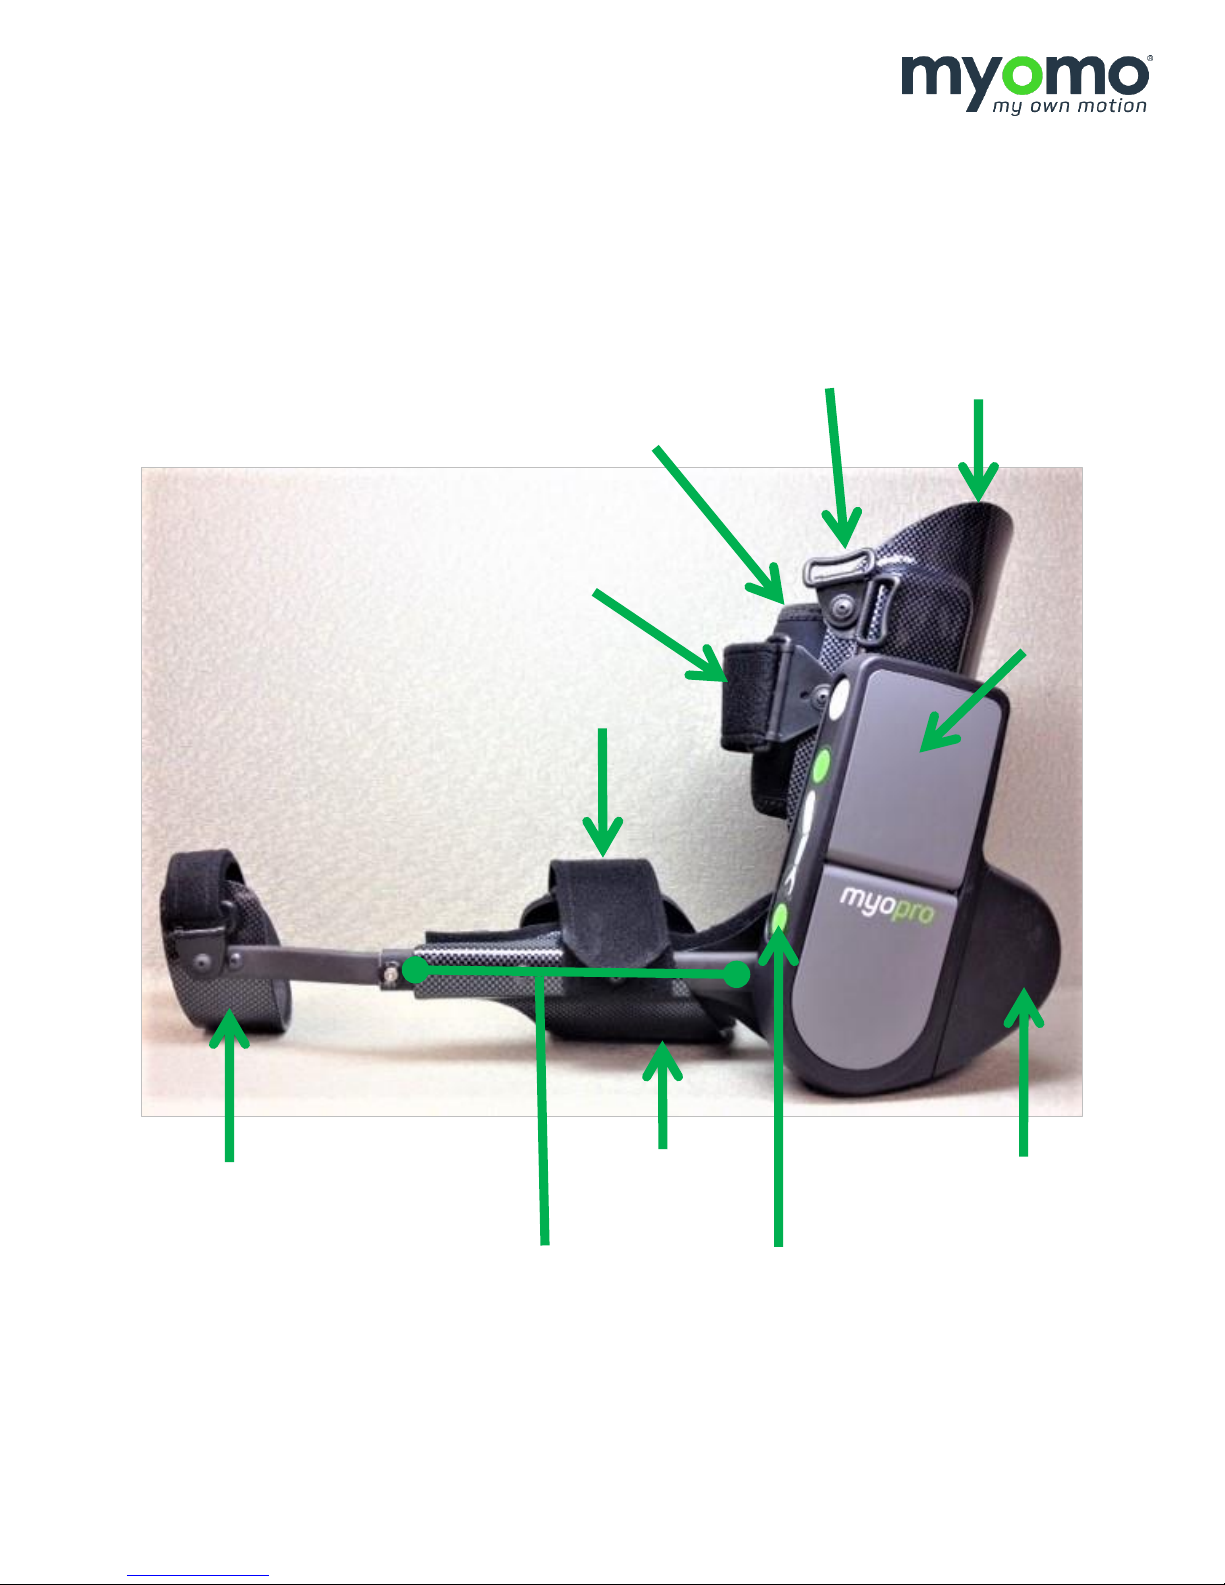
Upper-Arm
Shell
Harness
Attachment
Upper-Arm
Sensor Cuff
Forearm
Closure
Upper Cuff
Closure
Forearm Bar
Forearm
Shell
Control Panel (User
Interface)
Elbow
Motor
Battery
Compartment
MYOPRO 2 MOTION E DIAGRAM
Component names and references (not every device includes every component).
Hand
Support Shell
PN26035 Rev5
5

PN26035 Rev5 6

PUTTING YOUR MYOPRO 2 ON
(“DONNING”)
PN26035 Rev5 7

PN26035 Rev5 8

PUTTING YOUR MYOPRO 2 ON (“DONNING”)
The following pages include step-by-step instructions for putting the MyoPro 2 on (sometimes referred to as
“donning the MyoPro 2”).
WARNINGS REVIEW
BEFORE donning the MyoPro 2, review the warnings below:
WARNING: DO NOT expose the MyoPro 2 to flame or excessive heat; personal injury may
occur.
WARNING: The MyoPro 2 is a prescription device and should only be used as indicated under
clinical supervision of a Provider, or after receiving instruction from a clinical Provider for athome use.
WARNING: The MyoPro 2 is only to be used by the person for whom it is prescribed.
WARNING: Each component of the device is supplied for safety and best performance. Use all
provided components for optimal operation.
WARNING: ONLY use the MyoPro 2 upper limb orthosis on the prescribed elbow, wrist and
hand joints. Each MyoPro 2 is built specifically for a left arm or a right arm; never wear the
MyoPro 2 on the other arm.
WARNING: Tight straps may restrict the User’s circulation. Therefore, always check that straps
are not too tight throughout the User’s range of motion.
WARNING: Do not sleep while wearing the device as straps may alter the User’s circulation.
▲ CAUTION: If you detect fumes, flames, melting of components around the battery or battery
charger, or the device is hot to touch, TURN THE DEVICE OFF IMMEDIATELY and contact your
Provider.
PN26035 Rev5 9
STEPS FOR PUTTING YOUR MYOPRO 2 ON
1. POWER OFF: While donning, the MyoPro 2 should be turned OFF; check that it is OFF before starting to
put the MyoPro 2 on your arm.
NOTE: Pads and straps should be fully air-dried from the previous use.
▲ CAUTION: Do not use a hairdryer to dry components of the MyoPro 2.
2. PREPARE: Place the MyoPro 2 in your lap, or on a flat surface that is not slippery.
3. HAND: Start by feeding the fingers and hand through the Hand Support Shell. Be sure the strap around
the support shell sits at the base of your thumb. Tighten the Velcro strap around the hand.
NOTE: The motor and battery case should rest on the outside of the arm. If the motor and
battery case is aligned along the interior of the arm, you may be donning upside down or on
the wrong arm.
4. FOREARM: Lower your forearm into the Forearm Shell. Secure the Velcro of the Forearm Closure.
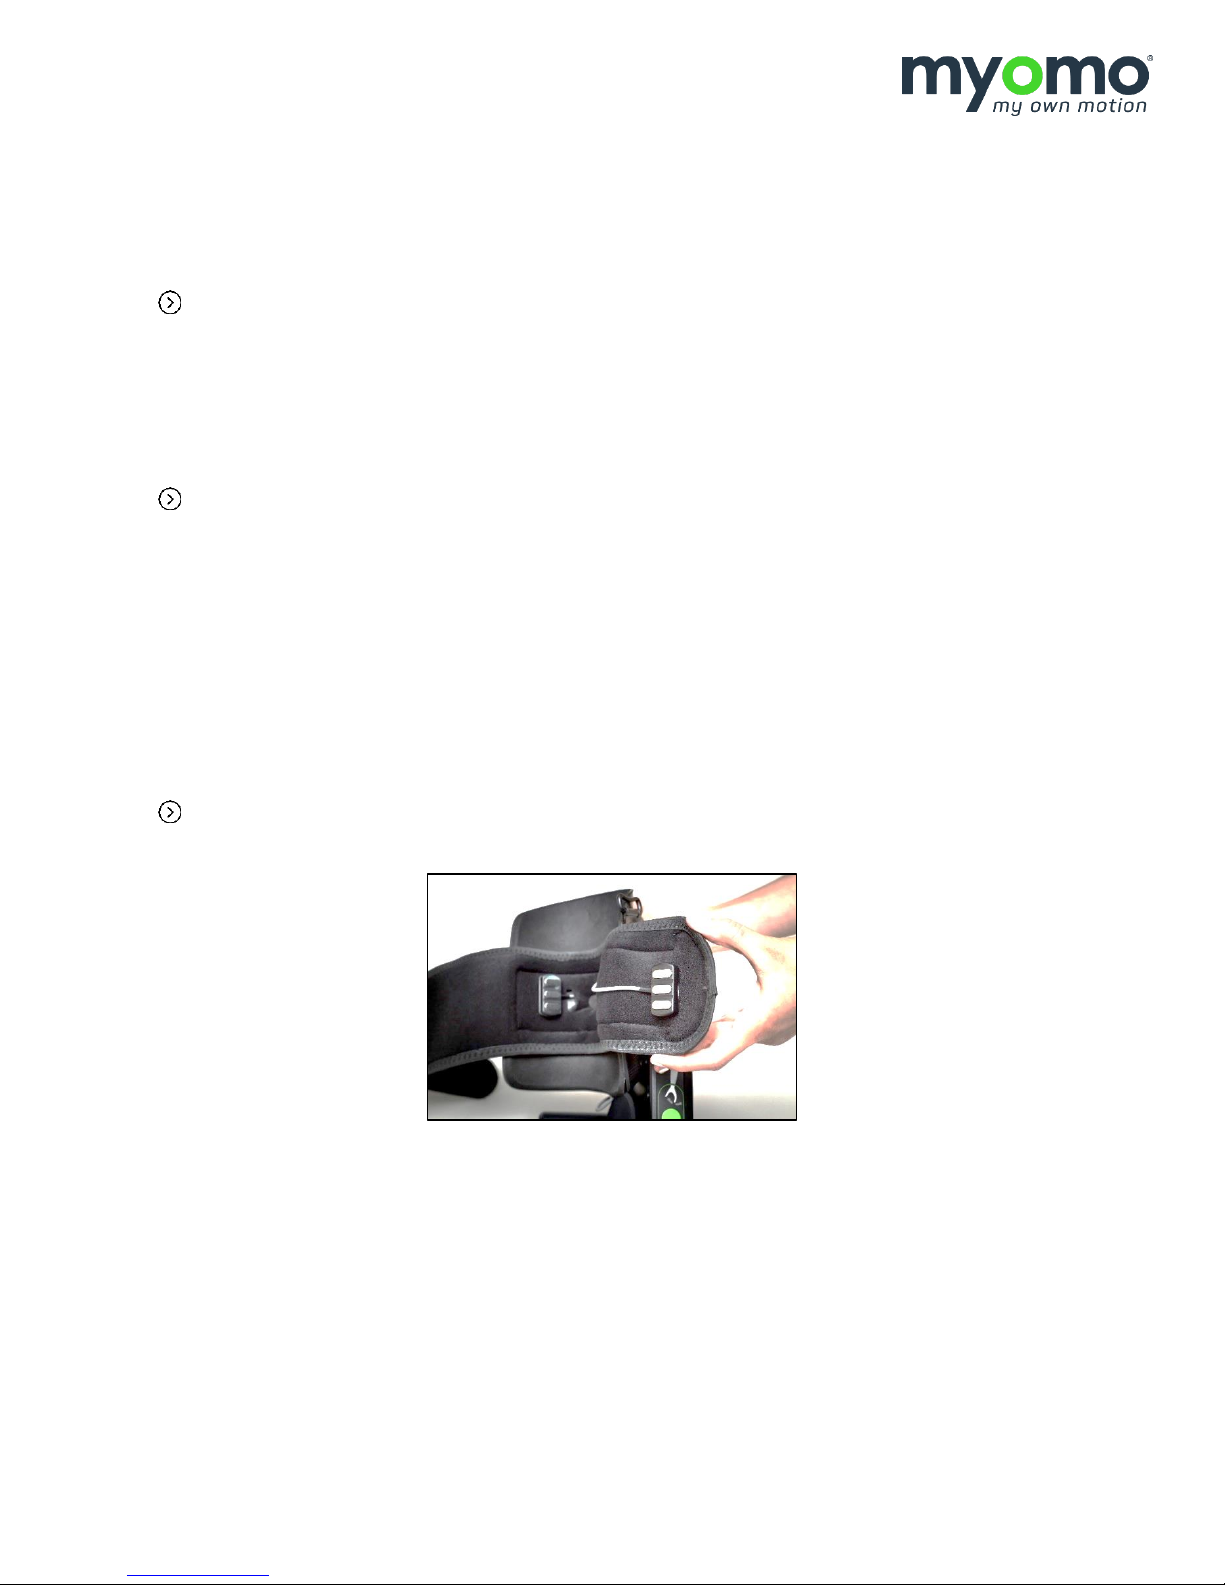
5. UPPER ARM:
• Wrap the Upper Sensor Cuff around your upper arm, keeping attention on the Biceps and
Triceps sensors; when the Upper Sensor Cuff is properly fit, the sensors should be centered
over the biceps and triceps muscles.
NOTE: the sensor with the BLUE Velcro goes on biceps, the sensor with the RED Velcro goes on
triceps.
• Secure the Upper Cuff Closure.
6. HARNESS: Secure the harness:
• Rest the shoulder pad on the shoulder of your MyoPro 2 arm.
• Wrap the strap under your non-MyoPro 2 arm.
• Secure quick release tab.
PN26035 Rev5
10

TAKING YOUR MYOPRO 2 OFF
(“DOFFING”)
PN26035 Rev5
11

PN26035 Rev5 12

TAKING YOUR MYOPRO 2 OFF (“DOFFING”)
WARNINGS REVIEW
WARNING: If at any time during the use of this device, you notices any of the following,
discontinue use and seek guidance from your Provider.
• Movement does not match the User’s desired motion.
• Persistent redness, swelling, or skin breakdown (bleeding, chafing, etc.)
• Rash on the arm, hand, or fingers.
• Pain associated with wearing the MyoPro 2 orthosis.
• Unusual noises from the orthosis (popping, clicking, etc.)
• Smells from the orthosis (smoking, burning plastic, etc.)
• Odor from the orthosis (sour smells or other indications of bio-contamination.)
STEPS FOR TAKING YOUR MYOPRO 2 OFF
1. Turn the MyoPro 2 OFF.
2. Place the MyoPro 2 in your lap, or on a flat surface that is not slippery.
3. Undo the harness Quick Release tab.
4. Undo the Upper Cuff Closure.
5. Undo the Forearm Closure.
6. Gently slide your hand back through the loosened hand strap and Hand Support Shell
7. Rest the MyoPro 2 in a clean, dry location to ensure it will fully air-dry before next use.
8. Place the MyoPro 2 into the carrying bag for travel or storage.
NOTE: The MyoPro 2 should remain OFF any time the MyoPro 2 is not being worn.
PN26035 Rev5 13

PN26035 Rev5 14

USING YOUR MYOPRO 2
PN26035 Rev5 15

PN26035 Rev5 16
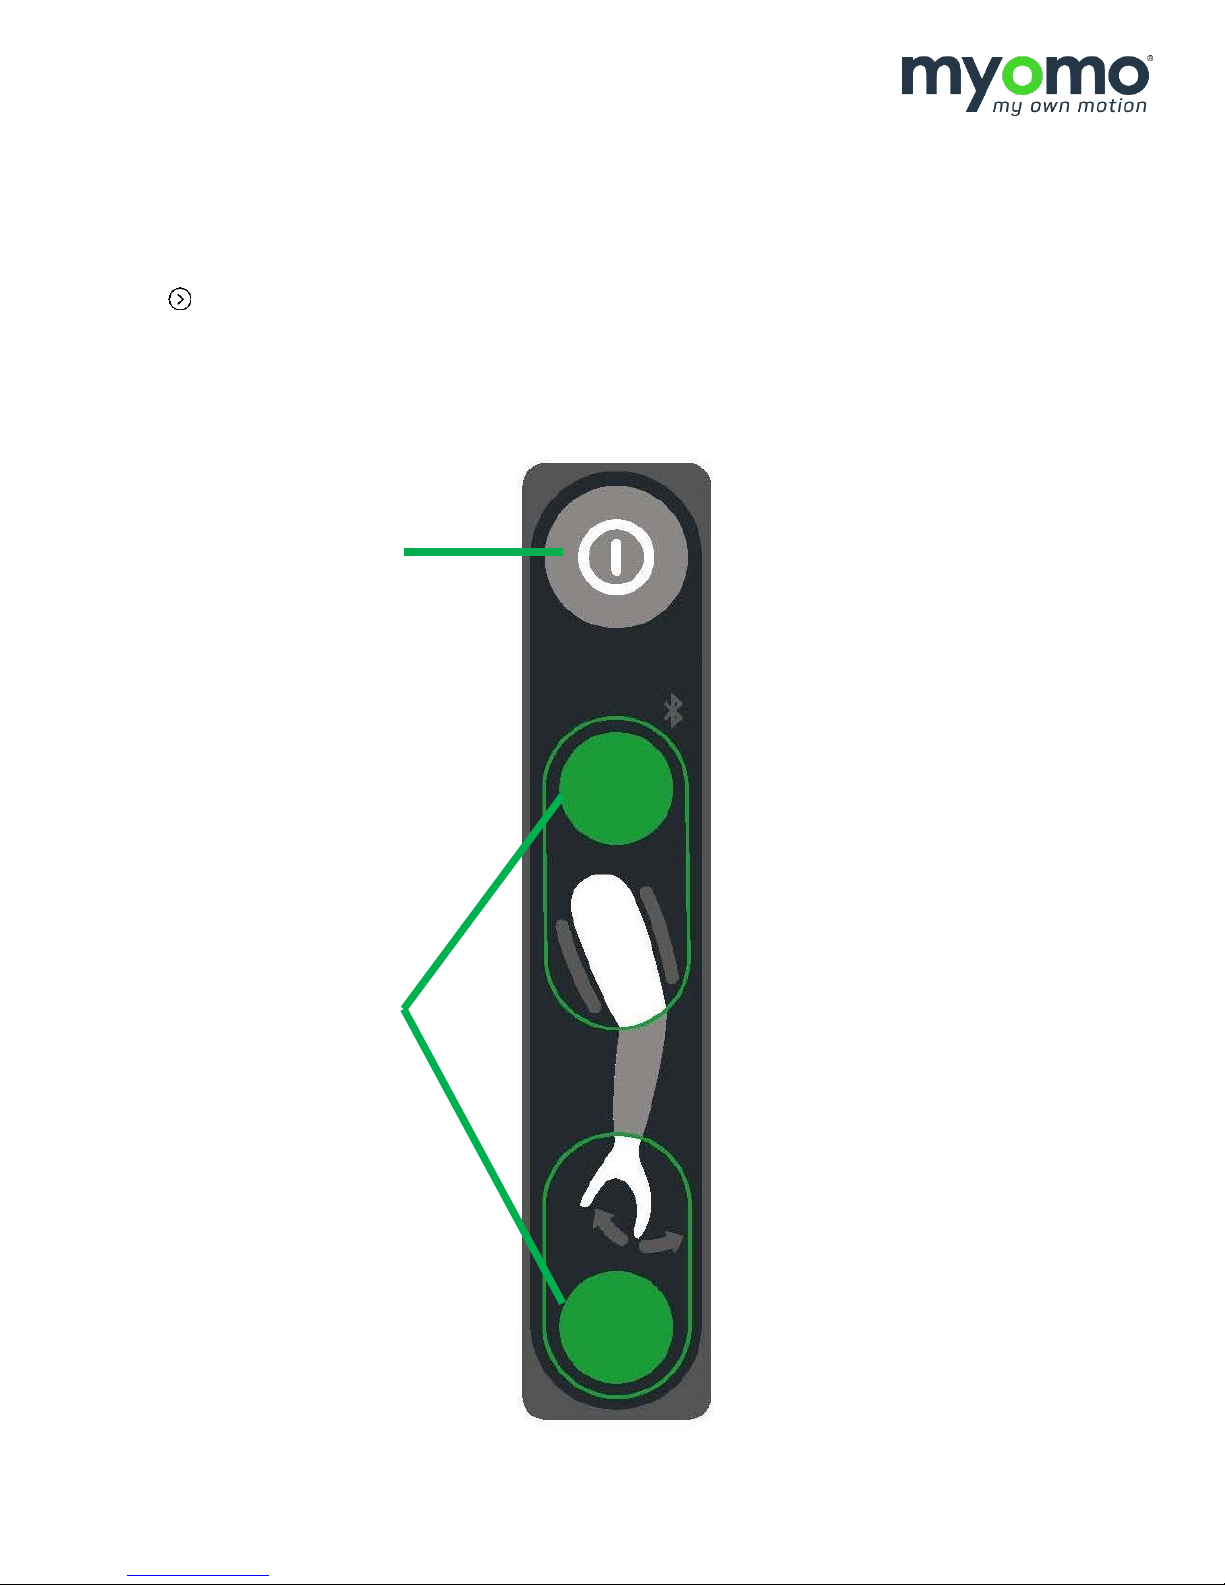
Power Button
Mode Buttons
CONTROL PANEL
See the User Manual – Sections for All MyoPro 2 Devices document for a comprehensive Control Panel
Buttons & Lights Diagram.
NOTE: For your MyoPro 2 Motion E
• The Grasp mode button is deactivated
• The Close Light and Open Light may turn on if a certain error occurs. See MyoPro 2
Error section of the User Manual
PN26035 Rev5
17

PN26035 Rev5
18

MODES OF USE
WARNING: Use caution when using the device in shoulder positions where it is possible for the
User to hit him or herself.
The MyoPro 2 may be used in a variety of modes. The different modes allow you to operate the MyoPro 2
by tensing or relaxing different muscles. You may find that you want to use different muscles – and
therefore different modes – when performing specific tasks with your MyoPro 2. Modes may be changed
using the buttons on the control panel.
When the device is fit to you, your Provider will optimize the sensitivity settings within each mode
depending on the strength of your EMG signal at that time. If over time you feel that the MyoPro 2 is not
assisting your arm or hand adequately, please contact your Provider; the sensitivity settings may need to be
readjusted.
START MODE
When you first power on the MyoPro 2, the elbow will be in Standby Mode. This setting may be changed by
your Provider.
ELBOW MODES
The elbow has four distinct modes of use when the MyoPro 2 is powered on.
1. Standby mode
2. Biceps mode
3. Triceps mode
4. Dual mode
These are explained in the following pages.
PN26035 Rev5 19
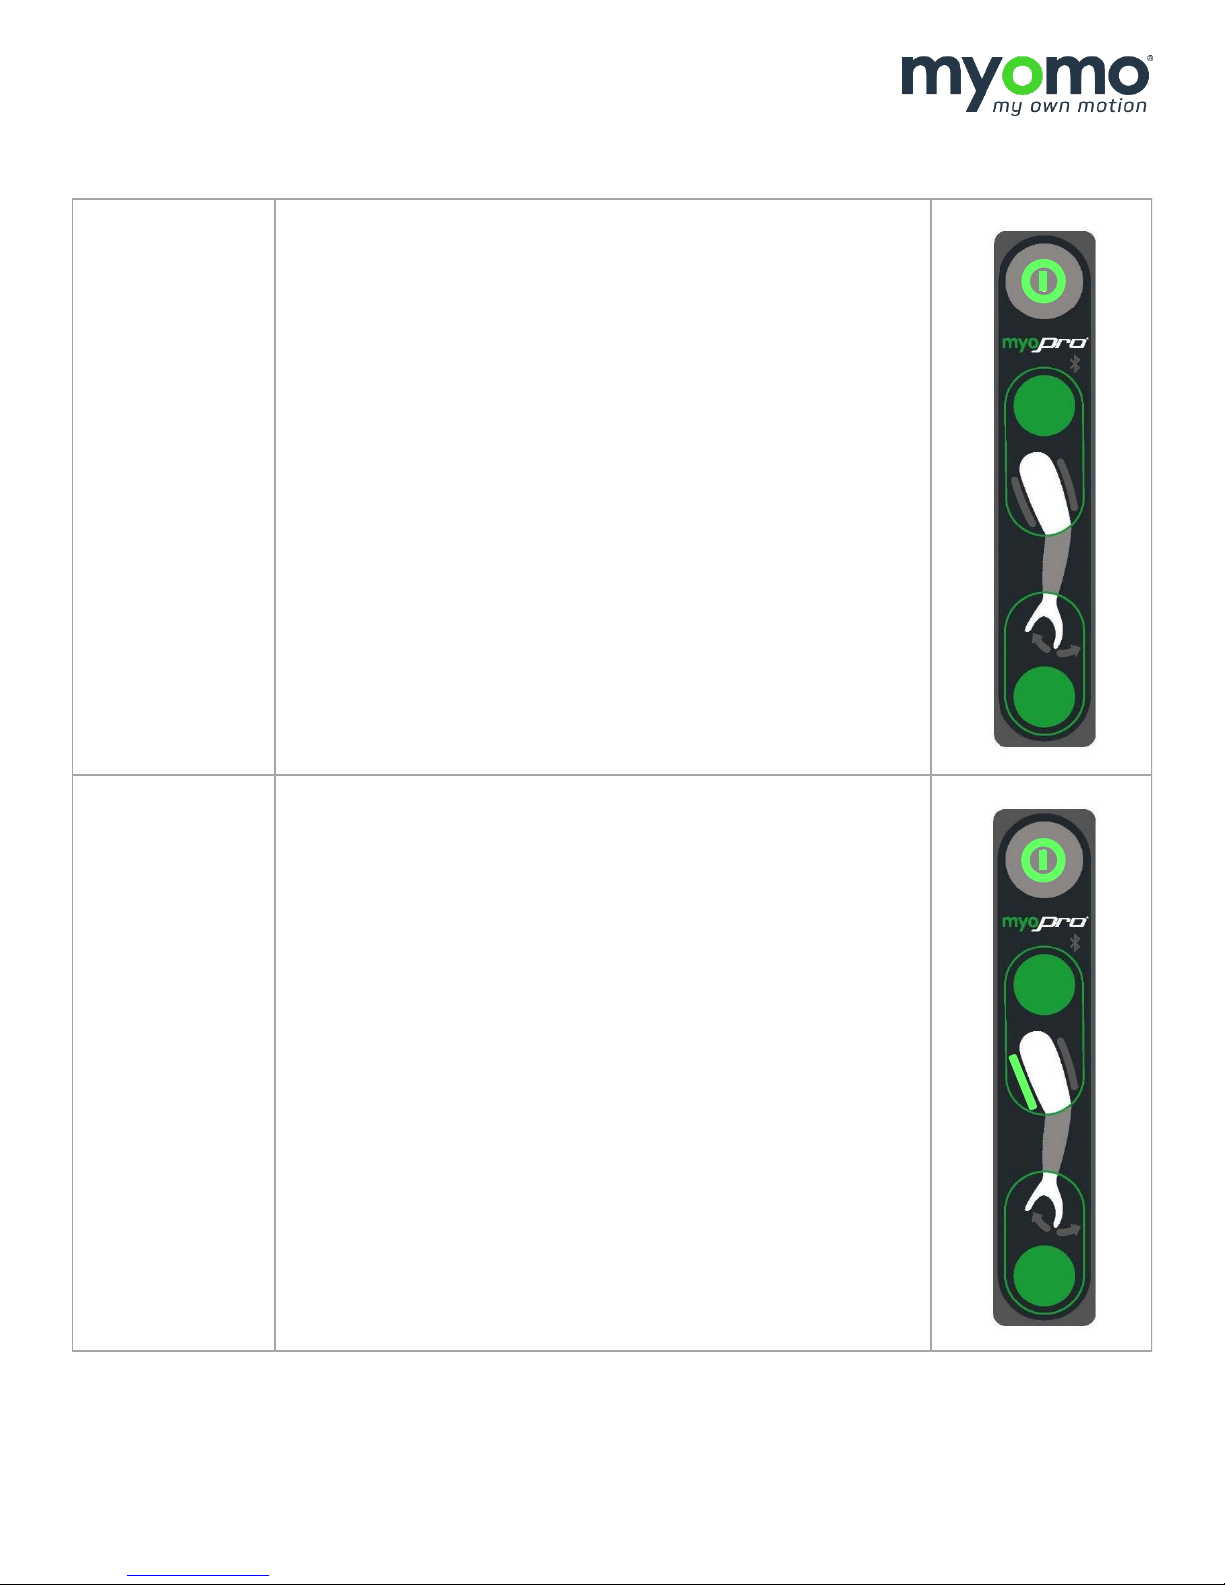
Standby mode
In this mode, neither the Biceps or Triceps Light will be
illuminated. The elbow motor will not respond to your EMG
signal from either muscle group.
Though the MyoPro 2 is powered on, no assistance is being
given to your elbow, and the arm will neither flex nor extend.
The sensors will be reading your EMG signal from both
biceps and triceps, but the motor response is paused.
Actions:
• This can be useful as a resting mode if straps or sensors
need to be adjusted, or if you want to take a short break
without turning the device off.
Biceps mode
In this mode, the Biceps Light will be illuminated. The elbow
motor will respond to your biceps EMG signal.
Actions:
• When you relaxes your biceps, the device will extend.
• When you contracts your biceps, the device will flex.
ELBOW MODES, CONTINUED
PN26035 Rev5
20
 Loading...