

MyMusix 42-422 User Manual [en, es]
TM
Expandable 8GB Video MP3 Player
with 3.5” Color Display and Speaker
42-422
User’s Guide
Please read this User’s Guide before operating your new MP3 player.
42-422 UG_En.031909.indd 1 03/25/2009 9:41:05
2
Contents
Setup ......................................................................................................................................................4
Features ............................................................................................................................................4
Package Contents ............................................................................................................................4
System Requirements .....................................................................................................................4
Lithium Battery Safety Instructions ......................................................................................... 5
Installation ............................................................................................................................................ 10
Software ......................................................................................................................................... 10
Converting Video Clips Using Media Converter .......................................................................... 11
Transferring Files to the Player Using Rhapsody .......................................................................12
Loading and Reloading the Player with Rhapsody Music ...................................................12
Transferring Files That You Own .............................................................................................12
Other Transfer Options ..................................................................................................................13
Operation ..............................................................................................................................................14
Setting Mode ................................................................................................................................. 14
Setting the Date and Time............................................................................................................. 15
Music Mode ...................................................................................................................................16
42-422 UG_En.031909.indd 2 03/25/2009 9:41:05

3
Photo Mode ...................................................................................................................................16
Video Mode ....................................................................................................................................17
Radio Mode ....................................................................................................................................18
Tuning and Storing Stations Manually .................................................................................18
Tuning and Storing Stations Automatically .......................................................................... 18
Selecting Output ..................................................................................................................... 19
Resetting the Player ...................................................................................................................... 19
Formatting the Player ....................................................................................................................19
Additional Information ........................................................................................................................20
Troubleshooting ............................................................................................................................20
Specifications ................................................................................................................................22
Listening Safely .............................................................................................................................22
FCC Information ............................................................................................................................23
Limited Warranty ..................................................................................................................................24
42-422 UG_En.031909.indd 3 03/25/2009 9:41:05
4
Setup
Setup
Features
• 3.5” QVGA display • 8GB flash memory
• Built-in speaker and earbud jack • Internal lithium polymer battery
• MP3 and WMA music playback • Video viewing (conversion required)
• Photo viewing (JPEG supported) • MicroSD card supported
• FM radio • ID3 tag support
• 8 preset equalizer settings • Rhapsody® supported
• Two-language menu (English and Spanish)
Package Contents
• 8GB MP3 Player • Stand • User’s Guide
• Mini USB 2.0 Cable • Earbuds • Quick Start
• Installation CD (Product Key on sleeve)
System Requirements
• Windows® XP (SP2 ) with Windows Media® Player 10 series or
Windows Vista® with Windows Media® Player 11 series
• CD-ROM drive • USB 2.0 high-speed
42-422 UG_En.031909.indd 4 03/25/2009 9:41:05
5
Setup
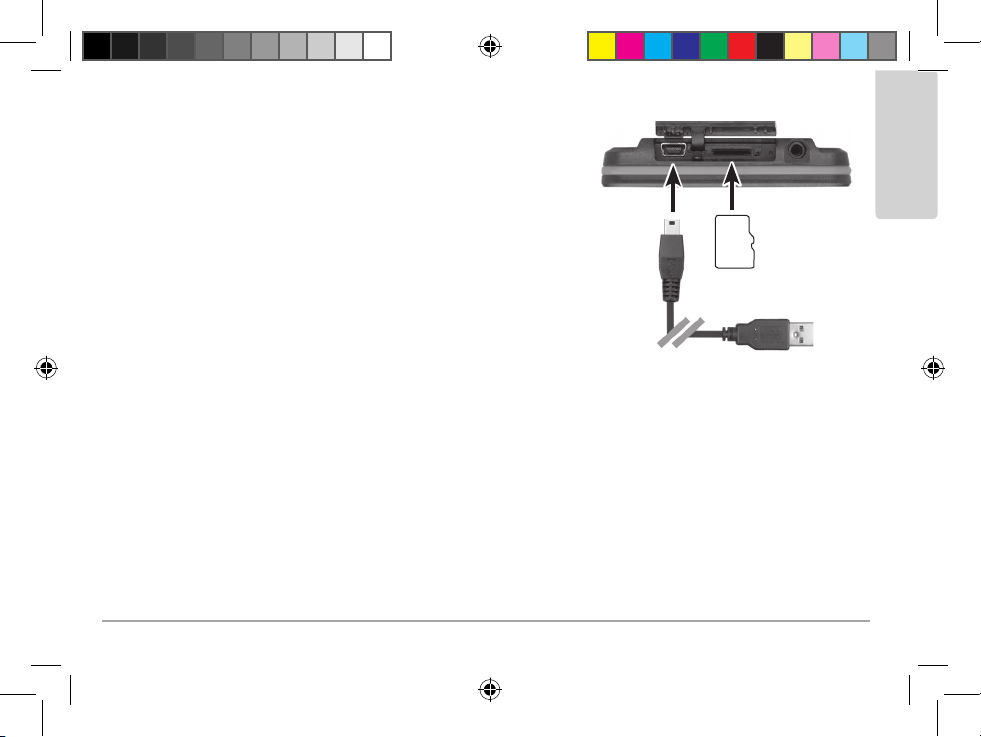
1 Charge your player
Open the USB jack and SD slot cover, then connect the supplied
USB cable to your player and PC. Your player appears as Audio
Player on your PC.
You must charge your player for at least 4 hours before using it for the
first time. Normally it takes about 4 hours to fully charge the player.
n Note
• Only charge the player using the supplied USB cable.
• If the player is connected to the PC via a hub, the hub must
be self-powered to charge your player.
• When the player is connected to the PC, all buttons are disabled.
Lithium Battery Safety Instructions
• Do not burn or bury batteries. Do not puncture or crush. Do not disassemble.
• Do not dispose of lithium batteries in the trash. Recycle at your local RadioShack store.
• If the electrolyte in the cells should get on your skin, thoroughly wash with soap and water. If in the eyes, rinse
thoroughly with cool water. Immediately seek medical attention.
• Use only chargers rated for lithium cells. Be sure the charger’s voltage and current settings are correct for the
battery pack being charged.
• Charge batteries on a fireproof surface away from flammable items or liquids.
• Do not charge inside an automobile, especially while driving.
• Batteries should NEVER be left unattended while charging. Only adults should charge the batteries.
• Follow the manufacturer’s instructions for charging the product and do not charge longer than recommended.
Unplug the charger when the battery is charged.
To PC
Insert
MicroSD
Card
42-422 UG_En.031909.indd 5 03/25/2009 9:41:06

6
Setup
2 Upload files to your player
• For audio/photo files: Use Windows Media® Player or included Rhapsody software (see
“Other
Transfer Options”
on page 13 and
“Transferring Files to the Player Using Rhapsody”
on page 12).
• For video files: Use included Arcsoft Media Converter software (see “Converting Video Clips
Using Media Converter“ on page 11).
• For advanced users: You can also drag and drop audio files from the PC to the player. This method
requires more time for the player to update after file transfer.
If you want to expand the player’s memory capacity, insert a microSD card (up to 8GB, not included)
into the MicroSD Slot.
w Warning:
• Remove the player from your PC only when file transfer is complete, or you will corrupt the data.
• To ensure video clips can be transferred successfully, convert them via Arcsoft Media Converter first.
3 Use your player
• Press and hold § to turn your player on or off.
• Use MENU (Up) to go to the main menu, and navigate to (Music), (Photo),
(Video), or (Radio) mode, and press § to start enjoying your player.
• Press (Now playing) to resume the last played music or video file or the radio station you last
listened to.
n Note:
• You must insert the earbuds to receive radio signal. The earbuds act as an antenna for the radio.
42-422 UG_En.031909.indd 6 03/25/2009 9:41:07

7
Setup
• In standby mode, the player turns off automatically in:
7 minutes after the backlight turns off, or
4 minutes if Backlight timer under (Settings) is set to Always on.
4
(Optional) Stand your player on a flat surface
1. Slide the Stand out of its slot.
2. Reverse it, then tilt it and direct the flat end into the slot.
3. Stand your player on a flat surface.
42-422 UG_En.031909.indd 7 03/25/2009 9:41:09
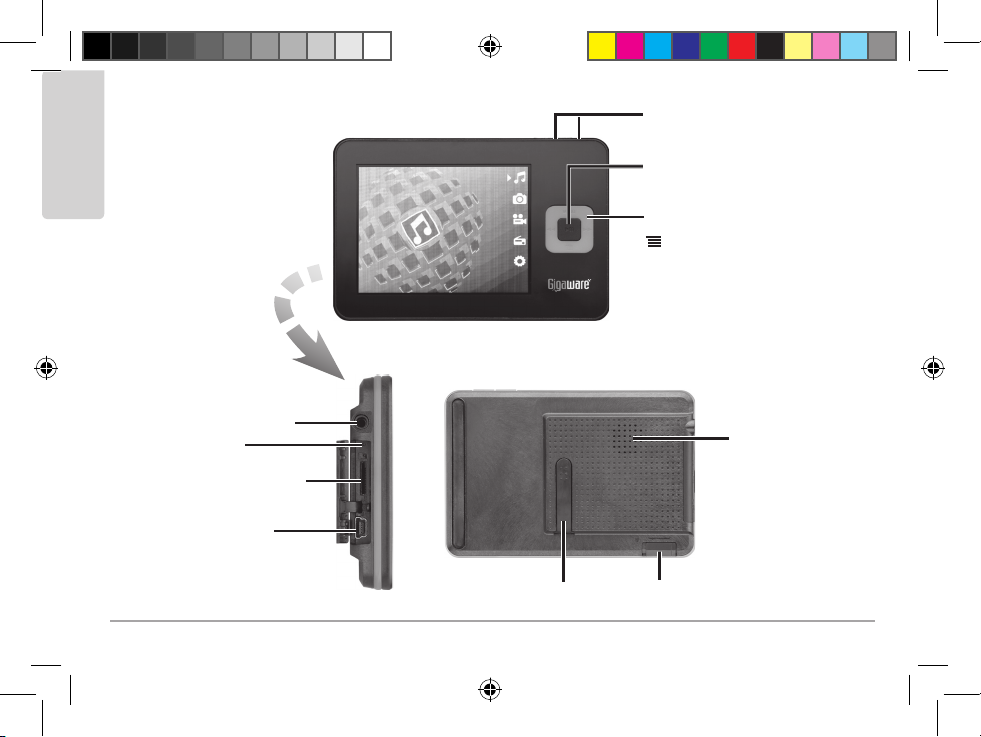
8
Setup
Earbud Jack
MicroSD Slot
USB Jack
_ (Hold Switch)
Built-in Speaker
Reset
§ (Power/Enter/
Play/Pause)
MENU (Up)
(Playlist/Down)
(Previous/Rewind)
(Next/Forward)
Stand
Back View
VOLUME –/+
Side View
Front View
42-422 UG_En.031909.indd 8 03/25/2009 9:41:11
9
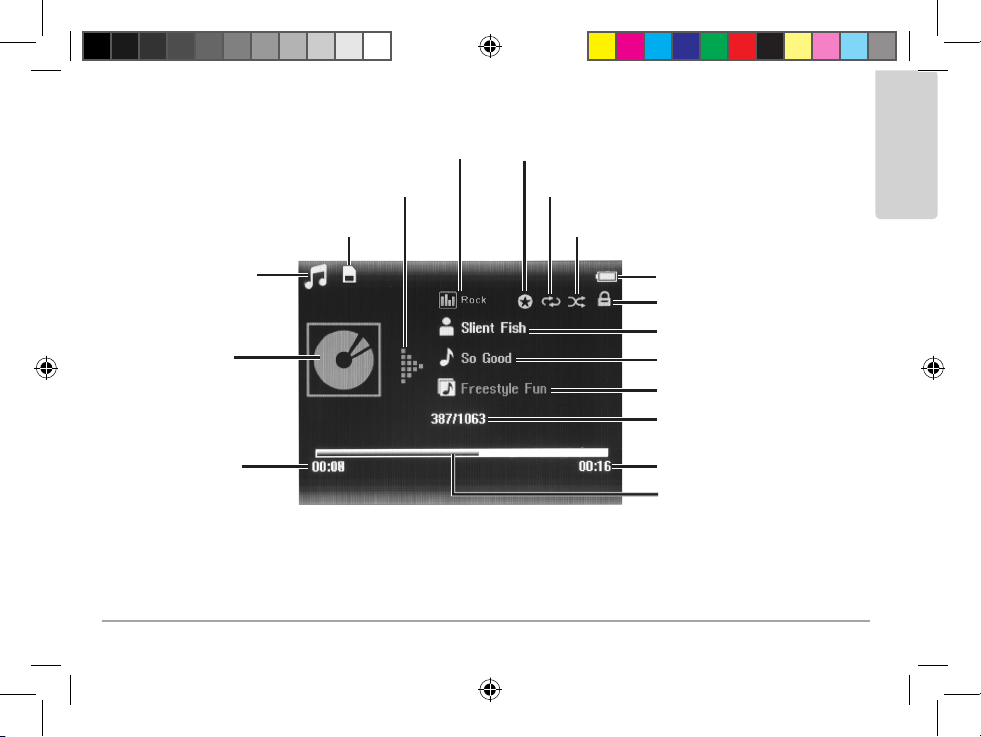
Setup
Progress bar
Play/Pause indicator
MicroSD card indicator
Mode indicator
Favorite songs tag indicator
Shuffle indicator
Battery indicator
Hold switch indicator
Repeat indicator
Artist
Track title
Current track/# of tracks
in the folder
Album
Total track time
Elapsed time
CD album picture
(if available)
EQ indicator
n Note:
• For license approved tracks, DRM information appears under Mode indicator.
•
EQ indicator appears only when earphones are inserted. EQ settings are valid in earphone mode only.
Video MP3 Player Display
42-422 UG_En.031909.indd 9 03/25/2009 9:41:11

10
Installation
Installation
Software
The supplied CD contains Arcsoft Media Converter software
and Rhapsody software. Arcsoft Media Converter converts
video clips to be played on your player. Rhapsody enables you
to manage your music and enjoy online music.
For more information about Rhapsody, visit
http://learn.rhapsody.com.
To install the software:
1. Load the CD into your PC’s CD-ROM drive. The installation
starts automatically. If it does not, select Start Run,
and type the path for your CD drive.
2. Select Arcsoft Media Converter and follow the on-
screen instructions. For Arcsoft Media Converter, input
your user name and the license key of the CD, which is
on the CD sleeve.
3. After the program is installed, select Rhapsody to install.
When complete, click Cancel to exit.
n Note: Rhapsody installation requires an Internet
connection.
42-422 UG_En.031909.indd 10 03/25/2009 9:41:12
11
Installation
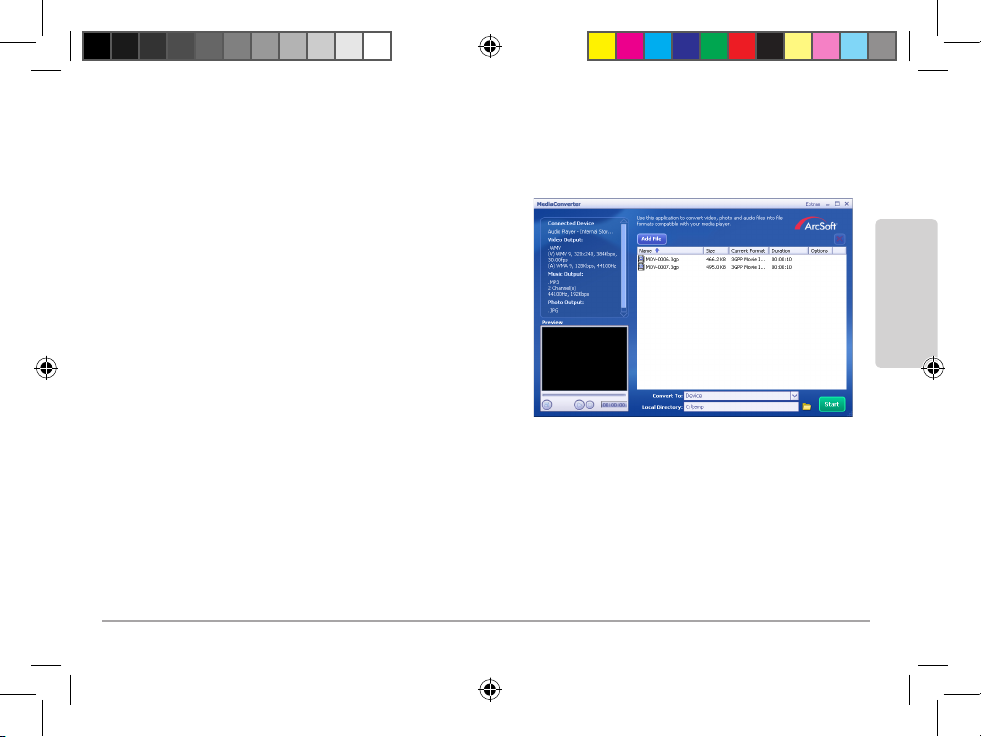
Converting Video Clips Using Media Converter
Make sure your video clips play in their original format before converting them with Arcsoft Media
Converter. If they cannot play on your computer, they will not play on your player.
To convert a video clip:
1. Start the Arcsoft Media Converter application.
2. Click Add File to add source files.
3. Click the Convert To: field to select a destination:
• If the player is connected, DEVICE appears in
the Convert To: field and the converted files
are directly stored on the player.
• If the player is not connected, LOCAL DISK
appears in the Convert To: field; then select a
destination in the Local Directory: field.
4. Click Start to start conversion.
n Notes:
• Arcsoft Media Converter can convert video files such as AVI, 3GP, MOV, and RM to WMV so they
can be played on your player. The output WMV format meets these requirements:
Video Stream: Windows Media® Video – Simple Profile, QVGA, 384kbps, 30 fps
Audio Stream: Windows Media® Audio – 128kbps
• A video clip must contain both video and audio content, otherwise conversion fails.
42-422 UG_En.031909.indd 11 03/25/2009 9:41:12
12
Installation
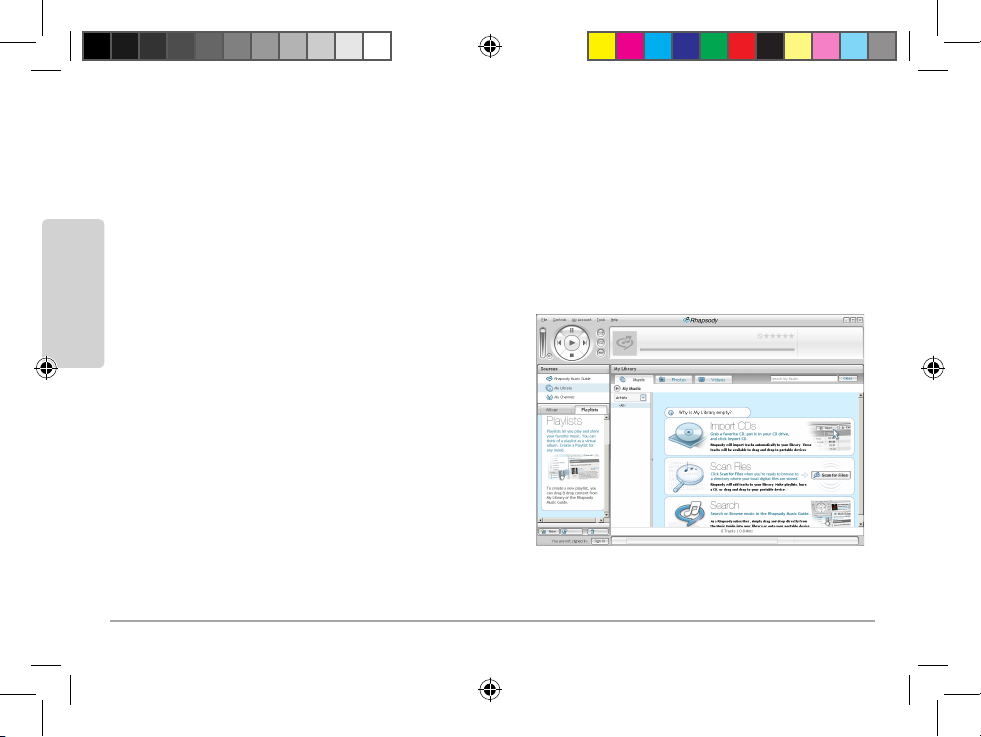
Transferring Files to the Player Using Rhapsody
Rhapsody allows you to transfer music to your player. With a Rhapsody membership, you can load
and reload your player with Rhapsody music as much as you want without having to pay for individual
tracks. Rhapsody also makes it easy to transfer video, photo and music files that you own.
Before connecting your player to the PC, first launch Rhapsody and sign in. You may need to create an
account if you have not already done so.
Loading and Reloading the Player with Rhapsody Music
1. Connect the player to the PC. The player icon appears in the Sources pane in Rhapsody.
2. Search the Rhapsody Music Guide and find
music that you like. You can transfer albums,
tracks, or playlists to your player from Rhapsody.
3. Click on album art, track, or playlist name and
drag and drop the music onto the player icon
in the Sources pane.
n
Note: When you download music with Rhapsody
while the player is connected, the player shows OK
to Disconnect. The files have not been transferred to
your player yet. Wait until the download progress bar in
Rhapsody is complete, then follow the music transfer steps.
Transferring Files That You Own
1. In Rhapsody, select the File menu, then click Add Media to My Library…
42-422 UG_En.031909.indd 12 03/25/2009 9:41:12
13
Installation
2. Follow the instructions to add your music or photo files from your PC to the Rhapsody Music Library.
3. Connect the player to the PC. The player icon appears in the Sources pane in Rhapsody.
4. Click My Library under Sources.
5. Drag and drop the music onto the player icon under Sources.
Other Transfer Options
It is recommended to transfer photos to the player via Rhapsody (see page 12) or Windows Media®
Player. This automatically converts photos (JPEG) into resolution suitable for the player and saves player
updating time after file transfer. You can also drag an drop files without the extra software.
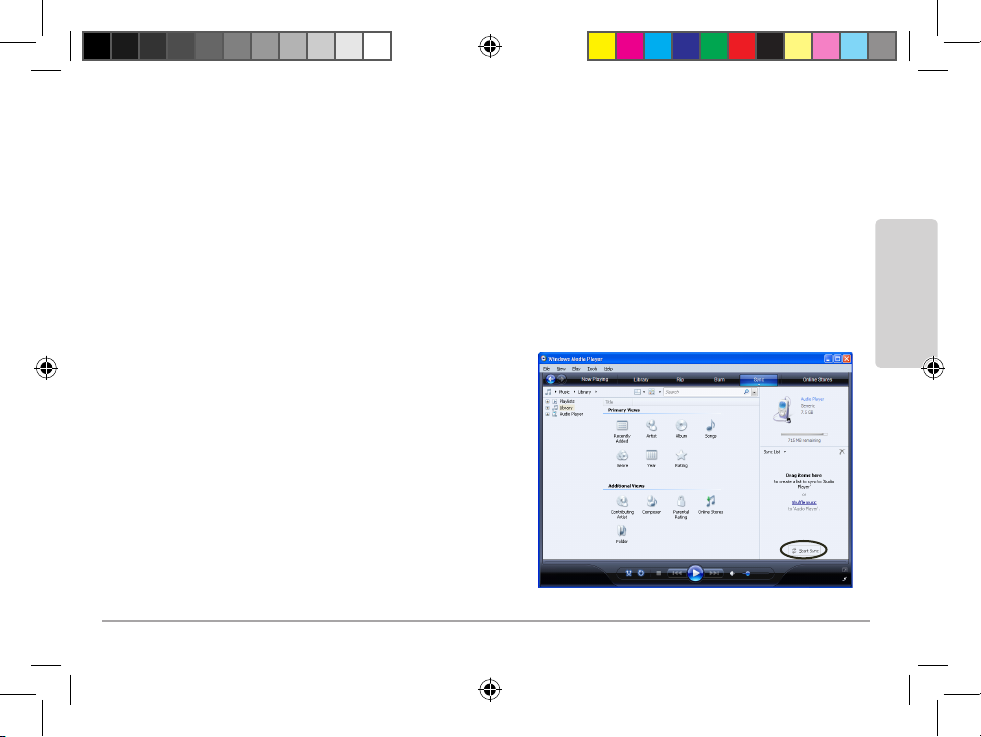
To transfer music and photo files via Windows Media® Player:
1. In Windows Media® Player, select Sync.
2. Drag and drop files from your library to the Sync
List pane, then press Start Sync.
To drag and drop files directly onto the player:
1. Navigate to the drive your computer has assigned
to the player (e.g. E:\ or F:\ drive).
2. Navigate to the folder your files are stored on your
computer (e.g. C:\My Documents\My Music).
3. Drag and drop files from the original folder to the
player’s folder.
42-422 UG_En.031909.indd 13 03/25/2009 9:41:12
14
Operation
Operation
Setting Mode
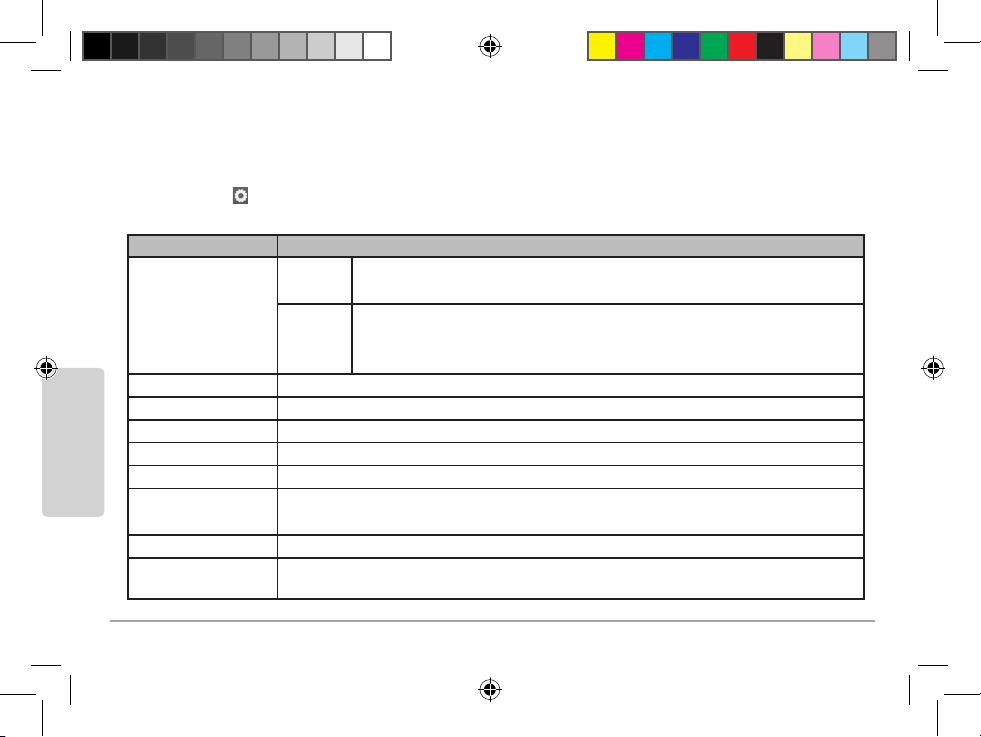
Options under (Settings) are: Play mode, Equalizer (EQ), Slideshow settings, Backlight timer,
Brightness, Language, Date and time, Factory settings, Information.
Setting Option
Play mode
Shuffle
Off: Play all selected tracks once through
On: Randomly play selected tracks once through
Repeat
Off: Play all selected tracks once through
Repeat 1: Repeat playing a track nonstop
Repeat All: Repeat playing all selected tracks nonstop
Equalizer (EQ)
Normal, Rock, Funk, Jazz, Classical, Dance, Hip Hop, Custom
Slideshow settings
Manual, 20 seconds, and 2 to 10 seconds in 2 seconds intervals
Backlight timer
Always on, 10 seconds, 30 seconds, 60 seconds
Brightness
Adjust the screen brightness
Language
English, Spanish (Español)
Date and time
Time Settings: Set time format (12-hour or 24-hour), Set time
Date Settings: Set date format (MM DD YY or DD MM YY), Set date
Factory settings
Restore factory settings
Information
Show internal and external (when microSD card is inserted) capacities, firmware
version, and model number
42-422 UG_En.031909.indd 14 03/25/2009 9:41:13
15
Operation
n Note: If you set Shuffle and Repeat modes together, the player randomly plays all selected tracks
nonstop. Shuffle and Repeat are valid in music mode only.
Setting the Date and Time
Date and time appear for 3 minutes only, after the backlight turns off. Press any button if you want to
view the date and time display again.
n Note: Before you set the date and time on your new player, synchronize one or more music files
to the player via Rhapsody or Windows Media Player while your PC is connected to the Internet. This
ensures that date and time run accurately.
To set the date:
1. Go to the main menu and select (Settings) Date and time Date Settings.
2. Select Set date format to set the desired date format: MM DD YY or DD MM YY. Press § or
to confirm the selection and press to exit.
3. Select Set date. Use MENU (Up) and (Down) to set the year, month, and date.
4. Press to confirm and exit.
To set the time:
1. Go to the main menu and select (Settings) Date and time Time Settings.
2. Select Set time format to set the desired time format: 12-hours or 24-hours. Press § or to
confirm the selection and press to exit.
3. Select Set time. Use MENU (Up) and (Down) to set the hour and minute.
4. Press to confirm settings and exit.
42-422 UG_En.031909.indd 15 03/25/2009 9:41:13
 Loading...