

Page 1
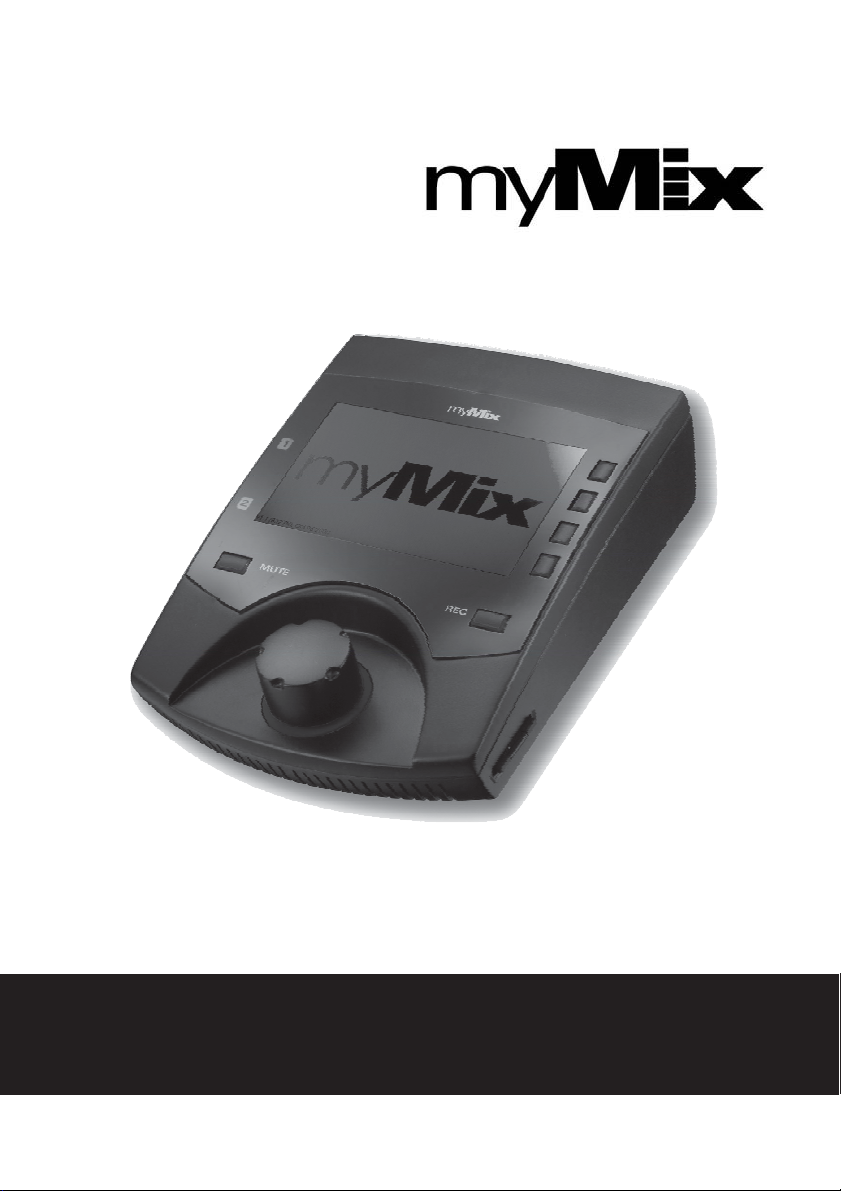
Networkable personal audio mixing and recording system
OWNER’S MANUAL
English
Page 2

SAFETY INSTRUCTIONS
IMPORTANT! Read the following before operating myMix
1. Read all safety and operating instruction before using myMix.
2. Keep these instructions in a safe place for future reference.
3. Heed all warnings and follow all instructions.
4. Do not use the myMix unit near water, e.g. a bathtub, or swimming poo l.
5. Clean only with dry cloth, and keep moisture away from the unit.
6. Do not block any ventilation openings. Install and use only in accordance with the
manufacturer’s instructions.
7. Do not install or use near any heat sources such as radiators, heat registers,
stoves, or other apparatus (including power amplifiers) that produce heat.
8. Protect the power cord from being walked on or pinched. Replace the power supply
it if the power cord or power supply shows signs of damage.
9. Only use attachments and accessories specified by the manufacturer.
10. The myMix unit should only be used with a power supply as specified from the
manufacturer. If the provided plug of the power supply does not fit in your outlet,
consult your local dealer for the appropriate outlet.
11. Do not handle the power supply and other power cables with wet hands or on wet
floor to avoid the risk of electric shock.
12. Unplug the myMix unit during lightning storms.
13. Refer all servicing to qualified service personnel. Do not attempt to open the unit
yourself. Servicing is required when the myMix unit has been damaged in any way,
liquid has been spilled or objects fallen into the unit, the unit has been exposed to
water or moisture, does not operate normally, or has been dropped.
14. Exchanging the internal battery for memory should only be done by qualified
personnel. Note that exchanging the battery will return the unit in factory default
settings. Refer to your local dealer or the myMix tech support if in doubt.
15. Do not place any objects filled with liquids such as cups and glasses on the unit.
16. Excessive sound pressure level from earphones, headphones and speakers can
cause hearing damage and even hearing loss.
17. If anything drops into the media card slot, r emove it after unplugging the power
supply or Ethernet cable (when using Power over Ethernet), or consult your
technical representative.
2
Page 3

WARNINGS
Do not locate myMix in a place subject to excessive heat or in direct sunlight. This could
•
be a fire hazard.
• Do not place myMix in a place subject to excessive humidity or dust. This could be a fire
and electrical shock hazard.
• Connect the supplied AC power supply only to an AC outlet of the type stated in this
Owner’s Manual or as marked on the main unit. Failure to do so is a fire and electrical
shock hazard.
• Do not place heavy objects on the power cord. A damaged power cord is a potential fire
and electrical shock hazard.
• If the power cord is damaged (i.e., cut or a bare wire is exposed), ask your dealer for a
replacement. Using myMix in this condition is a fire and shock hazard.
• Hold the AC power supply when disconnecting from an AC outlet. Never pull the cord.
Damaging the power cord in this way is a potential fire and electrical shock hazard.
• Do not place small metal objects on top of myMix. Metal objects inside myMix are a fire
and electrical shock hazard.
• Do not block the myMix ventilation holes. myMix has ventilation holes at the front and
the rear to prevent the internal temperature from rising. Blocked ventilation holes can
damage the unit and are a fire hazard.
• Do not try to modify myMix. This could be a fire and electrical shock hazard.
• Do not use myMix in an environment outside of the temperature range between 5°C and
35°C (41°F and 95°F).
CAUTION
Turn off all audio devices and speakers when connecting to myMix. Refer to the owner’s
•
manual for each device. Use the correct cables and connect as specified.
• myMix is a precision device. Handle it with care.
• If you notice any abnormality—such as smoke, odor, or noise, turn off
immediately. Remove the AC power cord from the AC outlet. Confirm that the
abnormality is no longer present. Consult your dealer for repair. Using myMix in this
condition is a fire and shock hazard.
• If a foreign object or water gets inside myMix, turn it off immediately. Remove the AC
power supply from the AC outlet. Consult your dealer for repair. Using myMix in this
condition is a fire and electrical shock hazard.
• If you plan not to use myMix for a long period of time (such as when you are on
vacation), remove the AC power supply from the AC outlet. Leaving myMix connected is
a fire hazard.
myMix
3
Page 4

MEDIA HANDLING FOR
SD CARD
Do not remove the SD/SDHC card while the unit is reading or writing data. Doing so
•
might result in corrupted data on the card as well as damaging the myMix unit.
• Ensure that dust and debris do not collect in the card terminal.
• Do not place the SD/SDHC card near a heat source, or leave it exposed to high
temperature and high humidity.
• Many SD/SDHC cards on the market are compatible with myMix. However, there can
be cards with limited or no functionality at all. If in doubt, check on
www.myMixaudio.com for compatible SD/SDHC media.
The SD card logo is a trade mark of the SD card association and is used under licensing.
Declaration of Conformity (for USA)
Model Number: myMix
Type of Equipment: Professional Audio Recording and Mixing Device
Responsible Party: MOVEK, LLC
Address: 6517 Navaho Trail, Edina, Minnesota, 55439, U.S.A.
Telephone Number : 1 (952) 657-7889
This device complies with Part 15 of the FCC Rules. Operation is subject to the following two conditions: (1) this device may not
cause harmful interference, and (2) this device must accept any interference received, including interference that may cause
undesired operation.
NOTE: This equipment has been tested and found to comply with the limits for a Class B digital device, pursuant to part 15 of
the FCC rules. These limits are designed to provide reasonable protection against harmful interference in a residential
installation. This equipment generates, uses and can radiate radio frequency energy and, if not installed and used in
accordance with the instructions, may cause harmful interference to radio communications. However, there is no guarantee
that interference will not occur in a particular installation. If this equipment does cause harmful interference to radio or television
reception, which can be determined by turning the equipment off and on, the user is encouraged to try to correct the
interference by one or more of the following measures:
a) Reorient or relocate the receiving antenna.
b) Increase the separation between the equipment and receiver.
c) Connect the equipment into an outlet on a circuit different from that to which the receiver is connected.
d) Consult the dealer or an experienced radio/TV technician for help.
CAUTION
Changes or modifications to this equipment not expressly approved by the manufacturer for compliance could void the user’s
authority to operate this equipment.
4
Page 5
Informati
on for Users on Collection and Disposal of Old Equipment
(European Union)
The symbol below on the products, packaging and/or accompanying documents means that used
electrical and electronic products should not be mixed with general household waste. For proper
treatment, recovery and recycling of old product please take them to applicable collection points, in
accordance with your national legislation and the directives 2002/96/EC and 2006/66/EC..
disposing of these products correctly, you will help to save valuable sources and prevent any
potential negative effects on human health and the environment which could otherwise arise from
inappropriate waste handling. For more information about collection and recycling of old products,
please contact your local municipality, your waste disposal service or the point of sale where you
purchased the item.
By
Information on Disposal in countries outside the European Union
The symbol above is only valid in the European Union. If you wish to discard these items, please
contact your local authorities or dealer and ask for the correct method of disposal.
LIMITED WARRANTY
This MOVEK warranty applies only to products you purchased for your own use. This MOVEK limited warranty is
available in others languages at
MOVEK warrants that each myMix product that you purchase is free from defects in materials and workmanship
under normal use during the warranty period. The warranty period starts on the original date of purchased
specified on your sales receipt or invoice unless MOVEK informs you otherwise in writing. During the warranty
period of one year (or longer as required by law) MOVEK will provide warranty service without charge for parts and
labor in case a defect in material or workmanship occurs.
THIS WARRANTY IS YOUR EXCLUSIVE WARRANTY AND REPLACES ALL OTHER WARRANTIES OR
CONDITIONS, EXPRESS OR IMPLIED, INCLUDING, BUT NOT LIMITED TO, THE IMPLIED WARRANTIES OR
CONDITIONS OF MERCHANTABILITY AND FITNESS FOR A PARTICULAR PURPOSE. SOME STATES OR
JURISDICTIONS DO NOT ALLOW THE EXCLUSION OF EXPRESS OR IMPLIED WARRANTIES, SO THE
ABOVE EXCLUSION MAY NOT APPLY TO YOU. IN THAT EVENT, SUCH WARRANTIES APPLY ONLY TO
THE EXTENT REQUIRED BY LAW AND ARE LIMITED IN DURATION TO THE WARRANTY PERIOD. NO
WARRANTIES APPLY AFTER THAT PERIOD. SOME STATES OR JURISDICTIONS DO NOT ALLOW
LIMITATIONS ON HOW LONG AN IMPLIED WARRANTY LASTS, SO THE ABOVE LIMITATION ON DURATION
MAY NOT APPLY TO YOU. LIMITATION OF WARRANTY: UNDER NO CIRCUMSTANCES SHALL MOVEK, ITS
SUPPLIERS, RESELLERS, OR SERVICE PROVIDERS BE LIABLE FOR ANY OF THE FOLLOWING EVEN IF
INFORMED OF THEIR POSSIBILITY: 1) THIRD PARTY CLAIMS AGAINST YOU FOR DAMAGES; 2) LOSS OR
DAMAGE TO YOUR DATA; OR 3) SPECIAL, INCIDENTAL, INDIRECT OR CONSEQUENTIAL DAMAGES,
INCLUDING LOST PROFITS, BUSINESS REVENUE, GOODWILL OR ANTICIPATED SAVINGS. AS SOME
STATES OR JURISDICTIO NS DO NOT ALLOW THE EXCLUSION OR LIMITATION OF INCIDENTAL OR
CONSEQUENTIAL DAMAGES, THE ABOVE LIMITATION OR EXCLUSION MAY NOT APPLY TO YOU.
THIS WARRANTY GIVES YOU SPECIFIC LEGAL RIGHTS AND YOU MAY HAVE OTHER RIGHTS WHICH
VARY FROM STATE TO STATE OR JURISDICTION TO JURISDICTION. YOU MAY ALSO HAVE OTHER
RIGHTS UNDER APPLICABLE LAW OR WRITTEN AGREEMENT WITH LENOVO. NOTHING IN THIS
WARRANTY AFFECTS STATUTORY RIGHTS, INCLUDING RIGHTS OF CONSUMERS UNDER NATIONAL
LEGISLATION GOVERNING THE SALE OF CONSUMER GOODS THAT CANNOT BE WAIVED OR LIMITED BY
CONTRACT.
www.mymixaudio.com
.
5
Page 6

TABLE OF CONTENTS
SAFETY INSTRUCTIONS
WARNINGS
CAUTION
.............................................................................................................
.................................................................................................................
MEDIA HANDLING FOR SD CARD
ECLARATION OF CONFORMITY (FOR USA)
D
NFORMATION FOR USERS ON COLLECTION AND DISPOSAL OF OLD EQUIPMENT
I
I
NFORMATION ON DISPOSAL IN COUNTRIES OUTSIDE THE EUROPEAN UNION.
WARRANTY INFORMATION 5
CONTENT
INTRODUCTION
HARDWARE
...............................................................................................................
.....................................................................................................
............................................................................................................
.......................................................................................
.......................................................................................
........................................................................
...................................................................
................
.....................
................................................................................................
QUICK START ........................................................................................................... 10
BOOTING UP ............................................................................................................ 11
NAVIGATING MYMIX ................................................................................................ 11
CONNECTIONS ........................................................................................................ 13
NPUTS ........................................................................................................................ 13
I
ETTING INPUT GAIN..................................................................................................... 13
S
O
UTPUTS..................................................................................................................... 13
N
ETWORK .................................................................................................................... 14
OWER........................................................................................................................ 14
P
MAIN SCREEN.......................................................................................................... 15
MV
ASTER OLUME ......................................................................................................... 15
OLO .......................................................................................................................... 15
S
M
UTE .......................................................................................................................... 16
TAT US BAR ................................................................................................................ 16
S
CHANNEL SCREEN.................................................................................................. 16
V
OLUME ...................................................................................................................... 17
ONE .......................................................................................................................... 17
T
E
FFECT ....................................................................................................................... 17
P
AN ............................................................................................................................ 17
SETTINGS................................................................................................................. 18
ROFILES .................................................................................................................... 18
P
I
NPUTS ........................................................................................................................ 18
EFFECTS .................................................................................................................. 19
REFERENCES ............................................................................................................. 19
P
ME
ASTER QUALIZER ..................................................................................................... 20
S
ESSIONS
A
DMINISTRATION .......................................................................................................... 21
.................................................................................................................... 20
UPDATING FIRMWARE ............................................................................................ 22
SPECIFICATIONS ..................................................................................................... 23
2
3
3
4
4
5
5
6
7
8
6
Page 7

INTRODUCTION
Thank you and congratulations for purchasing myMix, the first networked personal
mixer and multi-track recorder built for professionals. myMix has been designed
with two main goals: to enable musicians to hear their music the way they want to
hear it and to allow them to capture performances in multi-track recordings to
optional SD or SDHC cards. myMix puts each musician in control of his or her own
sound, with an intuitive user interface designed for creative people. myMix will
forever change the way you make music by taking the experience of creating music
to new levels. This owner’s manual covers all basic information in a step by step
process. Please take the time and read it carefully.
myMix is an audio mixing system that allows every user to create his or her own
mix, whether monitoring with headphones, ear plugs, or a speaker system. Each
unit has two combination mic/line inputs, balanced stereo outputs, and headphone
jack. Up to eight myMix units can be used in a system for a total of 16 audio
channels and eight individual stereo mixes. A myMix system is different in that it
doesn’t require a master unit. The connection of the individual units is accomplished
using common Ethernet CAT5 cabling and a 100MBs Fast Ethernet switch. Once a
unit is connected to the network, each input source (e.g. microphone or instrument)
is available on all units allowing a user to create an individual mix without affecting
others on the network. myMix can record up to 18 tracks of multi-track audio to an
optional SD or SDHC card. Two of those tracks are reserved for a stereo track that
is an exact copy of your individual mix, including all effects, panning, volume and
tone adjustments. The remaining tracks (up to 16) are sourced directly from the
preamp output on each unit, unaffected and ready to be imported into the recording
software of your choice for further overdubs, mixing and mastering. All audio files
are recorded in 24-bit, 48 kHz time-stamped .wav files.
For more details on using myMix including video tutorials and information in other
languages, check out : www.mymixaudio.com.
7
Page 8
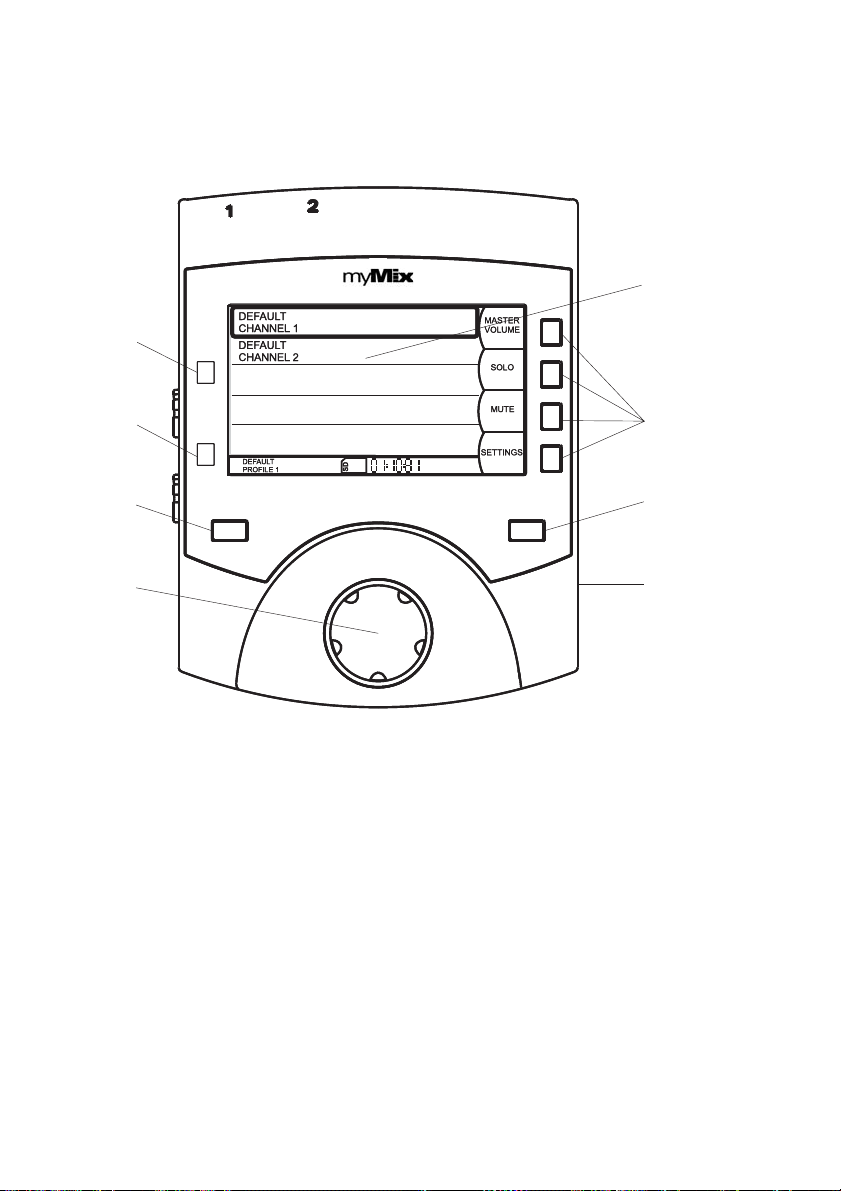
HARDWARE
1
7
2
3
4
1 & 2 Input signal LEDs for inputs 1 and 2
3 Master Mute button
4 Jog wheel and encoder button
5 Record button
6 Soft keys, function displayed on screen
7 Full color display screen
17 SD/SDHC card slot
6
5
17
8
Page 9
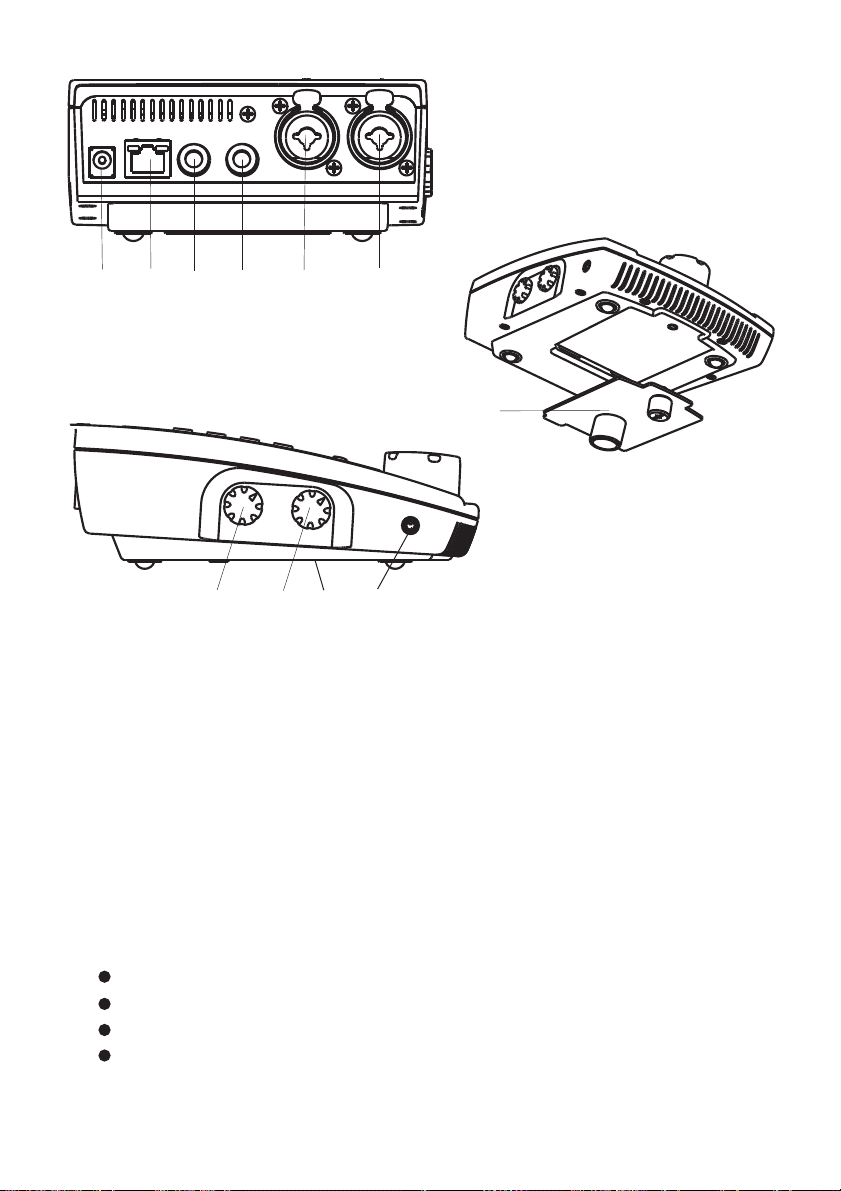
14 15 18 16
HARDWARE
8910111213
19
8 & 9
10 & 11
12
13 Connector for external power supply
14 & 15 Gain pots for inputs 1 and 2
16 Connector for stereo headphone
18 Attachment for microphone stand adaptor
19 Microphone stand adaptor (detachable)
You should find the following items in the box:
myMix unit
Power supply for myMix with US and/or EU power plug
myMix microphone stand adapter (pre-mounted to the unit)
Owner’s manual (this document) with warranty information
If any of these items are missing, contact your myMix dealer.
Balanced inputs 1 and 2 for mic or line levels
Balanced outputs for left and right signal
Network Connector
9
Page 10

QUICK START
1) IfyouplantousemyMix with a microphone stand leave the mic stand
adaptor on. Otherwise detach it.
2) Connect the external power supply or use Power Over Ethernet from your
switch.
3) Connect your myMix to a 100Mbps Fast Ethernet switch with a common Cat
5 cable.
4) Navigation on myMix: with the jog wheel [4] you can select an item (e.g. input
channel, input type, …). Pushing it opens the dialogue. (NAVIGATION)
5) Name your unit (SETTINGS
network to see you.
6) Select Input Type (Dual Mono, or Stereo, or Mono) and name your inputs
(SETTINGS Inputs→ ).
7) myMix automatically detects any unit on the network (up to eight). You’ll then
see other units with their unit names and input names.
8) Turn both gain pots down and connect your microphones and /or instruments.
9) Adjust the gain for your inputs. If he input LED turns red, turn the gain down.
10) Connect your outputs (headphones, in-ear system, speaker system).
11) The large MUTE button [3] mutes all outputs.
12) Start adjusting the mix you want to hear, channel by channel. Use the jog
wheel to scroll over the channel you want to edit, then push it. Now you can
change:
13) Volume control (0 to 100%)
- PREFERENCES) as you want others on the
14) Tone Control (more bass, or more treble)
15) Effects (first select an effect type on the Effects page (SETTINGS)
16) Panorama (if you are listening in stereo)
17) Mute and Solo are permanently available via soft buttons [6].
18) All mixer settings are automatically stored in a profile. Press SETTINGS and
go to Profiles to add a new profile for a different set-up (PROFILES).
19) If you want to record, insert a SD or SDHC card in the SD card slot [17] then
press REC [5]. You can see the time remaining on the card in the status bar.
If you are finished recording,
press REC [5] again.
10
Page 11
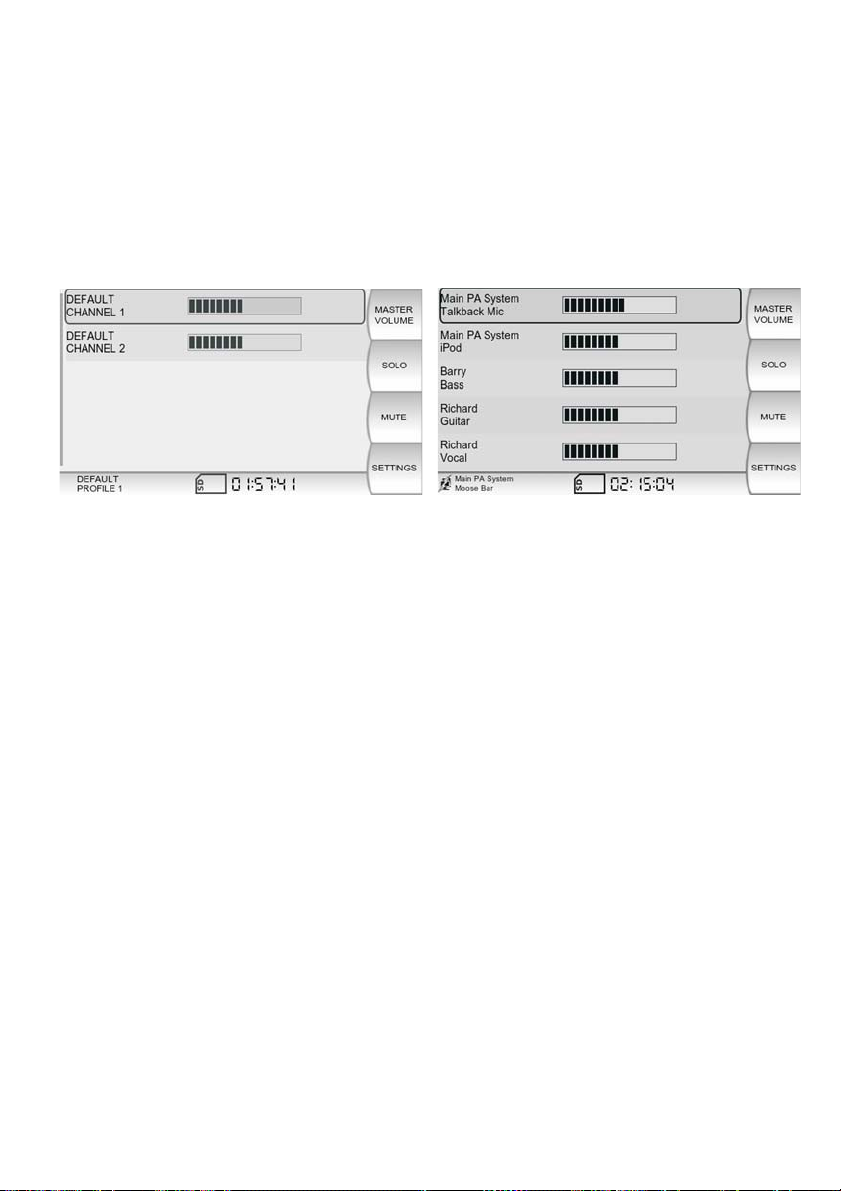
BOOTING UP
As soon as myMix receives power, it will boot up with the myMix logo splash
screen and automatically search for other myMix units on the network. Once boot
up is complete, the main screen appears which displays your local inputs as well as
the inputs coming from other myMix units. If another myMix on the network loses
power or is unplugged, it will disappear from your screen. Likewise, if a new myMix
is added to the network, it will automatically show up on your screen.
Default Main Screen with no other units,
showing the two local input channels.
Main screen displaying other units on the
network and their input channel names.
NAVIGATING MYMIX
myMix is designed to allow straightforward and intuitive navigation. The main
navigation tools are the jog wheel and the four soft keys on the right side of the unit.
Rotate the jog wheel to highlight channels, adjust parameters, and scroll through
setting options and the alphabet. Push the jog wheel [4] to show the channel
screen, parameter setting, move to the next letter, or to go back. For instance, to
adjust the volume of a channel, simply rotate the jog wheel to highlight the channel,
push the jog wheel to bring up the channel screen, and rotate the jog wheel to
adjust the volume up or down. Push the jog wheel again to go back to the main
screen, or simply allow the screen to time out [also see SETTINGS → Preferences,
Activity Timeout].
The four soft keys on the right side of the unit change functions depending on the
screen that is currently displayed. Their purpose is always listed on the screen
directly to the left of the button.
11
Page 12
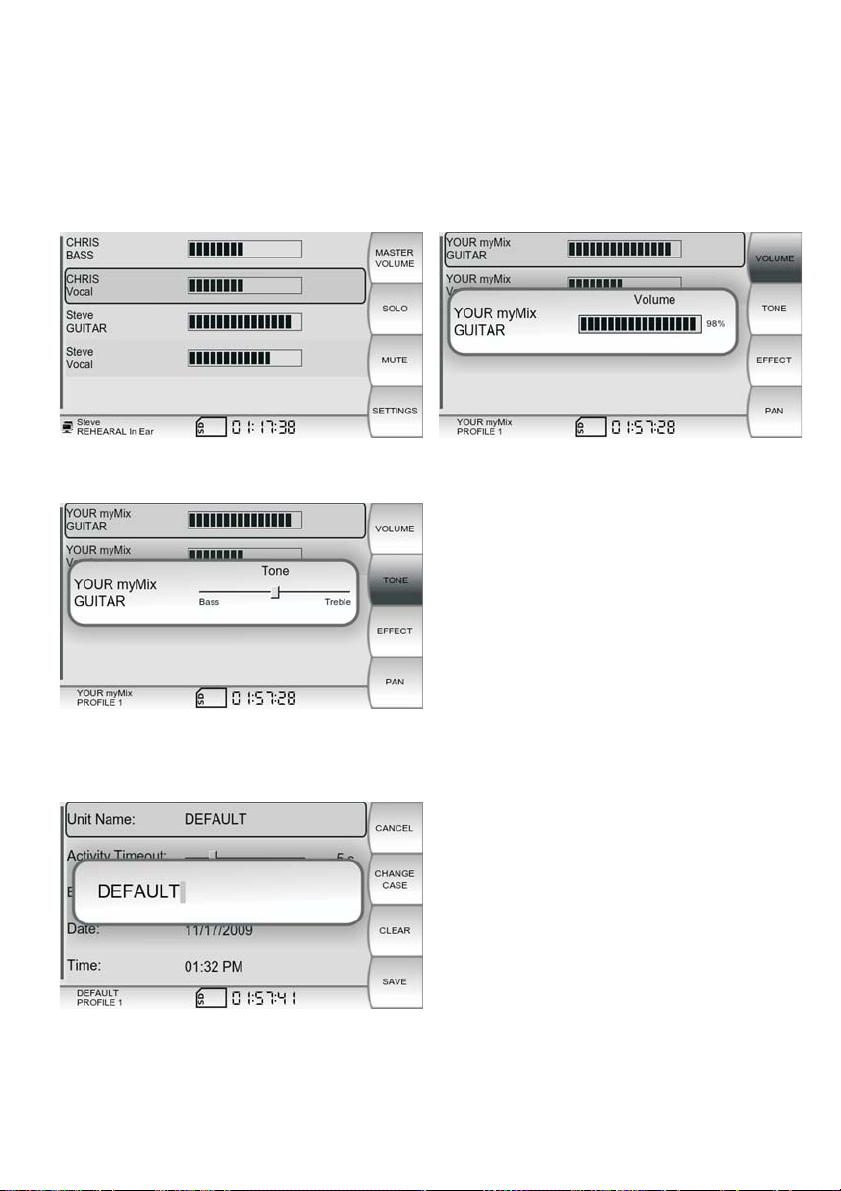
NAVIGATING MYMIX
For instance, if you wanted to adjust the tone of the channel, you would rotate the
jog wheel to highlight the channel and push the jog wheel to bring up the channel
screen. The VOLUME edit window appears.
Now push the soft key directly to the
right of the box labeled “TONE”. Once
the tone parameter is displayed you
can adjust it by rotating the jog wheel.
You can either push the jog wheel
again to return to the main screen, or
allow it to time out.
12
The jog wheel navigation is used for all
settings including naming. With the jog
wheel you can select the letter or
figure you want. CLEAR moves the
cursor one step back. Naming has to
be confirmed by pressing SAVE.
Pushing BACK gets you to the
previous screen.
.
Page 13

CONNECTIONS
Inputs
myMix has two balanced XLR/¼” combo input connectors for microphone (XLR)
and line level ( ¼”) signals. Before you connect anything to the inputs, make sure
the gain control pots [14 and 15] are turned fully counter clockwise. Take your time
to insure that you are connecting the correct device output to the correct input as a
mistake can result in a distorted signal or additional hum and noise. See the back of
the manual for technical specifications and connector pin out.
Setting Input Gain
After you have made the proper connections to the inputs and turned the input gain
knobs fully counter-clockwise, it is time to adjust input gain. Play the source
(instrument or microphone) at the loudest level you anticipate it producing. Slowly
turn the gain knob clockwise, watching the respective channel LED for signal. As
signal gain is brought up on the device you will see the channel LED turn green. If
you don’t see the channel LED turn green, check your connection and the output
level of your source. Continue to bring up the gain until the LED starts to turn red
(clip), then slowly turn the gain knob counter clockwise until the LED no longer turns
red. Repeat this process for both channels.
Turning clockwise increases, turning
counter clockwise reduces the gain
level.
NOTE: The gain setting is extremely important. While the mix you create with
myMix is your individual mix , the gain setting influences the signal for the entire
system, as well as for recording. In addition to the red LED on each unit, if an input
gain is clipping the name of the channel will flash red on all units, giving your band
mates an opportunity to alert you to the problem.
Outputs
The stereo mix you create on myMix is available on the headphone jack [16] and
as a balanced line level signal on the two ¼” phone jacks on the rear panel. [10 &
11] The balanced outputs will drive an external amplifier, a powered speaker or any
other device that accepts a line level signal.
13
Page 14
Outputs
While there is usually no harm in connecting a headphone to the ¼ “output jacks,
keep in mind that you will only be hearing either the left or right side of your mix.
See back of the manual for detailed specifications and pin out.
CAUTION: Before you connect to an amplifier or powered
loudspeaker, make sure they are switched off and turned down
to avoid equipment damage.
WARNING: Excessive sound pressure level on ear-plugs,
headphones or loudspeakers can damage your hearing and
cause hearing loss!
Network
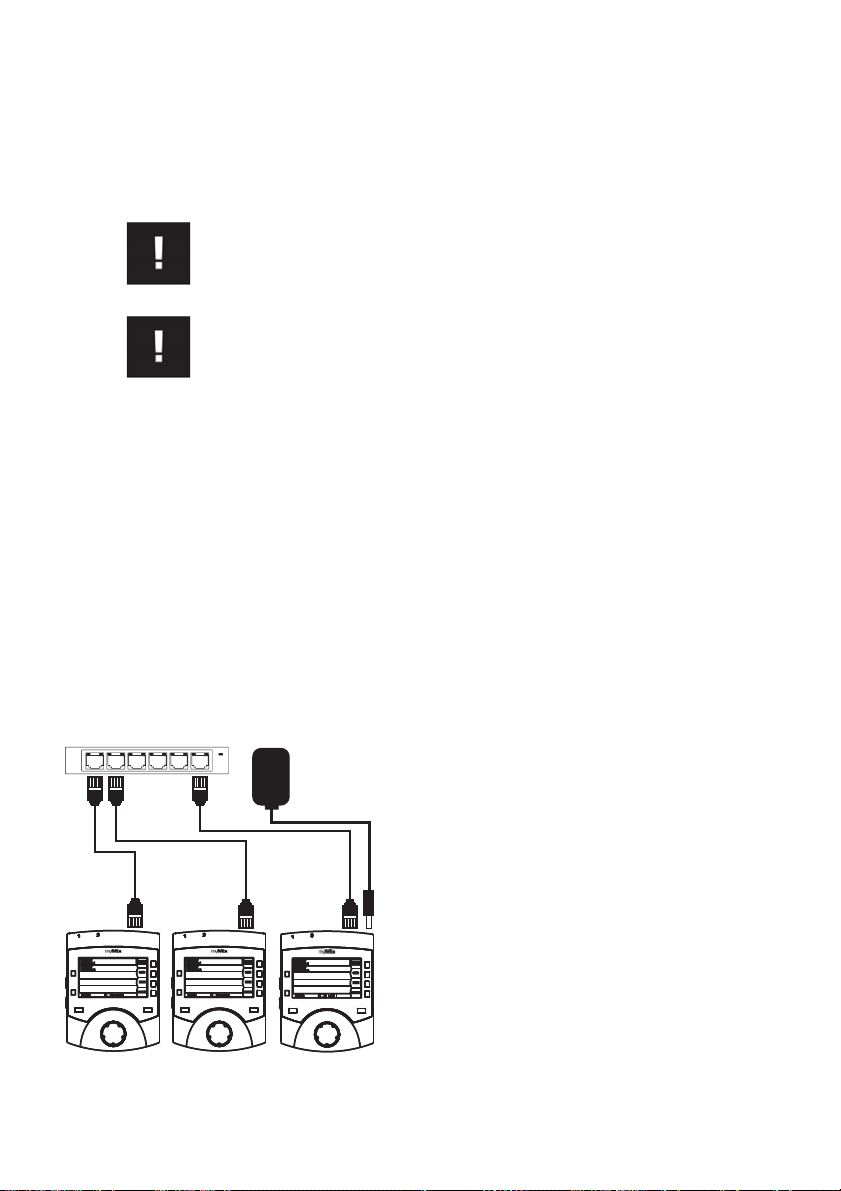
AtypicalmyMix system consists of multiple units.myMix units talk to each other
with common CAT5 cabling through a standard off-the-shelf 100MB Fast Ethernet
switch. If you are just using two myMix units, you can connect them directly to each
other with standard CAT5 cabling without the need for a switch. Three or more units
require a switch.
NOTE: Don‘t combine myMix units with other networkable devices. Although the myMix
network uses the Ethernet AVB protocol, which can be used with common Fast Ethernet
hardware, t he myMix system network needs to be exclusive. It is not possible to combine
several myMix units in a network with other networkable devices such as PCs, routers,
modems or printers
.
Power
Supply
Three units connected to a switch, two using
POE (30W) and one with external power supply.
14
Power
myMix can be powered using the
included external power supply, or by
a POE (Power Over Ethernet)
equipped Ethernet switch. Keep in
mind that each myMix unit requires 15
watts, so choose a POE switch that
has an overall wattage rating that is
capable of powering all units on the
network.
Page 15
MAIN SCREEN
Master Volume
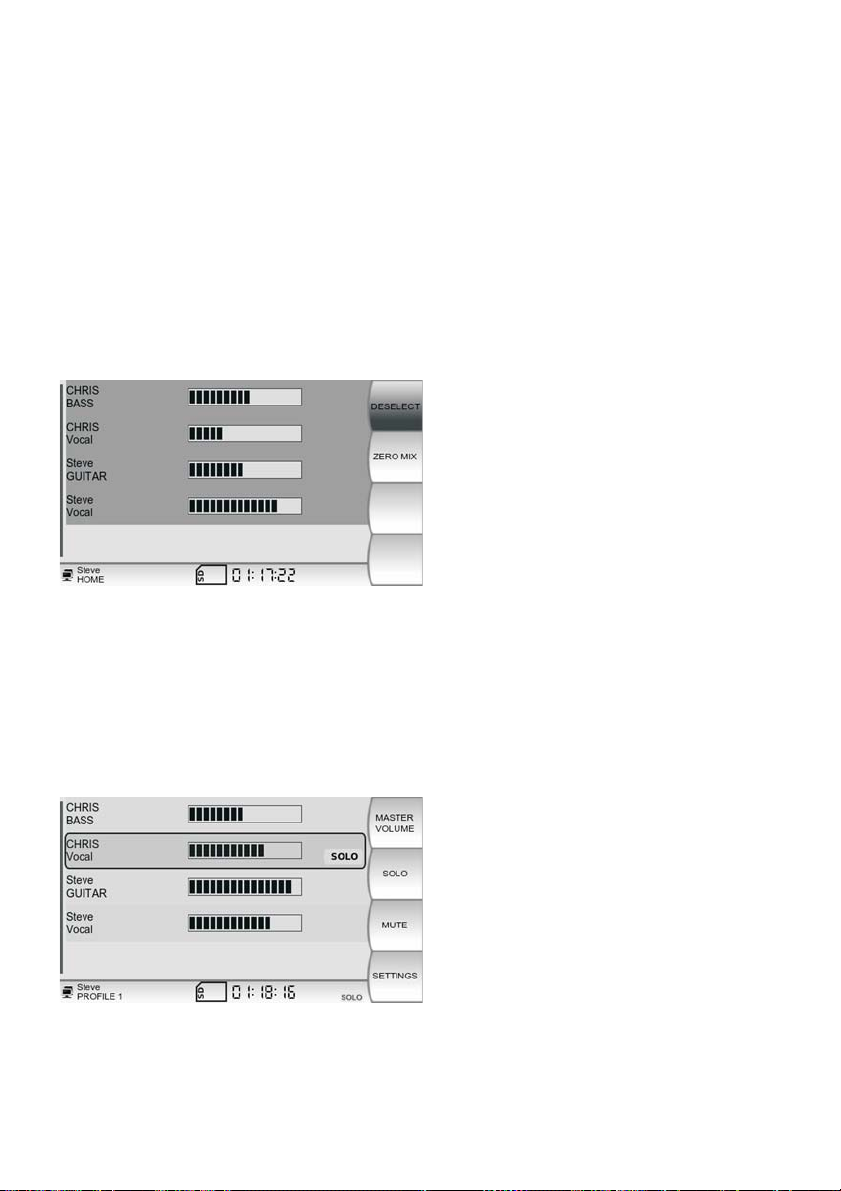
To adjust the levels of all channels simultaneously, while retaining the proportions
of your mix, push the soft key MASTER VOLUME. All channels will be selected and
can be adjusted with the jog wheel. If a channel hits the upper or the lower limit of
the volume range (0% to 100%) it will simply stop moving and all other channels will
continue to adjust. If you bring a channel back from the upper or lower limit, the
proportions remain the same.
To exit the MASTER VOLUME mod e,
push the soft key labeled DESELECT.
ZERO MIX returns the settings for all
channels to the default position.
Push the soft key labeled BACK to
return to the main screen.
Solo
In SOLO mode,
Multiple channels can be in SOLO mode simultaneously. To SOLO a channel, scroll
to the channel so it is highlighted and push the soft key labeled SOLO.
only channels with the SOLO function activated are audible.
A yellow SOLO indicator will appear
on the channels that are in SOLO
mode. Additionally, a SOLO indicator
will appear in the status bar. Push the
SOLO soft key again to clear the
channel SOLO. Pushing and holding
the SOLO button for more thanthree
seconds clears SOLO for all channels.
15
Page 16
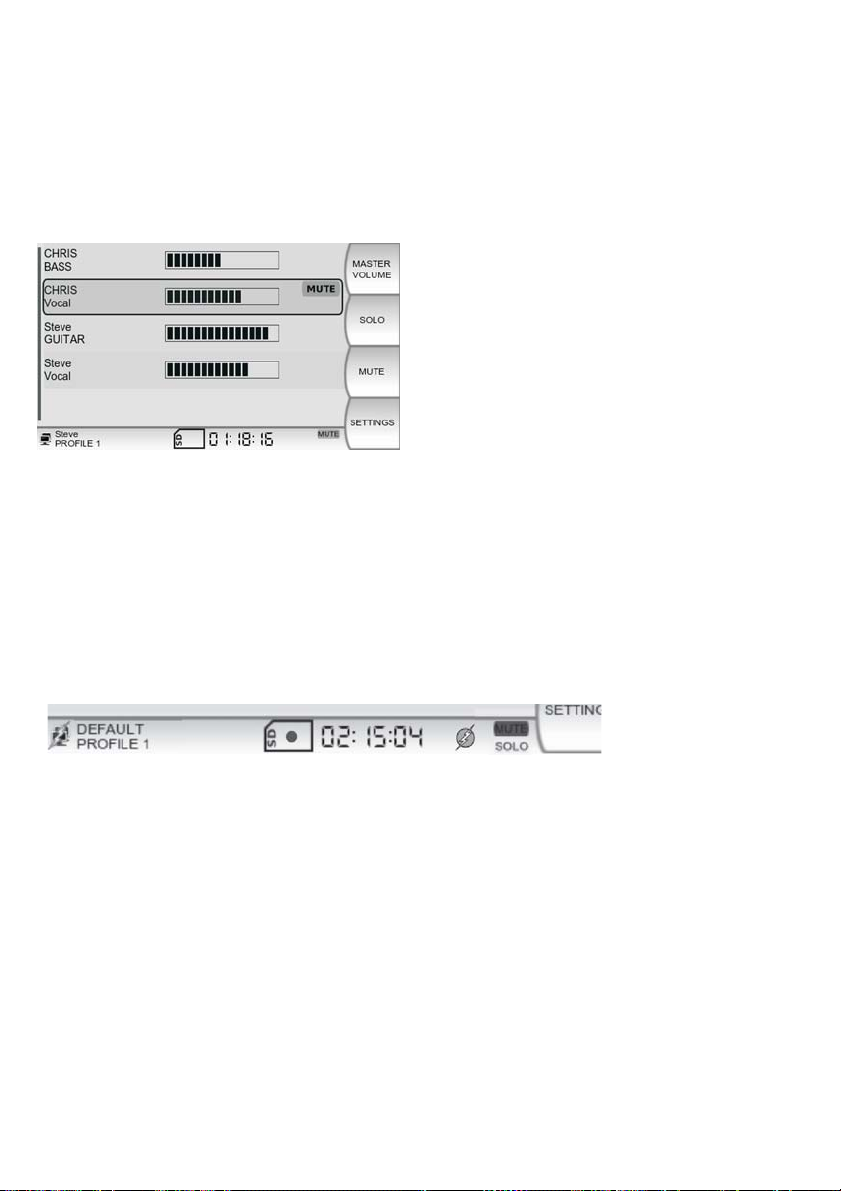
Mute
In MUTE mode, the channels with the MUTE function activated are completely
silenced. Multiple channels can be in MUTE mode simultaneously. To MUTE a
channel, scroll to the channel so it is highlighted and push the soft key labeled
MUTE.
A red MUTE indicator will appear on
the channels that are in MUTE mode.
Additionally, a MUTE indicator will
appear in the status bar. Push the
MUTE soft key again to clear the
channel MUTE. Pushing and holding
the MUTE button for more than three
seconds clears MUTE for all channels.
To MUTE all channels immediatel y,
press the master MUTE button on the control surface [3]. If the master MUTE
button is activated it will turn red. Pressing it again will un-MUTE the master output.
Status Bar
The status bar provides information about several different aspects of myMix
operation. The actual display depends on the situation.
Left to right: network connection with POE, unit name and active profile, SD
card inserted, red dot indicates recording, the time is the remaining time on
the SD card, phantom power enabled, one or more channels muted and
soloed.
CHANNEL SCREEN
Access the CHANNEL screen by scrolling to a channel and pushing the jog wheel
[4]. To return to the MAIN screen, either push the jog wheel again, or allow the
screen to time out.
16
Page 17
Volume
The default view on the CHANNEL screen is the volume control. The jog wheel
adjusts channel volume from 0% to 100%. The default volume is 50%.
Tone
While on the CHANNEL screen, push the soft key labeled TONE to adjust simple
Bass and Treble controls with the jog wheel. The default position is center.
Effect
Push the soft key labeled EFFECT to increase or decrease the amount of internal
effect applied to each channel (the type of effect is selected in the EFFECTS
screen under SETTINGS). The default position is 0%.
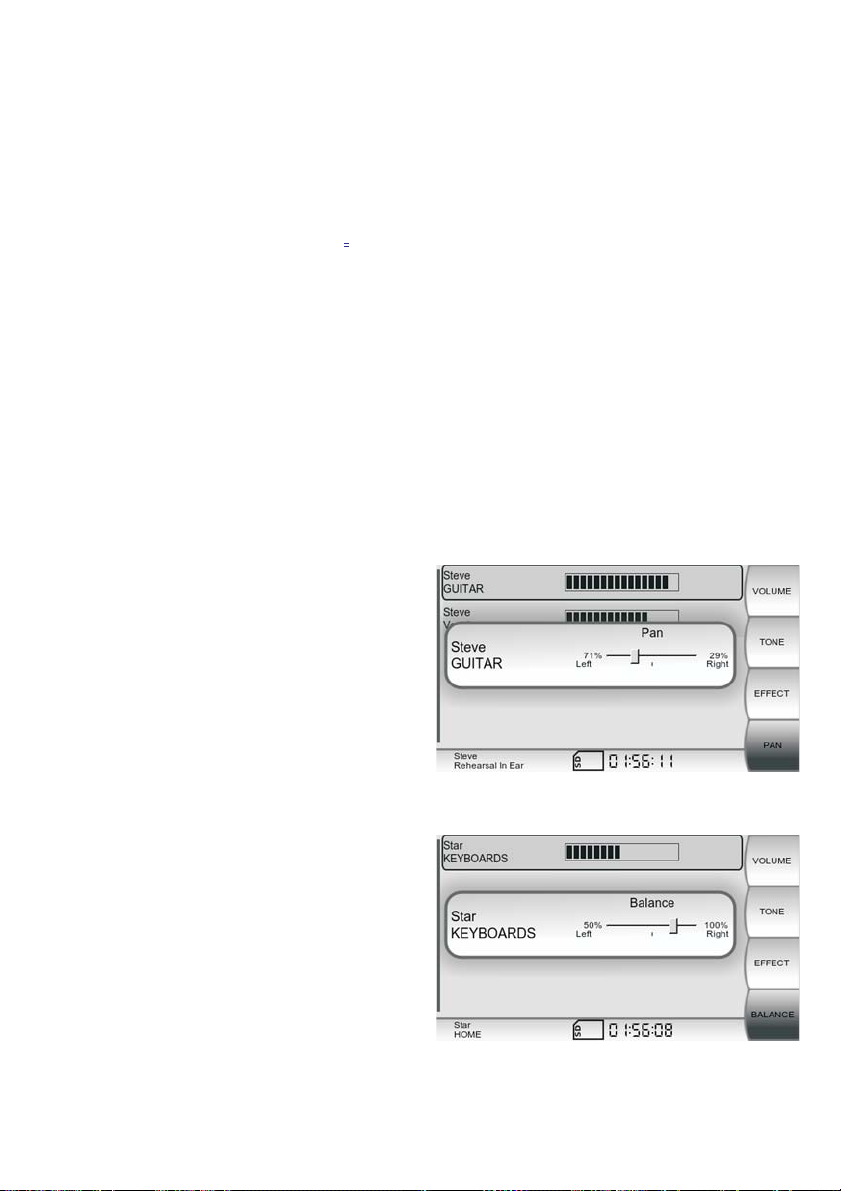
Pan
By pushing the soft key labeled PAN, you can control where the signal appears in
the stereo field.
Keep in mind that if you are
listening on a mono device,
panning a mono signal fully to the
unused output will make the signal
disappear. This also applies to
stereo signals as they default to
100% left and 100% right. The
default position is center.
For a stereo signal, the panorama
turns into a BALANCE control.
Each individual channel of a
stereo signal is routed 100% to
the left or right by default.
BALANCE allows you to move the
stereo image to either side.
17
Page 18
SETTINGS
Profiles
A profile stores all of the settings related to a mix and is automatically updated the
moment you make a change. This includes input mode, input naming, volume, tone,
mute, solo, pan, effect settings and master EQ. Profiles allow you to use your
myMix in a variety of situations, with different inputs and outputs, eliminating the
need to constantly reconfigure your unit.
In the PROFILE screen, you can create, name and delete profiles. Up to 20
different profiles can be created and stored. By default, there is one profile in which
all changes are saved. To select a profile, scroll to highlight and push the jog wheel.
The currently selected profile name is always displayed below the unit name on the
status bar.
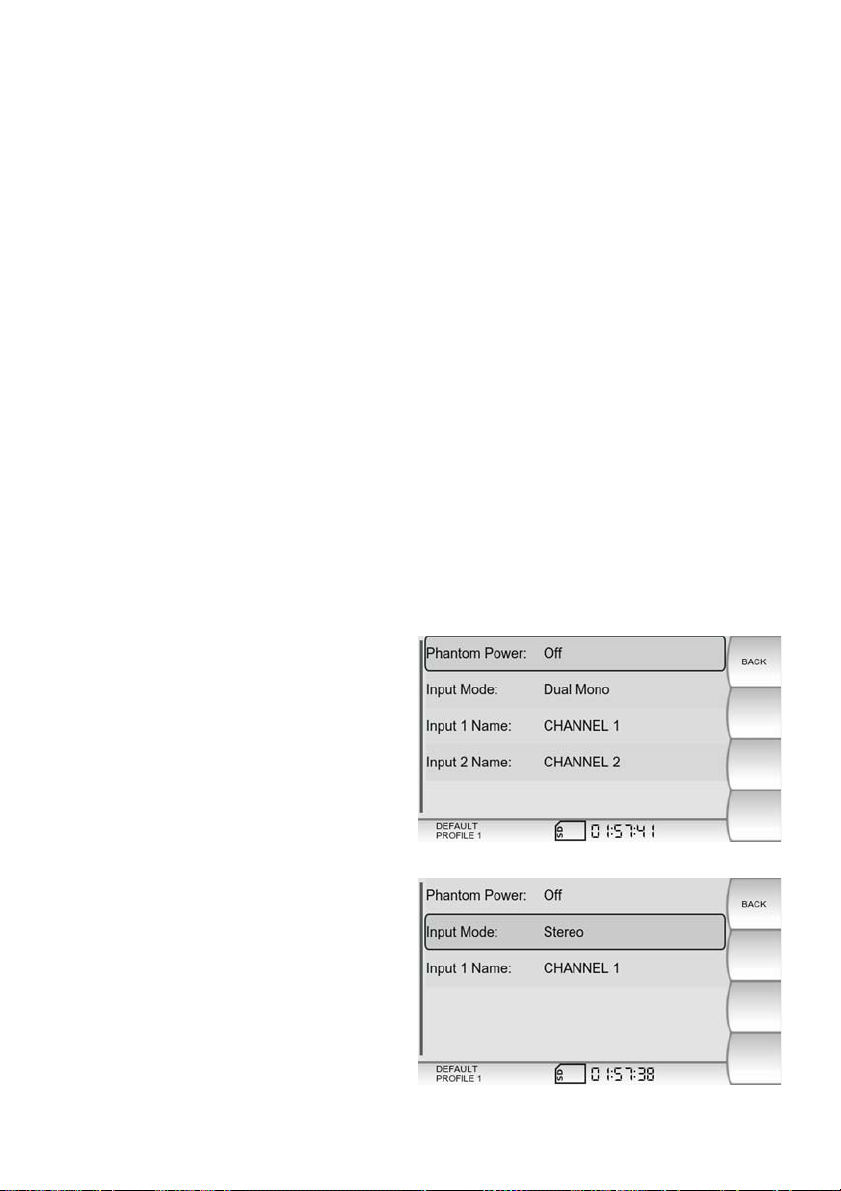
Inputs
The INPUTS screen allows you to activate phantom power, select input modes and
name your inputs. Phantom power is available and is switchable ON or OFF for
both inputs. When phantom power is activated,
is recommended to turn phantom power OFF when it is not required by an input
device.
myMix has three Input Modes:
DUAL MONO – Select dual mono for
two independent sources such as
guitar and vocal. Dual mono inputs
appear as two separate channels on all
myMix units.
an icon appears in the status bar. It
MONO - enables only input 1.
STEREO - Select stereo when using a
stereo source such as a keyboard, mp3
player, or electronic drums. In stereo
mode, inputs 1 and 2 are routed 100%
to the left and right sides, respectively.
A stereo input is displayed as a single
channel on all myMix units, yet
contains left and right signals.
18
Page 19
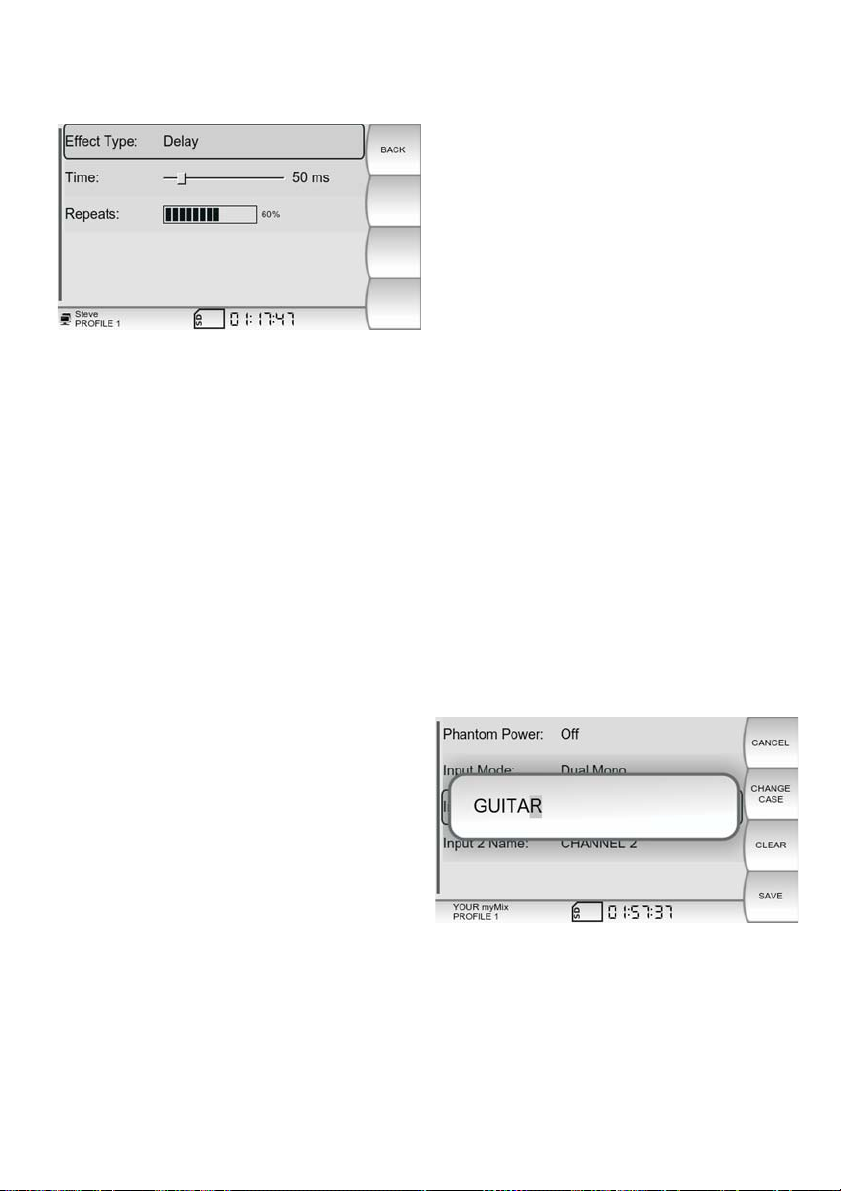
Effects
One global effect can be selected for
each myMix unit. There is a choice of
seven different effects from which to
choose: three room reverbs, three hall
reverbs or delay with adjustable delay
time (10ms to 350ms) and repeats.
Default setting for the Effect type is:
None.
Preferences
The Preferences screen allows you to name your myMix, set the length of Activity
Timeout, adjust screen brightness, date and time.
The name of your myMix is the primary way in which you will be identified on the
network, so choose something meaningful like your first name or your nickname.
Remember, you will name inputs separately and those input names will be
displayed just after your unit name on the respective channel. For example, if you
name your unit “Bill” and input 1 “Guitar”, the channel will be displayed as “Bill
Guitar”. Use the jog wheel to scroll through characters A-Z, space, and numbers 0
–9.
When you have selected the desired
character, space, or number, push
thejogwheeltomovethecursor
forward. CLEAR removes the
currently selected letter and moves
the cursor back.
The soft key labeled CHANGE CASE allows you to alternate between upper and
lower case letters. When you are finished editing the unit name, press the soft key
labeled SAVE. CANCEL exits the screen without saving changes.
19
Page 20
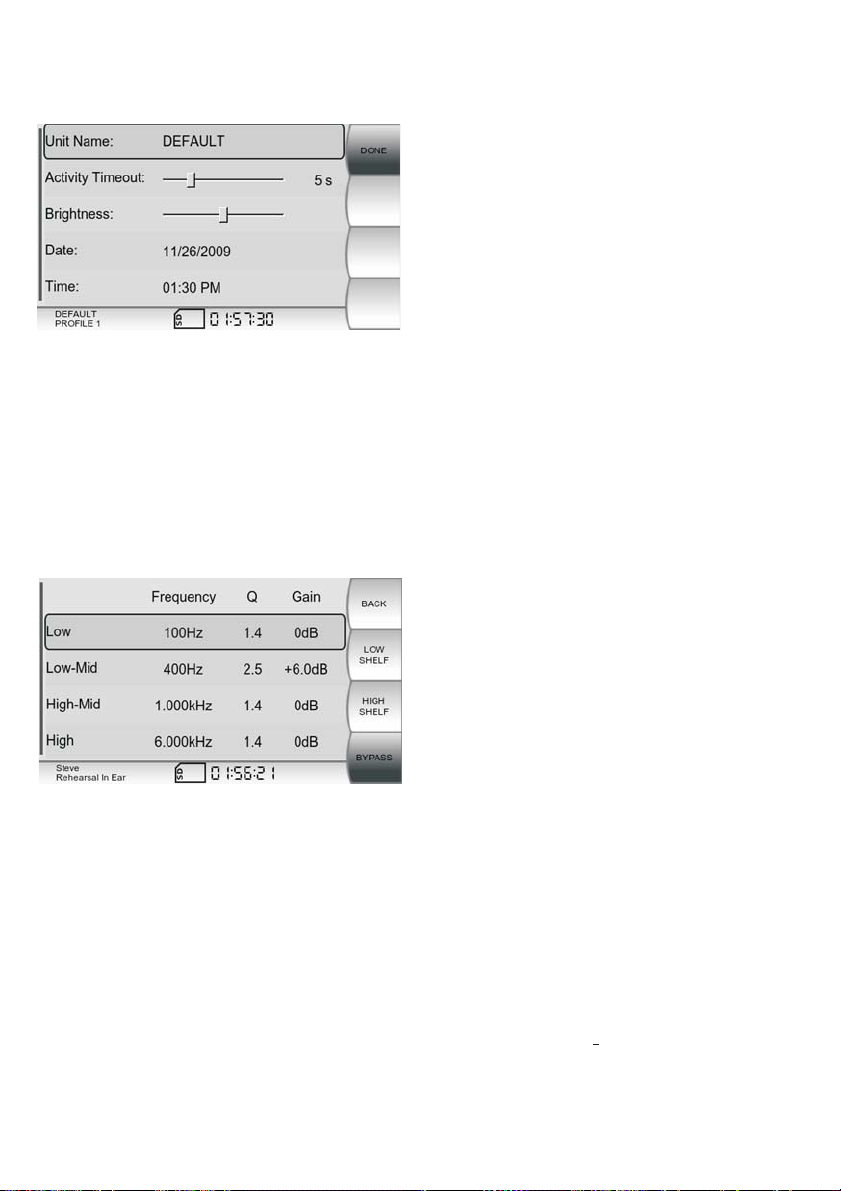
Preferences
Date and Time are adjusted in the
same fashion. The Date and Time that
you set will be embedded into any
recorded files you create. Activity
Timeout refers to the length of time it
takes for the CHANNEL screen to
automatically revert back to theMAIN
screen.
Master Equalizer
The Master Equalizer is a stereo 4- band fully parametric EQ designed to fine tune
the output of your myMix to the device through which you are monitoring. Each of
the four bands has adjustable frequency, Q (a measure for bandwidth of the filter,
where the higher the Q is, the more narrow the filter gets, and the lower the Q is,
the wider the filter gets) and Gain.
The Low and High frequencies can
also be configured as shelving filters.
Bypass removes the Master Equalizer
from the audio path yet retains your
settings to quickly compare between
the original and equalized versions.
Note: In most cases, the channel tone control is all you need to achieve your desired sound.
The master equalizer is mainly designed as a tool in situations where the actual output
device needs attention. Some applications would include dealing with feedback while using
stage monitors or boosting or removing frequencies on inexpensive headhones. Our
recommendation is if you don’t need it, don’t use it.
Sessions
One of the coolest features of myMix is the ability to initiate multi-track recording
with the push of the REC button. By inserting an optional SD
can record up to 18 channels of 24-bit, 48 kHz time-stamped .wav audio files.
20
or SDHC card, you
Page 21
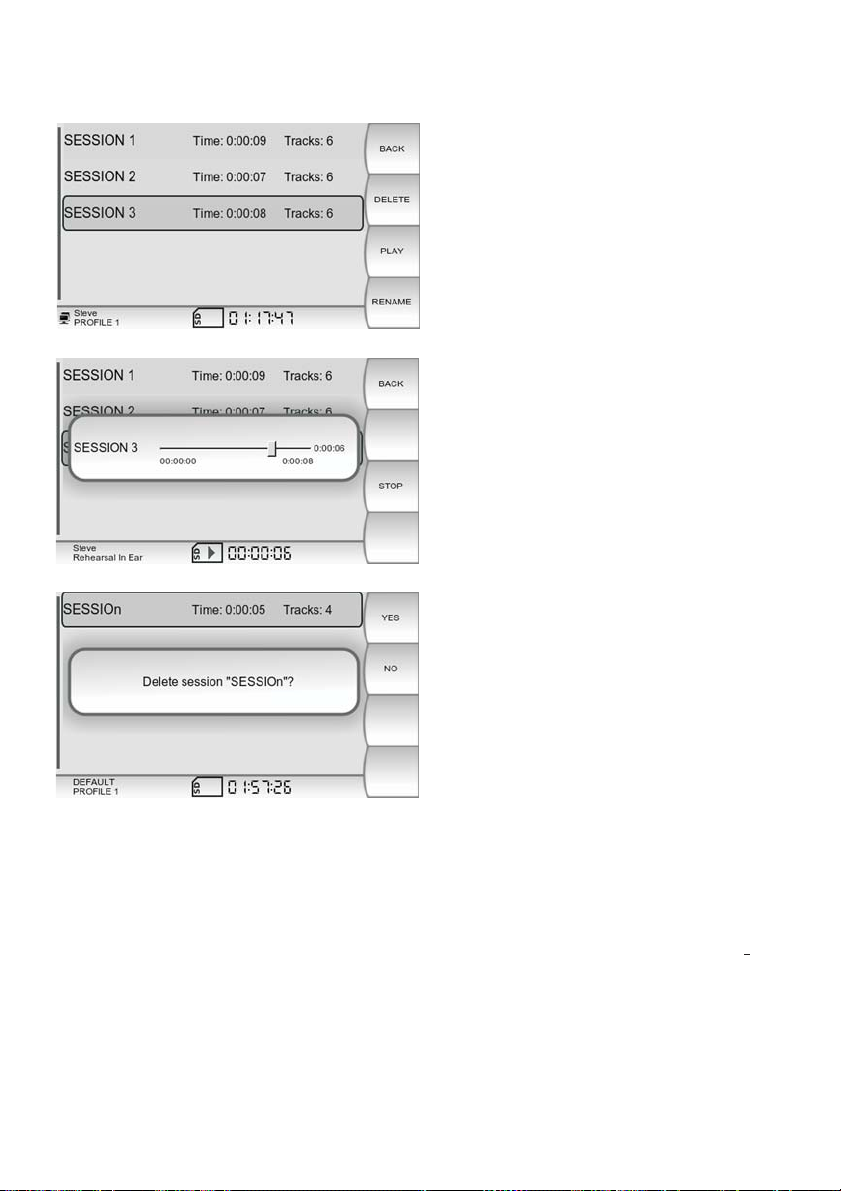
Sessions
Each time the REC button is pressed,
a stereo track that is a mirror image of
your individual mix, plus unaffected
individual tracks that are tapped
directly after the preamps from each
myMix on the network, are created.
You can import the audio to the
recording software of your choice, cut
overdubs, mix, master, and post it on
your website for your fans to
download the next day.
When you select a session and press
the soft button PLAY, the stereo file
(mirror image of your individual mix)
will be played back. During playback,
all audio signals from the system are
mute, with only the signal of the
playback routed to the outputs.
If you select DELETE, you are
prompted to confirm your decision.
Confirming YES will delete all files (all
individual tracks and the stereo
master) from the SD card. If in doubt,
press NO to exit without change.
Administration
The Administration screen lets you format the SD/SDHC card, restore to the unit to
factory defaults and view general information about your myMix unit such as
address and firmware version.
NOTE: formatting the SD card deletes all data from the card. Restoring the factory settings
clears ALL settings including preferences settings, input settings and profiles. Before you
confirm any of these activities, make sure that you really don’t need this data anymore.
MAC
21
Page 22

UPDATING FIRMWARE
Check on www.mymixaudio.com for the latest firmware updates. We recommend
not mixing units with different firmware versions on the same network. The firmware
update requires a temporarily free SD card. To update the firmware:
1. Format SD card (ADMINISTRATION screen)
2. Download the latest firmware from www.mymixaudio.com
3. Save the firmware files on the formatted SD card.
4.InserttheSDcardinmyMix while the unit is powered down and not
connected to a network.
5. Hold down the MUTE [5] button and the jog wheel [4], then power up
the unit.
6. Release the two buttons when you see the black Firmware Update
screen. Be patient while the update is taking place, and follow the
instructions on the screen.
7. Reboot your myMix.
22
Note: a firmware update doesn‘t clear your profile and preference setttings.
All profile and preference settings remain unaltered.
Page 23

SPECIFICATIONS
Inputs
Impedance (Microphone / Line) 2 k / 20 kΩΩ
Input Gain (Microphone)
Input Gain ( Line)
Maximum Input Level (Mic/Line)
Frequency Response 20 Hz to 20 kHz (+0dB, -1dB)
Outputs
Impedance (Line / Headphone Outputs)
Max Output Level (Line) +21 dBu
Signal to Noise Ratio
THD +N (Microphone Input to Line Out)
Cross talk (L to R)
Mute
System Network
Network Type Fast Ethernet 100 Mbps
Network Cabling Cat 5
System Latency < 3 ms
AD/DA Conversion 24-bit
Recording
Recording Media SD or SDHC card
Recording Format wav file, 24-bit, 48kHz sampling rate
Connectors
Microphone Input Balanced XLR (1 gnd, 2 pos, 3 neg)
Line Input Balanced ¼” jack (tip pos, ring neg, sleeve gnd)
Line Output Balanced ¼” jack (tip pos, ring neg, sleeve gnd)
Headphone Output 3.5mm stereo jack
System Network RJ45
Weight and Dimensions
Net Size (excl. mic stand adaptor) W x H x D 134mm x 171mm x 60 mm (5.3” x 6.7” x 2.4”)
Net Weight (excl. mic stand adaptor) 0,5 kg (1.1 lbs)
Packaged Size W x H x D 172mm x 280mm x 80mm (6.8” x 11” x 3.2”)
Packaged Weight 0,9 kg (2.0 lbs)
Included Accessory myMix PSU (24V, 12W)
variable from +4 dB to +60 dB
variable from -16 dB to +40 dB
+14 dBu / +34 dBu
75 / to drive >16Ω balanced Ω
> 104 dB
< 0,022 %
< -80 dB
> 100 dB
myMix microphone stand adaptor
E & OE. All specifications subject to change without prior notice.
myMix is a trademark of MOVEK, LLC. Patent Pending, all rights reserved by MOVEK LLC, USA.
23
Page 24

Rev 1- Jan 2010
Designed in U.S.A.
Printed in China
 Loading...