

1


Table of Contents
Installation of Quadron 3D®1001 Printer
& Operating Manual
Technical Parameters ............................................................................................... 4
Description of the Equipment Use ..................................................................... 4
Electrical Parameters ................................................................................................ 4
Quadron Printer Assembly .................................................................................... 5
Movement of Electrical Devices ........................................................................... 5
Safety Information .................................................................................................... 5
Preparation of the Printer for Printing ............................................................... 6
Preparation of the Glass for Printing .................................................................. 6
Wiring ............................................................................................................................ 6
Manual Calibration ................................................................................................... 6
Introduction of Filament into the Print Head .................................................. 7
LCD Display Control .................................................................................................. 7
Materials: PLA, PETG, CARBON, FLEX, PVA ........................................................ 8
Printing .......................................................................................................................... 8
Peeling the Model o the Pad .............................................................................. 8
Glass Cleaning ............................................................................................................ 8
Printing Speed and Quality .................................................................................... 8
Printing of Own Models .......................................................................................... 9
Slic3r Environment .................................................................................................... 9
Printing of Nonstandard Objects ...................................................................... 10
Assisted Printing ...................................................................................................... 10
Change of the Size of the Printed Object ....................................................... 10
Printer Maintenance and Troubles During Printing .................................... 10
Extruder - Print Head Cleaning; Access to the Feed Rollers ..................... 10
Maintenance of the Extruder Outside the Printer ....................................... 10
X Axis Swivel Settings ............................................................................................ 11
Cleaning the Nozzle from the Outside ............................................................ 12
Post-Printing Problems with the Object.......................................................... 12
Correct Wiring of Connectors ............................................................................. 12
Fluidity of Axes ......................................................................................................... 12
General Information ............................................................................................... 12
Disposal of the Device............................................................................................ 13
WARRANTY CERTIFICATE ...................................................................................... 14
EC DECLARATIONOF CONFORMITY.....................................................................15
Manufacturer: MYMEDIA, s.r.o., Popradská 40, 821 06 Bratislava, Slovakia
Technical support: info@3dimenzia.sk
3
Technical Parameters
Quadron 3D ® 1001
Build volume: (mm) x 1000 - y 1000 - z 1000
Layer resolution: 50-1000 microns
Positioning accuracy: 100 microns
Extruder: Two modular removeable
extrusion heads
Resolution of bed-leveling:
<100 microns
Fabrication methods: FFF
Printable materials: PLA, PETG, Carbon, Flex
Software: CURA
Printer weight: 50 kg
Size: (mm) x1400 y1400 z1400
Power: 220-240V
PC Remote: app for Linux, Mac OS X,
Windows, iOS, Android
Port: SD CARD
Description of
the Equipment Use
The application of any method other
than indicated by the manufacturer
is inconsistent with the device speci-
cation! This device may be operated only by persons, who have been made familiar with its properties and understand
the relevant regulations of its operation.
Any changes made to this device without
the manufacturer's permission relieve the
manufacturer from liability for consequential damages or injuries. If the user wants to use the
device for other purposes that are not listed in
its specications, or for prohibited activities, the
user is required to inform the manufacturer of
his/her intention to do so. Follow the safety
instructions at work to avoid a danger of own injury and injury to the persons in the vicinity.
Pre-operation check of the device: Before proceeding to the check of the device, the operator
is required to nd out, whether the device shows
any signs of damage or other features that could
endanger health or property. Do not touch
the moving parts of the device with a block or
objects and tools. Never carry out any structural
modications on, or interventions in, the device
that were not recommended and approved by
the manufacturer of the device; the same applies
to the replacement of parts with parts of other
types. Do not operate the device without covers.
Do not operate the device when it shows any
faults in the structure or mechanism of the device, and without safety features. Do not use the
device in a humid and explosive atmosphere.
The device is intended for indoor use. Please,
be careful when interacting with the printer
in any way. It is an electrical device with the moving and hot parts. Do not expose the printer
to the rain, snow and frost. Always use the printer
in a dry environment and at a minimum distance
of 50 cm from other objects.
Always place the printer on a stable place with
sucient load capacity, e.g. on a at oor or table
with no threat of fall or tilting of the device.
Electrical Parameters
The printer is powered by 230 V,
50 Hz, 12 V power sockets. Never
connect the printer to a voltage source dierent than that delivered to
you, it could result in malfunction or damage.
Place the power cord so as not to stumble over
it, step on it, or expose it to any damage. Make
sure that the power cord is not mechanically
or otherwise damaged. Immediately stop using
the cord that is damaged and replace it. When
disconnecting the power cord, pull the cord
from the socket by holding the socket itself, not
by pulling only the cable out, thus reducing the
risk of damage to the socket or network sockets.
Ensure that persons without proper electrotechnical qualication (lay persons) make no
unauthorized interference into the electrical
equipment. Never disassemble the voltage source on the printer; it does not contain any parts
that an unskilled worker could repair. If any
troubles occur, always hand the printer over to
a qualied service engineer. Make sure that the
print head temperature is around 200-260 °C.
4
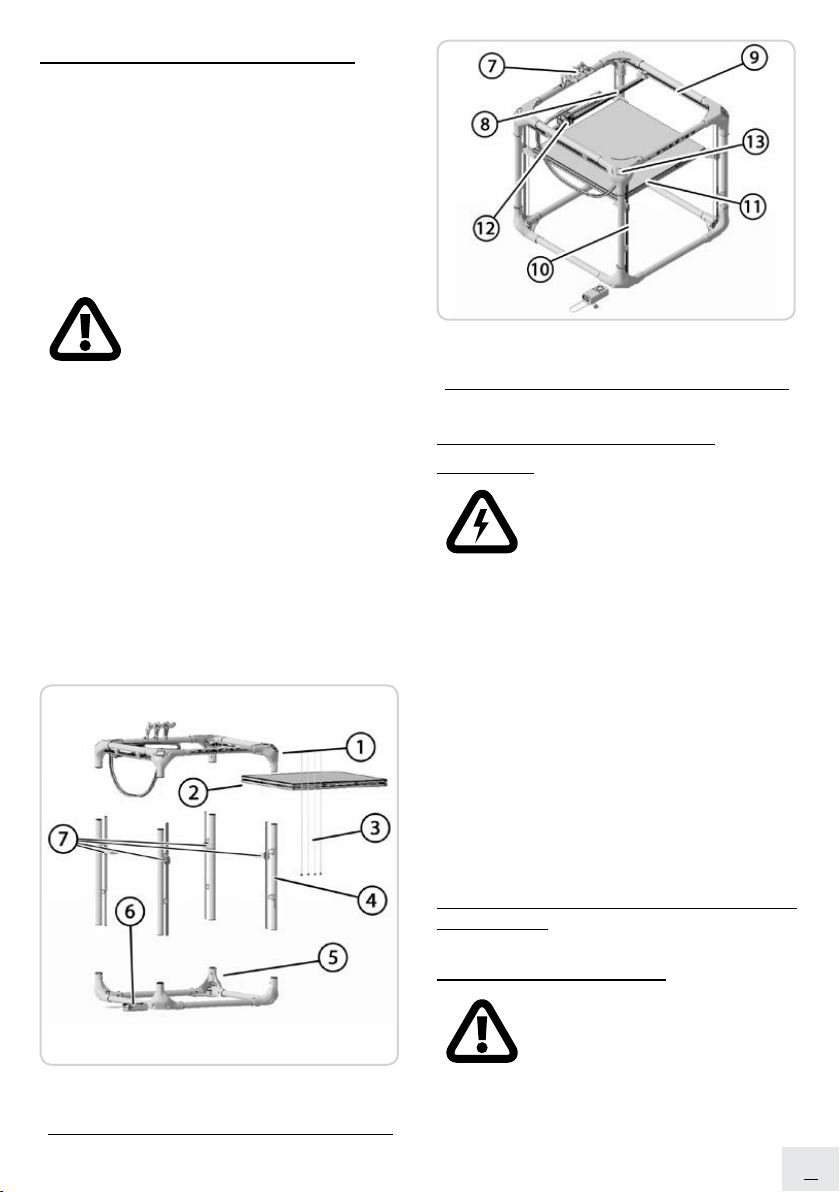
Quadron Printer Assembly
Start assembling the printer by placing the part 5
(Figure 1) on a stable horizontal surface. Insert vertical axes in its corners (Figure 1). In the clockwise
order, start with the corner containing the power
supply. Insert the part 1 on the vertical axes.
At the same time, plug the cable from the display
to the lower corner containing the power supply.
Lead the connector from the bottom corner and
connect it to the other connector.
When inserting the part 1 on the ver-
tical axes, make sure that part 1 does
not cross. There are holes on the
inner sides of the corners of the part
1 and part 2 ready for screwing.
Figure 2: (7) Filament holder, (8) X axis, (9) Y axis,
(10) Z axis, (11) Adjustment rollers of the print surface,
(12) Double extruder, (13) Display
There are hexagonal holes in the part 5 of the
engine gearboxes where, again, insert the threaded rods in the clockwise direction, beginning
with the rod 1 at the corner of the display. At
the same time, insert the corner rods into the
holders on the print pad placed on the pillars.
Mount the lament holder at the back of the
part 1.
Place the print pad (part 2) on the holders (part
7). Plug the printer to the power supply.
Figure 1: (1) Top section, (2) Printing pad, (3)
Threaded rods, (4) Pillars, (5) Bottom section, (6) Power
source with the switch, (7) Holders to the printing pad
Movement of Electrical
Devices
When operating the electrical
device, the operator must follow
the relevant instructions, rules and
local operating regulations for its
use, and ensure that the device is not
overloaded or otherwise damaged. Maintain
the electrical device in line with the manufacturer's instructions. When the electrical device is
switched o, you can move and extend the movable inlets by means of the connecting cables
equipped with the respective connecting parts.
The device must be switched o immediately
in the following cases: insulation damage,
the smell of burns, smoke, extremely unsmooth
or impact operation of the electrical device,
severe contusion, jerking launch, overheating
of some parts of the electrical device.
THE DAMAGED ELECTRICAL DEVICE SHOULD
NOT BE USED!
Safety Information
The device contains movable and
rotating parts; reduced caution du-
ring its operation and improper han-
dling can result in injury. Prevent
unaccompanied children from accessing
the printer, even if not in operation. The user is
required keep the electrical devices in a perma-
5
 Loading...