


Modica shower panel
INSTRUCTION MANUAL
Modica Duschpaneel
BEDIENUNGSANLEITUNG
Colonne de douche Modica
MODE D´EMPLOI
Modica zuhanypanel
HASZNÁLATI UTASÍTÁS
EN
DE
FR
HU
WZ00082
Modica


1400mm
220mm
520mm
520
220
1400

1
2
2
3
4
5
EN
I. Function
1. Shower Head
2. Body jets
3. Diverter
4. Mixer
5. Hand shower

6
2
6
Before assembly, flush the water
supply pipes thoroughly to
remove debris(allow the water to
run with the main stopcock open
for about 3 mins), otherwise dirt
particles might affect the function
of the shower panel!
Note!
2
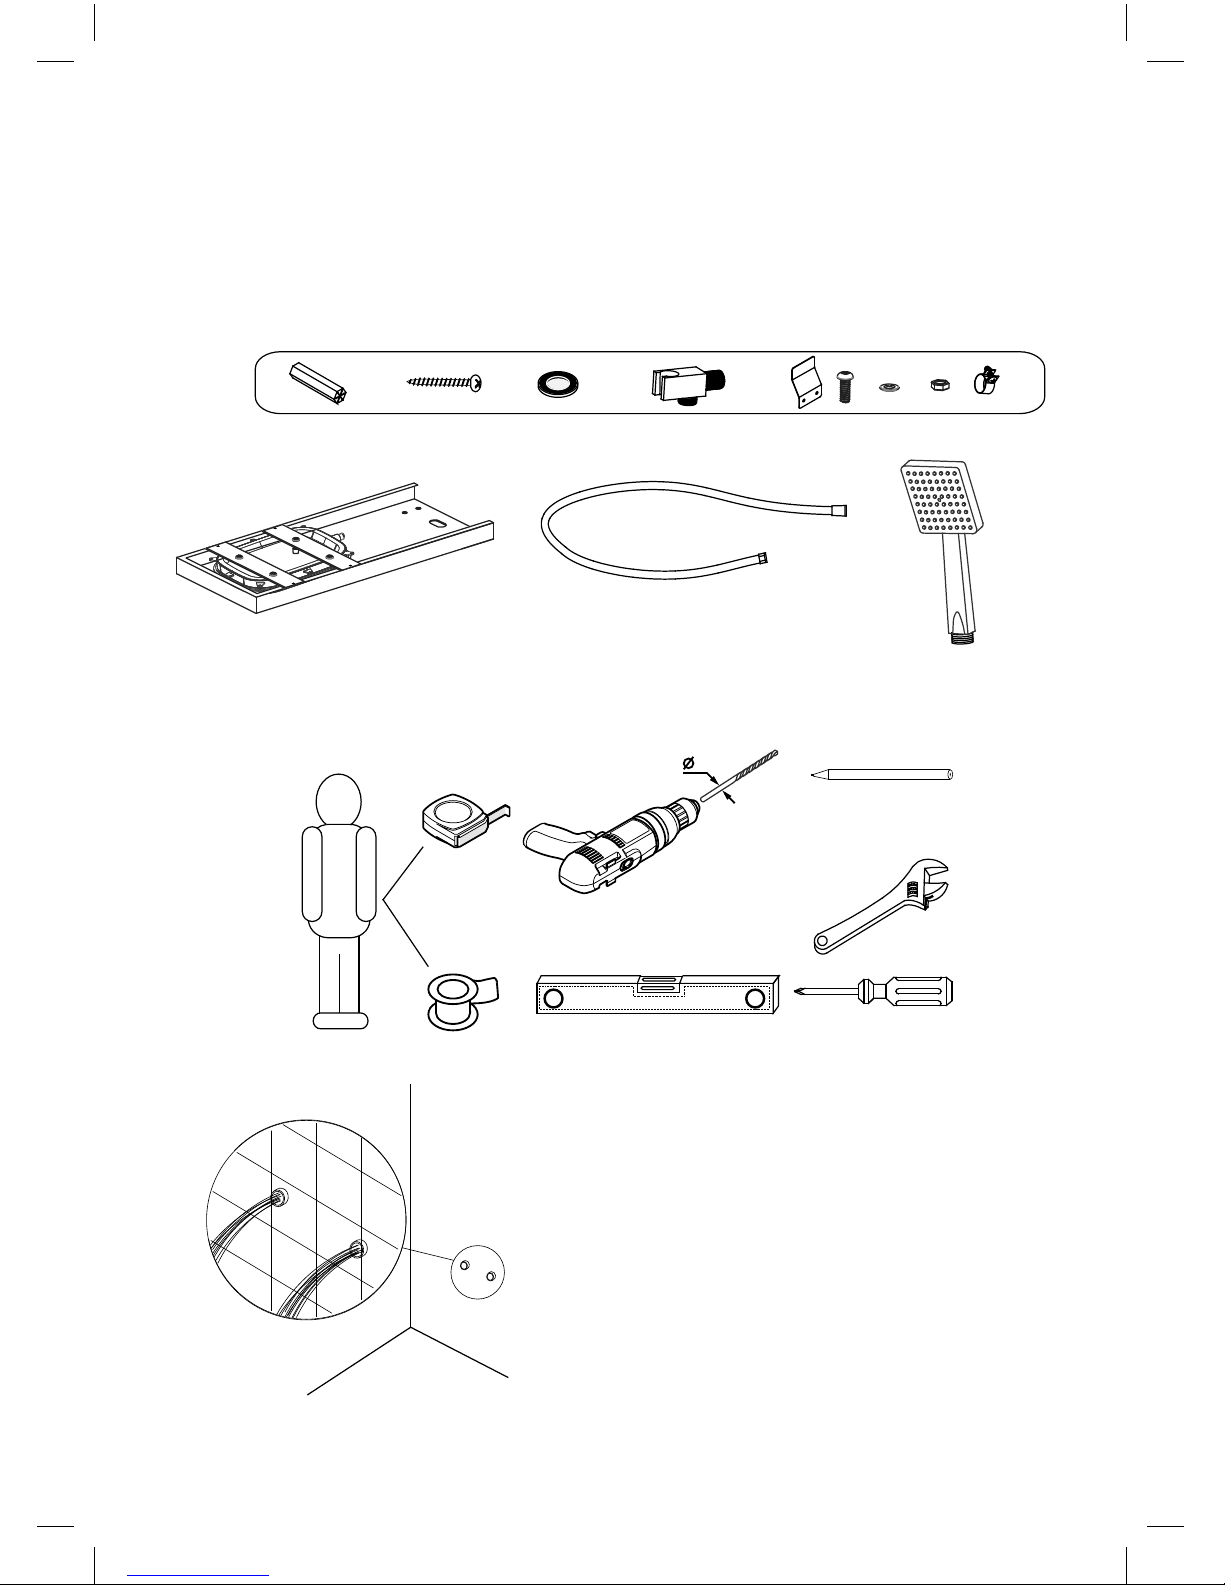
Please unpack and inspect all packages and components carefully, andmake
sure they are complete. Examine for shipping damage. If someparts are
damaged or missing, notify your dealer immediately.
Part list
For lnstallation You may Require the Following Tools
Note!
Before assembly, flush the watersupply
pipes thoroughly toremove debris (allow
the water torun with the main stopcock
openfor about 3 mins), otherwise
dirtparticles might affect the functionof
the shower panel!

2
1
2
1
EN

Select the shower function
Volume and temperature control
required by rotating the control knobs.
N o t e !
Before drilling any holes for fixing your shower panel ensure that
there are no hidden cables or pipework within the wall.
COLD
HOT
Wall-mounting
Insert the wall plugs inside
the holes
Tighten the screws to the wall
with wall mounting brackets
Note!
The height can be altered to suidt individual requirements.
The dimensions are for reference only.
1
2
3
wall
Drill the holes in the wall
Hang the shower panel on the mounting bracket
wall
wall
6mm Drill
25mm
Dimensions
Choose a suitable place to install the shower panel, adjust the shower panel’s
vertical position based on the user’s height and your sanitary room. Usually,
install the panels at the distance of 210cm from the top to the ground, but you
can assemble according to your preference.
1060mm145mm
N o t e !
Before drilling any holes for fixing your shower panel ensure that
there are no hidden cables or pipework within the wall.
Wall-mounting
1
2
3
wall
wall
wall
6mm Drill
25mm
Dimensions
Choose a suitable place to install the shower panel, adjust the shower panel’s
vertical position based on the user’s height and your sanitary room. Usually,
install the panels at the distance of 210cm from the top to the ground, but you
can assemble according to your preference.
Wall-mounting
Before drilling any holes for fixing your
shower panel ensure thatthere are no
hidden cables or pipework within the wall.
NOTE!
Drill the holes in the wall Insert the wall plugs
insidethe holes
Tighten the screws
to the wallwith wall
mounting brackets
Hang the shower panel on the mounting bracket

175cm
160cm
22cm
54cm
1060mm145mm
160cm
22cm
175cm
160cm
22cm
54cm
EN
Dimensions
Choose a suitable place to install the shower panel, adjust the shower
panel’s vertical position based on the user’s height and your sanitary
room. Usually, install the panels at the distance of 210cm from the top
to the ground, but youcan assemble according to your preference.
Note!
The height can be altered to suidt individual requirements.
The dimensions are for reference only.
Select the shower function
required by rotating the
control knobs.
Volume and temperature
control


1
2
2
3
4
5
DE
I.Funktionen
1. Duschkopf
2. Körperdüsen
3. Schalter
4. Mischer
5. Handbrause

6
2
6
Before assembly, flush the water
supply pipes thoroughly to
remove debris(allow the water to
run with the main stopcock open
for about 3 mins), otherwise dirt
particles might affect the function
of the shower panel!
Note!
2
Bitte alle Packungen und Komponenten sorgfältig auspacken und überprüfen.
Stellen Sie sicher, dass der Inhalt vollständig ist. Untersuchen Sie ihn
auf Versandschäden. Wenn einige Teile beschädigt sind oder fehlen,
benachrichtigen Sie sofort Ihren Händler.
Zubehör
Zum Auf baubenötigen Sie möglicherweise die folgenden
Werkzeuge
Hinweis!
Spülen Sie vor dem Aufbau die
Wasserleitungen sorgfältig durch, um
Schmutz zu entfernen (Lassen Sie
das Wasser bei geöffnetem Hahn für
ca. 3 Minuten laufen), Sonst könnten
Schmutzpartikel die Funktion des
Duschpaneels beeinträchtigen!
Zum Auf baubenötigen Sie möglicherweise die folgenden
Werkzeuge

2
1
2
1
DE

Select the shower function
Volume and temperature control
required by rotating the control knobs.
N o t e !
Before drilling any holes for fixing your shower panel ensure that
there are no hidden cables or pipework within the wall.
COLD
HOT
Wall-mounting
Insert the wall plugs inside
the holes
Tighten the screws to the wall
with wall mounting brackets
Note!
The height can be altered to suidt individual requirements.
The dimensions are for reference only.
1
2
3
wall
Drill the holes in the wall
Hang the shower panel on the mounting bracket
wall
wall
6mm Drill
25mm
Dimensions
Choose a suitable place to install the shower panel, adjust the shower panel’s
vertical position based on the user’s height and your sanitary room. Usually,
install the panels at the distance of 210cm from the top to the ground, but you
can assemble according to your preference.
1060mm145mm
N o t e !
Before drilling any holes for fixing your shower panel ensure that
there are no hidden cables or pipework within the wall.
Wall-mounting
1
2
3
wall
wall
wall
6mm Drill
25mm
Dimensions
Choose a suitable place to install the shower panel, adjust the shower panel’s
vertical position based on the user’s height and your sanitary room. Usually,
install the panels at the distance of 210cm from the top to the ground, but you
can assemble according to your preference.
Wandbefestigung
Bevor Sie Löcher für die Montage Ihres
Duschpaneels in die Wand bohren, stellen
Sie sicher, dass es keine versteckten Kabel
oder Rohrleitungen hinter der Wand gibt.
NOTE!
Löcher in die
Wandbohren
Stecken Sie die Dübel
in die Wand
Befestigen Sie die
Schrauben an der
Wandmit Wandhalterungen
Hängen Sie das Duschpaneel an der Halterung auf.
Wand Wand Wand
Kalt
Warm

175cm
160cm
22cm
54cm
1060mm145mm
160cm
22cm
175cm
160cm
22cm
54cm
DE
Maße
Wählen Sie einen geeigneten Platz, um das Duschpaneel aufzubauen.
Stellen Sie die Duschwand in vertikale Positionr basierend auf der
Körpergröße des Nutzers und Ihrem Sanitärraum auf. Normalerweise
bauen Sie die Platten in einem Abstand von 210 cm von oben nach
unten auf, aber Sie können die Größe auch gemäß Ihrer Bedürfnisse
anpassen.
Hinweis!
Die Höhe kann nach individuellen Bedürfnissen angepasst werden.
Die Abmessungen sind nur Referenzwerte
Wählen Sie die gewünschte
Funktion aus, indem Sie die
Drehknöpfe drehen
Stärken- und
Temperaturregulierung


1
2
2
3
4
5
FR
I. Fonctions
1. Pomme de douche
2. Jets massants
3. Inverseur
4. Mitigeur
5. Pommeau de douche

6
2
6
Before assembly, flush the water
supply pipes thoroughly to
remove debris(allow the water to
run with the main stopcock open
for about 3 mins), otherwise dirt
particles might affect the function
of the shower panel!
Note!
2
Veuillez déballer et inspecter tous les cartons et éléments avec attention,
assurez-vous qu´il n´en manque aucun. Vérifiez qu´ils n´ont pas été
endommagé pendant le transport. Si certains éléments sont endommagés ou
manquants, veuillez contacter le distributeur immédiatement.
Pièces
Vous aurez besoin de ces outils lors de l´installation
Attention!
Avant de les assembler, veuillez passer
les tuyaux sous l´eau afin d´enlever
les éventuels résidus (laisser l´eau
du robinet couler au moins 3 mins).
Ces résidus pourraient affecter le
fonctionnement de la douche.

2
1
2
1
FR

Select the shower function
Volume and temperature control
required by rotating the control knobs.
N o t e !
Before drilling any holes for fixing your shower panel ensure that
there are no hidden cables or pipework within the wall.
COLD
HOT
Wall-mounting
Insert the wall plugs inside
the holes
Tighten the screws to the wall
with wall mounting brackets
Note!
The height can be altered to suidt individual requirements.
The dimensions are for reference only.
1
2
3
wall
Drill the holes in the wall
Hang the shower panel on the mounting bracket
wall
wall
6mm Drill
25mm
Dimensions
Choose a suitable place to install the shower panel, adjust the shower panel’s
vertical position based on the user’s height and your sanitary room. Usually,
install the panels at the distance of 210cm from the top to the ground, but you
can assemble according to your preference.
1060mm145mm
N o t e !
Before drilling any holes for fixing your shower panel ensure that
there are no hidden cables or pipework within the wall.
Wall-mounting
1
2
3
wall
wall
wall
6mm Drill
25mm
Dimensions
Choose a suitable place to install the shower panel, adjust the shower panel’s
vertical position based on the user’s height and your sanitary room. Usually,
install the panels at the distance of 210cm from the top to the ground, but you
can assemble according to your preference.
Fixation au mur
Veuillez vous assurer qu´il n´y a pas de
câbles cachés ou de tuyauterie à l´intérieur
du mur avant de percer les trous.
Attention!
Percez les trous dans
le mur
Insérez les chevilles
dans les trous
Serrez les vis dans le
mur avec le support de
fixation mural.
Accrochez la colonne de douche aux supports de fixation.
Wand
FROID
CHAUD
Wand Wand

175cm
160cm
22cm
54cm
1060mm145mm
160cm
22cm
175cm
160cm
22cm
54cm
FR
Dimensions
Choisissez un emplacement approprié où installer la colonne de
douche. Ajustez la position verticale de la colonne de douche en
fonction de la taille des utilisateurs et de votre salle de bains. En
général, le haut de la colonne de douche s´installe à une hauteur de
210 cm du sol, mais vous pouvez modifier cela à votre convenance.
Attention!
La hauteur peut être modifiée afin de convenir aux exigences de
l´utilisateur.
Les dimensions sont données à titre indicatif uniquement.
Sélectionnez la fonction
souhaitée en faisant pivoter
la poignée de contrôle
Contrôle du débit et de
la température


1
2
2
3
4
5
HU
I. Funkció
1. Zuhanyfej
2. Felső vízsugár
3. Zuhanyátkapcsoló
4. Mixer
5. Kézizuhany
6
2
6
Before assembly, flush the water
supply pipes thoroughly to
remove debris(allow the water to
run with the main stopcock open
for about 3 mins), otherwise dirt
particles might affect the function
of the shower panel!
Note!
2
Kérjük csomagolja ki és óvatosan ellenőrizze a csomagokat és alkatrészeket.
Bizonyosodjon meg róla, hogy semmi nem hiányzik. Ellenőrizze, hogy
történt-e sérülés a szállítás során. Amennyiben egy alkatrész hiányzik vagy
megsérült, azonnal lépjen kapcsolatba az elosztóval.
Alkatrész lista
A beszereléshez a következőkre lehet szüksége
Megjegyzés!
Összeszerelés előtt alaposan öblítse
ki a vízellátást biztosító csöveket,
hogy eltávolítsa a szennyeződéseket
(a fő vízcsapot megnyitva legalább
3 percen át hagyja folyni a vizet).
Ennek hiányában a szennyeződések
befolyásolhatják a zuhanypanel
működését!

2
1
2
1
HU

Select the shower function
Volume and temperature control
required by rotating the control knobs.
N o t e !
Before drilling any holes for fixing your shower panel ensure that
there are no hidden cables or pipework within the wall.
COLD
HOT
Wall-mounting
Insert the wall plugs inside
the holes
Tighten the screws to the wall
with wall mounting brackets
Note!
The height can be altered to suidt individual requirements.
The dimensions are for reference only.
1
2
3
wall
Drill the holes in the wall
Hang the shower panel on the mounting bracket
wall
wall
6mm Drill
25mm
Dimensions
Choose a suitable place to install the shower panel, adjust the shower panel’s
vertical position based on the user’s height and your sanitary room. Usually,
install the panels at the distance of 210cm from the top to the ground, but you
can assemble according to your preference.
1060mm145mm
N o t e !
Before drilling any holes for fixing your shower panel ensure that
there are no hidden cables or pipework within the wall.
Wall-mounting
1
2
3
wall
wall
wall
6mm Drill
25mm
Dimensions
Choose a suitable place to install the shower panel, adjust the shower panel’s
vertical position based on the user’s height and your sanitary room. Usually,
install the panels at the distance of 210cm from the top to the ground, but you
can assemble according to your preference.
Falra-szerelés
Mielőtt lyukat fúrna a falba a zuhanypanel
beszereléséhez, bizonyosodjon meg róla,
hogy nincsen mögött kábel vagy cső.
Megjegyzés!
Fúrja ki a lyukakat Helyezze be a
falhüvelyeket
Rakja fel a fali
konzolokat és húzza
meg a csavarokat
Helyezze fel a zuhanypanelt a fali konzolokra
Fal
HIDEG
MELEG
Fal Fal

175cm
160cm
22cm
54cm
1060mm145mm
160cm
22cm
175cm
160cm
22cm
54cm
HU
Méretek
Válassza ki a zuhanypanel felszereléséhez megfelelő helyet. A panel
függőleges felszerelését a felhasználó magasságának és a fürdőszoba
méreteinek megfelelően állítsa be. Általában véve a panel teteje 210 cmre kell, hogy legyen a földtől, de saját igényei szerint beállíthatja.
Megjegyzés!
A magasság az egyéni igényeknek megfelelően állítható.
A megadott méretek csak tájékoztató jellegűek.
A szabályozógombok
elforgat ásával állítsa be
a kívánt funkciót.
Vízmennyiség és
hőmérséklet beállítása


 Loading...