

Page 1

Flex MX Transponder & Flex Manager
User Manual
(REVISION 1.0)
19 April 2011
ORIGINAL INSTRUCTIONS
Page 2

Manual rev. Software rev. Date (d/m/y) Amendments
Published by:
MYLAPS B.V.
Zuiderhoutlaan 4
2012 PJ Haarlem
The Netherlands
© 2011 No part of this document may be reproduced by any means without
the written consent of the publisher.
Whilst every care has been taken to ensure that the information in this
document is correct, no liability can be accepted by MYLAPS for loss,
damage or injury caused by any errors or omissions in this document.
(Revision 1.0) (Revision 1.0.0) 19/04/11 This is the first edition of this manual.
Page 2 of 32 Flex MX Transponder & Flex Manager User Manual (Revision 1.0)
Page 3

TABLE OF CONTENTS
1 INTRODUCTION . . . . . . . . . . . . . . . . . . . . . . . . . . . . . . . . . . . . . . . . . . . . . . . . . . . . . . 4
1.1 Scope of this manual. . . . . . . . . . . . . . . . . . . . . . . . . . . . . . . . . . . . . . . . . . . . . . . 4
1.2 How to use this manual. . . . . . . . . . . . . . . . . . . . . . . . . . . . . . . . . . . . . . . . . . . . . 4
2 SAFETY . . . . . . . . . . . . . . . . . . . . . . . . . . . . . . . . . . . . . . . . . . . . . . . . . . . . . . . . . . . . 5
2.1 General safety responsibilities . . . . . . . . . . . . . . . . . . . . . . . . . . . . . . . . . . . . . . . 5
2.2 Warnings and cautions . . . . . . . . . . . . . . . . . . . . . . . . . . . . . . . . . . . . . . . . . . . . . 5
3 PHYSICAL DESCRIPTION . . . . . . . . . . . . . . . . . . . . . . . . . . . . . . . . . . . . . . . . . . . . . . 6
3.1 Introduction . . . . . . . . . . . . . . . . . . . . . . . . . . . . . . . . . . . . . . . . . . . . . . . . . . . . . . 6
3.2 Transponder . . . . . . . . . . . . . . . . . . . . . . . . . . . . . . . . . . . . . . . . . . . . . . . . . . . . . 7
3.3 Cradle . . . . . . . . . . . . . . . . . . . . . . . . . . . . . . . . . . . . . . . . . . . . . . . . . . . . . . . . . . 8
3.4 USB connector cable and adaptors . . . . . . . . . . . . . . . . . . . . . . . . . . . . . . . . . . . 8
4 FUNCTIONAL DESCRIPTION . . . . . . . . . . . . . . . . . . . . . . . . . . . . . . . . . . . . . . . . . . . 9
4.1 Basic principle. . . . . . . . . . . . . . . . . . . . . . . . . . . . . . . . . . . . . . . . . . . . . . . . . . . . 9
4.2 How does the transponder work. . . . . . . . . . . . . . . . . . . . . . . . . . . . . . . . . . . . . . 9
4.2.1 Transponder LED indicator . . . . . . . . . . . . . . . . . . . . . . . . . . . . . . . . . . 10
4.2.2 Cradle LED indicator. . . . . . . . . . . . . . . . . . . . . . . . . . . . . . . . . . . . . . . 10
4.3 Flex Manager . . . . . . . . . . . . . . . . . . . . . . . . . . . . . . . . . . . . . . . . . . . . . . . . . . . 11
4.3.1 Status/Error line . . . . . . . . . . . . . . . . . . . . . . . . . . . . . . . . . . . . . . . . . . 12
5 ACTIVATE TRANSPONDER . . . . . . . . . . . . . . . . . . . . . . . . . . . . . . . . . . . . . . . . . . . 13
5.1 Purchase Subscription . . . . . . . . . . . . . . . . . . . . . . . . . . . . . . . . . . . . . . . . . . . . 13
5.2 Install Flex Manager . . . . . . . . . . . . . . . . . . . . . . . . . . . . . . . . . . . . . . . . . . . . . . 13
5.3 Activate transponder. . . . . . . . . . . . . . . . . . . . . . . . . . . . . . . . . . . . . . . . . . . . . . 16
5.3.1 Activate transponder (via internet) . . . . . . . . . . . . . . . . . . . . . . . . . . . . 16
5.3.2 Activate transponder (via SMS) . . . . . . . . . . . . . . . . . . . . . . . . . . . . . . 18
6 OPERATION . . . . . . . . . . . . . . . . . . . . . . . . . . . . . . . . . . . . . . . . . . . . . . . . . . . . . . . . 19
6.1 Mount transponder . . . . . . . . . . . . . . . . . . . . . . . . . . . . . . . . . . . . . . . . . . . . . . . 19
6.2 Remove and store transponder. . . . . . . . . . . . . . . . . . . . . . . . . . . . . . . . . . . . . . 20
6.3 View status (via Flex Manager). . . . . . . . . . . . . . . . . . . . . . . . . . . . . . . . . . . . . . 21
7 MAINTENANCE . . . . . . . . . . . . . . . . . . . . . . . . . . . . . . . . . . . . . . . . . . . . . . . . . . . . . 22
7.1 Periodic maintenance schedules . . . . . . . . . . . . . . . . . . . . . . . . . . . . . . . . . . . . 22
7.2 Clean. . . . . . . . . . . . . . . . . . . . . . . . . . . . . . . . . . . . . . . . . . . . . . . . . . . . . . . . . . 23
7.3 Charge battery . . . . . . . . . . . . . . . . . . . . . . . . . . . . . . . . . . . . . . . . . . . . . . . . . . 24
7.4 Check/Update subscription. . . . . . . . . . . . . . . . . . . . . . . . . . . . . . . . . . . . . . . . . 25
7.5 Replace parts and accessories. . . . . . . . . . . . . . . . . . . . . . . . . . . . . . . . . . . . . . 25
8 TROUBLESHOOTING . . . . . . . . . . . . . . . . . . . . . . . . . . . . . . . . . . . . . . . . . . . . . . . . 26
8.1 Troubleshooting principles . . . . . . . . . . . . . . . . . . . . . . . . . . . . . . . . . . . . . . . . . 26
8.2 Activation. . . . . . . . . . . . . . . . . . . . . . . . . . . . . . . . . . . . . . . . . . . . . . . . . . . . . . . 26
8.3 Flex Manager . . . . . . . . . . . . . . . . . . . . . . . . . . . . . . . . . . . . . . . . . . . . . . . . . . . 26
8.4 General . . . . . . . . . . . . . . . . . . . . . . . . . . . . . . . . . . . . . . . . . . . . . . . . . . . . . . . . 27
8.5 Flex Cradle . . . . . . . . . . . . . . . . . . . . . . . . . . . . . . . . . . . . . . . . . . . . . . . . . . . . . 28
8.6 Flex Transponder . . . . . . . . . . . . . . . . . . . . . . . . . . . . . . . . . . . . . . . . . . . . . . . . 28
TABLE OF CONTENTS
Flex MX Transponder & Flex Manager User Manual (Revision 1.0) Page 3 of 32
Page 4

1 INTRODUCTION
1.1 Scope of this manual
This manual is intended for users of the Flex MX Transponder & Flex Manager. It provides
information on installing, operating, and maintaining your unit.
The manual is divided into the following sections:
• Introduction - (this section)
• Safety (page 5): describes all safety aspects required when working with MYLAPS
equipment
• Physical description (page 6): physical descriptions of the major components in
the unit
• Functional description (page 9): functional descriptions of the unit
• Activate transponder (page 13): installing Flex Manager software and activating
the transponder
• Operation (page 19): how to use the unit and check status
• Maintenance (page 22): instructions on how to maintain and repair the equipment.
Contains sub-sections for periodic maintenance schedules and corrective
maintenance procedures
• Troubleshooting (page 26): tables with potential problems, causes and solutions
• Appendices (page 30): unit specifications and CE declaration form
1.2 How to use this manual
1 Introduction
This manual is designed to be used in electronic and printed form. Cross references in the
electronic version can be clicked to go directly to the referenced item. Navigation can be done
with the bookmarks and/or the table of contents, which contains live links. Page numbers are
also provided for ease of use with printed copy.
Before installing, operating or maintaining your Flex MX Transponder & Flex Manager for the
first time, always read section 2Safetyon page 5 to familiarize yourself with the safety
aspects of this manual and your system.
To identify individual components, read 3 Physical description on page 6.
For an explanation of how the unit works, read 4 Functional description on page 9.
Read both 5 Activate transponder on page 13 and 6Operationon page 19 completely to
overview the steps required to setup and run Flex MX Transponder & Flex Manager. Refer to
8 Troubleshooting on page 26 to find solutions to setup/operating problems.
When performing scheduled maintenance on Flex MX Transponder & Flex Manager, use
7.1 Periodic maintenance schedules on page 22 to view the schedules and find the required
maintenance procedures. Corrective maintenance is guided from the tables in section
8 Troubleshooting on page 26.
Refer to the Appendices on page 30 for an overview of the technical specifications.
Page 4 of 32 Flex MX Transponder & Flex Manager User Manual (Revision 1.0)
Page 5
2SAFETY
This section describes all safety aspects required when working with MYLAPS equipment. The
safety aspect can relate to potential equipment damage or to danger to personnel working
with this equipment or in the vicinity.
• When installing, operating or maintaining equipment, closely follow the prescribed
instructions in this manual, and use common sense at all times
• If ever in doubt about how to do a job or task safely, always ask for assistance
2.1 General safety responsibilities
High voltages, thermal and stored energy hazards are present in some MYLAPS systems.
Therefore, pay special attention to safety when transporting, operating and maintaining each
system, including:
• Meet all applicable codes, laws and local regulations.
• Read and understand each item in this manual and follow the installation, operator
and maintenance procedures exactly.
• Always use the correct tools for the job and only replace components wit h approved
parts.
• Take recommended precautions—never take short cuts.
RoHS Compliant
This equipment has been tested and found to comply with the limits for RoHS compliant materials. These
limits require manufacturers to ensure that they do not use materials or components that contain restricted
substances that may be harmful to the environment.
2.2 Warnings and cautions
The following alerts are used in this manual:
• WARNINGS alert users of potentially dangerous situations
• CAUTIONS alert users of potential equipment damage
Warnings and cautions in this manual, are indicated by:
•an icon
•the text WARNING or CAUTION
• a textual description, which states the hazard and how to avoid it
The following icons are used in this manual to highlight and warn of safety or other aspects.
These icons may also be attached to the Flex MX Transponder & Flex Manager equipment at
appropriate locations.
2 Safety
General
Caution or
Warning
Flex MX Transponder & Flex Manager User Manual (Revision 1.0) Page 5 of 32
Dangerous
voltage
Not harmful
to the
environment
Page 6

3 PHYSICAL DESCRIPTION
1 Transponder See 3.2 Transponder on page 7
2Cradle See 3.3 Cradle on page 8
3 12-24 VDC adaptor
(optional accessory)
This adaptor is used to connect the cradle to a DC power source
(see 3.4 USB connector cable and adaptors on page 8)
4 100- 240 VAC plugs Choose which plug can be inserted into the adaptor for connecting
the adaptor to your local power source (see 3.4 USB connector
cable and adaptors on page 8)
5 100- 240 VAC adaptor This adaptor is used to connect the cradle to a power source (see
3.4 USB connector cable and adaptors on page 8)
6 USB cable connector For connecting external devices and operator control (see
3.4 USB connector cable and adaptors on page 8)
2
1
3
4
4
5
6
3.1 Introduction
Flex MX Transponder & Flex Manager is a timing concept for sports where simple setup, plus
minimal handling are needed. The Flex Transponder is portable and is designed for operation
during outdoor sports events. The Flex transponder kit has the following standard
components and optional accessories (see Figure 3.1):
• Rechargable transponder
• Universal power sockets for connecting to 100-240 VAC supply (50-60 Hz; 200 mA)
•USB cable
• Cradle for recharging transponder and signal communication with a PC
•Attachment clip
• This Flex MX Transponder & Flex Manager User Manual
• Power adaptor for connecting to 12-24 VDC auto connector (optional accessory - can
be purchased separately from MYLAPS)
See Appendix 1 Specifications on page 30 for complete specifications.
3 Physical description
Page 6 of 32 Flex MX Transponder & Flex Manager User Manual (Revision 1.0)
Figure 3.1 Flex transponder kit
Page 7
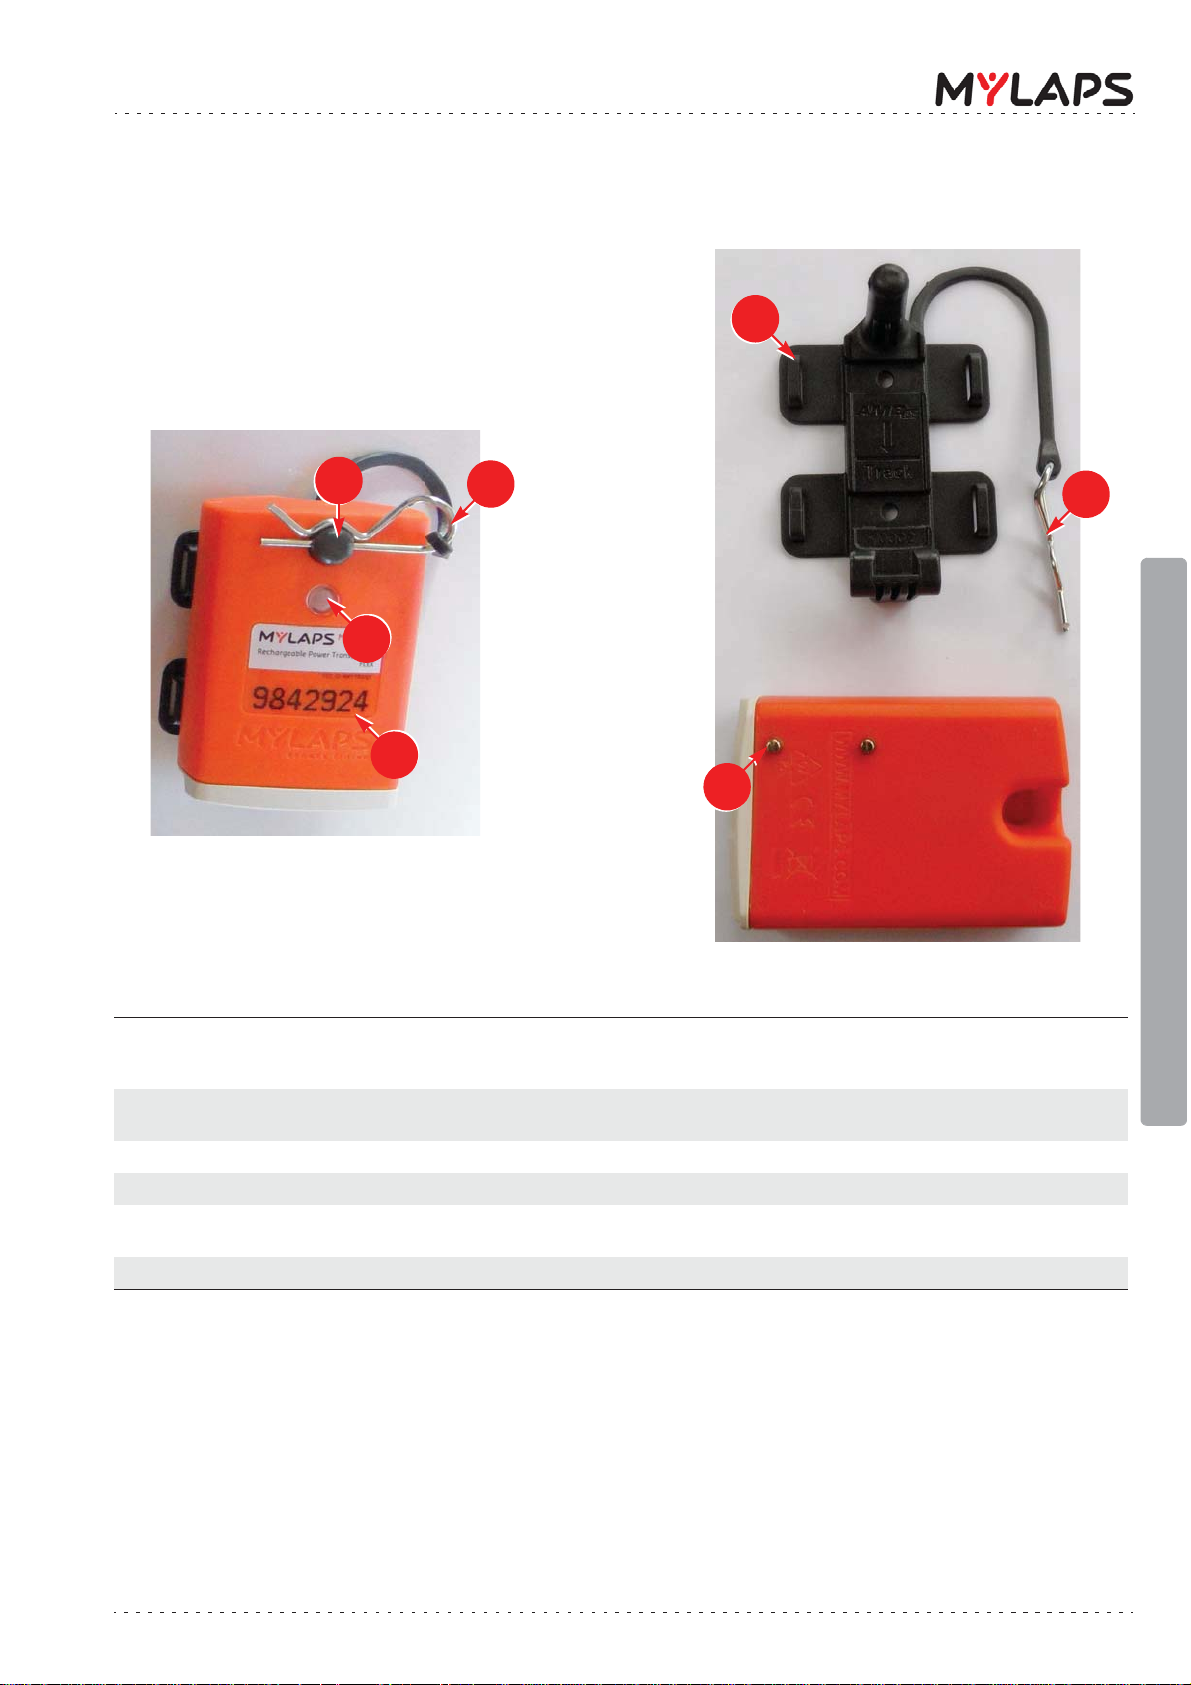
3.2 Transponder
1 LED status display This LED blinks and displays various colours to show the current
status of the transponder - see 4.2.1 Transponder LED
indicator on page 10
2 Attachment pin for holder This pin is inserted through the hole in the transponder to attach
the transponder to the holder
3 Clip Steel clip to lock transponder in place in holder
4Holder Plastic holder to attach transponder to vehicle
5 Charging pins These contact pins align with the cradle contact points when the
transponder is loaded into the cradle for charging
6 Transponder number Unique number to identify your transponder
2
1
5
4
3
front
back
3
6
3 Physical description
Figure 3.2 Transponder
Flex MX Transponder & Flex Manager User Manual (Revision 1.0) Page 7 of 32
Page 8
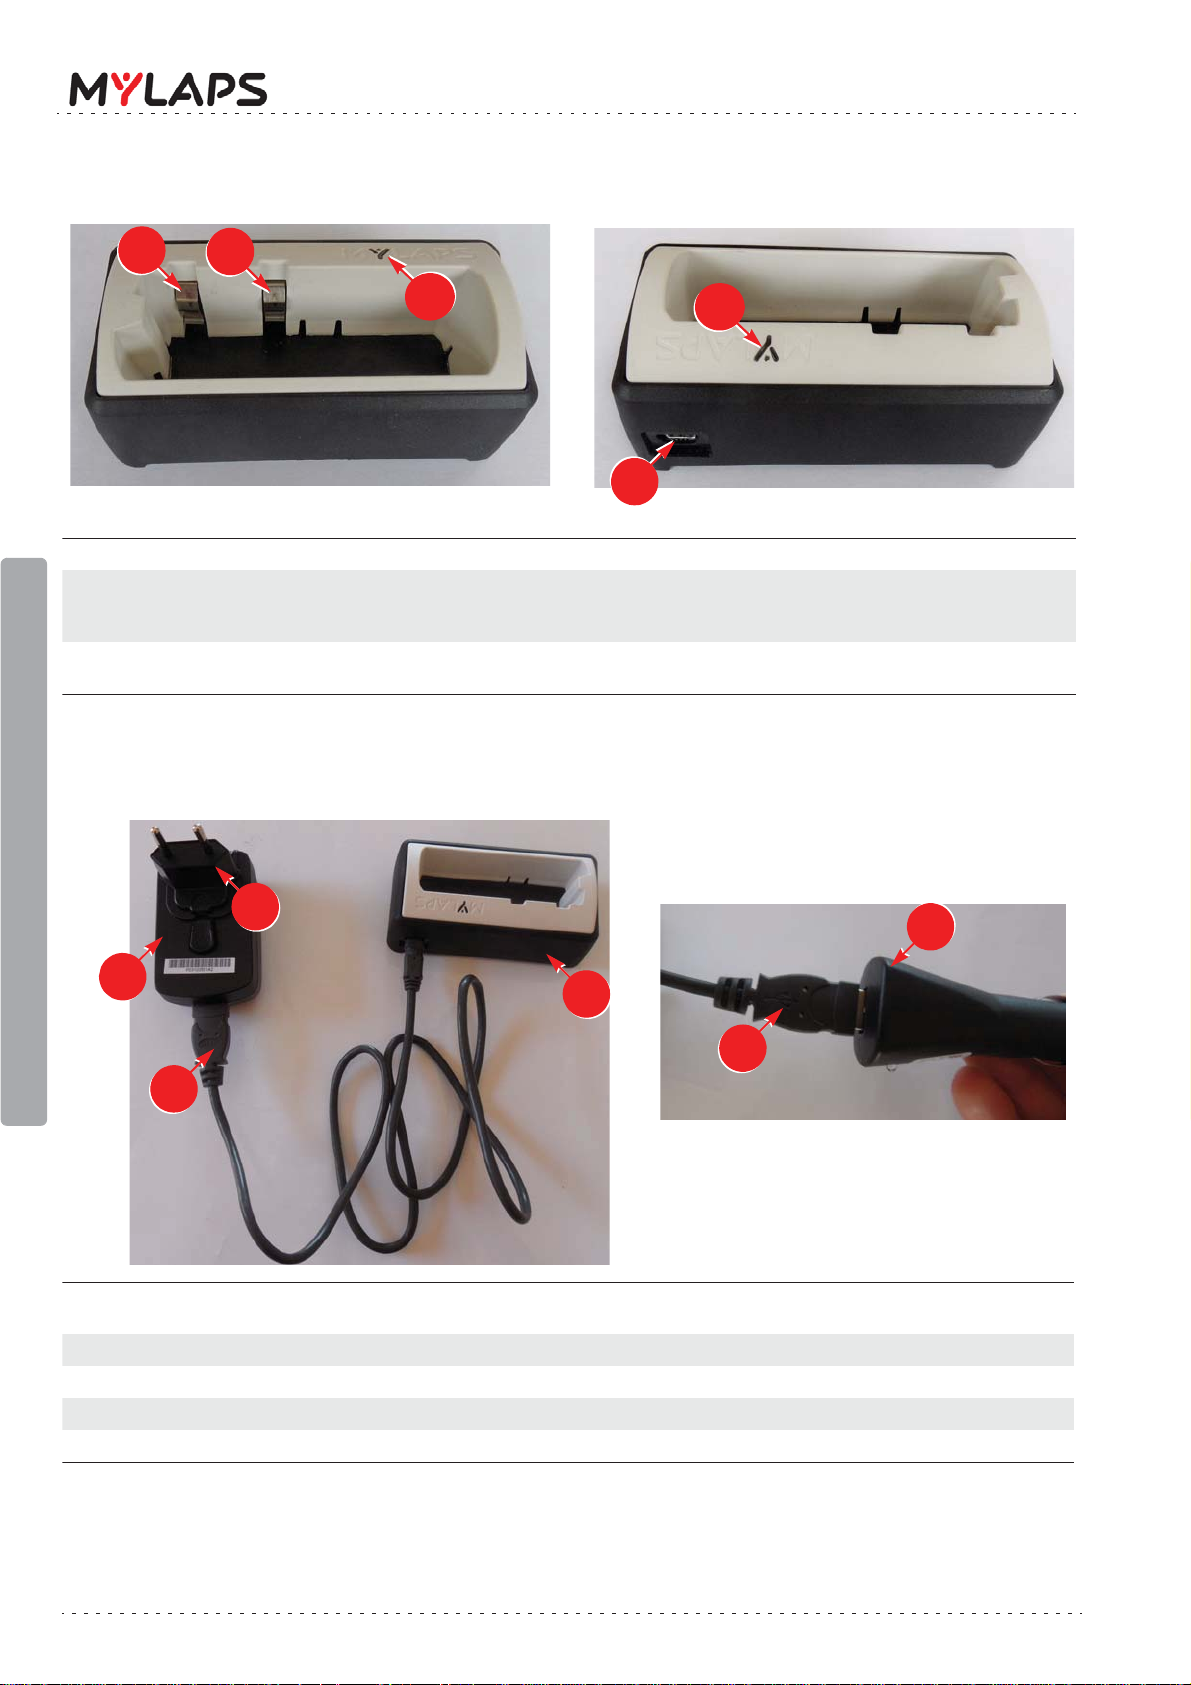
3.3 Cradle
1 USB cable connector Connect here the USB charging/communication cable
2LED indicator This LED blinks and changes color to indicate the status of the
cradle and loaded transponder - see 4.2.2 Cradle LED indicator on
page 10
3 Slots for transponder pins Load the transponder into this slot. The 2 metal strips in the slots
are contact points for the transponder when charging in cradle
1
2
3
3
front
back
2
1 100 - 240 VAC adaptor If using an alternative adaptor, always make sure it is a 5 V USB
adaptor with minimum 500 mA power output
2 USB connector cable Insert this cable into the adaptor and cradle for charging
3 Universal plug Select and insert the correct plug for your power supply
4Cradle
5 Car adaptor (optional) Always use 5 V USB adaptor with minimum 500 mA power output
1
2
4
5
3
2
Figure 3.3 Cradle
3.4 USB connector cable and adaptors
3 Physical description
Page 8 of 32 Flex MX Transponder & Flex Manager User Manual (Revision 1.0)
Figure 3.4 Connector cable and adaptors
Page 9

4 FUNCTIONAL DESCRIPTION
4.1 Basic principle
A MYLAPS personal transponder and account provides access to your official race and practice
data for every lap. Your MYLAPS transponder comes with a unique ID that you can activate
(after purchasing a subscription) and link to your MYLAPS account. Your MYLAPS account
provides unlimited access to all your race and practice results. Being able to analyze your data
will help you improve your performance. Just login to www.mylaps.com/practice from any
location with an internet connection.
The benefits of your personal transponder include:
• Guaranteed accurate and reliable results
• Free and unlimited MYLAPS account
• Online access to all your practice and race lap times
• Permanent storage of your data
• Share your results with your friends
• Simplify registering for events
• Use your transponder worldwide
4.2 How does the transponder work
MYLAPS MX Rechargeable Power Transponders work in combination with the MYLAPS MX
Timing System installed on the track at the start/finish line and optionally at intermediate
points along the track.
Every participant in a race has his own transponder attached to their vehicle/bike. The
transponder emits a unique identification signal. Systems with detection loops or mats along
the course will detect the identification signals from the transponder, giving an exact time of
crossing at that point in the course, e.g. a start or finish. Multiple detection lines can provide
intermediate times.
Based on these signals, the system records your lap time and lap counts. These lap times and
results can be accessed and published on:
• mylaps.com (via your MYLAPS account)
• Scoreboards/monitors
• Your mobile phone
When you first purchase your transponder and subscription, you will need to activate it using
the unique MYLAPS Flex Manager software. This software can be installed on a PC and
eventually used to read out and report the status of your transponder:
• See 5.1 Purchase Subscription on page 13 for how to purchase a subscription
• See 5.2 Install Flex Manager on page 13 for how to install Flex Manager
•Refer to 5.3 Activate transponder on page 16 for how to activate the transponder.
4 Functional description
•Refer to 6.3 View status (via Flex Manager) on page 21 for how to use the software.
The transponder (see Figure 3.2) is rechargeable by loading it into the cradle (when the
cradle is connected to AC or DC power source).
The cradle and the transponder also have LED indicators to show their current status - see:
• 4.2.1 Transponder LED indicator on page 10
• 4.2.2 Cradle LED indicator on page 10
Flex MX Transponder & Flex Manager User Manual (Revision 1.0) Page 9 of 32
Page 10
4.2.1 Transponder LED indicator
The LED on the transponder blinks or glows to show the current status of the transponder see following table:
Transponder LED Status
Steady GREEN (when in cradle) Active (battery full)
Blinks RED once every second (when in cradle) Active, charging (battery empty)
Blinks GREEN in a sequence to indicate the
number of days of charge remaining; e.g. 4
blinks indicates 4 days of charge remaining
(the blink sequence repeats every 5 sec)
Blinks RED quickly every 5 sec Active, not charging and battery almost empty -
Steady RED Active, not charging and battery empty -
Blinks RED quickly 5 times per second Inactive
LED is not lit (when in cradle) In ‘sleep mode’
LED is not lit Battery is completely discharged
Active, not charging and battery charge is
getting low
less than 1 day of charge left
transponder will stop working at any moment
4.2.2 Cradle LED indicator
The LED on the cradle blinks or glows to show its current status - see following table:
Cradle LED Status
4 Functional description
Blinks GREEN Connected to PC or to power source
Steady RED (with transponder loaded) In error state
Blinks RED In error state
Page 10 of 32 Flex MX Transponder & Flex Manager User Manual (Revision 1.0)
Page 11

4.3 Flex Manager
1 Status/error line See 4.3.1 Status/Error line on page 12
2 Language button Choose here the desired language for the Flex Manager user
interface (current choices are English, French, German, Italian,
Spanish, Dutch and Russian)
3 Help (?) button Choose here for help documentation (this documentation will be
displayed in the interface language - see above)
4 Internet status Displays if an internet connection is available or not
5 Connected to cradle Displays if the cradle is connected to the PC with the USB cable
6 Transponder is connected Displays if the transponder is docked in the cradle
7 Expiration date Displays the expiration date for the transponder subscription. If
the transponder is docked in the cradle after this date, then it will
not work until the subscription is renewed.
8 Activate button Used to activate transponder - see 5.3 Activate transponder on
page 16
9 Battery status Displays the current charged state of the tr ansponder rechargable
battery (0 to 5 days charge remaining)
3
1
2
4
5
6
7
8
9
Flex Manager is a user-friendly software interface for activating and reviewing the status of
your transponder. See Figure 4.1 for an example display when the software is started with a
cradle and transponder connected.
4 Functional description
Flex MX Transponder & Flex Manager User Manual (Revision 1.0) Page 11 of 32
Figure 4.1 Flex Manager user interface
Page 12

4.3.1 Status/Error line
Possible displays here are update information and error situations. See 3 example messages
in Figure 4.2.
NOTE: The normally green LED on the left of the status line will glow red if there is an error
present. See 8 Troubleshooting on page 26 for how to solve these errors.
Figure 4.2 Flex Manager status line
4 Functional description
Page 12 of 32 Flex MX Transponder & Flex Manager User Manual (Revision 1.0)
Page 13

5 ACTIVATE TRANSPONDER
This section describes how to install the Flex Manager software for eventually activating the
Flex transponder. You can only activate a transponder if you have previously purchased a
valid subscription - see below.
5.1 Purchase Subscription
Subscriptions are purchased through our web shop at www.mylaps.com. Buy a subscription
as follows:
1. Navigate to your favourite sport (e.g. MX) at www.mylaps.com.
2. Go to the shop and select an appropriate subscription for your Flex Transponder.
3. Pay for the subscription using your credit card or other payment methods.
Once the subscription is purchased, you can continue with installing Flex Manager and
activating the transponder. See following sections:
• 5.2 Install Flex Manager on page 13
• 5.3 Activate transponder on page 16
5.2 Install Flex Manager
Before starting installation, make sure that
1
the cradle is not connected to the PC.
Download software from:
2
http://flex.mylaps.com
From the pull-down menu, choose the lan-
3
guage to use while running the install wizard.
Press the
Wait until the STARTUP screen appears for the
4
install wizard screen.
Press the
OK button.
NEXT button.
5 Activate transponder
Flex MX Transponder & Flex Manager User Manual (Revision 1.0) Page 13 of 32
Page 14

Read the software license agreement, and
5
select the ‘I accept the agreement’ radio button.
Press the
Check the location where the Flex Manager
6
software application will be installed; if you
want to install at a different location, choose
‘Browse’ and select a new location.
When the location is correct, press
If required, press BACK to return to the
previous wizard screen.
NEXT button.
NEXT.
Choose if and where you want the Flex Man-
7
ager shortcuts.
5 Activate transponder
When the location is correct, press
If required, press BACK to return to the
previous wizard screen.
Choose if you want a desktop icon and/or a
8
Quick launch icon.
When ready, press
If required, press BACK to return to the
previous wizard screen.
NEXT.
NEXT.
Page 14 of 32 Flex MX Transponder & Flex Manager User Manual (Revision 1.0)
Page 15

Check that all the listed selections are correct.
9
When ready, press
If required, press BACK to return to the
previous wizard screen.
Wait while the installwizard installs the appli-
10
cation software (this may take a few minutes
during which a progress bar will be displayed).
INSTALL.
5 Activate transponder
When Flex Manager is correctly installed, a
11
FINAL window will appear.
If required, select the checkbox to launch Flex
Manager after closing the screen.
Press
ard.
If Flex Manager does not install correctly,
repeat steps 3 to 10; if Flex Manager still does
not install correctly, contact MYLAPS.
FINISH to acknowledge and exit the wiz-
Flex MX Transponder & Flex Manager User Manual (Revision 1.0) Page 15 of 32
Page 16

5.3 Activate transponder
Refer to the following possibilities:
• Activate a transponder subscription via internet - see 5.3.1 Activate transponder (via
internet) on page 16
• Activate a transponder subscription via SMS - see 5.3.2 Activate transponder (via
SMS) on page 18
NOTE: When activating a transponder in a cradle, make sure that no other transponder is closer
than 50 mm to the cradle.
5.3.1 Activate transponder (via internet)
Start up Flex Manager on the PC (if not
1
already started).
Flex Manager will automatically try to find a
connected crad le.
Use the supplied USB cable to connect the
2
cradle to a USB connector on the PC.
5 Activate transponder
Insert your transponder in the cradle and
3
check that the LED on the transponder is
showing RED or GREEN.
Page 16 of 32 Flex MX Transponder & Flex Manager User Manual (Revision 1.0)
Page 17

Activate your transponder by pressing the
4
‘
ACTIVATE’ button in Flex Manager (make sure
you have previously purchased a
subscription).
If you have correctly activated the
5
transponder, the expiration date will be shown
in the bottom left of the screen and you can
use your transponder - see 6Operationon
page 19.
If the transponder is not correctly activated,
you may need to purchase a new subscription
from http://flex.mylaps.com.
If the transponder information is not known
by MYLAPS, a ‘Registration form’ will be
displayed. Complete this form an d p r es s
If problems still occur, contact MyLaps at
OK.
support@mylaps.com.
5 Activate transponder
Flex MX Transponder & Flex Manager User Manual (Revision 1.0) Page 17 of 32
Page 18

5.3.2 Activate transponder (via SMS)
Use the supplied USB cable to connect the
1
cradle to a USB connector on the PC.
Insert your transponder in the cradle and
2
check that the LED on the transponder is
flashing RED.
Start up Flex Manager on the PC.
3
The ‘No internet connection’ status will be
shown.
5 Activate transponder
Select the ‘
button.
A new screen will be displayed with a
message and a series of code fields - see next
step.
Text the number listed in the message to the
4
telephone number ‘31658899776’.
You will receiv e a 55 character code which you
must enter into the fields displayed on th e
screen, and then press
Your transponder will then be activated.
ACTIVATE SUBSCRIPTION VIA SMS’
OK.
Page 18 of 32 Flex MX Transponder & Flex Manager User Manual (Revision 1.0)
Page 19

6OPERATION
Once correctly activated via Flex Manager (and fully charged), the transponder is ready to be
mounted to your vehicle/bike and automatically record your times as you pass the measuring
point(s).
The following operation steps may be required:
• Mount the transponder on your vehicle/bike for the race - see 6.1 Mount
transponder on page 19 for more details; if required
• Check your lap/race results on the scoreboard or by loggi ng in to ‘Your resul ts’ page
on www.mylaps.com/practice
• If required after the race, you can remove the Flex transponder from your vehicle/
bike and store it as described in 6.2 Remove and store transponder on page 20.
• Mount the Flex transponder in the cradle and check the charge and subscription
status - see 6.3 View status (via Flex Manager) on page 21.
6.1 Mount transponder
Remove holder from transponder:
1
• R emove retaining clip
• Carefully detach the holder from the
transponder
6 Operation
Use tie wraps to mount holder on vehicle/
2
bike:
• Find a suitable location on vehicle/bike,
making sure that the holder is not more
than 120 cm above the track surface
• Check that the holder is mounted firmly
and cannot become loose
WARNING: Loose transponders are very
dangerous.
Flex MX Transponder & Flex Manager User Manual (Revision 1.0) Page 19 of 32
Page 20

Attach transponder in holder:
3
• Press the transponder into place in the
holder
• Lock the transponder in place with the
retaining clip
6.2 Remove and store transponder
Remove the transponder from the holder:
1
• Normally you can leave the holder attached
to the vehicle/bike
• Remove the retaining clip
• Detach the transponder from the holder
6Operation
Store the transponder in a dry cool location:
2
• Normally you can best load the
transponder into the cradle for charging see 7.3 Charge battery on page 24
• After charging, you can disconnect the
cradle from the power source and allow the
transponder to enter the ‘sleep’ mode
(transponder LED is not lit while
transponder is in cradle). The ‘sleep’ mode
turns off transponder signal output and
saves battery life (up to 3 times longer on
a single charge).
When needed for the next race, remove the
3
transponder from the cradle to de-activ ate
‘sleep’ mode.
NOTE: Because many airline regulations require that all equipment output signals are switched
off during flights - you can best transport the transponder in the cradle in ‘sleep’ mode.
Page 20 of 32 Flex MX Transponder & Flex Manager User Manual (Revision 1.0)
Page 21

6.3 View status (via Flex Manager)
Start up Flex Manager on a PC.
1
Use the supplied USB cable to connect the
2
cradle to a USB connector on the PC.
Insert your transponder in the cradle and
3
check that the LED on the transponder is lit.
Check the expiration date in the bottom left of
4
the screen.
Also check the battery level on the right of the
screen and charge the transponder if
necessary - see 7.3 Charge battery on
page 24.
6 Operation
NOTE: When checking the status of a
transponder in a cradle, make sure no other
transponder is within 50 mm of the cradle.
Flex MX Transponder & Flex Manager User Manual (Revision 1.0) Page 21 of 32
Page 22

7 MAINTENANCE
Maintenance can be described as, but not limited to :
• Checking and testing components
• Cleaning the unit and individual components - accumulated dirt can hamper unit
operations
• Charging the unit
• Troubleshooting any malfunctions that may occur on the unit before, during and after
operations
7.1 Periodic maintenance schedules
Use the following table to plan routine maintenance for your unit. If you are using the
electronic version of this d o cument, click the text or the page number to jump to the
procedure.
Maintenance activity
Service interval
7 Maintenance
Clean 23
Charge battery 24
Check/Update subscription 25
Replace parts and accessories 25
Page
daily
100 hours
300 hours
z z
z
z
z
as required
Page 22 of 32 Flex MX Transponder & Flex Manager User Manual (Revision 1.0)
Page 23

7.2 Clean
CAUTION
ENVIRONMENTAL HAZARD
Plastic and other waste products are harmful to the environment. Dispose of waste items in a responsible,
environment-friendly manner. Separate recyclable products from other, non-recyclable waste. Heed site
regulations and obey local environmental by-laws
Take a clean soft cloth or brush and moisten it
1
with clean water (do not use an abrasive
cleaning liquid).
Use the moist cloth or brush to clean the
2
transponder, paying particular attention to
remove any dirt on the connector pins.
Dry off any excess moisture.
Take a fresh clean cloth and moisten it with
3
clean water.
Clean the cradle making sure not to get
moisture on the electrical connector where
the USB cable can be connected.
Dry off any excess moisture.
If necessary use clean cotton tips to clean any
dirt off the connectors on both the cradle and
transponder.
7 Maintenance
Dispose of the cleaning materials (check your
4
local environmental regulations).
Flex MX Transponder & Flex Manager User Manual (Revision 1.0) Page 23 of 32
Page 24

7.3 Charge battery
Check that temperature of the charging
1
location is within range 0 to +40
+104
°F).
CAUTION
HIGH VOLTAGE:
Before connecting power to the cradle, make sure that all electrical connections are secure..
Connect power to cradle:
2
• If charging with AC power, attach the 100
- 240 VAC cable between the cradle and an
AC power source
• If charging with DC power, attach the 12 24 VDC cable between the cradle and a DC
power source
• Check that the LED on the cradle shows
blinking green
°C (+32 to
3
7 Maintenance
4
5
Load the transponder into the cradle:
• The LED on the transponder will flash red to
show it is charging
• The LED on the cradle blinks green
Check the battery status on the LED on the
transponder:
• The LED will show a constant green when
the transponder is fully charged (takes
approximately 16 hours from empty to full)
Disconnect power:
• Remove power connecto r from source
• Allow the transponder to enter the sleep
mode (transponder LED is not lit while
transponder is in cradle)
Page 24 of 32 Flex MX Transponder & Flex Manager User Manual (Revision 1.0)
Page 25

7.4 Check/Update subscription
Connect the cradle with loaded transponder to
1
a PC with the USB cable.
Make sure there is no other transponder
located within 50 mm from the cradle.
Check on the PC that you are connected to the
2
internet.
Start up the FlexManager application.
Check the subscription valididy in the bottom
3
left corner of the screen.
If the expiration date shows ‘None’, update
the subscription as described in 5Activate
transponder on page 13.
7.5 Replace parts and accessories
Please contact MYLAPS for the part numbers and ordering instructions for defect or lost parts.
7 Maintenance
Flex MX Transponder & Flex Manager User Manual (Revision 1.0) Page 25 of 32
Page 26

8 TROUBLESHOOTING
8.1 Troubleshooting principles
Troubleshooting for the Flex transponder can be divided into 5 distinct categories:
• Activation - see page 26
• Flex Manager - see page 26
• General - see page 27
•Flex Cradle - see page 28
• Flex Transponder - see page 28
If troubleshooting does not solve a problem, contact MYLAPS at support.flex@mylaps.com.
8.2 Activation
Q: How can I activate (the subscription of) my transponder?
A: See 5 Activate transponder on page 13
Q: Can I upgrade my transponder when I don't have an internet connec-
tion?
A: If you have no internet connection but you do have a subscription, there is a
backup solution - see 5.3.2 Activate transponder (via SMS) on page 18
8.3 Flex Manager
8 Troubleshooting
Q: My Flex Manager won't connect to internet - what do I do?
A: Try to access a website to check your internet connection is OK (e.g.
www.mylaps.com)
1. If you cannot access a website, check your internet settings.
2. If you can access a website, check that you can access "flex.mylaps.com".
3. If you cannot access "flex.mylaps.com", please contact MYLAPS.
Q: How do I install Flex Manager?
A: Download it from flex.mylaps.com (make sure that you have administrator
rights to install Flex Manager).
Q: Can I install Flex Manager on every Operating System?
A: Only on a Windows Operating System.
Page 26 of 32 Flex MX Transponder & Flex Manager User Manual (Revision 1.0)
Page 27

Q: Am I using the latest version of Flex Manager?
A: Flex Manager automatically checks for the latest version when it starts up on
your PC with internet.
8.4 General
Q: What is the Mylaps MX Flex Rechargeable Power Transponder?
A: It is a pay for use based transponder for timekeeping. You pay a fee for using
the transponder for a certain period of time (normally 1 year).
Q: I didn't activate my transponder but I want to race now. What do I do?
A: Follow the instruction in section 5.3.1 Activate transponder (via internet) on
page 16. If you have no internet connection but you do have credit available -
see 5.3.2 Activate transponder (via SMS) on page 18
Q: How do I see when my transponder is NOT active?
A: The LED on the transponder will flash RED fast (5 x per second).
If you connect your transponder to the Flex Manager software (on your PC)
using the Flex cradle, Flex Manager will display the expire date and the status
of the transponder (active or not active) next to the LED on the screen.
Q: How/Where can I see that my subscription is about to expire?
A: Connect your transponder to Flex Manager using the Flex cradle; Flex Manager
will display the expire date and the state of the transponder (active or not
active)
Q: Is MYLAPS Flex transponder compatible with the timing system at my
club?
A: If your club uses the Mylaps MX Timing System for timekeeping, you can use
the Mylaps Flex transponder at your club.
Q: Is there documentation in my own language?
A: The documentation is available in English, French, German, Italian, Spanish,
Dutch and Russian. Select the correct language online in Flex Manager (upper
right corner) to automatically set the manual language.
8 Troubleshooting
Flex MX Transponder & Flex Manager User Manual (Revision 1.0) Page 27 of 32
Page 28

8.5 Flex Cradle
Q: Can I use someone else’s cradle to activate and/or charge my trans-
ponder?
A: Yes.
Q: How do I connect the flex cradle to my PC?
A: Use the enclosed USB cable to connect to a USB port.
Remember to FIRST install the software before connecting the cradle.
Q: I've put my transponder in the cradle, but the Flex Manager still says
"Transponder not detected".
A: See flowchart on page 29.
Q: What is the LED indication on my cradle?
A: See 4.2.2 Cradle LED indicator on page 10.
8.6 Flex Transponder
Q: What is the LED indication on my transponder?
8 Troubleshooting
A: See 4.2.1 Transponder LED indicator on page 10.
Q: How can I see that my transponder is active?
A: Flex Manager shows the transponder is active; or, check the LED indicator on
the transponder - see 4.2.1 Transponder LED indicator on page 10
Q: How/Where can I see that my subscription is about to expire?
A: Place your transponder in the cradle and start up Flex Manager on your PC to
see when your transponder subscription will expire.
Page 28 of 32 Flex MX Transponder & Flex Manager User Manual (Revision 1.0)
Page 29

Q: I've put my transponder in the cradle, but Flex Manager still says
Is the cradle
detected?
Transponder
not detected
Is transponder
active?
YES
Is transponder
LED steady
green or blink
red once/sec?
Communication error
between transponder and
cradle - check if contacts are
clean or check using a
different PC or a different USB
cable
Communication error
between PC and cradle
- check again using a
different PC or a
different USB cable
Transponder
is not
charging -
re-insert it
YES
NO
NO
YES
NO
A: Troubleshoot using the following flowchart:
"Transponder not detected".
8 Troubleshooting
Flex MX Transponder & Flex Manager User Manual (Revision 1.0) Page 29 of 32
Page 30

APPENDICES
Appendix 1: Specifications
NOTE: Specifications are subject to change without notice.
Transponder
Dimensions (B x D x H) 73 x 50 x 22 mm (approx. 2.9 x 2 x 0.9 in)
Weight (including accessories) 90 g (approx. 0.2 lb)
Charge time min. 16 hours for full charge
Operating time min. 4 days (after full charge)
Operating temperature -20 to +50 °C (-4 to +122 °F)
Protection class Water and shockproof (IP67)
Maximum speed 120 km/h (75 mph)
Timing Resolution 0.006 sec
Signal transfer magnetic induction
Transponder mounting position Max. height 120 cm (4 ft)
Cradle
Appendices
Dimensions (B x D x H) 95 x 45 x 38 mm (approx. 3.74 x 1.77 x 1.50 in)
Weight 80 g (approx. 0.17 lb)
Operating temperature 0 to +50 °C (+32 to +122 °F)
Input voltage
Power consumption 0.08 A / 5 V
IP Protection Class Indoor use only (IP20)
USB powered
(1)
Accessories
USB cable length 1000 mm (approx. 39 in)
USB cable type A to mini-B
Wall adapter input voltage 100 to 240 VAC at 50/60 Hz
Wall adapter DC output voltage
Wall adapter output current 1 A / 5 V
(1) When connecting multiple cradles to a PC, only use a USB hub with an extra power source.
Page 30 of 32 Flex MX Transponder & Flex Manager User Manual (Revision 1.0)
5 V +/- 5%
Page 31

Appendix 2: CE Declaration
CE DECLARATION OF CONFORMITY
We,
MYLAPS
Zuiderhoutlaan 4
2012 PJ Haarlem, The Netherlands
Declare that the system
MX Flex System
Appendix 2: CE Declaration
in accordance with the following directives:
2006 / 95 / EC The Low Voltage Directive
2004 / 108 / EC The Electromagnetic Compatibility Directive
1999 / 5 / EC Radio & Telecommunications Terminal Equipment Directive
has been designed and manufactured to the following specifications:
EN 300 330-2 V1.5.1 (2010-02)
EN 60950-1 (2006) + A11 (2004)
Name of authorized person: John Verwoerd
Function of authorized person: R&D Director
Place and Date: Haarlem, 14 April 2011
Signature of authorized person:
Flex MX Transponder & Flex Manager User Manual (Revision 1.0) Page 31 of 32
Page 32

Appendix 3: FCC Declaration
This equipment complies with part 15 of the FCC rules. Operation is subject to the following
two conditions:
(1) This equipment may not cause harmful interference, and
(2) this equipment must accept any interference received, including interference that may
cause undesired operation.
Warning (part 15.21)
Changes or modifications not expressly approved by the party responsible for compliance
could void the user's authority to operate the equipment.
Information to the User (Part 15.105 (b))
Note: This equipment has been tested and found to comply with the limits for a Class B digital
device, pursuant to part 15 of the FCC Rules. These limits are designed to provide reasonable
protection against harmful interference in a residential installation. This equipment
generates, uses and can radiate radio frequency energy and, if not installed and used in
accordance with the instructions, may cause harmful interference to radio communications.
However, there is no guarantee that interference will not occur in a particular installation. If
this equipment does cause harmful interference to radio or television reception, which can be
determined by turning the equipment off and on, the user is encouraged to try to correct the
interference by one or more of the following measures:
Appendix 3: FCC Declaration
- Reorient or relocate the receiving antenna.
- Increase the separation between the equipment and receiver.
- Connect the equipment into an outlet on a circuit different from that to which the receiver
is connected.
- Consult the dealer or an experienced radio/TV technician for help
Page 28 of 32 Flex MX Transponder & Flex Manager User Manual (Revision 1.0)
Page 33

MYLAPS contact information:
For general information:
MYLAPS EMEA Office Haarlem
Zuiderhoutlaan 4
2012 PJ Haarlem
The Netherlands
Phone: +31 (0)23 7600100
Fax: +31 (0)23 529 0156
info@mylaps.com
Worldwide support team
support.flex@mylaps.com
Worldwide sales
sales@mylaps.com
Local enquiries
Please contact your local distributor
Page 32 of 32 Flex MX Transponder & Flex Manager User Manual (Revision 1.0)
 Loading...