


WhisperJECT
INSTRUCTIONS FOR USE
IMPORTANT: Please read these instructions
prior to administering your rst injection, even
if you have used similar autoinjector devices.
Rx only
™

INSTRUCTIONS FOR USE FOR
WhisperJECT™ AUTOINJECTOR
For single patient or individual use only.
For Rx only.
The WhisperJECT
with FDA-approved drug products with non-viscous
(aqueous) liquid formulations, which are presented in
a 1.0 mL BD
needle, containing a fi xed needle of 27G to 29G.
The WhisperJECT
injection device for the subcutaneous injection
of FDA-approved drugs.
For instructions regarding the use of the drug,
refer to the drug patient information booklet
provided with the drug product.
If the device does not function, do not use.
TM
Autoinjector is intended for use
®
, pre-fi lled, glass syringe with staked
TM
Autoinjector is a reusable
For more information, call
Mylan Pharmaceuticals Inc.
at 1-877-446-3679
(1-877-4-INFO-RX).
Made in Taiwan
Manufactured for:
Mylan Pharmaceuticals Inc.
Morgantown, WV 26505 U.S.A.

ABOUT THE WhisperJECT™
AUTOINJECTOR AND CARRYING CASE
The WhisperJECT™ Autoinjector is good for two years from rst
day of use and should then be replaced.
Once set up and assembled, the WhisperJECT™ Autoinjector will
allow a user to administer a subcutaneous injection.
While not in use, store the WhisperJECT™ Autoinjector in the
Protective Case until required for your next dose.
4 5
IMPORTANT WARNINGS
CAUTION: Keep out of reach of children.
Only use the 1.0 mL BD®, pre-lled, glass
syringe with staked needle, containing a
xed needle of 27G to 29G with the
WhisperJECT™ Autoinjector.
DO NOT share your WhisperJECT™
Autoinjector with other people.
DO NOT use the WhisperJECT™ Autoinjector
without a 1.0 mL BD®, pre-lled, glass syringe
or with an empty or used 1.0 mL glass syringe.
This could damage the WhisperJECT™
Autoinjector.
After inserting the 1.0 mL BD®, pre-filled,
glass syringe, DO NOT attempt to remove
the Orange Needle Cap Remover unless
the WhisperJECT™ Autoinjector is
fully assembled.
DO NOT insert anything other than the
Orange Needle Cap Remover and Syringe
Housing to reset the device.
DO NOT twist or unscrew the Needle Depth
pa st “10.”
DO NOT attempt to replace the Orange
Needle Cap Remover after injection while a
syringe is still in the device.
If the WhisperJECT™ Autoinjector is
dropped, it should be replaced.
NOTE: Refer to the Patient Information
Leaet for patient support information and
to learn how to safely use the 1.0 mL BD®,
pre-lled, glass syringe.
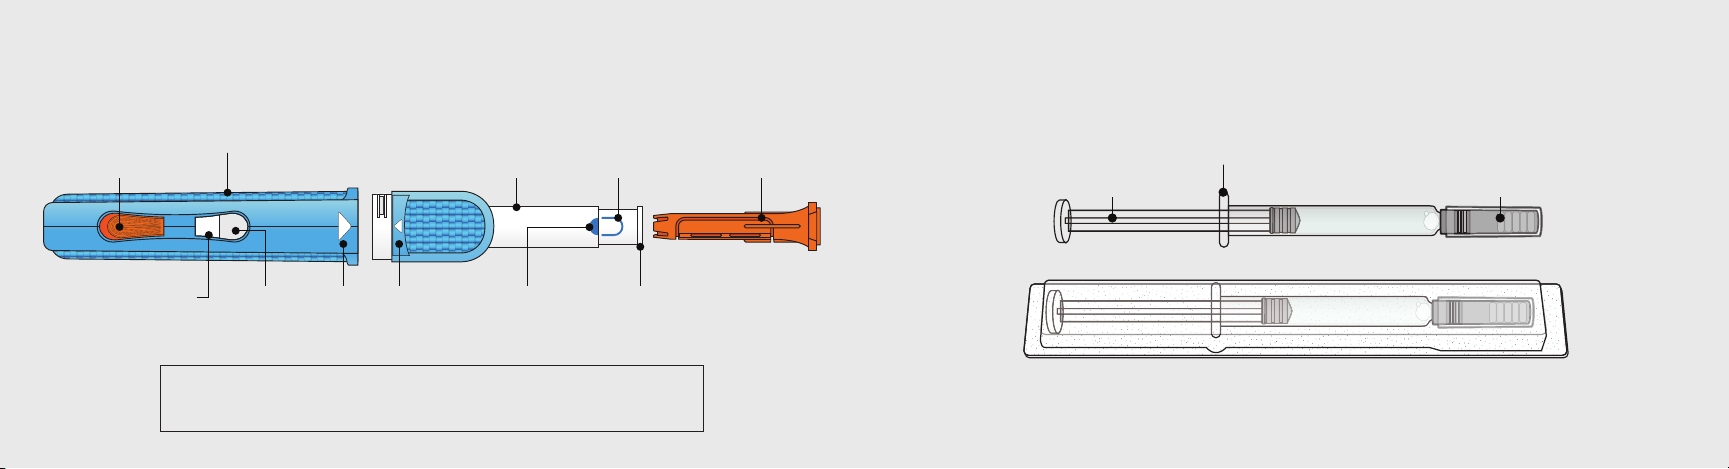
AUTOINJECTOR PARTS 1.0 mL BD®, PRE-FILLED, GLASS SYRINGE
(Not Included with WhisperJECT™ Autoinjector Kit)
Injection
Button
Plunger
Handle
Viewing
Window
White Alignment
Arrows
Syringe
Housing
Needle Depth
Indicator
Needle Depth
Setting Value
10
Needle Depth
Adjuster
Orange Needle
Cap Remover
Plunger
Rod
Glass Rim
Needle Cap
If you need help, or have any questions, please call
6 7
6 7
1-877- 446 - 3679 (1-877- 4 -INFO -R X).
1.0 mL BD®, pre-fi lled, glass syringe in Protective Blister Packaging
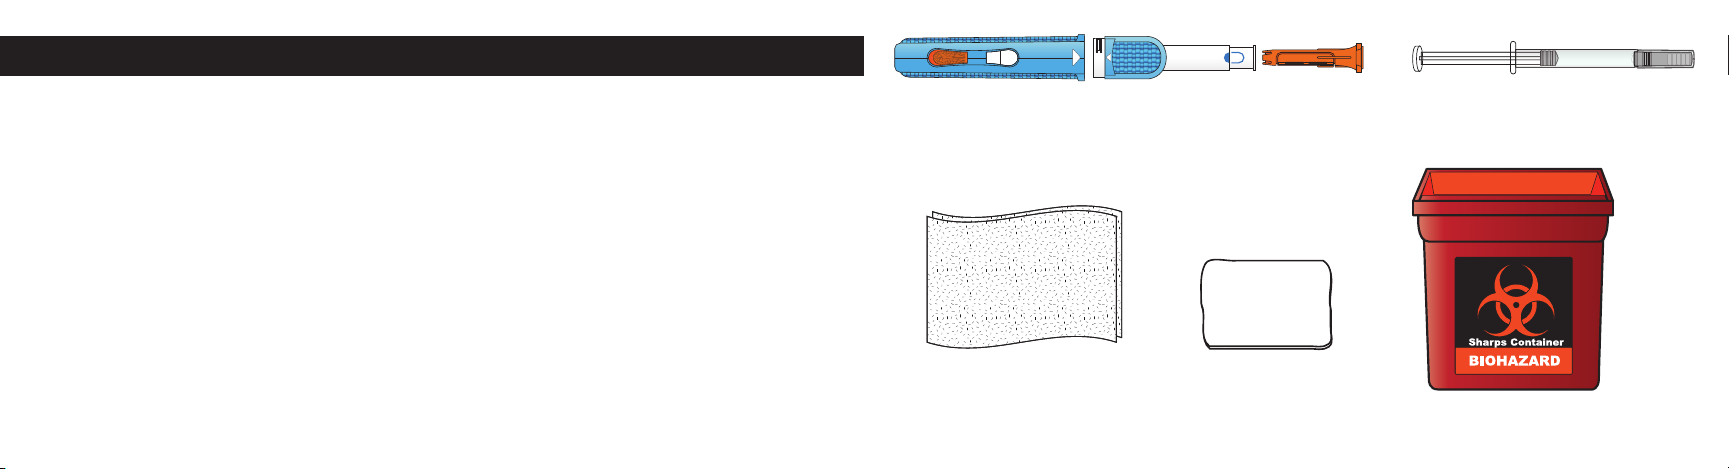
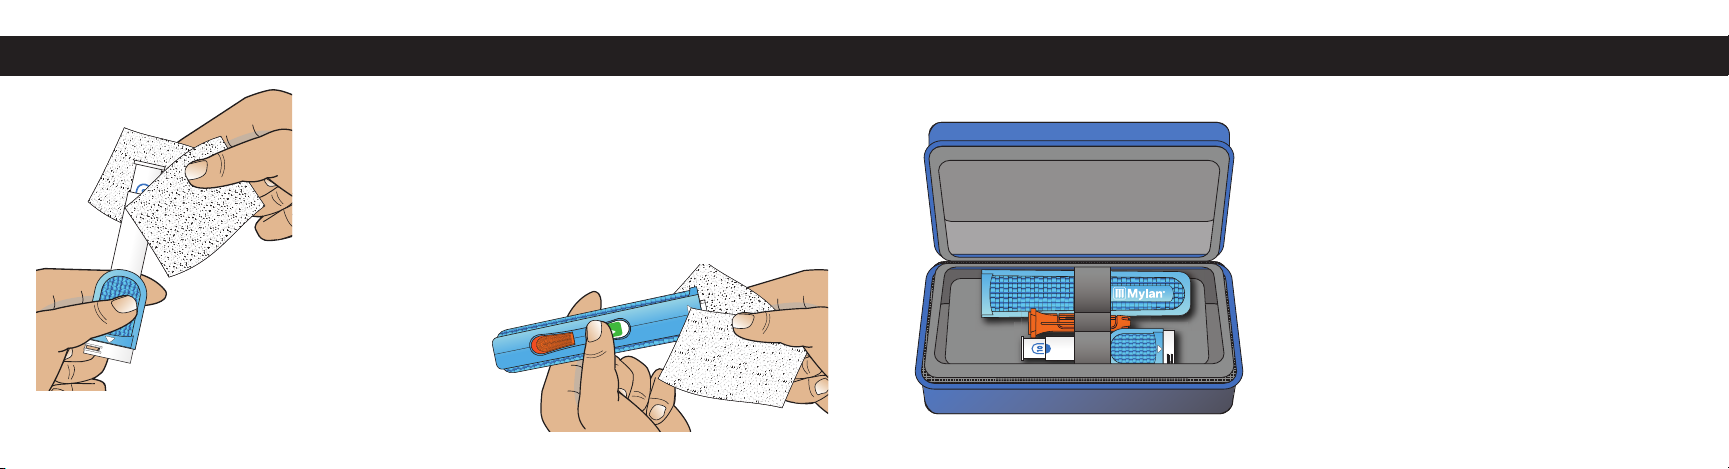
Wash Hands and Gather Supplies
10
Wash hands with soap and water prior to handling supplies.
Gather the following supplies:
• WhisperJECT™ Autoinjector in
Protective Case
• 1.0 mL BD
®
, pre- lled, Glass Syringe
(not included with device)
• Clean damp cloth for device
cleaning post-injection
(not included with device)
• Alcohol swab for skin
WhisperJECT™ Autoinjector
1.0 mL BD®, pre-fi lled,
Glass Syringe
(not included with device)
• Sharps Container
(not included with device)
Clean Damp Cloth
(for Device Cleaning)
8 9
Alcohol Swab
Sharps Container
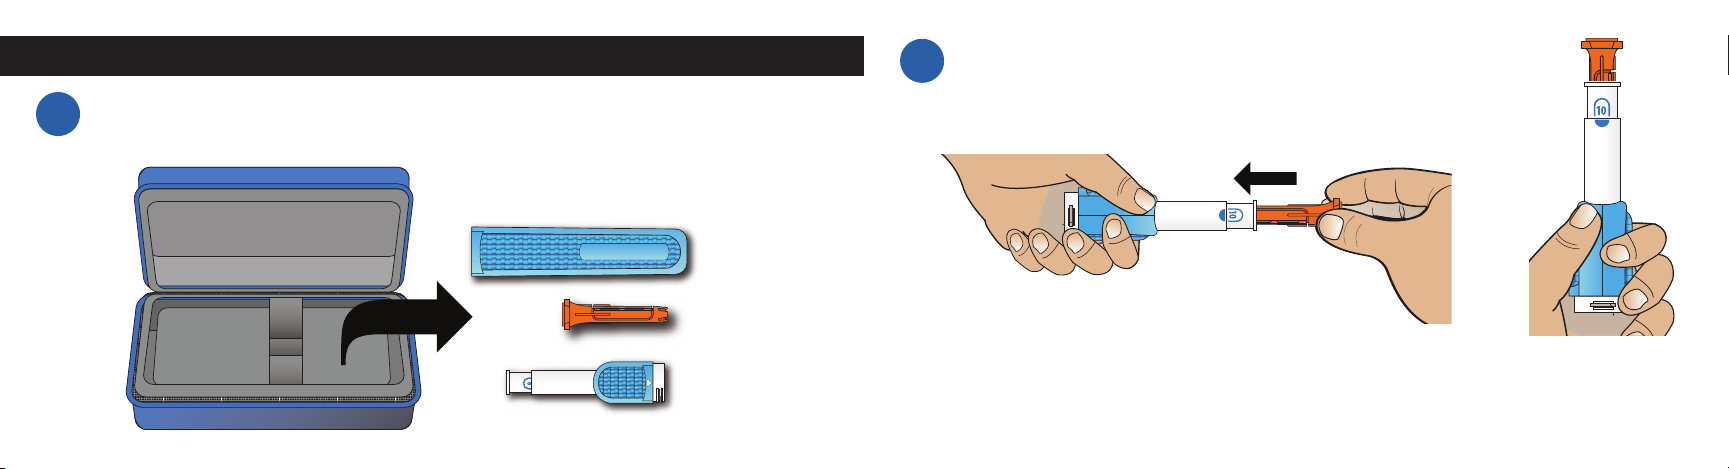
Step 1 – Attach the Orange Needle Cap Remover
Insert the Orange Needle Cap Remover into the Syringe Housing.
1B
Remove the Handle, Orange Needle Cap Remover and
1A
Syringe Housing from the Protective Case.
Note: The Orange Needle Cap Remover
does not click into place.
DO NOT continue to Step 2 until the
Orange Needle Cap Remover is inserted.
10 11

Position the Handle above
Step 2 – Reset the Autoinjector
Place the Syringe Housing on a clean at surface with the
2A
Orange Needle Cap Remover end up.
2B
the Syringe Housing with
the open end of the Handle
against the Orange Needle
Cap Remover.
While maintaining one hand
on the Syringe Housing for
stability, push the Handle
down onto the Syringe
Housing until you feel and
hear a “CLICK.” This signals
that the device has locked
into position.
The Viewing Window should
be blank (no green hash mark
or check mark visible).
12 13

Con rm the Autoinjector is reset.
AFTERBEFORE
2C
When the Autoinjector is reset:
• The white check mark inside a
green box will no longer be visible
and the white Plunger will occupy
about half of the Viewing Window.
• The Orange Injection Button will
pop up.
DO NOT proceed to Step 3 until you
have con rmed the Autoinjector has
been fully reset.
Step 3 – Set the Needle Depth
Rotate the Orange Needle Cap Remover
until the desired depth value (4, 6, 8 or 10)
is aligned with the blue semi-circle (see
image left). You will hear a slight “CLICK”
sound when a Needle Depth Setting
Value correctly lines up with the Needle
Depth Indicator.
Note: Smaller values (4 and 6) will result
in a shallow injection. Higher numbers
(8 and 10) will result in a deeper injection.
Check with your healthcare provider to
determine your correct needle depth setting.
DO NOT unscrew the white Needle
Depth Adjuster from device.
14 15

Step 4 – Insert 1.0 mL BD®, pre-fi lled, Glass Syringe into Syringe Housing
Place the Syringe Housing with
4B
Orange Needle Cap Remover
onto a at surface, as shown.
Insert the syringe with the
Needle Cap end down into
the Syringe Housing.
4A
Remove the 1.0 mL BD®, pre- lled,
Glass Syringe from the protective
blister packaging. (1.0 mL BD®, pre lled, Glass Syringe is not included
with the WhisperJECT™ Kit.)
DO NOT remove the 1.0 mL BD®,
pre- lled, Glass Syringe Needle Cap.
Firmly push down on the Glass Rim of the 1.0 mL BD®, pre- lled, Glass
4C
Syringe so it is rmly set into the Syringe Housing. You may feel the syringe
“CLICK” into place. The Glass Rim should be touching the white collar.
WARNING:
DO NOT press on the Plunger Rod when inserting
syringe into Syringe Housing. This may result in
sterile seal being broken and loss of drug.
DO NOT remove the Orange Needle Cap Remover
until syringe is inserted and device reassembled.
16 17

Step 5 – Reassemble the Autoinjector
Step 6 – Select and Clean Injection Site
Reassemble the device by
aligning the white arrows and
turning the Syringe Housing
until it locks into the Handle.
You will hear a “CLICK” as the
two parts lock together.
Once the Autoinjector is fully
assembled, you are ready to
start the injection process.
Place the Autoinjector on a clean
surface before preparing your
injection site.
Select the injection site. See the
Patient Information Lea et/Brochure
for the allowable injection sites.
Clean injection site with alcohol swab.
18 19

Step 7 – Remove the Syringe Needle Cap
Hold the Handle with one hand and the Orange
7A
Needle Cap Remover in your other hand, and
then pull the Orange Needle Cap Remover out of
the Syringe Housing. The grey pre- lled Syringe
Needle Cap will be removed.
DO NOT replace the Orange Needle Cap
Remover onto the Syringe Housing. This may
damage the needle.
DO NOT remove the Orange Needle Cap
Remover until syringe is inserted and device
reassembled.
IMPORTANT: DO NOT press down on Needle
Depth Adjuster as the needle will be exposed and
20 21
you could accidentally stick and/or inject yourself.
Turn the Orange Needle Cap Remover
7B 7C
upside down over a table to allow the
pre- lled Syringe Needle Cap to fall out.
Make sure that both the rubber inner
part and the transparent plastic outer
part of the Needle Cap fall out.
TROUBLESHOOTING:
If the needle cap becomes
stuck at the end of the Orange
Needle Cap remover, press
on the needle cap until it
dislodges.
DO NOT
recap the syringe.
Save the Orange Needle
Cap Remover for future use.
DO NOT dispose of
the Orange Needle Cap
Remover in the trash.

Step 8 – Inject the Dose
Gently place the Autoinjector straight
8A
on the injection site (not at an angle).
Make sure you can comfortably
reach the orange oval Injection Button.
If possible, position so you can see
the Viewing Window.
Gently press the Autoinjector down
until the Needle Depth Setting
Number is no longer visible. This
will release the safety lock so the
Injection Button can be pressed.
Press the Injection Button to start
8B
the injection. You will hear a “CLICK”
when the injection has started.
Continue to hold the Autoinjector
down against the injection site.
You will see green hash marks
in the Viewing Window as the
medication is injected.
When the injection is complete,
a check mark will be fully visible
inside the window.
If you cannot see the Viewing
Window, slowly count to
10 seconds after pressing
the Injection Button and
hearing the rst “CLICK.”
DO NOT lift up early.
23
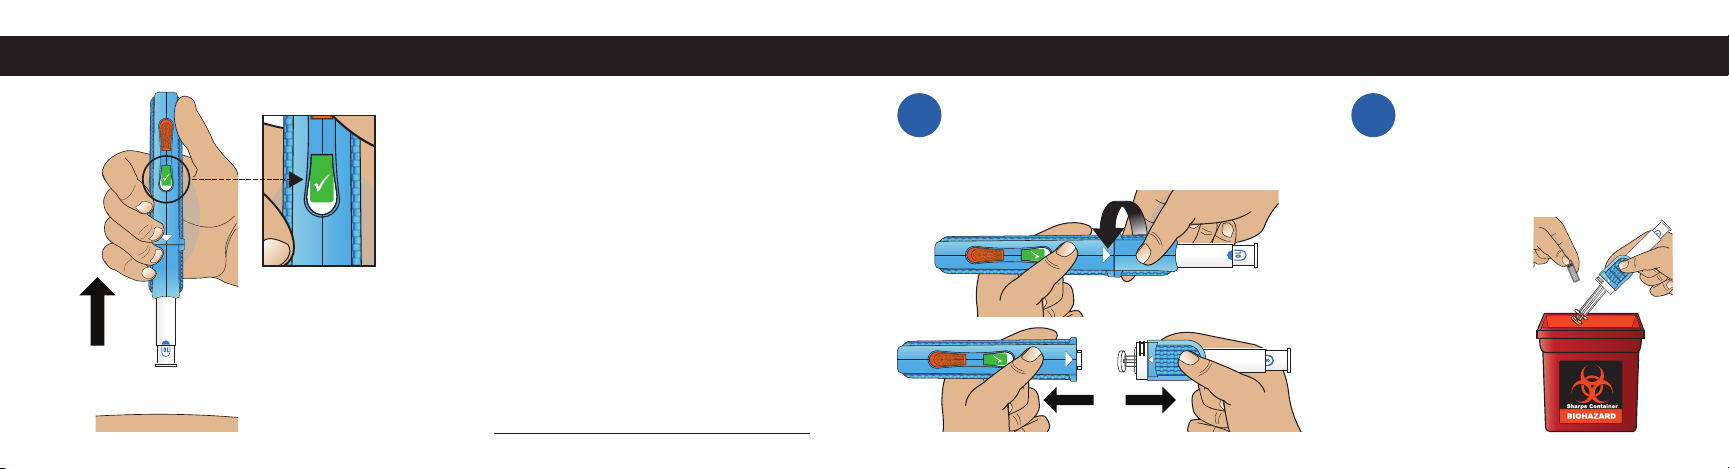
Step 9 – Confi rm Full Dose Received
Step 10 – Remove and Dispose of the Used Syringe
When your injection is complete, remove the
Autoinjector straight up from the injection site.
Always con rm that the full dose was
delivered by checking the Viewing Window.
If the full dose was delivered, you will see
a white check mark in a green box inside
the window.
If you believe you did not receive a full dose,
immediately contact your healthcare provider.
WARNING: DO NOT put your ngers near the needle
end of the Autoinjector. The Needle Depth Adjuster which
covers the needle does not lock. If the Needle Depth
24 25
Adjuster is pushed, you may accidentally stick yourself.
10A
Carefully and slowly unscrew the
Syringe Housing from the Handle.
Hold onto the Syringe Housing that
contains the used syringe.
10B
DO NOT dispose
in regular trash or
a recycling bin.
Check with
your healthcare
provider for the
correct way to
dispose of used
syringes in
your area.
Carefully hold and tip the
Syringe Housing to allow the
used 1.0 mL BD®, pre- lled,
Glass Syringe to fall into the
Sharps Container.
Step 11 – Clean the Autoinjector
Wipe the external parts and the accessible areas of
the Syringe Holder and Handle with a clean, damp
cloth after each use.
IMPORTANT:
DO NOT clean the Autoinjector using any other
methods (e.g., DO NOT immerse in water as this
can damage the Autoinjector).
DO NOT
clean with
detergents,
solvents or
alcohol.
Step 12 – Place the Autoinjector in Protective Case for Storing
Store the Autoinjector in the Protective
Case as shown until required for
your next dose.
WARNING:
Keep in a clean dry place at room
temperature and out of direct sunlight.
DO NOT store the Autoinjector in
the refrigerator.
DO NOT store 1.0 mL BD®, pre- lled,
glass syringe inside the device.
26 27

Manufactured for: Mylan Pharmaceuticals Inc.
Distributed by: Mylan Pharmaceuticals Inc.
*WhisperJECT™ is available by prescription only
WhisperJECT™ is a trademark of Mylan Pharmaceuticals Inc.
BD® is a registered trademark of Becton, Dickinson and Company.
For more information call 1-877-446-3679 (1-877-4-INFO-RX)
or visit Mylan.com
Revised: 4/2017 IFU:WJECT:R1
 Loading...