

MyGica A682, T232 User Manual

Dual HD ATSC/QAM USB Stick
A682
User's Guide

A682 User's Guide
Chapter 1 Overview
Important Notice: “All channels are subject to coverage and may be changed from time to
time. Reception may depend on the type and condition of your existing aerial. Aerial
upgrade may be required. Please confirm coverage in your area.” We strongly
recommend that you install an outdoors antenna when you use the DTV receiver indoors.
1
1.1 Introduction
Decoder setting
Recorded TV location
Schedule Recording
Channel setting
Menu Description(right click mouse)
HiDTV description
Video Recording
Recorded file playback
Snapshot
Preview
Time-shifting function
EPG
Video Windows description
PIP
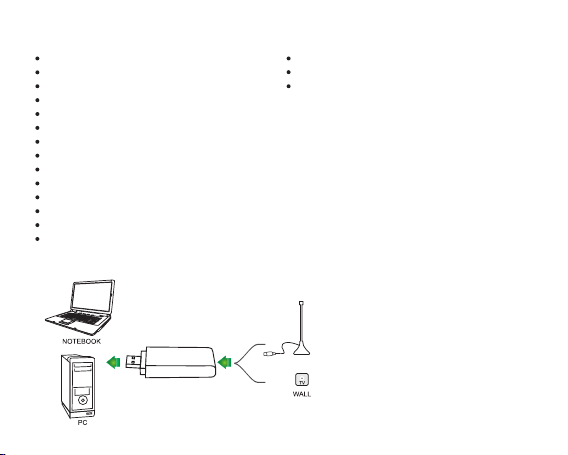
2.1 Hardware Connection
1.2 System requirements
Windows:Microsoft Windows7/8/10, 4GB RAM
MAC:OS X 10.9 or later
Minimum processor: Minimum processor: Quad
core i5 7400 3.0Ghz or faster
Note: If your PC is not fast enough, you might see
jerky live TV video, but your TV recordings will be
fine.
Sound and graphics with support for DirectX 9 or
higher
ANTENNA
2

Chapter 2 How to install driver and software
Windows Driver and Software download link: www.mygica.com/support
MAC Software download link: https://www.geniatech.eu/support/eyetv-3-en/
3.1 Windows Driver Installation:
Step1: OS will remind a new hardware-- “New Hardware Device” was found. Please choose “Cancel”
Step2: Open the windows driver file which you downloaded from website, and click setup.exe to install driver
Step3: Click “Next” to continue installation
Step4: Click Install to begin the installation.
Step5: Click “Finish” to completely install the Driver Software.
3.2 Software installation
Step6: Click “HiDTV Install”,
Step7: Installation of HiDTV, Choose setup language
Step8: Click “Next” to continue installation
Step9: If you want to change the destination folder, please click “Browse” and click “next”
(Recommended is better)
Step10: Please click “Next”
Step11: Click “Finish”, the Hidtv software is installed on your computer.
Step12: You will see that HiDTV application icons will appear on your desktop.
3
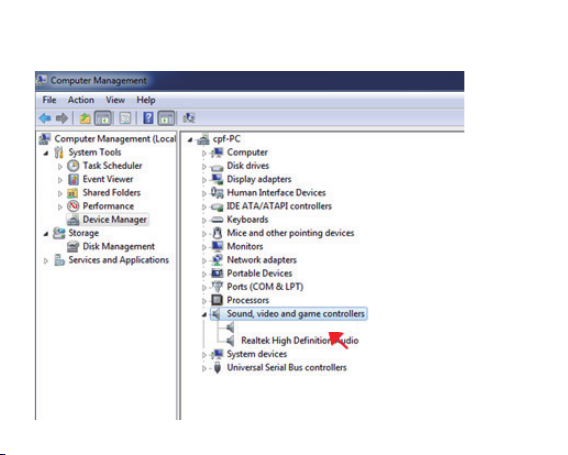
Step13: When its finished, please check on Control panel, select “System”—“System
properties”—“Device Manager”, you can see three devices which new driver is installed.
ATSC/CQAM Dual USB Sck
4
 Loading...