

Page 1

Installation Manual
Read this manual
before installation to
make it as easy as
possible to assemble,
install, operate and
maintain this ceiling fan.
TABLE OF CONTENTS
1. Important Safety Instructions p.1
2. Unpacking Your Fan p.1-2
3. Installing Your Fan p.3-7
4. Light Kit Option p. 8
5. Operating Your Fan p. 9
6. Care of Your Fan p. 9
7. Troubleshooting p. 9
8. Warranty Terms & Conditions p. 10
For Warranty in Australia call 1300 469 326
MUST BE
INSTALLED BY
A LICENSED
ELECTRICIAN
DIY
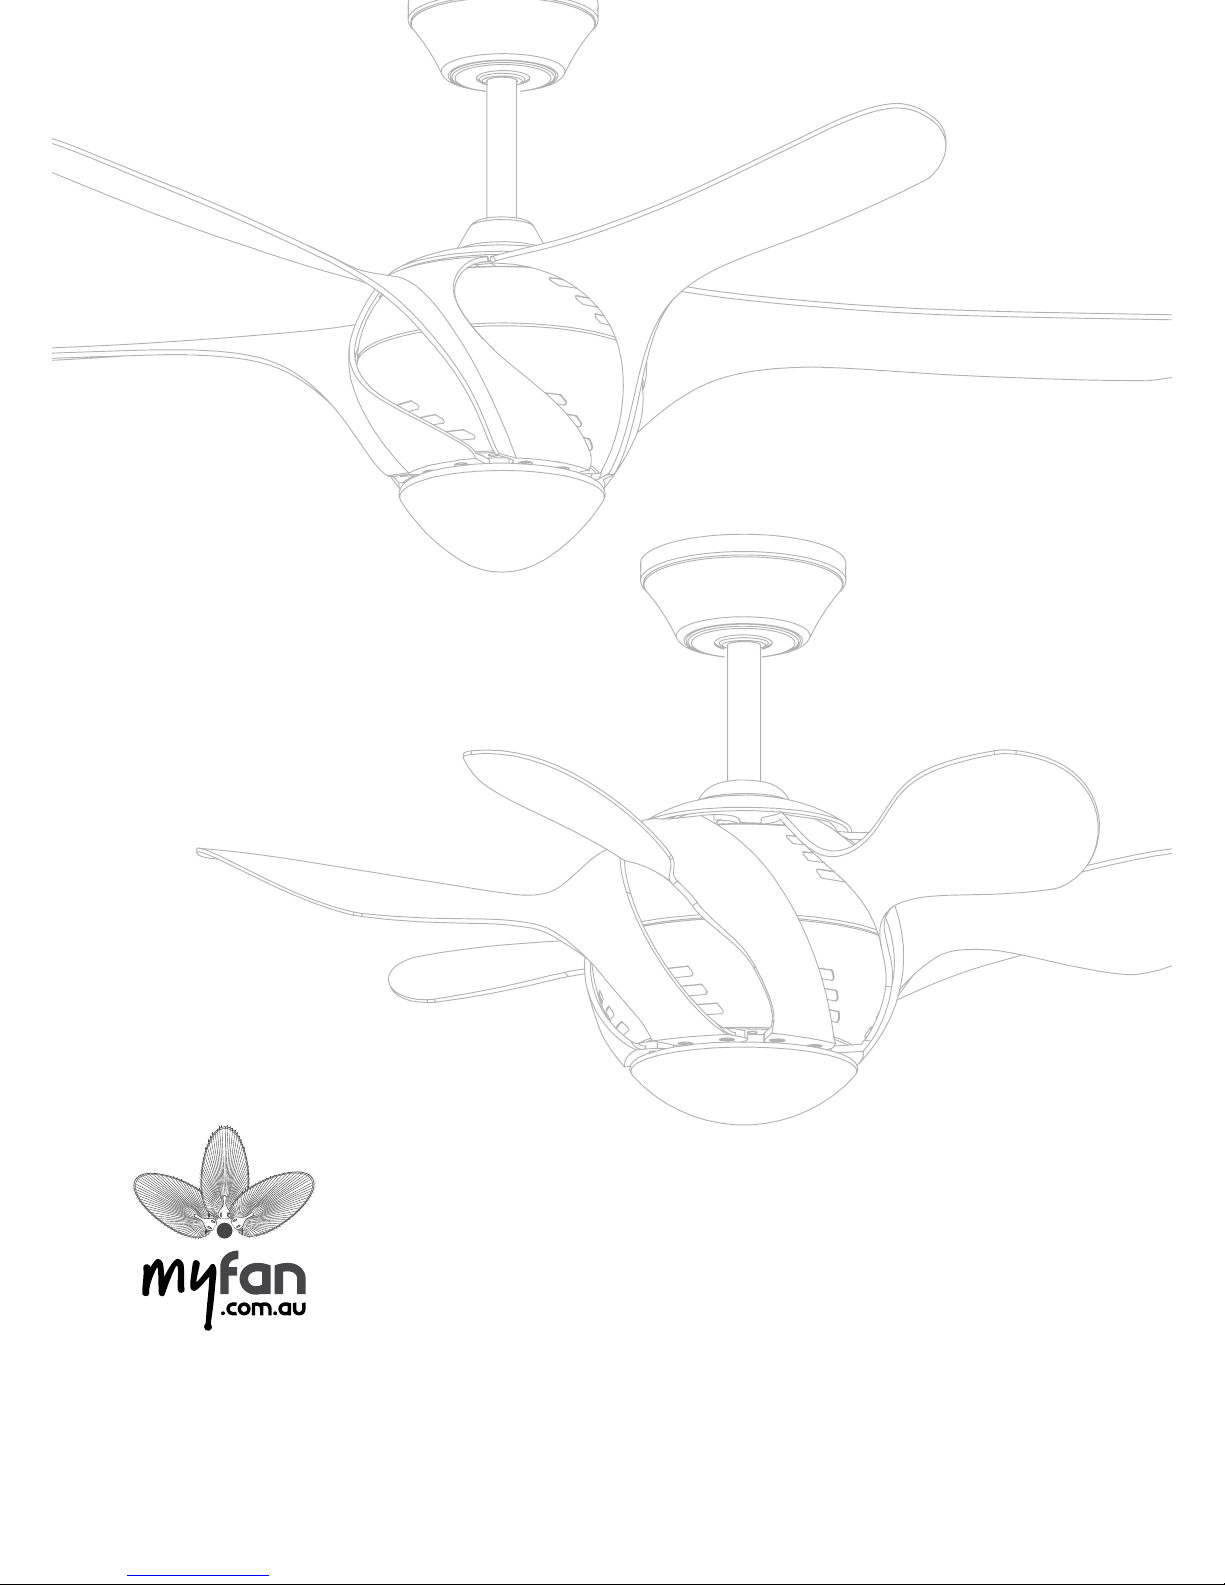
F36 HARLEQUIN
F54 NUOVO
Ceiling Fans for Indoor Use
Page 2

Installation Manual for F36 and F54 Ceiling Fans
1
WARNING. Do not install
or use fan if any part is
damaged or missing. This
product is designed to use
only those parts supplied
with this product and/or
any accessories designated
specifically for use with
this product by MyFan.
Substitution of parts or
accessories not designated
for use with this product
could result in personal
injury or property damage.
IF ANY PART IS DAMAGED
OR MISSING, CALL:
1300 469 326
1. Important Safety Instructions
2. Unpacking Your Fan
READ AND
SAVE THESE
INSTRUCTIONS
TO REDUCE THE RISK OF FIRE OR ELECTRIC SHOCK, DO NOT USE SOLID STATE
OR DIMMER-TYPE SPEED CONTROLS WITH THIS FAN. USE OF CONTROLS NOT
APPROVED BY MYFAN MAY PERMANENTLY DAMAGE YOUR FAN AND WILL VOID
THE WARRANTY.
1. To reduce the risk of electric shock, ensure electricity has been turned off at the
circuit breaker or fuse box before beginning.
2. All wiring must be in accordance with AS/NZS 3000 Wiring Rules and local
electrical codes. Electrical installation should be performed by a qualified licensed electrician. Means for
disconnection must be incorporated in the fixed wiring in accordance with the wiring rules.
3. The support structure must be securely mounted and capable of reliably supporting a minimum static
weight of 44kg.
4. The fan must be mounted with a minimum of 2.1m clearance from the blades to the floor.
5. Avoid placing objects in the path of the blades.
6. To avoid personal injury or damage to the fan and other items. Be cautious when working around or cleaning
the fan.
7. Do not use water or detergents when cleaning the fan or fan blades. A dry dust cloth or lightly dampened
cloth will be suitable for most cleaning.
8. An all-pole disconnection switch must be fitted into the fan supply circuit.
9. The ceiling fan light fitting is suitable for indoor use only. Use 25W max G9 bulbs.
10. This appliance is not intended for use by persons (including children) with reduced physical, sensory or
mental capabilities, or lack of experience and knowledge, unless they have been given supervision or
instruction concerning use of the appliance by a person responsible for their safety.
Ceiling Canopy
Hanger Bracket
Downrod/Hanger
Ball Assembly
Motor Coupling Cover
Fan Motor Assembly
Blade Set
Chrome Base
Frosted Glass Shade
Blade Screw & Washer
Page 3
Installation Manual for F36 and F54 Ceiling Fans
2
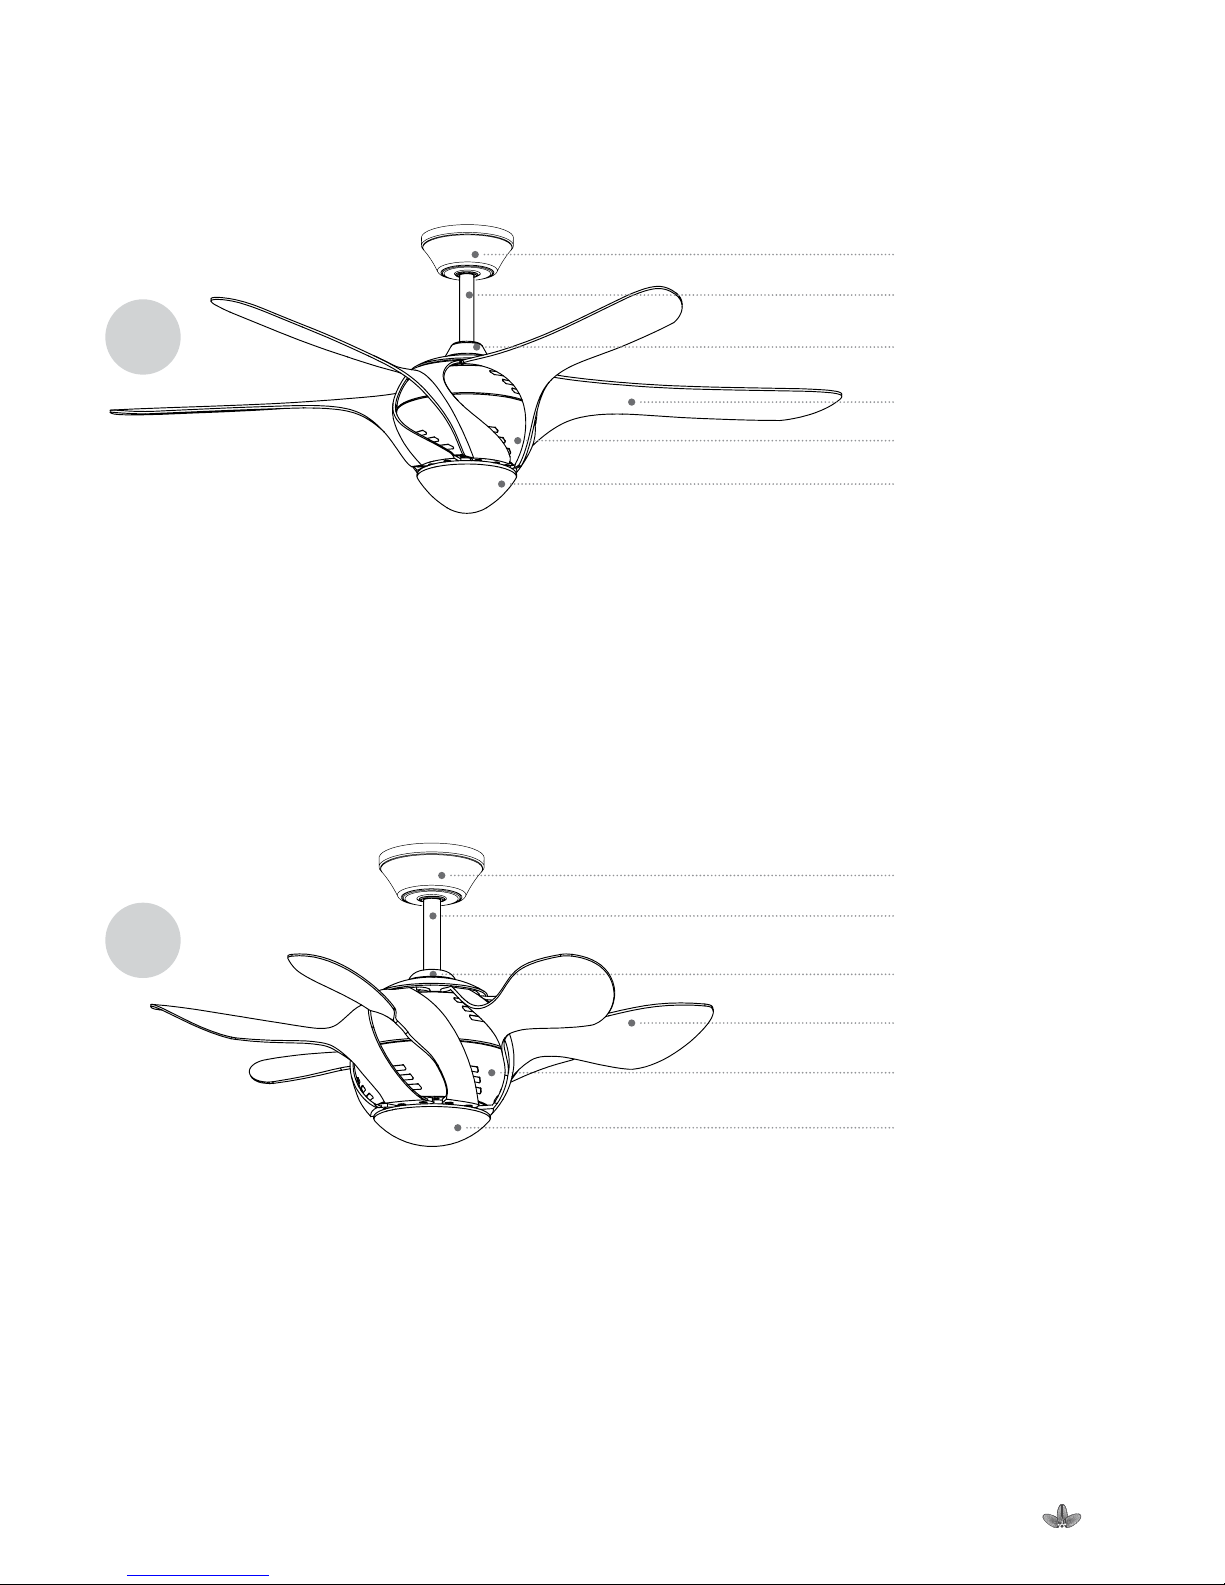
F54 – “Nuovo”
Unpack your fan and check the contents. You should have the following items:
1. Hanger Bracket (inside canopy) 5. Glass Shade
2. Downrod and Hanger Ball Assembly 6. Blades (5)
3. Canopy Cover 7. Coupling Cover
4. Fan Motor Assembly 8. Chrome base for use without light
a. Blade attachment hardware (20 washer head screws)
b. Mounting hardware (1bolt, 1 clevis pin, 1 rubber gasket)
Canopy
Downrod
Coupling Cover
Blade
Motor Assembly
Glass Shade
Figure
1
F36 – “Harlequin”
Unpack your fan and check the contents. You should have the following items:
1. Hanger Bracket (inside canopy) 5. Glass Shade
2. Downrod and Hanger Ball Assembly 6. Blades (6) 2 of each colour
3. Canopy Cover 7. Coupling Cover
4. Fan Motor Assembly 8. Chrome base for use without light
a. Blade attachment hardware (24 washer head screws)
b. Mounting hardware (1bolt, 1 clevis pin, 1 rubber gasket)
Canopy
Downrod
Coupling Cover
Blade
Motor Assembly
Glass Shade
Figure
2
Page 4
Installation Manual for F36 and F54 Ceiling Fans
3
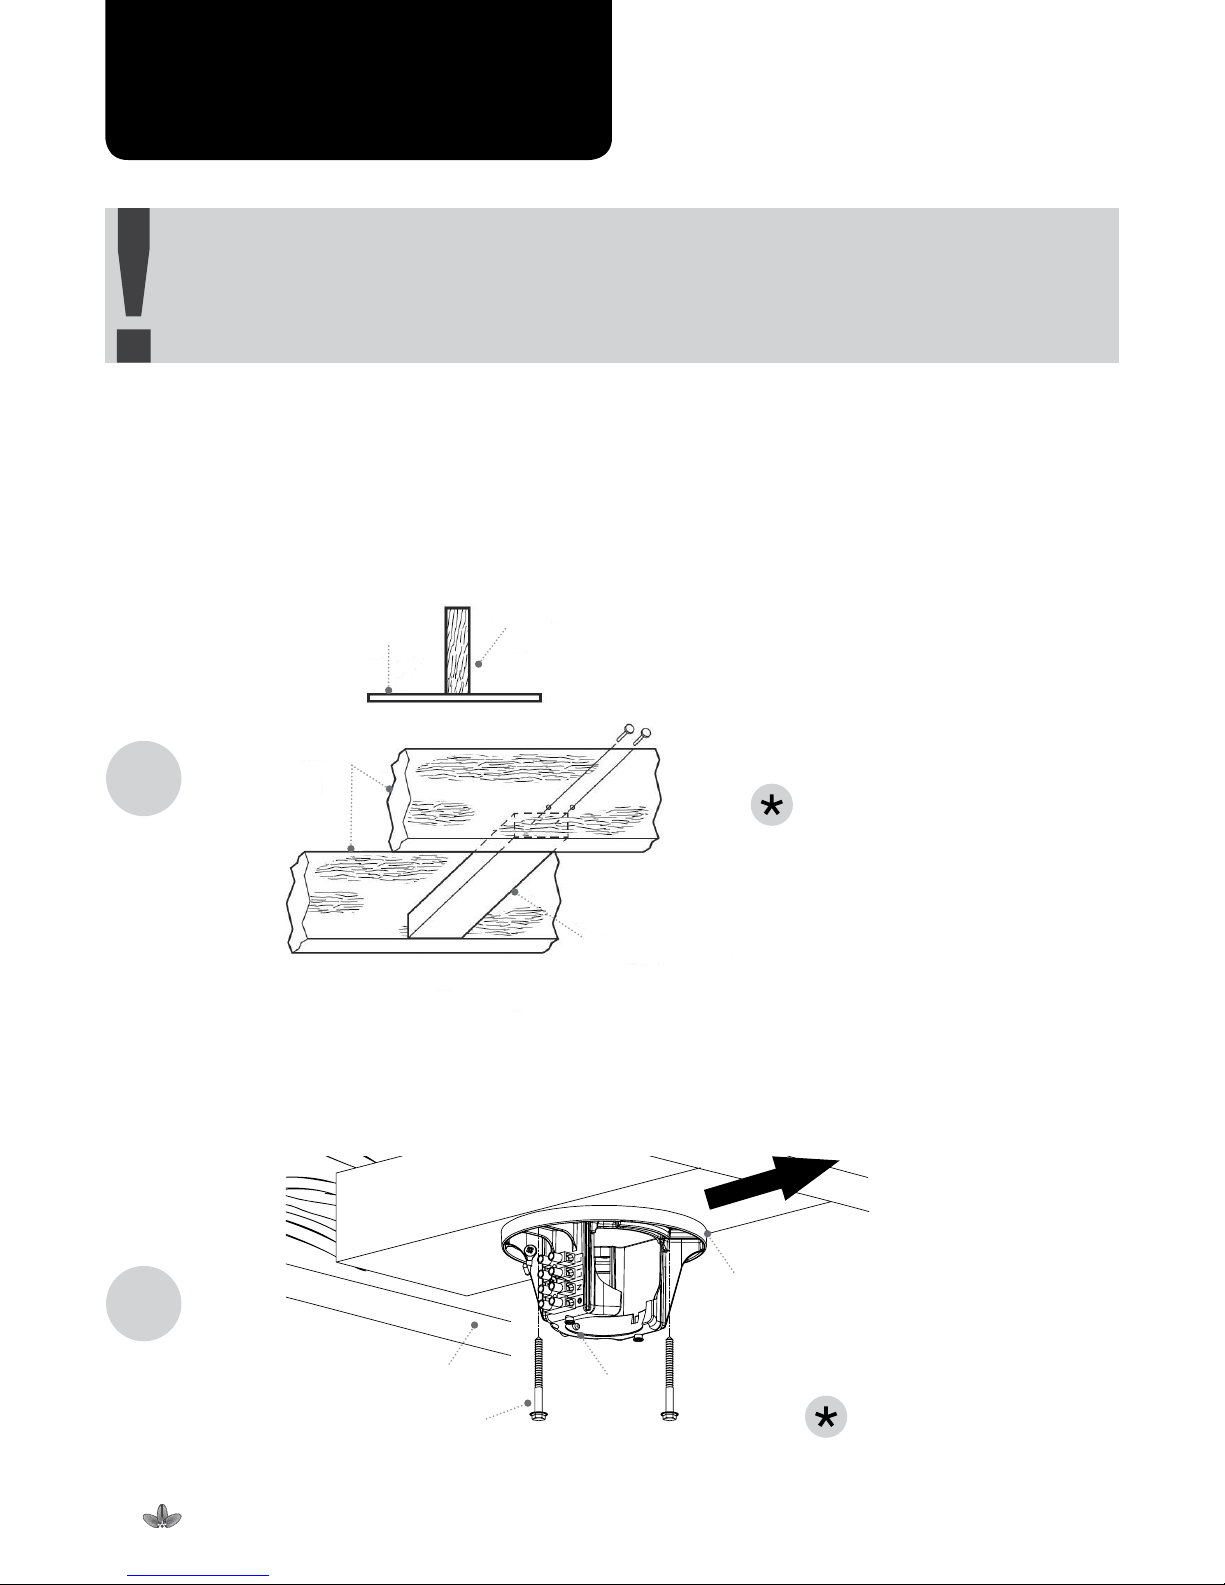
MOUNTING OPTIONS
Secure the mounting bracket directly to the building structure. Use appropriate fasteners into the structure as
it must be able to support 44kg static weight.
To hang your fan where there is an existing light fixture but no ceiling joist, you may need an installation hanger
bar OR install a timber batten as shown in the figure below.
Figure
3
Ceiling
Ceiling
Joists
Ceiling
Joists
Note: Ceiling board
omitted for clarity.
Timber Batten
Between Joists
3. Installing Your Fan
Note: You may need a longer downrod to maintain proper blade clearance when installing on a steep, sloped
ceiling. The maximum angle allowable is 30
o
.
When mounting the fan on a sloping ceiling, the hanger bracket must be mounted so that the slot
opening is on the high side facing up the slope.
Slot opening faces
up the slope.
Figure
4
Timber Batten
Screw with hex head wood
screws (2) Not supplied
Tab
Hanger
Bracket
Note: Ceiling board
omitted for clarity.
TURNING OFF WALL SWITCH IS NOT SUFFICIENT. TO AVOID POSSIBLE
ELECTRICAL SHOCK, BE SURE ELECTRICITY IS TURNED OFF AT THE MAIN FUSE
BOX BEFORE WIRING. ALL WIRING MUST BE IN ACCORDANCE WITH AS/NZS 3000
“THE WIRING RULES” AND THE CEILING FAN MUST BE PROPERLY GROUNDED AS
A PRECAUTION AGAINST POSSIBLE ELECTRICAL SHOCK.
Page 5
Installation Manual for F36 and F54 Ceiling Fans
4
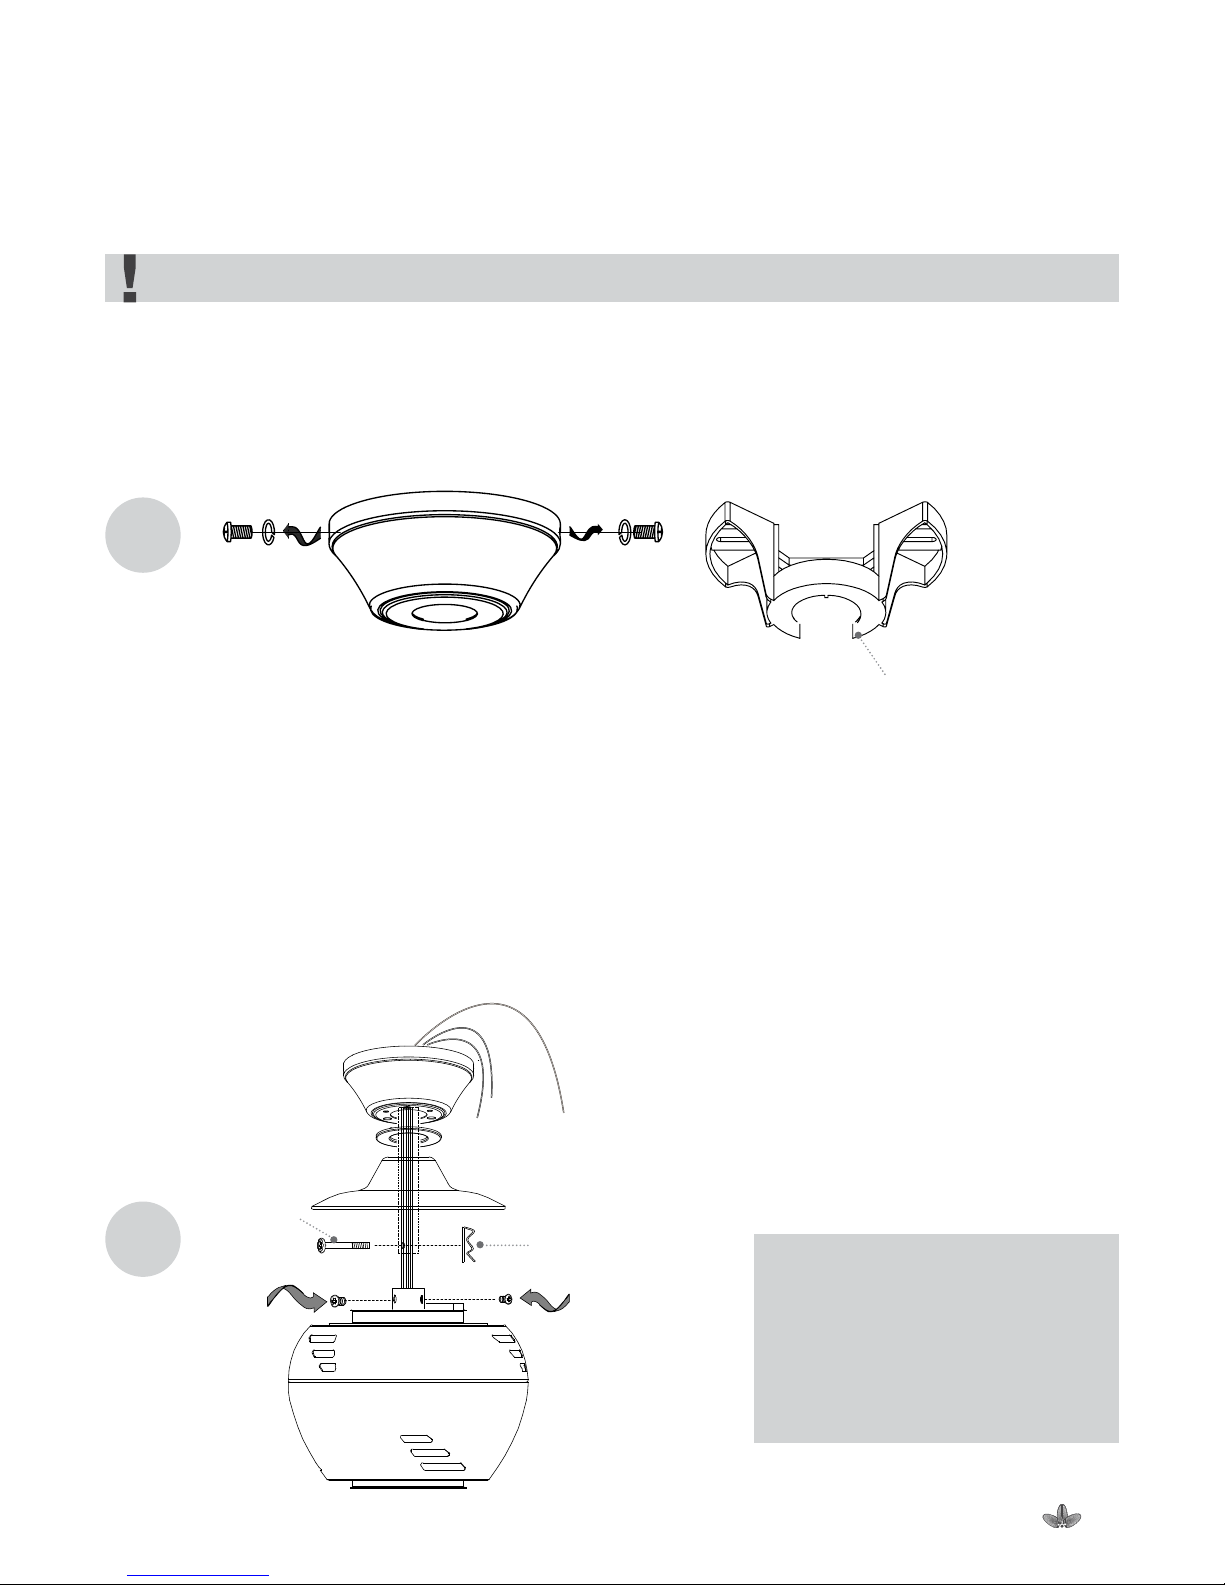
HANGING THE FAN
REMEMBER to turn off the power. Follow the steps below to hang this fan properly.
STANDARD CEILING MOUNTING
1. Remove the mounting plate from the canopy by loosening the two screws on the top of the canopy. Remove
the two non-slotted screws and loosen the slotted screws. This will enable you to remove the ceiling canopy
and install the Hanger Bracket on the ceiling. (Figure 5).
2. Route the wires exiting the top of the fan motor through the decorative motor coupling collar cover then the
canopy ring. Make sure the slot openings are on top. Route the wires through the canopy cover and then
through the ball/downrod assembly (Figure 6).
3. Loosen, but do not remove, the set screw on the collar on the top of the motor housing.
4. Align the holes at the bottom of the downrod with holes in the collar on top of the motor housing (Figure 6).
Carefully insert the hanger pin (bolt) through the holes in the collar and downrod. Be careful not to jam the
pin against the wiring inside the downrod. Insert the Split Pin through the hole near the end of the hanger
pin (bolt) until it snaps into its locked position, see below in Figure 6.
5. Re-tighten the set screw at the top of the fan motor firmly (Figure 6).
Figure
6
Figure
5
Hanger Bracket
Ceiling Canopy
Clevis Pin
Tighten set screw
Bolt
IMPORTANT:
PLEASE REMOVE RUBBER
MOTOR STOPS ON THE
BOTTOM OF THE FAN
BEFORE INSTALLING BLADES
OR TESTING MOTOR.
Page 6
Installation Manual for F36 and F54 Ceiling Fans
5
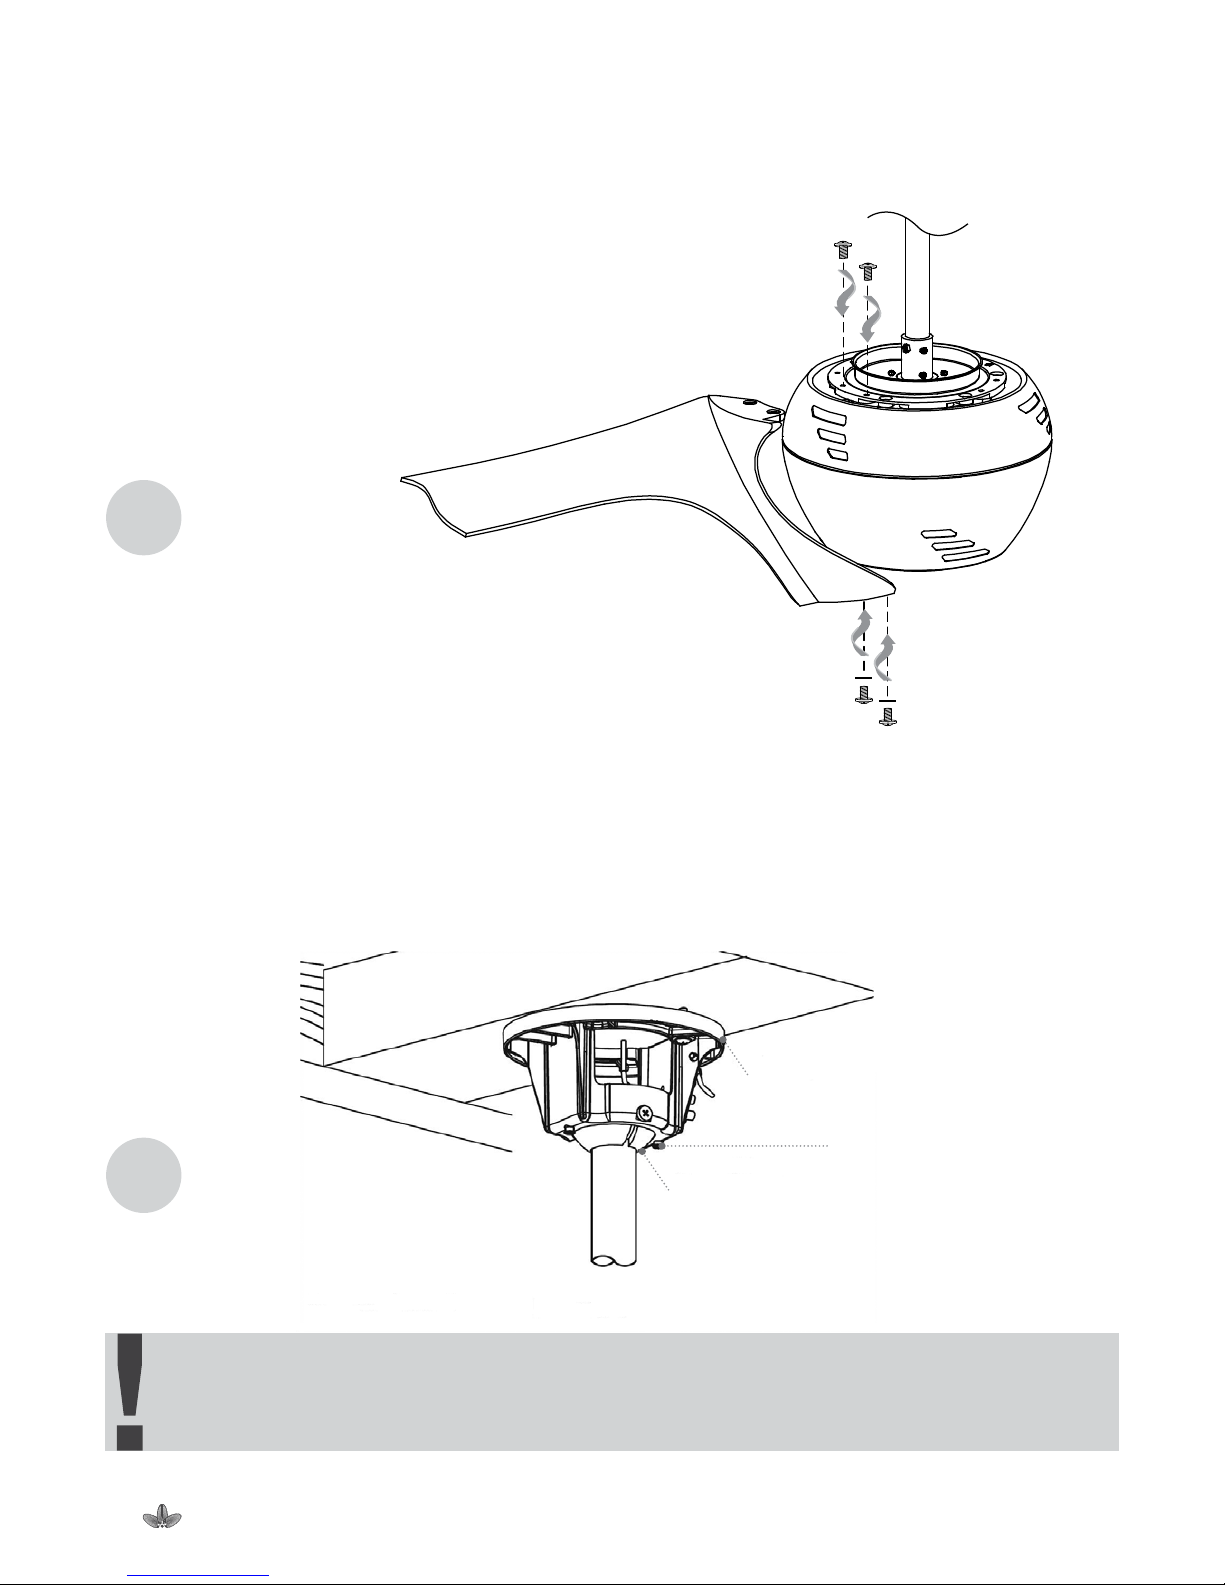
ATTACHING THE FAN BLADES
1. Fasten the blade assembly to the motor housing (Figure 7) – 2 screws
on top and 2 on bottom of blade. Tighten firmly but be careful to not
over tighten.
INSTALLING FAN TO THE ELECTRICAL CIRCUIT
1. Pass the supply wires through the center hole in the ceiling mounting bracket.
2. Carefully lift the fan assembly up to the ceiling mounting bracket and seat the ball joint in the bracket. Make
sure the tab on the ceiling mounting bracket is properly seated in the groove in the hanger ball joint. (Figure 8).
Figure
7
Figure
8
WHEN USING THE STANDARD BALL/HANGER MOUNTING, THE TAB IN THE RING
AT THE BOTTOM OF THE HANGER BRACKET MUST REST IN THE GROOVE OF THE
HANGER BALL. FAILURE TO PROPERLY SEAT THE TAB IN THE GROOVE COULD
CAUSE DAMAGE TO WIRING.
Downrod/Hanger
Ball Assembly
Hanger Bracket
Tab fits in groove
in ball joint
Page 7
Installation Manual for F36 and F54 Ceiling Fans
6
FINISHING THE FAN INSTALLATION
1. Align the locking slots of the ceiling canopy with the two screws in the mounting plate. Push up to engage
the slots and turn clockwise to lock in place. Immediately tighten the two mounting screws firmly. Install the
remaining two mounting screws into the holes in the canopy and tighten.
Figure
10
Canopy Ring
Ceiling Canopy
Hanger
Bracket
Downrod/Hanger Ball Assembly
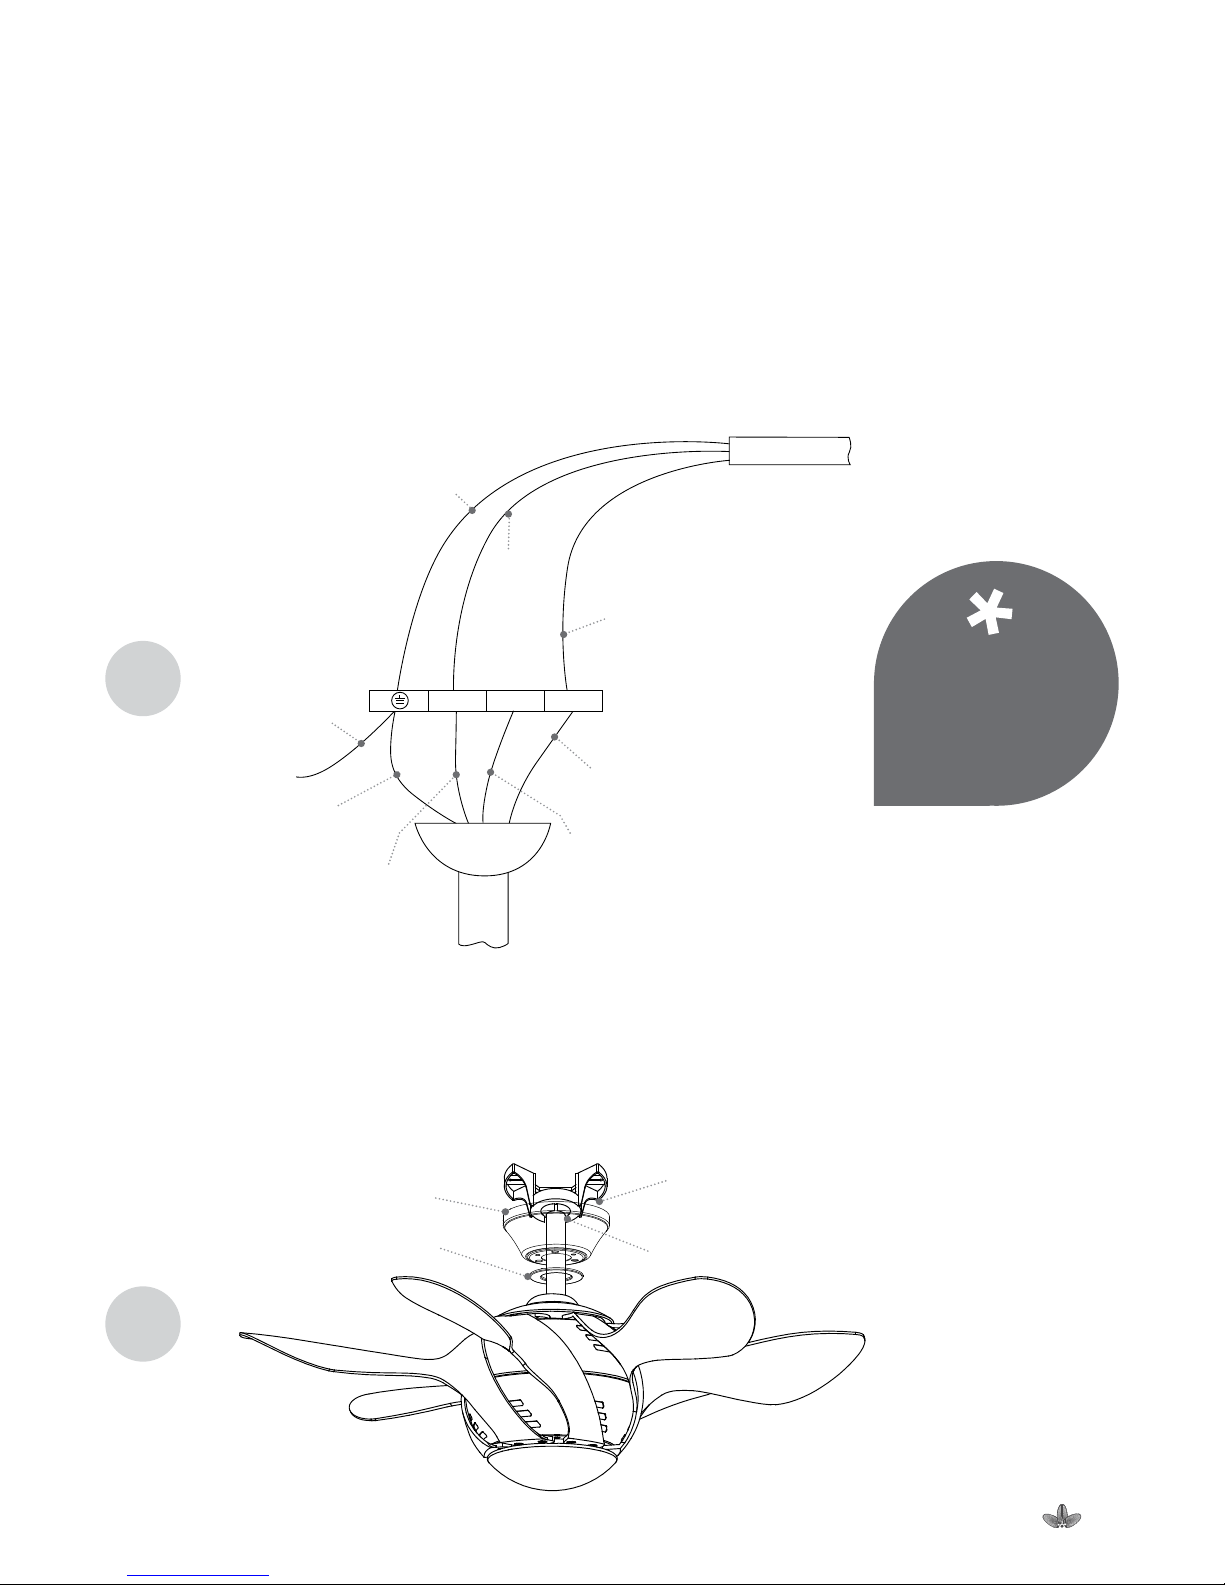
MAKING THE ELECTRICAL CONNECTIONS
1. Connect the fan supply wire and light supply wire (Brown wire and Orange wire) to the household supply
Active wire (usually Red).
2. Connect the neutral fan wire (Blue wire) to the neutral household wire (usually Black).
3. Connect the two green and yellow fan ground wires, located on the downrod and mounting bracket, to the
household ground (Earth) wire.
Figure
9
This ceiling
fan requires a
grounded electrical
supply of 220-240V
AC, 50 Hz.
N L1 L
Supply Cable
Grn/Yel Wire
(Earth)
Black Wire
(Neutral)
Red Wire
(Active)
Grn/Yel Wire
(Earth) from
Hanger Bracket
Grn/Yel Wire
(Earth) from Fan
Blue Wire
(Neutral)
Orange Wire
(Light Active)
Hanger Ball
Brown Wire
(Motor Active)
Terminal Block
(on Hanger Bracket)
Page 8
Installation Manual for F36 and F54 Ceiling Fans
7
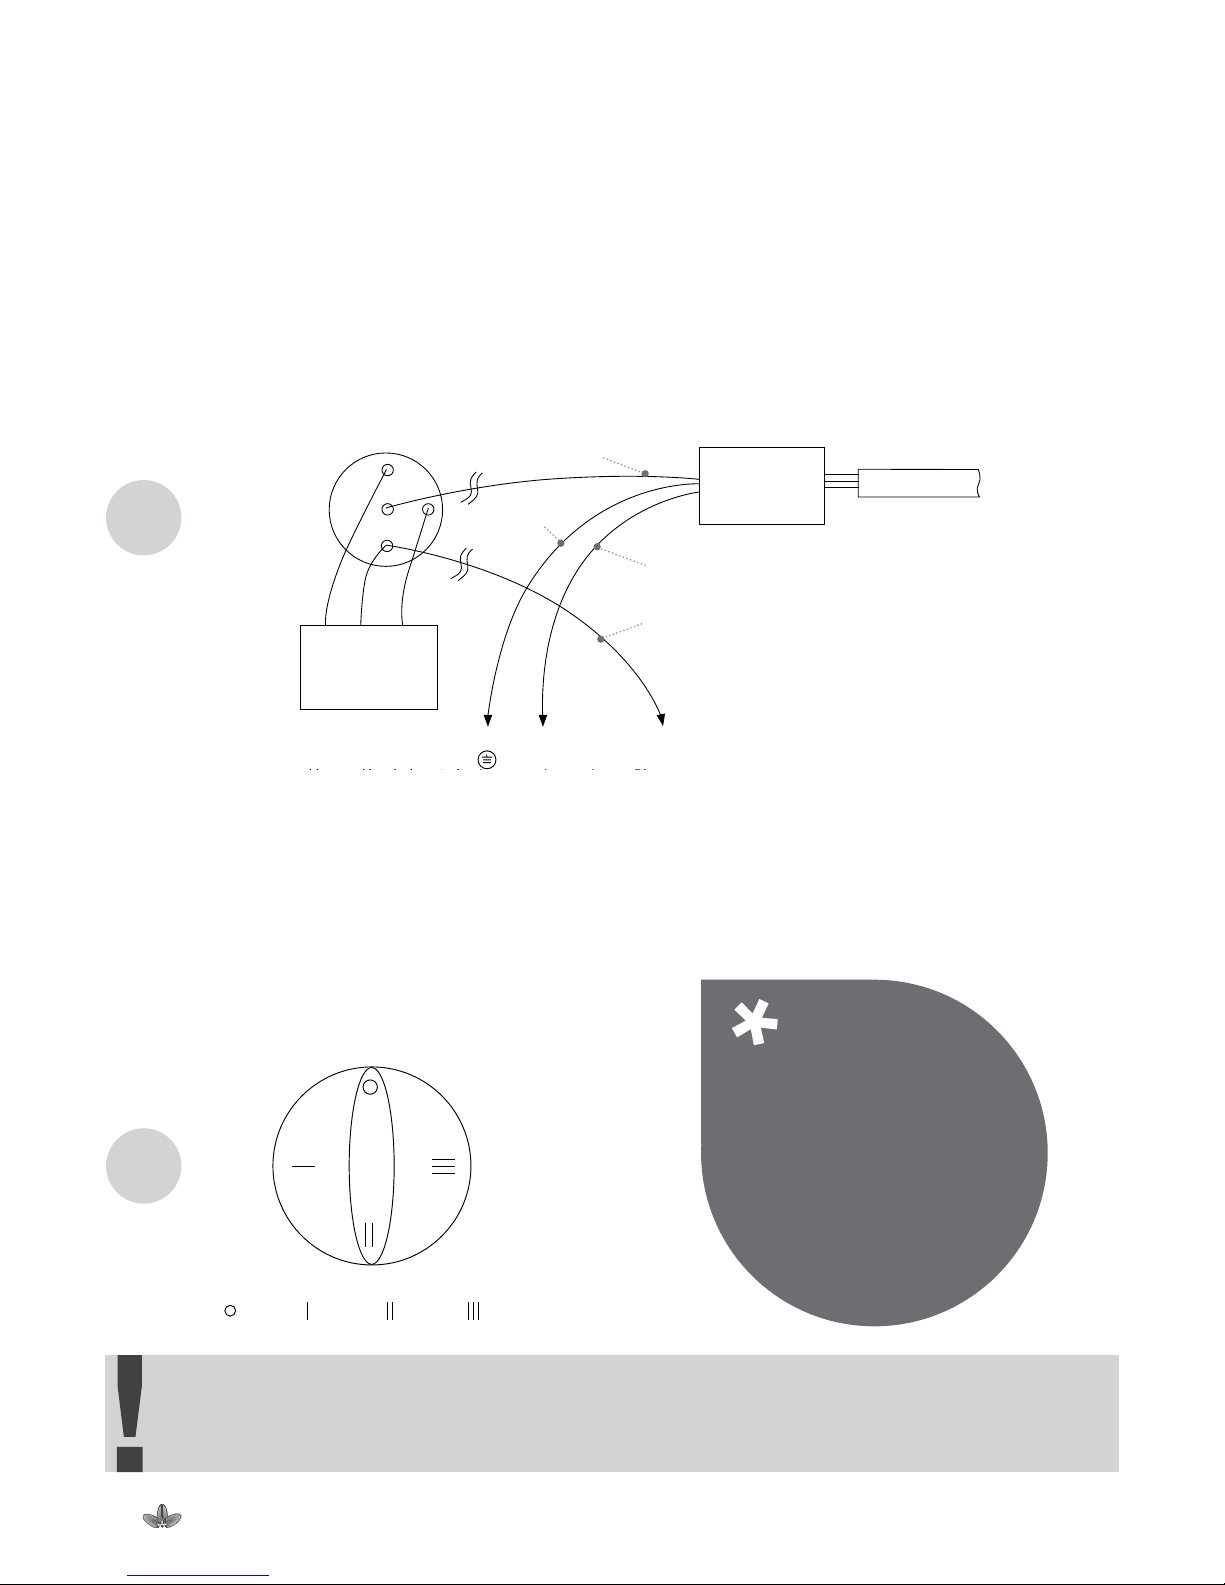
INSTALLING WALL CONTROL (ROTARY) SWITCH
1. With electrical power still disconnected, install fan switch control wiring to desired location on wall.
Wall plates are not supplied so that the customer can choose a style suitable for their specific situation (wall
plates should be supplied by the installer).
2. Ensure wiring connections are as shown in Fig 9. The Active (Red) supply wire must be connected to
terminal “C” on the rotary switch mechanism. Return switched wire to ceiling fan to be connected from
terminal ˝1˝ on the switch mechanism to ˝L˝ terminal on the connector block.
3. Fit the switch mechanism into a face plate (not supplied) and attach to wall. Then snap on the Switch
knob to the spindle of the switch mechanism protruding out from plate. Switch knob ‘0’ marking should
be in the 12 o’clock position.
4. Restore electrical power to the ceiling fan by turning the electricity on at the main fuse box.
5. Check the operation of the fan by rotating the control through the four positions marked 0 – III
(“0” position is OFF) (Figure 12).
Figure
11
Figure
12
TO REDUCE THE RISK OF FIRE OR ELECTRIC SHOCK, DO NOT USE SOLID STATE
OR DIMMER-TYPE SPEED CONTROLS WITH THIS FAN. USE OF CONTROLS NOT
APPROVED BY MYFAN MAY PERMANENTLY DAMAGE YOUR FAN AND WILL VOID
THE WARRANTY.
N L1 L
Supply Cable
Isolating
Switch
Red Wire
(Active)
Grn/Yel Wire
(Earth)
Black Wire
(Neutral)
Red Wire
(Motor Active)
Rotary Switch
3
C
1
2
Red
Brown
Purple
Capacitor
Grn/Yel Wire
(Earth) from
Terminal Block
(on Hanger Bracket)
To Terminal
Block
To Terminal
Block L
To Terminal
Block N
= OFF = FAST = MED
= SLOW
IMPORTANT:
Fan installation must be
completed including the
installation of the fan
blades, before testing of
the controls.
Switch knob
Page 9
Installation Manual for F36 and F54 Ceiling Fans
8
4. Light Option or Chrome Base
Your fan comes packaged with a frosted glass shade AND a polished chrome base allowing you the option of
installing your fan with OR without a light. Once you have decided which option you will use, proceed with the
corresponding instructions.
REMEMBER to disconnect the power.
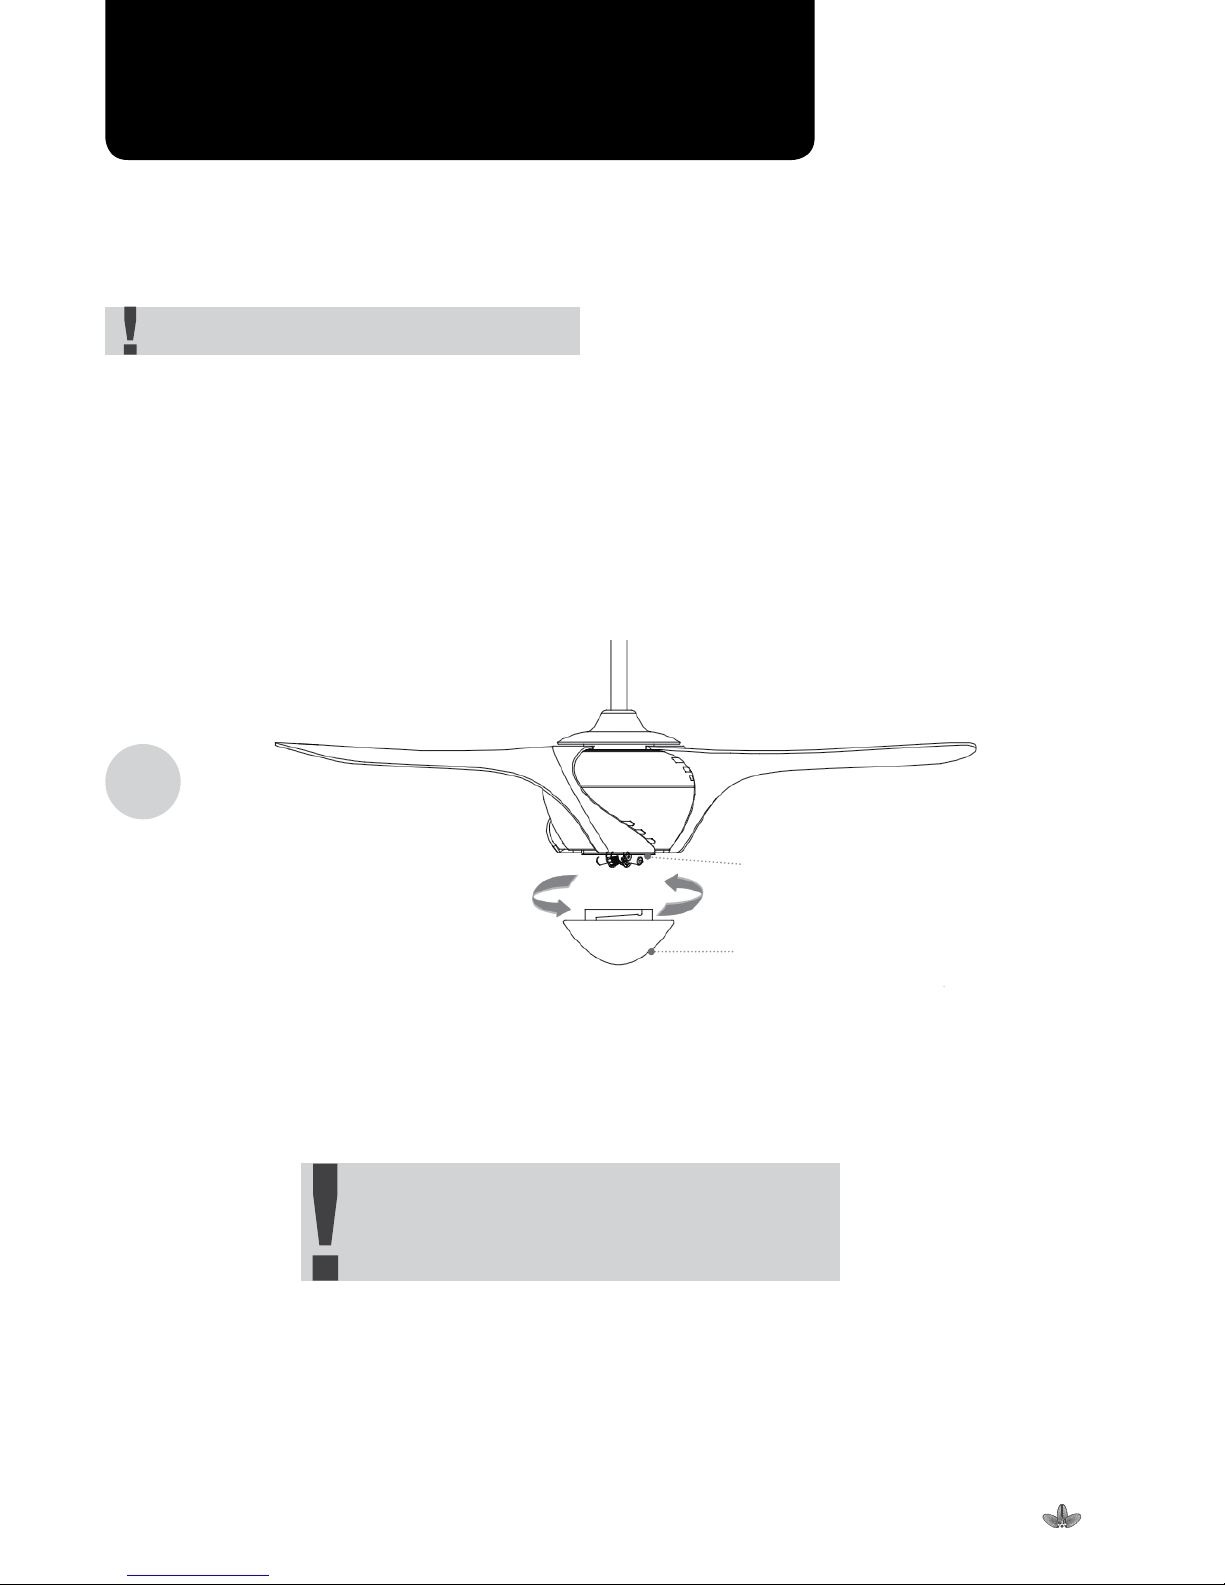
FAN WITH LIGHT
1. Avoid touching the glass part of the halogen light bulbs. The oil from your hands can shorten the life of the
bulb. Using a cloth or other material to hold each bulb, gently insert the two bulbs into the sockets (G9 Max
25W each).
2. To fit the Glass shade, align the tabs in the glass with the fitter plate and twist in a clockwise direction.
(Figure 13).
3. The installing electrician usually installs a wall switch for this light with the switched active wire going to
Terminal L1 on the fan terminal block.
FAN WITHOUT LIGHT
To fit the chrome base – align the tab in the plate and twist in a clockwise direction (Figure 13).
Figure
13
DO NOT FIT G9 LAMPS INTO SOCKETS
IF INSTALLING CHROME BASE.
Fitter plate with bulb sockets
Glass shade OR chrome base
Page 10
Installation Manual for F36 and F54 Ceiling Fans
9
6. Care for your Fan
Here are some suggestions to help you maintain your fan.
1. Because of the fan’s natural movement, some connections may become loose over time. Check the
support connections, brackets, and blade attachments twice a year. Make sure they are secure. (It is not
necessary to remove fan from ceiling.)
2. Clean your fan periodically to help maintain its new appearance over the years. Do not use water or chemicals
when cleaning. Use only a soft brush or lint-free cloth to avoid scratching the finish. The polished chrome
finish is sealed with a lacquer to minimise discolouration or tarnishing. The use of water or chemicals for
cleaning this fan may damage the motor, blades or other components, and possibly cause an electrical shock.
3. There is no need to oil your fan. The motor has permanently lubricated sealed ball bearings.
Problem Solution
Fan will not start. 1. Check main and branch circuit fuses or breakers.
2. Check line wire connections through any isolation switch that may be installed on
the wall.
Fan sounds noisy. 1. Make sure all motor housing screws are tight.
2. Make sure the screws that attach the fan blade bracket to the motor hub are tight.
3. Allow a 24-hour “breaking-in” period. Most noises associated with a new fan
disappear during this time.
4. If using the Ceiling Fan light kit, make sure the glassware and the light bulbs are
also secure.
5. Make sure the canopy is a short distance from the ceiling. It should not touch the
ceiling.
6. Make sure your ceiling bracket is secure and the rubber isolator pads are in place
between the hanger bracket and ceiling.
Fan wobbling. All fans wobble to some degree but if excessive make sure the ball joint is properly
seated in the hanger bracket and the fastening hanger ball screw is tight. Next check
for unbalanced blades by re-attaching blades to a different position on the fan motor.
7. Troubleshooting
Turn on the power and check the operation of the fan with the Wall control. The fan is best started from the high
speed position (I) and then if necessary adjusted down to lower speeds (II) medium (III) low. To turn off, return
knob to (0) position.
5. Operating Your Fan
WARNING. For your own safety, turn off power at fuse box or circuit breaker before trouble
shooting your fan. Some suggested remedies require the attention of a licensed electrician.
Page 11

Installation Manual for F36 and F54 Ceiling Fans
10
Our goods come with guarantees that cannot be excluded under the Australian Consumer Law. You are entitled
to a refund or replacement for a major failure and for compensation for any other reasonably foreseeable loss
or damage. You are also entitled to have the goods repaired or replaced if the goods fail to be of acceptable
quality and the failure does not amount to a major failure. All products have been imported in good faith from
the overseas manufacturer.
The following warranty only covers faults due to manufacturing defects in materials or workmanship. Only
orders placed through My Fan Pty Ltd ( “MyFan” ) or authorised sales partner are covered by this warranty.
Section 1: What to do if your fan has a problem
1. Satisfy yourself that there is not an installation problem.
2. Do NOT attempt to uninstall or repair your fan.
3. Call 1300 469 326 for further assistance.
Section 2: MyFan 12 month on-site warranty
Congratulations! By purchasing from an Authorised Partner or directly from MyFan, your products are now
covered by our 12 month on-site warranty. Should your fan fail within the first 12 months, MyFan (at our sole
discretion and conditional on the limitations outlined in Section 4) will repair or replace the faulty component.
Section 3: Limitations of warranty
After the 12 month on-site warranty period, all costs of removal and/or re-installation of the product are the sole
responsibility of the owner or their representative and not the retail shop that sold the fan or MyFan.
You must have proof of your purchase to obtain any after sales service. Keep your tax invoice or other proof of
purchase together with the installing electrician’s details. Do not uninstall or attempt to return the product to
the retail shop or MyFan unless advised to by MyFan. You must be the original purchaser of the product and it
must be installed in its original point of installation to be covered by this warranty. Warranty periods begin from
the date of purchase. Because of varying climate conditions, this warranty does not cover changes in finish,
including rusting, pitting, corroding, tarnishing or peeling.
This warranty does not cover light bulbs, batteries and similar perishable parts which, if supplied, are
complimentary.
The warranty is void and does not apply to damage from improper installation, neglect, accident, misuse,
exposure to extremes of heat or humidity or as a result of any modification to the original product. Force
majeure, electrical surges, lightning, power grid fluctuations, water or by connection to alternative power supply
sources (such as solar inverters) are not eligible for claims.
If electricians are engaged by MyFan to service fans that are installed in a location requiring special access
equipment (such as scaffolding, scissor lifts, etc.) the cost of providing, installing and operating the special
access equipment must be born by the site owner. The need for or use of such equipment must be stated when
booking a service call.
MyFan reserves the right to charge for travelling costs incurred beyond 25km from Australian major capital
cities. Travelling costs or other expenses must be agreed to prior to a service call being booked.
Signals sent through the power grid by the electricity supplier for the control of devices may cause intermittent
noise in your product. These noises are not the result of a faulty product. Filters are available as an additional
purchase to overcome this noise.
A certain amount of wobble is normal and should not be considered a problem or a defect.
Solid state or dimmer controls for controlling speeds may damage your fan. Use of controllers not approved by
MyFan will void your warranty.
8. MyFan Warranty for Australian purchasers
Page 12
Call 1300 469 326
Fax (07) 3801 8575
Email [email protected]
Mail My Fan Pty Ltd
PO Box 6560 GCMC QLD 9726 Visit us online at www.myfan.com.au
 Loading...