

Page 1
Wireless G
Notebook Card
User Manual
ME1002-NB
Page 2

Table of Contents
1. Introduction. . . . . . . . . . . . . . . . . . . . . . . . . . . . . . . . . . . . . 1
Benefits of a Home Network. . . . . . . . . . . . . . . . . . . . . . . . .
1
Advantages of a Wireless Network . . . . . . . . . . . . . . . . . . . .
1
Placement of your Wireless Networking
Hardware for Optimal Performance. . . . . . . . . . . . . . . . . . . .
2
2. Overview . . . . . . . . . . . . . . . . . . . . . . . . . . . . . . . . . . . . . . .
6
Product Features . . . . . . . . . . . . . . . . . . . . . . . . . . . . . . . . .
6
Applications and Advantages . . . . . . . . . . . . . . . . . . . . . . . .
7
Product Specifications . . . . . . . . . . . . . . . . . . . . . . . . . . . . .
8
System Requirements. . . . . . . . . . . . . . . . . . . . . . . . . . . . . .
8
Package Contents . . . . . . . . . . . . . . . . . . . . . . . . . . . . . . . .
8
3. Installing and Setting up the Card . . . . . . . . . . . . . . . . . . .
9
Step 1: Install . . . . . . . . . . . . . . . . . . . . . . . . . . . . . . . . . . . .
9
Step 2: Connect . . . . . . . . . . . . . . . . . . . . . . . . . . . . . . . . . 10
Step 3: Configure . . . . . . . . . . . . . . . . . . . . . . . . . . . . . . . . 12
4.
Using the MyEssentials Wireless Networking Utility. . . . 13
Accessing the MyEssentials Wireless Networking
Utility from the Windows System Tray . . . . . . . . . . . . . . . . 13
Available Networks . . . . . . . . . . . . . . . . . . . . . . . . . . . . . . .
14
Network Status and Solution Tips . . . . . . . . . . . . . . . . . . . 16
Setting Wireless Network Profiles . . . . . . . . . . . . . . . . . . . . 16
Securing your Wi-Fi Network . . . . . . . . . . . . . . . . . . . . . . . 17
Configuring your MyEssentials Wireless G Notebook
Card to use Security. . . . . . . . . . . . . . . . . . . . . . . . . . . . . . 20
5. Troubleshooting . . . . . . . . . . . . . . . . . . . . . . . . . . . . . . . . 27
6. Information . . . . . . . . . . . . . . . . . . . . . . . . . . . . . . . . . . . . 34
Page 3

1
2
1
3
4
5
6
section
Introduction
Thank you for purchasing the MyEssentials Wireless G Notebook Card.
Now you can take advantage of this great new technology and gain the
freedom to network your home and office computers wirelessly. This Card
allows you to connect a notebook computer to your network. Please
be sure to read through this User Manual completely, and pay special
attention to the section entitled “Placement of your Wireless Networking
Hardware for Optimal Performance”.
Benefits of a Home Network
Your MyEssentials Home Network will allow you to:
• Share one high-speed Internet connection with all the computers
in your home
• Share resources, such as files, and hard drives among
all the connected computers in your home
• Share a single printer with the entire family
• Share documents, music, video, and digital pictures
• Store, retrieve, and copy files from one computer to another
• Simultaneously play games online, check Internet email, and chat
Advantages of a Wireless Network
Here are some of the advantages of setting up a MyEssentials
wireless network:
• Mobility – you’ll no longer need a dedicated “computer room”
—now you can work on a networked laptop or desktop computer
anywhere within your wireless range
• Easy installation – MyEssentials Easy Installation Wizards make
setup simple
• Flexibility – set up and access printers, computers, and other
networking devices from anywhere in your home
• Easy expansion – the wide range of MyEssentials networking
products let you expand your network to include devices such
as printers and gaming consoles
• No cabling required – you can spare the expense and hassle
of retrofitting Ethernet cabling throughout the home or office
• Widespread industry acceptance – choose from a wide range
of interoperable networking products
Page 4

Introduction
2
Placement of your Wireless Networking Hardware
for Optimal Performance
Your wireless connection will be stronger the closer your computer is
to your wireless router (or access point). Typical indoor operating range
for your wireless devices is between 100 and 200 feet. In the same way,
your wireless connection and performance will degrade somewhat as the
distance between your wireless router (or access point) and connected
devices increases. This may or may not be noticeable to you. As you
move farther from your wireless router (or access point), connection
speed may decrease. Factors that can weaken signals simply by getting
in the way of your network’s radio waves are metal appliances or
obstructions, and walls.
If you have concerns about your network’s performance that might be
related to range or obstruction factors, try moving the computer to a
position between five and 10 feet from the wireless router (or access
point) in order to see if distance is the problem. If difficulties persist
even at close range, please contact MyEssentials Technical Support.
Note: While some of the items listed below can affect network
performance, they will not prohibit your wireless network from functioning;
if you are concer ned that your network is not operating at its maximum
effectiveness, this checklist may help.
1. Placement of your Wireless Router (or Access Point)
Place your wireless router (or access point), the central connection point
of your network, as close as possible to the center of your wireless
network devices.
To achieve the best wireless network coverage for your “wireless clients,”
(i.e., computers enabled with MyEssentials Wireless Notebook Cards and
Wireless USB Adapters):
• Ensure that your wireless router’s (or access point’s) antennas are
parallel to each other, and are positioned vertically (toward the ceiling).
If your wireless router (or access point) itself is positioned vertically,
point the antennas as much as possible in an upward direction.
• In multistory homes, place the wireless router (or access point) on a
floor that is as close to the center of the home as possible. This may
mean placing the wireless router (or access point) on an upper floor.
• Try not to place the wireless router (or access point) near a cordless
2.4GHz phone.
Page 5

3
2
1
3
4
5
6
section
Introduction
2. Avoid Obstacles and Interference
Avoid placing your wireless router (or access point) near devices that
may emit radio “noise”, such as microwave ovens. Other objects that can
inhibit wireless communication can include:
• Refrigerators
• Washers and/or dryers
• Metal cabinets
• Large aquariums
• Metallic-based, UV-tinted windows
If your wireless signal seems weak in some spots, make sure that objects
such as these are not blocking the signal’s path between your computers
and wireless router (or access point).
3. Cordless Phone Placement
If the performance of your wireless network is impaired after attending
to the above issues, and you have a cordless phone:
• Try moving cordless phones away from the wireless router (or access
point) and your wireless-enabled computers.
• Unplug and remove the battery from any cordless phone that
operates on the 2.4GHz band (check manufacturer’s information).
If this fixes the problem, your phone may be interfering.
• If your phone supports channel selection, change the channel on the
phone to the farthest channel from your wireless network as possible.
For example, change the phone to channel 1 and move your wireless
router (or access point) to channel 11. (Your channel selection will
vary depending on your region.) See your phone’s user manual
for detailed instructions.
• If necessary, consider switching to a 900MHz or 5GHz cordless phone.
Page 6

Introduction
4
4. Choose the “Quietest” Channel for your Wireless Network
In locations where homes or offices are close together, such as apartment
buildings or office complexes, there may be wireless networks nearby
that can conflict with yours. Use the Site Survey capabilities of your
MyEssentials Wireless Networking Utility to locate any other wireless
networks, and move your wireless router (or access point) and computers
to a channel as far away from other networks as possible.
Experiment with more than one of the available channels in order to find
the clearest connection and avoid interference from neighboring cordless
phones or other wireless devices.
For more MyEssentials wireless networking products, use the detailed Site
Survey and wireless channel information included in your User Manual.
5. Secure Connections, VPNs, and AOL
Secure connections typically require a user name and password, and are
used where security is important. Secure connections include:
• Virtual Private Network (VPN) connections, often used to connect
remotely to an office network
• The “Bring Your Own Access” program from America Online (AOL),
which lets you use AOL through broadband provided by another
cable or DSL service
• Most online banking websites
• Many commercial websites that require a user name and password
to access your account
Secure connections can be interrupted by a computer’s power
management setting, which causes it to “go to sleep.” The simplest
solution to avoid this is to simply reconnect by re-running the VPN
or AOL software, or by re-logging into the secure website.
Page 7

5
2
1
3
4
5
6
section
Introduction
A second alternative is to change your computer’s power management
settings so it does not go to sleep; however, this may not be appropriate
for portable computers. To change your power management setting in
Windows, see the “Power Options” item in the Control Panel.
If you continue to have difficulty with Secure Connections, VPNs, and
AOL, please review steps 1–4 in the previous pages to be sure you have
addressed these issues.
These guidelines should allow you to cover the maximum possible area
with your wireless router.
For more information regarding our networking products, visit our website at
www.MyEssentialssupport.com or call MyEssentials Technical Support at:
US: 1-866-761-4608
Page 8

Overview
6
Product Features
The Card complies with the IEEE 802.11g standard in order to
communicate with other 802.11g-compliant wireless devices at 54Mbps.
The Card is compatible with all 802.11g devices as well as other 802.11b
products at 11Mbps. 802.11g products operate on the same 2.4GHz
frequency band as 802.11b Wi-Fi® products.
• 2.4GHz ISM (Industrial, Science, and Medical) band operation
• Integrated easy-to-use Wireless Configuration Utility
• CardBus interface, for operation in virtually any notebook computer
• WPA, WPA2, 64-bit WEP (Wired Equivalent Privacy),
or 128-bit encryption
• Wireless access to networked resources
• Support for both Infrastructure and Ad-Hoc (peer-to-peer)
networking modes
• Data rate of up to 54Mbps (802.11g), or 11Mbps (802.11b)
• Easy installation and use
• Exter nal antenna
• LED power and network link indicators
Page 9

7
2
1
3
4
5
6
section
Overview
Applications and Advantages
• Wireless roaming with a laptop around the home or office
Offers the freedom of networking without cables
• Connection rates of up to 54Mbps
Provides immediate high-speed wireless connectivity at home,
work, and hotspot locations without compromising the use of
existing 802.11b products
• Compatibility with 802.11b products
802.11g wireless LAN solutions are backward-compatible with
existing Wi-Fi (IEEE 802.11b) products and with other products that
display the 54g™ mark
• Difficult-to-wire environments
Enables networking in buildings with solid or finished walls, or open
areas where wiring is difficult to install
• Frequently changing environments
Adapts easily in offices or environments that frequently rearrange
or change locations
• Temporary LANs for special projects or peak time
Sets up temporary networks such as at trade shows, exhibitions, and
construction sites, which need networks on a short-term basis; also
companies who need additional workstations for a peak activity period
• SOHO (Small Office/Home Office) networking needs
Provides the easy and quick, small network installation SOHO
users need
Page 10
Overview
8
Product Specifications
Host Interface: 32-bit CardBus
Power Consumption: Tx/Rx peak 450/260mA @ 3.3VDC (max)
Operating Temperature: 32–185 degrees F (0–85 degrees C)
Storage Temperature: -40–194 degrees F (-40–90 degrees C)
Humidity: Max. 95% (non-condensing)
Typical Operating Range: Up to 400 ft. (231m) (wireless performance may
vary depending on the networking environment)
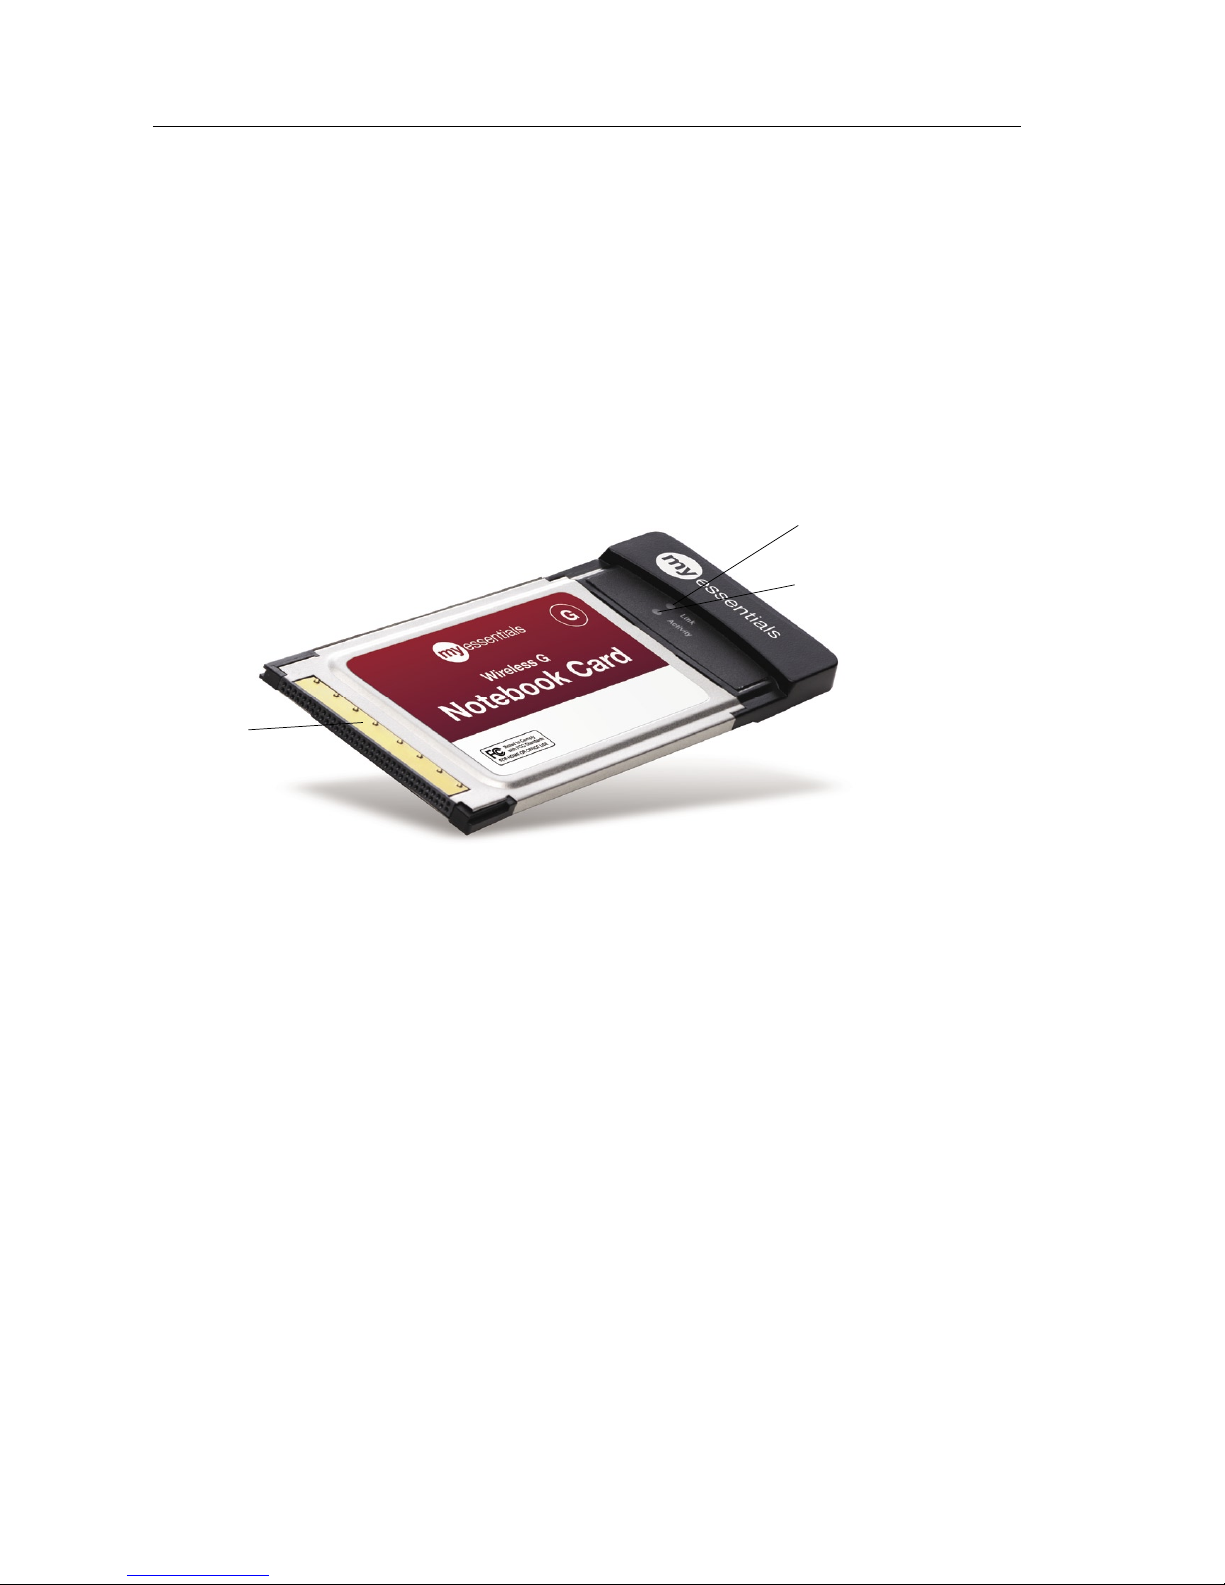
(a)
(c)
(b)
(a) Link LED
Lights up when the Card links to a wireless network
(b) Activity LED
Lights up when the Card is active
(c) Card Connector
Part of the Card that fits into your computer’s CardBus slot
System Requirements
• PC-compatible laptop with one available CardBus slot
• Windows
®
98SE, Me, 2000, XP
Package Contents
• Wireless G Notebook Card
• Quick Installation Guide
• Installation Software CD
• User Manual
Page 11
Step 1 Install
Important Note:
Install the software before inserting the Card.
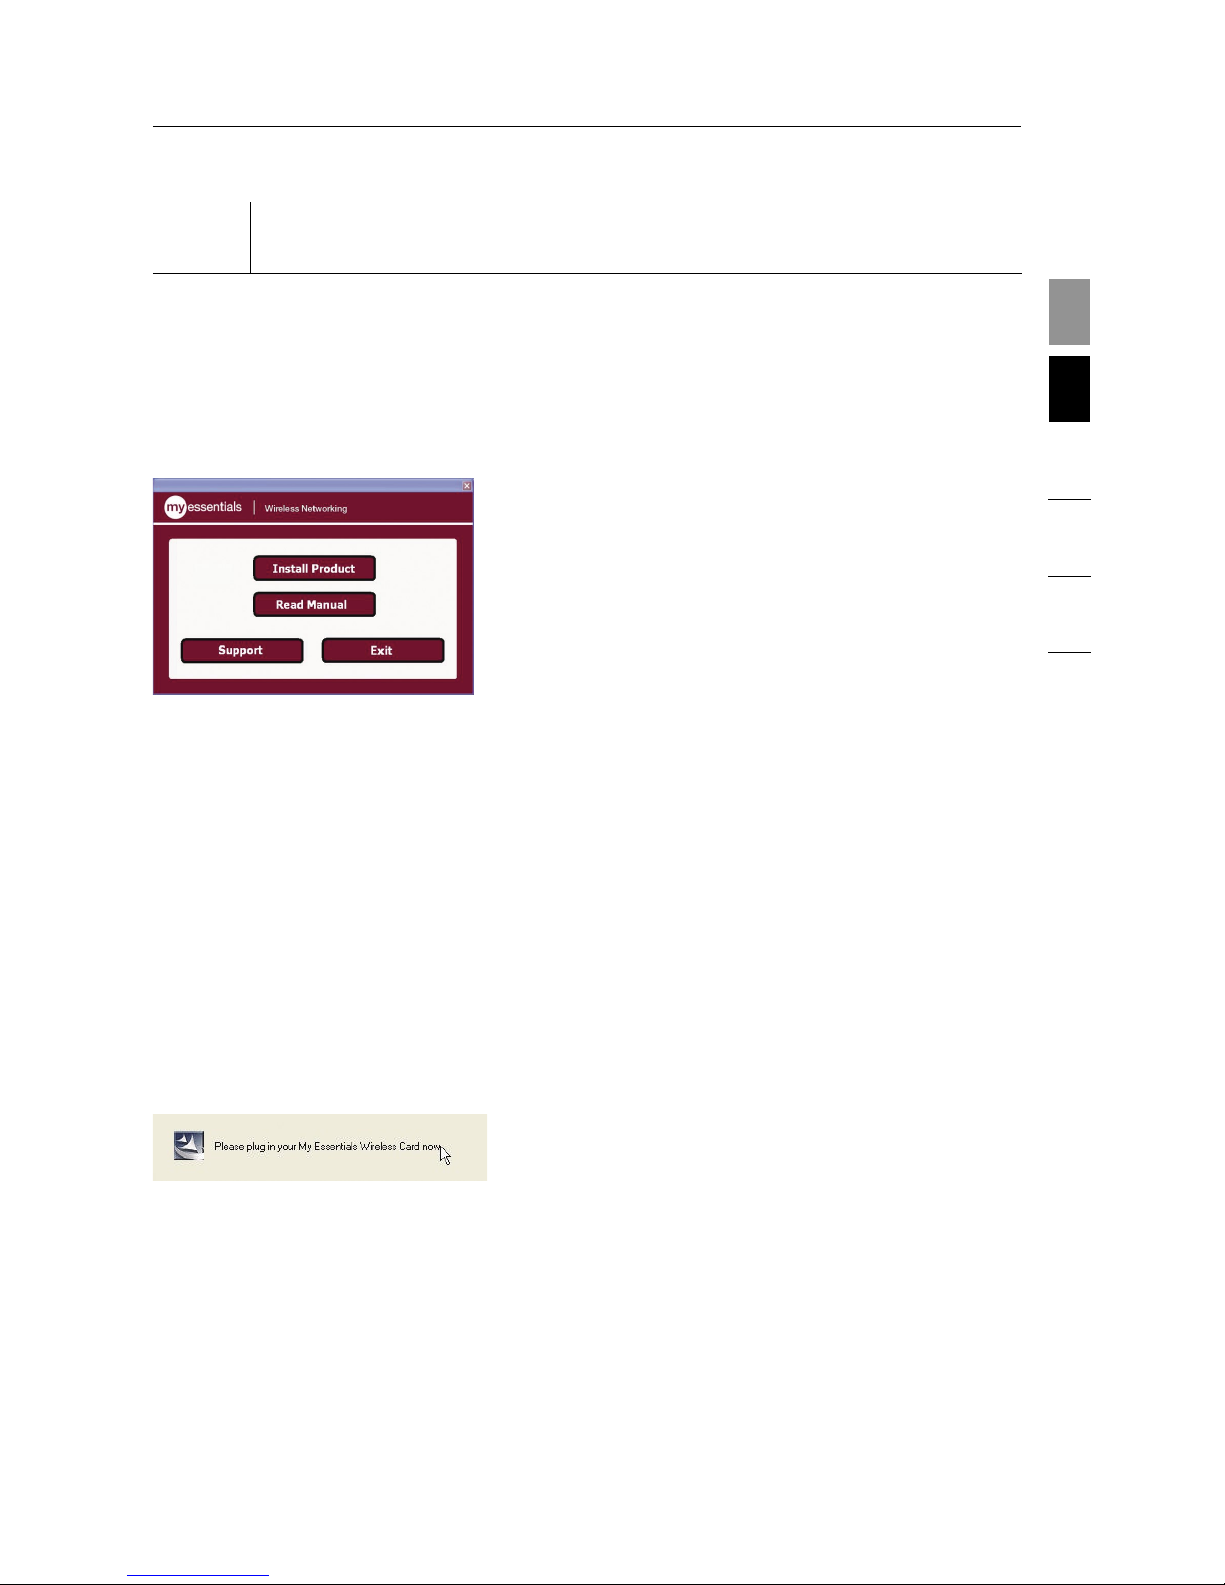
1.1 Insert the Installation Software CD
into your CD-ROM drive.
1.2 The MyEssentials Wireless
Networking Utility setup screen
will automatically appear (may take
15–20 seconds to appear).
1.3 Click “install” from the menu.
Note: If the MyEssentials Wireless
Networking Utility setup screen
does not appear within 20 seconds,
access your CD-ROM drive:
double-click on the “My Computer”
icon and then double-click on the
CD-ROM drive into which you have
placed the installation CD. Doubleclick on the folder named “Files”,
then double-click on the icon named
“setup.exe”.
1.4 The installer will now start. The
wizard will then prompt you to plug
in your MyEssentials Wireless Card.
9
2
1
3
4
5
6
section
Installing and Setting up the Card
Page 12
Installing and Setting up the Card
10
Step 2 Connect
Plug the Card into an available CardBus slot on your notebook computer
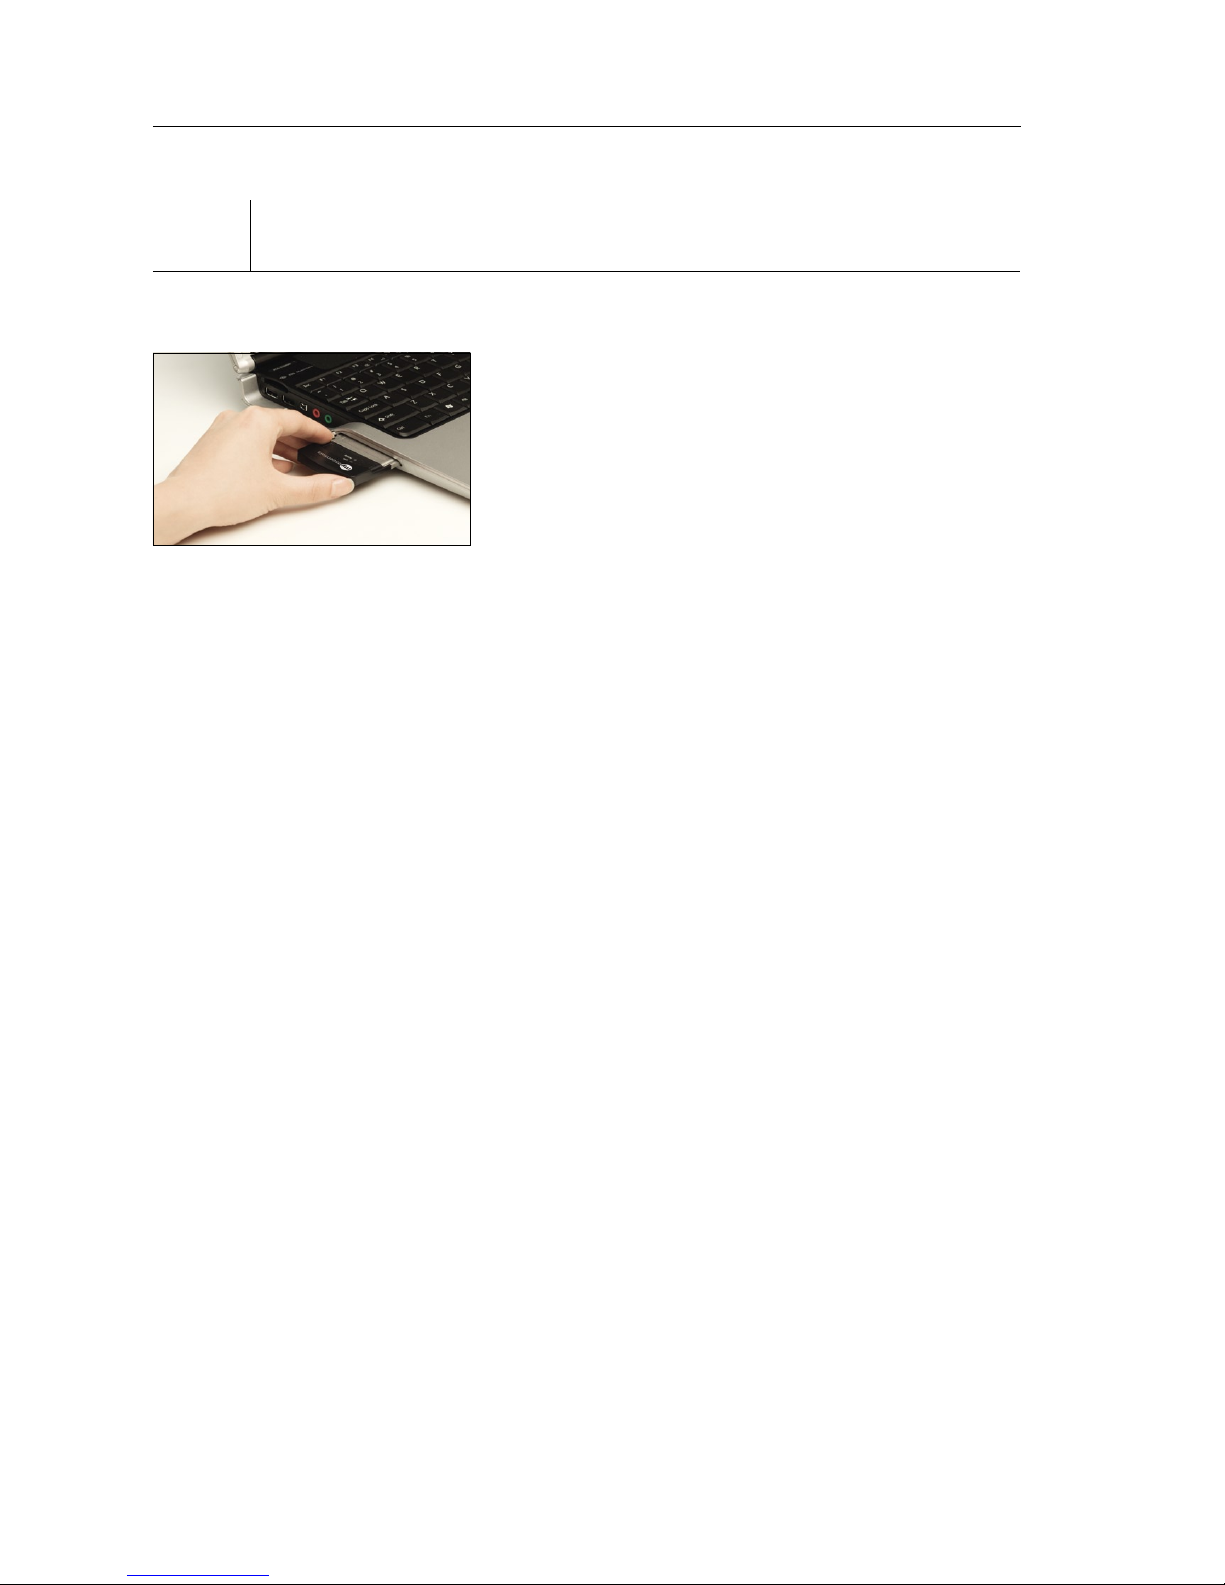
2.1 During the install process, you will
be prompted to insert your Card.
Firmly insert the Card, label side
UP, into your computer’s CardBus
slot until it stops. Click “OK”.
The power light on the top of the
Card will light when the Card is
inserted properly.
Note: If your system did not prompt
you to insert your Card after the
installation is completed, please do
so now.
Note: If you are using the Windows
XP operating system, you will not be
prompted to reboot until after the
drivers are installed.
Page 13
11
2
1
3
4
5
6
section
Installing and Setting up the Card
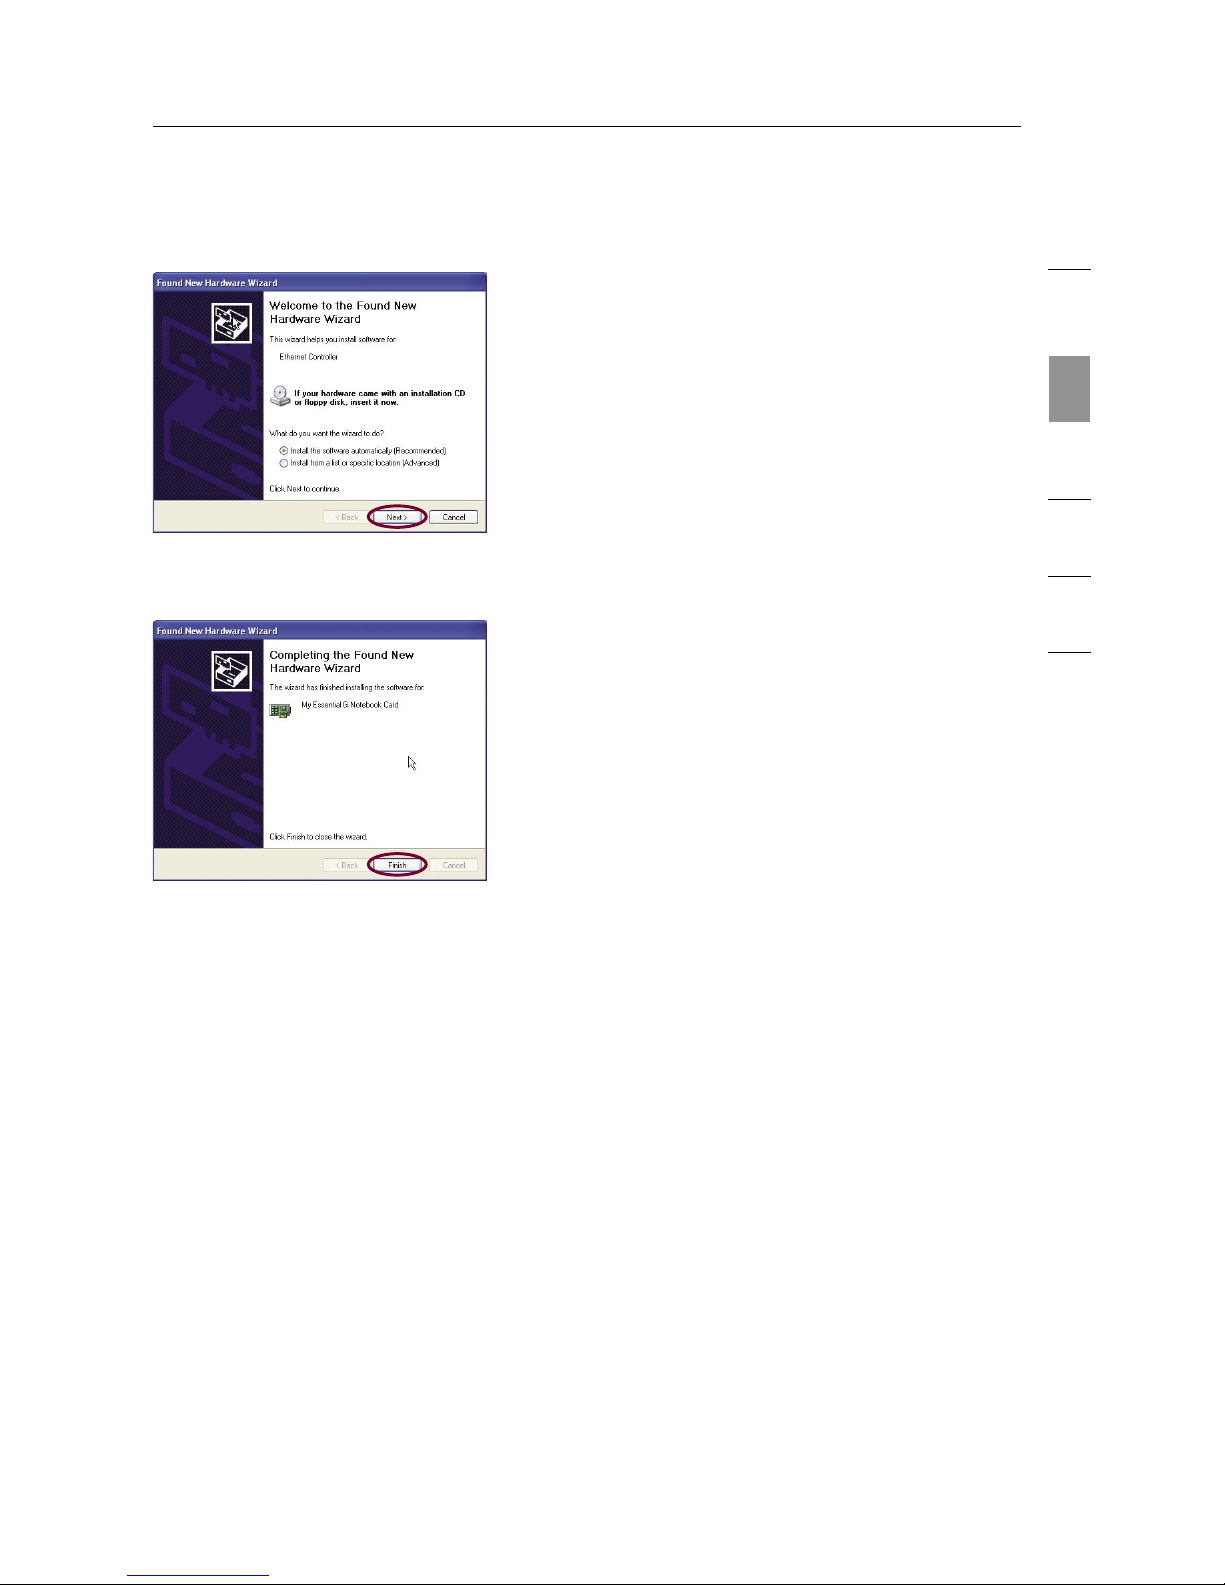
2.2 The wizard will prompt you to
install software for the MyEssentials
Wireless G Notebook Card. Select
the “Install the software automatically
(Recommended)” option.
Click “Next”.
2.3 Hardware installation is now
complete. Click “Finish” to close
the wizard.
2.4 MyEssentials Wireless Networking
Utility installation is now complete.
Click “Finish” to close the wizard.
Page 14
Installing and Setting up the Card
12
Step 3 Configure
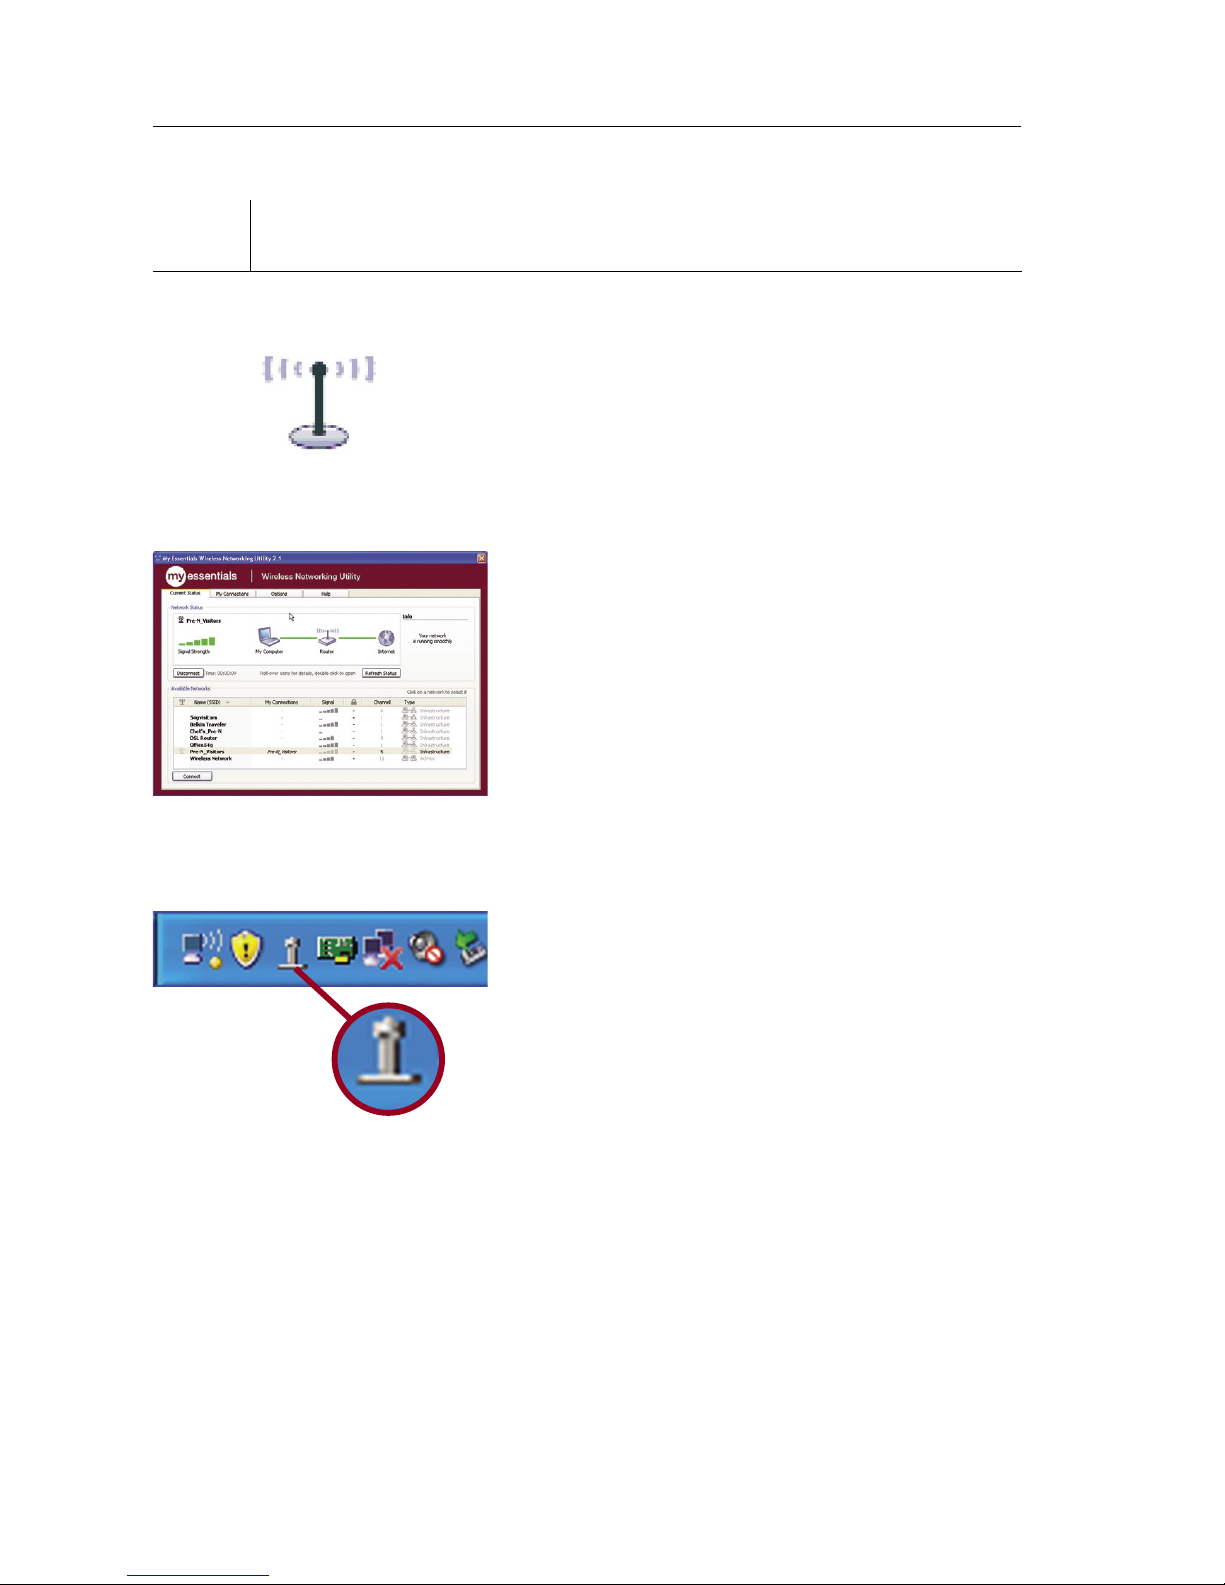
Use the MyEssentials Wireless Networking Utility
3.1 After restarting your computer,
double-click the MyEssentials
Wireless Networking Utility icon on
the desktop screen.
3.2 The MyEssentials Wireless
Networking Utility screen will
appear. Select a network to which
to connect from the “Available
Networks” list and click “Connect”.
Note: In order to see your
available networks, you must be
near a working wireless router or
access point.
3.3 The MyEssentials Wireless
Networking Utility icon can also be
found on the system tray.
Note: Double-clicking on the
MyEssentials Wireless Networking
Utility icon on the system tray will
bring up the “Utility” screen.
Installation is now complete.
Page 15
After successfully installing the MyEssentials Wireless Networking Utility
(WNU), configurations for wireless connection and security are just a
few easy clicks away.
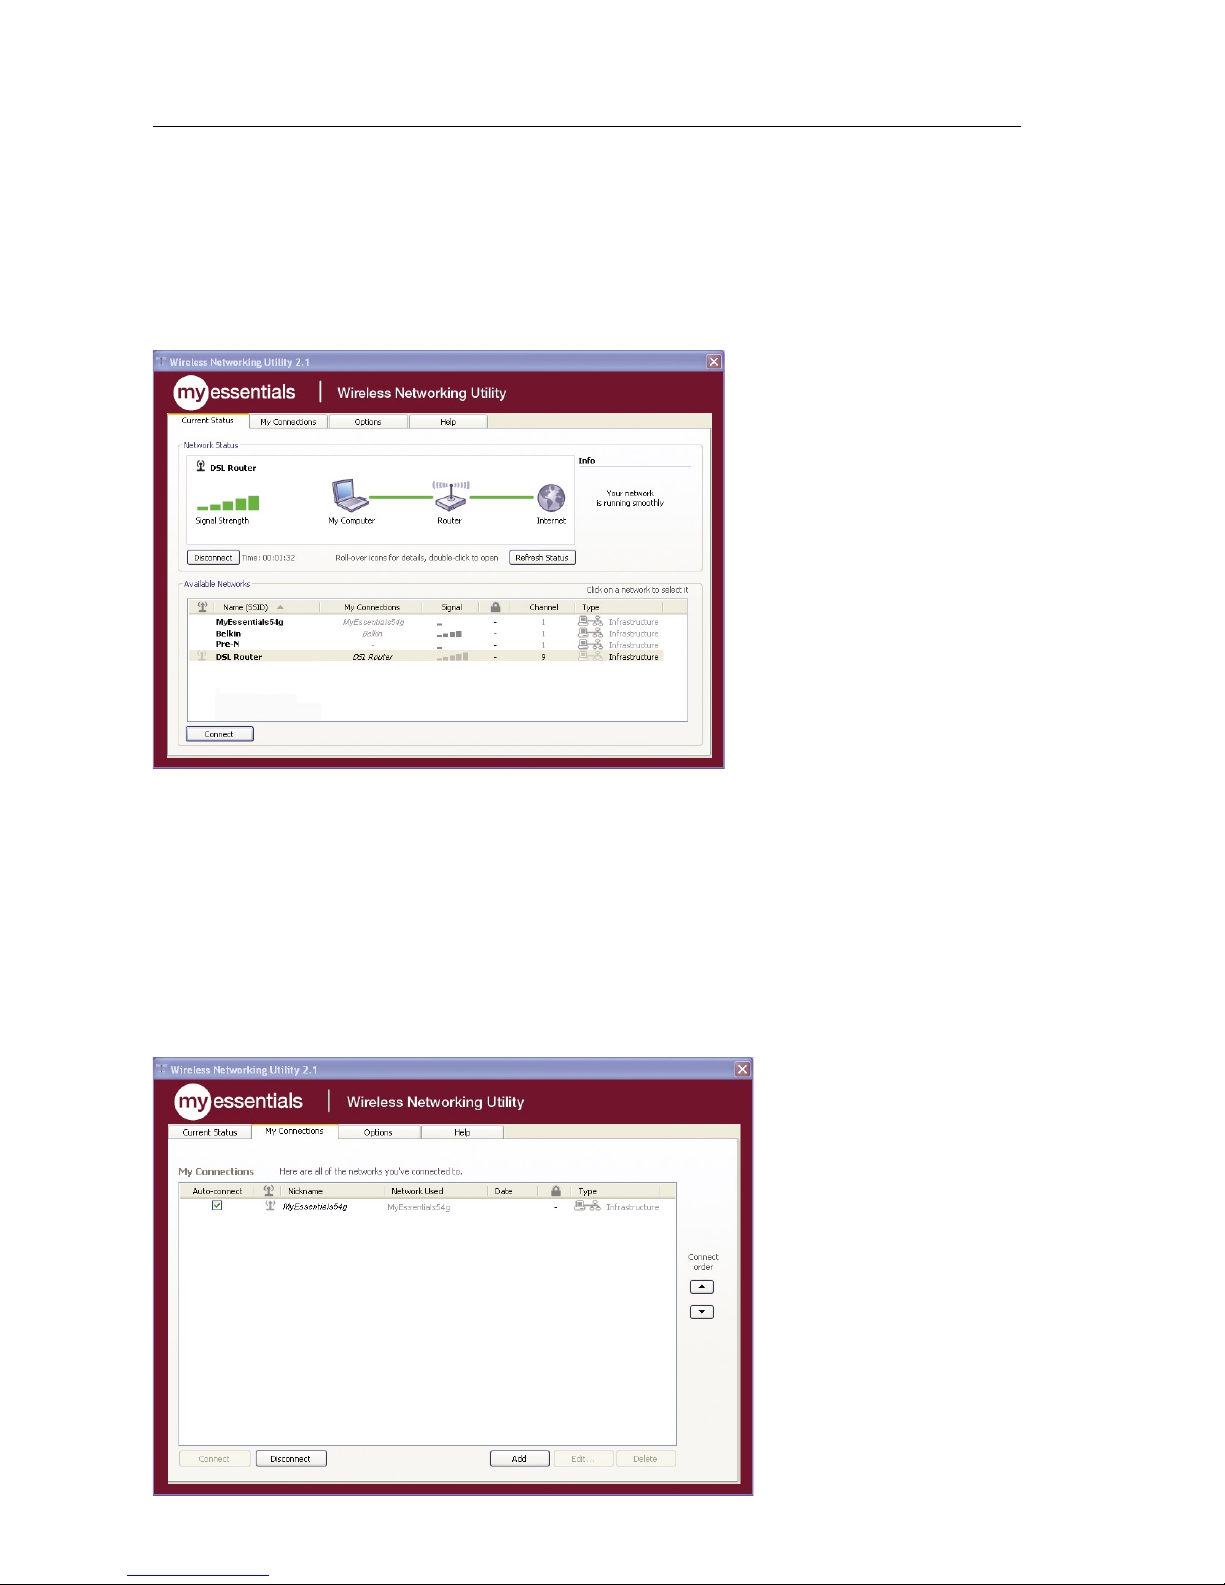
Accessing the MyEssentials Wireless Networking Utility from the
Windows System Tray
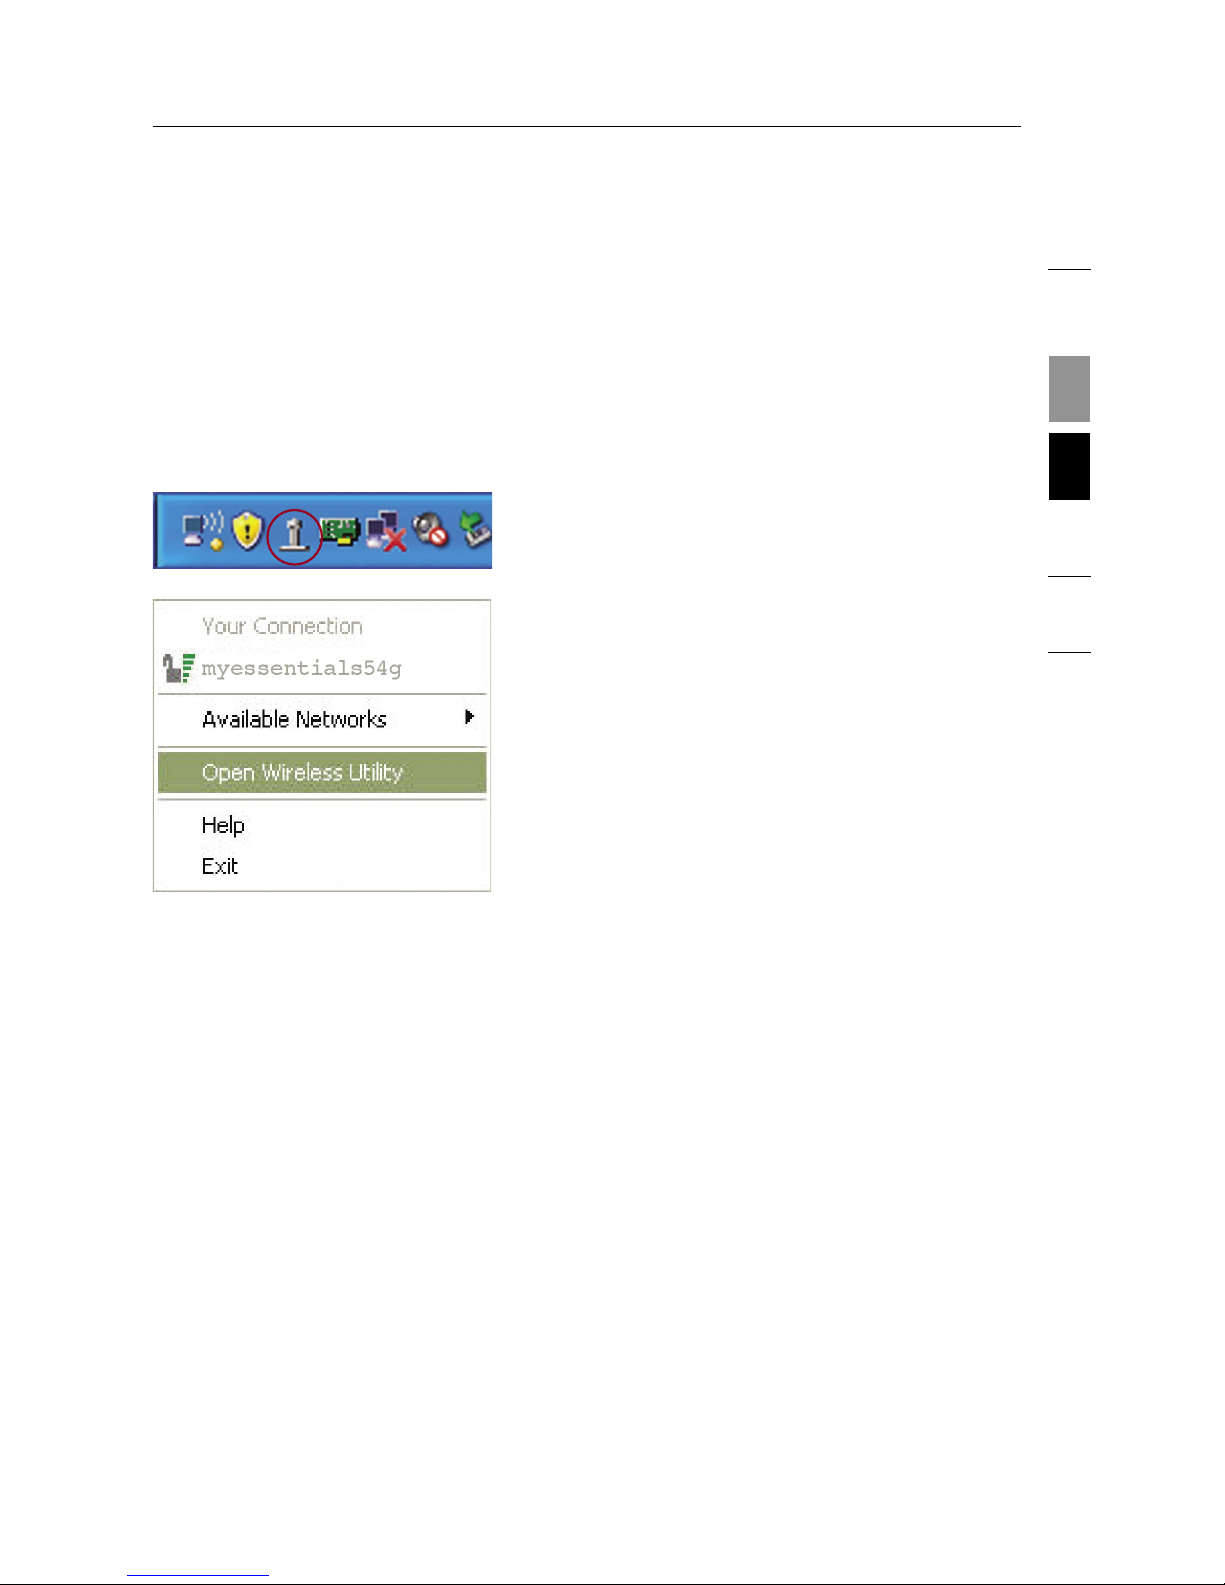
To access the WNU, simply place your mouse pointer and right-click
over the WNU icon on the Windows task tray.
If the icon is not present, click on “Start > Programs >
MyEssentials > MyEssentials Wireless Utility”.
The WNU’s default screen is the “Current Status” tab. The
“Current Status” tab displays the current Network Status and
Available Networks.
13
2
1
3
4
5
6
section
Using the MyEssentials Wireless Networking Utility
Page 16
Using the MyEssentials Wireless Networking Utility
14
Network Status
This window displays the connectivity status of the current network. It
even displays connectivity between the computer and router, and router
and Internet. In the event of a connectivity problem, this window can be
used to determine the problem’s source (e.g. computer, router, or
Internet/modem).
Available Networks
This window displays the available networks at the current location
as well as their SSID, Signal Strength, Security Type, Channel, and
Network Type.
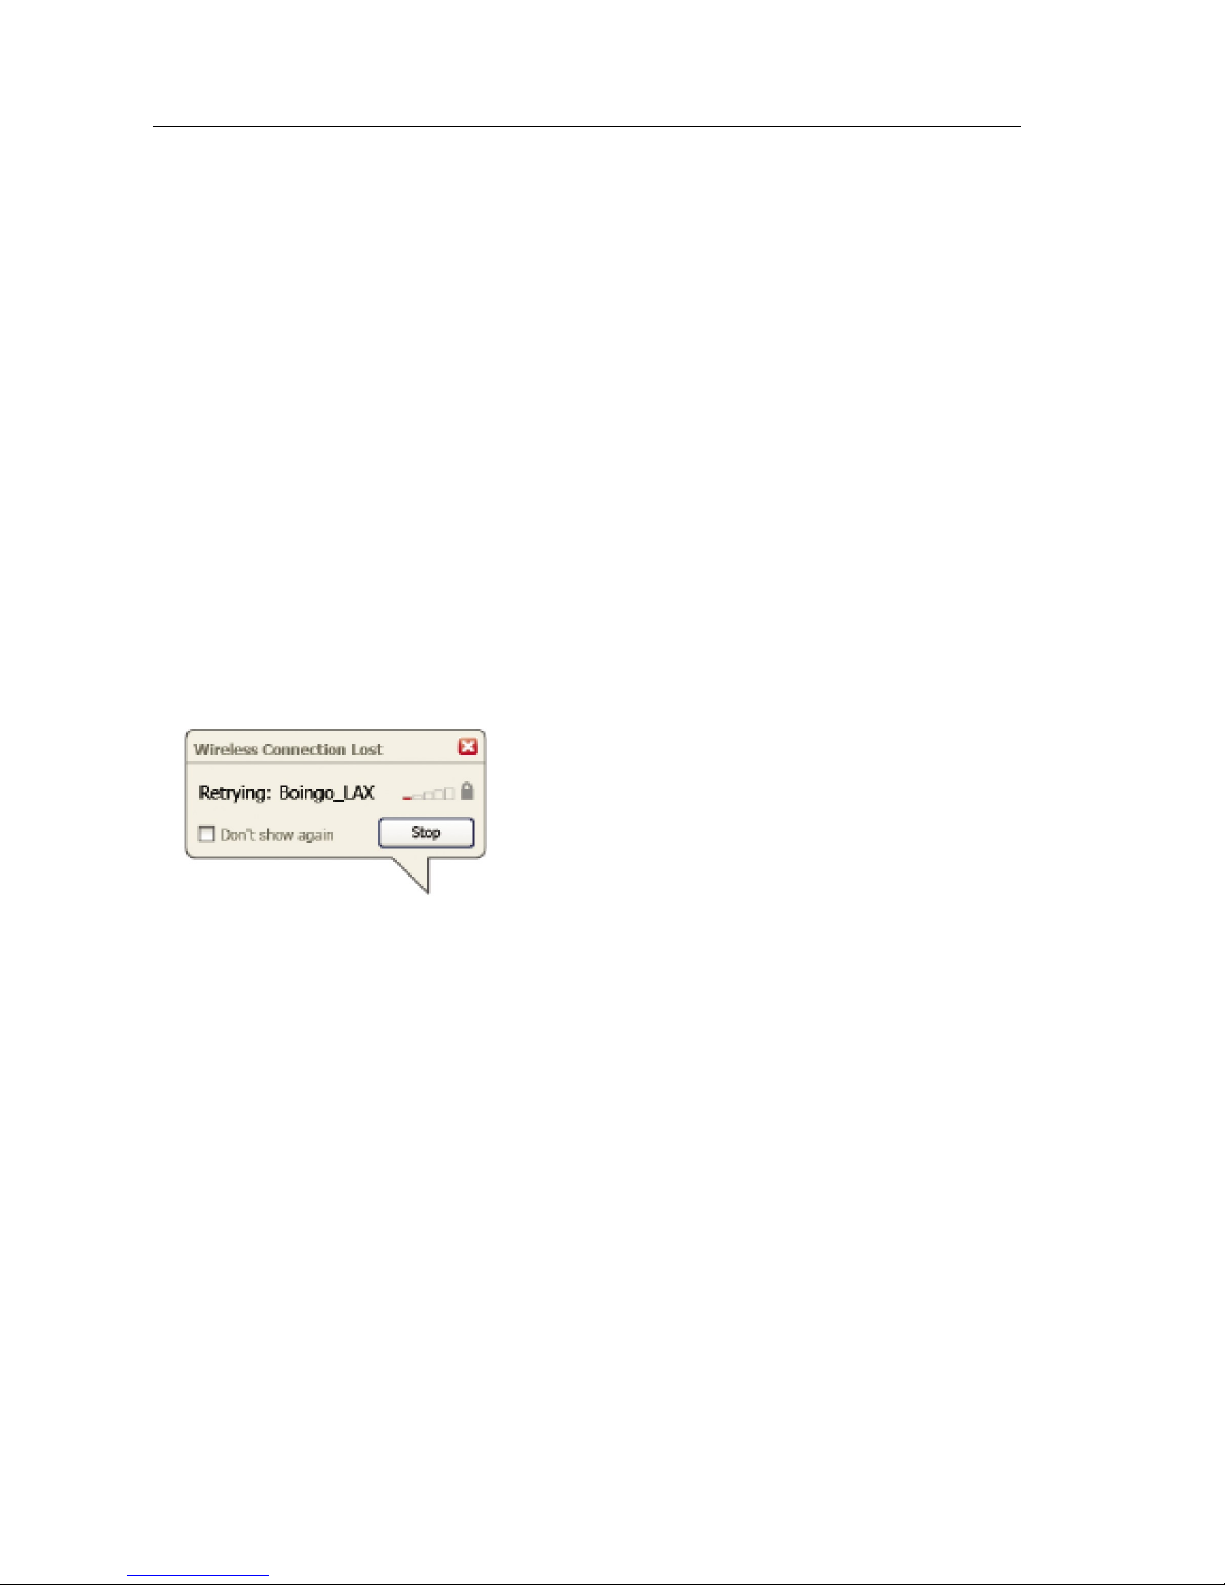
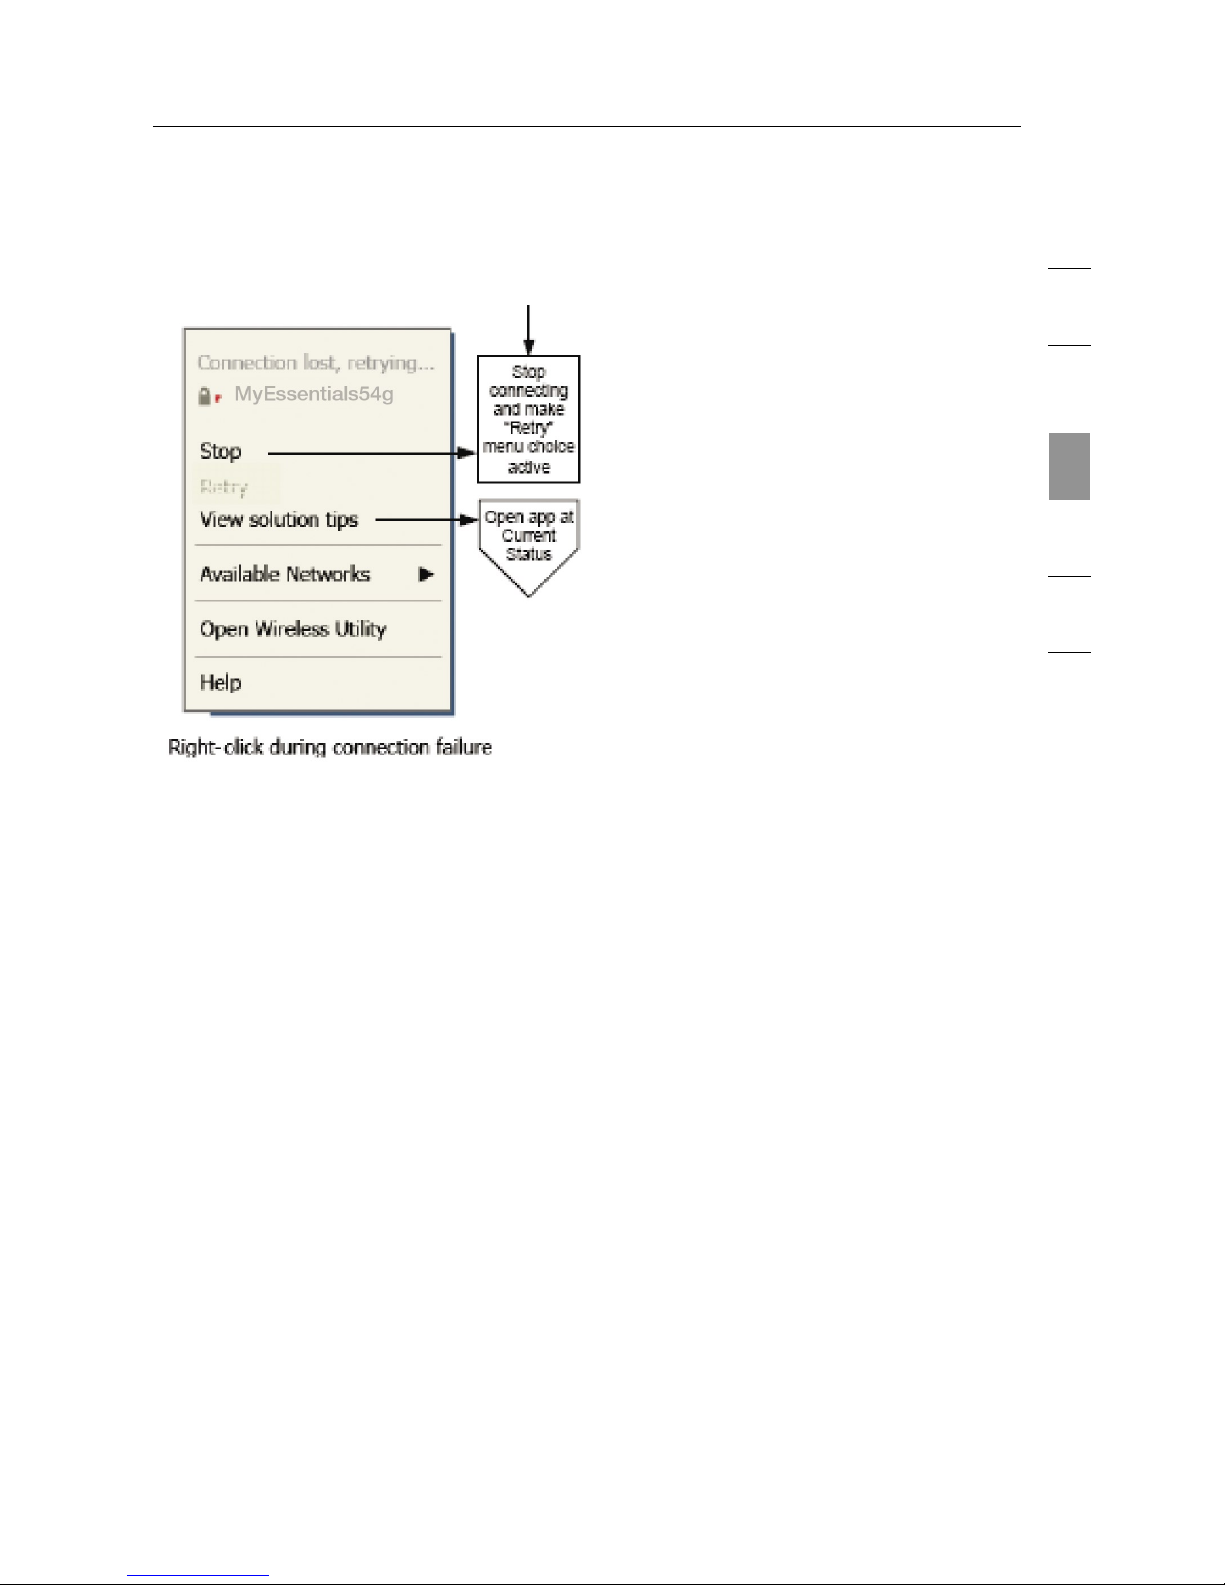
Lost Wireless Connection
If the current wireless connection is lost, a window will pop up and the
WNU will attempt to reconnect.
Page 17
15
2
1
3
4
5
6
section
Using the MyEssentials Wireless Networking Utility
Connection Failure
Other options will appear during attempts to reconnect. To stop
connecting, click “Stop” and to reattempt connection, click “Retry”.
Page 18
Using the MyEssentials Wireless Networking Utility
16
Network Status and Solution Tips
To further understand the current Network Status, click “Open Wireless
Utility”. The default screen will be the “Current Status” tab and the “Network
Status” section determines which connections are good and/or faulty.
The WNU also features a “Solution Tips” section that provides
troubleshooting guidelines.
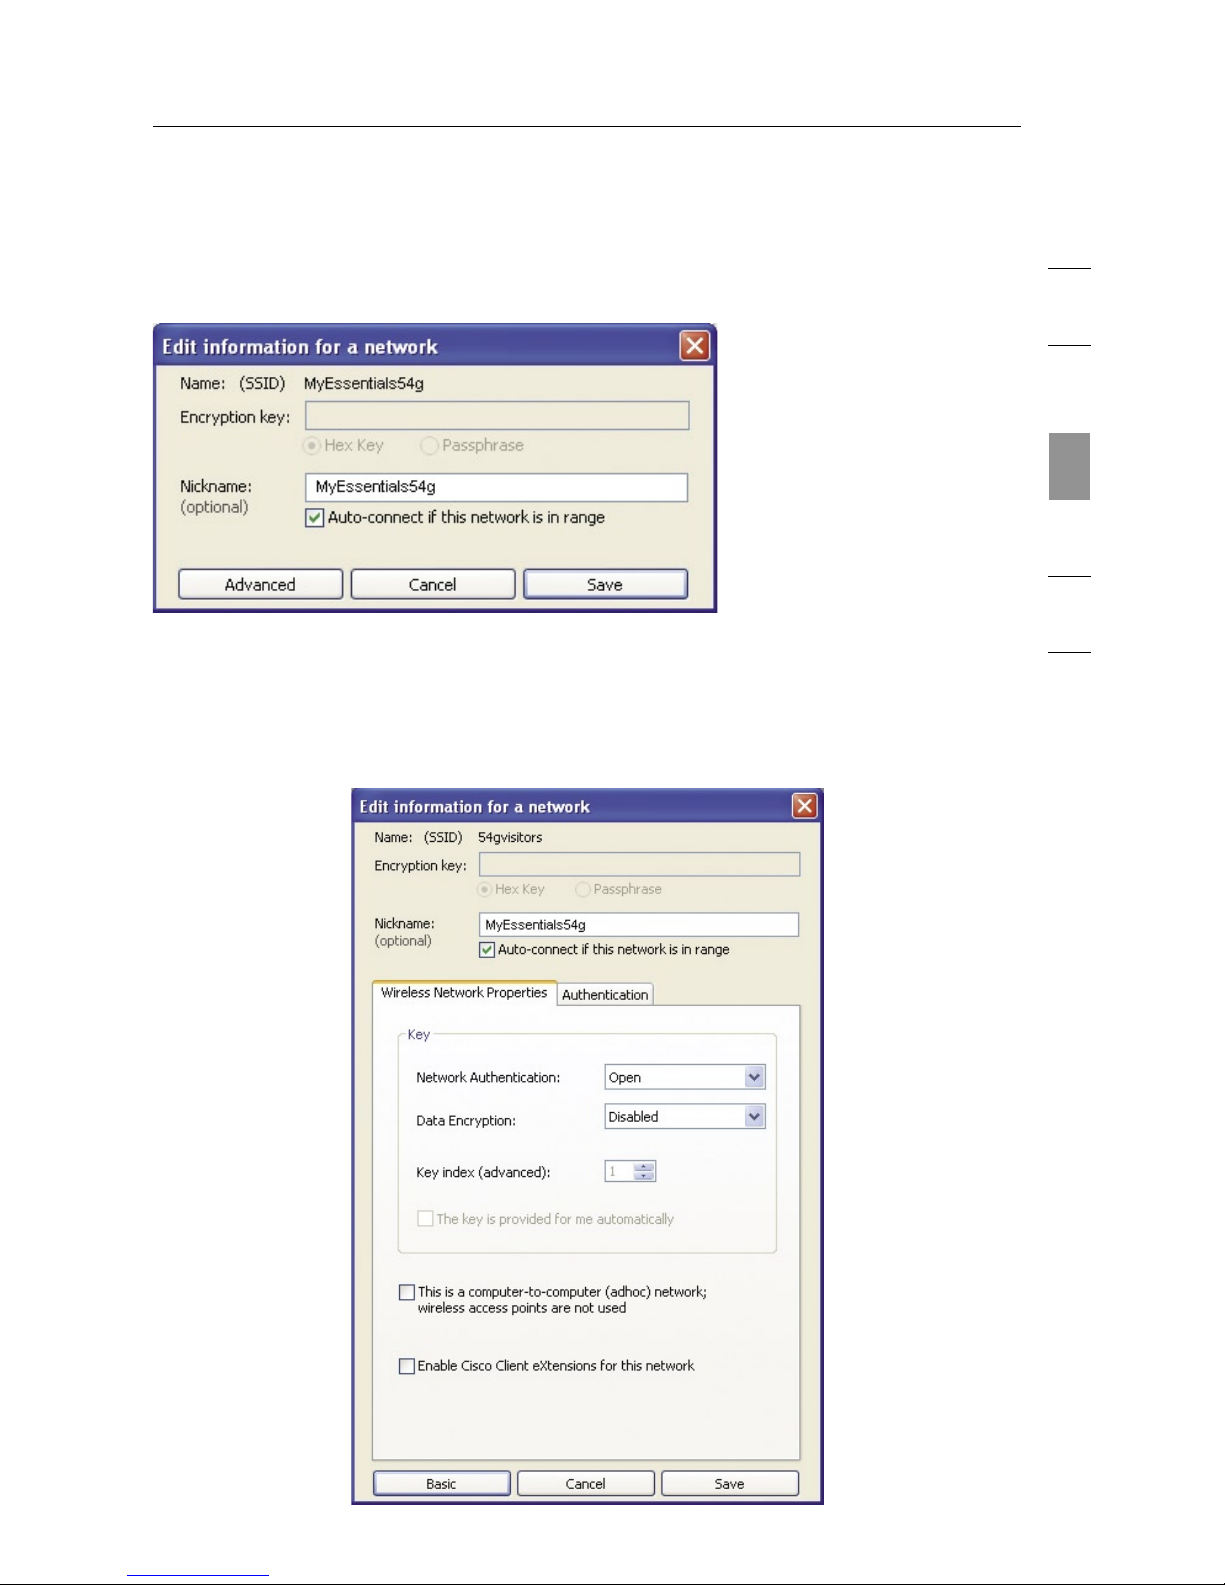
Setting Wireless Network Profiles
The “My Connections” tab on the WNU allows you to add, edit, and
delete connection profiles. It also displays signal strength, security, and
network type.
Page 19
17
2
1
3
4
5
6
section
Using the MyEssentials Wireless Networking Utility
Securing your Wi-Fi® Network
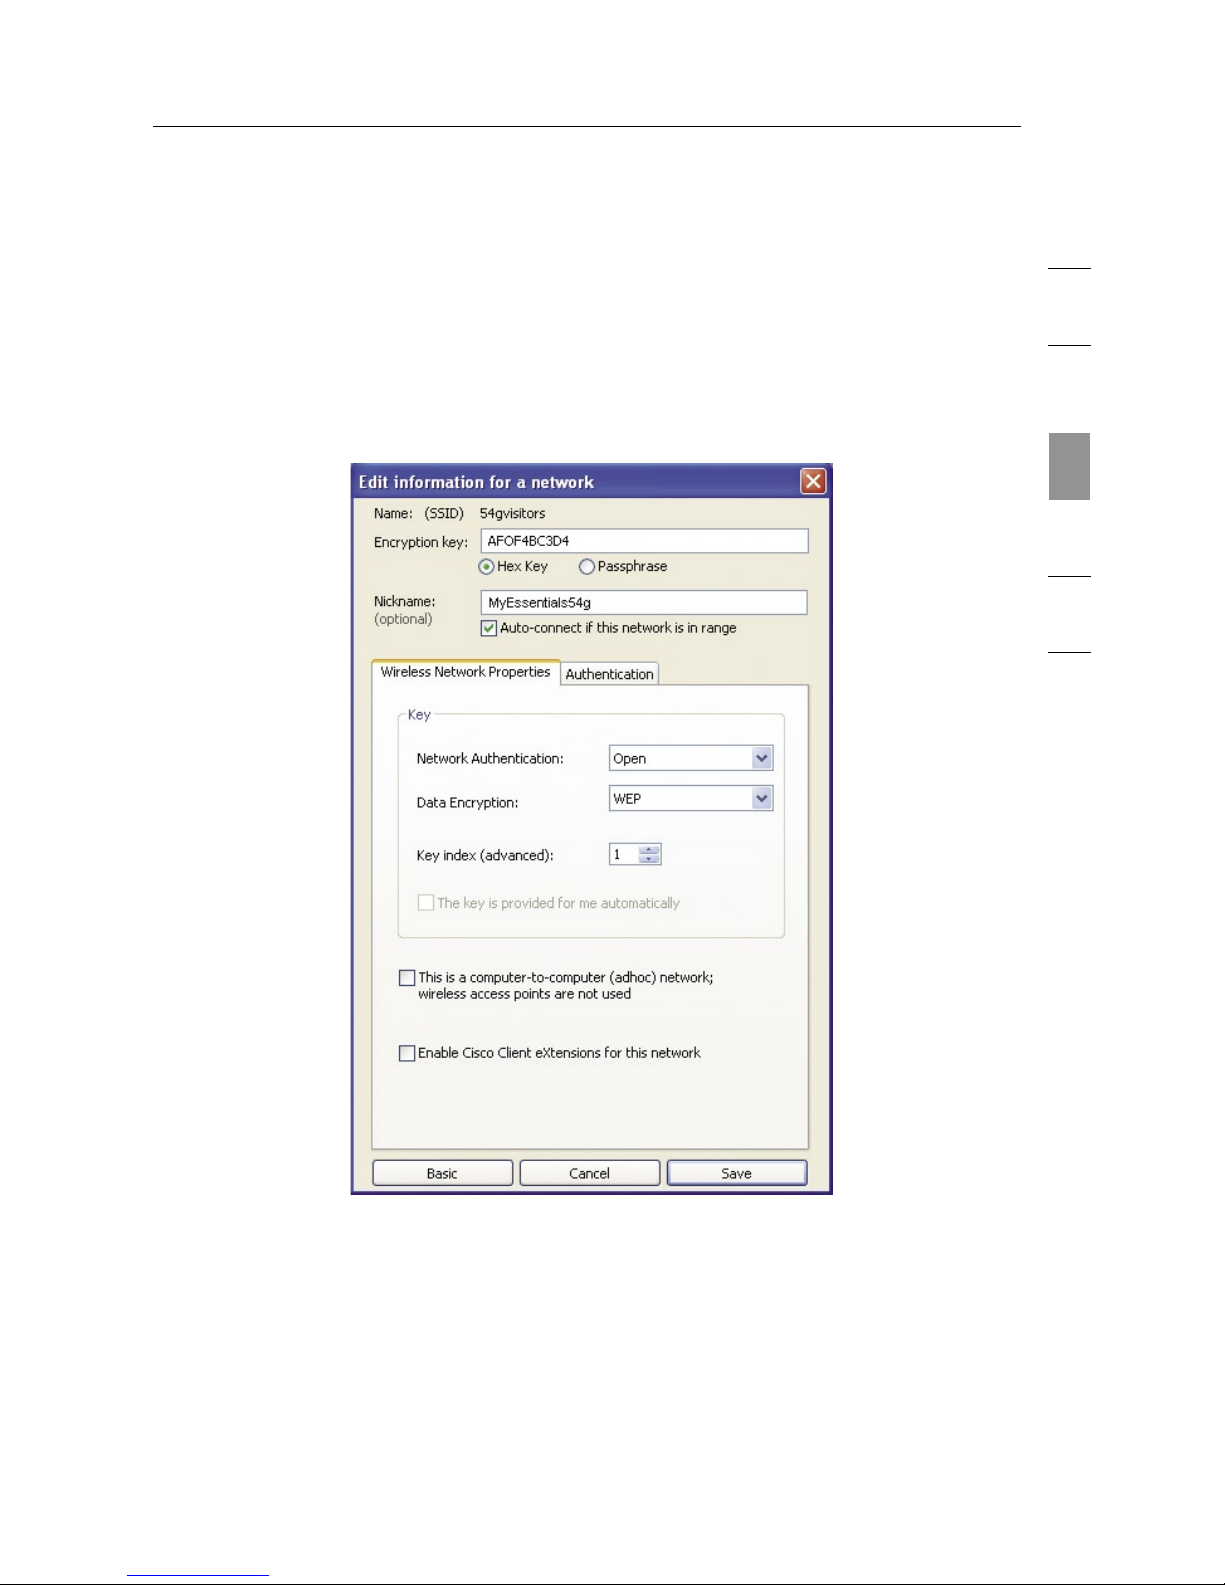
If you choose to connect to a secure network, determine the type of security
(WPA or WEP*) and use the appropriate field in the dialog box.
*Note: Types of security
Note: When you select a network using encryption, you will first see the
simple security screen. Click the “Advanced” button to see other security
options (below).
Page 20

Using the MyEssentials Wireless Networking Utility
18
Wired Equivalent Privacy (WEP) is a less secure, but more widely
adopted wireless security protocol. Depending on the security level (64or 128-bit), the user will be asked to input a 10- or
26-character hex key. A hex key is a combination of letters, a–f,
and numbers, 0–9.
Wireless Protected Access (WPA) is the new standard in the
wireless security. However, not all wireless cards and adapters support
this technology. Please check your wireless adapter’s user manual
to check if it supports WPA. Instead of a hex key, WPA uses only
passphrases, which are much easier to remember.
The following section, intended for the home, home-office, and
small-office user, presents a few different ways to maximize the security
of your wireless network.
At the time of publication, four encryption methods
are available:
Encryption Methods:
Name 64-Bit Wired
Equivalent
Privacy
128-Bit Wired
Equivalent
Privacy
Wi-Fi Protected
Access-TKIP
Wi-Fi Protected
Access 2
Acronym 64-bit WEP 128-bit WEP WPA-TKIP/AES
(or just WPA)
WPA2-AES (or
just WPA2)
Security Good Better Best Best
Features Static keys Static keys Dynamic key
encryption
and mutual
authentication
Dynamic key
encryption
and mutual
authentication
Encryption
keys based on
RC4 algorithm
(typically
40-bit keys)
More secure
than 64-bit
WEP using a
key length of
104 bits plus
24 additional
bits of systemgenerated data
TKIP (Temporal
Key Integrity
Protocol) added
so that keys
are rotated and
encryption is
strengthened
AES (Advanced
Encryption
Standard) does
not cause any
throughput loss
WEP (Wired Equivalent Privacy)
WEP is a common protocol that adds security to all Wi-Fi-compliant
wireless products. WEP gives wireless networks the equivalent level of
privacy protection as a comparable wired network.
Page 21

19
2
1
3
4
5
6
section
Using the MyEssentials Wireless Networking Utility
64-Bit WEP
64-bit WEP was first introduced with 64-bit encryption, which includes
a key length of 40 bits plus 24 additional bits of system-generated data
(64 bits total). Some hardware manufacturers refer to 64-bit as 40-bit
encryption. Shortly after the technology was introduced, researchers
found that 64-bit encryption was too easy to decode.
128-Bit Encryption
As a result of 64-bit WEP’s potential security weaknesses, a more
secure method of 128-bit encryption was developed. 128-bit
encryption includes a key length of 104 bits plus 24 additional bits of
system-generated data (128 bits total). Some hardware manufacturers
refer to 128-bit as 104-bit encryption. Most of the new wireless
equipment in the market today supports both 64-bit WEP and 128-bit
WEP encryption, but you might have older equipment that only supports
64-bit WEP. All MyEssentials wireless products will support both 64-bit
WEP and 128-bit encryption.
Encryption Keys
After selecting either the 64-bit WEP or 128-bit encryption mode, it is critical
that you generate an encryption key. If the encryption key is not consistent
throughout the entire wireless network, your wireless networking devices
will be unable to communicate with one another. You can enter your key by
typing in the hex key. A hex (hexadecimal) key is a combination of numbers
and letters from A–F and 0–9. For 64-bit WEP, you must enter 10 hex keys.
For 128-bit WEP, you must enter 26 hex keys.
For instance:
AF 0F 4B C3 D4 = 64-bit WEP key
C3 03 0F AF 0F 4B B2 C3 D4 4B C3 D4 E7 = 128-bit WEP key
Write down the hex WEP key from your wireless router (or access
point) and enter it manually into the hex WEP key table in your Card’s
configuration screen.
WPA (Wi-Fi Protected Access)
WPA is a new Wi-Fi standard that improves upon the security features of WEP.
To use WPA security, the drivers and software of your wireless equipment must
be upgraded to support it. These updates will be found on your wireless vendor’s
website. There are three types of WPA security: WPA-PSK (no server),WPA (with
radius server), and WPA2.
Page 22

Using the MyEssentials Wireless Networking Utility
20
WPA-PSK (no server) uses what is known as a pre-shared key as the network
key. A network key is a password that is between eight and 63 characters long. It
can be a combination of letters, numbers, or characters. Each client uses the same
network key to access the network. Typically, this is the mode that will be used in a
home environment.
WPA (with radius server) works best in a business environment,
in which a radius server automatically distributes the network key
to clients.
WPA2 requires Advanced Encryption Standard (AES) for encryption of data,
which offers much greater security than WPA. WPA uses both Temporal Key
Integrity Protocol (TKIP) and (AES) for encryption.
Setting up your MyEssentials Wireless Router to use Security
To start using security, you first must enable WEP or WPA for your wireless
router (or access point). For MyEssentials Wireless Routers, these security
features can be configured by using the web-based interface. See your
wireless router’s (or access point’s) manual for directions on how to access
the management interface.
IMPORTANT: You must now set all wireless network cards/adapters to
match these settings.
Configuring your MyEssentials Wireless G Notebook
Card to use Security
At this point, you should already have your wireless router (or access
point) set to use WPA or WEP. In order for you to gain a wireless
connection, you must set your Wireless G USB Network Adapter to use
the same security settings.
Page 23
21
2
1
3
4
5
6
section
Using the MyEssentials Wireless Networking Utility
Changing the Wireless Security Settings
The MyEssentials Wireless G Notebook Card supports the latest WPA
security feature as well as the legacy WEP security standard. By
default, wireless security is disabled.
To enable security, you first must determine which standard is used
by the router (or access point). (See your wireless router’s or access
point’s manual for directions on how to access the security settings.)
To access the security settings on your Card, click the “My
Connections” tab and point to the connection for which you want to
change security settings. Click “Edit” to change settings.
Page 24
Using the MyEssentials Wireless Networking Utility
22
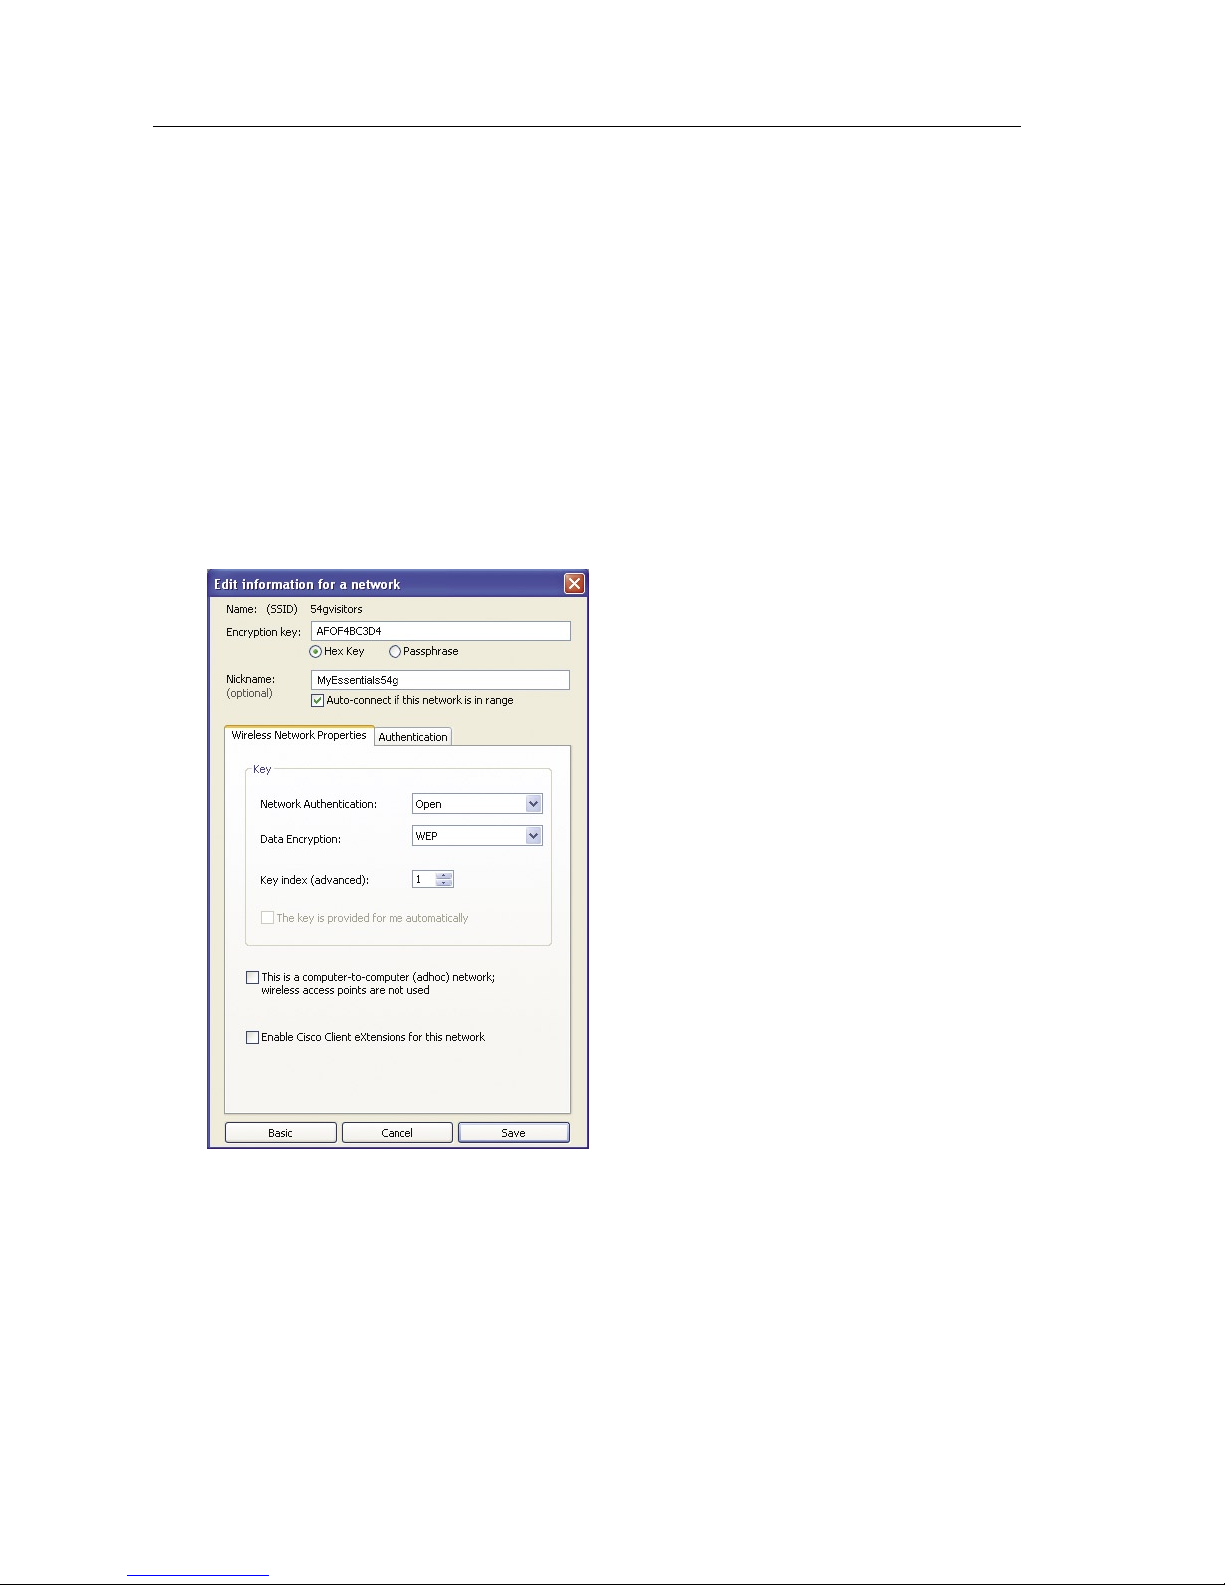
WEP Setup
64-Bit WEP Encryption
1.
Select “WEP” from the “Data Encryption” drop-down menu.
2. After selecting your WEP encryption mode, you can enter your key by
typing in the hex key manually.
A hex (hexadecimal) key is a combination of numbers and letters from
A–F and 0–9. For 64-bit WEP, you must enter 10 hex keys.
For instance:
AF 0F 4B C3 D4 = 64-bit WEP key
3. Click “Save” to finish. Encryption in the wireless router (or access
point) is now set. Each of your computers on your wireless network
must now be configured with the same security settings.
WARNING: If you are using a wireless client to turn on the security
settings in your wireless router (or access point), you will temporarily
lose your wireless connection until you activate security on your wireless
client. Please record the key prior to applying changes in the wireless
router (or access point). If you don’t remember the hex key, your client
will be locked out of the wireless router (or access point).
Page 25
23
2
1
3
4
5
6
section
Using the MyEssentials Wireless Networking Utility
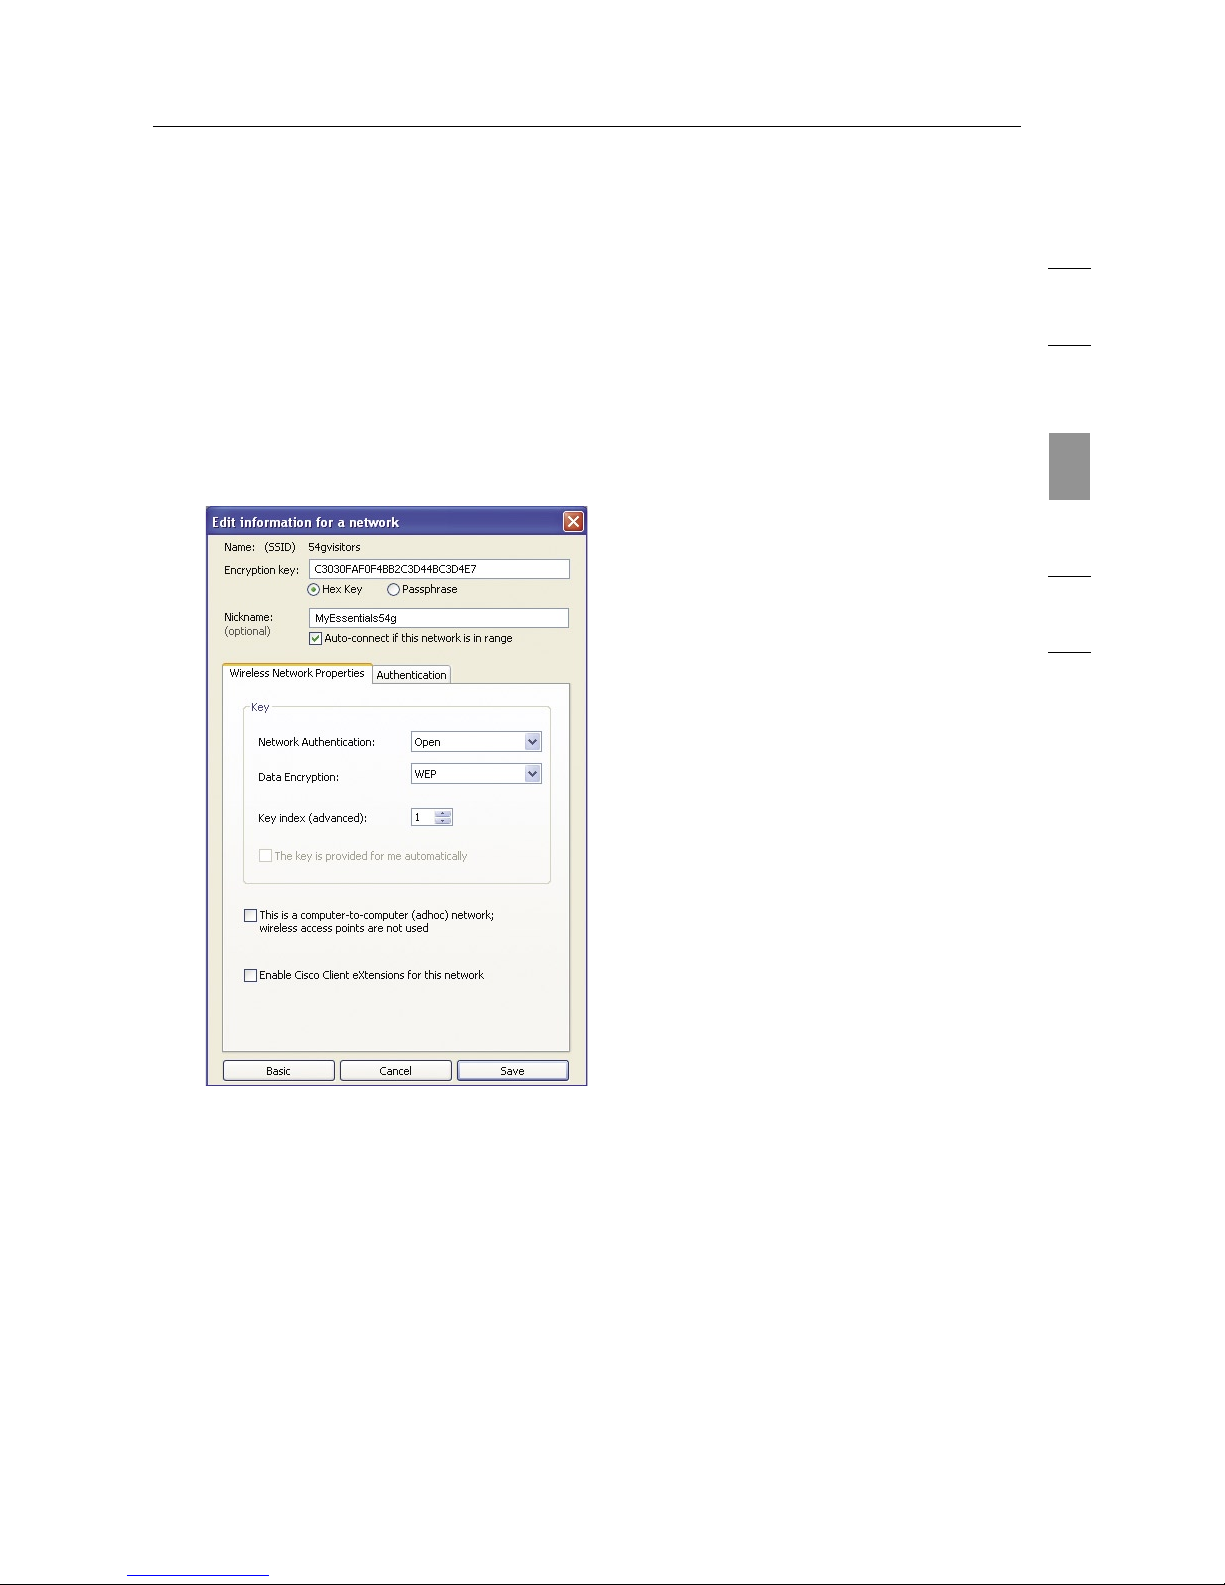
128-Bit WEP Encryption
1.
Select “WEP” from the drop-down menu.
2. After selecting your WEP encryption mode, you can enter your
key by typing in the hex key manually. A hex (hexadecimal) key is
a combination of numbers and letters from A–F and 0–9. For 128bit WEP, you must enter 26 hex keys.
For instance:
C3 03 0F AF 0F 4B B2 C3 D4 4B C3 D4 E7 = 128-bit WEP key
3. Click “Save” to finish. Encryption in the wireless router (or
access point) is now set. Each of the computers on your wireless
network must now be configured with the same security settings.
WARNING: If you are using a wireless client to turn on the security
settings in your wireless router (or access point), you will temporarily
lose your wireless connection until you activate security on your
wireless client. Please record the key prior to applying changes in the
wireless router (or access point). If you don’t remember the hex key,
your client will be locked out of the wireless router (or access point).
Page 26
Using the MyEssentials Wireless Networking Utility
24
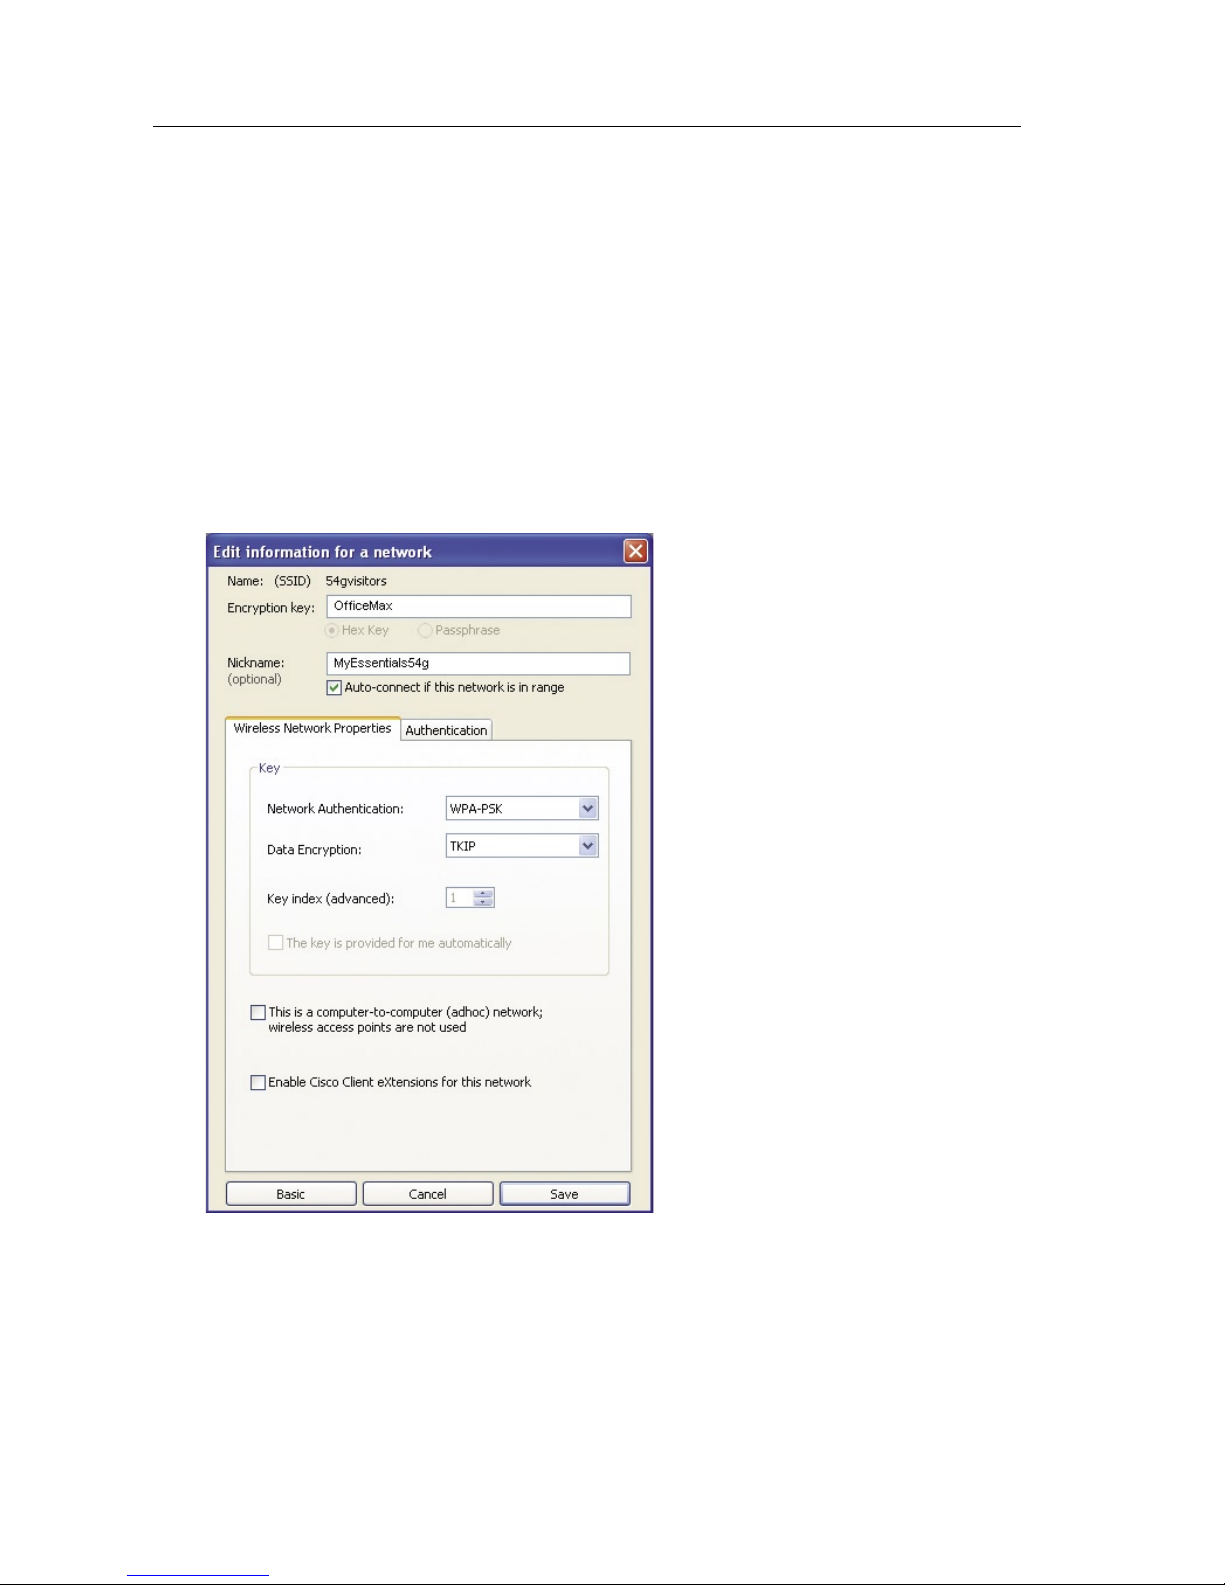
WPA-PSK (no server)
Choose this setting if your network does not use a radius server. WPA-PSK
(no server) is typically used in home and small office networking.
1. From the “Network Authentication” drop-down menu, select
“WPA-PSK (no server)”.
2. Enter your network key. This can be from eight to 63 characters
and can be letters, numbers, or symbols. This same key must be
used on all of the clients (network cards) that you want to include
in your wireless network.
3. Click “Save” to finish. You must now set all clients (network cards)
to match these settings.
Page 27
25
2
1
3
4
5
6
section
Using the MyEssentials Wireless Networking Utility
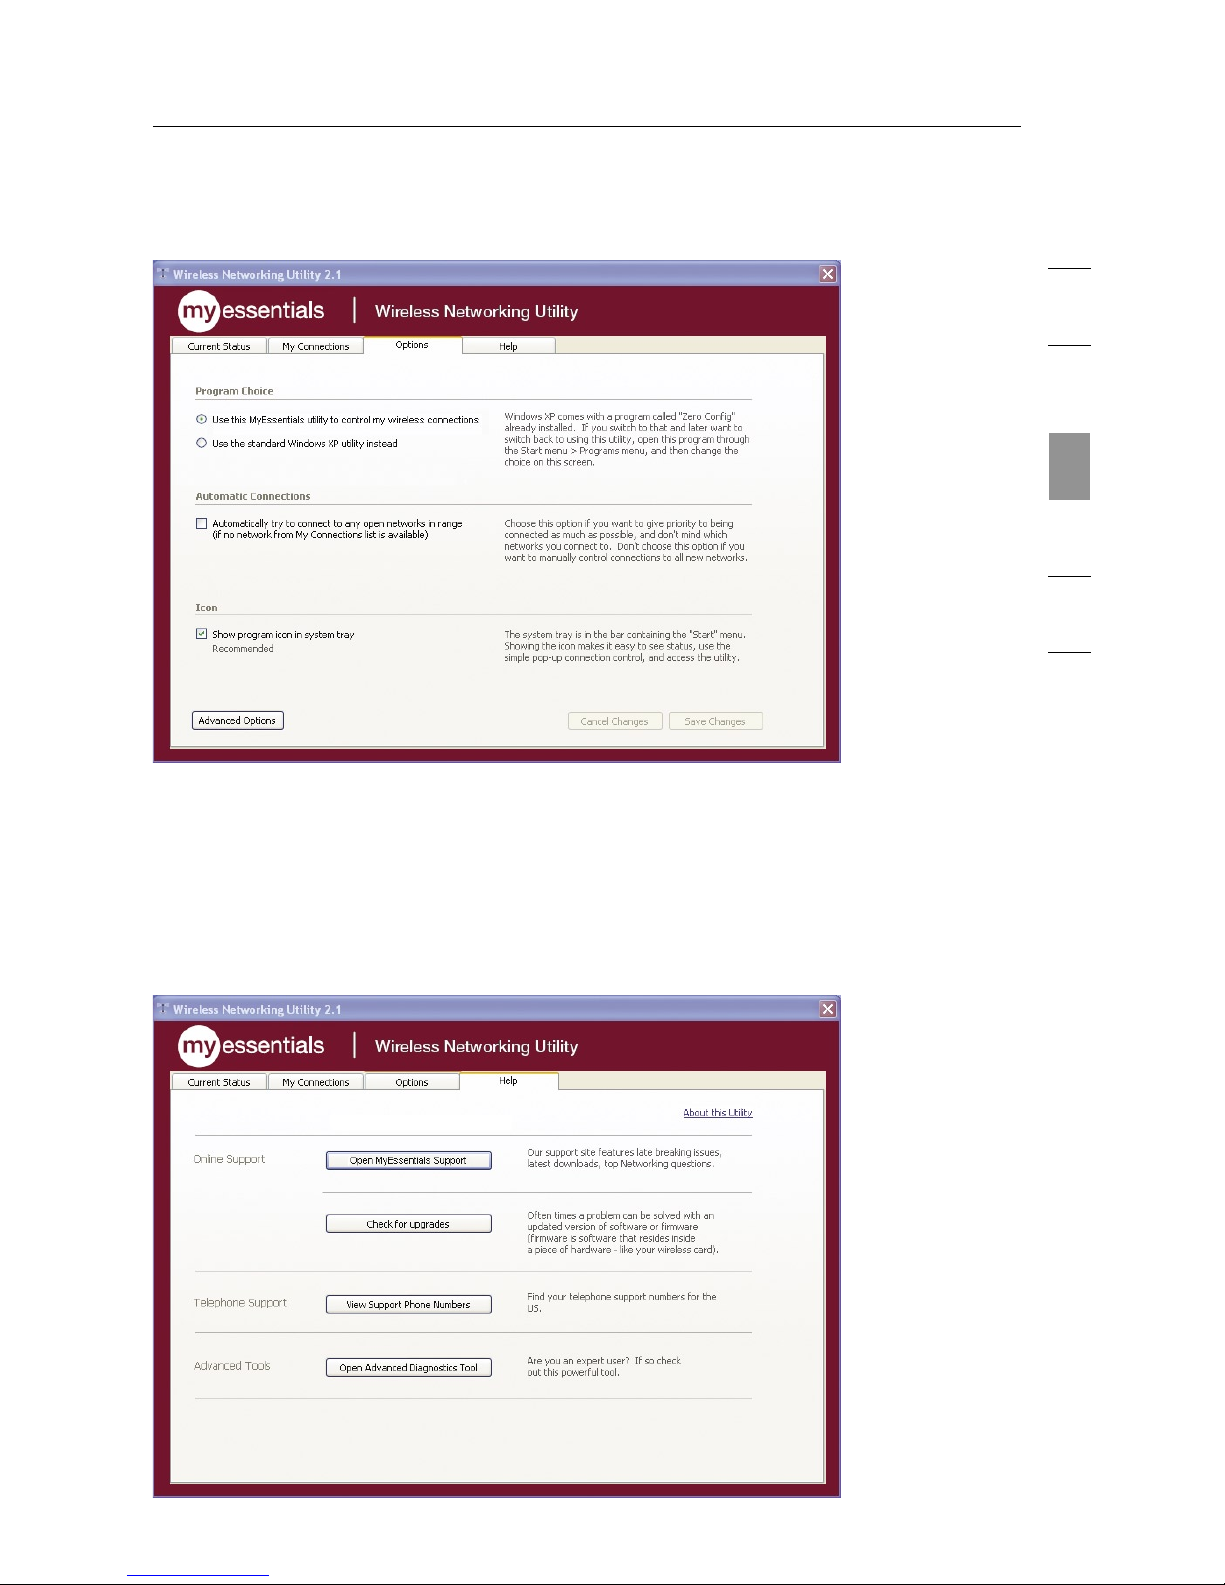
Wireless Networking Utility Options
The “Options” tab on the WNU provides the user the ability to customize
his or her WNU settings.
Wireless Networking Utility Help
The WNU “Help” tab provides users with access to online and telephone
support, as well as advanced diagnostic tools.
Page 28
Using the MyEssentials Wireless Networking Utility
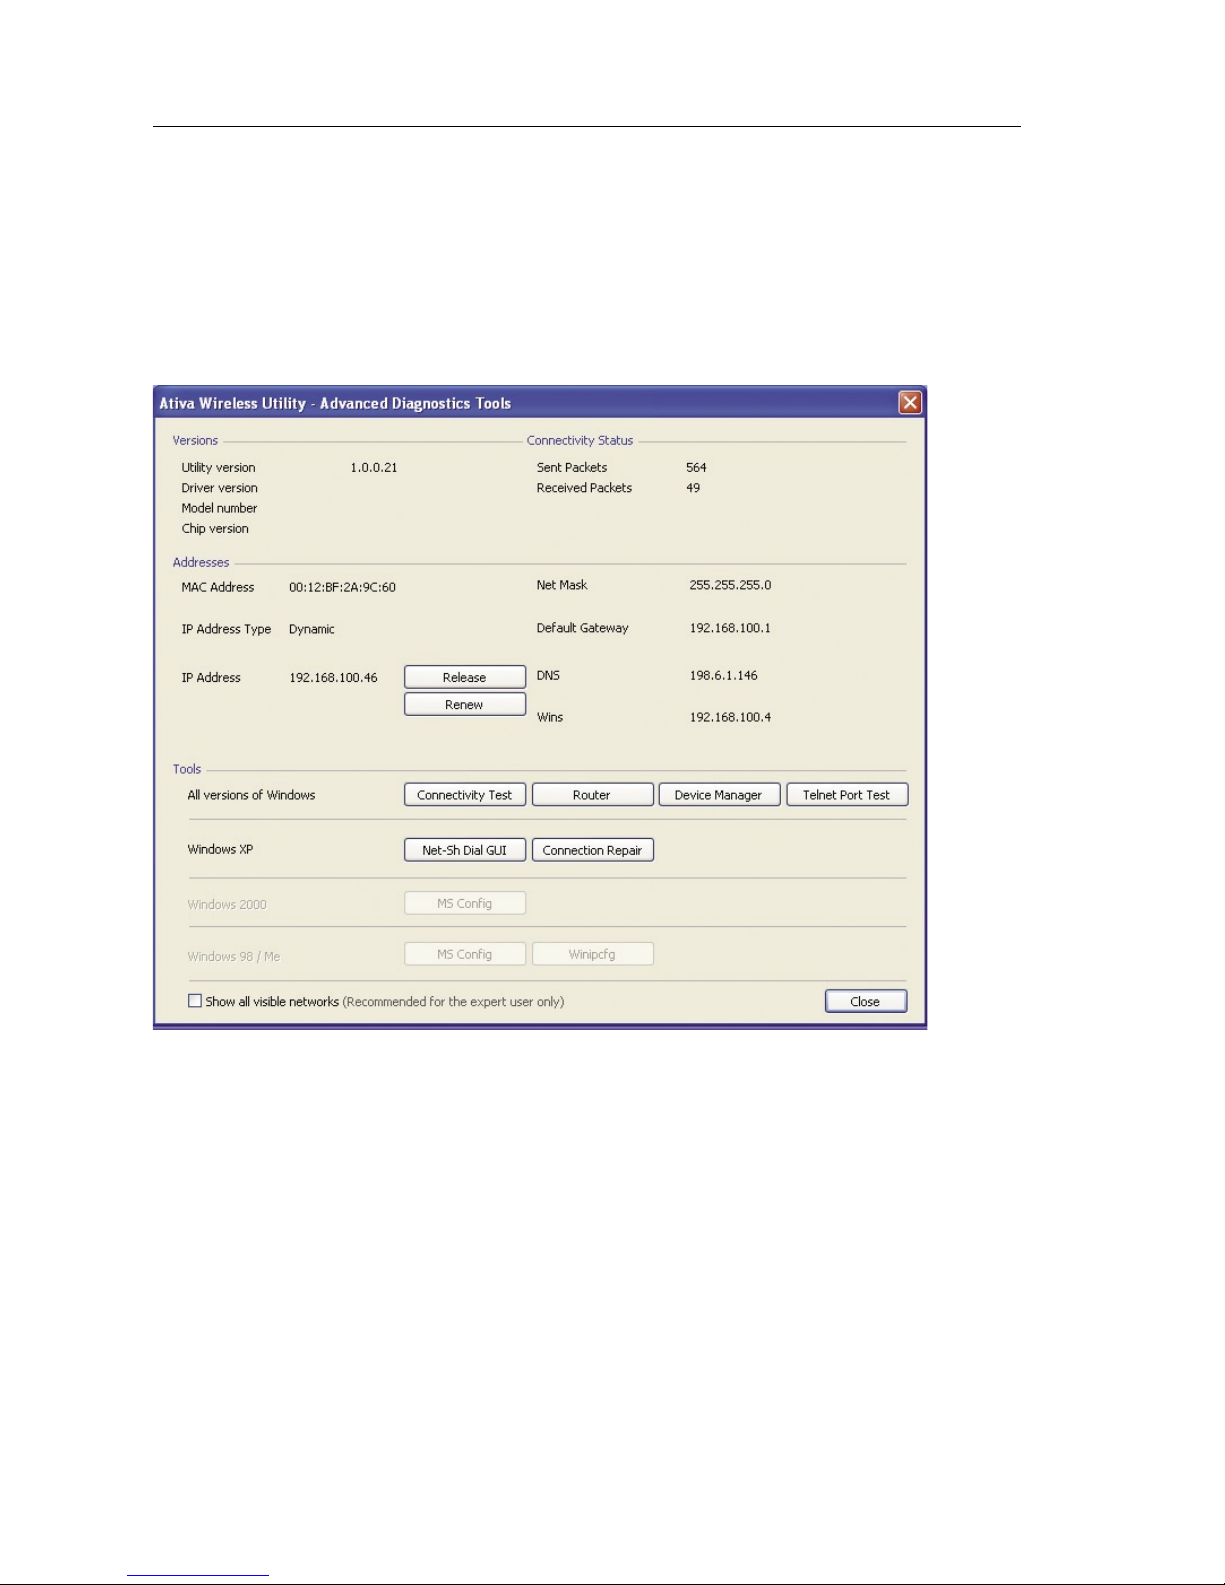
26
Advanced Diagnostic Tools
The “Advanced Diagnostic Tools” section is the central control panel
for all the settings of the hardware and software components of
the wireless network. It provides an array of tests and connectivity
services to ensure optimal network performance.
Page 29

27
2
1
3
4
5
6
section
Troubleshooting
I can’t connect to the Internet wirelessly.
If you are unable to connect to the Internet from a wireless computer, please
check the following items:
1. Look at the lights on your wireless router. If you’re using a MyEssentials
Wireless Router, the lights should be as follows:
• The “Power” light should be on.
• The “Connected” light should be on, and not blinking.
• The “WAN” light should be either on or blinking.
If your MyEssentials Wireless Router’s lights match these descriptions, go to
number 2, below.
If this is NOT the case, make sure
• The router’s power cord is plugged in.
• All cables are connected between the router and the modem.
• All the modem’s LEDs are functioning correctly. If not, see your modem’s
user manual.
• Reboot the router.
• Reboot the modem.
If you continue to have issues, please contact MyEssentials Technical
Support. If you are not using a MyEssentials Wireless Router, consult that
router manufacturer’s user guide.
2. Open your wireless utility software by clicking on the icon in the system
tray at the bottom right-hand corner of the screen. The tray icon should
look like this (the icon may be red or green):
3. The window that opens should have a list of “Available Networks”.
Available networks are wireless networks to which you can connect. If you
are using a MyEssentials Wireless G Router, “MyEssentials 54g” is the
default name. If you are NOT using a MyEssentials Router, please consult
your router manufacturer’s user manual for the default name.
Page 30

Troubleshooting
28
The name of your wireless network appears in
“Available Networks”.
If the correct network name is listed in the “Available Networks” list,
please follow the steps below to connect wirelessly:
1. Click on the correct network name in the “Available Networks” list.
2. If the network has security (encryption) enabled, you must enter
the network key. Click “Connect”. For more information regarding
security, see the page entitled: “Securing your Wi-Fi Network” on
page 17 of this User Manual.
3. Within a few seconds, the tray icon in the lower right-hand
corner of your screen should turn green, indicating a successful
connection to the network.
If you are still unable to access the Internet after connecting to the
wireless network, please contact MyEssentials Technical Support.
The name of your wireless network DOES NOT appear in the list
of “Available Networks”.
If the correct network name is not listed, check the SSID settings
to see if they match. The SSID is case-sensitive and the spelling on
each computer must be exactly the same in order for the Card to
connect to the wireless router (or access point).
Note: To check the SSID settings or look for an available network,
double-click the Signal Indicator icon to bring up the “Wireless
Networks” screen. Click “Add” if you do not see the network
you are trying to connect to and type in the SSID. For more
information about setting up an SSID, please reference your router
manufacturer’s user manual.
If issues persist even at close range, please contact MyEssentials
Technical Support.
Page 31

29
2
1
3
4
5
6
section
Troubleshooting
Installation CD-ROM does not start MyEssentials Wireless
Networking Utility.
If the CD-ROM does not start the MyEssentials Wireless Networking
Utility automatically, it could be that the computer is running other
applications that are interfering with the CD drive. If the MyEssentials
Wireless Networking Utility screen does not appear within 15-20
seconds, open up your CD-ROM drive by double-clicking on the
“My Computer” icon. Next, double-click on the CD-ROM drive that
the Installation CD has been placed in to start the installation. Then
double-click on the folder named “Files”. Next, double-click on the
icon named “setup.exe”.
Power LED does not come ON; Card is not working.
If the LED indicators are not ON, the problem may be that the Card
is not connected or installed properly. Verify that the Card is plugged
firmly into the CardBus slot of your computer. Check to see that
the drivers for the Card have been installed. Right-click on the “My
Computer” icon on your desktop. Choose “Properties” and navigate
to the “Device Manager” and see if your CardBus Card is listed
without any errors. If an error is indicated, contact MyEssentials
Technical Support.
Link LED is blinking slowly; I cannot connect to a wireless
network or the Internet.
If your Card appears to be functioning properly, but you cannot
connect to a network or you have a red wireless icon at the bottom
of your screen, the problem may be that there is a mismatch between
the network name (SSID) settings in your wireless network properties.
Check the SSID settings to see if they match. The SSID is
case-sensitive and the spelling on each computer must be exactly
the same in order for the Card to connect to the wireless router
(or access point).
Note: To check the SSID settings or look for an available network,
double-click the Signal Indicator icon to bring up the “Wireless
Networks” screen. Click “Add” if you do not see the network you are
trying to connect to and type in the SSID.
For more information about setting up an SSID, please reference your
router manufacturer’s user manual. If issues persist even at close
range, please contact MyEssentials Technical Support.
Page 32

Troubleshooting
30
Link LED is solid but I cannot connect to the Internet.
If you have a signal but can’t get online or obtain an IP address,
the problem may be that there is a mismatch between the
encryption key settings in your computer and wireless router (or
access point). Check the WEP key settings to see if they match.
The key is case-sensitive and the spelling on each computer and
wireless router (or access point) must be exactly the same in
order for the Card to connect to the router. For more information
about encryption, please see “Securing your Wi-Fi Network” on
page 17 of this User Manual.
If issues persist even at close range, please contact MyEssentials
Technical Support.
Data transfer is sometimes slow.
Wireless technology is radio-based, which means connectivity
and the throughput performance between devices decreases
when the distance between devices increases. Other factors that
will cause signal degradation (metal is generally the worst culprit)
are obstructions such as walls and metal appliances. As a result,
the typical indoor range of your wireless devices will be between
100 to 200 feet. Note also that connection speed may decrease
as you move farther from the wireless router (or access point).
In order to determine if wireless issues are related to range, we
suggest temporarily moving the computer, if possible, to five to
10 feet away from the wireless router (or access point). Please
see the section titled “Placement of your Wireless Networking
Hardware for Optimal Performance” on page 2 of this User
Manual. If issues persist even at close range, please contact
MyEssentials Technical Support.
Page 33

31
2
1
3
4
5
6
section
Troubleshooting
Signal strength is poor.
Wireless technology is radio-based, which means connectivity and
the throughput performance between devices decreases when
the distance between devices increases. Other factors that will
cause signal degradation (metal is generally the worst culprit) are
obstructions such as walls and metal appliances. As a result, the
typical indoor range of your wireless devices will be between 100
to 200 feet. Note also that connection speed may decrease as you
move farther from the wireless router (or access point). In order
to determine if wireless issues are related to range, we suggest
temporarily moving the computer, if possible, to five to 10 feet
away from wireless router (or access point).
Changing the wireless channel – Depending on local wireless
traffic and interference, switching the wireless channel of your
network can improve performance and reliability. The default
channel the router is shipped with is channel 11. You may choose
from several other channels depending on your region; see your
router’s (or access point’s) user manual for instructions on how to
choose other channels.
Limiting the wireless transmit rate – Limiting the wireless
transmit rate can help improve the maximum wireless range, and
connection stability. Most wireless cards have the ability to limit
the transmission rate. To change this property, go to the Windows
Control Panel, open “Network Connections” and double-click
on your Card’s connection. In the “Properties” dialog, select the
“Configure” button on the “General” tab (Windows 98 users will
have to select the Wireless Card in the list box and then click
“Properties”), then choose the “Advanced” tab and select the rate
property. Wireless client cards are usually set to automatically
adjust the wireless transmit rate for you, but doing so can cause
periodic disconnects when the wireless signal is too weak; as a
rule, slower transmission rates are more stable. Experiment with
different connection rates until you find the best one for your
environment; note that all available transmission rates should be
acceptable for browsing the Internet. For more assistance, see
your wireless card’s literature. If issues persist even at close range,
please contact MyEssentials Technical Support.
Page 34

Troubleshooting
32
Why are there two wireless utilities in my system tray? Which
one do I use?
There are several features and advantages from using the MyEssentials
Wireless Networking Utility over the Windows XP Wireless Zero
Configuration utility. We offer a site survey, detailed link information, and
adapter diagnosis, to name a few.
It’s essential to know which utility is managing your Card. We recommend
using the MyEssentials Wireless Networking Utility. To use the
MyEssentials Wireless Networking Utility, follow the steps below:
Step 1 Right-click on the network status icon in the system tray and
select “View Available Wireless Networks”.
Step 2 Click on the “Advanced” button in the lower left-hand corner of
the “Available Wireless Networks” window.
Step 3 From the “Advanced” tab, uncheck “Use Windows to configure
my wireless network”. Once the box is unchecked, click “OK” to close
the window.
You are now using the MyEssentials Wireless Networking Utility to
configure the Wireless Card.
Card does not perform or connection is unstable when computer
has a second built-in wireless network card (such as a mini PCI
or Intel
®
Centrino™).
This condition occurs if your computer has a built-in wireless card while
your MyEssentials Wireless Card is also active. This happens because
Windows must now handle two active wireless connections.
You must disable the built-in wireless card from your computer under
“Network Adapters” in the Device Manager.
Card does not perform or connection is slow when computer has
a built-in wired Ethernet card.
This condition occurs if your computer has an active Ethernet card
while your Wireless Card is also active. This happens because Windows
must now handle two active network connections. You must disable
the Ethernet card from your computer under “Network Adapters” in the
Device Manager.
Page 35

33
2
1
3
4
5
6
section
Troubleshooting
Technical Support
You can find technical-support information at
www.MyEssentialssupport.com through the tech-support area.
If you want to contact technical support by phone, please call:
US: 1-866-761-4608
Page 36

Information
34
FCC Statement
DECLARATION OF CONFORMITY WITH FCC RULES FOR
ELECTROMAGNETIC COMPATIBILITY
We, MyEssentials, of 501 West Walnut Street, Compton, CA
90220, declare under our sole responsibility that the product,
ME1002-NB
to which this declaration relates,
complies with Part 15 of the FCC Rules. Operation is
subject to the following two conditions: (1) this device may
not cause harmful interference, and (2) this device must
accept any interference received, including interference
that may cause undesired operation.
Caution: Exposure to Radio Frequency Radiation.
The radiated output power of this device is far below the FCC radio frequency
exposure limits. Nevertheless, the device shall be used in such a manner that
the potential for human contact during normal operation is minimized. When
connecting an external antenna to the device, the antenna shall be placed in such
a manner to minimize the potential for human contact during normal operation.
In order to avoid the possibility of exceeding the FCC radio frequency exposure
limits, human proximity to the antenna shall not be less than 20cm (8 inches)
during normal operation.
Federal Communications Commission Notice
This equipment has been tested and found to comply with the limits for a Class
B digital device, pursuant to Part 15 of the FCC Rules. These limits are designed
to provide reasonable protection against harmful interference in a residential
installation.
This equipment generates, uses, and can radiate radio frequency energy. If this
equipment does cause harmful interference to radio or television reception, which
can be determined by turning the equipment off and on, the user is encouraged
to try and correct the interference by one or more of the following measures:
• Reorient or relocate the receiving antenna.
• Increase the distance between the equipment and the receiver.
• Connect the equipment to an outlet on a circuit different from that to which the
receiver is connected.
• Consult the dealer or an experienced radio/TV technician for help.
Page 37

35
2
1
3
4
5
6
section
Information
Modifications
The FCC requires the user to be notified that any changes or modifications to
this device that are not expressly approved by MyEssentials may void the user’s
authority to operate the equipment.
MyEssentials 1-Year Limited Product Warranty
MyEssentials warrants this product against defects in materials and workmanship
for one year. If a defect is discovered, MyEssentials will, at its option, repair or
replace the product at no charge provided it is returned during the warranty
period, with transportation charges prepaid, to the authorized MyEssentials dealer
from whom you purchased the product. Proof of purchase may be required.
This warranty does not apply if the product has been damaged by accident,
abuse, misuse, or misapplication; if the product has been modified without the
written permission of MyEssentials; or if any MyEssentials serial number has been
removed or defaced.
THE WARRANTY AND REMEDIES SET FORTH ABOVE ARE EXCLUSIVE
IN LIEU OF ALL OTHERS, WHETHER ORAL OR WRITTEN, EXPRESSED
OR IMPLIED. MYESSENTIALS SPECIFICALLY DISCLAIMS ANY AND ALL
IMPLIED WARRANTIES, INCLUDING, WITHOUT LIMITATION, WARRANTIES OF
MERCHANTABILITY AND FITNESS FOR A PARTICULAR PURPOSE.
No MyEssentials dealer, agent, or employee is authorized to make any
modification, extension, or addition to this warranty.
MYESSENTIALS IS NOT RESPONSIBLE FOR SPECIAL, INCIDENTAL, OR
CONSEQUENTIAL DAMAGES RESULTING FROM ANY BREACH OF WARRANTY,
OR UNDER ANY OTHER LEGAL THEORY, INCLUDING BUT NOT LIMITED TO,
LOST PROFITS, DOWNTIME, GOODWILL, DAMAGE TO OR REPROGRAMMING
OR REPRODUCING ANY PROGRAM OR DATA STORED IN, OR USED WITH,
MYESSENTIALS PRODUCTS.
Some states do not allow the exclusion or limitation of incidental or consequential
damages or exclusions of implied warranties, so the above limitations or
exclusions may not apply to you. This warranty gives you specific legal rights, and
you may also have other rights that vary from state to state.
Page 38

Wireless G
Notebook Card
P75291
www.MyEssentialssupport.com
MyEssentials Tech Support:
US: 1-866-761-4608
© 2006 Belkin Corporation. All rights reserved. All trade names are registered trademarks of respective
manufacturers listed. Windows is either a registered trademark or trademark of Microsoft Corporation
in the United States and/or other countries.
 Loading...