

MYERS SR1830, CMV1830, SR1830I Installation And Service Manual
SR1830I
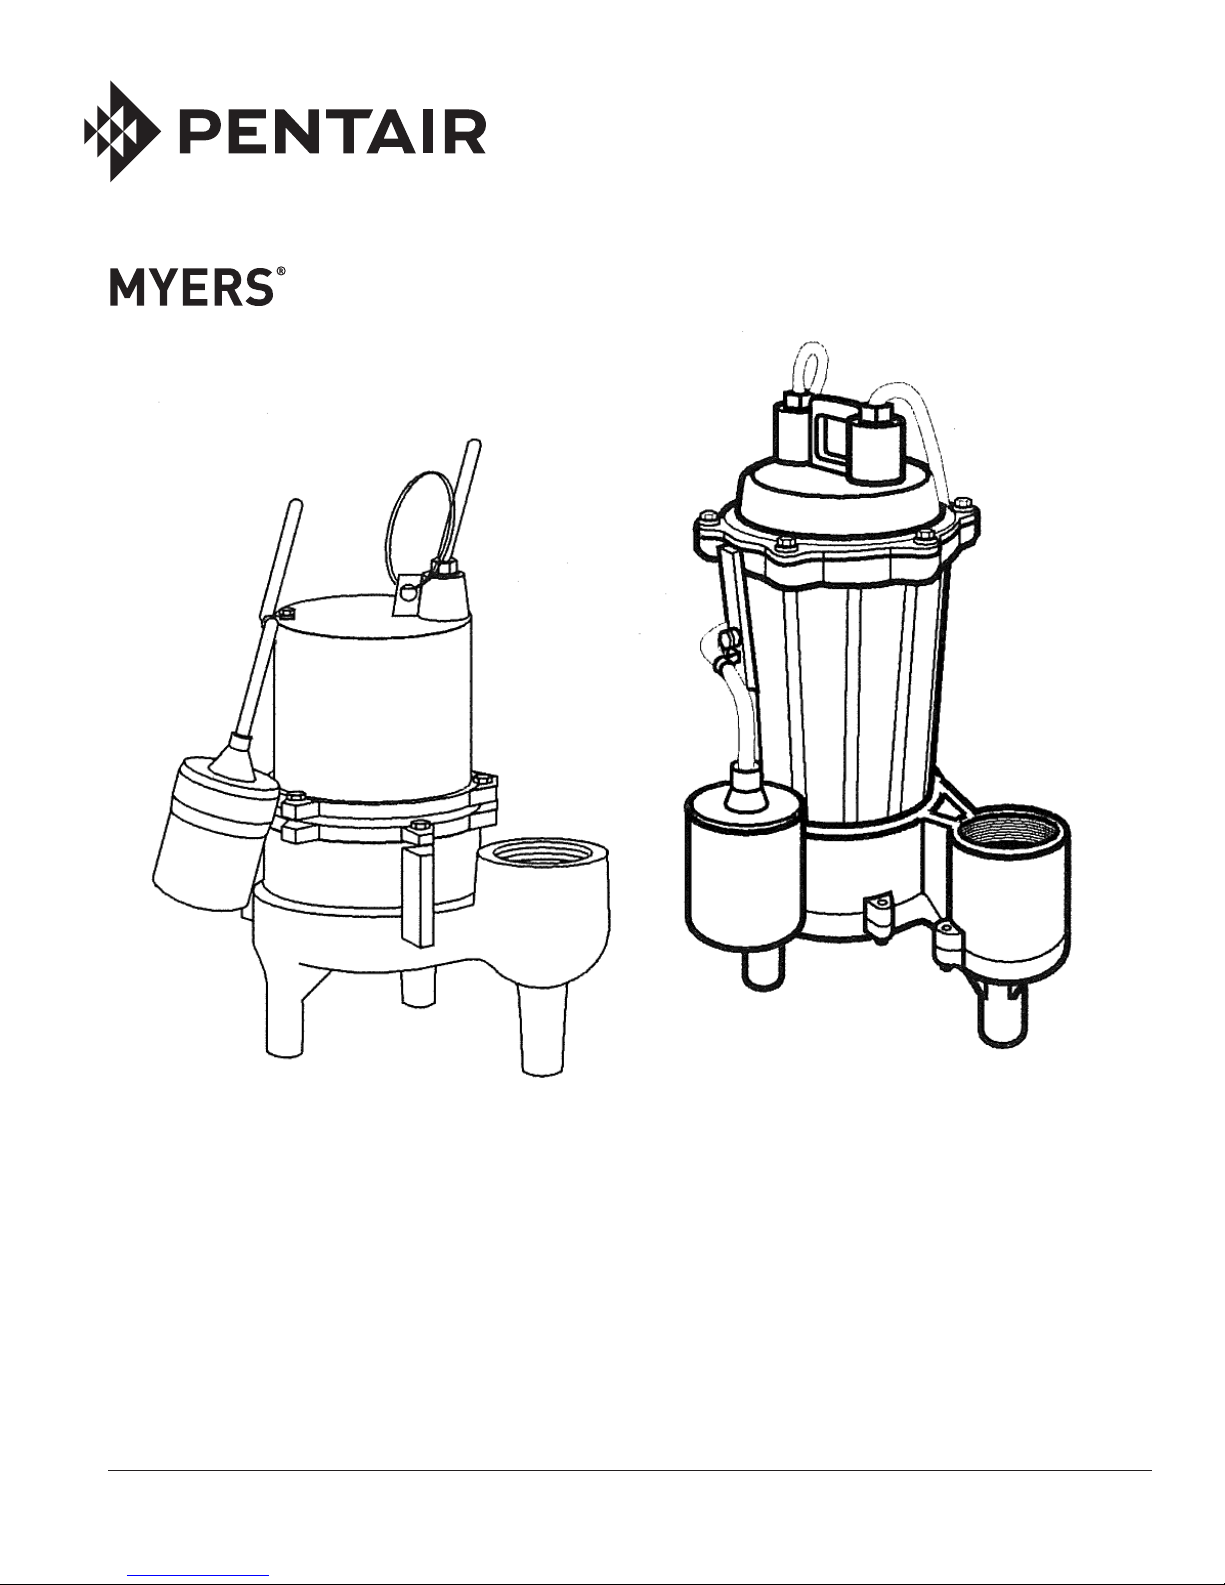
SR1830 CMV1830
MODELS SR1830 and CMV1830
SUBMERSIBLE SEWAGE PUMPS
INSTALLATION AND SERVICE MANUAL
NOTE! To the installer: Please make sure you provide this manual to the owner of the equip ment or to the responsible
party who maintains the system.
Part # 25581A043 | © 2014 Pentair Ltd. | 05/07/14

MODELS SR1830 AND CMV1830
Your SR1830 or CMV1830 is designed to operate
automatically or manually and for simple and quick
installation. Its preset fluid level control allows for
efficient operation when installed in a standard
18" x 30" sewage basin.
Before installing your pump, check carefully for
shipping damage. Any claim for shipping damage
must be made with your supplier at the point of
purchase. The manufacturer cannot make shipping
damage adjustments.
CALIFORNIA PROPOSITION 65 WARNING:
This product and related
accessories contain chemicals known to the
State of California to cause cancer, birth
defects or other reproductive harm.
INSTALLATION
This is a sewage handling pump and must be vented
in accordance with local plumbing codes. This
pump is not to be installed in locations classified as
hazardous in accordance with National Electric Code,
ANSI/NFPA 70.
The motor in your new submersible sewage pump is
oil-filled for efficient operation. DO NOT loosen the
three motor housing screws.
Place sewage pump on the bottom of the basin and
position it to allow float to rise in center of basin.
Check that nothing interferes with the float switch.
Slip cover over discharge pipe and power cord.
Bolt cover securely to basin (be sure to use a cover
gasket). Install discharge compression fitting and cord
seal grommet.
CHECK VALVE
A properly designed full-flow check valve MUST
be used on every installation. A series CV-200P is
provided. It eliminates back-flow, reduces vibration
and acts as a pipe union for easy servicing. Install on
discharge pipe (make certain that arrow on valve body
points in flow direction). Connect outlet of check valve
to the plumbing line leading to the sanitary sewer
system.
ELECTRICAL INFORMATION
WARNING: Risk of electric shock. This pump
is supplied with a grounding conductor and
grounding-type attachment plug. To reduce
the risk of electric shock, be certain that it is
connected only to a properly grounded, groundingtype receptacle. Read instructions before installing
pump. This pump has not been investigated for
use in swimming pools.
Never touch the sewage pump, switch or
discharge pipe when the pump is connected to
electrical power.
Check the electrical circuit to make sure it meets the
voltage and amperage requirement listed on the motor
nameplate.
Your electrical service outlet should meet the National
Electric Code and/or local codes. Your pump should
have a separate branch circuit, properly fused and
grounded. The outlet should be 4' above the floor and
close enough to your pump that the original cord can
reach it. Never use an extension cord.
Plug the switch power cord into a properly grounded
outlet. Plug the pump power cord into the back of
the switch cord plug. Tape the power cords to the
discharge pipe every 12 inches to make sure any
movement will not damage the insulation.
To test the system, add water to the sewage basin
until the float switch operates normally.
Your pump has thermal overload protection. If the
impeller becomes locked because of a foreign object,
the motor will overheat and the thermal overload
switch will cut off the electricity. Unplug pump and
remove the foreign object immediately. See that the
impeller turns freely.
SWITCH ADJUSTMENT AND
REPLACEMENT INSTRUCTIONS
CAUTION: Always disconnect the pump and
switch from the electrical power source before
doing any maintenance! This pump is equipped
with a float switch and does not control both
sides of the electrical circuit. To reduce the risk
of electric shock it is essential that it be wired in
series with the hot side of the electrical circuit.
Make sure your outlets are wired according to your
local electrical code.
1. Inspect the pump to be certain that there are no
rocks, lint, etc. clogging the openings where water
enters the pump housing. Remove any debris.
Check to see that the impeller turns freely.
2. Plug the pump power cord into a properly
grounded, 3 hole outlet. If the pump works
(impeller turns and air is blowing out of discharge
opening), proceed to step 3. If the pump does not
work, it must be replaced.
3. If the pump works, (1) unplug pump and (2) replug
into back of switch plug and (3) plug the assembly
into the electrical outlet. Raise switch by hand to
activate pump. If pump turns on, pump and switch
are OK-no need to replace. If pump does not turn
25581A043 05/07/14
2
 Loading...