

MTV15-M/NT
MTV15-S/NT
MYE 15" TFT LCD TV / NTSC
Operating Instructions
manmtv15
www.myeclubtv.com
Contents
M15TV Orientation………………………………….…….3
Rear Input Jack Identification……………………………….….…4
IR Remote Key Identification…………………………………..…4
Safety Instructions……………………………………………...…5
Getting Started………………………………………………...…..5
Menu Access………………………..………………………....….5
Set UP…………………………….………………………………6
Picture Adjustment…………………….……………………...….7
Sound Adjustment………………………………………….……..8
Parental Lock………………………………………………….…..9
Custom Adjustment/Closed Caption…………………………….10
MTVC Controller Overview…………………………………….11
M15TV Specifications……………………………………..……14
Warranty……………………………………………………..15/16
2
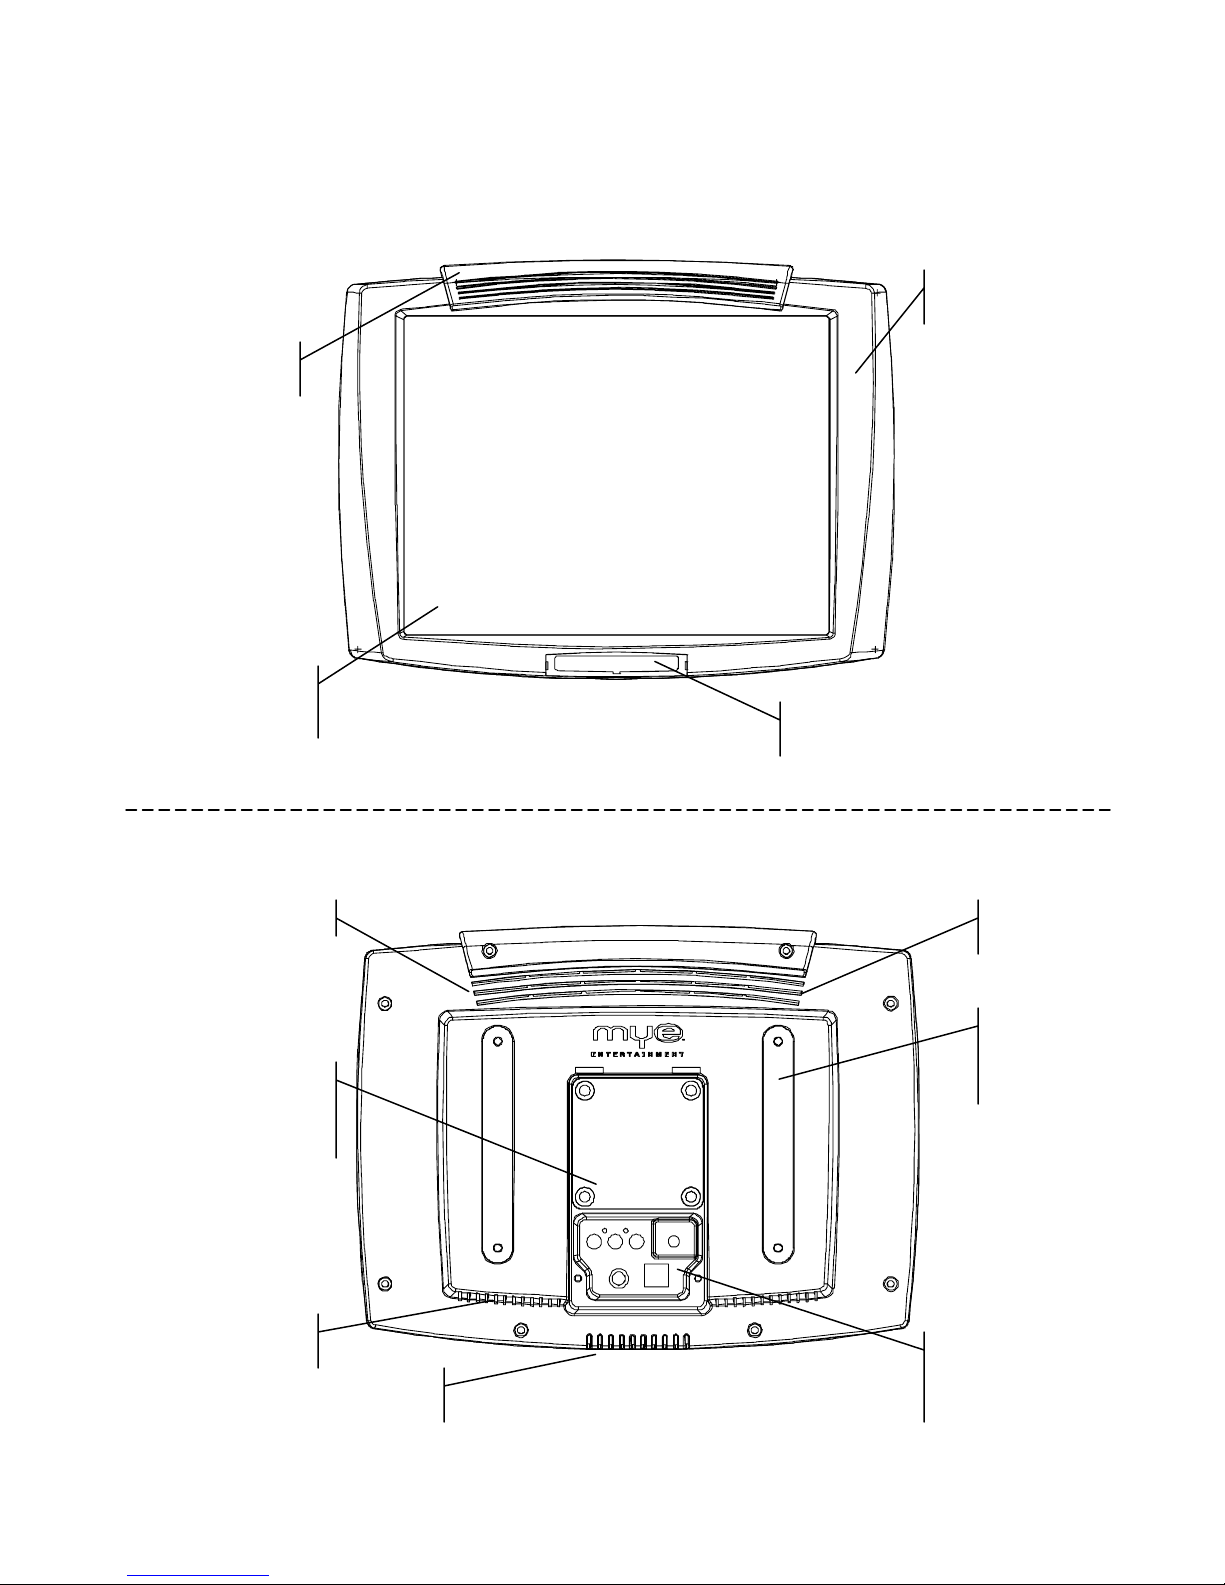
M15TV Orientation
FRONT VIEW
FRONT BEZEL
GRIP
PROTECTIVE
NON-GLARE
ACRYLIC PANEL
TOP VENT
IR LENS WITH
MYE LOGO
REAR VIEW
GRIP
VESA 75MM
MOUNTING
PATTERN
BOTTOM
VENT 1
BOTTOM
VENT 2
SHOCK
DAMPENING
FLANGE
SUPPORTS
SIGNAL, POWER,
CONTROLLER
INPUT JACKS
3
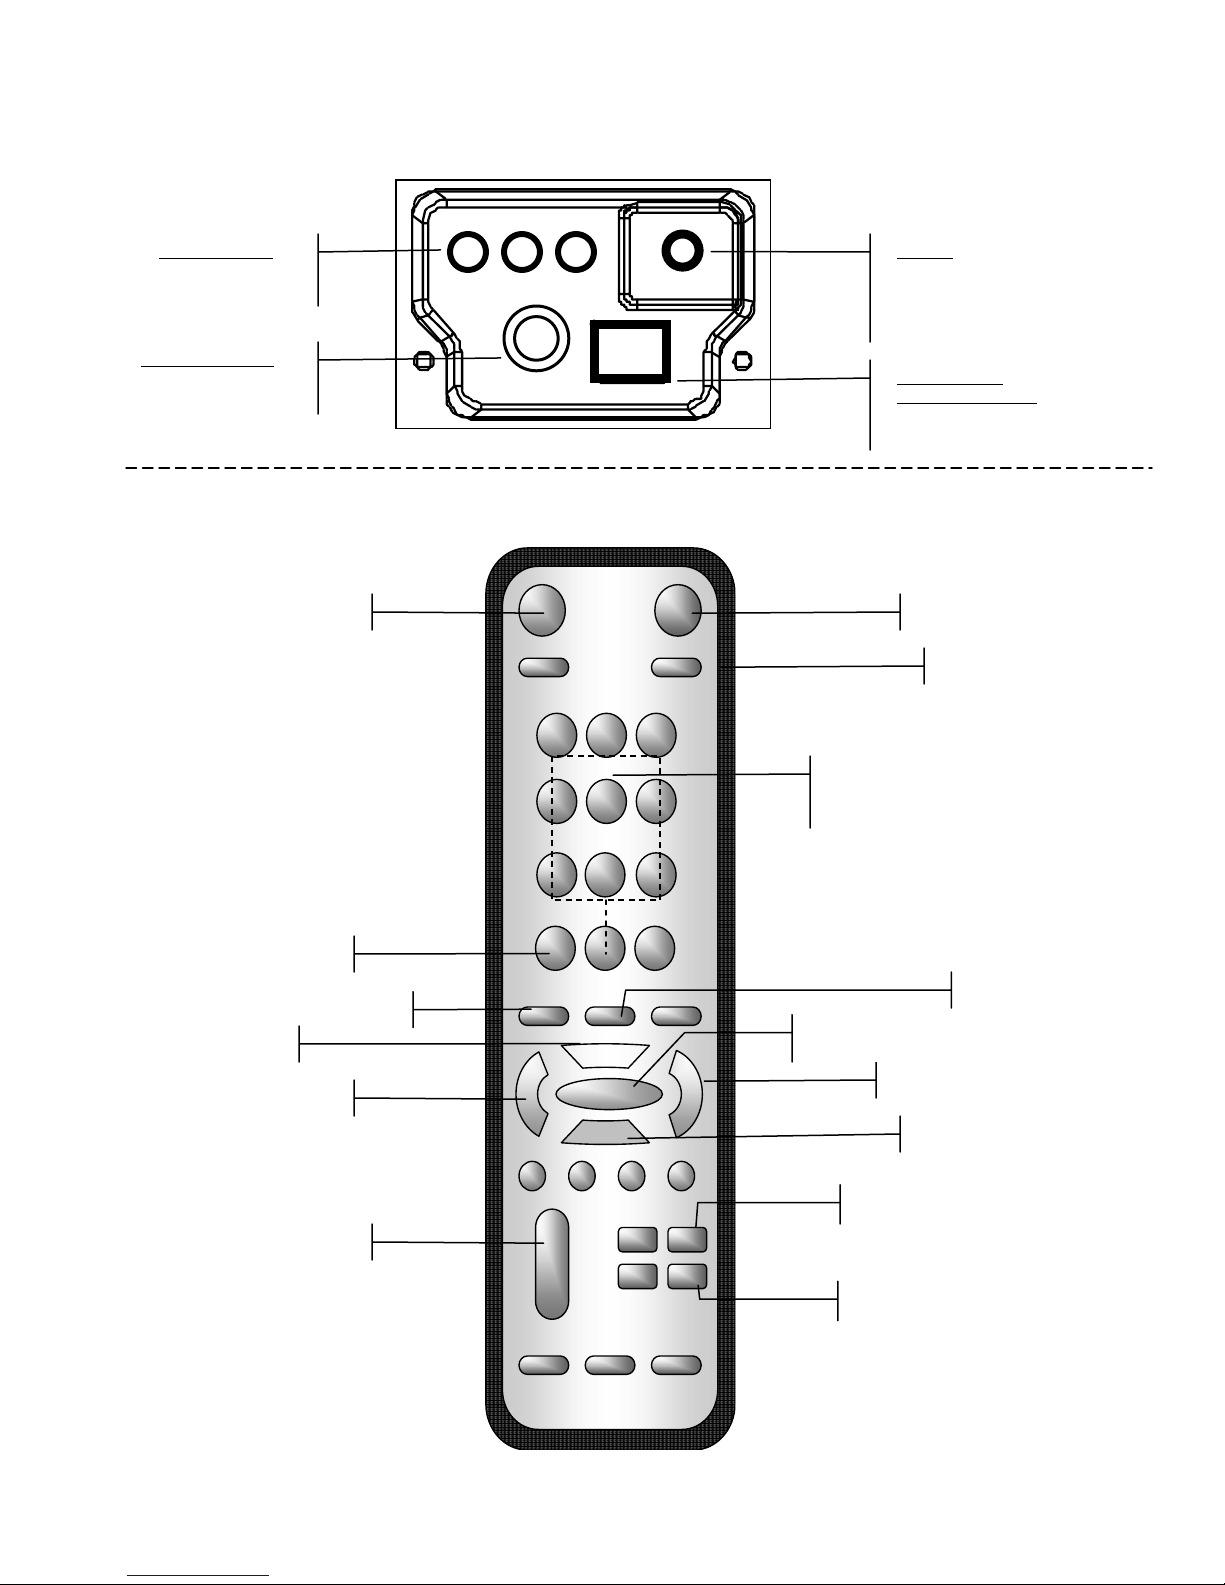
REAR INPUT JACK IDENTIFICATION
AUDIO / VIDEO
RCA STYLE
FEMALE
RF SIGNAL INPUT
TYPE F
CLOSED CAPTION
POWER
2.5MM DC JACK WITH
THREADED
LOCKING RING
CONTROLLER
COMMUNICATION
RJ45 8 PIN JACK
MYE IR REMOTE KEY IDENTIFICATION
1 2 3
4 5
DIRECT CHANNEL
NUMBER ACCESS 1-0
POWER ON / OFF
PREVIOUS CHANNEL
SOURCE SELECT
MENU NAVIGATE UP
MENU NAVIGATE LEFT
VOLUME UP / DOWN
MUTE
9 7 6 8
0
DISPLAY
MENU ENTER / SET / EXIT
MENU NAVIGATE RIGHT
MENU NAVIGATE DOWN
CHANNEL UP
CHANNEL DOWN
4

M15TV SET UP and OPERATION
Important Safety Instructions
• Read all instructions before installing and using the
equipment. Follow any labels on the equipment.
• Use the power adapter provided with the equipment. Plug the
power adapter into an appropriate, grounded power outlet as
marked on the equipment. Do not use accessory attachments
that are not recommended by the manufacturer, as such
attachments may cause injuries.
• Position power cables so that they are not walked on or
pinched by items placed upon or against them.
• Make sure that the equipment has adequate ventilation. Do
not place anything on top of or over the equipment. Do not
use on a cushioned surface that could block the ventilation
openings.
• Keep the equipment away from water and moisture.
• Locate the equipment away from sources of heat, such as
radiators, heat registers, and stoves. Avoid temperature
extremes.
• Avoid dropping anything on or spilling anything inside the
equipment, because doing so can damage the electronics.
• Do not attempt to service the unit yourself except to follow the
maintenance instructions found in this manual.
GETTING STARTED
1) Make all necessary connections for power and signal
2) Using IR Remote Control turn screen on using Power ON button. The MYE M15TV
will turn on and display the MYE logo for approximately 8 seconds while the TV checks
and sets the programmed preferences.
MENU ACCESS
1) Using IR Remote Control press the ENTER key to enter MENU mode.
2) MENU screen will appear for access to the following MENU cards:
a. RBG:Picture Quality Adjustment
b. AUDIO: Sound Adjustment
c. TV: Tuner/Channel SET UP
d. PARENTAL CONTROL
e. CUSTOM: Tools and Settings (CC)
5

SET UP
1) Using the IR remote Control press ENTER key to access MENU mode
2) Using the MENU navigation keys. Press the DOWN key to select TV
3) Using the navigation keys, Press the RIGHT key to enter the SELECTED mode.
TV or CABLE will be highlighted. Using the RIGHT navigation key again select
desired tuner mode, broadcast TV or standard RF NTSC CABLE.
4) Using the DOWN navigation key select AUTO PROGRAM.
5) Press the RIGHT navigation key to start AUTO PROGRAM sequence. Tuner will
begin searching all channels detectable in the desired tuner mode. This sequence
will take approximately 2 minutes.
6) When finished the TV will automatically exit MENU mode and default back to that
last channel that was watched.
7) Using the Channel UP / Down keys, scroll through the auto programmed channels to
verify all channels detected are also desired. Undesired channels may be deleted by
entering the MENU, selecting TV mode and navigating to CH. ADD / ERASE
6

PICTURE ADJUSTMENT
NOTE: PICTURE settings are PRESET and DO NOT need to be adjusted however in the
event a PICTURE adjustment is required please review the following procedure.
1) Using the IR remote Control press ENTER key to access MENU mode
2) Using the MENU navigation keys. Press the DOWN key to select RBG
3) Using the navigation keys, Press the RIGHT key to enter the SELECTED mode.
VIDEO MODE will be highlighted. Using the RIGHT navigation key again scroll through the
desired Video modes; CUSTOM, STANDARD, MOVIE, DYNAMIC.
4) STANDARD, MOVIE AND DYNAMIC modes are locked settings and cannot be changed.
5) CUSTOM allows the programmer to adjust the Picture Quality and Color settings.
6) Use the UP/DOWN navigation keys to select each desired Picture Control.
7) Press the RIGHT / LEFT navigation keys to adjust the selected Picture Control
8) When finished you can wait 30 seconds for the TV to automatically exit MENU mode. Your
adjustments will be saved in the Mode’s preferences. To exit MANUALLY press the ENTER
key to save your adjustments then press ENTER again to exit.
7

SOUND ADJUSTMENT
NOTE: SOUND settings are PRESET and DO NOT need to be adjusted however in the
event a SOUND adjustment is required please review the following procedure.
1) Using the IR remote Control press ENTER key to access MENU mode
2) Using the MENU navigation keys. Press the DOWN key to select SOUND
3) Using the navigation keys, Press the RIGHT key to enter the SELECTED mode.
TREBLE will be highlighted.
4) Use the UP/DOWN navigation keys to select each desired Sound Control.
5) Press the RIGHT / LEFT navigation keys to adjust the selected Sound Control.
6) When finished you can wait 30 seconds for the TV to automatically exit MENU mode.
Your adjustments will be saved in the Mode’s preferences. To exit MANUALLY you
may press the ENTER key to save your adjustments then press ENTER again to
exit.
8

PARENTAL LOCK
NOTE: PARENTAL LOCK will require the programmer to enter a PASSWORD once the LOCK is
turned ON. Entry to the Parental Lock will not be allowed once the mode has been exited unless the
PASSWORD is entered. The DEFAULT PASSWORD upon shipping is “0000”. A new PASSWORD
may be issued by selecting CHANGE PASSWORD from the Parental Lock Menu.
1) Using the IR remote Control press ENTER key to access MENU mode
2) Using the MENU navigation keys. Press the DOWN key to PARENTAL LOCK
3) Using the navigation keys, Press the RIGHT key to enter the SELECTED mode.
PARENTAL CONTROL will be highlighted.
4) Press the RIGHT / LEFT navigation keys to turn Parental Control On/Off.
5) Once the Parental Lock is turned ON use the DOWN navigation key to select
COUNTRY, MOVIE RATING (for A/V input) or TV RATING.
6) Press the RIGHT / LEFT navigation keys to adjust the selected Parental Control
option.
7) When finished you can wait 30 seconds for the TV to automatically exit MENU mode.
Your adjustments will be saved in the Mode’s preferences. To exit MANUALLY
press the ENTER key to save your adjustments then press ENTER again to exit.
9

CUSTOM ADJUSTMENT / Closed Caption
NOTE: Before the CLOSED CAPTION feature can be used with any MYE MTVC Controller
the Closed Caption option in the TV preferences must turned ON.
1) Using the IR remote Control press ENTER key to access MENU mode
2) Using the MENU navigation keys. Press the DOWN key to select CUSTOM.
3) Using the navigation keys, Press the RIGHT key to enter the SELECTED mode.
SLEEP TIMER will be highlighted.
4) Use the DOWN navigation key to select CC/TEXT mode.
5) Press the RIGHT / LEFT navigation keys to select “CC1”.
6) Use the UP/Down navigation keys to select other CUSTOM controls. DO NOT
ADJUST the SLEEP TIMER.
7) Press the RIGHT / LEFT navigation keys to adjust the selected Custom controls.
8) When finished you can wait 30 seconds for the TV to automatically exit MENU mode.
Your adjustments will be saved in the Mode’s preferences. To exit MANUALLY
press the ENTER key to save your adjustments then press ENTER again to exit.
10

MTVC CONTROLLER
Start with the M15TV turned off. Using the MYE Controller Cable (MCC-L) supplied,
connect one end to the MTVC-FM (or MTVC-ST) controller unit and the other end into the
RJ45 jack in the rear of the M15TV screen.
CONSULT YOUR MTVC MANUAL FOR ADDITIONAL INFORMATION.
The MYE Controller allows the user to watch and listen to a personal LCD TV, FM Radio (on select model) or FITP3
Player. When the FITP3 Player is inserted, the user will be able to use the FITP3 controls on the main console and listen
to any audio (regardless of source) directly through the headphone jack on the FITP3 player .
Main Features:
Music Button-
Selects between FITP3 Player and FM Radio (MTVC-FM Model)
Direct Access Numeric Buttons
Direct select TV Channels or preset FM Radio Stations.
TV Button / Hold for Off
Selects LCD TV Controls. When held for 2 seconds it turns the LCD TV off (standby) to allow users to listen to FITP3 or
FM only. When TV button pressed again turns LCD TV back ON.
Channel Up/Down Buttons
Manually scroll TV Channels or FM Radio Dial (MTVC-FM Model)
Volume Up/Down Buttons
Manually increase / decrease VOLUME output level in the MTVC controller.
Scan Button
Automatically scans the FM dial to the next available stati o n (M TVC - FM M odel )
Last ButtonSwaps back and forth between last and currently selected TV or FM radio stations (MTVC-FM Model)
Power Button
Turns Main Console ON/OFF
Mute /CC Button-
For LCD TV Mode:
First Press: CC ON
Second Press: CC & Mute ON
Third Press: CC OFF / Mute ON
Forth Press: CC OFF / Mute OFF
Music Mode: Mute ON or OFF
MYE LCD TV Controller OVERVIEW
Models:
MTVC-ST (Standard)
MTVC-FM (FM Radio Option)
11

EQ Button-
Select between 5 preset EQ tones including Flat, Rock, Jazz, Classical & Bass
FITP3 Player Feature:
When the FITP3 Player is docked the MP3 Icon illuminates in the LCD Window
The audio from the Controller regardless of source will be directed to the headphone jack of the FITP3 Player.
Basic Functions
Song Back <<
Song Forward >>
Song Play & Pause
Special Features:
Auto OFF Sensor-
The MYE Controller will monitor for the absence of vibration for 10 minutes. Should this occur, the console will
automatically power OFF saving energy and extending product lifespan. This feature can be programmed enabled or
disabled.
To Enable the Auto OFF Sensor:
1. Press the “Scan & CC” buttons simultaneously for 3-5 seconds unit the word “OFF” is displayed
2. Press the “TV” button to turn the feature ON or OFF
3. Press the “EQ” button to exit
LCD TV Channel Default Feature-
This feature allows the LCD TV to default to a specific TV channel when turned ON. Note: Factory default channel is
‘0’.
To set a default TV Channel:
1. Press the “1 & 3” numeric keys simultaneously for 3-4 seconds until a flashing channel number appears on the
display
2. Select the desired default TV channel number by pressing the direct access numeric keys.
3. Press the “EQ” button to exit. Note: the selected default TV channel number stops flashing and is displayed
briefly to confirm.
IntelliJack / Self Diagnostic Headphone Jack
The IntelliJack self diagnostic headphone circuit detects a faulty headphone jack. When a faulty headphone jack is
detected, a flashing headphone icon will appear in the LCD display and will remain until a new jack is installed and
reset.
To replace the IntelliJack:
1. Loosen the two screws evenly on the bottom of the IntelliJack module and remove.
2. Carefully insert new IntelliJack module without bending contact pins
3. Turn MYE Controller OFF then press the “Power” button for 3-4 seconds to reset fault icon. Note: Headphone
Icon will illuminate for reset confirmation
IMPORTANT NOTICE: Faulty headphones may trigger the fault icon. It is important to audibly test the headphone
jack prior to replacement. If the headphone jack is deemed OK simply follow step #3 above to reset faulty icon.
12

FM Radio Feature on MTVC-FM Model
Programming preset FM Radio Stations in memory (20 Presets Total)
1. Press “Music” button to select FM Mode.
2. Press “Last & Mute/CC” buttons simultaneously for 3-4 seconds until radio frequency begins flashing.
3. To find the desired radio station press the Channel Up/Down buttons.
4. To store the selected radio station to a specific number, press the desired numeric key for 2 seconds. Upon release,
the preset number will illuminate for 2 seconds before returning to the flashing frequency mode.
5. Select the next desired station and repeat the previous steps for up to 20 pr eset stati ons.
6. Press the “EQ” button to exit the program mode.
Selecting Japan FM Band
Note: Controller must be OFF before proceeding.
1. Press TV Button down and hold.
2. Press Power button once while still holding down the TV button.
3. After 3-4 seconds “JP” will appear on LCD to confirm Japan mode
4. Release TV button
5. To return to US mode follow steps 1-3
Attaching Controller:
1. Remove the rear mounting cup from the controller by loosening the two screws and opening both metal clamps on
the side of the controller
2. Attach the rear mounting cup to the desired mounting location by either using the secure clamp or tradition wire
ties. Secure Clamp- Insert screws (included)
3. Insert the Control Cable through the square opening of the rear mounting cup
4. Connect the Control Cable to the data port on the rear of the MYE Controller
5. Rotate the MYE Controller so it is vertical and position on the rear mounting cup
6. Lock the Controller in place by securing both metal clamps and tightening screws.
MYE SHALLOW CUP and SECURE MOUNT
CLAMP
Shallow Cup with Nylon Wire Tie Mounting
13

MYE M15-TV Specifications
Panel
Input Sources
Input Terminals
Control Input
Convenient
Features
Power
power Rating
(Support DPMS)
Operating Condition
Storage Condition
Dimensions
Weight
Set Color
Accessory
Container Loading
Cell Type
Aspect Ratio / Size
Glass Surface
Pixel numbers / Colors
Pixel Pitch
Active Area
Light Source
Brightness / Contrast
Viewing Angle
Response Time
TV System
Video System
Audio System
TV Tuner
Composite Video (AV)
Component Audio
DC Power plug
Wired Controller
Remote Controller
Screen Protected
Auto Calibration
Back Light
Adjustment
Wall Mount Ready
Input Voltage
- Operation
- Stand-By
- Off
Temperature
Humidity
Temperature
Humidity
Physical
Carton
N.W. / G.W.
20ft / 40ft / 40ft HQ
Color Active Matrix TFT LCD panel
4 : 3 / 15" (380 mm) viewable diagonal area
Hard Coating 2H, Glare treatment
1024(H) x 768(V) / 16.2M
0.297 (H) x 0.297 (V) mm
304.128(H) x 228.096(V) mm
Long life, 50,000 hrs (typ)
500 cd/m2 (typ) , 350 : 1
Horizontal 160o (typ) (- 80o ~ + 80o)
Vertical 135o (typ) (- 55o ~ + 80o)
< 25 ms
NTSC or PAL & SECAM ( 181 Channels supported)
NTSC / PAL / SECAM
Audio-R and Audio-L
Type "F" RF TV Tuner Input x 1
RCA Jack X 1
RCA Jack X 2 (Audio-R & Audio-L)
12V DC-IN 2.5mm DC Power Plug
RJ45 8 pin Modular Jack Access
Infrared
Acrylic Non- Glare
VESA 75 X 75(mm)
Universal / Auto-Sensing, 90 to 260VAC, 50 / 60 Hz
30 watt
< 5 watt
< 5 watt
O
0
C ~ 40OC (32OF ~ 104OF)
10% ~ 90% (no condensation)
10% ~ 90% (no condensation)
Without Base : (W x H x D) 403 x 302 x 90 mm
(W x H x D) 462 x 360 x 210 (mm)
O
- 20
C ~ 60OC (- 4OF ~
O
140
F)
3.50 Kg / 4.5 Kg
Front-Gun Metal Grey-semi gloss, Back-black, matte
AC/DC Adapter , IR remote controller
AC power cable, Coax/Power cable, Controller cable
720 / 1440 / NA sets
14

WARRANTY
PLEASE READ THESE WARRANTY TERMS AND CONDITIONS CAREFULLY BEFORE USING YOUR MYE
ENTERTAINMENT PRODUCT. BY USING THE EQUIPMENT, YOU ARE CONSENTING TO BE BOUND BY THE
FOLLOWING WARRANTY TERMS AND CONDITIONS.
LIMITED WARRANTY
MYE ENTERTAINMENT (MYE) WARRANTS ALL NEW MYE PRODUCTS TO BE FREE FROM DEFECTS IN MATERIALS
AND MANUFACTURERS FOR THE WARRANTY PERIODS SET FORTH BELOW. THE WARRANTY PERIODS
COMMENCE ON THE INVOICE DATE OF THE ORIGINAL PURCHASE. THIS WARRANTY APPLIES ONLY AGAINST
DEFECTS DISCOVERED WITHIN THE WARRANTY PERIOD AND EXTENDS ONLY TO THE ORIGINAL PURCHASER OF
THE PRODUCT. PARTS REPAIRED OR REPLACED UNDER THE TERMS OF THIS WARRANTY WILL BE
WARRANTED FOR THE REMAINDER OF THE ORIGINAL WARRANTY PERIOD ONLY. TO CLAIM UNDER THIS
WARRANTY, THE BUYER MUST NOTIFY MYE OR YOUR AUTHORIZED MYE ENTERTAINMENT DEALER WITHIN
30 DAYS AFTER THE DATE OF DISCOVERY OF ANY NONCONFORMITY AND MAKE THE AFFECTED PRODUCT
AVAILABLE FOR INSPECTION BY MYE ENTERTAINMENT OR ITS SERVICE REPRESENTATIVE. MYE
ENTERTAINMENT PRODUCTS DEEMED DEFECTIVE BY A MYE ENTERTAINMENT REPRESENTATIVE WILL BE
ISSUED A RETURN AUTHORIZATION NUMBER. MYE ENTERTAINMENT WILL NOT ACCEPT RETURNS WITHOUT
A RETURN AUTHORIZATION NUMBER. MYE ENTERTAINMENT RESERVES THE RIGHT, AT THEIR OPTION, TO
REPAIR OR REPLACE THE PRODUCT AFTER VERIFICATION OF DEFECT. PRODUCT THAT FAILS AFTER THE
WARRANTY PERIOD EXPIRES WILL BE REPAIRED OR REPLACED AT THE CURRENT PART AND LABOR
PRICING AFTER AUTHORIZATION FROM THE CUSTOMER. REPAIRS ARE WARRANTED FOR 90 DAYS. MYE
ENTERTAINMENT’S OBLIGATIONS UNDER THIS WARRANTY ARE LIMITED AS SET FORTH BELOW:
WARRANTY PERIODS AND COVERAGE:
MYE ENTERTAINMENT 15” LCD SCREEN 1 YEAR PARTS, LABOR
MYE ENTERTAINMENT CONTROLLERS 1 YEAR PARTS, LABOR
CONDITIONS AND RESTRICTIONS:
THIS WARRANTY IS VALID ONLY IN ACCORDANCE WITH THE FOLLOWING CONDITIONS:
THE WARRANTY APPLIES TO THE MYE ENTERTAINMENT PRODUCT ONLY 1) WHILE IT REMAINS IN THE
POSSESSION OF THE ORIGINAL PURCHASER AND PROOF OF PURCHASE IS DEMONSTRATED. 2) IT HAS NOT
BEEN SUBJECT TO ACCIDENT, MISUSE, ABUSE, IMPROPER SERVICE, MECHANICAL OR ELECTRICAL NON-MYE
ENTERTAINMENT A UTHO RI ZED M ODI FI CATI ON. 3 ) CL AI MS MADE W I THIN T HE W AR RANT Y P ERI OD.
THIS WARRANTY DOES NOT COVER DAMAGED OR FAILURE CAUSED BY ELECTRICAL WIRING NOT BEING IN
COMPLIANCE WITH ELECTRICAL CODES OR MYE’S OWNER MANUAL SPECIFICATIONS, OR FAILURES TO
PROVIDE REASONABLE AND NECESSARY MAINTENANCE AS OUTLINED IN THE OWNER’S MANUAL.
WARRANTIES OUTSIDE THE UNITED STATES AND CANADA MAY VARY. PLEASE CONTACT YOUR LOCAL
DEALER FOR DETAILS.
LIMITED WARRANTY SHALL NOT APPLY TO:
1) SOFTWARE UPGRADES.
2) NORMAL WEAR AND TEAR, CONSUMA BLES AND COSMETIC ITEMS INCLUDING BUT NOT LIMITED TO
LABELS.
3) REPAIRS REFORMED ON MYE PRODUCTS MISSING A SERIAL NUMBER O R WITH A SERIAL TAG THAT
HAS BEEN ALTERED, REATTACHED OR DEFACED.
4) SERVICE CALLS TO CORRECT INSTALLATION OF THE PRODUCT OR INSTRUCT OWNERS ON HOW TO
USE THE PRODUCT.
5) PICK UP AND DELIVERY INVOLVING REPAIRS
6) ANY LABOR COSTS INCURRED BEYOND THE APPLICABLE LABOR WARRANTY PER IOD
7) THE USER IS C AUTIONED THAT CHANGES OR MODIFICATIONS NOT EXPRESSLY APPROVED B Y THE
MANUFACTURER OF THE PRODUCT COULD VOID THE USER’S AUTHORITY TO OPERATE THE PRODUCT.
15

WARRANTY
– cont.
THE WARRANTIES PROVIDED HEREIN ARE THE EXCLUSIVE WARRANTIES GIVEN BY MYE ENTERTAINMENT AND
SUPERSEDE ANY PRIOR, CONTRARY OR ADDITIONAL REPRESENTATIONS, WHETHER ORAL OR WRITTEN. ANY
IMPLIED WARRANTIES, INCLUDING THE WARRANTY OF MERCHANTABILITY OR FITNESS FOR A PARTICULAR
PURPOSE THAT APPLY TO ANY PARTS DESCRIBED ABOVE ARE LIMITED IN DURATION TO THE PERIODS OF
EXPRESS WARRANTIES GIVEN ABOVE FOR THOSE SAME PARTS. MYE HEREBY DISCLAIMS AND EXCLUDES
THOSE WARRANTIES THEREAFTER. SOME STATES DO NOT ALLOW LIMITATIONS ON HOW LONG AN IMPLIED
WARRANTY LASTS, SO THE ABOVE LIMITATION MAY NOT APPLY TO YOU. MYE ENTERTAINMENT ALSO HEREBY
DISCLAIMS AND EXCLUDES ALL OTHER OBLIGATIONS OR LIABILITIES, EXPRESS OR IMPLIED, ARISING BY LAW
OR OTHERWISE, WITH RESPECT TO ANY NONCONFORMANCE OR DEFECT IN ANY PRODUCT, INCLUDING BUT
NOT LIMITED TO: (A) ANY OBLIGATION, LIABILITY, RIGHT, CLAIM OR REMEDY IN TORT, WHETHER OR NOT
ARISING FROM THE NEGLIGENCE OF MYE OR ITS SUPPLIERS (WHETHER ACTIVE, PASSIVE OR IMPUTED); AND
(B) ANY OBLIGATION, LIABILITY, RIGHT, CLAIM OR REMEDY FOR LOSS OF OR DAMAGE TO ANY PRODUCT. THIS
DISCLAIMER AND RELEASE SHALL APPLY EVEN IF THE EXPRESSED WARRANTY SET FORTH ABOVE FAILS OF
ITS ESSENTIAL PURPOSE.
FOR ANY PRODUCT DESCRIBED ABOVE THAT FAILS TO CONFORM TO I TS WARRANTY, MYE ENTERTAINMENT WILL
PROVIDE, AT THEIR OPTION ONE OF THE FOLLOWING: 1) REPAIR, 2) REPLACEMENT OR 3) REFUND OF THE
PURCHASE PRICE.
MYE AND/OR ITS SUPPLIERS SHALL HAVE NO OBLIGATION OR LIABILITY, WHETHER ARISING IN CONTRACT
(INCLUDING WARRANTY), TORT (INCLUDING ACTIVE, PASSIVE, OR IMPUTED NEGLIGENCE AND STRICT
LIABILITY), OR OTHERWISE, FOR DAMAGE TO THE PRODUCT, PROPERTY DAMAGE, LOSS OF USE, REVENUE OR
PROFIT, COST OF CAPITAL, COST OF SUBSTITUTE PRODUCT, ADDITIONAL COSTS INCURRED BY BUYER (BY
WAY OF CORRECTION OR OTHERWISE) OR ANY OTHER INCIDENTAL, SPECIAL, INDIRECT, OR CONSEQUENTIAL
DAMAGES, WHETHE R RES ULTIN G FRO M NON-D ELI VERY O R FROM THE U SE, MI SUSE O R INABI LIT Y TO US E THE
PRODUCT. THIS EXCLUSION APPLIES EVEN IF THE ABOVE WARRANTY FAILS OF ITS ESSENTIAL PURPOSES
AND REGARDLESS OF WHETHER SUCH DAMAGES ARE SOUGHT FOR BREACH OF WARRANTY, BREACH OF
CONTRACT, NEGLIGENCE OR STRICT LIABILITY IN TORT OR UNDER ANY OTHER LEGAL THEORY.
SOME STATES DO NOT ALLOW THE EXCLUSION OR LIMITATION OF INCIDENTAL OR CONSEQUENTIAL DAMAGES SO
THE ABOVE LIMITATION MAY NOT APPLY TO YOU.
THIS WARRANTY GIVES SPECIFIC LEGAL RIGHTS. YOU MAY ALSO HAVE OTHER RIGHTS WHICH VARY FROM STATE
TO STATE.
MYE Entertainment LLC All Rights Reserved
MYE Entertainment, LLC
25129 The Old Road
Suite 305
Stevenson Ranch, Ca. 91381
1-661-964-0217
www.myeclubtv.com
16
 Loading...