

MyDepots H.264 NETWORK, 7216D User Manual

H.264 NETWORK
Embedded DVR
16 channel
USER MANUAL

Visionari Limited Liability Company Visionari Copyright(1.4)2010Version
http://www.mydepots.com
2
7216D Series Network DVR User Manual

Visionari Limited Liability Company Visionari Copyright(1.4)2010Version
http://www.mydepots.com
3
7216D Series Network DVR User Manual
CONTENT
1.1 PREODUCT INTRODUCE ................................................................................................................ 4
1.2 PRODUCT FEATURE ........................................................................................................................ 4
1.2.1 SPECIFICATION ............................................................................................................................ 4
1.2.2 BASIC WORKING PARAMETER ............................................................................................... 6
1.3 ENVIRONMENT ADAPTABILITY ................................................................................................. 6
2 DEVICE OPERATION ............................................................................................................................... 7
2.1 REMOTE KEY INSTRUCTION ....................................................................................................... 7
2.1.1 REMOTE CONTROL .................................................................................................................... 7
2.1.2 MOUSE OPERATION.................................................................................................................... 8
2.1.3 MENU TREE ................................................................................................................................... 9
2.2 SYSTEM OPERSTION ..................................................................................................................... 10
2.2.1 USER LOGIN ................................................................................................................................ 10
2.2.2 GUI OPERATION ......................................................................................................................... 11
2.2.3 DEVICES SETUP .......................................................................................................................... 19
2.2.4 SYSTEM SETUP ........................................................................................................................... 24
3 IE OPERATION ........................................................................................................................................ 27
3.1 FEATURE .......................................................................................................................................... 27
3.2 USING REMOTE SURVEILLANCE ..................................................................................................... 27
3.3 REMOTE SURVEILLANCE MAIN SCREEN ..................................................................................... 29
3.3.1 LIVE VIEWING ............................................................................................................................... 30
3.3.2 REMOTE SETUP ............................................................................................................................. 35
4 DVR INSTALLATION .............................................................................................................................. 39
4.1 PRODUCT OVERVIEW .................................................................................................................. 39
4.2 HDD INSTALLATION ..................................................................................................................... 43
5. FAQ .................................................................................................................................................................. 44

Visionari Limited Liability Company Visionari Copyright(1.4)2010Version
http://www.mydepots.com
4
7216D Series Network DVR User Manual
INTRODUCTION
1.1 PREODUCT INTRODUCE
It is 16 channels CIF resolution digital video recording DVR, which have local recording,
playback, support triple code remote network surveillance, data backup, parameter setting,
motion detection, I/O alarm setting, PTZ and USB mouse, USB2.0 backup, IE browser and back
up.
1.2 PRODUCT FEATURE
H.264 compression
Two USB interface, USB2.0 for data backup, USB1.1 for mouse operation.
2 pcses 3.5” SATA HDD at most.
Special file system for security.
16 bit color translucent user-friendly GUI, with notes for selected menu items
Optimized one four channel simultaneously playback
double level user management
Support the live view, parameter setting and copy playback video via network.
1.2.1 SPECIFICATION
Item
Device Parameter
Specification
System
Language
English/Chinese
GUI
Graphic menu
password
user password, administrator password
Video
Video in
16ch composite video input 1.0V p-p,
impedance75Ω, BNC
Video out
2ch complex video output 1.0V p-p,
impedance75Ω, BNC
Video display
1/4/9/16 switch
Video standard
PAL: 25f/s, CCIR625line, 50scene
NTSC: 30f/s, CCIR525line, 60scene
Audio
Audio input
16ch audio input, impedance 600Ω,RCA
Audio output
1ch audio output, impedance 600Ω,RCA
Basic electricity
output
Linearity electricity
Record style
Audio video recorded simultaneously
Audio
compression
ADPCM
Picture
proceeding
and store
Picture
compression
H.264
Resolution
Ch1~9: D1;
Ch2~8,Ch10~16: CIF

Visionari Limited Liability Company Visionari Copyright(1.4)2010Version
http://www.mydepots.com
5
7216D Series Network DVR User Manual
Streaming style
ISO14496-10
Audio style
ADPCM
Video code rate
CIF: NORMAL: 160MByte/Hour
FINE: 220MByte/Hour
BEST: 330MByte/Hour
D1 : NORMAL: 450MByte/Hour
FINE: 530MByte/Hour
BEST: 670MByte/Hour
Audio code rate
14Mbyte/hour
Data storage
Support mainstream SATA HDD
Alarm
Alarm input
16 alarm input
Alarm output
1 alarm output
Serial interface
Support 1 RS485
Network interface
RJ45,10M/100M
USB
Mouse
USB1.1
Thumb drive
USB2.0
VGA
VGA
1 VGA (optional)
Software
PC playback
Playback video file
Software
upgrade
Support USB firmware upgrade
others
voltage input
AC:110~240V
Voltage output
DC:19V@3A
Power
16W without HDD
Working
temperature
-10----50℃

Visionari Limited Liability Company Visionari Copyright(1.4)2010Version
http://www.mydepots.com
6
7216D Series Network DVR User Manual
BASIC WORKING PARAMETER
item
parameter
Description
Voltage input
19V
DC 19V
Video impedance
input
75Ω
75Ω each channel.
Video output
1Vp-p
1Vp-p CVBS signal
I/O
0—2V
Low voltage alarm
5V-30v
High voltage alarm
RS232 serial port, for extend use
RS485 Connect to PTZ, (Pelco-D,Pelco-P)
SATA HDD
2 SATA HDD with mainstream capability
1.3 ENVIRONMENT ADAPTABILITY
For safety while using the DVR and to prolong device life, please pay attention to the
following details:
1) When installing device, please comply with all the electric product safety criteria.
2) Power and ground:
Do not touch the power and DVR with a wet hand
Do not drop liquid on DVR
Do not put any object on DVR
Please use soft dry cloth to clean DVR; do not use chemical impregnant.
The Device will have voltage before startup if the power line is connected to power
Source.
Please unplug power line from power source if the Device is not intended to be used
for a prolonged time.
Visionari Limited Liability Company Visionari Copyright(1.4)2010Version
http://www.mydepots.com
7
7216D Series Network DVR User Manual
2 DEVICE OPERATION
In device operation, the enter key on remote control has the same function as left click of the
mouse.
2.1 REMOTE KEY INSTRUCTION
2.1.1 REMOTE CONTROL
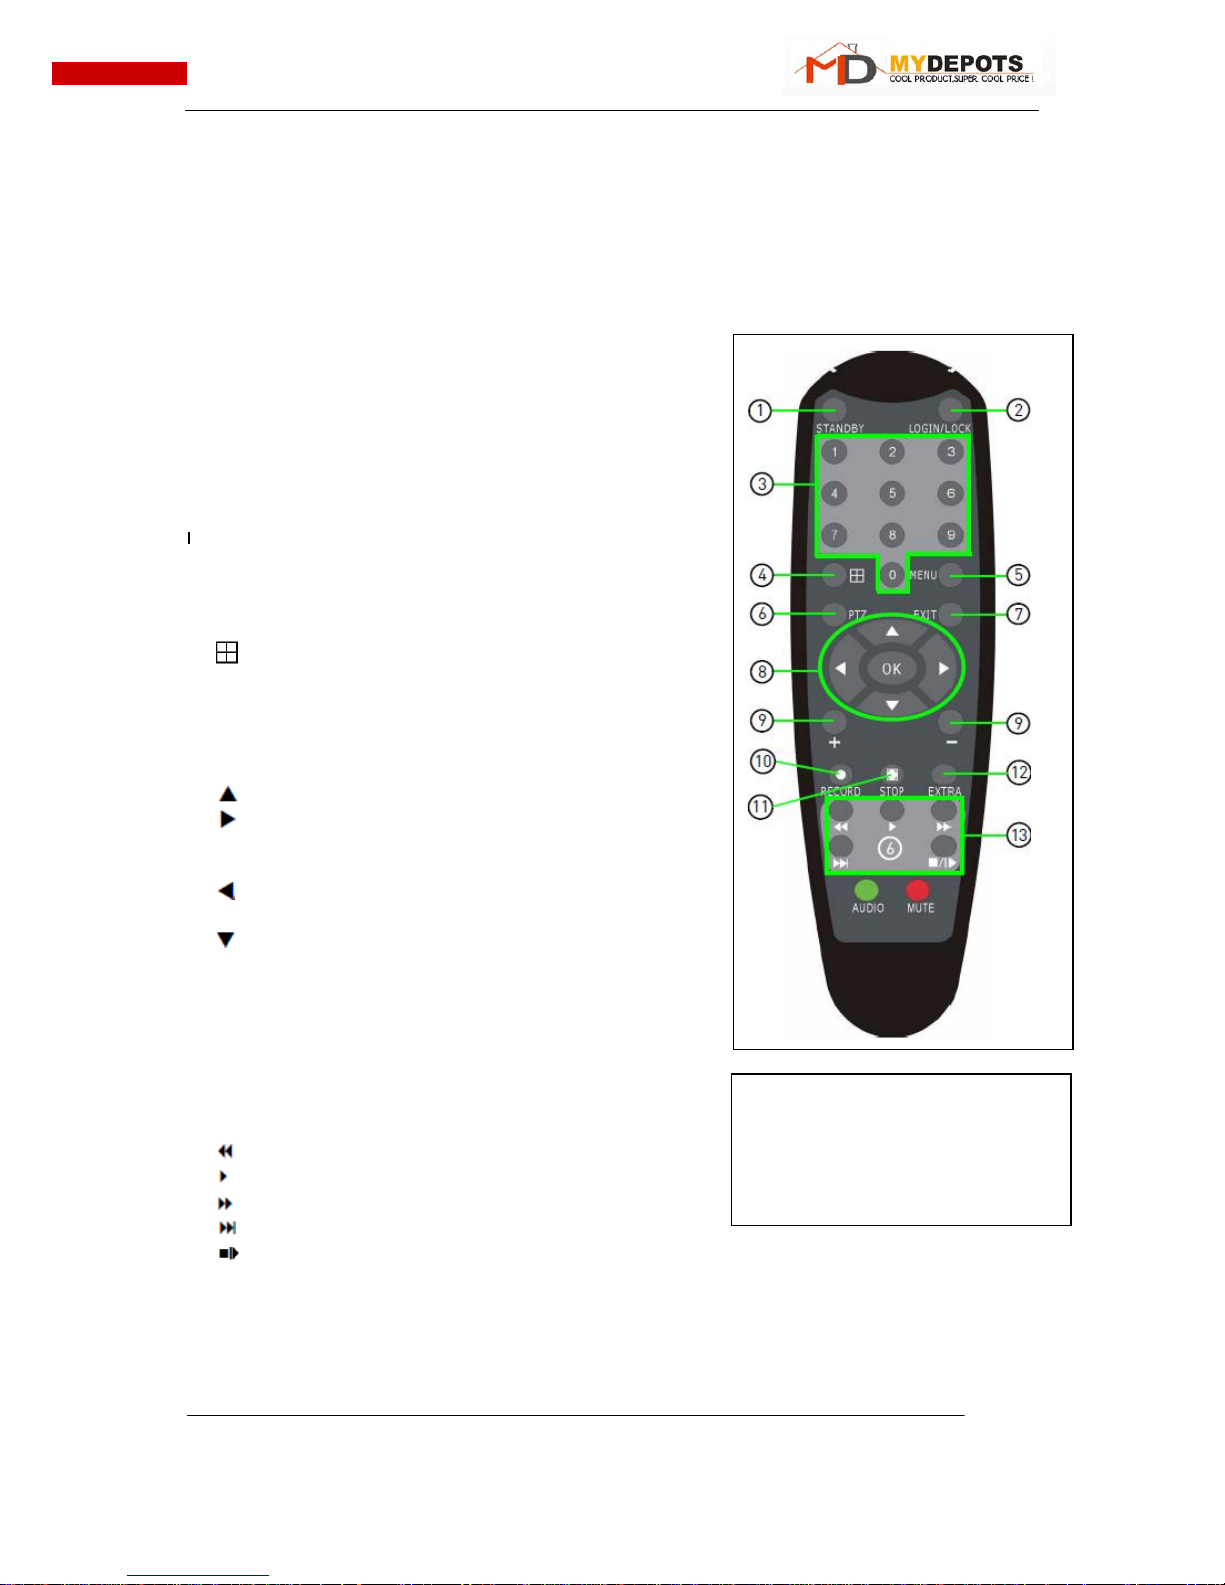
The remote control is the secondary input device
For navigating the system’s interface.
To use the remote control:
1. STANDBY: Press to turn standby mode ON/OFF.
2. LOGIN/LOCK: If "Security" has been enabled in the
Setup menu, press to open the user password login
screen.
3. Number/Channel buttons: While in menus,
press buttons 0~9 to enter values; during live
viewing, press to view channels in full-screen.
4. : Press to switch between quad and
split-screen displays.
5. MENU: Opens the main menu.
6. PTZ: Press to open the PTZ control window.
7. EXIT: Close menu windows.
8. Navigation/OK:
• /CH+: Move cursor in menus up; Channel Up.
• /FWD: Move cursor in menus right; during
playback, increase forward playback speed (5X, 15X,
60X).
• /REW: Move cursor in menus left; during playback,
increase reverse playback speed (5X, 15X, 60X)
• /CH-: Move cursor in menus down; Channel down.
• OK: In menus, press to confirm selections; during
playback and preview, press to view system
information
9. +/ - : In menus, press to adjust values.
10. RECORD: Press to start manual recording.
11. STOP: Press to stop manual recording.
12. EXTRA: For the future use.
13. Playback controls:
• : Increase reverse playback speed 1X, 2X, 4X
• : Press to start playback
• : Press to increase forward playback speed 1X, 2X, 4X
• : Press to slow playback speed by 1/2, 1/4, 1/8
• : Press to freeze playback to one frame, then press again to advance frame-by-frame
TIP: When using the remote control
to enter password and camera
titles, select the field using the
navigation buttons, press ENTER,
and then press the number
buttons.
Visionari Limited Liability Company Visionari Copyright(1.4)2010Version
http://www.mydepots.com
8
7216D Series Network DVR User Manual
2.1.2 MOUSE OPERATION
The mouse is the primary input device for navigating system menus.
NOTE: Unless otherwise noted, all system functions described in this manual are achieved
through
mouse input.
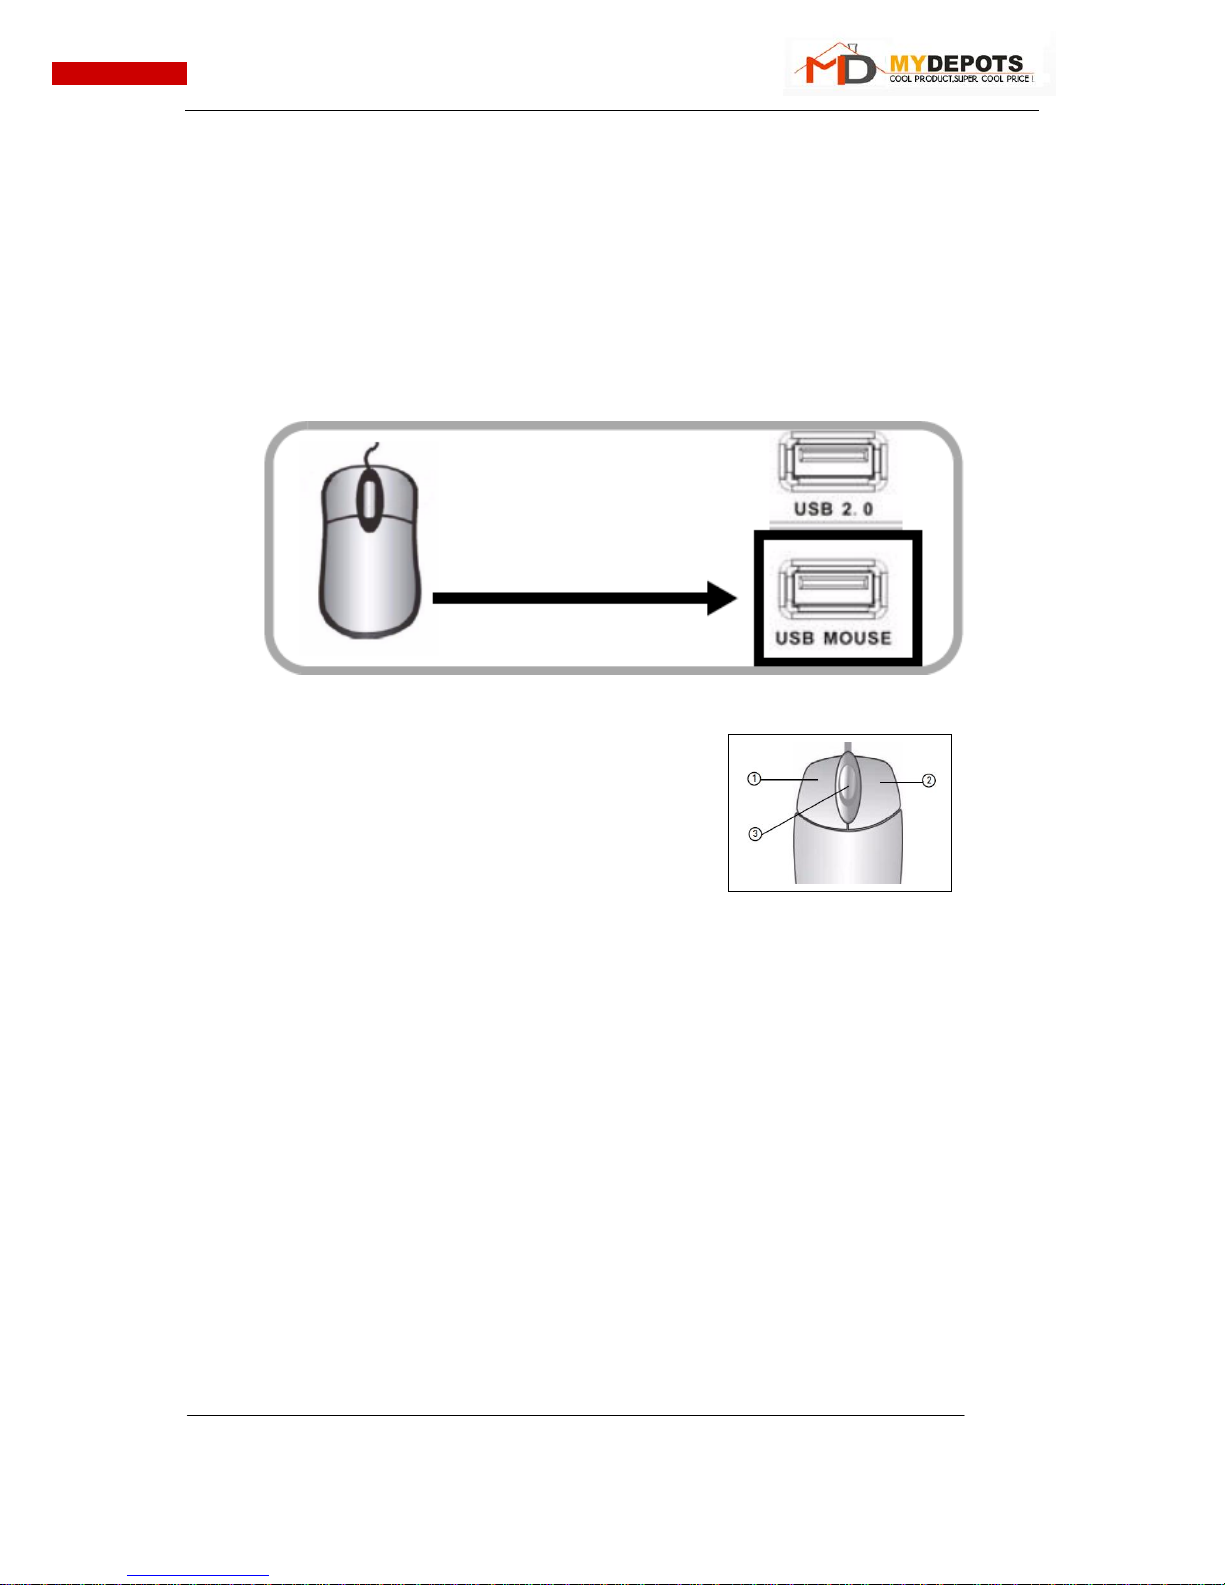
To use a mouse with the system:
1) Connect a USB mouse to the USB MOUSE port on front panel of the system.
NOTE: Only the top USB port on the front panel is designed for data backup to a USB flash
drive. Do not connect a USB flash drive to the bottom USB port on the rear panel.
Connect a USB mouse to the bottom USB port on the front panel
2) Use the mouse buttons to perform the following:
• Left-Button: Click to select a menu option;
during live viewing in split-screen, double-click
on a channel to view the selected channel in
full-screen.; double-click the channel again to
return to split-screen view
• Right-Button: Click to open the Sub-Menu
3) Scroll-Wheel: No function.
Mouse button operation

Visionari Limited Liability Company Visionari Copyright(1.4)2010Version
http://www.mydepots.com
9
7216D Series Network DVR User Manual
2.1.3 MENU TREE
You can control the DVR by a lot of menu operation. This tree will show you the menu
structure and it will be in details in after chapter.

Visionari Limited Liability Company Visionari Copyright(1.4)2010Version
http://www.mydepots.com
10
7216D Series Network DVR User Manual
2.2 SYSTEM OPERSTION
2.2.1 USER LOGIN
1. STARTING THE SYSTEM
To power the system ON/OFF:
Connect the power cable to the DC 19V port on the rear panel. At startup, the system
performs a basic system check and runs an initial loading sequence. After a few moments, the
system loads a live display view.
Standby Mode
The system can also be put into Standby Mode. Power will remain to the system but will not
be recording.
To start/stop Standby mode:
1) Press and hold the POWER button on the front panel or remote control until the prompt
closes. The system enters standby mode.
2) Press and hold the POWER button on the front panel or remote control until the system
beeps. The system will begin powering up.
Password
ATTENTION: By default, passwords are disabled on the system. You do not need to enter
a password when accessing any system menus. However, for security purposes, it is highly
recommended to enable passwords on the system using the Password Menu.
NOTE:
1) If there is no HDD in device, or the device didn`t read the HDD, or the HDD didn`t be
formatted it will display an 【H】 in the video preview interface.
2) You must format the HDD in the DVR before first using. The steps as follows: menu >
HDD management > format. After formatting, the system will restart.
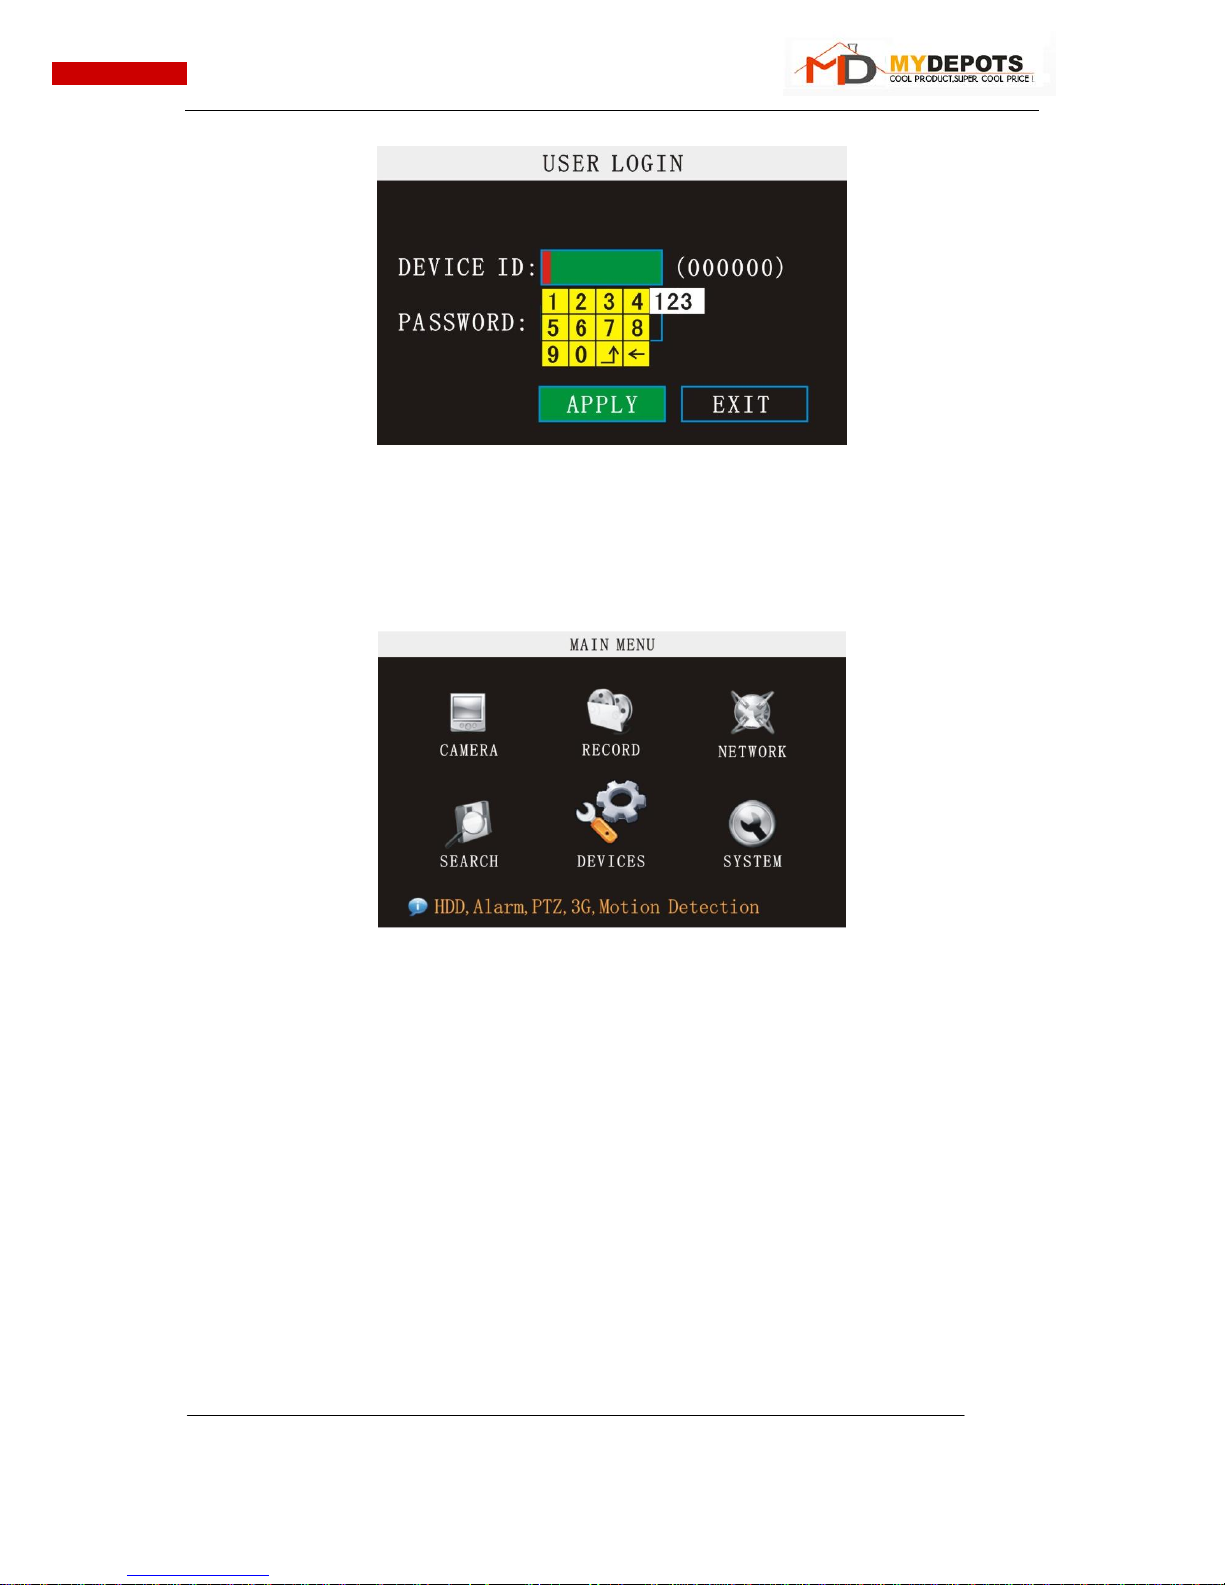
2. SYSTEM LOGIN
When you login, you will find the window as follow if the password is enabled, Input device
ID and user password via numeric key-board, and you can access to main menu via press
【Apply】
Remark: default device ID is: 000000, and the password is :user password is 000000 and
Admin password is 020818, in order to manage the device more convenience, please setup the
user password and change the device ID in the base setup. You can setup user and admin
password, Administrator has all authorities, operator has limited authorities who they can only
watch, playback, please change the unit ID and default password in time for system security.
Visionari Limited Liability Company Visionari Copyright(1.4)2010Version
http://www.mydepots.com
11
7216D Series Network DVR User Manual
DEVICE ID: You just need to enter the unit ID as the right frame.
PASSWORD: enter the admin password or user password.
2.2.2 GUI OPERATION
The main menu include
“CAMERA”,”RECORD”,”NETWORK”,”SEARCH”,“DEVICES”,and“SYSTEM”.
Remark: You must after pressing “APPLY” to make the setting for submenu valid. It will no use
when exit directly. This DVR have a special feature is: when you move the mouse to everywhere,
there will have the explanation information showed auto.
2.2.2.1 CAMERA
Move the cursor to【CAMERA】(Icon highlighted when selected), press【Enter】to enter
into the setting interface.
Visionari Limited Liability Company Visionari Copyright(1.4)2010Version
http://www.mydepots.com
12
7216D Series Network DVR User Manual
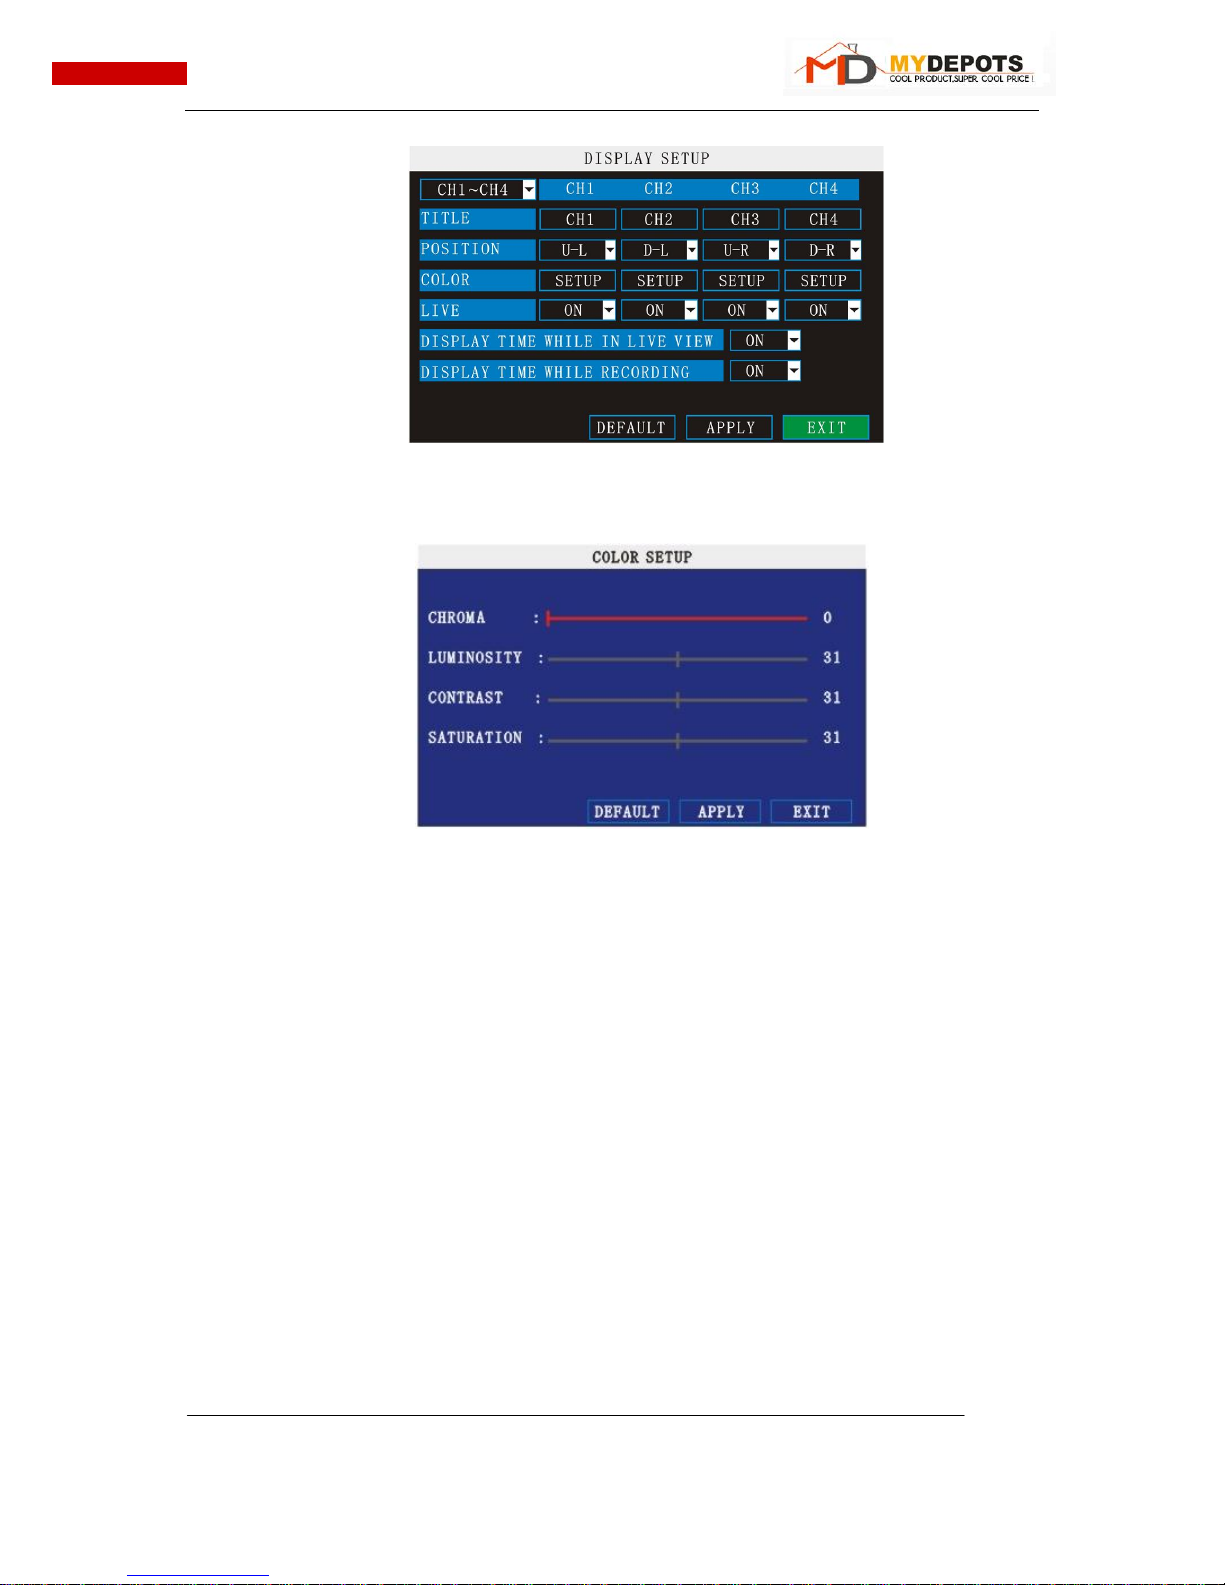
CH1~CH4: you can select the CH1~CH4, CH5~CH8, CH9~CH12, CH13~CH16 here.
NAME: press【Enter】to enter into the setting interface.
POSITION: press【Enter】 to switch name location, there are 5 options.
COLOR: press【Enter】to enter into setting interface, as following:
Press【Enter】or【+】【-】key or directly drag the cursor to set colors, including chroma,
brightness, contrast and saturation, press【APPLY】to save the parameters.
LIVE: ON: Means the channel is allowed to view the live mode, OFF means not.
DISPLAY TIME WHILE IN LIVE VIEW: ON: Means yes, OFF means not.
DISPLAY TIME WHILE RECORDING: ON: Means yes, OFF means not.
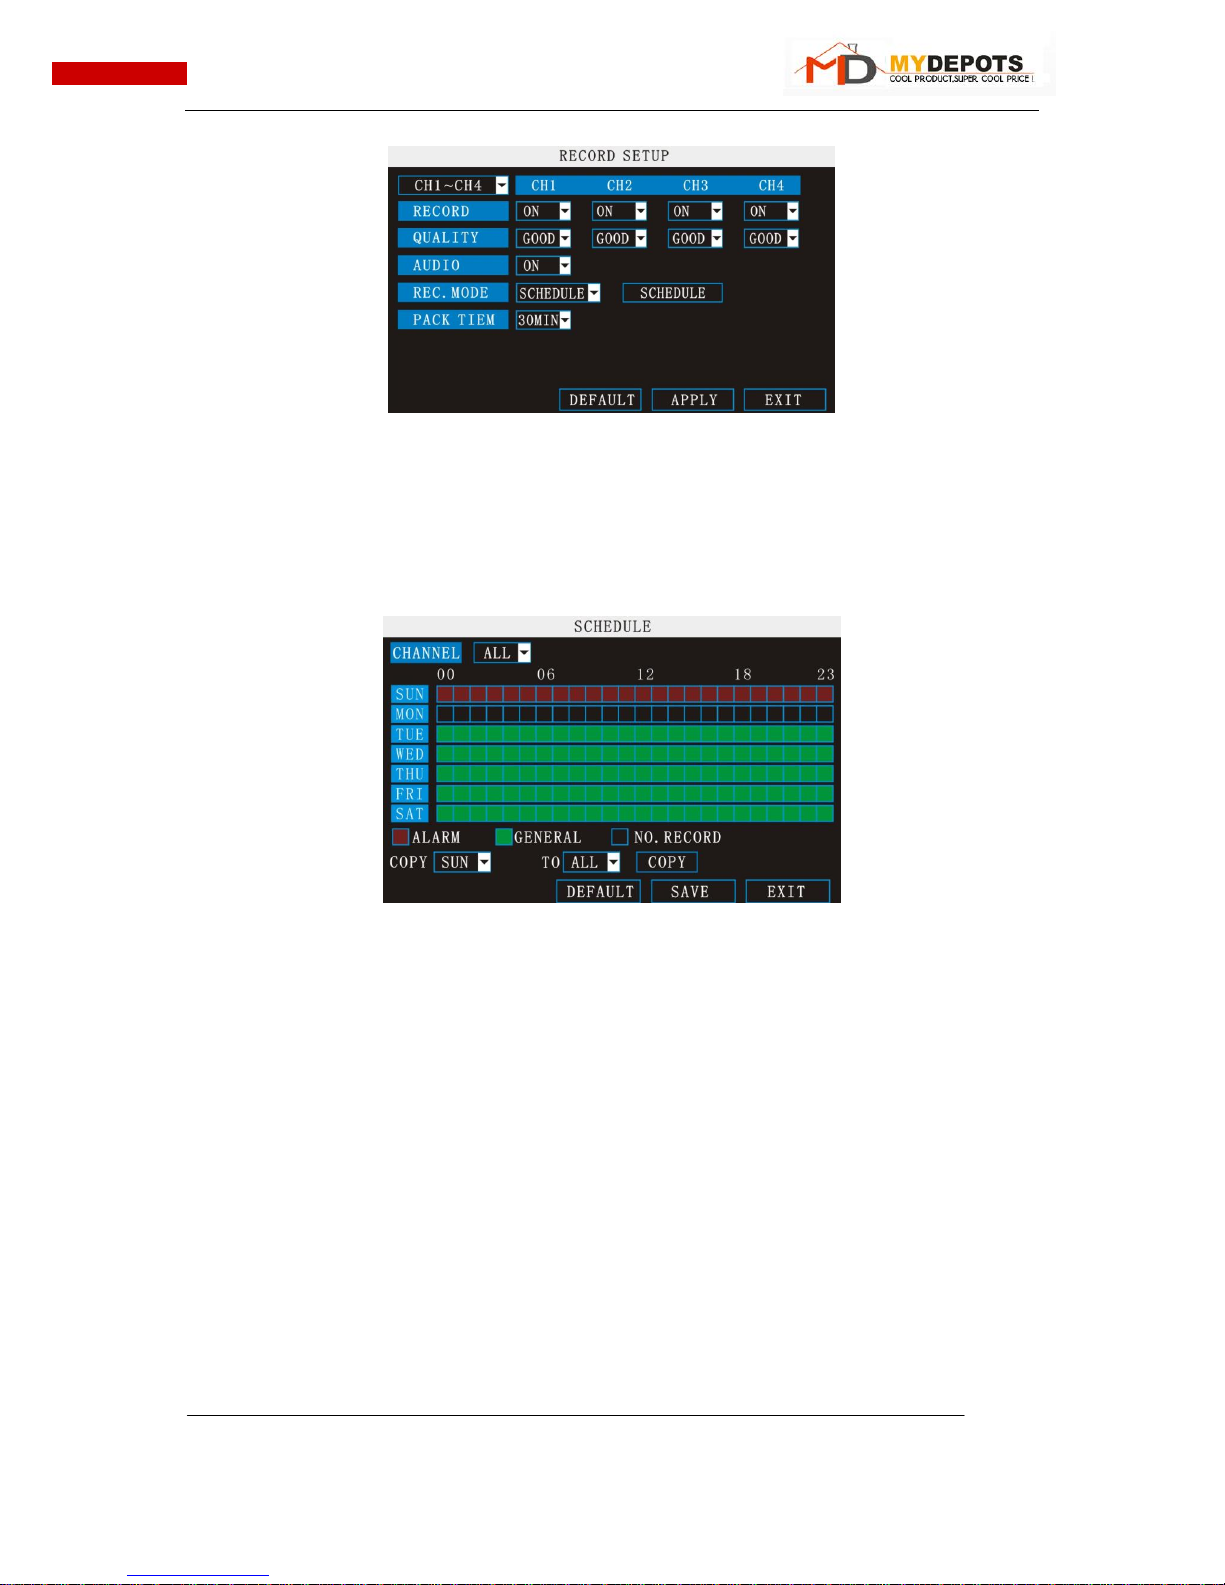
2.2.2.2 RECORD SETUP
Move the cursor to 【RECORD】(Icon highlighted when selected),press【Enter】to enter
into the setting interface. Press【Confirm】 and enter into the setup interface, and you can use
direction keys and cursor to change the options.
Visionari Limited Liability Company Visionari Copyright(1.4)2010Version
http://www.mydepots.com
13
7216D Series Network DVR User Manual
CH1~CH4: you can select the CH1~CH4, CH5~CH8, CH9~CH12, CH13~CH16 here.
RECORD: ON: Means the channel enable for recording.
QUALITY: There are three options, corresponding different data stream standard
AUDIO: ON: Means enable the audio recording for all channels, OFF: Means disable audio
recording
REC.MODE:
POWER UP: Means the device will start recording when it startup.
TIME: Recording as the schedule, you can setup the schedule as you want as follow.
CHANNEL: You can select all channels or just one channel to setup schedule.
WEEKLY: You can setup each as you want. There are ALARM, NORMAL, NO REC three
modes, if you select this, there will have a √ in the frame, that means when you select the period
of the day it will record as this mode, and you can just setup one day, then copy the setting to all
other days. Different color means different record mode: Red means alarm record, green means
normal record, grounding means no record.
PACK TIME: There are 15min, 30min, 45min, 60min four options, that means it will pack as
the mode you selected
Scroll to APPLY and press ENTER to save the new settings.
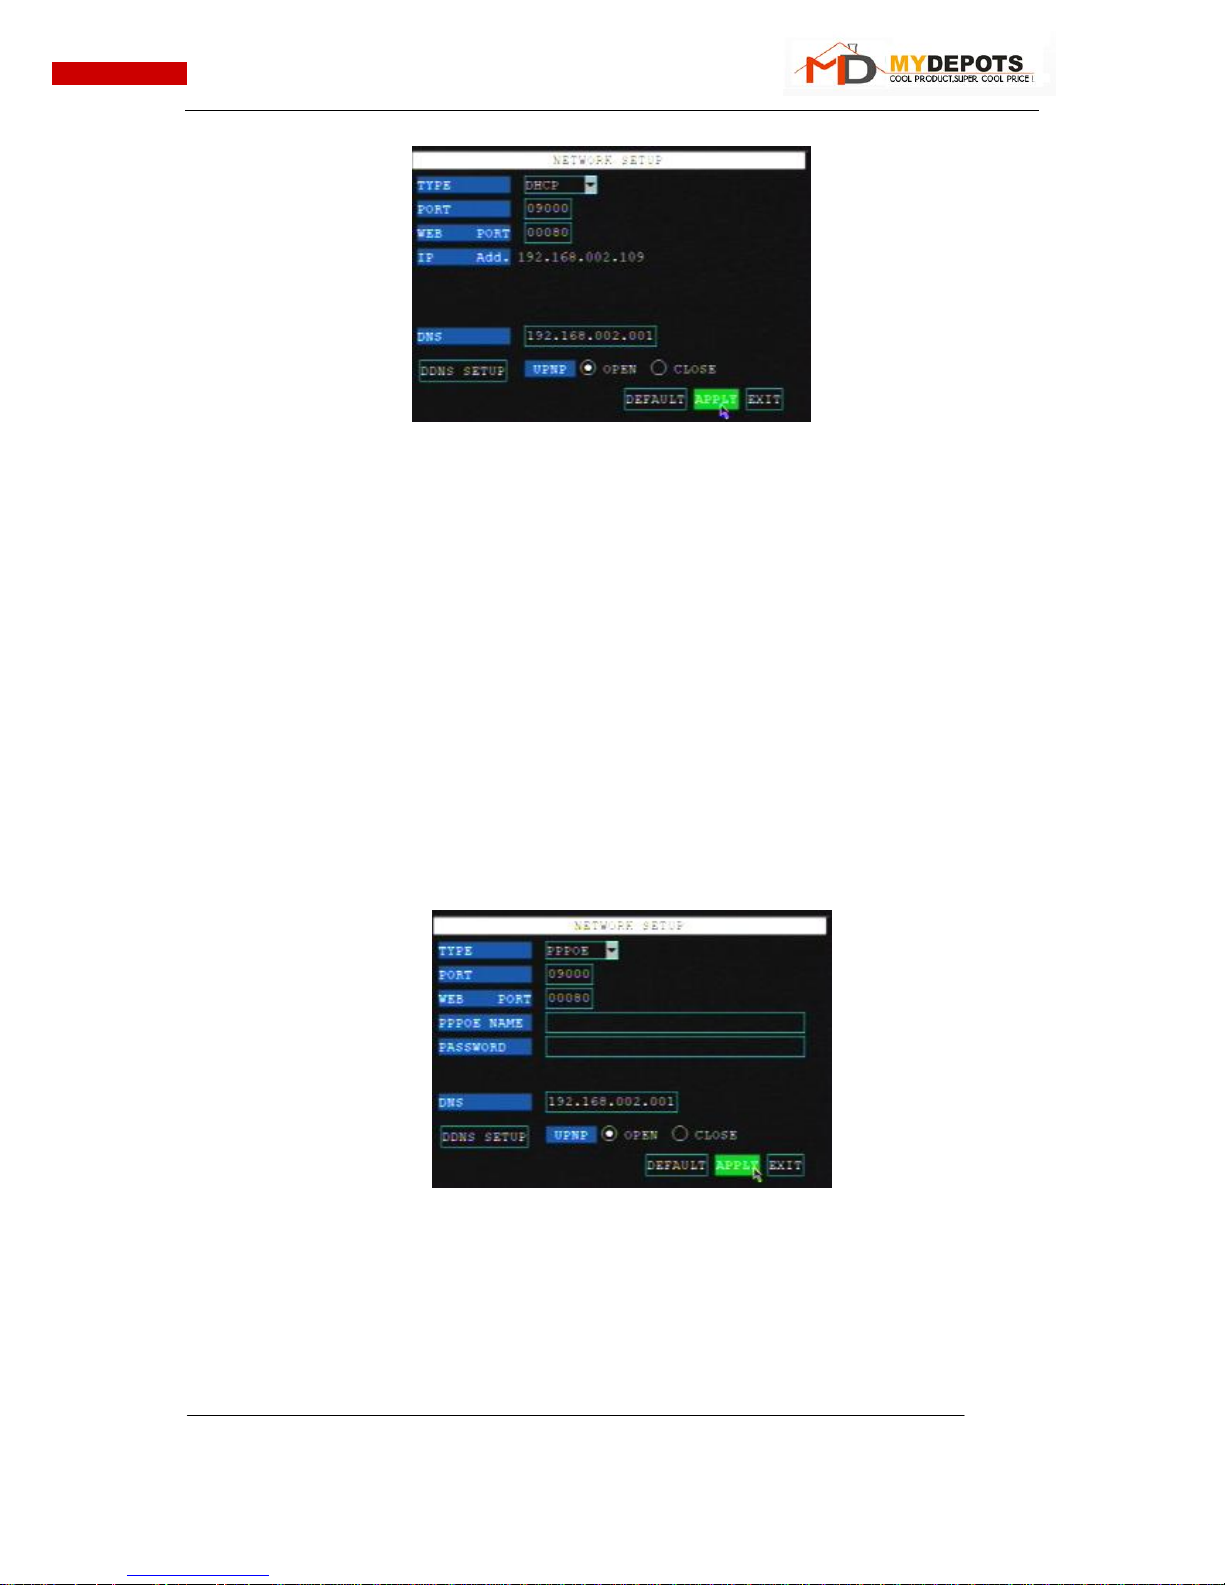
2.2.2.3 NETWORK SETUP
Use the Network Setup menu to configure your network and DNS review.
Visionari Limited Liability Company Visionari Copyright(1.4)2010Version
http://www.mydepots.com
14
7216D Series Network DVR User Manual
To configure network settings:
1) Under TYPE, select DHCP, PPPoE, or STATIC. If PPPoE, go to step 2. If STATIC, go to
step 3.
NOTE: DHCP allows you to quickly connect to your network by obtaining an IP address from
the router. 【AUTO DHCP】is DNS server1 which is obtained automatically, while 【DNS】 is DNS
server2 which should be filled in by yourself. To obtain an IP address automatically and to avoid
adding the MEDIA PORT and WEB PORT in your router, you should set UPNP as OPEN.
To configure UPNP settings:
Enable the UPNP function in your Router.
Under DVR GUI,Open the MAIN MENU and click ADVANCE.
From the Advanced Setup menu, click NETWORK.
Under UPNP, select OPEN.
Click APPLY to save your settings and then click OK in the confirmation window.
Using a remote PC, open Internet Explorer.
In the address bar, enter your Router WAN IP address immediately followed
by :WEB PORT (no spaces).
http://XXX.XXX.XXX.XXX(Router WAN IP):XXX(WEB PORT)
Enter your system ADMIN password and select INTERNET.
NOTE: If you have not enabled passwords on the system, leave the password field blank.
2) If you select PPPoE in step 1, enter your PPPoE user name and password in the
respective fields using the Virtual Keyboard.
3) If you selected STATIC in step 1, enter your IP Address, Net mask, Gateway and DNS
in the respective fields using the Virtual Keyboard.
 Loading...