


original operating instructions mycusini
User‘s Manual for
Mycusini
3D Food Printer for
Private Use
For questions please contact us at service@mycusini.com

original operating instructions mycusini
Content
1 Basic Information ................................................................................................. 4
1.1 General description ....................................................................................... 4
1.2 Technical data Mycusini ................................................................................ 5
1.3 Main components .......................................................................................... 6
1.4 Schematic overview ....................................................................................... 6
2 Qualification of personnel ..................................................................................... 7
3 Safety Procedures / Precautions .......................................................................... 7
3.1 General introduction and definition of the safety instructions ........................ 7
3.2 General safety instruction for the machine .................................................... 8
3.3 Special safety instruction for the machine ..................................................... 8
3.3.1 General directions ................................................................................... 8
3.3.2 Setup, location of operation .................................................................... 9
3.4 Use in accordance with regulations ............................................................. 10
3.5 Liability and guarantee ................................................................................ 11
3.5.1 Liability .................................................................................................. 11
4 Description of the Functions and Operation of the Machine ............................... 12
4.1 Mycusini and accessories ............................................................................ 12
4.2 Overview Main Screen ................................................................................ 12
4.3 The main menu............................................................................................ 13
4.4 Installation ................................................................................................... 13
4.4.1 Installation of the mycusini .................................................................... 13
4.4.2 Preparation of the flexible silicone production mat ................................... 13
4.5 Preparation of the production ...................................................................... 13
4.6 Loading 3D Choco and start printing production ......................................... 14
4.7 Remove 3D objects from the flexible mat .................................................... 15
4.8 The “Next action” menu ............................................................................... 15
4.8.1 „Print another object“ ............................................................................ 15
4.8.2 Remove cartridge .................................................................................. 16
4.8.3 Clean now ............................................................................................. 16
4.8.4 Turn off ................................................................................................. 17
5 Clean .................................................................................................................. 17
5.1 Cleaning of the stainless steel cartridge ...................................................... 17
5.2 Cleaning of the printing plate ....................................................................... 17
For questions please contact us at service@mycusini.com

original operating instructions mycusini
5.3 Cleaning of the flexible printing mat ............................................................. 17
5.4 Cleaning of the stamp .................................................................................. 18
5.4.1 Fast cleaning of the stamp .................................................................... 18
5.4.2 Extended cleaning of the stamp ............................................................ 19
6 Further options ................................................................................................... 19
6.1 The menu during printing ............................................................................. 19
6.1.1 Abort object ........................................................................................... 19
6.1.2 Abort and dose 3D choco ..................................................................... 19
6.1 The „Maintenance“ menu ............................................................................ 19
Select "Maintenance" in the main menu to access the extended service menu.
There you will find the following options. ............................................................... 19
6.1.1 Insert Stamp .......................................................................................... 19
6.1.2 Info ........................................................................................................ 20
6.1.1 Calibrate................................................................................................ 20
6.1.2 Extended Cleaning ................................................................................ 21
7 Create own Objects ............................................................................................ 22
7.1 mycusini-Club .............................................................................................. 22
7.2 Produce your own Object from the mycusini Club ....................................... 26
7.3 More Applications of the mycusini Club ....................................................... 26
7.3.1 Freehand drawing ................................................................................. 26
7.4 Trace outlines .............................................................................................. 27
7.5 Language Settings mycusini Club ............................................................... 27
7.6 Notifications ................................................................................................. 28
8 Troubleshooting ................................................................................................. 28
9 Returning Old Devices ....................................................................................... 29
10 Servicing and Maintenance............................................................................. 29
10.1 Safety instructions for servicing ................................................................ 29
For questions please contact us at service@mycusini.com

original operating instructions mycusini
1 Basic Information
1.1 General description
The Mycusini is an easy-to-use 3D-food-printer for use in private kitchen.
It consists of a heatable cartridge holder, which is mounted to a positioning unit and
operated via internal monitor. The x and y axis are controlled by a tooth belt, while
the z axis and the extruder are set into motion by threaded rods. The cartridge holder
is located at the end of the y axis and during the production process is moved
upwards layer by layer by means of the z-motor. The production plate represents the
x axis and serves as a bearing surface for the pads to be printed (flexible production
mat).
The food is filled into food-safe cartridges or are available as food-safe refills. These
cartridges are inserted into the cartridge holder and if necessary heated to a
temperature specifically defined for the food item. There is no direct contact between
the food item located in the cartridge and the device itself.
For questions please contact us at service@mycusini.com

original operating instructions mycusini
1.2 Technical data Mycusini
Produktion
• Usability mycusini 3D Choco
• Technology Layer-by-layer deposition of
consumables
• Tip Heatable
• Volume of capsule 15 ml (0.5 oz)
• Building Space X: 190 mm (7.5 in)
Y: 195 mm (7.7 in)
Z: 275 mm (10.8 in)
• Precision 0,1 mm (0.004 in)
• Nozzle diameter 0,5 - 1,2 mm (0.02-0.05 in)
• Rate of printing 5 – 50 mm/s (0.2-2 in/s)
• Movement volocity 5 – 200 mm/s (0.2-7,9 in/s)
• usable production area 105 x 80 x 50 mm (4.1 x 3.1 x 2 in)
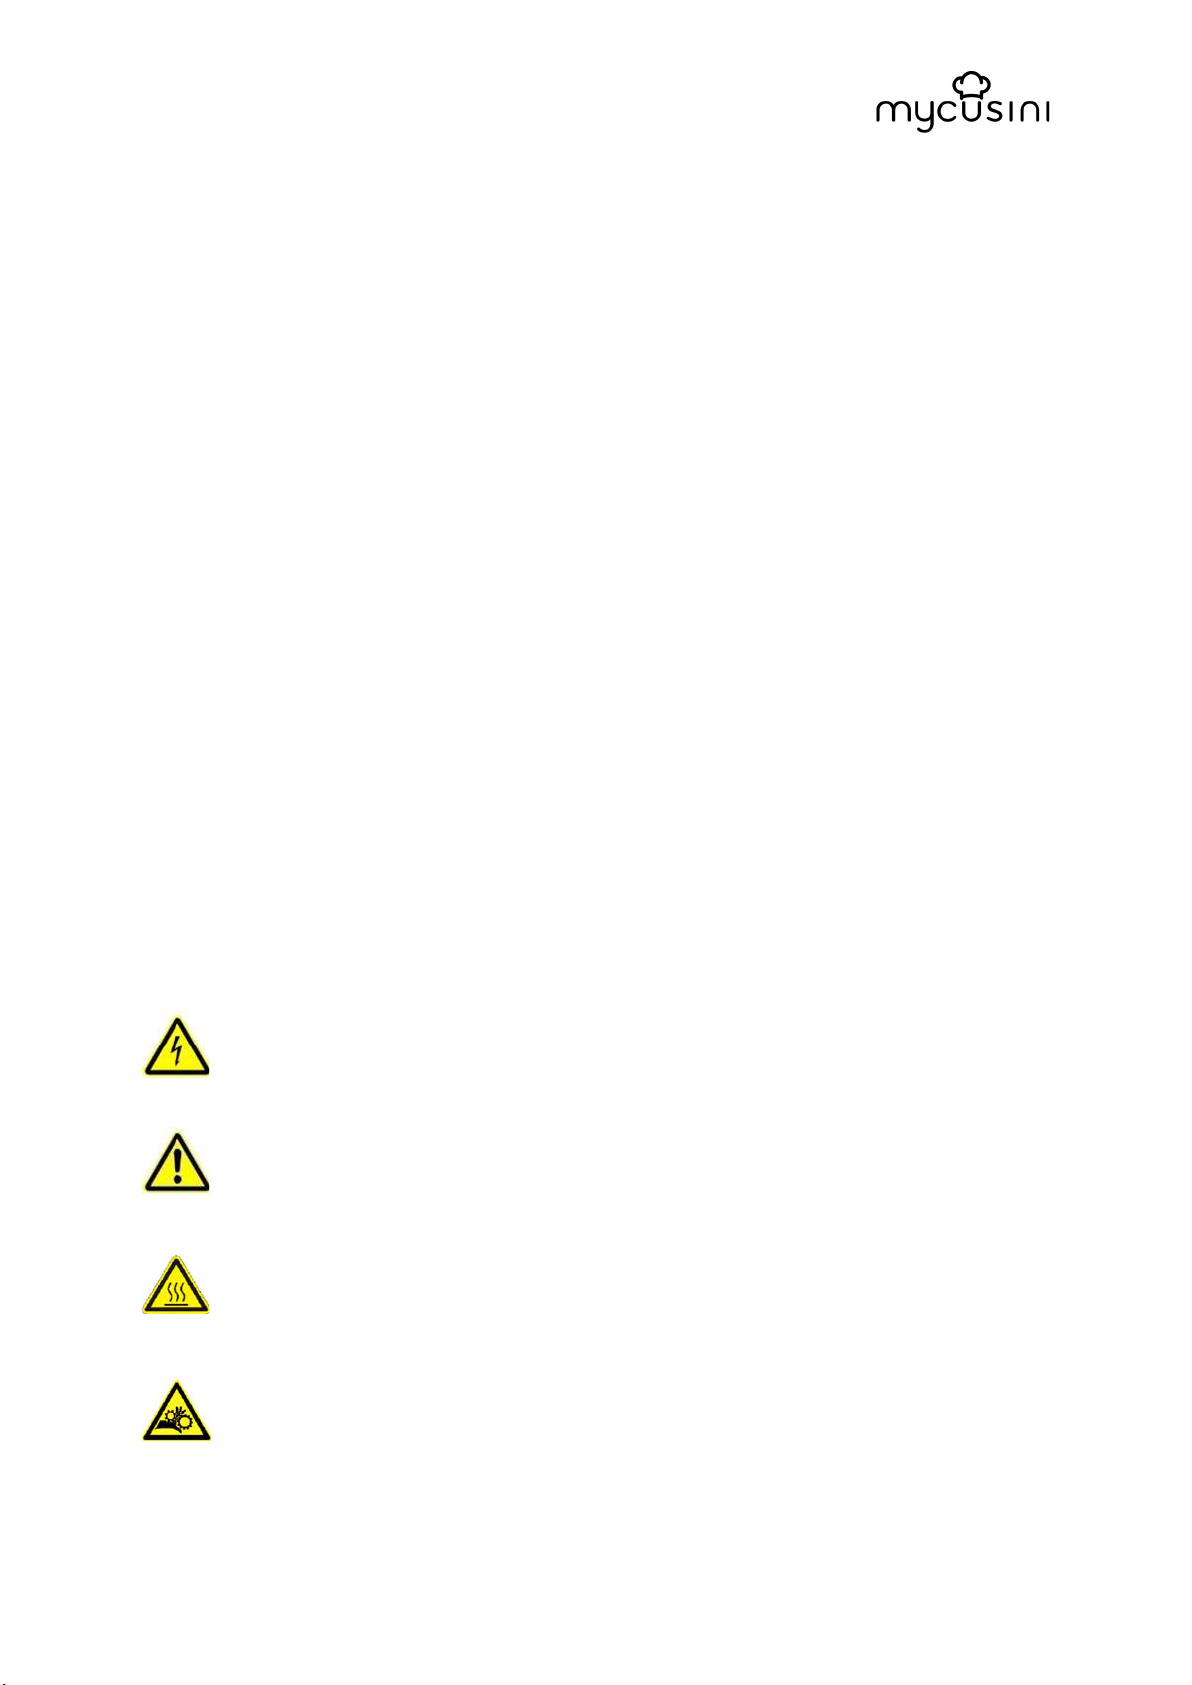
Physical Dimensions
•
Maximum space needed: X: 250 mm (9.8 in)(Plattform moves right and
left)
Y: 250 mm (9.8 in)
Z: 300 mm (11.8 in)
• Packaging volume 270 x 270 x 430 mm (L x B x H) (10.6 x 10.6 x 16.9 in)
• Weight 3,5 kg
• Shippingweight 4 kg
Temperature
• Ambient temperature 20 - 22 °C (50 – 71.6 F)
• Storage temperature 0 - 32 °C (32 - 89.6 F)
• Process temperature of
heated cartridge 20 - 40 °C (68 - 104 F)
Power Supply
• Power Supply(AC) 100-240 VAC; 50 – 60 Hz
• Power (DC) 12 V; 5 A; 60W
• Protection Short circuit / Overload / Over voltage / Over
temperature
Software / Connectivity
• Interface Display
• Connectivity Micro SD-card, USB-B
For questions please contact us at service@mycusini.com
original operating instructions mycusini
4
7
3
1
6
5
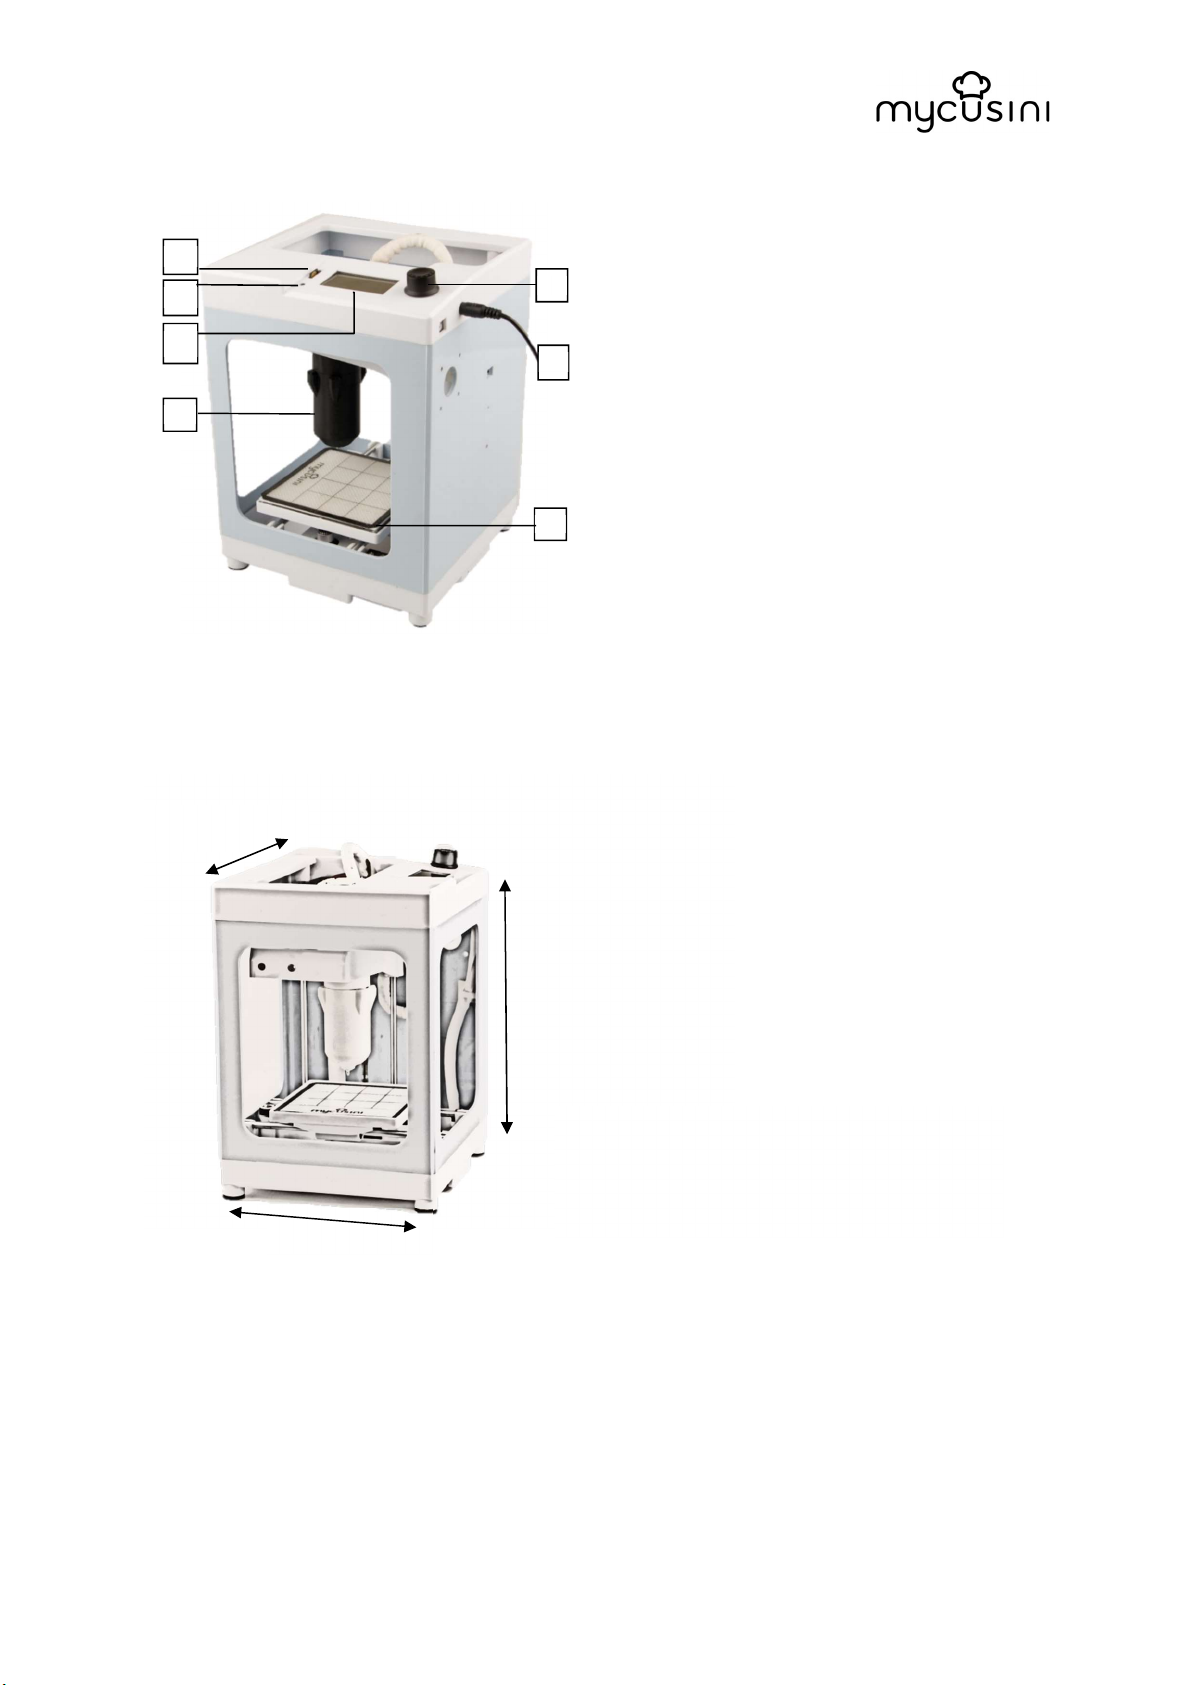
1.3 Main components
1. Power connection
2. Printing plate
3. Cartridge holder
4. Display
5. SD-Card slot
6. Rotary control knob
7. Reset knop
1.4 Schematic overview
Y-Axis
X-Axis
Z-Axis
Choco 3D Printer
Sketch with axis label
Maximum space: X 250 mm; Y 250 mm; Z 300 mm
For questions please contact us at service@mycusini.com
original operating instructions mycusini
2 Qualification of personnel
This machine requires proper training. It is ONLY recommended for use by
individuals with sufficient training and/or those that are monitored by a person who
has been properly trained on the safety and intended use of the machine.
This machine is not meant for use by children.
This machine is to be operated by a single person!
Troubleshooting, service, and maintenance are to be performed only by qualified
individuals who are familiar with the technology and dangers of the machine and
have been authorized by Print2Taste.
Work on electrical components is to be performed only by trained electricians.
The address for service is found in Chapter 9 of this user’s manual.
3 Safety Procedures / Precautions
The following information pertaining to safety- and possible hazards is important not
only for protection of the machine, but also to protect the user. Please read the
following points carefully:
3.1 General introduction and definition of the safety instructions
Important safety- and device-relevant instructions are visualised as symbols in this
handbook. The directions have to be followed at all times in order to prevent
accidents or damage to people or things.
WARNING! Danger from electrical current! This symbol indicates a situation
in which dangerous situations may exist due to electrical currents. If this
safety information is ignored, injury or a life-threatening situation may result.
WARNING! This symbol indicates dangers which may lead to injuries.
Uphold all of the given safety instructions exactly as indicated and pay
special attention in such cases.
WARNING! Hot surface! This symbol indicates that a hot surface is present
on the machine during operation. If this is ignored, the user may get burned
or a fire hazard may result!
WARNING! Danger from moving parts – keep fingers and other body parts
away. This symbol indicates the risk of injuries which may occur if the user
reaches into the machine during operation. Body parts may be smashed,
drawn in, or injured in other ways.
For questions please contact us at service@mycusini.com
original operating instructions mycusini
3.2 General safety instruction for the machine
This device is built according to the current technical rules and regulations. However,
dangers may arise if the device is used in an inappropriate manner or out of
accordance with regulations.
The information contained in the user’s manual designed to protect the user from
injury. It additionally serves to avoid mistakes, thus assuring that the device runs
safely and disturbance-free
In order to avoid dangers and to ensure optimal performance, neither alterations nor
reconstructions may be performed on the machine unless explicitly approved by the
manufacturer.
The device may only be used in technical and operationally safe conditions in
accordance with the instructions within this user’s manual.
In the case of damage due to a lack of observance of this operation manual, the
guarantee is voided. The manufacturer will not take over responsibility for
subsequent damages.
The manufacturer assumes no liability for damages to persons, objects or property
that occur due to inappropriate handling or a lack of adherence to the safety
instructions. In these cases, the guarantee is voided.
3.3 Special safety instruction for the machine
The information pertaining to work safety corresponds to the regulations of the
European Union at the time the device was manufactured.
3.3.1 General directions
Warning: Never leave the Mycusini unattended in use
Warning: High temperatures may develop in the printing head of the
Mycusini. For this reason, never grasp the printer while in operation. Change
the food cartridge only after the printer has cooled down sufficiently
Warning: The power supply plug must always be in vicinity of the printer and
easily be reachable.
Warning: In the case of emergency, immediately disconnect the power
source and power plug!
Warning: In order to prevent fire or electrocution, never set this device onto
damp or wet surfaces.
Warning: Mycusini includes moving parts that can cause injury. Never grip
inside the Mycusini during operation.
For questions please contact us at service@mycusini.com

original operating instructions mycusini
For use outside of the European Union, the occupational safety legislation and
regional stipulations have to be followed according to all local, state and federal
regulations.
In addition to the occupational safety notes in this manual, the valid safety- and
accident prevention regulations as well as the valid environmental protection
stipulations for the location at which the machine operates have to be observed and
maintained:
3.3.2 Setup, location of operation
Place the Mycusini on a stable, horizontal, large enough area only. Please note, that
the production plate moves from right to left when operating and thus requires
enough space. In addition, some movement also occurs vertically. When selecting
operating location, please ensure that the device may move in these directions.
Choose the operating location in a way, that children cannot reach the product.
When setting up the device, please ensure that the power adapter is easily
accessible in order to quickly and easily separate the device in the event of error.
Do not place the machine in areas of extreme temperatures, strong vibrations, high
humidity (i.e. rain or steam), dust, or heavy mechanical stresses.
Do not place any liquid-filled vessels (i.e. glasses, vases, etc.) on top of or in the
vicinity of the machine and never pour water over the machine. Fluids may enter the
machine casing and impair the electronic stability of the machine. Additionally, there
is a high risk of fire or life-threatening electrical shocks!
If such an event occurs, disconnect the power supply plug completely (i.e. turn off the
circuit breaker and earth leakage circuit breaker) and then pull the power cord from
the socket. Disconnect all wires from the device. The entire product may not be used
again. Please contact a specialized dealer or the manufacturer.
Do not place any sources of ignition such as stoves, fryers or burning candles next to
or on top of the device.
While setting up the machine, be sure that the power cord is not squeezed or
damaged by sharp corners.
Take note of the additional safety instructions to be found in the chapters of this
manual.
For questions please contact us at service@mycusini.com

original operating instructions mycusini
3.4 Use in accordance with regulations
Mycusini is an easy-to-use 3D-food-printer for use in a private kitchen.
Only the intended food-proof cartridges may be used. Moreover, the intended foodproof production plate has to be applied during the production process.
Please note, that only food from Print2Taste may be processed, such as mycusini 3D
Choco.
The machine may only be used under continuous monitoring of the operating
personnel.
The machine is only for indoor use.
The operation temperature for the system lies between 20 – 22°C. The maximum
allowable operating temperature for the printer head is 40 °C.
The operation environment should be dry and dust-free.
The reliability of device operation is only guranteed under operation in accordance
with the regulations listed in this operator’s manual.
All technical work, including assembly and servicing, may only be performed by
qualified individuals and those being authorized by Print2Taste.
The mycusini is only intended for edibles from the designated cartridges. The
mycusini is designed for food printing with the appropriate templates and objects from
the mycusini Club.
Any use deviant from the intended purpose and/or other type of use of the
equipment is forbidden and is considered to be out-of-accordance with regulations
and will negate the product warranty.
Claims against the manufacturer and/or its agent due to damages resulting from use
other than the intended are barred.
The user is held solely accountable for any damages occurring during use of the
device deviating from the intended use.
Please retain all original packaging as well as all shipping and handling material. This
is the only way to assure a successful and safe transport of the mycusini, for instance
in the case of a return under warranty!
Print2Taste takes no liability for devices that are not returned in their original
packaging or have been packaged improperly!
For questions please contact us at service@mycusini.com
original operating instructions mycusini
3.5 Liability and guarantee
3.5.1 Liability
All entries and information supplied in this user’s manual have been compiled in
accordance with the effective regulations, the current technical development status
as well as our personal long-time knowledge and experience.
The translation of the user’s manual has also been conducted to the best of our
knowledge. However, we cannot accept liability for translations errors. The
authoritative version of this user‘s manual is the accompanying German version.
The actual scope of delivery may deviate from the explanations and graphic
presentations given here due to special designs, the utilization of additional order
options or because of the most recent technical changes. Please contact the
manufacturer if you have any questions.
This user’s manual has to be read carefully and completely before starting
any work on or with the device, and especially before start of operation! The
manufacturer assumes no liability for damages and disturbances resulting
from a lack of observation of this manual.
The user’s manual has to be stored in the vicinity of the device and within reach of all
people working on or with the device. The manufacturer reserves the exclusive right
to make technical changes to the product in order to improve the operating
characteristics and develop the device.
For questions please contact us at service@mycusini.com

original operating instructions mycusini
Level indicator
Current temperature
Info
4 Description of the Functions and Operation of the Machine
4.1 Mycusini and accessories
Mycusini Checklist
1.
1. Mycusini 3D Printer
2. Power Supply
3. SD card with USB adapter
4. Flexible mat
5. Cartridge
6. Tweezer
4.
4.2 Overview Main Screen
5.
2.
6. 3.
For questions please contact us at service@mycusini.com

original operating instructions mycusini
4.3 The main menu
Press the control knob to get to the main menu. In the main menu you will find
various options. For more information, take a look at the mycusini Club, where you
will find video tutorials for the menus.
Back
Produce Object
► Clean >> .
Turn off >>
Maintenance >>
Produce Object: Select "Produce Object" to produce a 3D object.
Clean: Select "Clean" to clean the stamp of your mycusini. A detailed explanation of
this menu can be found under point 5.3.1 Quick cleaning of the stamp.
Turn off: Select "Turn off" to turn off your mycusini.
Maintenance: Select “Maintenance” to use expert options. A detailed explanation of
this menu can be found under point 4.4 The Maintenance menu.
4.4 Installation
4.4.1 Installation of the mycusini
1. Put the mycusini on a stable underground
2. If the SD card isn´t already inserted, please insert SD card (see
picture on the right)
3. Plug in power supply
4. Place the flexible mat
4.4.2 Preparation of the flexible silicone production mat
Remove the protective film before first use, clean with warm soapy water and dry
thoroughly prior to first use. Place the flexible production mat onto the production plate,
until you obtain a flat surface.
Do not cut on the flexible production mat. Do not use any sharp objects which
can perforate or cut up the production mat. Never use a flexible production
mat which has tears or cuts.
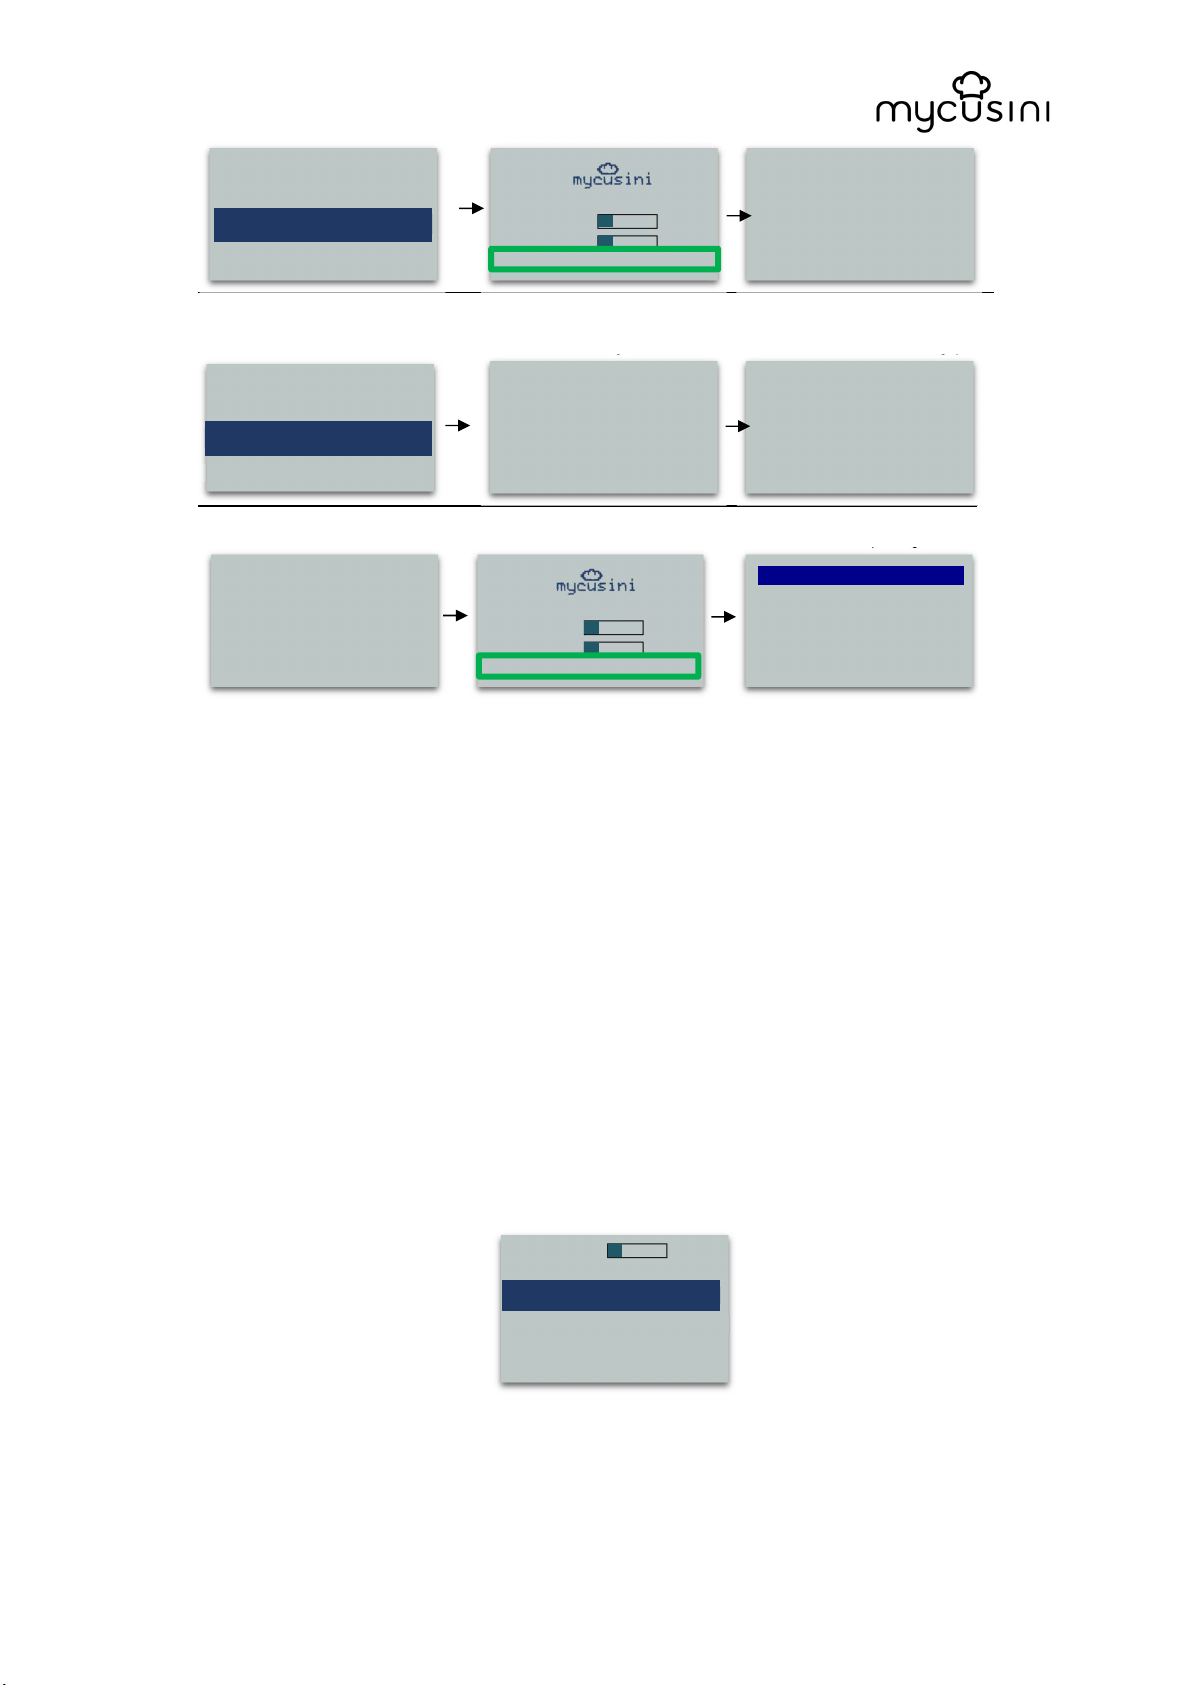
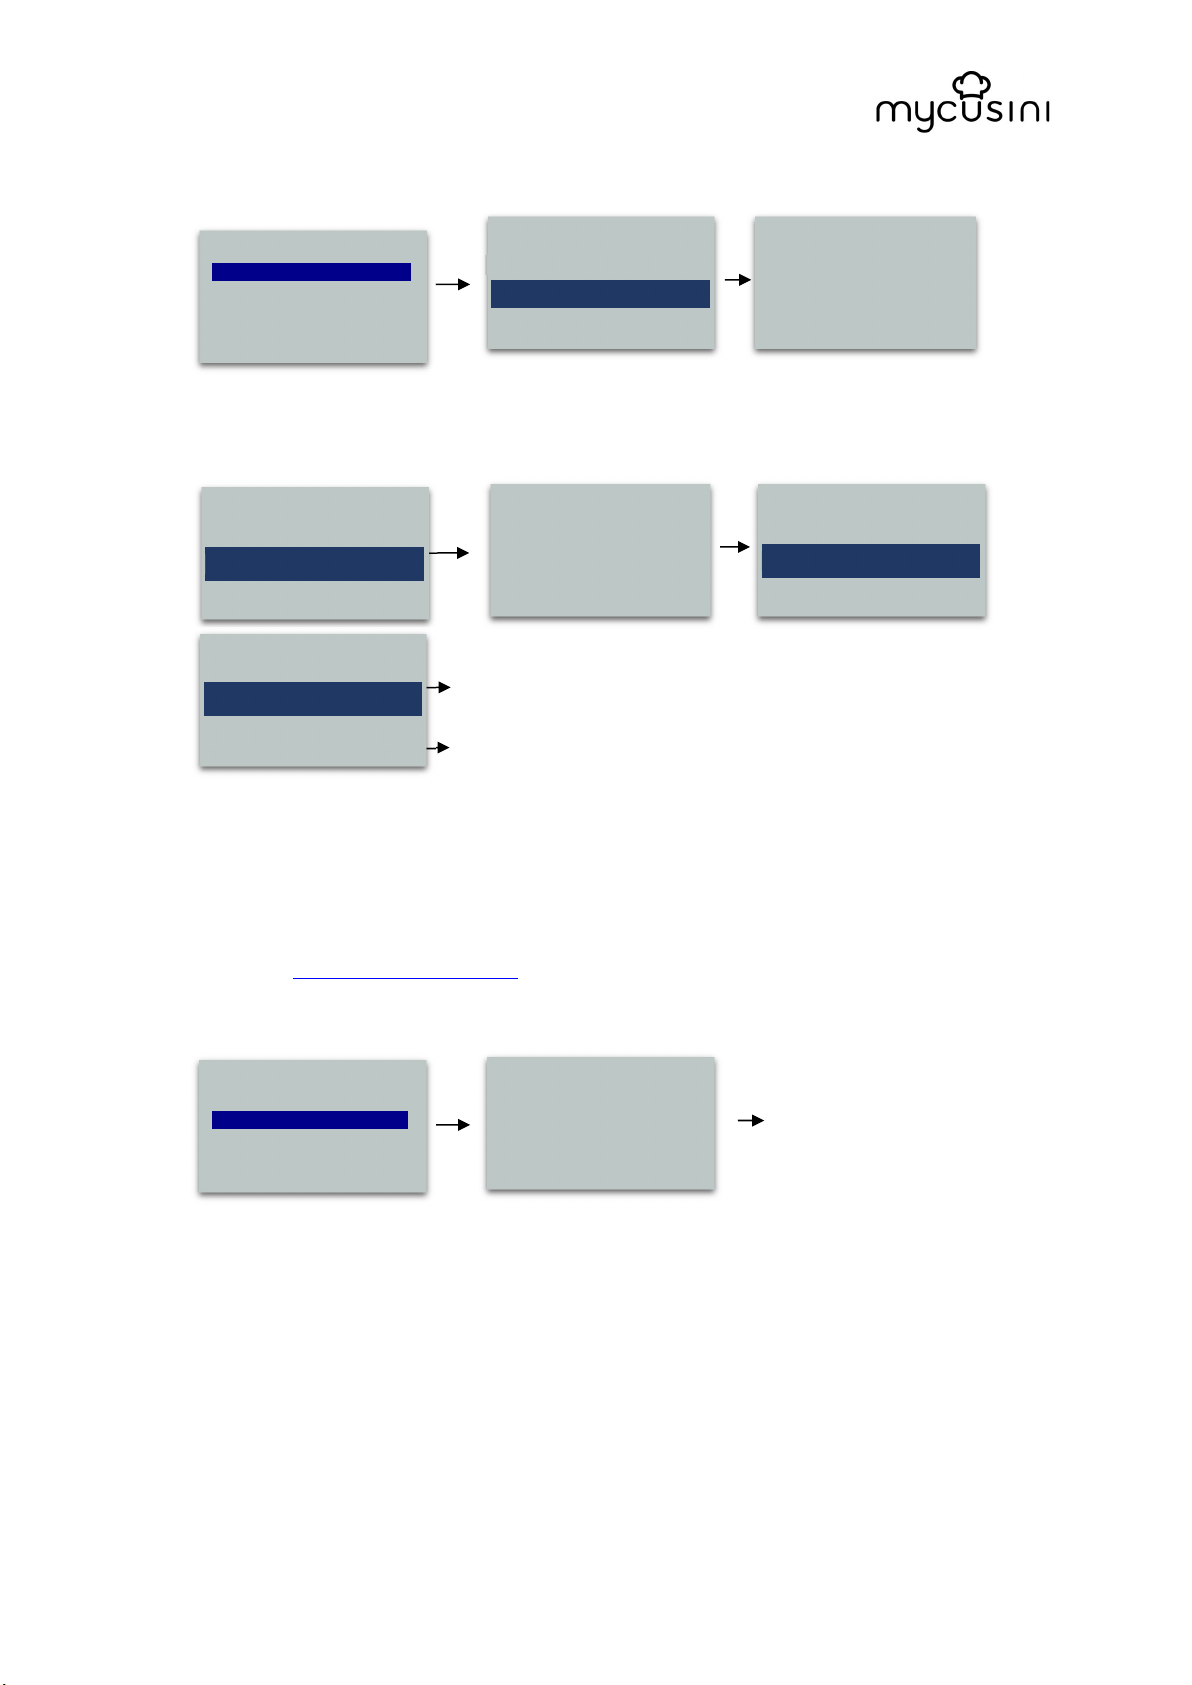
4.5 Preparation of the production
1. The display screen shows the main menu after starting 2. Press the control knob.
Theprinter is automatically moving to check all axis
3. Press the control knob again to access the main menu
For questions please contact us at service@mycusini.com

original operating instructions mycusini
“Produce
Object” to start
Choose “Yes” to insert the
The display shows
Take one Choco r
efill and
Put one
half
of this
refill in
to the
Open the cartridge holder by
Place the
cartridge with mycusini
If the refill or the clip comes out
Close the
cartridge
holder by
Preheating starts
a
utomatically
When preheating is finished you
Choose
your object by rotating
Change cartridge now?
►
>>
►
Important: Rotate the knob to select desired menu point. Press the knob to enter the
next menu!
printing
Back
► Produce Object .
Clean >>
Load Choco >>
Turn off >>
cartridge
No
Yes
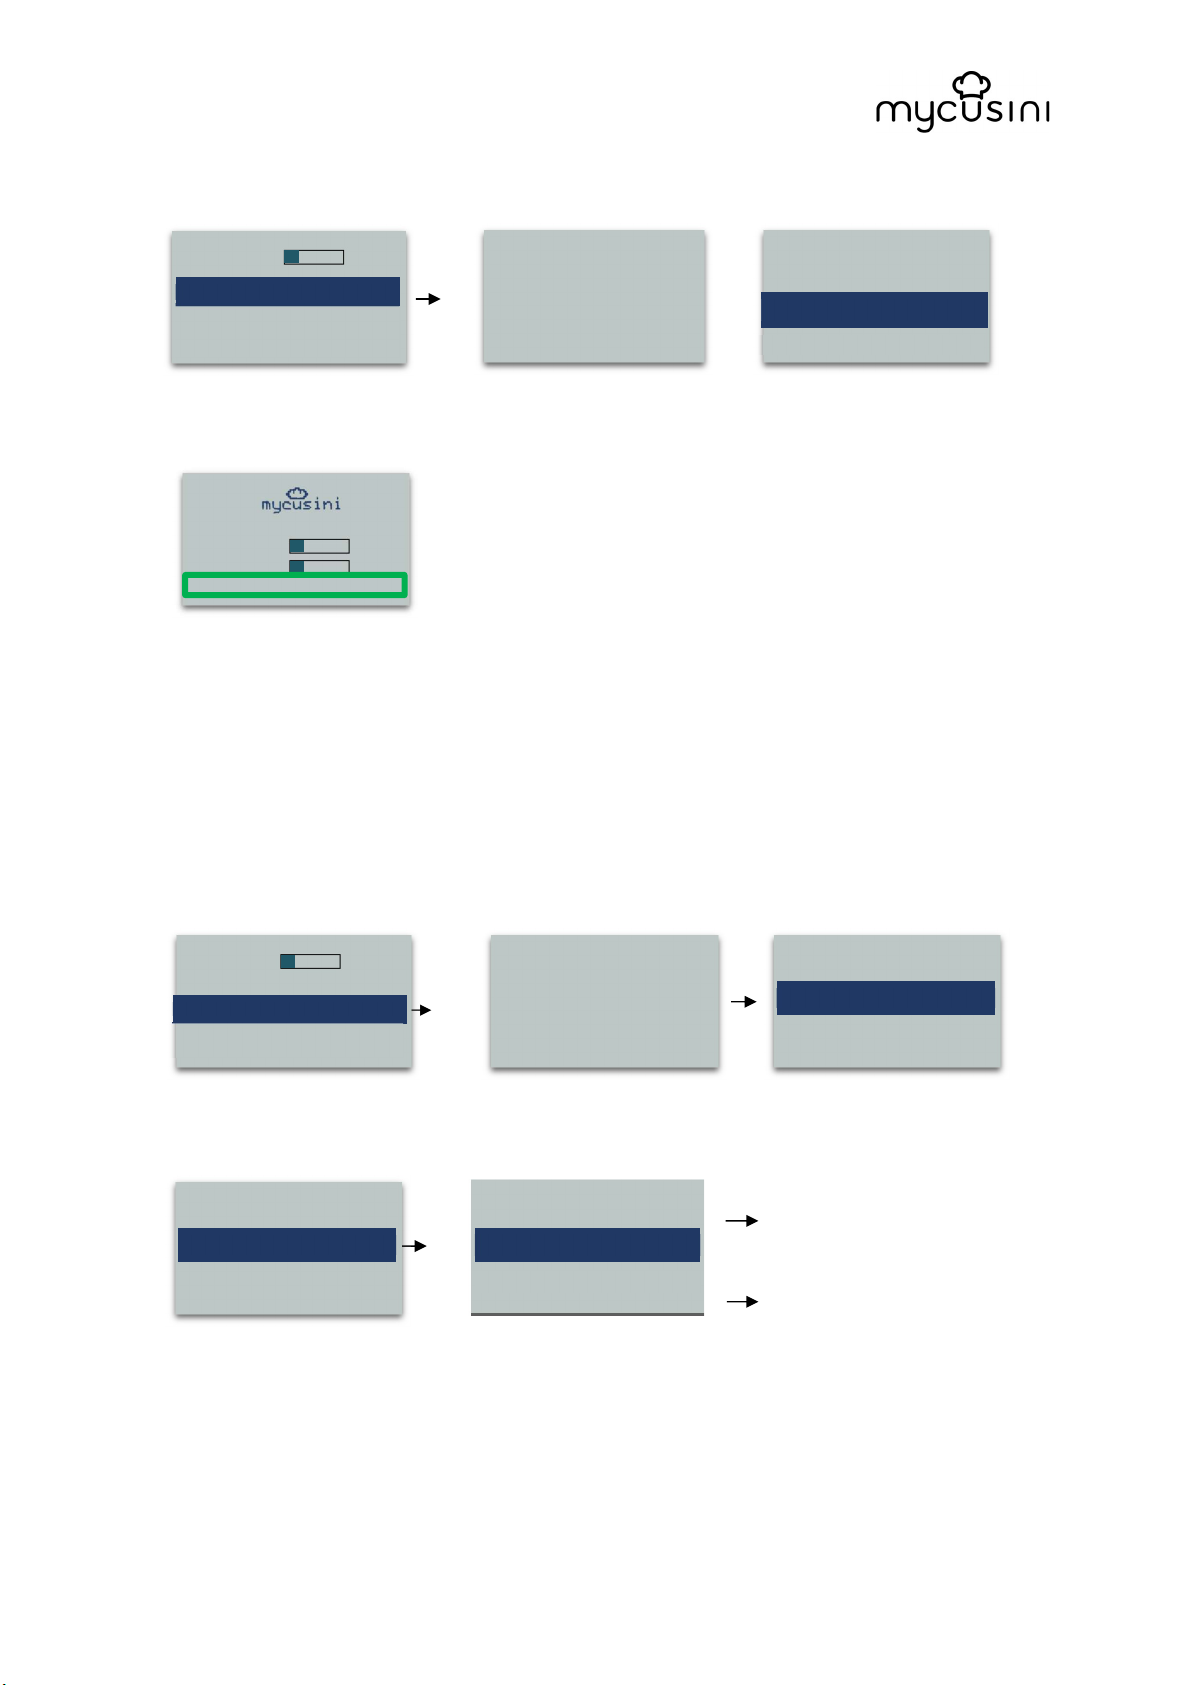
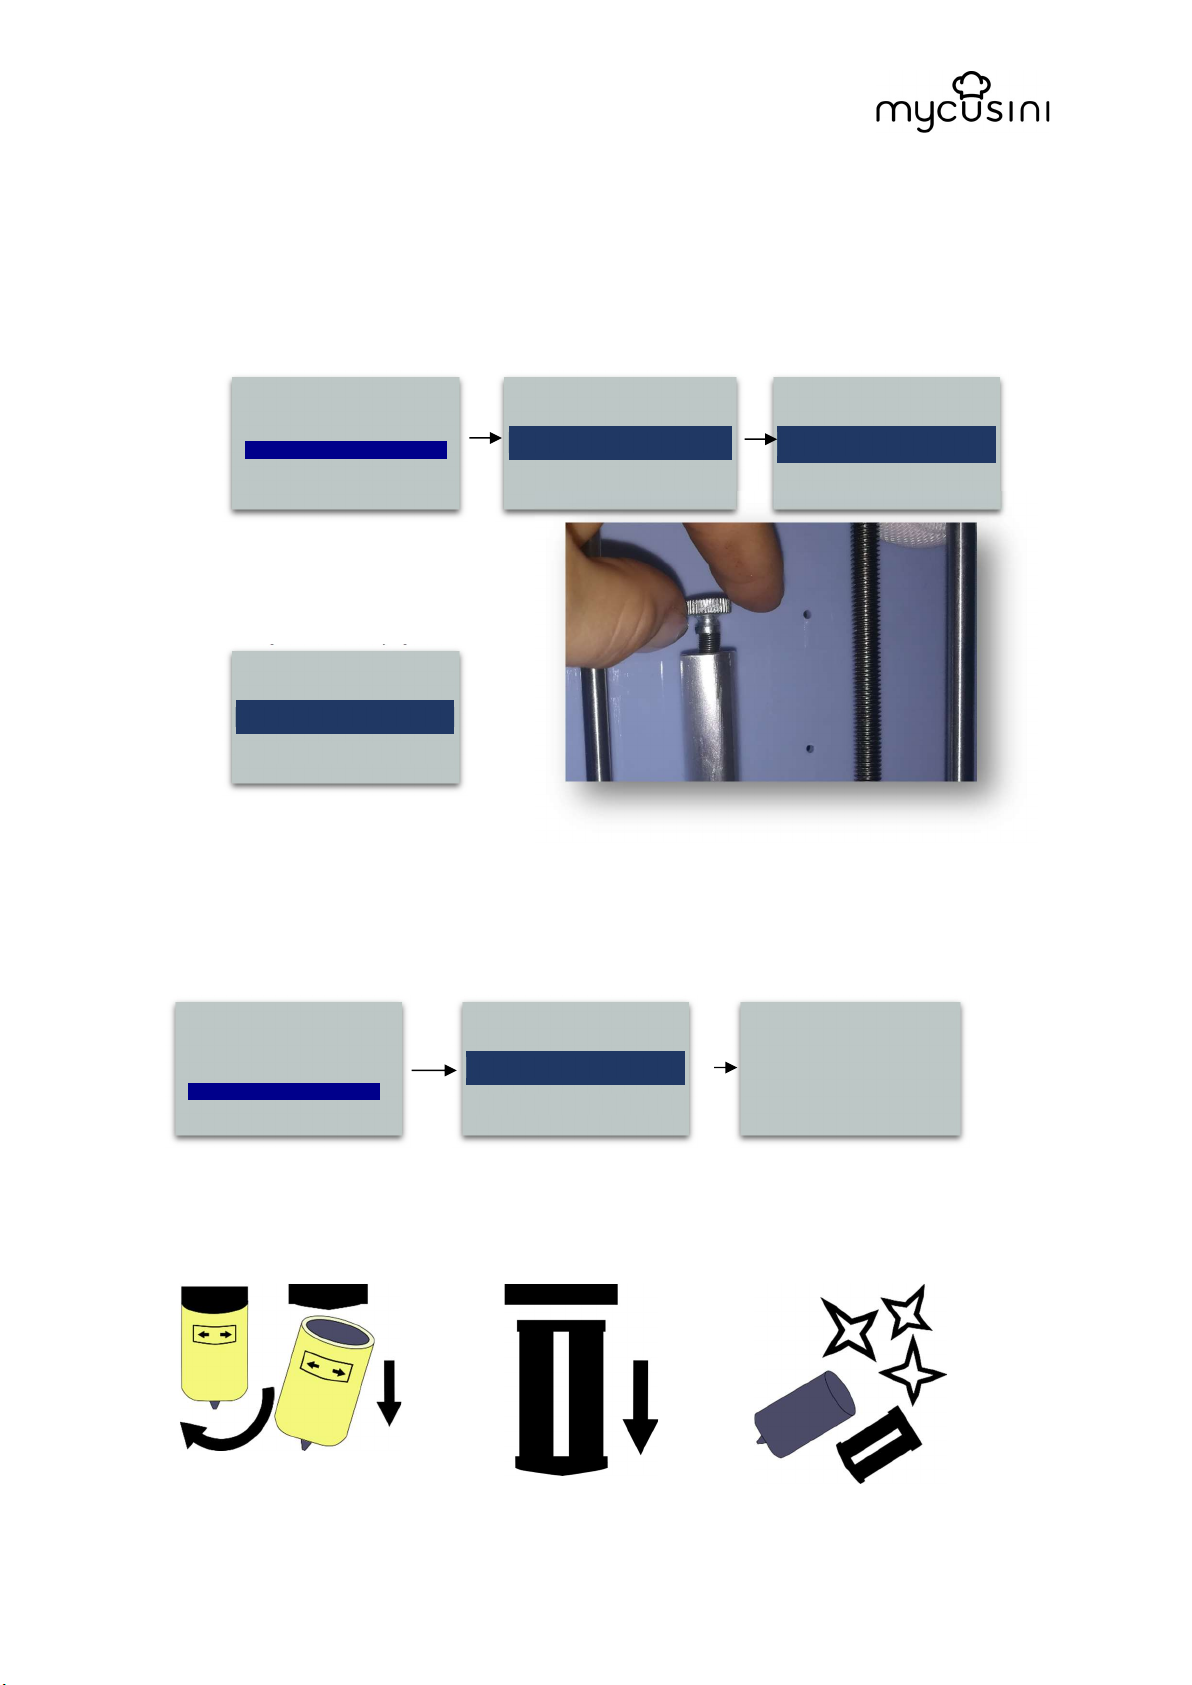
4.6 Loading 3D Choco and start printing production
Unpack your mycusini Choco refills
cut it exactly in the middle.
cartridge (open side downwards).
The refill should not be longer than
the cartridge.
“Insert cartridge now!
Follow the loading instruction
and click “Done” after you
finished all steps of loading
3D Choco.
rotation (see picture below).
OPEN CLOSE
3D Choco in the cartridge
holder.
the cartridge, the refill is too long.
Please shorten it at the open
edge.
may choose your object from the
SD card.
rotation (see picture below).
the rotary control knob and
confirm by pressing it.
For questions please contact us at service@mycusini.com
original operating instructions mycusini
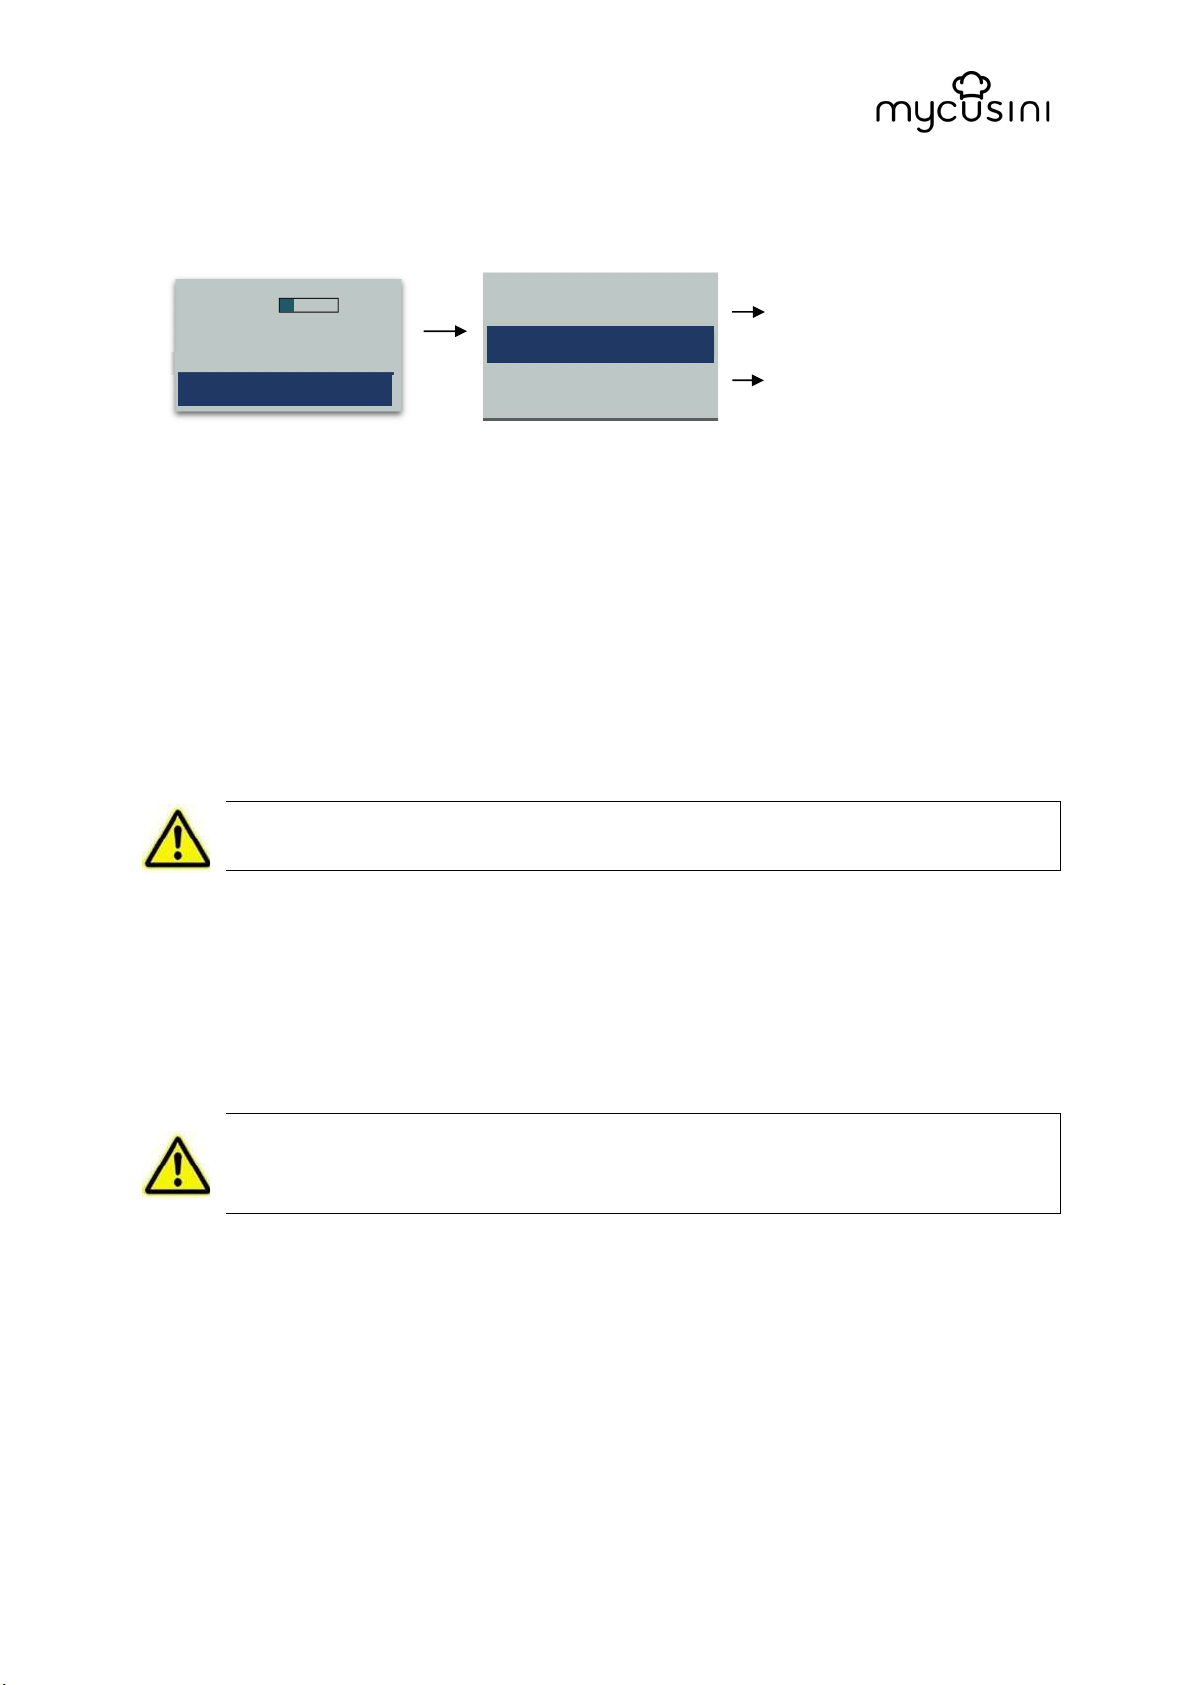
►
Turn right to extrude
(Turn about
3-5
Print status
P
reheating ...
5 m 59
s
Please wait while the
click when Done
click when Done
Print: Simon 6,3 %
.
►
Print another object
>>
>>
Insert cartridge now!
Done
►
Click “Start printing now” to print
Current object:
Simon.gco
Start printing now
►
Choose other object >
Click to continue
Turn right to Extrude
until Choco comes out
continously
Refill R█EFI d 11 %
Temperature R█EF I
Printer is moving all axes
>
mycusini is moving
Refill R█EFI d 11 %
Temperature R█EF I
Chooose object
Hello.gco
Simon.gco
Vase.gco
times clockwise after the first time
3D Choco has left the cartridge).
Turn right to Extrude
until Choco comes out
continously
Menu while printing
► Back
Abort print
Abort print & extrude
4.7 Remove 3D objects from the flexible mat
1. Wait till the object has cooled down and turned solid.
2. Remove the flexible mat.
3. Slightly bend the mat to remove your printed mycusini Choco object.
4. Clean the surface of the flexible mat (washable) in order to use for the next time.
5. Start printing another object or end with cleaning.
4.8 The “Next action” menu
After each successful print, the menu "Next action" appears. In this menu you have
the following options. At the top of the display, you can check the current fill level of
your refill to prevent starting a large object when the level is too low.
Refill R█EFI d 11 %
Next action
Remove cartridge >>
Clean now
Turn off
4.8.1 „Print another object“
With this option you can produce another object from your SD card. In addition, you
can control the level of your 3D Choco to have enough material for your next 3D
object.
For questions please contact us at service@mycusini.com
original operating instructions mycusini
Select "Print new object" to
Select the object of your choice
You can see the print status
Please wait while the
Insert Cartrige now!
Choose object
► Print new object
Turn off
Print: Simon 6,3 %
Select: "Yes" to turn off
mycusini
Select: "No" to return to the
main menu
Next action:
Turn off
Turn off
mycusini?
Press "Start printing now" to
continue printing
and confirm by pressing the
print
control knob
Refill R█EFI d 11 %
Remove cartridge
Clean now
Hello.gco
Simon.gco
Vase.gco
Current object:
Simon.gco
Start printing now
►
Choose other object >
►
>
in the main display
Refill R█EFI d 11 %
Temperature R█EF I
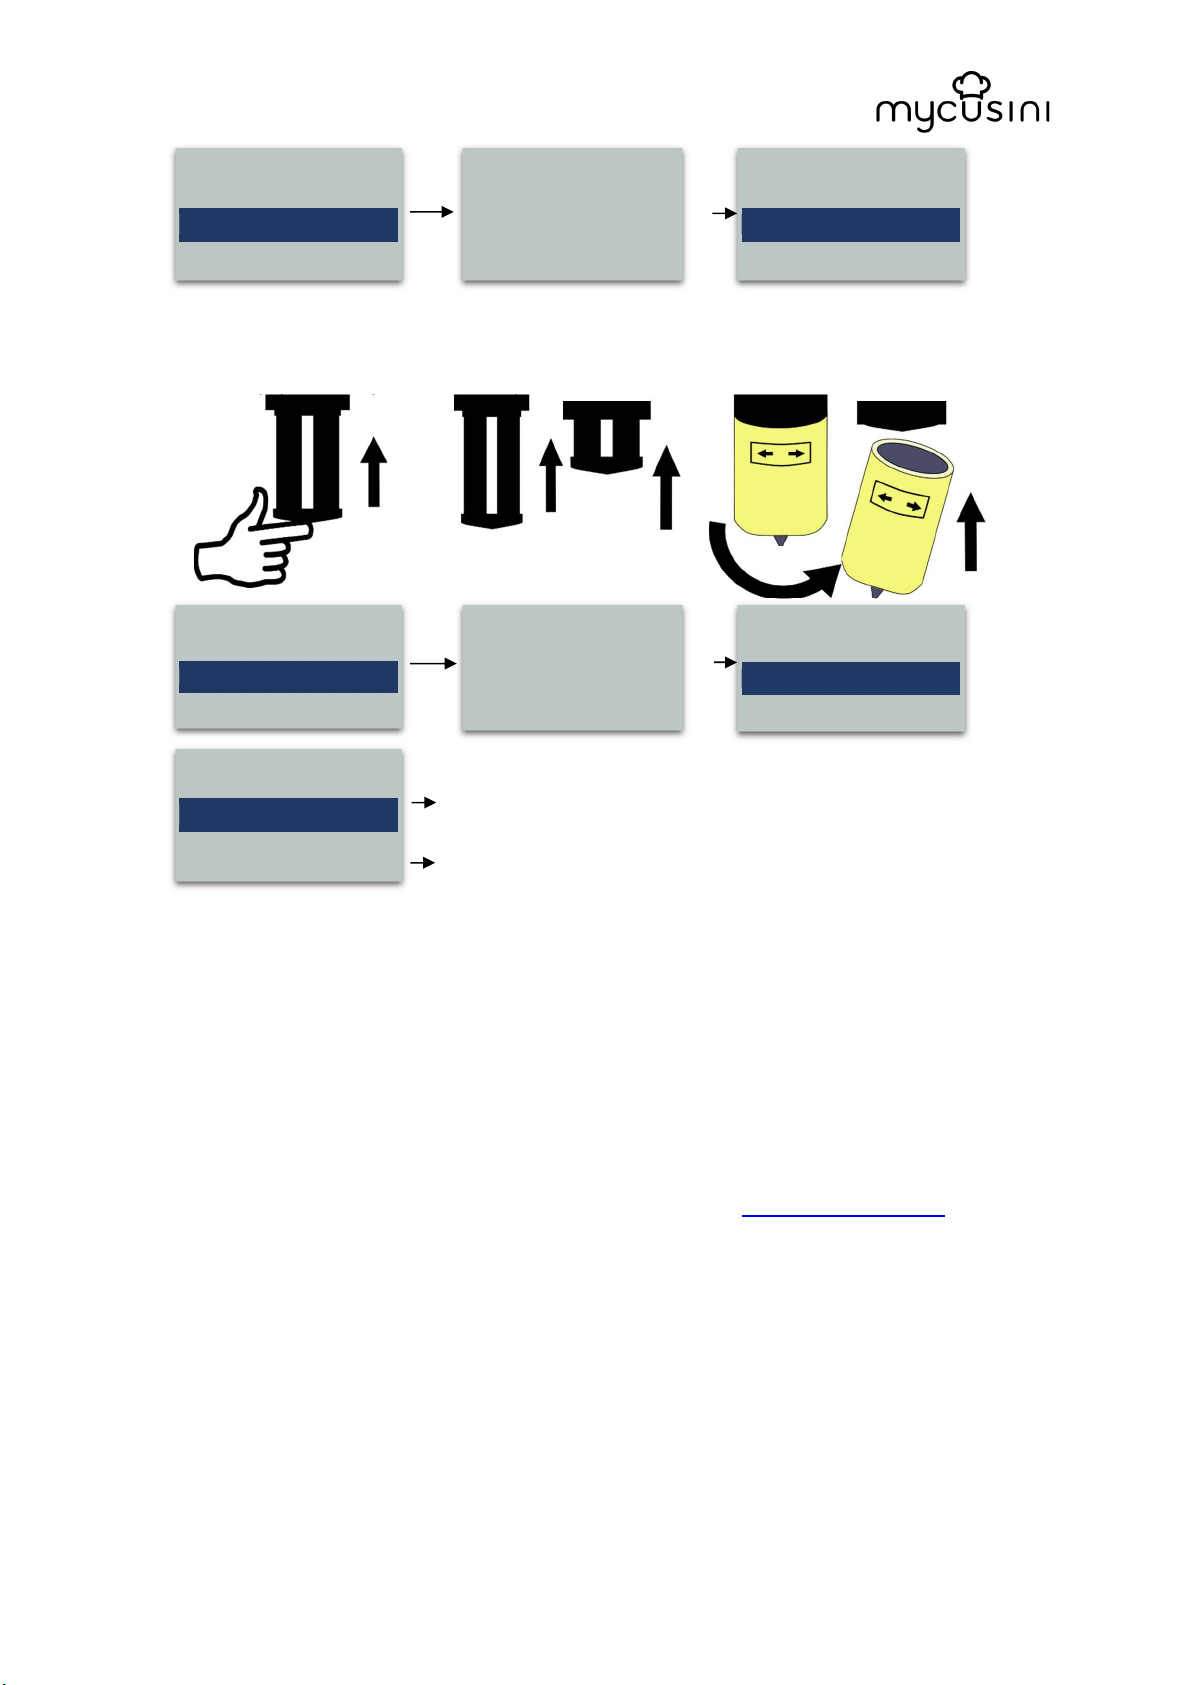
4.8.2 Remove cartridge
Select "Remove cartridge" if you like to remove the cartridge or if you like to use a
new refill.
If you want to use a new
Select "remove cartridge" to
remove the refill or foil of the
refill in the cartridge
Refill R█EFI d 11 %
Clean now
The stamp moves automatically
upwards, please wait while the
mycusini is in motion
mycusini is moving
refill, put this in or place
the empty stainless steel
cartridge
Done
►
>>
Confirm "Closed" as soon as
you have closed the cartridge
holder Choose your next step
Close cartridgeholder
Closed
►
>>
Yes
►
No, back to menu
►
4.8.3 Clean now
Select "Clean now" if you want to clean the mycusini. Detailed instructions can be found on
the next page under point 5. Cleaning.
For questions please contact us at service@mycusini.com
original operating instructions mycusini
Select "Turn off" to switch your
Turn off ?
Select: "No" to return to the
main menu
Select: "Yes" to turn off
mycusini
4.8.4 Turn off
If you want to switch off your mycusini, please select "Turn off"
mycusini off
Refill R█EFI d 11 %
Next action:
Print new object
Clean now
Turn off
►
Yes
►
No, back to menu
►
5 Clean
5.1 Cleaning of the stainless steel cartridge
Please use the enclosed cleaning tweezers.
Please remove the remainder of the refill with the cleaning tweezers before cleaning
or refilling the cartridge at the end of a production.
You can clean the empty cartridge in the dishwasher or by hand with warm water and
mild soap.
Warning! The stainless steel cartridge heats up during production. Allow it to
cool sufficiently before removing it for cleaning.
5.2 Cleaning of the printing plate
The production plate is fixed magnetically to the production table. Thus, you have the
opportunity to remove them for cleaning. To preserve the life of your production plate,
we recommend cleaning it by hand.
Important! Use only moderately warm water, so that your production plate
does not deform. Do not use scouring pads or scouring agents that scratch
the production board.
5.3 Cleaning of the flexible printing mat
The flexible printing mat is dishwasher safe in the upper drawer of the dishwasher.
However, due to the caustic effect of dishwashing detergents, washing by hand is
reccommended to increase the lifespan of the flexible printing mat.
Wipe with a damp, soft sponge, then rinse thoroughly. A mild detergent or soap may
be used. Do not use scouring pads. Shake off excess water and air dry the flexible
printing mat. Store flat, the flexible printing mat should not be kinked or folded.
For questions please contact us at service@mycusini.com
original operating instructions mycusini
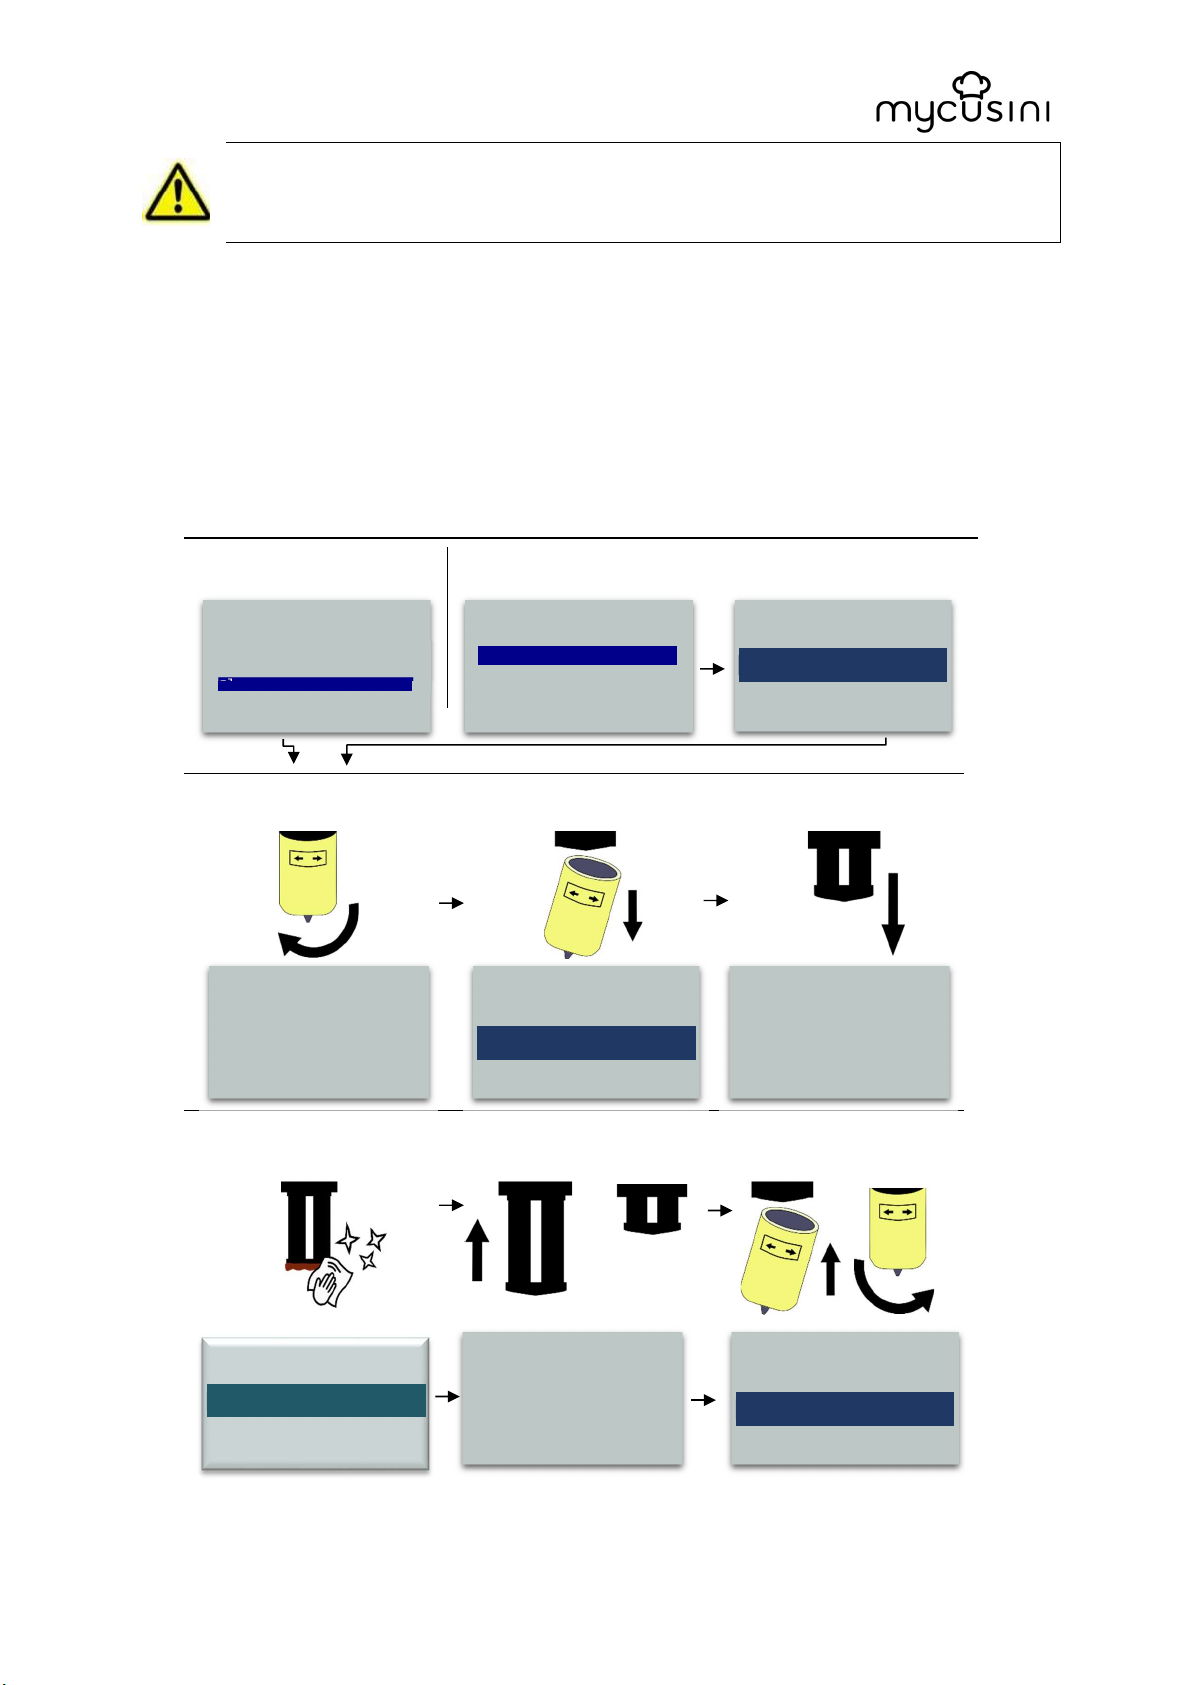
1. Start cleaning
after a print
2. Start cleaning in the main menu
Mainpath
of cleaning
Click done when the
cartridge
The stamp automatically moves
Clean the stamp with a paper
The stamp automatically moves up.
Close the cartridge
holder
Next action
>>
>>
Please wait while the
Stamp is moving up
holder
Clean the stamp now
► Cleaning done
Do not cut on the flexible printing mat. Do not use sharp objects that can
pierce or cut through the flexible production mat. Never use a flexible
production mat that has tears or cuts.
5.4 Cleaning of the stamp
5.4.1 Fast cleaning of the stamp
The cleaning program makes it possible to clean the stamp. If you want to do a full cleaning, take a look
at Tips & Tricks. In the video tutorials you will find detailed instructions.
Back
Print another object
Remove cartridge
Clean now
Turn off
Produce Object
► Clean >> .
Turn off >>
Maintenance >>
Open the cartridge holder
mycusini is moving
towel and press “Cleaning done”
if you finished cleaning
holder has been removed
Open and remove
cartridge holder now
Removed
►
Wait till it stops moving.
Start cleaning now?
Yes, clean now
►
No
►
down
Stamp is moving down
and continue with “Closed”
For questions please contact us at service@mycusini.com
Close cartridge
Closed
►

original operating instructions mycusini
P
ress the control knob
► Abort object
Print: Simon 6,3 %
5.4.2 Extended cleaning of the stamp
The advanced cleaning function enables to completely remove the stamp for
thorough cleaning under running water or in the dishwasher. The explanation of the
menu may be found in chapter 6. Further options of the menu, in chapter 6.1.2
"Extended Cleaning"
6 Further options
6.1 The menu during printing
You may access this menu by pressing the control knob while printing. A menu will
appear with the following options.
Note: both options will result in a loss of the current print data and your object will be
lost. The file on your storage is retained.
Back
Refill R█EFI d 11 %
Temperature R█EF I
►
Abort and extrude
►
6.1.1 Abort object
The "Abort object" option is to cancel the current printing. Select this menu item to
return to the object selection.
6.1.2 Abort and dose 3D choco
After cancelling your object, you can select a new object in this menu and in addition,
you can manually dose 3D Choco through the nozzle before starting the next print.
This option may be helpful, if no material leaves the nozzle after starting a print.
6.1 The „Maintenance“ menu
Select "Maintenance" in the main menu to access the extended service menu. There
you will find the following options.
Back
Insert Stamp >>
Info >>.
Calibrate >>
Extended Cleaning >>
6.1.1 Insert Stamp
This menu allows you to move the stamp upwards should it not have gone all the way up in
one of your previous steps or has been completely removed.
For questions please contact us at service@mycusini.com
original operating instructions mycusini
If
you have issues with reinstalling the
Wait while the mycusini is moving into
When the stamp is in the correct
Wait until the stamp has fully
Close the cartridge holder
For more information about the
Even
More information can be found
Press the control knob to return to
Insert Stamp now?
Please wait while the
Close cartrige holder
Select "Yes" to switch off the
Select "No" to return to the main
Current Version:
Turn off mycusini?
stamp you can move up the stamp
automatically.
Back
Insert Stamp >>
Info >>.
Calibrate >>
Extended Cleaning >>
position, click "stamp in position".
It will automatically move up
Put stamp into position
and hold it
Stamp in position
►
Yes
►
No, back to menu
►
Click "Yes" to insert the stamp
No
mycusini is moving
position
risen up
Stamp is moving up
► Closed
mycusini
menu
6.1.2 Info
This menu indicates your current software version. If a software update is available, you will
be informed in the mycusini Club in the message window. Also keep this information ready
in case of service issues. For more information contact our service team at the following email address: service@mycusini.com.
mycusini click on "Info"
Back
Insert Stamp >>
Info >>.
Calibrate >>
Extended Cleaning >>
on the website mycusini.club
Version 0.9.2
For help visit:
mycusini.club
the main screen.
6.1.1 Calibrate
Your mycusini is adjusted for printing with mycusini 3D Choco. If you notice, that the tip of
your cartridge is too low or too high during the first layer of printing, you may calibrate it using
the "Calibrate" menu. With this service menu you may reset or adjust the tip to the printing
area.
Please use this menu only in combination with the video tutorial "Calibrate", which you will
find in the mycusini Club in your personal account under Tips & Tricks. You may also contact
the mycusini service team at service@mycusini.com for assistance.
For questions please contact us at service@mycusini.com
original operating instructions mycusini
Choose
„Calibrate“
Click "Yes" when you
In the interior of the mycusini is
For
intensive
cleaning, select the
Confirm "Yes, clean now" to continue
Please wait a moment until the
Open the cartridge holder and
The stamp is now automatically
Clean the stamp and confirm by
Calibrate now ?
Turn the screw in the
Turn the screw again
Please wait while the
want to start the calibration
located, at the rear left, a set
screw. By turning this screw the
distance of the cartridge tip to the
production plate can be adjusted.
Turning clockwise decreases the
distance and counterclockwise
rotation increases the distance
between the cartridge tip and the
production mat.
Back
Insert stamp
Info
► Calibrate .
Extended cleaning
If the tip is in the position you want,
click "Done back to Menu" to get to
the main menu. When the tip is not at
the right height. Arrange the screw
again and click "Try again"
Yes
►
No
►
back
Click to calibrate
►
or go back
Try again
►
Done, Back to Menu
►
6.1.2 Extended Cleaning
The Extended Cleaning menu is intended for intensive cleaning of the stamp.
menu item "Extended Cleaning"
and confirm by pressing the
control knob
cleaning
mycusini automatically moves to the
cleaning position
Back
Insert stamp
Info
Calibrate
► Extended cleaning.
remove it for cleaning the
mycusini.
Confirm by pressing "Removed"
when you removed the cartridge
holder
Start cleaning now?
Yes, clean now
►
No
►
moved down.
Attention: The stamp is completely
detached from the device for
separate cleaning
mycusini is moving
pressing the control knob
For questions please contact us at service@mycusini.com
original operating instructions mycusini
Put the stamp in position to
move it
►
stamp in
position
stamp is moving up
►
Turn off ?
Select "No" to go back to
the main menu
Turn and remove
Cartridgeholder now
Removed
►
back upwards, push it up with your
finger and press the button with your
other hand at the same time to move
the stamp up automatically
Put the stamp into
position and hold it
stamp is moving out
for cleaning
The stamp is now automatically
raised, please wait until the mycusini
has completed all movements.
Clean the stamp now
Cleaning done
►
Close the cartridge holder and confirm
the selection "Closed" by pressing the
control knob.
Close Cartridgeholder
Closed
Yes
►
No, back to menu
►
Select "Yes" to turn off mycusini
7 Create own Objects
7.1 mycusini-Club
Creating an object with the mycusini Club requires an internet connection.
• Open your browser, preferably Chrome, and type www.mycusini.club in the
search bar.
• Now you can enter your login information and access the mycusini Club.
• If you haven’t logged in yes, please register under "register here"
For questions please contact us at service@mycusini.com

original operating instructions mycusini
Product
3D Food Printer
Serial-no.
3D1912030050
Made in Germany
Important! Always use the Google Chrome browser to log in to the mycusini
club, otherwise errors may occur.
• For the Registration you need your E-Mail Adress and the Serial number of
your mycusini
• You can find the serial number at the back of your mycusini
Product ID mycusini
Weight 3,5 kg
Operation Voltage 12 V DC
Power 60 W
Manufacturer Print2Taste GmbH
Liebigstrasse 11
Year of manufacturar 2019
85354 Freising
Germany
• After logging in you enter the start page of the club.
• Here you can select existing objects from the template library or create your
own templates in the section "Applications".
For questions please contact us at service@mycusini.com
original operating instructions mycusini
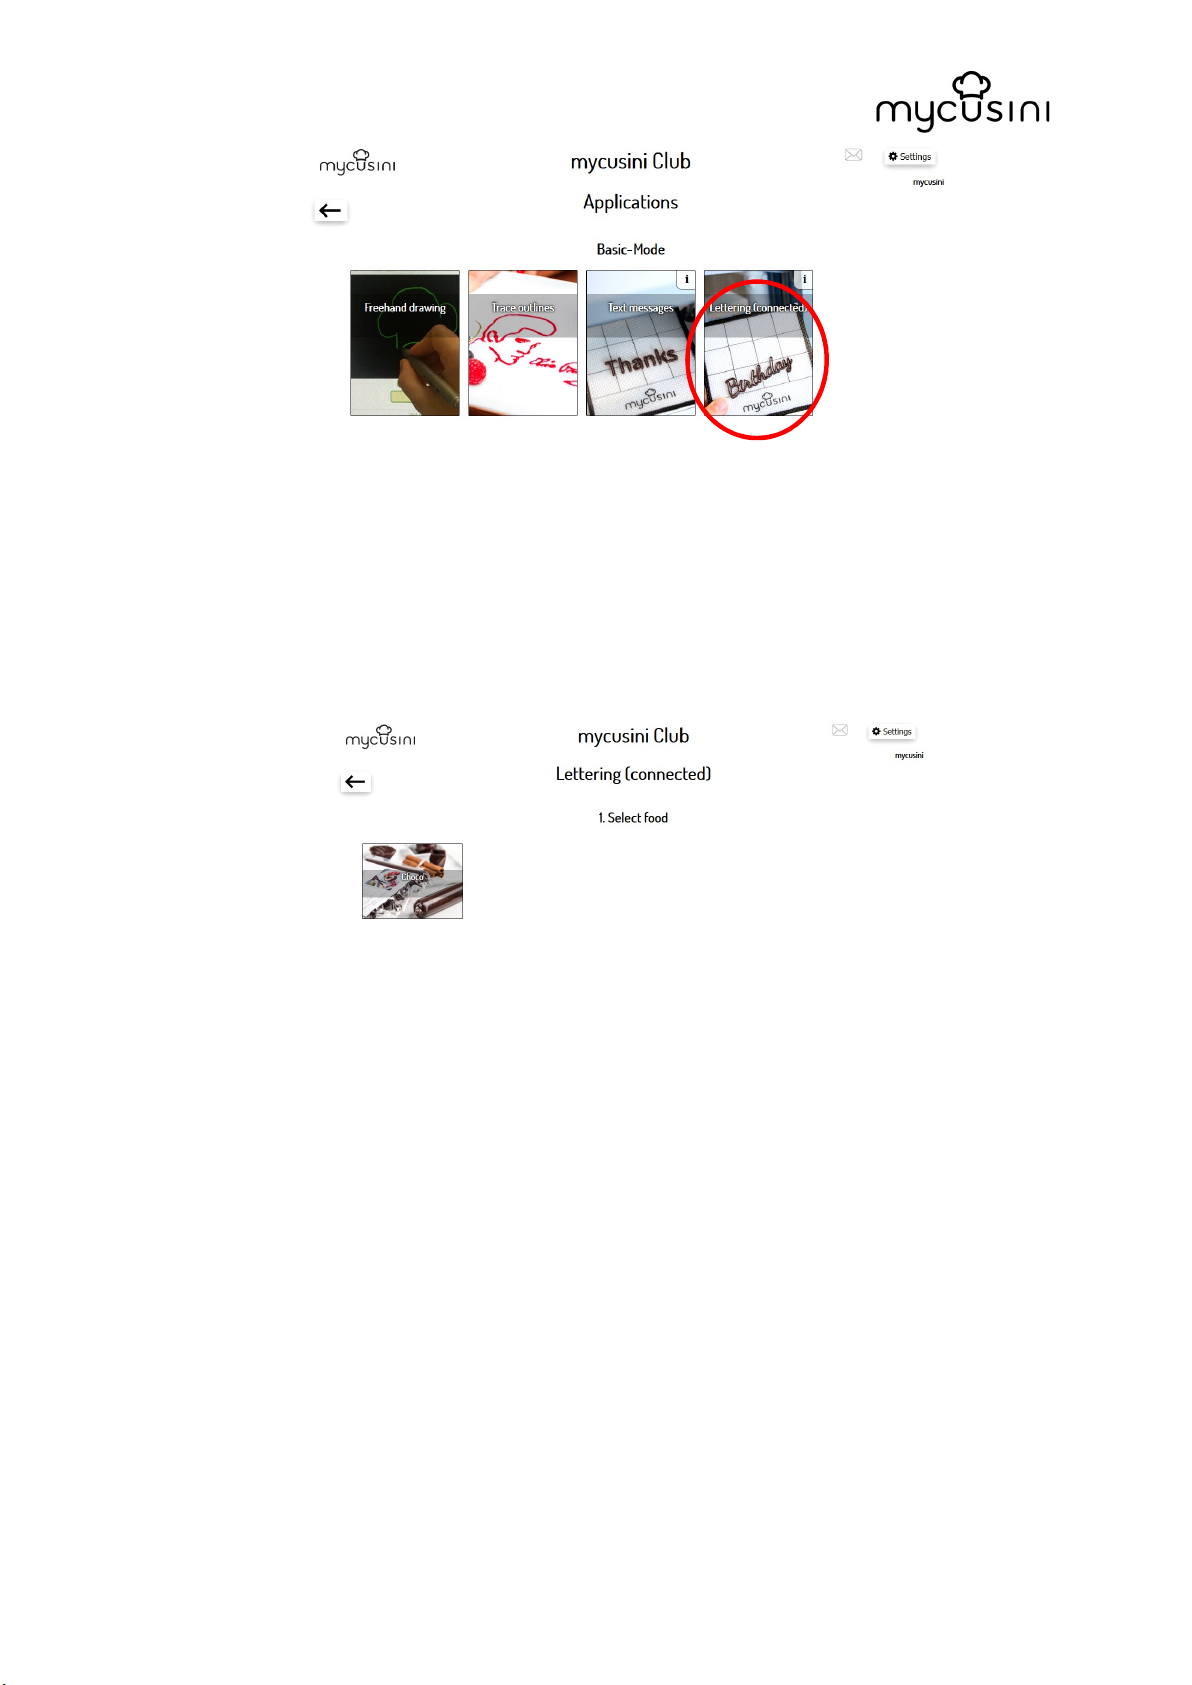
• In the section Applications you will have different options to create your own
objects.
• The basic principle of creating your own template is similar for the various
applications.
• As an example, the procedure with the application "Text messages" is
illustrated here.
• Select the desired food.
• Write down your personal message
• Now click "insert this Text" and your message will appear in the preview
• If you want to generate multiple texts press "insert this text" and write your
second text. Press "insert this text" again to add the second text.
• You may change the position of the text with the arrow keys on the screen
For questions please contact us at service@mycusini.com

original operating instructions mycusini
• After creating your text message, you may customize it. You may adjust
• the size,
• the font,
• the height through the number of layers
• and the position within the printing field
• when you click "Reflect", you may reflect your message
• If you are happy with your object, confirm with "Next".
• Now create a name (no special characters).
For questions please contact us at service@mycusini.com

original operating instructions mycusini
• Click "Continue". You will get back to the homepage of the mycusini club.
• If you like to download your 3D object onto your micro-SD-card, you can press
the arrow beneath Download
• In this case, the file will be automatically downloaded in the “Download” folder and
you may save your 3D object manually onto your micro-SD-Card.
• Please remove the micro-SD-card safely to ensure a perfect data processing
7.2 Produce your own Object from the mycusini Club
• Put the micro-SD-card in the predetermined slot of your mycusini
• Now turn on the power of the power adapter
• Choose "Produce object" in the main menu and follow the steps listed in point 4
of this operating manual. Alternative you can use the quick guide
7.3 More Applications of the mycusini Club
7.3.1 Freehand drawing
Under Applications you will find the function "Freehand Drawing".
After clicking on the button, a drawing field will appear.
For questions please contact us at service@mycusini.com

original operating instructions mycusini
• You may now create your own shapes with the mouse or by hand
(touchscreen required).
• Confirm with "Next".
• Your file will now be ready for download.
7.4 Trace outlines
In the Trace Outlines application, you may upload an image and use it as
drawing template.
7.5 Language Settings mycusini Club
• Open the settings tab on the upper right side of the main menu to change the
language settings
For questions please contact us at service@mycusini.com

original operating instructions mycusini
7.6 Notifications
• New Updates will be seen in the Notification function
8 Troubleshooting
By selecting mycusini you have chosen a product that has a state-of-the-art
construction and is operationally safe.
Despite this, problems or disturbances may occur. For this reason, a guide to
solve potential problems is given in the following: Observe the safety information!
After start-up, the 3D printer is not working. The LED switch does not light up
and the printer does not move to the home position:
• Check the connections to the power supply.
• Check the power socket. Is it being supplied with current?
After several minutes no movement of the printer occurs, the user interface,
however, is visible on the computer/laptop/tablet:
• Switch off the mycusini, wait at least 20 seconds and turn it back on.
Despite an audible movement of the motor and the fill level display, there is no
food coming out of the dosing tip:
For questions please contact us at service@mycusini.com

original operating instructions mycusini
• Check the dosing tip for blockages.
• Insert the enclosed pin needle into the small opening of the stainless steel tip from
below and try to extrude again.
The printer stops printing for no obvious reason:
• Turn the printer off.
• take out the micro-card and insert it againwhile the printer is switched off
• Wait 20 seconds and switch on again.
• Check whether the cartridge is filled sufficiently and replace it if necessary.
• Turn the control knob until the Choco leaves the nozzle in a continuous flow
• Start the object print again
If the fault continues to occur even after following the instructions, create a new
object in mycusini club specified in chapter7
• Be sure to safely remove the micro SD card
• Put the micro SD card in the designated slot. Then switch on the mycusini
If the fault continues to occur even after following the instructions, switch off the
device. Please contact our customer service at service@mycusini.com immediately
for the purpose of an inspection or repair.
Many more tips and tricks as well as recipes, printing templates, and the most recent
information pertaining to 3D printing and the mycusini food printer can be found at:
www.mycusini.com and www.mycusini.club
9 Returning Old Devices
We will accept your old printer after its operating life has been exhausted. Please
contact our customer service department at: service@mycusini.com
10 Servicing and Maintenance
10.1 Safety instructions for servicing
The power cord should be checked for any signs of damage every now and then.
Never use the device if the cord is damaged. In case the cord shows any damage, it
has to be replaced by an approved customer service in order to avoid potential
hazards.
For questions please contact us at service@mycusini.com

original operating instructions mycusini
In case of any damage or malfunction please contact our customer service at
service@mycusini.com. However, please pay attention to the hints on
”Troubleshooting“ first.
Any maintenance and repair work may only be performed by qualified and authorized
experts, while using original service and accessory parts. Never carry out repair work
on the device by yourself.
In order to lubricate the axes, only use food-safe lubricants such as Ballistol H1. This
is usually necessary every six months.
If you will need any help, please do not hesitate to contact our customer service by email at: service@mycusini.com
Contact:
Print2Taste GmbH
Liebigstraße 11
85354 Freising
Germany
www.mycusini.com
We hope you have a great time with your mycusini and look forward to hearing your
feedback, comments, and creative ideas.
Your mycusini-Team
Please think of the environment before printing this manual?
For questions please contact us at service@mycusini.com
 Loading...