

Mycricket UM185C Quick Start Manual

Contents
BEFORE USING UM185C .........................................2
About this User Manual ................................................................................................... 3
Product Overview ........................................................................................................... 3
What’s Inside the Product Package .................................................................................. 3
Introduction to Cricket UM185C Wireless USB Modem ...................................................... 3
Product Features ............................................................................................................. 4
Product Handling ............................................................................................................ 4
Configuration ................................................................................................................. 4
INSTALLATION AND SETUP .....................................5
The Cricket Broadband Connect Setup Program ( WINDOWS)............................................. 6
The Cricket Broadband Connect Setup Program (MAC)...................................................... 9
INSTALLING UM185C ............................................13
Precautions .................................................................................................................. 14
Recommended System Requirements ............................................................................ 14
Installing Software ...................................................................................................... 14
USING CRICKET BROADBAND CONNECT ................. 16
Features ....................................................................................................................... 17
Getting Started ............................................................................................................. 17
Connecting ................................................................................................................... 18
Additional Features ....................................................................................................... 19
The File Menu ............................................................................................................... 21
The View Menu ............................................................................................................. 21
The Tools Menu ............................................................................................................. 23
The Option Menu .......................................................................................................... 26
The Help Menu .............................................................................................................. 28
REGULATORY AND SAFETY INFORMATION ..............30
Regulatory Notices ....................................................................................................... 31
Operating Conditions ................................................................................................... 31
Warnings and Cautions ................................................................................................. 31
Safety Precautions ...................................................................................................... 32
APPENDIX ...........................................................33
Glossary ........................................................................................................................ 34
Specific Absorption Rates (SAR) ..................................................................................... 35
Safety Information for RF Exposure ............................................................................... 36
U.S. Federal Communications Commission Radio Frequency Interference Statement ...... 37
12 MONTH LIMITED WARRANTY...................................................................................... 38
1 Table of Contents
www.mycricket.com

Before Using UM185C
1
This chapter provides important information about
using the UM185C including:
About this User Manual
Product Overview
What’s Inside the Product Package
Introduction to Wireless UM185C USB Modem
Product Features
Product Handling
Configuration
www.mycricket.com
Before Using UM185C
Before Using UM185C
ABOUT THIS USER MANUAL
You will find all the information you need to install and use the UM185C in this user manual. Before using the UM185C, you must properly install the Cricket Broadband Connect
by closely following the installation instructions.
INSTRUCTIONS
• The software needed to install and configure your UM185C USB device is already included on the device.
• It is highly recommended that you read the safety precautions described in this manual before using the UM185C.
PRODUCT OVERVIEW
Thank you for purchasing the Cricket Wireless UM185C USB Modem. The UM185C is a 3G wireless device that enables high-speed wireless communication from your laptop or
desktop computer. The UM185C is simple to install and use.
WHAT’S INSIDE THE PRODUCT PACKAGE
The following items are included in the product package. If any of the items listed below are missing, please contact the retail location where you purchased the product.
• UM185C Wireless USB Modem
• Quick Start Guide
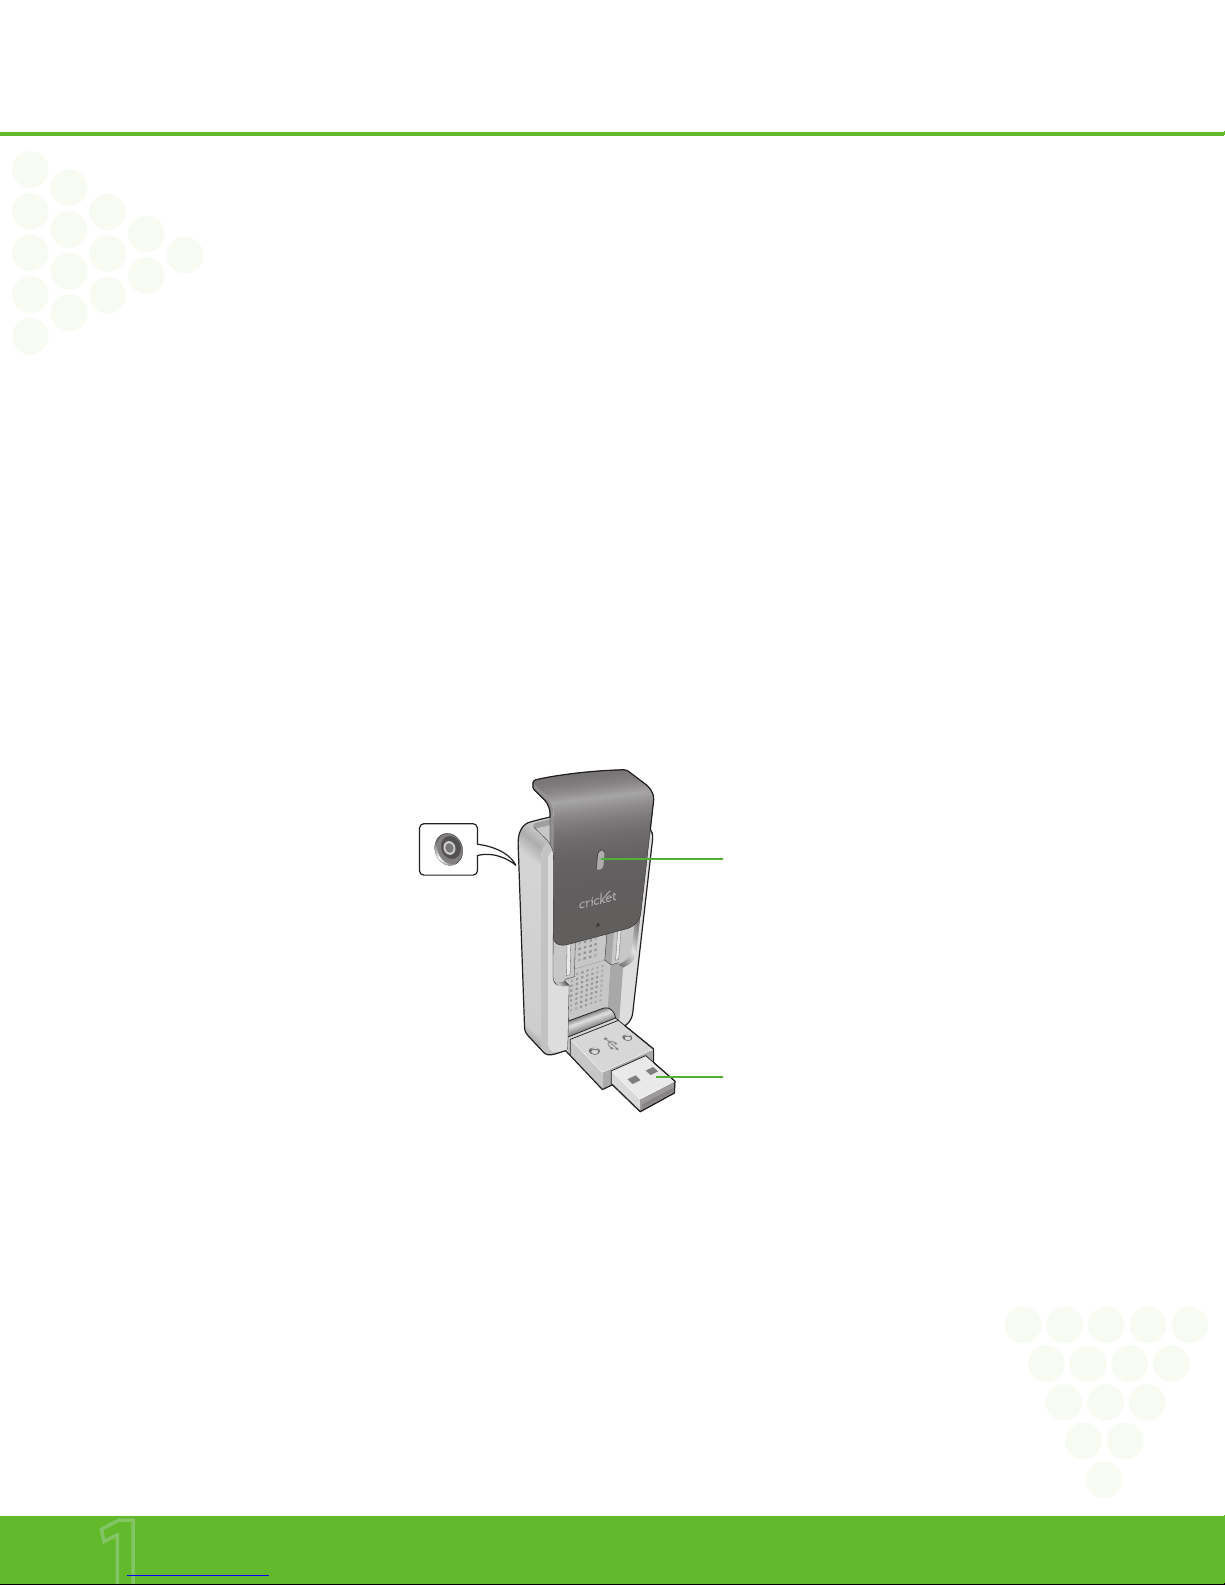
INTRODUCTION TO CRICKET UM185C WIRELESS USB MODEM
The Cricket UM185C is designed for your laptop or desktop computer’s USB port, which is available in most models. The UM185C can be used to access the Internet, your
company’s intranet, or you can use it to send and receive email. It is extremely useful when you are away from the office, on the road, or wherever a wireline Internet access is
not readily available.
LED status
indicator *
External Antenna
Booster Jack
(on the back side)
USB Connector
n Blue light: Connected to laptop or desktop computer and detected to network
Red light: Connected to laptop or desktop computer but out of service status
3 Before Using UM185C
www.mycricket.com

Before Using UM185C
PRODUCT FEATURES
• Power management: The UM185C utilizes power management and system overhead reduction functions provided by the USB interface for maximum power savings.
• Antenna design: Efficient, innovative internal antenna design optimizes data transfer rate and sensitivity to network signals.
• USB Modem that supports Type A USB Port interface.
• Supports North American US_PCS, Wireless CDMA and AWS bands.
• Utilizes QUALCOMM QSC6085 chipset.
• Supports 3G network technologies.
• Maximum Data Rate: 3.1 Mbps download; 1.8 Mbps upload.
• Supports Windows XP and Vista systems with installed host software and driver.
• Compatible with Mac OS x 10.4.11 or higher.
• Provides Cricket Wireless Internet service.
• The datacard cover automatically closes when you push the designated point as displayed in the following figure.
• When using the UM185C, please slide the black USB cover UP for the best reception.
PRODUCT HANDLING
1. Do not put any adhesive label on the USB connector. It may leave a sticky residue that can cause problems inside the USB port.
2. The UM185C USB device should easily slide into the USB port. Do not force the UM185C into the USB port as it may cause damage to the modem and/or the
port.
3. Keep the UM185C in a dry and clean place. (Storage temperature: -22°F to 149°F [- 30°C to 65°C]).
Keep your device away from liquids, dust and excessive heat.
CONFIGURATION
To use the UM185C, you should first install the software included on the device and configure the UM185C USB device. See the next section for more information on software
installation and USB device configuration.
4 Before Using UM185C
www.mycricket.com

Installation and Setup
2
The Cricket Broadband Connect and installation and setup
procedure of your USB modem.
The Cricket Broadband Connect Setup Program (WINDOWS)
The Cricket Broadband Connect Setup Program (MAC)
www.mycricket.com

Installation and Setup
Installation and Setup
This chapter will guide you through the installation and setup process for Cricket Broadband Connect. Before getting started, you should become familiar with the
documentation that came with your wireless device.
GETTING STARTED WINDOWS
Follow these steps to install Cricket Broadband Connect:
1. Turn on your computer and close all applications.
2. Insert the UM185C into the USB port.
3. If set up does not automatically start:
a. Click the Start Button
b. Choose My Computer
c. Find and double click on the drive icon (Cricket Broadband Connect) that represents the data card.
4. Follow the steps in the next section.
GETTING STARTED MAC
Follow these steps to install Cricket Broadband:
1. Turn on your computer and close all applications.
2. Insert the UM185C into the USB port.
3. Find and double click on the drive icon that represents the data card.
4. Find and run the Cricket Broadband icon in the MAC Cricket broadband folder.
5. Double click the Cricket Broadband icon to begin the installation.
6. Follow the steps in the next section.
THE CRICKET BROADBAND CONNECT SETUP PROGRAM WINDOWS
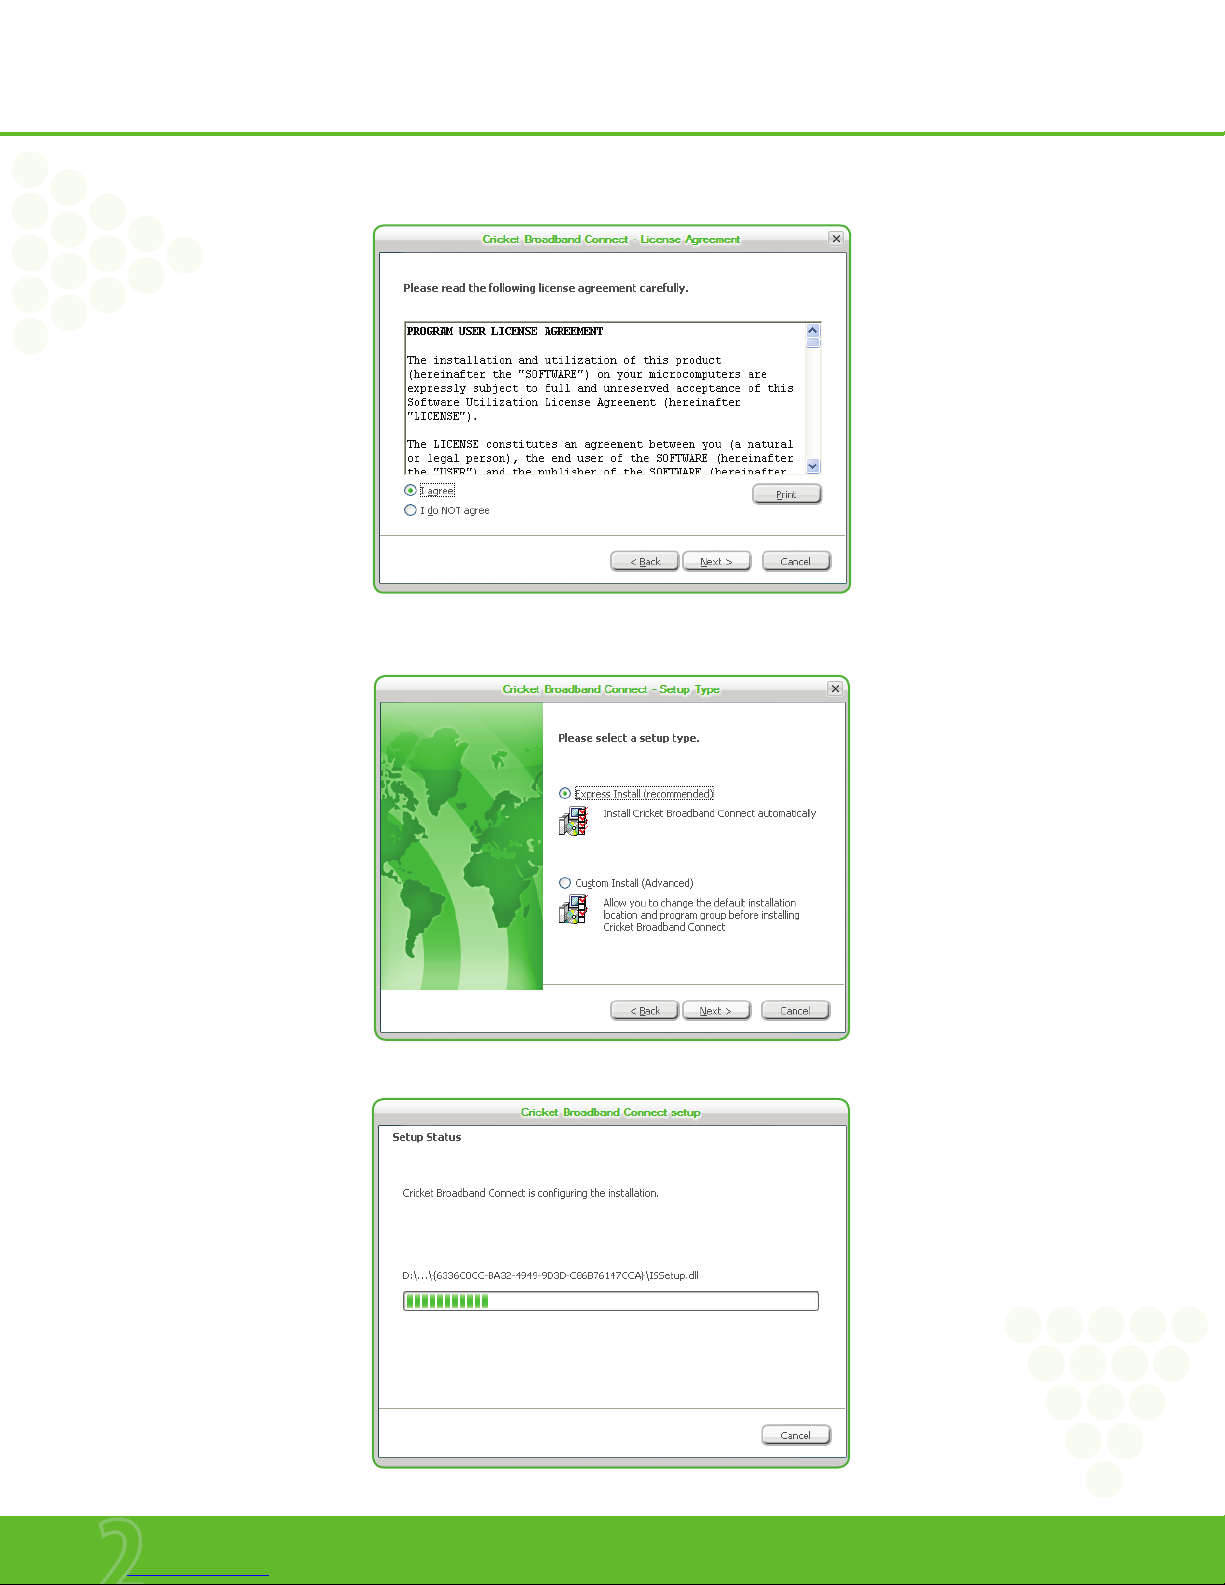
STEP 1: To install on your hard drive, connect your device to your PC. The installation process will start automatically.
Select the language for the installation from the choices below – “English”and “Spanish” and click “Next.”
6 Installation and Setup
www.mycricket.com
Installation and Setup
STEP 2: In the “Cricket Broadband Connect – License Agreement” screen, you will see the program user license Agreement. In order to install and use this product, you must
agree with the terms of this agreement. Select “I agree” then click the “Next” button to continue. If you do not agree with this agreement, click the “Cancel” button to exit.
STEP 3: After agreeing to the License Agreement, you will see the “Cricket Broadband Connect - Setup Type” screen. You can select from the two setup type – Express install or
Custom Install. It is recommended that you choose Express Install. Click the “Next” button to continue.
STEP 4: During this step, the components of Cricket Broadband Connect are being installed onto your computer.
7 Installation and Setup
www.mycricket.com

Installation and Setup
STEP 5: “The Install shield Wizard has successfully installed Cricket Broadband Connect“ appears on the screen. Click the “Finish” button.
n
After complete the installation, Important Customer Imformation will be installed to your PC. Adobe Acrobat reader required to view this file. If Adobe Acrobat reader is already installed,
the screen will be seen as followed.
STEP 6: The setup program will create an Access shortcut and the Cricket Broadband Connect will launch automatically. Now the installation is complete.
8 Installation and Setup
www.mycricket.com
Installation and Setup
THE CRICKET BROADBAND CONNECT SETUP PROGRAM MAC
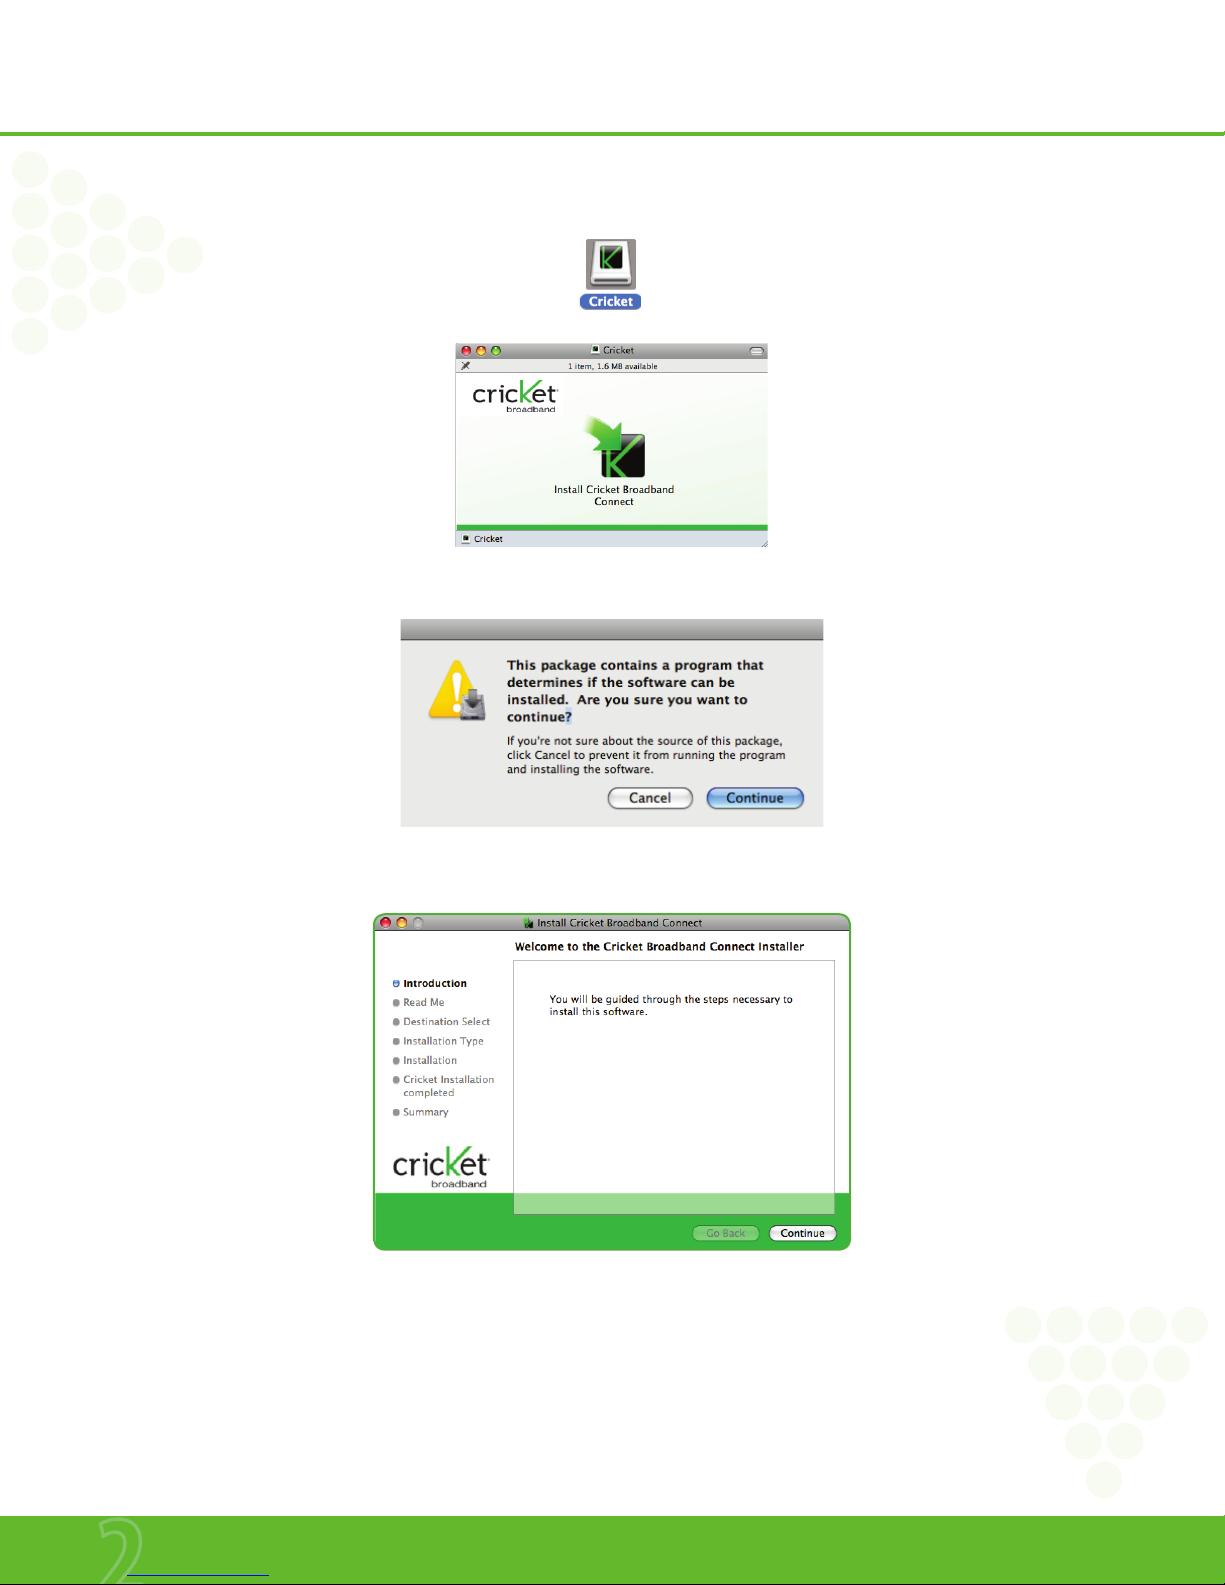
STEP 1: Click the Cricket Broadband Connect setup program.
When the pop-up screen appears to confirm installing the software, click the “Continue” button to continue with the installation process.
STEP 2: The “Welcome” screen appears. Click the “Continue” button.
9 Installation and Setup
www.mycricket.com
Installation and Setup
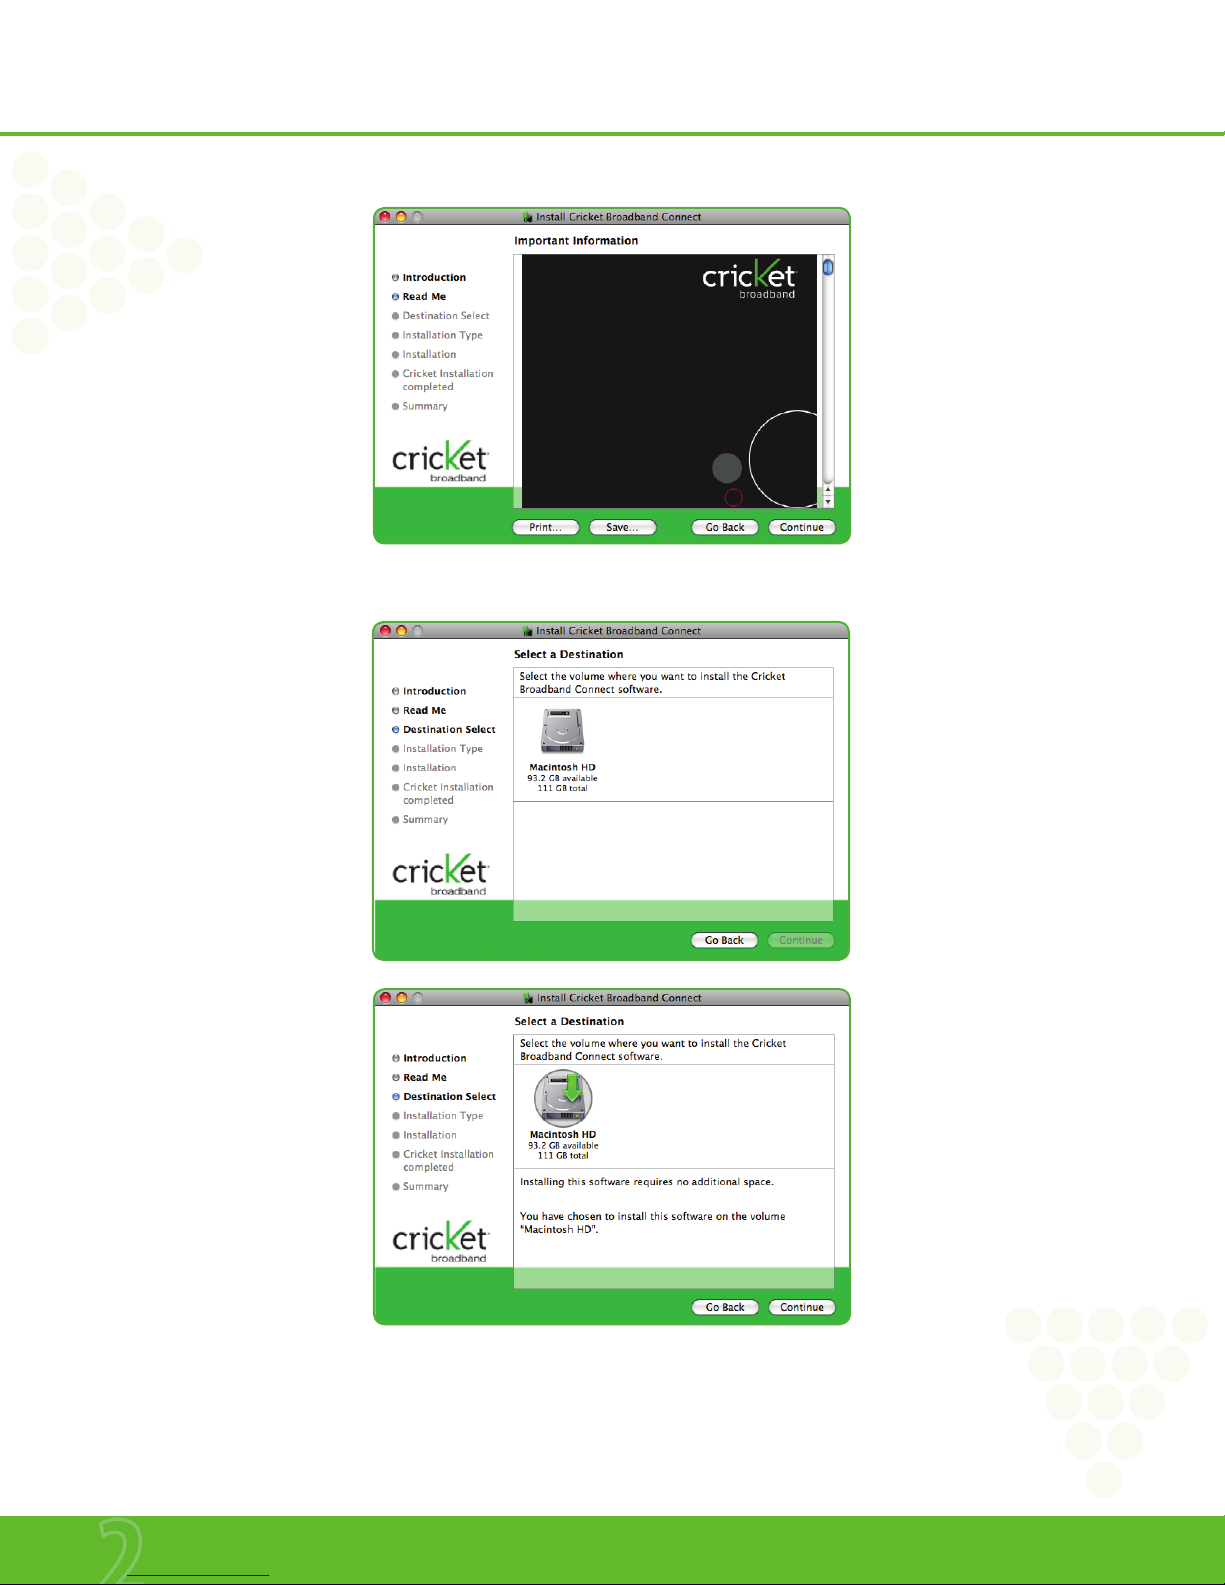
STEP 3: The “Read Me” screen appears. Click the “Continue” button.
STEP 4: You are now ready to select the location on your computer where Cricket Broadband Connect should be installed.
10 Installation and Setup
www.mycricket.com
Installation and Setup
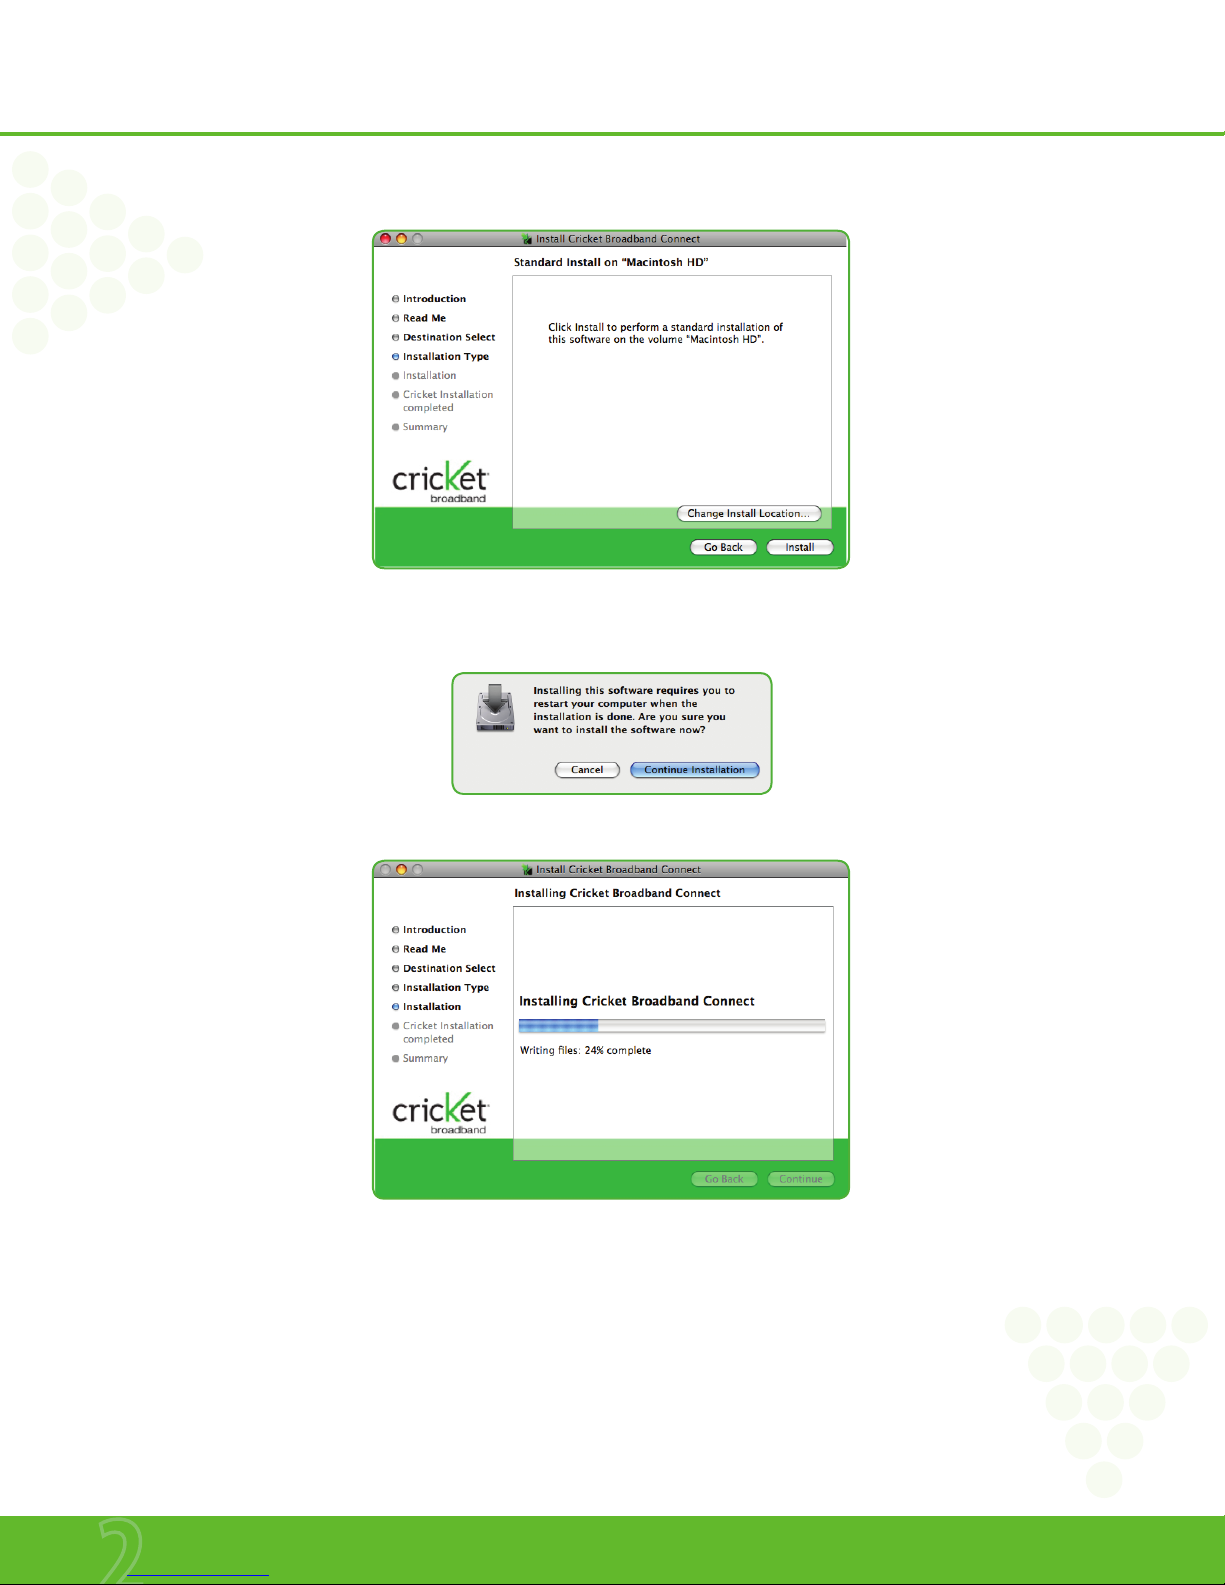
STEP 5: During this step the components of Cricket Broadband Connect are being installed onto your computer. Installation will occur to the destination folder specified in Step
3 above or you may change the installation location by pressing “Change Installation Location...”.
STEP 6: Installing the software requires you to restart your computer when the installation is complete. Please check that no other programs are running, then press “Continue
Installation”.
STEP 7: While your computer is running the installer script, do not turn your computer off.
11 Installation and Setup
www.mycricket.com
Installation and Setup
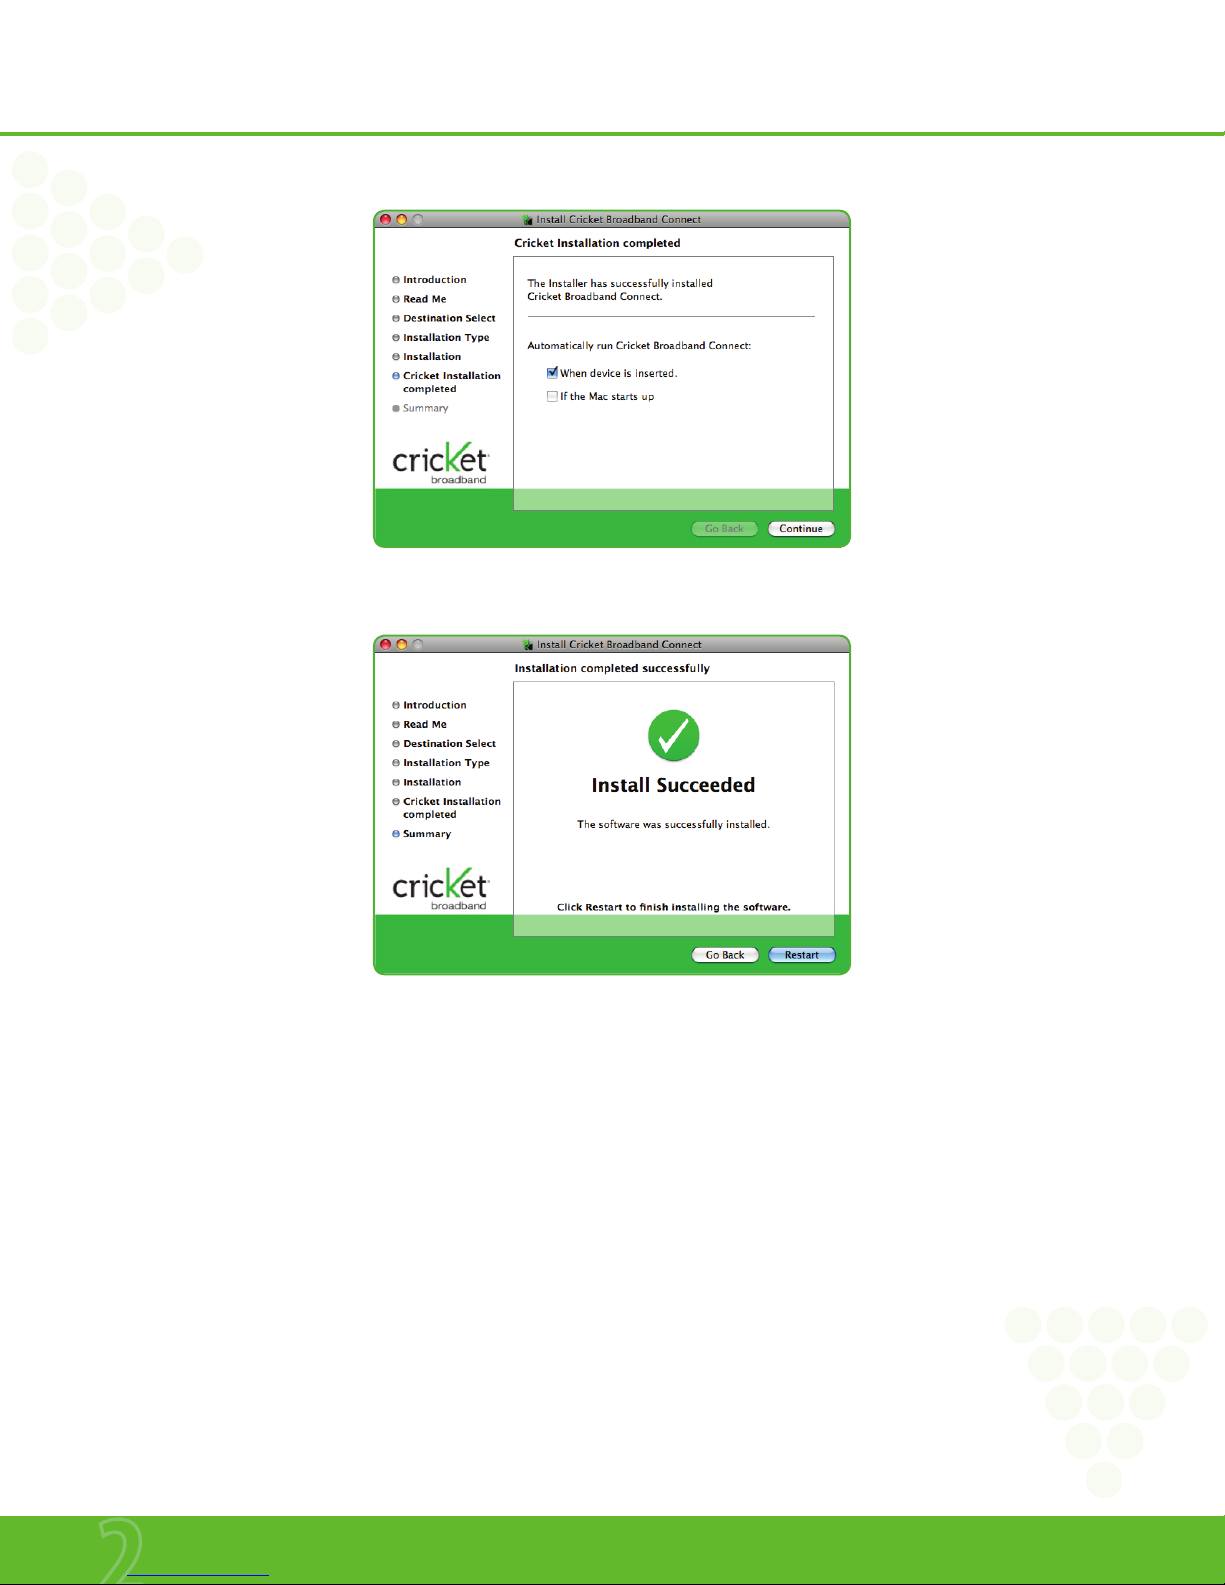
STEP 8: If you want to create an Access shortcut on your desktop, select “Create an alias on the desktop” and press “Continue”.
STEP 9: Installation is now complete. Click the “Restart” button to leave the Cricket Broadband Connect setup program and restart your computer.
n
Please note that Text Messaging is currently unavailable on Mac; this functionality is coming soon!
n To view the Guide go to Help > Guide. Adobe Acrobat reader is required.
12 Installation and Setup
www.mycricket.com
 Loading...