

Page 1
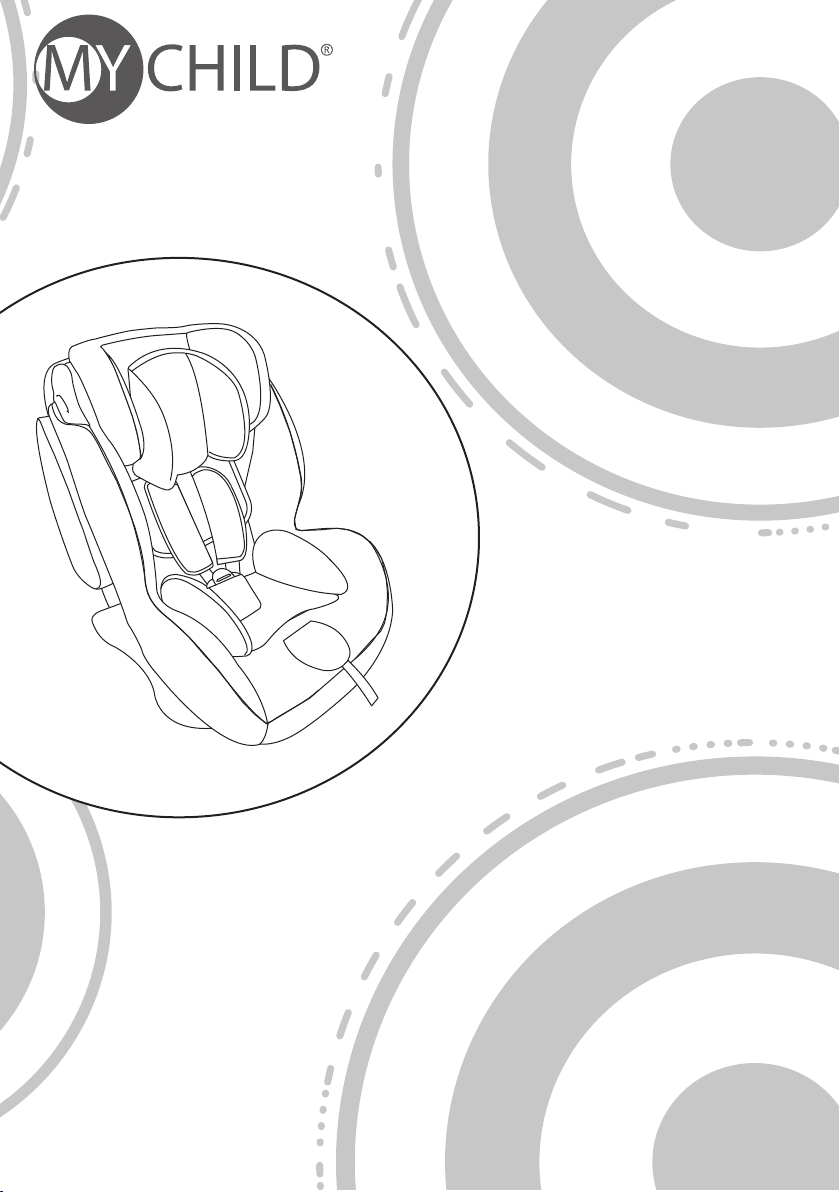
Jet Stream (SAP*) Car Seat
Groups 1+2+3 child car seat
*side armour protection
This product conforms to ECE R44.04
Group 1+2+3 child car seat. Suitable for children from 9kg to 36kg
(approx 9 months to 12 years old)
Instructions: Please read carefully and keep for future reference.
Your child’s safety may be affected if you do not follow these
instructions.
V3
Page 2
Notices
1. The child car seat must only be used in vehicles which are tted with a three point
seatbelt system that has been approved by regulation ECE-16 or similar.
2. A correct t is likely if the vehicle manufacturer has declared in the vehicle hand
book that the vehicle is capable of accepting a ‘Universal ’child restraint for this
group.
3. The child car seat is a ‘Universal’ child restraint; it conforms to regulation
ECE-R44/04 for general use in vehicles. It will t most, but not all vehicle seats.
4. This child car seat has been declared ‘Universal’ under more stringent conditions
than those applied to earlier designs, which do not carry the ‘Universal’ mark.
5. Child car seats can mark vehicle seat upholstery. The manufacturer cannot be
held responsible for damage or marking to vehicle seats.
6. The following situations could be illegal and will invalidate the warranty: 1) Any
modications or change of use of the child car seat that have not been authorised
or advised by the manufacturer. 2) Any failure to t the child car seat in strict
accordance with the instructions.
The manufacturer accepts no liability for issues arising from unauthorised
modications, uses or tting.
7. Please keep this manual safe for any possible queries you may have in the future.
8. You will need to keep your proof of purchase. We recommend you keep them
together.
GETTING STARTED
Read Carefully Before Attempting to Fit the Child Car Seat
Warning: NEVER leave your child unattended – your child’s safety is your responsibility.
Warning: The child car seat must be tted in accordance with the manufacturer’s
instructions. Incorrect installation could be dangerous.
Warning: This installation must only be performed by a competent adult. Don’t try to
install the seat when intoxicated or drowsy.
Warning: Always ensure that new or occasional users [e.g. grandparents] have read
the instructions or been taught the correct installation by someone who has read and
understood the instructions.
Warning: Always keep this instruction manual with the child car seat, or in the vehicle
in which you are carrying the child car seat. Some models of child car seat have a
pocket to store the instructions.
Before Starting
Warning: Do not t the child car seat on a side or rear facing vehicle seat.
Warning: Before installing the child car seat ensure that the passenger seat you are
using is locked in the upright position.
Warning: Do not use the child car seat in the home - it has only been designed to be
used in the car.
Warning: Do not leave loose/unsecured objects on the back seat of your car or the
parcel shelf. They may be dangerous to your child if you are forced to brake suddenly.
Which is the safest passenger seat to t your child car seat to?
THE CENTRE REAR PASSENGER SEAT
If your centre rear passenger seat is tted with a three point seatbelt system then you
should use it.
If your centre rear passenger seat does not have a three point seatbelt system (i.e. no
seatbelt at all, or only a lap belt):
- then you should use the rear left passenger seat or the rear right passenger seat.
The front passenger seat can only be used if it DOES NOT have an airbag and IS tted
with a three point seatbelt system.
page 2
Page 3

NEVER USE IN FRONT PASSENGER SEATS EQUIPPED WITH AIRBAGS (SRS)
THIS CAN INCLUDE REAR PASSENGER SEATS THAT ARE EQUIPPED WITH AIRBAGS*
*Consult car manufacturer for suitability. Children’s bodies are not able to withstand the forces
exerted on them by a deploying air-bag
EXTREME HAZARD
When Using the Child Car Seat
Warning: Make sure that the child car seat is placed somewhere so that rigid items and
plastic parts do not become trapped in doors or movable seat units when the seat is in
everyday use.
Warning: Always use the vehicle’s door child safety lock system, if one is available, to
make it impossible for the child to open the car doors from inside.
Warning: Allow the child a break during long car journeys and make sure they don’t
get out of the car unaided and without supervision.
Warning: The child car seat must be tted securely to the passenger seat. Ensure that it
is not loose or wobbly after you have tted it. If it is loose, re-t it.
Warning: Ensure that the child car seat is secured to the car seat at all times - even
when not in use.
Warning: The child car seat must not be used without its original cover. The original
cover is essential for the safe operation of the child car seat.
Warning: Stop the car at regular intervals to check that the child car seat is in the
correct position and that both the car seatbelt AND the child car seat harness (if tted)
are still taut and latched.
Warning: If you travel with passengers using both the front and the rear passenger
seats, the lighter occupants should be in the rear and the heavier occupants in the
front.
Warning: If you have no option other than to put your child car seat on a rear
passenger seat next to side airbags:
- Consult with your vehicle manufacturer for side airbag details. It may not be safe.
- Make sure your child does not lean into the area immediately around the airbag.
Warning: Do not place anything under the child car seat (e.g. a towel or cushion) as
this could affect the performance of the seat in an accident.
Warning: Avoid winter clothing bundling - Bulky clothing can lead to incorrect harness
tightening. In an accident, the child can slip right out of the extra padding - and thus
out of the seat. Let the car warm up or cool down prior to placing your child in there if
possible. If your child is cold, place a blanket over the top of the harness.
Warning: In the event of an emergency it is important to be able to release the child
quickly (as dened by British Standards). This means that the seat buckle cannot be
fully tamper proof and you should actively discourage your child from playing with or
using the buckle.
Important: Ensure your child knows the harness is there to keep them safe.
Important: Do not start the engine until you are sure that your child is securely
harnessed in their seat AND that you have also correctly fastened your seatbelt. Ask
your child if everyone is safely belted up and whether it is okay to drive off.
For tips and advice on preventing your child from tampering with the harness buckle
visit one of the following sites:
• http://www.theaa.com/motoring_advice/child_safety/belts_buckles.html
• http://www.childcarseats.org.uk/choosing-using/children-undoing-their-harness/
page 3
Page 4

Seatbelt
Warning: NEVER use any load bearing contact points other than those described in
these instructions or marked on the child car seat.
Warning: Ensure that the lap section of the seatbelt or harness is worn low down, so
that the pelvis is rmly engaged.
Warning: Make sure that ALL the passengers in your vehicle have their seatbelts
fastened, as unrestrained people can be very dangerous to the child in an accident.
Warning: NEVER use a seatbelt routing scheme that differs from these instructions.
Warning: The lap and diagonal seatbelt (and harness if tted) must be used at all times
when your child is in the child car seat.
Warning: Make sure that there are no twists in the seatbelt.
Sunlight/Hot days
Warning: Do not leave your child in the child car seat while parked in direct sunlight or on a
hot day.
Warning: Do not subject the child car seat to prolonged direct sunlight as this may be
dangerous for your child (the metal and plastic ttings could become hot) and may cause
the fabric to fade. You can reduce this problem by covering the child car seat with a
sheet when not in use.
Back of the Seat/Headrest
Warning: Ensure that the child car seat is as close as possible to the backrest of the car
seat.
Warning: REMOVE the head rest of the passenger seat being used if it obstructs the proper
installation of the child car seat. REMEMBER to ret the headrest when the child car seat
has been removed.
Second Hand or Damaged Child Car Seats and Seatbelts
Warning: Never buy a second hand child car seat. It may have unseen damage.
Warning: The manufacturer only guarantees this product when the original owner uses it.
Warning: You MUST replace the child car seat and your vehicles seatbelts if they becomes
badly worn or damaged.
Warning: You MUST replace the child car seat if it is involved in an accident – it may have
unseen damage and may not protect your child as well as they should. At the very least
send the child car seat to the manufacturers for inspection, together with the accident
report.
Your 3 year warranty
Whilst we make and test our products to the highest standards of durability there’s always
a small chance of a hiccup! Our promise is to repair, replace or refund a MyChild product
that has an identied manufacturing defect from the date of purchase for a full 3 years
thereafter at no extra cost.
However, you must register within 28 days of the date of purchase to receive the full 3
years guarantee!
To receive your full guarantee you can register your product by:
visiting www.mychildonline.co.uk/warranty.html and complete the warranty form,
or by telephone on 0161 335 2508.
page 4
Page 5
Contents
General safety information - READ FIRST
Welcome
Parts checklist
Positioning the seat
Four-position seat recline
Installing for group I [9-18kg]
Adjusting the headrest and harness height
Placing your child in the seat - group I [9-18kg]
Converting for groups II [15-25kg] + III [22-36kg]
Installing for groups II [15-25kg] + III [22-36kg]
Removing the seat cover
Replacing the seat cover
Replacing the harness
Maintenance and cleaning
1-4
5
6
7
7
8-9
10
10-11
12-15
15-16
16-17
17-18
18-21
21
Welcome
Thank you for purchasing the Jet Stream (SAP) child car seat. Please read these
instructions carefully before use to ensure safe and satisfactory operation of this
product.
Your child’s safety is your responsibility. If you have a query with this product or require
replacement parts, please contact your nearest MyChild retailer.
page 5
Page 6
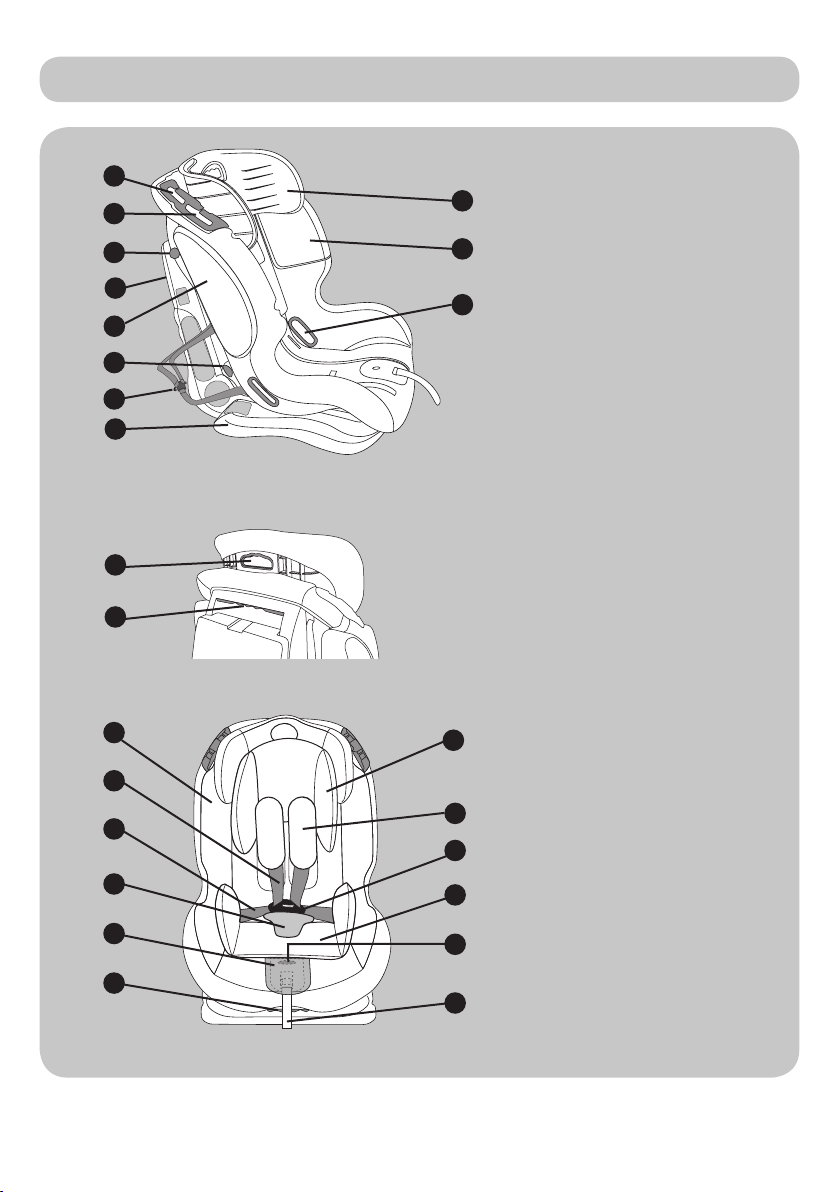
Parts checklist
1
2
3
4
5
6
7
8
12
13
14
15
16
17
18
1 Group II Belt guide slot
9
2 Group III Belt guide slot
3 Installation bar
10
11
4 Rear shell
5 Side Armour Protection
(SAP)
6 Lap belt hook
7 Belt yoke
8 Base
9 Headrest
10 Front shell
11 Belt guide hole
12 Headrest and harness
height adjuster handle
13 Carry handle
14 Seat cover
15 Shoulder strap
16 Waist strap
17 Buckle pad & crotch strap
18 Adjuster button cover
20
19 Recline adjuster handle
20 Head cushion
21
22
23
21 Harness shoulder pads
22 Central buckle
23 Booster cushion insert
24 Harness adjuster button
25 Harness adjuster strap
24
19
25
page 6
Page 7
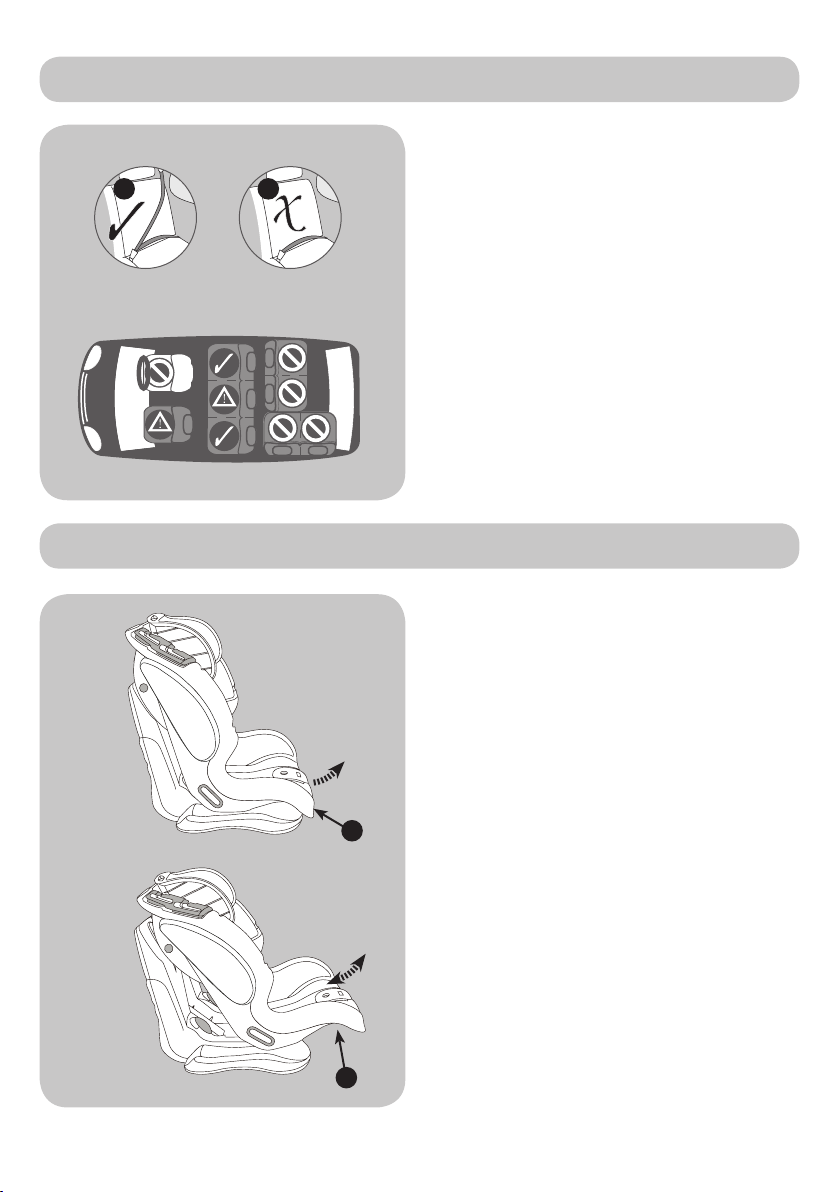
Positioning the seat
A B
Four-position seat recline
The child car seat can only be used with
an automatic 3-point safety belt (A) and
NOT with a 2-point lap belt (B).
The child car seat can be secured in
a forward-facing position in the rear
seats of the vehicle by using the existing
seatbelts. However, on some seats, if
the installation is not properly secured,
we suggest you try another seat in your
vehicle.
Although not recommended, the child
car seat can be used on a passenger
side front seat, so long as there is no
active airbag in place.
WARNING: Never use in a seat with an
active airbag.
The child car seat can be used in four
different seat positions, from seated
to a reclined sleeping position. Pull
the recline adjuster handle (A) under
the front of the shell and pull the shell
forwards or backwards, release the
handle on your required position when
hearing a distinct click.
upright
reclined
A
A
page 7
Page 8
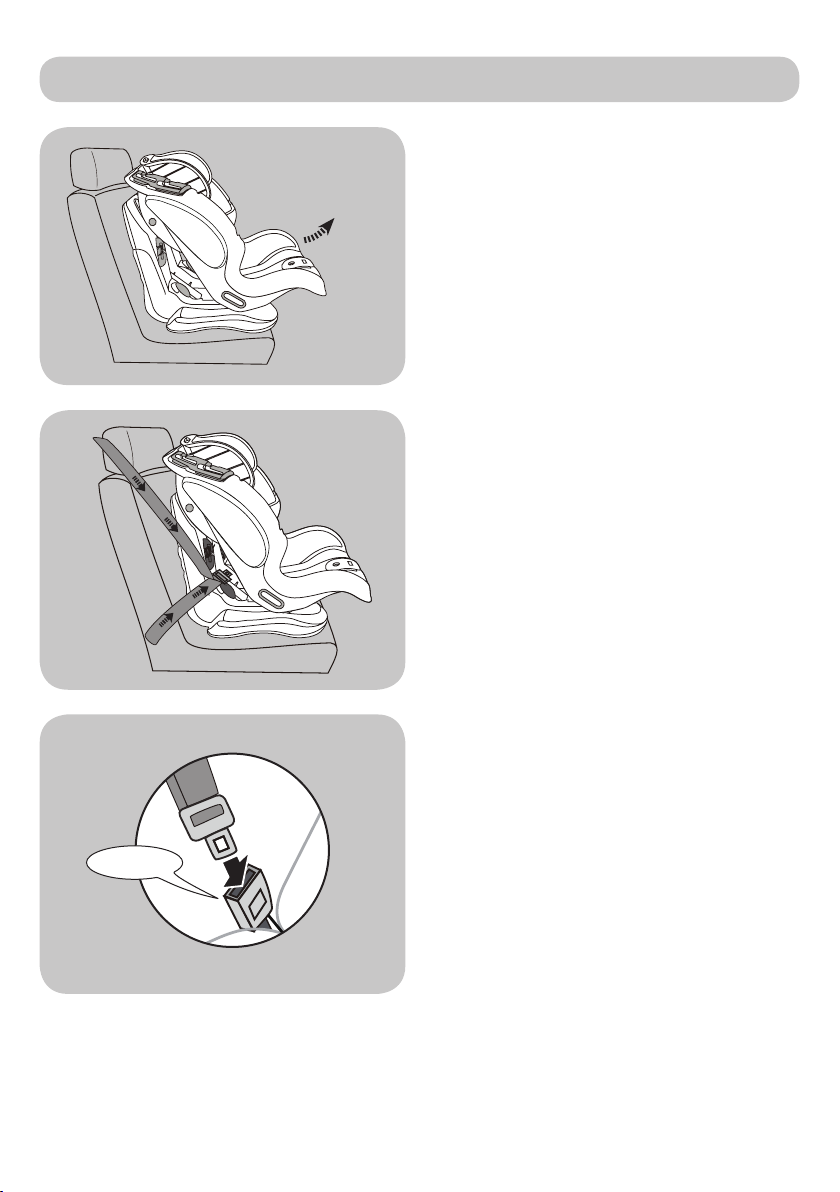
Installing for Group I [9-18kg]
Place the child car seat on a suitable
passenger seat. Pull the recline adjuster
handle under the front of the shell
and adjust the shell to its fully reclined
position.
Feed the seatbelt between the shell and
the base and ensure the seatbelt is not
twisted.
Push the child car seat back into the
passenger seat ensuring a good t.
Plug the seatbelt into the vehicles
buckle until you hear a “click”.
click
page 8
Page 9
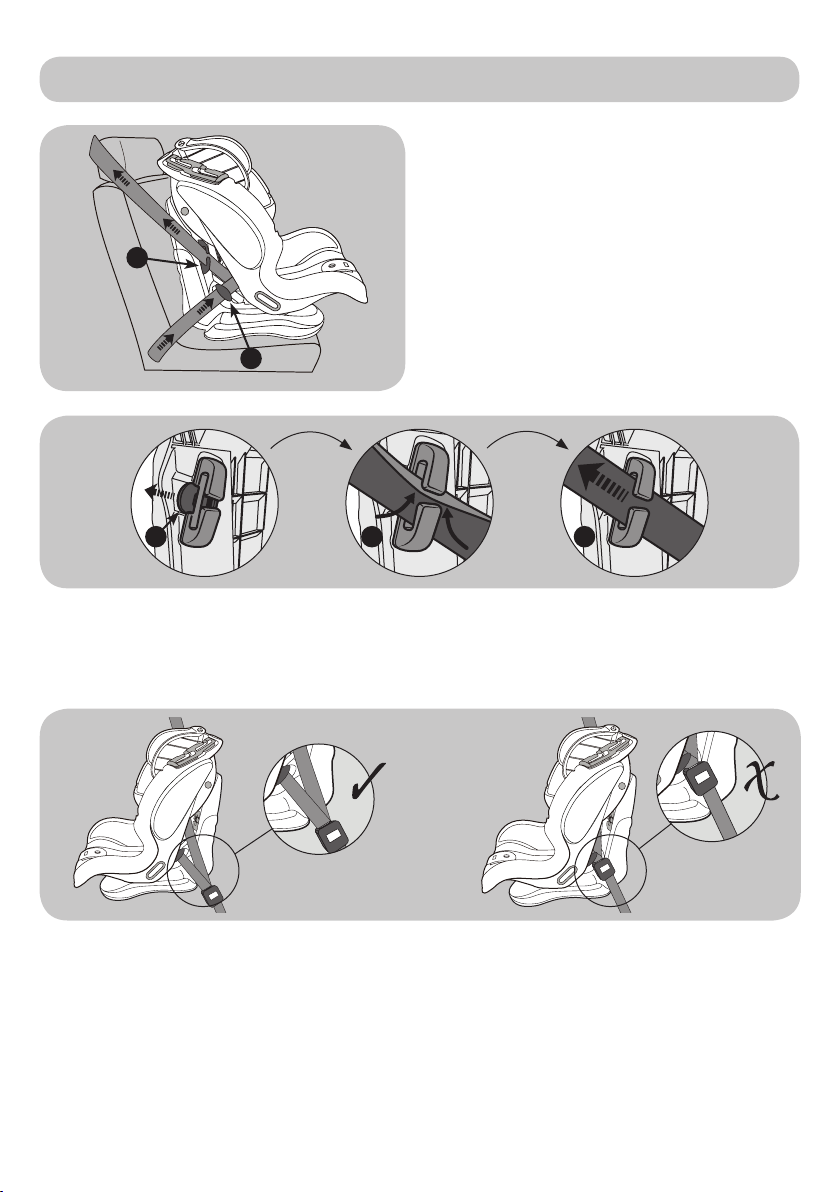
Installing for Group I [9-18kg] (continued)
D
C
Thread the horizontal lap belt section
under both hooks (C) and remove all
the slack by pulling up on the diagonal
section of seatbelt. Thread the diagonal
section through the lock off device (D).
E F G
To operate the lock-off device:
Pull down on tab (E) to open the locking device.
Feed the seatbelt into the gap between the tab and the locking device (F).
Pull the diagonal section of seatbelt tight (G).
With your child car seat now buckled in, check it is secure by pulling forward from both
harness straps, there should be little or no movement. Next check that the vehicle’s
seatbelt buckle is NOT resting against the child car seat shell. This is called ‘buckle
crunch’ and could cause the child car seat to work loose or the seatbelt to come
undone in an accident. If you nd you are experiencing ‘buckle crunch’ then this child
car seat is not suitable for your vehicle.
WARNING: The child car seat should always be strapped in using the vehicle’s seatbelt,
whether a child is seated in the child car seat or not.
page 9
Page 10
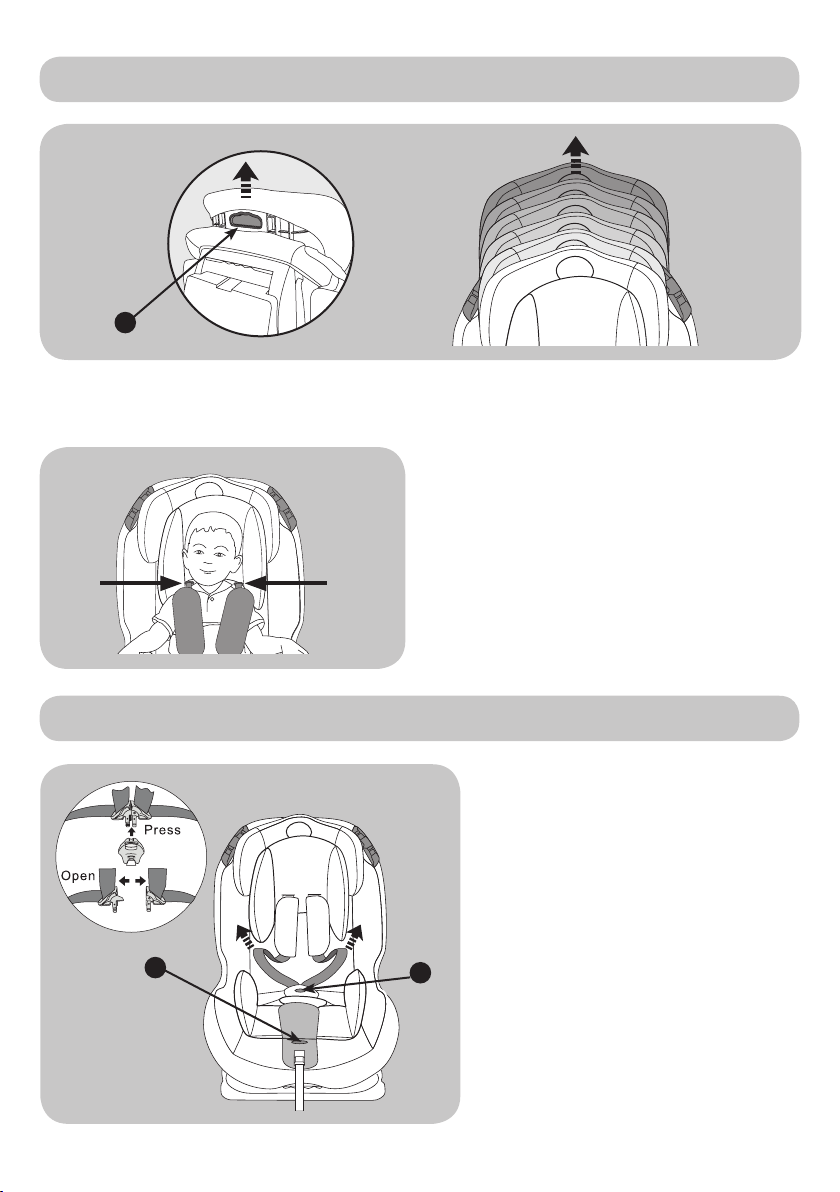
Adjusting the headrest and harness height
A
Adjust the headrest by pulling the adjuster handle (A) on the back of the headrest and
raising or lowering according to your child’s height.
The harness strap slots should be level
with your child’s shoulders.
Placing your child in the seat - Group I [9-18kg]
A
B
Ensure that you have rst installed
the child car seat correctly,
following the steps under
‘Installing for Group I [9-18kg]’,
Press button (A) and pull forward
on the shoulder straps (not the
shoulder pads) to loosen the
straps.
Press the red ‘buckle release’
button (B) and unbuckle the
harness.
page 10
IMPORTANT: DO NOT pull the
shoulder pads or the straps above
the shoulder pads.
Page 11
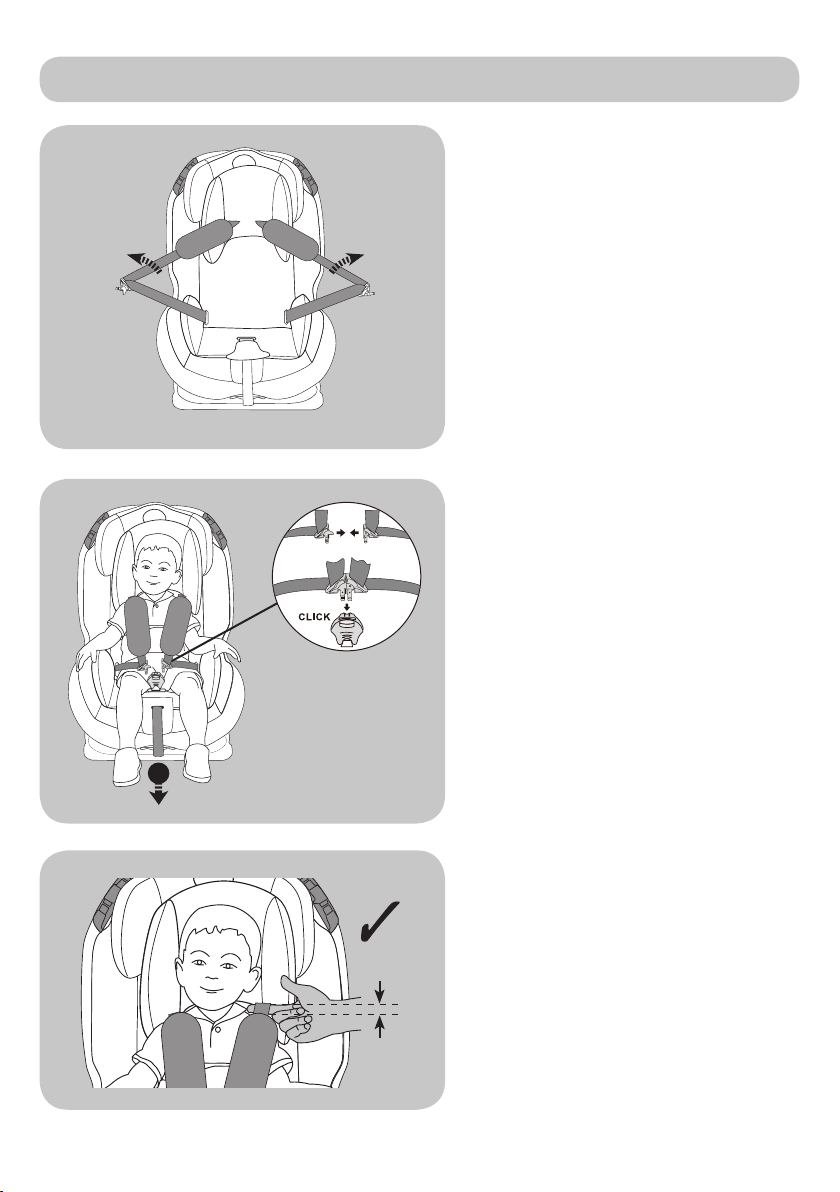
Placing your child in the seat - Group I [9-18kg] (continued)
Place the harness straps over the
side of the shell, position your child
in the child car seat ensuring no
toys or other hard objects are in the
seat.
After placing your child in the child
car seat, match the two halves of
the harness buckles together and
insert them into the crotch buckle.
Make sure the shoulder straps t
your child snugly by pulling the
adjuster belt (C).
C
1cm
page 11
The harness should allow 1 nger-
width (1cm) of space at the top
of the shoulders. This is the ideal
tightness.
Note: check that the buckle is
secured by tugging the shoulder
and waist straps.
Page 12
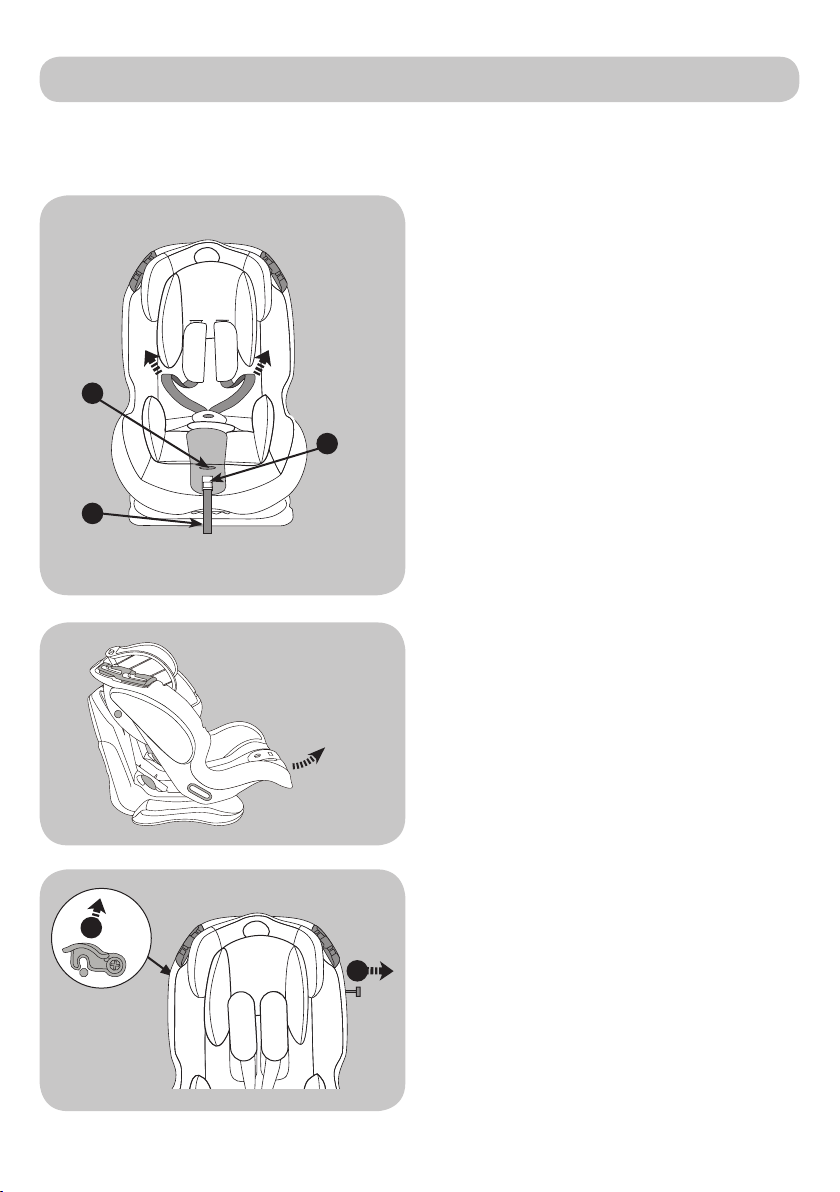
Converting for groups II+III [15-36kg]
It is recommended that you use the 5-point harness for as long as possible. Try removing
the booster cushion as this could allow you to use the seat in group I conguration for
longer.
A
C
B
When your child has outgrown the
group I(9-18kg) conguration and you
wish to use the seat for a child in either
group II (15 - 25kg) or group III (22-36kg)
then you will need to remove the child
car seat’s integral 5-point harness.
Lift the fabric adjuster cover at the
front of the car seat and whilst pressing
button (A), pull forwards on the shoulder
straps (not the shoulder pads) to
completely loosen the harness straps
and shorten the adjuster strap (B) as
much as possible. Any remaining strap
can be rolled up and stored under the
red plastic cover (C).
IMPORTANT: DO NOT pull the shoulder
pads.
D
E
page 12
Pull the recline adjuster handle under
the front of the shell and whilst holding it,
pull the shell forwards to its most reclined
position.
Release catch (D) on the top left
hand side of the shell and remove the
installation bar (E).
Page 13
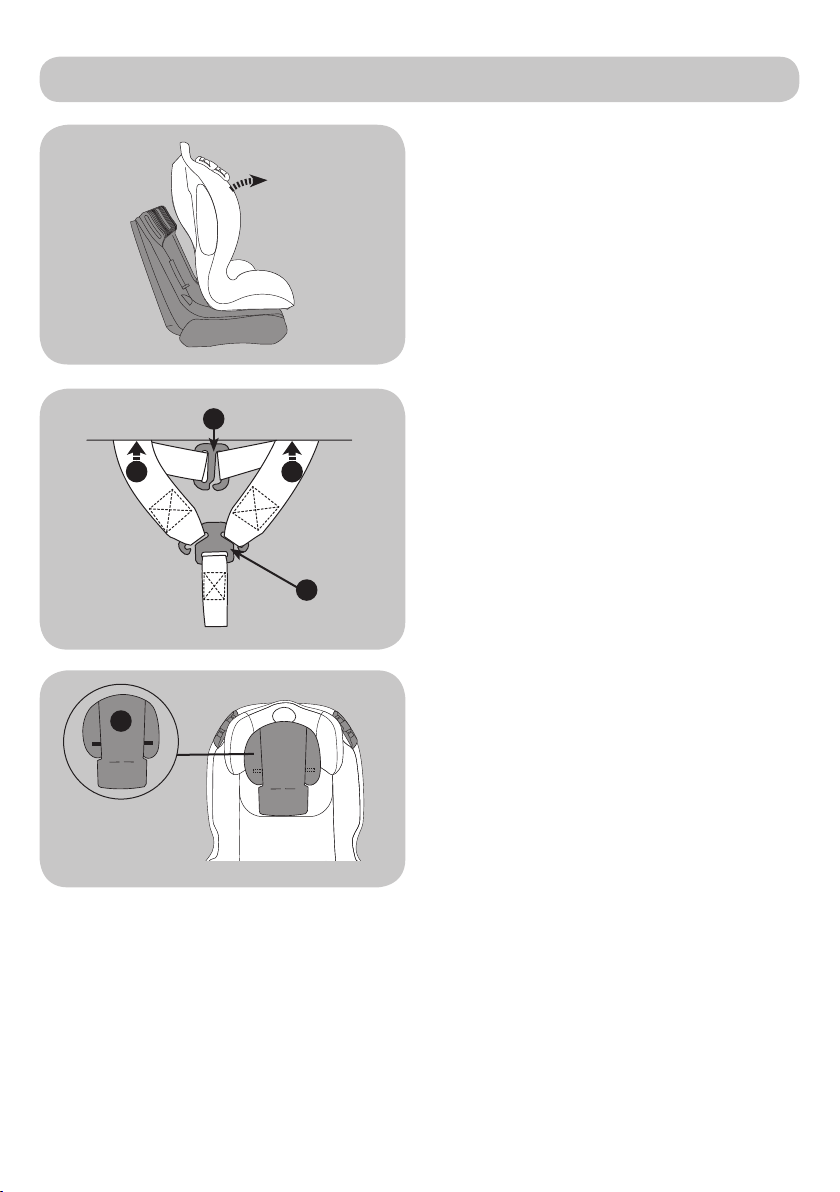
Converting for groups II+III [15-36kg] (continued)
F
H H
G
I
Pull and hold the shell forward.
Unhook the shoulder pad straps from
shoulder pad connector (F). Unhook the
shoulder harness straps from yoke (G).
Pass the shoulder straps through the slots
in the back of the shell (H).
Undo the two Velcro® tabs on each side
of the back of the head hugger (I) and
remove.
page 13
Page 14
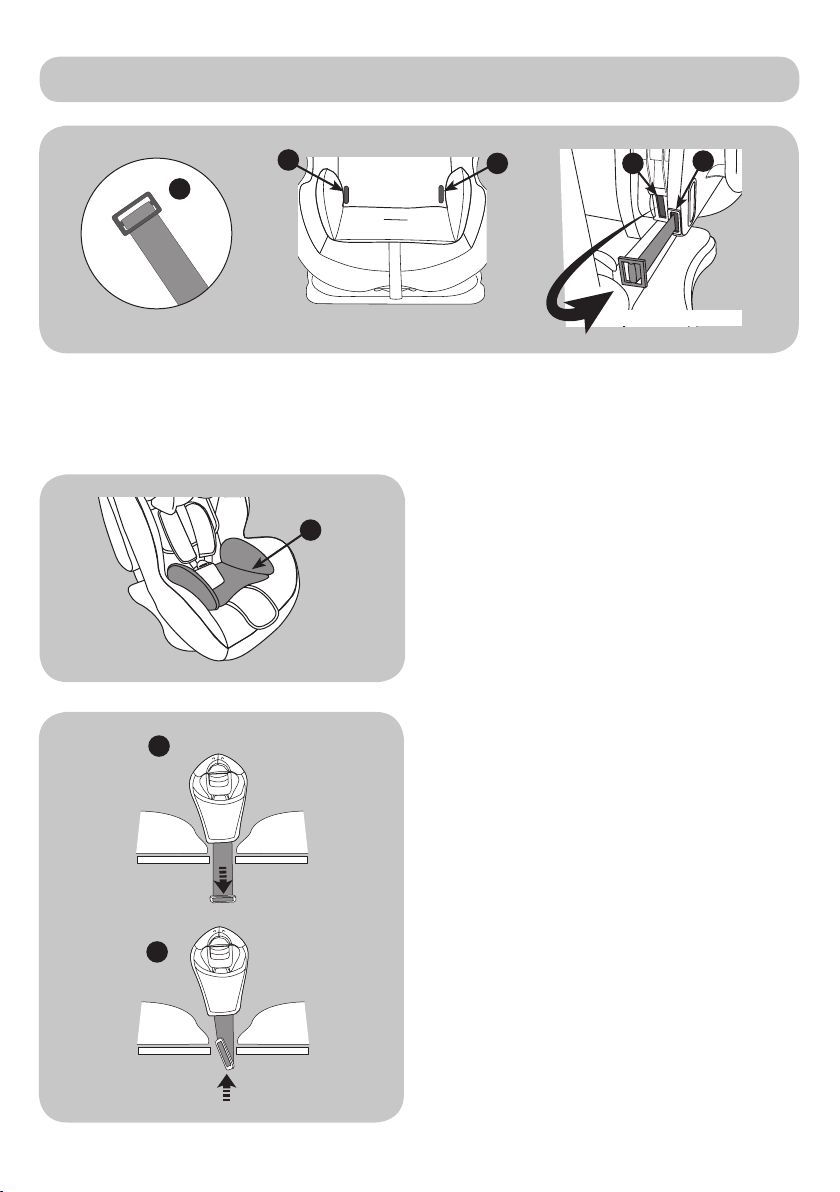
Converting for groups II+III [15-36kg] (continued)
1
J
2
K
rear view of shell
Locate the two metal retainer buckles (J) under the seat cover at points (1) and (2).
Pass the metal buckles on the waist harness from the front of the shell, through the inner
slots (K) on the back of the shell and back out the outer slots (L), to the front to remove
the harness.
L
Remove the booster cushion insert (M)
from the crotch strap.
M
1
To remove the crotch strap, ensure
the child car seat is in a fully reclined
position.
1. Push the crotch strap down through
the slot.
2. Whilst holding the strap locate the
metal retainer buckle underneath the
car seat shell, turn the retainer buckle
and post through the letter box opening
2
and remove the crotch strap.
page 14
Page 15
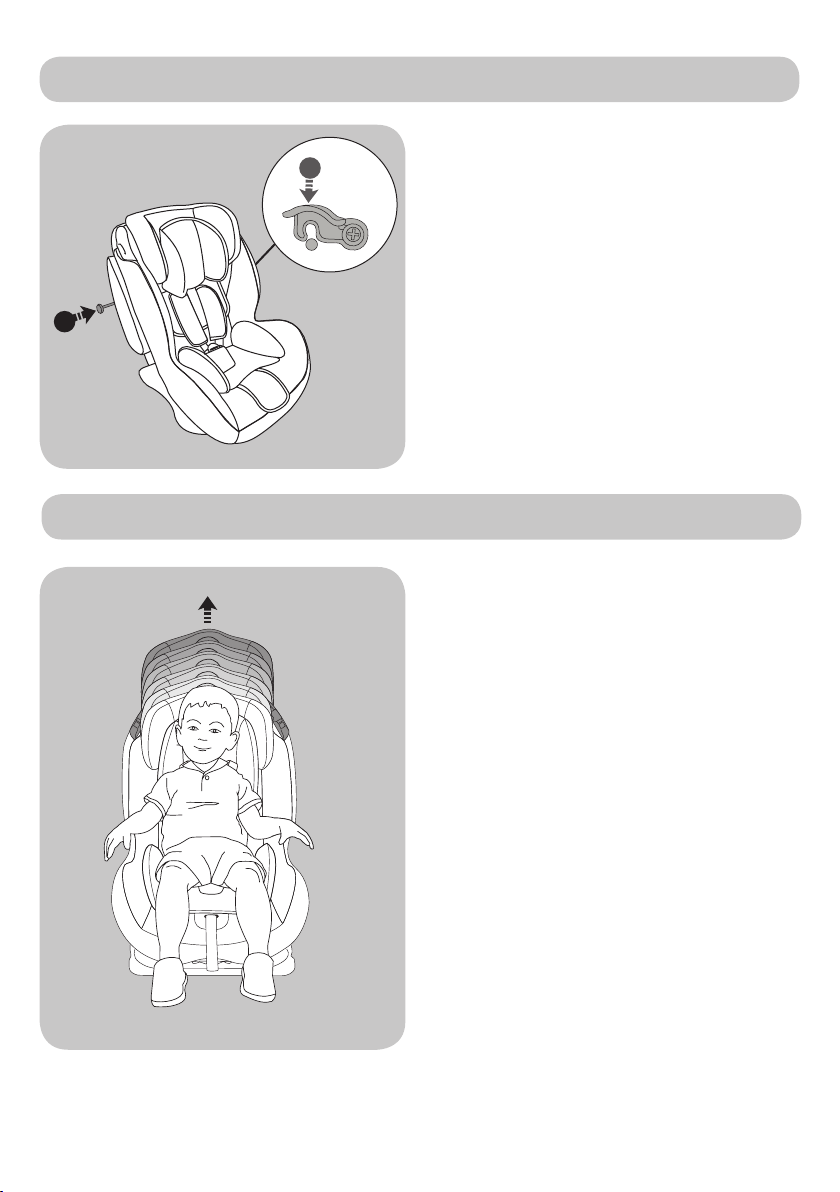
Converting for groups II+III [15-36kg] (continued)
O
N
Return the shell to its original position
and re-insert the installation bar (N) and
secure the catch (O).
The child car seat can now be placed
into your vehicle.
WARNING: The child car seat should
always be strapped in using the
vehicle’s seatbelt, whether a child is
seated in the child car seat or not.
Installing for groups II [15-25kg] + III [22-36kg]
Ensure that you have rst removed the
child car seat’s integral 5-point harness,
following the steps under ‘Converting to
group II+III [15-36kg]’ pages 12-15,
You can use the booster cushion insert if
your child needs it.
page 15
Position your child in the child car seat,
adjust the headrest by pulling the
headrest and harness height adjustment
handle on the back of the headrest and
raise or lower according to your child’s
height.
Page 16
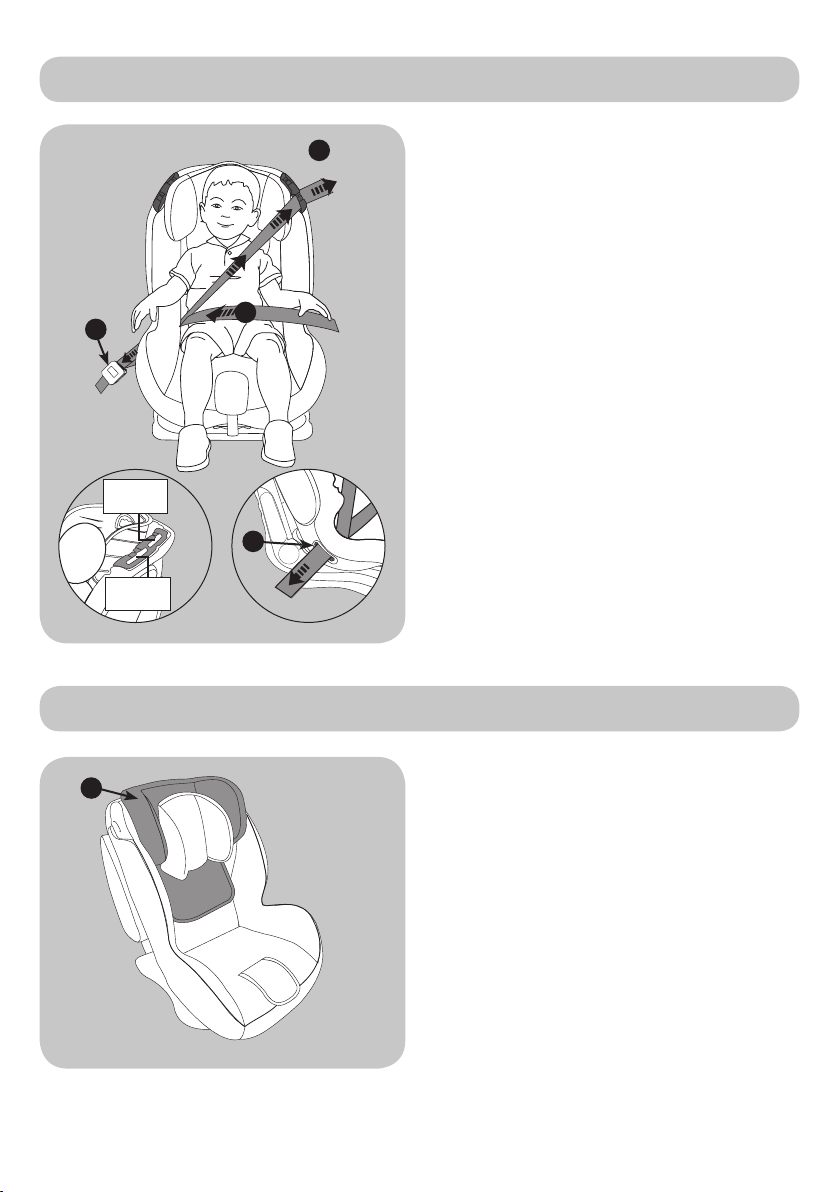
Installing for groups II [15-25kg] + III [22-36kg] (continued)
B
C
Group II
(22-36kg)
B
Group I
(15-25kg)
A
Removing the seat cover
Place the seatbelt shoulder strap
through the most suitable belt guide slot
(A): Use the lower strap hook for children
in group I [15 - 25kg].
Use the higher strap hook for children in
group II [22 - 36kg].
Place the lap belt over your child’s lap
and thread through the belt guide hole
(B) on the side nearest the seatbelt
buckle (C). Fasten the seatbelt buckle
(C) and remove all slack from both the
lap and diagonal sections of seatbelt.
WARNING: The child car seat should
always be strapped in using the
vehicle’s seatbelt, whether a child is
seated in the child car seat or not.
A
WARNING: The cover is a safety feature.
Never use the child car seat without it.
Remove the harness straps, crotch
strap, head pad and seat pad (see
‘Converting to group II+III [15-36kg]’
pages 12-15.
Remove the headrest cover (A) by
grasping the elasticed band and pulling
the cover off.
page 16
Page 17
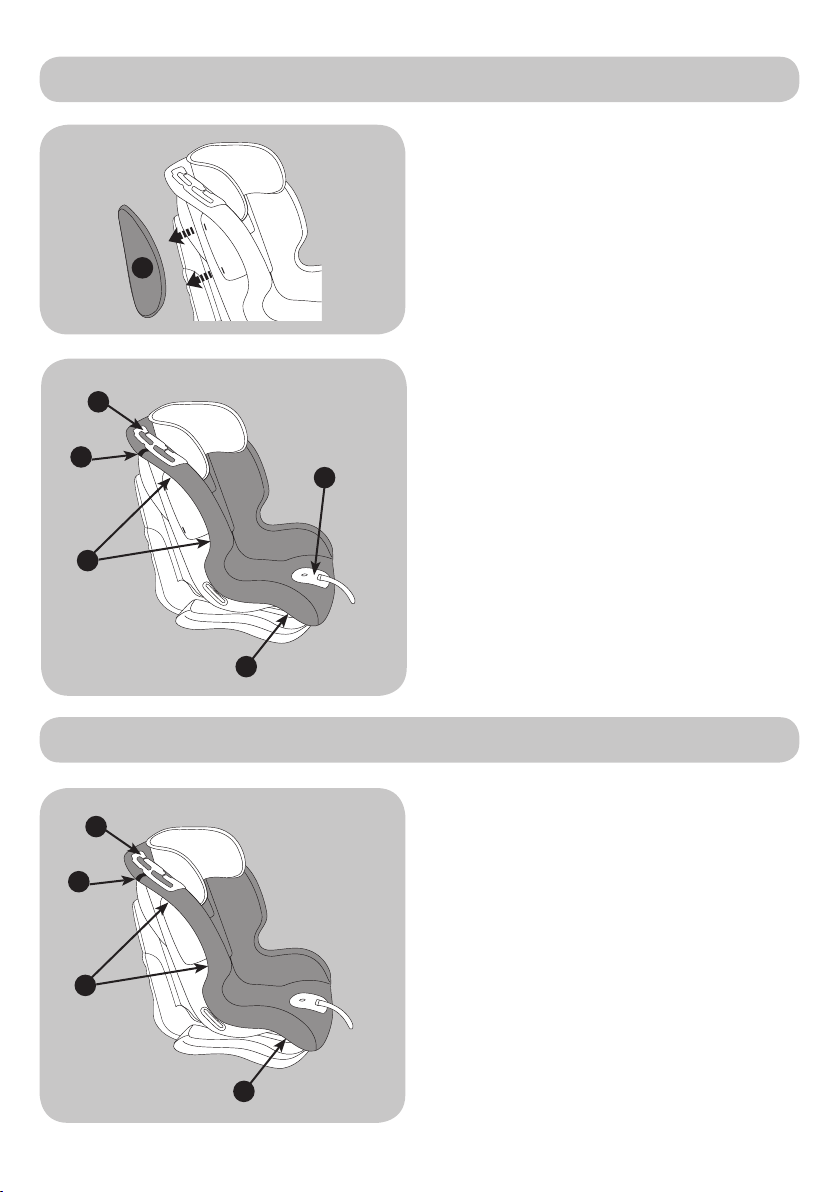
Removing the seat cover (continued)
Pull the two (SAP) Side Armour
Protection systems (B) in the direction of
the arrows to unclip them from the shell
and remove their covers.
B
E
The main cover is held in place by a
series of hooks (C) located on the back
and underside of the shell. Unhook the
cover’s elastic from the hooks. Undo
D
F
the Velcro® tabs (D) on the shoulders
of the shell, work the cover from under
the strap hooks (E) and from around the
plastic adjuster panel (F) and remove
the cover.
C
C
Replacing the seat cover
B
A
C
C
WARNING: The cover is a safety feature.
Never use the child car seat without it.
Place the main seat cover over the
child car seat and stretch the elasticed
band around the shell, taking care as
you work the cover over and around
the plastic parts. Ensure the Velcro® tabs
(A) pass under the strap hooks (B).
Once in place secure the cover on the
hooks (C) located on the back and
underside of the shell.
page 17
Page 18
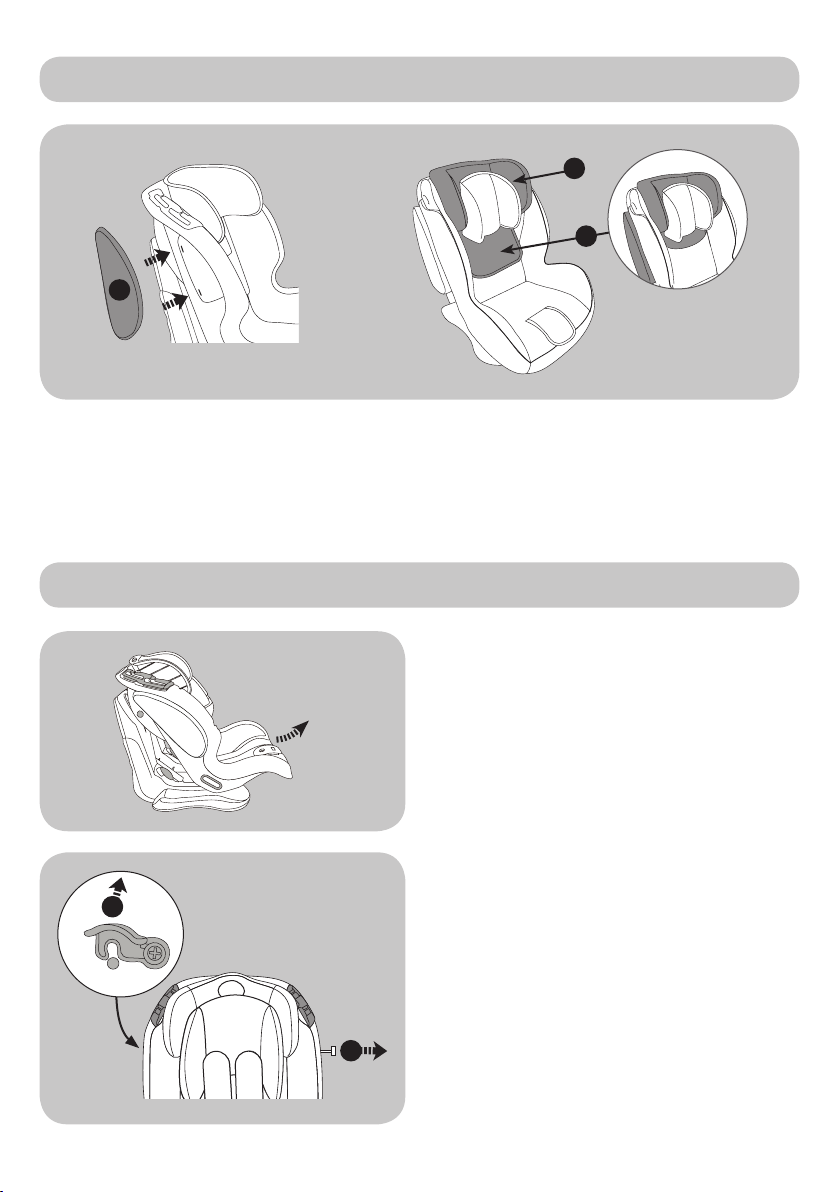
Replacing the seat cover (continued)
E
F
D
Stretch the side covers over the two (SAP) Side Armour Protection systems (D) and clip
them back on to the shell. Once clipped on jiggle them to ensure the are rmly clipped
on.
Stretch the headrest cover (E) over the headrest and tuck the lower part of the
headrest cover (F) behind the main seat cover.
Replacing the harness
A
B
page 18
Adjust the shell to its most reclined
position.
Pull the recline adjuster handle under
the front of the shell and whilst holding it,
pull the shell forwards to its most reclined
position.
Release catch (A) on the top left
hand side of the shell and remove the
installation bar (B).
Page 19
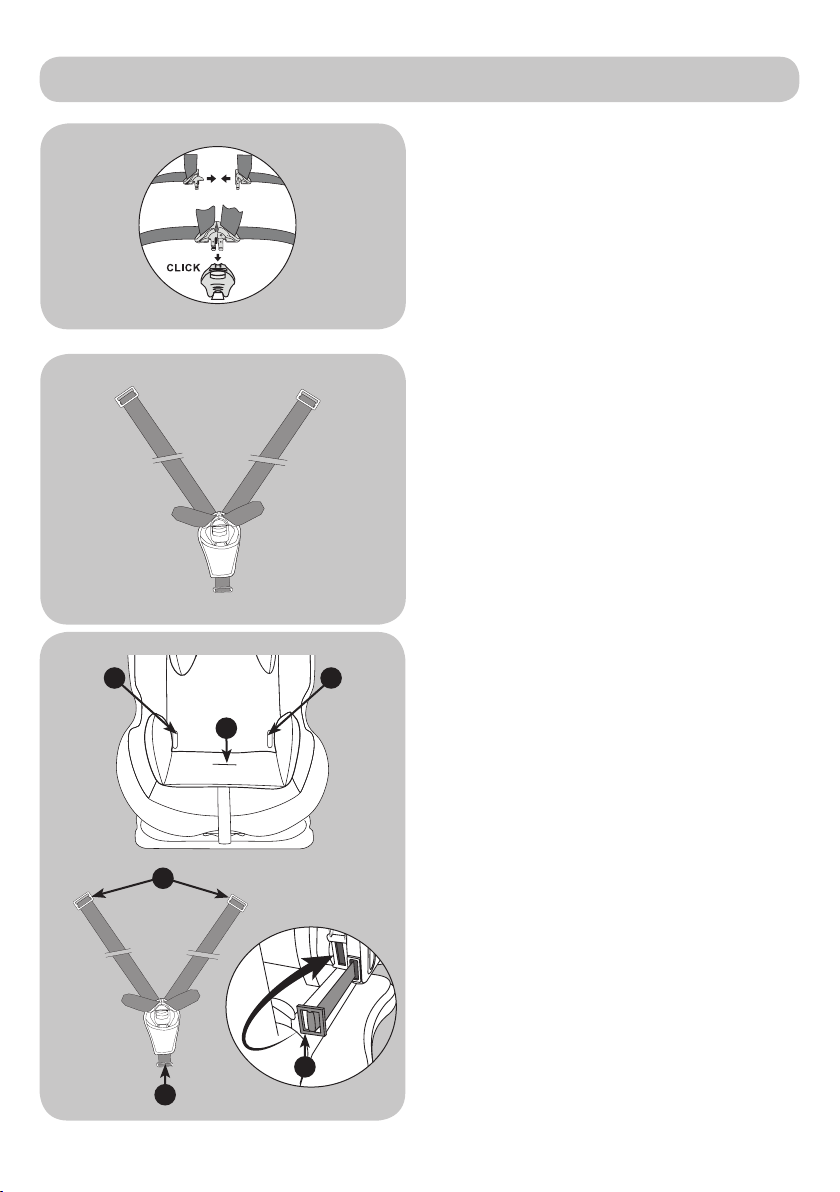
Replacing the harness (continued)
21
3
Take the two harness shoulder straps
with the buckle clips and crotch strap
and match the buckle tongue sections
together and insert into the buckle.
With the buckle connected you will
have something similar to the illustration
opposite.
Insert waist strap retainer buckles (C)
through the two slots (1) and (2) on the
cover and out through the outer slots on
the back of the shell then back through
the inner slots.
Insert crotch strap retainer buckle (D)
through slot (3).
C
C
D
page 19
Page 20
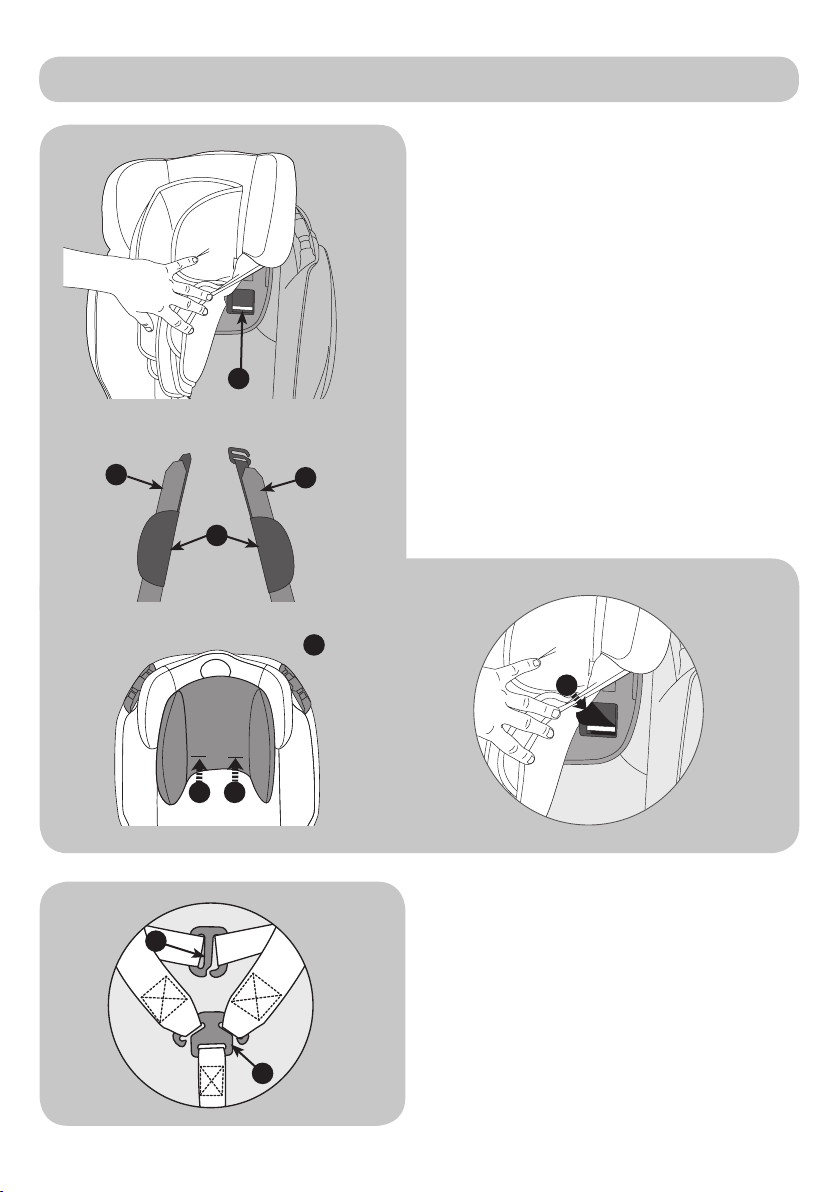
Replacing the harness (continued)
Adjust the headrest so that when you lift
up the headrest fabric you are able see
the metal bar (E) through the backrest .
Slide the shoulder pads (F) over the
shoulder harness straps (G), ensuring the
seams of the shoulder pads are facing
outwards.
Push the shoulder pad and harness
straps through slots (1 & 2)on the head
hugger (H) (if tted) and the headrest
E
fabric. Lift up the fabric and take the
straps through the shell over the metal
bar (I).
G
G
ATTENTION: The shoulder pad and
harness straps MUST pass over the metal
bar, failure to do so will result in an
F
incorrect installation.
H
I
1 2
J
Connect the narrow shoulder pad straps
to the shoulder pad connector (J).
Connect the wider shoulder harness
straps to the yoke (K).
ATTENTION: Check that the harness
straps are correctly attached to the
yoke and ensure the straps are not
K
twisted.
page 20
Page 21
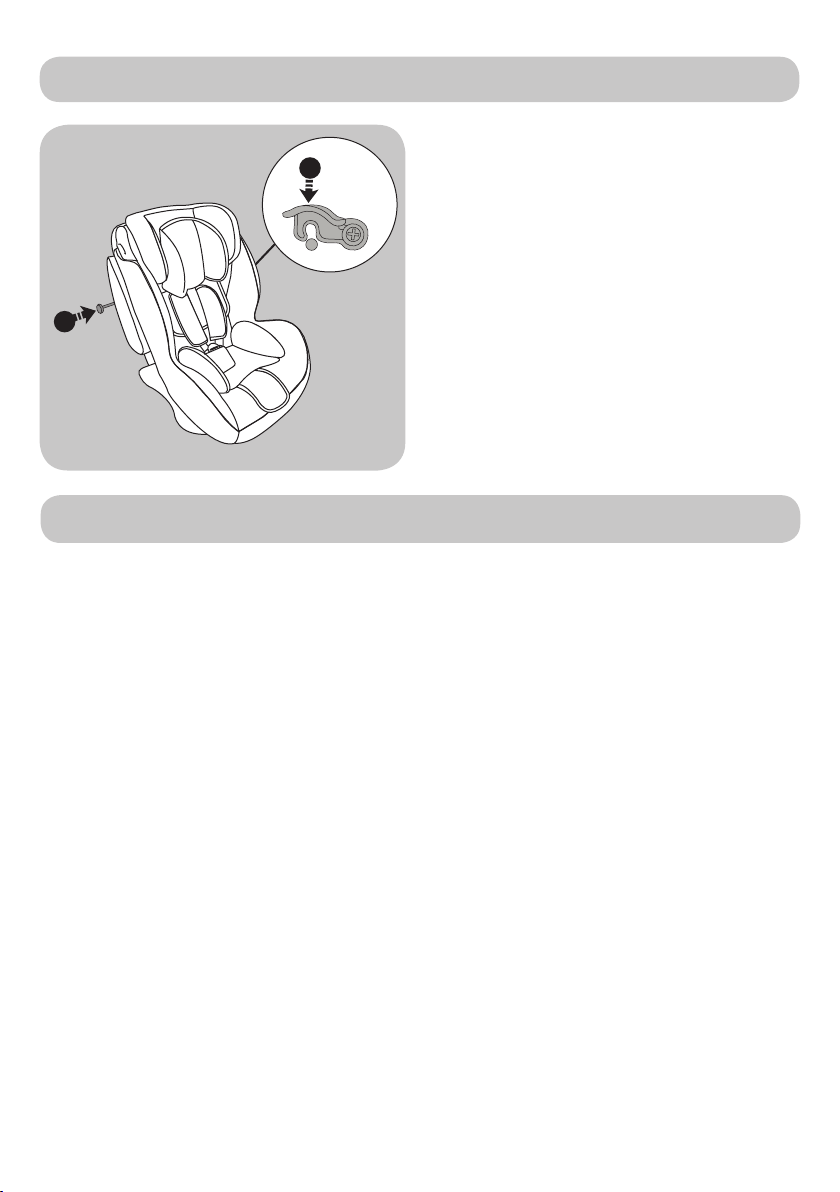
Replacing the harness (continued)
M
L
Return the shell to its original position
and re-insert the installation bar (L) and
secure lock (M).
Maintenance and cleaning
Storage
1) Store this child car seat in a safe place when not in use.
2) DO NOT place heavy objects on top of it.
3) Always store the child car seat in a dry environment.
4) DO NOT store the child car seat near a direct heat source such as a radiator.
Covers
1) The seat cover is easily removable and should be handwashed with a pH neutral
soap and cold water.
2) Do not press, iron, dry clean, tumble dry or wring the covers.
3) Do not use solvents, caustic or abrasive cleaning materials.
4) Dry at, away from direct heat and sunlight.
5) If the seat covers need to be replaced only use MyChild certied parts. They are the
only ones that are guaranteed to have been safety tested and designed to t this seat.
Plastic/Metal Parts
1) Wipe clean using a mild soap and warm water.
2) You must not remove, dismantle or alter any part of the seat shell.
3) You must not oil or lubricate any part of the seat shell.
Inspection
1) Check your child car seat regularly for wear and tear.
2) The child car seat may have a slight rattle when not in use, this is normal. If in any
doubt, contact MyChild immediately.
3) Check the adjustable parts of your child seat at intervals of about 6 months to
ensure it is still ts correctly for your growing child.
page 21
Page 22

Page 23

Page 24

 Loading...